
ST-120889.3 - Stapler Emerio - Free user manual and instructions
Find the device manual for free ST-120889.3 Emerio in PDF.


| Product Type | Stapler |
| Brand | Emerio |
| Model | ST-120889.3 |
| Dimensions (approx.) | 12 x 4 x 6 cm |
| Weight (approx.) | 200 g |
| Material | Plastic and metal |
| Color | Black / White |
| Staple Size | No. 26/6 |
| Paper Capacity | Up to 20 sheets (80 gsm) |
| Loading Type | Rear loading |
| Staple Capacity | 100 staples |
| Anvil Positions | Permanent and temporary |
| Power Source | Manual (hand-operated) |
| Warranty | 2 years |
| Included Accessories | Stapler, 100 staples |
| Country of Origin | China |
| Recommended Staple Type | Standard No. 26/6 staples |
| Cleaning Instructions | Wipe with dry cloth; avoid solvents |
| Safety Warnings | Keep away from children; use only as intended |
| Repairability | Not user-serviceable; consult professional |
Frequently Asked Questions - ST-120889.3 Emerio
User questions about ST-120889.3 Emerio
0 question about this device. Answer the ones you know or ask your own.
Ask a new question about this device
Download the instructions for your Stapler in PDF format for free! Find your manual ST-120889.3 - Emerio and take your electronic device back in hand. On this page are published all the documents necessary for the use of your device. ST-120889.3 by Emerio.
USER MANUAL ST-120889.3 Emerio
natural_image
Black and white photo of a modern kitchen grater with a red and green button on top (no visible text or symbols)Sandwichtoaster (D)
Sandwich toaster (NL)
Tostadora de Sandwiches (E)
Tostadeira (P)
natural_image
Black griddle oven with open lid and side panel, labeled with number 3 (no text or symbols on the appliance itself)natural_image
Interior view of a black griddle with open lid and side panels, labeled with number 3 (no text or symbols on the griddle itself)VOOR EERSTE GEBRUIK
natural_image
Interior view of a black griddle oven with open pan and side panels (no text or symbols visible)natural_image
Interior view of a black griddle oven with open lid and side panel (no text or symbols visible)natural_image
Black griddle oven with open pan and side panels, labeled with number 3 (no text or symbols on the appliance itself)PRED PRVÝM POUŽITÍM
natural_image
Black griddle oven with open lid and side panel, labeled with number 3 (no text or symbols on the appliance itself)PRED PRVO UPORABO
OPOZORILA ZA VARNO UPORABO
PRZED PIERWSZYM UŻYCIEM
natural_image
Black griddle oven with open lid and side panel, labeled with number 3 (no text or symbols on the appliance itself)ÎNAINTE DE PRIMA PUNERE ÎN FUNCTIUNE
natural_image
Interior view of a black griddle oven with open pan and side panels (no text or symbols visible)PRIJE PRVOG PUŠTANJA U RAD
- Uklonite kompletnu ambalažu.
- Očistite površine za tostiranje mekom i vlažnom krpom, a zatim ih osušite.
- Odmotajte kabel do kraja.
NAPOMENA: Kod prvog zagrijavanja uređaja može se pojaviti dim ili miris. To je uobičajena pojava za mnoge uređaje s grijačima. To ne utječe na sigurnost uređaja.
NAPOMENE ZA UPORABU
- Priključite uređaj na utičnicu s uzemljenjem. Oba svjetlosna indikatora će svijetliti i površina za tostiranje će se početi zagrijavati.
- Čim se uređaj zagrije, zeleno kontrolno svjetlo će se ugasiti.
- Uređaj se mora zagrijati prije tostiranje sendviča. U međuvremenu pripremite sendvič.
- Otvorite uređaj pomoću otključane ručke.
- Stavite krišku kruha na donju površinu za tostiranje. Nauljena strana treba biti okrenuta prema vani.
- Sada dodajte punjenje na krišku kruha (npr. sir, šunku, ananas itd.) i prekrijte ju drugom kriškom kruha. Još jedanput provjerite je li nauljena strana okrenuta prema vani.
- Zatvorite uređaj i provjerite je li ručka zaključana.
- Oprez: Ne stavljajte previše punjenja na kriške kruha, u suprotnom uređaj se ne može zatvoriti. U tom slučaju uklonite nešto punjenja. Ne zatvarajte uređaj silom.
- Regulator temperature uključuje i isključuje uređaj tijekom tostiranja. Zelena kontrolna lampica također se gasi i pali.
- Po završetku tostiranja (cca 4-6 minute) otvorite zaključavanje i izvadite sendviče pomoću ravne drvene ili plastične špatule. Ne koristite oštre ili metalne predmete (npr. noževe, metalne špatule), jer bi isti mogli oštetiti neljepljive sloj.
- Ako želite tostirati još sendviča, ponovno zatvorite uređaj i pričekajte dok se površine za tostiranje dovoljno zagriju, ponovite postupak tostiranja kako je opisano gore.
- Nakon upotrebe, odmah iskopčajte mrežni utikač. Otvorite uređaj i ostavite ga da se hladi.
SAVJETI ZA PRIPREMU UKUSNIH SENDVIČA
- Prije tostiranja ostavite uređaj da se potpuno zagrije.
- Stavite krišku kruha s nauljenom stranom prema vani.
- Kod voćnih punjenja kruh za tostiranje bit će hrskaviji, ako na nauljenu stranu pospete malo šećera.
- Posebno preporučljivi su sljedeći sastojci: sir, šunka, ananas, rajčica, kuhano meso, luk, začinsko bilje i začini.
ČIŠĆENJE I NJEGA
- Prvo izvucite utikač iz utičnice!
-
Čistite uređaj samo, ako je potpuno ohlađen.
-
Očistite površinu kućišta i površine za tostiranje mekom i vlažnom krpom.
- Mrvice možete ukloniti mekom četkom.
- Ne koristite abrazivna sredstva ili oštre predmete (npr. abrazivne četke ili noževe) za čišćenje.
- Oprez: Ne uranjajte proizvod u vodu ili druge tekućine. Postoji opasnost od strujnog udara!
TEHNIČKI PODACI
Nazivni napon: 2 2 0 -240V \~ 50-60Hz
Nazivna snaga: 750W
JAMSTVO | SERVIS
natural_image
Black griddle oven with visible internal compartments and labeled parts (no text or symbols)PŘED PRVNÍM POUŽITÍM
natural_image
Interior view of a black griddle oven with open pan and side panels (no text or symbols visible)ПРЕДИ ПЪРВОНАЧАЛНА УПОТРЕБА
AZ ELSŐ HASZNÁLAT ELŐTT
Before use make sure to read all of the below instructions in order to avoid injury or damage, and to get the best results from the appliance. Make sure to keep this manual in a safe place. If you give or transfer this appliance to someone else make sure to also include this manual.
In case of damage caused by user failing to follow the instructions in this manual the warranty will be void. The manufacturer/importer accepts no liability for damages caused by failure to follow the manual, a negligent use or use not in accordance with the requirements of this manual.
- This appliance can be used by children aged from 8 years and above and persons with reduced physical, sensory or mental capabilities or lack of experience and knowledge if they have been given supervision or instruction concerning use of the appliance in a safe way and understand the hazards involved.
- Children shall not play with the appliance.
- Cleaning and user maintenance shall not be made by children unless they are older than 8 years and supervised.
- Keep the appliance and its cord out of reach of children less than 8 years.
- If the supply cord is damaged, it must be replaced by the manufacturer, its service agent or similarly qualified persons in order to avoid a hazard.
- Regarding the instructions for cleaning the surfaces which come in contact with food or oil, please refer to the paragraph “cleaning and maintenance” of the manual.
- This appliance is not intended to be operated by means of an external timer or separate remote-control system.
-
This appliance is intended to be used in household and similar applications such as: staff kitchen areas in shops, offices and other working environments; farm houses; by clients in hotels, motels and other residential type environments; bed and breakfast type environments.
-
Before inserting the plug into the mains socket, please check that the voltage and frequency comply with the specifications on the rating label.
- If an extension cord is used it must be suited to the power consumption of the appliance, otherwise overheating of the extension cord and/or plug may occur. There is a potential risk of injuries from tripping over the extension cord. Be careful to avoid dangerous situations.
- Disconnect the mains plug from the socket when the appliance is not in use and before cleaning.
- Always plug the appliance into an earthed plug socket.
- Ensure that the mains cable is not hung over sharp edges and keep it away from hot objects and open flames.
- Do not immerse the appliance or the mains plug in water or other liquids. There is danger to life due to electric shock!
- To remove the plug from the plug socket, pull the plug. Do not pull the power cord.
- Do not touch the appliance if it falls into water. Remove the plug from its socket and send it to an authorized service center for repair.
- Do not plug or unplug the appliance from the electrical outlet with a wet hand.
- Never attempt to open the housing of the appliance, or to repair the appliance yourself. This could cause electric shock.
- Never leave the appliance unattended during use.
- This appliance is not designed for commercial use.
- Do not use the appliance for other than intended use.
- Do not wind the cord around the appliance and do not bend it.
- Place the appliance on a stable, level surface from which it cannot fall off.
-
If you use products with non-stick surfaces, please make sure no birds are in the same room and that the room can be completely closed off and well-ventilated.
-
Caution, hot surface.
WARNING!! Please do not touch surface while in use. The temperature of accessible surfaces may be high when the appliance is operating.
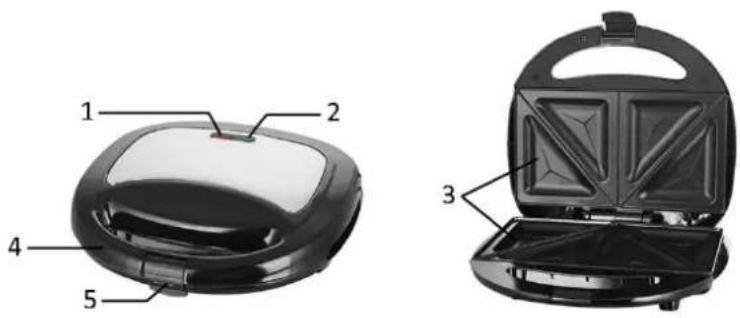
PARTS DESCRIPTION
- Red power light
- Green control light
- Non-stick cooking plates
- Handle
- Catch
BEFORE INITIAL USE
- Remove all packaging.
- Clean the toasting surfaces with a soft damp cloth and then dry them.
- Unwind the mains cable completely.
NOTE: When your appliance is heated for the first time, it may emit slight smoke or odor. This is normal with many heating appliances. This does not affect the safety or your appliance.
OPERATING INSTRUCTIONS
- Connect the appliance to an appropriate socket. Both of the indicator lights will illuminate and the toasting surface begins to heat.
- As soon as the appliance has heated up, the green control light goes off.
- The appliance must be heated up before you toast a sandwich. In the meantime prepare your sandwich.
- Open the appliance at the handle by unlocking the catch.
- Put the slices of bread on the lower toasting surface. Ensure that the buttered sides are facing outwards.
- Now put the filling on the bread slices (e.g. cheese, ham, pineapple, etc.) and cover this with the second slice of bread. Once again, ensure that the buttered sides are facing outwards.
- Close the appliance making sure the catch is engaged.
- Caution: If the slices of bread have too much filling on them, it will not be possible to close the appliance. Take some of the filling off. Never use force to close the appliance.
- During toasting the temperature regulating thermostat switches off and on again. The green control light also switches off and on again.
- After completion of the toasting process (approx. 4-6 minutes) open the appliance and remove the sandwiches with the help of a flat wooden or plastic spatula. Never use sharp or metal objects (e.g. knives, metal spatulas, etc.) as this will damage the non-stick coating.
- If you wish to toast more sandwiches, close the appliance again and wait until the toasting surfaces have reheated sufficiently, repeat the toasting process as described above.
- After use, disconnect the mains plug immediately. With the appliance open, allow it to cool down.
TIPS FOR TASTY SANDWICHES
- Allow the appliance to heat up completely before you begin toasting.
- Lay the buttered side facing outwards.
- With fruit fillings the toasted bread will be crispier if you sprinkle a little sugar on the buttered side.
- The following ingredients are particularly recommended: cheese, ham, pineapple, tomatoes, cooked meat, onions, herbs and spices.
CLEANING AND MAINTENANCE
- First, disconnect the mains plug!
- Only clean when the appliance has completely cooled down.
- Clean the housing surface and the toasting surfaces of the sandwich toaster with a soft, damp cloth.
- It is easiest to remove toast or food crumbs with a very soft brush.
- Never use abrasive cleaning agents or sharp objects (e.g. scrubbing brush or knife) for cleaning.
- Caution: Do not immerse the appliance in water or other liquids. There is danger to life due to electric shock!
TECHNICAL DATA
Operating voltage: 220-240V \~ 50-60Hz
Power: 750W
GUARANTEE AND CUSTOMER SERVICE
Before delivery our devices are subjected to rigorous quality control. If, despite all care, damage has occurred during production or transportation, please return the device to your dealer. In addition to statutory legal rights, the purchaser has an option to claim under the terms of the following guarantee:
For the purchased device we provide 2 years guarantee, commencing from the day of sale. If you have a defective product, you can directly go back to the point of purchase.
Defects which arise due to improper handling of the device and malfunctions due to interventions and repairs by third parties or the fitting of non-original parts are not covered by this guarantee. Always keep your receipt, without the receipt you can't claim any form of warranty. Damage caused by not following the instruction manual, will lead to a void of warranty, if this results in consequential damages then we will not be liable. Neither can we hold responsible for material damage or personal injury caused by improper use if the instruction manual is not properly executed. Damage to accessories does not mean free replacement of the whole appliance. In such case please contact our service department. Broken glass or breakage of plastic parts is always subject to a charge.
Defects to consumables or parts subjected to wearing, as well as cleaning, maintenance or the replacement of said parts are not covered by the warranty and are to be paid.
Electrical and electronic devices/ information for private households
The Directive 2012/19/EU on waste electrical and electronic equipment contains a large number of requirements for handling electrical and electronic equipment. The most important are compiled here.
1. Separate collection of waste electrical and electronic equipment
Electrical and electronic equipment that has become waste is referred to as waste electrical and electronic equipment (WEEE). Owners of WEEE must collect them separately from unsorted municipal waste. WEEE do not belong in household waste, but in special collection and return systems.
2. Batteries, accumulators and lamps
Owners of WEEE must hand over them in complete condition. However, owners of WEEE have to separate old batteries and accumulators which are not enclosed by the WEEE, as well as lamps which can be removed, from the WEEE without destroying it before handing it over to a collection point.
3. Ways to return the WEEE
Owners of WEEE from private households can hand them in free of charge at the designated collection points of the public waste disposal authorities or at the take-back points set up by manufacturers or distributors in terms of the Directive 2012/19/EU.
4. Privacy Protection Notice
WEEE often contain sensitive personal data. This applies especially to information and telecommunications technology devices such as computers and smartphones. In your own interest, please note that each end user is responsible for deleting the data on the WEEE before disposing it.
5. Potential environmental impact
WEEE contain substances that may have a negative impact on the environment and human health if their collection, hand-over, re-use or material recovery is not done in compliance with respective legislation.
6. Your role in WEEE waste treatment
By fulfilling these obligations and especially by fulfilling the obligation to collect WEEE separately, not to dispose it together with unsorted municipal waste and to hand it over to at collection points, you as the end user contribute to the re-use and material recovery of WEEE.
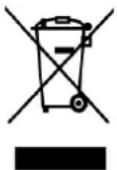
7. Meaning of the crossed-out dustbin symbol
The crossed-out dustbin, which is regularly displayed on electrical and electronic equipment, indicates that the respective device must be collected separately from unsorted municipal waste at the end of its life cycle.
Emerio B.V.
Oudeweg 115
2031 CC Haarlem
The Netherlands
Customer service:
T: +31 (0) 23 3034369
www.emerio.eu/service
Kundeninformation:
T: +49 (0) 3222 1097 600
www.emerio.eu/service
Klantenservice:
T: +31 (0) 23 3034369
www.emerio.eu/service
- VOOR EERSTE GEBRUIK
- PRED PRVÝM POUŽITÍM
- PRED PRVO UPORABO
- OPOZORILA ZA VARNO UPORABO
- PRZED PIERWSZYM UŻYCIEM
- ÎNAINTE DE PRIMA PUNERE ÎN FUNCTIUNE
- PRIJE PRVOG PUŠTANJA U RAD
- NAPOMENE ZA UPORABU
- SAVJETI ZA PRIPREMU UKUSNIH SENDVIČA
- ČIŠĆENJE I NJEGA
- TEHNIČKI PODACI
- JAMSTVO | SERVIS
- PŘED PRVNÍM POUŽITÍM
- ПРЕДИ ПЪРВОНАЧАЛНА УПОТРЕБА
- AZ ELSŐ HASZNÁLAT ELŐTT
- PARTS DESCRIPTION
- BEFORE INITIAL USE
- OPERATING INSTRUCTIONS
- TIPS FOR TASTY SANDWICHES
- CLEANING AND MAINTENANCE
- TECHNICAL DATA
- GUARANTEE AND CUSTOMER SERVICE
- Electrical and electronic devices/ information for private households
- Separate collection of waste electrical and electronic equipment
- Batteries, accumulators and lamps
- Ways to return the WEEE
- Privacy Protection Notice
- Potential environmental impact
- Your role in WEEE waste treatment
- Meaning of the crossed-out dustbin symbol
Brand : Emerio
Model : ST-120889.3
Category : Stapler