
NXT60 FLAT - Stroller Emmaljunga - Free user manual and instructions
Find the device manual for free NXT60 FLAT Emmaljunga in PDF.


| Product type | Stroller / convertible pram |
| Brand | Emmaljunga |
| Model | NXT60 FLAT |
| Maximum child weight | 22 kg (up to 4 years, whichever comes first) |
| Maximum weight of lower basket | 10 kg |
| Maximum weight of footrest | 3 kg |
| Carrycot compatibility | NXT Carrycot 3.0 (0-6 months, max 9 kg) |
| Seat compatibility | NXT Ergo Seat 3.0 / Flat Seat 3.0 (from 6 months) |
| Chassis compatibility | NXT90, NXT60, NXT Twin (version 3.0) |
| Allowed accessories | Skateboard (max 20 kg), side bag (max 2 kg), car seat adapters |
| Safety standards | EN1888-1:2018, EN1888-2:2018, EN1466:2014 |
| Not recommended for | Jogging, rollerblading, stairs, escalators, windy conditions |
| Parking brake | Always engage when stopping |
| Folding | Remove the child before folding the stroller |
| Maintenance | Follow the instructions in the manual; use only original Emmaljunga parts |
| Main warning | Never leave the child unattended |
| Canopy | Do not place anything on the canopy; never use the pram without the canopy |
| Wheels | The tires may discolor PVC floors; use protection when storing |
| Public transport | The brake alone may not be sufficient; follow the recommendations of the carrier |
| Carrycot | Do not place on a high surface; use on a flat and horizontal surface |
Frequently Asked Questions - NXT60 FLAT Emmaljunga
User questions about NXT60 FLAT Emmaljunga
0 question about this device. Answer the ones you know or ask your own.
Ask a new question about this device
Download the instructions for your Stroller in PDF format for free! Find your manual NXT60 FLAT - Emmaljunga and take your electronic device back in hand. On this page are published all the documents necessary for the use of your device. NXT60 FLAT by Emmaljunga.
USER MANUAL NXT60 FLAT Emmaljunga
INSTRUCTION AND SERVICE MANUAL
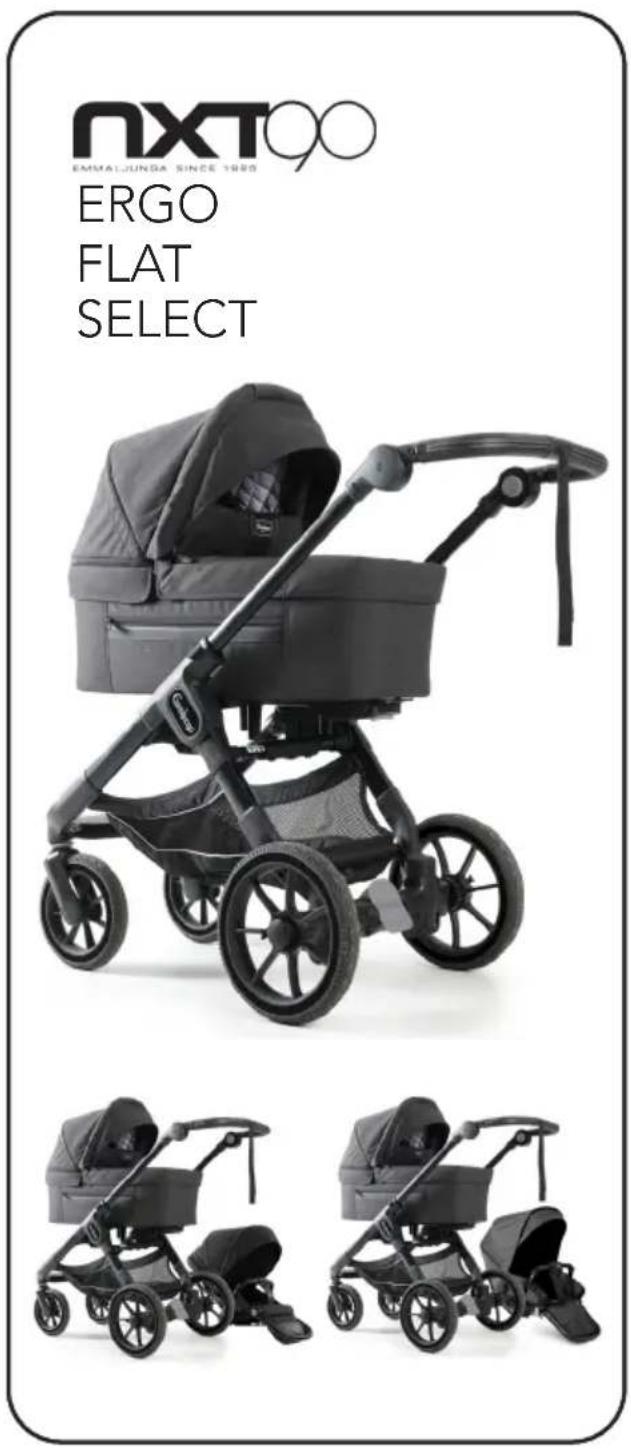
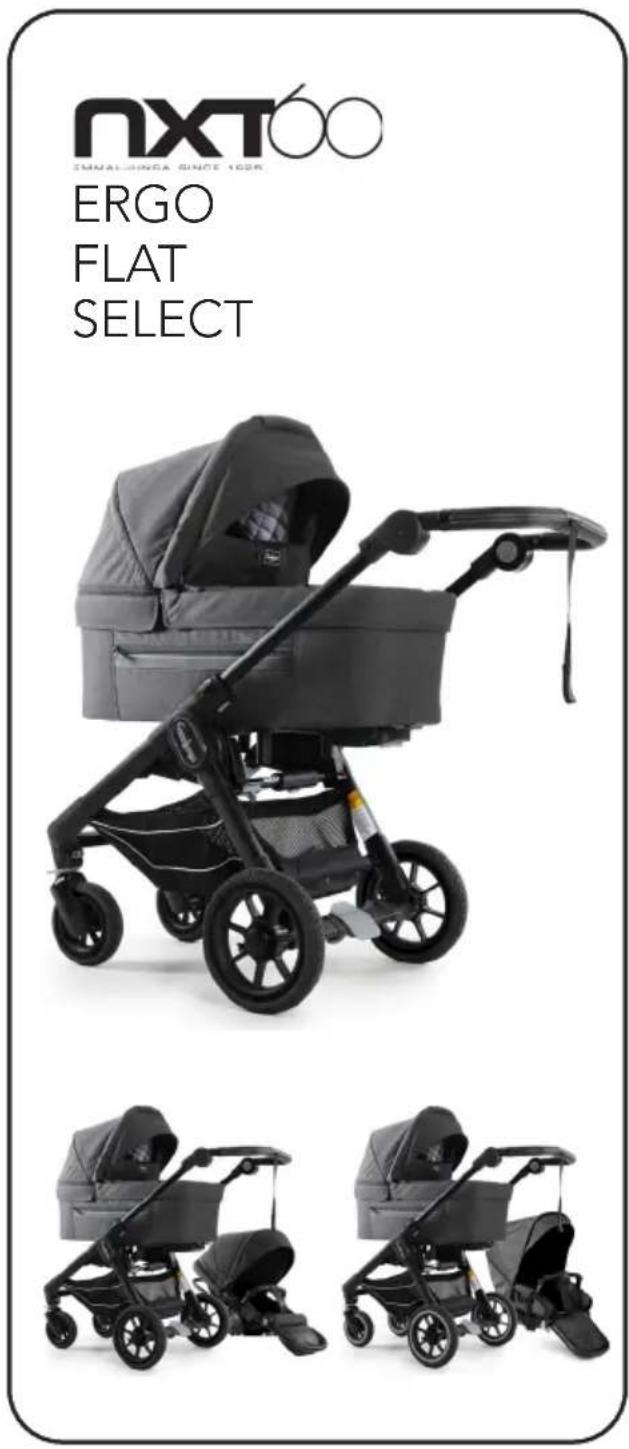
SE: VIKTIG INFORMATION - LÄS DESSA INSTRUKTIONER NOGGRANT FÖRE ANVÄNDNING OCH SPARA DE FÖR FRAMTIDA BRUK. DITT BARNS SÄKERHET KAN PÅVERKAS OM DU INTE FÖLJER DESSA INSTRUKTIONER.
Denna produkt motsvarar standard EN 1888-1:2018, EN1888-2:2018, EN 1466:2014.
Försäljning eller marknadsföring av produkten utanför EU, EFTA länder är inte tillåtet.
OBSERVERA! Besök www.emmaljunga.com för senaste versionen, innan du börjar använda produkten.
EN: IMPORTANT INFORMATION- READ THESE INSTRUCTIONS CAREFULLY BEFORE USE AND KEEP THEM FOR FUTURE REFERENCE. YOUR CHILD'S SAFETY MAY BE AFFECTED IF YOU DO NOT FOLLOW THESE INSTRUCTIONS.
This product complies with EN 1888-1:2018, EN1888-2:2018, EN 1466:2014. Sales or marketing of the product outside the EU, EFTA countries is not allowed. Please visit www.emmaljunga.com for the latest version of this manual before using the product.
DE: WICHTIG! LESEN SIE DIESE HINWEISE SORGFÄLTIG VOR DER BENUTZUNG UND BEWAHREN SIE SIE AUF. WENN SIE DIESE HINWEISE NICHT BEACHTEN, KANN DIE SICHERHEIT IHRES KINDES BEEINTRÄCHTIGT WERDEN.
Dieses Produkt entspricht der Norm EN 1888-1:2018, EN1888-2:2018, EN 1466:2014. Der Vertrieb oder die Vermarktung des Produkts außerhalb der EU oder in EFTA-Ländern ist nicht erlaubt.Besuchen Sie www.emmaljunga.com für neueste Informationen, bevor Sie dieses Produkt benutzen.
DK: VIGTIG! LÆS DISSE INSTRUKTIONER OMHYGGELIGT F∅R BRUG OG GEM DEM FOR FREMTIDIG REFERENCE. DIT BARNS SIKKERHED KAN PÅVIRKES HVIS DU IKKE F∅LGER DISSE INSTRUKTIONER! Dette produkt er i overensstemmelse med EN 1888-1:2018, EN1888-2:2018, EN 1466:2014. Salg eller markedsføring af produktet udenfor EU, EFTA lande er ikke tilladt. BEMÆRK! Besøg www.emmaljunga.com for seneste version, før du tager produktet i brug.
NO: VIKTIG! LES DISSE INSTRUKSJONER NÖYE F∅R BRUK OG TA VARE PÅ DEM FOR FRAMTIDIG BRUK. DITT BARNS SIKKERHET KAN PÅVIRKES OM DU IKKE F∅LGER DISSE INSTRUKSJONER! Dette produkt oppfyller standard EN 1888-1:2018, EN1888-2:2018, EN 1466:2014. Salg eller markedsføring av produktet utenfor EU, EFTA land er ikke tillatt. MERK! Før bruk av produktet sjekk www.emmaljunga.com for siste versjon.
FI: TÄRKEÄÄ TIETOA – LUE NÄMÄ KÄYTTÖOHJEET HUOLELLISESTI ENNEN KUIN KÄYTÄT VAUNUA JA SÄILYTÄ NE MAHDOLLISTA TULEVAA KÄYTTOÄ VARTEN. LAP-SESI TURVALLISUUS SAATTA KÄRSIÄ MIKÄLI NÄITÄ OHJEITA EI NOUDATETA. käytettävän rattaan ohjeen kanssa. Tämä tuote vastaa standardin EN 1888-1:2018, EN1888-2:2018, EN 1466:2014 vaatimuksia. Tuotteen myynti ja markkinointi EU, EFTA alueen ulkopuolella kielletty.
HUOMAA! Viimeisimmän päivitetyn version käyttöohjeesta löydät Emmaljungan kotisivuilta
osoitteesta www.emmaljunga.com
EE: TÄHTIS! LUGEGE KÄESOLEVAD JUHISED ENNE TOOTE KASUTAMIST HOOLI-KALT LÄBI JA HOIDKE KASUTUSJUHEND KÄEPÄRAST HIL SEMAKS VAATAMISEKS. JUHISTE EIRAMINE VÕIB KAHJUSTADA TEIE LAPSE TURVALISUST. Toode vastab Euroopa Liidu normidele EN 1888-1:2018, EN1888-2:2018, . Toote müük ja turustamine väljaspool EL ja EFTA riikide territooriumi ei ole lubatud. HOIATUS! Enne toote kasutamist palume külastada veebilehte www.emmaljunga.com juhiste viimase versiooniga tutvumi-seks.
LV: ŠVARĪGI! PIRMS LIETOŠANAS RŪPĪGI IZLASIET ŠO INSTRUKCIJU UN SAG-LABĀJIET TO TURPMĀKAI UZZINAΙ. JŪSU BĒRNAM VAR DRAUDĒT BRIESMAS, JA NEIEVĒROSIET LIETOŠANAS INŠTRUKCIJU.
Šis produkts atbilst EN 1888-1:2018, EN1888-2:2018, EN 1466:2014 prasībām. Produkta tirdzniecība vai mārketings nav atļauti ārpus ES un Eiropas Brīvās tirdzniecības asociācijas valstīm. BRĪDINĀJUMS Pirms izstrādājuma lietošanas izlasiet jaunāko instrukcijas variantu, kas ir pieejams tīmekļa lapā www.emmaljunga.com
- Instruction Box:
- Instruction manual
-
Axle shafts x2
-
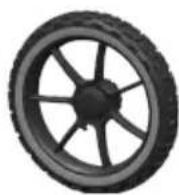
Rear wheels x 2
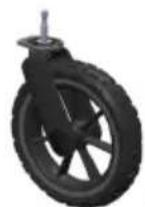
- Swivel wheels x 2
- Tray/Basket
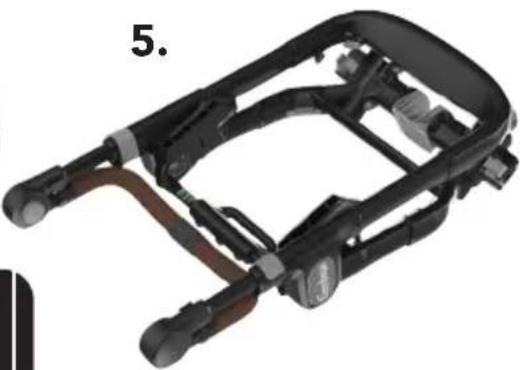
- Folded chassis + Insect net
1.
2.
3.
5.
natural_image
Mechanical component with black frame and brown connectors, no visible text or symbols4.
Box: Chassis NXT60:
- Instruction Box:
- Instruction manual
-
Axle shafts x2
-
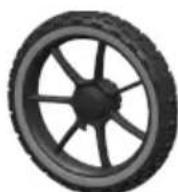
Rear wheels x 2
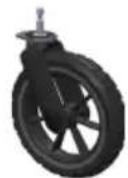
- Swivel wheels x 2
- Tray/Basket
- Folded chassis + Insect net
1.
2.
3.
5.
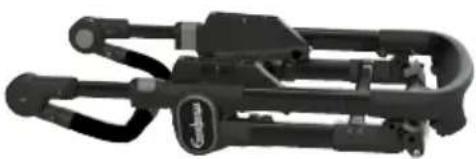
natural_image
Black mechanical device with articulated arms and a circular base (no visible text or symbols)4.
Box: NXT Carrycot 3.0
- Carrycot / Hood
- Apron for Carrycot
- Mattress
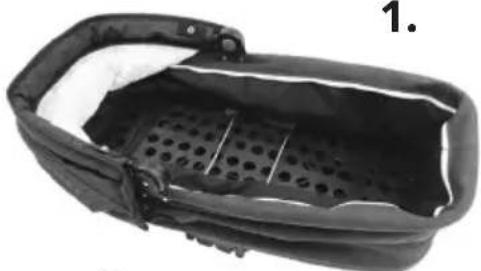
natural_image
Interior view of a black plastic bag with perforated interior and side connectors (no text or symbols visible)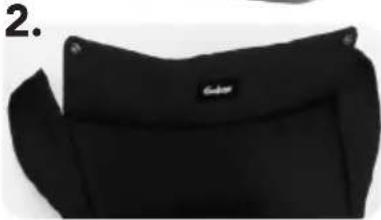
natural_image
Close-up of a black fabric or cushion with a small logo, no visible text or symbols
natural_image
Plain white rectangular object with a curved top edge, resembling a rounded rectangle or container (no text or symbols visible)Box: NXT Ergo 3.0
- Seat Unit Fram
- Seat Unit Fabrics with Fabrics incl. 5-point harness
- Hood
- Bumper Bar
-
Seat adjustment bar
-
natural_image
Black plastic bag with handle and side arm, no visible text or symbols
natural_image
Black silhouette of a stylized human head (no text or symbols)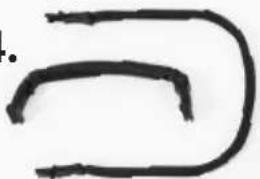
natural_image
Simple curved line drawing with no text or symbolsBox: NXT Flat 3.0
- Flat Seat Unit with Seat Unit Fabrics incl. 5-point harness
- Hood
-
Bumper Bar
-
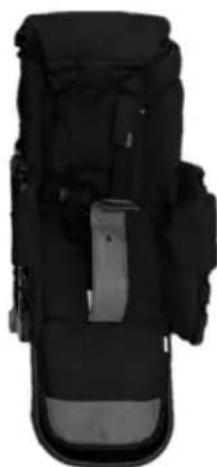
natural_image
Black tactical device with attached grip and buttons (no visible text or symbols)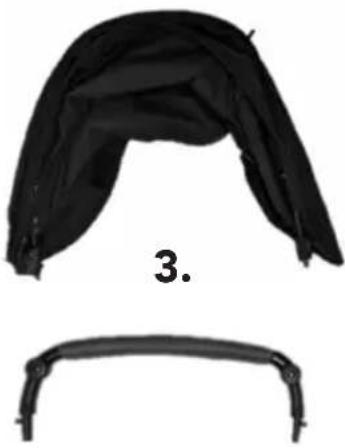
natural_image
Two black fabric or garment pieces, one curved and one rectangular, with the number 3 labeled below (no text or symbols on the garments themselves)Chassis NXT90
6 NXT SELECT V1.2
Chassis NXT90
natural_image
Close-up of a hand adjusting a car seatbelt with a textured cushion (no visible text or symbols)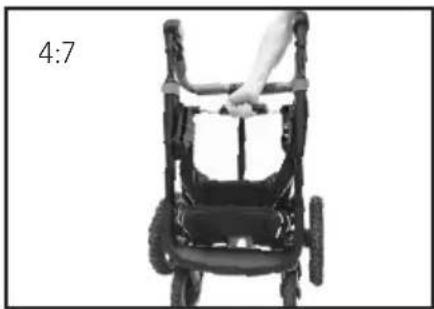
natural_image
Black-and-white photo of a baby stroller with hands adjusting the seat (no text or symbols visible)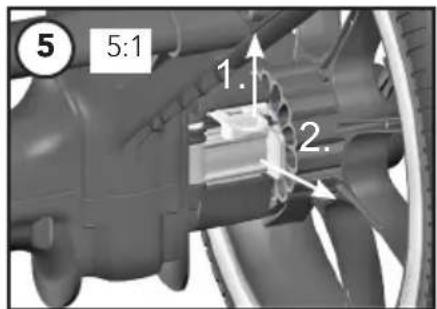
natural_image
Close-up of a person using a tire to lift a small object, with no visible text or symbols.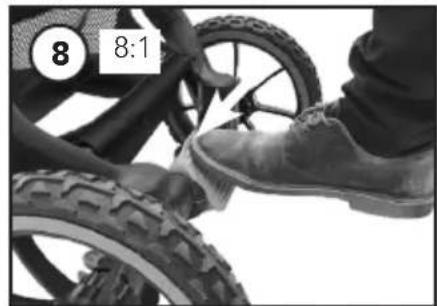
natural_image
Close-up of a person's foot wearing a bicycle tire, no visible text or symbols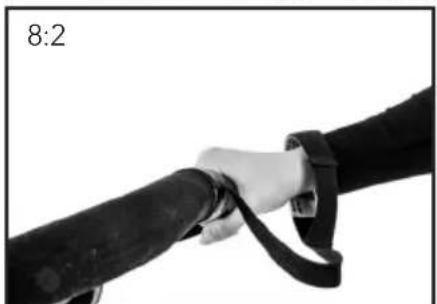
natural_image
Close-up of a hand gripping a black wrist strap, labeled '8:2' in the top-left corner (no other text or symbols)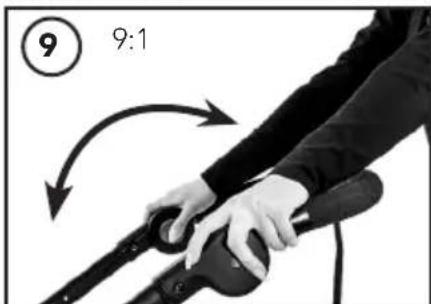
natural_image
Person holding a black athletic device with directional arrows indicating motion (no text or symbols)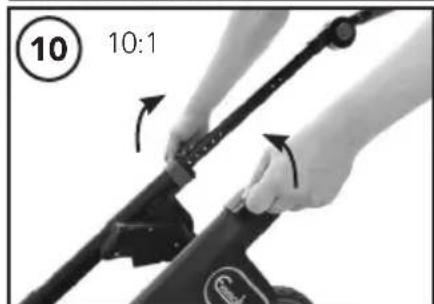
natural_image
Close-up of hands installing or adjusting a mechanical component, no visible text or symbols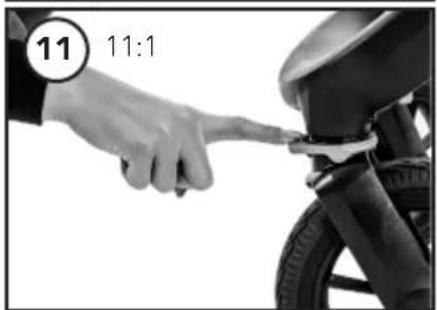
natural_image
Close-up of a hand pointing at a bicycle tire, no visible text or symbols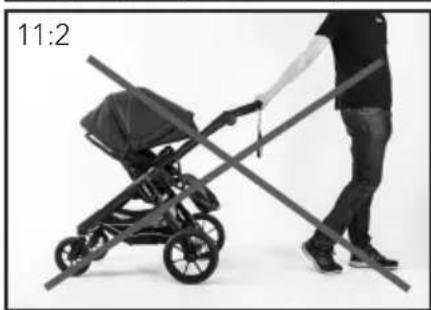
natural_image
Person using a walking stick to lift a baby stroller (no text or symbols visible)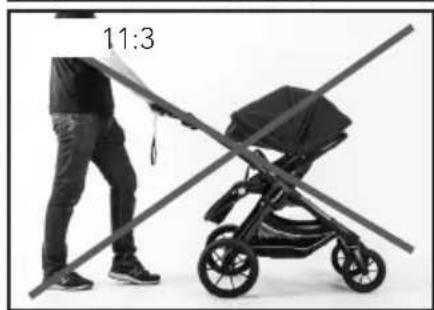
natural_image
Black-and-white photo showing a person pushing a stroller with a diagonal line crossing the basket (no text or symbols)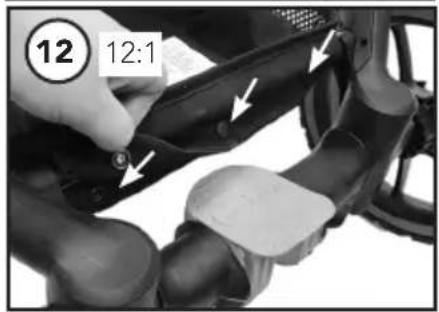
natural_image
Close-up of hands installing a black cable with a grid-patterned strap, no visible text or symbols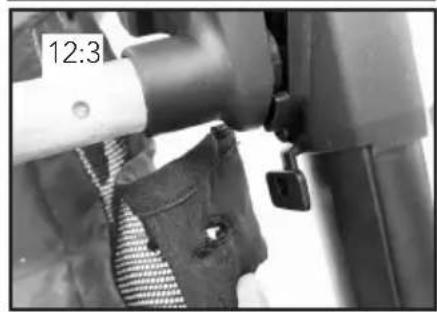
natural_image
Close-up of a mechanical component with a textured fabric and a labeled part '12:3' (no readable text or symbols beyond label)Chassis NXT60
8 NXT SELECT V1.2
Chassis NXT60
natural_image
Close-up of hands holding a mechanical device with directional arrows indicating movement (no text or symbols visible)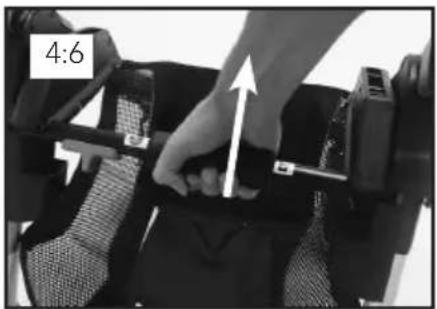
natural_image
Close-up of a hand adjusting a mechanical component with an arrow indicating motion (no text or symbols visible)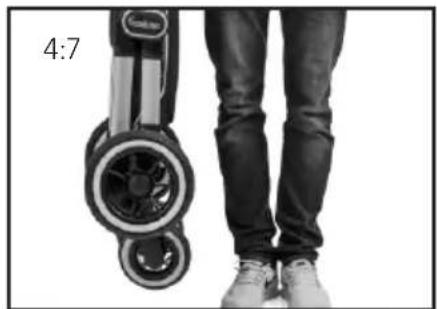
natural_image
Person standing with legs wearing a scooter seatbelt, viewed from the side (no text or symbols visible)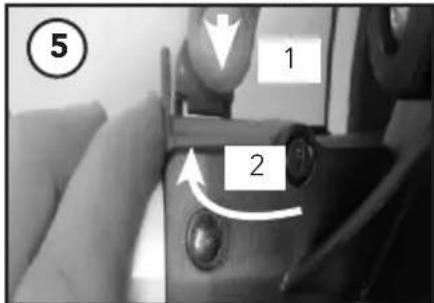
natural_image
Close-up of a person adjusting a car tire with a valve, no visible text or symbols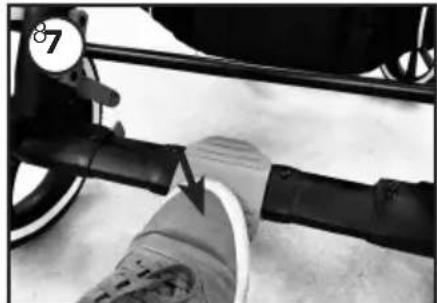
natural_image
Close-up of a bicycle suspension system with a hand connecting a cable to a car wheel (no visible text or symbols)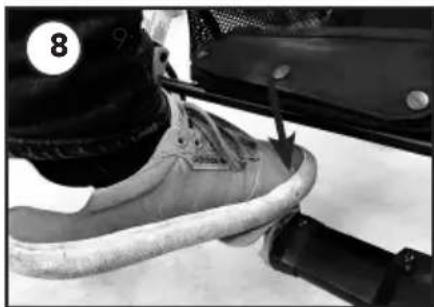
natural_image
Close-up of a foot pressing a brake pedal, showing the foot and ankle (no text or symbols visible)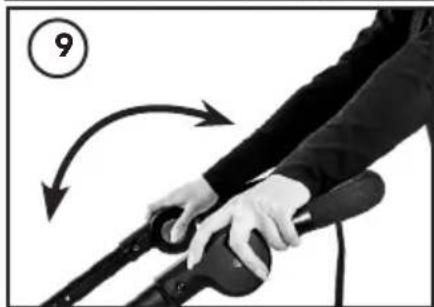
natural_image
Person holding a rifle with motion arrows indicating movement (no text or symbols)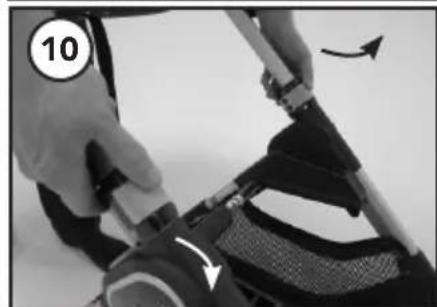
natural_image
Close-up of hands adjusting a mechanical component with a numbered circle marker (10), no visible text or symbols.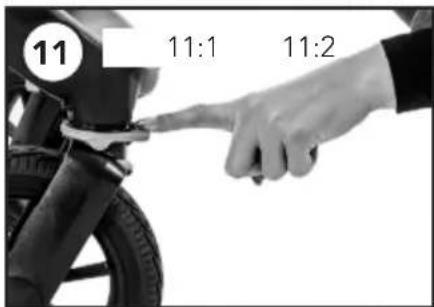
natural_image
Close-up of a hand adjusting a bicycle tire, no visible text or symbols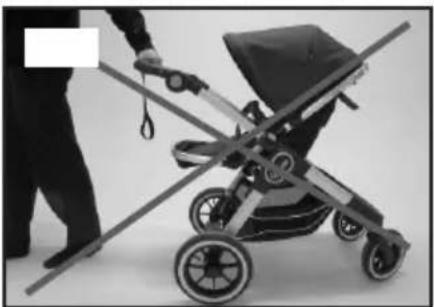
natural_image
Black and white photo of a baby stroller with a hand holding a strap, no visible text or symbols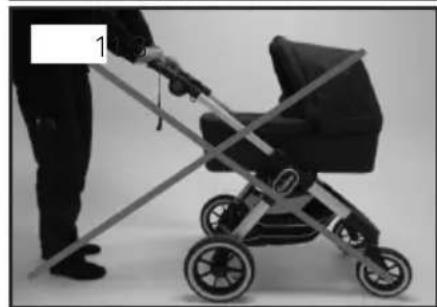
natural_image
Person pushing a baby stroller with a hand on the side (no text or symbols visible)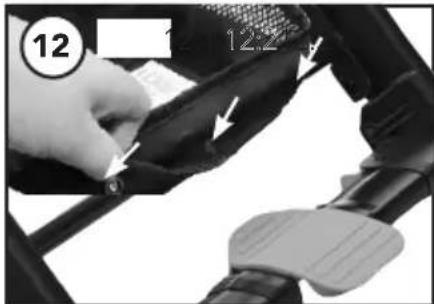
natural_image
Close-up of a hand adjusting a black car seatbelt with arrows indicating fastening (no text or symbols visible)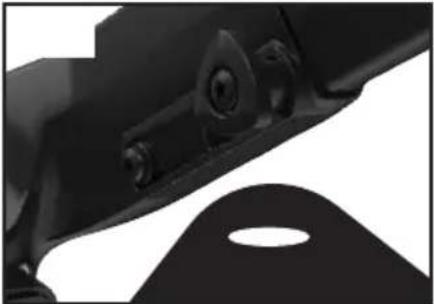
natural_image
Close-up of a mechanical component with no visible text or symbols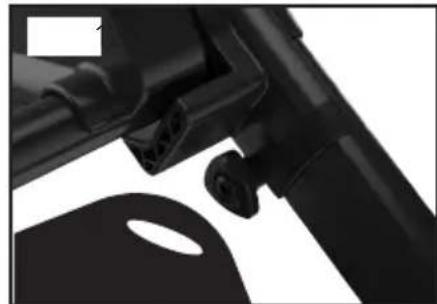
natural_image
Close-up of a black mechanical component with mounting holes and a curved surface (no text or symbols visible)Carrycot
natural_image
Close-up of a perforated metal plate with a hand using a tool to cut the surface (no text or symbols visible)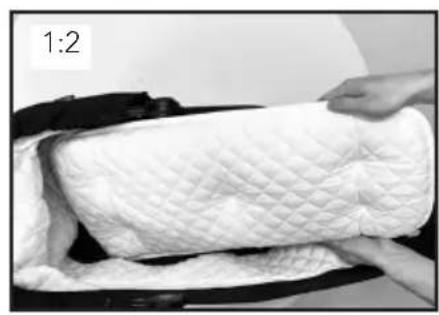
natural_image
Close-up of hands handling a white quilted cloth on a dark surface, no text or symbols visible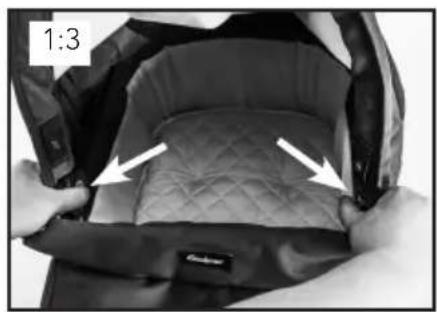
natural_image
Close-up of hands installing a quilted leather seat with arrows indicating fastening (no text or symbols visible)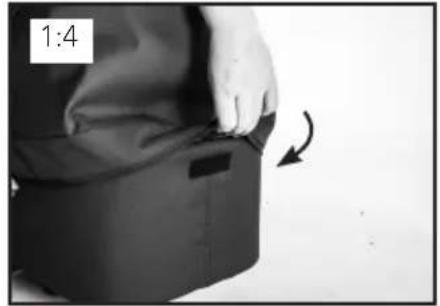
natural_image
Person holding a black box with a curved arrow indicating rotation (no text or symbols)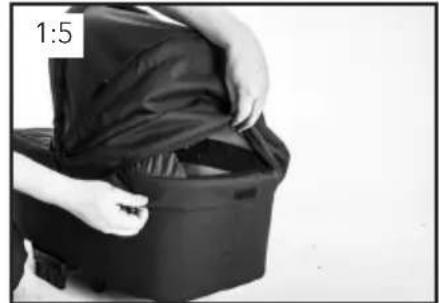
natural_image
Person opening a black plastic bag with hands adjusting the interior (no text or symbols visible)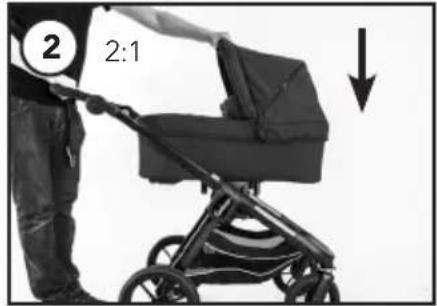
natural_image
Person pushing a baby stroller with a numbered label (2:1) and downward arrow, no readable text or symbols beyond the label.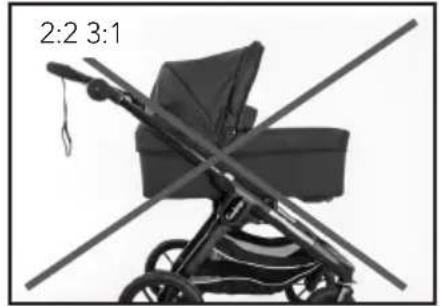
natural_image
Black stroller with two crossed arms, no visible text or symbols on the device itself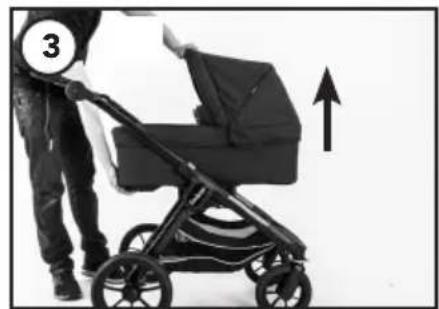
natural_image
Person pushing a baby stroller with an upward arrow, no text or symbols visible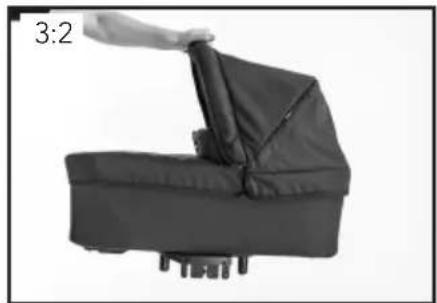
natural_image
Black fabric seat with a hand adjusting its seat, no visible text or symbols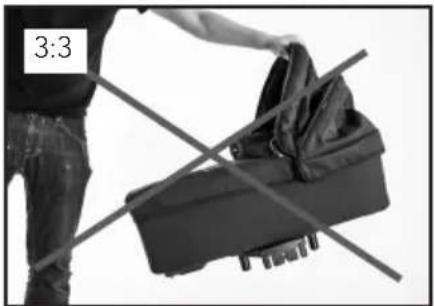
natural_image
Person handling a large black box with two crossed lines, no visible text or symbols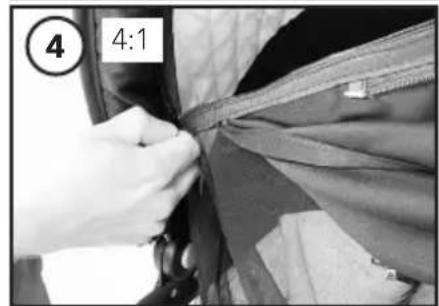
natural_image
Close-up of a hand adjusting fabric with a zipper, showing folds and texture (no text or symbols visible)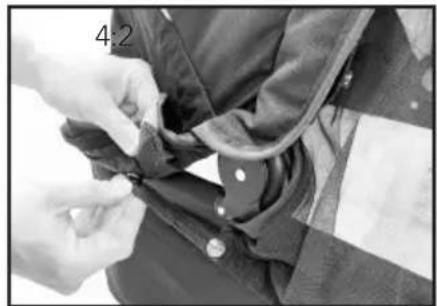
natural_image
Close-up of hands adjusting a dark jacket with a zipper, no visible text or symbols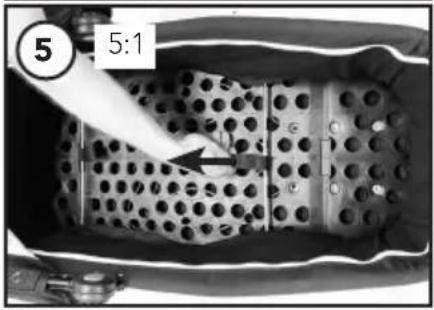
Seat Unit Ergo
natural_image
Close-up of a hand adjusting a black plastic device with a mesh cover, no visible text or symbols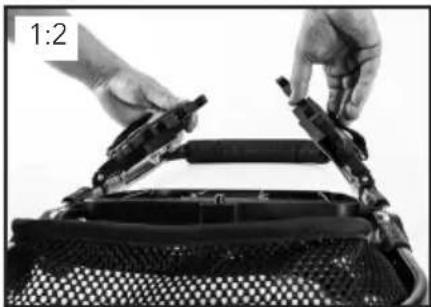
natural_image
Close-up of hands adjusting a mechanical device with a mesh mesh base (no visible text or symbols)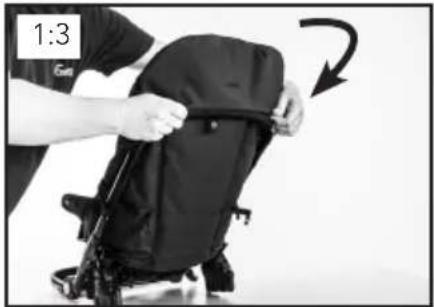
natural_image
Person adjusting a black athletic backpack with a belt, showing a 1:3 ratio adjustment (no text or symbols on the device itself)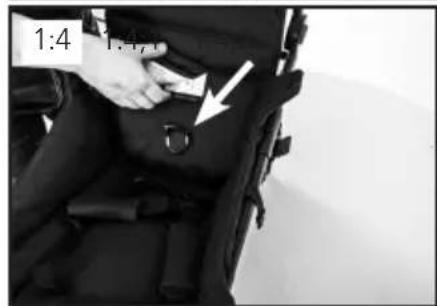
natural_image
Close-up of a hand adjusting a black mechanical component with a white arrow pointing to a detail (no text or symbols visible)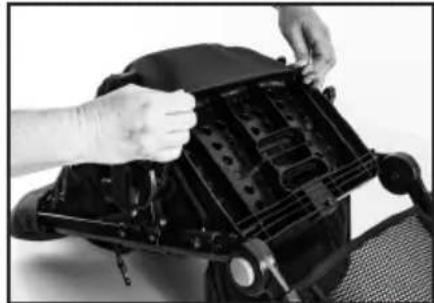
natural_image
Close-up of hands installing or adjusting a mechanical component on a vehicle chassis (no visible text or symbols)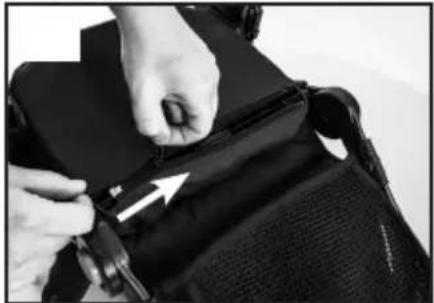
natural_image
Close-up of hands adjusting a black fabric piece with a zipper, no visible text or symbols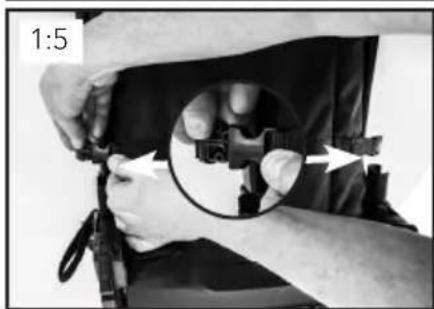
natural_image
Person adjusting a backpack with a magnified inset showing the fold of the device (no text or symbols visible)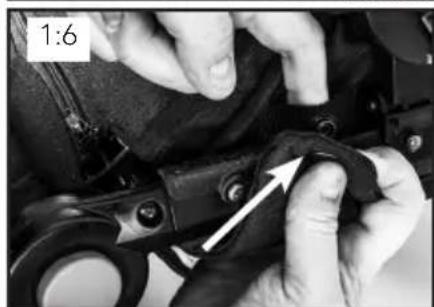
natural_image
Close-up of hands adjusting a mechanical component with a white arrow pointing to a detail (no text or symbols visible)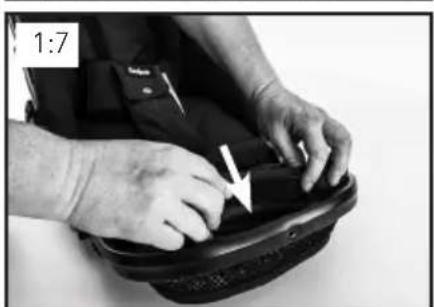
natural_image
Close-up of hands adjusting a dark object on a black surface, with a white arrow pointing to the part (no text or symbols visible)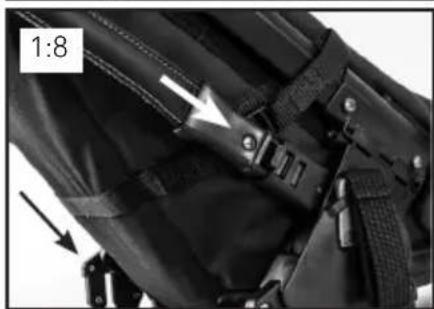
natural_image
Close-up of a black athletic belt buckle with visible fasteners and buttons, no text or symbols present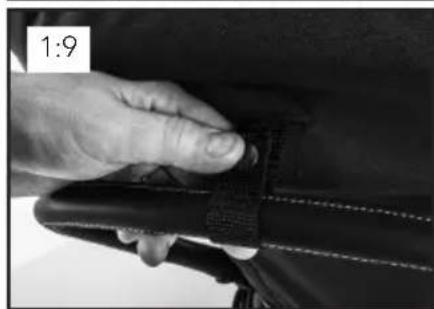
natural_image
Close-up of a hand adjusting a black belt buckle (no text or symbols visible)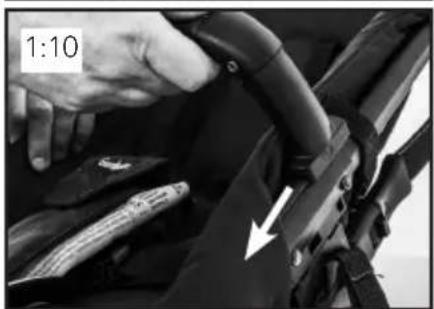
natural_image
Close-up of a hand adjusting a seatbelt with a white arrow pointing to the seat (no text or symbols visible)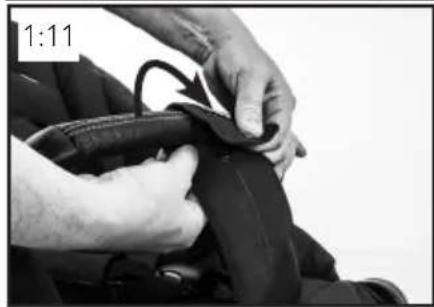
natural_image
Close-up of hands adjusting a seatbelt with a curved arrow indicating rotation (no text or symbols visible)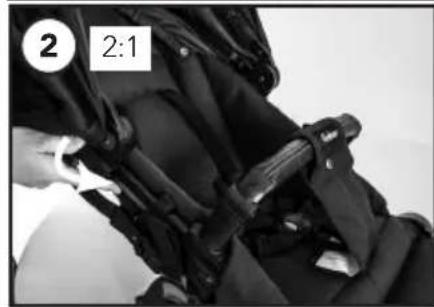
natural_image
Close-up of a person wearing a dark jacket with straps and straps, no visible text or symbols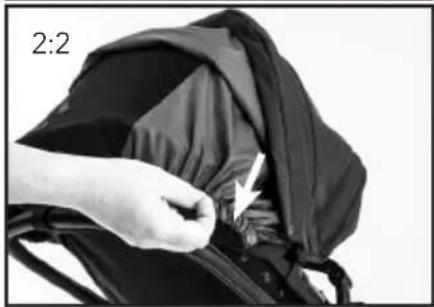
natural_image
Close-up of a hand adjusting a black backpack with a white arrow pointing to the pocket (no text or symbols visible)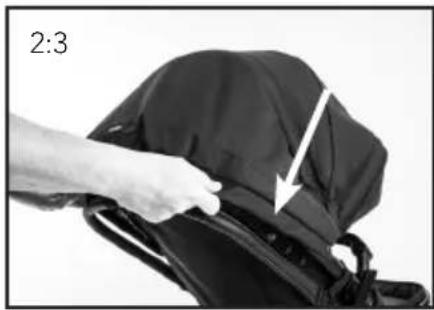
natural_image
Close-up of a hand adjusting a black fabric or cushion with a white arrow pointing to the seam (no text or symbols visible)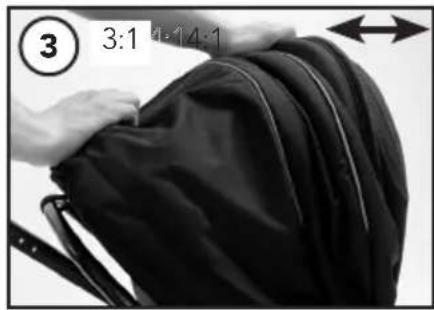
natural_image
Close-up of a person adjusting a helmet and jacket, no visible text or symbolsSeat Unit Ergo
natural_image
Close-up of a hand adjusting a bicycle seatbelt, no visible text or symbols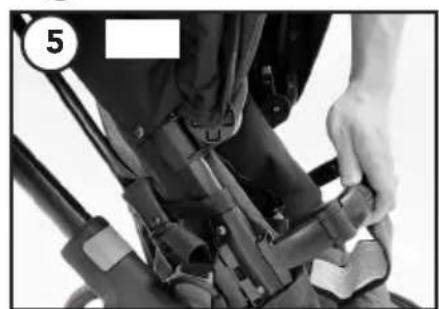
natural_image
Close-up of a person adjusting a bicycle seatbelt mechanism (no visible text or symbols)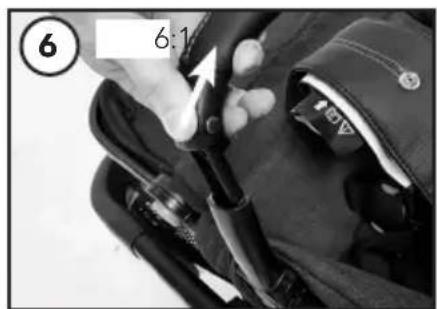
natural_image
Close-up of a person's jacket being adjusted for a cable, showing the number 6 and a 6:1 ratio label (no text or symbols on the jacket itself)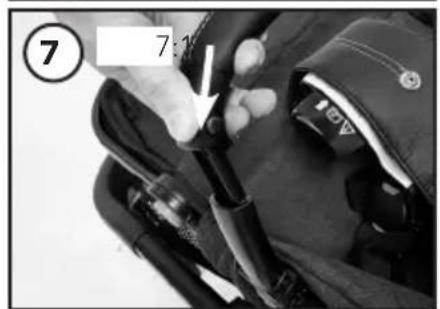
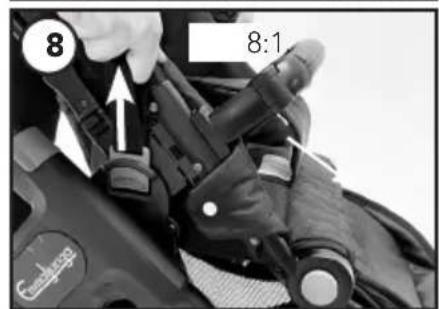
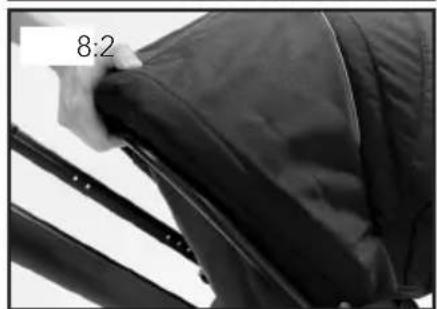
natural_image
Close-up of a hand adjusting a dark jacket, with no visible text or symbols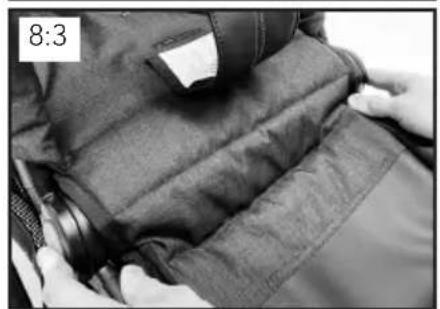
natural_image
Close-up of hands holding a jacket with visible stitching and fabric details (no text or symbols)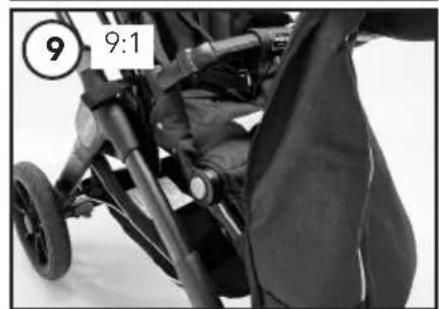
natural_image
Close-up of a person in a stroller with visible legs and torso, no text or symbols present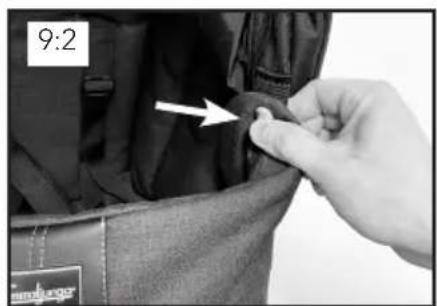
natural_image
Close-up of a hand adjusting a dark jacket with a white arrow pointing to the detail (no text or symbols visible)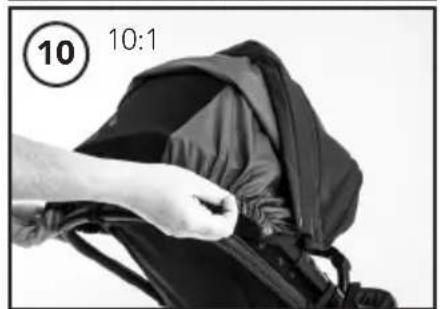
natural_image
Close-up of a hand holding a dark fabric bag, with a numbered circle highlighting '10:1' (no text or symbols on the bag itself)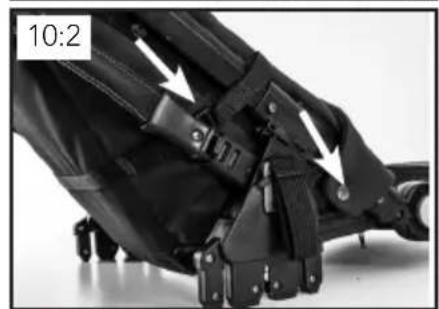
natural_image
Close-up of a black athletic suit with visible seatbelt and adjustment arrows (no text or symbols)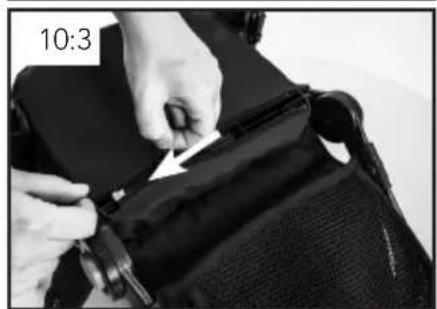
natural_image
Close-up of hands adjusting a black fabric item with a zipper, no visible text or symbols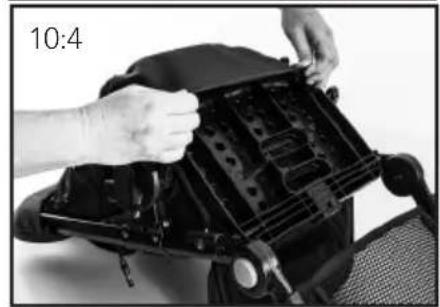
natural_image
Close-up of hands installing or adjusting a mechanical component on a vehicle chassis (no visible text or symbols)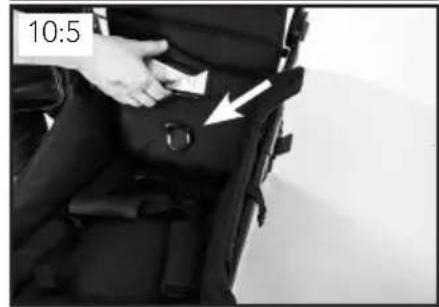
natural_image
Close-up of a hand pressing down on a black mechanical component, with no visible text or symbols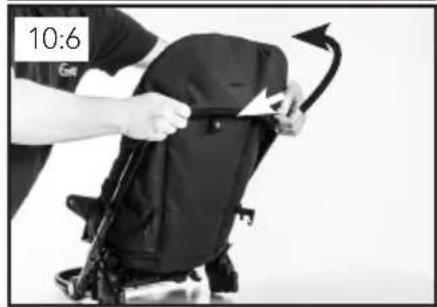
natural_image
Person adjusting a black athletic backpack with an arrow indicating rotation (no text or symbols visible)5-Point Harness (Ergo)
natural_image
Mechanical assembly diagram showing two hands operating a mechanical clamp or bracket (no text or symbols present)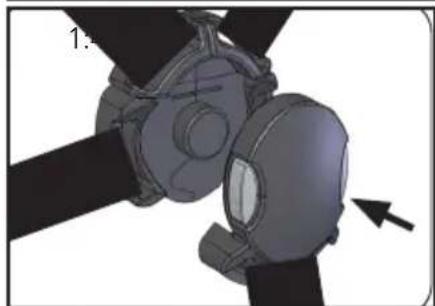
natural_image
3D mechanical assembly diagram showing a valve mechanism with a directional arrow (no text or symbols)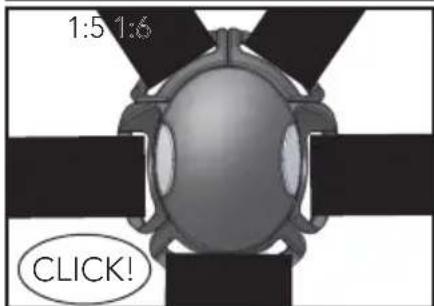
natural_image
Mechanical component with symmetrical arms and central hub, no visible text or symbols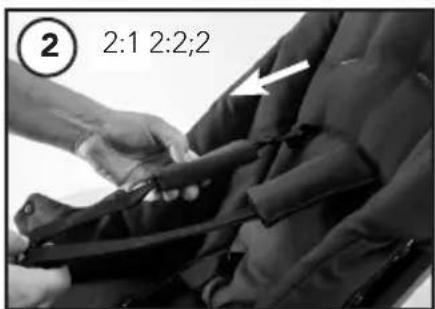
natural_image
Close-up of a hand using a hairdryer to clean a black garment (no visible text or symbols)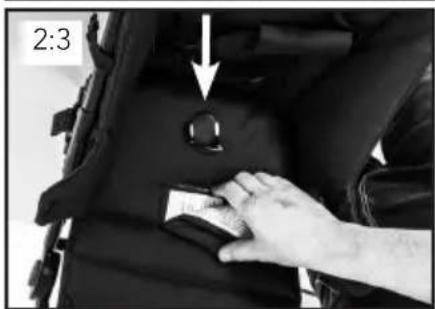
natural_image
Close-up of a hand pressing down on a dark mechanical component with a dial indicator (no text or symbols visible)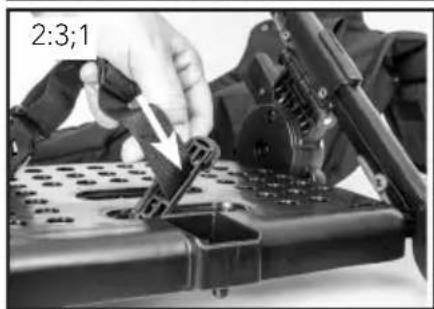
natural_image
Close-up of a hand using a tool to adjust or install a mechanical component, no visible text or symbols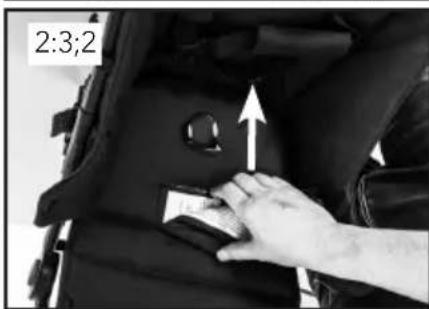
natural_image
Close-up of hands adjusting a black mechanical component with a white arrow pointing to a detail (no text or symbols visible)Seat Unit Flat
natural_image
Close-up of a hand holding a knitted fabric strap with a logo, no visible text or symbols on the strap itself.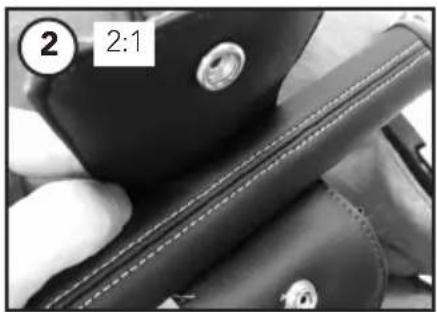
natural_image
Close-up of hands holding a black leather sleeve with a circular button, no visible text or symbols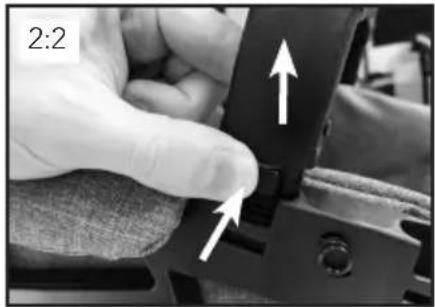
natural_image
Close-up of a hand holding a black mechanical component with white arrows pointing to specific parts (no text or symbols visible)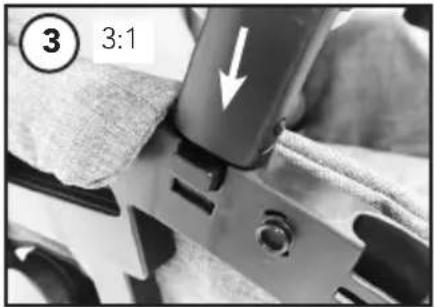
natural_image
Close-up of a mechanical component with a white arrow pointing to a feature, no visible text or symbols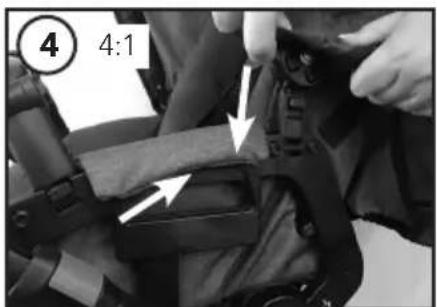
natural_image
Close-up of a person's seatbelt buckle being adjusted, with no visible text or symbols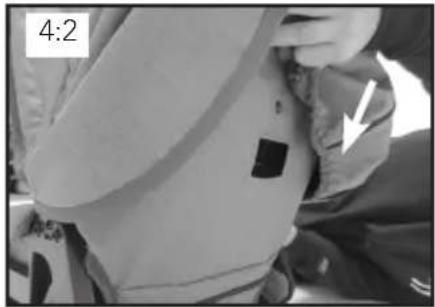
natural_image
Close-up of a person's torso with a black square patch and arrow pointing to the chest area (no text or symbols visible)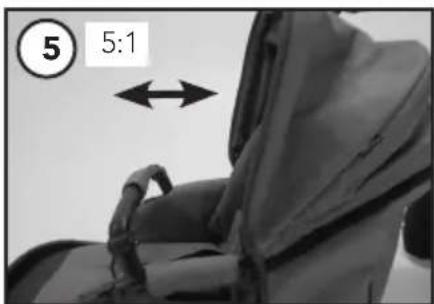
natural_image
Black-and-white photo of a folded athletic bag with a curved arrow indicating rotation (no text or symbols)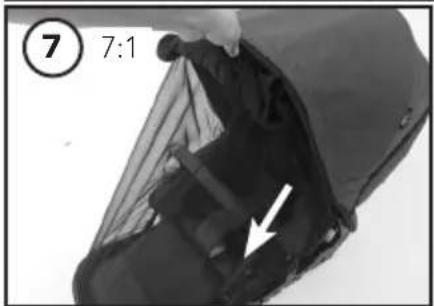
natural_image
Close-up of a bird's head with a white arrow pointing to the wing (no text or symbols visible)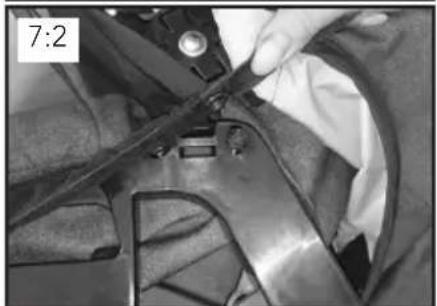
natural_image
Close-up of a hand adjusting a metal component with a curved bracket (no visible text or symbols)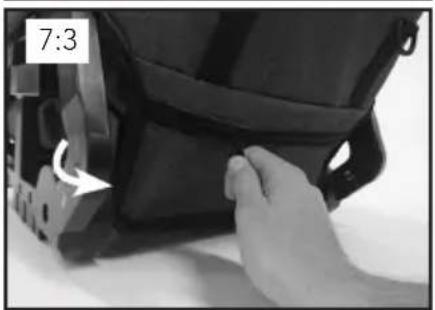
natural_image
Close-up of a hand adjusting a black athletic bag with a 7:3 ratio label (no text or symbols on the bag itself)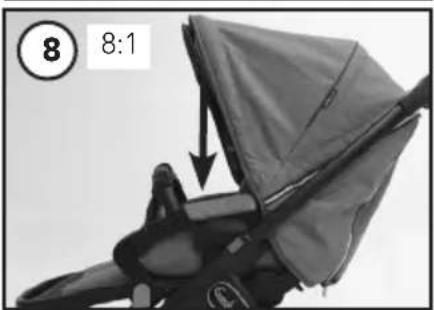
natural_image
Close-up of a baby stroller with a bandage and arrow indicating compression (no text or symbols)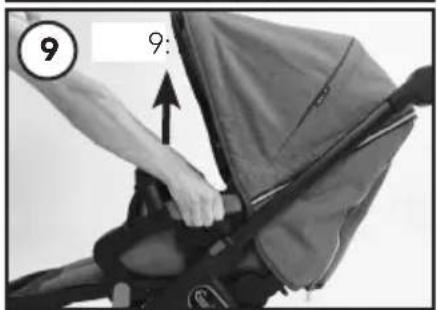
natural_image
Close-up of a person's torso and arm with arrows indicating motion or movement (no text or symbols)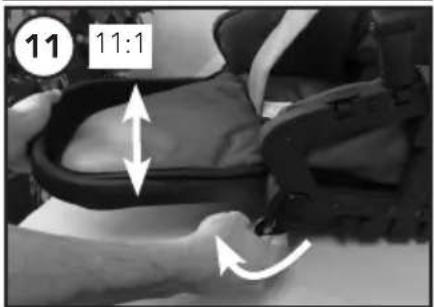
natural_image
Close-up of a hand holding a device with a textured fabric background (no visible text or symbols)Seat Unit Flat
natural_image
Close-up of a person wearing a reflective safety vest with plastic wrap, no visible text or symbols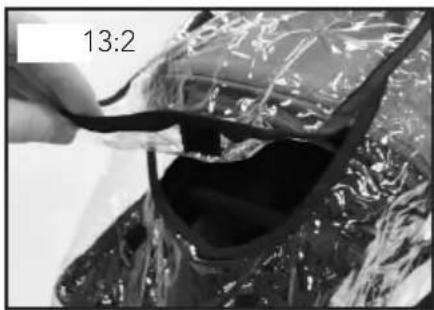
natural_image
Close-up of a hand pouring dark liquid from a glass container onto a textured surface (no text or symbols visible)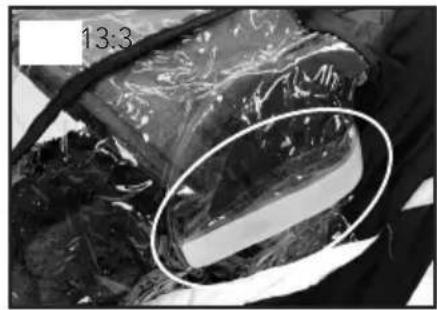
natural_image
Close-up of a textured surface with a magnified circular area highlighting a specific area (no text or symbols visible)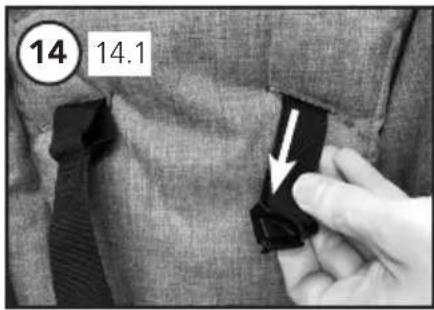
natural_image
Close-up of hands operating a laptop with a keyboard, no visible text or symbols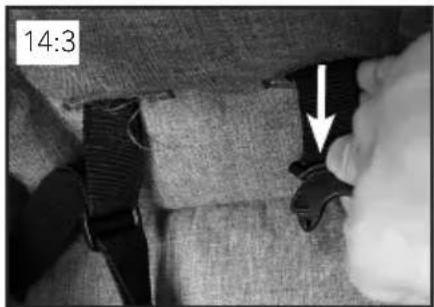
natural_image
Close-up of a fabric collar with a hand adjusting the seat, showing a white arrow pointing to a specific component (no text or symbols visible)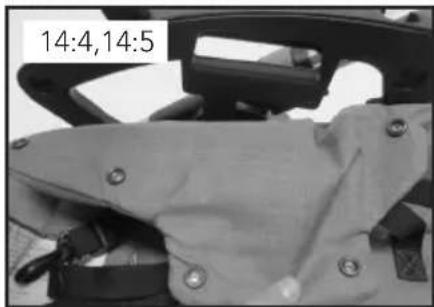
natural_image
Close-up of a mechanical component with bolts and a beige fabric patch, no visible text or symbols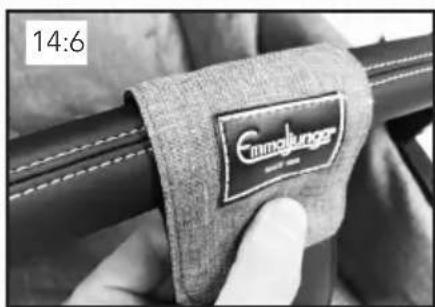
natural_image
Close-up of a hand holding a knitted car seatbelt with a logo, no visible text or symbols on the main subject.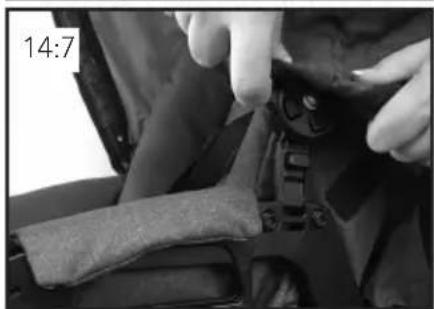
natural_image
Close-up of hands adjusting a mechanical component with a textured strap (no visible text or symbols)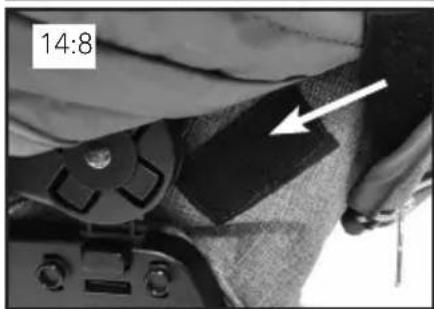
natural_image
Close-up of a sewing machine's clasp mechanism with a white arrow pointing to a fabric piece (no text or symbols visible)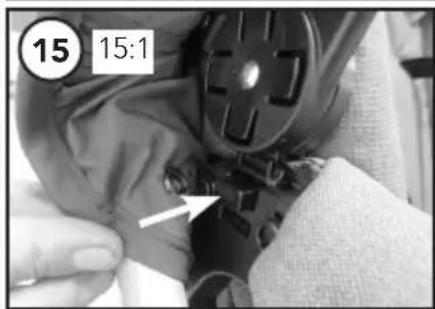
natural_image
Close-up of hands operating a sewing machine with a numbered callout (15:1) and an arrow pointing to the component (no readable text or symbols)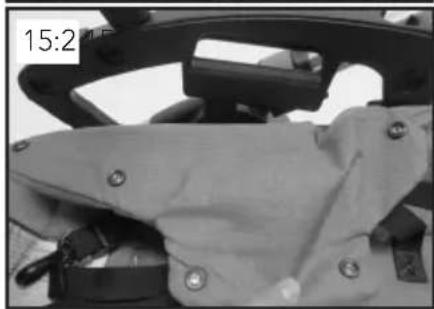
natural_image
Close-up of a mechanical component with bolts and a beige bandage (no visible text or symbols)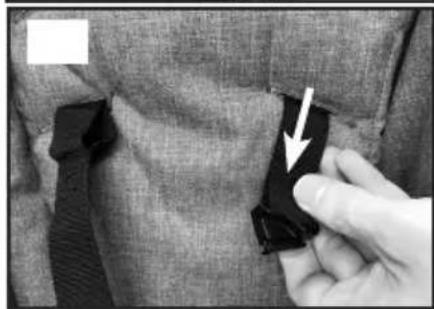
natural_image
Close-up of a hand adjusting a black belt buckle with a white arrow pointing to the buckle (no text or symbols visible)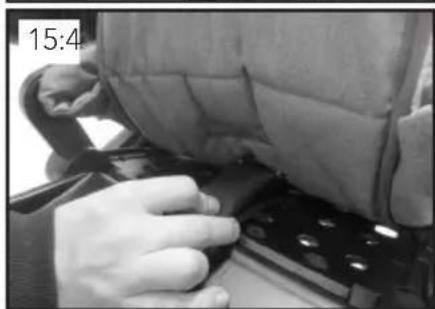
natural_image
Close-up of a hand pressing down on a device with a bag partially visible (no text or symbols)5-Point Harness (Flat)
natural_image
Diagram showing a mechanical component with an arrow pointing to a curved part, no text or symbols present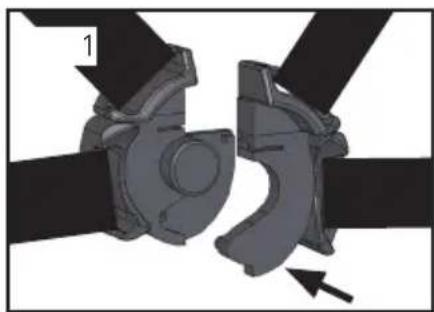
natural_image
Mechanical assembly diagram showing two interlocking components with a directional arrow (no text or symbols)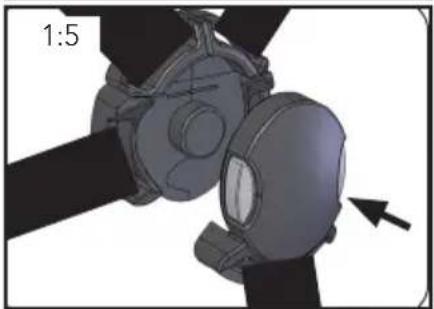
natural_image
3D mechanical assembly diagram showing a turbine or fan component with a directional arrow (no text or symbols)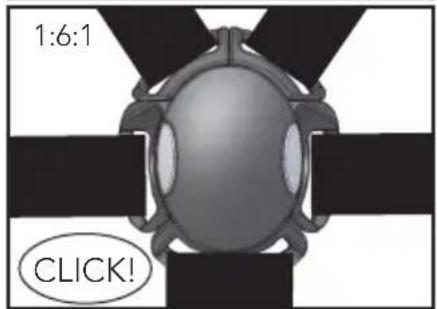
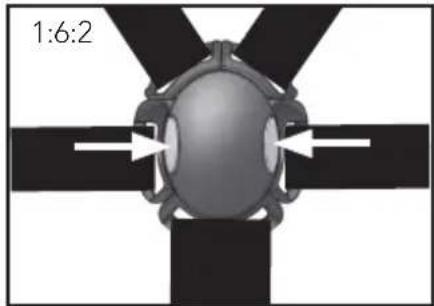
natural_image
Diagram of a mechanical or electrical component with symmetrical arms and central hub, no visible text or symbols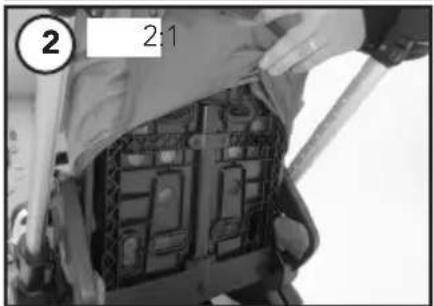
natural_image
Close-up of a person's arm holding a device with internal components, no visible text or symbols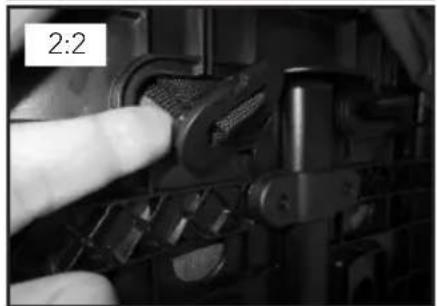
natural_image
Close-up of a finger pressing a mechanical component with no visible text or symbols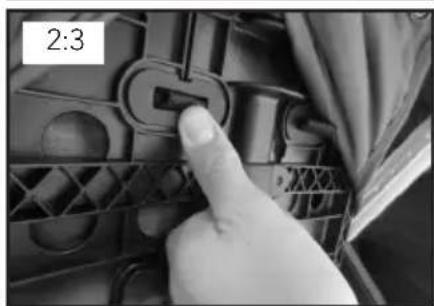
natural_image
Close-up of a finger pressing a button on a mechanical component (no visible text or symbols)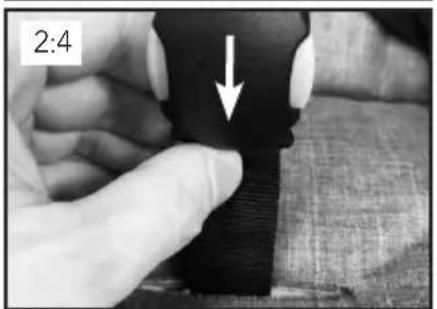
natural_image
Close-up of a hand pressing down on a textured fabric with a white arrow indicating compression (no text or symbols)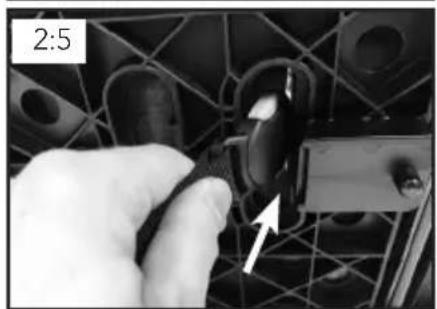
natural_image
Close-up of a hand holding a black plastic component with a white arrow pointing to it, against a mesh background (no text or symbols visible)VIKTIG SÄKERHETSINFORMATION
ALLMÄNNA SKÖTSELRÅD 31
natural_image
Close-up of a robotic arm with tweezers and a cylindrical component, no visible text or symbols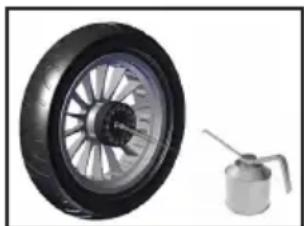
natural_image
Two small mechanical components: a wheel with spokes and a gas cylinder (no text or symbols visible)REGELBUNDEN ÖVERSYN
☐ 1 st Seat unit Flat with seat unit fabrics incl 5-point harness
□ 1 st Sufflett
□ 1 st Frambygel
2. Chassits/Liggdelen/Sittdelens funktion.
IMPORTANT SAFETY INFORMATION
IMPORTANT — READ THE INSTRUCTIONS CAREFULLY BEFORE USE AND KEEP FOR FUTURE REFERENCE
Your child's safety may be affected if you don't follow these instructions.
WARNING
- Never leave the child unattended
- Ensure that all the locking devices are engaged before use
- To avoid injury ensure that the child is kept away when unfolding and folding this product
- Do not let the child play with this product
- Use a harness as soon as the child can sit unaided
- This seat unit is not suitable for children under 6 months
• Always use the restraint system - Check that the pram body or seat unit or car seat attachment devices are correctly engaged before use
• This product is not suitable for running or skating
Warning sentences according to EN1888-1:2018, EN1888-2:2018
WARNING
- A child's safety is your responsibility.
- Children should be harnessed in at all times and should never be left unattended.
- The child should be clear of moving parts while making adjustments.
- This vehicle requires regular maintenance by the user.
- Overloading, incorrect folding and the use of non-approved accessories may cause injury to your child/children and/or damage or break this vehicle.
- Read the instructions.
- Keep away from fire.
IMPORTANT SAFETY INFORMATION
WARNING
- Never use this product on a stand.
- This product is only suitable for a child who cannot sit up unaided.
- Only use on a firm, horizontal level and dry surface.
- Do not let other children play unattended near the carry cot.
- Do not use if any part of the carry cot is broken, torn or missing.
- Use only replacement parts supplied or approved by the manufacturer.
- Be aware of the risk of open fire and other source of strong heat, such as electric bar fires, gas fires, etc., in the near vicinity of carrycot.
- The handles and the bottom of the carrycot should be inspected regularly for signs of damage and wear.
- Before carrying or lifting the carry cot place the backrest in the flat position.
- When using the carry cot make sure that the head of the child never is lower than the body of the child.
- Do not add another mattress on top of the mattress provided.
- Make sure that the adjustable handle is in carrying position before carrying the carrycot.
Warning sentences according to EN 1466:2014, Carrycot.
IMPORTANT INFORMATION - COMPATIBILITY
WARNING
If you need to identify this product there is a sticker showing the model name and serial number placed on the chassis / Seat / Carrycot
CHASSIS
- Compatible with: NXT Ergo Seat ^3.0 , NXT Flat Seat ^3.0 , NXT Carrycot ^3.0 . NXT Carseat adapter, NXT Toddler roller, NXT Sidebag.
- This vehicle is only suitable for the transport of one (1) child with a maximal weight of 22 kg or 4 years whichever comes first. Only use the pram for the number of children it is intended for.
- The shopping tray has a maximum weight limit of 10 kg. Always place heavier objects in the centre of the tray. The pram may become unstable if the weight in the tray is unevenly distributed.
SEAT
- Compatible with: NXT90 ^3.0 chassis, NXT60 ^3.0 chassis, NXT Twin ^3.0 chassis
- The seat-unit is not suitable for children under 6 months, maximal weight of 22 kg or 4 years whichever comes first. Don't use the seat-unit until your child can sit unaided.
CARRYCOT
- Compatible with: NXT90 ^3.0 chassis, NXT60 ^3.0 chassis, NXT Twin ^3.0 chassis.
- The carrycot / pram body (accessory) can only be used for the transportation of one child from 0 to 6 months. This carrycot is suitable for a child who cannot sit up by itself, roll over and cannot push itself up on its hands and knees. Maximum weight of the child: 9kg.
ACCESSORIES
- Please use only one authorised accessory at a time, eg. NXT toddler roller or NXT car seat adapter.
- Toddler Roller: The maximum weight for one child using the Toddler Roller accessory on the pram/stroller is 20 kg.
- NXT Sidebag: Max load 2 kg.
- Changing bag: Max load 2 kg.
WARNING
- If any part of this manual is unclear or requires further explanation, please contact an authorised Emmaljunga retailer who will be able to assist you.
- Do not modify this product as it may compromise the safety of your child.
• The manufacturer is NOT liable for any modifications to the product.
- Do not place objects on the hood. Never use the pram without the hood.
- Do not carry extra children or bags on this stroller.
- The pram/stroller is intended for transportation only. Never use the pram as a bed for your child.
- Do not stand or sit on the footrest. The footrest must only be used as a
- support for one (1) child's legs and feet. Any other usage may lead to serious personal injury. The maximum load for the footrest is 3 kg.
- Any load that is placed on the pram/stroller (e.g. on the handle, backrest or on the sides of the pram) will affect the stability of the pram. Do not use non-approved accessories.
- Do not place any additional mattresses in the bassinet. Only use the original Emmaljunga mattress that is included with the product.
- Items in the shopping tray should not protrude over the sides as items could get caught in the wheel spokes.
- The seat unit or carrycot must NOT be used as a car seat.
- For car seats used in conjunction with a chassis, this pram does not replace a cot or a bed. Should your child need to sleep, then it should be placed in a suitable place such as a cot or a bed.
- Never pull a pram/pushchair with swivel front wheels behind you. The pram/pushchair might self turn which can lead to a safety risk if you are not cautious and attentive.
- Never use the pram/stroller to go upstairs or downstairs with your child in the stroller, as you may suddenly lose control of the stroller or your child may fall out. Always remove your child from the stroller before using the stroller on stairs. Use of the stroller on stairs with a child inside could also damage the stroller.
- Never use the pram/stroller on escalators.
- Do not use this product in strong winds or thunderstorms.
- Please note that train or underground stations may cause sudden high pressure changes in the air (wind or vacuum). Never place this product near any rails
- without having both hands on the handle as the braking device alone may not be sufficient to keep your stroller safely in place.
- Do not cross rails when the child is placed in the stroller or the prambody. Wheels may get stuck!
- When transporting on public transport (bus, underground, train etc.) it is not enough to use the pram's parking brake only. The pram can be exposed to conditions (abrupt braking, turns and bumps in the road surface, acceleration etc.) that it has not been tested for according to the current standard EN1888. Follow the recommendations and instructions regarding the safe anchorage of prams during transport that public transport operators are obliged to supply.
- WARNING Never use the seat if parts of the 5-point belt are missing or if the belt is damaged.
- WARNING The 5-point harness contains magnets or magnetic components. Magnets that attract each other or a metallic object in the human body can cause serious injury or death. Seek medical advice immediately if magnets are swallowed or inhaled.
IMPORTANT SAFETY INFORMATION
WARNING
- Medical devices such as implanted pacemakers and defibrillators might contain sensors that respond to magnets and radios when in close contact. To avoid any potential interactions with these devices, keep a safe distance away from your device (more than 15 cm apart). But consult with your physician and your device manufacturer for specific guidelines.
- This product should not be used as a medical treatment device. This product is designed and built according to the standard EN1888/EN1466. If your child has special medical needs in connection with transportation you should consult your doctor.
Parking /Folding / Storage
• Always apply the brakes whenever the pram/stroller is stationary.
- The brake should always be engaged when you lift your child in and out of the pram.
- Never park the pram on a hill or an uneven surface.
• Always remove the child before you fold the pram.
- Make sure children are clear of any moving parts if you adjust the pram/stroller.
- Store the pram/stroller out of children's reach when not in use.
- Tyres can when in contact with PVC-flooring or other plastic materials cause discoloration. Always use wheel protection if the pram/stroller is stored on delicate surfaces.
Care, Maintenance, Spare parts
- Follow the care and maintenance instructions.
- Never use the product if a part is faulty or damaged.
- Check that all zips and poppers are securely fastened before use.
- Only use original replacement parts supplied or approved by the manufacturer.
- Accessories or spare parts that the manufacturer has not approved must not be used.
- Air tyres might contain controlled amounts of PAH polyaromatic hydrocarbons. Handle the tyres with care, and only allow professionals to repair or change tyres or inner tubes. Never let children play with the pram/stroller or the tyres.
General
The safety instructions and directions in this manual cannot cover all possible conditions and unforeseeable situations which may occur. It must be understood that common sense, caution and care are factors that cannot be built into a product. These factors are the responsibility of the person(s) caring for and operating the pram. It is important that these instructions are understood and followed by everyone that uses the pram and accessories. Always inform and instruct each person using the pram and accessories on how they should be used, even if the person(s) in question will only use them for a short time. Ensure that all users have the necessary physical capabilities and experience to operate this vehicle.
Table of Contents 1/2
EN
CHASSI NXT90
Table of Contents 2/2
Page nr. Bildnr.
7) CLOSE THE BUMPER BAR.... 48 12
8) REMOVING THE SEAT UNIT FROM THE CHASSIS 48 12
9) ASSEMBLY OF THE APRON (ACCESSORIES)...... 48 12
10) REMOVAL OF THE SEAT UNIT FABRIC.... 48 12
11) RAINCOVER (ACCESSORIES)...... 48 12
5-POINT HARNESS (ERGO)
1) BUCKLE THE CHILD 48 13
2) CHANGE POSITION OF THE HARNESS.... 49 13
SEAT UNIT FLAT
1) ASSEMBLY AND USE OF THE SEAT UNIT.... 49 14
2) OPEN THE BUMPER BAR.... 49 14
3) CLOSE THE BUMPER BAR.... 49 14
4) ASSEMBLY / USE OF THE HOOD.... 49 14
5) ADJUST THE HOOD 49 14
6) EXTENDING THE HOOD.... 50 14
7) INSECT NET (DELIVERY WITH CHASSIS) 50 14
8) ATTACH THE SEAT UNIT ON THE CHASSIS.... 50 14
9) REMOVAL OF THE SEAT UNIT FROM THE CHASSIS.... 50 14
10 ADJUST THE BACK REST.... 50 14
11 ADJUST THE FOOTREST 50 14
12 ASSEMBLY OF THE APRON (ACCESSORIES).... 50 14
13 RAINCOVER (ACCESSORIES).... 50 15
14) ASSEMBLY OF THE SEAT UNIT FABRIC 50 15
15) REMOVAL OF THE SEAT UNIT FABRIC.... 51 15
5-POINT HARNESS (FLAT)
1) BUCKLE THE CHILD 51 16
2) CHANGE POSITION OF THE HARNESS.... 51 16
CARE & MAINTENANCE
GENERAL CARE AND MAINTENANCE INSTRUCTIONS 52
ROUTINE INSPECTION 52
IMPORTANT INFORMATION LEATHERETTE....52
WASHING INSTRUCTIONS.... 53
CHASSI NXT90
1) ASSEMBLY OF THE CHASSIS
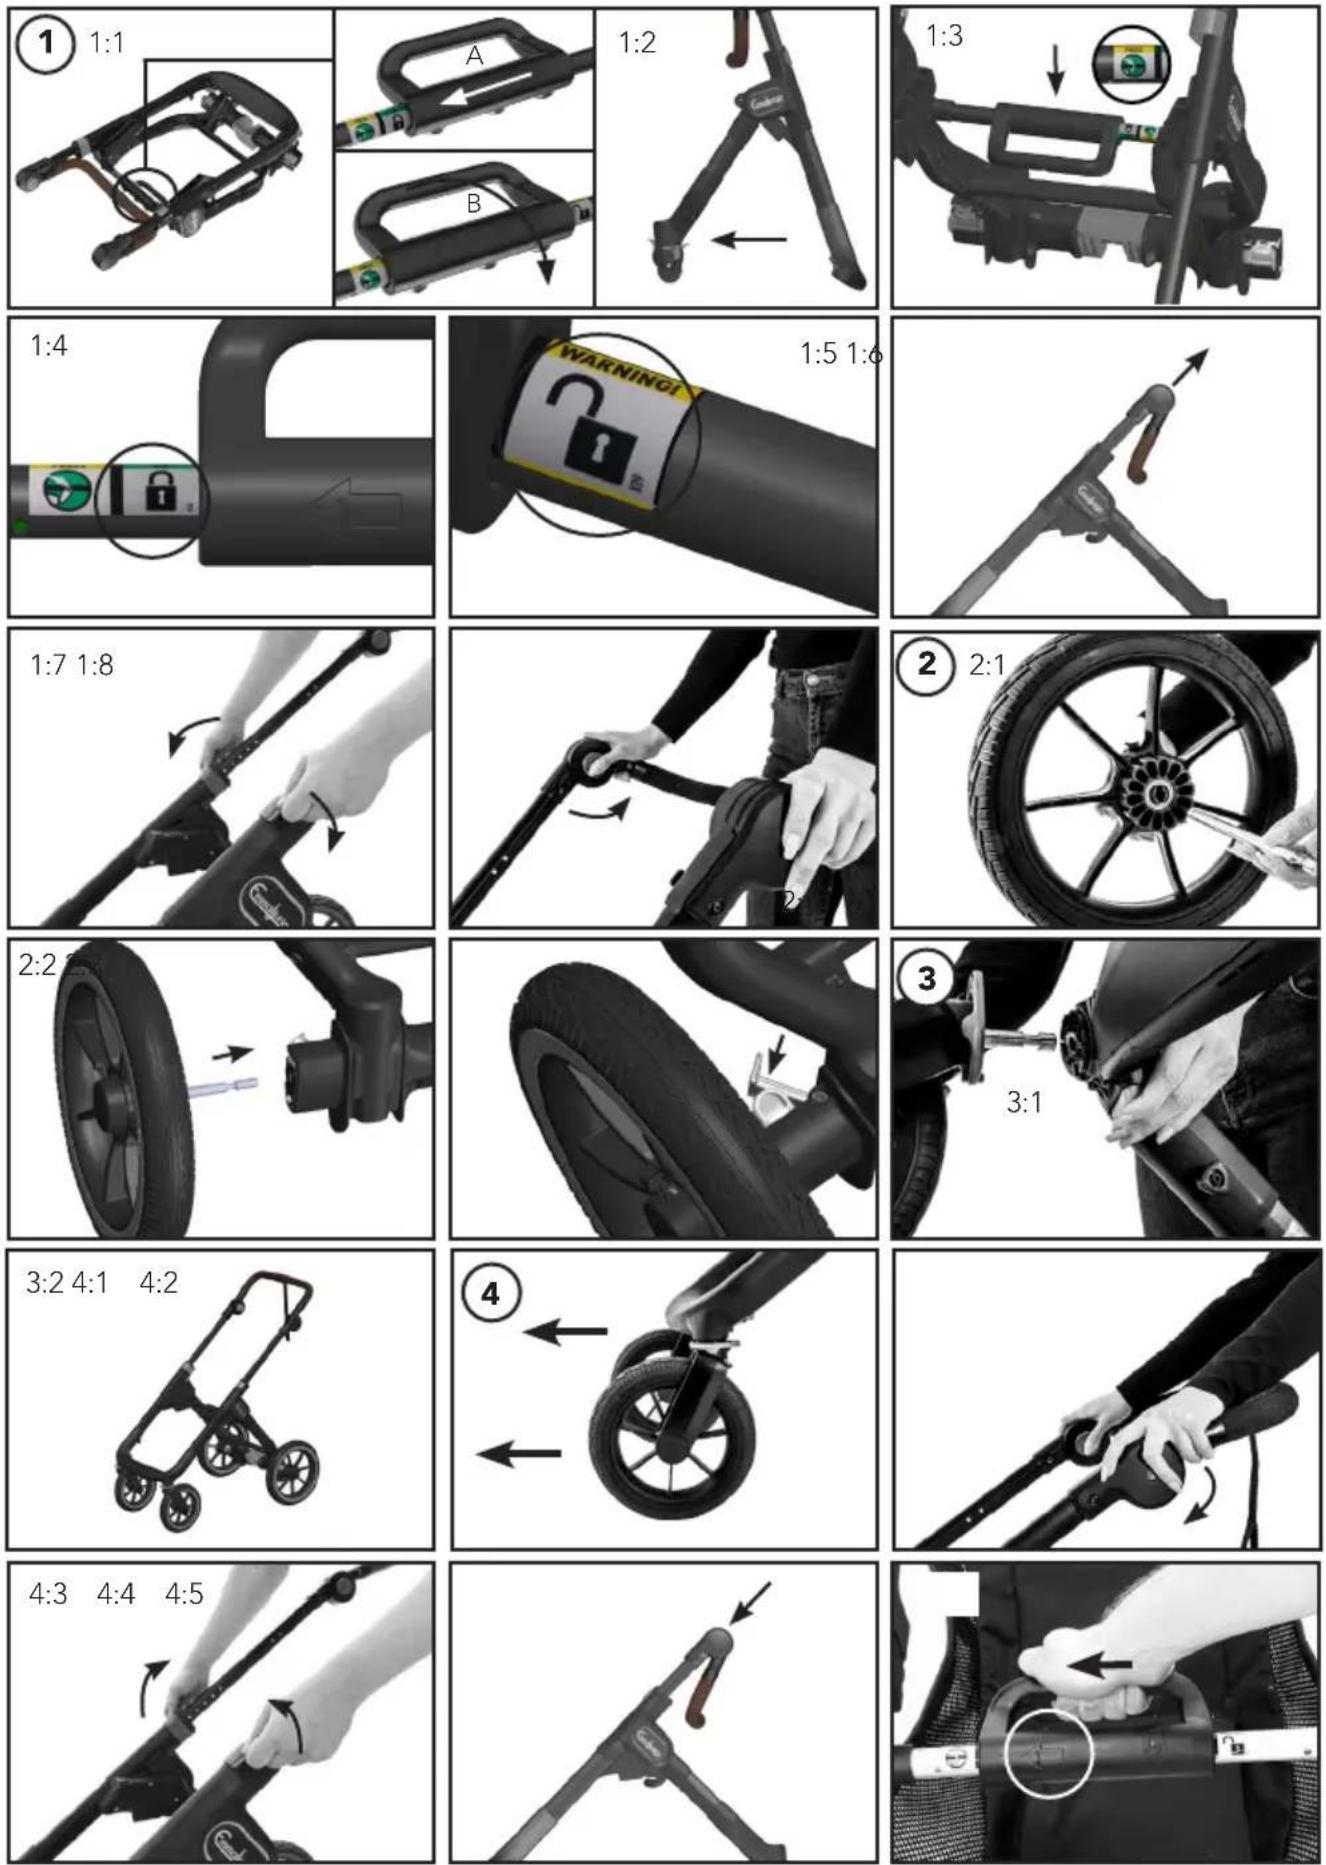
1.1 Unfolding the Chassis
A) Slide the safety handle all the way to the side (See arrow 1 located on the safety handle).
B) Maintain the position and rotate the safety handle all the way (See arrow 2 located on the safety handle)
1.2 Fold out the rear leg.
WARNING There must not be a child in the pram when it is folded or unfolded
WARNING Avoid having children in the vicinity when the pram is folded or unfolded.
WARNING Ensure that children are kept away from all moving parts of the pram to avoid risk of injury.
1.3 Press the bar in the middle of the chassis until you hear a clear "click". Make sure left and right side "Click" in properly.
1.4 Make sure that you now see the closed padlock. WARNING ALWAYS check before use that the chassis is locked. The closed padlock will be shown.
1.4.2 WARNING If the open padlock is visible, the chassis is NOT locked.
WARNING If the open padlock icon is visible, press down on the metal bar, the chassis locks and you will hear 'click'. Never use the stroller if the symbol with the open padlock is visible.
1.6 Pull out the telescopic handle.
1.7 Lock both grey clips on the right and left of the handlebars. Make sure that the telescopic handlebar clips are properly locked with a "click". Make sure that the handlebar is at the same height on both sides before you lock into place.
WARNING Ensure that children are kept away from all moving parts if you adjust the pram to avoid risk of injury.
1.8 Adjust the handle by pressing the grey buttons on the inside of the handlebar.
Make sure that they click into position.
WARNING! Ensure that children are kept away from all moving parts if you adjust the pram to avoid risk of injury.
2) ASSEMBLY OF THE REAR WHEELS
2.1 Wipe dirt from the axles before you put on the wheels. Press the button on the rear wheel. Insert the metal shaft axle in the rear wheel.
Ensure that the shaft clicks into the wheel WARNING Check that the wheels are firmly fixed and cannot be pulled off the shaft.
2.2 Push the axle shaft into the chassis.
2.3 Lock the shaft with the grey lock that sits on the brake bar. The shaft shall click in locked position. Check that the rear wheel is attached to the chassis properly by pulling the wheel. Repeat on both sides.
WARNING Check that the wheel is firmly fixed and can not be pulled from the chassis.
WARNING Avoid driving over sharp objects or surfaces eg. glass or the tyre can be punctured
3) ASSEMBLY OF THE FRONT WHEELS
3.1 Press in the button on the front section of the pram and push in the front wheel. Release the button and check that the front wheel is attached to the chassis properly by pulling the wheel. Repeat on both sides.
3.2 This is how the chassis should look when fully assembled. (as illustrated in the picture).
4) FOLDING THE CHASSIS
4.1 Take off the carrycot or the seat unit. Turn the chassis so that the front wheels are pointing forward (as illustrated in the picture). Make sure that the shopping basket is empty before folding the chassis. Brake the stroller by pressing the brake pedal all the way down.
WARNING There must not be a child in the pram when it is folded or unfolded.
WARNING Avoid having children in the vicinity when the pram is folded or unfolded.
WARNING Ensure that children are kept away from all moving parts of the pram to avoid risk of injury.
4.2 Adjust the handle in the lowest position.
WARNING Ensure that children are kept away from all moving parts of the pram to avoid risk of injury.
4.3 Open both clips on the telescopic handle.
WARNING Ensure that children are kept away from all moving parts of the pram to avoid risk of injury.
4.4 Push the telescopic handle down to the lowest point
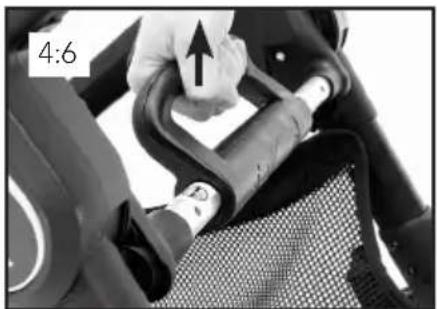
4.5-4.6 Slide the safety handle all the way to the side (See arrow 1 located on the safety handle). Maintain the position and rotate the safety handle all the way (See arrow 2 located on the safety handle). Lift the safety handle firmly upwards and the stroller folds.
WARNING Ensure that children are kept away from all moving parts of the pram to avoid risk of injury.
4.7 The pram is now folded.
5) REMOVING THE REAR WHEELS
5.1 Release the shafts and wheel by, (1) press down the grey button and at the same time (2) open the grey clip. Loosen the shaft by pressing the button on the rear wheel and pull out the shaft.
6) REMOVING THE FRONT WHEELS
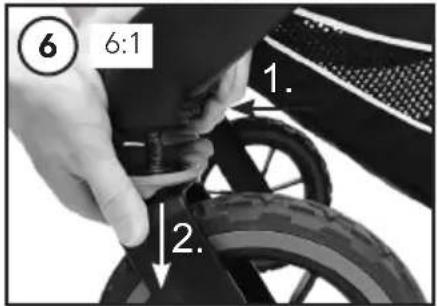
6.1 Press the grey button on the front part of the chassis and pull the front wheel off.
7.1 Brake the stroller by pressing the brake pedal down.
WARNING Never leave the child unattended in the pram without engaging the brake
WARNING The brake should always be applied when you lift your child in or out of the pram.
WARNING Never park the pram on a slope.
8.1 Release the brake by lifting the brake pedal upwards with your foot.
8.2 If the pram is equipped with a safety leash: Insert your hand into the leash for safety.
WARNING This product is not suitable for jogging, skating or rollerblading.
9) ADJUST THE ANGLE OF THE HANDLE
9.1 Adjust the angle of the handlebar by pressing the grey buttons on the inside of the handlebar. Keep the buttons pressed and adjust to the desired position. Make sure they click into position.
WARNING Ensure that children are kept away from all moving parts of the pram to avoid risk of injury.
10) ADJUSTING THE TELESCOPIC HANDLE
10.1 Open both clips on the handle bar and adjust to the desired position.
Lock both grey clips on both sides of the handlebar. Make sure that the telescopic handlebar is properly locked with a "click". Make sure that the handlebar is at the same height on both sides before you lock into place.
11) THE FRONT WHEELS CAN BE FIXED OR ROTATED 360 DEGREES.
11.1 The wheels can be locked by pressing the locking ring when the wheels are in the "forward facing" position. The wheels can rotate freely through 360 degrees when the locking wheel is released.
WARNING Ensure that children are kept away from all moving parts of the pram to avoid risk of injury.
11.2 WARNING Never pull the pram when the swivel wheels are unlocked. The pram may wobble which can lead to a safety risk if you are not cautious and careful.
11.3 The front wheels can be locked in a forward position.
WARNING This position of the front wheels shall only be used when the pram is parked.
Never push the pram with the wheels locked in forward position.
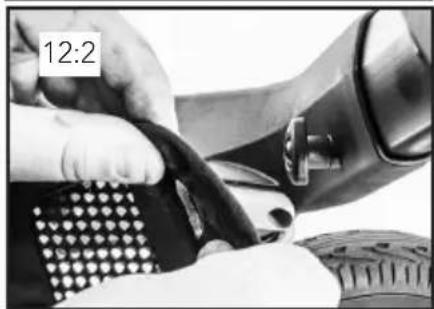
12) ASSEMBLY OF THE BASKET
1.1 Fasten the 3 buttons on the back around the tube
1.2 - 1.3 Pull the knobs through the holes
CHASSI NXT60
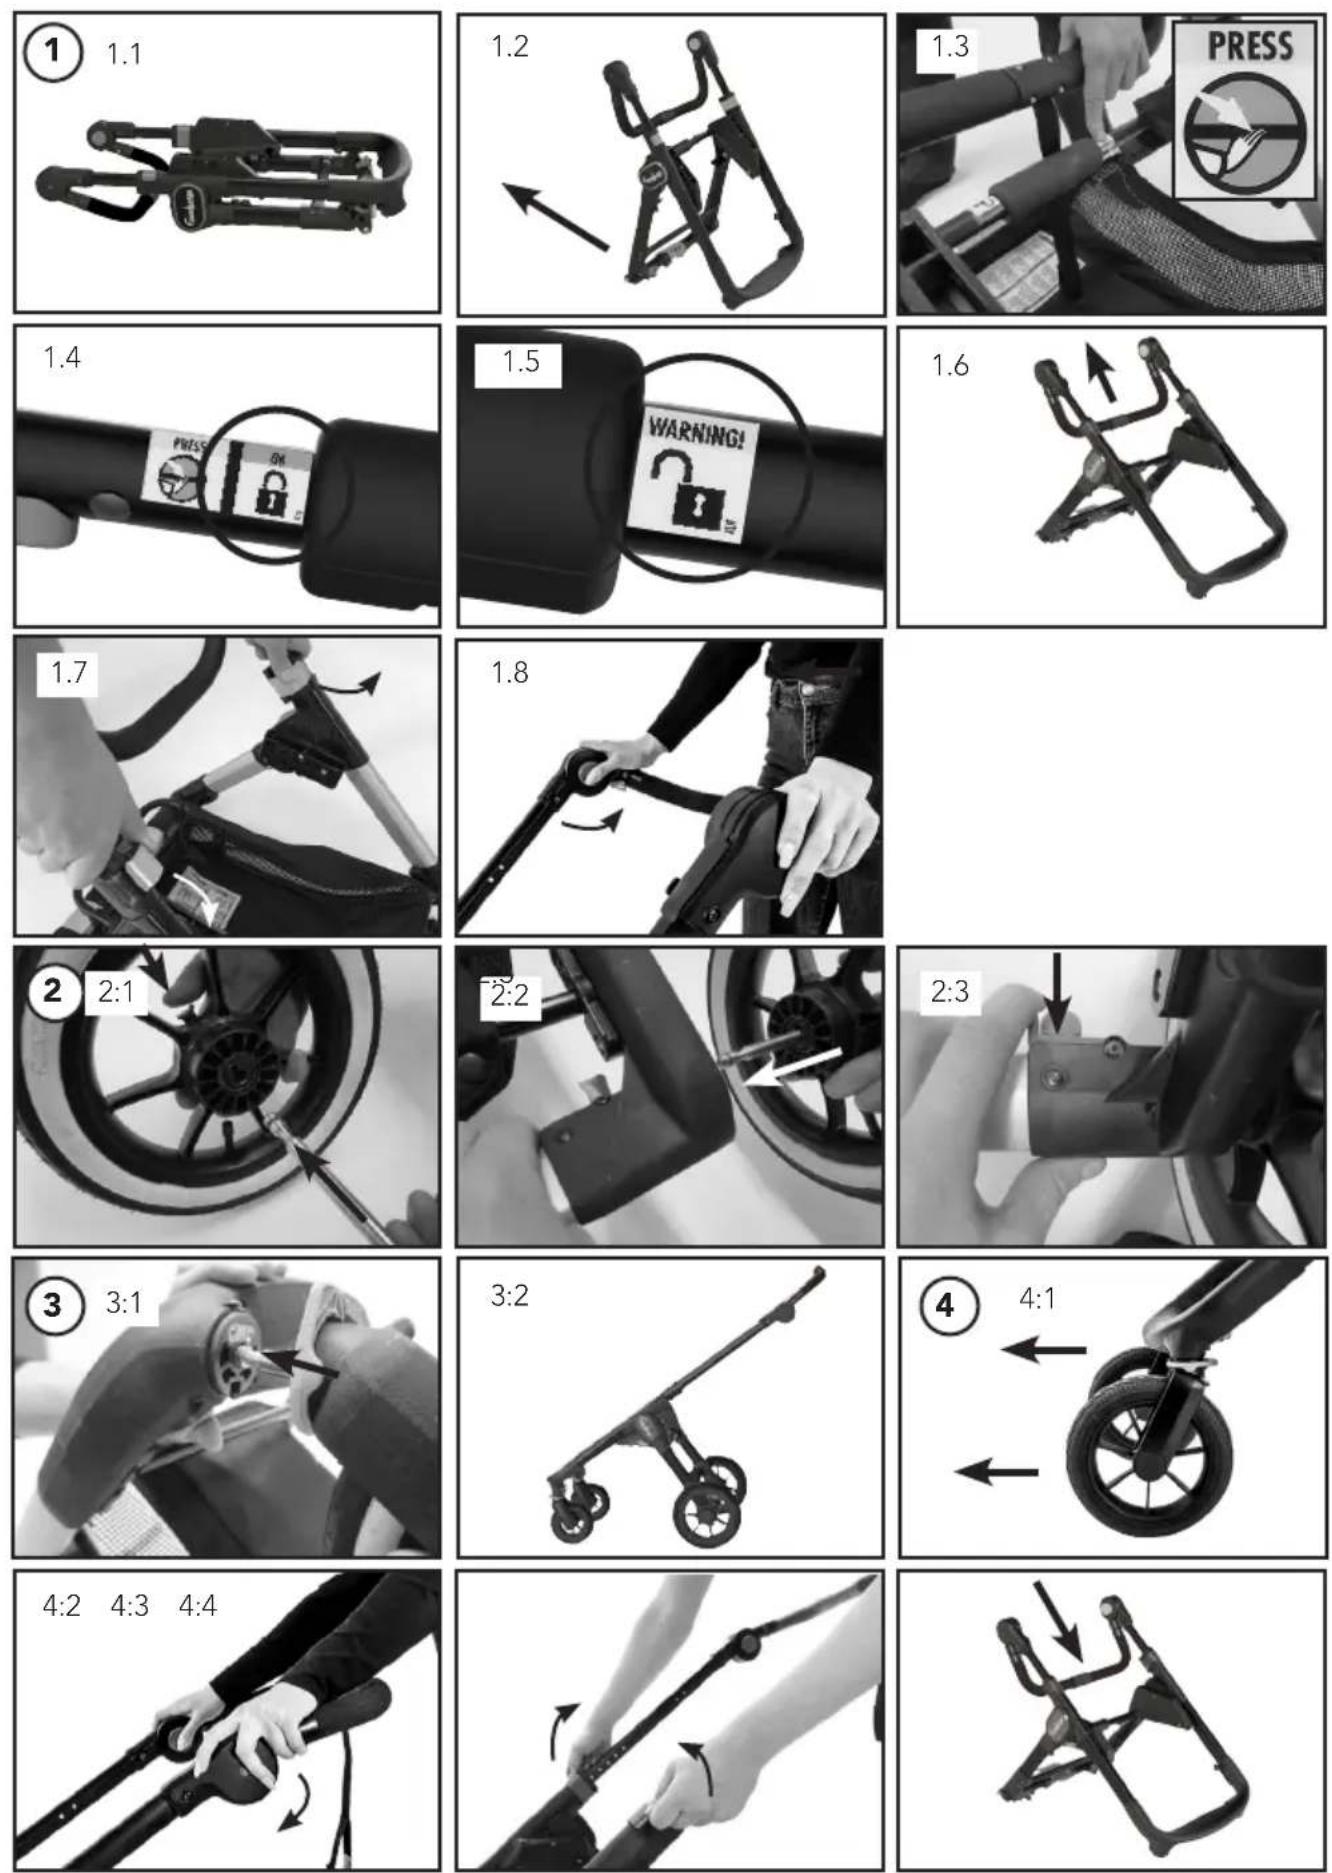
1) ASSEMBLY OF THE CHASSIS
1.1 Unfolding the Chassis
WARNING There must not be a child in the pram when it is folded or unfolded
WARNING Avoid having children in the vicinity when the pram is folded or unfolded.
WARNING Ensure that children are kept away from all moving parts of the pram to avoid risk of injury.
1.2 Fold out the rear leg.
1.3 Press the "Press" label on the bar in the middle of the chassis until you hear a clear "click"
1.4 Make sure that you now see the closed pad-lock.
WARNING ALWAYS check before use that the chassis is locked.the closed padlock will be shown.
1.5 WARNING If the open padlock is visible, the chassis is NOT locked.
WARNING If the open padlock icon is visible, press down on the metal bar, the chassis locks and you will hear 'click'. Never use the stroller if the symbol with the open padlock is visible.
1.6 Pull out the telescopic handle.
1.7 Lock both grey clicks on the right and left of the handlebars. Make sure that the telescopic handlebar clips are properly locked with a "click". Make sure that the handlebar is at the same height on both sides before you lock into place.
WARNING Ensure that children are kept away from all moving parts if you adjust the pram to avoid risk of injury.
1.8 Adjust the handle by pressing the grey buttons on the inside of the handlebar.
Make sure that they click into position.
WARNING! Ensure that children are kept away from all moving parts if you adjust the pram to avoid risk of injury.
2) ASSEMBLY OF THE BACK WHEELS
2.1 Wipe dirt from the axles before you put on the wheels. Press the button on the rear wheel. Insert the metal shaft axle in the rear wheel. Ensure that the shaft clicks into the wheel WARNING Check that the wheels are firmly fixed and cannot be pulled off the shaft.
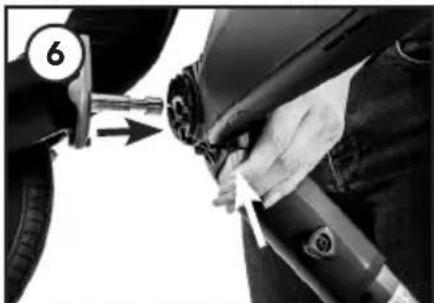
2.2 Push the axle shaft into the chassis.
2.3 Lock the shaft with the grey lock that sits on the brake bar. The shaft shall click in locked position.
Check that the rear wheel is attached to the chassis properly by pulling the wheel. Repeat on both sides.
WARNING Check that the wheel is firmly fixed and can not be pulled from the chassis.
WARNING Avoid driving over sharp objects or surfaces eg. glass or the tyre can be punctured WARNING To achieve optimum handling and to avoid punctures, air pressure should be correct. Please check the air pressure at regular intervals (see marking on the tyre).
3) ASSEMBLY OF THE FRONT WHEELS
3.1 Press in the button on the front section of the pram and push in the front wheel. Release the button and check that the front wheel is attached to the chassis properly by pulling the wheel. Repeat on both sides.
3.2 This is how the chassis should look when fully assembled. (as illustrated in the picture).
4) FOLDING THE CHASSIS
4.1 Take off the carrycot or the seat unit. Turn the chassis so that the front wheels are pointing forward (as illustrated in the picture). Make sure that the shopping basket is empty before folding the chassis.
WARNING There must not be a child in the pram when it is folded or unfolded.
WARNING Avoid having children in the vicinity when the pram is folded or unfolded.
WARNING Ensure that children are kept away from all moving parts of the pram to avoid risk of injury.
4.2 Adjust the handle in the low position.
WARNING Ensure that children are kept away from all moving parts of the pram to avoid risk of injury.
4.3 Open both clips on the telescopic handle.
WARNING Ensure that children are kept away
from all moving parts of the pram to avoid risk of injury.
4.4 Push the telescopic handle down to the lowest point
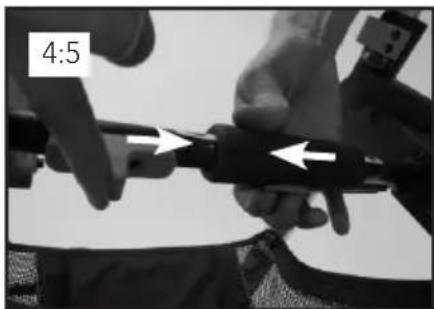
4.5 Slide the grey safety button to the middle (with the left hand) and simultaneously press the grey button under the handle (with the right hand) and move to the center. Hold the left safety button and the right handle and lift up a little bit.
4.6 You can now release the left hand and lift the handle up to fold the pram.
WARNING Ensure that children are kept away from all moving parts of the pram to avoid risk of injury.
4.7 The pram is now folded.
4.8 If you want to make the chassis more compact, you can remove the wheels. This can be done both before or after you fold the chassis.
5.1 Release the shafts and wheel by, (1) press down the grey button and at the same time (2) open the grey clip. Loosen the shaft by pressing the button on the rear wheel and pull out the shaft.
6) REMOVING THE FRONT WHEELS
6.1 Press the grey button on the front part of the chassis and pull the front wheel off.
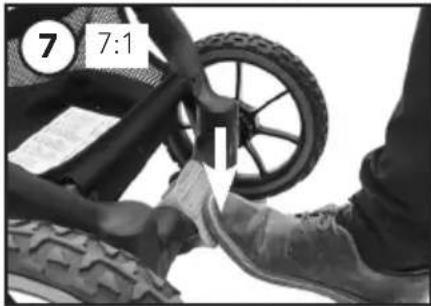
7.1 Stop the pram by pressing the brake pedal all the way with your foot.
WARNING Never leave the child unattended in the pram without engaging the brake
WARNING The brake should always be applied when you lift your child in or out of the pram.
WARNING Never park the pram on a slope.
WARNING Always check that the pram is properly parked.
8.1 Release the brake by lifting the brake bar upwards with your foot.
8.2 If the pram is equipped with a safety leash: Insert your hand into the leash for safety.
WARNING This product is not suitable for jogging, skating or rollerblading.
9) ADJUST THE ANGLE OF THE HANDLE
9.1 Adjust the angle of the handlebar by pressing the grey buttons on the inside of the handlebar. Keep the buttons pressed and adjust to the desired position. Make sure they click into position.
WARNING Ensure that children are kept away from all moving parts of the pram to avoid risk of injury.
10) ADJUSTING THE TELESCOPIC HANDLE
10.1 Open both clips on the handle bar and adjust to the desired position. Lock both grey clips on both sides of the handlebar. Make sure that the telescopic handlebar is properly locked with a "click".
Make sure that the handlebar is at the same height on both sides before you lock into place.
11) THE FRONT WHEELS CAN BE FIXED OR ROTATED 360 DEGREES.
11.1 The wheels can be locked by pressing the locking ring when the wheels are in the "forward facing" position. The wheels can rotate freely through 360 degrees when the locking wheel is released.
WARNING Ensure that children are kept away from all moving parts of the pram to avoid risk of injury.
11.2 WARNING Never pull the pram when the swivel wheels are unlocked. The pram may wobble which can lead to a safety risk if you are not cautious and careful.
11.3 The front wheels can be locked in a forward position.WARNING This position of the front wheels shall only be used when the pram is parked. Never push the pram with the wheels locked in forward position.
12) ASSEMBLY OF THE BASKET
1.1 Fasten the 3 buttons on the back around the tube
1.2 - 1.3 Pull the knobs through the holes
CARRYCOT
1) ASSEMBLY OF THE CARRYCOT
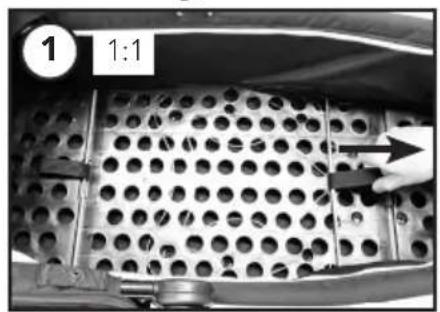
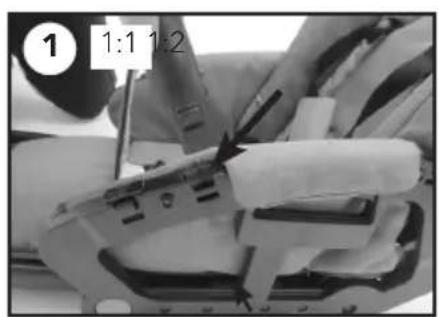
1:1 To erect the carrycot pull the bar using the easy pull handle along the bottom of the carrycot towards the plastic stops. Repeat both in the foot end and the head end.
WARNING Make sure the metal bars are firmly attached to the carrycot frame before the carrycot is erected. If the metal bars are not in place, the fabric may be damaged.
1.2 Remove the mattress from the plastic bag (discard safely)
WARNING Do not use additional mattresses in the carrycot. Use only the Emmaljunga original mattress that comes with the pram.
WARNING Risk of suffocation. Do not let children play with plastic bags.
1.3 Press both buttons on the inside of the hood and pull it up. Attach the apron using the velcro straps on each side of the carrycot.
The hood can be folded up and down in the desired position by pressing both buttons on the inside of the hood.
1.4 The hood is attached to the carrycot with velcro strips.
1.5 For ventilation, open up the Velcro strap on the hood. You can fasten the hood in place by folding under and securing it with the press stud on the inside of the hood.
The ventilation and UV/Insect net on the back of the hood is now visible. (only on certain models)
2) ATTACH THE CARRYCOT
2:1 Put on the brake. Lift the carrycot with the handle and place it onto the frame. Press down so that the carrycot locks into place you will hear a "click" on both sides.
WARNING Always check that the carrycot is properly attached in the locked position on both sides.
2:2 WARNING Never use the carrycot in the position with the hood placed towards the handlebar (see picture).
The hood on the carrycot should always be placed away from the handlebar
3) REMOVE THE CARRYCOT
3:1 Put on the brake. Under the carrycot base, push in the button and pull the handle towards you. Lift the carrycot upwards.
WARNING Always check that the carrycot is properly secured in the locked position on both sides.
3:2 WARNING Always use the carrycot lifting handle as illustrated. This is very important!
WARNING Never leave the carrycot near the stairs, on the top of a table or in places where it can fall off.
WARNING Do not use the carrycot as a cradle outdoors or on uneven surfaces.
WARNING Do not use the carrycot as a bed for your child.
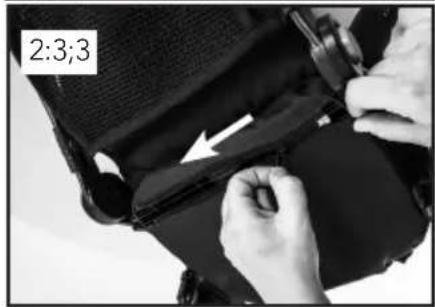
3:3 WARNING Never lift the carrycot with the lifting handle as illustrated. This is very important!
4) INSECT NET (ACCESSORY)
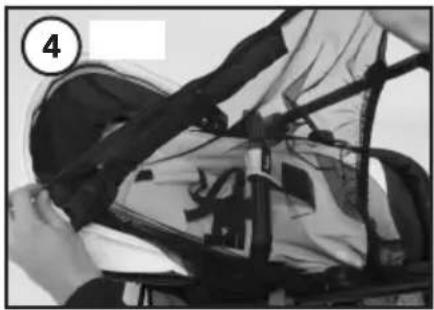
4:1 Attach the Insect net using the zip on the edge of the hood.
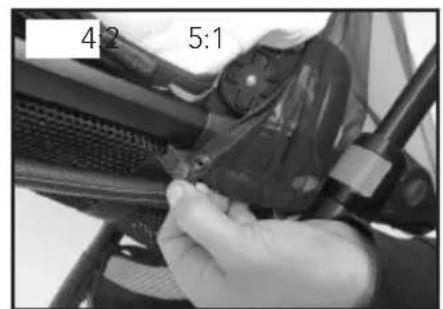
4:2 To secure the insect net fasten the press stud to the inside of the hood (See picture). Repeat on the other side.
5) FOLDING THE CARRYCOT
5.1 Remove the mattress.Pull the bar using the easy pull handle along the bottom of the carrycot. Repeat both in the foot end and the head end.
SEAT UNIT ERGO
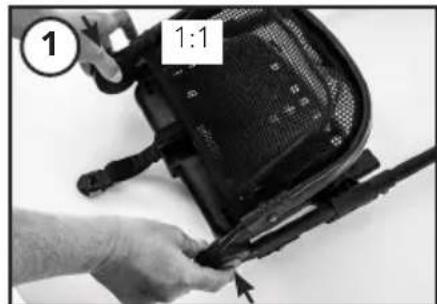
1. ASSEMBLY AND USE OF THE SEAT UNIT
1.1 Seat Frame
Press both buttons on the sides of the footrest to unfold.
1.2 Fold out both seat attachments.
1.3 Place the seat fabric cover over the top edge of the seat frame.
1.4- 1.4.2 Thread the harness strap through the seat fabric and then place the seat fabric around the seat plate. Close the zipper underneath the seat.
1.5 Position the safety straps around the frame and click into the buckle on the back of the backrest. Repeat on the left and right side of the frame.
1.6 Fasten the press studs that secure the fabrics to the frame on both sides.
1.7 Fasten the Velcro straps onto the footrest.
1.8 Click the back rest adjustment handle into the bracket on both sides.
1.9 Thread the strap through the hole in the fabric and fasten around the back rest adjustment handle with the press stud.
1.10 Insert the bumper bar into the brackets on both sides of the seat unit.
1.11 Fasten the crotch strap around the bumper bar.
WARNING It is important that the seat unit fabric is always fitted correctly.
WARNING Never use this product without fully assembling the seat unit fabrics onto the frame first.
WARNING The bumper bar should always be assembled when in use.
WARNING Always check that the bumper bar
is correctly assembled before use.
WARNING Ensure that children are kept away from all moving parts of the pram to avoid risk of injury.
2) ASSEMBLY/USE OF THE HOOD
2.1 Attach the hood onto the seat frame tubes at both sides.
WARNING Pinch point - Danger of trapping.
Please note: If the hood moves up and down on the seat frame tube this can cause scratches. Ensure the seat frame tube is free from dust and dirt.
2.2 Pull the inner fabric over the top of the seat frame and secure with the higher press stud. Repeat for the left and right sides.
2.3 Pull the outer fabric over the top of the seat frame and secure with the lower press stud.
Repeat for the left and right sides (The centre press stud is for use with the optional footmuff/accessories only).
WARNING Ensure that children are kept away from all moving parts of the pram to avoid risk of injury.
WARNING The hood should always be fitted when the pram is in use.
WARNING Never carry the stroller or the seat unit by the hood.
3) ADJUST THE HOOD
3.1 Pull the hood gently forward or backward to the desired position.
For ventilation, roll the fabric flap inwards on the back of the hood. The UV/insect net is now visible.
4) INSECT NET (DELIVERY WITH CHASSIS)
4.1 Attach the Insect net using the zipper on the hood. Pull the elasticated band of the insect net completely over the front foot area. The net is delivered with the chassis.
4.2 Use the press studs to secure the insect net elasticated band onto the seat unit. Repeat on the other side.
5) ASSEMBLY OF THE SEAT UNIT ON THE
CHASSIS
5.1 Click the seat unit into the chassis, making sure it clicks in properly and securely. The seat unit can be attached in the direction of travel or against the direction of travel.
WARNING Ensure that children are kept away from all moving parts of the pram to avoid risk of injury.
WARNING Always check that the seat unit is properly fixed firmly to the chassis before the pram is used.
6) OPEN THE BUMPER BAR
6.1 Unfasten the crotch strap. Press the button on the inside of the bumper bar and open.
7.1 Click the bumper bar into the bracket until you hear a "click".
Fasten the crotch strap around the bumper bar.
WARNING Ensure that children are kept away from all moving parts of the pram to avoid risk of injury.
WARNING The bumper bar should always be assembled when in use.
WARNING Always check that the bumper bar is correctly assembled before use.
8) REMOVING THE SEAT UNIT FROM THE
CHASSIS
8.1 Pull both handles upwards and lift the seat unit off the chassis
WARNING Ensure that children are kept away from all moving parts of the pram to avoid risk of injury.
WARNING Never leave a child in the seat unit when removing the seat unit.
8.2 The seat unit can be adjusted into different positions, lift the handle at the back of the seat unit up and adjust to desired position.
WARNING Always check that the seat unit is in one of the positions by pushing it back until it locks into place.
WARNING Ensure that children are kept away from all moving parts of the pram to avoid risk of injury.
8.3 Press both of the buttons on each side of the frame to adjust the footrest.
Please Note! Maximum weight on the footrest is 3kg.
WARNING Never let your child stand on the footrest.
9) ASSEMBLY OF THE APRON (ACCESSORIES)
9.1 Pull the apron over the footrest.
9.2 Fasten the apron with the press stud on the inside of the hood. Fasten the press studs at the back of the apron to the back of the seat unit.
IMPORTANT! The hood cannot be folded down when the apron is permanently attached to the hood.
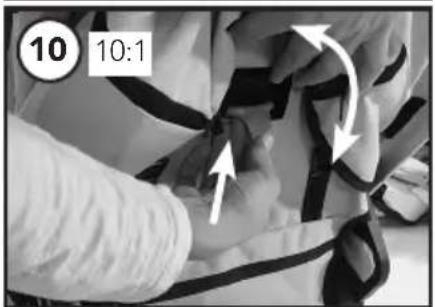
Open the zip in the middle of the apron when taking your child in or out of the pram.
10) REMOVAL OF THE SEAT UNIT FABRIC
10.1 Release the push buttons from the hood, remove the hood from the seat frame,
WARNING The hood must always be assembled when the pram is in use.
10.2 Unbutton the buttons and buckles on each side.
10.3 - 10.4 open the zipper located under the seat, remove the fabric from the seat plate.
10.5 Thread all seat belts through the holes.
10.6 Remove the push button around the folding handle and remove the fabric from the seat frame.
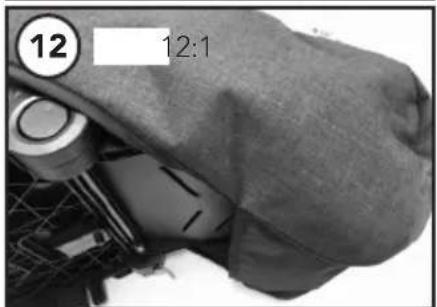
11.1. Assemble the rain cover by placing it over the hood and pull over the carrycot or the seat unit.
11.2. The rain cover has a large window at the top opening that you can open and close with the Velcro fasteners.
11.3. Make sure that the side ventilation windows are always open and free so that ventilation is ensured. Always use rain protection when it is raining or snowing. If the stroller is wet, try to dry it first before using the rain cover. Let the rain cover dry properly before putting it back in its pocket.
5-POINT HARNESS (ERGO)
1) BUCKLE THE CHILD
1.1 Place the 5 harness straps in front of the child so that the child is not sitting on them.
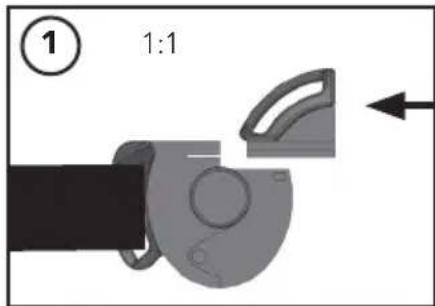
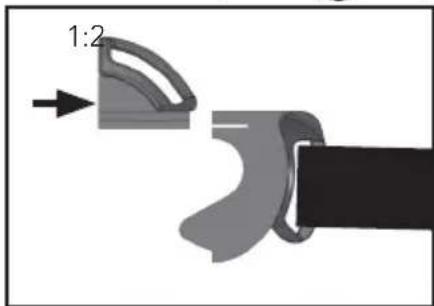
1.2 Assemble the left shoulder and waist straps by sliding the upper left buckle into the lower left buckle until it clicks into place.
1.3 Assemble the right shoulder and hip straps by sliding the upper right buckle into the lower right buckle until it clicks into place.
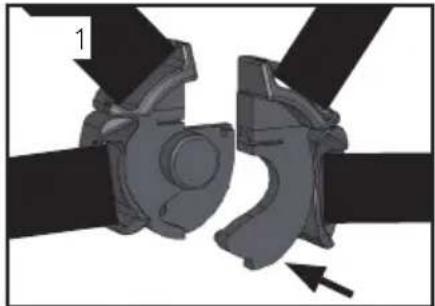
1.4 Click the right buckle over the left buckle until they are held together as a unit. It is very important that they sit together properly and that they cannot be pulled apart.
1.5 Lock the harness with the harness lock on the crotch strap with a "" CLICK "".
WARNING Always check that the belt is properly closed by pulling on it.
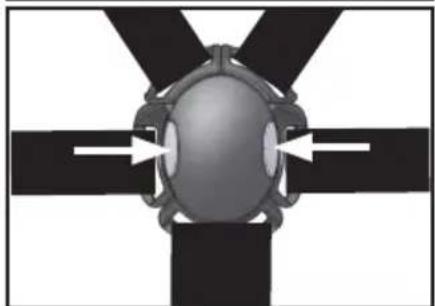
1.6 Adjust the harness using the sliding adjusters (3) on the shoulder and hip belts so that the belt fits snugly on the child's body.
To release the shoulder and waist straps, press in the buttons on the sides of the harness lock.
WARNING Always fasten the child in with the harness when the child is sitting in the stroller. Check that all buckles are correctly fastened and
that the harness is securely assembled in the stroller.
WARNING Never use the seat if parts of the 5-point harness are missing or if the harness is damaged. Always check that the harness is properly closed.
WARNING The 5-point harness contains magnets or magnetic components. Magnets that attract each other or a metallic object in the human body can cause serious injury or death. Seek medical advice immediately if magnets are swallowed or inhaled.
WARNING Medical devices such as implanted pacemakers and defibrillators might contain sensors that respond to magnets and radios when in close contact. To avoid any potential interactions with these devices, keep the harness a safe distance away from your device (more than 15 cm apart). But consult with your physician and your device manufacturer for specific guidelines.
2) CHANGE POSITION OF THE HARNESS
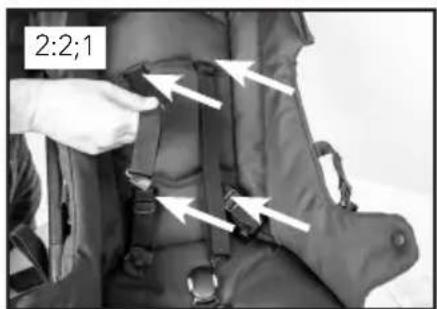
2.1 Shoulder straps, Remove the hood. Remove the shoulder pads. Push the shoulder and hip straps through the holes in the seat cover.
2.2 Open the zipper underneath the seat.Open the press studs that secure the seat fabric over the frame.
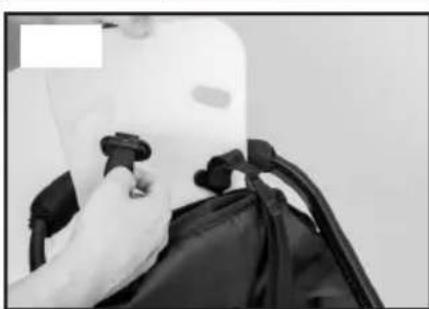
Open the press stud that holds the adjustment handle. Pull the back plate out of the fabric and place the shoulder straps in the desired position in the back plate. Insert the shoulder straps into the seat fabric in the same position. Slide the back plate back into the seat cover.
2.3 - 13.3.3 The Crotch Strap
Pass the crotch strap through the seat cover and the seat plate. Then mount the crotch strap in the desired position in the seat plate and pass the crotch strap in the same position through the fabric. Close the zipper at the bottom of the seat. Close the press studs firmly over the frame on both sides. Thread the strap through the hole in the fabric and secure it around the adjustment handle with the press stud.
Put the shoulder pads onto the shoulder straps.
WARNING Before you use the pram again always check that the seat unit fabric is secure and that all zips are securely and properly fastened
WARNING It is important that the seat unit fabric is always correctly fitted
WARNING Never use the pram without making sure the seat unit fabric is correctly assembled on the frame first.
SEAT UNIT FLAT
1) ASSEMBLY AND USE OF THE SEAT UNIT
1.1 The seat unit is delivered fully assembled. Only the bumper bar and the hood need to be assembled. Insert the bumper bar into the brackets on both sides of the seat until you hear a click.
- 2 Fasten the crotch strap around the bumper bar.
WARNING The bumper bar should always be fitted when using the seat unit.
WARNING Always check that the bumper bar is correctly attached to the seat unit before use.
2) OPEN THE BUMPER BAR
2.1 Unfasten the crotch strap.
2.2 Press the button on the inside of the bumper bar to open
WARNING The bumper bar should always be fitted when using the seat unit.
WARNING Always check that the bumper bar is correctly attached to the seat unit before use.
3) CLOSE THE BUMPER BAR
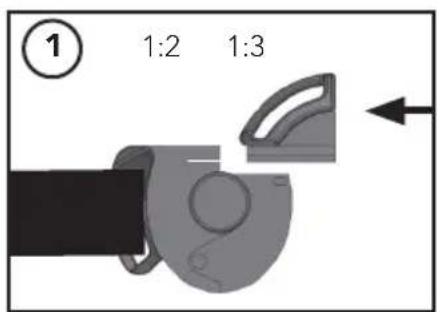
3.1 Click the bumper bar into the bracket until you hear a "click".
3.2 Fasten the crotch strap around the bumper bar.
WARNING Ensure that children are kept away from all moving parts of the pram to avoid risk of injury.
WARNING The bumper bar should always be fitted when using the seat unit.
WARNING Always check that the bumper bar is correctly attached to the seat unit before use.
WARNING Never carry the seat unit/stroller by the bumper bar.
4) ASSEMBLY / USE OF THE HOOD
4.1 Insert the hood in both sides of the seat until you hear a click.
4.2 Secure the back of the hood by using the 3 velcro strips.
You can click Emmaljunga's footmuff (accessory) into place using the eyelets/D-rings behind the backrest.
WARNING Ensure that children are kept away from all moving parts of the stroller to avoid risk of injury.
WARNING Never carry the seat unit/stroller by the hood.
5) ADJUST THE HOOD
5.1 Pull the hood gently forward or backward to the desired position.
6) EXTENDING THE HOOD
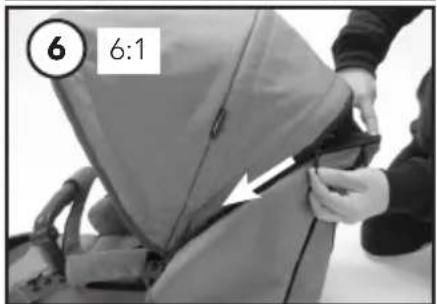
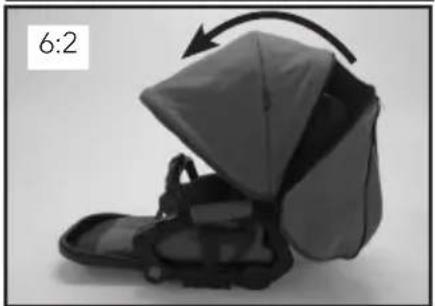
6.1 To extend the hood to protect the child from weather you can open the zip on the hood.
6.2 Pull the hood forward and the hood extends. There is a ventilation and UV/insect net built in the back of the hood (only on certain models). WARNING The hood should always be assembled when the stroller is in use.
IMPORTANT! The hood cannot be folded down when the optional apron is attached to the hood.
7) INSECT NET (DELIVERY WITH CHASSIS)
7.1 Attach the Insect net using the zipper on the hood. Pull the elasticated band of the insect net completely over the front foot area. The Insect net is delivered with the chassis.
7.2 Use the press stud to secure the elasticated band of the insect net onto the seat unit. Repeat on the other side.
7.3 Storage pocket for the Insect net.
8) ATTACH THE SEAT UNIT ON THE CHASSIS
8.1 Click the seat unit into the chassis, make sure it clicks in properly and securely on both sides. The seat unit can be attached in the direction of travel or against the direction of travel.
WARNING Ensure that children are kept away from all moving parts of the pram to avoid risk of injury.
WARNING Always check that the seat unit is securely fixed to the chassis before the pram is used.
WARNING Hold the carrying handles until the seat unit is in place.
9) REMOVAL OF THE SEAT UNIT FROM THE CHASSIS
9.1 Pull both handles on the sides upwards and lift the seat unit off the chassis.
WARNING Ensure that children are kept away from all moving parts of the stroller to avoid risk of injury.
WARNING Never leave a child in the seat unit when removing/attaching the seat unit.
The back rest of the seat-unit can be adjusted into various positions.
Adjust the back rest by squeezing the plastic adjuster together on the back of the seat unit and recline the back rest gently to the desired position. To adjust the back rest into upright position pull the back rest forward.
Open the zippers on both sides of the hood before you put the backrest in the full lying position.
WARNING Ensure that children are kept away from all moving parts of the stroller to avoid risk of injury.
11 ADJUST THE FOOTREST
Pull the grey handle on either left or right side of the footrest to adjust it.
Please Note! Maximum weight on the footrest is 3kg.
WARNING Never let your child stand on the footrest.
WARNING Ensure that children are kept away from all moving parts of the stroller to avoid risk of injury.
12 ASSEMBLY OF THE APRON (ACCESSORIES)
12.1 Pull the apron over the footrest.
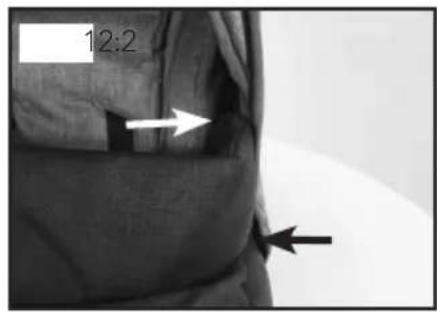
12.2 Fasten the apron with the press studs on the inside of the hood and on the seat frame.
IMPORTANT! The hood cannot be folded down when the apron is attached to the hood.
12.3 Open the zip in the middle of the apron when taking your child in or out of the pram.
13 RAINCOVER (ACCESSORIES)
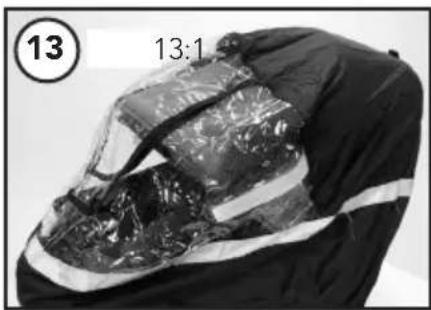
13.1 Assemble the rain cover by placing it over the hood and pull over the carrycot or the seat unit.
13.2. The rain cover has a large window at the top opening that you can open and close with the Velcro fasteners.
13.3. Make sure that the side ventilation windows are always open and free so that ventilation is ensured. Always use rain protection when it is raining or snowing. If the stroller is wet, try to dry it first before using the rain cover. Let the rain cover dry properly before putting it back in its pocket.
14) ASSEMBLY OF THE SEAT UNIT FABRIC
-
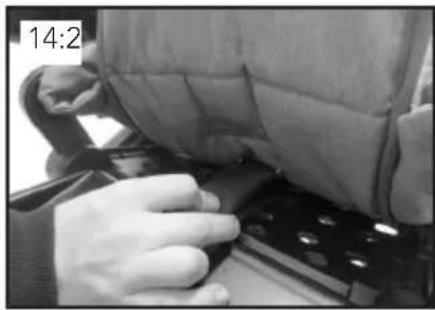
1 Place the seat unit fabric in the seat unit. Thread the shoulder straps through the fabric.
-
2 Thread the crotch strap through the seat fabric (see illustration).
-
3 Thread the waist straps through the seat unit fabric.
-
4 Fasten all of the press studs on the seat unit.
-
5 There are a total of 13 press studs. 5 press studs on each side and 3 on the back.
-
6 Attach the crotch strap by positioning it around the bumper bar and secure it by fastening the press stud.
14.7 Attach the hood into the frame
- 8 Attach the hood in place using the velcro strips attached to the seat unit fabric.
WARNING It is important that the fabric is always correctly fitted. The seat unit should never be used without fully fitting the seat unit fabric.
WARNING Before you use the stroller, check that the seat fabric is secure and that all the zips and press studs are firmly and correctly in place.
WARNING It is important that the seat unit fabric is always assembled correctly.
WARNING Never use this product without fully assembling the seat unit fabrics onto the frame first.
15) REMOVAL OF THE SEAT UNIT FABRIC
15.1 Press the buttons on both sides of the hood and remove the hood from the seat unit.
15. 2 Open the press studs on the seat unit and on the footrest.
15. 3 Take out the harness straps through the holes in the fabric.
15. 4 Take out the crotch strap completely from the fabric remove the seat unit.
WARNING The hood must always be assembled when the pram is in use.
5-POINT HARNESS (FLAT)
1) BUCKLE THE CHILD
Adjust the 5-Point Harness
1.1 Place the 5 harness straps in front of the child so that the child is not sitting on them.
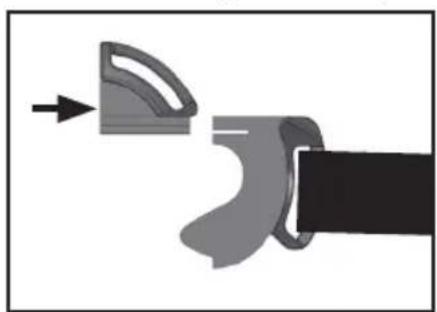
1.2 Assemble the left shoulder and waist straps by sliding the upper left buckle into the lower left buckle until it clicks into place.
1.3 Assemble the right shoulder and hip straps by sliding the upper right buckle into the lower right buckle until it clicks into place.
1.4 Click the right buckle over the left buckle until they are held together as a unit. It is very important that they sit together properly and that they cannot be pulled apart.
1.5 Lock the harness with the harness lock on the crotch strap with a "CLICK"
WARNING Always check that the belt is properly closed by pulling on it.
1.6 Adjust the harness using the sliding adjusters (3) on the shoulder and hip belts so that the belt fits snugly on the child's body.
WARNING Always fasten the child in with the harness when the child is sitting in the stroller. Check that all buckles are correctly fastened and that the harness is securely assembled in the stroller.
2) CHANGE POSITION OF THE HARNESS
2.1 Remove the seat unit fabric as described under point 15.
Shoulder straps
2.2. Unfasten the shoulder strap attachments from the rest of the harness.
2.3. Pull the shoulder straps backwards through the back part of the seat and reinsert them into the other opening to the front.
2.4 Refasten the shoulder strap fastener to the harness waist strap.
Repeat this step on the other side.
The Crotch Strap
2.5 Unfasten the crotch strap attachment from the rest of the harness and guide the crotch strap down through the seat plate.
2.6. Insert the strap through the other opening and refasten the harness. Reassemble the cover as described under point 14.
IMPORTANT Ensure that the shoulder straps and crotch straps are correctly fastened.
WARNING Before you use the pram again always check that the seat unit fabric is secure and that all press studs are securely and properly fastened.
WARNING It is important that the seat unit fabric is always correctly fitted
WARNING Never use the pram without making sure the seat unit fabric is correctly assembled on the frame first.
CARE & MAINTENANCE
GENERAL CARE AND MAINTENANCE
INSTRUCTIONS
- Never expose your pram to excessive sunlight for long periods of time.
• Always use a raincover when it is snowing or raining. - Never store your pram in cold and/or damp places.
- Should the chassis become wet, dry it off promptly. Make sure vehicle is completely dry before storing.
- If the pram is used near the ocean or salted roads, spray the chassis with a hose, and dry.
- Be careful during transportation and storage as the surface of the chassis is fragile. Scratches that arise after the sale are not a justifiable complaint.
ROUTINE INSPECTION
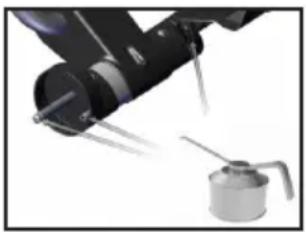
- Regularly clean the chassis and metal parts of the vehicle, dry off and lubricate thereafter all joints. WARNING! Do not lubricate the telescopic bar. Spokes and rims on all wheels should frequently be washed in hot water and wiped off with a dry cloth. When the pram is used during the winter time, cleaning of the pram should be done at least once a week. Lack of maintenance could cause rust.
- Clean the shafts (clean axles with a cloth).
natural_image
Close-up of a robotic arm with forceps lifting a cylindrical component (no visible text or symbols)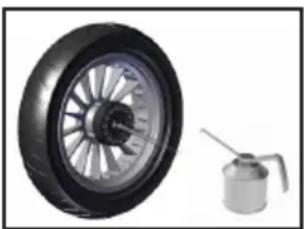
natural_image
Two automotive wheel components: a full wheel with spokes and a gas cylinder (no text or symbols visible)IMPORTANT INFORMATION LEATHERETTE
- Never use disinfectant liquid or Hand Sanitiser gel on the Leatherette handle bar as it may cause permanent stains and damage to the Leatherette surface.
- Make sure Leatherette is kept clean by washing with mild soap and water. Always dry your hands after disinfecting or sanitising before touching the handle bar.
- Never use Velcro straps (eg changing bags, organisers) on Leatherette handle bars as this can damage the surface..
Air Wheels
- If you need to inflate the tyre, use an air pump with an adapter for a car.
- For air pressure see marking on the tyre. Please neglect possible travel direction marks on the tires.
- The tyres are assembled in the factory. Any
balancing problems can be easily adjusted by releasing the air and setting the tyres correctly on the rim and inflating to the correct pressure.
- With ozone and UV radiation the tyres may have small cracks. It does not affect handling and safety, and is not a complaint basis.
WARNING
Tyres can when in contact with PVC-flooring or other plastic materials cause discoloration. Always use wheel protection if the pram/stroller is stored on delicate surfaces.
Check that:
- all chassis locking devices, seat unit and carrycot are functioning properly.
- all rivets, nuts and bolts are firmly tightened and not broken.
- all plastic parts are not cracked or broken.
- the wheel bearings are in a good condition.
- all zips and velcro straps are securely fastened.
- all elastic straps are in a good condition.
- the brake works.
- the tyre air pressure is correct (see marking on tyre).
- check regularly for damage to the chassis, carrycot and seat unit.
PLEASE NOTE
- When in need of servicing with original parts and other technical issues that require a professional evaluation, Always get in touch with the store where you purchased your product.
- The product you have chosen follows the guarantee regulations.
- The parking brake consists of moving parts and requires regular maintenance to function correctly.
- To ensure effective functioning always make sure that the parking brake is well lubricated.
- Immediately remove sand, snow, ice and dirt from any moving part of the braking system.
- Use a silicon or oil based lubricant to lubricate the brake pedal, wheel axle and brake pins on both sides of the pram brake at least once a month. Also lubricate the release mechanism on the wheels on a similarly regular basis.
- If you use your Emmaljunga pram/stroller eg. on sandy beaches or under other dirty and wet conditions make sure to take extra care of the parking brake and maintain the braking system and wheels as detailed above whenever needed.
WASHING INSTRUCTIONS
Hood:
Take off and extend the hood. Shower the hood from the inside (interior fabric) with lukewarm water. Use mild liquid soap as detergent.
Cleanse it thoroughly. Drip dry the fully extended hood.
Seat fabric and 5-point harness:
Remove the seat fabric from the chassis and remove the wooden seat board from the seat unit fabrics. Hand wash seat fabrics in lukewarm water. Use mild liquid soap as detergent. Cleanse thoroughly. Drip dry the seat fabric. Only wipe the nylon straps and plastic parts clean with a damp cloth. Do not hand wash. Make sure the harness is dry before reassembly.
Mattress
We recommend hand washing, drip dry.
Carrycot:
Remove hood and mattress. Wipe the exterior fabric and the interior nonwoven material, clean with a damp cloth. Do not hand wash. Dry the pram body in its fully extended position.
General Information
Ironing: If any fabric part needs to be ironed, always use a 100 % cotton cloth in-between the iron and the fabric to protect the fabric surface. Iron the exterior fabrics (100 %) polyester and the interior fabrics on gentle heat (110°C on the iron).
Make sure all parts are completely dry before reassembly. Check all seams, edges and zips
You may apply a material protector on the exterior fabric after washing. Always apply before reassembly.
WARNING
Do not place your child/children in the stroller for at least 24 hours after applying a material protector. Reassemble after washing
WARNING
Make sure all parts are assembled correctly according to the instructions in this manual.
Emmaljunga®
Service Documentation - NXT SELECT
Your pushchair requires regular care and maintenance. We recommend that you have your product serviced regularly, following the suggested service intervals in order for you to take full advantage of and maintain the quality of the product and to minimize the effects of wear and tear.
Always take your product to an authorised Emmaljunga retailer to carry out the service. After every service you will receive a report covering what has been inspected and checked together with a note stating the date on which
the service has been carried out.
Before the pram is sent from the factory it has undergone regular checks and testing. Another check is completed before the product is given to you to ensure that it fulfills all safety and quality requirements.
In addition to the regular service by your authorised retailer it is very important that you also check and maintain the product. You can find out more about this under the care and maintenance section in the product manual.
Chassis number
Delivery control
0

6 month service
Date, stamp
6
Customer name, signature
12 month service
Date, stamp
12
Customer name, signature

24 month service
Date, stamp
24
Customer name, signature Customer name, signature
36 month service
Date, stamp
36
1. Check that the following items are present in the correct numbers:
Chassis
□ 1 pc Folded chassis
□ 1 pc Tray/Basket
□ 2 pc Swivel wheels
□ 2 pc Wheels
□ 2 pc Axle shafts
☐ 1 pc Instruction manual
Carrycot
□ 1 pc Carrycot
□ 1 pc Apron for carrycot
□ 1 pc Mattress
Seat unit Ergo
☐ 1 pc Seat unit Ergo with seat unit fabrics incl 5-point harness
□ 1 pc Hood
□ 1 pc Bumper Bar
Seat unit Flat
☐ 1 pc Seat unit Flat with seat unit fabrics incl 5-point harness
□ 1 pc Hood
□ 1 pc Bumper Bar
2. Check the functions of the chassis/seat unit/carrycot:
□ Unfold the chassis.
☐ Check the function of the chassis, that the two locking clips lock properly on both sides.
☐ Check that the seat/carrycot click on the chassis and it locks on both sides.
☐ Check the 5 point safety harness on the seat unit by checking that it locks into place.
☐ Check the telescopic height adjustment by lifting/pulling the handle up and down, the handlebars should be checked that they lock in each position.
☐ Check that the back rest can be adjusted and locked into each position.
☐ Check that the footrest on the seat unit can be adjusted and locked into each position.
3. Wheels and brakes:
□ Lubricate the ends of the axles.
☐ Attach the wheels and make sure that the wheels lock into position.
☐ Check that the parking device locks both rear wheels when engaged.
4. Overall inspection of the product:
☐ Check that all rivets, screws and nuts are securely fastened.
☐ Check that all press studs and zips on the seat fabrics and the tray/basket are correctly and securely attached.
☐ Make sure that there are no other visible differences on the chassis, seat fabrics, tray/basket and wheels.
Emmaljunga®
Service Protocol - NXT SELECT
| Service | 6 mon | 12 mon | 24 mon | 36 mon |
| Chassis/seat unit/carry cot functionCheck the function of the chassis, that the two locking clips lock properly on both sides. | ||||
| Check that the seat/carrycot click on the chassis and it locks on both sides. | ||||
| Check the 5 point safety harness on the seat unit by checking that it locks into place. | ||||
| Check the telescopic height adjustment by lifting/pulling the handle up and down, the handlebars should be checked that they lock in each position. | ||||
| Check that the back rest can be adjusted and locked into each position. | ||||
| Check that the footrest on the seat unit can be adjusted and locked into each position. | ||||
| Wheels and brakesAttach the wheels and make sure that the wheels lock into position. | ||||
| Check that the parking device locks both rear wheels when engaged. | ||||
| Visual overviewCheck that all rivets and screws are tightened correctly | ||||
| Check that all press studs and zippers are intact and correctly fastened | ||||
| Check for any other visible deviations on the chassis, fabrics, tray/basket and wheels | ||||
| LubricationClean and lubricate the wheels, axles, chassis locks, footrest and the safety catch |
Other notes (further adjustments or changed details)
natural_image
Close-up of a robotic arm with forceps lifting a cylindrical component (no visible text or symbols)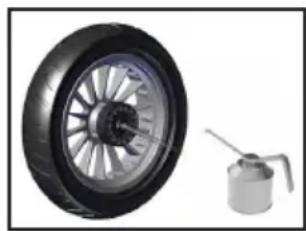
natural_image
Exterior view of a bicycle steering wheel and its fuel injector (no text or symbols visible)Chassis/seat unit/carry cot function
natural_image
Close-up of a robotic arm with forceps and a small cylindrical component (no visible text or symbols)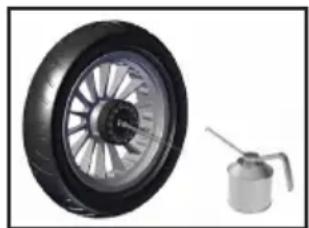
natural_image
Two small mechanical components: a wheel with spokes and a gas can (no text or symbols visible)WASCHANLEITUNG Dach
PLEJE OG VEDLIGEHOLD
ALMINDELIGE PLEJERÅD 119
PLEJE OG VEDLIGEHOLD
ALMINDELIGE PLEJERÅD
natural_image
Close-up of a robotic arm with forceps and a cylindrical component, no visible text or symbols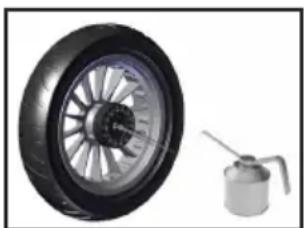
natural_image
Two small mechanical components: a wheel with spokes and a gas cylinder (no text or symbols visible)VIGTIG INFORMATION KUNSTLÆDER
12.1 Tõmmake jalakate jalatoe peale.
natural_image
Close-up of a robotic arm handling a small metallic object with a probe inserted (no visible text or symbols)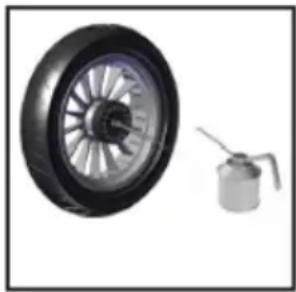
natural_image
Two small mechanical components: a wheel with spokes and a gas cylinder (no text or symbols visible)TÄHTIS TEADE! KUNSTNAHK
natural_image
Close-up of a robotic arm handling a small cylindrical component (no visible text or symbols)
natural_image
Two small mechanical components: a wheel with spokes and a gas cylinder (no text or symbols visible)WARNING Never carry the stroller or the seat unit on the hood.
3) KUOMUN ASENTAMINEN
Pull the grey handle on either left or right side of the footrest to adjust it.
(TARVIKKEET/JOTKUT MALLIT)
natural_image
Close-up of a robotic arm handling a small cylindrical object with a pointed tip (no visible text or symbols)
natural_image
Two small mechanical components: a wheel with hub and a gas cylinder (no text or symbols visible)HUOMAA
PLEIE OG VEDLIKEHOLD
GENERELLE PLEIERÅD 207
JEVNLIG TILSYN 207
VIKTIG INFORMASJON KUNSTSKINN 208
VASKERÅD: 208
CHASSI NXT90
1) MONTERING AV UNDERSTELLET
1.1 SLÅ OPP UNDERSTELLET.
PLEIE OG VEDLIKEHOLD
GENERELLE PLEIERÅD
natural_image
Close-up of a robotic arm handling a cylindrical tool, with no visible text or symbols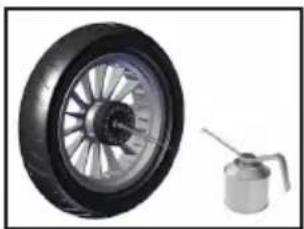
natural_image
Two small mechanical components: a wheel with spokes and a gas can (no text or symbols visible)VASKERÅD:
Kalesje:
1) MONTÁŽ PRENOSNEJ VANIČKY
natural_image
Close-up of a robotic arm with metal components and a small cylindrical device (no visible text or symbols)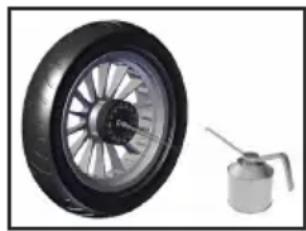
natural_image
Two small mechanical components: a wheel with spokes and a gas cylinder (no text or symbols visible)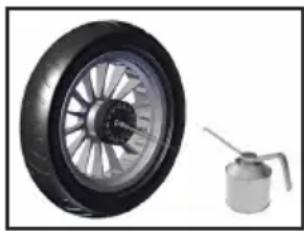
natural_image
Two small mechanical components: a wheel with spokes and a gas cylinder (no text or symbols visible)Emmaljunga®
TAGHRIF IMPORTANTI DWAR IS-SIGURTÀ
Dan il-prodott jikkonforma ma' EN 1888-1:2018, EN1888-2:2018, EN 1466:2014. Il-bejgh jew il-kummerčjalizzazzjoni tal-prodott barra mill-UE u l-pajjiži tal-EFTA mhuwiex permess. Jekk jogħgbok żur www.emmaljunga.com għall-aktar verzjoni riċenti ta' dan il-manwal qabel ma tuża l-prodott. IMPORTANTI - AQRA L-ISTRUZZJONIJIET TAJJEB QABEL TUŻA U ŻOMMHOM GĦAL REFERENZA FUTURA. Is-sigurtà tat-tifel/tifla tiegħek tista' tigi affettwata jekk ma ssegwix dawn l-istruzzjonijiet. DEJJEM AQRA FLIMKIEN MAL-MANWAL KORRISPONDENTI (Chassis, Carrycot, Sedil, Aċcessorji)
TWISSIJA
• Qatt thalli t-tfal wahedhom
- Žgura ruħek li l-apparati li jinqaflu jkunu mdahħlin f'posthom qabel tużahom
- Biex tevita xi korriment żgura ruħek li t-tfal ma jkunix ħdejk meta tiftaħ u titwi dan il-prodott
- Thallix lit-tfal jilagħbu b'dan il-prodott
- Uza ć-ćinga appena t-tfal jibdew joqogħdu bilqiegħda waħedhom
- Dan it-tip ta' siggu m'hux addattat biex joqoghdu tfal taht is-6 xhur
- Dejjem uża s-sistema ta' trażzin
- Icčekkja li l-apparati li jinqaflu jkunu mdahhlin sewwa wara li tkun poggejthom f'posthom fil-pramm jew f'xi tip ta' siggu ghat-tfal
• Dan il-prodott m'hux tajjeb ghall-ğiri jew ghalliskejzjar
Twissija skont EN1888-2:2018
TWISSIJA
- Inti responsabbli ghas-sigurtà tat-tifel/tifla.
- It-tfal ghandhom ikunu marbutin kull hin u qatt m'ghandhom jithallew wahedhom minghajr supervizjoni.
- lt-tifel/tifla m'ghandhomx ikunu f'pożizzjoni li jinqabdu f'partijiet li waqt li jsiru l-aġgustamenti.
- Il-vettura tehtieg manutenzjoni regolari mill-utent.
- It-taghbija žejda, it-tiwi skorrett u Ī-užu ta' ačessorji
mhux approvati jistghu jikkawzaw hsara lit-tifel/ tfal tieghek u/jew jaghmlu l-hsara lill-vettura jew ikkissruha.
WAZNE INFORMACJE O WADZE & O PRZYSTOSOWANIU
natural_image
Aerial view of a large industrial complex surrounded by autumn-colored trees and roads (no visible text or signage)Made in Emmaljunga / Sweden
- INSTRUCTION AND SERVICE MANUAL
- Box: Chassis NXT60:
- Box: NXT Carrycot 3.0
- Box: NXT Ergo 3.0
- Box: NXT Flat 3.0
- Chassis NXT90
- Chassis NXT60
- Carrycot
- Seat Unit Ergo
- 5-Point Harness (Ergo)
- Seat Unit Flat
- 5-Point Harness (Flat)
- VIKTIG SÄKERHETSINFORMATION
- REGELBUNDEN ÖVERSYN
- Chassits/Liggdelen/Sittdelens funktion.
- IMPORTANT SAFETY INFORMATION
- IMPORTANT — READ THE INSTRUCTIONS CAREFULLY BEFORE USE AND KEEP FOR FUTURE REFERENCE
- WARNING
- IMPORTANT INFORMATION - COMPATIBILITY
- CHASSIS
- SEAT
- ACCESSORIES
- Parking /Folding / Storage
- Care, Maintenance, Spare parts
- General
- Table of Contents 1/2
- CHASSI NXT90
- Table of Contents 2/2
- CARE & MAINTENANCE
- 1) ASSEMBLY OF THE CHASSIS
- 2) ASSEMBLY OF THE REAR WHEELS
- 3) ASSEMBLY OF THE FRONT WHEELS
- 4) FOLDING THE CHASSIS
- 5) REMOVING THE REAR WHEELS
- 6) REMOVING THE FRONT WHEELS
- 9) ADJUST THE ANGLE OF THE HANDLE
- 10) ADJUSTING THE TELESCOPIC HANDLE
- 11) THE FRONT WHEELS CAN BE FIXED OR ROTATED 360 DEGREES.
- 12) ASSEMBLY OF THE BASKET
- CHASSI NXT60
- 2) ASSEMBLY OF THE BACK WHEELS
- 1) ASSEMBLY OF THE CARRYCOT
- 2) ATTACH THE CARRYCOT
- 3) REMOVE THE CARRYCOT
- 4) INSECT NET (ACCESSORY)
- 5) FOLDING THE CARRYCOT
- ASSEMBLY AND USE OF THE SEAT UNIT
- Seat Frame
- 2) ASSEMBLY/USE OF THE HOOD
- 3) ADJUST THE HOOD
- 4) INSECT NET (DELIVERY WITH CHASSIS)
- 5) ASSEMBLY OF THE SEAT UNIT ON THE
- 6) OPEN THE BUMPER BAR
- 8) REMOVING THE SEAT UNIT FROM THE
- 9) ASSEMBLY OF THE APRON (ACCESSORIES)
- 10) REMOVAL OF THE SEAT UNIT FABRIC
- 1) BUCKLE THE CHILD
- 2) CHANGE POSITION OF THE HARNESS
- 1) ASSEMBLY AND USE OF THE SEAT UNIT
- 2) OPEN THE BUMPER BAR
- 3) CLOSE THE BUMPER BAR
- 4) ASSEMBLY / USE OF THE HOOD
- 5) ADJUST THE HOOD
- 6) EXTENDING THE HOOD
- 7) INSECT NET (DELIVERY WITH CHASSIS)
- 8) ATTACH THE SEAT UNIT ON THE CHASSIS
- 9) REMOVAL OF THE SEAT UNIT FROM THE CHASSIS
- ADJUST THE FOOTREST
- ASSEMBLY OF THE APRON (ACCESSORIES)
- RAINCOVER (ACCESSORIES)
- 14) ASSEMBLY OF THE SEAT UNIT FABRIC
- 15) REMOVAL OF THE SEAT UNIT FABRIC
- GENERAL CARE AND MAINTENANCE
- INSTRUCTIONS
- ROUTINE INSPECTION
- IMPORTANT INFORMATION LEATHERETTE
- Air Wheels
- Check that:
- PLEASE NOTE
- WASHING INSTRUCTIONS
- Hood:
- Seat fabric and 5-point harness:
- Mattress
- Carrycot:
- General Information
- Emmaljunga®
- Check that the following items are present in the correct numbers:
- Check the functions of the chassis/seat unit/carrycot:
- Wheels and brakes:
- Overall inspection of the product:
- Chassis/seat unit/carry cot function
- WASCHANLEITUNG Dach
- PLEJE OG VEDLIGEHOLD
- ALMINDELIGE PLEJERÅD
- VIGTIG INFORMATION KUNSTLÆDER
- TÄHTIS TEADE! KUNSTNAHK
- (TARVIKKEET/JOTKUT MALLIT)
- HUOMAA
- PLEIE OG VEDLIKEHOLD
- 1) MONTERING AV UNDERSTELLET
- GENERELLE PLEIERÅD
- VASKERÅD:
- Kalesje:
- 1) MONTÁŽ PRENOSNEJ VANIČKY
- TAGHRIF IMPORTANTI DWAR IS-SIGURTÀ
- TWISSIJA
- WAZNE INFORMACJE O WADZE & O PRZYSTOSOWANIU
Brand : Emmaljunga
Model : NXT60 FLAT
Category : Stroller