D 62 EU - Dishwasher INDESIT - Free user manual and instructions
Find the device manual for free D 62 EU INDESIT in PDF.

| Product Type | Freestanding Dishwasher |
| Brand | Indesit |
| Model | D 62 EU |
| Dimensions (W x D x H) | 60 x 60 x 85 cm |
| Capacity | 12 standard place settings |
| Water Pressure Range | 20 kPa – 1 MPa (0.2 – 10 bar) |
| Power Voltage | See rating plate (typically 220-240 V) |
| Total Absorber Power | See rating plate (typically 1900-2100 W) |
| Fuse | See rating plate (typically 10-13 A) |
| Wash Cycles | Heavy Duty, Daily Wash, Rinses, Quick Wash 25', Soak |
| Temperature Boost Button | 65°C for cycles 1 & 2 |
| Water Softener | Adjustable salt consumption based on water hardness |
| Rinse Aid Dispenser | Adjustable dosage (6 settings, default 4) |
| Detergent Dispenser | Two compartments for pre-wash and main wash |
| Filter System | Semi-circular filter, microfilter, cup; clean monthly |
| Spray Arms | Top and bottom, removable for cleaning |
| Salt Container Capacity | Approx. 2 kg |
| Low Salt Indicator Light | Yes |
| Anti-Flood Protection | Yes (system stops water supply in case of leak) |
| Installation | Built-in capable (kit provided) or freestanding |
| Water Connection | Cold water standard; hot water up to 60°C possible |
| Drain Hose Length | Sufficient for installation; plastic elbow provided |
| Noise Level | Not specified (estimated ~52 dB) |
Frequently Asked Questions - D 62 EU INDESIT
User questions about D 62 EU INDESIT
0 question about this device. Answer the ones you know or ask your own.
Ask a new question about this device
Download the instructions for your Dishwasher in PDF format for free! Find your manual D 62 EU - INDESIT and take your electronic device back in hand. On this page are published all the documents necessary for the use of your device. D 62 EU by INDESIT.
USER MANUAL D 62 EU INDESIT
Installation and use
Oppvaskmaskin
GB Dishwasher 1 Instructions for installation and use
Safety, a good habit to get into
WARNING
Read the instructions contained in this manual carefully, as they will provide you with important information on safety when installing, using and servicing your appliance.
CE This dishwasher conforms to the following European Community Directives:
- 73/23/EEC of 19/02/73 (Low Voltage) and subsequent modifications;
- 89/336/EEC of 03/05/89 (Electromagnetic Compatibility) and subsequent modifications.
-
Remove the packaging carefully and dispose of it.
-
After removing the packaging, check to make sure your appliance is intact. If in doubt, contact a qualified professional.
-
This dishwasher must only be used by adults and for washing household dishes.
-
Essential rules you should follow when using your appliance:
- do not touch the appliance with wet hands or feet or barefoot,
- we advise against the use of extension leads and multiple plugs,
- during installation, the power supply wire must be completely free of bends or large dangerous kinks,
- if the appliance is not operating properly or if maintenance
operations are necessary, disconnect the dishwasher from the mains power supply.
-
Keep children away from the dishwasher when it is open and keep detergents out of their reach.
-
Your dishwasher is not to be installed outdoors, not even if the area is covered by a roof, and it is extremely dangerous to leave it exposed to rain and thunderstorms.
-
Do not touch the heating element during or straight after a wash cycle.
-
Do not lean or sit on the door when it is open, as this could overturn the dishwasher.
-
If the appliance malfunctions, turn off the water inlet tap and disconnect the plug from the wall socket. Then try to consult the chapter entitled "Is there a problem?" and if you can't find a solution there, then call for assistance.
-
Once taken out of use, appliances must be made inoperable, by cutting the power supply wire and damaging the door lock.
To guarantee the efficiency and safety of this appliance:
● only contact authorised technical assistance service centres
● always ask that original spare parts be used
Close-up view (control panel)
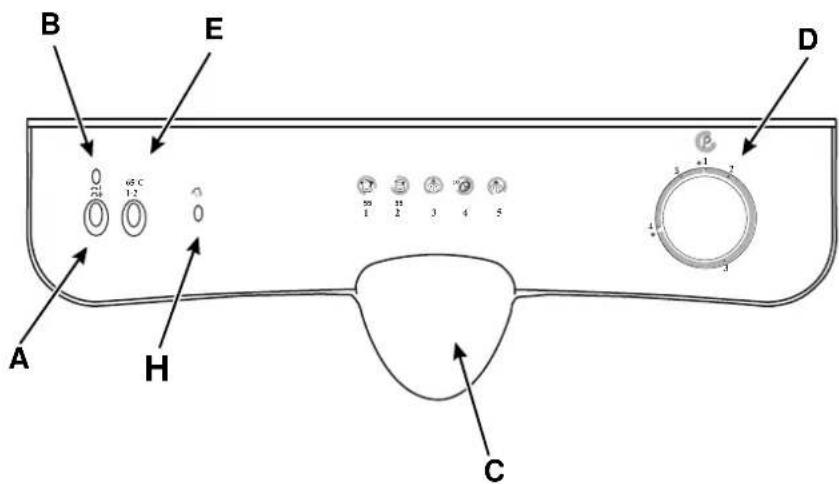

ON-OFF Button

ON-OFF Indicator light

Door opening handle

Cycle selection knob

"65°C" button

Low salt indicator light
Close-up view (Inside)
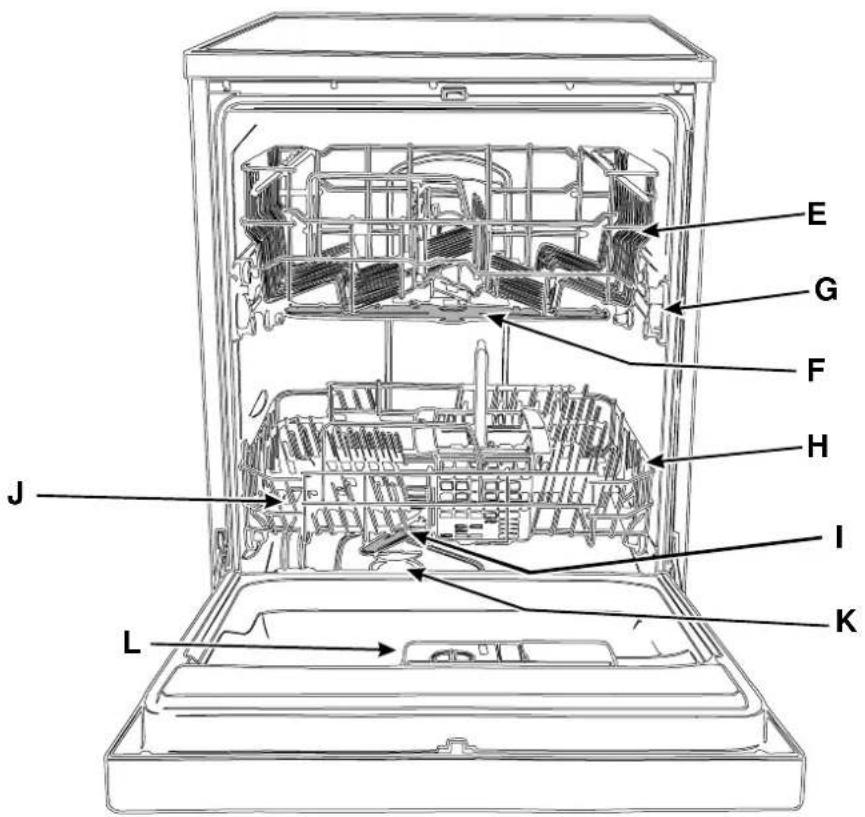

Upper rack

Top sprayer arm

Rack height adjuster

Lower rack

Bottom sprayer arm

Salt container cap

Washing filter

Detergent and rinse aid dispenser
Technical characteristics
| Width cm. 60 |
| Depth cm. 60 |
| Height cm. 85 |
| Capacity 12 standard place settings |
| Mains water pressure 20 KPa÷ 1MPa (0,2 ÷10 bar) |
| Power voltage See data plate |
| Total absorber power See data plate |
| Fuse See data plate |
Salt ...
Salt
Water hardness varies according to where you live. If hard water were to enter your dishwasher, scaly incrustations would form on your dishes.
Thanks to a water softener which uses special dishwasher salt, the limescale in the water is eliminated.
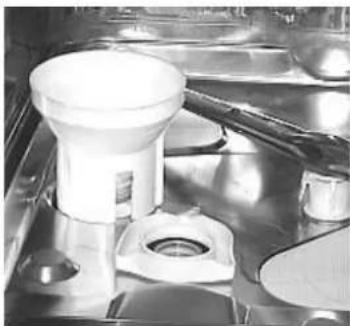
Loading salt into the water softener
Always use salt which is intended for dishwasher use.
The salt container is situated underneath the lower rack and should be filled up as follows:
-
Pull out the lower rack completely, unscrew and remove the container cap.
-
If it is the first time you load the salt container, fill it up with water.
-
Put the funnel provided on the hole and pour in approximately two kilos of
salt. It is normal if some water comes out of the container.
- Screw the cap back in place carefully.
natural_image
Close-up of a kitchen appliance with a white funnel and metal bowl (no visible text or symbols)The salt container should be filled up when the "low salt" indicator light on the control panel comes on.
Warning: To prevent rust from forming, load the salt just before beginning a wash cycle.
Adjusting the salt consumption
Your dishwasher can adjust its salt consumption according to the hardness of the water used in order to optimise and customise the dishwasher's salt consumption to the minimum level necessary.
You can find out what the level of water hardness in your area is from the company that supplies the water there.
To make the adjustment, follow the instructions below:
natural_image
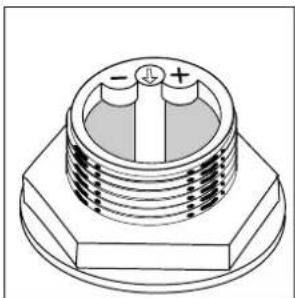
Technical line drawing of a mechanical component with concentric layers and mounting holes (no text or symbols)- unscrew the salt container cap
- there is an arrow on the neck of the container (see figure on the right); if necessary, turn the arrow anti-clockwise from the "-" setting to the "+" setting according to the hardness of the water supplied.
We recommend you make the adjustment according to the following table:
| Water Hardness | |||||
| Clarke degrees | °dH mmol/l | Selector position | Salt consumption (grams/-cycle) | Autonomy (cycles\2-kg) | |
| 0,140 | 170,1,7/0/ | ||||
| 14,3618 | 441,8 | 4,4 "-" 20 | 60 | ||
| 36,7145 | 894,5 | 8,9 | MED | 40 40 | |
| >71 | >89 | >8,9 | "+" | 60 | 25 |
Detergent and rinse aid ....
The detergent
Only use specific dishwasher detergents. The detergent dispenser must be filled before each wash cycle begins according to the instructions given in the "Wash cycle table". The detergent dispenser is situated on the inside of the appliance door.
Loading the detergent
To open lid "A", press button "B". The detergent should be poured into the two containers "C" and "D" up to the rim. After pouring in the detergent, replace the lid, pressing down until it clicks.
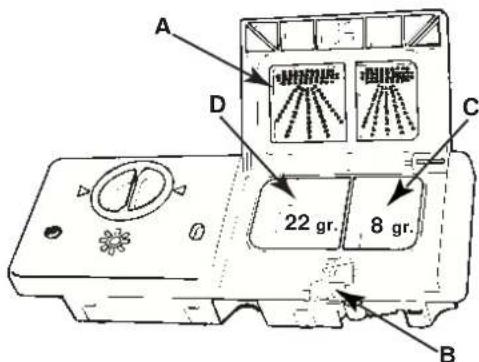
Dishwasher detergent in tabs is now available on the market, in which case you should place one tab into container "D" and replace the lid.
If you use powder or liquid detergent, you can also fit the 2 plugs provided in the two special housings in lid "A", before closing the latter. This way, your dishes will come out cleaner
Warning: to make sure the lid shuts properly, remove any detergent residue from the edges of the container before closing it.
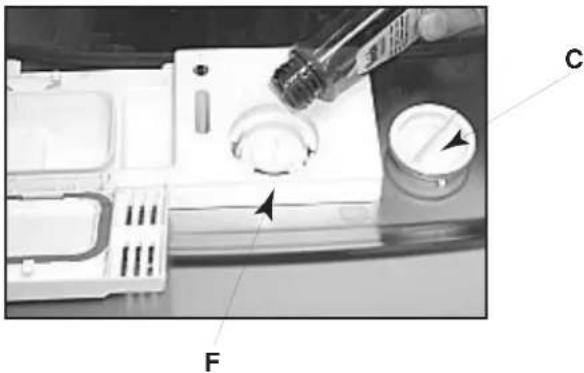
The rinse aid
This product makes dishes sparkle more and it improves their drying. The rinse aid container is situated on the inside of the door; you should fill it up on average every 80 wash cycles (if your dishwasher is provided with the "low rinse aid" indicator light, then fill it up when the latter comes on).
Loading the rinse aid
To open the dispenser, turn cap "C" anticlockwise and take care when you pour in the rinse aid to avoid it overflowing. You can adjust the amount of rinse aid used by the dishwasher, by using a screwdriver to regulate the dosage adjuster "F" you will find under lid "C". There are 6 possible settings; it is normally set to 4.
Important:
Adjusting the rinse aid supply improves drying.
If drops of water remain on the dishes or spotting occurs, turn the dosage adjuster to a higher setting. If, on the other hand, the dishes have white streaks, then turn the dosage adjuster down to a lower setting.
Loading the dishes
Before placing the dishes in the racks, remove the largest scraps of food left over on your plates, you will thus avoid blocking the filter, which would reduce the efficacy of the wash.
If the saucepans and frying pans are very dirty, allow them to soak before being washed.
You will thus avoid having to wash them again.
To make it easier to load your dishes, pull the racks out fully.
How to use the lower rack
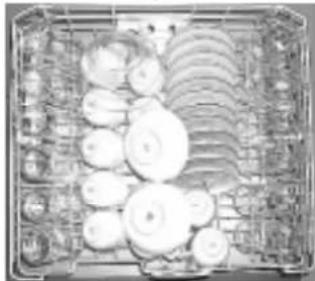
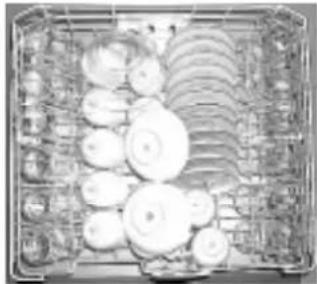
We recommend you place the most difficult dishes to wash into the lower rack:
pans, lids, dinner plates and soup plates as illustrated in the figure to the left.
Serving dishes and large lids should preferably be placed on the sides of the rack, without for that matter obstructing the rotation of the top sprayer arm.
- pans, salad bowls etc. must always be placed upside down - very deep dishes should be placed obliquely, thus allowing water to run down them freely.
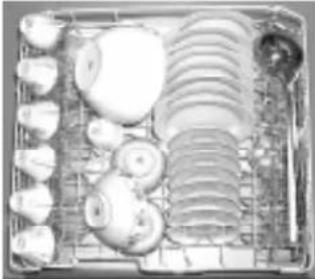
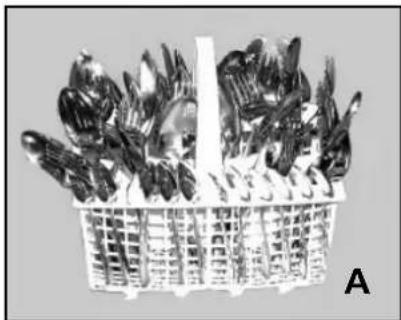
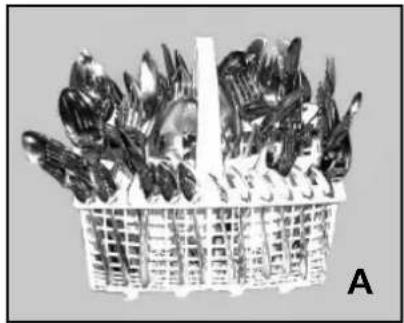
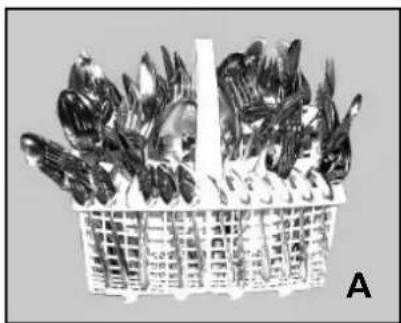
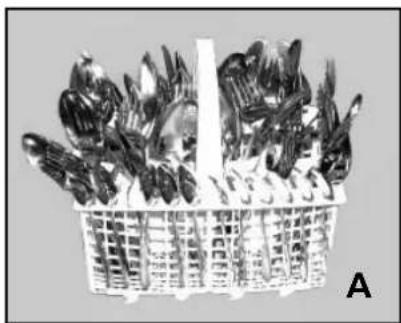
- Place the cutlery with the handles at the bottom; if the basket is the one with side inserts, then insert the tea spoons one by one into the slots provided (see fig. A).
Longer utensils should be placed horizontally at the front of the upper rack.
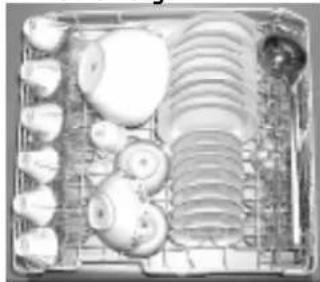
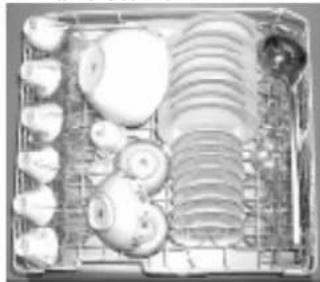
How to use the upper rack
The upper rack is designed to contain delicate and lightweight items such as glasses, tea and coffee cups, saucers, but also plates, shallow salad bowls, slightly dirty frying pans and saucepans.
- Position lightweight dishes in such as way as to avoid their being moved by the spray of water.
How to adjust the upper rack.
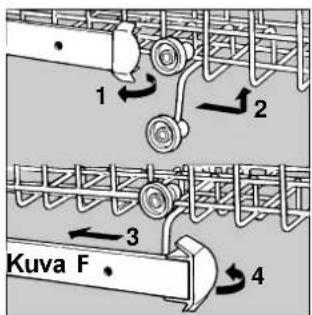
The upper rack can be set in a high or low position. To do so, open the rail stop flaps and pull the rack out completely; now place it with the back wheels in high or low position, then slide it along the guide rails until the front wheels also go in; now close the rail stop flaps. (see figure F).
lower rack
natural_image
Cross-sectional view of a mechanical or electrical component with coiled wires and internal components (no visible text or symbols)upper rack

natural_image
Top-down view of a kitchen appliance with sliced kitchen utensils arranged in rows (no visible text or labels)12 standard place-settings load
lower rack
natural_image
Close-up of a mechanical component with two circular components and threaded ends (no visible text or symbols)upper rack
natural_image
Top-down view of a kitchen tray with various kitchen utensils and dish items (no visible text or labels)Daily load
natural_image
Black-and-white photo of a basket filled with various vegetables, labeled 'A' in the corner (no text or symbols on the objects themselves)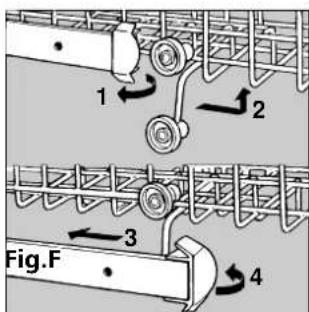
How to start the dishwasher
To start a wash cycle...
- Make sure the appliance is plugged into the power socket in the wall.
- Ensure the water tap has been turned on fully.
- Load the dishes (see chapter entitled "loading the dishes")
- Pour in the detergent (see chapter entitled "salt, detergent and rinse aid").
- Turn the knob situated on the right-hand side of the control panel anticlockwise until the reference notch on the knob corresponds with the number or symbol for the cycle you wish to set (have a look at the chapter entitled "Wash cycle table").
- Press the ON-OFF button and the respective ON-OFF indicator light will come on. The wash cycle will now begin.
Cancelling or modifying a wash cycle in progress.....
Premise: a wash cycle in progress can only be modified if it hasn't been running for long. Press the ON-OFF button and the relative indicator light will come off. Turn the knob clockwise to the desired setting (see paragraph entitled "to start a wash cycle"), then turn the appliance back on by pressing the ON-OFF button.
If you have left out some dishes...
You can interrupt the wash cycle, if it has only just started, by turning off the appliance (press the ON-OFF button) then insert the dishes you had left out, taking care not to scald yourself with the hot steam and then turn the dishwasher back on. The wash cycle will start up from where it was interrupted.
At the end of the wash cycle.....
When the knob stops turning and stops at a STOP notch (see figure), the wash cycle has finished. Turn the appliance off by pressing the ON-OFF button, turn off the water tap and open the door taking care not to scald yourself with the hot steam.
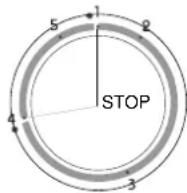
Wait a few minutes before removing the dishes: this way you won't have to handle them while they're still hot and more sensitive to shock, and they will also dry better.
Warning:
When you open the dishwasher door after the wash cycle has just ended or is under way, take care not to scald yourself with hot steam!
Wash cycle modification buttons
"65°C" button
Press this button "E" with wash cycles 1 and 2 and the temperature of the water is increased to 65^ . Use it if you have to wash saucepans and dishes with dry caked-on food.
We do not recommend you use it for washing delicate items as the high temperatures reached could make their surfaces opaque or discolour the decorations.
Wash cycle table
| Cycle Cycle | selection instructions | Cycle description | Detergent for pre-wash and wash | Rinse Aid |
| 1) Heavy duty | Very dirty dishes and pans (not to be used for delicate items). | Pre-wash with hot water. Cold pre-wash Extended wash at 55°C. Hot rinse at 70°C. Drying. | 8+22 g. | * |
| 2) Daily wash | Normally dirty pans and dishes. Standard daily cycle. | 2 pre-washes with cold water. Extended wash at 55°C. Hot rinse at 70°C. Drying. | 8+22 g. | * |
| 3) Rinses | Dishes that only need to be rinsed and dried | Hot rinse at 70°C. Drying. | * | |
| 4) Quick Wash 25' | Economic and fast cycle to be used for slightly dirty dishes. Run cycle immediately after use. No drying. | Short wash at 55°C. Cold rinse | 22 g. | |
| 5) Soak | Preliminary wash cycle for dishes and pans awaiting completion of the load with the dishes from the next meal. | Short cold wash to prevent food from drying onto the dishes. |
Tips to help you save
- It is important that you try to use the dishwasher with a full load only in order to optimise consumption levels; in the meantime use the soak cycle to avoid the formation of bad odours and caked-on food.
- Select the most suitable wash cycle: the choice of wash cycle depends on the type of dishes to wash and on how dirty they are.
- Use the right amount of detergent: if you use too much, you will not get cleaner dishes, but just more environmental pollution.
- There is no need to rinse the dishes before placing them inside the dishwasher.
How to keep your dishwasher in shape
After every wash
After every wash, turn off the water tap and leave the dishwasher door ajar, so that moisture and bad odours are not trapped inside.
Unplug the appliance
Before carrying out any cleaning or maintenance on the dishwasher, always remove the plug from the electricity socket: this way you will avoid the risk of any danger.
No solvent or abrasive cleaning products
Do not use solvents or abrasive cleaning products to clean the exterior and rubber parts of your appliance. Use a cloth dampened with lukewarm soapy water only.
To remove any stains from the surface of the appliance interior, use a cloth dampened with water and a little white vinegar or a cleaning product specifically made for dishwashers.
If you are off on holiday
When you go on holiday, we recommend you run a cycle with the dishwasher empty, then unplug it, turn off the water inlet tap and leave the dishwasher door ajar: this will help the seals last longer and prevent unpleasant odours from forming inside the appliance.
If you are moving home
Should the appliance have to be moved, try to keep it in a vertical position.; if absolutely necessary, it can be positioned on its back.
The seals.
One of the factors that cause unpleasant odours to form inside the dishwasher is food that remains trapped in the seals. Periodic cleaning using a damp sponge will prevent this from occurring.
Cleaning and special maintenance
The filter assembly
If you want consistent good results from your dishwasher, you need to clean the filter assembly.
Thanks to the filter, the food particles are removed from the wash water, allowing it to be recirculated during the cycle, filtered perfectly. For this reason, it is a good idea to remove the larger food particles trapped inside the cup "C" and semi-circular filter "A" after each wash. All you need to do is rinse them under running water; to remove the filter assembly, pull the cup handle upwards. The entire filter assembly, comprising a semi-circular filter "A" and a microfilter "B", should be cleaned thoroughly once a month.
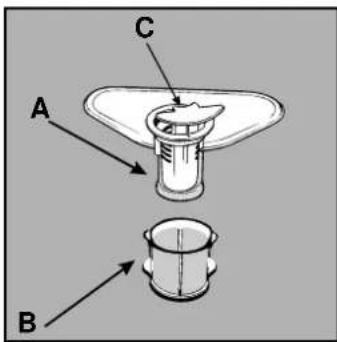
To clean the filter and the microfilter, use a toothbrush. Reassemble the two parts as shown in the figures below and reinsert the whole assembly into the dishwasher, positioning it into its housing and pressing downwards.
The dishwasher is not to be used without filters. Improper replacement of the filters may reduce the efficiency of the wash and even damage your dishwasher.
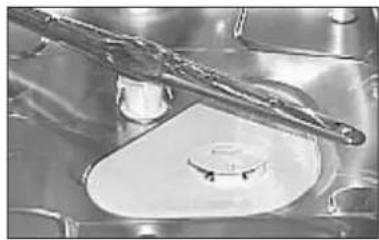
Cleaning the sprayer arms
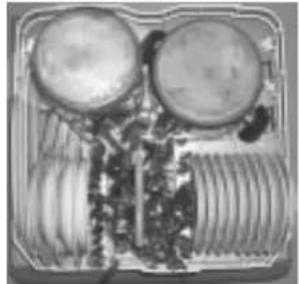
Food residue may become encrusted onto the sprayer arms and block the holes where water comes out; check them on a regular basis and clean them (see the Close-up View (inside) letters F-I).
natural_image
Close-up of a metallic mechanical component with a handle and central circular feature (no visible text or symbols)Is there a problem?
Your dishwasher may not work or not function properly. Before calling for assistance, let's have a look at what can be done: you may have forgotten to press a button or for some reason or another you haven't carried out a procedure necessary for the appliance to operate correctly.
The dishwasher won't start
Have you checked:
whether the appliance is plugged in properly or whether there is electricity in your home, or whether the dishwasher door has been shut correctly or whether the ON-OFF button is on "ON" and whether the tap has been turned on?
The dishwasher won't load any water
Have you checked:
whether the tap has been turned on and is well connected to the hose or whether there is no water throughout your home or whether the pressure of the water supply is sufficient, whether the hose is bent or the filter on the water supply hose is blocked?
The dishes are not clean
Have you checked:
whether the right amount of detergent is in the dispenser, the wash cycle selected is suitable for the dishes loaded, or
whether the filter and the microfilter are clean and whether the sprayer arms can turn freely?
The dishwasher won't drain
Have you checked:
whether the drain hose is bent?
Limescale deposits or a white film form on the dishes
Have you checked:
whether the lid on the salt container is closed properly or whether the amount of rinse aid has been adjusted correctly?
If, despite all these checks, your dishwasher still won't work and the trouble you are having persists, call your nearest authorised service centre, mentioning the following information:
- the type of malfunction
- the model mark (Mod....) and the serial number (SIN....) indicated on the rating plate located on the inner door, to one side.
Never call upon the services of unauthorised technicians and always refuse spare parts that are not originals.
Installation
Positioning the appliance
Place your dishwasher where you want to install it. The appliance can even be placed so that its sides or back panel are side by side with furniture or up against the wall. The dishwasher is provided with water supply and drain hoses, which can be directed towards the left or right to facilitate appropriate installation.
This dishwasher model can be built-in under the one worktop, and it therefore comes provided with an assembly kit complete with an instructions sheet.
Levelling
Once the appliance is positioned, adjust the feet by screwing them in or out depending on how high you want it and level it so that it is horizontal; however it must not be tilted by more than 2^ under any circumstances.
If the appliance is level, this will help ensure its correct operation.
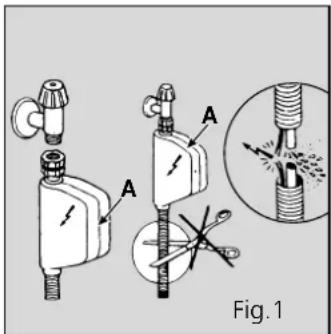
Cold water connection.
Connect the cold water supply hose to a 3/4 gas threaded connection, taking care to screw it tightly onto the tap (see figure 1).
If the water hoses are new or have been out of use for an extended period of time, let the water run to make sure it is clear and free of impurities before making the connection. If this precaution is not taken, the water inlet could get blocked, causing damage to your dishwasher.
Hot water connection
Your dishwasher can be supplied with hot water from the mains supply (if you have a central heating system with radiators) at a temperature of no more than 60^ C.
In this case, the wash cycle time will be about 15 minutes shorter and the wash will be slightly less effective.
The connection must be made to the hot water supply following the same procedures as those indicated for the cold water connection.
Anti-flooding protection
Your dishwasher is provided with a system that stops the supply of water in the event of a problem with the water supply hose or leaks within the appliance, thus preventing any damage from being caused to your home. If for any reason the box (containing the electrical components) happens to get damaged, unplug the appliance from the electricity socket immediately. To guarantee that the anti-flooding safety device operates properly, box "A", with the water inlet hose, must be attached to the water supply tap only as shown in the figure.
Under no circumstance should the water supply hose be cut as it contains live electrical parts. If the length of the hose is not sufficient for proper connection, replace the hose with one which is long enough. This hose is available upon request from specialised retailers and service centres.
Drain hose connection
Fit the drain pipe into a drain line with a minimum diameter of 4 cm or place it over the sink, avoiding restricting or bending it and using the special plastic elbow provided (see figure to the left). The free end of the hose should be between 40 and 100 cm above the ground and should not be immersed in water.

natural_image
Technical line drawing of a washing machine with hoses and a control panel (no text or symbols)Warning: the special plastic elbow should be fastened firmly onto the wall to prevent the drain hose from moving and allowing water to spill outside the drain.
Electrical connection
Plug the appliance into a socket provided with an efficient earth connection (the system's earthing is a guarantee of safety provided for by law), after having checked that the mains voltage and frequency values correspond to those stated on the rating plate located on the stainless steel inner door of the appliance and that the electrical system to which the dishwasher is connected is sized for the maximum current indicated on said rating plate. If the power socket to which the appliance is connected is not compatible with the plug, replace it with a suitable plug rather than using adapters or multiple plugs as these could cause overheating or burns.
If the electricity supply wire is damaged, we recommend you contact authorised Technical Assistance service centres exclusively for a replacement.

Overkurv

∅vre spylearm

natural_image
Technical line drawing of a mechanical component with no visible text or symbols- Skru opp saltbeholderens deksel.
- Det er en pil på beholderens hals (se figuren til høyre); om nødvendig kan du dreie pilen moturs fra "-" innstillingen til "+" innstillingen, i henhold til vannets hardhetsnivå. Vi anbefaler at du justerer i henhold til følgende tabell:
| Vannets hardhet | |||||
| °fH °d | H mmol/l | Velg-erens posis-jon | Saltforb-ruk (gram/s-yklus) | Varig-het (syklu-ser/2 kg) | |
| 0 - 10 0 | -17 0- 1,7 | / 0 / | |||
| 10- 25 | 18- 44 1,8 | -4,4 - 20 60 | |||
| 25- 50 | 45- 89 4,5 | -8,9 MED | 40 40 | ||
| > 50 | > 89 | > 8,9 | + | 60 | 25 |
Oppvaskmiddel og glansmiddel .....
Oppvaskmiddel
Lasting av serviset
natural_image
Close-up of a mechanical component with coiled springs and a labeled 'nedre kurv' (no other text or symbols visible)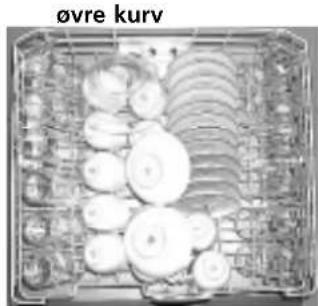
natural_image
Interior view of a kitchen appliance with circular cutouts and meshed panels (no visible text or symbols)natural_image
Close-up of a mechanical component with two circular components and threaded ends (no visible text or symbols)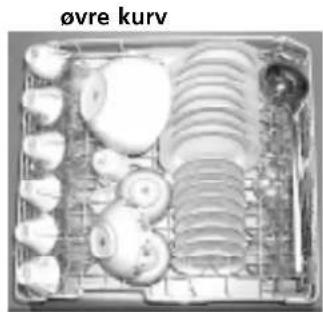
natural_image
Assorted kitchen utensils arranged in a tray, including ovre kurv and various kitchenware (no text or symbols visible)Daglig lasting
natural_image
Black-and-white photo of a basket filled with various vegetables, labeled 'A' in the corner (no text or symbols on the objects themselves)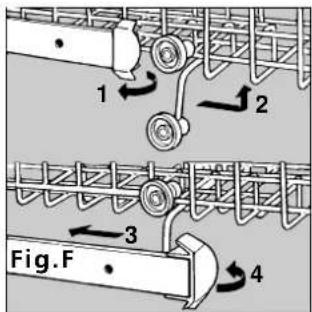
Knapper for programendring
"65°C" knapp
natural_image
Close-up of a metallic mechanical component with a central circular feature and a diagonal rod (no visible text or symbols)Har du problemer?
natural_image
Technical line drawing of a medical or industrial device with hoses and a control panel (no text or symbols)
Övre korg

Övre spolarm

natural_image
Technical line drawing of a mechanical component with threaded base and mounting flange (no text or symbols)natural_image
Close-up of a mechanical device with labeled components (F, C) and a tool inserted into a housing (no readable text or symbols)Placering av disk
natural_image
Cross-sectional view of a mechanical or electrical component with coiled wires and internal components (no visible text or symbols)övre korg
natural_image
Top-down view of a metal tray containing sliced white food items (no text or symbols visible)Placering av 12 standardkuvert
nedre korg

natural_image
Close-up of a mechanical component with two circular components and threaded connectors (no visible text or symbols)övre korg
natural_image
Interior view of a kitchen appliance with arranged utensils and dish (no visible text or labels)Daglig disk
natural_image
Black-and-white photo of a basket filled with various vegetables, labeled 'A' in the corner (no text or symbols on the objects themselves)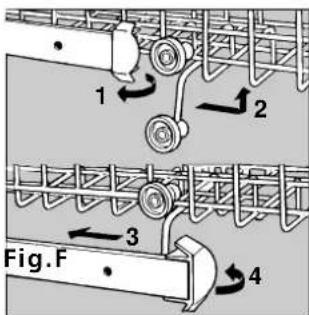
natural_image
Close-up of a metallic mechanical component with a handle and central base (no visible text or symbols)natural_image
Technical line drawing of a medical or laboratory device with tubing and a control unit (no text or symbols)
∅verste kurv

∅verste spulearm

natural_image
Close-up of a kitchen utensil with a white funnel and metal bowl (no visible text or symbols)natural_image
Technical line drawing of a mechanical component with threaded base and hexagonal base (no text or symbols)natural_image
Close-up of coiled wire or filament components in a container (no visible text or symbols)øverste kurv
natural_image
Top-down view of a stainless steel kitchen counter with multiple circular cutlery (no visible text or labels)Rummer service svarende til 12 standard kuverter
nederste kurv

natural_image
Close-up of a mechanical component with two circular components and threaded connectors (no visible text or symbols)øverste kurv
natural_image
Top-down view of a kitchen appliance rack with multiple circular cutlery items (no visible text or labels)Hverdagsopvask.
natural_image
Black-and-white photo of a basket filled with various vegetables, labeled 'A' in the corner (no text or symbols on the objects themselves)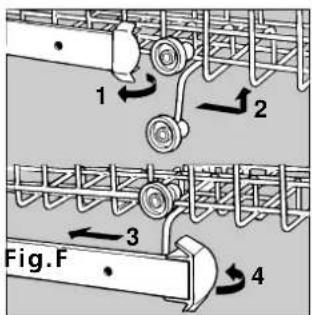
natural_image
Close-up of a mechanical component with a metallic rod and central hub (no visible text or symbols)natural_image
Technical line drawing of a washing machine with tubing and a control panel (no text or symbols)
Yläkori

Yläsuihkuvarsi

natural_image
Technical line drawing of a mechanical component with concentric layers and mounting holes (no text or symbols)natural_image
Close-up of a cleaning or cleaning device with labeled parts (F, C) and a tool applying material to a component (no readable text or symbols)natural_image
Close-up of coiled industrial pipes or coils labeled 'alakori' (no other text or symbols visible)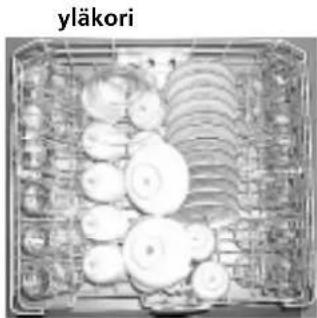
natural_image
Top-down view of a tray with circular objects, possibly food items or containers (no visible text or symbols)natural_image
Close-up of a mechanical component with two circular components and threaded ends, labeled 'alakori' at top (no other text or symbols visible)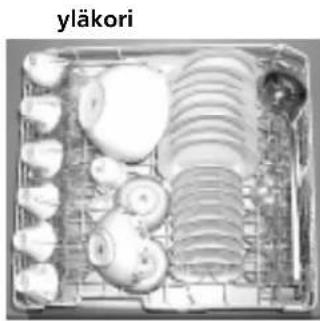
natural_image
Interior view of a kitchen appliance with sliced onions and arranged dish (no text or symbols visible)natural_image
Black-and-white photo of a basket filled with fresh vegetables, labeled 'A' in the corner (no text or symbols on the items themselves)