
CSWA 400 - Kitchen scale MIELE - Free user manual and instructions
Find the device manual for free CSWA 400 MIELE in PDF.


| Product Type | Built-in Kitchen Scale |
| Brand | Miele |
| Model | CSWA 400 |
| Load Capacity | 10 kg (22 lb) |
| Accuracy | ± (1% of weight + 1 digit), approx. ±5 g / 0.2 oz |
| Battery Type | 9V PP3 |
| Battery Life | Approximately 2 years |
| Display | Digital, 5-digit |
| Measurement Units | kg or lb/oz (switchable) |
| Tare Function | Yes (calibrate to zero) |
| Auto Off | After 2 minutes of inactivity |
| Overload Indication | Displays "···" above 10 kg |
| Underweight Limit | Inaccurate below 0.015 kg (0.6 oz) |
| Weighing Surface Material | Ceramic |
| Installation Type | Built-in (combiset) |
| Cut-out Dimensions (Single Appliance) | 266 mm (W) x 500 mm (D) ±1 mm |
| Cleaning Method | Damp cloth, mild detergent; no abrasive cleaners or steam |
| Safety Precautions | Do not use steam cleaner; avoid dropping heavy objects; keep liquids away from frame |
| Warranty | Manufacturer's warranty (see manual for details) |
| Service Contact | Miele Service Department or authorized dealer |
| Package Contents | Scale, 9V battery, building-in frame, instruction manual |
Frequently Asked Questions - CSWA 400 MIELE
User questions about CSWA 400 MIELE
0 question about this device. Answer the ones you know or ask your own.
Ask a new question about this device
Download the instructions for your Kitchen scale in PDF format for free! Find your manual CSWA 400 - MIELE and take your electronic device back in hand. On this page are published all the documents necessary for the use of your device. CSWA 400 by MIELE.
USER MANUAL CSWA 400 MIELE
natural_image
Illustration of a cooking scene with a wok, mushrooms, and a pot on a grating (no text or symbols)D Combiset-Waage CSWA 400
natural_image
Technical diagram of a mechanical assembly with numbered components and directional arrows (no text or symbols)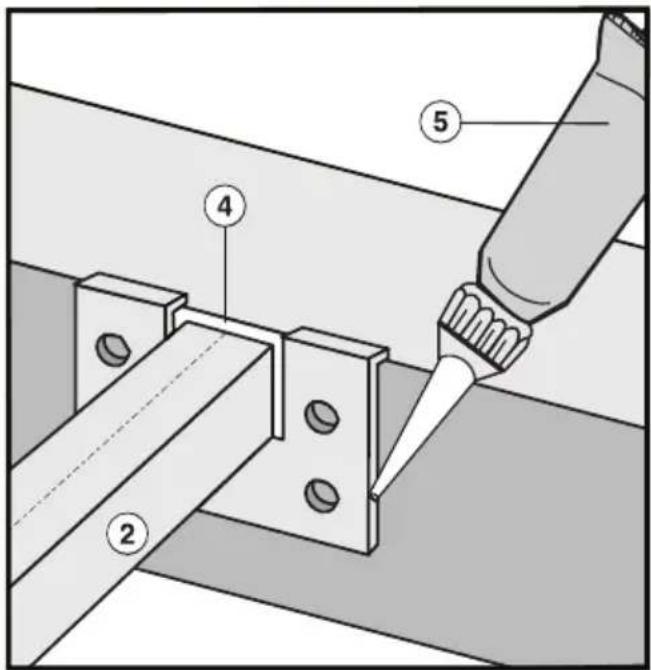
⑤ Låg til batterirum
⑥ 9 V batteri
⑦ Batteristik
natural_image
Technical diagram of a mechanical assembly with numbered components and directional arrows (no text or symbols)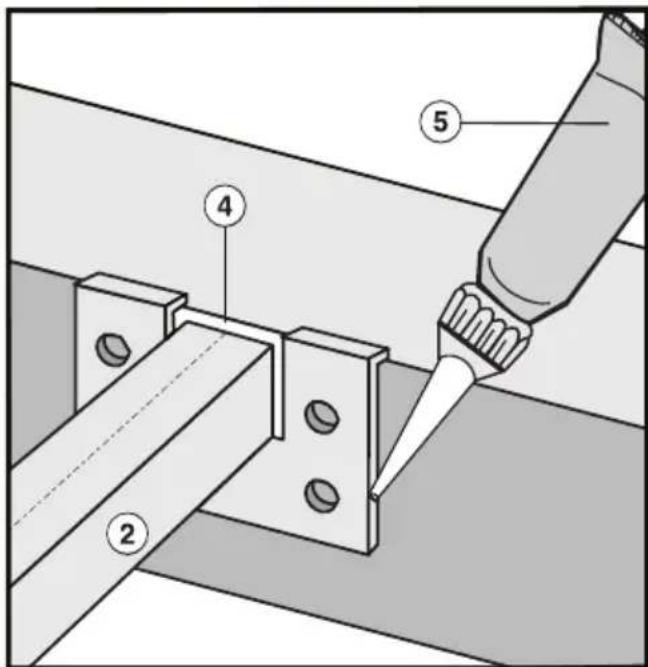
⑤ Deksel batterijvak
⑥ Batterij
⑦ Batterijclip
natural_image
Technical diagram of a mechanical assembly with numbered components and directional arrows (no text or symbols)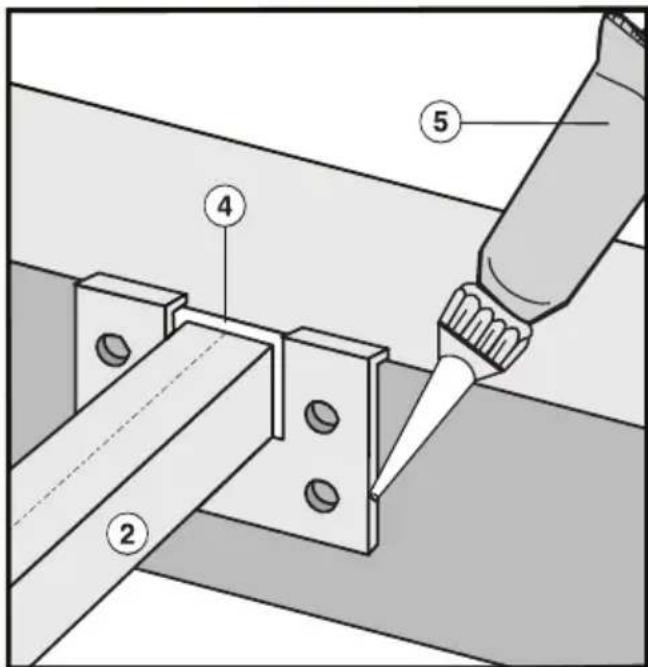
① Klemveren
② Verbindingsstrip
④ Dubbelzijdig plakband
⑤ Siliconenkit
Inbouwen
Description of the appliance 52
Warning and Safety instructions 53
Caring for the environment 54
Disposal of the packing material 54
Before using for the first time....55
General notes 55
Inserting the battery....55
Cleaning for the first time....55
Operation 56
Changing from metric to imperial measurements 56
Switching on and weighing 56
Calibrating 57
Over loading / under loading....57
Switching off. 57
Replacing the battery 58
Cleaning and care 59
Technical data and After sales service 60
Technical data 60
After sales service 61
Data Plate 61
Installation 62
Appliance and building-in dimensions 62
Installation 65
Appliance surface
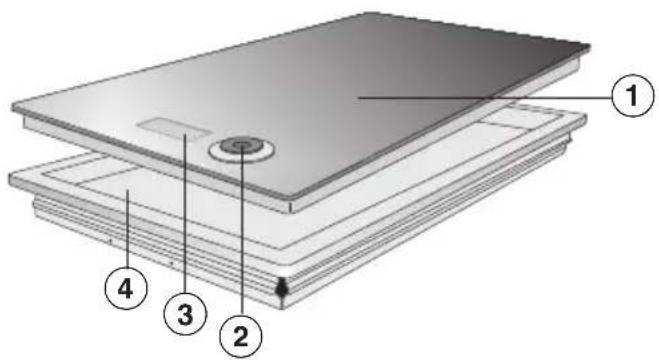
① Weighing surface
② Control
③ Display
④ Building-in frame
Battery compartment/ underneath the appliance
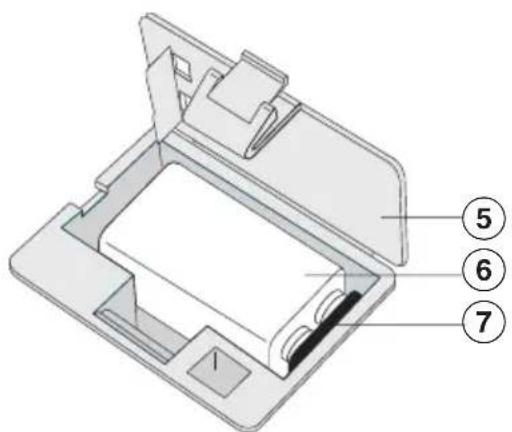
⑤ Battery compartment lid
⑥ 9V battery
⑦ Battery clip
To avoid the risk of accidents and damage to the appliance you should read these operating instructions carefully before using it for the first time. They contain important notes on the safety, operation and care of the appliance.
This appliance is intended for domestic use only and is not to be used for commercial purposes.
Do not drop pots, pans or other objects on the ceramic surface.
Even a light object could cause the ceramic surface to crack or break in certain circumstances.
To avoid damage such as scratches or marks on the surface please note the following:
- Do not use knives to cut food on the weighing surface.
- Never push pots and pans etc. back and forth across the weighing surface. Soiling such as sand can also cause scratches to occur.
- Never place hot, dirty or damp containers or pans etc. on the weighing surface. Please note that soiling containing starches or acids can cause marks to appear which cannot be removed.
Never place hot pots or pans near the display area. The electronic unit underneath could get damaged.
- Keep hot pans etc away from the control. The lacquering on it is not heat-resistant.
Do not let liquid get into the building-in frame through the gap around the appliance. This could damage the electronic unit. If liquid does get into the building-in frame, wipe it up immediately to avoid any damage or unpleasant odours building up.
Also make sure that food particles cannot get lodged in the gap around the appliance or get into the building-in frame. This could result in an incorrect weight being shown in the display.
Only lift the ceramic weighing surface up by the control. Do not use any metal implements to lift it up. These could scratch the frame.
Do not use a steam cleaner to clean this appliance. Pressurised steam could cause permanent damage to the surface and to components, for which the manufacturer cannot accept liability.
While the appliance is under guarantee, repairs should only be undertaken by a service technician authorised by the manufacturer. Otherwise the guarantee is invalidated.
Disposal of the packing material
The transport and protective packing has been selected from materials which are environmentally friendly for disposal and can normally be recycled.
Ensure that any plastic wrappings, bags etc. are disposed of safely and kept out of the reach of babies and young children. Danger of suffocation!
Rather than just throwing these materials away, please ensure they are offered for recycling.
Disposal of an old appliance
Old appliances contain materials which can be reclaimed or recycled. Please contact your dealer, your local waste collection centre or scrap merchant about potential recycling schemes.
Used batteries should be disposed of safely.
General notes
A data plate for your appliance is supplied with this documentation. It should be stuck into the space provided at the end of the instruction book.
Keep these instructions in a safe place for reference and pass them on to any future user.
Inserting the battery
Before the weighing function can be used, the battery supplied must be inserted into the appliance.
Cleaning for the first time
Before using for the first time, clean the appliance with a damp cloth only and then wipe dry.
Changing from metric to imperial measurements
The weight can be displayed in kg or in lb/oz. You can only change from one to the other when the weighing function is switched off.
Altering the weight measurement unit
■ Press the control for about 5 seconds.
The measurement unit currently selected will appear in the display.
■ To change the measurement unit displayed, press the control briefly.
■ Then press the control again for approx. 5 seconds until "88888" appears in the display.
The measurement unit selected is now stored in memory.
If you try to do this with the weighing function switched on, "C 100" will appear in the display.
Remove any food which has been placed on the surface and wait 2 minutes for the weighing function to switch off automatically.
Now start again from the beginning.
Switching on and weighing
■ Switch on the weighing function by pressing the control.
"88888" will appear in the display first of all, followed automatically by
"0.000" kg or
"0: 0.0" lb/oz .
The weighing function is now ready for use.
■ If possible, the items to be weighed should be placed in the middle of the weighing surface.
The weight will appear in the display.
Calibrating
You can calibrate the weighing function, i.e. set the display back to zero, to add items to those already weighed.
■ Press the control until the zeros appear in the display.
You can calibrate it again if you want to weigh additional items.
Finally you can call up the total weight in the display by calibrating the weighing function once again and then removing all the items.
The total weight will be displayed with a (-) in front of the amount.
Over loading / under loading
If the item(s) being weighed is more than 10 kg / 22 lb "···" will appear in the display.
If the item(s) being weighed is less than 0.015 kg / 0.6 oz, a value will appear in the display. However, this value will be incorrect as the appliance is not designed for items less than 0.015 kg / 0.6 oz.
Switching off
■ Press the control until "0.000" kg or "0: 0.0" lb/oz appears in the display.
■ Switch off the weighing function by pressing the control again.
If the weighing function is not used for a period of two minutes, it will switch itself off automatically.
Replacing the battery
The battery needs replacing approx. every 2 years. When it does, the following will appear in the display:
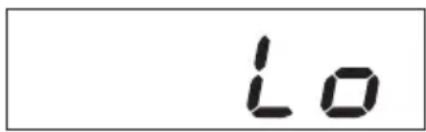
A 9V battery PP3 is required.
Proceed as follows:
■ Lift the ceramic weighing surface up by the control.
■ Pull the weighing surface out with both hands and place it with the underside facing upwards on a clean, smooth surface.
■ Open the battery compartment lid.
■ Remove the used battery and take off the battery clip.
■ Secure the battery clip to the new battery and once connected, place the battery in the battery compartment.
■ Close the battery compartment lid firmly making sure that it clicks into place.
■ Place the weighing surface back on to the building-in frame.
Only lift the ceramic weighing surface up by the control. Do not use any metal implements to lift it up. These could scratch the frame.
Used batteries should be disposed of safely.
Under no circumstances use a steam cleaning appliance to clean this appliance. Pressurised steam could cause permanent damage to the surface and to components, for which the manufacturer cannot accept liability.
Only lift the ceramic weighing surface up by the control. Do not use any metal implements to lift it up. These could scratch the frame.
Never use abrasive or aggressive cleaning agents, such as grill or oven cleaning sprays, stain or rust removers, scouring agents, pads or sponges as these could damage the surface of the appliance.
The ceramic surface of the appliance should be cleaned after each use. Also check the frame after each use and remove any food debris or liquid immediately. Clean the building-in frame regularly.
Use a damp cloth or a solution of washing up liquid and hot water, as necessary.
For more stubborn soiling, a cleaning agent specially designed for cleaning ceramic surfaces may be used. After cleaning, wipe the surface with a damp cloth to avoid smearing.
Finally, wipe dry the whole appliance using a clean, soft cloth.
Technical data
Load bearing capacity:
10 kg / 22 lb
Accuracy of the scales:
± (accurate to 1 % + 1 digit)
This equates to 1 % of the actual weight + 5g / 0.2oz
Battery:
9V battery, PP3
In the event of any faults which you cannot remedy yourself, please contact
- Your Miele Dealer
or
- The Miele Service Department (see address on back cover).
When contacting the Service Department, please quote the model and serial number of your appliance. These are given on the data plate.
Data Plate
Space in which to stick the extra data plate supplied with the appliance. Ensure that the model number is the same as the one on the front of these operating instructions.
Please note that telephone calls may be monitored and recorded to improve our service.
Appliance and building-in dimensions
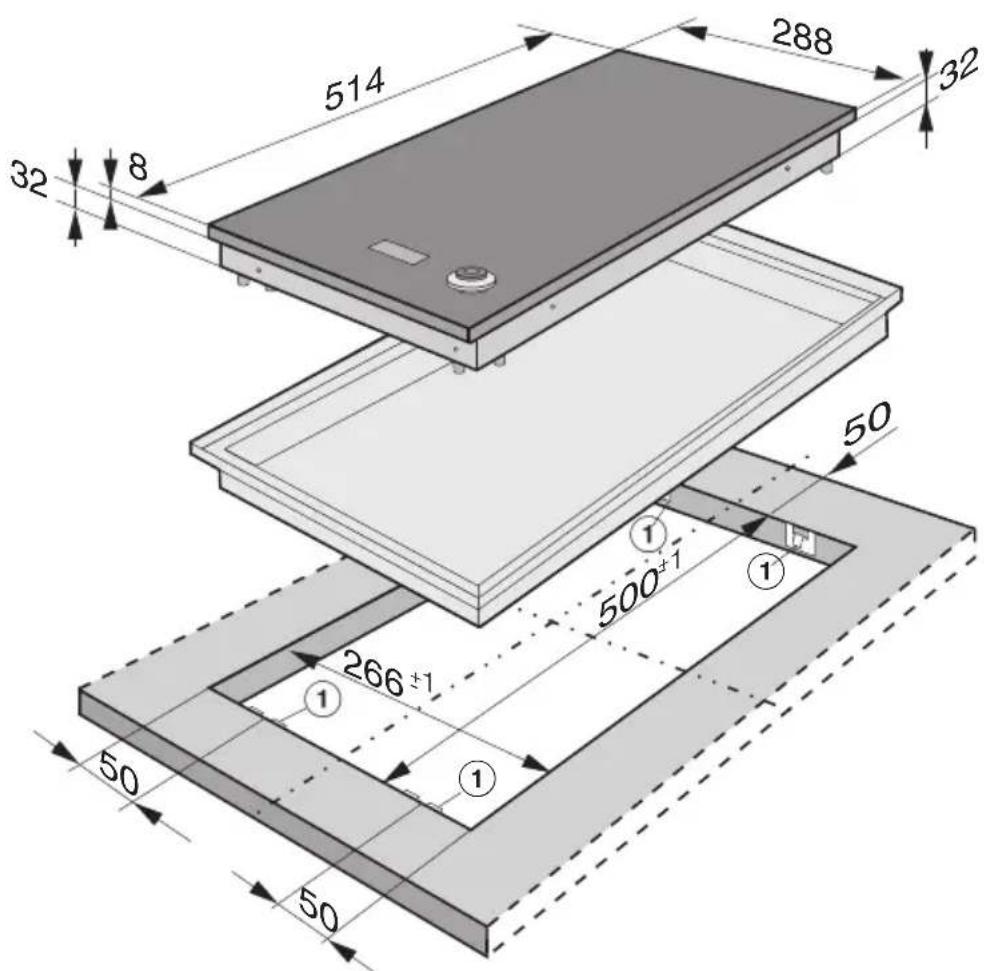
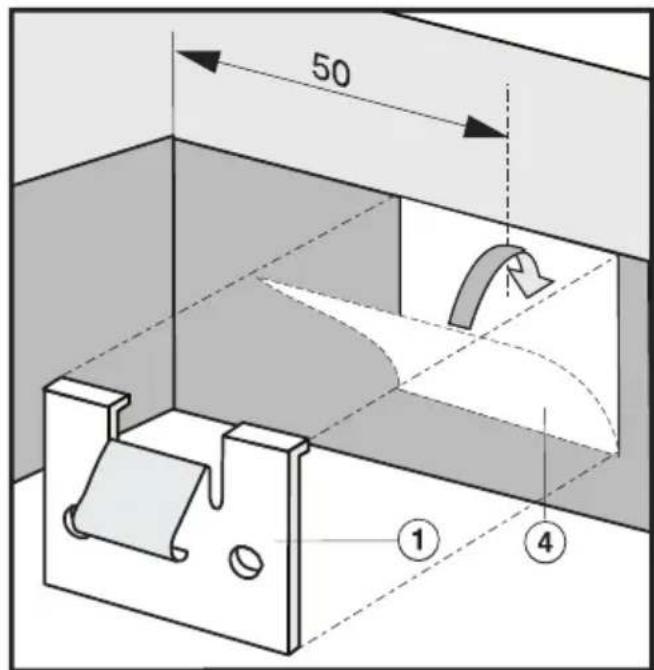
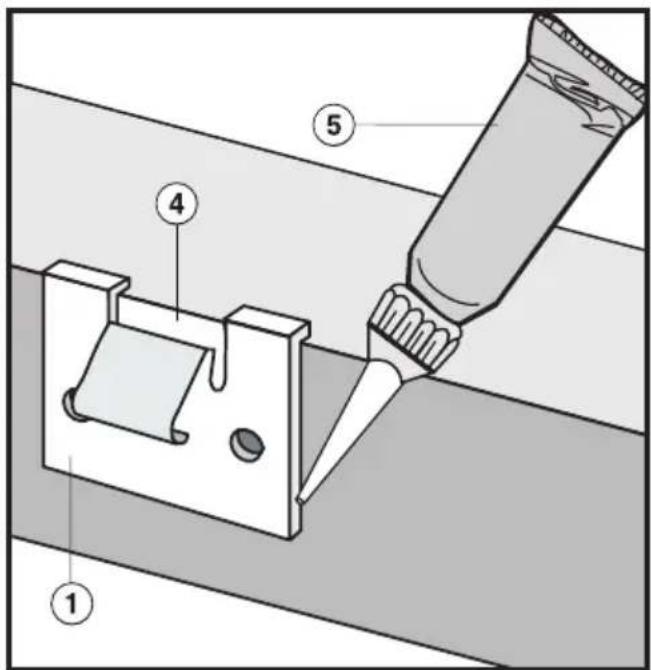
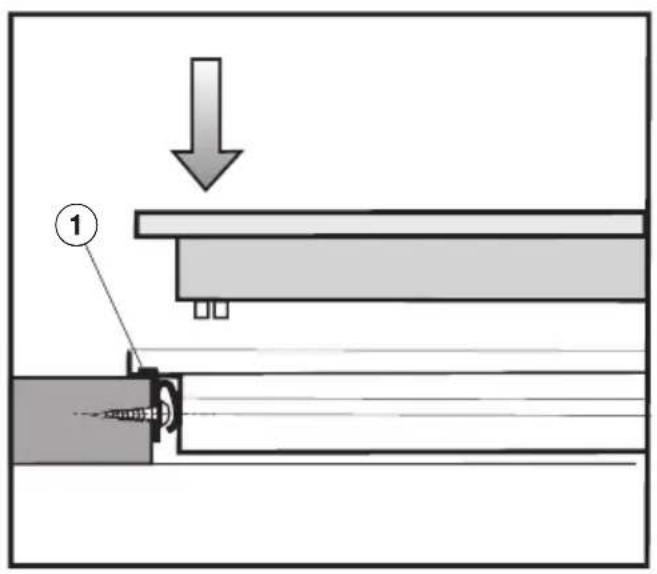
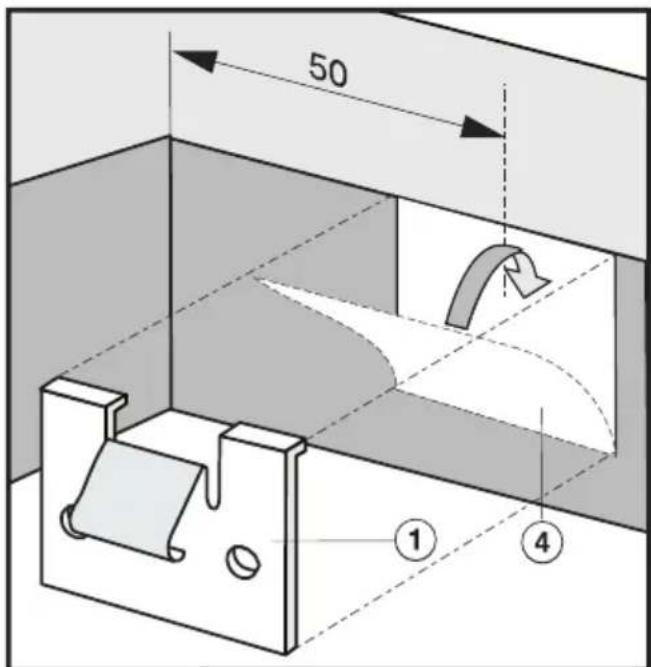
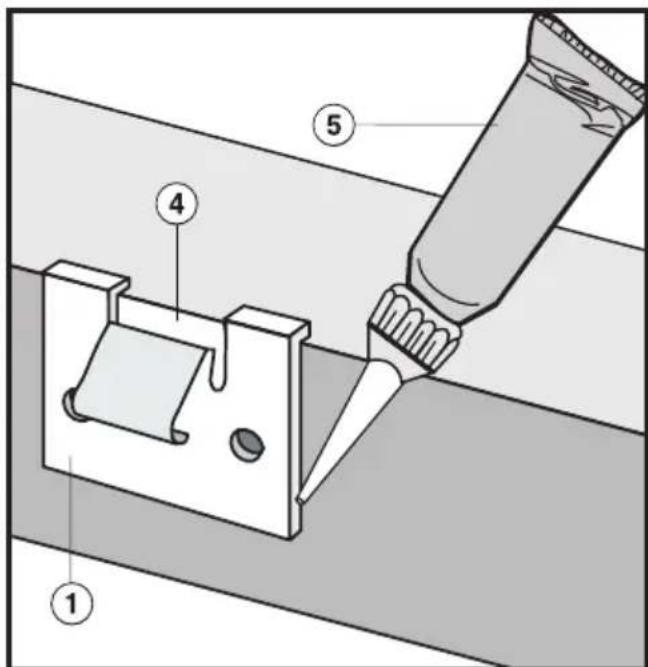
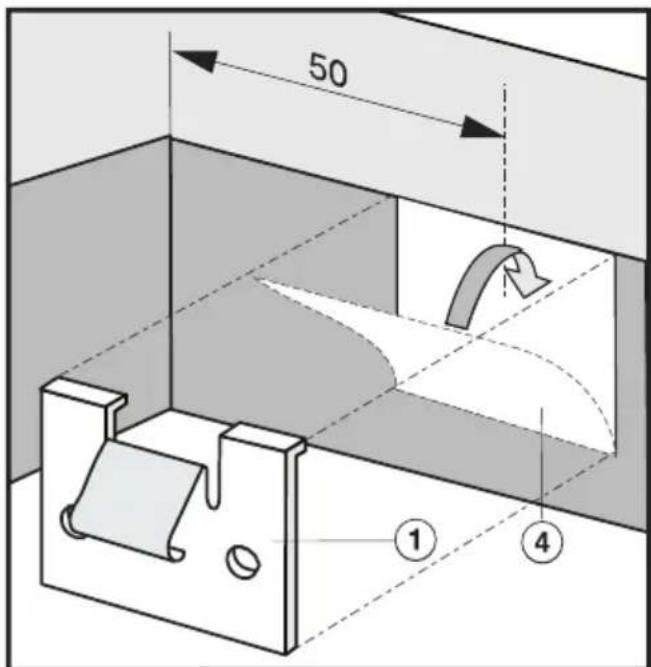
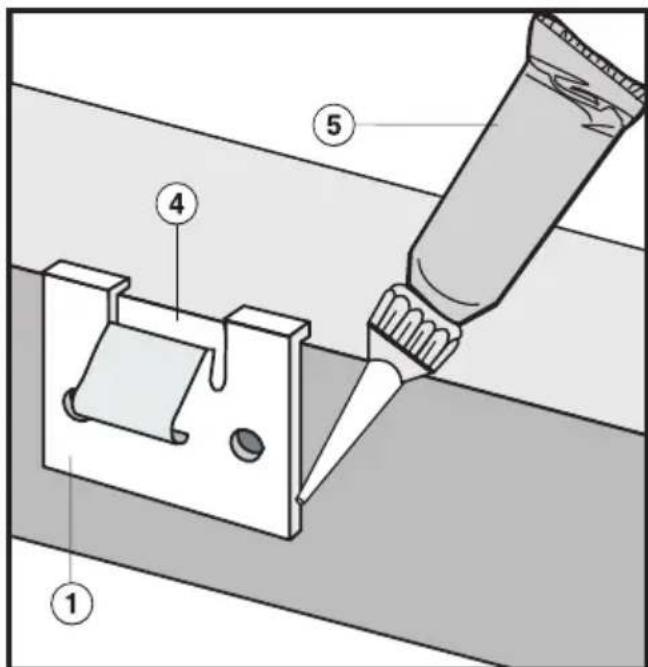
① Spring clamps
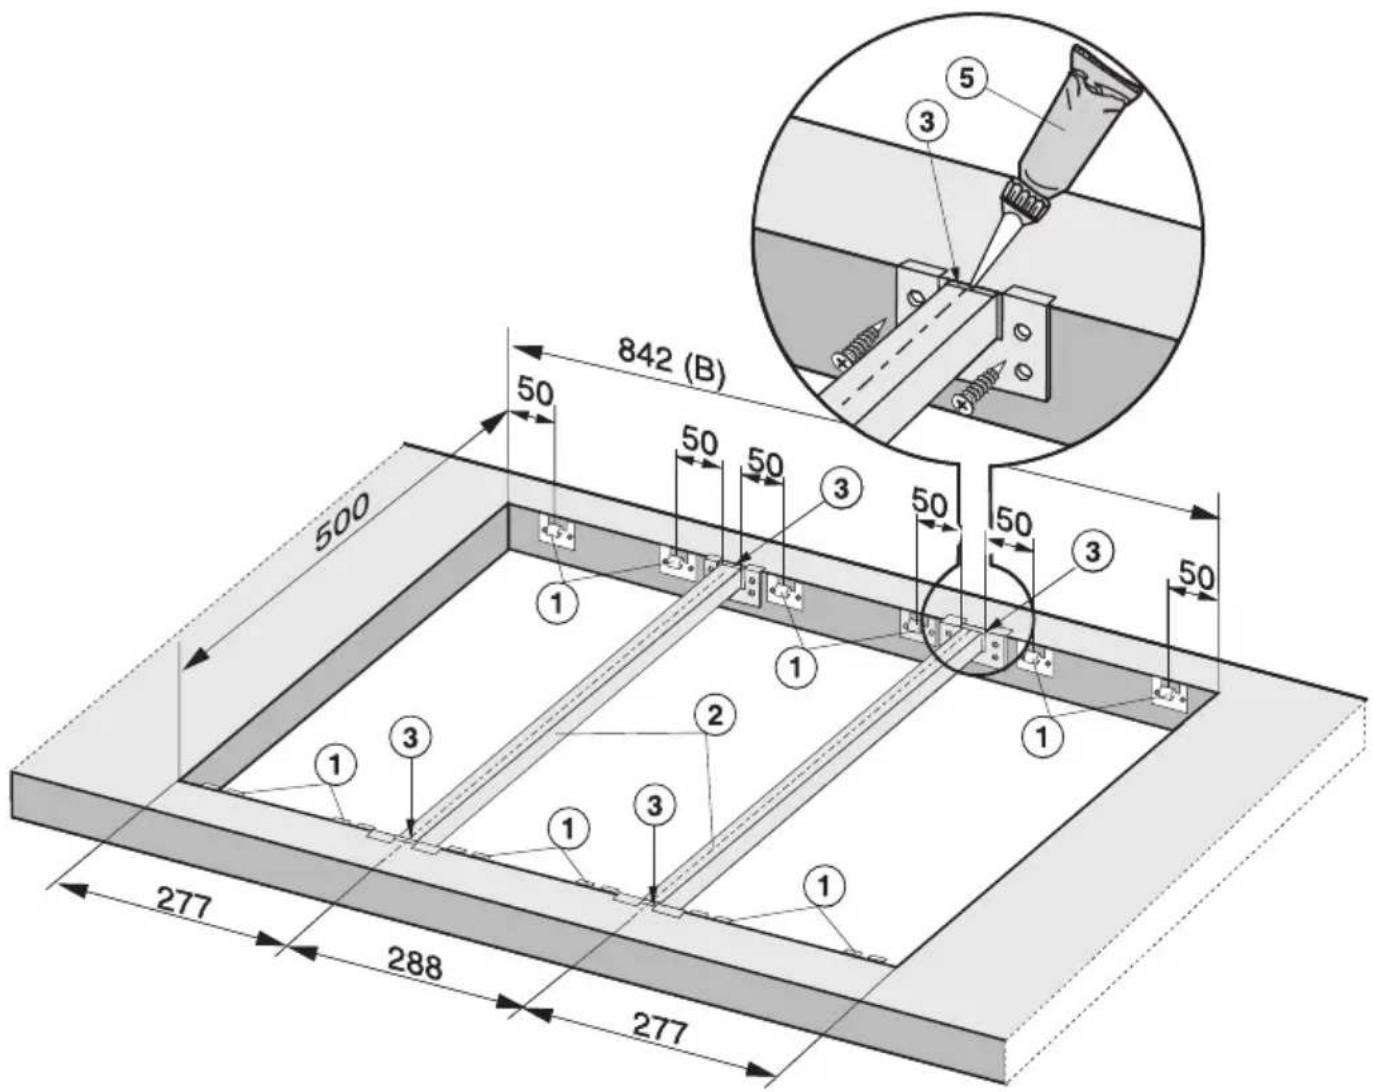
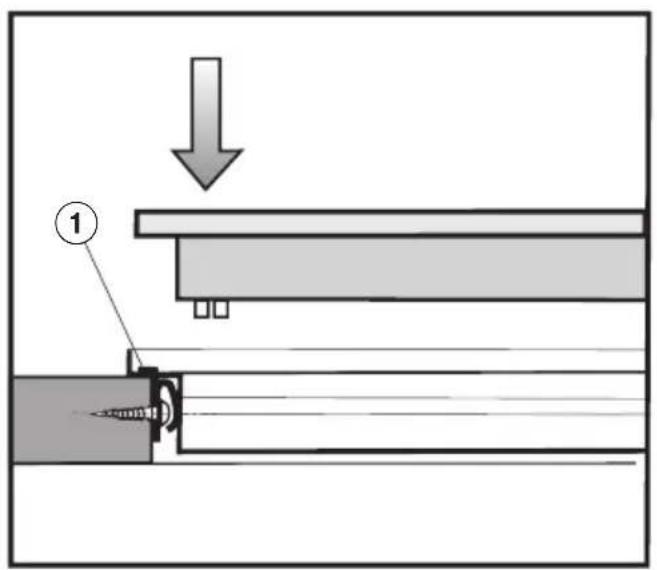
① Spring clamps
② Spacer bar
③ Gap between spacer bar and worktop
⑤ Silicone sealant
Fixing spring clamps / spacer bars in granite worktops
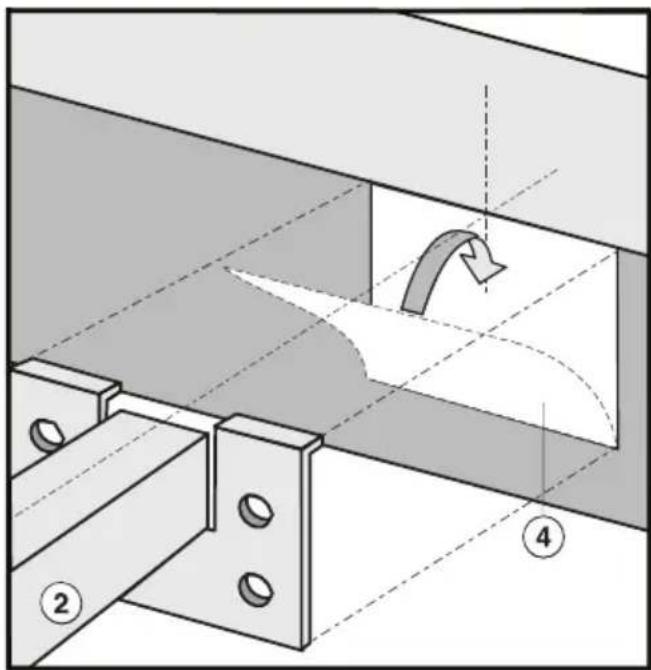
natural_image
Technical diagram of a mechanical assembly with numbered components and directional arrows (no text or symbols)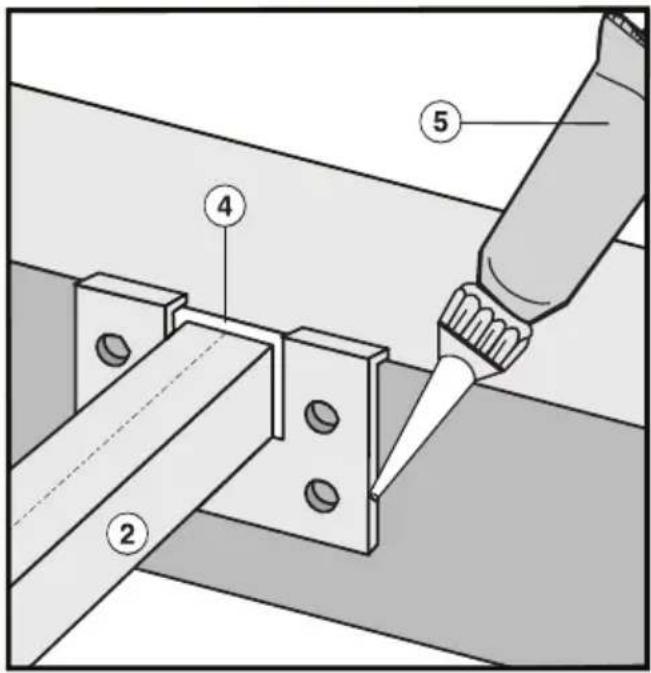
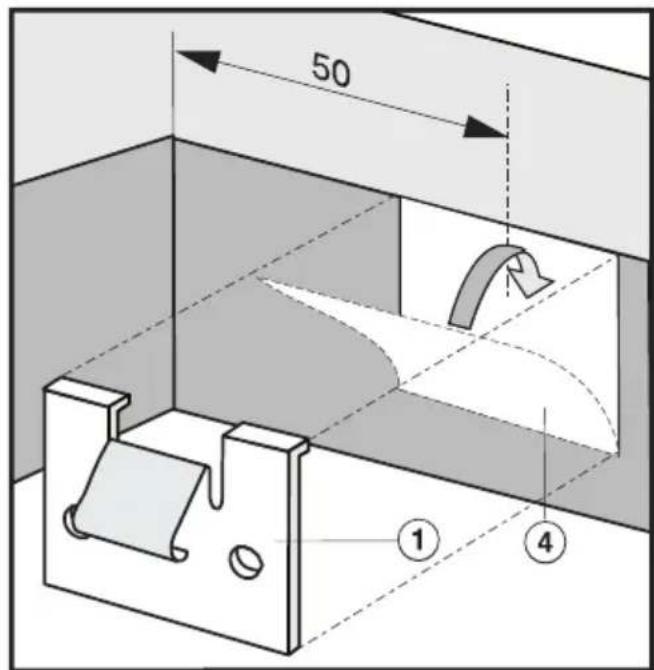
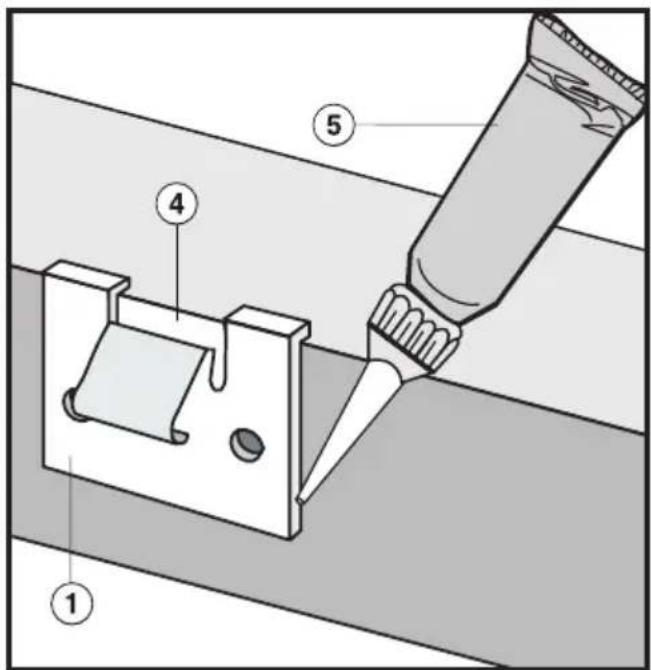
① Spring clamps
② Spacer bar
④ Double sided adhesive tape
⑤ Silicone sealant
Installation
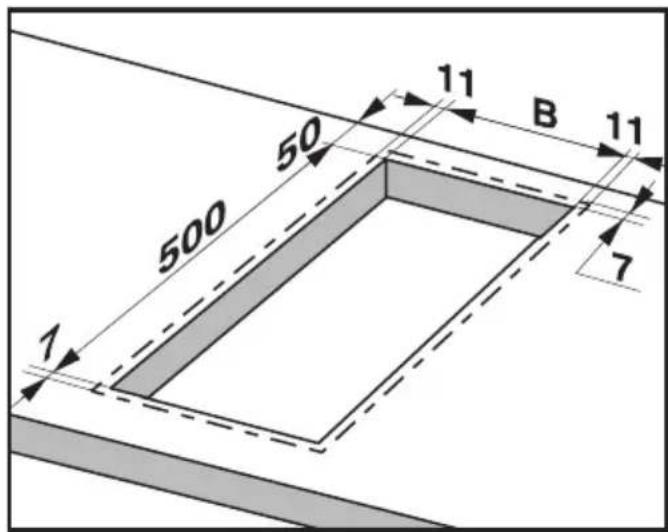
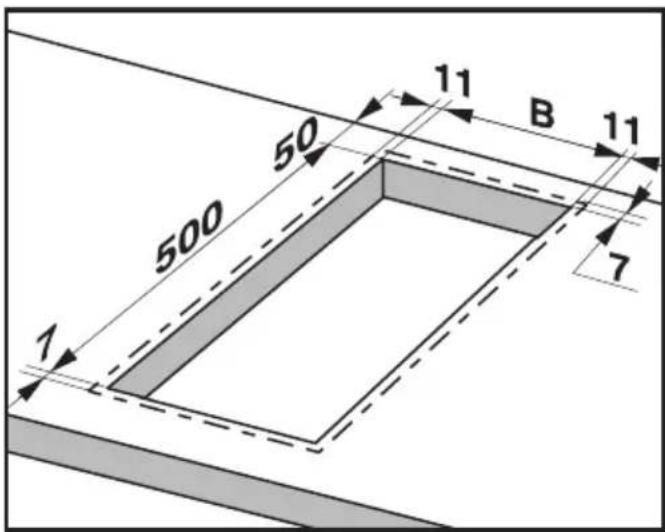
Dimensions 7 mm and 11 mm show the space taken up by the frame of the appliance on the worktop.
■ Make a cut-out in the worktop, paying attention to the appliance height.
Dimension "B" applies to a number of appliances and is shown on the chart.
■ A minimum safety distance of 50 mm must be maintained between the appliance and the back wall and a side wall to the right or left.
■ Seal the cut surfaces with a suitable sealant to avoid swelling caused by moisture.
The materials used must be heat resistant.
| Number of appliances | Worktop cut-out | |
| Depth in mm ± 1 mm | Width (= Dim B) in mm ± 1 mm | |
| 1 | 500 | 266 |
| 2 | 500 | 554 |
| 3 | 500 | 842 |
| 4 | 500 | 1130 |
| 5 | 500 | 1418 |
| 6 | 500 | 1706 |
| 7 | 500 | 1994 |
Important:
The maximum tolerance for the worktop cut-out must not exceed ± 1 mm.
When building in several combiset appliances, a spacer bar must be fitted between each unit.
België / Belgique:
Miele België N.V. / Miele Belgique S.A. Hof te Bollebeeklaan 9 – 1730 Mollem Tel. (02) 451.14.11 – Fax (02) 451.14.14 Internet: http://www.miele.be
USA:
Miele, Inc. 9 Independence Way Princeton, NJ 08540 Phone: 800-843-7231 609-419-9898 Fax: 609-419-4298 Technical Service: 800-999-1360 www.mieleusa.com
Singapore:
Miele Southeast Asia Miele Pte. Ltd. 163 Penang Road
04 - 02/03 Winsland House II
Singapore 238463 Tel : +65-67351191 Fax: +65-67351161 Email: infosea@miele.com.sg
Australia:
Miele Australia Pty. Ltd., A.C.N. 005635398 1 Gilbert Park Drive, Knoxfield, VIC 3180 Telephone: (03) 9764 7100, Fax: (03) 9764 7129 Distributor Western Australia: G.B.I. Sales Pty. Ltd., 27-33 Cleaver Terrace, Belmont, WA 6104 Telephone: (08) 9478 0466, Fax: (08) 9478 0470 www.miele.com.au Distributor New Zealand: Steelfort Engineering Company. Ltd. 500 Rangitikei Street, Palmerston North, Priv. Bag 11045, NZ Telephone: (06) 350 1350, Fax: (06) 356 1507
Ireland:
Miele Ireland Ltd.
Broomhill Road, Tallaght, Dublin 24
Tel: (01) 46 10 710, Fax: (01) 46 10 797
Email: info@miele.ie
Internet: http://www.miele.ie
United Kingdom:
Miele Co. Ltd.
Fairacres, Marcham Road, Abingdon, Oxon, OX14 1TW
tel. Abingdon (01235) 554455 - fax (01235) 554477
Service Office, tel. Abingdon (01235) 554466
Internet: www.miele.co.uk
Nederland:
- Inbouwen
- Appliance surface
- Battery compartment/ underneath the appliance
- Disposal of the packing material
- Disposal of an old appliance
- General notes
- Inserting the battery
- Cleaning for the first time
- Changing from metric to imperial measurements
- Altering the weight measurement unit
- Switching on and weighing
- Calibrating
- Over loading / under loading
- Switching off
- Replacing the battery
- Proceed as follows:
- Technical data
- Load bearing capacity:
- Accuracy of the scales:
- Battery:
- Data Plate
- Fixing spring clamps / spacer bars in granite worktops
- Installation
- België / Belgique:
- USA:
- Singapore:
- - 02/03 Winsland House II
- Australia:
- Ireland:
- United Kingdom:
- Nederland:
Brand : MIELE
Model : CSWA 400
Category : Kitchen scale