
FZP 3001-B - Saw Fieldmann - Free user manual and instructions
Find the device manual for free FZP 3001-B Fieldmann in PDF.


| Product Type | Chainsaw |
| Brand | Fieldmann |
| Model | FZP 3001-B |
| Dimensions (without guard and chain) | 410 x 235 x 265 mm |
| Weight (without guard and chain) | 5.5 kg |
| Engine Displacement | 45.2 cm³ |
| Maximum Engine Output Power | 1.7 kW / 7500 rpm |
| Maximum Engine Speed with Cutting Accessories | 10000 rpm |
| Idle Speed | 2800 rpm |
| Fuel Type | Mixture (petrol 25: two-stroke oil 1) |
| Fuel Tank Capacity | 550 ml |
| Chain Lubrication Oil | Engine oil SAE (10W-30 all year, 30-40 summer, 20 winter) |
| Oil Tank Capacity | 260 ml |
| Guide Bar Length | 18 inches |
| Chain Pitch | 0.325 inch |
| Chain Gauge | 0.058 inch |
| Chain Brake | Yes (automatic and manual) |
| Oil Injection System | Automatic pump with adjuster |
| Kickback Protection | Front hand guard and chain brake |
| Spark Plug Gap | 0.65 mm |
| Package Contents | Drive unit, bar cover, guide, chain, spark plug wrench, screwdriver, screws |
Frequently Asked Questions - FZP 3001-B Fieldmann
User questions about FZP 3001-B Fieldmann
0 question about this device. Answer the ones you know or ask your own.
Ask a new question about this device
Download the instructions for your Saw in PDF format for free! Find your manual FZP 3001-B - Fieldmann and take your electronic device back in hand. On this page are published all the documents necessary for the use of your device. FZP 3001-B by Fieldmann.
USER MANUAL FZP 3001-B Fieldmann
natural_image
Abstract black-and-white spiral pattern with no text or symbolsFIELDMANN®
Home & Garden Performance

natural_image
Fieldmann industrial chain saw with visible branding and blade (no text-heavy elements)FZP 3001-B
English 11 - 29
Čeština 31 -49
Slovenčina 51 - 69
Magyarul 71 - 90
Polski 91 - 111
Русский 119 - 135
1
2
3
4
11 12
13
natural_image
Line drawing of hands using a tool to adjust or install a device (no text or symbols present)14
15 16
17 18
(a)
natural_image
Line drawing of a mechanical device with no visible text or symbols(b)
natural_image
Simple line drawing of a mechanical device with no visible text or symbols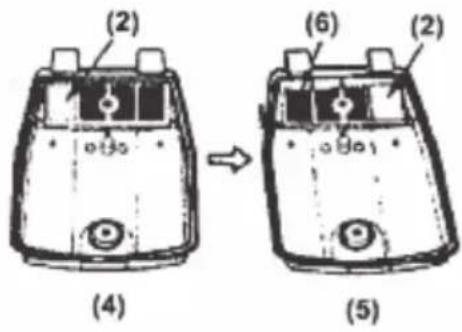
19
natural_image
Illustration of a person using a chainsaw to cut tree bark (no text or symbols)20 21
natural_image
Diagram illustrating a mechanical or fluidic process with circular objects and directional arrows, no text or symbols present.22 23
natural_image
Simple line drawing of a pipe or channel with a downward arrow indicating flow or direction (no text or symbols)24
25 26
27 28
natural_image
Technical line drawing of a mechanical device with two components, no visible text or symbols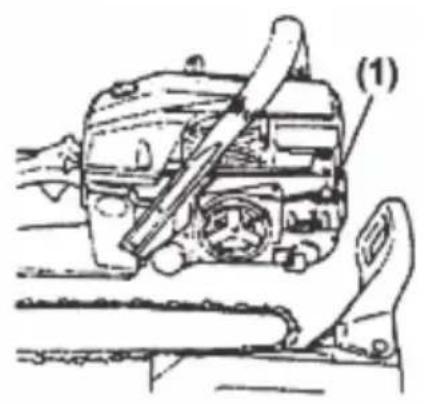
natural_image
Technical line drawing of a mechanical assembly with a tool and clamped parts (no text or symbols)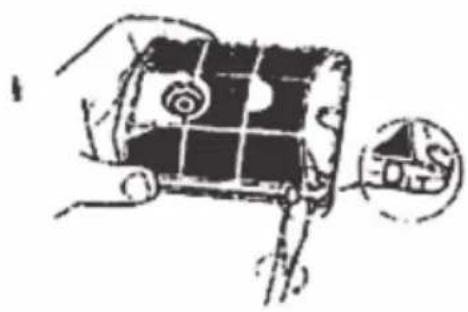
natural_image
Hand holding a small grid device with a magnified inset showing a small circular detail (no text or symbols visible)29
natural_image
Illustration of a hand holding a tool with a labeled point (1), no text or symbols present30 31
natural_image
Mechanical assembly diagram showing a lever mechanism with no visible text or symbols32 33
34
natural_image
Simple line drawing of a hammer cutting a block, no text or symbols present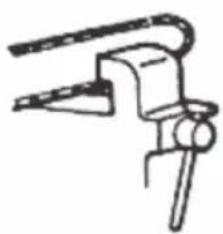
natural_image
Simple line drawing of a mechanical clamp or clamp device (no text or symbols)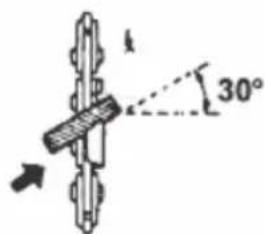
natural_image
Simple line drawing of a mechanical part with two circular holes and a notch, no text or symbols present.35
(3)21BP, 21VB: .025"(0.65mm)
36
37
Chainsaw
INTSTRUCTIONS FOR USE
Thank you for buying this chainsaw. Before use, please be sure to carefully read these instructions and keep them for possible future reference.
CONTENTS
VISUAL APPENDIX 2
- GENERAL SAFETY GUIDELINES 13
Important safety warnings
Package
Instructions for use
-
EXPLANATION OF INSTRUCTION LABELS ATTACHED TO THE MACHINE ..... 14
-
MACHINE DESCRIPTION AND SCOPE OF DELIVERY 16
-
SAFETY INSTRUCTIONS ...... 16
Before using your machine
Working equipment and clothing
- OPERATION 18
Fuel handling instructions
Before starting the engine
Engine startup
Operation
- MAINTENANCE 19
Transport
-
GUIDE AND CHAIN INSTALLATION 20
-
FUEL AND CHAIN LUBRICATION OIL 21
Fuel
Chain lubrication oil
- MOTOR OPERATION 21
Engine startup
Lubrication check
Carburettor setup
Carburettor anti-freeze device
Operation mode toggling
Chain brake
Engine shutdown
- SAWING 24
Kickback protection
Tree felling - MAINTENANCE 26
Maintenance after each use
Points of regular maintenance - CHAIN AND GUIDE MAINTENANCE 27
Chain
Chain guide - SPECIFICATIONS 28
- DECLARATION OF CONFORMITY 29
- DISPOSAL 29
1. . GENERAL SAFETY INSTRUCTIONS
Important safety warnings
* Unpack the product carefully and be sure not to throw away any part of the package before having found all components of the product.
- Keep the product in a dry place out of reach of children.
Read all cautions and instructions. The failure to adhere to warning cautions and instructions may result in an accident, fire and/or a serious injury.
Packaging
The product is placed in a package preventing damage during transport. This package is a raw material therefore it can be handed-over for recycling.
Instructions for use
Before beginning to work with the machine, read the following safety rules and instructions for use. Familiarize with operating elements and the proper use of the device. Keep the manual in a safe place for future reference. We recommend keeping the original package including the inner packaging materials, cash voucher and guarantee card for a period of warranty at minimum. For a case of transportation, pack the machine into the original box from the manufacturer, thus ensuring a maximum protection of the product during a possible transport (e.g. moving or sending into a service station).

Note: If you hand the machine over to next persons, hand it over together with the manual. Adherence to the attached instructions for use is a precondition for the proper use of the machine. The operation manual includes also instructions for operation, maintenance and repairs.
The manufacturer does not take any responsibility for accidents or damages resulting from the failure to adhere to this manual.
2. EXPLANATION OF INSTRUCTION LABELS ATTACHED TO THE MACHINE

"FUEL MIXTURE" refueling icon - position fuel tank cap

"CHAIN LUBRICATION OIL" refilling icon - position: oil tank cap

ON/OFF icon. The engine will switch to the "O" (STOP) position and will stop. Position: rear left of the unit

Choke icon. Pull the choke out half way to close. Position: rear right of the unit
flowchart
graph TD
    A["CHAIN OIL"] --> B["MAX"]
    B --> C["MIN"]
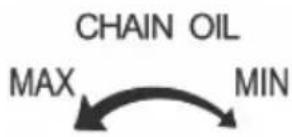
Chain lubrication oil injection icon "MIN" direction - oil injection will decrease; "MAX" direction - oil intake will increase. Position: clutch bottom
H
H position of the screw (used to set high
speed)
L
L position of the screw (used to set low speed)
T
The T position is used to set idle speed.
Position: rear left of the unit

Please read the instructions for use carefully before using the machine.

When operating the machine, please wear protective aids such as glasses, hearing protectors, etc.
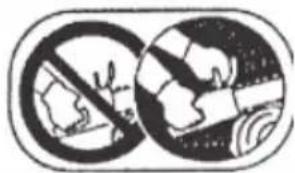
natural_image
Two circular diagrams showing a crossed-out road with a hand holding a vehicle, no text or symbols present.Always use both hands when operating your chainsaw.

Caution! Kickback hazard

Warning! Caution!
3. MACHINE DESCRIPTION AND SCOPE OF DELIVERY
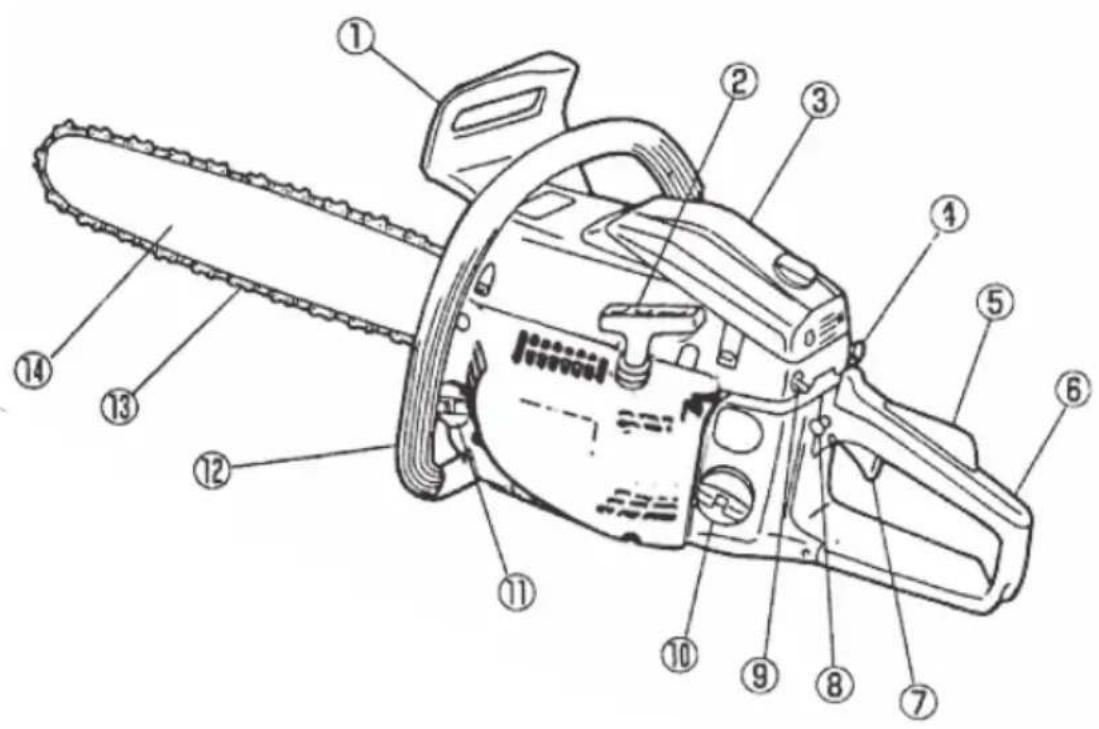
Machine description (see fig. 1)
| 1 - Front hand guard | 8 - Throttle arrest |
| 2 - Starter | 9 - Engine switch |
| 3 - Air filter | 10 - Fuel tank |
| 4 - Choke | 11 - Oil tank |
| 5 - Throttle safety lock | 12 - Front handle |
| 6 - Rear handle | 13 - Chain |
| 7 - Throttle lever | 14 - Guide |
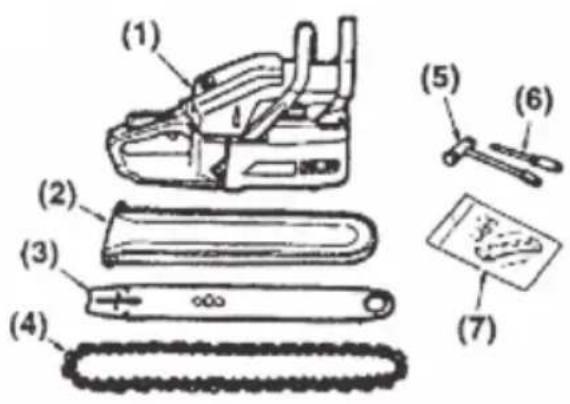
A standard chainsaw package consists of the following components (fig. 1)
Drive unit
Bar cover
Guide
Chain
Spark plug wrench
* Screw driver to adjust the carburettor
Screws and accessories
4. SAFETY INSTRUCTIONS
Caution! Safety guidelines in these instructions for use marked with the symbol contain critical points that require attention to be paid when operating the machine to prevent serious or fatal injuries. Please read through and observe the safety instructions thoroughly.
Caution! This symbol marks instructions that must be observed in order to prevent accidents which may lead to serious or fatal injuries.
Note: This symbol marks help or instructions that are useful when operating the machine.
Before using your machine
* Please read the instructions for use carefully before using the machine.
* Refrain from using the machine if you have used alcohol or addictive substances and/or if you are tired or exhausted. Refrain from using the machine if you are on drugs that may affect and/or limit your judgment abilities to safely operate the machine.
* Refrain from using the machine in indoor space as the released gases contain hazardous carbon monoxide.
* Never use the machine under any of the following conditions:
- The work area is slippery or weather conditions do not allow you to keep stable position when operating the machine.
- Under dark, strong fog or poor weather conditions that affect the work area visibility.
- In rain, storm or strong wind or other conditions that may be pose danger to using the machine.
If you are using the chainsaw for the first time, please consult with a skilled worker before you start.
Fatigue or physical exhaust may cause inattention that may lead to serious injury.
Please limit the machine operating time to about 10 minutes for a single use and try to have 10-20 minute rests between individual work sessions. Limit the total work amount to about 2 hours for a single day.
Make sure you always have the instructions for use with you to keep it ready when you need it.
Make sure to include the instructions for use when selling, lending or transferring the machine.
* Never allow children or other persons who are not enough familiar with the instructions to use the machine.
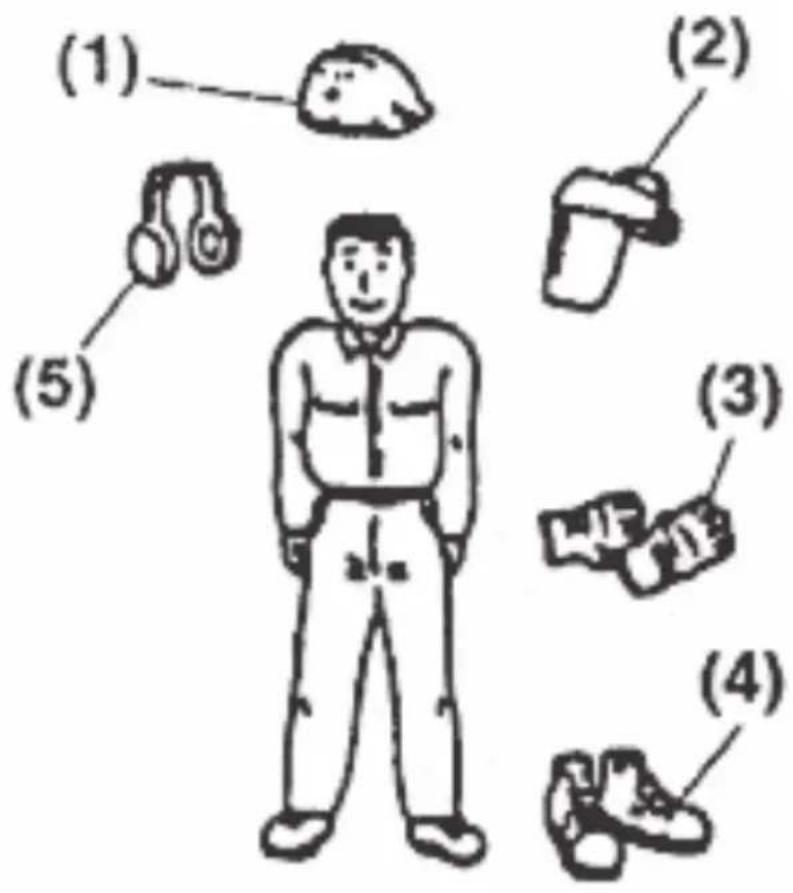
Working equipment and clothing (fig. 2)
You should wear the following working clothes and protective aids when operating the chainsaw:
- Helmet (1)
- Face protective glasses or shield (2)
- Work gloves (3)
- Anti-slip work shoes (4)
- Hearing protection (5)
Also, you should take the following items with you:
- Attached tools and files
- Sufficient store of fuel and oil to lubricate the chain
- Accessories to delimit the work area (rope, warning signs)
- Whistle (to call help)
- Saw or axe (for possible removal of obstacles)
When working make sure you never wear loose clothes or jewels that might get caught on the chainsaw. When working, never wear sandals or stay barefoot.
5. OPERATION
Fuel handling instructions
The machine's engine is designed to run on fuel mixture which is highly combustible. Never store fuel containers or refuel in the vicinity of naked flame, stove, electrical installations, welding jobs or other sources of heat or fire which may lead to inflammation.
It is forbidden to smoke when operating the machine or refueling.
When refueling, make sure that the machine is turned off and there are no sources of naked flame in its vicinity.
* Should the machine be stained with fuel, use a dry cloth to remove the stains.
After refueling, please screw back the tank cap, bring the machine at least 3m away from the refueling place and then start it up.
Before starting the engine
Please check the work area, subject to be cut and cutting direction. Remove any obstacles.
* Never launch any jobs until the work area is clean, you have secured a stable position and have planned an escape route from a falling tree.
Please be very careful and keep passers-by and domestic animals out of the work area at a distance of at least 2.5 times the length of the subject being cut.
Please check the machine for damaged, worn or missing parts. Please never use the machine if damaged, improperly adjusted or incomplete. Make sure the chain stops rotating when the throttle lever is released.
Engine startup
* Always hold the chainsaw with both hands. Take a firm grip on the handle. When operating the machine, keep all your body parts well away from the machine.
Before starting the engine, please make sure that the saw chain does not contact any unwanted subject.
Operation
- Keep the handles dry, clean and free of oil or fuel stains.
Do not touch damper, spark plug or other metal parts of the engine while the machine is running or immediately after it stops - this poses risk of burning or electric shock.
* Please pay extreme attention to cutting thin twigs and small trunks since such fragile material may be caught by the chain, flung against the operator and thus result in a loss of balance.
When cutting sprung branches, remember they may be flung forward once their tension is released by cutting the wood fibers.
Please check and remove any dry branches that might be released from the falling tree.
Please make sure the machine is shut down before you put it away.
A kickback notice for the chainsaw user
CAUTION! A kickback may occur if the front of the bar comes into contact with the subject or if the chain is clamped by material being cut in the section. Upon contacting the subject, the saw may be flung backward with the bar moving up and back towards the operator. Clamping the chain inside the section may lead to a fast flyback of the bar towards the operator. Both of these reactions may result in losing your control over the saw with subsequent serious injuries. Do not rely just on the saw safety elements. As the saw user, you should always observe some rules to prevent accidents or damages.
If you are familiar with the kickback principle, you can reduce or eliminate the moment of being surprised. Abrupt reactions lead to accidents.
When the engine is running, take a firm grip on the saw with both hands holding the rear handle with your right hand and the front handle with your left hand. Hug the saw handles firmly with your thumb pressing against other fingers. A firm grip helps to limit the kickback and keep control over the saw.
The workplace must be free of any obstacles. While operating the saw, the bar loose end must not brush against branch, trunk or any other obstacle.
* Always cut at the engine's high speed.
In order to prevent losing your stable position during cutting, always make sure you are not cutting above the level of your shoulders.
* Observe manufacturer instructions for chain lubrication and sharpening.
Use only manufacturer specified spare chains and bars or equivalents.
6. MAINTENANCE
* To ensure long and reliable service of your chainsaw, ensure that regular maintenance and service inspections are made.
Before starting any maintenance or test jobs, always make sure that the engine is turned off.
⚠️ CAUTION! The saw metal parts remain hot even after turning the engine off.
Please have any repair other than described in the instructions for use made in an authorized service center.
Transport
Please do not carry the saw unless the engine is turned off and the bar protective guard is attached.
7. GUIDE AND CHAIN INSTALLATION
A standard chainsaw package consists of the following components (fig. 3):
Drive unit (1)
Bar cover (2)
Guide (3)
Chain (4)
Spark plug wrench (5)
* Screw driver to adjust the carburettor (6)
* Screws and accessories (7)
Remove the guide and the chain from the packaging and install them on the drive unit as follows:
⚠️ CAUTION! The chain teeth are very sharp. For your safety, wear strong protective gloves.
* Pull the protective frame toward the front handle to make sure that chain brake in not engaged.
* Loosen the nuts and remove the chain cover.
Install the attached spike on the drive unit.
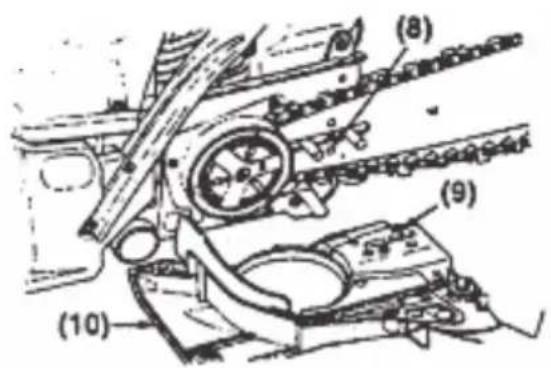
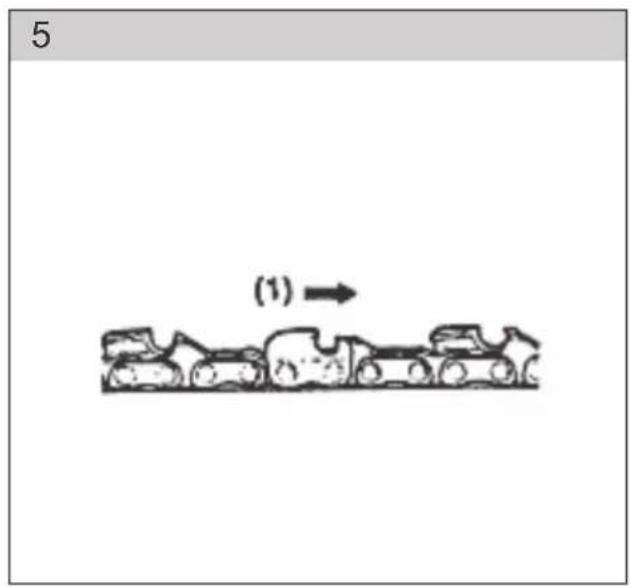
Run the chain over the pinion and while holding the chain on the bar fix the bar on the drive unit. Tighten the chain cover tensioning nut down to the bottom hole on the guide (fig. 4):
Hole (8)
* Tightening nut (9)
Chain cover (10)
Note: The chain must be attached to the bar in proper direction (fig. 4).
* Moving direction
* Attach the chain cover to the drive unit and tighten the nuts by hand.
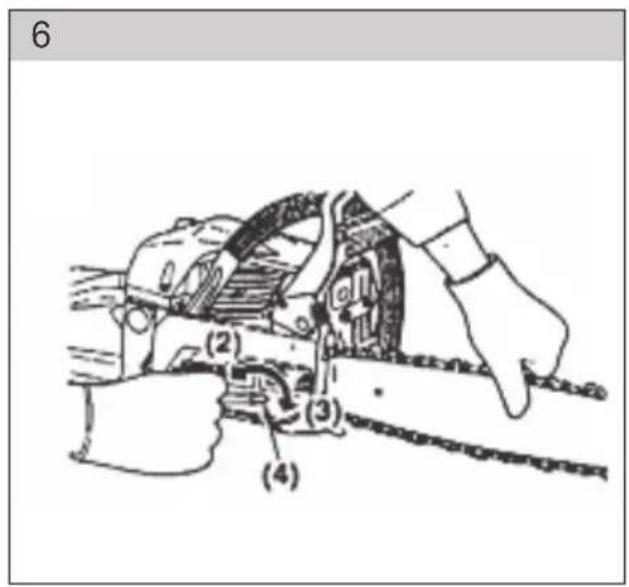
* Lift the bar loose end and turn the chain tensioning screw by a screwdriver, so that the chain links will touch the bottom of the bar guide groove (fig. 6).
* Lift the bar loose end and firmly tighten the bar nuts (12 - 15 Nm). While moving the chain by hand, check free running and correct tensioning. Make any adjustments as necessary
* Tighten the tensioning device bolt.
Loosen (2) (fig. 6).
* Tighten (3) (fig. 6).
* Tensioning device screw (4) (fig. 6).
Note: A newly installed chain will slightly extend after some time of use. Please check the chain tensioning frequently as a loose chain may easily come out of the guide groove or cause its fast wear.
8. FUEL AND CHAIN LUBRICATION OIL
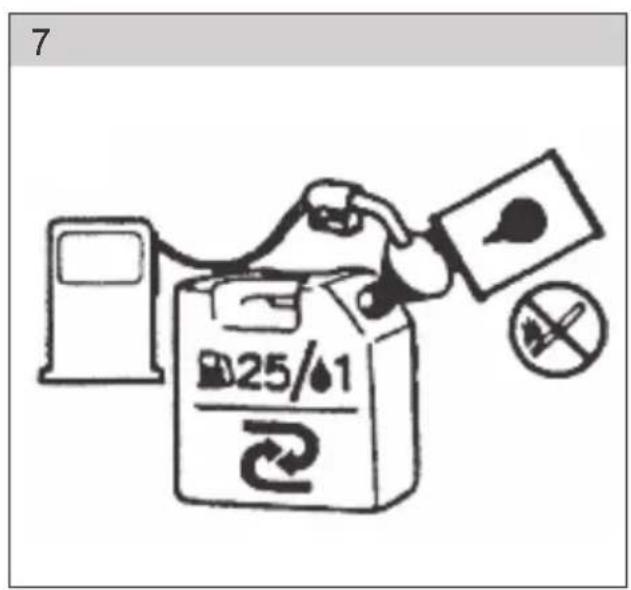
Fuel (fig. 7)
* Mix common petrol (lead or lead-free, alcohol-free) with quality oil used in air-cooled two stroke engines (manufacturer recommended oils).
Recommended fuel mixing ratios:
| When using Petrol: Oil | |
| up to 20 hours 20:1 | |
| over 20 hours 25:1 |
25:1 Mixing ratio table
| Liters of petrol 1 2 3 4 5 | |||||
| Oil for two-stroke engines in ml 40 80 | 120 160 | 200 |
⚠️ CAUTION! Do not smoke or use naked flame in fuel storage area and when handling the fuel. Please mix and store the fuel in a dedicated petrol can only.
Note: Used fuel is the usual cause of most engine failures. Do not mix petrol with oil designed for four-stroke engines.
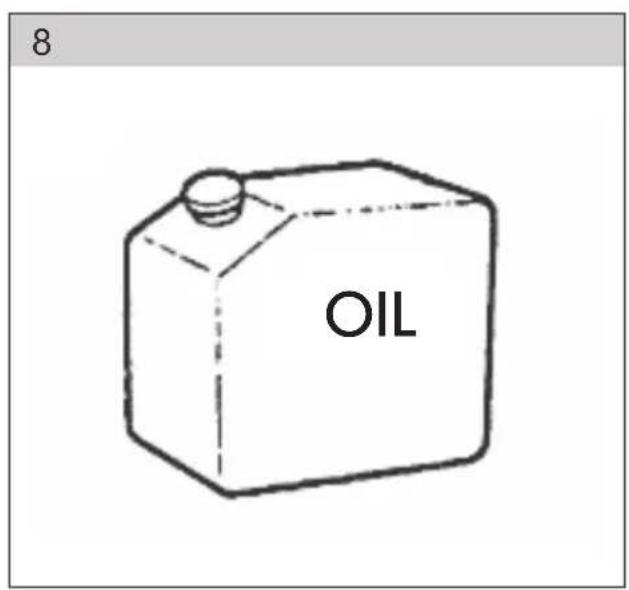
Chain lubrication oil (fig. 8)
* Please use engine oil SAE#10W\~30 all year round, engine oil SAE#30\~#40 in summer and engine oil SAE#20 in winter (manufacturer recommended oils).
Note: Do not use already used or recycled oil; otherwise, oil pump damage could occur.
9. MOTOR OPERATION
ENGINE STARTUP
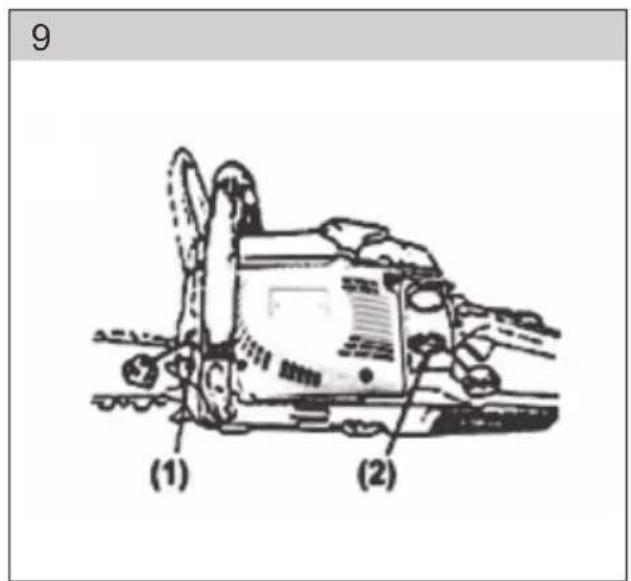
* Add fuel or chain lubrication oil and tighten the filler caps. (fig. 9).
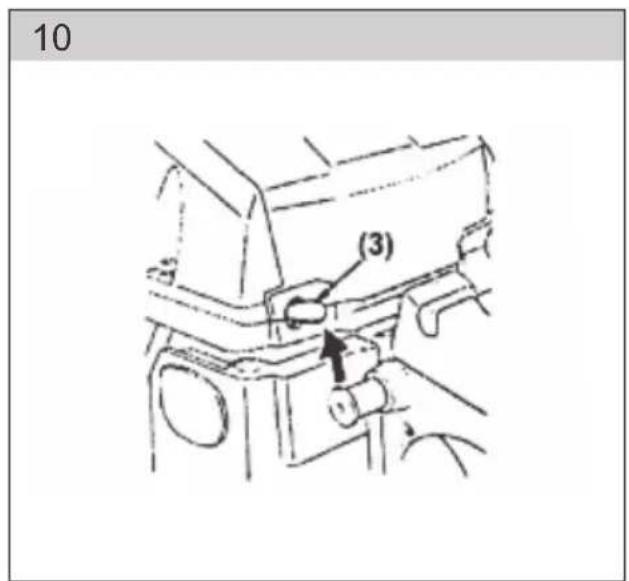
Set the switch to „I“ position (fig. 10).
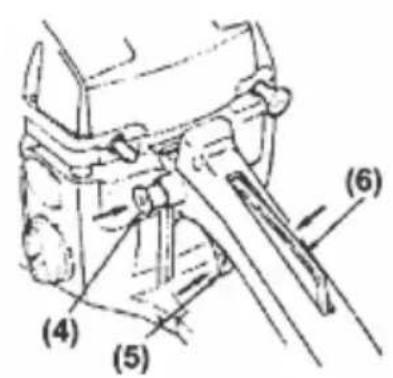
Hold the throttle control lever and the lock simultaneously, press the side plate and then release the throttle lever which will remain in its starting position (fig. 11).
* Chain lubrication oil (1) (fig. 9).
* Fuel (2) (fig. 9).
Switch (3) (fig. 11).
* Throttle control lever arrest (4) (fig. 11).
* Throttle control lever (5) (fig. 11).
* Throttle lever lock (6) (fig. 11).
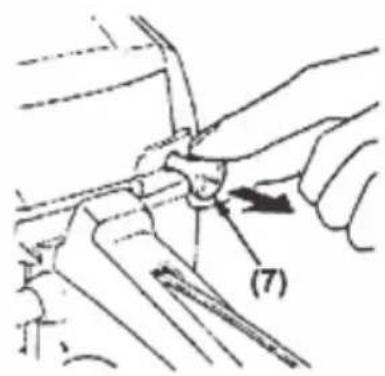
Choke (7) (fig. 12).
* Pull the choke lever up to the closed position (fig. 12).

Note: When restarting the engine immediately after stop please move the choke lever to the first position (open).
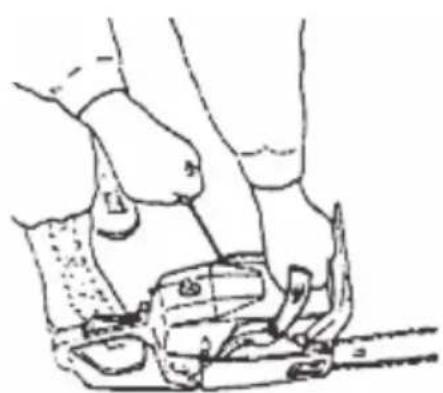
Hold the saw firmly against the base and pull the starter rope sharply (fig. 13).

CAUTION! DO NOT start the saw when you are holding it by your hands. This is very dangerous as the chain might come into contact with your body.
If the engine failed to start, press the choke lever and pull the starter rope again.
* Pull out the throttle control lever to allow the engine to warm up.

CAUTION! Keep away from the chain as the chain will start running once the engine is started.
Lubrication check
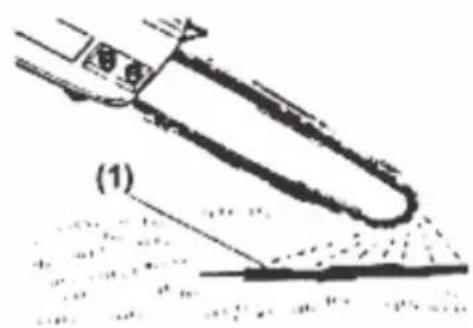
Once the engine is started, allow the chain to run at low speed and check if the chain is splashing oil, as shown on fig. 14.
* Chain lubrication oil (1) (fig. 14).
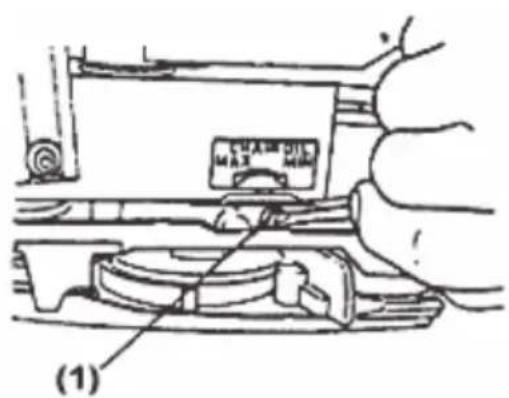
The oil flow can be set with a screwdriver at the bottom hole on the clutch side. Set according to your work conditions. (fig. 15).
* Screw to set the oil flow (1) (fig. 15).

Note: When the fuel is consumed, the oil tank is almost empty. Please refill the oil tank on each refueling.
Carburettor setup (fig. 16)
The carburettor comes adjusted from the factory. If it's necessary to make a new setting due to altitude changing or working conditions, please have the saw adjusted by a qualified dealer. Wrong setting may lead to machine damage. Before setting the carburettor, make sure that the fuel and air filter is clean and the fuel is properly mixed. If you make the setup on your own, please follow the procedure below carefully.

Note: Do not adjust the carburettor unless the chain is in place.
* Stop the engine and turn the H and L screws until they both stop. Do not apply excessive force! Then, turn the screws back within the range below:
„H“ screw: 13/8
„L“ screw: 11/4
* Start the engine and allow it to worm up by pulling out the throttle lever (i.e. at low speed).
Turn the L screw slowly clockwise up to the point where the idle speed reaches its maximum. Then, turn the screw head back counterclockwise by a quarter of turn ( 14 ).
Turn the idle speed adjustment screw (T) counterclockwise until the chain stops. If the idle speed is too low, turn the screw clockwise.
- Perform a test cut and set the "H" screw to an optimum performance, not to a maximum speed.
L (1) screw (fig. 16)
H(2) screw (fig. 16)
* Idle speed adjustment screw (3) (fig. 16)
Carburettor anti-freeze device
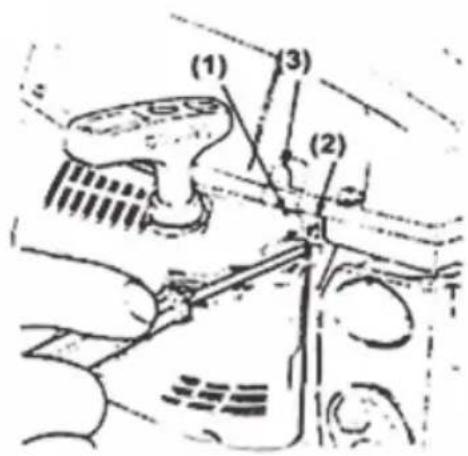
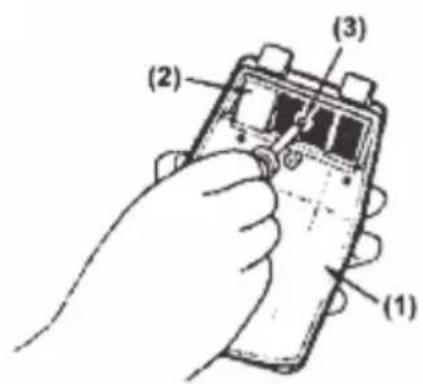
When operating the saw at temperatures of 0 to 5 °C and high humidity, ice may form inside the carburettor. This leads to performance reduction or irregular machine running. Thus, installing a dedicated accessory allows the saw to heat up the air fed from the right of the cylinder head to prevent ice formation. Under normal conditions, the saw operates in default mode, i.e. the one used right at the time of purchase. If ice formation occurs, the saw must be switched to the anti-freeze mode before use (fig. 17).
Operation mode switching (fig. 17)
Switch the lever to turn the engine off.
Remove the air filter lid from the cylinder cover.
Loosen the screw and remove the diaphragm from the back of the air filter lid.
* Fix the diaphragm back in place so that the anti-freeze cap is positioned to the right of the diaphragm. Fix the cylinder cover back in its original position.
Air filter lid (1) (fig. 17).
Anti-freeze cap (2) (fig. 17).
Screw (3) (fig. 17).
* Normal operating mode (4) (fig. 17).
Anti-freeze mode (5) (fig. 17).
Diaphragm (6) (fig. 17).
⚠️ CAUTION! Operating the saw in the anti-freeze mode even when the temperatures have returned to normal may cause engine startup problems or prevent working at normal speed. Therefore, it is necessary that the saw be switched back into the normal operating mode if there is no more any freezing risk
When operating the saw in the anti-freeze mode, please check the diaphragm regularly and keep it clean (remove any saw dust).
Chain brake
This saw incorporates an automatic brake to stop the chain rotation after a kickback occurs
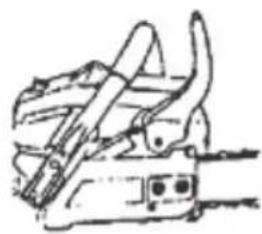
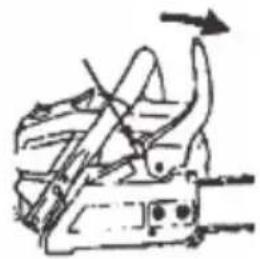
during cutting operation. The brake activates automatically by inertial force acting on the weight located under the front cover. This brake can be also operated manually by lowering the front protective frame towards the bar (fig. 18)
Lifting the front protective frame until a click is heard will release the brake again.
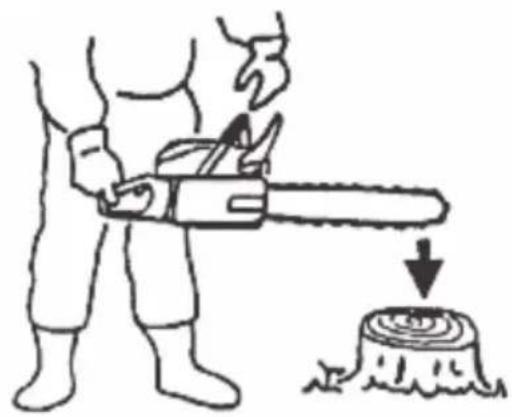
⚠️ CAUTION! Before each use, check the chain brake correct function by following the procedure below.
Turn the engine off.
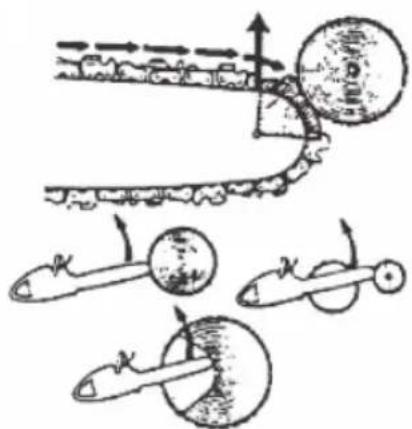
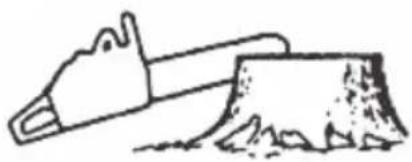
Hold the saw horizontally, release your hand from the front handle and catch the front of the bar on a stub or a wood chunk. The brake must engage. The braking intensity varies with the bar length (fig. 19). If the brake fails to operate, please have the saw repaired by an authorized service. If the brake has engaged but the engine is still running at high speed, the clutch will overheat and be damaged. If the brake engages during operation, release the throttle lever to turn the engine off immediately
Engine shutdown
Release the throttle lever and leave the engine running at idle speed for several minutes.
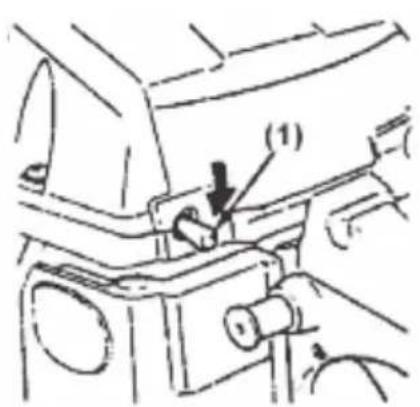
Set the switch to „0“ position (STOP). (fig. 20).
Switch (1) (fig. 20).
10. CUTTING
⚠️ CAUTION! Please read the „Safe operation“ chapter before you continue. We recommend that you gain some experience by cutting smaller chunks. In this way, you will become familiar with the saw.
Always observe safety instructions. The chainsaw is designed to cut wood only. Cutting other materials is inadmissible. Vibrations and kickback vary with different materials. Do not use the saw as a lever to lift, move or destroy objects. Do not place the saw on fixed stands. It is forbidden to attach parts or fixtures to the saw other than those specified in the technical documentation.
* You don't need to press the saw into the cut. When the engine is running at full throttle, apply just a slight pressure on the saw.
If the chain gets caught inside the cut, don't try to pull to release but use a wedge or a lever to expand the cut instead.
Kickback protection (fig. 21)
This saw incorporates a chain brake which immediately stops the chain should a kickback occur if it works correctly. The chain brake function should be checked before each saw use. Run the saw at full throttle for 1 - 2 seconds and then lower the front guard. The chain must
stop immediately even at full engine speed. If the chain stops slowly or doesn't stop at all, please replace the brake jaws and the clutch drum before further use.
It is extremely important that the chain brake function and chain sharpening status should be checked before each use in order to keep necessary safety level of the saw in case of a kickback. Overriding safety devices, incorrect maintenance or using inappropriate bar or chain may lead to serious injuries in case of a kickback.
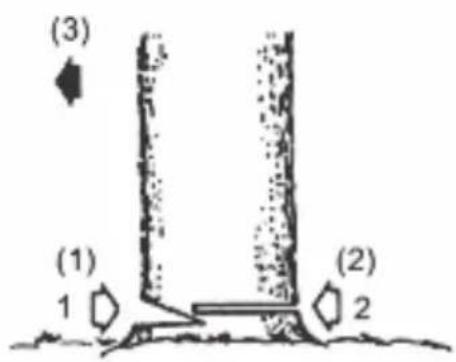
Tree felling (fig. 22)
Please determine the tree falling direction considering wind direction, tree inclination and location of branches as well as all other factors before you start the work.
The tree surrounding area must be open, free of obstacles and allow your stable position to be taken. The escape route must be passable.
Please make a wedge notch down to a third of the trunk diameter on the side where the tree is supposed do fall.
On the opposite side, please make a separation cut above the wedge notch level.
⚠️ CAUTION! When felling trees, please warn other persons in the neighborhood of a potential hazard.
* Wedge notch (1) (fig. 22)
* Separation cut (2) (fig. 22)
* Falling direction (3) (fig. 22)
Debranching and trunk felling
⚠️ CAUTION! Always keep a stable position. Keep off the chunks.
The chunk being cut may roll away. Always stand above the chunk being cut especially when working on a slope
Take precautions against the saw kickback by following the instructions described in the "Safe operation" chapter.
Before you start, please evaluate the direction of the cut trunk bending force. Make sure you always make the final cut on the opposite side of the trunk bending force action to prevent clamping the bar inside the section.
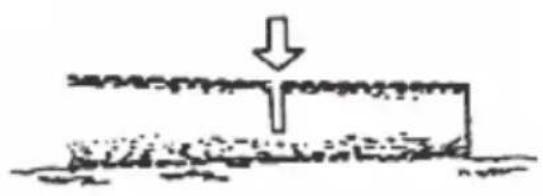
A Chunk lying on the ground (fig. 23).
* Cut in half, then turn around and finish the cut from the opposite side.
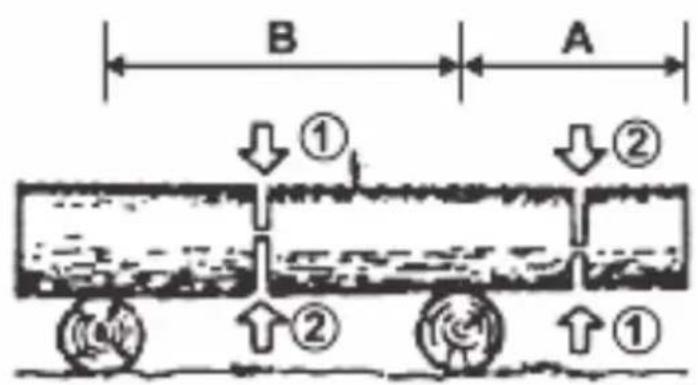
B Chunk above the ground (fig. 24).
In the „A” section, make a cut up to a third of the chunk from beneath, then finish the cut from above. In the „B” section, make a cut up to a third, then finish the cut from beneath.
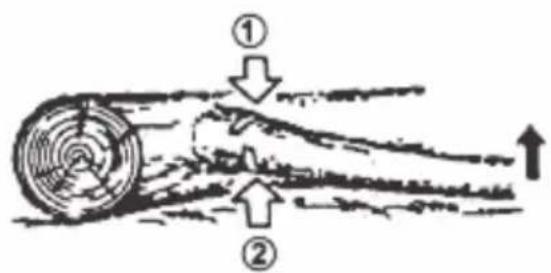
* Debranching a fallen tree (fig. 25).
* At first, determine the direction in which the branch is bent. Then, make an initial cut from the bending side and then finish the cut from the opposite side.
⚠️ CAUTION! A bent branch may fling.
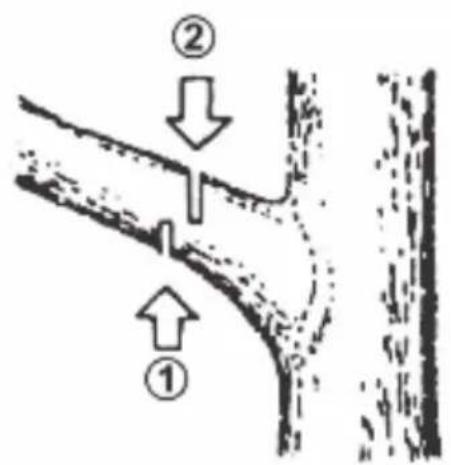
Debranching a standing tree (fig. 26).
* Start cutting from beneath, finish from top downward.
⚠️ CAUTION! When working, never use unstable platforms or ladders.
Do not lean.
Do not cut above the height of your shoulders.
Always hold the saw with both hands when cutting.
11. MAINTENANCE
⚠️ CAUTION! Before cleaning, inspecting or repairing the saw it is required that the engine should be turned off and cold and the glow plug removed in order to prevent inadvertent start.
Maintenance after each use
Air filter:
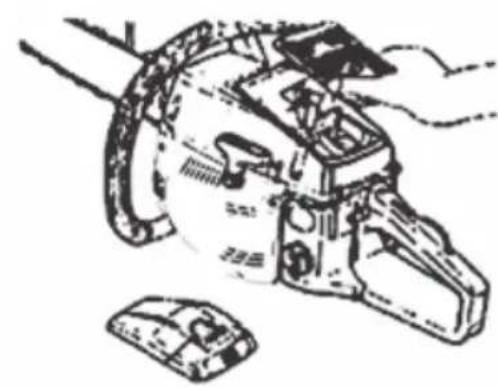
Loosen the nut and remove the air filter lid. Remove the filter element and brush away any dust deposits. If the filter element is clogged by dust, split it into two parts and wash them in petrol. If you are using compressed air, blow from inside. (fig. 27)
Lubrication hole:
Please remove the bar and check the lubrication hole continuity. (fig. 28)
Guide:
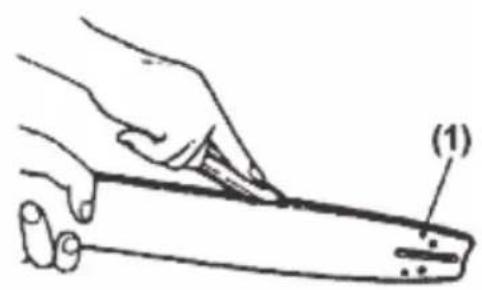
Once the bar is removed, please clear the dust from grooves and lubrication hole. (fig. 29) Lubricate the pinion hub at the front of the bar through the lubrication hole. When assembling the two parts, please press the hem until it clicks. (fig. 30)
* Lubrication hole (1) (fig. 28) (fig. 29)
Grease hole (2) (fig. 30)
* Pinion (3) (fig. 30)
Other parts:
Please check for possible oil leaks, loose covers and damage to the main sections, mainly at the mounting points of handle and bar. Any problems that are found must be fixed before further use of the saw.
Points of regular maintenance
Cylinder ribwork:
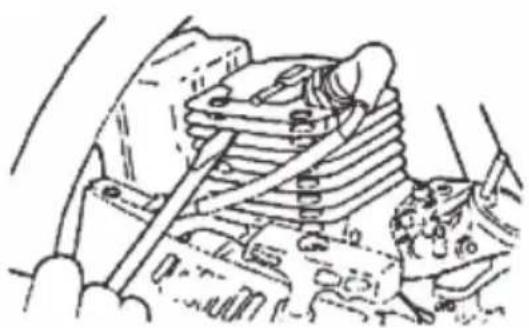
Dust deposits on the cylinder ribwork causes the engine to overheat. Regularly check and clean the cylinder ribwork. The air filter and the cylinder head cover must be removed before this action. When reassembling the cover, the wiring with bushings must be positioned correctly. (fig. 31)

Note: Make sure that the air inlet holes are clean.
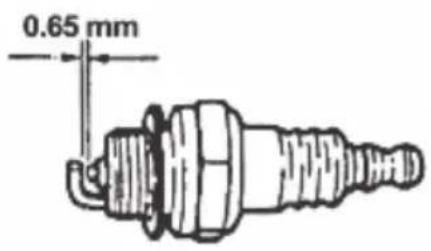
Spark plug (fig. 32):
If necessary, clean the electrodes with a wire brush and adjust the gap between them to 0,65 mm.
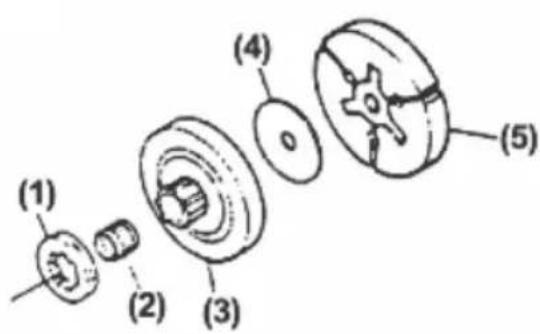
Geared pinion (fig. 33):
Check the pinion for flaws and excessive wear caused by the chain. Replace the pinion if the wear is high. Never use a new chain together with a worn pinion or vice versa.
* Pinion (1) (fig. 33)
* Spike/screw sealing (2) (fig. 33)
* Clutch drum (3) (fig. 33)
* Insert (4) (fig. 33)
* Slip foot/jaw (5) (fig. 33)
* Fuel filter:
Disassemble the filter and wash in petrol or replace with new if necessary.
Oil filter:
Disassemble the filter and wash in petrol or replace with new if necessary.
* Front and rear dampers :
If the damper rubber section is damaged or worn, replace it. If the rear damper metal part is distorted by the set pin impacts and the clearance between these parts increases, replace them.
12. CHAIN AND GUIDE MAINTENANCE
Chain
⚠️ CAUTION To ensure safe and faultless saw operation, it is required that the chain should be sharp at all times.
Chain sharpening rules:
CAUTION! Wear protective gloves
Before sharpening:
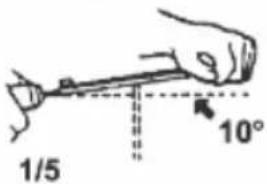
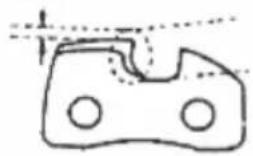
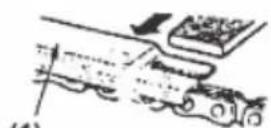
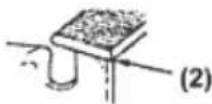
Apply the file to the cutting link and push directly forward. Keep the file in the position as shown. (fig. 34) After sharpening of each link, check the depth using a feeler gauge; file down to adjust as shown if necessary. (fig. 35).
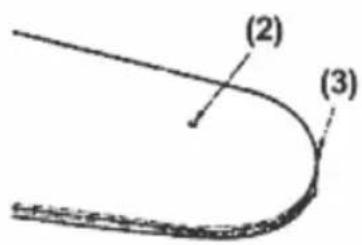
⚠️ CAUTION! The front edge must be round in order to reduce the risk of kickback or clamping inside the section.
Suitable feeler gauge (1) (fig. 35)
* Feeler gauge reference level (2) (fig. 35)
Link/edge standard depth (3) (fig. 35)
- Suitable feeler gauge (1) (fig. 35) - Feeler gauge reference level (2) (fig. 35) - Link/edge standard depth (3) (fig. 35)
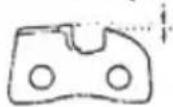
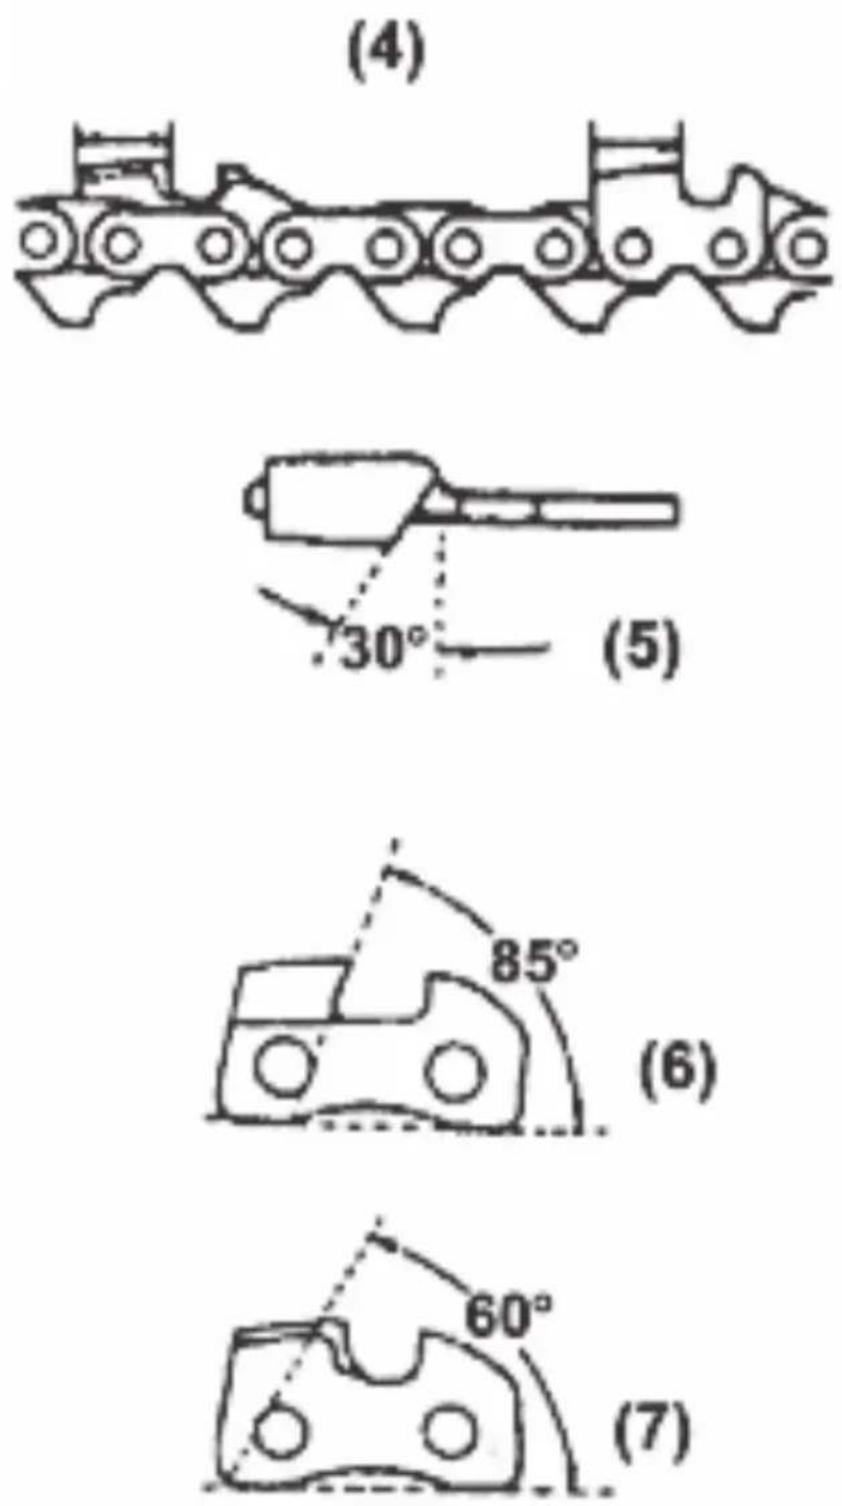
* Each cutting link must have equal length and edge bevels as shown. (fig. 37)
* Cutting link length (4) (fig. 37)
File angle (5) (fig. 37)
* Vertical bevel (6) (fig. 37)
Edge cutting angle (7) (fig. 37)
Chain guide
Turn the chain guide over from time to time to prevent unilateral wear.
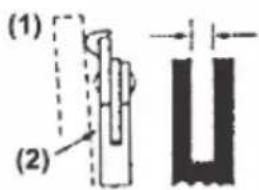
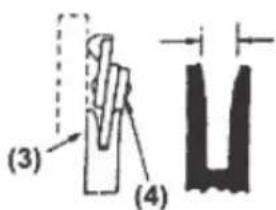
The bar groove must be rectangular at all times. Check the bar groove for wear. To check, apply a ruler to the bar and the outer edge of the cutting links. If there is a gap between them, the bar is OK. Otherwise, the bar is worn. This means the bar needs a repair or a replacement. (fig. 36).
Ruler (1) (fig. 36).
Gap (2) (fig. 36).
* Zero gap (3) (fig. 36).
The chain tilts (4) (fig. 36).
13. SPECIFICATIONS
Chainsaw type: 4500
Weight (without guard and chain): 5.5 (Kg)
Dimensions (without guard and chain): 410x235x265 (mm)
Fue: ...... Mixture (petrol 25: two-stroke oil 1) (manufacturer recommended oils)
Fuel tank capacity: 550ml
Chain lubrication oil: Engine oil SAE (manufacturer recommended oils)
Oil tank capacity: 260ml
Engine: 45,2 (cm3)
Maximum engine output power: 1,7 kw /7500rpm
Maximum engine speed with cutting accessories: 10000rpm
Maximum engine speed at idle run: 2800rpm
Maximum chain length: 38cm
Gear wheel: 7Tx0.325
Chainsaw pitch: 0.325 (in)
Chainsaw inclination: 0.058
Bar type: Toothed chain
Bar dimensions: 18 (in)
Oil injection system: .... Automatic pump with adjuster
Instructions Manual - language version only.
14. DECLARATION OF CONFORMITY
EC Declaration of Conformity
FAST ČR, a.s., Černokostelecká 1621, 251 01 Ríčany u Prahy, tel.: 323204111, declares obligatorily that Fieldmann FZP 3001-B (year of manufacture is marked on the type plate and is followed by the machine serial number) conforms to regulations of the COUNCIL DIRECTIVES:
EC no. 2006/42/EC, 2004/108/EC, (number of the approval certificate: CSG177428)
Approval number: e11*97/68SA*2004*26*0843*00
and it was tested in conformity with standards below:
EN 836:1997 +A1+A2+A3+AC; EN ISO 14982:1998
FAST ČR, a.s. company is entitled to act on behalf of the manufacturer.
CE label: 12
In Ríčany, on 29/12/2011
Name Stamp Signature

15. DISPOSAL
INSTRUCTIONS AND INFORMATION ON USED PACKAGE DISPOSAL
Put the used packaging material to the place designated for waste disposal by a municipality.
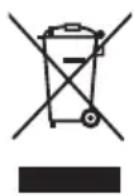
The machine and its accessories are made of various materials, e.g. of metal and plastics. Hand-over damaged components to sorted waste. Get yourselves informed at a respective authority.

This product meets all fundamental requirements of EU directives relating to it.
Changes of the text, design and technical specifications can be done without prior notice and we reserve the right for the changes.
flowchart
graph LR
    A["CHAIN OIL"] --> B["MAX"]
    B --> C["MIN"]
flowchart
graph LR
    A["CHAIN OIL"] --> B["MAX"]
    B --> C["MIN"]
natural_image
Fieldmann industrial chain saw with visible branding and blade (no text-heavy elements)
FIELDMANN®
Home & Garden Performance

- FIELDMANN®
- Chainsaw
- INTSTRUCTIONS FOR USE
- CONTENTS
- . GENERAL SAFETY INSTRUCTIONS
- Important safety warnings
- Packaging
- Instructions for use
- EXPLANATION OF INSTRUCTION LABELS ATTACHED TO THE MACHINE
- MACHINE DESCRIPTION AND SCOPE OF DELIVERY
- SAFETY INSTRUCTIONS
- Before using your machine
- Working equipment and clothing (fig. 2)
- OPERATION
- Fuel handling instructions
- Before starting the engine
- Engine startup
- Operation
- A kickback notice for the chainsaw user
- MAINTENANCE
- Transport
- GUIDE AND CHAIN INSTALLATION
- FUEL AND CHAIN LUBRICATION OIL
- Fuel (fig. 7)
- Chain lubrication oil (fig. 8)
- MOTOR OPERATION
- Lubrication check
- Carburettor setup (fig. 16)
- Carburettor anti-freeze device
- Operation mode switching (fig. 17)
- Chain brake
- Engine shutdown
- CUTTING
- Kickback protection (fig. 21)
- Tree felling (fig. 22)
- MAINTENANCE
- Maintenance after each use
- Points of regular maintenance
- CHAIN AND GUIDE MAINTENANCE
- Chain
- Chain guide
- SPECIFICATIONS
- DECLARATION OF CONFORMITY
- EC Declaration of Conformity
- DISPOSAL
- INSTRUCTIONS AND INFORMATION ON USED PACKAGE DISPOSAL
Brand : Fieldmann
Model : FZP 3001-B
Category : Saw