
H3902 - Iron IMETEC - Free user manual and instructions
Find the device manual for free H3902 IMETEC in PDF.


| Product Type | Steam Iron |
| Brand | Imetec |
| Model | H3902 |
| Power Supply | 220-240V~, 50Hz, 2200W |
| Water Reservoir | Removable, with max fill level indicator |
| Temperature Settings | Adjustable knob with settings for synthetic, silk/wool, cotton/linen |
| Steam Settings | Adjustable steam selector (0 to max) including ECO mode |
| ECO Function | Yes, reduces energy consumption for delicate fabrics |
| Super-Steam Function | Provides strong steam shot for stubborn creases |
| Vertical Steam | Yes, for curtains and hanging clothes |
| Spray Function | Yes, adjustable spray (dense or mist) |
| Dry Ironing | Yes, by setting steam selector to 0 |
| Soleplate | With steam holes |
| LED Indicator | Soleplate temperature LED (heating/ready) |
| Safety Features | Auto shut-off not specified; requires stable surface; keep away from children |
| Cleaning | Wipe soleplate with damp cloth; plastic parts with damp cloth |
| Water Type | Tap water; mix with distilled if hard; no additives |
| Includes | Water cup |
| Warranty | Manufacturer warranty, details in attached sheet |
Frequently Asked Questions - H3902 IMETEC
User questions about H3902 IMETEC
0 question about this device. Answer the ones you know or ask your own.
Ask a new question about this device
Download the instructions for your Iron in PDF format for free! Find your manual H3902 - IMETEC and take your electronic device back in hand. On this page are published all the documents necessary for the use of your device. H3902 by IMETEC.
USER MANUAL H3902 IMETEC
Tel. +39.035.688.111 Fax +39.035.320.149


Operating instructions
natural_image
Simple diagram showing a curved arrow inside a divided rectangular area (no text or symbols)

[A]
GUIDA ILLUSTRATIVA
ILLUSTRATIVE GUIDE
GUÍA ILUSTRATIVA
GUIA ILUSTRATIVO
KÉPES HASZNÁLATI òTMUTATÓ
UDHEZIME ILUSTRUESE
SLIKOVNI VODNIK
![[B] Max Ø](/content/2026/05/844556/images/9c68ddd6e0f394e65d131cdf6175610d5c0f0a9413a459a1beeae6af60fe4323.jpg)
![IMETEC H3902 - [A] - 3](/content/2026/05/844556/images/70d15d3e21bd78c9a1c1a5d472416d46248f71e7ec25e26b81e39119cd41cb36.jpg)
natural_image
Close-up of a robotic arm holding a tool, showing mechanical components and motion (no text or symbols visible)![[D] Ø Max](/content/2026/05/844556/images/9f29ca08b646fbdb41720d50c495b405654d12fef0e6a1d43009ba3de2c3c039.jpg)
![IMETEC H3902 - [A] - 5](/content/2026/05/844556/images/61d9601ffa90ac686a59f51b4ab6d6de3808689d9494f45cbf5efa3d2e45647a.jpg)
natural_image
Illustration of a steam iron with exhaust plume emitting smoke, no text or symbols present![IMETEC H3902 - [A] - 6](/content/2026/05/844556/images/65e80b95fbdcfe49104dd901d78c7c745b62b6387e606938360c01d663681dc6.jpg)
natural_image
Illustration of a steam iron with smoke clouds and exhaust plume (no text or symbols)![IMETEC H3902 - [A] - 7](/content/2026/05/844556/images/1b1ec2dd41a48b7695f5fffb288aeb88c1b51029f426cb7489b925e1d9da9f7c.jpg)
natural_image
Illustration of a steam iron with showerhead emitting powder, no text or symbols present||
![IMETEC H3902 - [A] - 8](/content/2026/05/844556/images/b06e678e82c4bb00567726f188305cfd0f34ab24b7028be7bd12d7596d68079e.jpg)
DATI TECNICI
TECHNICAL DATA
DATOS TÉCNICOS
DADOS TÉCNICOS
MÜSZAKI ADATOK
TE DHENA TEKNIKE
TEHNIČNI PODATKI
TEXNIKA ΣΤΟΙΧΕΙΑ
TYPE H3902
220-240 V 50 Hz 2200W
![IMETEC H3902 - [A] - 9](/content/2026/05/844556/images/4af4853a1390ee2c77e11e30b03ebc086ccef7563c28e570995dd66cfe3ff9f8.jpg)
![IMETEC H3902 - [A] - 10](/content/2026/05/844556/images/12891d0ceadf7e173e5ca0b5eb9af43aad69775de8cfbeba080694c3d8decfd9.jpg)
![IMETEC H3902 - [A] - 11](/content/2026/05/844556/images/6d207e354c2c985bba729b1a4013224181a92e2231b94f475cdb29f367aed67e.jpg)
![IMETEC H3902 - [A] - 12](/content/2026/05/844556/images/4b6a158de3a0fd7f8cd057fed069e5bb1ccee37493ec9aaa4e94077f56831416.jpg)
ME10
IMETEC
www.imetec.com
III
IT
![IMETEC H3902 - [A] - 13](/content/2026/05/844556/images/666ffdcb0e5a42e89930ac952ca8a4605fe9bf8c8e42bb6a6ac61ac0eb1b07c1.jpg)
ISTRUZIONI PER L'USO DEL FERRO A VAPORE
Dear customer, IMETEC thanks you for having purchased this product. We are certain you will appreciate the quality and reliability of this appliance, designed and manufactured with customer satisfaction in mind. These instructions for use have been drawn up in compliance with the European Standard EN 62079.

ATTENTION!
Instructions and warnings for a safe use.
Please read the use and safety instructions before using the appliance and follow these at all times. Keep this manual and illustrative guide with the appliance for future consultation. Should you pass the appliance on to another user, make sure to also include this documentation.
Should certain parts of this user manual be difficult to understand or should doubts arise, contact the company before using the product, at the address indicated on the last page.
CONTENTS
OPERATING INSTRUCTIONS page 10
SAFETY WARNINGS page 11
DESCRIPTION OF THE APPLIANCE AND ACCESSORIES page 13
PREPARATIONS page 14
TIPS ON IRONING page 14
USE page 15
- Filling the reservoir page 15
- Selecting the temperature page 15
• ECO function page 15 - Ironing without steam (dry) page 15
- Ironing with steam page 15
- Super-steam and vertical steam page 16
- Spray function page 16
AFTER IRONING page 16
• Emptying the iron page 16
MAINTENANCE page 16
- Cleaning page 16
PROBLEMS AND SOLUTIONS page 17
DISPOSAL page 18
ASSISTANCE AND WARRANTY page 18
Illustrative guide I-II
Technical data III
GB
SAFETY WARNINGS
- The appliance may be used by children who are at least 8 years old, by persons with reduced physical, sensorial or mental abilities or persons lacking experience only if they have received prior instructions concerning its safe use and if they are informed about the dangers associated with this product. Children may not play with the appliance. The appliance cannot be cleaned or serviced by children without adult supervision.
Keep the appliance and power supply cord away from children under 8 when the appliance is on or cooling down.

NEVER leave the iron unattended when connected to the power supply.
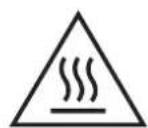
ATTENTION! hot surface.
- Always disconnect the appliance from the mains supply before cleaning or performing maintenance, before filling the water reservoir and when the appliance is not in use.
- The iron must be used on a stable surface. When the iron is placed on the iron rest make sure the support is stable. The iron must not be used if
GB
it has been dropped, if it is visibly damaged or it leaks water.
- After having removed the appliance from its packaging, check the integrity of the supply based on the drawing and any presence of transport damages. If in doubt, do not use the appliance and contact the authorised assistance service.
- Do not let children play with the packaging! Keep the plastic wrapping out of the reach of children; risk of suffocation!
- Before connecting the appliance, check that the mains voltage data reported on the identification plate corresponds to that of the available electric mains. The identification plate is attached to the appliance.
- This appliance must be used solely for the purpose for which it was designed, namely, as a steam iron for home use. Any other use is improper and potentially dangerous.
- In case of a fault or malfunctioning of the appliance, switch it off and do not tamper with it. If the appliance needs to be repaired, contact an authorised technical assistance centre.

DO NOT use the appliance with wet hands, damp feet or barefoot.

DO NOT pull the power cord or the appliance itself to remove the plug from the socket.

DO NOT expose the appliance to humidity or weather conditions (rain, sun, etc.).
- If the power cord is damaged, it must be replaced by an authorised technical service centre, so as to prevent all risks.
- The electrical safety of this appliance is only guaranteed when it is connected correctly to an effective earthing system as required by applicable electrical safety standards. This important safety requirement must be verified and if in doubt, request a thorough check of the system by a skilled technician.

DO NOT immerse the iron, the power cord or the plug in any kind of liquid.

DO NOT leave the hot iron in contact with easily flammable fabric.

DO NOT use chemical additives, scented substances or descaling agents.
- This iron is not equipped with a pressure boiler and has been designed to be used for brief periods of time in order to prevent stress related to this chore. For this reason it is recommended not to iron for more than an hour.
GB
IMPORTANT GUIDELINES
The appliance is designed to work with tap water, however, if the water in your residence area is very hard, mix the tap water (50%) with distilled and/or demineralised water (50%). Salt concentration in water in certain seaside areas is very high: in which case, demineralised water for steam irons (available on the market) must be used. in which case, demineralised water for steam irons (available on the market) must be used.
Do not introduce diluting agents, scented liquids or descaling agents. These can damage the product. Do not use water from dryers, air-conditioners and rain water.
The boiler may contain some water as each product is tested before being put on the market.
It is recommended to place a cloth between the iron and the fabric when using the iron for the first time.
It is recommended to direct a jet of steam into the air before starting to iron, for any residual condensation to be let out.
SYMBOLS

WARNING

PROHIBITION
DESCRIPTION OF THE APPLIANCE AND ACCESSORIES
Refer to the illustrative diagram at the beginning of this user manual to verify your appliance equipment. All the figures are at the front of this instruction manual.

ATTENTION!
accessories and features vary according to the models. Identify your model by referring to the illustrative diagrams at the beginning of the user manual and that shown on the product package.
-
Plate temperature LED
-
Temperature adjustment knob
-
Spray button
-
Super-steam button
-
Steam selector
-
Water fill-up opening
-
Spray
-
Max fill-up level Max
-
Plate with steam holes
-
Water reservoir
GB
- Plug
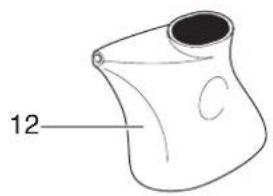
- Water cup
PREPARATIONS
Sort the laundry according to the international symbols shown on the labels; if these are missing, sort according to the type of material.
Start to iron the garments that require a lower temperature so as to reduce idle time (the iron requires less time to warm up than to cool down) and eliminate the risk of burning the fabric.

Synthetic, acrylic, nylon, polyester: low temperatures;

wool, silk: medium temperatures;

cotton, linen: high temperatures;

do not iron.
TIPS ON IRONING
It is recommended to use the lowest temperatures on fabric with particular details (sequins, embroidery, satin, etc.). In the case of mixed fabric, (e.g. 40% cotton 60% synthetic), set the temperature knob to the lowest.
To determine the temperature of a fabric with an unknown composition, first test a hidden corner, starting with a low temperature and gradually increase it to the ideal temperature. Never iron perspiration or other marks: the heat of the plate sets the stains on the fabric, making them become indelible. Starch helps all the more when a dry iron is used at a low temperature: excessive heat burns it and a yellow stain may appear. Prevent shine effects from forming on silk, wool or synthetics, iron on reverse side. Prevent shine effects from forming on velvet, iron in one direction (following the fabric) and do not press on the iron. The more the washing machine is loaded, the more creased the garments will be.
The same applies when the spin speed is high. Many fabrics are ironed more easily when not completely dry. Silk should always be ironed while damp.
GB
USE
FILLING THE RESERVOIR
Verify that the plug (11) is disconnected from the socket.
Set the steam selector (5) to 0 [Fig. B].
Open the water fill cover (6).
Set the iron in a position that facilitates filling the water and prevents it from overflowing.
Slowly pour the water into the reservoir (10) using the special cup (12) [Fig. C].
Do not exceed the maximum fill-up level (8) indicated on the reservoir (10).
Close the water fill cover (6).
SELECTING THE TEMPERATURE
Set the iron upright.
Insert the plug (11) in the socket.
Set the temperature according to the type of fabric in line with the international symbols shown on the labels; using the adjustment knob (2), [Fig. D].
Consult the table below for the correct temperatures.
The plate temperature LED (1) indicates that the iron is warming up.
Wait for the plate temperature LED (1) to go off before starting to iron.
| Garment label | Type of fabric | Temperature setting |
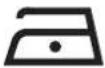 | syntheticse.g. viscose, polyester. | ● |
 | silk, wool. | ● ● |
 | cotton, linen. | ● ● ● |
ECO FUNCTION
The appliance is equipped with technology that optimises the steam production, thereby reducing energy consumption.
Set the steam selector (5) to ECO to activate the function.
It is recommended to use the ECO function for delicate garments (silk, wool and light cotton).
IRONING WITHOUT STEAM (DRY)
Follow the instructions in the "steam ironing" section, leaving the steam selector (5) set to 0.
IRONING WITH STEAM
Select the amount of steam via the steam selector (5).
Move the steam selector (5) to any position between minimum and maximum according to the desired amount.
Continuous steam will only be dispensed when the iron is in a horizontal position.
This stops when the iron is set upright or the steam selector (5) is set to 0.
Steam can only be used at the highest temperatures, as indicated by the symbol on the temperature adjustment knob (2) [Fig. D].
If the selected temperature is too low, water droplets may drip from the plate.
GB
Warnings: the plate temperature LED (1) goes on intermittently while ironing, thereby indicating that the selected temperature is maintained.
SUPER-STEAM AND VERTICAL STEAM
Press the super-steam button (4) to generate a strong shot of steam that penetrates the fabric and eliminates the most difficult creases [Fig. E].
Wait a few seconds between each pressing action of the iron.
Press the super-steam button (4) intermittently to iron in an upright direction (curtains, hung clothes, etc.) [Fig. F].
Warnings: the super-steam function can only be used at high temperatures.
Stop the steam when the plate temperature LED (1) lights up and start ironing when this goes off.
SPRAY FUNCTION
Verify that there is water in the reservoir (10).
Press the spray button (3): slowly for dense spray or fast for mist [Fig. G].
Warnings: first dampen the fabric lightly using the spray function (3) or alternatively, lay a damp cloth between the fabric and the iron.
Do not use the spray on silk or synthetics.
AFTER IRONING
EMPTYING THE IRON
Disconnect the plug (11) from the socket.
Empty the reservoir (10) by turning the iron upside down and shaking it lightly.
Let the iron cool down completely in an upright position.
MAINTENANCE
CLEANING

ATTENTION!
sure the plug of the appliance (11) is disconnected from the socket and the plate (9) has cooled down completely before cleaning the iron.
Any starch deposits or residue on the surface of the plate can be removed with a damp cloth and non-abrasive liquid detergent.
Avoid scratching the plate with steel wool or metal objects.
The plastic parts can be cleaned with a damp cloth and then wiped with a dry cloth.
GB
PROBLEMS AND SOLUTIONS
This chapter describes the most common problems related to appliance use. If the problems cannot be resolved with the information below, please contact the Authorised Assistance Centre.
| Problem Possible cause Solution | ||
| The plate (9) remains cold or does not heat up. | There is no power supply. | Verify whether the plug (11) is inserted correctly or try inserting it in another socket. |
| Verify whether the temperature adjustment knob (2) is set to the minimum temperature ∅ (Fig. D). | ||
| The plate temperature LED (1) goes on and off. | Normal procedure. | This indicates the heating phase of the iron.The LED (1) goes off once the set temperature is reached. |
| Only a little steam or none at all is dispensed. | The steam selector (5) is set to ∅. | Set the steam selector (5) to the desired field (Fig. B). |
| There is not enough water in the reservoir (10). | Fill the reservoir (10). | |
| The impurities that come out from the steam holes stain the garments. | Chemical additives, scented liquids or descaling agents are being used. | These damage the product: do not add additives to the water in the reservoir. |
| Pure distilled water or softened water is being used. | Mix tap water (50%) with distilled and/or demineralised (50%) water. | |
| Starch is being used. | Always spray the starch on the reverse side of the fabric. | |
| Water leaks from the plate (9). | The plate temperature is too cold due to the Super-steam button being pressed too often (4). | Allow slightly longer intervals between the jets of steam. |
| The temperature adjustment knob (2) is set to a temperature that is too low (Fig. D). | Turn the temperature adjustment knob (2) to the Max level (Fig. D). | |
GB
DISPOSAL

The product is packaged in recyclable materials. Dispose of it in compliance with the environmental protection standards.

The product must be disposed of appropriately, in compliance with European standard 2002/96/EC. The recyclable materials contained in the appliance must be recovered so as to prevent environmental pollution. For further information, contact the local disposal body or the appliance dealer.
ASSISTANCE AND WARRANTY
To request repairs or purchase spare parts, please contact IMETEC's authorised customer assistance service on the Toll-Free Number below or via the website. The appliance is covered by the manufacturer's warranty. For details, read the attached warranty sheet. Failure to comply with the instructions for use and maintenance provided in this manual will render the manufacturer's warranty null and void.
IMETEC
www.imetec.com
Tenacta Group S.p.A. Via Piemonte 5/11 24052 Azzano S. Paolo (BG) ITALY Tel. +39.035.688.111 Fax +39.035.320.149
OFF3(MMYY)
M1001087
ES

INSTRUCCIONES DE USO DE LA PLANCHA A VAPOR
Tel. +39.035.688.111 Fax +39.035.320.149
013(MMYY)
M1001087

INSTRUÇÕES PARA O USO DO FERRO A VAPOR
PROBLEMAS E SOLUÇÕES
ELIMINAÇÃO
ASSISTÊNCIA E GARANTIA
Guia ilustrativo
Dados técnicos
pág. 33
pág. 33
pág. 33
pág. 33
pág. 34
pág. 34
pág. 34
pág. 34
pág. 34
pág. 34
pág. 35
pág. 36
pág. 36
| - ||
III
PT
ADVERTÊNCIAS SOBRE A SEGURANÇA
INDICAÇÕES IMPORTANTES
PROBLEMAS E SOLUÇÕES
ASSISTÊNCIA E GARANTIA
Tel. +39.035.688.111 Fax +39.035.320.149
M1001087 013 (MIMY)
UDHEZIME PERDORIMI TE HEKURIT ME AVULL
HEKUROSJE PA AVULL (NE TE THATE)
Per hekurosje pa avull ndiqni udhezimet e seksionit “hekurosje me avull” duke lene percaktuesin e avullit (5) ne pozicionin “0”.
HEKUROSJE ME AVULL
Seleksiononi sasine e avullit me ane te percaktuesit te tij (5).
Spostoni percaktuesin e avullit (5) ne nje pozicion midis minimales dhe maksimales ne
SQ
baze te sasise se avullit qe deshironi.
Avulli del ne menyre te vazhdueshme vetem ne qofte se hekuri vendoset ne pozicion orizontal.
Nderprerja e avullit te vazhdueshem mund te realizohet duke mbeshtetur hekurin ne pozicion vertikal ose duke spostuar percaktuesin e avullit (5) ne pozicionin "0".
Perdorimi i avullit eshte i mundur vetem me temperaturat me te larta, sic tregohet nga simboli mbi celesin rrotullues per rregullimin e temperatures (2) [Fig.D].
Ne qofte se temperatura e percaktuar eshte teper e ulet, nga pjastra mund te rrjedhin pika te vogla uji.
Kujdes: gjate hekurosjes llama se kontrollit te temperaures se piastres (1) ndizet me nderprerje gje qe tregon se vazhdon te mbahet temperatura e zgjedhur.
SUPER- AVULL DHE AVULL NE VERTIKALE
Tel. +39.035.688.111 Fax +39.035.320.149
M1001087 013(MMINY)
EL


- [A]
- ISTRUZIONI PER L'USO DEL FERRO A VAPORE
- ATTENTION!
- Instructions and warnings for a safe use.
- CONTENTS
- SAFETY WARNINGS
- GB
- it has been dropped, if it is visibly damaged or it leaks water.
- IMPORTANT GUIDELINES
- SYMBOLS
- DESCRIPTION OF THE APPLIANCE AND ACCESSORIES
- PREPARATIONS
- TIPS ON IRONING
- USE
- FILLING THE RESERVOIR
- SELECTING THE TEMPERATURE
- ECO FUNCTION
- IRONING WITHOUT STEAM (DRY)
- IRONING WITH STEAM
- SUPER-STEAM AND VERTICAL STEAM
- SPRAY FUNCTION
- AFTER IRONING
- EMPTYING THE IRON
- MAINTENANCE
- CLEANING
- PROBLEMS AND SOLUTIONS
- DISPOSAL
- ASSISTANCE AND WARRANTY
- INSTRUCCIONES DE USO DE LA PLANCHA A VAPOR
- INSTRUÇÕES PARA O USO DO FERRO A VAPOR
- ADVERTÊNCIAS SOBRE A SEGURANÇA
- INDICAÇÕES IMPORTANTES
- PROBLEMAS E SOLUÇÕES
- ASSISTÊNCIA E GARANTIA
- UDHEZIME PERDORIMI TE HEKURIT ME AVULL
- HEKUROSJE PA AVULL (NE TE THATE)
- HEKUROSJE ME AVULL
- SQ
- SUPER- AVULL DHE AVULL NE VERTIKALE
- EL
Brand : IMETEC
Model : H3902
Category : Iron