
38.2016 - Sports Watch TFA - Free user manual and instructions
Find the device manual for free 38.2016 TFA in PDF.


| Product Type | Sports Watch / Stopwatch |
| Brand | TFA |
| Model | 38.2016 |
| Display Type | Digital LCD |
| Time Format | 12-hour or 24-hour |
| Calendar | Month, date, day of week |
| Chronograph Resolution | 1/100 second (under 30 min), 1 second (over 30 min) |
| Chronograph Range | 23 hours, 59 minutes, 59 seconds |
| Timer Resolution | 1 second |
| Timer Range | 23 hours, 59 minutes, 59 seconds |
| Alarm Types | Current time daily alarm, dual time daily alarm, hourly chime |
| Dual Time Display | Second time zone (hour, minute, second) |
| Battery Type | 1 x CR2032 |
| Battery Life | Approximately 1-2 years (typical) |
| Water Resistance | Not specified (likely splash resistant) |
| Material | Plastic case, nylon cord |
| Dimensions | Not specified |
| Weight | Not specified |
| Maintenance | Clean with soft damp cloth; avoid solvents, extreme temperatures, vibration |
| Battery Replacement | By specialized dealer; ensure sealing ring integrity |
Frequently Asked Questions - 38.2016 TFA
User questions about 38.2016 TFA
0 question about this device. Answer the ones you know or ask your own.
Ask a new question about this device
Download the instructions for your Sports Watch in PDF format for free! Find your manual 38.2016 - TFA and take your electronic device back in hand. On this page are published all the documents necessary for the use of your device. 38.2016 by TFA.
USER MANUAL 38.2016 TFA
Operating Instructions HITRAX GO STOPWATCH
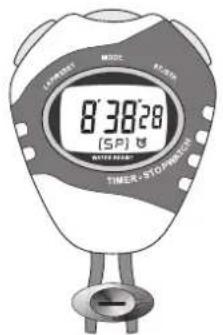
Congratulations! Now you have a HITRAX Stopwatch from TFA. This instrument includes a Watch, Alarm Clock, Stopwatch and Timer.
Please read this Operating Instructions to ensure that you have the full benefit of all its features.
1.0 Features
Features
1) Current Time Display:
- Hour, minute, second, month, date and day of week.
- 12 or 24 hour formats at user's option
2) Chronograph Display:
- 1/100 seconds resolution.
- Maximum display range 23 hours, 59 minutes, 59 seconds.
3) Alarm Display
- Current Time Daily Alarm.
- Dual Time Daily Alarm
4) Timer Display:
- 1 seconds resolution
Maximum display range 23 hours, 59 minutes, 59 seconds.
5) Dual Time Display
- Hour, minute, second.
2.0 Parts Descriptions & Function of the Buttons
![mode button lap/reset button lens 8:30:28 [SP] start/slop button TIMER STOP/STOP clipper nylan cord](/content/2026/05/844082/images/e360f2abeb3fd0a788efb88a61662f502199d0dce89be7adf8c558f0ff298251.jpg)
Function of the Buttons
1) Lap/Reset
- Press to select the setting modes of Current Time Mode, Alarm Time Mode, Timer Mode, and Dual Time Mode.
- Press to reset the chronograph to 'zero' display when the chronograph is stopped.
- Press to select the lap time display, in the Chronograph Running Display.
- Press to return to chronograph running display when the Chronograph Lap Time Display is displayed.
2) Mode
- Press to select among Current Time Mode, Chronograph Mode, Alarm Time Mode, Timer Mode, and Dual Time Mode.
- Press to select among the items which to be set during the setting sequence.
3) Start/Stop
- Press to start/stop the chronograph and timer.
- Press to increase the number, in the setting sequence.
- Press to enable/disable the chime and alarm sounds.
3.0 Major Function Modes
flowchart
graph TD
    A["12:3828 (2 i)"] -->|hold start/stop| B["921"]
    B --> C["Date Display"]
    D["Current Time Mode"] --> E["0 (SP)"]
    F["Chronograph Mode"] --> G["7:28 t 1 (RL)"]
    H["Alarm Time Mode"] --> I["0:00:00 (TR)"]
    J["Dual Time Mode"] --> K["0:00:00 (TR)"]
    L["Timer Mode"] --> M["8:3828 (T2)"]
    N["mode button"] --> O["mode button"]
    P["mode button"] --> Q["mode button"]
Major Function Modes
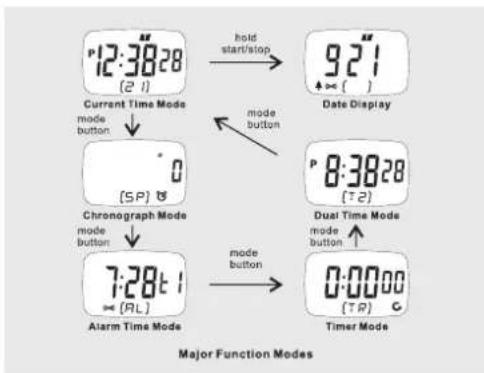
- There are 5 major function modes:
1) Current Time Mode,
2) Chronograph Mode,
3) Alarm Mode,
4) Timer Mode, and
5) Dual Time Mode.
How to Select among Function Modes
- Press the [mode] button once to select among Current Time Mode, Chronograph Mode, Alarm Mode, Timer Mode, and Dual Time Mode.
How to Select Date Display
- Press and hold the [start/stop] button to select Date Display, in the Current Time Mode.
4.0 How to Set the Time and Date
flowchart
graph TD
    A["12:38:28"] --> B["day of week"]
    B --> C["time"]
    C --> D["day of week"]
    D --> E["day"]
    E --> F["minutes"]
    F --> G["day"]
    G --> H["minutes"]
    H --> I["day"]
    I --> J["minutes"]
    J --> K["day"]
    K --> L["minutes"]
    L --> M["day"]
    M --> N["minutes"]
    N --> O["day"]
    O --> P["minutes"]
    P --> Q["day"]
    Q --> R["minutes"]
    R --> S["day"]
    S --> T["minutes"]
    T --> U["day"]
    U --> V["minutes"]
    V --> W["day"]
    W --> X["minutes"]
    X --> Y["day"]
    Y --> Z["minutes"]
    Z --> AA["day"]
    AA --> AB["minutes"]
    AB --> AC["day"]
    AC --> AD["minutes"]
    AD --> AE["day"]
    AE --> AF["minutes"]
    AF --> AG["day"]
    AG --> AH["minutes"]
    AH --> AI["day"]
    AI --> AJ["minutes"]
    AJ --> AK["day"]
    AK --> AL["minutes"]
    AL --> AM["day"]
    AM --> AN["minutes"]
    AN --> AO["day"]
    AO --> AP["minutes"]
    AP --> AQ["day"]
    AQ --> AR["minutes"]
    AR --> AS["day"]
    AS --> AT["minutes"]
    AT --> AU["day"]
    AU --> AV["minutes"]
    AV --> AW["day"]
    AW --> AX["minutes"]
    AX --> AY["day"]
    AY --> AZ["minutes"]
    AZ --> BA["day"]
    BA --> BB["minutes"]
    BB --> BC["day"]
    BC --> BD["minutes"]
    BD --> BE["day"]
    BE --> BF["minutes"]
    BF --> BG["day"]
    BG --> BH["minutes"]
    BH --> BI["day"]
    BI --> BJ["minutes"]
    BJ --> BK["day"]
    BK --> BL["minutes"]
    BL --> BM["day"]
    BM --> BN["minutes"]
    BN --> BO["day"]
    BO --> BP["minutes"]
    BP --> BQ["day"]
    BQ --> BR["minutes"]
    BR --> BS["day"]
    BS --> BT["minutes"]
    BT --> BU["day"]
    BU --> BV["minutes"]
    BV --> BW["day"]
    BW --> BX["minutes"]
    BX --> BY["day"]
    BY --> BZ["minutes"]
    BZ --> CA["day"]
    CA --> CB["minutes"]
    CB --> CC["day"]
    CC --> CD["minutes"]
    CD --> CE["day"]
    CE --> CF["minutes"]
    CF --> CG["day"]
    CG --> CH["minutes"]
    CH --> CI["day"]
    CI --> CJ["minutes"]
    CJ --> CK["day"]
    CK --> CR["minutes"]
    CR --> CS["day"]
    CS --> CT["minutes"]
    CT --> CU["day"]
    CU --> CV["minutes"]
    CV --> CW["day"]
    CW --> CX["minutes"]
    CX --> CY["day"]
    CY --> CZ["minutes"]
    CZ --> DA["day"]
    DA --> DB["minutes"]
    DB --> DC["day"]
    DC --> DV["minutes"]
    DV --> DW["day"]
    DW --> DX["minutes"]
    DX --> DXB["day"]
How to Set the Time and Date
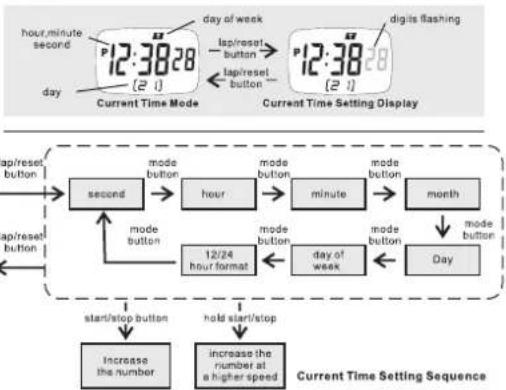
- Press the [lap/reset] button to select the Current Time Setting Display, in the Current Time Mode.
- The second digits start flashing on the display because they are being selected. Press the [mode] button to select among the different setting items following the Current Time Setting Sequence, or press the [start/stop] button once to reset the second to zero second.
- If one of the setting items (hour, minute, month, day, day of week) is flashing press the [start/stop] button to change the setting, or hold down the [start/stop] button to change the setting at a higher speed.
- If the '12' or '24' is flashing, press the [start/stop] button once to select between '12' (12 hour format) and '24'(24 hour format).
- After you set the current time, date and 12/24 hour format, press the [lap/reset] button once to exit the Current Time Setting Sequence.
- If no key-stoke has been activated for 30 seconds, the setting display will return to Current Time Mode.
5.0 Chronograph Mode

flowchart
graph TD
    A["Chronograph 'SP'"] --> B["Start/Stop Button"]
    B --> C["13828 (SP)"]
    C --> D["Chronograph 'running' Display"]
    D --> E["Start/Stop Button"]
    E --> F["83828 (SP)"]
    F --> G["Chronograph 'stop' Display"]
    G --> H["13828 (SP)"]
    H --> I["Press the mode button 4 times"]
    I --> J["12:3828 (2 i)"]
    J --> K["Current Time Mode"]
    style A fill:#f9f,stroke:#333
    style K fill:#f9f,stroke:#333
Chronograph Mode
- The Chronograph measures elapsed times and lap times. The display shows the 'Zero' display, if the chronograph is being selected the first time or the chronograph has been reset.
To Start/Stop the Chronograph
- When the chronograph is stopped, press the [start/stop] button once to start the chronograph; press the [start/stop] button once again to stop the chronograph.
- The elapsed time between the two 'start/stop' keystrokes will be appeared on the display.
- Repeat the above mentioned steps to get the accumulative time of which the chronograph is running.
To Reset the Chronograph
- Record a new set of accumulative elapsed time, press the [lap/reset] button to reset the chronograph to 'Zero' display when the chronograph is stopped.
NOTE: (1) The maximum counting range of the chronograph is 23 hours 59 minutes and 59 seconds.(2) If the accumulated time is long than 30 minutes, the display shows chronograph time in hours, minutes and seconds instead of minutes, seconds and 1/100 seconds. (3) If the Chronograph 'running' indicator is flashing, the chronograph is running. If the Chronograph 'running' indicator stop flashing, the chronograph is stopped.
5.1 How to Record Lap Time

flowchart
graph TD
    A["Chronograph 'running' Display"] --> B["the 'day' indicator running"]
    B --> C["158 SP"]
    B --> D["138 SP"]
    E["Chronograph 'running' Display"] --> F["lap/reset button"]
    F --> G["138 SP"]
    E --> H["thec second digits are running"]
    H --> I["chronograph 'running' indicator flashing"]
    J["Chronograph Lap Time Display"] --> K["time: 1/100 seconds"]
    K --> L["seconds (After 30 Minute)"]
    M["Chronograph Mode (Before 30 Minute)"] --> N["minutes: 158 SP"]
    N --> O["seconds (After 30 Minute)"]
    P["Chronograph Mode (After 30 Minute)"] --> Q["seconds (After 30 Minute)"]
    R["The chart includes a line graph of the 'day' indicators running from left to right"] --> S["time: lap time"]
    T["The chart includes a line graph of the 'day' indicators running from left to right"] --> U["time: lap time"]
To Record Lap Time
- The Chronograph Mode allows you to record lap time.
- Press the [lap/reset] button once to record the lap time during the chronograph is running. During the lap time is displaying, the chronograph keeps on running.
- Press the [lap/reset button once again to return to chronograph running display during the lap time is displaying.
Repeat the steps mentioned above to get another lap time.
NOTE: (1) The maximum counting range of the chronograph is 23 hours 59 minutes and 59 seconds.(2) If the accumulated time is long than 30 minutes, the display shows chronograph time in hours, minutes and seconds instead of minutes, seconds and 1/100 seconds. (3) If the Chronograph 'running' Indicator is flashing, the chronograph is running. If the Chronograph 'running' Indicator stop flashing, the chronograph is stopped.
6.0 Alarm Time Mode
flowchart
graph TD
    A["7:28t1 (RL)"] --> B["Hour"]
    B --> C["Alarm Time Mode"]
    C --> D["time"]
    D --> E["alarm mode indicator"]
    E --> F["7:28t1 (RL)"]
    F --> G["Hour"]
    G --> H["Alarm Time Setting Display"]
    H --> I["Time"]
    I --> J["amp reset button"]
    J --> K["load reset button"]
    K --> L["alarm 1/2 indicator"]
    L --> M["Time"]
    M --> N["amp activate automatically"]
    N --> O["7:28t1 (RL)"]
    O --> P["Hour"]
    P --> Q["Alarm Time Setting Sequence"]
    Q --> R["Increase the number"]
    R --> S["load stop button"]
    S --> T["load start/stop"]
    T --> U["Increase the number at a higher speed"]
    U --> V["amp mode button"]
    V --> W["mode button"]
    W --> X["hour"]
    X --> Y["amp reset button"]
    Y --> Z["load reset button"]
    Z --> AA["alarm 1/2 indicator"]
    AA --> AB["Time"]
    AB --> AC["amp activate automatically"]
    AC --> AD["7:28t1 (RL)"]
Alarm Time Mode
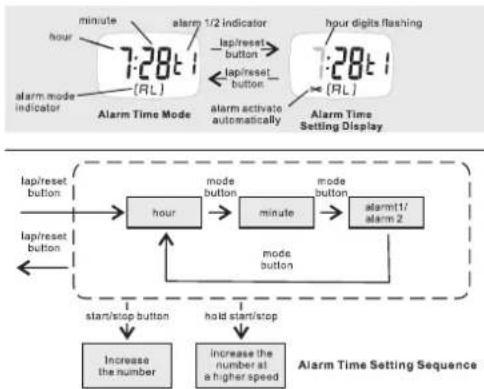
- Alarm 1 for the Current Time Mode; Alarm 2 for the Dual Time Mode.
To Set the Alarm Time
- Press the [lap/reset] button to change from Alarm Time Mode to Alarm Time Setting Display. The hour digits flash on the display because it is being selected.
The Setting Procedures
- Press [mode] button to select among the items which to be set following the Alarm Time Setting Sequence.
- If the digits are flashing, press the [start/stop] button to increase the number; hold the [start/stop] button to change the number at a higher speed.
- After setting the alarm time, press the [lap/reset] button to exit the setting sequence. If no key-stoke has been activated for 30 seconds, the setting display will auto return to Alarm Time Mode.
NOTE: Alarm will be activated automatically when setting alarm.
How to Select the ON/OFF of the Alarm and Chime
- Press the [start/stop] button to change the ON/OFF status of the hourly chime and alarm, in the Alarm Time Mode.
- If the chime indicator is appeared (chime ON), the unit beeps every hour on the hour. If the alarm indicator ( ) is appeared (alarm ON), the unit sounds at the pre-set alarm time every day.
7.0 Timer Mode
flowchart
graph TD
    A["Timer Mode"] --> B["Hour"]
    B --> C["Mode Button"]
    C --> D["Minute"]
    D --> E["Second"]
    E --> F["Hour setting Display"]
    F --> G["Timer 'counting' Indicator"]
    H["Start/Stop Button"] --> I["Increase the number"]
    J["Hold Start/Stop"] --> K["Increase the number at a higher speed"]
    L["Start/Stop Button"] --> M["Start/Stop Button"]
    N["Mode Button"] --> O["Start/Stop Button"]
    P["Hour reset button"] --> Q["Hour reset button"]
    R["Time mode indicator"] --> S["0:0000 [TR"] C]
    T["time mode indicator"] --> U["0:0000 [TR"] C]
    V["time mode indicator"] --> W["0:0000 [TR"] C]
    X["time mode indicator"] --> Y["0:0000 [TR"] C]
    Z["time mode indicator"] --> AA["0:0000 [TR"] C]
    AB["time mode indicator"] --> AC["0:0000 [TR"] C]
    AD["time mode indicator"] --> AE["0:0000 [TR"] C]
    AF["Time mode indicator"] --> AG["0:0000 [TR"] C]
    AH["Time mode indicator"] --> AI["0:0000 [TR"] C]
    AJ["Time mode indicator"] --> AK["0:0000 [TR"] C]
    AL["Time mode indicator"] --> AM["0:0000 [TR"] C]
    AN["Time mode indicator"] --> AO["0:0000 [TR"] C]
    AP["Time mode indicator"] --> AQ["0:0000 [TR"] C]
    AR["Time mode indicator"] --> AS["0:0000 [TR"] C]
    AT["Time mode indicator"] --> AU["0:0000 [TR"] C]
    AV["Time mode indicator"] --> AW["0:0000 [TR"] C]
    AX["Time mode indicator"] --> AY["0:0000 [TR"] C]
    AZ["Time mode indicator"] --> BA["0:0000 [TR"] C]
    BB["Time mode indicator"] --> BC["0:0000 [TR"] C]
    BD["Time mode indicator"] --> BE["0:0000 [TR"] C]
    BF["Time mode indicator"] --> BG["0:0000 [TR"] C]
    BH["Time mode indicator"] --> BI["0:0000 [TR"] C]
    BJ["Time mode indicator"] --> BK["0:0000 [TR"] C]
    BL["Time mode indicator"] --> BM["0:0000 [TR"] C]
    BN["Time mode indicator"] --> BO["0:0000 [TR"] C]
    BP["Time mode indicator"] --> BQ["Hour reset button"]
    BP --> RB["Mode Button"]
    BP --> SC["Minute"]
    BP --> SD["Second"]
    BP --> TB["Mode Button"]
    BP --> BU["Mode Button"]
    BP --> BV["Start/Stop Button"]
To Set the Timer
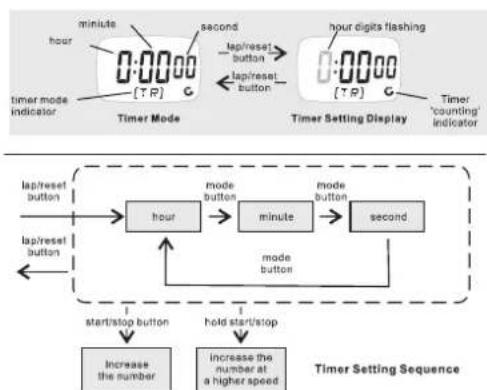
- The timer can be set/start counting from within the range from 0 to 23 hours, 59 minutes, 59 seconds.
- Press the [lap/reset] button to change from Timer Mode to Timer Setting Display. The hour digits flash on the display because it is being selected.
- Press [mode] button to select among the items which to be set following the Alarm Time Setting Sequence.
- If the digits are flashing, press the [start/stop] button to increase the number; hold the [start/stop] button to change the number at a higher speed.
- After setting the timer, press the [lap/reset] button to exit the setting sequence.
- If no key-stoke has been activated for 30 seconds, the setting display will auto return to Timer Mode.
The Setting Procedures
7.1 How to Use the Timer
flowchart
graph TD
    A["Timer 'Stop' Display"] --> B["Timer 'Counting' Display"]
    B --> C["Press the mode button 2 times"]
    C --> D["Timer 'Counting' indicator flashing"]
    D --> E["Current Time Mode"]
    style A fill:#f9f,stroke:#333
    style B fill:#ccf,stroke:#333
    style C fill:#cfc,stroke:#333
    style D fill:#fcc,stroke:#333
    style E fill:#ffc,stroke:#333
How to Start/Stop the Timer
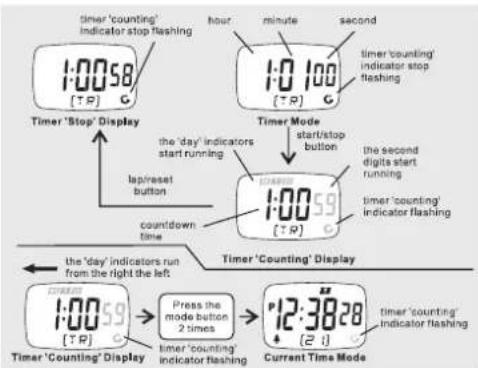
- Press the [start/stop] button to start the timer when the timer is set, press the [start/stop] button once again to stop the timer.
- The countdown time will be shown on the display continuously.
NOTE: If the Timer 'counting' Indicator is flashing, the timer is counting. If the Timer 'counting' Indicator is stop flashing, the timer is stopped.
Alarm Sounds
- Sound 2 beeps at 30-second interval when timer remains at between 11 seconds and 3 minutes.
- Sound 1 beep at 1-second interval when timer remains at between 1 second and 10 seconds.
- Sound 3 beeps for 10 seconds when timer remains at zero second.
How to Reset/Re-load the Timer
- If the countdown time is come to zero or the timer is stopped, press the [lap/reset] button to re-load the preset countdown time into the display. Press [lap/reset] button once again to get the timer ready for counting.
- Check the 'To Set the Timer' section for setting another countdown time.
8.0 How to Set the Dual Time
Dual Time Mode
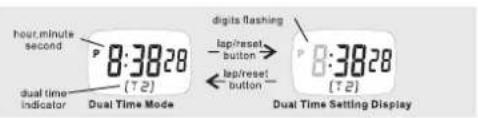
- Dual Time Mode shows the time of the second time zone in hour, minute and second.
How to Set the Dual Time
- Press the [lap/reset] button to select Dual Time Setting Display, in the Dual Time Mode.
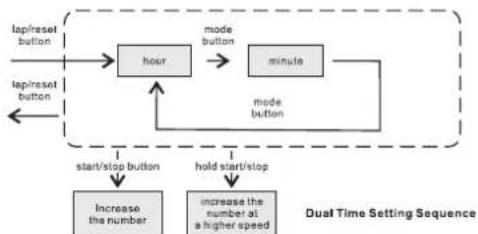
- The hour digits start flashing on the display because they are being selected. Press the [mode] button to select between hour and minute setting or press the [start/stop] button to change the setting (hold the [start/stop] button to change the setting at a higher speed).
- If the minute digits are flashing, press the [start/stop] button once to increase the setting by 30 minutes.
- After you set the dual time, press the [lap/reset] button to exit the Dual Time Setting Sequence.
- If no key-stoke has been activated for 30 seconds, the setting display will return to Dual Time Mode.
flowchart
graph TD
    A["lap/reset button"] --> B["hour"]
    B --> C["minute"]
    C --> D["time"]
    D --> E["start/stop button"]
    E --> F["increase the number"]
    E --> G["increase the number at a higher speed"]
    style A fill:#f9f,stroke:#333
    style B fill:#ccf,stroke:#333
    style C fill:#cfc,stroke:#333
    style D fill:#fcc,stroke:#333
    style E fill:#cff,stroke:#333
    style F fill:#ffc,stroke:#333
    style G fill:#ffc,stroke:#333
9.0 Specifications
Current Time Mode
Time System:
- AM, PM, Hour, minute, second
- 12-hour or 24-hour format
Calendar: - Month, date and day of week display
Alarm Mode
Alarm Type:
- Current time daily alarm
- Dual time daily alarm
- Hourly chime
Alarm Sound: - Sound for 20 seconds when it is alarm time
Chronograph Mode
Resolution:
- Within 30 minutes: 1/100 second (Display minutes, seconds and 1/100 seconds).
- Over 30 minutes:1 second (Display hours,minutes and seconds).
Range:
23 hours 59 minutes 59 seconds
Countdown Timer
Resolution:
- 1 second
Range:
- 23 hours 59 minutes 59 seconds
Operation Mode:
- Countdown to zero and stop at zero
Timer Sounds:
- Sound 2 beeps at 30-second interval when timer remains at between 11 seconds and 3 minutes.
- Sound 1 beep at 1-second interval when timer remains at between 1 second and 10 seconds.
- Sound 3 beeps for 10 seconds when timer remains at zero second.
Dual Time Display
Time System:
- AM, PM, Hour, minute, second
10.0 Battery change
- Battery: 1 x CR 2032
- Please contact a specialized dealer for battery change. Thereby the sealing ring must not be damaged.
- Do not dispose of empty batteries in household waste. Take them to special local collection sites.
11.0 Maintenance
- Do not expose the instrument to extreme temperatures, vibration or shock
- Clean it with a soft damp cloth. Do not use solvents or scouring agents.
- Please do not try to repair the unit. Contact the original point of purchase. Please let change the battery before complaining. No guarantee if the instrument is handled or opened improperly.



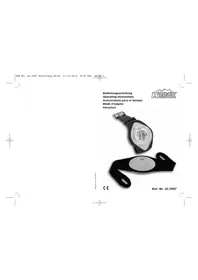
- Operating Instructions HITRAX GO STOPWATCH
- Features
- Features
- Parts Descriptions & Function of the Buttons
- Function of the Buttons
- Major Function Modes
- How to Select among Function Modes
- How to Select Date Display
- How to Set the Time and Date
- Chronograph Mode
- To Start/Stop the Chronograph
- To Reset the Chronograph
- To Record Lap Time
- Alarm Time Mode
- To Set the Alarm Time
- The Setting Procedures
- How to Select the ON/OFF of the Alarm and Chime
- To Set the Timer
- How to Start/Stop the Timer
- Alarm Sounds
- How to Reset/Re-load the Timer
- Dual Time Mode
- How to Set the Dual Time
- Specifications
- Current Time Mode
- Alarm Mode
- Range:
- Countdown Timer
- Operation Mode:
- Dual Time Display
- Battery change
- Maintenance
Brand : TFA
Model : 38.2016
Category : Sports Watch