
C-3000 ZOOM - Digital Camera OLYMPUS - Free user manual and instructions
Find the device manual for free C-3000 ZOOM OLYMPUS in PDF.

| Product type | Digital camera |
| Brand | OLYMPUS |
| Model | C-3000 ZOOM |
| Dimensions (L x H x D) | 109.5 x 76.4 x 66.4 mm |
| Weight (without batteries or card) | 300 g |
| Power supply | 2 CR-V3 lithium batteries or 4 R6 (AA) NiMH, NiCd, alkaline or lithium batteries; optional AC adapter |
| Shooting modes | Program (P), Aperture Priority (A), Shutter Priority (S), Manual (M), Video, Panorama |
| Zoom | Optical zoom + digital zoom (enable) |
| Built-in flash | Auto, red-eye reduction, forced, off; range W: 0.8-3.8 m, T: 0.2-3.8 m |
| LCD screen | 4.5 cm color TFT (114,000 pixels) |
| Viewfinder | Real-image optical viewfinder with autofocus marks and backlight compensation |
| Storage media | SmartMedia card 3.3 V (2 to 64 MB) |
| Maximum resolution | 2048 x 1536 pixels (TIFF or JPEG) |
| Focus | TTL iESP autofocus, manual; macro distance 0.2 m |
| Connections | USB, RS-232C, PAL video output, DC input |
| Maintenance and cleaning | Wipe with a soft cloth; avoid dust, humidity, shocks; remove batteries if not used for an extended period |
| Safety | Do not use within 1 m of the face with flash; use only recommended accessories |
| Spare parts and repairability | Lens cap, USB and A/V cables, CR-V3 battery, optional AC adapter; repair by authorized center |
| Operating temperature | 0 to 40°C (operation), -20 to 60°C (storage) |
Frequently Asked Questions - C-3000 ZOOM OLYMPUS
User questions about C-3000 ZOOM OLYMPUS
0 question about this device. Answer the ones you know or ask your own.
Ask a new question about this device
Download the instructions for your Digital Camera in PDF format for free! Find your manual C-3000 ZOOM - OLYMPUS and take your electronic device back in hand. On this page are published all the documents necessary for the use of your device. C-3000 ZOOM by OLYMPUS.
USER MANUAL C-3000 ZOOM OLYMPUS
natural_image
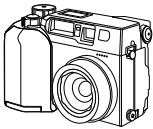
Line drawing of a digital camera with lens and control buttons (no text or symbols)INSTRUCTIONS
MODE D'EMPLOI
BEDIENUNGSANLEITUNG
■ Before using your camera, read this manual carefully to ensure correct use.
■ We recommend that you take test shots to get accustomed to your camera before taking important photographs.
■ Avant d'utiliser votre appareil photo, veuillez lire attentivement ce mode d'emploi, de manière à obtenir les meilleurs résultats possibles.
■ Avant d'effectuer des prises de vues importantes, nous vous conseillons par ailleurs de faire quelques essais afin de vous familiariser avec le maniement de l'appareil photo.
■ Bitte lesen Sie vor Gebrauch dieser Kamera sorgfältig diese Bedienungsanleitung, um optimale Ergebnisse beim Fotografieren zu erzielen.
■ Wir empfehlen, vor wichtigen Aufnahmen Probeaufnahmen durchzuführen, um sich mit der Bedienung und den Funktionen der Kamera vertraut zu machen.
PREPARATION
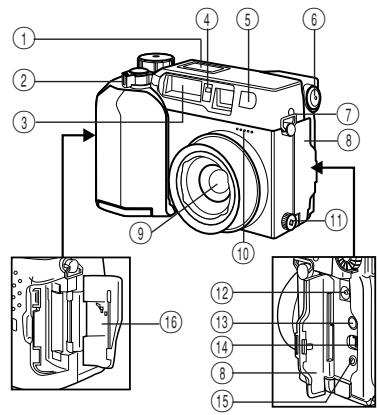
Names of parts
CAMERA
① Control panel
② Zoom lever
③ Flash
④ Selftimer/Remote control signal
⑤ Remote control window
⑥ Diopter adjustment dial
⑦Strap hook
⑧ Connector cover
⑨ Lens
⑩ Microphone
⑪ Extension flash connector cover (The connector is located beneath the cover.)
⑫ AC adapter connector
⑬ A/V output connector
⑭ USB connector
⑮ Computer connector (RS-232C)
⑯ Card compartment cover
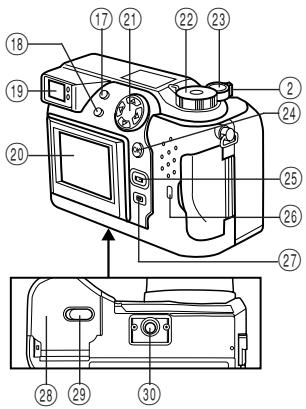
⑰ Flash button, Erase button
⑱ Spot/Macro button, Print button
⑲ Viewfinder
⑳ LCD monitor
②1 Jog dial
②2 Mode dial
⑳ Shutter release button
⑳ OK button, MF button, Protect button
⑲ LCD monitor ON/OFF button
⑳ Card access lamp
⑳ Menu button
⑳ Battery compartment cover (bottom)
⑲ Battery compartment open/close switch (bottom)
③0 Threaded mount (bottom)
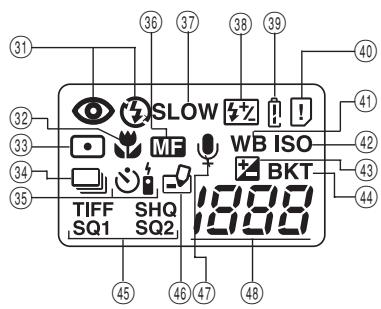
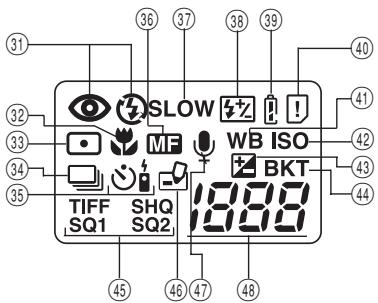
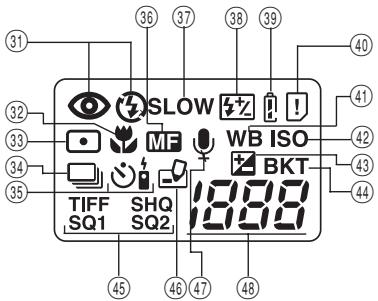
CONTROL PANEL
③1 Flash mode
③2 Macro mode
③3 Spot metering mode
③4 Sequential shooting
③5 Selftimer/Remote control
③6 Manual focus
③7 Slow shutter synchronization flash
③8 Flash exposure correction
⑲ Battery check
④0 Card error
④1 White balance
④2 ISO
④3 Exposure compensation
④4 Auto bracket
④5 Recording mode
④6 Writing
④7 Sound record
④8 Number of storable pictures
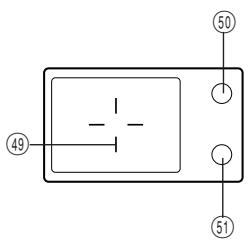
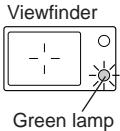
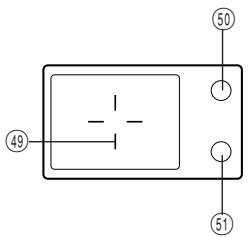
VIEWFINDER DISPLAY
④9 Autofocus mark/Backlighting correction mark
⑤0 Orange lamp (flash)
⑤1 Green lamp (focus)
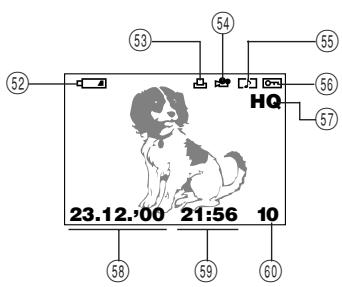
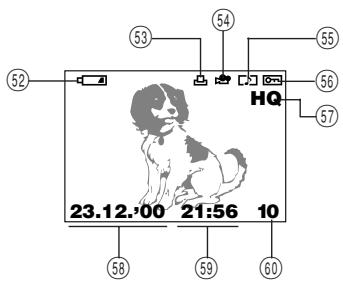
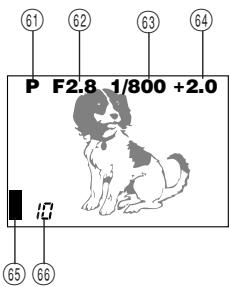
LCD MONITOR (Display mode)
⑤2 Battery check
⑤3 Random print
⑤4 Movie picture
⑤5 Sound record
⑤6 Protect
⑤7 Recording mode
⑤8 Date
⑤9 Time
⑥0 Frame number
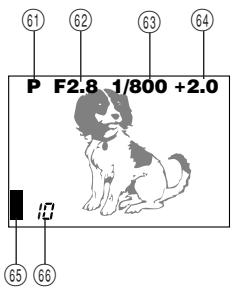
(Record mode)
⑥1 Photo mode
⑥2 Aperture
⑥3 Shutter speed
⑥4 Exposure compensation/Exposure differential
⑥5 Image memory blocks
⑥6 Number of storable pictures
natural_image
Line drawing of a digital camera with lens and buttons (no text or symbols)Camera

Lens cap
USB cable
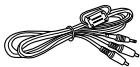
A/V cable
natural_image
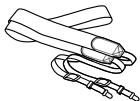
Line drawing of a medical or laboratory device with a coiled tube and a central connector (no text or symbols)Strap

Software CD's (including instructions on CD-ROM)

Instructions (concise version)

Warranty card
CR-V3 lithium battery pack (2 packs)

SmartMedia (SSFDC-8MB)

Static-free case

Index labels (2 pieces)

Write-protect
adhesive seals
(4 pieces)

SmartMedia instructions
Optimal items
• Photo Printers For Olympus Digital Cameras
- AC Adapter
• Leather Camera Case
- Standard SmartMedia Card (8/16/32/64MB)
• Leather SmartMedia Case
- Special Function SmartMedia Cards
Template Card (4MB)
Calendar Card (4MB)
Title Card (4MB) - FlashPath Floppy Disk Adapter
- PC Card Adapter
- NiMH Batteries
- NiMH Battery Charger
- SmartMedia Reader/Writer
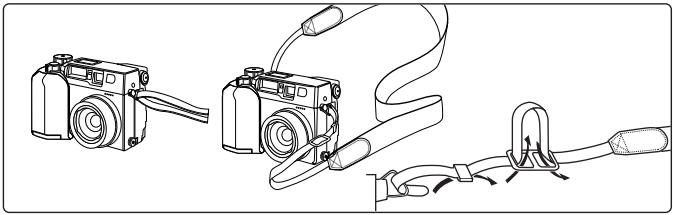
Attaching the strap
Attach the strap to the strap hook on the camera.
natural_image
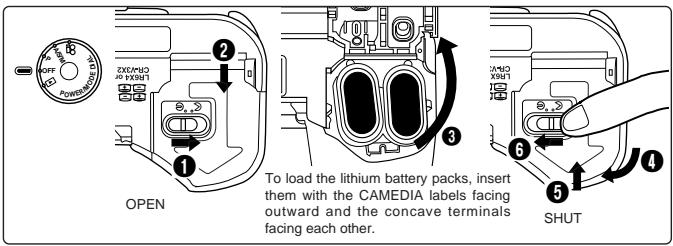
Line drawing of three connected cameras with cable and connectors, no text or symbols presentLoading the batteries
This camera uses 2 CR-V3 lithium battery packs or 4 AA NiMH batteries, NiCd batteries, alkaline batteries or lithium batteries. Performance will be limited with alkaline batteries, especially in low temperatures. Lithium battery packs or NiMH batteries are recommended. Do not use zinc-carbon batteries; they may overheat and destroy the camera.
When pressing the battery cover shut, be sure to press the center of the cover since it may be difficult to close properly by pressing the edge.
Close the battery cover, then press it down and slide it in the opposite direction of the arrow printed on it. Slide the opening and closing switch on the battery cover in the direction of .
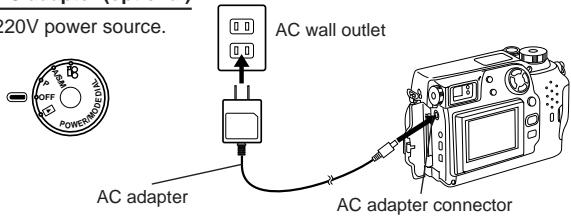
Using the AC adapter (optional)
Use an AC220V power source.
Note:
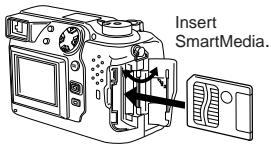
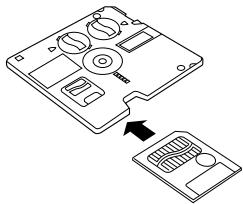
- Use 3V (3.3V) cards only. 5V cards cannot be used.
- Olympus brand cards are recommended (already formatted). Non-Olympus brand cards must be formatted by the camera.
- When using a special function SmartMedia card (optional), insert it in the same way.
Caution:
- NEVER open the card cover, eject the card, remove the batteries, or pull the plug while the camera is in operation. It may destroy the data in the card.
- The card is a precision instrument. Handle it carefully and do not subject it to physical shocks.
- Do not touch the contact area of the card.
Power on/off
Remove the lens cap, then set the Mode dial to P, A/S/M, 📋 or ▶. If there are no pictures stored in the card when the Mode dial is set to ▶, NO PICTURE will appear on the LCD monitor.
Checking the card
When the power is turned on in the Record mode, the camera checks the SmartMedia card.
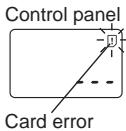
When there is no SmartMedia card in the camera / the card is protected:
The Card error indicator on the control panel and the Green lamp blink.

![CARD SETUP NO [OFF]](/content/2019/11/84396/images/cde3b0eeb316f2cc6c2b6256a84eef1c627c7ff641848016bb3bcc4cf18b3b0f.jpg)
LCD monitor
When the card needs to be formatted: The Card error indicator on the control panel lights, and the Card format confirmation screen appears. Select ➤ to enter the Card format mode.
Card format
Press the Menu button, then press the top/bottom arrows on the Jog dial to select CARD SETUP. Press the right arrow to select ⏻, and press the OK button to display ⏻ YES NO. Press the OK button again with YES selected to format the card.
Note:
- Formatting the card erases the existing data, including pictures which have been write-protected from the camera. Be careful not to erase important data when formatting a recorded card.
Adjusting the date and time
Press the Menu button, then press the top/bottom arrows on the Jog dial to select MODE SETUP and press the right arrow. Press the OK button. Press the top/bottom arrows to select ⏻, press the right arrow and press the OK button. Select the date order, and adjust the date and time using the Jog dial. Press the OK button. Press the OK button twice.
- When the Mode dial is set to ▶, the card must contain images in order to display the Menu.
LCD brightness
Press the Menu button, then press the top/bottom arrows on the Jog dial to select MODE SETUP and press the right arrow. Press the OK button. Press the top/bottom arrows to select ☐, press the right arrow and press the OK button. Select the brightness using the Jog dial. Press the OK button twice.
Beep sound
Press the Menu button, then press the top/bottom arrows on the Jog dial to select MODE SETUP and press the right arrow. Press the OK button. Press the top/bottom arrows to select ■), press the right arrow and top/bottom arrows to make the selection. Press the left arrow to confirm the setting. Press the OK button twice.
RECORDING FUNCTIONS
How to use the mode dial
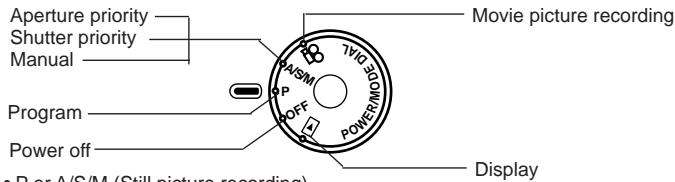
- P or A/S/M (Still picture recording)
• (Movie picture recording) - OFF (Power off)
- ▶ (Display)
Adjusting the diopter
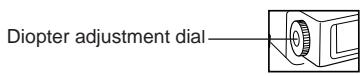
- Turn the Diopter adjustment dial to see the Autofocus mark clearly.

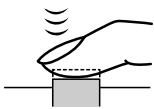
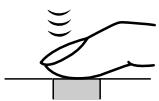
Proper shutter release
Press the Shutter release button halfway to lock the focus and exposure.
natural_image
Simple line drawing of a hand pressing a block with motion lines indicating sound or vibration (no text or symbols)- The Green lamp next to the viewfinder lights.
- If the Green lamp blinks, the focus or exposure is not locked. Check the working distance.
Press the Shutter release button fully to release the shutter and take the picture.
natural_image
Simple line drawing of a hand pressing a block with motion lines indicating sound or vibration (no text or symbols)- The camera emits a beep sound when the shutter is released.
- The Card access lamp blinks while the picture is being recorded.
Press the Shutter release button halfway to lock the focus and exposure. Press the Shutter release button fully to take the picture. When the Green lamp stops blinking, the camera is ready to take the next picture.
A/S/M mode
P A/S/M
Press the Menu button, then press the top/bottom arrows on the Jog dial to select A/S/M MODE. Press the right arrow on the Jog dial, then press the top/bottom arrows to select A (Aperture priority), S (Shutter priority) or M (Manual). Press the left arrow on the Jog dial to confirm the setting. If you take a picture without pressing the OK button, the setting will be valid until the Menu is canceled.
Quick view
P A/S/M
To switch to the Display mode, quickly press the LCD monitor ON/OFF button twice in the Record mode. To return to the Record mode, press the LCD monitor ON/OFF button or the Shutter release button.
Recording movies

Press the Shutter release button halfway to lock the focus and exposure. The focus and exposure will be locked during the recording. Press the Shutter release button fully to start recording. Press the Shutter release button fully again to stop recording.
- During movie recording, focus is fixed at the point where focus is locked. Only Digital zoom is available. Because the image in the viewfinder is not affected by Digital zoom, use the LCD monitor to check results. The sound may not be recorded clearly if there is a distance of 1m or more between subject and camera.
How to use the menu
P A/S/M
Press the Menu button, then press the top/bottom arrows on the Jog dial to select the item to adjust. Press the right arrow to display further selections. Press the top/bottom arrows to adjust the item, and press the left arrow to confirm the adjustment. Press the OK button.
When the power is turned on in the Record mode, the remaining battery power will be displayed on the control panel.

lights and turns off automatically.
Batteries are OK. You can shoot.

blinks and other indicators on the control panel are displayed normally.
Battery power is low and batteries should be replaced. If NiMH batteries are used, the battery low warning will blink faster than when lithium battery packs are used.

blinks and other indicators on the control panel go out.
Batteries are dead and should be replaced immediately.
Note:
- When the camera is being operated on batteries that are running low, the camera may emit several short beeps and blink the number of storable pictures on the control panel after you take a shot or when you turn on the power. If this happens, the picture you have just taken will not turn out properly. Replace the batteries and take the picture again.
Checking the number of storable pictures

When the power is turned on in the Still Picture Record mode, the number of storable pictures will appear on the control panel. (For movie pictures, the seconds remaining will appear.)

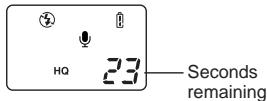
The Green lamp blinks and CARD FULL appears on the LCD monitor when the number reaches 0.

No more photographs can be taken. Replace the SmartMedia, erase unwanted pictures, or transfer the data to a personal computer and free up space in the SmartMedia.
Number of Still Pictures that can be Taken
| Recording mode | Number of pixels | File | Memory capacity (without sound/with sound) | ||||||
| 2MB | 4MB | 8MB | 16MB | 32MB | 64MB | ||||
| TIFF | 2048 x 1536 | TIFF | 0/0 | 0/0 | 0/0 | 1/1 | 3/3 | 6/6 | |
| 1600 x 1200 | 0/0 | 0/0 | 1/1 | 2/2 | 5/5 | 11/11 | |||
| 1280 x 960 | 0/0 | 1/1 | 2/2 | 4/4 | 8/8 | 17/17 | |||
| 1024 x 768 | 0/0 | 1/1 | 3/3 | 6/6 | 13/13 | 27/27 | |||
| 640 x 480 | 2/1 | 4/4 | 8/8 | 17/16 | 34/33 | 68/66 | |||
| SHQ | 2048 x 1536 | JPEG | 1/1 | 2/2 | 4/4 | 8/8 | 17/17 | 35/34 | |
| HQ | 2048 x 1536 | 2/2 | 5/4 | 10/10 | 21/20 | 42/40 | 84/81 | ||
| SQ1 | HIGH (High quality) | 1600 x 1200 | 1/1 | 3/3 | 6/6 | 12/12 | 25/25 | 51/50 | |
| NORMAL | 3/3 | 7/7 | 16/15 | 31/30 | 64/60 | 128/120 | |||
| HIGH (High quality) | 1280 x 960 | 2/2 | 5/4 | 10/10 | 21/20 | 42/40 | 84/81 | ||
| NORMAL | 5/5 | 12/11 | 24/22 | 49/45 | 99/90 | 199/181 | |||
| SQ2 | HIGH (High quality) | 1024 x 768 | 3/3 | 6/6 | 13/12 | 26/25 | 53/51 | 107/102 | |
| NORMAL | 9/7 | 18/16 | 37/32 | 76/66 | 153/132 | 306/266 | |||
| HIGH (High quality) | 640 x 480 | 7/6 | 16/14 | 32/28 | 66/58 | 132/117 | 266/234 | ||
| NORMAL | 20/15 | 40/30 | 82/61 | 165/123 | 331/248 | 665/498 | |||
- Sound cannot be recorded with a picture in the TIFF mode, but it can be added later in the ▶ mode.
Seconds that Movies can be Photographed
| Recording mode | Number of pixels | Memory capacity | |||
| 2MB | 4MB | 8MB | Over 16MB | ||
| HQ | 320 x 240 | 6 | 13 | 27 | 30 |
| SQ | 160 x 120 | 25 | 53 | 108 | 120 |
Working range
| P | A/S/M |
| Macro mode | 0.2 ~ 0.8 m |
| Standard mode | 0.8 m ~ |
With ON selected, the settings of the following items will be canceled and reset to the default when the power is turned off.
| Aperture priority mode | Auto bracket |
| Shutter priority mode | Flash light volume correction |
| Manual mode | Slow shutter synchronization flash |
| Zoom | Flash select |
| Exposure compensation | Digital zoom mode |
| Flash modes | White balance |
| Spot metering mode | ISO setting |
| Macro mode | Picture effects |
| Macro + Spot metering mode | Recording mode |
| Manual focus | A/S/M mode setting |
| Sequence mode | Picture information |
| Selftimer/Remote control |
File number
P A/S/M
Press the Menu button, then press the top/bottom arrows on the Jog dial to select MODE SETUP and press the right arrow to select SETUP. Press the OK button. Press the top/bottom arrows to select FILE NAME, press the right arrow and top/bottom arrows to make the selection. Press the left arrow to confirm the setting. Press the OK button twice.
About the File No. and Folder No.
The file number and folder number used for each image are expressed as shown.

*Month: Jan. \~ Sep. = 1-9, Oct. = A, Nov. = B, Dec. = C
The File No. and Folder No. in Each Mode
- NAME RESET
When RESET is selected, the file number and folder number will be reset every time a card is inserted in the camera.
- AUTO FILE
When AUTO is selected, the same folder number and a continuing number from the last file number of the last card will be used, so that the same file number will not be used for pictures taken together and saved in multiple cards.
DISPLAYING FUNCTIONS

Displaying recorded pictures
Set the Mode dial to ▶. With each press of the right arrow on the Jog dial, you can view the succeeding picture. With each press of the left arrow, you can view the preceding picture.
[10-frame jump using the Jog dial]
- With each press of the bottom arrow, you can view the picture 10 frames ahead.
- With each press of the top arrow, you can view the picture 10 frames behind.
Playing movies
Display a picture with 🎨 on the LCD monitor using the Jog dial. Press the Menu button, then press the top/bottom arrows on the Jog dial to select 🎨 PLAY and press the right arrow. Press the OK button to start the movie. Press the OK button during the movie to pause it. Pressing the Jog dial enables frame-by-frame playback of the movie. Press the OK Button again to restart. Press the Menu button during the movie to stop it. Press the Menu button twice when movie playback is finished. The movie playback mode is canceled. Sound cannot be played back by this camera. Connect it to a TV or personal computer for sound playback.
Picture information
Press the Menu button, then press the top/bottom arrows on the Jog dial to select INFO and press the right arrow. Press the top/bottom arrows on the Jog dial to select ON. Press the left arrow to confirm the setting. Press the OK button to save the setting and exit the Menu. When the LCD monitor displays a picture you selected, picture information appears. After 5 seconds, it disappears.
Index-display mode
Press the Zoom lever toward W to display several pictures on the monitor. Press the right arrow on the Jog dial to select succeeding pictures. Press the left arrow on the Jog dial to select preceding pictures. Press the bottom arrow on the Jog dial to select the succeeding group of pictures. Press the top arrow on the Jog dial to select the preceding group of pictures. Press the Zoom lever toward T to display the currently selected picture in one frame.
Close-up display mode (3X inspection)
With each press of the Zoom lever toward T, the picture is enlarged 1.5X, 2X, 2.5X, and 3X. Pressing the Zoom lever toward W returns to 1X. Use the Jog dial to select the section of the picture to view. To select another picture, select 1X and move the Jog dial.
Slide-show
Press the Menu button, then press the top/bottom arrows on the Jog dial to select ▶ and press the right arrow. Press the OK button to start the slide-show. Press the Menu button to stop the Slide-Show.
Recording sound
Press the Menu button to display the Menu, then press the top/bottom arrows on the Jog dial to select ⏻. Press the right arrow on the Jog dial to select START. Press the OK button to start recording. About 4 seconds of sound is recorded. A progress bar will be displayed on the LCD monitor.
The sound may not be recorded clearly if there is a distance of 1 m or more between subject and camera.
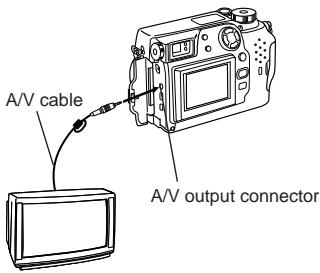
Connecting to a television
Recorded images can be viewed on a TV (PAL only). Make sure that the power of the TV and the camera are off before connecting.
Connect the AV cable to the camera's A/V output connector, then connect it to the TV's audio (white) and video (yellow) input connectors. Turn on the TV. Set the Mode dial to ▶. Select a picture using the Jog dial. If sound is recorded with pictures, sound is also played back.
Protection
Press the OK button to protect the currently displayed picture.
One-frame erase
Display the picture you want to erase and press the Erase button. Press the OK button with YES selected to erase the picture.
All-frame erase
Press the Menu button, then press the top/bottom arrows on the Jog dial to select CARD SETUP. Press the right arrow to select ⏻, and press the OK button to display ⏻ YES NO. Press the OK button again with YES selected to ease all the pictures in the card.
SOPHISTICATED FUNCTIONS
Autofocus

A/S/M

There are certain conditions where the autofocus may not work properly even when the Green lamp lights when the Shutter release button is pressed halfway. When this happens, try the procedure below or use Manual focus.
①Subjects with low contrast
Lock the focus on an object that is at the same distance from the camera as the subject, then aim at the subject to take the picture.
②Subjects with no vertical lines
Lock the focus on the subject by holding the camera vertically, then change it to the horizontal position to take the picture.
③Subjects in excessively bright light
Lock the focus on an object that is at the same distance from the camera as the subject, then aim at the subject to take the picture.
④Subjects at different distances
Lock the focus on an object that is at the same distance from the camera as the subject, then aim at the subject to take the picture.
⑤ Fast-moving subjects at close distances
Lock the focus on an object that is at the same distance from the camera as the subject, then aim at the subject to take the picture.
natural_image
Line drawing of a classic car (no text or symbols)
natural_image
Illustration of a striped panel with a small plant on the right side (no text or symbols)
natural_image
Line drawing of a car parked under a fence with trees in the background (no text or symbols)
natural_image
Silhouette of a person sitting on a bench surrounded by vertical bars (no text or symbols)
Focus lock

A/S/M

Position your subject within the autofocus marks, and press the Shutter release button halfway. Recompose the picture while keeping the Shutter release button pressed halfway. Press the Shutter release button fully to take the picture.
AE lock

A/S/M
You can take a picture of a subject with a different exposure than that set with focus lock. While keeping the Shutter release button pressed halfway, recompose the picture and press the OK button. The exposure is metered and stored in memory. If the OK button is pressed again, the new exposure is stored in memory. If the Shutter release button is not released after being pressed halfway, a new exposure will be stored in memory with each press of the OK button.
Press the OK button to turn on the LCD monitor. Press the right arrow on the Jog dial to select the Manual focus mode. While looking at the LCD monitor, press the top/bottom arrows on the Jog dial to select the distance. When the cursor is moved below 0.8 m, shorter distances will appear on the LCD monitor. Press the OK button to save the setting.
Zoom
P A/S/M
Press the lever to T to choose Telephoto shooting. Press the lever to W to choose wide-angle shooting. Only digital zoom is available in the ⚙️ mode. Use the LCD monitor to check images that have been zoomed-in or -out.
- The image will be more grainy the more you zoom to a subject because only Digital zoom is available in the ⚙️ mode.
- When movie recording while zooming, images may become jittery.
Digital zoom mode
P A/S/M
Press the Menu button, then press the top/bottom arrows on the Jog dial to select DIGITAL ZOOM. Press the right arrow on the Jog dial, then press the top/bottom arrows to select ON or OFF. Press the left arrow on the Jog dial to confirm the setting. If you take a picture without pressing the OK button, the setting will be valid until the Menu is canceled.
Note:
- The setting will be canceled and only the optical zoom will be available when the LCD monitor is turned off.
- Images may be grainy in this mode.
Spot metering mode/Macro mode/Macro mode + Spot metering mode
P A/S/M
You can select the following modes with each press of the Spot/Macro button.
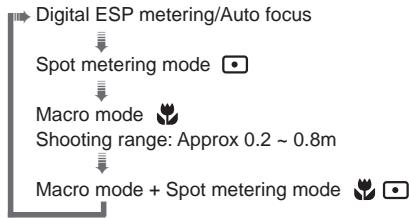
flowchart
graph TD
    A["Digital ESP metering/Auto focus"] --> B["Spot metering mode"]
    B --> C["Macro mode"]
    C --> D["Shooting range: Approx 0.2 ~ 0.8m"]
    D --> E["Macro mode + Spot metering mode"]
Press the Menu button, then press the top/bottom arrows on the Jog dial to select DRIVE. Press the right arrow and press the top/bottom arrows to select or AF. Press the left arrow on the Jog dial to confirm the setting. If you take a picture without pressing the OK button, the setting will be valid until the Menu is canceled. This mode cannot be used in the TIFF/SHQ recording mode.
Selftimer/Remote control Ⓟ A/S/M
Press the Menu button, then press the top/bottom arrows on the Jog dial to select DRIVE. Press the right arrow and press the top/bottom arrows to select 🎨. Press the left arrow on the Jog dial to confirm the setting. If you take a picture without pressing the OK button, the setting will be valid until the Menu is canceled.
Taking a picture using the selftimer
When the shutter is released, the Selftimer/Remote control signal lights for approx. 10 seconds then blinks for approx. 2 seconds before the picture is taken. To stop the activated selftimer, press the Menu button.
Taking a picture using the remote control
Compose the picture, aim the remote control at the Remote control window on the camera, then press the Shutter release button on the remote control to take a picture.
Exposure compensation Ⓓ A/S/M
Turn on the LCD monitor in the Record mode. Press the right arrow on the Jog dial for + adjustment and the left arrow for – adjustment.
White balance Ⓓ A/S/M
Press the Menu button, then press the top/bottom arrows on the Jog dial to select WB. Press the right arrow on the Jog dial, then press the top/bottom arrows to select AUTO, ⚙ (Daylight), ⚙ (Overcast), ⚙ (Tungsten light) or ⚙ (Fluorescent). Press the left arrow on the Jog dial to confirm the setting. If you take a picture without pressing the OK button, the setting will be valid until the Menu is canceled.
ISO P A/S/M
Press the Menu button, then press the top/bottom arrows on the Jog dial to select ISO. Press the right arrow on the Jog dial, then press the top/bottom arrows to select the sensitivity. Press the left arrow on the Jog dial to confirm the setting. If you take a picture without pressing the OK button, the setting will be valid until the Menu is canceled.
Press the Menu button, then press the top/bottom arrows on the Jog dial to select 📋. Press the right arrow and press the top/bottom arrows to select ON. When the Shutter release button is released, sound is recorded for 4 seconds per picture. So be sure to for a while keep the camera's microphone directed toward the subject for a while even after the shutter has been released. The sound may not be recorded clearly if there is a distance of 1 m or more between subject and camera. This is not possible in the TIFF mode.
Picture effects

Press the Menu button, then press the top/bottom arrows on the Jog dial to select FUNCTION. Press the right arrow on the Jog dial, then press the top/bottom arrows to select the desired picture effect. Press the left arrow on the Jog dial to confirm the setting. If you take a picture without pressing the OK button, the setting will be valid until the Menu is canceled.
Panorama mode Ⓟ
Turn on the LCD monitor. Press the Menu button, then press the top/bottom arrows on the Jog dial to select □ and press the right arrow. Press the OK button. Select the connecting direction (right, left, up, down) using the Jog dial. Take pictures by overlapping the edges of the images. Press the Menu button to cancel the Panorama mode and Menu.
Selecting the recording mode

Press the Menu button, then press the top/bottom arrows on the Jog dial to select ◄. Press the right arrow on the Jog dial, then press the top/bottom arrows to select the recording mode. Press the left arrow on the Jog dial to confirm the setting. If you take a picture without pressing the OK button, the setting will be valid until the Menu is canceled.
TIFF setup

Press the Menu button, then press the top/bottom arrows on the Jog dial to select MODE SETUP and press the right arrow to select SETUP. Press the OK button. Press the top/bottom arrows to select TIFF, press the right arrow to select SETUP and press the OK button. Use the top/bottom arrows to make the selection. Press the OK button to confirm the setting. Press the OK button repeatedly until the Menu disappears.
Press the Menu button, then press the top/bottom arrows on the Jog dial to select MODE SETUP and press the right arrow to select SETUP. Press the OK button. Press the top/bottom arrows to select SQ1 or SQ2, then press the right arrow to select SETUP and press the OK button. Press the top/bottom arrows to select the resolution and press the right arrow, then press the top/bottom arrows to select the picture quality. Press the left arrow to confirm the setting. Press the OK button repeatedly until the Menu disappears.
Full-time AF Ⓓ A/S/M
Press the Menu button, then press the top/bottom arrows on the Jog dial to select MODE SETUP and press the right arrow. Press the OK button. Press the top/bottom arrows to select FULL-TIME AF, press the right arrow and top/bottom arrows to ON or OFF. Press the left arrow to confirm the setting. Press the OK button twice to close the Menu. ON keeps the image on the LCD monitor in focus at all times without having to press the Shutter release button.
Rec view Ⓟ A/S/M
Press the Menu button, then press the top/bottom arrows on the Jog dial to select MODE SETUP and press the right arrow to select SETUP. Press the OK button. Press the top/bottom arrows to select REC VIEW, press the right arrow and top/bottom arrows to make the selection. Press the left arrow to confirm the setting. Press the OK button twice. When set to CHECK, it is possible to check the image and decide whether or not to save it. CHECK is not possible in the TIFF mode.
Index-display adjustment ▶
Press the Menu button, then press the top/bottom arrows on the Jog dial to select MODE SETUP and press the right arrow to select SETUP. Press the OK button. Press the top/bottom arrows to select ☑, press the right arrow and top/bottom arrows to select the number. Press the left arrow to confirm the setting. Press the OK button twice.
Sharpness Ⓓ A/S/M
Press the Menu button, then press the top/bottom arrows on the Jog dial to select MODE SETUP and press the right arrow to select SETUP. Press the OK button. Press the top/bottom arrows to select 🔒, press the right arrow and top/bottom arrows to make the selection. Press the left arrow to confirm the setting. Press the OK button twice.
Press the Menu button, then press the top/bottom arrows on the Jog dial to select MODE SETUP and press the right arrow to select SETUP. Press the OK button. Press the top/bottom arrows to select m/ft, press the right arrow and top/bottom arrows to make the selection. Press the left arrow to confirm the setting. Press the OK button twice.
Using the flash

A/S/M
Flash working range:
| Wide-angle | Telephoto |
| Approx. 0.8 ~ 3.8 m | Approx. 0.2 ~ 3.8 m |
Auto-flash
In the Auto-Flash mode, the flash will fire automatically in low-light and backlight conditions. When you take a picture that is backlit, position the subject within the backlighting correction marks to fire the flash.
Red-eye reducing flash
This mode significantly reduces the phenomenon of "red-eye".
Fill-in flash (forced activation)
In the Fill-In Flash mode, the flash fires regardless of available light. For example, this mode can be used to brighten up the subject's shaded face. Another use of this mode is to correct the color shift produced by artificial lights (eg. fluorescent light).
Off (flash override)
In the Off mode, the flash does not fire even in low-light conditions. Use this mode in situations where flash photography is not desired or is prohibited, or in twilight/night scenes.
Selecting the flash mode
With each press of the Flash mode button, the flash mode will switch from Auto-Flash to ⏻ (Red-Eye Reducing Flash), ↘ (Fill-In Flash) and ⚙ (Flash Off). If the Orange lamp lights when the Shutter release button is pressed halfway, the flash is ready to fire.
Press the Menu button, then press the top/bottom arrows on the Jog dial to select \$SLOW. Press the right arrow on the Jog dial, then press the top/bottom arrows to select 1 or 2. Select 1 for capturing images at the beginning of the shutter release duration. The taillights of a moving car will have a forward streak. Select 2 for capturing images at the end of the shutter release duration. The taillights of a moving car will have a receding streak. When 2 is selected, the flash will fire a pre-flash before the regular flash. Press the left arrow on the Jog dial to confirm the setting. If you take a picture without pressing the OK button, the setting will be valid until the Menu is canceled.
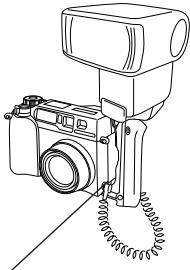
Taking photographs using the FL-40 extension flash
P A/S/M
If the FL-40 extension flash (optional) is used, the flash mode and exposure compensation are detected automatically, allowing the main flash and extension flash to function together. The FL-40 extension flash can be used to take various kinds of flash photographs, either by itself or together with the main flash. To connect the extension flash to the camera, the exclusive grip (optional) and bracket cable (optional) are required. Mount the FL-40 extension flash on the exclusive grip, then fasten it to the camera's tripod hole and connect the exclusive grip and the camera's extension flash connection terminal using the exclusive bracket cable.
When using the FL-40 extension flash only:
Press the Menu button, then press the top/bottom arrows on the Jog dial to select FLASH and press the right arrow on the Jog dial. Press the top/bottom arrows to select ☑. Press the left arrow on the Jog dial to confirm the setting. Press the OK button to save the setting and cancel the Menu.
The extension flash is set to the TTL-AUTO mode.
- The default setting is IN + ≡.
- Do not connect any cable other than the exclusive bracket cable to the camera's extension flash connection terminal.
natural_image
Line drawing of a camera mounted on a stand with coiled spring (no text or symbols)Extension flash connection terminal
PRINTING PICTURES
Selected images can be reserved in a SmartMedia card for printing on a printer or at a photo lab that supports the DPOF (Digital Print Order Format) system.
Single-frame print reserve
Press the Print button (☐), press the top/bottom arrows on the Jog dial to select ☐ and press the OK button. To select the desired picture, press the arrows on the Jog dial, then press the OK button. Press the top/bottom arrows to select ☐× (no. of prints), ☑ (date/time), ☑ (trimming). To set each parameter, press the right/left arrows and press the OK button. To set print reserve for more pictures, press the arrows to select another image. To exit the print reserve mode, press the Print button (☐).
All-frame print reserve
Press the Print button (☐), then press the top/bottom arrows on the Jog dial to select ☐. Press the right arrow on the Jog dial, then press the top/bottom arrows to select ON.
Trimming print reserve
Lets you print an enlarged part of a recorded picture. Press the Print button (☐), press the top/bottom arrows on the Jog dial to select ☐ and press the OK button. To select the desired picture, press the arrows on the Jog dial, then press the OK button. Press the zoom lever toward T to display the Trimming mode screen. To set the top left corner of the picture, press the arrows to move the cursor and press the OK button at the desired point. To set the bottom right corner, press the arrows to move the cursor and press the OK button at the desired point. The trimming size is displayed. To set ☐ (no. of prints), ☑ (date/time) and ☒ (trimming) on the Single-frame print reserve screen, press the OK button.
Note:
- This camera cannot be directly connected to printers.
- If a card contains DPOF reservations set by another device, entering reservations using this camera may overwrite the previous reservations. Be sure to use this camera for reservations.
Resetting print reserve
Press the Print button (☐) to display the PRINT ORDER SETTING screen. If there are no pictures with print reserve settings in a card, this screen is not displayed. Press the right/left arrows on the Jog dial to select RESET, then press the OK button. RESET cancels the print reserve settings for all images in the card.
USING A PERSONAL COMPUTER
Computer system requirement
- Windows
CPU: Pentium or later
OS: Windows 98/98 Second Edition/2000 Professional (USB)
Windows 95/98/98 Second Edition/2000 Professional/NT 4.0 SP3 or later
Available HD space: 100MB or more
RAM: 32MB or more (64MB or more recommended)
Connectors: USB port (USB connection)
RS-232C port (serial connection)
D-SUB 9-pin connector (serial connection)
Monitor: More than 32000 colors
Minimum monitor resolution: 800 x 600 pixels
- USB support is not available under the following environments, even for PCs equipped with a USB port.
Windows 98 upgrade (from Windows 95)
Windows 95
Windows NT 4.0
- To record or play back sound, a sound card and a microphone are required.
- Apple Macintosh
CPU: PowerPC
OS: Mac OS 8.6 to 9 (USB)
Mac OS 7.6.1 to 9 (serial)
Available HD space: 100MB or more
RAM: 32MB or more (8MB or more free memory for the included application)
Connectors: USB port
Serial port
Monitor: More than 32000 colors
Minimum monitor resolution: 800 x 600 pixels
- For USB connection, your Macintosh must have a USB port.
•To record sound, a microphone is required.
Note:
- QuickTime 4.0 must be installed to play back movies.
Connecting to a personal computer
Use the appropriate connector according to your computer's specifications.
- For USB-equipped computers (IBM PC/AT compatible, Apple Macintosh) Connect the provided USB cable to the USB port on your computer.
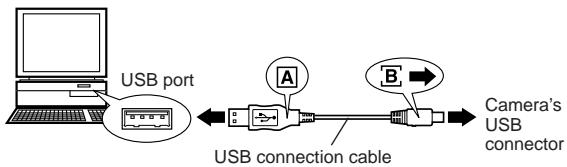
flowchart
graph LR
    A["Computer"] --> B["USB port"]
    B --> C["USB connection cable"]
    C --> D["Camera's USB connector"]
    style A fill:#f9f,stroke:#333
    style D fill:#bbf,stroke:#333
- For serial port-equipped computers (IBM PC/AT compatible)
Connect the optional RS-232C PC serial cable to the serial port (COM1, COM2, etc.) on your computer.

- To connect to the serial port on your Macintosh using the RS-232C PC serial cable, use the optional conversion connector for Macintosh.
Using a personal computer
- Make sure that the power of the personal computer and the camera are OFF.
- Connect the provided USB cable or optional RS-232C PC serial cable to your computer. (See the previous page for details)
- Remove the lens cap, and connect the cable to the camera's USB connector or computer connector, then turn on your computer.
- Set the Mode dial on the camera to ▶.
- Start CAMEDIA Master on the computer.
Installing provided software
By installing the provided software (CAMEDIA Master), you can download images to a computer via the provided USB cable or serial cable and access the following functions. For installation and operation, refer to the software's online manual.
- Image download
Image download via the provided USB cable or RS-232C cable, as well as support for adding/canceling Protection, picture erase, date set, and others.
- Image viewer
Single and Index display, Slide-Show, and easy image storage. It is also possible to pick up any frame from a movie.
- Format exchange
Image rotation, format exchange and file renaming can be done from the index window.
- Image processing
Rotation ( 90^ clockwise, 90^ counterclockwise, 180^ , desired angle), changing the number of colors, size change, text insertion, and filtering (brightness, contrast, color balance, sharpness).
- Function support
[Panorama function]: Connection of images taken in the Panorama mode on the camera.
[Template function]: Joining of picture data with original Template images.
- Printing
Single print, Date print, print on split-sticker print paper.
Transferring data from SmartMedia
PC card adapter
The picture data in the SmartMedia can be directly transferred to a personal computer equipped with a PC card (PCMCIA) slot or an external PC card reader/writer, using the optional PC Card Adapter.
flowchart
graph TD
    A["USB Drive"] --> B["Digital Output"]
    style A fill:#f9f,stroke:#333
    style B fill:#ccf,stroke:#333
FlashPath floppydisk adapter
The picture data in the SmartMedia can be directly transferred to a personal computer equipped with a 3.5" FDD, using the optional FlashPath Floppydisk Adapter.
natural_image
Diagram showing a computer case with internal components and an external device (no text or symbols)SmartMedia reader/writer
The picture data in the SmartMedia can be directly transferred to a personal computer (Windows 98/Mac OS 8.6) equipped with a USB port, using the optional SmartMedia Reader/Writer.
| Control panel | LCD monitor | Error content | Remedy |
 | CARD COVER OPEN | The card cover is open. | Insert a card and close the cover. |
 | NO CARD | The card is not inserted, or it cannot be recognized. | Insert a card. Or insert the card again. |
| [1476][2880] | CARD FULL | No more pictures can be taken. | Replace the card or erase unnecessary pictures. |
| [1479][4790] | WRITE PROTECT | Writing to the card is prohibited. | If you are taking pictures, remove the write-protect adhesive seal. |
| [1484] | CARD ERROR | Cannot record, play back or erase pictures in this card. | If the card is dirty, wipe it with a clean tissue and insert it again. Or, format the card. If the problem is still not corrected, this card cannot be used. |
| (No display) | PICTURE ERROR | The recorded image cannot be played back with this camera. | Load the image using personal computer image processing software. If that cannot be done, the image file is partially damaged. |
1  | (Format confirmation screen) | The card is not formatted. | Format the card. |
1  | NO PICTURE | There are no pictures in the card, so there is nothing to play back. | Insert a card which contains images. |
| 1 | CARD FULL | There is no empty space in the card, so print data or sound cannot be recorded. | Replace the card or erase unnecessary pictures. |
Questions and answers
How long will the batteries last?
→ Battery life is affected by many variables such as the amount of LCD monitor use, the frequency of flash use, as well as by the kind of battery used and the environmental conditions under which the camera is used. Using the LCD monitor frequently will use up your batteries quickly. Keep the LCD monitor turned off to save power. Use of the optional AC adapter is recommended.
How can I correct the clock in the camera that will be used to record the date on the image data?
→ Date adjustment is not made when the camera is shipped. You can adjust the date either from the camera or from the computer.
How should I store the camera?
→ Cameras are susceptible to damage caused by dust, moisture, and salt. Wipe and dry the camera thoroughly before storing it. After using it at the beach, wipe it with a cloth that has been moistened with fresh water and then wrung out. Do not store in an area where mothballs are used. Unload the batteries if you do not plan to use the camera for a long period.
Why do the subjects' eyes sometimes appear red in pictures?
→ This “red-eye phenomenon” occurs with all cameras when a flash is used. It is caused by light from the flash reflecting off the retina at the back of the eye. Red-eye varies depending on the individual and the shooting conditions such as ambient lighting. Use of the Red-Eye Reducing Pre-Flash mode significantly reduces this phenomenon.
Can I use a filter, hood or conversion lens?
→ You cannot use a filter or a hood. A conversion lens adapter (optional) is required to attach a conversion lens to the camera.
Can I use an extension flash?
→ Yes you can. You can use an extension flash with a grip. For more information, please see our Internet home page (http://www.olympus.com).
Precautions
Caution concerning the flash
- Be careful when taking pictures at close range.
- Do not take pictures of people's faces (babies in particular) at close range. If the flash goes off too close to someone's eyes it may cause a loss of vision. In particular, when taking pictures of babies, be sure that the distance is at least 1 m.
Be careful when handling the unit
- Do not use in an unstable position. If you lose your balance, you might get hurt.
- Be careful that no foreign substance (dirt, rain, sand) can enter the unit, particularly when the battery cover or lens barrier is open, as it may cause damage.
- To prevent damage, do not drop the camera or subject it to severe shock or vibration.
- This camera is not water-resistant. Do not put it in water, and be careful to protect it from rain, sea water, etc.
- Do not use the camera outside during a storm or when there is lightning.
- When replacing the batteries, make sure the power is OFF. If it is left ON, it may damage the internal circuits.
Storage environment
- To avoid damage or mis-operation of the camera, only store it where the temperature is -20 60^ and the humidity 10 90% .
- Do not store in humid places, as condensation may form and cause damage.
- To prevent injuries or accidents, keep the camera out of the reach of children.
Usage environment
- Do not use where there may be a large concentration of flammable or explosive gases, as it may cause a fire or explosion.
- To avoid damage or mis-operation of the camera, use it only if the temperature is 0 \~ 40°C and the humidity 30 \~ 90%.
- Do not move the camera suddenly from a hot to cold place, or vice versa. It may cause the formation of condensation inside the unit that may damage it. To prevent the formation of condensation, put the camera in a plastic bag, etc. to protect it and wait until the camera has reached the ambient temperature before taking it out.
- If used in low temperatures, the batteries will have a shorter life span than normal.
Points to verify before using the camera
- If taking particularly important pictures or if you have not used the camera for a long period, first confirm that it functions properly, or consult an Authorized Service Centre.
- We decline all responsibility concerning the loss of data, down time, loss of revenue or any other direct or indirect damage or claims caused by this camera.
Precautions when handling the batteries
To prevent leakage, fire, or damage, please read the instructions carefully and observe the following points:
- Do not heat or throw the batteries into a fire.
- Do not disassemble, modify or solder.
- Do not install with inverted polarity (+, -).
- Do not let metal objects touch the contacts. Do not store or carry loosely with necklaces or hairpins.
- Do not use old batteries together with new ones, and do not use different types of batteries at the same time.
- Do not store them in humid places as they may corrode.
- Do not use if something seems to be wrong.
- Do not use if there is leaking, swelling, a rise in temperature, or any other abnormal condition.
- When using them for the first time, if there are signs of corrosion or if they are warm, please take them back to where they were bought.
- NEVER use any battery whose body is not fully covered by the insulating sheet or the sheet is torn as it may cause leak, fire or injury. Some commercially available batteries are also partially covered, or not covered at all by the insulating sheet. Never use these batteries.
If there is a leak
- If the liquid gets into your eyes, do not rub them. Rinse with clean water, then seek medical attention immediately.
- If the liquid gets in contact with your skin or clothing, rinse with clean water.
- If the liquid has leaked inside the battery compartment, clean it carefully with a wet rag before inserting new batteries.
When the batteries are dead, take them out of the camera
- If old batteries are left inside the camera they may leak. If the camera is going into storage or if you intend not to use the camera for a long period of time, remove the batteries.
Do not use in an airtight device
- If may cause the batteries to leak and/or the camera to be damaged.
Do not recharge alkaline or lithium batteries
- If you try to recharge them, it may cause the batteries to leak and/or the camera to be damaged.
Do not use or store in a hot place (e.g. inside a closed car on a hot and sunny day)
- If may shorten their service life. Store in a dry cool place protected from direct sunlight.
Keep out of the reach of children
- Make sure children do not take the batteries out when using the camera. If a child is going to use the camera, be sure to teach the child proper usage according to this manual.
- When disposing of old batteries, be sure to do so in accordance with all applicable regulations in your area.
Precautions on using accessories
- Be sure to use only the supplied accessories, or accessories recommended by the manufacturer, otherwise fire, electric shock or damage may result. For more information, please consult the dealer where the unit was purchased.
- Do not keep the AC adaptor connected when not using the camera, otherwise fire, electric shock or damage may result.
- To prevent electric shock and damage, do not plug, connect or handle the AC adaptor with wet hands.
- Do not modify, bend forcibly, pull strongly, scratch, etc., or otherwise alter the AC adaptor power cord. Also, do not put heavy objects on the power cord, or place it close to a heat source as it may result in a fire or electric shock.
Notes on display and backlight
- The Control panel and the fluorescent lamps used in the LCD monitor have a limited service life. If they begin to darken or flicker, contact your nearest service center.
- In cold conditions, the display backlight may be slow to come on or may change color suddenly. To avoid this, keep the camera warm when using in cold temperatures. Backlight performance will return to normal under normal temperature conditions.
- When the color LCD monitor shows different pictures, some pixels may not change color and remain on or off. This phenomenon may be due to a lag in some circuits, but is considered to be within the normal operating tolerances of the LCD monitor. In addition, the brightness of the color LCD monitor may vary between pictures.
A variety of capabilities are available when connected to optional equipment.
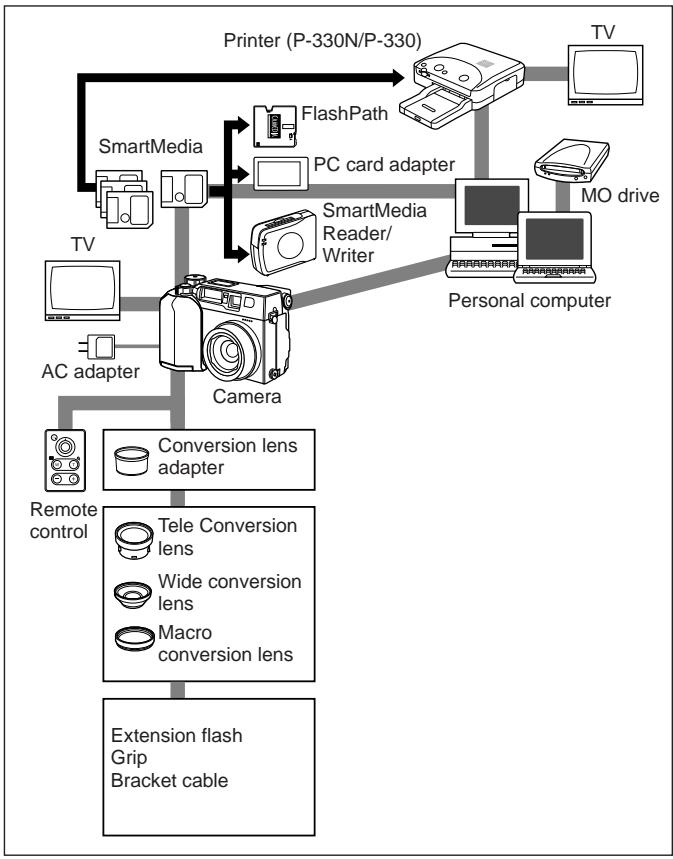
flowchart
graph TD
    A["Printer (P-330N/P-330)"] --> B["TV"]
    A --> C["SmartMedia"]
    C --> D["FlashPath"]
    C --> E["PC card adapter"]
    C --> F["SmartMedia Reader/Writer"]
    C --> G["Personal computer"]
    C --> H["MO drive"]
    C --> I["AC adapter"]
    I --> J["Camera"]
    J --> K["Conversion lens adapter"]
    J --> L["Remote control"]
    J --> M["Extension flash Grip Bracket cable"]
    J --> N["Tele Conversion lens"]
    J --> O["Wide conversion lens"]
    J --> P["Macro conversion lens"]
Compatibility of the picture data
- Images taken by this camera may not be properly displayed or printed with other Olympus digital cameras.
- Images taken by other Olympus digital cameras may not be properly displayed with this camera.
When taken with this camera and displayed/printed with other models
| Models | Display | Direct print |
| C-3030ZOOM | ○ | ○ |
| C-960ZOOM | ○ *1 | × |
| C-860L | ○ *1, *2 | × |
| C-2020ZOOM | ○ | ○ |
| C-2500L | ○ | × |
| C-21 | ○ | ○ |
| C-920ZOOM | ○ | ○ |
| C-2000ZOOM | ○ | ○ |
| C-900ZOOM(D-400ZOOM) | × | × |
| C-830L | × | × |
| C-840L(D-340L) | × | × |
| C-820L(D-320L) | × | × |
| C-420L | × | × |
| C-1400XL | × | × |
| C-1400L | × | × |
| C-1000L | × | × |
When taken with other models and displayed/printed with this camera
*1: Depending on to the no. of pixels only the thumbnail playback is available.
*2: Images taken in the TIFF mode cannot be displayed.
*3: Only the images taken in the SQ mode can be displayed. Close-up display is not available.
Important notice
Disclaimer of Warranty
Olympus makes no representations or warranties, either expressed or implied, by or concerning any content of these written materials or software, and in no event shall be liable for any implied warranty of merchantability or fitness for any particular purpose or for any consequential, incidental or indirect damages (including but not limited to damages for loss of business profits, business interruption and loss of business information) arising from the use or inability to use these written materials or software. Some states do not allow the exclusion or limitation of liability for consequential or incidental damages, so the above limitations may not apply to you.
Copyright Notice
All rights reserved. No part of these written materials or software may be reproduced or used in any form or by any means, electronic or mechanical, including photocopying and recording and the use of any kind of information storage and retrieval system, without prior permission in writing from Olympus. No liability is assumed with respect to the use of the information contained in these written materials or software, or for damages resulting from the use of the information contained in these written materials or of the software. Olympus reserves the right to alter the features and contents of this publication or software without obligation or advance notice.
WARNING:
Unauthorized photographing or use of copyrighted material may violate applicable copyright laws. Olympus assumes no responsibility for unauthorized photographing, use or other acts that infringe upon the rights of copyright owners.
- IBM is a registered trademark of International Business Machines Corporation.
- Microsoft and Windows are registered trademarks of Microsoft Corporation.
• Macintosh is a trademark of Apple Computer Inc. - All other company and product names are registered trademarks and/or trademarks of their respective owners.
Specifications
| Product type | : Digital camera (for shooting and displaying) |
| Recording System | |
| Still | : Digital recording, JPEG (in accordance with Design rule for Camera File system (DCF)), TIFF (non-compression), Digital Print Order Format (DPOF) |
| Sound with still images | : Wave format |
| Movie | : QuickTime Motion JPEG support |
| Memory | : 3V (3.3V) SmartMedia 2MB, 4MB, 8MB, 16MB, 32MB, 64MB |
| No. of storable pictures(When an 8 MB card is used) | : Approx. 0 frame (TIFF/2048 x 1536) |
| : Approx. 4 frames (SHQ) | |
| : Approx. 10 frames (HQ) | |
| : Approx. 24 frames (SQ1/1280 x 960 NORMAL) | |
| : Approx. 82 frames (SQ2/640 x 480 NORMAL) | |
| Erase | : One-Frame erase / All-Frames erase |
| Image pickup element | : 1/1.8 inch CCD solid-state image pickup |
| : 3,340,000 pixels (gross) | |
| Recording image | : 2048 x 1536 pixels (TIFF/SHQ/HQ) |
| : 1600 x 1200 pixels (TIFF/SQ1) | |
| : 1280 x 960 pixels (TIFF/SQ1) | |
| : 1024 x 768 pixels (TIFF/SQ2) | |
| : 640 x 480 pixels (TIFF/SQ2) | |
| White balance | : Full Auto TTL (iESP auto), Preset (Daylight, Overcast, Tungsten light, Fluorescent) |
| Lens | : Olympus lens 6.5 ~ 19.5 mm, F2.8, 6 elements in 8 groups (equivalent to 32 ~ 96 mm lens on 35 mm camera), aspherical glass |
| Photometric system | : Digital ESP metering system, Spot metering system |
| Exposure control | : Program auto, Aperture priority, Shutter priority, Manual |
| Aperture | : W : F2.8 ~ 11.0 |
| : T : F2.8 ~ 11.0 | |
| Shutter speed | : Used with mechanical shutter |
| Still | : 1 ~ 1/800 sec. (16 ~ 1/800 sec. with manual setting) |
| Movie | : 1/30 ~ 1/10000 sec. |
| Working range | : 0.8 m ~ (Standard mode) |
| 0.2 m ~ 0.8 m (Macro mode) | |
| Viewfinder | : Optical real image viewfinder (Autofocus mark/Backlighting correction mark), LCD monitor |
| LCD monitor | : 1.8" TFT color LCD display |
| No. of pixels | : Approx. 114,000 pixels |
| On-screen display | : Date/Time, Frame number, Protect, Recording mode, Battery check, Picture information, Print-reserve, Menu, etc. |
| Battery charging time for flash | : Approx. 6 sec. (at normal temperature with new batteries) |
| Flash working range | : W : Approx. 0.8 m ~ 3.8 m: T : Approx. 0.2 m ~ 3.8 m |
| Flash modes | : Auto-Flash (automatic flash activation in low light and backlight), Red-Eye Reducing Flash, Fill-In Flash (forced activation), Off (no flash) |
| Autofocus | : TTL system iESP autofocus, Contrast detection system |
| Focusing range | : 0.2 m ~∞ |
| Selftimer | : Electronic Selftimer with 12-sec. delay |
| Outer connectors | : AC adapter connector, Computer connector (RS-232C), A/V output connector, USB terminal (USB 1.0 compatible), Extension flash connector |
| Date and time | : Recorded with picture data simultaneously |
| Automatic calendar system | : Up to 2030 |
| Operating environment | |
| Temperature | : 0 ~40°C (operation)- 20 ~ 60°C (storage) |
| Humidity | : 30 ~ 90% (operation)10 ~ 90% (storage) |
| Power supply | : For batteries, use 2 CR-V3 lithium battery packs, or 4 AA (R6) NiMH batteries, NiCd batteries, alkaline batteries or lithium batteries. AC adapter (optional) |
| Dimensions | : 109.5 (W) x 76.4 (H) x 66.4 (D) mm |
| Weight | : 300g (without batteries/card) |
SPECIFICATIONS ARE SUBJECT TO CHANGE WITHOUT ANY NOTICE OR OBLIGATION ON THE PART OF THE MANUFACTURER.
PRÉPARATIFS


natural_image
Line drawing of a digital camera with lens and buttons (no text or symbols)
Appareil photo

natural_image
Line drawing of a mechanical device with a strap and coiled cable (no text or symbols)Bandoulière

natural_image
Line drawing of three camera setups with cable and clasp (no text or symbols)natural_image
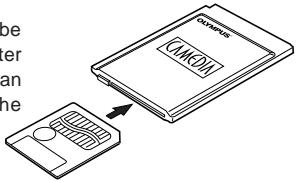
Line drawing of a DSLR camera with an attached door panel and a scroll wheel (no text or symbols)Insérer la carte SmartMedia.
Avertissement:
Écran ACL
natural_image
Simple line drawing of a hand pressing a block with motion lines indicating sound or vibration (no text or symbols)natural_image
Simple line drawing of a hand pressing a block with sound waves above (no text or symbols)natural_image
Line drawing of a classic car (no text or symbols)
natural_image
Illustration of a striped panel with a small plant on the right side (no text or symbols)
natural_image
Line drawing of a car parked near a fence and trees (no text or symbols)
natural_image
Silhouette of a person sitting on a bench surrounded by vertical bars (no text or symbols)
Mise au point

A/S/M

natural_image
Line drawing of a camera with mounted lens and spring base (no text or symbols)natural_image
Diagram showing a computer case with internal components and an external device (no text or symbols)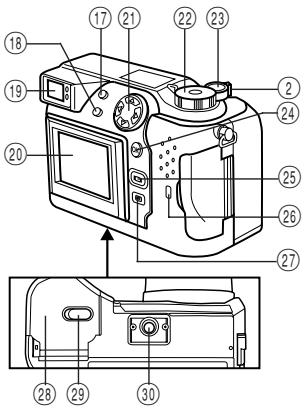


natural_image
Line drawing of a digital camera with lens and control buttons (no text or symbols)
Kamera
natural_image
Line drawing of a medical or surgical device with attached tubing (no text or symbols)Trageriemen

natural_image
Line drawing of three different camera setups with cable and connector (no text or symbols)natural_image
Line drawing of a DSLR camera with an attached door panel and control panel (no text or symbols)LCD-Monitor
natural_image
Simple line drawing of a hand pressing a block with sound waves above (no text or symbols)natural_image
Simple line drawing of a hand pressing a block with sound waves above (no text or symbols)natural_image
Line drawing of a classic sports car (no text or symbols)
natural_image
Illustration of a striped panel with a small plant sprout emerging from the right side (no text or symbols)
natural_image
Line drawing of a car with a starburst effect, surrounded by trees and flags (no text or symbols)
natural_image
Silhouette of a mouse inside a vertical bar, no text or symbols visible
Schärfespeicher
P A/S/M
Permanenter Autofocus Ⓓ A/S/M
natural_image
Line drawing of a camera with attached lens and spring, no text or symbols presentBlitzsynchronbuchse
AUSDRUCKEN
natural_image
Diagram showing a computer case with internal components and an external device (no text or symbols)Two Corporate Center Drive, Melville, NY 11747-3157, U.S.A. Tel. 631-844-5000
(Customer support) Tel. 1-888-553-4448
www.olympusamerica.com
distec@olympus.com
OLYMPUS OPTICAL CO. (EUROPA) GMBH.
(Premises/Goods delivery) Wendenstraße 14-16, 20097 Hamburg, Germany. Tel. 040-237730
(Letters) Postfach 10 49 08, 20034 Hamburg, Germany.
www.olympus-europa.com
OLYMPUS OPTICAL CO. (U.K.) LTD.
2-8 Honduras Street, London EC1Y 0TX, United Kingdom. Tel. 0171-253-2772

- “CE” mark indicates that this product complies with the European requirements for safety, health, environment and customer protection.
- La marque “CE” indique que ce produit est conforme avec les exigences européennes en matière de sécurité, santé, environnement et protection du consommateur.
- Das CE-Zeichen bestätigt, daß dieses Produkt mit den europäischen Bestimmungen für Sicherheit, Gesundheit, Umweltschutz und Personenschutz übereinstimmt.
- Names of parts
- CAMERA
- CONTROL PANEL
- VIEWFINDER DISPLAY
- LCD MONITOR (Display mode)
- (Record mode)
- Optimal items
- Attaching the strap
- Loading the batteries
- Using the AC adapter (optional)
- Note:
- Caution:
- Power on/off
- Checking the card
- Card format
- Adjusting the date and time
- LCD brightness
- Beep sound
- RECORDING FUNCTIONS
- How to use the mode dial
- Adjusting the diopter
- Proper shutter release
- A/S/M mode
- P A/S/M
- Quick view
- Recording movies
- How to use the menu
- Checking the number of storable pictures
- File number
- About the File No. and Folder No.
- The File No. and Folder No. in Each Mode
- - NAME RESET
- - AUTO FILE
- DISPLAYING FUNCTIONS
- Displaying recorded pictures
- Playing movies
- Picture information
- Index-display mode
- Close-up display mode (3X inspection)
- Slide-show
- Recording sound
- Connecting to a television
- Protection
- One-frame erase
- All-frame erase
- SOPHISTICATED FUNCTIONS
- ①Subjects with low contrast
- ②Subjects with no vertical lines
- ③Subjects in excessively bright light
- ④Subjects at different distances
- ⑤ Fast-moving subjects at close distances
- Focus lock
- AE lock
- Zoom
- Digital zoom mode
- Spot metering mode/Macro mode/Macro mode + Spot metering mode
- Selftimer/Remote control Ⓟ A/S/M
- Taking a picture using the selftimer
- Taking a picture using the remote control
- Exposure compensation Ⓓ A/S/M
- White balance Ⓓ A/S/M
- ISO P A/S/M
- Picture effects
- Panorama mode Ⓟ
- Selecting the recording mode
- TIFF setup
- Full-time AF Ⓓ A/S/M
- Rec view Ⓟ A/S/M
- Index-display adjustment ▶
- Sharpness Ⓓ A/S/M
- Using the flash
- Auto-flash
- Red-eye reducing flash
- Fill-in flash (forced activation)
- Off (flash override)
- Selecting the flash mode
- Taking photographs using the FL-40 extension flash
- When using the FL-40 extension flash only:
- PRINTING PICTURES
- Single-frame print reserve
- All-frame print reserve
- Trimming print reserve
- Resetting print reserve
- USING A PERSONAL COMPUTER
- Computer system requirement
- - Windows
- - Apple Macintosh
- Connecting to a personal computer
- Installing provided software
- - Image download
- - Image viewer
- - Format exchange
- - Image processing
- - Function support
- - Printing
- Transferring data from SmartMedia
- PC card adapter
- FlashPath floppydisk adapter
- SmartMedia reader/writer
- Questions and answers
- How long will the batteries last?
- How can I correct the clock in the camera that will be used to record the date on the image data?
- How should I store the camera?
- Why do the subjects' eyes sometimes appear red in pictures?
- Can I use a filter, hood or conversion lens?
- Can I use an extension flash?
- Precautions
- Caution concerning the flash
- Be careful when handling the unit
- Storage environment
- Usage environment
- Points to verify before using the camera
- Precautions when handling the batteries
- If there is a leak
- When the batteries are dead, take them out of the camera
- Do not use in an airtight device
- Do not recharge alkaline or lithium batteries
- Do not use or store in a hot place (e.g. inside a closed car on a hot and sunny day)
- Keep out of the reach of children
- Precautions on using accessories
- Notes on display and backlight
- Compatibility of the picture data
- Important notice
- Disclaimer of Warranty
- Copyright Notice
- WARNING:
- Avertissement:
- Mise au point
- A/S/M
- Schärfespeicher
- Permanenter Autofocus Ⓓ A/S/M
- AUSDRUCKEN
Brand : OLYMPUS
Model : C-3000 ZOOM
Category : Digital Camera