
D10VC2 - Drill HiKOKI - Free user manual and instructions
Find the device manual for free D10VC2 HiKOKI in PDF.


| Brand | HiKOKI |
| Model | D10VC2 |
| Product Type | Corded Drill |
| Voltage | 220 V~ |
| Power Input | 460 W |
| No Load Speed | 0 – 2300 /min (variable speed with trigger and speed control dial) |
| Chuck Capacity | 13 mm (keyed chuck) |
| Drilling Capacities | Steel: 10 mm (twist bit); Aluminum: 13 mm (twist bit); Wood: 25 mm (flat spade bit), 16 mm (auger bit) |
| Weight (without cord) | 1.3 kg |
| Rotation Direction | Reversible (clockwise/counterclockwise) with push button |
| Lock-On Feature | Yes (trigger lock with stopper for continuous use) |
| Speed Control Dial | Yes (preselect speed from low to high) |
| Side Handle | Optional accessory (mounts on left or right side of gear cover) |
| Hook | Optional accessory (side-attaching hook using M10 bolt; also top-attaching hook (A) installable only at Authorized Service Center) |
| Safety Features | Insulated gripping surfaces; use of RCD recommended; ear protection recommended for impact drilling; warning against loose clothing and jewelry |
| Standard Accessories | Chuck wrench (1) |
| Optional Accessories | Side handle, Hook, Hook (A) |
| Maintenance | Inspect drill bits and mounting screws regularly; carbon brush inspection and replacement only by Authorized Service Center |
| Service | Repairs and modifications must be carried out by a HiKOKI Authorized Service Center |
| Warranty | See separate warranty document |
Frequently Asked Questions - D10VC2 HiKOKI
User questions about D10VC2 HiKOKI
0 question about this device. Answer the ones you know or ask your own.
Ask a new question about this device
Download the instructions for your Drill in PDF format for free! Find your manual D10VC2 - HiKOKI and take your electronic device back in hand. On this page are published all the documents necessary for the use of your device. D10VC2 by HiKOKI.
USER MANUAL D10VC2 HiKOKI
natural_image
Line drawing of a handheld electric drill inside a circular frame (no text or symbols)保留备用
Keep for future reference
中文
项目号 代码号 使用数 备注
| 1 980057 1 10TL2 | |
| 2 950292 1 10TLRA | |
| 3 948001 1 | |
| 4 321626 1 | |
| 5 305490 2 D4×30 | |
| 6 6002VV 1 | 6002VVCMPS2L |
| 7 939544 1 | |
| 8 301815 2 D4×45 | |
| 9 321625 1 | |
| 10 321627 1 | |
| 11 321624 1 | |
| 12 608VVM 2 608VVC2PS2L | |
| 13 360596G 1 220V | |
| 14 321623 1 | |
| 15 950514 2 D4×40 | |
| 16 340547G 1 220V | |
| 17A 331661 1 | |
| 18 ———— 1 | |
| 19 321633 1 | |
| 21 321634 1 | |
| 23 301653 3 D4×20 | |
| 25 321632 1 | |
| 26 321628 1 | |
| 27 999041 2 | |
| 28 955203 2 | |
| 29 ———— 1 | |
| 30 994273 1 | |
| 31 992635 1 | |
| 32 984750 2 D4×16 | |
| 33 937631 1 | |
| 34 981373 2 | |
| 35 953327 1 | |
| 36 ———— 1 |
CONTENTS
GENERAL POWER TOOL SAFETY WARNINGS ....11
PRECAUTIONS ON USING DRILL 13
SYMBOL....14
SPECIFICATIONS....14
STANDARD ACCESSORIES 14
OPTIONAL ACCESSORIES (sold separately)....14
APPLICATIONS....14
Read all safety warnings and all instructions.
Failure to follow the warnings and instructions may result in electric shock, fire and/or serious injury.
Save all warnings and instructions for future reference.
The term “power tool” in the warnings refers to your mains-operated (corded) power tool or battery-operated (cordless) power tool.
1) Work area safety
a) Keep work area clean and well lit.
Cluttered or dark areas invite accidents.
b) Do not operate power tools in explosive atmospheres, such as in the presence of flammable liquids, gases or dust.
Power tools create sparks which may ignite the dust or fumes.
c) Keep children and bystanders away while operating a power tool.
Distractions can cause you to lose control.
2) Electrical safety
a) Power tool plugs must match the outlet.
Never modify the plug in any way.
Do not use any adapter plugs with earthed (grounded) power tools.
Unmodified plugs and matching outlets will reduce risk of electric shock.
b) Avoid body contact with earthed or grounded surfaces, such as pipes, radiators, ranges and refrigerators.
There is an increased risk of electric shock if your body is earthed or grounded.
c) Do not expose power tools to rain or wet conditions.
Water entering a power tool will increase the risk of electric shock.
English
d) Do not abuse the cord. Never use the cord for carrying, pulling or unplugging the power tool.
Keep cord away from heat, oil, sharp edges or moving parts.
Damaged or entangled cords increase the risk of electric shock.
e) When operating a power tool outdoors, use an extension cord suitable for outdoor use.
Use of a cord suitable for outdoor use reduces the risk of electric shock.
f) If operating a power tool in a damp location is unavoidable, use a residual current device (RCD) protected supply.
Use of an RCD reduces the risk of electric shock.
3) Personal safety
a) Stay alert, watch what you are doing and use common sense when operating a power tool.
Do not use a power tool while you are tired or under the influence of drugs, alcohol or medication.
A moment of inattention while operating power tools may result in serious personal injury.
b) Use personal protective equipment. Always wear eye protection.
Protective equipment such as dust mask, non-skid safety shoes, hard hat, or hearing protection used for appropriate conditions will reduce personal injuries.
c) Prevent unintentional starting. Ensure the switch is in the off position before connecting to power source and/or battery pack, picking up or carrying the tool.
Carrying power tools with your finger on the switch or energising power tools that have the switch on invites accidents.
d) Remove any adjusting key or wrench before turning the power tool on.
A wrench or a key left attached to a rotating part of the power tool may result in personal injury.
e) Do not overreach. Keep proper footing and balance at all times.
This enables better control of the power tool in unexpected situations.
f) Dress properly. Do not wear loose clothing or jewellery. Keep your hair, clothing and gloves away from moving parts.
Loose clothes, jewellery or long hair can be caught in moving parts.
g) If devices are provided for the connection of dust extraction and collection facilities, ensure these are connected and properly used.
Use of dust collection can reduce dust-related hazards.
4) Power tool use and care
a) Do not force the power tool. Use the correct power tool for your application.
The correct power tool will do the job better and safer at the rate for which it was designed.
b) Do not use the power tool if the switch does not turn it on and off.
Any power tool that cannot be controlled with the switch is dangerous and must be repaired.
c) Disconnect the plug from the power source and/or the battery pack from the power tool before making any adjustments, changing accessories, or storing power tools.
Such preventive safety measures reduce the risk of starting the power tool accidentally.
d) Store idle power tools out of the reach of children and do not allow persons unfamiliar with the power tool or these instructions to operate the power tool.
Power tools are dangerous in the hands of untrained users.
e) Maintain power tools. Check for misalignment or binding of moving parts, breakage of parts and any other condition that may affect the power tool's operation.
If damaged, have the power tool repaired before use.
Many accidents are caused by poorly maintained power tools.
f) Keep cutting tools sharp and clean.
Properly maintained cutting tools with sharp cutting edges are less likely to bind and are easier to control.
g) Use the power tool, accessories and tool bits etc. in accordance with these instructions, taking into account the working conditions and the work to be performed.
Use of the power tool for operations different from those intended could result in a hazardous situation.
5) Service
a) Have your power tool serviced by a qualified repair person using only identical replacement parts.
This will ensure that the safety of the power tool is maintained.
CAUTION
Keep children and infi rm persons away.
When not in use, tools should be stored out of reach of children and infirm persons.
PRECAUTIONS ON USING DRILL
- Wear ear protectors with impact drills.
Exposure to noise can cause hearing loss.
- Use auxiliary handles supplied with the tool.
Loss of control can cause personal injury.
-
Hold power tool by insulated gripping surfaces, when performing an operation where the cutting accessory may contact hidden wiring or its own cord. Cutting accessory contacting a “live” wire may make exposed metal parts of the power tool “live” and could give the operator an electric shock.
-
Do not wear gloves made of stuff liable to roll up such as cotton, wool, cloth or string, etc.
-
Prior to drilling into walls, ceilings or floors, ensure there are no electric cables or conduits inside.
SYMBOL
WARNING
The following show symbols used for the machine. Be sure that you understand their meaning before use.

To reduce the risk of injury, user must read instruction manual.
SPECIFICATIONS
| Voltage | 220 V~ | ||
| Power input 460 W | |||
| No load speed 0 – 2300 /min | |||
| Drill chuck capacity 13 mm | |||
| Capacity | Steel Twist | Bit 10 mm | |
| Aluminum | Twist Bit 13 mm | ||
| Wood | Flat Spade Bit 25 mm | ||
| Auger Bit 16 mm | |||
| Weight (without cord) 1.3 kg | |||
STANDARD ACCESSORIES
In addition to the main unit (1 unit), the package contains the accessories listed in the below.
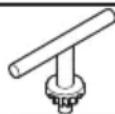
Chuck wrench 1
OPTIONAL ACCESSORIES (sold separately)
(1) Side handle
(2) Hook
(3) Hook (A)
APPLICATIONS
Boring holes in metal, wood and plastic.
PRIOR TO OPERATION
1. Power source
Ensure that the power source to be utilized conforms to the power requirements specified on the product nameplate.
2. Power switch
Ensure that the power switch is in the OFF position. If the plug is connected to a receptacle while the power switch is in the ON position, the power tool will start operating immediately, inviting serious accident.
3. Extension cord
When the work area is removed from the power source. Use an extension cord of sufficient thickness and rated capacity. The extension cord should be kept as short as practicable.
4. Selecting the appropriate drill bit:
○ When boring metal or plastic
Use ordinary metalworking drill bits.
○ When boring wood
Use ordinary woodworking drill bits.
However, when drilling 6.5 mm or smaller holes, use a metalworking drill bit.
5. Mounting and dismounting of the bit (Fig. 1)
(1) Open the chuck jaws, and insert the bit into the chuck.
(2) Place the chuck wrench in each of the three holes in the chuck, and turn it in the clockwise direction (viewed from the front side). Tighten securely.
(3) To remove the bit, place the chuck wrench into one of the holes in the chuck and turn it in the counterclockwise direction.
6. Check the rotational direction (Fig. 2)
The bit rotates clockwise (viewed from the rear side) by pushing the R-side of the push button.
The L-side of the push button is pushed to turn the bit counterclockwise.
(The (L) and (R) marks are provided on the body.)
7. Installing the side handle (Optional accessory)
A Side handle can be installed on either side of the tool for right or left handed use.
To install the side handle, thread it into the socket on the desired side of the gear cover and tighten it securely. (Fig. 3)
8. Attaching the hook (Optional accessory)
For hook (side-attaching) (Fig. 4)
Fix the hook firmly on the desired side of the gear cover using M10 bolt which is supplied with hook.
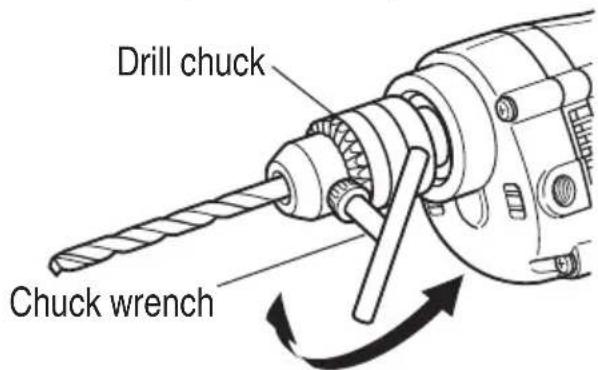
Fig. 1
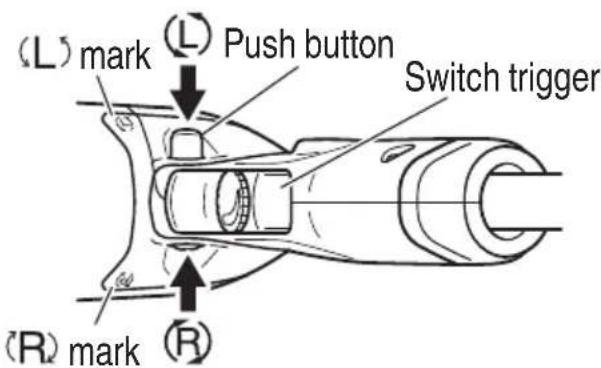
Fig. 2
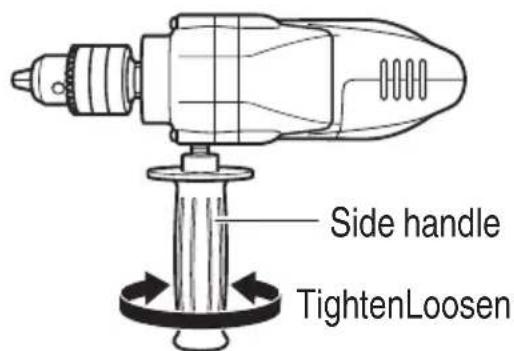
Fig. 3
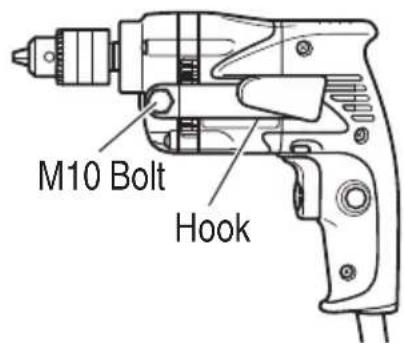
Fig. 4
English
For hook (A) (top-attaching) (Fig. 5)
To attach the hook (A), it is necessary to disassemble the handle portion which covered the tool's electrical system. For your continued safety and electrical shock protection, installing the hook (A) on this drill should ONLY be performed by a Hitachi Authorized Service Center.
CAUTION
When the power tool is used with a hook fixed to it, pay attention to the following points:
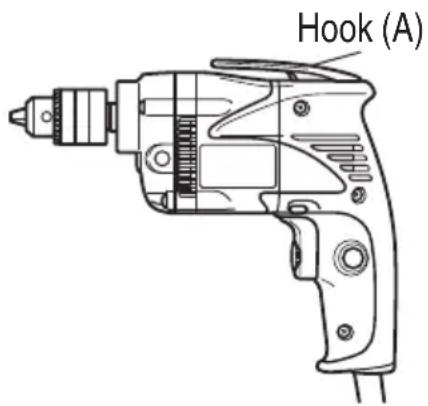
Fig. 5
Before hanging the main unit from the waist belt, make sure that the drill has come to a complete stop.
While it is suspended from the waist belt, the power plug must be disconnected from the power source.
○ Do not walk about with the power tool hanging from the waist belt.
☐ In the case of operation in a high place, it is dangerous to drop the tool accidentally. If the hook is deformed or hung from the wrong position, there is danger that the hook will slip off and the tool will fall.
Be careful to avoid danger.
☐ In making a through hole, the power tool sometimes shakes violently when the workpiece is pierced, from example. Be careful you are not hurt by the hook even if such situation happens.
HOW TO USE
- Switch operation
○ When the trigger is depressed, the tool rotates. When the trigger is released, the tool stops.
☐ The rotational speed of the drill can be controlled by varying the amount that the trigger switch is pulled. Speed is low when the trigger switch is pulled slightly and increases as the trigger switch is pulled more.
○ The desired rotation speed can be pre-selected with the speed control dial.
Turn the speed control dial clockwise for higher speed and counterclockwise for lower speed. (Fig. 6)
○ Pulling the trigger and pushing the stopper, it keeps the switched-on condition which is convenient for continuous running. When switching off, the stopper can be disconnected by pulling the trigger again.
- Drilling
○ When drilling, start the drill slowly, and gradually increasing speed as you drill.
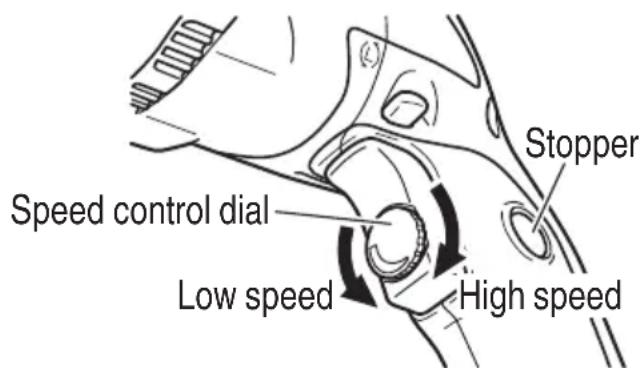
Fig. 6
○ Always apply pressure in a straight line with the bit. Use enough pressure to keep drilling, but do not push hard enough to stall the motor or deflect the bit.
☐ To minimize stalling or breaking through the material, reduce pressure on drill and ease the bit through the last part of the hole.
☐ If the drill stalls, release the trigger immediately, remove the bit from the work and start again. Do not click the trigger on and off in an attempt to start a stalled drill. This can damage the drill.
○ The larger the drill bit diameter, the larger the reactive force on your arm.
Be careful not to lose control of the drill because of this reactive force.
To maintain firm control, establish a good foothold, use side handle, hold the drill tightly with both hands, and ensure that the drill is vertical to the material being drilled.
MAINTENANCE AND INSPECTION
- Inspecting the drill bits
Since use of an abraded drill bits will cause motor malfunctioning and degraded efficiency, replace the drill bits with a new one or resharpening without delay when abrasion is noted.
- Inspecting the mounting screws
Regularly inspect all mounting screws and ensure that they are properly tightened. Should any of the screws be loose, retighten them immediately. Failure to do so could result in serious hazard.
- Maintenance of the motor
The motor unit winding is the very “heart” of the power tool. Exercise due care to ensure the winding does not become damaged and/or wet with oil or water.
- Inspecting the carbon brushes
For your continued safety and electrical shock protection, carbon brush inspection and replacement on this tool should ONLY be performed by a Hitachi Authorized Service Center.
- Service parts list
CAUTION
Repair, modification and inspection of Hitachi Power Tools must be carried out by a Hitachi Authorized Service Center.
This Parts List will be helpful if presented with the tool to the Hitachi Authorized Service Center when requesting repair or other maintenance.
In the operation and maintenance of power tools, the safety regulations and standards prescribed in each country must be observed.
SERVICE PARTS LIST
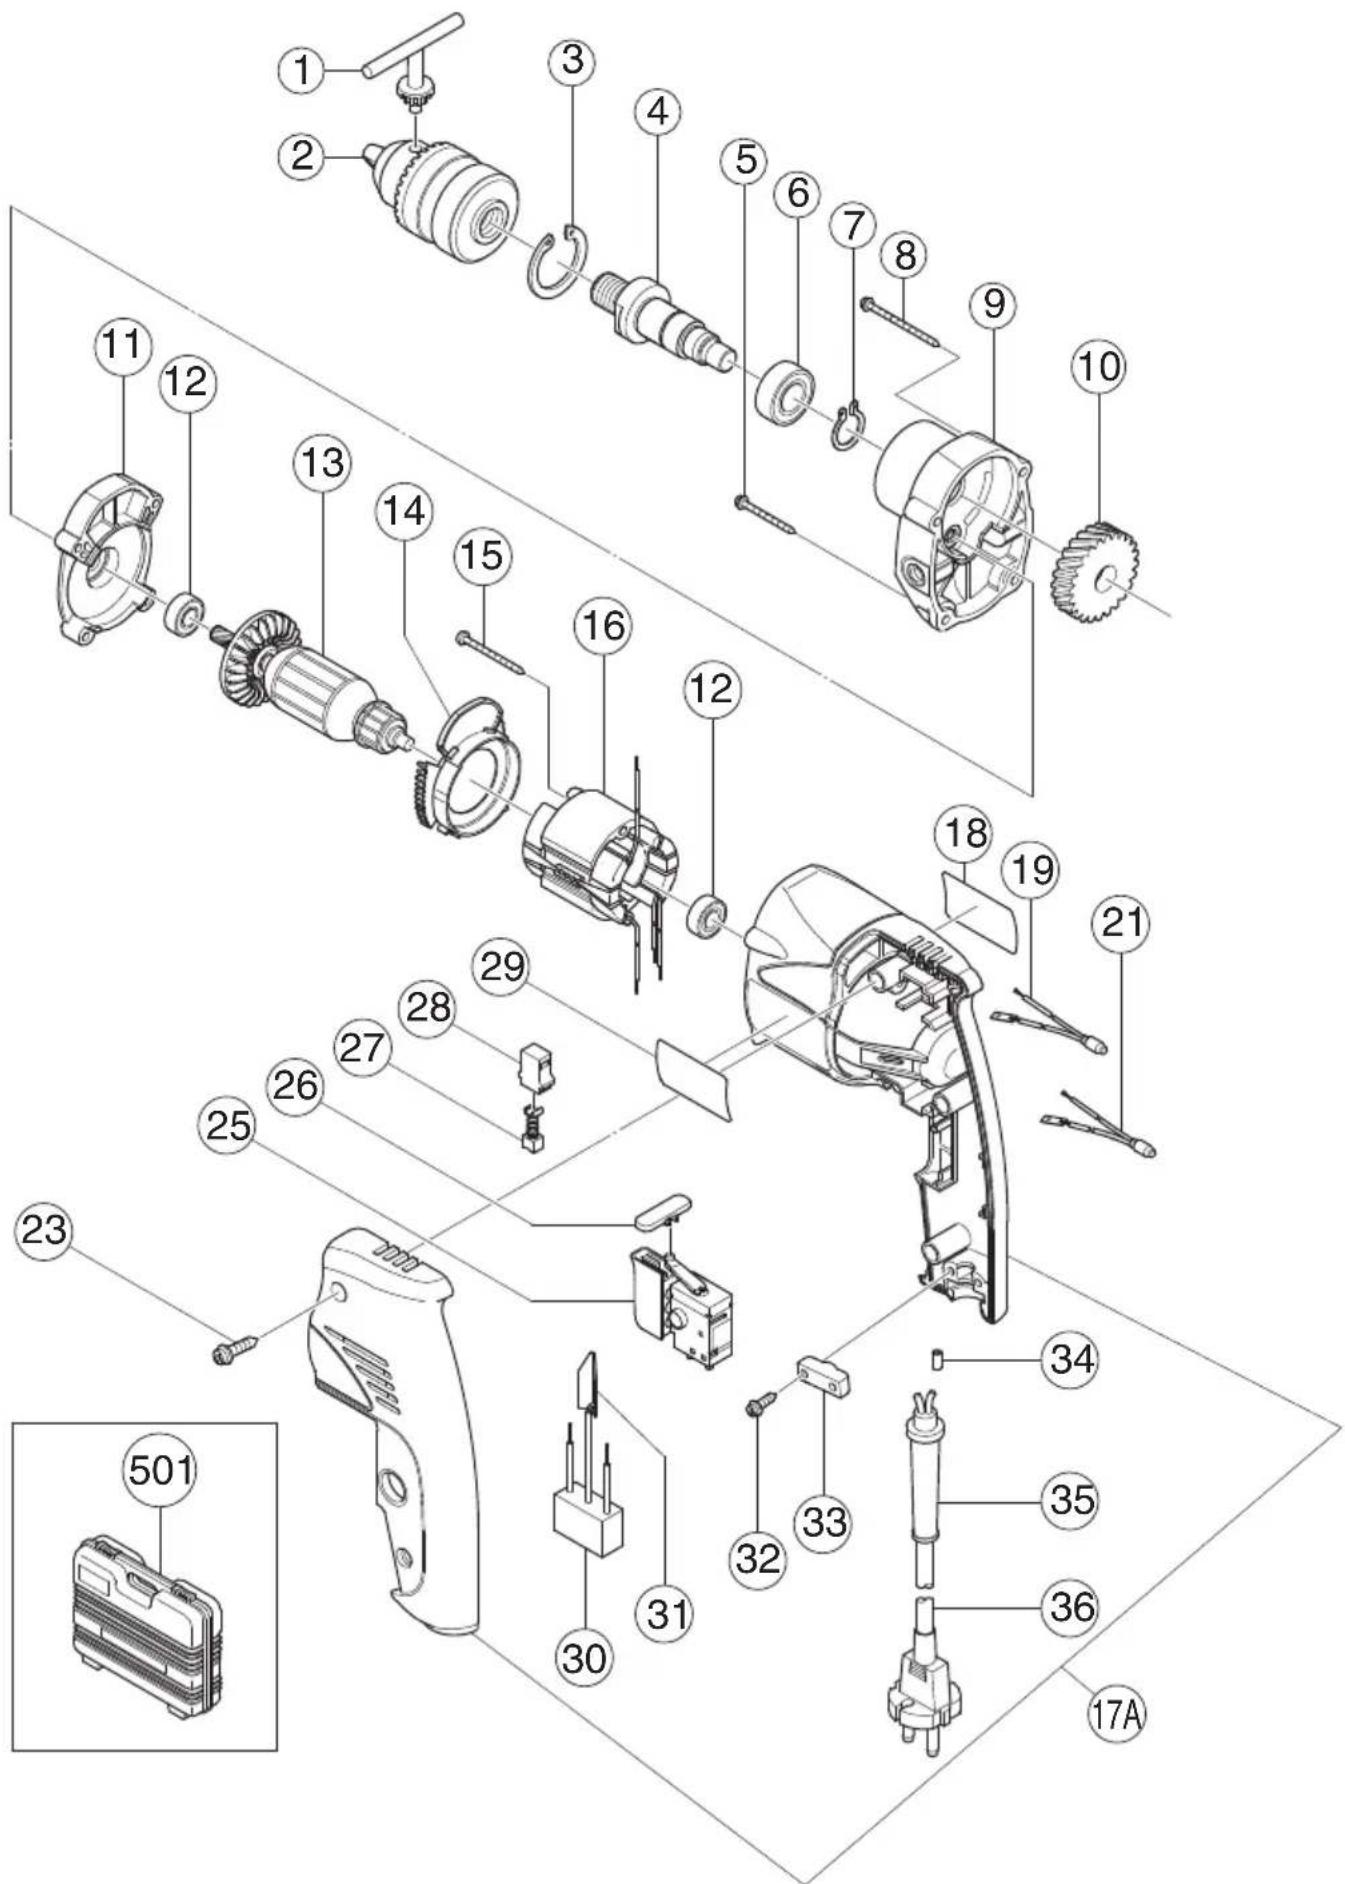
| Item No. | Code No. | No. Used | Remarks |
1 980057 1 10TL2
2 950292 1 10TLRA
3 948001 1
4 321626 1
5 305490 2 D4×30
6 6002VV 1 6002VVC MPS2L
7 939544 1
8 301815 2 D4×45
9 321625 1
10 321627 1
11 321624 1
12 608VVM 2 608VVC2PS2L
13 360596G 1 220V
14 321623 1
15 950514 2 D4×40
16 340547G 1 220V
17A 331661 1
18 — 1
19 321633 1
21 321634 1
23 301653 3 D4×20
25 321632 1
26 321628 1
27 999041 2
28 955203 2
29 —— 1
30 994273 1
31 992635 1
32 984750 2 D4×16
33 937631 1
34 981373 2
35 953327 1
36 —— 1
服务中心
日立工机商业(中国)有限公司
- CONTENTS
- Save all warnings and instructions for future reference.
- English
- CAUTION
- PRECAUTIONS ON USING DRILL
- SYMBOL
- WARNING
- STANDARD ACCESSORIES
- OPTIONAL ACCESSORIES (sold separately)
- APPLICATIONS
- PRIOR TO OPERATION
- Power source
- Power switch
- Extension cord
- Selecting the appropriate drill bit:
- Mounting and dismounting of the bit (Fig. 1)
- Check the rotational direction (Fig. 2)
- Installing the side handle (Optional accessory)
- Attaching the hook (Optional accessory)
- For hook (side-attaching) (Fig. 4)
- For hook (A) (top-attaching) (Fig. 5)
- HOW TO USE
- MAINTENANCE AND INSPECTION
- SERVICE PARTS LIST
Brand : HiKOKI
Model : D10VC2
Category : Drill