
Flat 90 - Range hood Seenergy - Free user manual and instructions
Find the device manual for free Flat 90 Seenergy in PDF.


| Product Type | Range Hood |
| Brand | Seenergy |
| Model | Flat 90 |
| Width | 90 cm |
| Installation Type | Wall-mounted or under cabinet |
| Exhaust Type | Ducted / Recirculating (with charcoal filter) |
| Number of Speeds | 3 |
| Control Type | Push buttons |
| Lighting | 2 x LED bulbs |
| Filter Type | Aluminum grease filter (washable) |
| Charcoal Filter | Optional for recirculation mode |
| Max Airflow | 650 m³/h |
| Noise Level (max) | 65 dB |
| Power Supply | 220-240 V, 50 Hz |
| Total Power Consumption | 200 W |
| Motor Power | 180 W |
| Height (approx.) | 15 cm |
| Depth (approx.) | 50 cm |
| Net Weight | 12 kg |
| Material | Stainless steel and tempered glass |
| Duct Diameter | 150 mm |
| Warranty | 2 years |
| Energy Class | A+ |
Frequently Asked Questions - Flat 90 Seenergy
User questions about Flat 90 Seenergy
0 question about this device. Answer the ones you know or ask your own.
Ask a new question about this device
Download the instructions for your Range hood in PDF format for free! Find your manual Flat 90 - Seenergy and take your electronic device back in hand. On this page are published all the documents necessary for the use of your device. Flat 90 by Seenergy.
USER MANUAL Flat 90 Seenergy
GB English - Use and installation instructions






![graph TD A["∅"] --> B["P0"] C["<"] --> D["P8"] E[">"] --> F["P9"] G["+"] --> H["PT"] I["<"] --> J["PL"] K[">"] --> L[">"] M["+"] --> N["钟"] O[]<] --> P["靶"]](/content/2026/05/842405/images/839676e0fa6c7a0080e08d5529ef17cb8d98e1f5fb2a24ad3914f9f446616a45.jpg)


SAFETY WARNINGS
- This appliance has been designed for domestic use in the household environment. Never use the appliance for professional or industrial use.
- This appliance can be operated by children over the age of 8 and by people with impaired physical, sensory, or mental faculties, or without the necessary experience and competence, only if properly supervised and if they have been duly provided with the necessary instructions concerning the safe use of the appliance and informed of the potential associated risks and warnings.
- Children shall not be allowed to play with the appliance.
- Safety and warning instructions specified in the user manual shall be strictly followed.
- Caution: Failure to use screws and fixing devices according to the instructions specified in this manual may result in electrical risk.
- The appliance shall not be used by persons (including children) with impaired physical, sensory, or mental faculties, or without the necessary experience and competence, unless they have been properly supervised and instructed.
- Children shall not be allowed to play with the appliance. Cleaning the appliance carefully after each use is very important, as
failure to perform regular cleaning may result in fire risk.
- Make sure all of the appliance components are not damaged. In such a case, do not carry out installation and contact a qualified technical assistance center.
- Qualified installers shall make any necessary carpentry and installation works in full compliance with directives in force.
- Do not connect the appliance to the electrical network during installation.
- Disconnect the appliance from power supply before carrying out any cleaning or maintenance operation.
WARNINGS FOR ELECTRICAL CONNECTION
- Electrical connections shall be approved by a qualified electrician before using the appliance.
Electrical connection shall be performed by just one qualified electrician, who will be responsible for proper electrical connection of the appliance to power supply. Before connecting the appliance to the electrical network, check if voltage, frequency and power values specified in the rating label of the appliance are compatible with home power supply and socket.
- The power cord shall be connected to an omnipolar magneto-thermal breaker with a switch-contact gap
of at least 3 mm.
- Means for disconnection must be incorporated in the fixed wiring in accordance with the wiring rules.
- In case the power cord is damaged, it shall be replaced either by the manufacturer or the technical assistance service or by specialized personnel.
- The power cord shall not enter into contact with surfaces whose temperature exceeds 50°C once the appliance has been installed.
- Adequately ventilate the room when a cooker hood and other appliances powered by energy other than electricity, are used simultaneously (this is not applicable in case of hoods working in the recirculation mode).
- Comply with any local standard in force on air exhaust operations.
- If the appliance is used in the recirculation mode, make sure the exhaust duct is in good conditions in case it was not used for long.
- It is not allowed to cook food over open flames (flambé) under the hood.
- Never leave pots unattended when the hob is on: oil contained in the pot might overheat and burn. Fire risk is quite higher when oil is used.
- Grease filters proper maintenance and accurate cleaning are extremely important.
- Clean the hood and the other surfaces regularly in order to avoid any fire risk.
- CAUTION: when the hob is on, accessible parts of the hood might become hot.
- Connection of the exhaust device to exhaust ducts or channels and pipes for room ventilation is not allowed.
- Extracted air shall not be conveyed into a hot air circulation duct. • Air shall not be discharged into a chimney flue used for fumes from household appliances powered by gas or other fuels (this is not applicable in case of hoods working in the recirculation mode)
- Adequately ventilate the room when a cooker hood and other appliances powered by energy other than electricity, are used simultaneously.
- Maximum negative pressure in the room shall not exceed 4 Pa ( 4 × 10⁻⁵ bar).
- The room where the hood is being installed shall be provided with an air intake whose capacity shall be greater than the hood exhaust device one.
- It is strictly forbidden to place the limbs or any other part of the human body, as well as cooking objects or other objects, near the extractable unit of the hood (if your appliance is equipped with it).
Dear Customer,
thank you for choosing us!
Congratulations for having purchased your new kitchen hood.
In order to use the appliance safely and to better know all of its features and performances:
- Read this instructions manual carefully before installing and switching the appliance on.
- Special attention shall be paid to safety warnings!
- The appliance shall only be used according to instructions given in this user manual.
- Keep this instruction manual for further reference.
- If the appliance is given to a third party, the instruction manual must also be provided.
GENERAL INFORMATION
When communicating with the appliance MANUFACTURER, please refer to the serial number and identification data specified on the rating label.
This appliance has been designed, tested, and manufactured in full compliance with all relevant standards concerning:
• Safety: CEI/EN 60335-1; CEI/EN 60335-2-31; • Performance: CEI/EN 61591; CEI/EN 60704-1; CEI/EN 60704-2-13; EN 50564; CEI 62301. EMC: EN 55014-1; EN 55014-2; CEI/EN 61000-3-2; CEI/EN 61000-3-3.
Recommendations for proper use of the appliance to reduce environmental impact: when you start cooking, switch the hood on at minimum speed and switch it off only a few minutes after you finish cooking. Increase the hood speed only in case of large amounts of vapors and fumes, and use the booster function only when absolutely necessary. Clean the grease filter only when necessary to maintain its efficiency over time. Use a piping system with the maximum diameter specified in this manual to increase efficiency and reduce noise levels.

The symbol on the appliance or its documentation indicates that this product must not be treated as household waste; instead, it should be handed over to a designated collection
point for the recycling of electrical and electronic equipment. Proper disposal of this appliance will help reduce raw material consumption and environmental pollution.
For more detailed information about recycling this appliance, please contact your local city office, your household waste disposal service, or the shop where you purchased the appliance.
Spare Parts
Use only original spare parts.
Replace components before they are worn out. Perform regular maintenance checks as detailed in the "MAINTENANCE" section.
Warranty
To enjoy the MANUFACTURER'S warranty, users must strictly follow all instructions specified in this manual, in particular they must:
- Use the hood only for its intended purposes.
- Perform continuous and scrupulous maintenance operations.
Allow the use of the hood only to persons with proven skills and know-how.
Failure to comply with the instructions contained in this manual will immediately void the manufacturer's warranty.
INSTALLATION INSTRUCTIONS
- Installation and electrical connection operations shall be performed according to these instructions and by qualified and specialized personnel.
- Wear protective gloves before and during installation.
- Check that no accessory material provided with the appliance (manuals, accessories, etc.) is placed inside the hood: in such a case, remove and keep them.
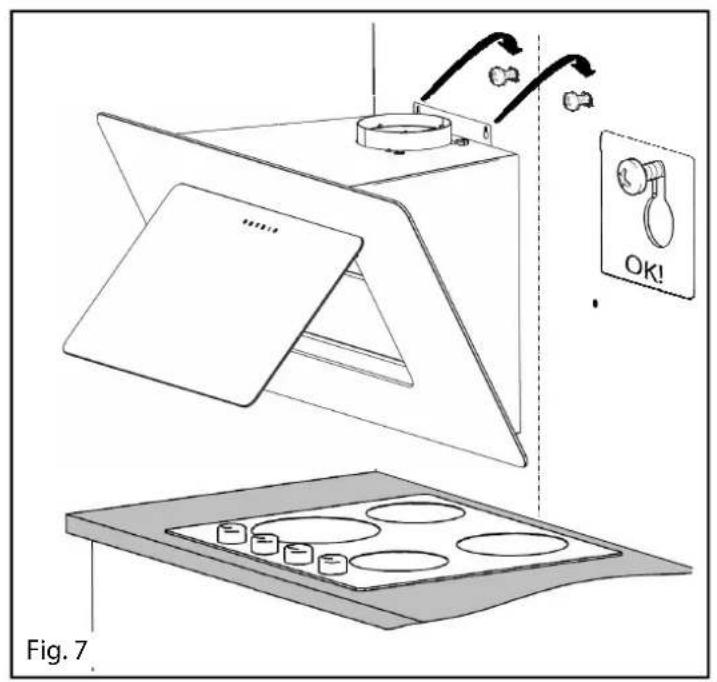
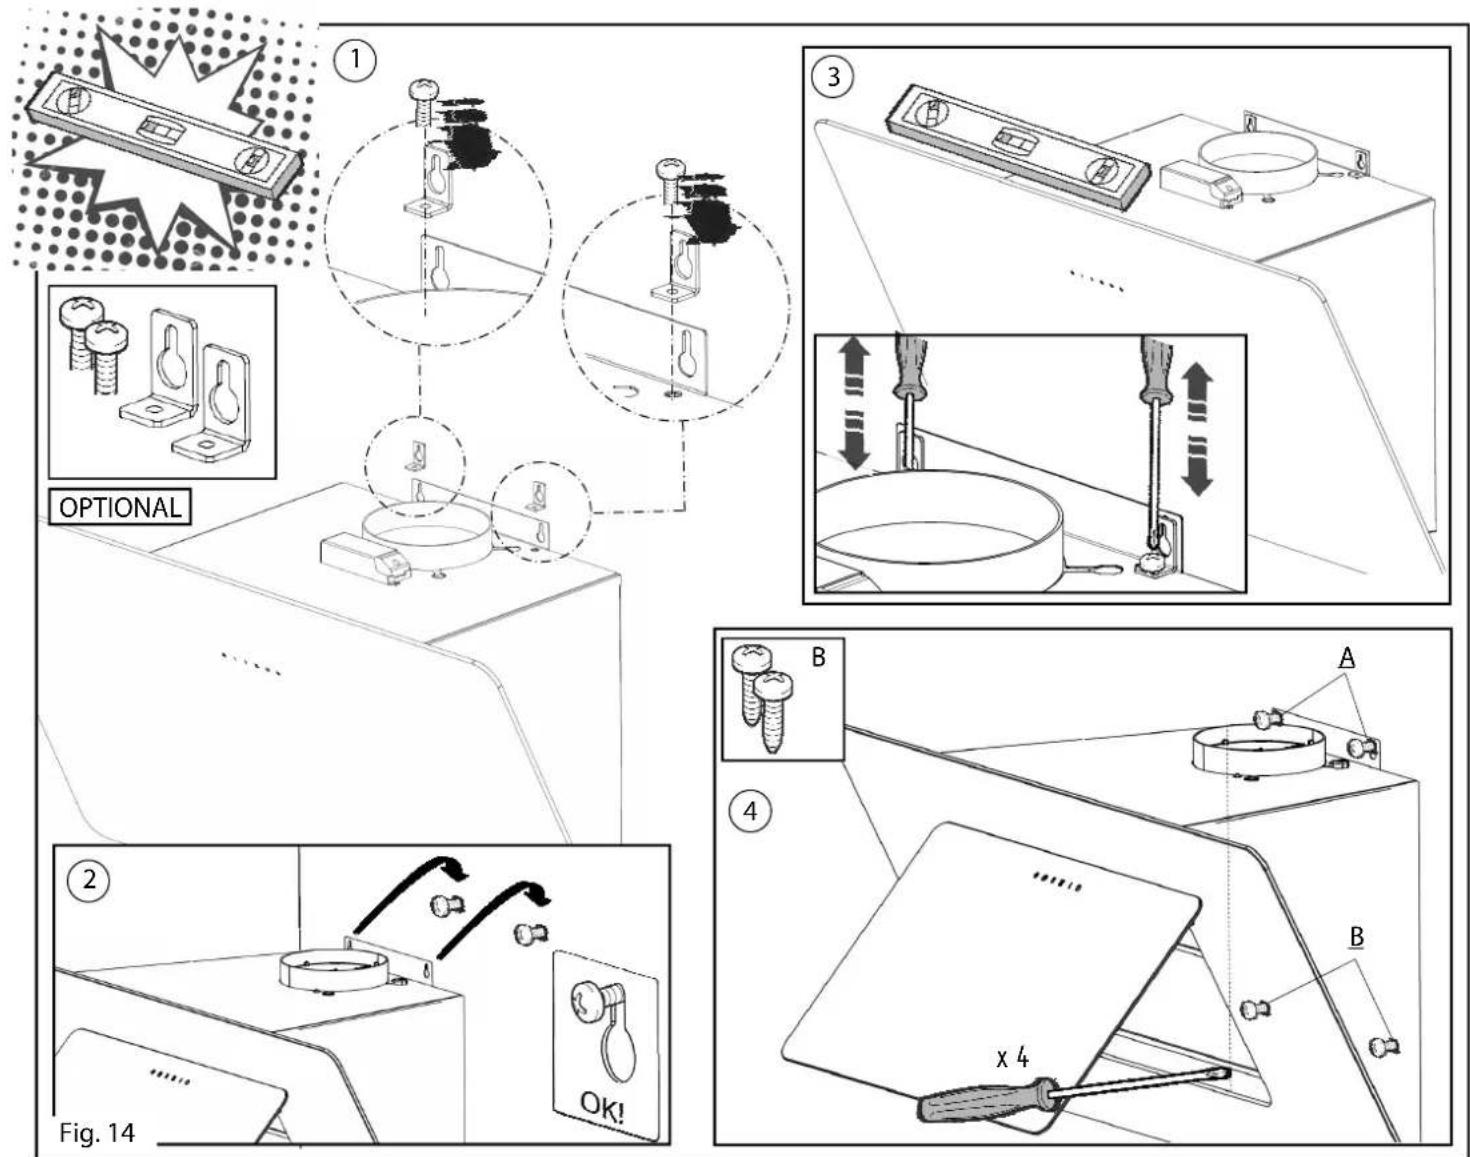
- Figures shown in this installation manual might also refer to different aesthetics of the appliance: in any case, use, installation, and maintenance instructions remain the same.
SAFETY MINIMUM DISTANCE x (*) (fig. 3 - 4)
The minimum installation distance between the lowest part of the range hood and the hob shall be not less than 550 mm from electric hobs and 650 mm from gas hobs.
If minimum distances specified in the hob installation manual are higher, then the appliance shall be installed taking these greatest distances into account.
Wall installation:
To install the appliance, use expansion anchors and screws which are suitable for your type of wall (reinforced concrete, plasterboard, etc.).
This wall-mounted hood can work both in the SUCTIONING mode, with fumes exhausted outside, and the RECIRCULATION mode, with fumes internal recycling.
RECIRCULATION mode (fig. 1 - 15 - 16)
Caution! Charcoal filters shall be ordered at your retailer's.
HOW THE HOOD WORKS
Touch Control (fig.17)
P0: Motor OFF key
P1: 1st speed key ("P1" symbol lights up)
P2: 2nd speed key ("P2" symbol lights up)
P3: 3rd speed key ("P3" symbol lights up)
4th intensive speed key (**) ("P3" symbol flashes) is activated by pressing the "P3" key again
PT: TIMER key ("PT" symbol flashes)
PL: LIGHT ON/OFF key ("PL" symbol lights up)
Light Control (fig.18)
P0: Motor ON/OFF key ("P0" symbol lights up)
P8: key for reducing motor speed: when the hood works at first speed it turns the motor off.
P9: key for increasing motor speed: if the hood is off, it activates first speed ("P0" symbol lights up), by pressing it for the second time the 2nd speed is activated ("P0+P8" symbols light up), by pressing it for the third time the 3rd speed is activated ("P0+P8+P9" symbols light up), by pressing it for the fourth time intensive speed is activated (**) ("P0+P8" symbols light up and "P9" symbol flashes)
PT: TIMER key ("PT" symbol flashes)
PL: LIGHT ON/OFF key ("PL" symbol lights up)
. Mechanic Control (fig.19)
P0: motor OFF key
P1: 1st speed key
P2: 2nd speed key
P3: 3rd speed key
(**) Intensive speed: (if available). Intensive speed lasts for 6 minutes: once elapsed, electronics automatically resets motor at 3rd speed
TIMER: timer performs a 15 minute countdown and can be activated only when the motor is on.
The 15 minutes timer duration will not change even if speeds are changed during the countdown.
When the 15 minute time elapses, the hood switches off.
Metal grease filters cleaning signal
After 30 hours of operation, "PL" key will flash every 2 seconds intermittently and grease filters need to be washed.
The grease filters pilot lamp reset shall be done only after having cleaned the filters, by simultaneously pressing "PT+PL" keys for 4 seconds with the hood switched off.
Charcoal or long-life filters cleaning signal
After 120 hours of operation, the "PL" key will flash every 0.5 seconds intermittently, and the filters need to be replaced or washed depending on the type of filter used.
The charcoal or long-life filters pilot lamp reset shall be done only after having cleaned the filters, by simultaneously pressing "PT+PL" keys for 4 seconds with the hood switched off.
MAINTENANCE
CAUTION! Disconnect the hood from power supply before carrying out any cleaning or maintenance operation, by removing the power cord or disconnecting the main power switch.
Cleaning
The appliance shall be cleaned quite often, both internally and externally, using a cloth dampened with tepid water and a non-abrasive, neutral liquid detergent.
Metal grease filters (fig. 6)
They capture grease particles from cooking fumes and protect the motor, therefore they can obstruct at various times depending on the use of the appliance. These filters can be washed in the dishwasher, with short washing cycles at low temperature, maximum every two months in order to prevent fire risk. Filters may change in color after several washings: this will not entitle users to claim for replacement.
Charcoal filters
They capture odors and purify the air which is then re-conveyed into the room.
- Charcoal filters are neither washable nor renewable and shall be replaced every 4 months. Charcoal filters saturation depends on how much you use your hood. To replace charcoal filters, open the panel, remove the metal grease filter and then remove the charcoal filters. (fig. 6 - 15)
- Renewable charcoal filters can be washed in the dishwasher at a maximum temperature of 65°C (complete washing cycle without dishware) or hand-washed using non-abrasive neutral detergents. Remove excess water having care not to damage the filter, place it in the oven for 10 minutes at 100°C in order to dry it.
Replace the pad every 3 years or every time the cloth is damaged. (fig. 6 - 16)
Lighting
The hood is equipped with a LED technology-based lighting system whose main features are high efficiency, low consumption and very long life-time under normal use conditions.
Contact the technical assistance service to replace lighting.
THE MANUFACTURER declines all liabilities for any damages resulting from incorrect installation or misuse of this appliance.


- SAFETY WARNINGS
- WARNINGS FOR ELECTRICAL CONNECTION
- DEAR CUSTOMER
- GENERAL INFORMATION
- SPARE PARTS
- WARRANTY
- INSTALLATION INSTRUCTIONS
- SAFETY MINIMUM DISTANCE X (*) (FIG. 3 - 4)
- WALL INSTALLATION
- RECIRCULATION MODE (FIG. 1 - 15 - 16)
- HOW THE HOOD WORKS
- METAL GREASE FILTERS CLEANING SIGNAL
- CHARCOAL OR LONG-LIFE FILTERS CLEANING SIGNAL
- MAINTENANCE
- CLEANING
- METAL GREASE FILTERS (FIG. 6)
- CHARCOAL FILTERS
- LIGHTING
Brand : Seenergy
Model : Flat 90
Category : Range hood