
C-3020 ZOOM - Digital Camera OLYMPUS - Free user manual and instructions
Find the device manual for free C-3020 ZOOM OLYMPUS in PDF.
Download the instructions for your Digital Camera in PDF format for free! Find your manual C-3020 ZOOM - OLYMPUS and take your electronic device back in hand. On this page are published all the documents necessary for the use of your device. C-3020 ZOOM by OLYMPUS.
USER MANUAL C-3020 ZOOM OLYMPUS
C-3020ZOOM Before using your camera, read this manual carefully to ensure correct use. We recommend that you take test shots to get accustomed to your camera before taking important photographs. These instructions are only for quick reference. For more details on the functions described here, refer to the camera reference manual on the CDROM included with the camera. ENGLISH BASIC MANUAL Thank you for purchasing an Olympus digital camera. Before you start to use your new camera, please read these instructions carefully to enjoy optimum performance and a longer service life. Keep this manual in a safe place for future reference. For customers in Europe “CE” mark indicates that this product complies with the European requirements for safety, health, environment and customer protection. “CE” mark cameras are intended for sales in Europe. For customers in North and South America For customers in USA Declaration of Conformity Model Number : C-3020ZOOM Trade Name : OLYMPUS Responsible Party : Olympus America Inc. Address : 2 Corporate Center Drive, Melville, New York 11747-3157 U.S.A. Telephone Number : 631-844-5000 Tested To Comply With FCC Standards
FOR HOME OR OFFICE USE
This device complies with Part 15 of the FCC rules. Operation is subject to the following two conditions: (1) This device may not cause harmful interference. (2) This device must accept any interference received, including interference that may cause undesired operation. For customers in Canada This Class B digital apparatus meets all requirements of the Canadian Interference-Causing Equipment Regulations. Trademarks
- IBM is a registered trademark of International Business Machines Corporation.
- Microsoft and Windows are registered trademarks of Microsoft Corporation.
- Macintosh is a trademark of Apple Computer Inc.
- All other company and product names are registered trademarks and/or trademarks of their respective owners.
- The standards for camera file systems referred to in this manual are the “Design Rule for Camera File System/DCF” standards stipulated by the Japan Electronics and Information Technology Industries Association (JEITA).
NAMES OF PARTS
HOW TO USE THIS MANUAL
TRANSFERRING PICTURES TO A COMPUTER
OPTIONAL ACCESSORIES
These instructions are only for quick reference. For more details on the functions described here, refer to the camera reference manual on the CD-ROM included with the camera.
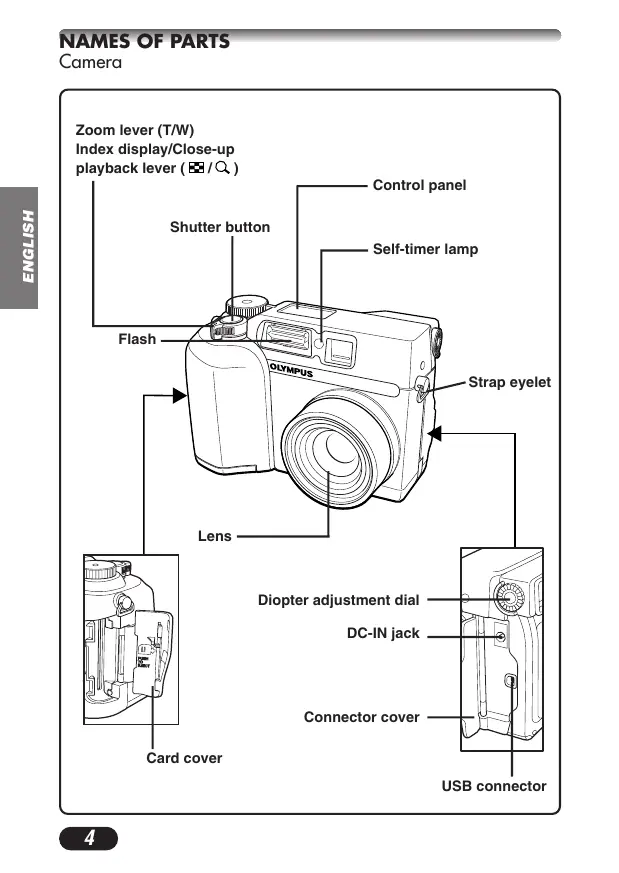
NAMES OF PARTS
Camera Zoom lever (T/W) Index display/Close-up playback lever ( ENGLISH Control panel Shutter button Self-timer lamp Flash Strap eyelet Lens Diopter adjustment dial DC-IN jack Connector cover Card cover USB connector
Mode dial (S-Prg, A/S/M/ , P, OFF,
OK/Menu button Manual focus button AE lock button (AEL) Custom button ( Protect button (
Card access lamp Battery compartment lock Battery compartment cover Tripod socket
ENGLISH Print button (
NAMES OF PARTS
Viewfinder indications
● In some situations, this lamp lights up when you press the shutter button halfway. This indicates that the flash will fire when the picture is taken. ● Lights when you start movie recording and remains lit while movie recording is in progress. ● Blinks if the flash is required for a particular shot and the flash is turned off. ● If this lamp blinks just after you change from the flash override mode to another mode or after you shoot with the flash, it means that the flash is recharging. Wait until the lamp stops blinking, then press the shutter button. Green lamp ● When you press the shutter button down halfway to lock focus and exposure, this lamp lights. If the subject is out of focus, the lamp blinks. ● Blinks when shutter button will not release, such as when there is no memory left to store the image. ● Blinks when there is a problem with the SmartMedia card. AF target mark ● Place this on the subject in order to focus on it.
Control panel indications
● Displayed when the flash mode is selected by pressing the (flash mode) button. No indication: Auto-flash, : Red-eye reduction flash, : Fill-in flash, SLOW: Slow synchronization flash, : Off (flash override) Manual Focus ● Displayed when locking focus using the Manual focus function. Flash intensity control ● Displayed when the amount of the light emitted by the flash is adjusted. Battery check ● When remaining battery power is low, the battery check indication changes as follows: Fully charged Low power Blinks, then turns off. No power ● Be aware that the amount of power remaining when the battery check indication appears varies depending on the type of batteries used. 5 Card error
● When the power is turned on, the camera checks the removable memory card. If there is a problem with the card, this indication appears. White balance ● Displayed when the White balance is set to any mode except AUTO.
NAMES OF PARTS
Control panel indications (Cont.)
7 ISO ● Displayed when the ISO is set to any mode except AUTO. 8 Exposure compensation ● Displayed when exposure compensation is set to any value except 0. 9 Auto-bracket ● Displayed when the drive mode is set to the Auto-bracket mode. 0 Macro mode ● Displayed when the macro mode is engaged. ! Spot metering mode ● Displayed when the Spot metering mode is set. @ Sequential shooting
● Displayed when the drive mode is set to Sequential shooting or AF Sequential shooting. Self-timer mode ● Displayed when self-timer mode is set. Record mode (TIFF, SHQ, HQ, SQ) ● Displays the mode in which images will be recorded. Card writing ● Displayed when images are being written to a removable memory card. Number of storable still pictures ● Displays the number of still pictures you can shoot. Seconds remaining ( Movie mode only) ● Displays available movie recording time. Card error ● Displayed if there is a problem with the removable memory card. T See “Error codes”.
Monitor indications — Shooting information The indications vary depending on the shooting mode. The information below is displayed for about 3 seconds after operating the buttons/mode dial or closing the menus. ENGLISH The information below is always displayed in the shooting mode. AEL AEL SLOW1 HQMF HQMF
- These illustrations show examples of indications displayed when the mode dial is set to P. 1 Shooting mode
● Displays the shooting mode. S-Prg: Scene program mode ( : Portrait mode, : Sports mode, : Landscape-Portrait mode, : Night-scene mode, : Movie mode), P: Program mode, A: Aperture priority mode, S: Shutter priority mode, M: Manual mode, : My mode Aperture value ● Displays the current aperture value. Shutter speed ● Displays the current shutter speed. Exposure compensation ● Displays the current exposure (brightness) compensation value. Exposure differential (M mode only) ● Displays the difference between the exposure determined by the currently selected combination of the aperture and shutter speed and that considered optimal by the camera. Exposure lock AEL : AE lock ● The exposure is locked until single-frame shooting is performed. After you shoot an image, the indication disappears.
NAMES OF PARTS
Monitor indications — Shooting information (Cont.) ENGLISH AEL HQMF
MEMO : AE memory ● The exposure is locked and retained in memory even after shooting. This indicator is displayed until the AE memory is turned off. AF target mark ● Place this on the subject in order to focus on it. Record mode (TIFF, SHQ, HQ, SQ) ● Displays the record mode that was selected on the menus. Manual Focus ● Displayed when locking focus using the Manual focus function. Number of storable still pictures ● Displays the number of still pictures you can shoot. Seconds remaining ( Movie mode only) ● Displays available movie recording time for one-time shutter operation. Memory gauge ● Displays the amount of space used by the pictures stored in the built-in memory as the images are being written to the SmartMedia card. If you take pictures continuously, the indication changes as shown below. The memory gauge changes depending on the number of storable pictures or seconds remaining.
AEL SLOW1 ! Drive mode
● Displayed when the drive mode is set on the menus. : Single-frame shooting, : Sequential shooting, : AF Sequential shooting, : Self-timer shooting, BKT : Auto-bracket Spot metering/Macro mode ● Displayed when the Spot metering/Macro mode is selected by pressing the (Macro/Spot) button. No indication: Digital ESP (factory default setting), : Spot metering, : Macro, : Spot metering+Macro White balance ● Displayed when WB is set on the menus. No indication: AUTO, : Daylight, : Overcast, : Tungsten light, : Fluorescent, : One touch white balance ISO ● Displays the ISO (AUTO, 100, 200 or 400) selected on the menus. Even if AUTO is selected, the ISO changes to 100 when the Mode dial is set to A/S/M/ . Even if AUTO is selected, the ISO is automatically increased when the flash is not used in low-light situations in order to prevent blurring due to camera movements. Flash mode ● Displayed when the flash mode is selected by pressing the (flash mode) button. No indication: Auto-flash, : Red-eye reduction flash, : Fill-in flash, SLOW1/ SLOW2/ SLOW1: Slow synchronization flash, : Off (flash override)
NAMES OF PARTS
Monitor indications — Playback information INFO setting on the Menu allows you to select how much information to display on the menu. Still picture playback information ENGLISH x10 x10
When INFO is set to ON When INFO is set to OFF 1 Battery check ● The battery check indication changes as follows: Fully charged
Low power ● Be aware that the time remaining varies depending on the type of batteries used. Print reserve ● Displayed when the Print reserve is set. Number of prints ● Displays the number of prints to be produced. Protect ● Displayed when the picture is protected. Record mode Frame number
● The year 2001 is displayed as ’01. Number of pixels Aperture value Shutter speed Exposure compensation White balance ISO File number/Frame number Movie playback information ’01.12.23 21:56 FILE: 123–0020
When INFO is set to OFF 1 Battery check 2 Movie mark 3 Protect
● Displayed when the picture is protected. Frame number Date ● The year 2001 is displayed as ’01. When INFO is set to ON 6 Record mode 7 Number of pixels 8 Time 9 File number/Frame number ● During movie playback, the recording time appears as follows: Total recording time ● The indications that appear on a movie picture that has been selected and displayed from the thumbnail display are different from those that appear when the movie picture is displayed using the movie play function.
HOW TO USE THIS MANUAL
The instructions in this manual use a series of numbers for each operating procedure and button/dial illustration. Follow these numbers in order when operating the camera. ENGLISH Set the mode dial to the position shown in the illustration. In this example, you would set the dial to P.
Means “Press this button”. If a button is shown in black, press it as part of the step.
Ñ, ñ, É and í used in instructions correspond to the buttons on the arrow pad as shown.
Set the functions in the menus in the order of these arrows. Before using the menus, read “Using the Menus” for details. In the top menu, select MODE MENU T CAMERA T A/S/M/ T S, then press to complete the setting. To start shooting, press again.
GETTING STARTED Loading the batteries Load the batteries as shown below:
When using CR-V3 (Olympus LB-01) lithium battery packs
When using AA (R6) batteries ● CR-V3 (Olympus LB-01) lithium battery packs cannot be charged. Using the AC power adapter (optional) Use an AC adapter designed for the area where the camera is used. Consult your nearest Olympus dealer or Service center for details.
GETTING STARTED (Cont.) Inserting/ejecting the SmartMedia card Be sure to use a 3V (3.3 V) card. Non-Olympus 3 V (3.3 V) cards must be formatted with the camera. Do not use a 5 V card or a 2 MB card. ENGLISH
Make sure the camera is turned off (i.e. the mode dial is set to OFF).
Open the Card cover. Inserting a SmartMedia removable memory card Insert the card fully with the contact area facing towards the monitor side (back of the camera). Push the card down firmly, being careful not to bend it. The card will lock into position and not pop back up when properly inserted. ● Note the orientation of the card. If it is inserted incorrectly, it may become jammed.
Ejecting the card Push the card in lightly to unlock it, then pull it out.
Close the cover tightly. Power on/off 1 Press the tabs on the lens cap to remove it. the mode dial to S-Prg, P, A/S/M/ 2 Set ● The camera turns on.
ENGLISH ● The lens does not extend when the mode dial is set to the mode dial to OFF. 3 Set ● The camera turns off. Date/time setting
í on the arrow pad to 3 Press select MODE MENU. DRIVE MODE MENU
MY MODE SETUP
FILE NAME RESET
SETUP CARD PIC CAM
SETUP CARD PIC CAM
● The items in the SETUP menu appear. , then screen appears. ’01.01.01 00:00 is selected in green on 6 When the screen, press Ññ to select the date format. ● Select any one of the following formats: D-M-Y (Day/Month/Year) M-D-Y (Month/Day/Year) Y-M-D (Year/Month/Day) ● This step and the following steps show the procedure used when the date and time settings are set to Y-M-D. SELECT SET
screen 7 Press í to move to the year (Y) setting. Ññ to set the year. When the year is set, press í to move to 8 Press the month (M) setting. ● Repeat this procedure until the date and time are completely set. ● To move back to the previous setting, press É. SELECT SET
9 Press ● The camera returns to the menu screen. ● If is pressed again, the menu disappears. ● For more accurate setting, press at the time of 00 seconds. The clock starts when you press the button. ● The current settings stay the same even when the power is turned off, unless they are readjusted. ● The date/time setting will be canceled if the camera is left with no batteries for approximately 1 hour. If this happens, set the date/time again. If you remove the batteries a short time after loading them in the camera, it may take less than 1 hour for the date/time setting to be canceled.
Adjusting the diopter Turn the diopter adjustment dial until you see the AF target mark clearly. Viewfinder ENGLISH Diopter adjustment dial AF target mark SHOOTING BASICS Shooting mode setting — Mode dial Scene program shooting Allows you to shoot pictures by simply selecting an appropriate shooting mode from the five program shooting modes ( Portrait, Sports, Landscape-Portrait, Night-scene and Movie modes) depending on the shooting condition. Program shooting The camera sets aperture and shutter speed each time you shoot a still picture. Aperture priority/Shutter priority/Manual/My (image) mode shooting Allows you to set aperture and/or shutter speed manually. When the mode dial is set to A/S/M/ , the following items can be set with the menus: A (Aperture priority shooting) You set the aperture and the camera sets the shutter speed. S (Shutter priority shooting) You set the shutter speed and the camera sets the aperture. M (Manual shooting) You set both the aperture and shutter speed. My (image) mode shooting Allows you to make your own original set of function settings such as aperture value and zoom position and save them as the mode so that you can access all the saved settings just by selecting the mode.
SHOOTING BASICS (Cont.) Using the menus Shortcut menu ß Shortcut menus are the menus other than MODE MENU on the top menu. These can be replaced with your favorite items, but only when the mode dial is set to P or A/S/M/ . Just pressing the arrow pad buttons according to the marks shown next to each item will lead you directly to their screens.
SET CARD PIC CAMERA
DRIVE setting screen DRIVE ISO SLOW BKT
SET CARD PICTURE CAM
Setting screen WB setting screen
SET CARD PICTURE CAM
ENGLISH When displaying menus, the first screen that appears on the monitor is called the top menu. The contents of this menu change depending on the position of the mode dial (see the diagram below). On the top menu, two types of menus are available: MODE MENU and the other menus (shortcut menus). MODE MENU (displayed on the top menu) contains all the functions that are available and is divided into four tabs: CAMERA, PICTURE, CARD, and SETUP. These can be selected with the tabs on the left of the screen by using Ññ, as shown below.
SET CARD PICTURE CAM
AUTO To enter PICTURE SHARPNESS CONTRAST CARD SETUP
DRIVE ISO To enter CARD SET
SETUP CARD PIC CAM
SET CARD PIC CAMERA
MY MODE SETUP
FILE NAME RESET
SHOOTING BASICS (Cont.) Example of How to Set a Function Follow the steps below to set one function in MODE MENU. In this example, you will set (beep sound) to OFF when the mode dial is set to P.
SETUP CARD PIC CAM
Set the mode dial to P and press to display the top menu. ENGLISH
DRIVE MODE MENU ALL RESET
MY MODE SETUP
FILE NAME RESET
SLOW SLOW1 ALL RESET
SETUP CARD PIC CAM
Keep pressing ñ until the SETUP tab is selected. The å mark moves to the selected tab and the selection becomes highlighted.
Press í to enter SETUP. ALL RESET
MY MODE SETUP
FILE NAME RESET
Press í to display OFF/LOW/HIGH. The factory default setting is LOW. LOW REC VIEW
MY MODE SETUP
FILE NAME RESET
SETUP CARD PIC CAM
SET CARD PIC CAMERA
A screen is displayed with tabs on the left.
SETUP CARD PIC CAM
Press í to enter MODE MENU. ALL RESET REC VIEW
MY MODE SETUP
Press Ñ to select OFF.
Press to save the setting. To go back to shooting, press again. OFF LOW HIGH ● Some menu functions cannot be set separately for each mode. For details, see “Setting limitations and Default settings” that you can find on each mode menu function page in the Reference Manual.
For more details on the functions described here, refer to the reference manual contained on the software CD-ROM. Some function settings may not be available depending on the mode dial position. Factory default settings of some functions vary depending on the mode dial position. CAMERA Display Function Setting DRIVE Changes the drive modes, or sets autobracketing or self-timer shooting. Adjusts the ISO sensitivity. AUTO, 100, 200, 400 A/S/M/ Selects Aperture and Shutter priority modes, Manual mode, or mode. A, S, M, Controls the flash intensity. –2EV to +2EV SLOW Allows you to take pictures of night scenes. Reduces the noise on images during long exposures. OFF, ON DIGITAL ZOOM Zooming is possible to a maximum of 7.5x using the digital zoom function. OFF, ON FULLTIME AF Provides continuous focusing without having to press the Shutter button halfway. OFF, ON AF MODE Selects the auto focus method. iESP, SPOT
ENGLISH Menu functions (Shooting) SHOOTING BASICS (Cont.) ENGLISH Display Function PANORAMA Makes a panoramic image. FUNCTION Renders special effect photos. PICTURE (not available in the Display
Setting OFF, BLACK&WHITE, SEPIA, WHITE BOARD, BLACK BOARD Sets the record mode.
TIFF, SHQ, HQ, SQ
Adjusts the white balance according to the light source. Makes the color bluer/redder.
SHARPNESS Adjusts the level of picture sharpness.
CONTRAST Adjusts the picture contrast.
CARD Display CARD SETUP
Function Formats SmartMedia cards. (*All existing data stored on the card is erased when the card is formatted.) Setting
Menu functions (Shooting) SETUP Function Setting Determines whether or not current camera settings are retained when the camera is turned off. OFF, ON Sets the beep sound used for warnings, etc.
OFF, LOW, HIGH
REC VIEW Sets whether or not the picture being recorded is displayed during shooting. OFF, ON
MY MODE SETUP
Allows you to make your original set of function settings and save it as the mode. Once you save your settings, you can recall the entire setting just by selecting the mode at any time you turn on the camera. The saved settings remain on the memory after you turn off the camera. CURRENT, RESET, CUSTOM FILE NAME Specifies how to record file names on the card. RESET, AUTO Adjusts the brightness of the monitor.
m/ft Sets the measurement units during manual focus. m, ft SHORT CUT Replaces any of the 3 functions except MODE MENU on the top menu with other functions. All functions included in the CAMERA & PICTURE menus CUSTOM BUTTON Assigns a mode to the Custom button. AE LOCK, any function in the CAMERA menu, WB,
ENGLISH SHOOTING BASICS (Cont.) Menu functions (Playback) Setting methods on the playback menu are similar to the shooting menu. Display Function Setting Displays all stored pictures automatically (Slide-show).
INFO Changes the amount of picture information displayed. ON, OFF MOVIE PLAY*2 Plays back movies, edits movies or saves movies as indexed still pictures. CARD CARD SETUP SETUP Erases all pictures and formats SmartMedia cards. (*All existing data stored on the card is erased when the card is formatted.)
Changes camera settings. T SETUP menu *1 Available only during still picture playback. *2 Available only during movie playback. SETUP Display ALL RESET Function Setting Determines whether or not current camera settings are retained when the camera is turned off. OFF, ON Sets the beep sound used for warnings, etc.
OFF, LOW, HIGH
Adjusts the brightness of the monitor.
Sets the date/time. Sets the number of pictures displayed at one time during playback.
4, 9, 16 Aperture setting — Aperture priority shooting In the top menu, select MODE MENU T CAMERA T A/S/M/ T A, 1 then press to complete the setting. To start shooting, press
Shutter speed setting — Shutter priority shooting the top menu, select MODE MENU T CAMERA T A/S/M/ T S, 1 In then press to complete the setting. To start shooting, press again.
To set the shutter speed faster, press
To set the shutter speed slower, press ñ. Aperture & Shutter speed setting — Manual shooting the top menu, select MODE MENU T CAMERA T A/S/M/ T M, 1 In then press to complete the setting. To start shooting, press again.
To set the shutter speed faster, press Ñ. To set the shutter speed slower, press ñ.
ENGLISH again. SHOOTING BASICS (Cont.) Taking still pictures the lens cap and 1 Remove set the mode dial to P. ENGLISH
Point the camera towards a subject while viewing through the viewfinder. Card access lamp focus on the subject, press the shutter 3 To button halfway, slowly and gently. ● When the subject is in focus, the green lamp lights up. Green lamp
To start shooting, press the shutter button gently all the way (fully). ● The green lamp and card access lamp blink and the camera begins storing pictures on the card. ● NEVER open the card cover, eject the card, remove the batteries, or pull the plug of an optional AC adapter when the card access lamp is blinking. Doing so could destroy stored pictures and prevent storage of pictures you have just taken.
Recording movies Press the lens cap and set 1 Remove the mode dial to S-Prg. 3 Press Ñ to select S-Prg. S-Prg ñ repeatedly to select 4 PressMovie. S-prg S-pr CANCEL
SHOOTING BASICS (Cont.) Point the camera towards the subject and compose the picture while viewing through the monitor. ENGLISH
Viewfinder Orange lamp Card access lamp the shutter button all the way to 7 Press start recording. AF target mark ● The orange lamp lights up. ● The subjects are kept in focus all the time during movie recording. the shutter button all the way again 8 Press to stop recording. ● The card access lamp blinks and the camera starts writing the movie to the card. ● If you use up the remaining seconds displayed, the camera automatically stops shooting and starts writing the movie to the card.
Seconds remaining Focus lock If the subject of your composition is not within the AF target mark and focusing is not possible, try the following: on another object within the AF 1 Focus target mark that is at the same distance as your subject. Press the shutter button halfway to lock the focus. your picture while keeping the shutter button pressed 2 Compose halfway. 3 Press the shutter button completely to take the shot.
ENGLISH To zoom in on a subject, press the zoom Zoom lever lever towards T. To shoot a wider picture, press the zoom lever towards W. Telephoto/Wide-angle shooting is possible at up to 3x magnification (equivalent to 32 mm – 96 mm on a 35 mm camera). By combining the digital zoom with the 3x optical zoom, zoom magnification up to 7.5x is possible. How to shoot using the monitor T Press the (monitor) button. Compose the shot using the monitor and press the shutter button to shoot. SHOOTING BASICS (Cont.) Manual focus If Auto focus is unable to lock, use manual focus. down for more than 1 second. 1 Hold When the focus distance selection screen appears on the monitor, ENGLISH press í to select MF. 2 Press Ññ to select the focus distance. 3 Hold down for more than 1 second to save the setting. 4 Shoot. cancel the MF setting, hold down again for more than 1 second 5 To to display the focus distance selection screen. 6 To return to the AF mode, press É to select AF, then press
Using the flash Auto-flash (No display) : Automatically fires in low-light and backlight conditions. Red-eye reduction flash Significantly reduces the phenomenon of “red-eye” (subject’s eyes appearing red). Fill-in flash : Always fires regardless of available light. Flash off For situations where flash is prohibited, or when not using the flash. Slow Synchronization SLOW1 SLOW2 SLOW: Adjusts the flash for slow shutter speeds. In the top menu, select MODE MENU T CAMERA T SLOW T SLOW1, SLOW2 or SLOW. Press the (flash mode) button repeatedly until the desired flash mode indication appears.
ADVANCED SHOOTING Single-frame shooting : Shoots 1 frame at a time when the shutter button is pressed all the way. (normal shooting) Sequential shooting : Shoots pictures sequentially. Focus, exposure and white balance are locked at the first frame. AF Sequential shooting : Shoots pictures sequentially. Focus is locked for each frame automatically. The AF Sequential shooting speed is lower than normal sequential shooting. Self-timer shooting : Shoots a single frame using the self-timer. Auto bracketing BKT : Shoots multiple frames of the same picture, each with a different exposure value. Focus and white balance are locked at the first frame. In the top menu, select MODE MENU T CAMERA T DRIVET select a mode. Metering modes There are 2 metering methods: Digital ESP metering and Spot metering. Digital ESP metering T Meters the center of the subject and the area around it. Digital ESP metering is the factory default setting. Spot metering T Exposure is determined by metering within the AF target mark. In this mode, a subject can be shot with optimal exposure regardless of the background light. In the working range of the macro mode, Spot metering is also available (Spot metering+Macro mode). Press the button repeatedly until (Spot metering) or (Spot metering+Macro mode) appears on the control panel.
ENGLISH Drive mode AE lock Suitable for situations when optimal exposure is difficult to achieve (such as excessive contrast between the subject and the surroundings). For example, if the sun is in the frame and shooting with automatic exposure results in a dark subject, re-compose your shot so that the sun is not in the frame. Then, press the button to lock the metered value (exposure) temporarily. Then compose your shot again with the sun in the frame and shoot. In other words, use AE lock when you want an exposure setting that’s different from the setting that the camera would normally calculate for the image you want to shoot. Macro mode shooting Allows you to shoot close to the subject (no closer than 0.2 m (8 inches)) so that you can fill the entire frame with your subject while the zoom lever is pressed to the maximum W position. When your target subject is at the center of the frame, macro mode shooting with the Spot metering will bring you a better picture. If you are close to a subject, the picture area in the viewfinder is different from the picture that the camera actually records. For macro mode shooting, we recommend using the monitor. Press the button repeatedly until (Macro mode) or metering+Macro mode) appears on the control panel. (Spot Exposure Compensation This function allows you to make fine changes to the present exposure setting. In some situations, you may get better results when the exposure that the camera sets is compensated (adjusted) manually. You can adjust between +/–2.0 in 1/3 steps. The current exposure compensation value is displayed on the monitor. Adjusts towards – (images become darker)
Adjusts towards + í (images become brighter) PLAYBACK Viewing still pictures
Press (monitor button) twice quickly while in the shooting mode (Quick View). ● The monitor turns on and the recorded picture appears.
Display the desired pictures using the arrow pad. ● Pictures indicated by are movie frames. Jumps to the picture 10 frames behind. Displays the next picture. Jumps to the picture 10 frames ahead. Displays the previous picture. Zoom lever Turning the zoom lever towards T: Enlarges the picture. W: Displays multiple pictures at the same time. return to the shooting mode quickly (available only when the 3 To camera entered playback mode using Quick View), press the shutter button halfway. ● The monitor turns off. You can now shoot pictures using the viewfinder.
ENGLISH the mode dial to 1 Set (playback). Display the movie frame (picture with ) you want to play back. T See steps 1 and 2 in “Viewing still pictures”.
Press Press Ñ on the arrow pad to 3 select MOVIE PLAY. ENGLISH ● The card access lamp blinks while movie data is accessed. The camera starts playing back after loading the movie data. ● When playback finishes, the screen returns to the beginning of the movie. ● If you press again, the MOVIE PLAYBACK screen appears. MOVIE PLAYBACK PLA To return to the shooting mode, press the shutter button halfway. ● The monitor turns off. Shoot pictures using the viewfinder.
EXIT Select an item displayed on the screen by pressing Ñ or ñ on the arrow pad, and then press to start one of following operations. PLAYBACK: Plays back the entire movie again. FRAME BY FRAME: Plays back the movie manually by one frame at a time. EXIT: Leaves the movie playback mode. (Protecting Images Against Accidental ENGLISH 1 Display the picture you want to protect by using the arrow pad. . The picture is now protected. 2 Press ● To cancel protection, press again. Single-Frame Erase a picture you wish to erase by using the arrow pad. 1 Select ● If the picture is protected, cancel the protection. 2 Press the ● The (erase) button. ERASE screen is displayed. 3 Press Ñ to select YES. 4 Press to erase the picture. ● To cancel erasing, select NO in step 3 and press again. , or press the button All-Frame Erase This function erases all still pictures and movies on the SmartMedia card, except protected ones. top menu, select MODE MENU T CARD T CARD SETUP T 1 In the ALL ERASE. 2 Press ● The
ALL ERASE screen is displayed. 3 Press Ñ to select YES. to start erasing. 4 Press ● A bar is displayed to show the progress of erasing. ● To cancel erasing, select NO in step 3 and press
● Pictures on a SmartMedia card with a write-protect seal cannot be erased. ● Once erased, pictures cannot be brought back.
PRINT SETTINGS ENGLISH Selected images can be reserved in a card for printing on a printer or at a photo lab that supports the DPOF (Digital Print Order Format) system. ● Print reserve cannot be performed for a picture displayed with Single-frame print reserve Press . The PRINT ORDER screen is displayed. Press Ññ on the arrow pad to select , then press . The print reserve selection screen is displayed. Press the arrow pad to select the picture you wish to print. Press . The setting menu is displayed. Press Ññ to select
then press í. Press Ññ to select a setting for each item, then press save the setting. ( x: number of prints, : date/time display, trimming setting) To save all the settings, press to exit from the selection screen. Press twice to exit the Print reserve mode. All-frame print reserve Allows you to store print data for all the pictures on the card, as well as allowing you to choose how many prints you want. Trimming print reserve You can print an enlarged part of a recorded picture. Resetting print reserve This resets all the print reserve settings for images saved in a card. Press . The PRINT ORDER SETTING screen is displayed. If there are no pictures on the card, this screen is not displayed. Press Ññ to select RESET, then press . To keep the print order, select KEEP and press ● To remove the selected image only, select KEEP, then set the number of prints in single- frame print reserve to 0. ● To perform print reserve for additional pictures, select KEEP. Print reserve can be added to the print reserve data already stored on the card. ● This camera cannot be directly connected to printers. ● If a card contains DPOF reservations set by another device, entering reservations using this camera may overwrite the previous reservations. Be sure to use this camera for reservations.
TRANSFERRING PICTURES TO A COMPUTER
How to connect to a computer by USB cable depends on the Operating System (OS) your computer is running. Consult the manufacturer of your computer for details of its operating system Identification of running OS (Windows 98/98SE, Windows 2000 Professional/Me, Mac OS 9.0 - 9.1)
Windows 98/98SE Windows 2000 Professional/Me
Connecting USB cable
Confirming the computer recognizes the camera
Transferring images to a computer -Downloading
Disconnecting the cable
- Even if your computer has a USB connector, data transfer may not function correctly if you are using one of the operating systems listed below. ● Windows 95/NT 4.0 ● Windows 98 upgraded from Windows 95 ● Mac OS 8.6 or lower (except Mac OS 8.6 equipped with USB MASS Storage Support 1.3.5 installed at the factory) ● A computer that uses a USB connector mounted on an extension card, etc. ● Data transfer is not guaranteed on a generic (non-name brand) PC system. CAMEDIA Master also allows you to transfer image files stored on the card and edit them on your computer. For detailed information about using CAMEDIA Master, refer to its instruction manual. Note on using CAMEDIA Master 2.5: ● When using CAMEDIA Master 2.5, click on “Removable Disk”, not “My Camera”. Under Mac OS, the driver name is “Untitled”.
ENGLISH Install the USB driver as instructed in the provided “Software Installation Guide”.
Mac OS 9.0 - 9.1 TRANSFERRING PICTURES TO A COMPUTER (Cont.) Saving directly from a SmartMedia removal memory card Card adapters enable you to save images on your personal computer without having to connect your camera directly to your computer. For the latest information on available adapters, consult our Customer Support Center or your local Olympus dealer. ENGLISH Computer operating environment Required devices Personal computer equipped with 3.5" floppy disk-drive Floppy disk adapter Personal computer equipped with a PC card slot (PCMCIA) or an external PC card reader/writer PC card adapter Personal computer equipped with a USB port SmartMedia reader/writer Note: ● Check for compatibility. Depending on the computer operating environment and/or the card memory capacity, the above devices may not function properly. ● For details on operating the above devices, read the instructions provided with the device. For more details, refer to the software CD’s instructions on CD-ROM.
OPTIONAL ACCESSORIES As of October 2001 Camera case Photo printers for Olympus digital cameras (P-330N, P-200, P-400) AC adapter Standard SmartMedia card (8/16/32/64/128MB) Floppy disk adapter PC card adapter USB SmartMedia Reader/Writer NiMH battery NiMH battery charger ENGLISH Visit the Olympus home page for the latest information on optional items. http://www.olympus.com
ERROR CODES If there is a problem with your camera, a blinking error code will appear. ENGLISH Control panel Empty screen
Monitor Possible causes A SmartMedia card is not inserted, or it cannot be recognized. Corrective action Insert the card correctly. Insert a different card. No more pictures can be taken. Replace the card or erase unneeded pictures. Writing to the card is prohibited. If you are taking pictures, remove the write-protect seal. Cannot record, play back or erase pictures in this card. If the card is dirty, wipe it with a clean tissue and insert it again. If the problem is still not corrected, this card cannot be used. The recorded image cannot be played back with this camera. Load the image using personal computer image processing software. If that cannot be done, the image file is partially damaged. Monitor Possible causes The SmartMedia card is not formatted. Corrective action Format the card. (*All existing data stored on the card is erased when the card is formatted.) There are no pictures on the card, so there is nothing to play back. Insert a card that contains images. There is no empty space in the card, so it cannot record new information including print data. Replace the card or erase unneeded pictures. The card cover is open. Close the card cover. CARD-COVER OPEN
ENGLISH Control panel SPECIFICATIONS Product type Recording System Still ENGLISH Movie Digital camera (for shooting and displaying) Digital recording, JPEG (in accordance with Design rule for Camera File system (DCF)), TIFF (non-compression), Digital Print Order Format (DPOF) QuickTime Motion JPEG support Memory 3V (3.3V) SmartMedia, 4 MB – 128 MB (all cards except 2 MB) No. of storable pictures (When a 16 MB card is used) 1 frame (TIFF: 2048x1536) Approx. 8 frames (SHQ: 2048x1536) Approx. 21 frames (HQ: 2048x1536) Approx. 49 frames (SQ: 1280x960 NORMAL) Approx. 165 frames (SQ: 640x480 NORMAL) No. of Effective pixels 3,180,000 pixels Image pickup device 1/1.8" CCD solid-state image pickup device 3,340,000 pixels (gross) Recording image 2048x1536 pixels (TIFF/SHQ/HQ) 1600x1200 pixels (TIFF/SQ) 1280x960 pixels (TIFF/SQ) 1024x768 pixels (TIFF/SQ) 640x480 pixels (TIFF/SQ) Lens Olympus lens 6.5 mm to 19.5 mm, F2.8, 8 elements in 6 groups (equivalent to 32 mm to 96 mm lens on 35 mm camera), aspherical glass Photometric system Aperture Digital ESP metering, Spot metering system W : F2.8 to F11.0 T : F2.8 to F11.0 Shutter speed Still Used with mechanical shutter 4 to 1/800 sec. (M mode: 16 to 1/800 sec.; P/A mode: 1 to 1/800 sec.) 1/30 to 1/10000 sec. Movie
Optical real image viewfinder Monitor 1.8" (4.5 cm) TFT color LCD display, approx. 123,000 pixels Battery charging time for flash Approx. 6 sec. (at normal temperature with new batteries) Autofocus TTL system autofocus, Spot AF, Contrast detection system, Focusing range: 0.2 m to ∞ (0.6 ft to ∞) Outer connector DC-IN jack, USB connector (USB 1.0 compatible) Automatic calendar system Up to 2031 Operating environment Temperature Humidity ENGLISH Viewfinder 0°C to 40°C (32°F to104°F) (operation) –20°C to 60°C (– 4°F to 140°F) (storage) 30% to 90% (operation) 10% to 90% (storage) Power supply For batteries, use 2 CR-V3 lithium battery packs, or 4 AA (R6) NiMH batteries, NiCd batteries, Alkaline batteries or lithium batteries. Manganese (zinc-carbon) batteries cannot be used. AC adapter (optional) Dimensions (W) x (H) x (D) 110 mm x 76 mm x 70 mm (4.3" x 3.0" x 2.8") Weight 300 g (0.66 lb) (without batteries/card) SPECIFICATIONS ARE SUBJECT TO CHANGE WITHOUT ANY NOTICE OR OBLIGATION ON THE PART OF THE MANUFACTURER.
Molette Mode (S-Prg, A/S/M/ , P, OFF,
SETUP CARD PIC CAM
MY MODE SETUP
FILE NAME RESET
SETUP CARD PIC CAM
SET CARD PIC CAMERA
SET CARD PICTURE CAM
SET CARD PICTURE CAM
SET CARD PICTURE CAM
SETUP CARD PIC CAM
SET CARD PIC CAMERA
MY MODE SETUP
FILE NAME RESET
MY MODE SETUP
FILE NAME RESET
MY MODE SETUP
FILE NAME RESET
SETUP CARD PIC CAM
SET CARD PIC CAMERA
SETUP CARD PIC CAM
SETUP CARD PIC CAM
MY MODE SETUP
FILE NAME RESET
MY MODE SETUP
FILE NAME OFF LOW HIGH
TIFF, SHQ, HQ, SQ
CURRENT, RESET, CUSTOM FILE NAME CARD CARD SETUP SETUP CARD-COVER OPEN 2048x1536 pixels (TIFF/SHQ/HQ) 1600x1200 pixels (TIFF/SQ) 1280x960 pixels (TIFF/SQ) 1024x768 pixels (TIFF/SQ) 640x480 pixels (TIFF/SQ) Objectif 110 mm (L) x 76 mm (H) x 70 mm (P) Poids C-3020ZOOM OLYMPUS Olympus America Inc. 2 Corporate Center Drive, Melville, New York 11747-3157 USA : 631-844-5000 DEUTSCH Programmwählscheibe (S-Prg, A/S/M , P, OFF,
OK/Menü-Taste MF-Taste ( ) LCD-MonitorTaste (
MY MODE SETUP
FILE NAME RESET
SETUP CARD PIC CAM
SETUP CARD PIC CAM
SET CARD PIC CAMERA
SET CARD PICTURE CAM
DEUTSCH Einstellmenü
SET CARD PICTURE CAM
SETUP CARD PIC CAM
SET CARD PICTURE CAM
SET CARD PIC CAMERA
MY MODE SETUP
FILE NAME RESET
SETUP CARD PIC CAM
MY MODE SETUP
FILE NAME RESET
MY MODE SETUP
FILE NAME RESET
SET CARD PIC CAMERA
SETUP CARD PIC CAM
SETUP CARD PIC CAM
MY MODE SETUP
FILE NAME OFF LOW HIGH LOW REC VIEW
MY MODE SETUP
FILE NAME RESET
TIFF, SHQ, HQ, SQ
CURRENT, RESET, CUSTOM FILE NAME CARD CARD SETUP SETUP CARD-COVER OPEN 4,5-cm-TFT-LCD-Farbmonitor, ca. 123.000 Pixel Blitzladezeit
CÓMO USAR ESTE MANUAL
SIZE: 2048x1536 F2.8 1/800 +2.0
MY MODE SETUP
FILE NAME RESET
aparece. ’01.01.01 00:00
SETUP CARD PIC CAM
SETUP CARD PIC CAM
Menú principal P DRIVE MODE MENU
SET CARD PIC CAMERA
SET CARD PICTURE CAM
SET CARD PICTURE CAM
ESPAÑOL Menú principal P
SET CARD PICTURE CAM
MY MODE SETUP
FILE NAME RESET
SETUP CARD PIC CAM
SET CARD PIC CAMERA
MY MODE SETUP
FILE NAME RESET
ESPAÑOL SLOW SLOW1 ALL RESET
SETUP CARD PIC CAM
MY MODE SETUP
FILE NAME RESET
MY MODE SETUP
FILE NAME RESET
SET CARD PIC CAMERA
SETUP CARD PIC CAM
MY MODE SETUP
OFF, BLACK&WHITE, SEPIA, WHITE BOARD, BLACK BOARD
TIFF, SHQ, HQ, SQ
CURRENT, RESET, CUSTOM FILE NAME CARD CARD SETUP SETUP CARD-COVER OPEN ESPAÑOL 2048x1536 pixels (TIFF/SHQ/HQ) 1600x1200 pixels (TIFF/SQ) 1280x960 pixels (TIFF/SQ) 1024x768 pixels (TIFF/SQ) 640x480 pixels (TIFF/SQ) Objetivo Jack DC-IN, conector USB (USB 1.0 compatible) Dimensiones (An.) X (Alt.) X (P) 110mm x 76mm x 70mm Peso http://www.olympus.com OLYMPUS OPTICAL CO., LTD. San-Ei Building, 22-2, Nishi Shinjuku 1-chome, Shinjuku-ku, Tokyo, Japan Customer support (Japanese language only): Tel. 0426-42-7499 Tokyo OLYMPUS AMERICA INC. Two Corporate Center Drive, Melville, NY 11747-3157, U.S.A. Tel. 631-844-5000 Technical Support (USA): 24/7 online automated help: http://support.olympusamerica.com/ Phone customer support: Tel. 1-888-553-4448 (Toll-free) Our Phone customer support is available from 8 am to 10 pm (Monday to Friday) ET E-Mail: distec@olympus.com Olympus software updates can be obtained at: http://olympus.com/digital Adobe [Photoshop] Support Adobe software updates and technical information can be obtained at: http://www.adobe.com/support/ OLYMPUS OPTICAL CO. (EUROPA) GMBH. Premises/Goods delivery: Wendenstraße 14-18, 20097 Hamburg, Germany Tel. 040-237730 Letters: Postfach 10 49 08, 20034 Hamburg, Germany ESPAÑOL Hotline Numbers for customers in Europe: Tel. 01805-67 10 83 for Germany Tel. 00800-67 10 83 00 for Austria, Belgium, Denmark, France, Netherlands, Norway, Sweden, Switzerland, United Kingdom Tel. +49 180 5-67 10 83 for Finland, Italy, Luxemburg, Portugal, Spain, Czech Republic Tel. +49 40-237 73 899 for Greece, Croatia, Hungary and the Rest of Europe Our Hotline is available from 9 am to 6 pm (Monday to Friday) E-Mail: di.support@olympus-europa.com © 2001-2002 OLYMPUS OPTICAL CO., LTD. Printed in Japan 1AG6P1P1186 -- B VT330203