
CM9409TB-CE - Coffee maker Clas Ohlson - Free user manual and instructions
Find the device manual for free CM9409TB-CE Clas Ohlson in PDF.


| Product Type | Coffee Maker |
| Model | CM9409TB-CE |
| Brand | Clas Ohlson |
| Power Supply | 220–240 V, 50/60 Hz |
| Power Consumption | 900 W |
| Capacity | 1.5 L (approx. 12 cups) |
| Filter Type | Size 1×4 (reusable filter included, paper filters sold separately) |
| Brewing Control | Manual and programmable timer |
| Display | Illuminated screen with clock and timer setting |
| Auto Shut-off | After 40 minutes (keep-warm function) |
| Keep-Warm Function | Automatic after brewing, lasts up to 40 minutes |
| Drip-Stop | Yes, on filter holder (prevents dripping when carafe removed) |
| Carafe Material | Glass |
| Water Reservoir | With water level scale |
| Descaling | Recommended every 30–40 uses with white vinegar solution |
| Cleaning | Hand wash carafe, wipe exterior with damp cloth |
| Safety Features | Hot surface warnings, child safety, automatic shut-off |
| Included Accessories | Reusable filter |
| Color | Not specified (typical white/black) |
Frequently Asked Questions - CM9409TB-CE Clas Ohlson
User questions about CM9409TB-CE Clas Ohlson
0 question about this device. Answer the ones you know or ask your own.
Ask a new question about this device
Download the instructions for your Coffee maker in PDF format for free! Find your manual CM9409TB-CE - Clas Ohlson and take your electronic device back in hand. On this page are published all the documents necessary for the use of your device. CM9409TB-CE by Clas Ohlson.
USER MANUAL CM9409TB-CE Clas Ohlson
natural_image
Line drawing of a modern coffee maker with lid and side panel (no text or symbols)Art.no
44-3726
Model
CM9409TB-CE
Ver. 20190517
clas ohlson
Coffee Maker
Art.no 44-3726 Model CM9409TB-CE
Please read the entire instruction manual before using the product and then save it for future reference. We reserve the right for any errors in text or images and any necessary changes made to technical data. In the event of technical problems or other queries, please contact our Customer Services (see address details on the back).
- Certain parts of the product become hot during use. Only touch the handle and the buttons. Do not touch any other parts of the product during use.
- Do not use any accessories other than those recommended by the manufacturer or retailer. The use of incompatible accessories may result in fire, electric shock or personal injury.
- This product can be used by children aged from 8 years and above if they have been given supervision or instruction concerning use of the product in a safe way and understand the hazards involved.
- Cleaning and user maintenance shall not be made by children unless they are older than 8 and supervised.
- Keep the product and its mains lead out of reach of children under the age of 8.
- The product may be used by persons with reduced physical, sensory or mental capabilities or persons with a lack of experience or knowledge which could jeopardise their safety, provided they have been instructed in the safe operation of the product and understand the hazards involved.
- Never let children play with the product.
- The product is only designed for domestic use or under similar conditions such as in:
- staff canteens, offices and other staff rooms
- holiday homes and chalets
- hotel rooms and other forms of temporary accommodation
-
Bed and Breakfast facilities
-
The product must never be immersed in water or other liquid.
- Avoid spilling liquid onto any electrical connectors.
- The warming plate is hot during both the brewing process and keep-warm mode. Let the plate cool before touching it.
- Inspect the mains lead regularly for signs of damage. If the mains lead has been damaged, it must only be replaced by the manufacturer, authorised service facility or qualified tradesman. This is to prevent the risk of electric shock or fire.
- The product is intended for indoor use only.
- Any children present when the product is in use must be closely supervised.
- Always let the product cool completely before cleaning it. Never place any objects onto the product when it is in use or when hot after use.
- The product must only be used as described in this instruction manual.
- Place the product on a flat, non-flammable surface where air can circulate freely around it.
- The product must not be used while it is in a cabinet or similar enclosed space.
- Never leave the product unattended while in use.
- Unplug the product immediately should it begin functioning abnormally. Never attempt to repair or modify the product in any way.
- Do not place the product where it could fall into water or other liquid.
- If the product has fallen into water or other liquid during use, do not touch it. Unplug the product from the electrical socket immediately. Do not try to retrieve the product from the water with your bare hands.
-
The product must only be connected to a 230 V AC electrical socket.
-
Make sure that the mains lead does not come in contact with hot surfaces such as cooker hobs.
- Never insert cutlery, tools or similar objects into the product.
- Do not pull or carry the product by its mains lead. Do not use the lead as a handle and make sure that it is not crushed. Do not pull the lead around sharp corners or edges.
- Never use the product if it, its mains lead or plug is damaged in any way. Do not use the product if you have dropped it onto the floor or into water or other liquid.
- Do not open the housing. Certain unshielded components inside the housing carry dangerous voltages. Contact with these components could result in electric shock.
- The product must only be repaired by qualified service technicians using original spare parts.
- The product must not be taken apart or modified.
Product description
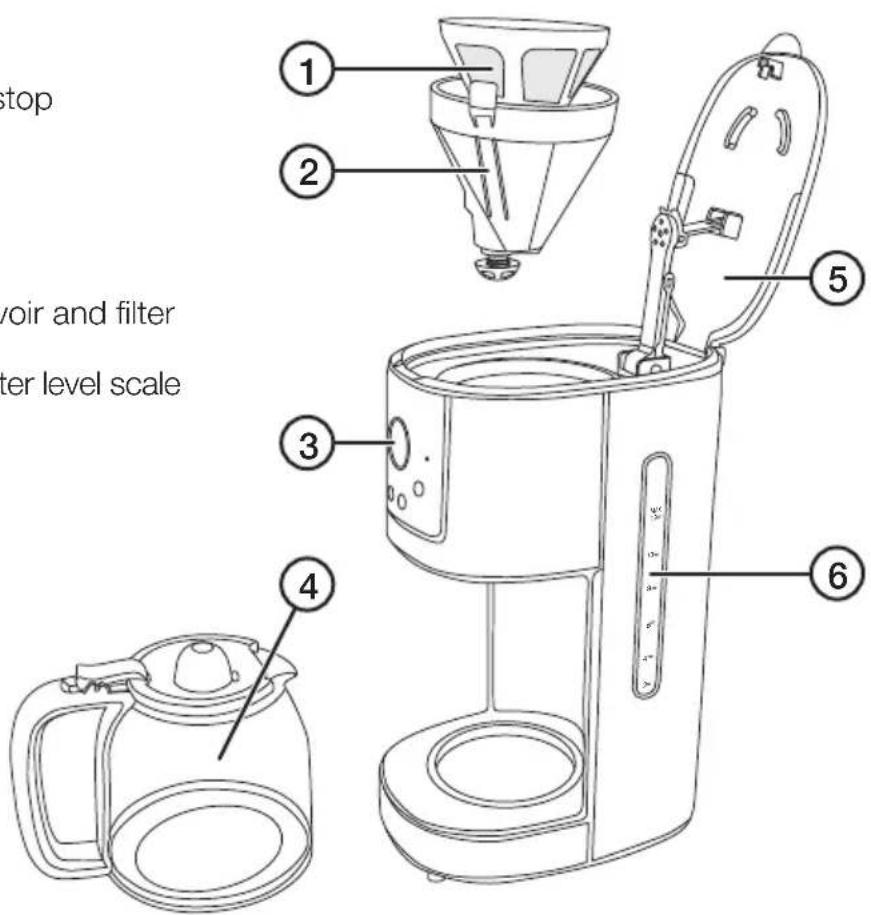
- Reusable filter
- Filter holder with drip-stop
- Control panel
- Carafe
- Lid for the water reservoir and filter
- Water reservoir with water level scale
Control panel
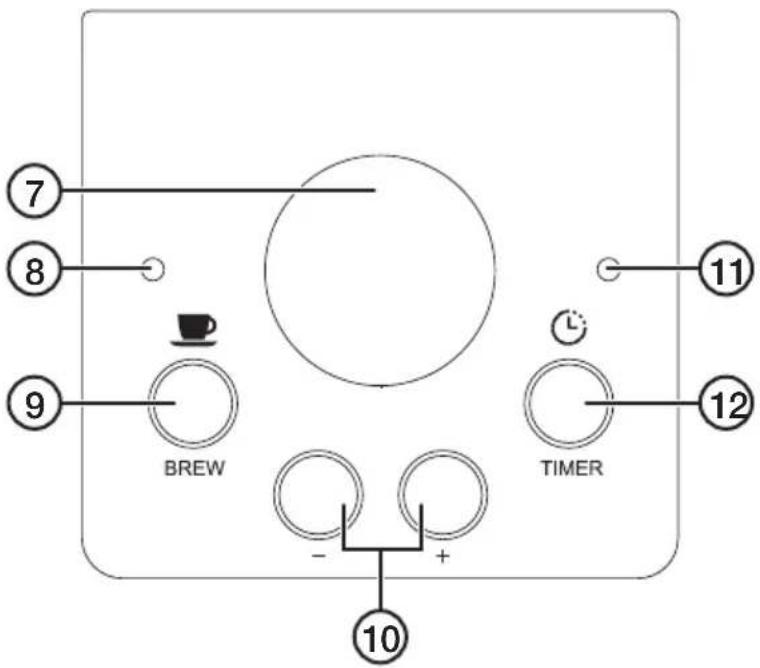
- Illuminated screen with time and timer setting display
- LED indicator, shines red when brewing is in progress
- [BREW] Press to manually start/stop the brewing process
- [ - / + ] Time setting buttons
- LED indicator, shines green when the timer is activated
- [L / TIMER]
Instructions for use
Before initial use
- Wash the glass carafe and filter holder before initial use.
- Before using the coffee maker you should run the machine through two to three filtration cycles at full water capacity, but without coffee grounds. This should also be done when the coffee maker has not been used for a long time, and after descaling.
- The water level scale on the water reservoir makes it easier for you to fill the reservoir with the correct amount of water. Make sure not to exceed the maximum water level.

Warning: Hot steam will come out of the top of the coffee maker during the brewing process. Do not touch or lift the water reservoir cover whilst brewing is in progress. Let the coffee maker cool before lifting the water reservoir and filter cover.
Setting the time
- Plug the mains lead into a wall socket. The display lights up and shows "0:00".
- Press [TIMER], "CLOCK PROG" and the hour digits will flash.
- Press or hold in [ + ] or [-] to set the hours.
- Press [TIMER] again – the minute digits will flash.
- Press or hold in [ + ] or [-] to set the minutes.
- Press [TIMER] to exit the settings mode.

Information: If you need to reset the time, hold in [TIMER] until "CLOCK PROG" and the hour digits flash. Set the time according to the instructions above.
Manual brewing
- Lift the lid (5) and add the desired amount of water and ground coffee. You can either use the included reusable filter or a disposable size 1 × 4 paper filter (sold separately).
- Close the lid.
- Close the lid on the carafe and place the carafe onto the warming plate. The carafe must be positioned correctly in order for the drip-stop mechanism on the filter holder to function correctly.
- Press [BREW] to start brewing. The word "BREW" will show on the display and the red LED indicator (8) will come on. The coffee maker will emit an audible signal when it has finished brewing.
-
Wait until all the water has run through the filter before removing the carafe from the warming plate.
-
The coffee maker automatically enters keep-warm mode once brewing is complete.
It will switch off automatically 40 minutes after it was switched on. - Press [BREW] to switch the coffee maker off before the 40 minutes has elapsed.
- Make sure that the coffee maker is switched off after use.
Brewing using the timer
- Perform steps 1–3 above.
- Press [TIMER], the display lights up, "PROG/BREW" shows on the display and the hour digits will flash.
- Set the time that you want the brewing to begin using the [-] and [+] buttons as instructed above.
- Press [TIMER] to exit the settings mode. The green timer LED indicator (11) will shine and "PROG/BREW" will show on the display to indicate that the timer is activated.
The brewing will begin at the set time. The timer indicator (11) will go out and the brewing indicator (8) will come on. The display will show “BREW”.
- Follow step 5 above.
i Information:
- If you wish to deactivate the timer before the set time, press [ TIMER ] once.
- If you wish to start the brewing process before the set time, press [BREW].
- If you wish to set the timer to the same time as last time, press [TIMER] three times. The most recent timer time setting will be retrieved from the memory.
Care and maintenance
Cleaning
- Always unplug the lead from the power point and let the coffee maker cool down properly before cleaning it.
- Clean the exterior of the coffee maker using a soft, moist cloth. Use only mild cleaning agents, never solvents or corrosive chemicals.
- Hand wash the glass carafe with a little washing up liquid and hand dry it with a kitchen towel.
Descaling
- For optimal performance, your coffee maker should be descaled regularly.
-
If a substantial amount of scale is allowed to build up removal will be extremely difficult even when using a descaling agent. Scale can also cause leaks in the brewing mechanism. We recommend that the coffee maker be descaled after every thirty to forty uses. For descaling you can use a mixture of white vinegar and water:
-
Mix 2–3 tablespoons of white vinegar (12 %) with an amount of cold water equal to the coffee maker's maximum capacity.
-
Pour this solution into the tank. Insert a filter into the filter basket without coffee.
-
Turn on the coffee maker and allow it to run through a complete filtering cycle. Repeat if necessary. Conduct this descaling process in a well ventilated area and avoid breathing in the resulting fumes.
-
To clean the coffee maker after descaling you should run the machine through 2–3 filtration cycles using clean water filled to full capacity.
Responsible disposal
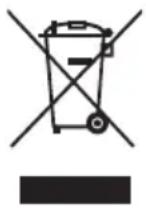
This symbol indicates that the product should not be disposed of with general household waste. This applies throughout the entire EU. In order to prevent any harm to the environment or health hazards caused by incorrect waste disposal, the product must be handed in for recycling so that the material can be disposed of in a responsible manner. When recycling your product, take it to your local collection facility or contact the place of purchase. They will ensure that the product is disposed of in an environmentally sound manner.
Specifications
Power supply 220–240 V, 50/60 Hz
Power 900 W
Capacity 1.5 L (approx 12 cups)
Filter size 1×4
Kaffebryggare
Art.nr 44-3726 Modell CM9409TB-CE
Postal 10 – 13 Market Place
Kingston upon Thames
Surrey
KT1 1JZ
Deutschland
Kundenservice Hotline: 040 2999 78111
E-Mail: kundenservice@clasohlson.de
Homepage
www.clasohlson.de


Brand : Clas Ohlson
Model : CM9409TB-CE
Category : Coffee maker