
TMK-014 - Saw Batavia - Free user manual and instructions
Find the device manual for free TMK-014 Batavia in PDF.


| Product Type | Speed Saw |
| Model | TMK-014 |
| Brand | Batavia |
| Battery Voltage | 18 V DC |
| Battery Type | Lithium-Ion |
| Battery Capacity | 1.35 Ah |
| Rated Energy Consumption | 24.3 Wh |
| Depth of Cut | 0–12 mm |
| Blade Mounting Hole | 11 mm |
| Weight (without battery) | 1.5 kg |
| Charger Input | 230 V ~ 50 Hz, 50 W |
| Charger Output | 22 V DC, 1.4 A |
| Charging Time | Approx. 1 hour |
| Features | Long runtime, no memory effect, electronic protection (over-charge, over-heat, total discharge) |
| Battery Capacity Indicator | 3 LEDs (red = discharged, red+orange = half, all 3 = full) |
| Dust Extraction | Forced dust extraction; dust bag included |
| Safety Features | Safety hood, guard return spring, blade guard, lock-on switch |
| Adjustable Cutting Depth | Yes, via depth limiter knob |
| Blade Type Compatibility | HSS, TCT, Diamond blades (various teeth) |
| Maintenance | Remove battery; clean safety hood, ventilation slots; store dry and frost-free |
| Warranty | 2 years |
| Included Accessories | Battery, charger, dust bag, Allen spanner, plastic cap |
Frequently Asked Questions - TMK-014 Batavia
User questions about TMK-014 Batavia
0 question about this device. Answer the ones you know or ask your own.
Ask a new question about this device
Download the instructions for your Saw in PDF format for free! Find your manual TMK-014 - Batavia and take your electronic device back in hand. On this page are published all the documents necessary for the use of your device. TMK-014 by Batavia.
USER MANUAL TMK-014 Batavia
7045891
Safety Notes 12
Product Features | Before first Use 13
Charging the Battery | Checking Battery Capacity 13
Inserting and Removing the Battery 14
Installing the Saw Blade 14
Cutting Depth | Marking the Cuts 14
Dust Extraction 15
Cutting | Following Lines 15
Cutting difficult or abrasive Materials 16
Cleaning and Maintenance 16
Changing the Saw Blade 16
Technical Data | Disposal 17
EG-Declaration of Conformity 24
nederlands
PRÜFEN DER BATTERIEKAPAZITÄT
EINSETZEN UND ENTNEHMEN DES AKKUS
SCHNITTTIEFE
TECHNISCHE DATEN
SPEED SAW
Typ TMK-014
This Speed Saw is ideally suited for many DIY and precision tasks. No matter whether you use it on your model railroad, for scale modelling, for restoration work on furniture or for delicate jobs in home remodelling, this small machine feels right at home in all these tasks. This manual contains important information on operating and handling the device. Keep these operating instructions for further reference. Please pass it on along with the unit if it is handed over to a third party!
Please read the safety instructions! These instructions will make it easier for you to handle the device appropriately and help prevent misunderstandings and possible damage or injury.
! Please note the included General Safety Notes and the following safety notes to avoid malfunctions, damage or physical injury:
- Make sure the voltage corresponds to the type label on the battery charger.
- The battery charger is designed for charging the speed saw only. Do not charge other machines with this charger. Do not charge the battery of the speed saw with other charger.
- Protect battery and battery charger from humidity. Do not operate the battery charger outdoors.
- When not in use and before cleaning and servicing, disconnect the battery charger from the power supply.
• Take special care of the battery. Avoid dropping it onto any hard surface and do not subject it to pressure or any other form of mechanical stress. Keep the battery away from extreme heat and cold. - Do not open or attempt to repair the battery or the battery charger. If any parts are damage have them repaired by a qualified technician or contact your customer service.
- Only charge the battery at an ambient temperature between 10°C and 40°C . A charged battery can be used to power the machine under ambient temperature conditions between 0°C and 50°C .
- When not in use, store the battery in a dry place between 10° C and 30° C .
- Important Danger! Never short-circuit the battery or expose it to moisture. Do not store it together with any metal parts which could short-circuit the contacts. The battery could overheat, start burning or explode.
- Keep hand away from cutting area and the blade.
- Do not reach underneath the work piece. The guard cannot protect you from the blade below the work piece.
- Adjust the cutting depth to the thickness of the work piece. Less than a full tooth of the blade teeth should be visible below the work piece.
- Never hold piece being cut in your hands or across your leg. Secure the work piece to a stable platform. It is important to support the work properly to minimize body exposure, blade binding, or loss of control.
- Hold power machine by insulated gripping surfaces when performing an operation where the cutting machine may contact hidden wiring. Contact with a "live" wire will also make exposed metal parts of the power machine "live" and shock the operator.
• Always use blades with correct size and shape of arbour holes. Blades that do not match the mounting hardware of the saw will run eccentrically, causing loss of control.
- Never use damaged or incorrect blade washers or bolt. The blade washers and bolt where specially designed for your saw, for optimum performance and safety of operation.
- Check guard for proper closing before each use. Do not operate the saw if guard does not move freely and enclose the blade instantly. Never clamp or tie the guard with the blade exposed. If saw is accidentally dropped, guard may be bent. Check to make sure that guard moves freely and does not touch the blade or any other part, in all angles and depths of cut.
- Check the operation and condition of the guard return spring. If the guard and the spring do not operate properly, they must be serviced before use. Guard may operate sluggishly due to damaged parts, gummy deposits, or a build-up of debris.
OPERATION
PRODUCT FEATURES
- The feature of this machine is the long runtime. The battery can be charged at any time, regardless of the charging condition and without damaging the cells. There is no memory effect.
• The electronics protects the battery from over-charging, over-heating and total discharge. - There is no loss of charge. The unit will work with full battery capacity from the first up to the last screw. The battery is characterised by low self-discharge. A fully charged battery is always ready for use, even if you do not use it for months.
BEFORE FIRST USE
Remove the speed saw and all accessories out of the packaging. Check all parts for damage in transit and do not use damaged accessory or a damaged speed saw. Keep packaging materials out of reach of children. There is risk of suffocation!
CHARGING THE BATTERY
Charge the battery before first use. In contrast to Ni-Cad or MH batteries Lithium-ion batteries do not have a memory effect. The capacity of other batteries decreases steadily but the capacity of Lithium-ion batteries does not decrease. The capacity remains constantly until the electronics interrupts discharging. Regardless of the charging condition, the battery can be charged at any time without damaging the cells.
If desired you can order a second battery under the item-no. 7051576.
-
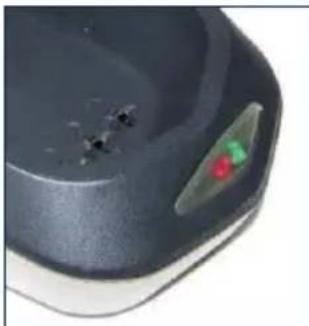
Connect the power cord of the quick charger with a wall socket. The red power control lamp (13) lights up.
-
Place the battery (10) into the quick charger. The charger fits only in one position into the charger.
-
The green charging control lamp (13) starts flashing and indicates that the battery is charged. After charging, the red LED turns off and the green LED is lighting continuously. Please note that during charging process, battery and charger heat up slightly. The quick charger needs approx. 1 hour to fully charge the empty battery. After charging process the green charge continuously.
-
Remove the battery and unplug the power cord from the wall socket.
CHECKING BATTERY CAPACITY
By pressing the button (|A) on the battery you can detect the battery capacity.
• If the red LED is on, the battery is discharged.
- If the red and the orange LEDs light up, the battery is half-empty.
• If all three LEDs light up, the battery is fully charged.
- If none of the LEDs light up, the battery is totally discharged and has to be charged immediately.

INSERTING AND REMOVING THE BATTERY
- Slide the battery into the bottom side of the speed saw until the locking clip locks audibly and visibly. Make sure the battery can be inserted easily. Do not force the battery.
- For removing, first press the locking clip down and slide the battery in an upright direction out of the machine.
INSTALLING THE SAW BLADE
Always use sharp blades recommended by Batavia. When using dull blades the speed saw might stop frequently and a clean cut is not possible.
- Remove the battery from the toll before inserting the blade.
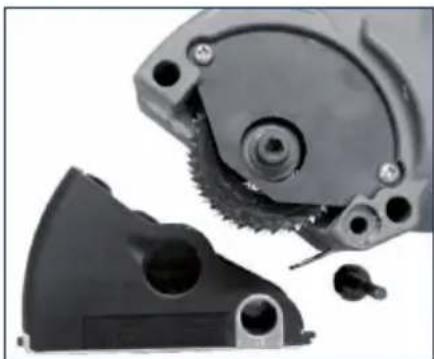
- Remove the plastic cap (B) on one side of the safety hood (2).
- Keep the driveshaft locking button (10) pressed and insert the included Allen spanner into the free end of the drive shaft. Loosen the screw by turning clockwise and remove the screw and the saw blade.
- Insert the new saw blade. The direction of the arrow on the saw blade must be in accordance with the arrow on the housing. Make sure the centre hole of the saw blade exactly matches the outer ring of the inner flange.
- Finally, check the correct position of the saw blade in its slot. It has to be parallel to the slot of the safety hood.

CUTTING DEPTH
- The depth of cut can be set in millimetres by adjusting the cutting depth limiter (|3).
- Unscrew the cutting depth limiter by turning clockwise and slide the depth limiter to the desired position. Fasten it when the end of the slide (|D) lines up with the desired depth figure on the scale.
- When cutting wood, the depth of cut should be set to slightly greater than the thickness of the material for best results.

- When cutting plastics the depth of cut should be set to slightly greater than the thickness of the material. If melting occurs, a greater depth setting will improve results.
- When cutting sheeting, the depth of the cut should be set to approximately 1 mm greater than the material thickness for best results.
- The depth can be set to the same as the material thickness when cutting wood or plastics to prevent marking of the surface below. This may result in a rough edge on the other side of the work piece.
MARKING THE CUTS
When making cut outs it is desirable to know exactly where the cut will start and stop to prevent unsightly over cutting. Indication numbers (|E), which correspond to the depth setting, are marked on both sides of the safety hood to show where the cut starts and stops.
- Mark the area to be cut out on the material to be cut. If the area is not a square or rectangle, separate start and finish lines may

have to be drawn. These are drawn from the start and finish point, at right angles to the line of cut.
-
To use the width indication system first set the cutting depth, for example, 9 mm and identify this number both on the sides of the safety hood.
-
Align the indication mark below the rearmost number (in this case 9) on the guard with the start
line on the material to be cut.
- Proceed with the cut until the indication mark below the forward number (in this case 9) aligns with the finish line on the material being cut.
DUST EXTRACTION
This saw is a powerful machine which produces a large amount of dust.
As the machine has a fully enclosed blade, forced dust extraction is particularly efficient. Dust extraction is particularly recommended when many cuts are carried out. Do not over adjust dust extraction to avoid breaks during cutting.
The enclosed dust bag, an industrial vacuum dust extractor or a vacuum cleaner for domestic use can be connected to the dust outlet nozzle of the machine, using the rubber sleeve for dust bag.
- Before using attach the dust bag (15) into the stepped end of the rubber sleeve (16) and the other end over the dust extractor flange (16) of the speed saw.
- Tape can be used to assist the rubber sleeve and the dust extractor flange, if required.
- Forced dust extraction and a dust mask should always be used when cutting hazardous materials such as hard woods, MDF or ceramics.
- Forced dust extraction is recommended when it is desirable to keep the working area clean.
- Forced dust extraction is essential if the material being cut is slightly damp.
CUTTING
This saw clamps the material to be cut between its base plate and the work surface, using a plunge action to ease the blade into the cut.
- Make sure the saw blade is correct for the material you want to cut.
- Fit the correct blade ensuring it is sharp and not damaged. Set the depth of cut.
- Place the material to be cut onto a flat surface such as a workbench, table or floor. Use a piece of scrap material underneath to prevent marking the work surface and prevent damage to the blade by the work surface by e.g. a concrete floor.
- Grasp the handle firmly with your hand so that it feels comfortable. Thumb or forefinger should be towards the front of the power switch. Do not cover any of the front or rear vents with your hand.
- To switch on the machine, push the ON/OFF switch (1) forward. When releasing the switch, the speed saw switches off.
- Rest the machine with its metal base plate onto the surface to be cut. For a full cut, ensure that the rear half of the base plate overhangs the work piece. Do not plunge the blade into the material.
- Switch on the machine, press the safety hood release button (19) and plunge the blade into the material slowly and gently, but firmly.
- Push the machine forwards along the line to be cut. Never draw the machine backwards.
- Very little force should be used to feed the machine along the cut. Excess force will cause operator fatigue and excessive wear to the blade and machine.
- Ensure that the base plate is always held flat on the material being cut. This is particularly important at the start or finish of a cut or if thin strips are being cut where the base plate is not fully supported.
FOLLOWING LINES
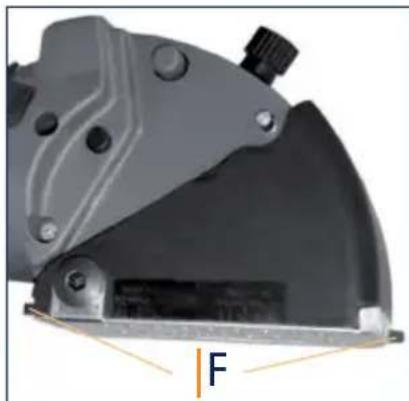
- Pointers (|F) at the front and rear of the safety hood allow a line to be followed when cutting.
- For more accurate and neater cutting a metal ruler, held with the free hand, can be followed. To position the ruler draw a second line 12 mm to the left of the cutting line or 37 mm to the right of the cutting line.
CUTTING DIFFICULT OR ABRASIVE MATERIALS
• Practice using the machine by cutting wood before attempting to cut anything tougher.
- When cutting tougher material, such as plastics, more force is required to hold the work piece and clamping may be required.
- Do not cut materials that produce toxic dust or fumes such as PTFE or asbestos.
Sheet metal
• Always set the depth adjustment to at least 1 mm greater than the material thickness to avoid the blade riding up over the surface. Scrap material is required underneath the work surface.
- Remove burrs and rust as these impede the feed across the material.
- Do not cut steel or galvanised steel.
Ceramic Tiles, Slates, etc.
- Only use a blade specifically designed for the purpose. Always use with a suitable vacuum cleaner or dust extractor connected as the dust can be hazardous to the operator and prevent the safety hood from operating correctly.
- Applying masking or PVC tape to the base plate of the machine, or alternatively to the work piece can make cutting easier and avoid scratching the tile.
Plasterboard:
- This saw is only recommended for making occasional cut outs in plasterboard, and should only be used with a suitable vacuum cleaner or dust extractor connected. The dust can prevent the safety hood operating correctly.
- Although conventional machines such as keyhole saws or knives generally give excellent results, the speed saw is ideal if a particularly neat and dust free cut is required or if there is a danger of cutting pipes or cables.
CLEANING AND MAINTENANCE
- Before maintaining the speed saw, remove the battery.
- Regular cleaning is required for the safe operation of the machine, as an excessive build up of dust will prevent the machine operating correctly. The dust extract nozzle may block and require cleaning occasionally, especially if damp wood is cut.
- Remove the safety hood. Insert the included Allen spanner into the safety hood retaining nut (7) and unscrew the nut.
- Also remove the associated flange on the other side of the machine and remove the safety hood. Please note the right place
for the retaining nut and the associated flange in order to reattach correctly. Clean thoroughly with a small soft brush.
- Keep the ventilation slots of the speed saw free from dust and dirt.
- Store the speed saw in a dry and frost-free location
CHANGING THE SAW BLADE
Replacement saw blade can be ordered from Batavia under the item-no.:
5 pcs Set HSS Saw Blades 60 teeth – for delicate cuts, item-no. 7050875
5 pcs Set TCT Saw Blades 18 teeth – for ripping cuts, item-no. 7050859
5 pcs Set Diamond Saw Blades – for tiles, ceramics, etc., item-no. 7051634
• Always use a sharp blade recommended by Batavia.
- Beware when changing blades as they can become hot enough to burn.
- If the machine does not cut as well as expected or if it cuts very slowly or unsmooth the most common cause is a dull blade.
- Blades are consumable items.
TECHNICAL DATA
SPEED SAW
Type TMK-014
Rated Current 20 A
Rating Voltage 18 V
Depth of Cut o - 12 mm
Blade Mounting Hole 11 mm
Weight 1.5 kg
BATTERY
Voltage DC 18 V
Type Lithium Ionen
Capacity 1.35 Ah
Rated Energy Consumption 24.3 Wh
Charging in Time 1
Item-No 7051576
CHARGER
Type TMK-027-Coo1
Primary 230 V\~50 Hz 50 W
Secondary DC 22 V 1.4 A
DISPOSAL
Dear Customer, please help avoid waste materials.
If you at some point intend to dispose of this article, then please keep in mind that many of its components consist of valuable materials, which can be recycled. Please do not discharge it in the rubbish bin, but check with your local council for recycling facilities in your area.
VEILIGHEIDSINSTRUCTIES
CONTROLEREN VAN HET VERMOGEN VAN DE BATTERIJ
INZETTEN EN UITHALEN VAN DE BATTERIJ
EG-DECLARATION OF CONFORMITY GB
We, the Batavia GmbH, Blankenstein 230-1b, NL-7943PG Meppel, declare by our own responsibility that the product Speed Saw, TMK-014 Item-Nr. 7045891 is according to the basic requirements, which are defined in the European Directives 2004/108/EC Electromagnetic Compatibility (EMC) – 2006/42/EC Machinery and their amendments. For the evaluation of conformity, the following harmonized standards were consulted: 2004/108/EC – EN 55014-1:2000+A2, EN 55014-2:1997+A1, EN 61000-3-2:2000, EN 61000-3-3:1995+A1 und 2006/42/EC – EN 60745-1:2003+A1, EN 60745-2-5:2003, EN 60335-1:1994+A16, EN 60335-2-29:1996+A11.
Meppel, 24th of July 2009

CE-VERKLARING NL
DIESES PRODUKT HAT
2 JAHRE GARANTIE
THIS PRODUCT HAS GOT A 2 YEAR WARRANTY
DIT PRODUCT HEEFT 2 JAAR GARANTIE
CE PRODUIT A 2 ANS DE GARANTIE
Dear Client, if for any reason this product is not working, please ensure you contact our Client Service Centre. Ensure you have your original receipt of purchase. This warranty covers all defects in workmanship or materials in this Batavia product for a two year period from the date of purchase. The warranty does not cover any malfunction, or defect resulting from misuse, neglect, alteration, or repair.
Other European countries | Customer Services Monday till Friday from 8am until 4pm

00800 66477400


- NEDERLANDS
- PRÜFEN DER BATTERIEKAPAZITÄT
- EINSETZEN UND ENTNEHMEN DES AKKUS
- SCHNITTTIEFE
- TECHNISCHE DATEN
- SPEED SAW
- OPERATION
- PRODUCT FEATURES
- BEFORE FIRST USE
- CHARGING THE BATTERY
- CHECKING BATTERY CAPACITY
- INSERTING AND REMOVING THE BATTERY
- INSTALLING THE SAW BLADE
- CUTTING DEPTH
- MARKING THE CUTS
- DUST EXTRACTION
- CUTTING
- FOLLOWING LINES
- CUTTING DIFFICULT OR ABRASIVE MATERIALS
- SHEET METAL
- CERAMIC TILES, SLATES, ETC
- PLASTERBOARD
- CLEANING AND MAINTENANCE
- CHANGING THE SAW BLADE
- TECHNICAL DATA
- BATTERY
- CHARGER
- DISPOSAL
- VEILIGHEIDSINSTRUCTIES
- CONTROLEREN VAN HET VERMOGEN VAN DE BATTERIJ
- INZETTEN EN UITHALEN VAN DE BATTERIJ
- EG-DECLARATION OF CONFORMITY GB
- CE-VERKLARING NL
Brand : Batavia
Model : TMK-014
Category : Saw