
KVT-745DVD - Car DVD player KENWOOD - Free user manual and instructions
Find the device manual for free KVT-745DVD KENWOOD in PDF.
Download the instructions for your Car DVD player in PDF format for free! Find your manual KVT-745DVD - KENWOOD and take your electronic device back in hand. On this page are published all the documents necessary for the use of your device. KVT-745DVD by KENWOOD.
USER MANUAL KVT-745DVD KENWOOD
KENWOOD CORPORATION OOo] sirius# to rarrac PIRIUS
Contents Before Use . About discs Notes on playing MP3/WMA . Opening/Closing the Monitor and Power Switch Removing/Attaching the Protection Panel
2 English Mute Telephone + Mute Telephone TV Control (with the optional accessory TV Tuner connected only) + Displaying the TV Picture screen + Displaying the Easy Control Panel + Displaying the TV Control screen + Displaying the TV Menu screen + Seek Mode + Auto Memory + Manual Memory + Preset Select + Set Station Name + Direct Search SIRIUS Tuner Control <North Americ n sales only> (with the optional accessory SIRIUS Tuner connected only) + Displaying the Easy Control Panel + Displaying the SIRIUS Tuner Control screen + Displaying the SIRIUS Tuner Menu + Channel Search + Channel Memory + Direct Channel Search + Information Display HD Radio Control <North American sales only> {with the optional accessory HD Radio tuner connected only) , + Displaying the Easy Control Panel + Displaying the HD Radio Control screen + Displaying the HD Radio Menu screen + Seek Mode + Auto Memory + Manual Memory + Receive Mode + Title Display DAB Tuner control (with the optional accessory DAB tuner connected only). 48 + Displaying the Easy Control Panel + Displaying the DAB Tuner Control screen + Displaying the DAB Tuner Menu screen + Seek Mode + Auto Ensemble Memory + Service Preset Memory + Service Select + Language Filter + Search for Program Type + DAB Information + DAB Announcement Weather Band Tuner Control (with the optional accessory Weather Band Tuner connected only) … + Displaying the Easy Control Panel + Displaying the Weather Band Tuner Control screen Character Entry … + How To Use the Character Entry screen Source Select... + Displaying the Control screen + Displaying the Source Select screen Adjusting the Monitor Display Position and Quality + Displaying the Screen Control screen + Displaying the Angle Control screen Setup Menu Setup Menu + Displaying the Control screen + Displaying the Setup Menu screen Audio Set Up … + Displaying the Audio Set Up screen + Crossover Network Setup DVD Setup … + Displaying the DVD SETUP 1 screen + Displaying the DVD SETUP 2 screen + Language Setup + Parental Level Setup System Setup … + Displaying the System Set Up 1 screen + Displaying the System Set Up 2 screen AV Interface + Displaying the AV [/F 1 screen + Displaying the AV [/F 2 screen User Interface … + Displaying the User [/F 1 screen + Displaying the User [/F 2 screen + Touch Panel Adjust + Clock + Security Code Setup AMP Control <Function of KVT-815DVD> {with the optional accessory LX Power Amp connected only) . + Display the AMP Control screen SIRIUS Setup <North American sales only> {with the optional accessory SIRIUS Tuner connected only) . + Displaying the SIRIUS Set Up screen DAB Set Up (with the optional accessory DAB tuner connected only) . 78 + Displaying the DAB Set Up screen + Announcement Selection
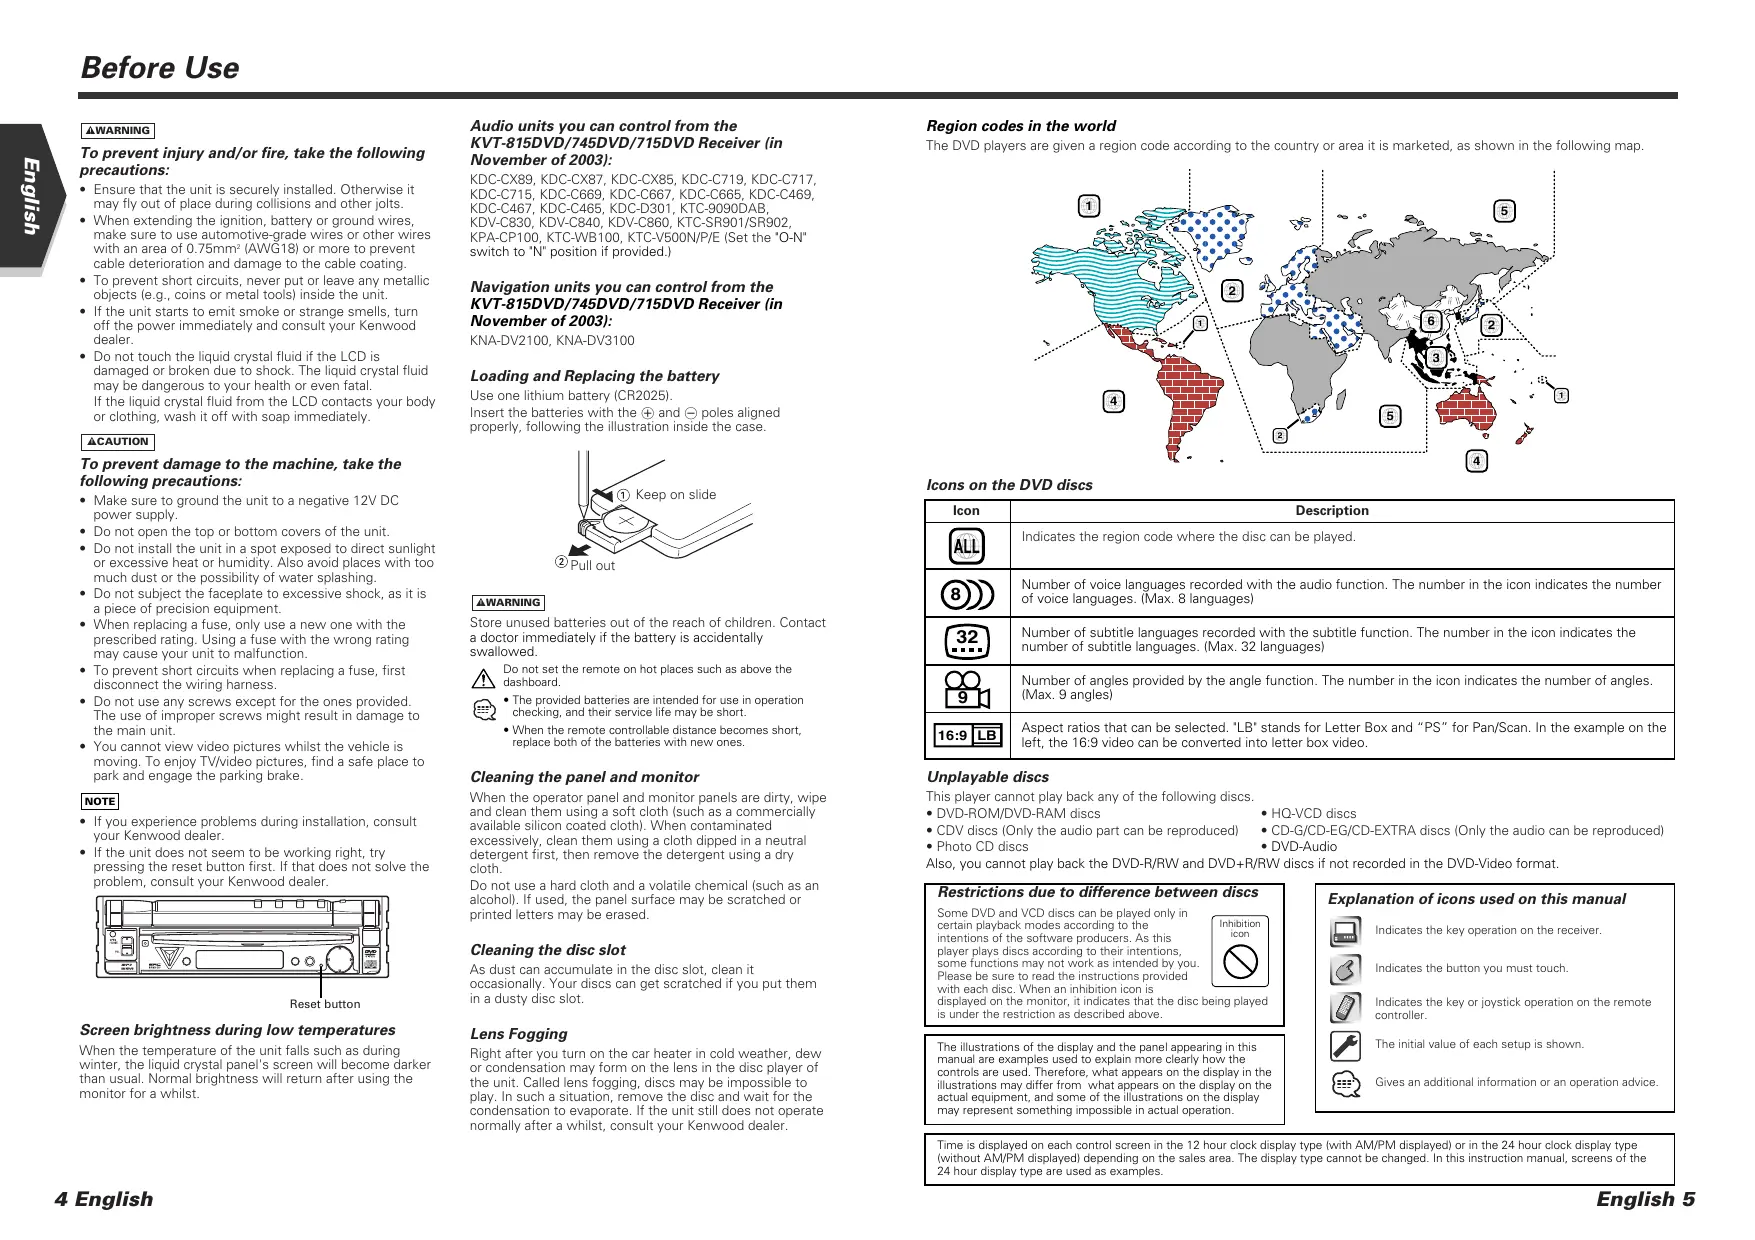
Before Use To prevent injury and/or fire, take the following precautions: + Ensure that the unit is securely installed. Otherwise it may fly out of place during collisions and other joits + When extending the ignition, battery or ground wires, make sure to use automotive-grade wires or other wires with an area of 0.75mm? (AWG 18] or more to prevent cable deterioration and damage to the cable coating + To prevent short circuits, never put or leave any metallic objects (e.g., coins or metal tools) inside the unit. the unit starts to emit smoke or strange smells, turn off the power immediately and consult your Kenwood dealer. + Do not touch the liquid crystal fluid if the LCD is damaged or broken due to shock. The liquid crystal fluid may be dangerous to your health or even fatal the liquid crystal fluid from the LCD contacts your body or clothing, wash it off with soap immediately. To prevent damage to the machine, take the following precautions: + Make sure to ground the unit to a negative 12V DC power supply. + Do not open the top or bottom covers of the unit. Do not install the unit in a spot exposed to direct sunlight or excessive heat or humidity. Also avoid places with too much dust or the possibilty of water splashing, Do not subject the faceplate to excessive shock, as it is a piece of precision equipment. When replacing a fuse, only use a new one with the prescribed rating. Using a fuse with the wrong rating may cause Your unit to malfunction + To prevent short circuits when replacing a fuse, first disconnect the wiring harness. + Do not use any screws except for the ones provided The use of improper screws might result in damage to the main unit + You cannot view video pictures whilst the vehicle is moving. To enjoy TVWideo pictures, find a safe place to park and engage the parking brake: + you experience problems during installation, consult your Kenwood dealer. +_I£the unit does not seem to be working right, try pressing the reset button first. If that does not solve the problem, consult your Kenwood dealer. Resot button Screen brightness during low temperatures When the temperature of the unit falls such as during winter, the liquid crystal panel's screen will become darker than usual. Normal brightness wsl return after using the monitor for à wihilst. 4 English Audio units you can control from the KVT-815DVD/745DVD/715DVD Receiver (in November of 2003): KDC-CX89, KDC-CX87, KDC-CX85, KDC-C719, KDC-C717, KDC-C715, KDC-C669, KDC-C667, KDC-C665, KDC-C469, KDC-C487, KDC-C465, KDC-D301, KTC-9090DAB, KDV-C830, KDV-C840, KDV-C860, KTC-SR901/SR902, KPA-CP100, KTC-WB100, KTC-VS0ON/P/E (Set the ‘O-N* switch to "N° position if provided.) Navigation units you can control from the KVT-815DVD/745DVD/715DVD Receiver (in November of 2003): KNA-DV2100, KNA-DV3100 Loading and Replacing the battery Use one lithium battery (CR2025). Insert the batteries with the ® and © poles aligned properiy, following the illustration inside the case @ Keep on slide Store unused batteries out of the reach of children. Contact 8 doctor immediately if the battery is accidentally swallowed Do not set the remote on hot places such as above the dashboard. + The provided batteries are intended for use in operation chedking, and thaï service fe may be short. + When the remote contrllable distance becomes short, replace both of the batteries with news ones, Cleaning the panel and monitor When the operator panel and monitor panels are dirty, wipe and clean them using a soft cloth (such as a commercially available silicon coated cloth}. When contaminated excessively, clean them using a cloth dipped in a neutral detergent first, then remove the detergent using a dry cloth Do not use a hard cloth and a volatile chemical (such as an alcohoil. If used, the panel surface may be scratched or printed letters may be erased Cleaning the disc slot As dust can accumulate in the disc slot, clean it occasionally. Your discs can get scratched if you put them in a dusty disc slot. Lens Fogging Right after you turn on the car heater in cold weather, dewr or condensation may form on the lens in the disc player of the unit. Called lens fogging, discs may be impossible to play. In such a situation, remove the disc and wait for the condensation to evaporate. If the unit stil does not operate normally after a whilst, consult your Kenwood dealer Region codes in the worid The DVD players are given a region code according to the country or area it is marketed, as shown in the following map Icons on the DVD discs Icon Description Indicates the region code where the disc can be played. of voice languages. (Max. 8 languages) [O)) Number of voice languages recorded with the audio function. The number in the icon indicates the number Number of subtile languages recorded with the subtitle function. The number in the icon indicates the number of subtitle languages. (Max. 32 languages) (Max. 9 angles) Number of angles provided by the angle function. The number in the icon indicates the number of angles. Aspect ratios that can be selected. LB" stands for Letter Box and “PS” for Pan/Scan. In the example on the left, the 16:9 video can be converted into letter box video. Unplayable dises This player cannot play back any of the following discs. + DVD-ROM/DVD-RAM discs + Photo CD discs + HO-VCD discs + CDV dises (Only the audio part can be reproduced} + CD-G/CD-EG/CD-EXTRA discs (Only the audio can be reproduced) + DVD-Audio Also, you cannot play back the DVD-R/RW and DVD+R/RW dises if not recorded in the DVD-Video format: Restrictions due to difference between discs Some DVD and VCD dises can be played ony in certain playback modes according to the Thon intentions of the software producers. Às this Ed player plays discs according to their intentions, Some functions may net work as intended by ou Please be sure to read the instructions provided with each disc. When an inhibition icon is displayed on the monitor, indicates that the disc being played is under the restriction as described above. The ilustrations of the display and the panel appearing in this manual are examples used to explain mare cleariy how the controls are used. Therefore, what appears on the display in the ilustrations may differ from what appears on the display on the actual equipment, and some of the Ilustratians on the display may represent something impossible in actual operation Explanation of icons used on this manual a Indicates the key operation on the receive. [@1 "récente pou mation (Os 1er arioie opte en veranoe conveller The initial value of each setup is shown. 24 hour display type are used as examples. Time is displayed on each control screen in the 12 hour clock display type lith AM/PM displayed) or in the 24 hour clock displey type {without AM/PM displayed) depending on the sales area. The display type cannot be changed. In this instruction manual, screens of the English 5
About discs Handling discs + Don't touch the recording surface of the disc. + CD-R/RW, DVD-R/RW, and DVD+R/RW are easier to damage than a normal music CD. Use a CD-R/RW, DVD- R/RW, or DVD+R/RW after reading the caution items on the package etc. + Don't stick tape etc. on the disc. Also, don't use a disc with tape stuck on it When using a new disc the disc center hole or outside rim has burrs, use it after removing them with a ball pen etc.
Disc accessories Don't use disc type accessories. Disc cleaning Clean from the center of the disc and move outward.
6 English Removing discs When removing discs from this unit pull them out horizontally Discs that can't be used + Discs that aren't round can't be used. D @ + Discs with coloring on the recording surface or that are dirty can't be used ‘This unit can only play the CDs with LES LE I may not correctiy play discs which do not have the mark. A CD-R or CD-RW that hasn't been finalized can't be played. (For the finalzation process refer to your CD- R/CD-RW writing software, and your CD-R/CD-RW recorder instruction manual.) Disc storage + Don't place them in direct sunlight (On the seat or deshboard etc.) and where the temperature is high. + Store discs in their cases. Notes on playing MP3/WMA This unit can play MP3 (MPEG1, 2 Audio Layer 3) WMA. Note, however, that the MP3WMA recording media and formats acceptable are limited. When writing MP3/WMA, pay attention to the following restrictions. Acceptable media The MP3MVMA recording media acceptable to this unit are CD-ROM, CD-R, and CD-RW When using CD-RW, do full format not quick format to prevent malfunction. Acceptable medium formats The following formats are available for the media used in this unit. The maximum number of characters used for file name including the delimiter ("and three-character extension are indicated in parentheses + 1S0 9660 Level 1 (12 characters) + ISO 9660 Level 2 (31 characters) + Joliet (64 characters) + Romeo (128 characters) Up to 170 characters can be displayed in the long file name format, For a list of available characters, see the instruction manual of the writing software and the section Entering file and folder names below The media reproducible on this unit has the following limitations: + Maximum number of directory levels: 8 + Maximum number of files per folder: 255 + Maximum number of characters for folder name: 64 + Maximum number of folders: 100 MP3MMA written in the formats other than the above may not be successfully played and their file names or older names are not properly displayed Settings for your MP3/WMA encoder and CD writer Do the following setting when compressing audio data in MP3/VWMA data with the MP3/AWMA encoder. + Transfer bit rate: MP3: 8 —320 kbps MA: 48 —192 kbps + Sampling frequency: MP3: 32, 44.1, 48 kHz WMA: 32, 44.1, 48 kHz When you use your CD writer to record MP3/WMA up to the maximum disc capacity, disable additional writing. For recording on an empty disc up to the maximum capacity at once, check Disc at Once Play mode may not be possible when portions of the functions of Windows Media Player 9 or higher are used Entering ID3 tag The Displayeble ID3 tag is ID3 version 1.x. For the character code, refer to the List of Codes. A Eat 5 TM RETIRE ï Entering file and folder names The code list characters are the only file names and folder names that can be entered and displayed you use any other character for entry, the file and folder names are not displayed correctiy. They may neither be displayed correctiy depending on the CD writer used. The unit recognizes and plays only those MP3/VMA which have the MPSANMA extension [ MP3/ WMA) GA file vith a name entered vath characters net on the code list may not play correct. Writing files into a medium When a medium containing MP3/MW/MA data is loaded, the unit checks al the data on the medium. the medium contains a lot of folders or non-MPS/MVMA files, therefore, it takes a long time until the unit starts playing MP3/MWMA. In addition, it may take time for the unit to move to the next MP3ANMA file or a File Search or Folder Search may not be performed smoothly. ( Loscina such à medium may produce loud noise to damage the speakers. + Do no attempt to play a medium containing a norr MP3MMA file with the MP3MMA extension. ‘The unit mistakes non-MPS/MWMA files for MP3NVMBA data as long as they have the MP3AWMA extension + Do not attempt to play a medium containing non MP3ANMA. MP3/WMA playing order When selected for play, Folder Search, File Search, or for Folder Select, fles and folders are accessed in the order in which they were written by the CD writer. Because of this, the arder in which they are expected to be played may not match the order in which they are actually played. You may be able to set the order in which MP3/AWMA are to be played by writing them onto a medium such as a CD-R with their file names beginning with play sequence numbers such as "01" to ‘99', depending on your CD writer. English 7
Opening/Closing the Monitor and Power Switch Removing/Attaching the Protection Panel Open the monitor IOPEN/CLOSE] key Close the monitor Turn the power switch on Hold down the [SRC] key more than one second to turn it off + Do not touch the moving components when you are opening or closing the monitor. If done, you wil get hurt. + Do not ty to open or close the monitor by hand. + You can automatically open or close the monitor when you turn on or off the ignition key (see page 58). 2 te monitor mosement is stop y ne ai lever ar noter hate when the mon or pened is mouement is canceled by the safety function. If an obstacle is pinched by the monitor when closed, the monitor movement is also canceled by the safety function. If it has occurred, remove the obstacle and press the [OPEN/CLOSEI key again. 8 English Remove the protection panel Attach the protection panel Place the right end of the protection panel onto hooks and push it until clicked and locked Then, push the left end of the panel to lock it + ose the monitor tt then remove or at he protection panel (EE) « ar vou have removea te proton panel you cannot perte te rcoier + After you have removed the protection panel, you can flash the burglar alarm lamp (see page 74) English 9
KVT-815DVD/745DVD/715DVD Basic operations M When the monitor is open El [e] ER] Play Disc IDise insertion slot] A disc is played when you insert it Stop to Play Im] key Stops to play. Play/Pause Lu] key Pauses and replays a disc. Eject Disc LEJECT] key The disc is ejected. Switch Video Sources IV.SEL] key The video sources are switched each time you press the key.
M cc Ciears the video image when pressed more than ane second. When pressed again, the original image is redisplayed Volume Controls HU key Track/Station Selectors 1/1 key Selects a music or capter, track, or frequency. Band/Folder Selectors LFMJ/LAMI key Press the [FMI key to switch to the FM1/2/3 band or the next folder/disc. Press the [AM] key to switch to the AM band or the previous folder/disc. Attenuator/Loudness IATTI/ILOUD] key Attenuates the volume. Press it again to cancel muting, Press it for more than one second to turn the Loudness function on or off Htumed on, high and low tones are enhanced during low volume KVT-815DVD Small Display IDISP] key Switches to the Small Display. (see page 14)
Select Seek Mode LAUTO] key Selects the Seek mode. (see pages 24/88 for the <Seek Mode>) 6] Switch Audio Source/Power Supply 12 Screen Setup ISRCI key ISCREENI key The audio sources are switched each time you press Displays the Screen Setup or Angle Setup screen. (see the key. page 58) 53 Function va LFNC] key SU The video sources are switched each time you press 2 the key. MH When the monitor is closed CNRS TUNER or FD Radio
Y Switches the source that is output at the AV OUTPUT = terminal when it is pressed more than 1 second. 14 Switch Screen Mode La [MODE] key Cieurer Banner 7) The screen mode is switched. (see page 15)
15. Fast Forward/Rewind
M cs LFFJ/IREW] key Fast forwards / rewinds songs, chapters or tracks. Hold down more than 1 second to turn the power supply Off Push it again to turn power supply On. + The display turns on when you put the parking brëke, except for the navigation system. + You cannot rewind while playing MPSAWMA. 10 English English 11
Basic Operations of Remote Controller & Joysti 15 (DISC] {DvD] Select a folder or à disc. Enters your selection from the DVD Disc Menu mu 7 (DVD]IVCD] FM: Switches to TV, TV2 or VIDEO Returns ta the previous screen when the DVD/VCD (TUNER) Disc Menu is used. ES FM: Switches to the FM, FM2, or FM3 band He — D] # DVD] AM: Switches to the AM band. n = À Calls the Top menu of DVD Disc Menu. m Disc tx) 8 51 Switch Video Sources Selects a chapter, a track or a song (C2) IV.SELI key (When [is set to TV) 12 + 7 The video sources are switched each time you press [TV] Zoo the key. Select a channel. 13 à £ £ ITUNER] fa] {9 7 6 n Selects a station. LE] u “ (DVD] <<: Fast Backward (Rewind). The speed changes each El 3 time it is pressed. a as »>: Fast Forward. The speed changes each time it is 19 M cor pressed Fr} 5 [DVD] 1 [TVIITUNER] Po] Calis the DVD Disc Menu. CD — Ch: Call the stations from memory. GE “ (vo) 1 [DISC] Each time you press the button, the angle switches. Plays or pauses.
[2] “2 (DVD](VCD] LTVI TUNER]
Each time you press the button, the 20m ratio Selects the Seek mode. (see page 24/88 for the <Seek GE pi switches. Modes) 5 (vol & (DVD) Switches a subtitle language. a: Slow Backwward “ [DVD] »>: Slow Forward. KENWOOD Switches an audio language. Zi Attenuator AÈMOTE onto UT ATTI key Atienuates the volume Press it again to cancel muting 1] Remote Control Mode selector 4] Switches over the sound source each time it is Selects one of the following remote control modes. pressed. TV: TV source DVD: Builtin DVD/VCD/CD/MP3/WMBA player source AUD: Tuner source or attached disc changer/disc player source 5] Selects the Direct Search mode: (see pages 21/26/35/89 for <Direct Search> 2] Volume Control Adjusts the volume. 3 (DISCI (vo) An operation during DVD playback Stops to play the built-in disc player. IVCD] An operation during VCD playback IDISC] An operation during DVD, VCD, CD, MP3AWMBA or MD playback tv An operation during TV source [TUNER] An operation during FM/AM broadcasting source 12 English English 13
Switch Small Display (Function of KVT-815DVD) The Small Display screen mode changes each time the [DISP] key is pressed.
- Hold down the [DISP] key more than 1 second to switch to the Frequency display: 14 English Switch Screen Mode The Screen mode of the monitor changes each time the [MODE] key is pressed. Ê— IMODEI Key Full picture mode [FULL] Justify picture mode [JUST] Cinema picture mode [CINEMA] Zoom picture mode (ZOOM] Normal picture mode [NORMAL] + When the Menu, Easy Control screen, or Navigation is selected, it is shown in the ful-size display mode automatically. ‘Their Screen mode cannot be changed. +_ The Screen mode can be set for each of DVD/VCD, TV, and video images. English 15
Control during DVD Video or Video CD Playback Control during Video or Video CD Playback Various control screens appear when you play back a DVD Video (DVD) or a Video Displaying the DVD/VCD Playback screen You can use the following operations when displaying DVD/VCD images. =) Dre DVD playback screen Selects the previous chapter. ovovoco | [caps PET 00227 DVD Dise Menu Control Buttons Area LT AV. E Displays the Disc Menu Control buttons Ce a — (see page 20) Title Number Display Chapter Number Display Play Time Display Forward Chapter Search Area Selects the next chapter. Backward Chapter Search Area Information Display Button Area (see page 21) DVD VIDEO Tite 1 _Chaps VCD playback screen F = Scene/Track Number Display pvp ven Scene 25 Fa Lame Vice) Co) 5 Forward Scene/Track Search Area 5 gl Selects the next scene (when PBC is On) or track {when PBC is Off.
10) Backward Scene/Track Search Area
Selects the previous scene (when PBC is Oni or track (then PBC is Of
11) Zoom Control Button Area
Displays the Zoom Contral buttons (see page 21} 12 Information Display Button Area (see page 21) di! + For DVD/VCD playback, DVDIVCD picture selection, or controller key operations, see <KVT- 815DVD/745DVD/715DVD Basic Operations > (see page 10) + The information display is cleared automatically after approximately 5 seconds. Also, the information can be displayed automatically when it is updated (see page 71) 16 English CD (VCD) disc. Displaying the Easy Control Panel The Control Panel is displayed in a floating position of the DVDVCD screen. (=\MA Display of Easy Control Panel DVD VIDEO Title 1 Chap 3 Tr 0:05:321f} ss | MODE: FU LL AV-OUT: AV: INT] 13 Adjusts the volume. 54] Switches the source. 1 Stops to play. 1 Rewinds or fast forwards. 5] Chapter Search (DVD) Searches for a chapter. Scene/Track Search (VCD) Selects a scene (when PBC is On) or a track (when PEC is Off)
Plays or pauses. The Easy Control Panel display is cleared when you touch the center of image display area. English 17
Control during DVD Video or Video CD Playback Displaying the DVD/ VCD Control screen Plays a DVD/VCD using various functions. (=\A DVD/VCD Control screen [CI DU VIDEO gp —m—— ls:
18 English Adjusts the volume Ejects the disc from the butin disc player. Cals the Sound Effects Menu. (see page 80) Switches the source. Displays the Source Select screen when touched more than one second. (see page 571 Calis the Setup Menu. (see page 59) Fast Fonwards or Rewinds. Stops to play. When pressed twice, the disc is played from its beginning when you play it in the next time. Selects a chapter, a scene or a track. When the DD is paused, touch this button to start single-frame stepping, Plays or pauses. Slow Fonwards or Backwards. (during DVD playback
Turs the PBC function of VCD On or Off. (when VCD ver2.0 or SVCD is in use only) Switches the Repeat Play operations in the following sequence. DVD: Title Repeat, Chapter Repeat, Repeat Off VCD: Track Repeat, Repeat Off (Available when the PEC is off) Scrolls the display text Switches the play time display in the following sequence. DVD: Title, chapter, remaining titles VCD: Track, disc, remaining discs (Effective only when the PBC function is offl Title Number Display (DVD) Chapter/Scene/Track Number Display Play Time Display Appears when a disc is inserted Function Indicator English 19
Control during DVD Video or Video CD Playback DVD Disc Menu Selects an option from the DVD Disc Menu. a isplays the Disc Menu Control screen |é) [6] 255 Mg" Convl Burtons area (page 16) Calls the Menu Control. 2 Switches the picture angle: (during program playback only) Switches the caption language {during program playback only) Switches the voice language {during program playback only) Displays the Zoom Control screen. Clears the Disc Menu Control 20 English a Select Disc Menu options Disc Menu L&] nanucius D Calls the Menu. (during DVD playback only) 2 Returns to the Disc Menu Control screen. 3 Selects a menu option. 2 Enters your menu selection. © Returns to the previous menu screen © Displays the Top Menu D Ciears the Disc Menu Control Zoom Control [S] con x 011 et D Changes the zoom ratio at 4 levels (2 times, 3 times, 4 times, or off) each time you touch 2 Scrolls the screen in the direction you touch, 3 Returns to the Disc Menu Control screen © Ciears the Disc Menu Control VCD Zoom Control Direct Search Displays an enlarged VCD screen. a Displays the Zoom Control screen CA Zoom Control Button Area (page 161 Changes the zoom ratio at 4 levels (2 times, 3 times, 4 times, or off) each time you touch 2 Scrolls the screen in the direction you touch. 3 Clears the Zoom Control button. Information Display Displays the DVD and AV information. [6] The information is displayed for 5 seconds. Information Display Button Area {Page 16) You can search for a DVD/VCD chapter, scene or track by entering its number. C1 [Selects the Direct Search mode
The following items can be searched directly each time itis pressed DVD: Title, Chapter, Time, Direct number VCD {when PBC is On: Scene, Direct number VCD {when PBC is Off: Track, Time However, the direct search may not be supported for some discs. GENE go-© When playing back a VCD, enter a PBC screen number (if PBC is Oni or a track number (if PBC is off.
775 operston ons automate you do not operate within 10 seconds. English 21
Tuner Control Tuner Control Various control screens appear in the Tuner Source mode. Displaying the Easy Control Panel The Tuner Control Panel is displayed in a floating position of the selected picture El O Displaying the Easy Control Panel Adjusts the volume Switches the source. Switches the band {to AM or FM1/2/3) Tunes in a station Switches the Seek mode. (see page 24 for the <Seek Mode>) ER ‘Ses iecever tar operation see VT 815DVD/745DVD/715DVD Basic Operations > (see page 10) + The Easy Control Panel display is cleared when vou touch the center of image display area.
MODE: FU LL AV-OUT:AV- IN
TUNER _FM1 Preset 1 08.1 MHz 22 English Displaying the Tuner Control screen You can tune in a station using various functions.
5 Pa re ee Mouse FMI Preseti 98.1 MHz Displaying the Tuner Menu screen You can select menu options using various functions. |6] Sons Tuner Menu screen Adjusts the volume: Calls the Tuner Menu. Calls the Sound Effects Menu. (see page 80) 3] Switches the source. Displays the Source Select screen when touched more than one second. (see page 57)
1) Calls the Setup Menu. (see page 59)
5] Turns the Traffic Information function On or Off. (see <Traffic Informations, page 26) 12 Switches to the FM1/2/3 band 13 Switches to the AM band. 54] Tunes in a station. Use the <Seek Mode> {see page 24) to change the frequency switching 1 Switches between @xm to @mæ buttons and Function buttons to use. 18] Turns the CRSC function On or Off. (Only when receiving the FM broadcast) 1] Selects the Auto Memory mode {See page 24 for the <Auto Memory>) 18] Switches the Seek mode (see page 24 for the <Seek Mode>} 13 Selects the Program Service Name, Station Name, or Radio Text mode for text display, Scrolls the display text. When @m to @@ buttons appear, you can call up the stations from memory. For memory of broadcasting stations, see <Auto Memory (see page 24) or <Manual Memory> (see page 24) Seek Mode Indicator Selects options from various function menus 24 Returns to the Tuner Control screen. S The available functions vary depending on the model used (the tuner specifications and the broadcasting system that can be received English 23
Tuner Control Seek Mode Manual Memory Sets a station selection. The mode is switched each time you touch the button. AUTOI ] lunes in a station with good reception automatically [AUTO Z Tune in stations in memory one after another.
MANUAL _] Switches to the next channel manually. Auto Memory Stores stations with good reception in memory automatically. a Select a band you wish to store in memory
[&] es I @uu13 is not shown, touch (x) a Start Auto Memory [6] LED CES Touch mins 0° ES Auto Memory terminates when 6 stations are stored or when all stations are tuned in GR) 12 operation ends automatic vou de not cperate within 10 seconds. 24 English Stores the current receiving station in memory. a Select a station you to store in memory C2 [Store in memory | Æ 2 El =- F eu to @æ are not shown, touch Lit) Continue to touch until the memory number appears Preset Select Set Station Name Lists and tunes in stations in memory one after the other. C1 [Call the Tuner Menu Call the Preset Select Menu Tunes in the displayed station Ifthe station name is displayed if it has been set Switches the band of the displayed station list Band Display. Returns to the Tuner Menu Switches the Station List display between the Program Service Name and SNPS {Frequency} Names a station. a Tune in a station you wish to name Clœmm— Ces erane ons [6] mu Coast sathamemose
CERTES For character entry details, see <Character Entry> (see page 56). (5 [Exit the Set Name mode
+ You can store up to 30 stations in memory. + You can set a station name only after you have applied the parking brake. English 25
Tuner Control Direct Search Traffic Information Tunes in a station when its frequency is entered. GEST VAE
CEE ge-© When you enter them, signal reception starts. Example: When you receive FM 92.1 MHz Coms) Example: When you receive AM 810 kHz Deoisio) The operation ends automatically if you do not operate within 10 seconds. 26 English When a traffic bulletin starts, any source is switched to the traffic information and it is displayed automatically. When the traffic bulletin starts.. The Traffic Information screen appears automatically. Traffic Information screen D Control the volume. 2 Calls the Sound Effects Menu. (see page 80) 5 Switches the source © Calls the Setup Menu. (see page 59) © Tums the Traffic Information function on or off. During reception of traffic information the adjusted volume is automatically remembered, and the next time it switches to traffic information it's automatically the remembered volume. Search for Program Type Radio Text A program is tuned when you set its program type. GENE C2 [Call the PTY Search Menu as ||
( Selects a program type. @ Scrolls the program type list ® Searches for the program type. Itis displayed when the Program Type is selected & Continue to touch more than 2 seconds, the currently receiving station is registered to have the selected program type. (The registered program type is displayed.) I vou touch it the program type registered in the currently receiving station is displayed. ® Returns to the Tuner Menu. a Select a program type GE … a Search for the program type
CD/MP3/WMA/Disc Changer Play Control Displaying the Easy Control Panel The CD/MP3WMA)Disc Changer Play Control Panel is displayed in a floating position of the selected picture. (=\M4 Display of Easy Control Panel During CD playback Br Es Ed GENRE es) During MP3WMA playback 28 English Adjusts the volume Switches the source. Stops to play the buit-in disc player. When a CD is played back on the built-in disc player: Rewinds or fast forwards Selects a song. Plays or pauses. When an MP3WMA is played back on the builtin disc player: Selects a folder. When a disc is played back on the disc changer: Selects a disc. + For CD/MPS/WMAJDisc Changer playback and receiver key operations, see <KVT- 815DVD/745DVD/715DVD Basic Operations > (see page 10) + The Easy Control Panel display is cleared when vou touch the center of image display area. Displaying the CD/MP3/WMA/ Disc Changer Control screen You can play the CD/MPSMNMA/disc changer using various functions. (=\MA CD Control screen DvD
D —ÿ#5::0 Crem a CD/MP3/WMA/Disc Changer Play Control You can call various control screens during CD/MP3/WMA/Disc Changer playback. During CD playback 3] Adjusts the volume. 1 Calls the CD Menu
11) Calls the Sound Effects Menu. (see page 80)
12 Switches the source. Displays the Source Select screen when touched more than one second. (see page 57) 13] Calls the Setup Menu. (see page 59)
4) Ejects the disc from the buil-in disc player
1 Fast Forwards or Rewinds. 1 Selects a track.
17) Plays or pauses.
18] Starts or stops Scan Play (that plays the beginning of each song one after the other) 13 Repeats to play (the present track).
20) Starts or stops Random Play (to play songs in
random order) 2 Selects the Disc Name (see <Set Disc Name>, page 83), Disc Text, or Track Text mode for text display. 2à Scrolls the display text. 23 Switches the play time display between Track, Disc, and Disc Remaining Time. 23 Track Number Display 3 Play Time Display Appears when a disc is inserted. Stops to play the built-in disc player. When pressed twice, the disc is played back from ‘5 beginning in the next time Function Indicator English 29
CD/MP3/WMA/Disc Changer Play Control MP3/WMA Control screen Ie DvpP ne 5 m2: 0) ae) — — ES D —— During MP3WMA play Calls the MP3MWMA Menu! Ejects a disc. Fast Forward. 8 EE Stops to play. When pressed twice, the disc is played back from its beginning in the next time. æ _P o:00:8 CH ES EE, or Per on Eur ee — les) Selects a song Plays or pauses. Selects a folder.
Starts or stops Scan Play (that plays the beginning of each song one after the other). Repeats to play (the present song E Starts or stops Random Play (to play songs of the present folder in random order) Selects the Folder name, File name, Title (ID3WMA tagl, Artist name (ID3WMA tag), or Album name {ID3 tag) for text display. Scrolls the display text. Switches the button display. Repeats to play the song of the present folder. Folder and File Number Display play Appears when a disc is inserted Play Time ë & & 6 8 E & Function Indicator 30 English Disc Changer/ CD player Control screen During play by the disc changer/ CD player Hi Calls the Disc Changer/ CD player Menu H Selects a track. Starts Fast Forward or Fast Rewind when it is held down 3 Selects a disc. (Function of Disc Changer) E Plays or pauses. E Starts or stops Scan Play (that plays the beginning of each song one after the other) E2 Repeats to play (the present track 3 Starts or stops Random Play (to play songs in random order) F3 Repeats to play disc (the present disc. (Function of Disc Changer) ES Starts or stops Magazine Random Play (to play songs of the disc changer in random order) {Function of Disc Changer) FE Switches the button display. F1 Selects the Disc Name (see <Set Disc Name>, page 33, Disc Text, or Track Text mode for text display. 8 Scrolls the display text F3 Switches the play time display between Track, Disc, and Disc Remaining Time. c Number Display (Function of Disc Changer) F1 Track Number Display Play Time Display Æ Function Indicator The funcions that cn be usedandhe information Hat ea de dspayed al fer depending on he models being connected. English 31
CD/MP3/WMA/Disc Changer Play Control Displaying the CD/MP3/WMA/ Disc Changer Menu screen You can select menu options using various functions. FX Selects options from various function menus. Æ Returns to the CD/MPSAWMA/Dise Changer Control CD Menu screen BL ovo co ETsnc +] ss anciens any depending on he source used. 32 English Set Disc Name Names a CD. a Play a CD you wish to name Call the CD/Disc Changer Menu [6] ve (3 [Select the Set Name mode position varies
> cepenang on ne dse vou are piyrg For character entry details, see <Character Entry> (see page 56) [5 [Exitthe Set Name mode &l = + You cannot name an MD or MP3/WMA disc. + Number of discs that can be stored in memory Built-in disc player: 10 External CD changer / player Varies depending on the CD changer / player. Refer to the CD changer / player manual. Directory List (during MP3/WMA play) The directory of an MP3WMA disc are listed for quick search. C1 [cal the MP3/WMA Menu Returns to the root directory Displays the next higher level of hierarchy. Displays a directory if the subdirectory has a directory. When you touch the directory, it opens. Displays a directory if the subdirectory has files without a directory. When you touch the directory, it opens and songs in the directory are played Displays the MP3/WMA files. When you touch a file, its song is played back ) Plays the selected directory. Scrolls the list C3 | Select a song Display the desired song and touch the file display. English 33
ALsun: (D Scrolls the list 34 English MP3/WMA play) disc changer) The ID3/WMA TAG information of MP3/WMA The discs loaded on the disc changer are listed file is listed. for quick disc selection. a Calls the Disc Changer Menu Call the Disc Select Menu D Plays the displayed disc 2 Selects the Disc Name or Disc Text mode for text display. D Scrolls the list {lt is not displayed when a disc changer having 6 or less discs is used.) [3 [Select the desired disc Touch the desired disc display. Direct Search Mute Telephone Mute Telephone Searches for a disc or a song when its number is entered. During play on the built-in disc player PTE ren somme
The following items can be searched directly each time it is pressed. CD: Track number, Total play time MPSMVMA: Folder, File ge-©
When searching for a song 1 & During play on an extern changer GREEN ge-©
When searching for a song VAE When searching for a disc: VAS The aperaion ends automatslyi vou do not ED sperate witin 10 seconds n dise player or disc When the telephone is called, the system is paused automatically. When the telephone is called... The Phone Call l'CALL') screen appears, and system is paused Phone Call ("CALL*) screen @ Returns to the previous source screen and restart the system to play. H you continue to listen the source audio during phone cal [6] us [= eV The system restarts to play while the phone call is continued. When the call ends... Hang up the phone. The system restarts to play. English 35
TV Control TV Control (with the op: Various control screens appear in the TV Source mode. nal accessory TV Tuner connected only) Displaying the TV Picture screen Various control screens appear in the TV Source mode TV Band Number Display Memory Number Display = Selects the Channel Number Display (e: É were Channel Up Area Increase the channel TV Picture screen Channel Down Area Decrease the channel. Band/Video Switch Area Switches to TV1, TV2 or VIDEO. Information Display Button Area Gperains, 2e AT-SIBVOPASEVON1SOVD Basic Operations» ce page 10 + he information spy is sera automataly ar approimaty 5 seconds As. 1he information ce be dplsyedautomstcaly when ii update ee page 7 Displaying the Easy Control Panel # Adjusts the volume The Control Panel is displayed in floating position of the [9] Switches the source. TV picture 1 Switches to Video (VIDEO) | 51 Switches the TV band (to TV1 or TV21 A 12 Calls up à channel 13] Switches the Seek mode Displaying the Easy Control Panel (see page 38 for the <Seek Mode>) GR) 1 E22y Cenrai Panel spy is lead when vou touch the center of image display area 36 English Displaying the TV Control screen You can tune in a TV station using various functions. 5 Adjusts the volume. 1} Calls the TV Menu. Gl 16, Calls the Sound Effects Menu. (see page 80) 7] Switches the source. Displays the Source Select screen when touched TV Control screen more than one second. (see page 57) 58] Calls the Setup Menu. (see page 59) 13 Switches to VIDEO & Switches to TV1 or TV2 Zi Select a channel Use the <Seek Mode> {see page 38) to change the channel tuning sequence. Z Switches between @m to @Em buttons and Function buttons to use. 23 Selects the Auto Memory mode (see page 38 for the <Auto Memory>) 24 Switches the Seek mode (see page 38 for the <Seek Mode>) When @æ to @m buttons appear, you can call up the channels from memory. For memory of broadcasting stations, see <Auto Memory> (see page 38) or <Manual Memory> (see page 38) Seek Mode Indicator Memory Number Display Displaying the TV Menu screen You can select menu options using various functions. |6] Sons ‘TV Menu screen Æ Selects options from various function menus. 2 Returns to the TV Control screen. The available functions vary depending on the model used (the tuner specifications and the broadcasting system that can be received English 37
TV Control Seek Mode Manual Memory Sets a TV station selection. The mode is switched each time you touch the button. AUTO1 ] Tunes in a station with good reception automatically [AUTO Z Tune in stations in memory one after another.
MANUAL | Switches to the next channel u manually. Auto Memory Stores stations with good reception in memory automatically. a Select a band you wish to store in memory (&] ei — Select the Auto Memory mode H us is not shown, touch (us) CE Er at [6] CD CCD) Touch mins 0° ES Auto Memory terminates when 6 stations are stored or when all stations are tuned in ne operation ends automate à you d not ED cost win 10 seconds 38 English Stores the current receiving channel in memory. h to store a Select a channel you memory | [6] me = nr ] GES (6) Fe to @m are not shown, touch CH) Continue to touch until the memory number appears Preset Select Lists and tunes in stations in memory one after the other. D [eniect a band vou wi oi (ES) = GEI 21 e37 (É! == (3 [Call the Preset Select Menu D Tunes in the displayed station the station name is displayed if it has been set 2 Returns to the TV Menu Set Station Name Direct Search Names a station.
é—— CS) CCD) CA Cents] (5 [és te Sertame mode
For character entry details, see <Character Entry> (see page 56) LS [Esitine set home mode | UC: + You can store up 10 20 stations in memory. + You can set a station name only after you have applied the parking brake. Tunes in a station when its channel number is entered. (EEE
When you enter a channel number, signal reception starts Exemple: When you receive Channel 06 ao) Direct Search ends automatically f you do not operate within 10 seconds: English 39
SIRIUS Tuner Control SIRIUS Tuner Control <North American sales only> (with the optional accessory SIRI Tuner connected only) Various control screens appear in the SIRIUS Tuner source mode. Displaying the Easy Control Panel The SIRIUS Tuner Control Panel is displayed in a floating position of the selected picture. El O Display of Easy Control Panel
ns MODE: FU LL AV-OUT: AVE: IN TE) 40 English 1] Adjusts the volume: 2] Switches the source. Switches the band. Tunes in a station. Switches the Seek mode. SEEK 1: Tunes channels one after the other. SEEK 2: Selects channels in memory one after the other. ED Écyien her opertons see <KVT- 815DVD/745DVD/715DVD Basic Operations > (see page 10) + The Easy Control Panel display is cleared when vou touch the center of image display area. Displaying the SIRIUS Tuner Control screen
Adjusts the volume Calls the SIRIUS Tuner Menu: Calls the Sound Effects Menu. (see page 80) Switches the source. Displays the Source Select screen when touched more than one second. (see page 57) Calls the Setup Menu. (see page 59) Tunes in a station. Switches the band Switches between em to @L buttons and Function button to use Starts or stops Channel Scan (that tunes channels one after the other) Switches the Seek mode: SEEK 1: Tunes channels one after the other. SEEK 2: Selects channels in memory one after the other. Changes the display from Song Title & Artist Name, Composer Name, Channel Name, to Category Name. Scrolls the display text When @æ to @æ buttons appear, you can call up the channel from memory. For memory of channel stations, see <Channel Memory> (see page 42) Seek Mode Indicator Selects options from various function menus Returns to the SIRIUS Tuner Control screen Q 2, SUS luner lune detle, see the Instruction Manual of SIAIUS Satellite Radio Tuner {optional accessory). English 41
SIRIUS Tuner Control Channel Search The categories and channels are listed for your channel selection. GENE [E] sus Start Channel Searching
The category list appears. Category Selection screen eBl Sirius (D Selects a category. @ Scrolls the list. @ Returns to the SIRIUS Tuner Menu 42 English a Select a category [6] The channel list of the selected category appears etc Channel Selection screen LLIETEES D Tunes in a channel. 2 Scrolls the list 3 Returns to the Category Selection screen. ® Returns to the SIRIUS Tuner Menu.
The selected channel is tuned etc Channel Memory Stores the current receiving channel in memory. a Select a channel you wish to store in memory CA Lt 1 Esnd LL _ _] F eu to @œm are not shown, touch (it) Continue to touch until the memory number appears Direct Channel Search Information Display A channel is tuned when you enter its number. C1 [Call the SIRIUS Tuner Menu 6] ee Display the Direct Search screen Direct Search screen Sirius
(D Enters a channel number. @ Returns to the SIRIUS Tuner Menu. @ Tunes in a channel when ou enter is number. (3 [Enter a channel number The tuned program information is displayed. Da [Call the SIRIUS Tuner Menu &] eee Display the Information screen
Information screen Sirius Channel Name: Artist Name. Song Titie: @ Displays the information (such as Channel Name, Artist Name, Song Title, Category Name, and Composer) @ Scrolls the information display. @ Returns to the SIRIUS Tuner Menu. English 43
HD Radio Control HD Radio Control «North American sales only> (with the optional accessory HD Radio tuner connected only) Various control screens appear in the HD Radio Source mode. Displaying the Easy Control Panel The HD Radio Control Panel is displayed in a floating position of the selected picture. [=\M Displaying the Easy Control Panel Adjusts the volume Switches the source. Switches the band (HD FM1/2/3, HD AMI. Tunes in a station. Switches the Seek mode. (see page 46 for the <Seek Mode>) ER ‘Ses iecever tar operation see VT 815DVD/745DVD/715DVD Basic Operations > (see page 10) + The Easy Control Panel display is cleared when vou touch the center of image display area. RE A HD RADIO _HDFM1 08.1 MHz 44 English Displaying the HD Radio Control screen You can tune in a station using various functions.
Adjusts the volume: Calls the HD Radio Menu Calls the Sound Effects Menu. (see page 80) Switches the source. Displays the Source Select screen when touched more than one second. (see page 57) Calls the Setup Menu. (see page 59) Switches to the HD FM1/2/3 band Switches to the HD AM band Tunes in a station. Use the <Seek Mode> {see page 46) to change the frequency switching Switches between sm to @mæ buttons and Function buttons to use. Selects the Auto Memory mode {See page 46 for the <Auto Memory>) Switches the Seek mode: (see page 46 for the <Seek Mode>} Switches between Station Name and Song Title display modes. Scrolls the display text. When @æm to @æ buttons appear, you can call up the stations from memory. For memory of broadcasting stations, see <Auto Memory> (see page 46) or <Manual Memory> (see page 46) Seek Mode Indicator Selects options from various function menus Returns to the HD Radio Control screen ( Fo" HD Radio funation details, see te Instruction Manual of HD Radio tuner (optional accessory) English 45
HD Radio Control Seek Mode Manual Memory Sets a station selection. (&l= # is not shown, touch FREE The mode is switched each time you touch the button. AUTOI ] lunes in a station with good reception automatically AUTOZ ] Tune in stations in memory one after the other.
MANUAL | Switches to the next channel manually. Auto Memory Stores stations with good reception in memory automatically. a Select a band you wish to store in memory Select the Auto Memory mode |é| aus I @u3 is not shown, touch a Start Auto Memory [6] LD ED Touch mins 0° ES Auto Memory terminates when 6 stations are stored or when all stations are tuned in 46 English Stores the current receiving station in memory. a Select a station you to store in memory L_HUFM }L nU AM } (e: CRD CES) GE Z F eu to @æ are not shown, touch ER] Continue to touch until the memory number appears Receive Mode Title Display The digital or analog program is selected and received. GENE CEE HD Radio D rene O)
ive ge Cor, —, D Switches the Receive mode. 2 Receive mode Display.
5) Returns to the HD Radio Menu
[3 [Select the Receive mode
AUTO: … Automatically switches between the Digital and Analog Receive modes depending on the broadcasting type. If programs are broadcasted in both modes, the digital program is received. Also, if a program is received in the Ball Game mode (the non-displayed broadcast programi, the analog program is automatically received DIGITAL: Receives the digital program only. ANALOG: Receives the analog program only. An information about the received song is displayed. CLssonsonn 7 [E] sus a Display the Title screen
Title screen @ Displays the information. @ Scrolls the information display. @ Returns to the HD Radio Menu. English 47
DAB Tuner control B Tuner control (with the optional accessory DAB tuner connected only) Various control screens appear in the DAB Tuner source mode. Displaying the Easy Control Displaying the DAB Tuner Panel Control screen Adjusts the volume Adjusts the volume: The DAB Tuner Control Panel is displayed in a floating 8] Calls the DAB Tuner M alls the uner Menu! You can select the Ensemble and services using various Switches the source. position of the selected picture. functions. [=\M Display of Easy Control Panel Switches the band (to DAB1/2/3) Calls the Sound Effects Menu. (see page 80) Selects a service LH 1] Switches the source. Selects the Ensemble Displays the Source Select screen when touched more than one second. (see page 57) Switches the Seek mode. (see page 50 for the <Seek Mode>) DAB Tuner Control screen 11] Calls the Setup Menu. (see page 59) 12 Switches the band (to DAB1/2/3).
- For system key operations, see <KVT- 815DVD/745DVD/715DVD Basic Operations > (see page 10) + The Easy Control Panel display is cleared when vou touch the center of image display area. 13 Selects a service. 54] Selects the Ensemble 5 Switches between @sm to @Em buttons and Function button to use 15 Selects the Auto memory mode. 220.094MH2 (see page 50 for the <Auto Ensemble memory>} 1 Switches the Seek mode (see page 50 for the <Seek Mode>} Changes the display between Ensemble label, PTY. label, Component label, Region label, and Audio quality. 13 When @&D to @EMD buttons appear, you can cal a service from memory. Seek Mode Indicator Selects the primary or secondary operation. Displaying the DAB Tuner Menu screen You can select menu options using various functions. 2 Selects options from various function menus 3 Returns to the DAB Tuner Control screen. C: CO (A Fs'DA8 Tuner huntion detis, 586 ie Inatruton Manuel of DAB Tuner (optional access). DAB Tuner Menu screen 48 English English 49
DAB Tuner control Seek Mode Service Preset Memory A service selection method can be set. (&l= il is not shown, touch EE The mode display is switched each time you touch the button AUTOT }. Tunes in an ensemble with good reception automatically
(CAUTOZ ] Selects services in memory one after another.
MANUAL | Switches to the next channel uw manually. Auto Ensemble Memory An ensemble with good reception is stored in memory automatically. D [ete a band vou iso store in memor | (S\ == [6] I @u3 is not shown, touch a Start Auto Memory [6] LD ED Touch mins 0° ES Auto Memory terminates when 6 ensembles are stored or when all ensembles are tuned in 50 English The current receiving service is stored in memory. a Select a service you wish to store in memory Fe to @m are not shown, touch FE] Continue ta touch until the memory number blinks: once. Service Select Language Filter The service list ofthe currently receiving ensemble is displayed for your selection. C1 [Call the DAB Tuner Menu Call the Service Select Menu LUE ae NTe © BTS me
ex Servies Nine = See — | Cam sresnene—) D Selects a service. 2 Scrolls the service list. 3 Returns to the DAB Tuner Menu [3 [Select a sen
The languages are list for your selection. Qi oureDas rene 7 [ES] sus a Call the Language Filter Menu Language English =, genes, en] (D Selects a language Searches for the selected language. @ Returns to the DAB Tuner Menu. a Select a language you wish to use a Search for the language English 51
DAB Tuner control Search for Program Type The services are received when you set its program type. C1 [Call the DAB Tuner Menu 6] ee CRE ces a (D Selects a program type. @ Searches for the program type. @ Displays the Language select screen @ Returns to the DAB Tuner Menu (:| Select a program type
52 English a Select a Language Display the Language select screen CAE Langua English ( Selects a Language @ Searches for the program type. @ Returns to the PTY Search Menu. Select a Language (81 Cut) (ka) GENE CA L'SHCH } DAB Information DAB Announcement The DAB information is displayed. C1 [Call the DAB Tuner Menu [E] «us Display the DAB Information screen Service Label Ensemble Label Component Label (D Displays the DAB information (such as Service lebel, Ensemble label, Component label, Audio quality, Region label, and Dynamic label. @ Scrolls the information display. @ Returns to the DAB Tuner Menu. When the Announcement you have turned on starts, any source is switched to the Announcement automatically. When the announcement starts… The Announcement screen appears automatically Announcement screen rattie News (D Adjusts the volume @ Calls the Sound Effects Menu. (see page 80) @ Switches the source. @ Calls the Setup Menu. (see page 59) English 53
Weather Band Tuner Control Weather Band Tuner Control Various control screens appear in the Weather Band Tuner source mode. ith the optional accessory Weather Band Tuner connected only) Displaying the Easy Control Displaying the Weather Band Panel Tuner Control screen 1] Adjusts the volume Adjusts the volume: The Weather Band Tuner Control Panel is displayed in à Z] Switches the source. floating position of the selected picture. | Calls the Sound Effects Menu. (see page 80) Switches the source. Displays the Source Select screen when touched + For system key operations, see <KVT- more than one second. (see page 57) 815DVD/745DVD/715DVD Basic Operations > Western CntolenEn Cas the Setup Menu. (see page 59) (see page 10) + The Easy Control Panel display is cleared when vou touch the center of image display area. Tunes in a station Display of Easy Control Panel omHz
54 English English 55
Source Select How To Use the Character Source Select Entry screen The source you wish to listen to can be selected quickly. Character Entry When you select the Set Disc Name mode or others, the following screen appears for character entry. Displaying the Control screen Character Entry screen = en ns kenwoov Press this key several times unit the Control screen appears. Control screen (D Shifts the cursor. @ Enters a space = — If vou erase a character, locate the cursor on it and touch this button. ( Enters characters. & Scrolls up or down the character button display,
Title 1 Chap 3 » TO:05:20 KENWooD Te Source Salt screen can be dispayed from Æ> 1e contrat screen o any source ® Exits the Character Entry mode and returns to the previous screen. You can enter characters only after you have applied the parking brake. Displaying the Source Select screen ST as Continue to touch until the Source Select screen appears. [1] Adjusts the volume F2] Select the source. [5] Returns to the Control screen previously displayed Source Select screen 56 English English 57
Adjusting the Monitor Display Position and Quality Adjusting the Monitor Display Position and Quality You can adjust the position and picture quality of the monitor. Displaying the Screen Control screen ] Brightness Control You can adjust the picture quality using the following Disabied if the Auto Dimmer is On keys Tint Control | Displayed for an NTSC system image on TV or (=) Video Color Control Displayed on the TV/Video screen only. Screen Control screen Contrast Control Black Level Adjustment Serena Con. © Displays the Adjust Monitor Position screen (see <Displaying the Angle Control screen>, page Fu00 DOOOOOOOON =>, 5e)
56. 9° DODOOOOOON 5 Auto Dimmer Setup
ORNE = When tumed ‘On', the display is dimmed Er El automatically when the ambient becomes dark. Returns to the previous screen. GR) 1 55227 Conroi sereen is solyes any en you have applied the parking brake.
Displaying the Angle Control screen You can set the monitor position and open/close speed. 8] Monitor Angle Adjustment Forward/Backward Monitor Position Adjustment CA (angle ‘1 Monitor Open/Close Setup When tumed ‘On', the monitor is opened or closed automatically when you turn on or off the ignition key. 12 Monitor Action Setup When set to "Quick, the monitor is opened quickly. Angle Control screen
13) Returns to the Screen Control screen.
4 Returns to the previous screen 58 English Setup Menu You can set up various receiver parameters. Displaying the Control screen
Press this key several times until the Control screen appezars. Control screen DVD VIDEO TC RE == == ET = Title 1 Chap 3 » TO:05:20 KENWooD GR) *oesn ca the same Setup Menu for the Genre screen of each source. Displaying the Setup Menu screen Setup Menu screen Adjusts the volume: Scrolls the Setup Menu. Calls each Setup Menu: Calls the Sound Effects Menu. (see page 80) Returns to the Control screen of the previous source. + Your setup on the Sound Effects menu is sdustedautomatealy accorng 1 your <AiO Set Up> (see page 60) on the Setup menu. We recommend you to complete the <Audio Set Up first, then set up the <Sound Effects menu + The available functions vary depending on the model used (the tuner specifications and the n) n) broadcasting system that can be received). English 59
Setup Menu Audio Set Up You can setup a speaker network, etc. Displaying the Audio Set Up screen
Speaker setup screen Front LER Standerd_ 2m; 60 English Adjusts the volume Returns to the Control screen of the previous. source. Calls the Sound Effects Menu. (see page 80) Calls the Setup Menu. Displays the X'Over setup screen. (see page 61) Sets up the front speaker type to fine-tune for the optimal equalizer curves. Standard: Setup for general diameter speakers Narrow: _ Setup for small diameter speakers Middle: Setup for small diameter woofer Wide: Setup for large diameter woofer Crossover Network Setup You can set a crossover frequency of speakers. CA ŒœAUTES® P605) X'Over setup screen em x'over @ THR = e THR =
OSUEERSSES Normal GEcmrs ce] Sets a Front High Pass Filter frequency, You can select any of the following frequency. Through, 40, 60, 80, 100, 120, 150, 180, 220 Hz Sets a Rear High PassFiter frequency. You can select any of the following frequency. Through, 40, 60, 80, 100, 120, 150, 180, 220 Hz Sets a Sub woofer Low Pass Filter frequency. You can select any of the following frequency. 60, 80, 120, Through Hz Sets the phase of subwoofer output The phase is reversed 180 degrees when set to "Reverse"
Setup Menu You can set up the DVD play. Displaying the DVD SETUP 1 screen Dynamic Range Controi D Micniont 00 62 English Adjusts the volume Returns to the Control screen of the previous source Calls the Sound Effects Menu. (see page 80) Calls the Setup Menu. Selects a disc menu language. *! (See <Language Setup>, page 64) Selects a subtile language." (See <Language Setup>, page 64) Selects an audio language. * (See <Language Setup>, page 64) Sets the dynamic range. (13) Wide) The dynamic range is reduced by changing from “Wide” to ‘Normal' and from Normal" to "Midnight" You can easy to listen à small sound when the dynamic range is narrow This is effective only when ou are using a Dolby Digital software Displays the DVD SETUP 2 screen S W is not shown, touch Ca or CE to display it Displaying the DVD SETUP 2 screen |é| DVD SETUP 2 screen Te me et Up. DVD SETUP 2
Sets an angle mark display. (2) On) Selects the screen display mode." (93 16:9) 16:9": Displays wide pictures. “4:3 LB": Displays wide pictures in the Letter Box format {having black stripes at the top and bottom of screen) “4:3 PS": Displays wide pictures in the Pan & Scan format (showing pictures cut at the right and left ends). Displays the Parental Lock screen.“ (43) Offl (See <Parental Level Setup>, page 65) Keep ‘Auto' to use Displays the DVD SETUP 1 screen
- Disabled when a DVD is being played. *: Disabled when the Zone function is On. English 63
Setup Menu System Setup You can set up the system parameters. Displaying the System Set Up 1 screen CA : System Set Up 1 screen jai Manuat (Em som Set Up 1 CN 66 English Adjusts the volume Returns to the Control screen of the previous source Calls the Sound Effects Menu. (see page 80) Calls the Setup Menu. Turns the key touch tone On or Off. ([4 On) Allows scrolling of text display on the Source Control screen. {3 Auto) “Auto”: Scrolls the screen automatically. “Manual”: Allows you to scroll the screen manually. Selects a remote control signal. (4 On When tumed "Off, the remote control of TV reception is rejected ] Displays the System Set Up 2 screen. N ESRI EIRE is not shown, touch a or LT to display it Displaying the System Set Up 2 screen é\= System Set Up 2 screen Red Disp ILLUMI Key Syne System Set 3] Sets a music CD playback. (3 1) “1: Automatically recognizes and plays back an MP3MMA disc, a DVD or a music CD. "2: Forcibly plays back a disc as à music CD. Select 2" if you wish to play a music CD having à special format or if vou cannot play a disc in the "1" position + You cannot play an MPSAWMANVCD disc in the °2* position. Also, you may not play some music: CDs in the "2" position. + Your setup is disabled when the disc is being played. 1 Selects an illumination color of receiver keys. (@ Red) “Green”: Green "Red: Red ‘] Selects an illumination color of the Small Display, {@ Blue) (KVT-815DVD only} Blue” A blue color display "Key Sync”: The same color as the this unit button illumination color 1 Displays the System Set Up 1 screen English 67
Setup Menu AV Interface You can set audio and visual (AV) interface parameters. Displaying the AV 1/F 1 screen Displaying the AV 1/F 2 screen Adjusts the volume Selects an AV source to be output at the AV CA 7 Returns to the Control screen of the previous |é| OUTPUT port. ([Z AV-IN) source 1] Selects speakers used for voice guidance of the 3] Calls the Sound Effects Menu. (see page 80) navigation system. (3 F-Left} *F-Left: … Uses the front left side speaker for AV UF 1 screen 1] Call the Setup Menu: AV L/F 2 screen voice guidance Selects a navigation system connection. ((4 RGB) ‘F-Right= Uses the front right side speaker for "RGB: Allows the Kenwood's Navigation System RS TE av Our voice guidance V- IN to connect via its interface cable. DES av-in FAI Uses both front speakers for voice PS CES “AV-IN':_ Allows a third-party navigation system to NAV_laterttniten guidance Da connect via the AV INPUT port. NAV Guide Volume f1] Adjusts the volume for voice guidance of the Normal "OFF" Must be used if no navigation system is qn 15 navigation system. (À) 19) connected. (The navigation display is Line Mute cancelled when the AV source is 12) Mutes the volume during voice guidance of the switched.) _— navigation system. (13) On) When turned ‘On', the voice level drops for voice guidance. Sets a name to be displayed when you select à system that is connected via the AV INPUT port _ (@ VIDEO) v GS pute en ua ce 7] Sets an image display of the system that is connected via the AV INPUT port. [4 Normali “Normal”: When the image source is switched, an image entered via the AV INPUT port is displayed Displays the AV [JF 1 screen "AUTO" When an image signal is entered via the AV INPUT port, this image is displayed! 8] Displays the AV 1/F 2 screen. K GREEN is not shown, touch a or Lt to display it 68 English English 69
Setup Menu You can set up user interface (IF) parameters. Displaying the User 1/F 1 Displaying the User 1/F 2 screen screen Adjusts the volume Sets an on-screen display of the navigation screen. {8 Autol 21 2] Returns to the Control screen of the previous 2] If you set to Auto”, an information is displayed for 5 Ce: source C: =— seconds when updated
3) Call the Sound Effects Menu. (see page 80) #1 Sets an on-screen display of the video playback
screen. (2 Autol User WF 1 screen 41 Calls the Setup Menu: User JF 2 screen w vou set to ‘Auto’, an information is displayed for 5 seconds when updated! Switches the wall paper. Displays the User 1/F 2 screen Sets an on-screen display of the DVD playback screen. (4 MANU) I you set to ‘Auto’, an information is displayed for 5 seconds when updated à" Ù is not shown, touch Ca or CE J to display it Sets an on-screen display of the TV screen {& Auto) (optional accessory) (when the optional accessory TV tuner is connected only} I vou set to ‘Auto’, an information is displayed for 5 seconds when updated
1) Displays the User l/F 1 screen.
70 English English 71
Setup Menu Touch Panel Adjust You can adjust the touch panel operations. a Display the Touch Panel Adjust screen CA nc
is not shown, touch 207 Cr to display it. ® Adjusts the volume. @ Returns to the Control screen of the previous source. @ Calls the Sound Effects Menu. (see page 80) @ Calls the Setup Menu. @ Alows you to start touch panel adjustment. Start to adjust the touch panel ® Cancels the adjustment and retums to the Touch Panel Adjust screen @ Resets to the initial status 72 English EE 7 S'E Touch the center of left lower and right upper when requested Clock Adjusts the clock time. a Display the Clock Screen
La or & 0 to display it is not shown, touch PM 11:18@ (D Adjusts the volume @ Returns to the Control screen of the previous source. ® Calls the Sound Effects Menu. (see page 80) & Calls the Setup Menu. ® Clock time display, © Adjusts hours. D Adjusts minutes. ® Sets "00" minute. Setup examples: 3:00--3:29 — 3:00 3:30-3:59 + 4:00 @ Sets the clock time in synchronous with the time data sent from the RDS station. (13) Off When tumed ‘On', the synchronous mode starts and the clock cannot be adjusted manually. CA =), English 73
Setup Menu Security Code Setup You can set a security code to protect your receiver system against theft. S When the Security Code function is activated, the code can't be changed and the function can't be released. Note, the Security Code can be set as the 4 digit number of your choice. a isplay the Security Code Setup screen
C2 or C2) to display it is not shown, touch @ Adjusts the volume. @ Returns to the Control screen of the previous source. 3 Cas the Sound Effects Menu. (see page 80) ® Calls the Setup Menu. @ Alows you to start security code registration. © Turs the DS] function on or off. Htumed “On', the burglar alarm lamp flashes when the protection panel is removed. ([4 On) If you have already completed the code registration, the @xam is not displayed. 74 English Start the security code registration Pass Word
D Enters a security code 2 Clears your entry. D Cancels the registration and returns to the Security Code Setup screen. © Enters the security code GES CA Cons Input a four-digit number. a Register your security code [@ co a Reenter the security code Reenter the same security code as that you have entered in Step 3 for confirmation. es If you enter a different security code, the screen retums to Step 3 [for the first code entry} C6] Register the security code again lé] ax Your security code has been registered If vou press the Reset button or if you disconnect your Receiver from the battery after the code registration, you need to enter the registered security code. See below for details: H you have pressed the Reset button or if you have disconnected the Receiver from battery... a Enter the correct security code CA ee» You must enter the same security code as that you have entered in Step 3 above. Enter the security code [El su Now, you can use your Receiver. English 75
Setup Menu unction of KVT-815DVD> AMP Control Sn the optional accessory LX Power Amp connected only) Sets the power amp connected via the LX bus. Display the AMP Control screen
Enters the set value. of GROS is not shown, touch C2) or C2) to display it AMP Control + For the model name of amp you can control from the system, see the amp's catalog. + For the options and values you can change and for the amp's operation when changed, see the amp's instruction manual. 76 English <North Ame: y SIRIUS Setup {with the optional accessory SIRIUS Tuner connected only) You can display the SIRIUS ID. Displaying the SIRIUS Set Up screen
Setup Menu B Set Up (with the optional accessory DAB tuner connected only) Announcement Selection The DAB reception can be set. Various announcement reception parameters can be set. Displaying the DAB Set Up (Disons the Amouneament also en screen Adjusts the volume Calls the Sound Effects Menu. (see page 80) Returns to the Control screen of the previous. source.
DAB Set Up screen ED announcement Calls the Setup Menu. Turs the DAB Priority On or Off CTERRERORENENE ED emmener 01 5] Tums the Dynamic Range Control function On or a— Er DR 0 y off. SERRES © 7 Tums the Regional Announcement function On or ai of. PTY Watch ot os Li 5) Sets a program type to be selected automatically Announcement Select CESR when the receiving ensemble starts D Adjusts the volume. DAB Set UP m 5) Displays the Announcement Selection screen. 2 Turns the Announcement Reception function On or Oft. ©: is not show 3 Scrolls the Announcement items. touch or Ce) to disply © Returns to the DAB Set Up screen Set the announcement parameters Traffie News: Traffic information Transport News: Time table information of public transportation services Warning Lower priority items than alarms {power failure, cutoff of water supply and others) etc. News: News flash Weather: Weather forecasting Event Event information Special Event: Undetermined event information Radio Info: Programme information, advance notice Sports news: Sports news Financial news: Financial news (Efron es 78 English English 79
Sound Effects Menu Sound Effects Menu You can set up the receiver sound effects. Displaying the Control screen [=\A Control screen DVD VIDEO
Audio Control 2 screen Adjusts the volume: Returns to the Control screen of the previous source. Calls the Setup Menu. (see page 59) Calls the Sound Effects Menu Adjusts the right and left volume balance. Adjusts the front and rear volume balance. Adjusts the volume of the present source based on the difference level of ariginal volume. Adjusts the subwoofer volume: If you have increased the volume first, then reduced it using the “Vol. offset’, the big sound may suddenly be generated when you switch to another source. Turns the Loudess contol function On or Off Htumed ‘On', high and low tones are automatically enhanced during low volume. (4 On) Displays the Audio Control 2 screen. Adjusts the bass boost of the B.M.S power amplifier (optional accessory) You may not set some models of power amp boost to "+18". See the catalog or instruction manual of power amplifier. Set the center frequency of bass boost you have set for the ‘Amp Bass” you set it to ‘Low’, the center frequency is dropped for 20 to 30% 13 Displays the Audio Control 1 screen.
Sound Effects Menu You can set up the equalizer. Displaying the Equalizer screen
Equalizer screen 82 English Adjusts the volume Returns to the Control screen of the previous source Calls the Setup Menu. (see page 59) Calls the Sound Effects Menu Selects an equalizer curve type. You can select any of the following equalizer curves. Natural” Selects items to be adjusted for tone curve setup. H tumed "Off, only Level can be setup for tone curves. Displays the Tone curve setup screen. (see page 83) Tone curve setup You can set a Tone curve. (fosse ons saunas
Tone setup screen D Adjusts the volume: 2 Bass adjustment items are displayed
5) Middle adjustment items are displayed
® Treble adjustment items are displayed! 5 Bass DC Extend settings Htumed ‘On’, it extends the bass center frequency to the low register by approximately 20% © Returns to the Equalizer screen. Select a frequency band you wish to adjust You can adjust the following frequency bands Bass: 60, 70, 80, 100/150 (When "Q Factor is 2.00) Hz Middle: 500, 1k, 1.5k, 2k Hz Treble: 10k, 12.8k, 18k, 17.5k Hz a Set a center frequency FREO |é] (ons jen GET Level (É! (5 [Set a Q factor Q Factor (&1 . You can set it up only when Bass or Middle is adjusted. C6] Close the Tone setup screen Return English 83
Sound Effects Menu Zone Control You can set the front and rear audio source. Displaying the Zone Control screen
TUNER Adjusts the volume Returns to the Control screen of the previous. source. Calls the Setup Menu. (see page 59) Calls the Sound Effects Menu Turns the Zone Function (that sets different source sounds for front and rear speakers) On or Off When tumed On, @ and @iB are shown. Sets the front and rear audio source separately (This button appears when the Zone function is On.} {non the rer speaker sound suitcheg the audio source that is output at the AV OUTPUT. terminal is also switched to the same source. However, if you have set the "Area" to ‘Reverse”, the audio source that is output at the AV OUTPUT. terminal is switched depending on the front sound source. Switches the front and rear audio sources. {This button appears when the Zone function is On.) Use ‘Reverse" to change over the front and rear audio sources. S Ithe zone function is turned on, the LE) QD 84 English button appears on each source control screen, with which you can adjust the volume balance between the front and rear sources. Glossary A type of disc which contains recording of audioWideo packaged media with high video and audio quality, such as a movie, featuring large recording capacity and digital signal processing capability.
A type of CD which contains the recording of moving images. It compresses image information by about 1/120 and audio information by about 1/6 and accommodates up to 74 minutes of recording in a disc with the same diameter as ordinary music CD of 12 cm Some VCDs do not have the P.B.C. compatibility and are capable of playback only, while some are P.B.C-compatible and are capable of various special playback control operations. This player can play both of these VCDs. MPEG: Moving Picture Expert Group (DVD, VCD) This is an international standard for digital video and audio compression and decompression in media Dolby Digital This is a digital audio compression technology developed by Dolby Laboratories. It is compatible with 5.1-channel surround audio as well as normal stereo (2-channel) audio and can accommodate a lerge amount of audio data efficientiy in a disc. DTS Name of a digital surround system developed by. Digital Theater Systems, Inc. Top menu/menu (DVD) Some DVDs display more than one title in à screen. This screen is referred to as the top menu The menu is the item display (menu screen) for use in setting operations. The menu can be recalled any time during playback to perform settings according to the current software, including the audio switching between Dolby Digital and PCM, switching of language used in the subtiles and spoken voice. Title number (DVD) The title is the largest unit of video and audio recorded in a DVD. It usually corresponds to a single movie of video software or an album {sometimes a piece of music} of music software. The numbers assigned to individual titles are referred to as the title numbers. Chapter number (DVD) The chapter is a section of video and audio recorded in a DVD. À title is composed of several chapters. The numbers assigned to individual chapters are referred to as the chapter numbers. Subtitles (DVD) Some DVD discs contains the recording of more than one subtitle language. This player allow you to select one of the recorded subitle languages during playback. Track number (CD, VCD) A track is also a section of video and audio recorded in a disc. The numbers assigned to individual tracks are referred to as the track numbers. With most of music CDs, a track is assigned to a piece of music. However, with a VCD, the sections of the contents do not always correspond to the assigned tracks. As (special) playback functions such as skipping and programming of ordinary CDs are based on track number data, such playback functions are sometimes impossible with some VCDs. P.B.C.: Play-Back Control (VCD) When a VIDEO CD caries ‘Play Back Control capable” or similar message on the disc or jacket, desired scenes and information can be played back in an interactive manner using a hierarchical structure while viewing the menu screens displayed on the TV screen. English 85
Troubleshooting Guide M General The power does not turn on. {+ The fuse has blown. After checking for short circuits in the wires, replace the fuse with one having the same rating The desired source is NOT selected although you pressed the SRC button. "An optional unit required to listen to each source is not connected yet + The RESET button is not pressed yet although the optional unit has been connected to the system. + The ‘O-N' switch of the optional unit is at the "O* position. +_A disc changer not supported by the system is used Noti g happens when the buttons are pressed. + The computer chip in the uni is not functioning normally. No television/video image appears. + The unis not connected to the parking brake detection switch The screen is dark. {+ The unit is in a location where temperature is low. +_The parking brake is not engaged! / A non-connected source is not selected. Press the reset button (see page 4) Set the "O-N° switch to the ‘N' position. Use a disc changer supported by the system (see page 4) Press the reset button on the unit (see page 4) Make proper connections according to <instrlation manual>. For safety reasons no televisionWideo images are displayed while the vehicle is moving. Engaging the parking brake wsl cause images to be displayed H the temperature of the monitor unit drops, the screen may appear darker when power is first turned on due to the characteristics of a liquid crystal panel. Wait a while after tumning power on for the temperature to rise. Normal brightness will return The screen does not darken when the vehicle's lights are turned on. The unit is set to auto dimmer. + The illumination wire has not been connected. {If manual dimmer is set) AM/FM r: jo reception is poor and/or there is noise. + The TV antenna and vehicle's radio antenna are too close. The remote controller does not operate. "The remote control mode selector is not set correctiy. 86 English When the unit is set to auto dimmer, it is not linked to the vehicle’ light switch. Make proper connections according to <instrlation manual>. Separate the two antennes as far as possible. Turn off the main unit Switch the remote control mode selector according to the source you select (see page 121 No sound can be heard, or the volume is low. +7 Atienuator is turned on + The fader or balance settings are set all the way to one side. +_ The input/output wires or wiring hamness are connected incorrectiy. The sound quai orted. is poor or + One of the speaker wires is being pinched by a screwr in the car. +_The speakers are not wired correctiy. Radio reception is poor. + The car antenna is not extended +_The antenna control wire is not connected! The memory is erased when the ignition is turned off. + The battery wire has not been connected to the proper terminal + The ignition and battery wire are incorrectiy connected! The sound/picture skips on a DVD/VCD/CD. [+ The dise is soratched or dirty. De A track will not play. Fe Random play has been selected De A VCD cannot be played using menus. + The VCD disc being played is not compatible with PBC The subtitle is not displayed. + The DVD disc being played does not contain the recording of subtitles. The voice (or subtitle) language cannot be changed. + The DVD disc being played does not contain the recording of more than one audio {or subtitlel language. Turn off Attenuator. Reset the fader and/or balance settings. Reconnect the inputfoutput wires or the wiring harness correctly. See the section on <instrlation manual. Check the speaker wiring, Reconnect the speaker wires s0 that each output terminal is connected to a different speaker. Pull the antenna out all the way. Connect the wire correctly, referring to the section on <instlltion manual Connect the wire correctly, referring to the section on <instlltion manual Connect the wire correctly, referring to the section on <instlltion manual Clean the dise, referring to the section on <Disc cleaning> (see page 6). Turn off random play. Menu playback is available only with VCD discs recorded with P.B.C. The subtitle cannot be displayed when the DVD disc being played does not contain the recording of subtitles. The voice (or subtile) language cannot be changed when the DVD disc being played does not contain the recording of more than one voice (or subtile) language. English 87
Troubleshooting Guide The viewing angle cannot be changed. + The DUD disc being played does not contain the recording of more than one angle. + The viewing angle cannot be changed when the DVD disc being played does not contain the recording of more than one angle + More than one viewing angle may be recorded only in limited sections in à disc. + You are attempting to switch the angle in a DVD section where more than one angle is not recorded! Playback will not start even after a title is selected. + A viewing restriction (RATING) has been set for the, + Check the viewing restriction level (RATING) setting. disc. P The voice or subtitle language selected in the ial setting is not played. + The DUD disc being played does not contain the recording of the selected voice or subtitle language. + Use a DVD disc containing the recording of the selected voice or subtitle language. M Disc soruce The dise control mode cannot be selected. + "No wire has been connected to the disc changer, + Connect the wire to the disc changer input terminal on the input terminal on the unit. unit ‘The specified disc does not play, but another one plays instead. + The specified CD is quite dirty. + The CD is upside-down Load the CD with the labeled side up. + The disc is loaded in a different slot from that } + Eject the disc magazine and check the number for the specified. / specified disc +_The disc is severely scratched. À + Try another disc instead Clean the CD. The sound skips. + Something is touching the disc changer. +_The CD is scratched or dirt. Remove whatever is touching it H skipping happens at the same place when the car is stopped, something with the CD is wrong. Clean the CD. The display shows that the changer is being played, but no sound can be heard. + The computer chip in the unit is not functioning + Press the reset button on the unit (see page 4) normally. The specified track not play. + Random play or magazine random play has been selected +_ Turn off random play or magazine random play. Track repeat, disc repeat, track scan, disc scan, r \dom play, and magazine random play start by themselves. {+ The seting is not cancelled + The settings for these functions remain on until the setting to off or the disc ejected, even if the power is turned off or the source changed. Can't remove disc. + The cause is that more than 10 minutes has elapsed since the vehicle ACC switch was tumed OFF + The disc can only be removed within 10 minutes of the ACC switch being turned OFF. If more than 10 minutes hes elapsed, tum the ACC switch ON again and press the Eject button. 88 English Æ MP3/WMA source Cannot play an MP3/WMA. Fe The media is scratched or dirty ©> + Clean the media, referring to the CD cleaning of the section on <About discs> (see page 6). The sound skips when an MP3/WMA is being played. + The media is scratched or dirty. Clean the media, referring to the CD cleaning of the section on <About discs> (see page 6). Record the media again or use another media. +_The recording condition is bad. / The MP3/WMA track time isn't displayed correctiy. There are times when it isn't displayed correctiy according to the MP3/WMA recording conditions, Can't display the ID3 tag information correctly. + Record is not made in conformity with the ID3 tag, + Record in conformity with the ID3 tag version 1.x version 1x Also, the display may be incorrect if an MP3 file uses the 1D3 tag v1.x standard and if this standard has been expanded after production of the machine software. The following messages are displayed when certain problems are occurring in your system. Take the recommended actions. Hot Error The protective circuit in the unit activates when the temperature inside the unit exceeds 60°C {(140°F), stopping all operation: Cool down the unit by opening the windows or turning on the air conditioner. As the temperature falls below 60°C (140°F), the disc will start playing again Hold Error The protective circuit in the unit activates when the temperature inside the automatic disc: changer exceeds 60°C (140°F), stopping all operation: © Cool down the unit by opening the windows or turning on the air conditioner. As the temperature falls below 60°C (140°F), the disc will start playing again Mecha Error The disc player is malfunctioning. © Eject the disc and tr inserting it again. Contact the Kenwood dealer if this indicator continues. biinking or the disc cannot be ejected. Dise Error The unplayable discs is inserted Read Error The dise is upside-down. © Load the disc with the labeled side up. The disc is quite dirty. © Clean the disc, referring to the section on <Diac cleaning> (see page 6). Region code Error The DVD software encoded for ather region code: Parental level Error The parental level is set to high levels. Error 07 — 67 The unit is malfunctioning for some reason © Press the reset button on the unit. If the ‘Error ##" code does not disappear, consult your nearest service center. English 89
Specifications Specifications subject to change without notice. Monitor Section Video secetion Picture size 6:95 inches (diagonal) wide Color system of external video input NTSC 154.1(WIx87.1{Himm External video input level (RCA jacks) 1Vp-p/750 Display system Transparent TN LCD panel External audio mx input level(RCA jacks) 1VI22kQ Drive system TFT active matrix system Analog RGB input 01Vp-p750 Number of pixels: 336,960 (480Hx234VxRGB) Effective pixels 99.99% Audio secetion Pixel arrangement RGB striped arrangement Maximum Power (Front&Rear) SOA Back lighting Cold Cathode Fluorescent Tube Full Bandwidth Power (Front&Rear) (at Less than 1%THD) 224 DVD Section Preout level (V) svr0ke D/A Converter 24Bit Preout impedance 800 Decorder Linear PCM/Dolby digital/dts/MP3/WMA Tone action Wow & Flutter Below Measurable Limit Bess. 100 Hz +10 dB Frequency response Middle 1 kHz 210 dB {Sampling frequency:96k) 20-44,000Hz Treble 10 KHz 210 dB {Sampling frequency:48k) 20-22,000Hz {Sampling frequency:44.1k) 20-20,000H7 General Total harmonie distortion (1k} 0.010% Signal to Noise ratio. 95dB (DVD 96k) Dynamic range: 90dB (DVD 96k) Operating voltage Current consumption Dimensions (WxHxD 144V (TIV-16V) 15A DISC Formet DVDideo/VIDEO-CD/CD-DA Main Unit Instlation 182mmx53mmx165mm Sampling frequency. 44.1KHz/48kHz, 96KHz 7-316x2-1/16x6-1/2inch Quantifying bit number 16/20/24bit Hideaway unit 205mmx30mmx 195mm 8-1/16x1-3/16x7-10/16inch FM Tuner section Operational temperature range -10°C-60°C Frequency range (200kH2). 87.9-107.9MHz Storage temperature range -20°C-85°C Usable sensitivity (S/N=30dB) 9.3dBf (0. 8uV/750) Weight: Main unit 2.2kg (4.9lbs) Quieting sensitivity (S/N=50d8) ….15.2dBf (1. 6uV/750) Hideaway unit 14kg (8.0lbs) Frequency response (3.0dB) 30Hz-15kHz SIN (dB) (MONO) 72dB Selectivity (*400kH2) = 80dB Stereo separation. 3748 (1KHz) AM Tuner section Frequency range (10KHz) 530kHz-1700kHz Usable sensitivity 28dBy Although the effective pixels for the liquid crystal panel is given as 89.99% or more, 0.01% of pixels may not light or may light incorrectiy. Use of controls or adjustments or performance of procedures other than those specified herein may result in hazardous radiation exposure. In compliance with Federal Regulations, following are reproductions of labels on, or inside the product relating to laser product safety. KENWOOD CORPORATON 29673, ISHIKAWA-CHO, HACHIOJ-SA1 TOKYO, JAPAN
Location : Bottom Panel FCC WARNING This equipment may generate or use radio frequency energy. Changes or modifications to this equipment may cause harmful interference unless the modifications are expressiÿ approved in the instruction manual. The user could lose the authority to operate this equipment if an unauthorized change or modification is made. This equipment has been tested and found to comply with the limits for a Class B digital device, pursuant to Part 15 of the FCC Rules. These limits are designed to provide reasonable protection against harmful interference in a residential installation. This equipment may cause harmful interference to radio communications, i is not installed and used in accordance with the instructions. However, there is no guarantee that interference wil not occur in a particular installation If this equipment does cause harmful interference to radio or television reception, which can be determined by tuming the equipment off and on, the user is encouraged to try to correct the interference by one or more of the following measures: + Reorient or relocate the receiving antenne. + Increase the separation between the equipment and receiver. + Connect the equipment into an outlet on a circuit different from that to which the receiver is connected + Consult the dealer or an experienced radio/TV technician for help. This Class B digital apparatus complies with Canadian ICES-003. [ DV is a trademark of DVD Format/Logo Licensing Corporation registered in the U.S., Japan and other countries. This product incorporates copyright protection technology that is protected by U.S. patents and other intellectual property rights. Use of this copyright protection technology must be autharized by Macrovision, and is intended for home and other limited viewing uses only unless otherwise authorized by Macrovision. Reverse engineering or disassembly is prohibited Manufactured under license from Dolby Laboratories. Dolby" and the double-D symbol are trademarks of Dolby Laboratories. “DTS" and'DTS 2.0 + Digital Out are trademarks of Digital Theater Systems, Inc. 90 English English 91