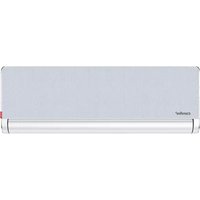
CF-XTW09 IU - Air-conditioner COMFEE - Free user manual and instructions
Find the device manual for free CF-XTW09 IU COMFEE in PDF.


| Product Type | Split Air Conditioner (Indoor Unit) |
| Model | CF-XTW09 IU |
| Brand | Comfee |
| Color | White |
| Cooling Capacity | 9,000 BTU/h |
| Heating Capacity | 9,000 BTU/h (Heat Pump) |
| Power Supply | 220-240 V, 50 Hz |
| Power Consumption (Cooling) | Approx. 900 W |
| Energy Efficiency Ratio (EER) | 3.0 (approx.) |
| Refrigerant | R32 |
| Indoor Unit Dimensions (W x H x D) | 770 x 280 x 220 mm |
| Outdoor Unit Dimensions (W x H x D) | 715 x 540 x 240 mm |
| Indoor Unit Weight | 9 kg |
| Outdoor Unit Weight | 23 kg |
| Operating Modes | Cool, Heat, Fan, Dry, Auto |
| Fan Speeds | 3 (Low, Medium, High) |
| Timer | 24-hour On/Off Timer |
| Sleep Mode | Yes |
| Remote Control | Included |
| Air Filter | Washable Mesh Filter |
| Filter Cleaning Interval | Every 2 weeks |
| Self-Diagnosis | Error Code Display |
| Safety Features | Auto Restart, Overheat Protection |
| Spare Parts Available | Filter, Remote Control, Indoor/Outdoor Units |
| Repairability Index | 7.5 / 10 (estimated) |
Frequently Asked Questions - CF-XTW09 IU COMFEE
User questions about CF-XTW09 IU COMFEE
0 question about this device. Answer the ones you know or ask your own.
Ask a new question about this device
Download the instructions for your Air-conditioner in PDF format for free! Find your manual CF-XTW09 IU - COMFEE and take your electronic device back in hand. On this page are published all the documents necessary for the use of your device. CF-XTW09 IU by COMFEE.
USER MANUAL CF-XTW09 IU COMFEE
CF-XT09A IU
CF-XT12A IU
Libeccio
natural_image
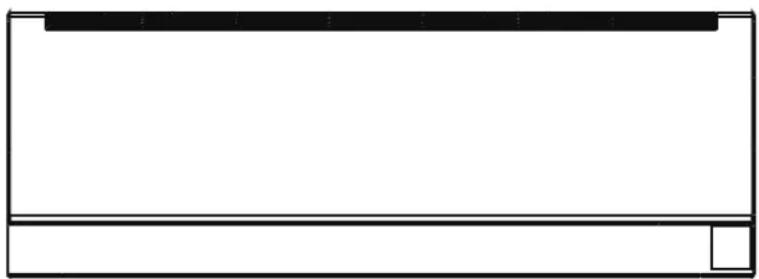
Blank rectangular frame with a black top bar and a small bottom rectangle (no text or symbols)
NOTA IMPORTANTE:
natural_image
Pure line drawing of a mechanical or architectural component without any text, numbers, or symbolsnatural_image
Simple line drawing of a rectangular frame with curved and angular lines, no text or symbols present.natural_image
Pure mechanical diagram showing a bracket with curved and angular features, no text or symbols presentnatural_image
Simple line drawing of a mechanical component with an arrow indicating rotation (no text or symbols)natural_image
Diagram showing a car interior with a patterned roof and a downward arrow indicating airflow or movement (no text or symbols)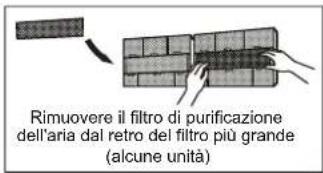
natural_image
Diagram showing a water tap and a grid-patterned container with a starburst pattern (no text or symbols)
ATTENZIONE
natural_image
Diagram of a 3D grid structure with a small arrow pointing upward (no text or symbols)natural_image
Simple line drawing of a house with wavy lines inside, enclosed in a rounded square frame (no text or symbols)natural_image
Technical line drawing of a device with internal components (no text or symbols)natural_image
Symbolic illustration of a crossed-out electrical hazard zone with lightning bolts (no text or labels)natural_image
Diagram of a 3D grid structure with hatched fill and an arrow indicating direction (no text or symbols)natural_image
Line drawing of a smartphone with internal components (no text or symbols)The image is too blurry to recognize any text content.
natural_image
Pure technical diagram of a mechanical assembly without any text, numbers, or symbolsnatural_image
Technical diagram of a mechanical assembly with labeled components and alignment indicators (no readable text or symbols)natural_image
Illustration of a hand using a tool to adjust a component, with no visible text or symbols.natural_image
Mechanical diagram showing a pipe fitting with a tool interacting with a valve (no text or symbols present)Collegare i tubi
6
natural_image
Pure electrical circuit lines without any symbolsnatural_image
Illustration of two hands holding a black object with a wavy line in the background (no text or symbols)natural_image
Diagram of a cable being inserted into a wire, showing sheath and sheath with insulation (no text or symbols)natural_image
Illustration of two hands holding a rectangular object with horizontal lines and arrows indicating motion or force (no text or symbols)Unità: mm (pollici)
natural_image
Technical line drawing of two mechanical components with spring-loaded arms (no text or symbols)
ATTENZIONE
natural_image
Simple line drawing of a bracket and vertical wall with a checkmark (no text or symbols)CORRETTO
natural_image
Simple line drawing of a mechanical joint or bracket with a cross symbol (no text or labels)NON CORRETTO
natural_image
Simple line drawing of a mechanical or electrical component with no text, numbers, or symbolsNON CORRETTO
natural_image
Simple line drawing of a door and wall junction with a cross symbol (no text or labels)NON CORRETTO
natural_image
Technical line drawing of a front-end air conditioner unit with fan and ventilation slots (no text or symbols)| Dimensioni unità esterna (mm)L x A x P | Dimensioni di montaggio | |
| Distanza A (mm) | Distanza B (mm) | |
| 681x434x285 (26.8"x17.1"x11.2") 460 (18.1") | 292 (11.5") | |
| 700x550x270 (27.5"x21.6"x10.6") 450 (17.7") | 260 (10.2") | |
| 700x550x275 (27.5"x21.6"x10.8") | 450 (17.7") | 260 (10.2") |
| 720x495x270 (28.3"x19.5"x10.6") | 452 (17.8") | 255 (10.0") |
| 728x555x300 (28.7"x21.8"x11.8") | 452 (17.8") | 302(11.9") |
| 765x555x303 (30.12"x21.8"x11.9") | 452 (17.8") | 286(11.3") |
| 770x555x300 (30.3"x21.8"x11.8") | 487 (19.2") | 298 (11.7") |
| 805x554x330 (31.7"x21.8"x12.9") | 511 (20.1") | 317 (12.5") |
| 800x554x333 (31.5"x21.8"x13.1") | 514 (20.2") | 340 (13.4") |
| 845x702x363 (33.3"x27.6"x14.3") | 540 (21.3") | 350 (13.8") |
| 890x673x342 (35.0"x26.5"x13.5") | 663 (26.1") | 354 (13.9") |
| 946x810x420 (37.2"x31.9"x16.5") | 673 (26.5") | 403 (15.9") |
| 946x810x410 (37.2"x31.9"x16.1") | 673 (26.5") | 403 (15.9") |
natural_image
3D mechanical component labeled 'Fibbia' showing a bracket and mounting holes (no other text or symbols)natural_image
3D mechanical component diagram showing a bracket with mounting holes and a central hole, no text or symbols present.natural_image
Simple line drawing of a mechanical lever or clamp device with no text or symbolsnatural_image
Illustration of a hand using a tool to lift a mechanical component (no text or symbols present)REQUISITI DI COPPIA
| Diametro esterno del tubo (mm) | Coppia di serraggio (N•m) | Dimensione svasatura (B) (mm) | Forma svasata |
| ∅ 6.35 (∅ 0.25") | 18~20(180~200kgf.cm) | 8.4~8.7 (0.33~0.34") | 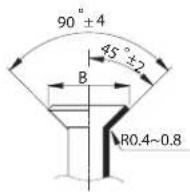 |
| ∅ 9.52 (∅ 0.375") | 32~39(320~390kgf.cm) | 13.2~13.5 (0.52~0.53") | |
| ∅ 12.7 (∅ 0.5") | 49~59(490~590kgf.cm) | 16.2~16.5 (0.64~0.65") | |
| ∅ 16 (∅ 0.63") | 57~71(570~710kgf.cm) | 19.2~19.7 (0.76~0.78") | |
| ∅ 19 (∅ 0.75") | 67~101(670~1010kgf.cm) | 23.2~23.7 (0.91~0.93") |

NON UTILIZZARE UNA COPPIA ECCESSIVA
natural_image
Line drawing of hands using a tool to adjust or install a mechanical component (no text or symbols present)natural_image
Technical line drawing of an air conditioner unit with internal compartments and ventilation slots (no text or labels)natural_image
Illustration of a hand holding a remote control panel with a gray arrow indicating left motion (no text or symbols)
NOTA PER BATTERIE
Display controllo wireless

Owner's Manual & Installation Manual

CF-XT09A IU
CF-XT12A IU
Libeccio
natural_image
Simple rectangular outline with a horizontal bar at the top and a small square at the bottom (no text or symbols)IMPORTANT NOTE:
Read this manual and SAFETY MANUAL(if any) carefully before installing or operating your new air conditioning unit. Make sure to save this manual for future reference.
Please check the applicable models, technical data, F-GAS(if any) and manufacturer information from the "Owner's Manual - Product Fiche" in the packaging of the outdoor unit. (European Union products only)
Table of Contents
Safety Precautions 03
Owner's Manual
Unit Specifications and Features....07
- Indoor unit display....07
- Operating temperature....08
- Other features ....09
- Setting angle of airflow....11
- Manual operation (without Remote)....11
Care and Maintenance....12
Troubleshooting....14
Installation Manual
Accessories....17
Installation Summary - Indoor Unit ....18
Unit Parts....19
Indoor Unit Installation....20
- Select installation location....20
- Attach mounting plate to wall....20
- Drill wall hole for connective piping....21
- Prepare refrigerant piping....22
- Connect drain hose....22
- Connect signal and power cables....23
- Wrap piping and cables....24
- Mount indoor unit....25
Outdoor Unit Installation....26
- Select installation location....26
- Install drain joint....27
- Anchor outdoor unit....27
- Connect signal and power cables....29
Refrigerant Piping Connection....30
A. Note on Pipe Length....30
B. Connection Instructions –Refrigerant Piping....30
1. Cut pipe....30
2. Remove burrs....31
3. Flare pipe ends....31
4. Connect pipes....31
Air Evacuation....33
- Evacuation Instructions....33
- Note on Adding Refrigerant....34
Electrical and Gas Leak Checks....35
Test Run....36
Packing and unpacking the unit ....37
Safety Precautions
Read Safety Precautions Before Operation and Installation Incorrect installation due to ignoring instructions can cause serious damage or injury.
The seriousness of potential damage or injuries is classified as either a WARNING or CAUTION.

WARNING
This symbol indicates the possibility of personnel injury or loss of life.

CAUTION
This symbol indicates the possibility of property damage or serious consequences.

WARNING
This appliance can be used by children aged from 8 years and above and persons with reduced physical, sensory or mental capabilities or lack of experience and knowledge if they have been given supervision or instruction concerning use of the appliance in a safe way and understand the hazards involved. Children shall not play with the appliance. Cleaning and user maintenance shall not be made by children without supervision (European Union countries).
This appliance is not intended for use by persons(including children) with reduced physical, sensory or mental capabilities, or lack of experience and knowledge, unless they have been given supervision or instruction concerning use of the appliance by a person responsible for their safety. Children should be supervised to ensure that they do not play with the appliance.

WARNINGS FOR PRODUCT USE
- If an abnormal situation arises (like a burning smell), immediately turn off the unit and disconnect the power. Call your dealer for instructions to avoid electric shock, fire or injury.
- Do not insert fingers, rods or other objects into the air inlet or outlet. This may cause injury, since the fan may be rotating at high speeds.
- Do not use flammable sprays such as hair spray, lacquer or paint near the unit. This may cause fire or combustion.
- Do not operate the air conditioner in places near or around combustible gases. Emitted gas may collect around the unit and cause explosion.
- Do not operate your air conditioner in a wet room such as a bathroom or laundry room. Too much exposure to water can cause electrical components to short circuit.
- Do not expose your body directly to cool air for a prolonged period of time.
- Do not allow children to play with the air conditioner. Children must be supervised around the unit at all times.
- If the air conditioner is used together with burners or other heating devices, thoroughly ventilate the room to avoid oxygen deficiency.
- In certain functional environments, such as kitchens, server rooms, etc., the use of specially designed air-conditioning units is highly recommended.
CLEANING AND MAINTENANCE WARNINGS
- Turn off the device and disconnect the power before cleaning. Failure to do so can cause electrical shock.
- Do not clean the air conditioner with excessive amounts of water.
- Do not clean the air conditioner with combustible cleaning agents. Combustible cleaning agents can cause fire or deformation.

CAUTION
- Turn off the air conditioner and disconnect the power if you are not going to use it for a long time.
• Turn off and unplug the unit during storms.
• Make sure that water condensation can drain unhindered from the unit. - Do not operate the air conditioner with wet hands. This may cause electric shock.
- Do not use device for any other purpose than its intended use.
- Do not climb onto or place objects on top of the outdoor unit.
- Do not allow the air conditioner to operate for long periods of time with doors or windows open, or if the humidity is very high.

ELECTRICAL WARNINGS
- Only use the specified power cord. If the power cord is damaged, it must be replaced by the manufacturer, its service agent or similarly qualified persons in order to avoid a hazard.
- Keep power plug clean. Remove any dust or grime that accumulates on or around the plug. Dirty plugs can cause fire or electric shock.
- Do not pull power cord to unplug unit. Hold the plug firmly and pull it from the outlet. Pulling directly on the cord can damage it, which can lead to fire or electric shock.
- Do not modify the length of the power supply cord or use an extension cord to power the unit.
- Do not share the electrical outlet with other appliances. Improper or insufficient power supply can cause fire or electrical shock.
- The product must be properly grounded at the time of installation, or electrical shock may occur.
- For all electrical work, follow all local and national wiring standards, regulations, and the Installation Manual. Connect cables tightly, and clamp them securely to prevent external forces from damaging the terminal. Improper electrical connections can overheat and cause fire, and may also cause shock. All electrical connections must be made according to the Electrical Connection Diagram located on the panels of the indoor and outdoor units.
- All wiring must be properly arranged to ensure that the control board cover can close properly. If the control board cover is not closed properly, it can lead to corrosion and cause the connection points on the terminal to heat up, catch fire, or cause electrical shock.
- If connecting power to fixed wiring, an all-pole disconnection device which has at least 3mm clearances in all poles, and have a leakage current that may exceed 10mA, the residual current device(RCD) having a rated residual operating current not exceeding 30mA, and disconnection must be incorporated in the fixed wiring in accordance with the wiring rules.
TAKE NOTE OF FUSE SPECIFICATIONS
The air conditioner's circuit board (PCB) is designed with a fuse to provide overcurrent protection.
The specifications of the fuse are printed on the circuit board ,such as :
T3.15AL/250VAC, T5AL/250VAC, T3.15A/250VAC, T5A/250VAC, T20A/250VAC, T30A/250VAC, etc.
NOTE: For the units using R32 or R290 refrigerant, only the blast-proof ceramic fuse can be used.
UV-C lamp(Applicable to the unit contains an UV-C lamp only)
This appliance contains a UV-C lamp. Read the maintenance instructions before opening the appliance.
- Do not operate UV-C lamps outside of the appliance.
- Appliances that are obviously damaged must not be operated.
-
Unintended use of the appliance or damage to the housing may result in the escape of dangerous UV-C radiation. UV-C radiation may, even in small doses, cause harm to the eyes and skin.
-
Before opening doors and access panels bearing the ULTRAVIOLET RADIATION hazard symbol for the conducting USER MAINTENANCE, it is recommended to disconnect the power.
- The UV-C lamp can not be cleaned, repaired and replaced.
- UV-C BARRIERS bearing the ULTRAVIOLET RADIATION hazard symbol should not be removed.
WARNING This appliance contains an UV emitter. Do not stare at the light source.

WARNINGS FOR PRODUCT INSTALLATION
- Installation must be performed by an authorized dealer or specialist. Defective installation can cause water leakage, electrical shock, or fire.
- Installation must be performed according to the installation instructions. Improper installation can cause water leakage, electrical shock, or fire. (In North America, installation must be performed in accordance with the requirement of NEC and CEC by authorized personnel only.)
- Contact an authorized service technician for repair or maintenance of this unit. This appliance shall be installed in accordance with national wiring regulations.
- Only use the included accessories, parts, and specified parts for installation. Using non-standard parts can cause water leakage, electrical shock, fire, and can cause the unit to fail.
- Install the unit in a firm location that can support the unit's weight. If the chosen location cannot support the unit's weight, or the installation is not done properly, the unit may drop and cause serious injury and damage.
- Install drainage piping according to the instructions in this manual. Improper drainage may cause water damage to your home and property.
- For units that have an auxiliary electric heater, do not install the unit within 1 meter (3 feet) of any combustible materials.
- Do not install the unit in a location that may be exposed to combustible gas leaks. If combustible gas accumulates around the unit, it may cause fire.
- Do not turn on the power until all work has been completed.
- When moving or relocating the air conditioner, consult experienced service technicians for disconnection and reinstallation of the unit.
- How to install the appliance to its support, please read the information for details in "indoor unit installation" and "outdoor unit installation" sections.
Note about Fluorinated Gasses(Not applicable to the unit using R290 Refrigerant)
- This air-conditioning unit contains fluorinated greenhouse gasses. For specific information on the type of gas and the amount, please refer to the relevant label on the unit itself or the "Owner's Manual - Product Fiche" in the packaging of the outdoor unit. (European Union products only).
- Installation, service, maintenance and repair of this unit must be performed by a certified technician.
- Product uninstallation and recycling must be performed by a certified technician.
- For equipment that contains fluorinated greenhouse gases in quantities of 5 tonnes of CO2 equivalent or more, but of less than 50 tonnes of CO2 equivalent, If the system has a leak-detection system installed, it must be checked for leaks at least every 24 months.
- When the unit is checked for leaks, proper record-keeping of all checks is strongly recommended.

WARNING for Using R32/R290 Refrigerant
- When flammable refrigerant are employed, appliance shall be stored in a well -ventilated area where the room size corresponds to the room area as specific for operation.
For R32 frigerant models:
Appliance shall be installed, operated and stored in a room with a floor area larger than 4m^2 . For R290 refrigerant models, appliance shall be installed, operated and stored in a room with a floor area larger than:
<=9000Btu/h units: 13m²
9000Btu/h and <=12000Btu/h units: 17m^2
12000Btu/h and <=18000Btu/h units: 26m^2
18000Btu/h and <=24000Btu/h units: 35m^2
- Reusable mechanical connectors and flared joints are not allowed indoors.
(EN Standard Requirements).
- Mechanical connectors used indoors shall have a rate of not more than 3g/year at 25% of the maximum allowable pressure. When mechanical connectors are reused indoors, sealing parts shall be renewed. When flared joints are reused indoors, the flare part shall be re-fabricated. (UL Standard Requirements)
- When mechanical connectors are reused indoors, sealing parts shall be renewed. When flared joints are reused indoors, the flare part shall be re-fabricated.
(IEC Standard Requirements)
- Mechanical connectors used indoors shall comply with ISO 14903.
European Disposal Guidelines
This marking shown on the product or its literature, indicates that waste electrical and electrical equipment should not be mixed with general household waste.
Correct Disposal of This Product
(Waste Electrical & Electronic Equipment)
This appliance contains refrigerant and other potentially hazardous materials. When disposing of this appliance, the law requires special collection and treatment. Do not dispose of this product as household waste or unsorted municipal waste.
When disposing of this appliance, you have the following options:
- Dispose of the appliance at designated municipal electronic waste collection facility.
- When buying a new appliance, the retailer will take back the old appliance free of charge.
- The manufacturer will take back the old appliance free of charge.
- Sell the appliance to certified scrap metal dealers.
Special notice
Disposing of this appliance in the forest or other natural surroundings endangers your health and is bad for the environment. Hazardous substances may leak into the ground water and enter the food chain.
Unit Specifications and Features
Indoor unit display
NOTE: Different models have different front panel and display window. Not all the indicators describing below are available for the air conditioner you purchased. Please check the indoor display window of the unit you purchased.
Illustrations in this manual are for explanatory purposes. The actual shape of your indoor unit may be slightly different. The actual shape shall prevail.
Functional Filter
(On Back of Main Filter - Some Units)
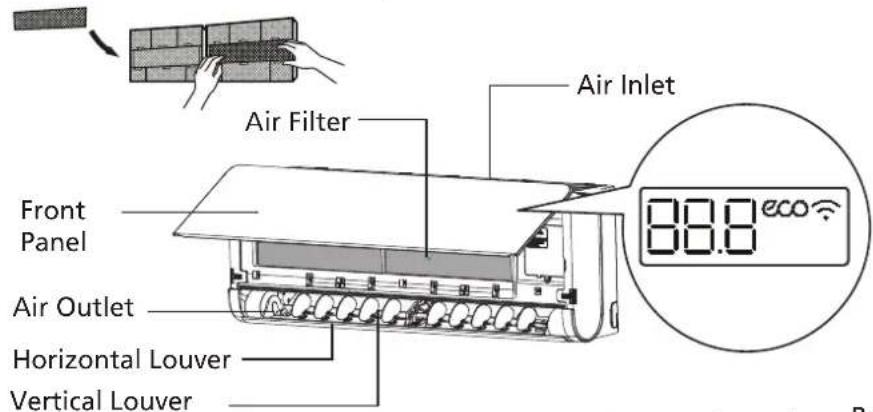
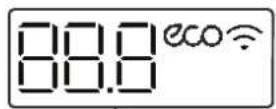
"88.8" Displays temperature, operation feature and Error codes:
"ON " for 3 seconds when:
- TIMER ON is set
- FRESH, SWING, TURBO, ECO, BREEZE AWAY, CASCADE or SILENCE feature is turned on
"OF " for 3 seconds when:
- TIMER OFF is set
- FRESH, SWING, TURBO, ECO, BREEZE AWAY, CASCADE or SILENCE feature is turned off
“df” when defrosting(for cooling & heating units)
“DL” when Active Clean feature is turned on
"FP " when 8°C(46°F) heating mode is turned on(some units)
“ ECO ” when ECO feature is activated(some units)
“ ✉ ” when wireless control feature is activated(some units)
Display Code Meanings
Operating temperature
When your air conditioner is used outside of the following temperature ranges, certain safety protection features may activate and cause the unit to disable.
Inverter Split Type
| COOL mode HEAT mode DRY mode | |||
| Room Temperature | 16°C - 32°C(60°F - 90°F) | 0°C - 30°C(32°F - 86°F) | 10°C - 32°C(50°F - 90°F) |
| Outdoor Temperature | 0°C - 50°C(32°F - 122°F) | -15°C - 24°C(5°F - 75°F) | 0°C - 50°C(32°F - 122°F) |
| -15°C - 50°C(5°F - 122°F)(For models with low temp. cooling systems.) | |||
| 0°C - 52°C(32°F - 126°F)(For special tropical models) | 0°C - 52°C(32°F - 126°F)(For special tropical models) | ||
FOR OUTDOOR UNITS WITH AUXILIARY ELECTRIC HEATER
When outside temperature is below 0°C (32°F), we strongly recommend keeping the unit plugged in at all time to ensure smooth ongoing performance.
Fixed-speed Type
| COOL mode | HEAT mode | DRY mode | |
| Room Temperature | 16°C-32°C (60°F-90°F) | 0°C-30°C(32°F-86°F) | 10°C-32°C (50°F-90°F) |
| Outdoor Temperature | 18°C-43°C (64°F-109°F) | -7°C-24°C(19°F-75°F) | 11°C-43°C (52°F-109°F) |
| -7°C-43°C (19°F-109°F)(For models with low-temp cooling systems) | 18°C-43°C (64°F-109°F) | ||
| 18°C-52°C (64°F-126°F)(For special tropical models) | 18°C-52°C (64°F-126°F)(For special tropical models) |
NOTE: Room relative humidity less than 80%. If the air conditioner operates in excess of this figure, the surface of the air conditioner may attract condensation. Please sets the vertical air flow louver to its maximum angle (vertically to the floor), and set HIGH fan mode.
To further optimize the performance of your unit, do the following:
- Keep doors and windows closed.
- Limit energy usage by using TIMER ON and TIMER OFF functions.
- Do not block air inlets or outlets.
- Regularly inspect and clean air filters.
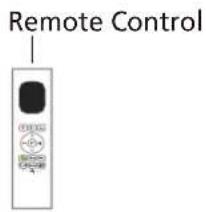
A guide on using the infrared remote is not included in this literature package. Not all the functions are available for the air conditioner, please check the indoor display and remote control of the unit you purchased.
Other Features
• Auto-Restart(some units)
If the unit loses power, it will automatically restart with the prior settings once power has been restored.
- Low Ambient Heating
- The advanced inverter technology to withstand the most extreme weather conditions. You can enjoy comfortable and heating air even when the outdoor temperature is as low as -30^(-22^) .
- Under heat mode, the hot air can blow vertically, warm your feet and whole room quickly.
- Low Ambient Cooling
With low ambient cooling function, the outdoor fan speed can be changed according to the condenser temperature and AC can run smoothly under the temperature as low as -15^(5^) .
- Wireless Control (some units)
Wireless control allows you to control your air conditioner using your mobile phone and a Wireless connection.
For the USB device access, replacement, maintenance operations must be carried out by professional staff.
- Louver Angle Memory(some units)
When turning on your unit, the louver will automatically resume its former angle.
• Air Fresh function (some units)
The ion generator is energized and will help to purify the air in the room.
• Anti-mildew (some units)
When turning off the unit from COOL, AUTO (COOL), or DRY modes, the air conditioner will continue operate at very low power to dry up condensed water and prevent mildew growth.
• Active Clean function(some units)
-- The Active Clean Technology washes away dust when it adheres to the heat exchanger by automatically freezing and then rapidly thawing the frost. A “pi-pi” sound will be heard. The Active clean operation is used to produce more condensed water to improve the cleaning effect, and the cold air will blow out. After cleaning, the internal wind wheel then keeps operating with hot air to blow-dry the evaporator, thus keeping the inside clean.
-- When this function is turned on, the indoor unit display window appears "CL", after 20 to 130 minutes, the unit will turn off automatically and cancel Active Clean function.
-- For some units, the system will start high-temperature cleaning process, and the temperature of air outlet is very high. Please keep away from it. And this would lead to the rising of the room temperature.
• Refrigerant Leakage Detection (some units)
The indoor unit will automatically display "ELOC" when it detects refrigerant leakage.
- Sleep Operation
The SLEEP function is used to decrease energy use while you sleep (and don't need the same temperature settings to stay comfortable). This function can only be activated via remote control. And the Sleep function is not available in FAN or DRY mode.
Press the SLEEP button when you are ready to go to sleep. When in COOL mode, the unit will increase the temperature by 1°C (2°F) after 1 hour, and will increase an additional 1°C (2°F) after another hour. When in HEAT mode, the unit will decrease the temperature by 1°C (2°F) after 1 hour, and will decrease an additional 1°C (2°F) after another hour.
The sleep feature will stop after 8 hours and the system will keep running with final situation.
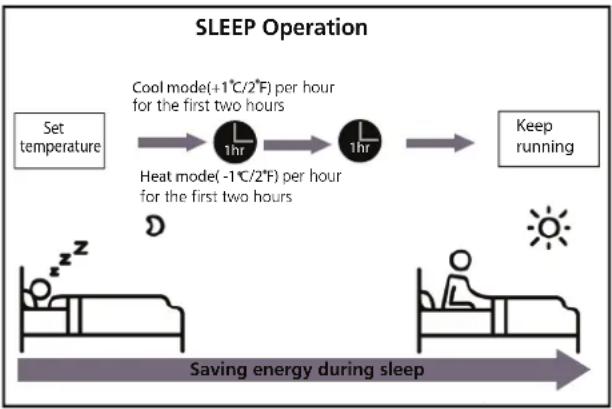
flowchart
graph LR
    A["Set temperature"] --> B["Cool mode(+1°C/2°F) per hour for the first two hours"]
    B --> C["Heat mode(-1°C/2°F) per hour for the first two hours"]
    C --> D["Keep running"]
    E["Saving energy during sleep"] --> F["Sun icon"]
    G["Bed with 2zzz"] --> H["Bed with sun icon"]
- Breeze Away Operation
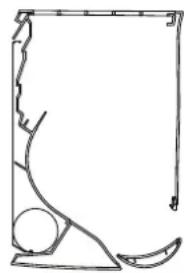
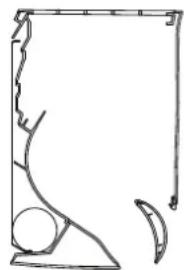
-- Press the Breeze Away button on the remote control to activate the avoiding direct air blowing on the body.
-- Under Breeze Away operation, the system will adjust the louver angles and fan speed automatically. You can also choose the fan speed by remote controller.
-- Under Breeze Away operation, the louver moves as shown below:
natural_image
Pure architectural line drawing of a building facade with curved and angular elements (no text or symbols)Upword Breeze Away
natural_image
Simple line drawing of a mechanical component or bracket with no text or symbolsDownward Breeze Away
NOTE: This feature is only available under COOL, Dry or Fan mode.
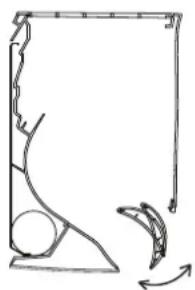
- Cascade Operation
-- Press the Cascade button on the remote control to activate Cascade feature.
-- With the newly improved volute casing design, the air duct can rotate 180 degree, which brings faster and stronger cooling effect. And the whole room can be cool quickly and evenly.
-- The system will adjust the louver angles and fan speed automatically. You can also choose the fan speed by remote controller.
-- This feature is only available under COOL or Fan mode.
-- Under Cascade operation, the louver moves as shown below:
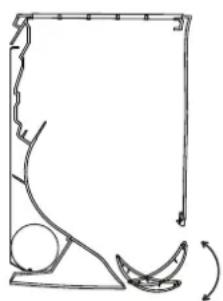
natural_image
Pure mechanical diagram showing a bracket with curved and angular features, no text or symbols presentUpword Cascade
natural_image
Simple line drawing of a mechanical component with an arrow indicating rotation (no text or symbols)Downward Cascade
- Setting Angle of Air Flow
Setting angle of air flow
While the unit is on, use the SWING button on remote control to set the direction (vertical/horizontal angle) of airflow. Please refer to the Remote Control Manual for details.
NOTE ON LOUVER ANGLES
When using COOL or DRY mode, do not set louver at too vertical an angle for long periods of time. This can cause water to condense on the louver blade, which will drop on your floor or furnishings.
When using COOL or HEAT mode, setting the louver at too small an angle can reduce the performance of the unit due to restricted air flow.
NOTE: According to the relative standards requirement, please sets the vertical air flow louver to its maximum angle under heating capacity test.
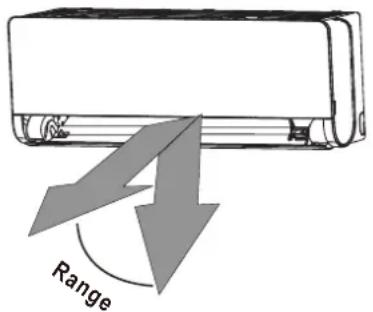
NOTE: Do not move louver by hand. This will cause the louver to become out of sync. If this occurs, turn off the unit and unplug it for a few seconds, then restart the unit. This will reset the louver.

CAUTION
Do not put your fingers in or near the blower and suction side of the unit. The high-speed fan inside the unit may cause injury.
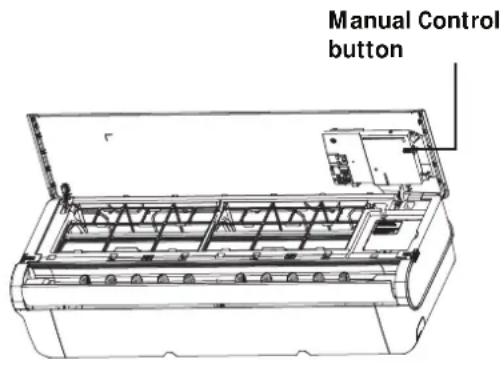
Manual Operation(without remote)

CAUTION
The manual button is intended for testing purposes and emergency operation only. Please do not use this function unless the remote control is lost and it is absolutely necessary. To restore regular operation, use the remote control to activate the unit. Unit must be turned off before manual operation.
To operate your unit manually:
- Open the front panel of the indoor unit.
- Locate the MANUAL CONTROL button on the right-hand side of the display box.
- Press the MANUAL CONTROL button one time to activate FORCED AUTO mode.
- Press the MANUAL CONTROL button again to activate FORCED COOLING mode.
- Press the MANUAL CONTROL button a third time to turn the unit off.
- Close the front panel.
Care and Maintenance
Cleaning Your Indoor Unit

BEFORE CLEANING OR MAINTENANCE
ALWAYS TURN OFF YOUR AIR CONDITIONER SYSTEM AND DISCONNECT ITS POWER SUPPLY BEFORE CLEANING OR MAINTENANCE.

CAUTION
Only use a soft, dry cloth to wipe the unit clean. If the unit is especially dirty, you can use a cloth soaked in warm water to wipe it clean.
- Do not use chemicals or chemically treated cloths to clean the unit
- Do not use benzene, paint thinner, polishing powder or other solvents to clean the unit. They can cause the plastic surface to crack or deform.
- Do not use water hotter than 40°C (104°F) to clean the front panel. This can cause the panel to deform or become discolored.
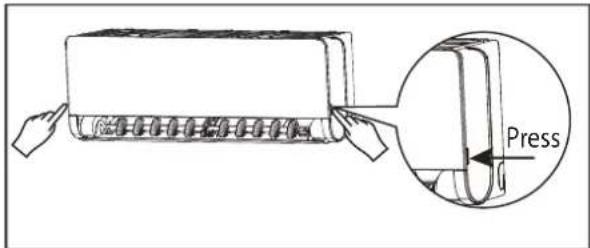
Cleaning Your Air Filter
A clogged air conditioner can reduce the cooling efficiency of your unit, and can also be bad for your health. Make sure to clean the filter once every two weeks.
-
Press down the buttons on both side of the panel, then lift the panel up until it clicks.
-
Grip the tab on the end of the filter, lift it up, then pull it towards yourself.
-
Now pull the filter out.
-
If your filter has a small air freshening filter, unclip it from the larger filter. Clean this air freshening filter with a hand-held vacuum.
-
Clean the large air filter with warm, soapy water. Be sure to use a mild detergent.
-
Rinse the filter with fresh water, then shake off excess water.
-
Dry it in a cool, dry place, and refrain from exposing it to direct sunlight.
-
When dry, re-clip the air freshening filter to the larger filter, then slide it back into the indoor unit.
-
Close the front panel of the indoor unit.
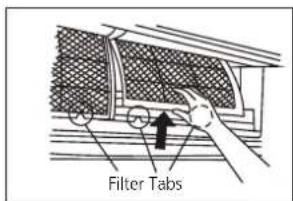
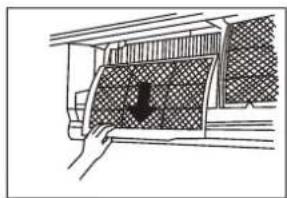
natural_image
Simple line drawing of a door with a patterned panel and a downward arrow, no text or symbols present.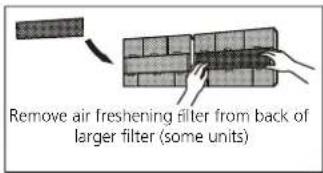
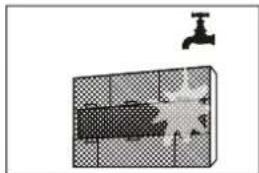
natural_image
Diagram showing a water tap and a grid-patterned object with a starburst pattern (no text or symbols)
CAUTION
Do not touch air freshening (Plasma) filter for at least 10 minutes after turning off the unit.
Cleaning Your Louver
Only use a soft, dry cloth to wipe the unit clean. If the louver is especially dirty, you can remove it and wash it with water.
-
Press and hold MODE and SWING buttons on the remote controller together for one second, the deflector will open for a certain angle.
-
Hold the louer and remove it as shown below.
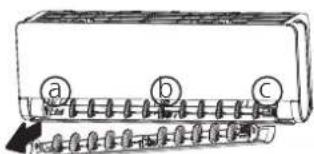
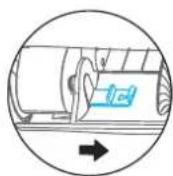
(a)
Release the left
side lock block
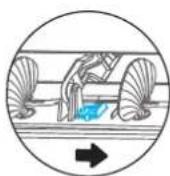
b
Release the middle lock block
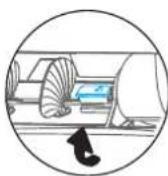
©
Remove the right side small cover
-
Wash it with water and dry it in a cool, dry place.
-
Reinstall the lover, connect the power again, and this will reset the louver.

CAUTION
- Before changing the filter or cleaning, turn off the unit and disconnect its power supply.
- When removing filter, do not touch metal parts in the unit. The sharp metal edges can cut you.
- Do not use water to clean the inside of the indoor unit. This can destroy insulation and cause electrical shock.
- Do not expose filter to direct sunlight when drying. This can shrink the filter.
Air Filter Reminders (Optional)
Air Filter Cleaning Reminder
After 240 hours of use, the display window on the indoor unit will flash "CL." This is a reminder to clean your filter. After 15 seconds, the unit will revert to its previous display.
To reset the reminder, press the LED button on your remote control 4 times, or press the
MANUAL CONTROL button 3 times. If you don't reset the reminder, the "CL" indicator will flash again when you restart the unit.
Air Filter Replacement Reminder
After 2,880 hours of use, the display window on the indoor unit will flash "nF." This is a reminder to replace your filter. After 15 seconds, the unit will revert to its previous display.
To reset the reminder, press the LED button on your remote control 4 times, or press the
MANUAL CONTROL button 3 times. If you don't reset the reminder, the "nF" indicator will flash again when you restart the unit.

CAUTION
- Any maintenance and cleaning of outdoor unit should be performed by an authorized dealer or a licensed service provider.
- Any unit repairs should be performed by an authorized dealer or a licensed service provider.
Maintenance – Long Periods of Non-Use
If you plan not to use your air conditioner for an extended period of time, do the following:
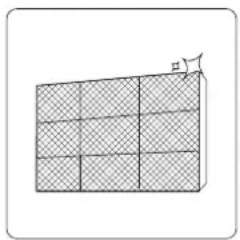
natural_image
Diagram of a 3x3 grid structure with a small directional arrow pointing upward (no text or symbols)Clean all filters
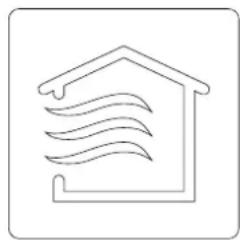
natural_image
Simple line drawing of a house with wavy lines indicating airflow or ventilation (no text or symbols)Turn on FAN function until unit dries out completely
Turn off the unit aRemove batteries
disconnect the power
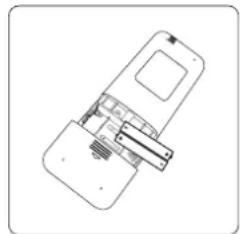
natural_image
Diagram of a smartphone internal structure showing battery, RAM, and display components (no text or labels)from remote control
Maintenance – Pre-Season Inspection
After long periods of non-use, or before periods of frequent use, do the following:
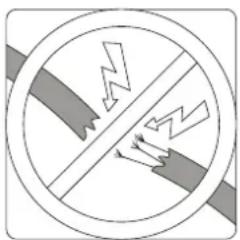
natural_image
Cross-sectional diagram of a no-leaved electrical hazard symbol (no text or labels)Check for damaged wires Clean all filters
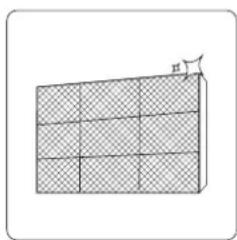
natural_image
Diagram of a 3D grid structure with a small arrow pointing to the top-right corner (no text or symbols)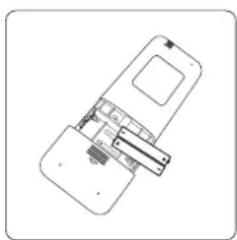
natural_image
Technical line drawing of a device with internal components (no text or symbols)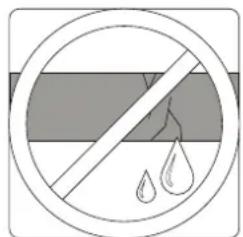
Check for leaks Replace batteries
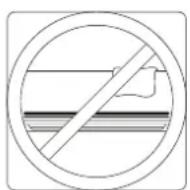
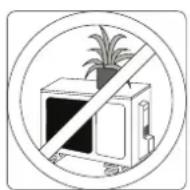
Make sure nothing is blocking all air inlets and outlets
Troubleshooting

SAFETY PRECAUTIONS
If ANY of the following conditions occurs, turn off your unit immediately!
- The power cord is damaged or abnormally warm
- You smell a burning odor
- The unit emits loud or abnormal sounds
- A power fuse blows or the circuit breaker frequently trips
• Water or other objects fall into or out of the unit
DO NOT ATTEMPT TO FIX THESE YOURSELF! CONTACT AN AUTHORIZED SERVICE PROVIDER IMMEDIATELY!
Common Issues
The following problems are not a malfunction and in most situations will not require repairs.
Issue Possible Causes
| Unit does not turn on when pressing ON/OFF button | The Unit has a 3-minute protection feature that prevents the unit from overloading. The unit cannot be restarted within three minutes of being turned off. |
| The unit changes from COOL/HEAT mode to FAN mode | The unit may change its setting to prevent frost from forming on the unit. Once the temperature increases, the unit will start operating in the previously selected mode again. |
| The set temperature has been reached, at which point the unit turns off the compressor. The unit will continue operating when the temperature fluctuates again. | |
| The indoor unit emits white mist | In humid regions, a large temperature difference between the room's air and the conditioned air can cause white mist. |
| Both the indoor and outdoor units emit white mist | When the unit restarts in HEAT mode after defrosting, white mist may be emitted due to moisture generated from the defrosting process. |
| The indoor unit makes noises | A rushing air sound may occur when the louver resets its position. |
| A squeaking sound may occur after running the unit in HEAT mode due to expansion and contraction of the unit's plastic parts. | |
| Both the indoor unit and outdoor unit make noises | Low hissing sound during operation: This is normal and is caused by refrigerant gas flowing through both indoor and outdoor units. |
| Low hissing sound when the system starts, has just stopped running, or is defrosting: This noise is normal and is caused by the refrigerant gas stopping or changing direction. | |
| Squeaking sound: Normal expansion and contraction of plastic and metal parts caused by temperature changes during operation can cause squeaking noises. |
Issue Possible Causes
| The outdoor unit makes noises | The unit will make different sounds based on its current operating mode. |
| Dust is emitted from either the indoor or outdoor unit | The unit may accumulate dust during extended periods of non-use, which will be emitted when the unit is turned on. This can be mitigated by covering the unit during long periods of inactivity. |
| The unit emits a bad odor | The unit may absorb odors from the environment (such as furniture, cooking, cigarettes, etc.) which will be emitted during operations. |
| The unit's filters have become moldy and should be cleaned. | |
| The fan of the outdoor unit does not operate | During operation, the fan speed is controlled to optimize product operation. |
| Operation is erratic, unpredictable, or unit is unresponsive | Interference from cell phone towers and remote boosters may cause the unit to malfunction.In this case, try the following:Disconnect the power, then reconnect.Press ON/OFF button on remote control to restart operation. |
NOTE: If problem persists, contact a local dealer or your nearest customer service center. Provide them with a detailed description of the unit malfunction as well as your model number.
Troubleshooting
When troubles occur, please check the following points before contacting a repair company.
Problem Possible Causes Solution
| Poor Cooling Performance | Temperature setting may be higher than ambient room temperature | Lower the temperature setting |
| The heat exchanger on the indoor or outdoor unit is dirty | Clean the affected heat exchanger | |
| The air filter is dirty | Remove the filter and clean it according to instructions | |
| The air inlet or outlet of either unit is blocked | Turn the unit off, remove the obstruction and turn it back on | |
| Doors and windows are open | Make sure that all doors and windows are closed while operating the unit | |
| Excessive heat is generated by sunlight | Close windows and curtains during periods of high heat or bright sunshine | |
| Too many sources of heat in the room (people, computers, electronics, etc.) | Reduce amount of heat sources | |
| Low refrigerant due to leak or long-term use | Check for leaks, re-seal if necessary and top off refrigerant | |
| SILENCE function is activated (optional function) | SILENCE function can lower product performance by reducing operating frequency. Turn off SILENCE function. |
| Problem Possible Causes Solution | ||
| The unit is not working | Power failure | Wait for the power to be restored |
| The power is turned off Turn on | the power | |
| The fuse is burned out | Replace the fuse | |
| Remote control batteries are dead | Replace batteries | |
| The Unit's 3-minute protection has been activated | Wait three minutes after restarting the unit | |
| Timer is activated | Turn timer off | |
| The unit starts and stops frequently | There's too much or too little refrigerant in the system | Check for leaks and recharge the system with refrigerant. |
| Incompressible gas or moisture has entered the system. | Evacuate and recharge the system with refrigerant | |
| The compressor is broken Replace the compressor | ||
| The voltage is too high or too low | Install a manostat to regulate the voltage | |
| Poor heating performance | The outdoor temperature is extremely low | Use auxiliary heating device |
| Cold air is entering through doors and windows | Make sure that all doors and windows are closed during use | |
| Low refrigerant due to leak or long-term use | Check for leaks, re-seal if necessary and top off refrigerant | |
| Indicator lamps continue flashing | The unit may stop operation or continue to run safely. If the indicator lamps continue to flash or error codes appear, wait for about 10 minutes. The problem may resolve itself.If not, disconnect the power, then connect it again. Turn the unit on.If the problem persists, disconnect the power and contact your nearest customer service center. | |
| Error code appears and begins with the letters as the following in the window display of indoor unit:• E(x), P(x), F(x)• EH(xx), EL(xx), EC(xx)• PH(xx), PL(xx), PC(xx) | ||
NOTE: If your problem persists after performing the checks and diagnostics above, turn off your unit immediately and contact an authorized service center.
Accessories
The air conditioning system comes with the following accessories. Use all of the installation parts and accessories to install the air conditioner. Improper installation may result in water leakage, electrical shock and fire, or cause the equipment to fail. The items are not included with the air conditioner must be purchased separately.
| Name of Accessories | Q'ty(pc) | Shape | Name of Accessories | Q'ty(pc) | Shape |
| Manual | 2~3 |  | Remote controller | 1 |  |
| Drain joint (for cooling & heating models) | 1 |  | Battery | 2 |  |
| Seal (for cooling & heating models) | 1 |  | Remote controller holder(optional) | 1 |  |
| Mounting plate | 1 | 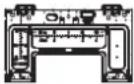 | Fixing screw for remote controller holder(optional) | 2 |  |
| Anchor | 5~8 (depending on models) | 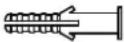 | Small Filter (Need to be installed on the back of main air filter by the authorized technician while installing the machine) | 1~2 (depending on models) |  |
| Mounting plate fixing screw | 5~8 (depending on models) |  |
| Name | Shape | Quantity(PC) | |
| Connecting pipe assembly | Liquid side | Φ6.35(1/4in) | Parts you must purchase separately. Consult the dealer about the proper pipe size of the unit you purchased. |
| Φ9.52(3/8in) | |||
| Gas side | Φ9.52(3/8in) | ||
| Φ12.7(1/2in) | |||
| Φ16(5/8in) | |||
| Φ19(3/4in) | |||
| Magnetic ring and belt (if supplied, please refer to the wiring diagram to install it on the connective cable.) | 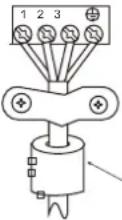 |  | Varies by models |
| Pass the belt through the hole of the Magnetic ring to fix it on the cable | |||
Installation Summary - Indoor Unit
1
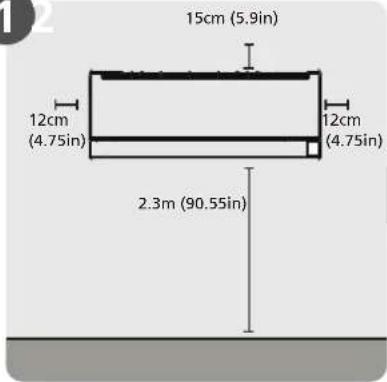
Select Installation Location
The image is too blurry to recognize any text content.
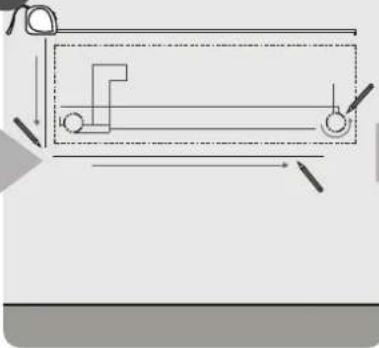
natural_image
Pure technical diagram of a mechanical assembly with no text, numbers, or symbolsDetermine Wall Hole Position
3
natural_image
Technical diagram of a mechanical assembly with labeled components and measurement indicators (no readable text or symbols)Attach Mounting Plate
4
natural_image
Illustration of a hand using a tool to adjust a component, with no visible text or symbols.Drill Wall Hole
5
natural_image
Mechanical diagram showing a tool interacting with a bolt and nut (no text or symbols present)Connect Piping
6
natural_image
Pure electrical circuit lines without any symbolsConnect Wiring (not applicable for some locations in North America)
7
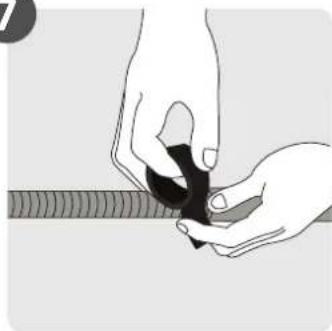
natural_image
Illustration of two hands holding a black object with a wavy line in the background (no text or symbols)Prepare Drain Hose
8
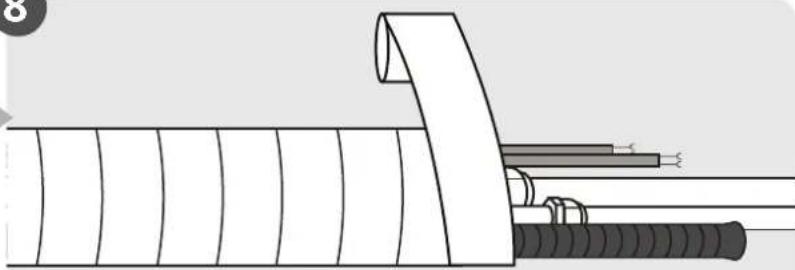
natural_image
Diagram of a cable being inserted into a wire, showing sheath and sheath with insulation (no text or symbols)Wrap Piping and Cable (not applicable for some locations in North America)
9
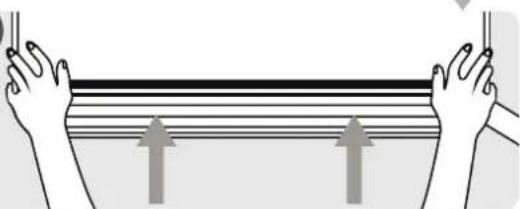
natural_image
Illustration of two hands holding a horizontal bar with three upward arrows below (no text or symbols)Mount Indoor Unit
Unit Parts
NOTE: The installation must be performed in accordance with the requirement of local and national standards. The installation may be slightly different in different areas.
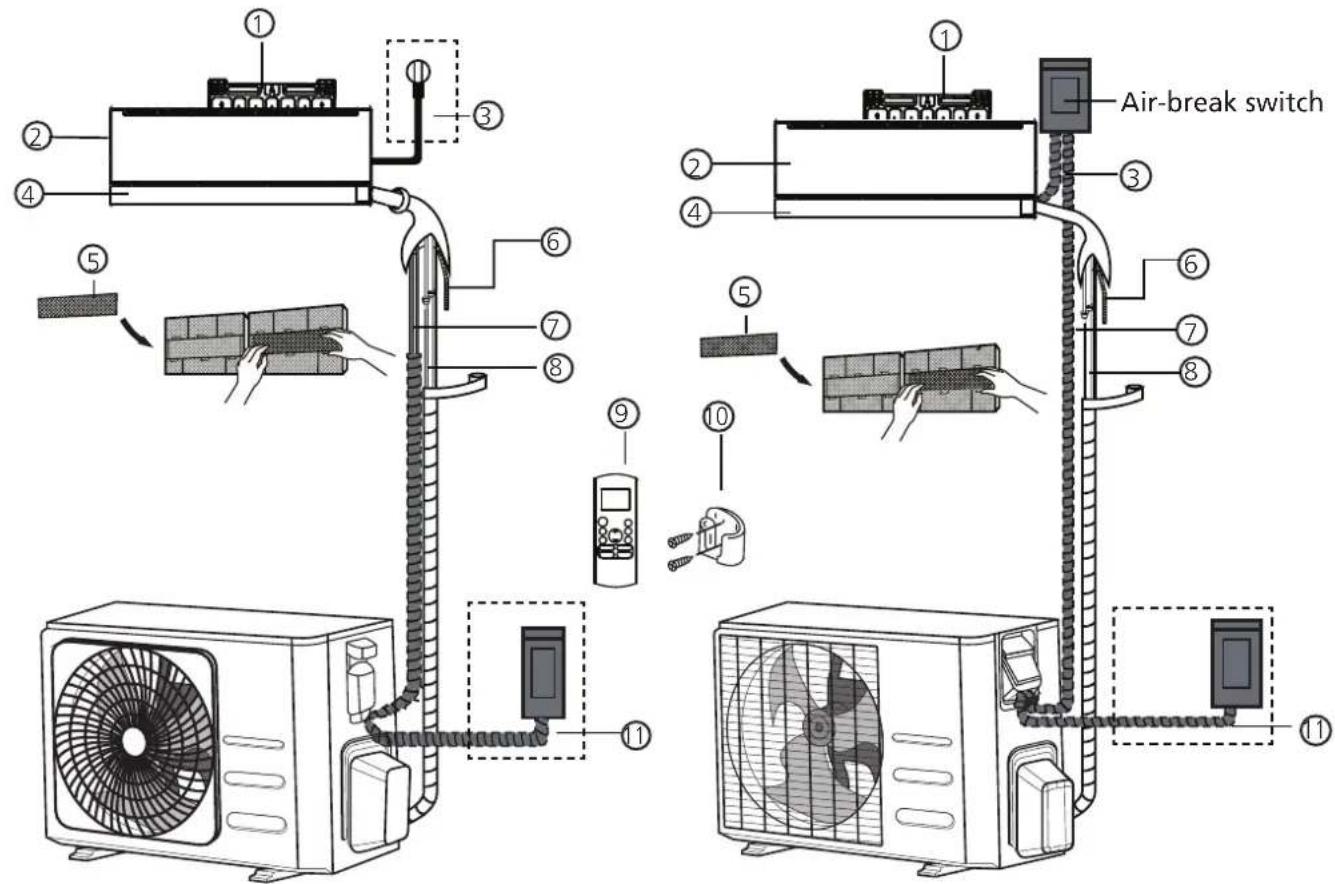
(1) (2)
① Wall Mounting Plate
② Front Panel
③ Power Cable (Some Units)
④ Louver
⑤ Functional Filter (On Back of Main Filter - Some Units)
⑥ Drainage Pipe
⑦ Signal Cable
⑧ Refrigerant Piping
⑨ Remote Controller
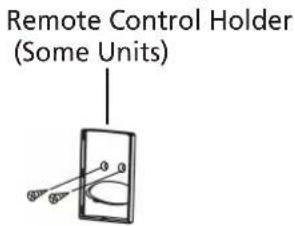
⑩ Remote controller Holder (Some Units)
⑪ Outdoor Unit Power Cable (Some Units)
NOTE ON ILLUSTRATIONS
Illustrations in this manual are for explanatory purposes. The actual shape of your indoor unit may be slightly different. The actual shape shall prevail.
Indoor Unit Installation
Installation Instructions – Indoor unit
PRIOR TO INSTALLATION
Before installing the indoor unit, refer to the label on the product box to make sure that the model number of the indoor unit matches the model number of the outdoor unit.
Step 1: Select installation location
Before installing the indoor unit, you must choose an appropriate location. The following are standards that will help you choose an appropriate location for the unit.
Proper installation locations meet the following standards:
√ Good air circulation
√ Convenient drainage
√ Noise from the unit will not disturb other people
√ Firm and solid—the location will not vibrate
√ Strong enough to support the weight of the unit
☑ A location at least one meter from all other electrical devices (e.g., TV, radio, computer)
DO NOT install unit in the following locations:
∅ Near any source of heat, steam, or combustible gas
∅ Near flammable items such as curtains or clothing
∅ Near any obstacle that might block air circulation
∅ Near the doorway
∅ In a location subject to direct sunlight
NOTE ABOUT WALL HOLE:
If there is no fixed refrigerant piping:
While choosing a location, be aware that you should leave ample room for a wall hole (see Drill wall hole for connective piping step) for the signal cable and refrigerant piping that connect the indoor and outdoor units.
The default position for all piping is the right side of the indoor unit (while facing the unit). However, the unit can accommodate piping to both the left and right.
Refer to the following diagram to ensure proper distance from walls and ceiling:
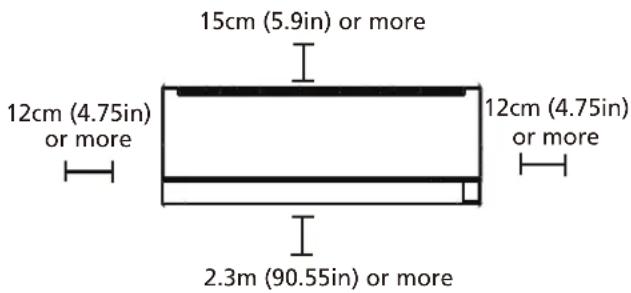
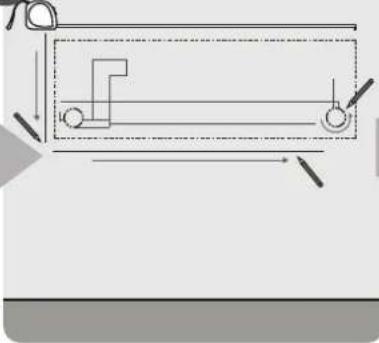
Step 2: Attach mounting plate to wall
The mounting plate is the device on which you will mount the indoor unit.
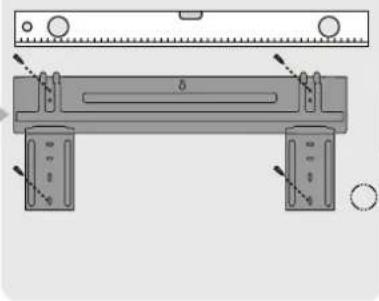
- Remove the screw that attaches the mounting plate to the back of the indoor unit.
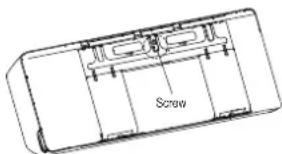
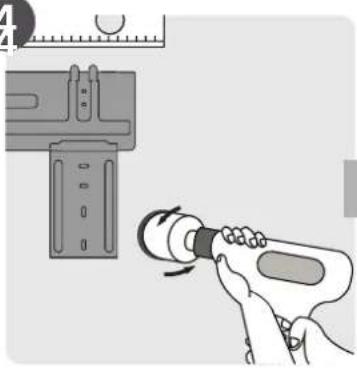
- Secure the mounting plate to the wall with the screws provided. Make sure that mounting plate is flat against the wall.
NOTE FOR CONCRETE OR BRICK WALLS:
If the wall is made of brick, concrete, or similar material, drill 5mm-diameter (0.2in-diameter) holes in the wall and insert the sleeve anchors provided. Then secure the mounting plate to the wall by tightening the screws directly into the clip anchors.
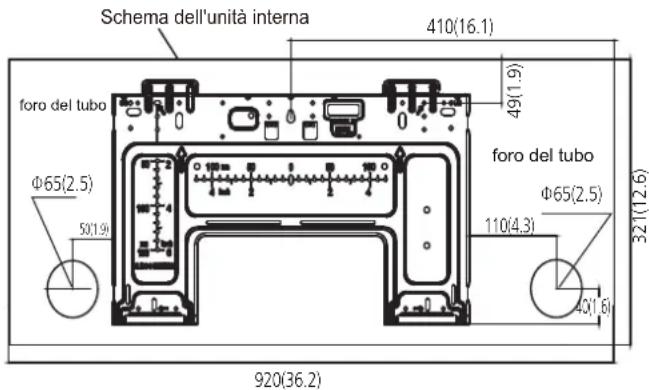
Step 3: Drill wall hole for connective piping
-
Determine the location of the wall hole based on the position of the mounting plate. Refer to Mounting Plate Dimensions.
-
Using a 65mm (2.5in) or 90mm(3.54in) (depending on models) core drill, drill a hole in the wall. Make sure that the hole is drilled at a slight downward angle, so that the outdoor end of the hole is lower than the indoor end by about 5mm to 7mm (0.2-0.275in). This will ensure proper water drainage.
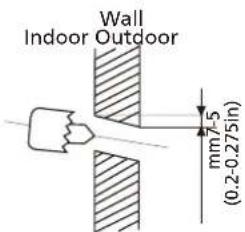
NOTE: When the gas side connective pipe is 16mm(5/8in) or more, the wall hole should be 90mm(3.54in).
- Place the protective wall cuff in the hole. This protects the edges of the hole and will help seal it when you finish the installation process.

CAUTION
When drilling the wall hole, make sure to avoid wires, plumbing, and other sensitive components.
MOUNTING PLATE DIMENSIONS
Different models have different mounting plates. For the convenience of installation, there are carved dimensions on the mounting plate. Please install the plate and drill wall hole according to the information of the mounting plate. See the figures below.
Correct orientation of Mounting Plate
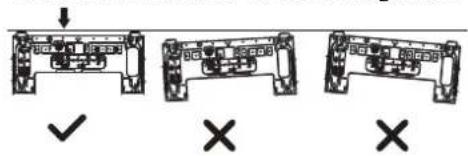
Unit: mm(inch)
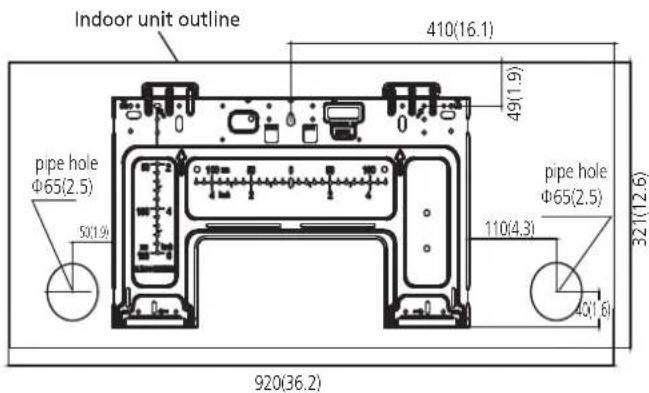
Step 4: Prepare refrigerant piping
The refrigerant piping is inside an insulating sleeve attached to the back of the unit. You must prepare the piping before passing it through the hole in the wall.
- Based on the position of the wall hole relative to the mounting plate, choose the side from which the piping will exit the unit.
- If the wall hole is behind the unit, keep the knock-out panel in place. If the wall hole is to the side of the indoor unit, remove the plastic knock-out panel from that side of the unit.
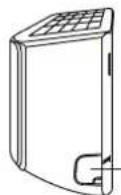
Knock-out Panel
- If existing connective piping is already embedded in the wall, proceed directly to the Connect Drain Hose step. If there is no embedded piping, connect the indoor unit's refrigerant piping to the connective piping that will join the indoor and outdoor units. Refer to the Refrigerant Piping Connection section of this manual for detailed instructions.
NOTE ON PIPING ANGLE
Refrigerant piping can exit the indoor unit from four different angles: Left-hand side, Right-hand side, Left rear, Right rear.
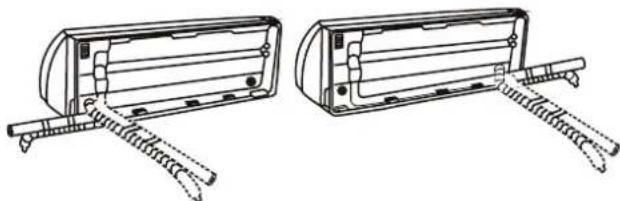
natural_image
Technical line drawing of two rectangular electronic components with coiled leads and internal channels (no text or symbols)
CAUTION
Be extremely careful not to dent or damage the piping while bending them away from the unit. Any dents in the piping will affect the unit's performance.
Step 5: Connect drain hose
By default, the drain hose is attached to the right-hand side of unit (when you're facing the back of the unit).
- Wrap the connection point firmly with Teflon tape to ensure a good seal and to prevent leaks.
- Remove the air filter and pour a small amount of water into the drain pan to make sure that water flows from the unit smoothly.

NOTE ON DRAIN HOSE PLACEMENT
Make sure to arrange the drain hose according to the following figures.
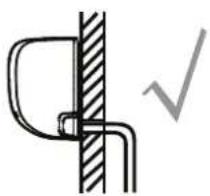
natural_image
Simple line drawing of a bracket and vertical wall with a checkmark (no text or symbols)CORRECT
Make sure there are no kinks or dent in drain hose to ensure proper drainage.
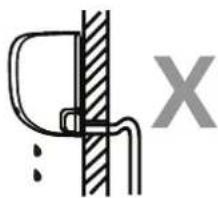
natural_image
Simple line drawing of a mechanical joint or bracket with a cross symbol (no text or labels)NOT CORRECT
Kinks in the drain hose will create water traps.
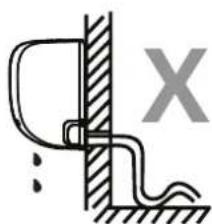
natural_image
Simple line drawing of a mechanical or electrical component with no text, numbers, or symbolsNOT CORRECT
Kinks in the drain hose will create water traps.
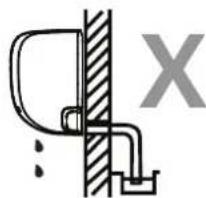
natural_image
Simple line drawing of a door handle and pipe joint with a cross symbol (no text or labels)NOT CORRECT
Do not place the end of the drain hose in water or in containers that collect water. This will prevent proper drainage.
PLUG THE UNUSED DRAIN HOLE
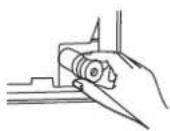
To prevent unwanted leaks you must plug the unused drain hole with the rubber plug provided.

BEFORE PERFORMING ANY ELECTRICAL WORK, READ THESE REGULATIONS
- All wiring must comply with local and national electrical codes, regulations and must be installed by a licensed electrician.
- All electrical connections must be made according to the Electrical Connection Diagram located on the panels of the indoor and outdoor units.
- If there is a serious safety issue with the power supply, stop work immediately. Explain your reasoning to the client, and refuse to install the unit until the safety issue is properly resolved.
- Power voltage should be within 90-110% of rated voltage. Insufficient power supply can cause malfunction, electrical shock, or fire.
- If connecting power to fixed wiring, a surge protector and main power switch should be installed.
- If connecting power to fixed wiring, a switch or circuit breaker that disconnects all poles and has a contact separation of at least 1/8in (3mm) must be incorporated in the fixed wiring. The qualified technician must use an approved circuit breaker or switch.
- Only connect the unit to an individual branch circuit outlet. Do not connect another appliance to that outlet.
- Make sure to properly ground the air conditioner.
- Every wire must be firmly connected. Loose wiring can cause the terminal to overheat, resulting in product malfunction and possible fire.
- Do not let wires touch or rest against refrigerant tubing, the compressor, or any moving parts within the unit.
- If the unit has an auxiliary electric heater, it must be installed at least 1 meter (40in) away from any combustible materials.
- To avoid getting an electric shock, never touch the electrical components soon after the power supply has been turned off. After turning off the power, always wait 10 minutes or more before you touch the electrical components.

WARNING
BEFORE PERFORMING ANY ELECTRICAL OR WIRING WORK, TURN OFF THE MAIN POWER TO THE SYSTEM.
Step 6: Connect signal and power cables
The signal cable enables communication between the indoor and outdoor units. You must first choose the right cable size before preparing it for connection.
Cable Types
- Indoor Power Cable (if applicable): H05VV-F or H05V2V2-F
• Outdoor Power Cable: H07RN-F or H05RN-F
• Signal Cable: H07RN-F
NOTE: In North America, choose the cable type according to the local electrical codes and regulations.
Minimum Cross-Sectional Area of Power and Signal Cables (For reference) (Not applicable for North America)
| Rated Current of Appliance (A) | Nominal Cross-Sectional Area ( mm^2 ) |
| >3 and ≤6 | 0.75 |
| >6 and ≤10 | 1 |
| >10 and ≤16 | 1.5 |
| >16 and ≤25 | 2.5 |
| >25 and ≤32 | 4 |
| >32 and ≤40 | 6 |
CHOOSE THE RIGHT CABLE SIZE
The size of the power supply cable, signal cable, fuse, and switch needed is determined by the maximum current of the unit. The maximum current is indicated on the nameplate located on the side panel of the unit. Refer to this nameplate to choose the right cable, fuse, or switch.
NOTE: In North America, please choose the right cable size according to the Minimum Circuit Ampacity indicated on the nameplate of the unit.
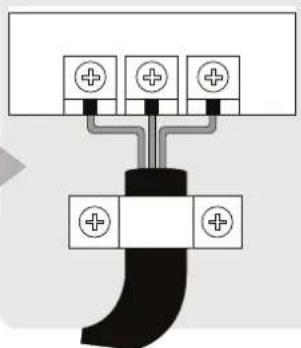
- Open front panel of the indoor unit.
- Using a screwdriver, open the wire box cover on the right side of the unit. This will reveal the terminal block.
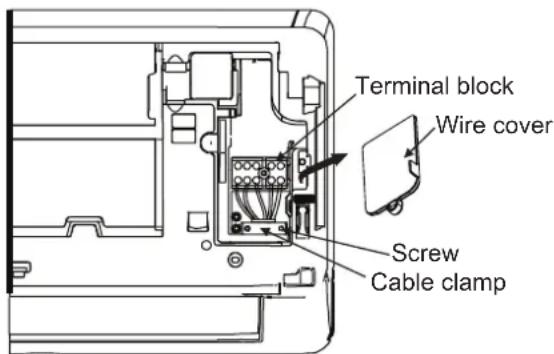

WARNING
ALL WIRING MUST BE PERFORMED STRICTLY IN ACCORDANCE WITH THE WIRING DIAGRAM LOCATED ON THE BACK OF THE INDOOR UNIT'S FRONT PANEL.
- Unscrew the cable clamp below the terminal block and place it to the side.
- Facing the back of the unit, remove the plastic panel on the bottom left-hand side.
- Feed the signal wire through this slot, from the back of the unit to the front.
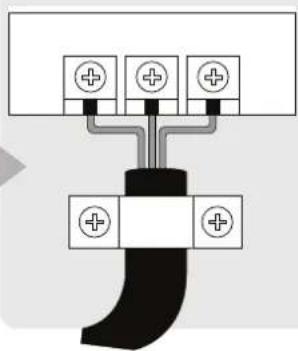
- Facing the front of the unit, connect the wire according to the indoor unit's wiring diagram, connect the u-lug and firmly screw each wire to its corresponding terminal.
CAUTION
DO NOT MIX UP LIVE AND NULL WIRES
This is dangerous, and can cause the air conditioning unit to malfunction.
-
After checking to make sure every connection is secure, use the cable clamp to fasten the signal cable to the unit. Screw the cable clamp down tightly.
-
Replace the wire cover on the front of the unit, and the plastic panel on the back.

NOTE ABOUT WIRING
THE WIRING CONNECTION PROCESS MAY DIFFER SLIGHTLY BETWEEN UNITS AND REGIONS.
Step 7: Wrappiping and cables
Before passing the piping, drain hose, and the signal cable through the wall hole, you must bundle them together to save space, protect them, and insulate them(Not applicable in North America).
- Bundle the drain hose, refrigerant pipes, and signal cable as shown below:
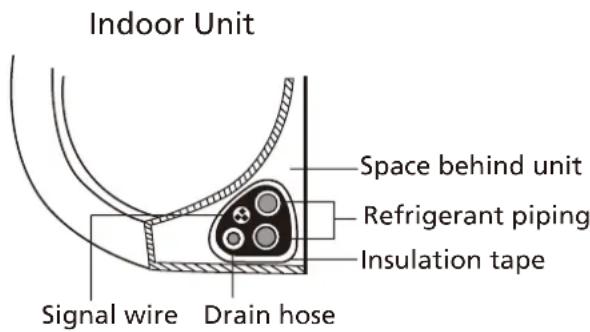
DRAIN HOSE MUST BE ON BOTTOM
Make sure that the drain hose is at the bottom of the bundle. Putting the drain hose at the top of the bundle can cause the drain pan to overflow, which can lead to fire or water damage.
DO NOT INTERTWINE SIGNAL CABLE WITH OTHER WIRES
While bundling these items together, do not intertwine or cross the signal cable with any other wiring.
- Using adhesive vinyl tape, attach the drain hose to the underside of the refrigerant pipes.
- Using insulation tape, wrap the signal wire, refrigerant pipes, and drain hose tightly together. Double-check that all items are bundled.
DO NOT WRAP ENDS OF PIPING
When wrapping the bundle, keep the ends of the piping unwrapped. You need to access them to test for leaks at the end of the installation process (refer to Electrical Checks and Leak Checks section of this manual).
Step 8: Mount indoor unit
If you installed new connective piping to the outdoor unit, do the following:
- If you have already passed the refrigerant piping through the hole in the wall, proceed to Step 4.
- Otherwise, double-check that the ends of the refrigerant pipes are sealed to prevent dirt or foreign materials from entering the pipes.
- Slowly pass the wrapped bundle of refrigerant pipes, drain hose, and signal wire through the hole in the wall.
- Hook the top of the indoor unit on the upper hook of the mounting plate.
- Check that unit is hooked firmly on mounting by applying slight pressure to the left and right-hand sides of the unit. The unit should not jiggle or shift.
- Using even pressure, push down on the bottom half of the unit. Keep pushing down until the unit snaps onto the hooks along the bottom of the mounting plate.
- Again, check that the unit is firmly mounted by applying slight pressure to the left and the right-hand sides of the unit.
If refrigerant piping is already embedded in the wall, do the following:
- Hook the top of the indoor unit on the upper hook of the mounting plate.
- Use a bracket or wedge to prop up the unit, giving you enough room to connect the refrigerant piping, signal cable, and drain hose.
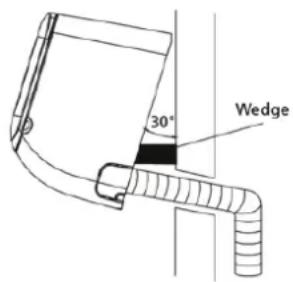
-
Connect drain hose and refrigerant piping (refer to Refrigerant Piping Connection section of this manual for instructions).
-
Keep pipe connection point exposed to perform the leak test (refer to Electrical Checks and Leak Checks section of this manual).
-
After the leak test, wrap the connection point with insulation tape.
-
Remove the bracket or wedge that is propping up the unit.
-
Using even pressure, push down on the bottom half of the unit. Keep pushing down until the unit snaps onto the hooks along the bottom of the mounting plate.
UNIT IS ADJUSTABLE
Keep in mind that the hooks on the mounting plate are smaller than the holes on the back of the unit. If you find that you don't have ample room to connect embedded pipes to the indoor unit, the unit can be adjusted left or right by about 50mm (1.96in), depending on the model.
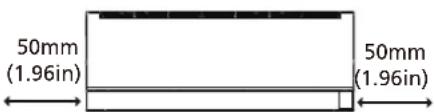
Move to left or right
Outdoor Unit Installation
Install the unit by following local codes and regulations, there may be differ slightly between different regions.
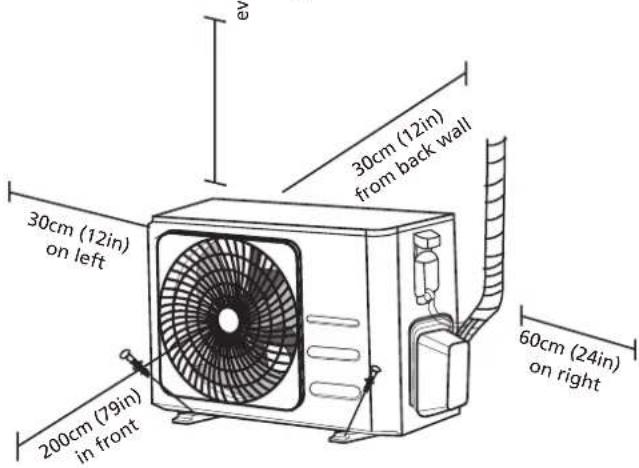
Installation Instructions – Outdoor unit
Step 1: Select installation location
Before installing the outdoor unit, you must choose an appropriate location. The following are standards that will help you choose an appropriate location for the unit.
Proper installation locations meet the following standards:
√ Meets all spatial requirements shown in Installation Space Requirements above.
√ Good air circulation and ventilation
√ Firm and solid—the location can support the unit and will not vibrate
√ Noise from the unit will not disturb others
√ Protected from prolonged periods of direct sunlight or rain
√ Where snowfall is anticipated, take appropriate measures to prevent ice buildup and coil damage.
DO NOT install unit in the following locations:
Near an obstacle that will block air inlets and outlets
Near a public street, crowded areas, or where noise from the unit will disturb others
Near animals or plants that will be harmed by hot air discharge
∅ Near any source of combustible gas
∅ In a location that is exposed to large amounts of dust
In a location exposed to a excessive amounts of salty air
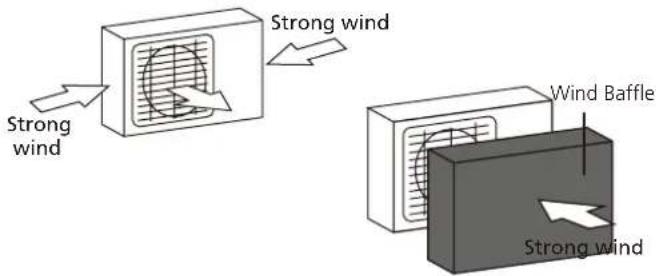
If the unit is exposed to heavy wind:
Install unit so that air outlet fan is at a 90^ angle to the direction of the wind. If needed, build a barrier in front of the unit to protect it from extremely heavy winds. See Figures below.
If the unit is frequently exposed to heavy rain or snow:
Build a shelter above the unit to protect it from the rain or snow. Be careful not to obstruct air flow around the unit.
If the unit is frequently exposed to salty air (seaside):
Use outdoor unit that is specially designed to resist corrosion.
Step 2: Install drain joint(Heat pump unit only)
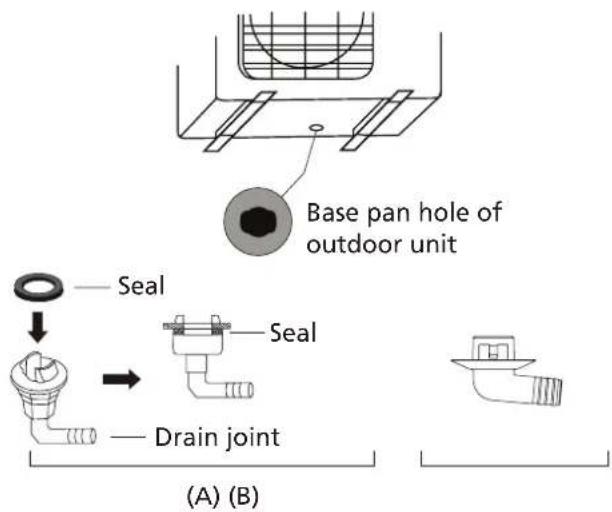
Before bolting the outdoor unit in place, you must install the drain joint at the bottom of the unit. Note that there are two different types of drain joints depending on the type of outdoor unit.
If the drain joint comes with a rubber seal (see Fig. A), do the following:
- Fit the rubber seal on the end of the drain joint that will connect to the outdoor unit.
- Insert the drain joint into the hole in the base pan of the unit.
- Rotate the drain joint 90° until it clicks in place facing the front of the unit.
- Connect a drain hose extension (not included) to the drain joint to redirect water from the unit during heating mode.
If the drain joint doesn't come with a rubber seal (see Fig. B), do the following:
- Insert the drain joint into the hole in the base pan of the unit. The drain joint will click in place.
- Connect a drain hose extension (not included) to the drain joint to redirect water from the unit during heating mode.

IN COLD CLIMATES
In cold climates, make sure that the drain hose is as vertical as possible to ensure swift water drainage. If water drains too slowly, it can freeze in the hose and flood the unit.
Step 3: Anchor outdoor unit
The outdoor unit can be anchored to the ground or to a wall-mounted bracket with bolt(M10). Prepare the installation base of the unit according to the dimensions below.
UNIT MOUNTING DIMENSIONS
The following is a list of different outdoor unit sizes and the distance between their mounting feet. Prepare the installation base of the unit according to the dimensions below.
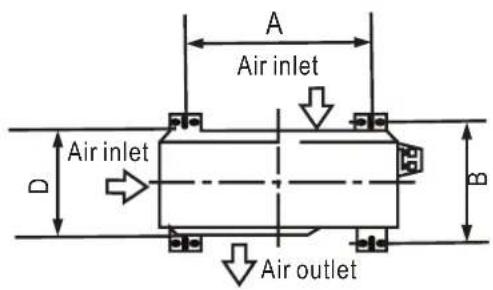
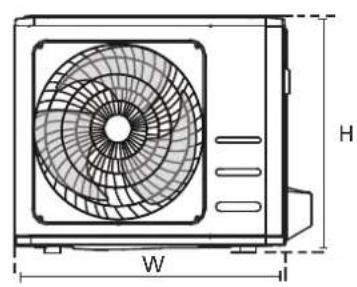
natural_image
Technical line drawing of a front-end air conditioner unit with labeled dimensions H and W (no text or symbols beyond labels)| Outdoor Unit Dimensions (mm)W x H x D | Mounting DimensionsDistance A (mm) Distance B (mm) | |
| 681x434x285 (26.8"x17.1"x11.2") 460 (18.1") | 292 (11.5") | |
| 700x550x270 (27.5"x21.6"x10.6") 450 (17.7") | 260 (10.2") | |
| 700x550x275 (27.5"x21.6"x10.8") | 450 (17.7") | 260 (10.2") |
| 720x495x270 (28.3"x19.5"x10.6") | 452 (17.8") | 255 (10.0") |
| 728x555x300 (28.7"x21.8"x11.8") | 452 (17.8") | 302(11.9") |
| 765x555x303 (30.12"x21.8"x11.9") | 452 (17.8") | 286(11.3") |
| 770x555x300 (30.3"x21.8"x11.8") | 487 (19.2") | 298 (11.7") |
| 805x554x330 (31.7"x21.8"x12.9") | 511 (20.1") | 317 (12.5") |
| 800x554x333 (31.5"x21.8"x13.1") | 514 (20.2") | 340 (13.4") |
| 845x702x363 (33.3"x27.6"x14.3") | 540 (21.3") | 350 (13.8") |
| 890x673x342 (35.0"x26.5"x13.5") | 663 (26.1") | 354 (13.9") |
| 946x810x420 (37.2"x31.9"x16.5") | 673 (26.5") | 403 (15.9") |
| 946x810x410 (37.2"x31.9"x16.1") | 673 (26.5") | 403 (15.9") |
If you will install the unit on the ground or on a concrete mounting platform, do the following:
- Mark the positions for four expansion bolts based on dimensions chart.
- Pre-drill holes for expansion bolts.
- Place a nut on the end of each expansion bolt.
- Hammer expansion bolts into the pre-drilled holes.
- Remove the nuts from expansion bolts, and place outdoor unit on bolts.
- Put washer on each expansion bolt, then replace the nuts.
- Using a wrench, tighten each nut until snug.

WARNING
WHEN DRILLING INTO CONCRETE, EYE PROTECTION IS RECOMMENDED AT ALL TIMES.
If you will install the unit on a wall-mounted bracket, do the following:

CAUTION
Make sure that the wall is made of solid brick, concrete, or of similarly strong material. The wall must be able to support at least four times the weight of the unit.
- Mark the position of bracket holes based on dimensions chart.
- Pre-drill the holes for the expansion bolts.
- Place a washer and nut on the end of each expansion bolt.
- Thread expansion bolts through holes in mounting brackets, put mounting brackets in position, and hammer expansion bolts into the wall.
- Check that the mounting brackets are level.
- Carefully lift unit and place its mounting feet on brackets.
- Bolt the unit firmly to the brackets.
- If allowed, install the unit with rubber gaskets to reduce vibrations and noise.
Step 4: Connect signal and power cables
The outside unit's terminal block is protected by an electrical wiring cover on the side of the unit. A comprehensive wiring diagram is printed on the inside of the wiring cover.

WARNING
BEFORE PERFORMING ANY ELECTRICAL OR WIRING WORK, TURN OFF THE MAIN POWER TO THE SYSTEM.
- Prepare the cable for connection:
USE THE RIGHT CABLE
Please choose the right cable refer to "Cable types" in page 23.
CHOOSE THE RIGHT CABLE SIZE
The size of the power supply cable, signal cable, fuse, and switch needed is determined by the maximum current of the unit. The maximum current is indicated on the nameplate located on the side panel of the unit.
NOTE: In North America, please choose the right cable size according to the Minimum Circuit Ampacity indicated on the nameplate of the unit.
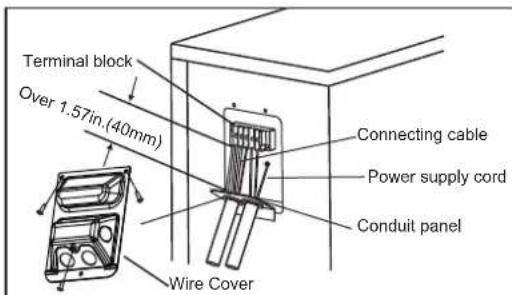
a. Using wire strippers, strip the rubber jacket from both ends of cable to reveal about 40mm (1.57in) of the wires inside.
b. Strip the insulation from the ends of the wires.
c. Using a wire crimper, crimp u-lugs on the ends of the wires.
PAY ATTENTION TO LIVE WIRE
While crimping wires, make sure you clearly distinguish the Live ("L") Wire from other wires.

WARNING
ALL WIRING WORK MUST BE PERFORMED STRICTLY IN ACCORDANCE WITH THE WIRING DIAGRAM LOCATED INSIDE OF WIRE COVER OF THE OUTDOOR UNIT.
- Unscrew the electrical wiring cover and remove it.
- Unscrew the cable clamp below the terminal block and place it to the side.
- Connect the wire according to the wiring diagram, and firmly screw the u-lug of each wire to its corresponding terminal.
- After checking to make sure every connection is secure, loop the wires around to prevent rain water from flowing into the terminal.
-
Using the cable clamp, fasten the cable to the unit. Screw the cable clamp down tightly.
-
Insulate unused wires with PVC electrical tape. Arrange them so that they do not touch any electrical or metal parts.
- Replace the wire cover on the side of the unit, and screw it in place.
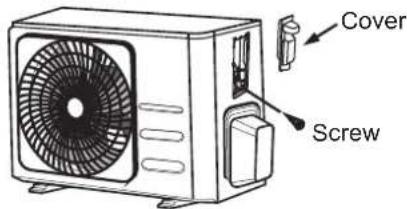
NOTE: If the cable clamp looks like the following, please select the appropriate through-hole according to the diameter of the wire.
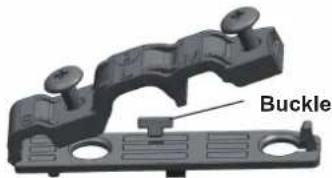
natural_image
Mechanical component labeled 'Buckle' showing a black bracket and mounting base (no other text or symbols visible)Three size hole: Small, Large, Medium
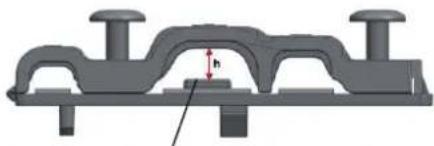
natural_image
3D mechanical component diagram showing a bracket with mounting holes and a central hole, labeled with dimension 'h' (no text or symbols beyond the label)When the calbe is not fasten enough, use the buckle to prop it up, so it can be clamped tightly.
In North America
- Remove the wire cover from the unit by loosening the 3 screws.
- Dismount caps on the conduit panel.
- Temperarily mount the conduit tubes (not included) on the conduit panel.
- Properly connect both the power supply and low voltage lines to the corresponding terminals on the terminal block.
- Ground the unit in accordance with local codes.
- Be sure to size each wire allowing several inches longer than the required length for wiring.
- Use lock nuts to secure the conduit tubes.
Please select the appropriate through-hole according to the diameter of the wire.
Refrigerant Piping Connection
When connecting refrigerant piping, do not let substances or gases other than the specified refrigerant enter the unit. The presence of other gases or substances will lower the unit's capacity, and can cause abnormally high pressure in the refrigeration cycle. This can cause explosion and injury.
Note on Pipe Length
The length of refrigerant piping will affect the performance and energy efficiency of the unit. Nominal efficiency is tested on units with a pipe length of 5 meters (16.5ft)(In North America, the standard pipe length is 7.5m (25'). A minimum pipe run of 3 metres is required to minimise vibration & excessive noise. In special tropical area, for the R290 refrigerant models, no refrigerant can be added and the maximum length of refrigerant pipe should not exceed 10 meters(32.8ft).
Refer to the table below for specifications on the maximum length and drop height of piping.
Maximum Length and Drop Height of Refrigerant Piping per Unit Model
| Model Capacity (BTU/h) Max. Length (m) Max. Drop Height (m) | |||
| R410A,R32 Inverter Split Air Conditioner | < 15,000 | 25 (82ft) 10 (33ft) | |
| ≥ 15,000 and < 24,000 30 (98.5ft) 20 (66ft) | |||
| ≥ 24,000 and < 36,000 50 (164ft) 25 (82ft) | |||
| R22 Fixed-speed Split Air Conditioner | < 18,000 | 10 (33ft) 5 (16ft) | |
| ≥ 18,000 and < 21,000 | 15 (49ft) | 8(26ft) | |
| ≥ 21,000 and < 35,000 10(33ft) 20 (66ft) | |||
| R410A, R32 Fixed-speed Split Air Conditioner | 20 (66ft) | 8(26ft)< 18,000 | |
| ≥ 18,000 and < 36,000 | 25 (82ft) | 10(33ft) | |
Connection Instructions – Refrigerant Piping
Step 1: Cut pipes
When preparing refrigerant pipes, take extra care to cut and flare them properly. This will ensure efficient operation and minimize the need for future maintenance.
- Measure the distance between the indoor and outdoor units.
- Using a pipe cutter, cut the pipe a little longer than the measured distance.
- Make sure that the pipe is cut at a perfect 90^ angle.
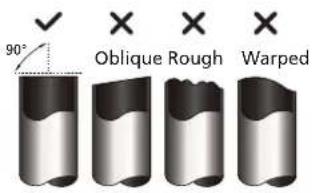
DO NOT DEFORM PIPE WHILE CUTTING
Be extra careful not to damage, dent, or deform the pipe while cutting. This will drastically reduce the heating efficiency of the unit.
Step 2: Remove burrs
Burrs can affect the air-tight seal of refrigerant piping connection. They must be completely removed.
- Hold the pipe at a downward angle to prevent burrs from falling into the pipe.
- Using a reamer or deburring tool, remove all burrs from the cut section of the pipe.
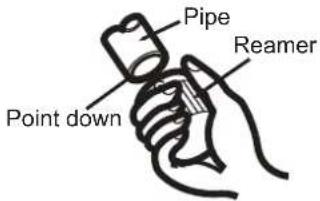
Step 3: Flare pipe ends
Proper flaring is essential to achieve an airtight seal.
- After removing burrs from cut pipe, seal the ends with PVC tape to prevent foreign materials from entering the pipe.
- Sheath the pipe with insulating material.
- Place flare nuts on both ends of pipe. Make sure they are facing in the right direction, because you can't put them on or change their direction after flaring.
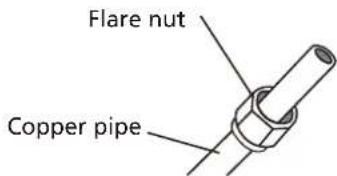
- Remove PVC tape from ends of pipe when ready to perform flaring work.
- Clamp flare form on the end of the pipe. The end of the pipe must extend beyond the edge of the flare form in accordance with the dimensions shown in the table below.
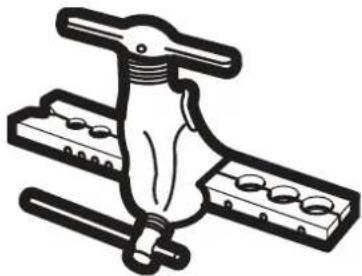
natural_image
Illustration of a mechanical clamp or lever assembly with multiple base plates (no text or symbols)PIPING EXTENSION BEYOND FLARE FORM
| Outer Diameter of Pipe (mm) | A (mm) Min. Max. | |
| ∅ 6.35 (∅ 0.25") | 0.7 (0.0275") | 1.3 (0.05") |
| ∅ 9.52 (∅ 0.375") | 1.0 (0.04") | 1.6 (0.063") |
| ∅12.7 (∅ 0.5") 1.0 (0.04") | 1.8 (0.07") | |
| ∅ 16 (∅ 0.63") | 2.0 (0.078") | 2.2 (0.086") |
| ∅ 19 (∅ 0.75") | 2.0 (0.078") | 2.4 (0.094") |
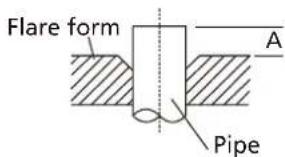
- Place flaring tool onto the form.
- Turn the handle of the flaring tool clockwise until the pipe is fully flared.
- Remove the flaring tool and flare form, then inspect the end of the pipe for cracks and even flaring.
Step 4: Connect pipes
When connecting refrigerant pipes, be careful not to use excessive torque or to deform the piping in any way. You should first connect the low-pressure pipe, then the high-pressure pipe.
MINIMUM BEND RADIUS
When bending connective refrigerant piping, the minimum bending radius is 10cm.
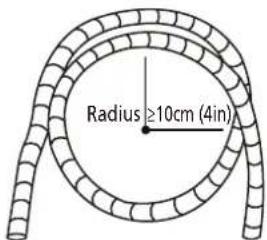
Instructions for Connecting Piping to Indoor Unit
- Align the center of the two pipes that you will connect.
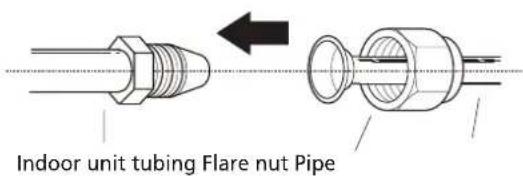
-
Tighten the flare nut as tightly as possible by hand.
-
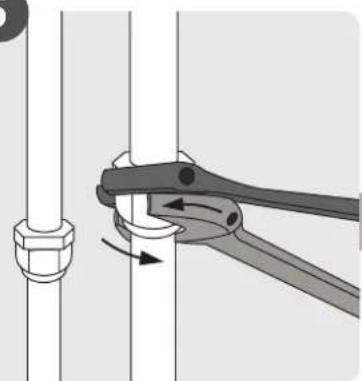
Using a spanner, grip the nut on the unit tubing.
-
While firmly gripping the nut on the unit tubing, use a torque wrench to tighten the flare nut according to the torque values in the Torque Requirements table below. Loosen the flaring nut slightly, then tighten again.
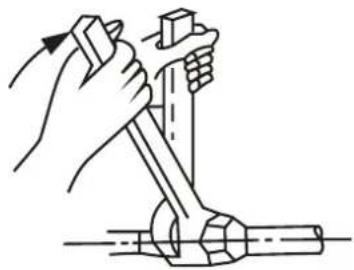
natural_image
Illustration of a hand using a tool to lift a mechanical component (no text or symbols present)TORQUE REQUIREMENTS
| Outer Diameter of Pipe (mm) | Tightening Torque (N•m) | Flare dimension(B) (mm) | Flare shape |
| ∅ 6.35 (∅ 0.25") | 18~20(180~200kgf.cm) | 8.4~8.7 (0.33~0.34") | |
| ∅ 9.52 (∅ 0.375") | 32~39(320~390kgf.cm) | 13.2~13.5 (0.52~0.53") | |
| ∅ 12.7 (∅ 0.5") | 49~59(490~590kgf.cm) | 16.2~16.5 (0.64~0.65") | |
| ∅ 16 (∅ 0.63") | 57~71(570~710kgf.cm) | 19.2~19.7 (0.76~0.78") | |
| ∅ 19 (∅ 0.75") | 67~101(670~1010kgf.cm) | 23.2~23.7 (0.91~0.93") |

DO NOT USE EXCESSIVE TORQUE
Excessive force can break the nut or damage the refrigerant piping. You must not exceed torque requirements shown in the table above.
Instructions for Connecting Piping to Outdoor Unit
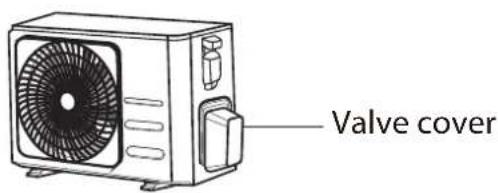
-
Unscrew the cover from the packed valve on the side of the outdoor unit.
-
Remove protective caps from ends of valves.
-
Align flared pipe end with each valve, and tighten the flare nut as tightly as possible by hand.
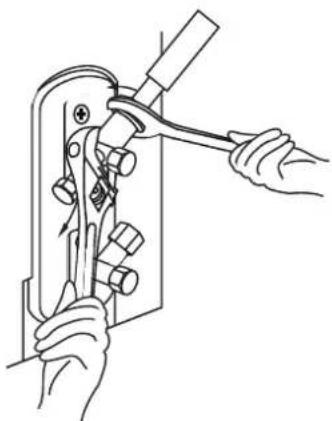
-
Using a spanner, grip the body of the valve. Do not grip the nut that seals the service valve.
-
While firmly gripping the body of the valve, use a torque wrench to tighten the flare nut according to the correct torque values.
-
Loosen the flaring nut slightly, then tighten again.
-
Repeat Steps 3 to 6 for the remaining pipe.

USE SPANNER TO GRIP MAIN BODY OF VALVE
Torque from tightening the flare nut can snap off other parts of valve.
natural_image
Line drawing of hands using a tool to adjust or install a mechanical component (no text or symbols present)Air Evacuation
Preparations and Precautions
Air and foreign matter in the refrigerant circuit can cause abnormal rises in pressure, which can damage the air conditioner, reduce its efficiency, and cause injury. Use a vacuum pump and manifold gauge to evacuate the refrigerant circuit, removing any non-condensable gas and moisture from the system.
Evacuation should be performed upon initial installation and when unit is relocated.
BEFORE PERFORMING EVACUATION
√ Check to make sure the connective pipes between the indoor and outdoor units are connected properly.
√ Check to make sure all wiring is connected properly.
Evacuation Instructions
- Connect the charge hose of the manifold gauge to service port on the outdoor unit's low pressure valve.
- Connect another charge hose from the manifold gauge to the vacuum pump.
- Open the Low Pressure side of the manifold gauge. Keep the High Pressure side closed.
- Turn on the vacuum pump to evacuate the system.
- Run the vacuum for at least 15 minutes, or until the Compound Meter reads -76cmHG (-10 ^5 Pa).
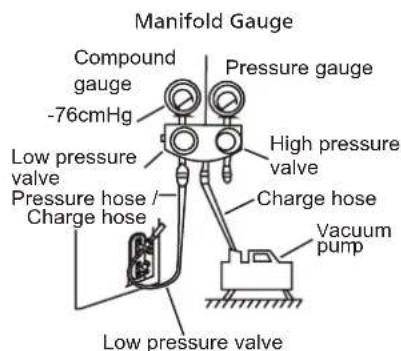
- Close the Low Pressure side of the manifold gauge, and turn off the vacuum pump.
-
Wait for 5 minutes, then check that there has been no change in system pressure.
-
If there is a change in system pressure, refer to Gas Leak Check section for information on how to check for leaks. If there is no change in system pressure, unscrew the cap
- from the packed valve (high pressure valve). Insert hexagonal wrench into the packed valve (high pressure valve) and open the valve by turning the wrench in a 1/4 counterclockwise turn. Listen for gas to exit the system, then close the valve after 5 seconds.
- Watch the Pressure Gauge for one minute to make sure that there is no change in pressure. The Pressure Gauge should read slightly higher than atmospheric pressure.
- Remove the charge hose from the service port.
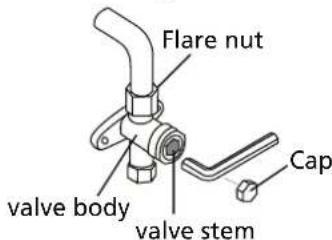
- Using hexagonal wrench, fully open both the high pressure and low pressure valves.
- Tighten valve caps on all three valves (service port, high pressure, low pressure) by hand. You may tighten it further using a torque wrench if needed.
! OPEN VALVE STEMS GENTLY
When opening valve stems, turn the hexagonal wrench until it hits against the stopper. Do not try to force the valve to open further.
Note on Adding Refrigerant
Some systems require additional charging depending on pipe lengths. The standard pipe length varies according to local regulations. For example, in North America, the standard pipe length is 7.5m (25'). In other areas, the standard pipe length is 5m (16'). The refrigerant should be charged from the service port on the outdoor unit's low pressure valve. The additional refrigerant to be charged can be calculated using the following formula:
ADDITIONAL REFRIGERANT PER PIPE LENGTH
| Connective Pipe Length (m) | Air Purging Method | Additional Refrigerant | |
| ≤ Standard pipe length | Vacuum Pump N/A | ||
| > Standard pipe length | Vacuum Pump | Liquid Side: ∅ 6.35 (∅ 0.25")R32:(Pipe length – standard length) x 12g/m(Pipe length – standard length) x 0.13oZ/ftR290:(Pipe length – standard length) x 10g/m(Pipe length – standard length) x 0.10oZ/ftR410A:(Pipe length – standard length) x 15g/m(Pipe length – standard length) x 0.16oZ/ftR22:(Pipe length – standard length) x 20g/m(Pipe length – standard length) x 0.21oZ/ft | Liquid Side: ∅ 9.52 (∅ 0.375")R32:(Pipe length – standard length) x 24g/m(Pipe length – standard length) x 0.26oZ/ftR290:(Pipe length – standard length) x 18g/m(Pipe length – standard length) x 0.19oZ/ftR410A:(Pipe length – standard length) x 30g/m(Pipe length – standard length) x 0.32oZ/ftR22:(Pipe length – standard length) x 40g/m(Pipe length – standard length) x 0.42oZ/ft |
For R290 refrigerant unit, the total amount of refrigerant to be charged is no more than: 387g(<=9000Btu/h), 447g(>9000Btu/h and <=12000Btu/h), 547g(>12000Btu/h and <=18000Btu/h), 632g(>18000Btu/h and <=24000Btu/h).

CAUTION DO NOT mix refrigerant types.
Electrical and Gas Leak Checks
Before Test Run
Only perform test run after you have completed the following steps:
- Electrical Safety Checks – Confirm that the unit's electrical system is safe and operating properly
- Gas Leak Checks – Check all flare nut connections and confirm that the system is not leaking
- Confirm that gas and liquid (high and low pressure) valves are fully open
Electrical Safety Checks
After installation, confirm that all electrical wiring is installed in accordance with local and national regulations, and according to the Installation Manual.
BEFORE TEST RUN
Check Grounding Work
Measure grounding resistance by visual detection and with grounding resistance tester. Grounding resistance must be less than 0.1 .
Note: This may not be required for some locations in North America.
DURING TEST RUN
Check for Electrical Leakage
During the Test Run, use an electroprobe and multimeter to perform a comprehensive electrical leakage test.
If electrical leakage is detected, turn off the unit immediately and call a licensed electrician to find and resolve the cause of the leakage.
Note: This may not be required for some locations in North America.

WARNING – RISK OF ELECTRIC SHOCK
ALL WIRING MUST COMPLY WITH LOCAL AND NATIONAL ELECTRICAL CODES, AND MUST BE INSTALLED BY A LICENSED ELECTRICIAN.
Gas Leak Checks
There are two different methods to check for gas leaks.
Soap and Water Method
Using a soft brush, apply soapy water or liquid detergent to all pipe connection points on the indoor unit and outdoor unit. The presence of bubbles indicates a leak.
Leak Detector Method
If using leak detector, refer to the device's operation manual for proper usage instructions.
AFTER PERFORMING GAS LEAK CHECKS
After confirming that the all pipe connection points DO NOT leak, replace the valve cover on the outside unit.
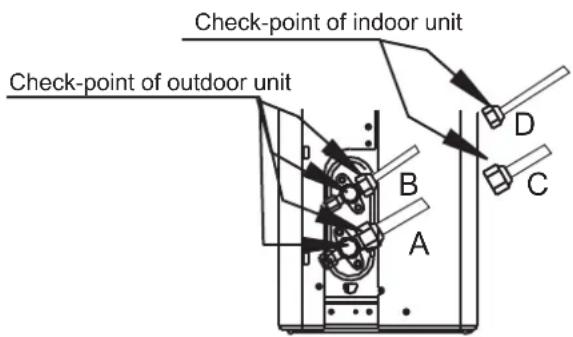
A: Low pressure stop valve
B: High pressure stop valve
C& D: Indoor unit flare nuts
Test Run
Test Run Instructions
You should perform the Test Run for at least 30 minutes.
- Connect power to the unit.
- Press the ON/OFF button on the remote controller to turn it on.
- Press the MODE button to scroll through the following functions, one at a time:
• COOL – Select lowest possible temperature
• HEAT – Select highest possible temperature
- Let each function run for 5 minutes, and perform the following checks:
List of Checks to Perform PASS/FAIL
| No electrical leakage | ||
| Unit is properly grounded | ||
| All electrical terminals properly covered | ||
| Indoor and outdoor units are solidly installed | ||
| All pipe connection points do not leak | Outdoor (2): | Indoor (2): |
| Water drains properly from drain hose | ||
| All piping is properly insulated | ||
| Unit performs COOL function properly | ||
| Unit performs HEAT function properly | ||
| Indoor unit louvers rotate properly | ||
| Indoor unit responds to remote controller |
DOUBLE-CHECK PIPE CONNECTIONS
During operation, the pressure of the refrigerant circuit will increase. This may reveal leaks that were not present during your initial leak check. Take time during the Test Run to double-check that all refrigerant pipe connection points do not have leaks. Refer to Gas Leak Check section for instructions.
- After the Test Run is successfully completed, and you confirm that all checks points in List of Checks to Perform have PASSED, do the following:
a. Using remote control, return unit to normal operating temperature.
b. Using insulation tape, wrap the indoor refrigerant pipe connections that you left uncovered during the indoor unit installation process.
IF AMBIENT TEMPERATURE IS BELOW 16°C (60°F)
You can't use the remote controller to turn on the COOL function when the ambient temperature is below 16°C. In this instance, you can use the MANUAL CONTROL button to test the COOL function.
- Lift the front panel of the indoor unit, and raise it until it clicks in place.
- The MANUAL CONTROL button is located on the right-hand side of display box. Press it 2 times to select the COOL function.
- Perform Test Run as normal.
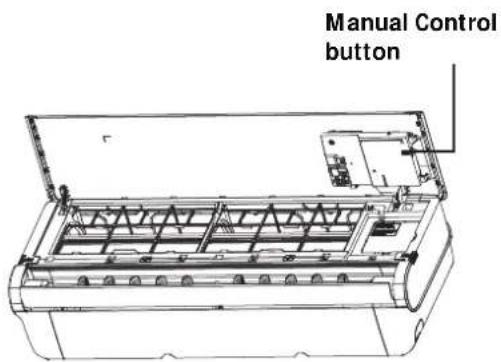
Packing and unpacking the unit
Instructions for packing unpacking the unit:
Unpacking:
Indoor unit:
- Cut the sealing tape on the carton with a knife, one cut on the left, one cut in the middle and one cut on the right.
- Use the vice to take out the sealing nails on the top of the carton.
3.Open the carton. - Take out the middle support plate if it is included.
- Take out the accessory package, and take out the connecting wire if it is included.
- Lift the machine out of the carton and lay it flat.
- Remove the left and right package foam or the upper and lower packaging foam, untie the packaging bag.
Outdoor Unit
- Cut the packing belt.
- Take the unit out of the carton.
- Remove the foam from the unit.
- Remove the packaging bag from the unit.
Packing:
Indoor unit:
- Put the indoor unit into the packing bag.
- Attach the left and right package foam or the upper and lower packaging foam to the unit.
- Put the unit into the carton, then put accessory package in.
- Close the carton and seal it with the tape.
- Using the packing belt if necessary.
Outdoor unit:
- Put the outdoor unit into the packing bag.
- Put the bottom foam into the box.
- Put the unit into the carton, then put the upper packaging foam on the unit.
- Close the carton and seal it with the tape.
- Using the packing belt if necessary.
The design and specifications are subject to change without prior notice for product improvement. Consult with the sales agency or manufacturer for details. Any updates to the manual will be uploaded to the service website, please check for the latest version.
CS017UI-XT
SAFETY MANUAL
IMPORTANT NOTE:
Read this manual carefully before installing or operating your new air conditioning unit. Make sure to save this manual for future reference.
Safety Precautions
Read Safety Precautions Before Operation and Installation Incorrect installation due to ignoring instructions can cause serious damage or injury.

WARNING
1. Installation (Space)
- That the installation of pipe-work shall be kept to a minimum.
- That pipe-work shall be protected from physical damage.
- Where refrigerant pipes shall be compliance with national gas regulations.
- That mechanical connections shall be accessible for maintenance purposes.
- In cases that require mechanical ventilation, ventilation openings shall be kept clear of obstruction.
- When disposing of the product is used, be based on national regulations, properly processed.
2. Servicing
- Any person who is involved with working on or breaking into a refrigerant circuit should hold a current valid certificate from an industry-accredited assessment authority, which authorises their competence to handle refrigerants safely in accordance with an industry recognised assessment specification.
- Maintenance and repair requiring the assistance of other skilled personnel shall be carried out under the supervision of the person competent in the use of flammable refrigerants.
- Do not use means to accelerate the defrosting process or to clean, other than those recommended by the manufacturer.
- The appliance shall be stored in a room without continuously operating ignition sources (for example: open flames, an operating gas appliance or an operating electric heater)
- Be more careful that foreign matter(oil, water, etc) does not enter the piping. Also, when storing the piping, securely seal the opening by pinching, taping, etc.
- Do not pierce or burn.
- Be aware that refrigerants may not contain an odour.
- All working procedure that affects safety means shall only be carried by competent persons.
- Appliance shall be stored in a well -ventilated area where the room size corresponds to the room area as specific for operation.
- The appliance shall be stored so as to prevent mechanical damage from occurring.
- Joints shall be tested with detection equipment with a capability of 5 g/year of refrigerant or better, with the equipment in standstill and under operation or under a pressure of at least these standstill or operation conditions after installation. Detachable joints shall NOT be used in the indoor side of the unit(brazed, welded joint could be used).
- When a FLAMMABLE REFRIGERANT is used, the requirements for installation space of appliance and/or ventilation requirements are determined according to
-- the mass charge amount(M) used in the appliance,
--the installation location,
--the type of ventilation of the location or of the appliance.
The maximum charge in a room shall be in accordance with the following:
$$ \mathsf {m} _ {\max} = 2, 5 \times (\mathrm{LFL}) ^ {(5 / 4)} \times \mathsf {h} _ {0} \times (\mathsf {A}) ^ {1 / 2} $$
or the required minimum floor area A_min to install an appliance with refrigerant charge M(kg) shall be in accordance with following:
$$ \mathsf {A} _ {\min} = \left(\mathsf {M} / (2, 5 \times (\text { LFL }) ^ {(5 / 4)} \times \mathsf {h} _ {0})\right) ^ {2} $$
Where.
m_max is the allowable maximum charge in a room, in kg; M is the refrigerant charge amount in appliance, in kg;
A min is the required minimum room area, in m^2 ;
A is the room area, in m^2 ;
LFL is the lower flammable limit, in kg/m ^3 ;
h_0 is the release height, the vertical distance in metres from the floor to the point of release when the appliance is installed;
h_0 = (h_inst + h_rel) or 0,6 m whichever is higher
hrel is the release offset in metres from the bottom of the appliance to the point of release
hinst is the installed height in metres of the unit
Reference installed heights are given below:
0.0 m for portable and floor mounted;
1.0m for window mounted;
1.8m for wall mounted;
2.2m for ceiling mounted;
If the minimum installed height given by the manufacturer is higher than the reference installed height, then in addition A_min and m_max for the reference installed height have to be given by the manufacturer. An appliance may have multiple reference installed heights. In this case, A_min and m_max calculations shall be provided for all applicable reference installed heights.
For appliances serving one or more rooms with an air duct system, the lowest opening of the duct connection to each conditioned space or any opening of the indoor unit greater than 5 cm^2 , at the lowest position to the space, shall be used for ho. However, ho shall not be less than 0,6 m. Amin shall be calculated as a function of the opening heights of the duct to the spaces and the refrigerant charge for the spaces where leaked refrigerant may flow to, considering where the unit is located. All spaces shall have a floor area more than Amin.
NOTE 1 This formula cannot be used for refrigerants lighter than 42 kg/kmol.
NOTE 2 Some examples of the results of the calculations according to the above formula are given in Tables 1-1 and 1-2.
NOTE 3 For factory sealed appliances, the nameplate on the unit itself marked the refrigerant charge can be used to calculate Amin.
NOTE 4 For field charged products, calculation of Amin can be based on the installed refrigerant charge not to exceed the factory specified maximum refrigerant charge.
The maximum charge in a room and the required minimum floor area to install an appliance, please refer to the “Owner’s Manual & Installation Manual” of the unit. For specific information on the type of gas and the amount, please refer to the relevant label on the unit itself
Table.1-1
Max Refrigerant Charge (kg)
| Refrigerant Type | LFL(kg/m3) | Installation Height H0(m) | Floor Area (m2) | ||||||
| R32 | 0.306 | 4 | 7 | 10 | 15 | 20 | 30 | 50 | |
| 0.6 | 0.68 | 0.90 | 1.08 | 1.32 | 1.53 | 1.87 | 2.41 | ||
| 1.0 | 1.14 | 1.51 | 1.80 | 2.20 | 2.54 | 3.12 | 4.02 | ||
| 1.8 | 2.05 | 2.71 | 3.24 | 3.97 | 4.58 | 5.61 | 7.24 | ||
| 2.2 | 2.50 | 3.31 | 3.96 | 4.85 | 5.60 | 6.86 | 8.85 | ||
| R290 | 0.038 | 0.6 | 0.050.07 | 0.080.100 | 0.110.140 | 0.18 | |||
| 1.0 | 0.080.11 | 0.130.160 | 0.190.230 | 0.30 | |||||
| 1.8 | 0.150.20 | 0.240.290 | 0.340.410 | 0.53 | |||||
| 2.2 | 0.180.24 | 0.290.360 | 0.410.510 | 0.65 | |||||
Table.1-2
Min. Room Area ( m^2 )
| Refrigerant Type | LFL(kg/m3) | Installation Height H0(m) | Charge Amount in kg Minimum Room Area (m2) | ||||||
| R32 | 0.306 | 1.224kg | 1.836kg | 2.448kg | 3.672kg | 4.896kg | 6.12kg | 7.956kg | |
| 0.6 | 29 | 51 | 116 | 206 | 321 | 543 | |||
| 1.0 | 10 | 19 | 42 | 74 | 116 | 196 | |||
| 1.8 | 3 | 6 | 13 | 23 | 36 | 60 | |||
| 2.2 | 2 | 4 | 9 | 15 | 24 | 40 | |||
| R290 | 0.038 | 0.152kg | 0.228kg | 0.304kg | 0.456kg | 0.608kg | 0.76kg | 0.988kg | |
| 0.6 | 821463 | 2858491 | 21541 | ||||||
| 1.0 | 305311 | 8210328 | 55 | ||||||
| 1.8 | 916366 | 5101171 | |||||||
| 2.2 | 611244 | 368115 | |||||||
Information Servicing
1. Checks to the area
Prior to beginning work on systems containing flammable refrigerants, safety checks are necessary to ensure that the risk of ignition is minimised. For repair to the refrigerating system, the following precautions shall be complied with prior to conducting work on the system.
2. Work procedure
Works shall be undertaken under a controlled procedure so as to minimise the risk of a flammable gas or vapour being present while the work is being performed.
Technical personnel in charge of operation, supervision, maintenance of air-conditioning systems shall be adequately instructed and competent with respect to their tasks.
Works shall be undertaken with appropriate tools only (In case of uncertainty, please consult the manufacturer of the tools for use with flammable refrigerants)
3. General work area
All maintenance staff and others working in the local area shall be instructed on the nature of work being carried out. work in confined sapces shall be avoided. The area around the work space shall be sectioned off. Ensure that the conditions within the area have been made safe by control of flammable material.
4. Checking for presence of refrigerant
The area shall be checked with an appropriate refrigerant detector prior to and during work, to ensure the technician is aware of potentially flammable atmospheres. Ensure that the leak detection equipment being used is suitable for use with flammable refrigerants, i.e. no sparking, adequately sealed or intrinsically safe.
5. Presence of fire extinguisher
If any hot work is to be conducted on the refrigeration equipment or any associated parts, appropriate fire extinguishing equipment shall be available to hand. Have a dry power or CO2 fire extinguisher adjacent to the charging area.
6. No ignition sources
No person carrying out work in relation to a refrigeration system which involves exposing any pipe work that contains or has contained flammable refrigerant shall use any sources of ignition in such a manner that it may lead to the risk of fire or explosion. All possible ignition sources, including cigarette smoking, should be kept sufficiently far away from the site of installation, repairing, removing and disposal, during which flammable refrigerant can possibly be released to the surrounding space. Prior to work taking place, the area around the equipment is to be surveyed to make sure that there are no flammable hazards or ignition risks. "NO SMOKING" signs shall be displayed.
7. Ventilated area
Ensure that the area is in the open or that it it adequately ventilated before breaking into the system or conducting any hot work. A degree of ventilation shall continue during the period that the work is carried out. The ventilation should safely disperse any released refrigerant and preferably expel it externally into the atmosphere.
8. Checks to the refrigeration equipment
Where electrical components are being changed, they shall be fit for the purpose and to the correct specification. At all times the manufacturer's maintenance and service guidelines shall be followed. If in doubt consult the manufacturer's technical department for assistance. The following checks shall be applied to installations using flammable refrigerants:
- the charge size is in accordance with the room size within which the refrigerant containing parts are installed;
● the ventilation machinery and outlets are operating adequately and are not obstructed; - if an indirect refrigerating circuit is being used, the secondary circuits shall be checked for the presence of refrigerant; marking to the equipment continues to be visible and legible.
- marking and signs that are illegible shall be corrected;
- refrigeration pipe or components are installed in a position where they are unlikely to be exposed to any substance which may corrode refrigerant containing components, unless the components are constructed of materials which are inherently resistant to being corroded or are suitably protected against being so corroded.
9. Checks to electrical devices
Repair and maintenance to electrical components shall include initial safety checks and component inspection procedures. If a fault exists that could compromise safety, then no electrical supply shall be connected to the circuit until it is satisfactorily dealt with. If the fault cannot be corrected immediately but it is necessary to continue operation, and adequate temporary solution shall be used. This shall be reported to the owner of the equipment so all parties are advised.
Initial safety checks shall include:
- that capacitors are discharged: this shall be done in a safe manner to avoid possibility of sparking
- that there no live electrical components and wiring are exposed while charging, recovering or purging the system:
● that there is continuity of earth bonding.
10. Repairs to sealed components
10.1 During repairs to sealed components, all electrical supplies shall be disconnected from the equipment being worked upon prior to any removal of sealed covers, etc. If it is absolutely necessary to have an electrical supply to equipment during servicing, then a permanently operating form of leak detection shall be located at the most critical point to warn of a potentially hazardous situation.
10.2 Particular attention shall be paid to the following to ensure that by working on electrical components, the casing is not altered in such a way that the level of protection is affected. This shall include damage to cables, excessive number of connections, terminals not made to original specification, damage to seals, incorrect fitting of glands, etc.
- Ensure that apparatus is mounted securely.
- Ensure that seals or sealing materials have not degraded such that they no longer serve the purpose of preventing the ingress of flammable atmospheres. Replacement parts shall be in accordance with the manufacturer's specifications.
NOTE: The use of silicon sealant may inhibit the effectiveness of some types of leak detection equipment. Instrinsically safe components do not have to be isolated prior to working on them.
11. Repair to intrinsically safe components
Do not apply any permanent inductive or capacitance loads to the circuit without ensuring that this will not exceed the permissible voltage and current permitted for the equipment in use. Intrinsically safe components are the only types that can be worked on while live in the presence of a flammable atmosphere. The test apparatus shall be at the correct rating. Replace components only with parts specified by the manufacturer. Other parts may result in the ignition of refrigerant in the atmosphere from a leak.
12. Cabling
Check that cabling will not be subject to wear, corrosion, excessive pressure, vibration, sharp edges or any other adverse environmental effects. The check shall also take into account the effects of aging or continual vibration from sources such as compressors or fans.
13. Detection of flammable refrigerants
Under no circumstances shall potential sources of ignition be used in the searching for or detection of refrigerant leaks. A halide torch(or any other detector using a naked flame) shall not be used.
14. Leak detection methods
The following leak detection methods are deemed acceptable for systems containing flammable refrigerants. Electronic leak detectors shall be used to detect flammable refrigerants, but the sensitivity may not be adequate, or may need re-calibration.(Detection equipment shall be calibrated in a refrigerant-free area.) Ensure that the detector is not a potential source of ignition and is suitable for the refrigerant. Leak detection equipment shall be set at a percentage of the LFL of the refrigerant and shall be calibrated to the refrigerant employed and the appropriate percentage of gas (25% maximum) is confirmed. Leak detection fluids are suitable for use with most refrigerants but the use of detergents containing chlorine shall be avoided as the chlorine may react with the refrigerant and corrode the copper pipe-work.
If a leak is suspected, all naked flames shall be removed or extinguished. If a leakage of refrigerat is found which requires brazing, all of the refrigerant shall be recovered from the system, or isolated (by means of shut off valves) in a part of the system remote from the leak. For appliances containing FLAMMABLE REFRIGERANTS, oxygen free nitrogen (OFN) shall then be purged through the system both before and during the brazing process.
15. Removal and evacuation
When breaking into the refrigerant circuit to make repairs - or for any other purpose-conventional procedures shall be used, However, for FLAMMABLE REFRIGERANTS it is important that best practice is followed since flammability is a consideration. Opening of the refrigerant systems shall not be done by brazing. The following procedure shall be adhered to:
- remove refrigerant;
● purge the circuit with inert gas; - evacuate;
• purge again with inert gas; - open the circuit by cutting or brazing.
The refrigerant charge shall be recovered into the correct recovery cylinders. For appliances containing FLAMMBLE REFRIGERNATS, the system shall be “flushed” with OFN to render the unit safe. This process may need to be repeated several times. Compressed air or oxygen shall not be used for puring refrigerant systems.
For appliances containing FLAMMABLE REFRIGERNATS, flushing shall be achieved by breaking the vacuum in the system with OFN and continuing to fill until the working pressure is achieved, then venting to atmosphere, and finally pulling down to a vacuum. This process shall be repeated until no refrigerant is within the system. When the final OFN charge is used, the system shall be vented down to atmospheric pressure to enable work to take place. This operation is absolutely vital if brazing operations on the pipe-work are to take place.
Ensure that the outlet for the vacuum pump is not closed to any ignition sources and there is ventilation available.
16. Charging procedures
In addition to conventional charging procedures, the following requirements shall be followed:
- Works shall be undertaken with appropriate tools only (In case of uncertainty, please consult the manufacturer of the tools for use with flammable refrigerants)
- Ensure that contamination of different refrigerants does not occur when using charging equipment. Hoses or lines shall be as short as possible to minimize the amount of refrigerant contained in them.
• Cylinders shall be kept upright. - Ensure that the refrigeration system is earthed prior to charging the system with refrigerant.
- Label the system when charging is complete(if not already).
- Extreme care shall be taken not to overfill the refrigeration system.
- Prior to recharging the system it shall be pressure tested with OFN. The system shall be leak tested on completion of charging but prior to commissioning. A follow up leak test shall be carried out prior to leaving the site.
17. Decommissioning
Before carrying out this procedure, it is essential that the technician is completely familiar with the equipment and all its detail. It is recommended good practice that all refrigerants are recovered safely or safely vented(For R290 refrigerant models). Prior to the task being carried out, an oil and refrigerant sample shall be taken.
In case analysis is required prior to re-use of reclaimed refrigerant. It is essential that electrical power is available before the task is commenced.
a) Become familiar with the equipment and its operation.
b) Isolate system electrically
c) Before attempting the procedure ensure that:
● mechanical handling equipment is available, if required, for handling refrigerant cylinders;
- all personal protective equipment is available and being used correctly;
● the recovery process is supervised at all times by a competent person;
- recovery equipment and cylinders conform to the appropriate standards.
d) Pump down refrigerant system, if possible.
e) If a vacuum is not possible, make a manifold so that refrigerant can be removed from various parts of the system.
f) Make sure that cylinder is situated on the scales before recovery takes place.
g) Start the recovery machine and operate in accordance with manufacturer s instructions.
h) Do not overfill cylinders. (No more than 70% liquid volume. The liquid density of the refrigerant with a reference temperature of 50^ C).
i) Do not exceed the maximum working pressure of the cylinder, even temporarily.
j) When the cylinders have been filled correctly and the process completed, make sure that the cylinders and the equipment are removed from site promptly and all isolation valves on the equipment are closed off.
k) Recovered refrigerant shall not be charged into another refrigeration system unless it has been cleaned and checked.
18. Labelling
Equipment shall be labelled stating that it has been de-commissioned and emptied of refrigerant. The label shall be dated and signed. Ensure that there are labels on the equipment stating the equipment contains flammable refrigerant.
19. Recovery
When removing refrigerant from a system, either for service or decommissioning, it is recommended good practice that all refrigerants are removed safely.
When tranferring refrigerant into cylinders, ensure that only appropriate refrigerant recovery cylinders are employed. Ensure that the correct numbers of cylinders for holding the total system charge are available. All cylinders to be used are designated for the recovered refrigerant and labelled for that refrigerant(i.e special cylinders for the recovery of refrigerant). Cylinders shall be complete with pressure relief valve and associated shut-off valves in good working order.
Empty recovery cylinders are evacuated and, if possible, cooled before recovery occurs.
The recovery equipment shall be in good working order with a set of instructions concerning the equipment that is at hand and shall be suitable for the recovery of flammable refrigerants. In addition, a set of calibrated weighing scales shall be available and in good working order.
Hoses shall be complete with leak-free disconnect couplings and in good condition. Before using the recovery machine, check that it is in satisfactory working order, has been properly maintained and that any associated electrical components are sealed to prevent ignition in the event of a refrigerant release. Consult manufacturer if in doubt.
The recovered refrigerant shall be returned to the refrigerant supplier in the correct recovery cylinder, and the relevant Waste Transfer Note arranged. Do not mix refrigerants in recovery units and especially not in cylinders.
If compressors or compressor oils are to be removed, ensure that they have been evacuated to an acceptable level to make certain that flammable refrigerant does not remain within the lubricant. The evacuation process shall be carried out prior to retruning the compressor to the suppliers. Only electric heating to the compressor body shall be employed to accelerate this process. When oil is drained from a system, it shall be carried out safely.
20. Venting of HC Refrigerant (R290)
Venting may be carried out as an alternative to recovering the refrigerant. Because HC refrigerants have no ODP and negligible GWP, under certain circumstances it may be considered acceptable to vent the refrigerant. However, if this is to be considered, it should be done in accordance with the relevant national rules or regulations, if they permit.
In particular, before venting a system, it would be necessary to:
- Ensure that legislation relating to waste material has been considered
- Ensure that environmental legislation has been considered
- Ensure that legislation addressing safety of hazardous substances is satisfied
- Venting is only carried out with systems that contain a small quantity of refrigerant, typically less than 500 g.
- Venting to inside a building is not permissible under any circumstances
- Venting must not be to a public area, or where people are unaware of the procedure taking place
- The hose must be of sufficient length and diameter such that it will extend to at least 3 m beyond the outside of the building
- The venting should only take place on the certainty that the refrigerant will not get blown back into any adjacent buildings, and that it will not migrate to a location below ground level
- The hose is made of material that is compatible for use with HC refrigerants and oil
- A device is used to raise the hose discharge at least 1 m above ground level and so that the discharge is pointed in an upwards direction (to assist with dilution)
- The end of the hose can now discharge and disperse the flammable fumes into the ambient air.
- There should not be any restriction or sharp bends within the vent-line which will hinder the ease of flow.
- There must be no sources of ignition near the hose discharge
- The hose should be regularly checked to ensure that there are no holes or kinks in it, that could lead to leakage or blocking of the passage of flow
When carrying out the venting, the flow of refrigerant should be metered using manifold gauges to a low flow rate, so as to ensure the refrigerant is well diluted. Once the refrigerant has ceased flowing, if possible, the system should be flushed out with OFN; if not, then the system should be pressurised with OFN and the venting procedure carried out two or more times, to ensure that there is minimal HC refrigerant remaining inside the system.
21. Transportation, marking and storage for units
- Transport of equipment containing flammable refrigerants Compliance with the transport regulations
- Marking of equipment using signs Compliance with local regulations
- Disposal of equipment using flammable refrigerants Compliance with national regulations
- Storage of equipment/appliances The storage of equipment should be in accordance with the manufacturer's instructions.
- Storage of packed (unsold) equipment Storage package protection should be constructed such that mechanical damage to the equipment inside the package will not cause a leak of the refrigerant charge. The maximum number of pieces of equipment permitted to be stored together will be determined by local regulations.
Explanation of symbols displayed on the indoor unit or outdoor unit
 | WARNING | This symbol shows that this appliance used a flammable refrigerant. If the refrigerant is leaked and exposed to an external ignition source, there is a risk of fire. |
 | CAUTION | This symbol shows that the operation manual should be read carefully. |
 | CAUTION | This symbol shows that a service personnel should be handling this equipment with reference to the installation manual. |
 | CAUTION | |
 | CAUTION | This symbol shows that information is available such as the operating manual or installation manual. |
natural_image
Warning symbol of a flame inside a triangle (no text or numbers)CAUTION: Risk of fire
natural_image
Warning symbol depicting flame inside a triangle (no text or numbers)Warning: low burning velocity material (For products containing R32 refrignent comply with the IEC 60335-2-40:2018 standard only)
The design and specifications are subject to change without prior notice for product improvement. Consult with the sales agency or manufacturer for details. Any updates to the manual will be uploaded to the service website, please check for the latest version.
SAFETY MANUAL-R32(R290)-B
REMOTE CONTROLLER
OWNER'S MANUAL
IMPORTANT NOTE:
Thank you for purchasing our air conditioner. Please read this manual carefully before operating your new air conditioning unit. Make sure to save this manual for future reference.
Table of Contents
Remote Controller Specifications ....02
Handling the Remote Controller 03
Buttons and Functions ....04
Remote Screen Indicators 05
How to Use Basic Functions ....06
How to Use Advanced Functions ....09
Remote Controller Specifications
| Model | RG10X1(G2HS)/BGEF |
| Rated Voltage | 3.0V( Dry batteries R03/LR03×2) |
| Signal Receiving Range | 8m |
| Environment | -5°C~60°C(23°F~140°F) |
Quick Start Guide
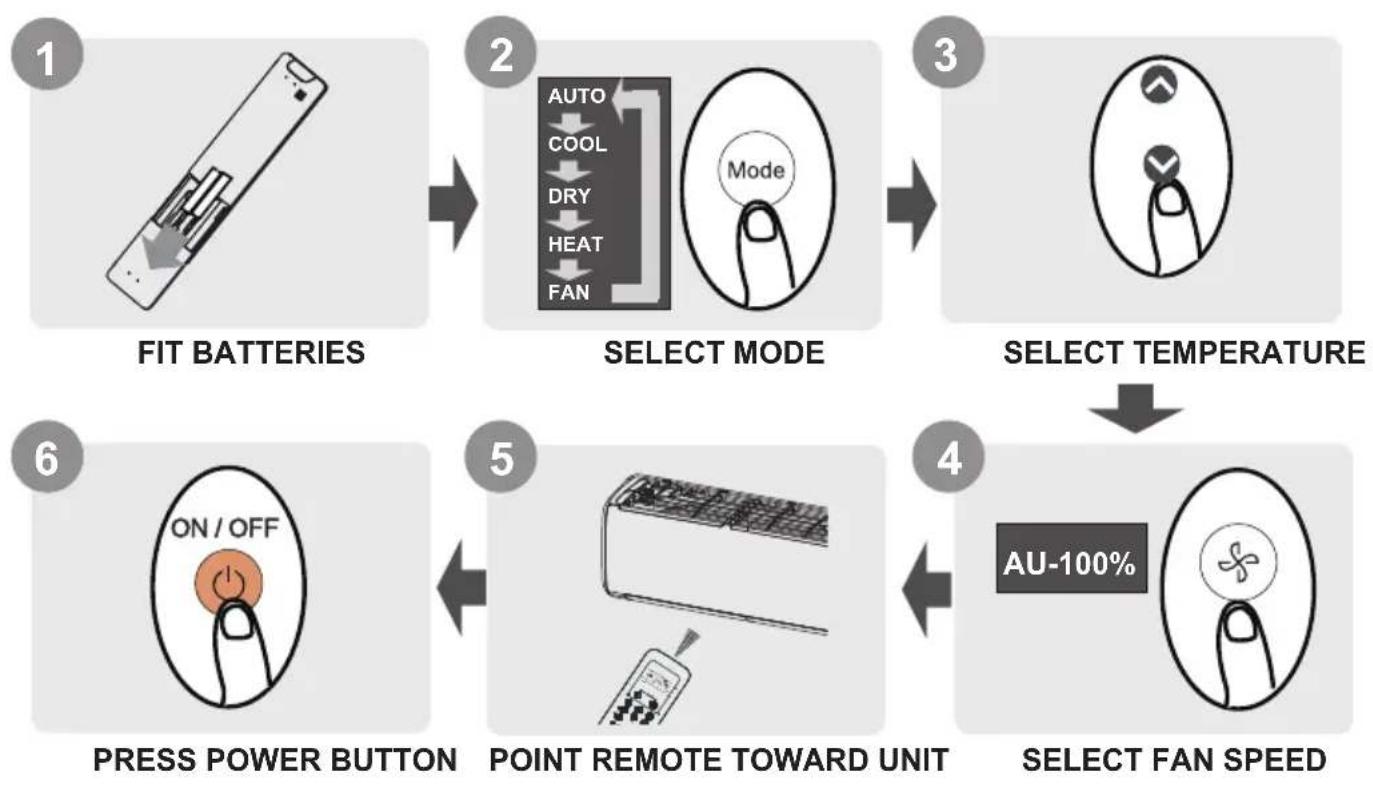
NOT SURE WHAT A FUNCTION DOES?
Refer to the How to Use Basic Functions and How to Use Advanced Functions sections of this manual for a detailed description of how to use your air conditioner.
SPECIAL NOTE
- Button designs on your unit may differ slightly from the example shown.
- If the indoor unit does not have a particular function, pressing that function's button on the remote control will have no effect.
- When there are wide differentces between "Remote controller Manual" and "USER'S MANUAL" on function description, the description of "USER'S MANUAL" shall prevail.
Handling the Remote Controller
Inserting and Replacing Batteries
Your air conditioning unit may come with two batteries(some units). Put the batteries in the remote control before use.
- Slide the back cover from the remote control downward, exposing the battery compartment.
- Insert the batteries, paying attention to match up the (+) and (-) ends of the batteries with the symbols inside the battery compartment.
- Slide the battery cover back into place.
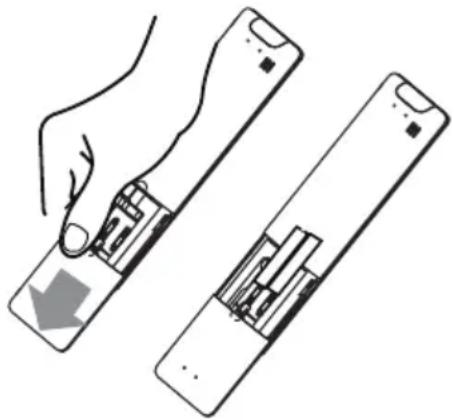
natural_image
Illustration of a hand holding a remote control panel with a gray arrow indicating left motion (no text or symbols)
BATTERY NOTES
For optimum product performance:
- Do not mix old and new batteries, or batteries of different types.
- Do not leave batteries in the remote control if you don't plan on using the device for more than 2 months.

BATTERY DISPOSAL
Do not dispose of batteries as unsorted municipal waste. Refer to local laws for proper disposal of batteries.
TIPS FOR USING REMOTE CONTROL
- The remote control must be used within 8 meters of the unit. The unit will beep when remote signal is received.
- Curtains, other materials and direct sunlight can interfere with the infrared signal receiver.
- Remove batteries if the remote will not be used more than 2 months.
- Prevent any liquid from falling into the remote control.
NOTES FOR USING REMOTE CONTROL
The device could comply with the local national regulations.
- In Canada, it should comply with CAN ICES-3(B)/NMB-3(B).
- In USA, this device complies with part 15 of the FCC Rules. Operation is subject to the following two conditions:
(1) This device may not cause harmful interference, and
(2) this device must accept any interference received, including interference that may cause undesired operation.
This equipment has been tested and found to comply with the limits for a Class B digital device, pursuant to part 15 of the FCC Rules. These limits are designed to provide reasonable protection against harmful interference in a residential installation. This equipment generates, uses and can radiate radio frequency energy and, if not installed and used in accordance with the instructions, may cause harmful interference to radio communications. However, there is no guarantee that interference will not occur in a particular installation. If this equipment does cause harmful interference to radio or television reception, which can be determined by turning the equipment off and on, the user is encouraged to try to correct the interference by one or more of the following measures:
- Reorient or relocate the receiving antenna.
- Increase the separation between the equipment and receiver.
- Connect the equipment into an outlet on a circuit different from that to which the receiver is connected.
- Consult the dealer or an experienced radio/TV technician for help.
- Changes or modifications not approved by the party responsible for compliance could void user's authority to operate the equipment.
Buttons and Functions
Before you begin using your new air conditioner, make sure to familiarize yourself with its remote control. The following is a brief introduction to the remote control itself. For instructions on how to operate your air conditioner, refer to the How to Use Basic Functions section of this manual.
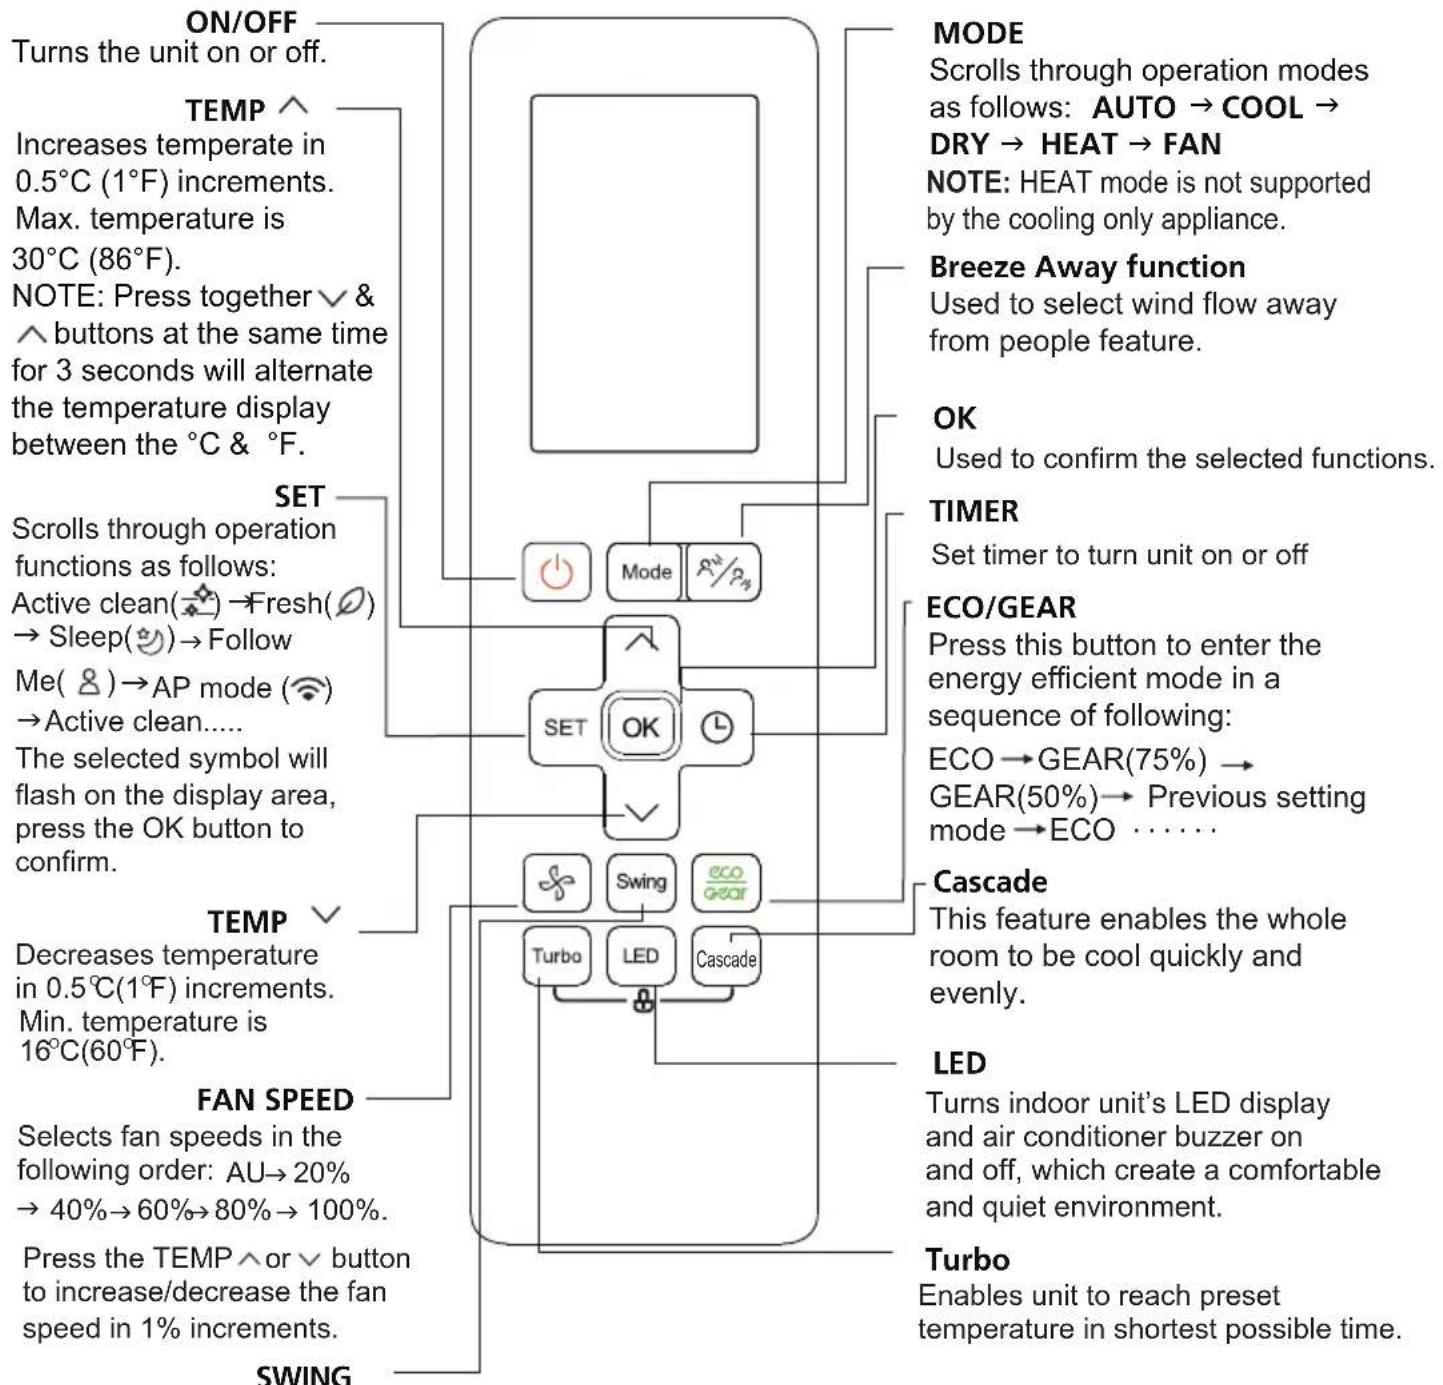
flowchart
graph TD
    A["ON/OFF"] --> B["Turns the unit on or off."]
    C["TEMP"] --> D Increases temperate (0.5°C (1°F) increments)
Max. temperature is 30°C (86°F).
NOTE: Press together & buttons at the same time for 3 seconds will alternate the temperature display between the °C & °F.
SET]
    D --> E Scrolls through operation functions as follows:
Active clean(✗)→Fresh(✗) → Sleep(✗)→Follow
Me(✗)→AP mode(✗) → Active clean......
The selected symbol will flash on the display area,
press the OK button to confirm.
TEMP
Decreases temperature in 0.5°C (1°F) increments.
Min. temperature is 16°C (60°F).
FAN SPEED
Selects fan speeds in the following order: AU→20% →40%→60%→80%→100%.
Press the TEMP ∧ or √ button to increase/decrease the fan speed in 1% increments.
SWING
MODE
Scrolls through operation modes as follows: AUTO → COOL → DRY → HEAT → FAN
NOTE: HEAT mode is not supported by the cooling only appliance.
Breeze Away function
Used to select wind flow away from people feature.
OK
Used to confirm the selected functions.
TIMER
Set timer to turn unit on or off
ECO/GEAR
Press this button to enter the energy efficient mode in a sequence of following:
ECO → GEAR (75%) → GEAR (50%) → Previous setting mode → ECO ......
Cascade
This feature enables the whole room to be cool quickly and evenly.
LED
Turns indoor unit's LED display and air conditioner buzzer on and off, which create a comfortable and quiet environment.
Turbo
Enables unit to reach preset temperature in shortest possible time.
Starts and stops the horizontal louver movement. Hold down for 2 seconds to initiate vertical louver auto swing feature.
Remote Screen Indicators
Information are displayed when the remote controller is power up.
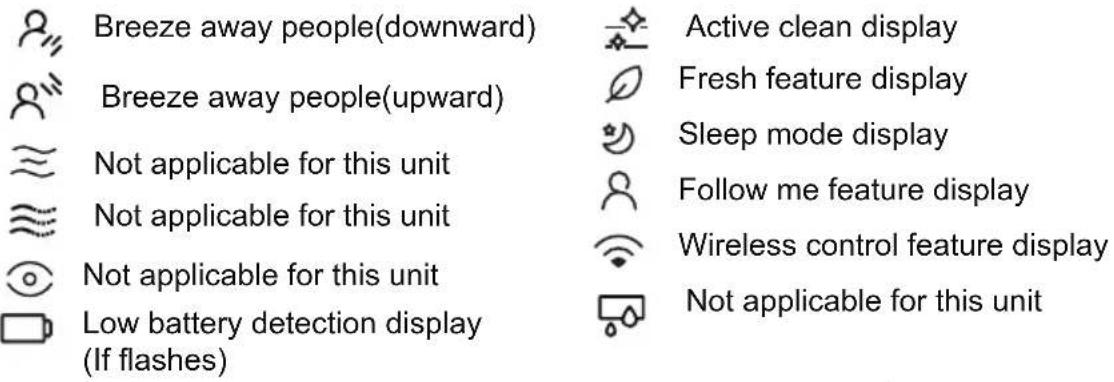
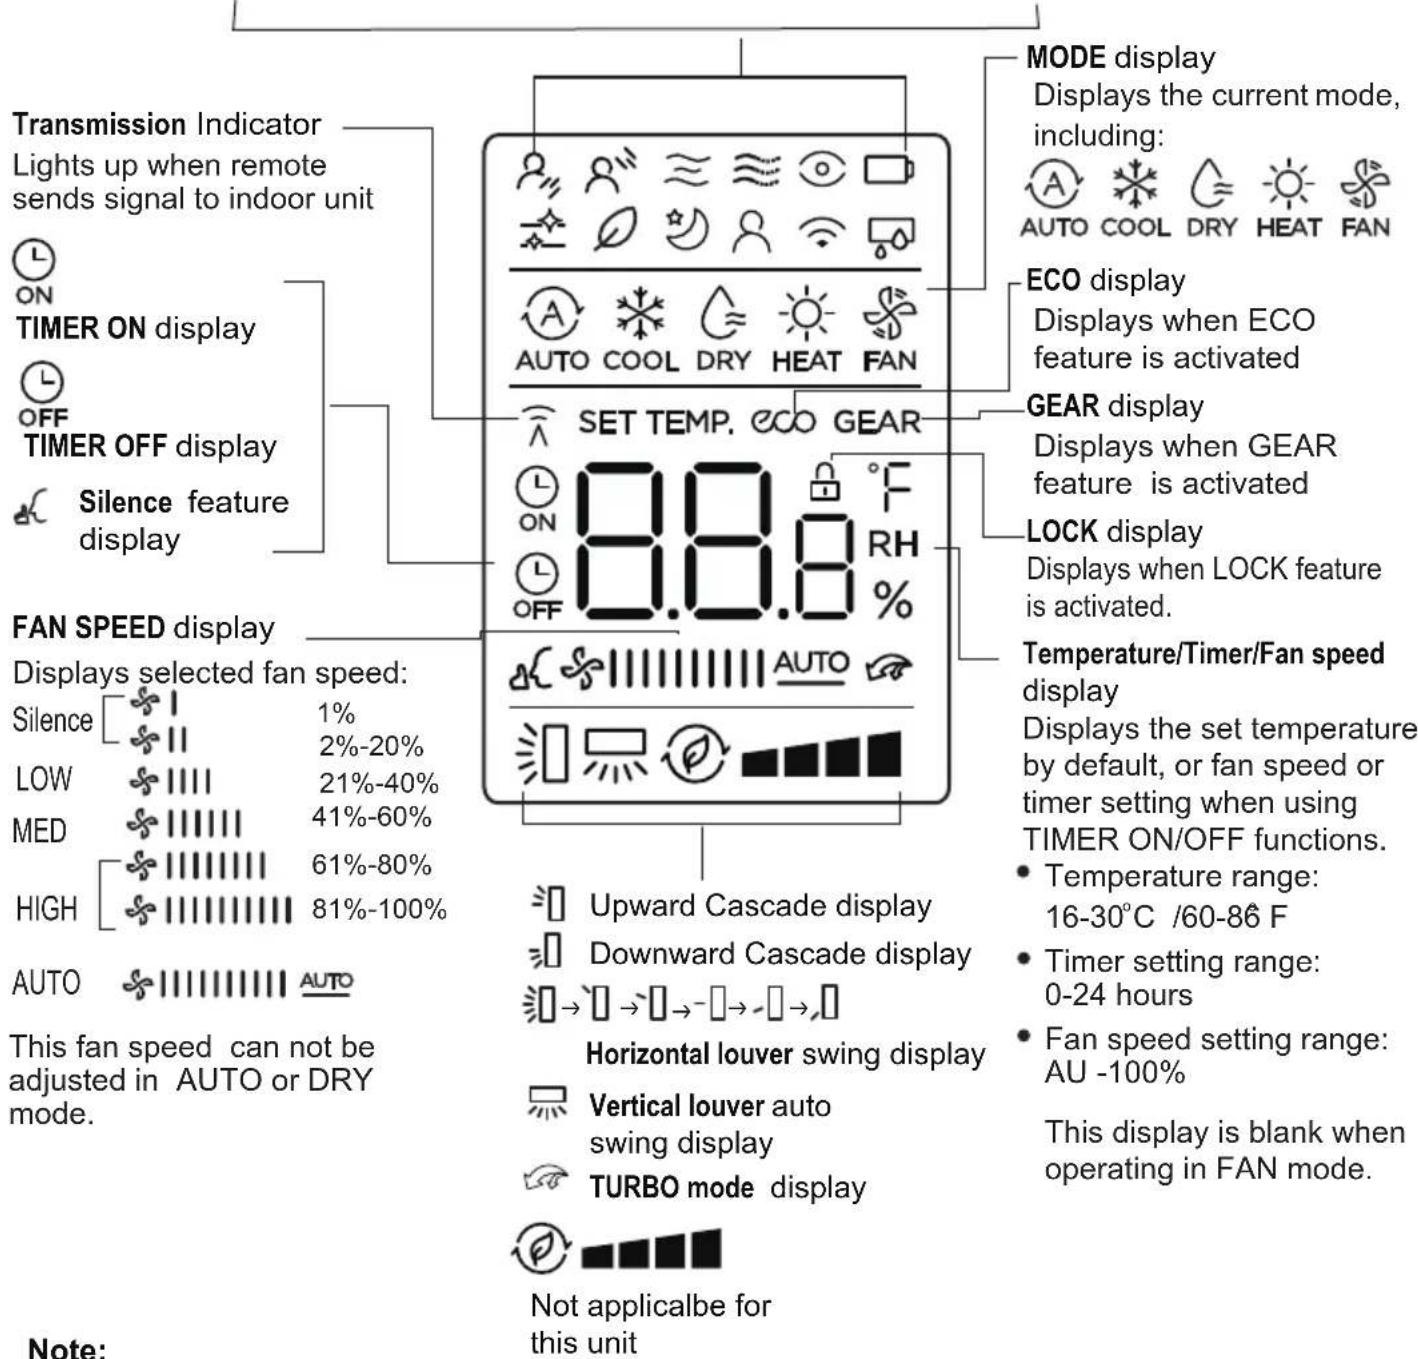
All indicators shown in the figure are for the purpose of clear presentation. But during the actual operation, only the relative function signs are shown on the display window.
How to Use Basic Functions
Basic operation
ATTENTION! Before operation, please ensure the unit is plugged in and power is available.
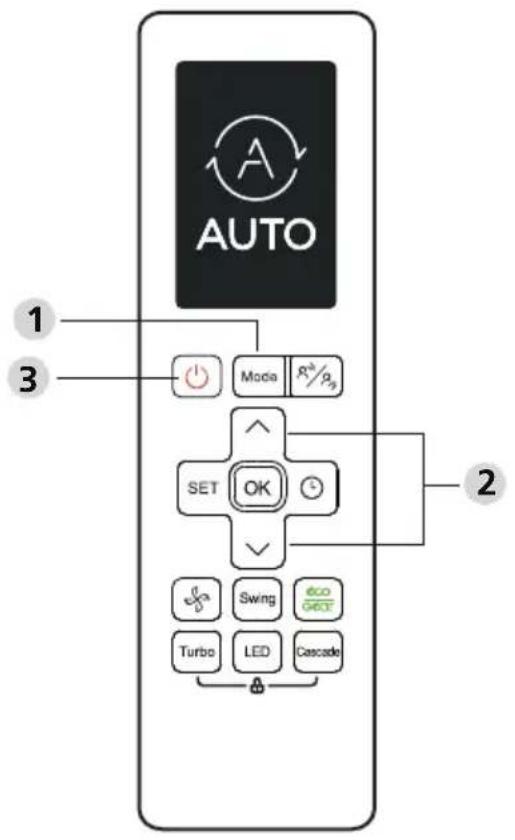
COOL Mode
- Press the MODE button to select COOL mode.
- Set your desired temperature using the TEMP ^ or TEMP ∨ button.
- Press FAN button to select the fan speed in a range of AU-100%.
- Press the ON/OFF button to start the unit.
SETTING TEMPERATURE
The operating temperature range for units is 16-30°C (60-86°F). You can increase or decrease the set temperature in 0.5°C (1°F) increments.
AUTO Mode
In AUTO mode, the unit will automatically select the COOL, FAN, or HEAT operation based on the set temperature.
- Press the MODE button to select AUTO.
- Set your desired temperature using the TEMP ^ or TEMP \button.
- Press the ON/OFF button to start the unit.
NOTE: FAN SPEED can't be set in AUTO mode.
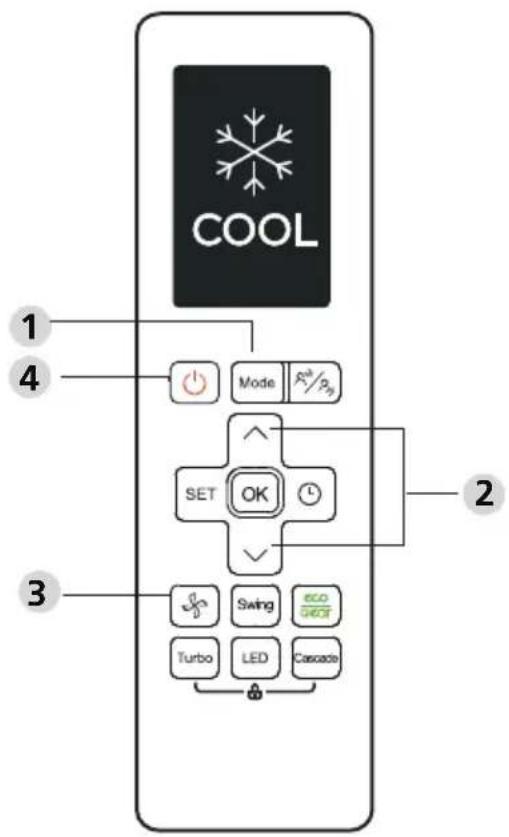
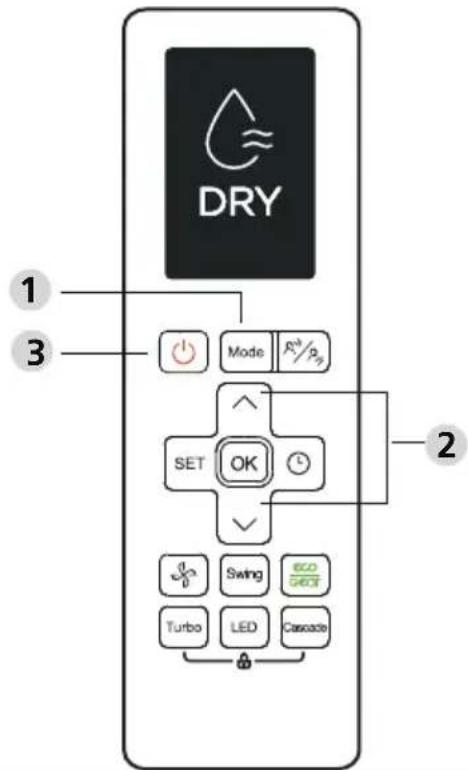
FAN Mode
- Press the MODE button to select FAN mode.
- Press FAN button to select the fan speed in a range of AU-100%.
- Press the ON/OFF button to start the unit.
NOTE: You can't set temperature in FAN mode. As a result, your remote control's LCD screen will not display temperature.
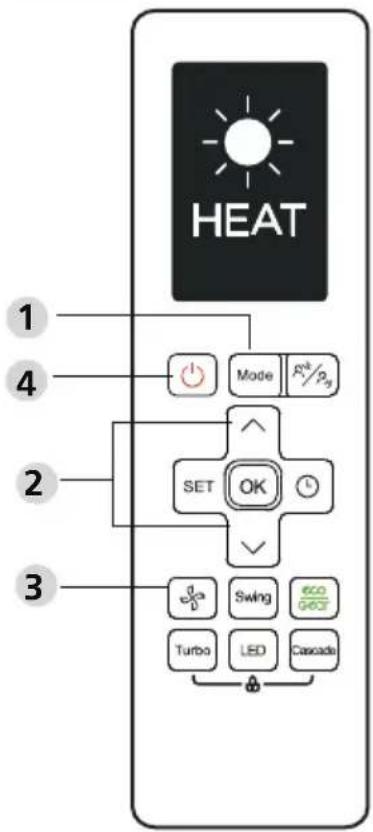
DRY Mode (dehumidifying)
- Press the MODE button to select DRY.
- Set your desired temperature using the TEMP ∧ or TEMP ∨ button.
- Press the ON/OFF button to start the unit.
NOTE: FAN SPEED cannot be changed in DRY mode.
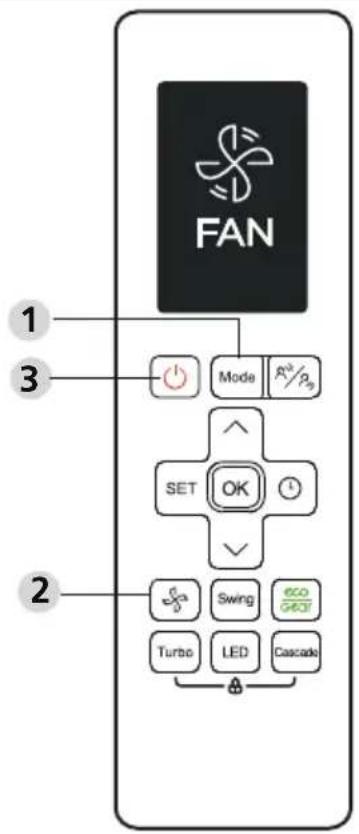
HEAT Mode
- Press the MODE button to select HEAT mode.
- Set your desired temperature using the TEMP ^ or TEMP ∨ button.
- Press FAN button to select the fan speed in a range of AU-100%.
- Press the ON/OFF button to start the unit.
NOTE: As outdoor temperature drops, the performance of your unit's HEAT function may be affected. In such instances, we recommend using this air conditioner in conjunction with other heating appliances.
Setting the TIMER
TIMER ON/OFF - Set the amount of time after which the unit will automatically turn on/off.
TIMER ON setting
Press TIMER button to initiate the ON time sequence.
Press Temp. up or down button for for multiple times to set the desired time to turn on the unit.
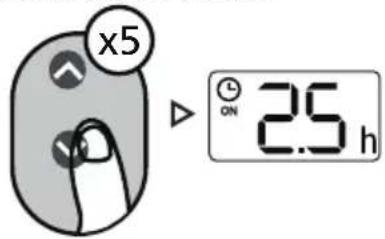
Point remote to unit and wait 1sec, the TIMER ON will be activated.

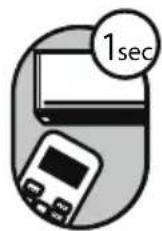
TIMER OFF setting
Press TIMER button to initiate the OFF time sequence.
Press Temp. up or down button for for multiple times to set the desired time to turn off the unit.
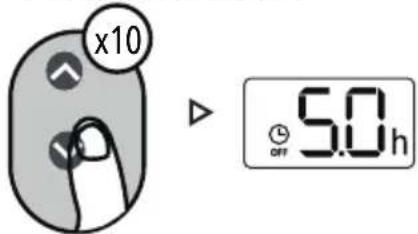
Point remote to unit and wait 1sec, the TIMER OFF will be activated.
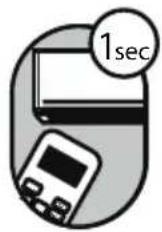
NOTE:
-
When setting the TIMER ON or TIMER OFF, the time will increase by 30 minutes increments with each press, up to 10 hours. After 10 hours and up to 24, it will increase in 1 hour increments. (For example, press 5 times to get 2.5h, and press 10 times to get 5h,) The timer will revert to 0.0 after 24.
-
Cancel either function by setting its timer to 0.0h.
TIMER ON & OFF setting(example)
Keep in mind that the time periods you set for both functions refer to hours after the current time.

flowchart
graph LR
    A["TIMER"] --> B["xn"]
    B --> C["2.5 h"]
    C --> D["Timer"]
    D --> E["xn"]
    E --> F["5.0 h"]
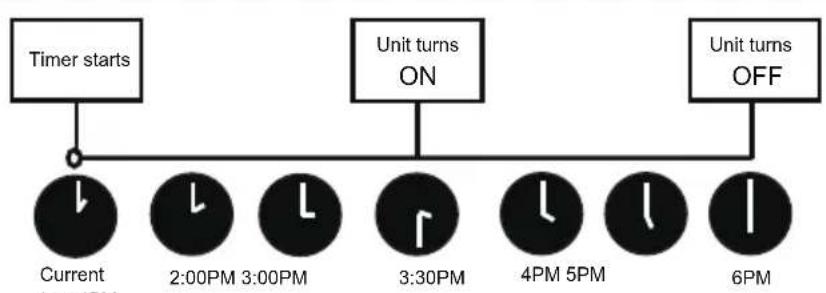
flowchart
graph TD
    A["Timer starts"] --> B["Current 4PM"]
    B --> C["2:00PM 3:00PM"]
    C --> D["Unit turns ON"]
    D --> E["3:30PM"]
    E --> F["4PM 5PM"]
    F --> G["Unit turns OFF"]
    G --> H["6PM"]
Example: If current timer is 1:00PM, to set the timer as above steps, the unit will turn on 2.5h later (3:30PM) and turn off at 6:00PM.
How to Use Advanced Functions
Swing function
Press Swing button
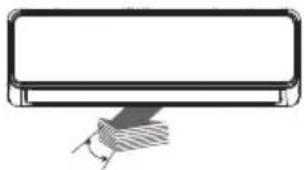
natural_image
Simple line drawing of a rectangular object with a diagonal hatched element at the base (no text or symbols)The horizontal louver will swing up and down automatically when pressing Swing button. Press again to make it stop.
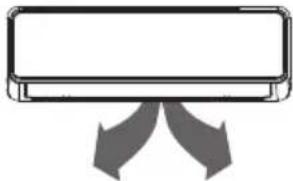
natural_image
Simple line drawing of a rectangular device with two curved arrows pointing outward from its side (no text or symbols)Keep pressing this button more than 2 seconds, the vertical louver swing function is activated. (Model dependent)
Airflow direction
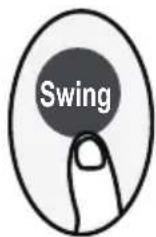
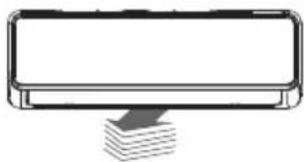
natural_image
Simple line drawing of a rectangular object with a stack of three horizontal lines underneath (no text or symbols)If continue to press the SWING button, five different airflow directions can be set. The louver can be move at a certain range each time you press the button. Press the button until the direction you prefer is reached.
NOTE: When the unit is off, press and hold MODE and SWING buttons together for one second, the louver will open for a certain angle, which makes it very convenient for cleaning. Press and hold MODE and SWING buttons together for one second to reset the louver(Model dependent).
LED DISPLAY
Press LED button
Press this button to turn on and turn off the display on the indoor unit.
Press this button more than 5 seconds(some units)
Keep pressing this button more than 5 seconds, the indoor unit will display the actual room temperature. Press more than 5 seconds again will revert back to display the setting temperature.
Cascade feature
Press this button to adjust activate Cascade feature in a sequence of following: Upward Cascade(≡□) → Downward Cascade(≡□) → Cancel Cascade feature This feature enables the whole room to be cool quickly and evenly.
The system will adjust the louver angles and fan speed automatically. You can also choose the fan speed by remote controller.
Note: This function is only available under COOL or Fan mode.
ECO/GEAR function
Press this button to enter the energy efficient mode in a sequence of following:
ECO → GEAR(75%) → GEAR(50%) → Previous setting mode → ECO.....
Note: This function is only available under COOL mode.
ECO operation:
Under cooling mode, press this button, the remote controller will adjust the temperature automatically to 24^ C/75°F, fan speed of Auto to save energy (only when the set temperature is less than 24^ C/75°F). If the set temperature is above 24^ C/75°F, press the ECO button, the fan speed will change to Auto, the set temperature will remain unchanged.
NOTE:
Pressing the this button, or modifying the mode or adjusting the set temperature to less than 24^ C/75°F will stop ECO operation.
Under ECO operation, the set tmeperature should be 24^ C/75°F or above, it may result in insufficient cooling. If you feel uncomfortable, just press the ECO button again to stop it.
GEAR operation:
Press the ECO/GEAR button to enter the GEAR operation as following:
75%(up to 75% electrical energy consumption)
Previous setting mode.
Under GEAR operation, the display on the remote controller will alternate between electrical energy consumption and set temperature.
Breeze Away Function
Press this button to adjust the breeze away from people in a sequence of following:
Upward Breeze away from people( ^n )→ Downward Breeze away from people( _n ) → Cancel Breeze away feature
This feature avoids direct air flow blowing on the body and makes you feel indulging in silky coolness.
Note: This function is only available under COOL, Dry or Fan mode.
Silence function
Keep pressing Fan button for more than 2 seconds to activate/disable Silence function(some units).
Due to low frequency operation of compressor, it may result in insufficient cooling and heating capacity. Press ON/OFF, Mode, Sleep, Turbo or Clean button while operating will cancel silence function.
FP function
The unit will operate at high fan speed (while compressor on) with temperature automatically set to 8^ C/ 46^ F.
Note: This function is for heat pump air conditioner only.
Press this button 2 times during one second under HEAT Mode and setting temperature of 16^ / 60^ to activate FP function. Press On/Off, Sleep, Mode, Fan and Temp. button while operating will cancel this function.
LOCK function
Press together Turbo button and Cascade button at the same time more than 5 seconds to activate Lock function. All buttons will not response except pressing these two buttons for two seconds again to disable locking.
Turbo Function
Press Turbo button

When you select Turbo feature in COOL mode, the unit will blow cool air with strongest wind setting to jump-start the cooling process.
When you select Turbo feature in HEAT mode, for units with Electric heat elements, the Electric HEATER will activate and jump-start the heating process.
SET function
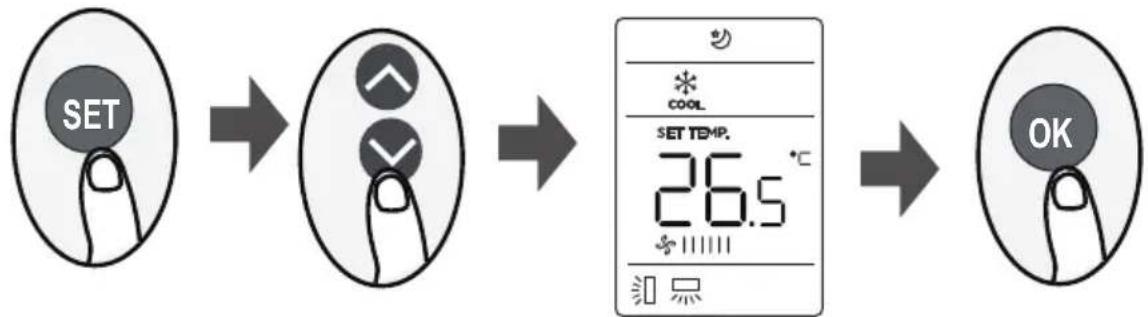
flowchart
graph LR
    A["SET"] --> B["↑"]
    B --> C["COOL SET TEMP. 26.5 °C"]
    C --> D["OK"]
- Press the SET button to enter the function setting, then press SET button or TEMP▼ or TEMP▲ button to select the desired function. The selected symbol will flash on the display area, press the OK button to confirm.
- To cancel the selected function, just perform the same procedures as above.
- Press the SET button to scroll through operation functions as follows:
Active clean ( ✉ ) → Fresh*(∅) → Sleep(∅) → Follow Me(∅) → AP mode*(∅)
[*]: Model dependent
Active clean function( ) (some units):
The Active Clean Technology washes away dust, and mold that may cause odors when it adheres to the heat exchanger by automatically freezing and then rapidly thawing the frost. When this function is turned on, the indoor unit display window appears "CL", after 20 to 130 minutes, the unit will turn off automatically and cancel CLEAN function.
FRESH function(∅) (some units):
When the FRESH function is initiated, the ion generator is energized and will help to purify the air inside.
Sleep function(💡) :
The SLEEP function is used to decrease energy use while you sleep (and don't need the same temperature settings to stay comfortable). This function can only be activated via remote control.
For the detail, see "sleep operation" in "USER'S MANUAL".
Note: The SLEEP function is not available in FAN or DRY mode.
Follow me function( 👁 ):
The FOLLOW ME function enables the remote control to measure the temperature at its current location and send this signal to the air conditioner every 3 minutes interval. When using AUTO, COOL or HEAT modes, measuring ambient temperature from the remote control (instead of from the indoor unit itself) will enable the air conditioner to optimize the temperature around you and ensure maximum comfort.
NOTE: Press and hold Boost button for seven seconds to start/stop memory feature of Follow Me function.
- If the memory feature is activated, "On" displays for 3 seconds on the screen.
- If the memory feature is stopped, "OF" displays for 3 seconds on the screen.
- While the memory feature is activated, press the ON/OFF button, shift the mode or power failure will not cancel the Follow me function.
AP function( ) (some units) :
Choose AP mode to do wireless network configuration. For some units, it doesn't work by pressing the SET button. To enter the AP mode, continuously press the LED button seven times in 10 seconds.
The design and specifications are subject to change without prior notice for product improvement. Consult with the sales agency or manufacturer for details.
CR286-RG10KX(2HS)

- NOTA IMPORTANTE:
- ATTENZIONE
- NON UTILIZZARE UNA COPPIA ECCESSIVA
- NOTA PER BATTERIE
- Owner's Manual & Installation Manual
- IMPORTANT NOTE:
- Table of Contents
- Safety Precautions 03
- Owner's Manual
- Unit Specifications and Features....07
- Care and Maintenance....12
- Troubleshooting....14
- Installation Manual
- Accessories....17
- Installation Summary - Indoor Unit ....18
- Unit Parts....19
- Indoor Unit Installation....20
- Outdoor Unit Installation....26
- Refrigerant Piping Connection....30
- Air Evacuation....33
- Electrical and Gas Leak Checks....35
- Test Run....36
- Packing and unpacking the unit ....37
- Safety Precautions
- Read Safety Precautions Before Operation and Installation Incorrect installation due to ignoring instructions can cause serious damage or injury.
- WARNING
- CAUTION
- WARNINGS FOR PRODUCT USE
- CLEANING AND MAINTENANCE WARNINGS
- ELECTRICAL WARNINGS
- TAKE NOTE OF FUSE SPECIFICATIONS
- UV-C lamp(Applicable to the unit contains an UV-C lamp only)
- WARNINGS FOR PRODUCT INSTALLATION
- Note about Fluorinated Gasses(Not applicable to the unit using R290 Refrigerant)
- WARNING for Using R32/R290 Refrigerant
- European Disposal Guidelines
- Special notice
- Unit Specifications and Features
- Indoor unit display
- Operating temperature
- FOR OUTDOOR UNITS WITH AUXILIARY ELECTRIC HEATER
- To further optimize the performance of your unit, do the following:
- Other Features
- • Auto-Restart(some units)
- - Low Ambient Heating
- - Low Ambient Cooling
- - Wireless Control (some units)
- - Louver Angle Memory(some units)
- • Air Fresh function (some units)
- • Anti-mildew (some units)
- • Active Clean function(some units)
- • Refrigerant Leakage Detection (some units)
- - Sleep Operation
- - Breeze Away Operation
- - Cascade Operation
- - Setting Angle of Air Flow
- Setting angle of air flow
- NOTE ON LOUVER ANGLES
- Manual Operation(without remote)
- Care and Maintenance
- Cleaning Your Indoor Unit
- BEFORE CLEANING OR MAINTENANCE
- Cleaning Your Air Filter
- Cleaning Your Louver
- Air Filter Reminders (Optional)
- Air Filter Cleaning Reminder
- Air Filter Replacement Reminder
- Maintenance – Long Periods of Non-Use
- Maintenance – Pre-Season Inspection
- Troubleshooting
- DO NOT ATTEMPT TO FIX THESE YOURSELF! CONTACT AN AUTHORIZED SERVICE PROVIDER IMMEDIATELY!
- Common Issues
- Accessories
- Installation Summary - Indoor Unit
- Unit Parts
- NOTE ON ILLUSTRATIONS
- Indoor Unit Installation
- Installation Instructions – Indoor unit
- PRIOR TO INSTALLATION
- Step 1: Select installation location
- Proper installation locations meet the following standards:
- DO NOT install unit in the following locations:
- NOTE ABOUT WALL HOLE:
- Refer to the following diagram to ensure proper distance from walls and ceiling:
- Step 2: Attach mounting plate to wall
- NOTE FOR CONCRETE OR BRICK WALLS:
- Step 3: Drill wall hole for connective piping
- MOUNTING PLATE DIMENSIONS
- Step 4: Prepare refrigerant piping
- NOTE ON PIPING ANGLE
- Step 5: Connect drain hose
- NOTE ON DRAIN HOSE PLACEMENT
- PLUG THE UNUSED DRAIN HOLE
- BEFORE PERFORMING ANY ELECTRICAL WORK, READ THESE REGULATIONS
- BEFORE PERFORMING ANY ELECTRICAL OR WIRING WORK, TURN OFF THE MAIN POWER TO THE SYSTEM.
- Step 6: Connect signal and power cables
- Cable Types
- Minimum Cross-Sectional Area of Power and Signal Cables (For reference) (Not applicable for North America)
- CHOOSE THE RIGHT CABLE SIZE
- DO NOT MIX UP LIVE AND NULL WIRES
- NOTE ABOUT WIRING
- THE WIRING CONNECTION PROCESS MAY DIFFER SLIGHTLY BETWEEN UNITS AND REGIONS.
- Step 7: Wrappiping and cables
- DRAIN HOSE MUST BE ON BOTTOM
- DO NOT INTERTWINE SIGNAL CABLE WITH OTHER WIRES
- DO NOT WRAP ENDS OF PIPING
- Step 8: Mount indoor unit
- If you installed new connective piping to the outdoor unit, do the following:
- If refrigerant piping is already embedded in the wall, do the following:
- UNIT IS ADJUSTABLE
- Outdoor Unit Installation
- Installation Instructions – Outdoor unit
- If the unit is exposed to heavy wind:
- If the unit is frequently exposed to heavy rain or snow:
- If the unit is frequently exposed to salty air (seaside):
- Step 2: Install drain joint(Heat pump unit only)
- If the drain joint comes with a rubber seal (see Fig. A), do the following:
- If the drain joint doesn't come with a rubber seal (see Fig. B), do the following:
- IN COLD CLIMATES
- Step 3: Anchor outdoor unit
- UNIT MOUNTING DIMENSIONS
- If you will install the unit on the ground or on a concrete mounting platform, do the following:
- WHEN DRILLING INTO CONCRETE, EYE PROTECTION IS RECOMMENDED AT ALL TIMES.
- Step 4: Connect signal and power cables
- USE THE RIGHT CABLE
- PAY ATTENTION TO LIVE WIRE
- ALL WIRING WORK MUST BE PERFORMED STRICTLY IN ACCORDANCE WITH THE WIRING DIAGRAM LOCATED INSIDE OF WIRE COVER OF THE OUTDOOR UNIT.
- In North America
- Refrigerant Piping Connection
- Note on Pipe Length
- Connection Instructions – Refrigerant Piping
- Step 1: Cut pipes
- DO NOT DEFORM PIPE WHILE CUTTING
- Step 2: Remove burrs
- Step 3: Flare pipe ends
- Step 4: Connect pipes
- MINIMUM BEND RADIUS
- Instructions for Connecting Piping to Indoor Unit
- DO NOT USE EXCESSIVE TORQUE
- Instructions for Connecting Piping to Outdoor Unit
- USE SPANNER TO GRIP MAIN BODY OF VALVE
- Air Evacuation
- Preparations and Precautions
- BEFORE PERFORMING EVACUATION
- Evacuation Instructions
- ! OPEN VALVE STEMS GENTLY
- Note on Adding Refrigerant
- Electrical and Gas Leak Checks
- Before Test Run
- Electrical Safety Checks
- Check Grounding Work
- DURING TEST RUN
- Check for Electrical Leakage
- WARNING – RISK OF ELECTRIC SHOCK
- Gas Leak Checks
- Soap and Water Method
- Leak Detector Method
- AFTER PERFORMING GAS LEAK CHECKS
- Test Run
- Test Run Instructions
- DOUBLE-CHECK PIPE CONNECTIONS
- IF AMBIENT TEMPERATURE IS BELOW 16°C (60°F)
- Packing and unpacking the unit
- Instructions for packing unpacking the unit:
- Unpacking:
- Indoor unit:
- Outdoor Unit
- Packing:
- Outdoor unit:
- SAFETY MANUAL
- Installation (Space)
- Servicing
- Reference installed heights are given below:
- Information Servicing
- Checks to the area
- Work procedure
- General work area
- Checking for presence of refrigerant
- Presence of fire extinguisher
- No ignition sources
- Ventilated area
- Checks to the refrigeration equipment
- Checks to electrical devices
- Initial safety checks shall include:
- Repairs to sealed components
- Repair to intrinsically safe components
- Cabling
- Detection of flammable refrigerants
- Leak detection methods
- Removal and evacuation
- Charging procedures
- Decommissioning
- Labelling
- Recovery
- Venting of HC Refrigerant (R290)
- Transportation, marking and storage for units
- REMOTE CONTROLLER
- Remote Controller Specifications
- Quick Start Guide
- NOT SURE WHAT A FUNCTION DOES?
- SPECIAL NOTE
- Handling the Remote Controller
- Inserting and Replacing Batteries
- BATTERY NOTES
- BATTERY DISPOSAL
- TIPS FOR USING REMOTE CONTROL
- NOTES FOR USING REMOTE CONTROL
- Buttons and Functions
- Remote Screen Indicators
- How to Use Basic Functions
- Basic operation
- COOL Mode
- SETTING TEMPERATURE
- AUTO Mode
- FAN Mode
- DRY Mode (dehumidifying)
- HEAT Mode
- Setting the TIMER
- TIMER ON setting
- TIMER OFF setting
- NOTE:
- TIMER ON & OFF setting(example)
- How to Use Advanced Functions
- Swing function
- Airflow direction
- LED DISPLAY
- Cascade feature
- ECO/GEAR function
- ECO operation:
- GEAR operation:
- Breeze Away Function
- Silence function
- FP function
- LOCK function
- Turbo Function
- SET function
- Active clean function( ) (some units):
- FRESH function(∅) (some units):
- Sleep function(💡) :
- Follow me function( 👁 ):
- AP function( ) (some units) :
Brand : COMFEE
Model : CF-XTW09 IU
Category : Air-conditioner