
MPS1-07CRN1-1 - Air-conditioner COMFEE - Free user manual and instructions
Find the device manual for free MPS1-07CRN1-1 COMFEE in PDF.


| Product Type | Portable Air Conditioner |
| Brand | Comfee |
| Model | MPS1-07CRN1-1 |
| Cooling Capacity | 7000 BTU/h |
| Power Supply | 115V / 60Hz / 6.5A |
| Energy Efficiency | EER 8.5 |
| Dimensions (W x D x H) | 16.5 x 13.4 x 12.2 inches |
| Weight | 45 lbs |
| Airflow | 150 CFM |
| Refrigerant | R-410A |
| Noise Level (Low/High) | 52 dB / 56 dB |
| Modes | Cool, Fan, Dehumidify, Sleep |
| Thermostat Range | 61°F - 88°F |
| Fan Speeds | Low, High |
| Timer | 24-hour programmable |
| Remote Control | Included |
| Air Filter | Washable, reusable mesh |
| Drainage | Self-evaporating (most conditions); manual drain in humid areas |
| Window Kit | Includes slider and exhaust hose |
| Safety Features | Overheat protection, tip-over switch |
| Room Size Recommendation | Up to 200 sq ft |
| Warranty | 1 year limited |
| Maintenance | Clean filter every 2 weeks; drain when needed |
| Included Accessories | Remote control, window slider, exhaust hose, manual |
Frequently Asked Questions - MPS1-07CRN1-1 COMFEE
User questions about MPS1-07CRN1-1 COMFEE
0 question about this device. Answer the ones you know or ask your own.
Ask a new question about this device
Download the instructions for your Air-conditioner in PDF format for free! Find your manual MPS1-07CRN1-1 - COMFEE and take your electronic device back in hand. On this page are published all the documents necessary for the use of your device. MPS1-07CRN1-1 by COMFEE.
USER MANUAL MPS1-07CRN1-1 COMFEE
The design and specifications are subject to change without prior notice for product improvement. Consult with the sales agency or manufacturer for details.
CR054-RG51B13
202055091305
20141117
Thank you very much for purchasing our air conditioner.
Please read this owner's manual carefully before using your air conditioner.
CONTENTS
Handling the remote controller 2
Remote controller Specifications.... 3
Function buttons 4
Indicators on LCD 6
How to use the buttons 7
Auto operation.... 7
Cooling/Heating/Fan operation.... 7
Dehumidifying operation 8
Swing operation.... 8
Timer operation.... 9
ECONOMY operation 12
Handling the remote controller
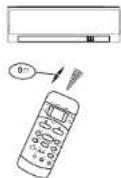
Location of the remote controller.
- Use the remote controller within a distance of 8 meters from the appliance, pointing it towards the receiver. Reception is confirmed by a beep.
CAUTIONS
- The air conditioner will not operate if curtains, doors or other materials block the signals from the remote controller to the indoor unit.
- Prevent any liquid from falling into the remote controller. Do not expose the remote controller to direct sunlight or heat.
- If the infrared signal receiver on the indoor unit is exposed to direct sunlight, the air conditioner may not function properly. Use curtains to prevent the sunlight from falling on the receiver.
- If other electrical appliances react to the remote controller, either move these appliances or consult your local dealer.
Replacing batteries
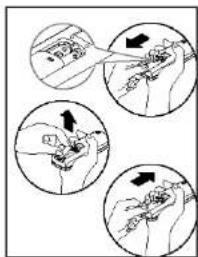
The remote controller is powered by two dry batteries(R03/LR03X2) housed in the rear part and protected by a cover. (1) Remove the cover by pressing and sliding off. (2) Remove the old batteries and insert the new batteries, placing the(+) and (-) ends correctly. (3) Reattach the cover by sliding it back into position.
NOTE: When the batteries are removed, the remote controller erases all programming. After inserting new batteries, the remote controller must be reprogrammed.
1
2
CAUTIONS
- Do not mix old and new batteries or batteries of a different type.
- Do not leave the batteries in the remote controller if it is not going to be used for 2 or 3 months.
- Dispose of the old batteries in the special containers to be found in the sales outlets.
Remote Controller Specifications
| Model | RG51B1/(C)EU, RG51B14/(C)E,RG51B31/(C)ERG51B/(C)EU, RG51B16/(C)E,RG51B31/(C)EURG51B17/(C)EU, RG51B18/(C)E,RG51B32/(C)ERG51B19/(C)E-M, RG51B20/(C)E,RG51B30/(C)EURG51B25/(C)E, RG51B26/(C)EU;RG51B27/(C)E,RG51B30/(C)E,RG51B30/(C)EF |
| Rated Voltage | 3.0V(Dry batteries R03/LR03j2) |
| Lowest Voltage ofCPU Emitting Signal | 2.0V |
| Signal ReceivingRange | 8m |
| Environment | -5°C 60°C (-41°F~140°F) |
NOTE:
Temperature setting display:
Celsius scale(°C): RG51B14/(C)E, RG51B16/(C)E, RG51B18/(C)E, RG51B31/(C)E, RG51B19/(C)E-M, RG51B20/(C)E, RG51B25/(C)E, RG51B27/(C)E, RG51B30/(C)E, RG51B32/(C)E, RG51B30/(C)EF.
Fahrenheit scale(°F): RG51B/(C)EU, RG51B1/(C)EU, RG51B17/(C)EU, RG51B26/(C)EU, RG51B30/(C)EU, RG51B31/(C)EU.
Performance Feature
- Operating Mode: AUTO, COOL, DRY, HEAT(Cooling only model without), and FAN.
- Timer Setting Function in 24 hours.
- Indoor Setting Temperature Range : 17℃\~30℃(62 F\~88 F).
- Full function of LCD (Liquid Crystal Display)
NOTE: All the illustrations in this manual are for explanation purpose only. Your air conditioner may be slightly different. The actual shape shall prevail.
3
Function buttons
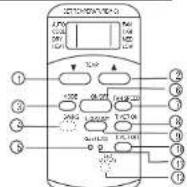
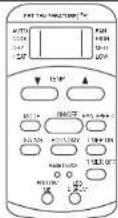
Model: RG51B14/(C)E, RG51B16/(C)E. RG51B18/(C)E, RG51B19/(C)E-M. RG51B20/(C)E, RG51B31/(C)E RG51B30/(C)E, RG51B32/(C)E
NOTE:
●RG51B16/(C)E, RG51B18/(C)E
models have no SWING feature;
- RG51B18/(C)E, RG51B19/(C)E-M, RG51B20/(C)E models have no LED DISPLAY feature.
● RG51B19/(C)E-M model has no MED FAN feature.
●RG51B31/(C)E model ECONOMY button is instead of SLEEP button.
- RG51B30/(C)E model has no MED FAN and SWING features.
RG51B32/(C)E model has no MED FAN, SWING and ECONOMY features.
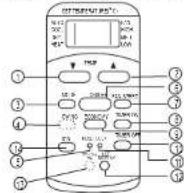
Model: RG51B25/(C)E;RG51B27/(C)E RG51B30/(C)EF NOTE:
- RG51B25/(C)E model has no SWING and FOLLOW ME features.
- RG51B27/(C)E model has no FOLLOW ME feature.
- RG51B30(C)EF model has no SWING and ION features, ECONOMY button is instead of SLEEP button
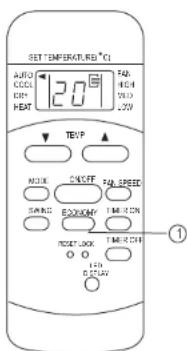
TEMP DOWN Button Push this button to decrease the indoor temperature setting in 1°C(2°F) increments to 30°C(88°F).
TEMP UP Button Push this button to increase the indoor temperature setting in 1°C(2°F) increments to 17°C(62°F).
③ MODE Button Each time the button is pressed, the operation mode is selected in the sequence of the following: AUTO → COOL → DRY → HEAT FAN NOTE: Do not select HEAT mode if the machine you purchased is cooling only type. Heat mode is not supported by the cooling only appliance.
4 SWING Button(on some models) Used to stop or start louver movement and set the desired up/down airflow direction.
⑥ RESET Button Once the recessed RESET button is pressed, all of the current settings will be cancelled and the controller will return to the initial settings.
⑥ ON/OFF Button Operation starts when this button is pressed and stops when the button is pressed again.
7 FAN SPEED Button Used to select the fan speed in four steps: • Auto→ Low→ Med→ High • Some models have no MED FAN feature.
8 TIMER ON Button Press this button to activate the Auto-on time setting. Each press will increase the time setting in 30 minutes increments, up to 10 hours, then at 1 hour increments up to 24 hours. To cancel the Auto-on time setting, just press the button until the time setting is 0.0.
⑨ ECONOMY(SLEEP) Button Select this function during the sleeping time. It can maintain the most comfortable temperature and save energy. This function is available on COOL, HEAT or AUTO mode only.
4
Function buttons(continued)
Model: RG51B1/(C)EU,
RG51B/(C)EU.
RG51B26/(C)EU,
RG51B30/(C)EU.
RG51B31/(C)EU
NOTE: RG51B/(C)EU models have no SWING and FOLLOW ME buttons; RG51B1/(C)EU models have no FOLLOW ME button; RG51B30/(C)EU models have no SWING, FOLLOW ME buttons and MED FAN feature, and SLEEP button instead of ECONOMY button; RG51B31/(C)EU models have on FOLLOW ME button.
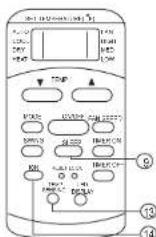
Model: RG51B17/(C)EU
NOTE: While the unit is running under SLEEP mode, it would be cancelled if ON/OFF, FAN SPEED, SLEEP or MODE button is pressed.
TIMRT OFF Button
Press this button to activate the Auto-off time setting. Each press will increase the time setting in 30 minutes increments, up to 10 hours, then at 1 hour increments up to 24 hours. To cancel the Auto-off time setting, just press the button until the time setting is 0.0.
1 LOCK Button
Press this recessed button to lock all current settings, and the remote controller will not accept any operation except that of the LOCK. Use the LOCK mode when you want to prevent settings from being changed accidentally. Press the LOCK button again to cancel the LOCK function. A lock symbol will appear on the remote controller display when the lock function is activated.
⑫ LED Display Button
Press this button to clear the display on the indoor unit, press it again to light the display. NOTE: RG51B18/(C)E ,RG51B19/(C)E-M, RG51B20/(C)E models have no this feature.
FOLLOW ME/TEMP SENSING Button
- Press this button to initiate FOLLOW ME function.
- When the Follow Me function is activated, the remote display is actual temperature at its location. The remote control will send this signal to the air conditioner every 3 minutes interval until press the Follow Me button again.
● The Follow Me function is not available under DRY and FAN mode.
- Switch the operation mode or turn off the unit will cancel the follow me function automatically.
14 ION Button
When push this button, the ion generator is energized and will help to remove pollen and impurities from the air.
Indicators on LCD
MODE display
Displays the current selected mode. Including AUTO, COOL, DRY, HEAT (cooling & heating models only) and FAN.
Transmission Indicator
This transmission indicator will light when remote controller transmits signals to the indoor unit.
Temp./Timer display
The temperature setting (from 17 °C(62 °F) to 30 °C(88 °F)) or timer setting (0\~24h) will be displayed. If FAN mode is selected, there will be no display.
ON/OFF display
This indicator will be displayed when the unit is operating.
MODE display(FAN mode)
FAN SPEED display
Displays the selected fan speed: AUTO, HIGH, MED and LOW. Nothing displays when the fan speed is selected in AUTO speed. When AUTO or DRY Mode is selected, there will be no signals displayed.
NOTE: RG51B19/(C)E-M model has no MED FAN speed feature.
FOLLOW ME display
When pressing FOLLOW ME/TEMP SENSING button in COOL or HEAT mode, the remote sensing function is activated and this indicator displays.
TIMER display
This display area shows the settings of the TIMER. That is, if only the Auto-on time function is set, it will display TIMER ON. If only the Auto-off time function is set, it will display TIMER OFF. If both functions are set, it will display TIMER ON OFF which indicates you have chosen both the Auto-on time and Auto-off time.
LOCK Indicator
LOCK display is displayed when pushing the LOCK button. Push the LOCK button to clear display.
5
6
How to use the buttons
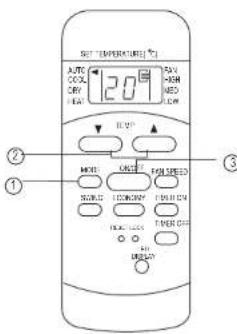
Auto operation
Ensure the unit is plugged in and power is available. The OPERATION indicator on the display panel of the indoor unit illuminates.
- Press the MODE button to select Auto.
- Press the TEMP button to set the desired temperature. The temperature can be set within a range of 17 C(62 F)\~30 C° in 1 C(2 F) increments.
- Press the ON/OFFbutton to start the air conditioner.
NOTE
- In the Auto mode, the air conditioner can logically choose the mode of Cooling, Fan, Heating and Dehumidifying by sensing the difference between the actual ambient room temperature and the set temperature on the remote controller.
- In the Auto mode, you can not switch the fan speed. It has already been automatically controlled.
- If the Auto mode is not comfortable for you, the desired mode can be selected manually.
Cooling /Heating/Fan operation
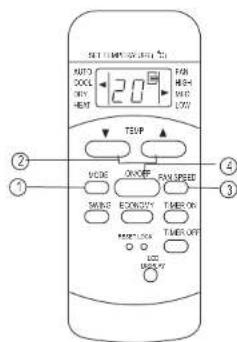
Ensure the unit is plugged in and power is available.
- Press the MODE button to select COOL, HEAT, (cooling & heating models only) or FAN mode.
- Press the TEMP button to set the desired temperature. The temperature can be set within a range of 17 C(62 F)\~ 30 C° in 1 C(2 F) increments.
- Press the FAN SPEED button to select the fan speed in four steps- Auto, Low, Med, or High.
- Press the ON/OFF button to start the air conditioner.
NOTE
In the FAN mode, the setting temperature is not displayed in the remote controller and you are not able to control the room temperature either. In this case, only step 1, 3 and 4 may be performed.
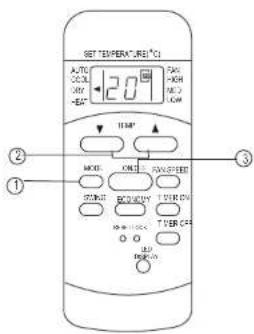
Dehumidifying operation
Ensure the unit is plugged in and power is available. The OPERATION indicator on the display panel of the indoor unit illuminates.
- Press the MODE button to select DRY mode.
- Press the TEMP button to set the desired temperature. The temperature can be set within a range of 17 C(62 F)\~30 C in 1 C(2 F) increments.
- Press the ON/OFF button to start the air conditioner.
NOTE
In the Dehumidifying mode, you can not switch the fan speed. It has already been automatically controlled.
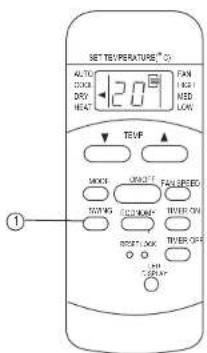
Swing operation(on some models)
Use the SWING button to adjust the Up/Down airflow direction.
- When press the button once and quickly, the air flow direction setting feature of the louver is activated. The moving angle of the louver is 6^ for each press. Keep pressing the button to move the louver to the desired position.
NOTE: On some models press it to initiate the Auto swing feature only. - If keep pressing the SWING button without releasing for 2 more seconds, the auto swing feature of the louver is activated. The horizontal louver would swing up/down automatically. Press it again to stop.
NOTE: When the louver swing or move to a position which would affect the cooling and heating effect of the air conditioner, it would automatically change the swing/moving direction.
7
8
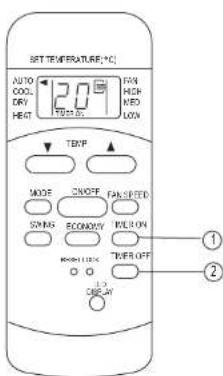
Timer operation
press the TIMER ON button can set the auto-on time of the unit. And press the TIMER OFF button can set the auto-off time of the unit.
To set the Auto-on time.
- Press the TIMER ON button. The remote controller shows TIMER ON, the last Auto-on setting time and the signal "h" will be shown on the LCD display area. Now it is ready to reset the Auto-on time to START the operation.
- Push the TIMER ON button again to set desired Auto-on time. Each time you press the button, the time increases in 30 minutes increments, up to 10 hours, then at 1 hour increments up to 24 hours.
- After setting the TIMER ON, there will be a one-half second delay before the remote controller transmits the signal to the air conditioner. Then, after approximately another 2 seconds, the signal "h" will disappear and the set temperature will re-appear on the LCD display window.
To set the Auto-off time.
- Press the TIMER OFF button. The remote controller shows TIMER OFF, the last Auto-off setting time and the signal "h" will be shown on the LCD display area. Now it is ready to reset the Auto-off time to START the operation.
- Push the TIMER OFF button again to set desired Auto-off time. Each time you press the button, the time increases in 30 minutes increments, up to 10 hours, then at 1 hour increments up to 24 hours.
- After setting the TIMER OFF, there will be a one-half second delay before the remote controller transmits the signal to the air conditioner. Then, after approximately another 2 seconds, the signal "h" will disappear and the set temperature will re-appear on the LCD display window.
IMPORTANT
- The effective operation time set by the remote controller for the timer function is limited to the following settings: 0.5, 1.0, 1.5, 2.0, 2.5, 3.0, 3.5, 4.0, 4.5, 5.0, 5.5, 6.0, 6.5, 7.0, 7.5, 8.0, 8.5, 9.0, 9.5, 10, 11, 12, 13, 14, 15, 16, 17, 18, 19, 20, 21, 22, 23 and 24.
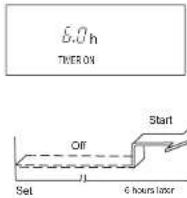
Example of Timer setting
TIMER ON
(Auto-on Operation)
The TIMER ON feature is useful when you want the unit to turn on automatically before say when you return home. The air conditioner will automatically start operating at the set time.
Example:
To start the air conditioner in 6 hours.
- Press the TIMER ON button, the last setting of starting operation time and the signal "h" will show on the display area.
- Press the TIMER ON button to display "6:0h" on the TIMER ON display of the remote controller.
- Wait for about 3 seconds and the digital display area will show the temperature again. Now this function is activated.
9
10
TIMER OFF
(Auto-off Operation)
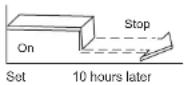
The TIMER OFF feature is useful when you want the unit to turn off automatically after you go to bed. The air conditioner will stop automatically at the set time.
Example:
To stop the air conditioner in 10 hours.
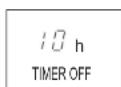
- Press the TIMER OFF button, the last setting of stopping operation time and the signal "h" will show on the display area.
- Press the TIMER OFF button to display "10h" on the TIMER OFF display of the remote controller.
- Wait for about 3 seconds and the digital display area will show the temperature again. Now this function is activated.
COMBINED TIMER
(Setting both ON and OFF timers simultaneously)
(On i Stop j Start operation)
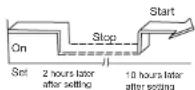
This feature is useful when you want to stop the air conditioner after you go to bed, and start it again in the morning when you wake up or when you return home.
Example:
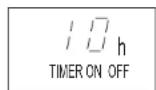
To stop the air conditioner 2 hours after setting and start it again 10 hours after setting.
- Press the TIMER OFF button.
- Press the TIMER OFF button again to display 2.0h on the TIMER OFF display.
- Press the TIMER ON button.
- Press the TIMER ON button again to display 10h on the TIMER ON display.
- Wait for the remote control to display the setting temperature.
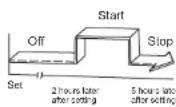
This feature is useful when you want to start the air conditioner before you wake up and stop it after you leave the house.
Example:
To start the air conditioner 2 hours after setting, and stop it 5 hours after setting.
- Press the TIMER ON button.
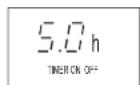
- Press the TIMER ON button again to display 2.0h on the TIMER ON display.
- Press the TIMER OFF button.
- Press the TIMER OFF button again to display 5.0h on the TIMER OFF display.
- Wait for the remote control to display the setting temperature.
CAUTION
- The timer setting(TIMER ON or TIMER OFF) that in sequence occurs directly after the set time will be activated first.
ECONOMY(SLEEP) operation
Active/Disable sleep function. It can maintain the most comfortable temperature and save energy. This function is available on COOL, HEAT or AUTO mode only. For the detail, see "Sleep operation" in "USER'S MANUAL".
NOTE: While the unit is running under SLEEP mode, it would be cancelled if MODE, FAN SPEED or ON/OFF button is pressed.
NOTE:
-Buttons design is based on typical model and might be slightly different from the actual one you purchased, the actual shape shall prevail.
-All the functions described are accomplished by the unit, if the unit has no this feature, there is no corresponding operation happened when
-When there are wide differences between Remote controller Illustration and USERS MANUAL on function description, the description on USERS MANUAL shall prevail.
-The device could comply with the local national regulations. In Canada, it should comply with CAN ICES-3(B)/NMB-3(B). In USA, this device complies with part 15 of the FCC Rules. Operation is subject to the following two conditions: (1) This device may not cause harmful interference, and (2) this device must accept any interference received, including interference that may cause undesired operation.
-This equipment has been tested and found to comply with the limits for a Class B digital device, pursuant to part 15 of the FCC Rules. These limits are designed to provide reasonable protection against harmful interference in a residential installation. This equipment generates, uses and can radiate radio frequency energy and, if not installed and used in accordance with the instructions, may cause harmful interference to radio communications. However, there is no guarantee that interference will not occur in a particular installation. If this equipment does cause harmful interference to radio or television reception, which can be determined by turning the equipment off and on, the user is encouraged to try to correct the interference by one or more of the following measures:
•Reorient or relocate the receiving antenna.
- Increase the separation between the equipment and receiver.
- Connect the equipment into an outlet on a circuit different from that to which the receiver is connected.
- Consult the dealer or an experienced radio/TV technician for help. Changes or modifications not approved by the party responsible for compliance could void suers authority to operate the equipment.
- CONTENTS
- Handling the remote controller
- Location of the remote controller.
- CAUTIONS
- Replacing batteries
- NOTE:
- Performance Feature
- 3
- 4
- Function buttons(continued)
- TIMRT OFF Button
- LOCK Button
- ⑫ LED Display Button
- FOLLOW ME/TEMP SENSING Button
- ION Button
- Indicators on LCD
- MODE display
- Transmission Indicator
- Temp./Timer display
- ON/OFF display
- MODE display(FAN mode)
- FAN SPEED display
- FOLLOW ME display
- TIMER display
- LOCK Indicator
- 5
- 6
- How to use the buttons
- Auto operation
- NOTE
- Cooling /Heating/Fan operation
- Dehumidifying operation
- Swing operation(on some models)
- 7
- 8
- Timer operation
- To set the Auto-on time.
- To set the Auto-off time.
- IMPORTANT
- Example of Timer setting
- TIMER ON
- (Auto-on Operation)
- Example:
- TIMER OFF
- (Auto-off Operation)
- COMBINED TIMER
- CAUTION
- ECONOMY(SLEEP) operation
Brand : COMFEE
Model : MPS1-07CRN1-1
Category : Air-conditioner