
HIF5340DBT - Hi-Fi System Reflexion - Free user manual and instructions
Find the device manual for free HIF5340DBT Reflexion in PDF.


| Product Type | Vertical Hi-Fi System with CD, Bluetooth, FM, DAB+, USB, AUX IN |
| Model Name | HIF5340DBT |
| Main Unit Dimensions (W x D x H) | 260 x 160 x 51 mm |
| Speaker Dimensions (each, W x D x H) | 110 x 160 x 51 mm |
| Packaging Dimensions (W x D x H) | 316 x 216 x 150 mm |
| Weight | 1.8 kg |
| Power Supply | External AC adapter: Input 100-240V~ 50/60Hz, 0.3A Max; Output 5V 1.2A |
| Power Consumption | 12 W |
| Backup Battery | 2 x AAA 1.5V (not included) for radio, clock, alarm settings |
| Remote Control Battery | CR2025 (included) |
| CD Playback | CD-R, CD+R, CD-RW, CD+RW; Audio CDs and MP3 discs |
| USB Playback | USB sticks up to 32 GB, FAT/FAT32, MP3/WMA, up to 999 tracks, 99 folders |
| Bluetooth | Version 4.2, A2DP, AVRCP; Range up to 10m |
| FM Radio | Frequency 87.5 - 108 MHz |
| DAB/DAB+ Radio | Frequency 174.928 - 239.200 MHz |
| AUX IN | 3.5 mm jack |
| Speaker Output (RMS) | 2 x 2 W |
| Speaker Output (Max) | 2 x 16 W |
| Working Temperature | 0 °C to +45 °C |
| Safety Features | Class 1 laser product; do not expose to rain or moisture; use only specified power supply; do not open the unit; keep ventilation clear |
| Cleaning Instructions | Unplug before cleaning; use a dry cloth only |
| Included Accessories | Main unit, 2 speakers (L/R), external power supply, remote control (with CR2025 battery), user manual |
| Repairability | No user-serviceable parts; repairs by authorized workshop only |
Frequently Asked Questions - HIF5340DBT Reflexion
User questions about HIF5340DBT Reflexion
0 question about this device. Answer the ones you know or ask your own.
Ask a new question about this device
Download the instructions for your Hi-Fi System in PDF format for free! Find your manual HIF5340DBT - Reflexion and take your electronic device back in hand. On this page are published all the documents necessary for the use of your device. HIF5340DBT by Reflexion.
USER MANUAL HIF5340DBT Reflexion
TO PREVENT FIRE OR SHOCK HAZARD DO NOT EXPOSE THIS APPLIANCE TO RAIN OR MOISTURE.
CLASS 1 LASER PRODUCT
KLASS 1 LASER APPARAT
LUOKEN 1 LAISERLAITE
KLASSE 1 LASER PRODUKT
Vertical system with CD / Bluetooth / FM / DAB+ / USB /
AUX IN
Model No.: HIF5340DBT
REFLEXION
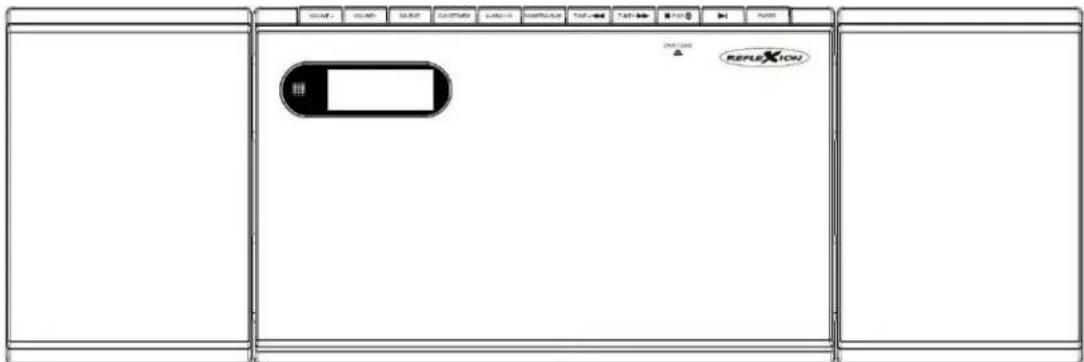
Read this manual carefully before use and keep the manual for future reference.
SAFETY INSTRUCTIONS

The exclamation point in the triangle points the user to important Operating and maintenance instructions (service) in this Manual, which must be followed.
The lightning bolt symbol in the triangle alerts the user to "dangerous voltages" on some components inside the unit.
To avoid the risk of electric shock, never open the housing. Inside, there are no user-repairable parts. Repairs may only be carried out by an authorized specialist workshop.
230v\~





This device is designed for 230V \~ 50Hz mains voltage. If the device is not used for a long time, remove the plug from the socket.
Do not expose the unit to moisture or rain.
Do not turn on the system until you have checked all connections.
Set up the device so that an undisturbed supply of fresh air is always ensured. Never place the unit on rugs and curtains, or place it in bookshelves.
Do not expose the device to direct sunlight Heat sources.
READ ALL INSTRUCTIONS BEFORE USE
Always follow basic safety precautions when using this Bluetooth speaker system with microphone, especially when children are present.
SAFETY INSTRUCTIONS
- Read this manual before attempting to connect or operate the device.
- Keep this manual for future reference.
- WARNING WARNINGS - All warnings on the device and in the operating instructions must be observed.
- Follow Instructions - All operating instructions must be followed.
- The device must not be exposed to dripping or splashing, and no objects filled with liquids, such as vases, should be placed on or near the device. Use only in dry regions.
- The device may only be connected to the power supply described in the operating instructions or specified on the device.
- Route the power cord so that it is not pinched or pinched, and so that you can not trip over the cord.
- Do not place naked flames like candles on the appliance and keep the appliance away from naked flames.
- Attention the device has a class 1 laser. Do not open the device and do not look into the laser beam as this may damage the eyes.
- Children should be supervised to ensure that they do not play with the appliance.
- The ventilation must not be obstructed by covering the ventilation openings. Do not place the unit on a bed, sofa, rug, or similar surface that could block the vents.
-
Make sure that the device is connected to an AC 100-240V 60 / 50Hz outlet. Using other or higher voltages may cause the unit to malfunction. Turn off the device before disconnecting it from the power supply to completely switch it off.
-
If you have wet or damp hands, do not plug the power cord into the wall outlet or pull it out of the wall outlet.
- Do not use force to plug the mains plug into the socket if the mains plug does not fit.
- Only use accessories and spare parts approved by the manufacturer.
- Install the device according to the manufacturer's instructions.
- Only install the device in well-ventilated areas. Place the device on a level and stable surface. Do not expose to temperatures over 40^ C. When installing, make sure to keep the 30 cm to the back and the top of the unit and 5 cm from the left and right sides.
- Do not use the buttons on the device with excessive force as this may cause damage.
- Dispose of used batteries in an environmentally friendly manner.
- Always make sure that the appliance is unplugged before transport or cleaning. Only clean it with a dry cloth.
- In the event of a thunderstorm or if the device is not used for a long period of time, disconnect the device from the mains.
- This product has no user serviceable parts. Do not try to repair this product yourself. Only qualified service personnel may perform the maintenance. In the event of a defect, return the product to the manufacturer through your dealer.
- Do not let anyone, especially children, push anything into holes, slots, or any other openings in the body of the device, as this can result in a fatal electric shock.
- Do not place the unit near televisions, speakers, and other objects that generate strong magnetic fields.
- Do not leave the device unattended when in use.
- A dirty or scratched CD can cause a skipping problem. Clean or replace the CD.
NOTE: To completely disconnect the system when not in use for a long time, unplug the power cord from the wall outlet.
Attention
Risk of explosion if the battery is changed incorrectly. Only replace batteries with the same type.
TO PREVENT FIRE OR ELECTRIC SHOCK HAZARD, DO NOT EXPOSE THIS UNIT TO RAIN OR MOISTURE.
TO PREVENT FIRE OR SHOCK HAZARD DO NOT EXPOSE THIS APPLIANCE TO RAIN OR MOISTURE.
Class 1 laser product
The label on the device indicates to the user that this device is equipped with a class 1 laser.
CLASS 1 LASER PRODUCT
KLASS 1 LASER APPARAT
LUOKEN 1 LAISERLAITE
KLASSE 1 LASER PRODUKT
INFORMATION ABOUT RAYS
This mark in the CD compartment indicates that this device is working with hazardous Class 1 radiation. Please do not open the device and do not remove components for use other than this device. Please never look directly into the laser as this may damage the eyes.
WARNING TO RADIATION
This label is inside the device. As shown in the picture.
Warning about further measures on the device. The device contains a laser that Laser beams according to the limit of the class 1 laser product.
WARNING: DO NOT INSPECT BATTERY, CHEMICAL BURNS.
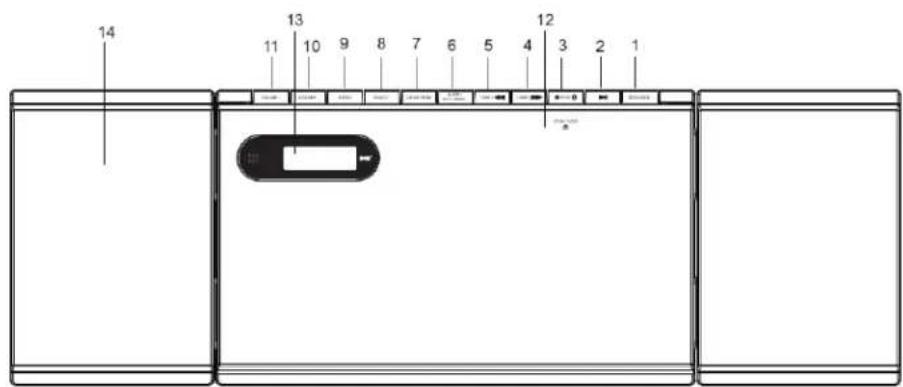
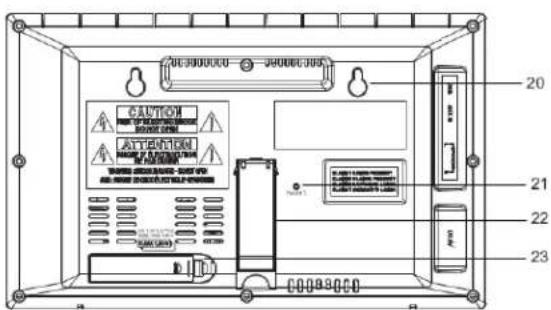
FRONT
- POWER / SOURCE: Switch the device on / off (standby). Select playback source.
- ▶||: Play / Pause für CD / USB Playback.
- ■ / PAIR (Bluetooth): Play CD, Stop USB / Bluetooth connection button.
- TUNE+ / ▶▶: Radio frequency increase / next playback (CD, USB).
- TUNE- / ◀◀: Reduce radio frequency / previous playback (CD, USB).
- ALBUM / PLAY MODE: Display dimming / Select folder (USB / MP3)
- CLK SET / MEM: Clock Settings / Memory Settings.
- SELECT: Confirm selection.
- MENU: Open / close settings menu.
- VOLUME+: Volume Up
- VOLUME -: Volume Down
- OPEN / CLOSE: Open / close CD drive.
- DISPLAY: Information display.
- SPEAKER: Left / right sound output
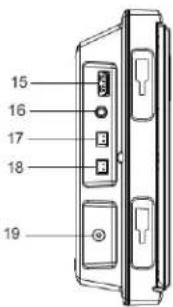
BACK
- USB: USB jack.
- AUX IN: 3,5mm AUX IN jack.
- SPEAKER L: Left speaker output.
-
SPEAKER R: Right speaker output.
-
DC IN: Power supply input (5V / 1200mA).
-
WALL MOUNTING POINTS: For hanging on screws or similar.
-
ANTENNA: Cable antenna for FM reception.
-
FOLDING FOOT: Folding foot for placement on a solid and even surface.
-
BACKUP BATTERY 2x AAA 1.5V for the radio, clock, and alarm settings.
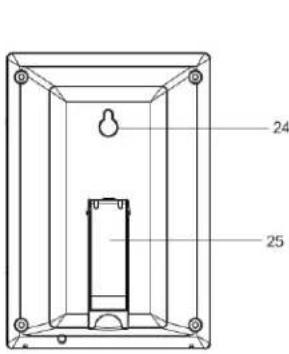
SPEAKER
- WALL MOUNTING POINTS: For hanging on screws or similar.
- FOLDING FOOT: Folding foot for placement on a solid and even surface.
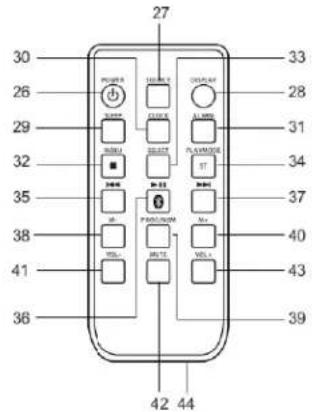
REMOTE CONTROL
-
POWER: Switch the device on / off (standby).
-
SOURCE: Select playback source.
-
DISPLAY: Switch display information through.
-
SLEEP: Set sleep timer.
-
CLOCK: Alarm clock mode switch on / off.
-
ALARM: Alarm Modus Ein / Aus schalten.
-
■ / MENU: Einstellungsmenü Öffnen / Schließen.
-
SELECT: Einstellungen bestätigen.
-
PLAY MODE / ST: Select playback mode.
-
▪◀◀: Previous title.
-
▶ || / PAIR: Play / Pause / Bluetooth connection button.
-
▶▶| : Next title.
-
M-: Previous Preset place (FM / DAB+)
-
PROG/MEM: Set Playlist (CD, USB).
Save preset (radio).
-
M+: Next preset place (FM / DAB +).
-
VOL:- Volume Down.
-
MUTE: Mute the sound on / off.
-
VOL+: Volume UP.
-
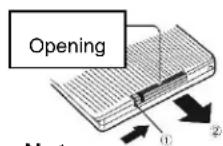
BATTERY: Remote control battery compartment.
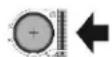
Button cell C2025
Note:
Remove the battery from the remote control during storage or longer time not use of the CD radio.
CONNECT SPEAKER
- The left speaker has two chopping on the right side and the right speaker has two chop on the left side to fold out to connect the speakers to the main unit.
- Connect the speakers to the main unit by pushing the speakers into the main unit with the hacks open and sliding them down.
- Plug the speaker cable for the left speaker into the left speaker output [SPEAKER L] (17) and the speaker cable for the right speaker into the right speaker output [SPEAKER R] (18).
CONNECT POWER SUPPLY
- Connect one end of the external power supply to the [DC IN] jack (19) of the vertical unit.
- Plug the other end of the power cord into the wall outlet.
Note:
Compare the specifications of the external power supply with your home power supply and connect the power supply to your home power supply only if they match.
POWER ON / OFF
- Press the [POWER / SOURCE] button (1/26) to turn on the unit.
- Press and hold the [POWER / SOURCE] button (1/26) for about 3 seconds to put the device into standby mode.
- Press the [POWER / SOURCE] button (1/26) when the power is on to select the different modes.
SETTING THE CLOCK
- Press and hold the [MENU] button (9/32) for about 3 seconds to enter the device menu.
- Press the [SELECT] button (8/33) to enter the system menu.
- Press the [TUNE + / ▶▶] (4/37) or [TUNE- / ◀◀] (5/35) buttons and navigate to the "Time" menu item.
- Press the [SELECT] button (8/33) to enter the clock setting.
- You can make the following settings.
Set time / date
Set the time and date.
[TUNE + / ▶▶] (4/37): Change the time and date setting.
[TUNE- / ◀◀] (5/35): Change the time and date setting.
SELECT (8/33): Confirm setting / move to the next menu item.
Set hours ▶ Set minutes ▶ Set days ▶ Set month ▶ Set year ▶ Save time and date
Note:
You can also set the time and date using the standby mode. Hold down the [CLK SET / MEM] button (7/30) for about 3 seconds.
Automatic update
Set from which source to load updates for time and date.
Update All / Update from DAB / Update from FM / No update
Set 12/24 hours
Set whether to display the time with the 24-hour display or 12-hour display.
12. Set hours / set 24 hours
Set date format
Set the date format.
You can set the following setting for the date format:
DD.MM.YYYY (days / months / years)
MM.TT.JJJJ (months / days / years)
SET ALARM
- Press and hold the [MENU] button (9/32) for about 3 seconds to enter the device menu.
- Press the [SELECT] button (8/33) to enter the system menu.
- Press the [TUNE + / ▶▶] (4/37) or [TUNE- / ◀◀] (5/35) buttons and navigate to the menu item "Alarm clock".
- Press the [SELECT] button (8/33) to enter the alarm setting.
- You can make the following settings.
Note:
You can also set the alarm via standby mode. To do this, press the [ALARM] key (31) in standby mode to enter the alarm setting.
[TUNE + / ▶▶] (4/37): Change the setting.
[TUNE- / ◀◀] (5/35): Change the setting.
SELECT (8/33): Confirm setting / move to the next menu item.
POWER / SOURCE (1/26): Turn off the alarm.
SELECT (8/33): Sleep mode. Device wakes up after 9 minutes.
Set ALARM 1 or 2
▼ [SELECT] (8/33)
To set hours
▼ [SELECT] (8/33)
Set minutes
▼ [SELECT] (8/33)
Set duration
▼ [SELECT] (8/33)
Set source (CD / USB / Buzzer / DAB / FM / USB /
▼ [SELECT] (8/33)
Set alarm rhythm (daily / once / weekend / weekdays)
▼ [SELECT] (8/33)
Adjust Volume
▼ [SELECT] (8/33)
Alarm Clock On / Alarm Off
▼ [SELECT] (8/33)
Alarm clock saved
SLEEP MODE
- Press and hold the [MENU] button (9/32) for about 3 seconds to enter the device menu.
- Press the [SELECT] button (8/33) to enter the system menu.
-
Press the [TUNE + / ▶▶] (4/35) or [TUNE- / ◀◀] (5/37) buttons and navigate to the "Sleep" menu item.
-
Press the [SELECT] button (8/33) to enter the sleep setting.
-
You can make the following settings.
Off / 10/20/30/45/60/90/120 minutes.
Note:
When the set time has elapsed, the device automatically switches to standby mode.
ADJUST VOLUME
Press the [VOLUME +] (10/41) or [VOLUME -] (11/42) button to increase or decrease the volume.
MUTE SETTING
- Press the [MUTE] button (41) to mute the volume.
- Press the [MUTE] button (41) again to turn the volume back on.
THROW ANTENNA
The device has a wire antenna. Lay and align the wire antenna for the best possible FM reception.
CHOOSE SOURCE
Press the [POWER / SOURCE] button (1/27) repeatedly until the desired playback source appears in the display.
The following sources are available:
DAB / FM / BLUETOOTH / CD / USB / AUX IN
FM-RADIO MODE
- Press the [SOURCE] button (1/27) repeatedly until FM appears in the display.
- Press the [PLAY / PAUSE] (2/35) button to perform the auto search.
Automatic search:
With the automatic search, all receivers become radio stations
(20 max.) as preset Automatically saved.
- Press and hold the [TUNE + / ▶▶] (4/35) or [TUNE- / ◀◀] (5/37) button for about 3 seconds and the unit will search for the next available radio station.
FM (FM) MENU
- Press and hold the [MENU] key (9/32) for about 3 seconds until the menu appears in the display.
- The following menu items and setting options are available in the menu.
Search setting
In this menu you determine whether all radio stations should be found or only the strong radio stations.
All stations / strong stations only
Audio setting
In this menu you can set whether the sound should be output as stereo or mono sound.
Stereo possible / mono only
DAB / DAB + MODE
- Press the [SOURCE] button (1/27) repeatedly until "DAB" appears in the display.
- Press and hold the [PLAY / PAUSE] button (2/35) for about 2 seconds until Scan appears in the display.
- Playback starts automatically with the first stored station.
Automatic search:
With the automatic search all received DAB / DAB + radio stations are stored.
- Press and hold the [MENU] key (9/32) for about 3 seconds until the menu appears in the display.
- The following menu items and setting options are available in the menu.
Full search
Press the menu item "Full Search" to execute the automatic search. All stored DAB / DAB + radio stations are stored in a list.
Manual adjustment
Press the menu item "Manual setting" to carry out a manual search.
- Use the [TUNE + / ▶▶] (4/35) or [TUNE- / ◀◀] (5/37) buttons to select the desired transponder frequency.
- Press the [SELECT] key (8/33) to start the search.
- The found DAB / DAB + radio stations are added to the list.
DRC
Set the value for the DRC (Dynamic Range Control). You can choose from:
DRC off / DRC high / DRC low
Inactive stations
Press this menu item to delete all stations without reception from the DAB / DAB + Radio list.
Save your favorite FM and DAB / DAB + radio stations as favorites in the preset list.
- Max. 20 preset stations for FM and DAB / DAB + Radio stations.
- In the event of a power failure, the preset list is not lost. Only if backup batteries are inserted.
SAVE PRESET MANUALLY
- Press the [CLK / MEM] button (7/39). The display flashes "P01" or the frequency of an already stored station.
- Press the [TUNE + / ▶▶] (4/35) or [TUNE- / ◀◀] (5/37) button to select the preset memory.
- Press the [SELECT] button (8/33) to save the radio station as a preset.
SELECT PRESET
- Press the [CLK SET / MEM] button (7) to open the station selection.
- Press the [TUNE + / ▶▶] (4/35) or [TUNE- / ◀◀] (5/37) buttons to select the desired preset station.
- Press the [SELECT] button (8/33) to change to the desired preset memory.
Note:
Press the [MEM -] (38) or [MEM +] (43) button to change the preset memory locations directly.
CD MODE
- Press the [SOURCE] key (1/27) repeatedly until "CD" appears in the display.
- Press the drive cover [OPEN / CLOSE] (12) to open the drive.
- Insert a CD with the side facing the front facing the drive.
- Close the drive.
- Playback will start automatically with the first track.
USB MODE
- Press the [SOURCE] button (1/27) repeatedly until "USB" appears in the display.
- Insert a USB stick into the [USB] (15) socket.
- Playback starts automatically with the first track.
CONTROL IN CD & USB MODE
Play / Pause: Press the [▶] (2/36) button to start or pause the playback (display flashes).
Previous track: Press the [TUNE - / ◀◀] (5/35) button to play the previous track.
Next track: Press the [TUNE + / ▶▶] (4/37) button to play the next track.
Playback Point Find (-): Press and hold the [TUNE - / ◀◀] (5/35) button to rewind the track and quickly search for a specific playback point.
Playback Point Find (+): Hold down the [TUNE + / ▶▶] (4/37) button to fast forward in the title and quickly search for a specific playback point.
To stop playback: Press the [■ / PAIR] button (3/32) to stop playback. The number of tracks from the CD is shown in the display.
Previous folder: Press the [MEM -] button (38) to select the previous folder.
Next Folders: Press the [MEM +] key (40) to select the next folder.
REPEAT FUNCTION
- Press the [ALBUM / PLAY MODE] (6/34) button on the remote control repeatedly to select the repeat function.
-
The following symbols appear in the display.
-
REP-1 = The selected track will be played repeatedly.
- REP-DIR = All tracks in a folder are played repeatedly (MP3 / USB).
- REP-ALL = All tracks will be played repeatedly.
- RANDOM = Random playback of all tracks.
PROGRAM PLAYLIST
(CD / CD MP3 / USB mode)
• CD = maximum of 20 tracks
• CD MP3 or USB = maximum 99 tracks
- Press the [■ / PAIR] button (3/32).
- Press the [CLK Set / MEM] (7/39) button. P01 appears in the display.
- Press the [TUNE - / ◀◀] (5/35) or [TUNE + / ▶▶] (4/37) button to select the desired track.
- Press the [CLK Set / MEM] (7/39) button again to save the selected title.
- Repeat steps 1-4 until the desired playlist is reached.
- Press the [▶] (2/36) button to play the programmed track list ("MEM" indicator lights).
- Press the [■ / PAIR] key (3/32) twice to cancel the programmed track list
- The repeat function is available for the programmed track list.
BLUETOOTH
- Press the [SOURCE] button (1/27) repeatedly until "Bluetooth" appears in the display.
- Open the Bluetooth settings on your external device and start the search.
- Select HIF5340DBT from the list of found devices.
- When entering a password, enter "0000".
- When the external device is connected to the HIF5340DBT, playback may begin.
Note:
- If no device is connected to the HIF5340DBT, "Not connected" is displayed.
- If a device is connected to the HIF5340DBT, "connected" is shown in the display.
Play / Pause:
Press the [▶] (2/36) button to start or stop playback.
Previous track:
Press the [TUNE - / ◀◀] (5/35) button to play the previous track.
Next track:
Press the [TUNE + / ▶▶] (4/37) button to play the next track.
Volume adjustment:
Press the [VOLUME +] (10/43) or [VOLUME -] (11/41) button to adjust the device volume.
The playback volume can be adjusted with the external device.
Note:
Playback can also be controlled using the Connected Bluetooth device.
AUX IN MODE
- Press the [SOURCE] button (1/27) repeatedly until "AUX IN" appears in the display.
- Use a 3.5mm aux cable (not included) to connect the device to an external playback device.
- Insert the AUX cable one end into the [AUX IN] (16) jack and the other end into the external playback device.
- Playback is controlled by the external audio player.
- The basic volume is set on the HIF5340DBT and the playback volume is controlled by the externally connected audio device.
SYSTEM MENU
- Press and hold the [MENU] button (9/32) for about 3 seconds to enter the device menu.
- Press the [TUNE + / ▶▶] (4/37) or [TUNE- / ◀◀] (5/35) buttons and navigate to "System".
- Press the [SELECT] key (8/33) to enter the system menu.
- Press the [TUNE + / ▶▶] (4/37) or [TUNE- / ◀◀] (5/35) buttons to navigate in the menu.
- The following menu items are available.
Sleep: Set the time after which the device should automatically switch to
standby mode.
Off / 15/30 45 60 90
Alarm clock: Set an alarm clock. See Alarm clock setting.
Time: Set the time. See clock setting.
Backlight: Set the backlight.
Language: Set the menu language.
Factory setting: Reset all settings to the factory settings.
Software Upgrade: Perform a software update via USB stick.
SW version: Displays the current software version.
TECHNICAL SPECIFICATIONS
General
Power Supply AC Adapter: Input: AC100-240V \~ 50 / 60Hz, 0.3A Max
Output: 5V 1.2A
Energy consumption: 12W
FM Frequency: FM 87,5-108MHz
DAB / DAB+: 174,928 - 239.200 MHz
AUX IN jack: 3.5mm
Music Performance RMS: 2 x 2W
Max. Music power: 2 x 16W
Working temperature: 0 °C - + 45 °C
Dimensions (W x D x H): 48.0 x 16.0 x 5.1 cm
Device: 260 X 160 X 51 mm
Speaker: 110 X 160 X 51mm X 2pcs
Packaging: 316 x 216 x 150 mm
Weight: 1.8 kg
Radio: FM / DAB / DAB+
Backup battery: 2 x 1.5V / AAA (batteries not included)
CD
| CD audio formats: | Audio discs / mp3 |
| Compatible disc types: | CD-R / CD + R / CD-RW / CD + RW |
USB
Max. USB stick size: 32GB
Max. Supported USB Title: 999 tracks
Max. Supported Folders: 99
Supported playback quality: 8 - 320 kbps
USB formatting: FAT / FAT32
USB playback formats: MP3 / WMA
Bluetooth
Bluetooth: V4.2 (A2DP)
Bluetooth frequency: 2.4 GHz
Reception range: 10 meters (visibility without obstacles)
Compatible Bluetooth profiles: A2DP V1.0, AVRCP V1.0
Bluetooth transmission power: 8dBm
Bluetooth frequency range: 2.402 - 2.480 GHz
Note: Specifications are subject to change for continuous improvement without prior notice.
DELIVERY
Device (HIF5340DBT) 1x
Speaker (L / R) 2x
External power supply (5V 1,2A) 1x
Remote control 1x
Including battery C2025)
User manual 1x
DISPOSAL INSTRUCTIONS
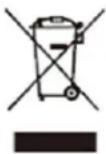
This symbol on the product or in the instructions means that the appliance, electrical and electronic appliances must be disposed of separately from your household waste at the end of their service life. There are separate collection systems for recycling in the EU. For more information, contact the local authority or your local distributor where you purchased the product.
Simplified EU Declaration of Conformity
Hereby, UltraMedia GmbH & Co. Handels KG declares that the HIF5340DBT radio equipment complies with Directive 2014/53 / EU.
The full text of the EU Declaration of Conformity is available at the following Internet address http://www.ultramedia.de/index.php/ce-konformitaetserklaerung.html
We hope you enjoy the device.
Your UltraMedia team
WARRENTY CONDITIONS

The company: UltraMedia GmbH & Co. Handels KG
assumes a warranty of 24 months for this product.
The warranty does not cover wearing parts, aesthetic parts, products with a damaged warranty seal or unreadable / existing serial number, as well as damage caused by improper operation and / or use, by the use of non-original spare parts, inappropriate packaging or for any other reason which are not attributable to "reflection" products.
On accessories, such as the remote control, the power supply, etc., we grant a warranty of 6 months from the date of purchase.
It is essential to observe the warnings in the operating instructions.
In the event of a warranty claim, send the device, if possible, in the original packaging with complete accessories, a cover letter from you with address and telephone / fax number and / or email address and a copy of your proof of purchase free of charge (sender takes care of the transport) to the above Address. Non-free packages can not be accepted. For transport damages of devices, which are not sent in the original packaging, UltraMedia assumes no liability! Before any shipment of the device please contact us, should there be any questions, please contact us.
Some issues can also be resolved through service support by phone or email.
After repair we will send you the device free of charge (UltraMedia will pay for the transport).
- SAFETY INSTRUCTIONS
- 230v\~
- READ ALL INSTRUCTIONS BEFORE USE
- Attention
- TO PREVENT FIRE OR ELECTRIC SHOCK HAZARD, DO NOT EXPOSE THIS UNIT TO RAIN OR MOISTURE.
- Class 1 laser product
- INFORMATION ABOUT RAYS
- WARNING TO RADIATION
- FRONT
- BACK
- SPEAKER
- REMOTE CONTROL
- Note:
- CONNECT SPEAKER
- CONNECT POWER SUPPLY
- POWER ON / OFF
- SETTING THE CLOCK
- Set time / date
- Automatic update
- Set 12/24 hours
- Set hours / set 24 hours
- Set date format
- SET ALARM
- SLEEP MODE
- ADJUST VOLUME
- MUTE SETTING
- THROW ANTENNA
- CHOOSE SOURCE
- FM-RADIO MODE
- Automatic search:
- FM (FM) MENU
- Search setting
- Audio setting
- DAB / DAB + MODE
- Full search
- Manual adjustment
- DRC
- Inactive stations
- SAVE PRESET MANUALLY
- SELECT PRESET
- CD MODE
- USB MODE
- CONTROL IN CD & USB MODE
- REPEAT FUNCTION
- PROGRAM PLAYLIST
- BLUETOOTH
- AUX IN MODE
- SYSTEM MENU
- TECHNICAL SPECIFICATIONS
- General
- CD
- USB
- DELIVERY
- DISPOSAL INSTRUCTIONS
- Simplified EU Declaration of Conformity
- WARRENTY CONDITIONS
Brand : Reflexion
Model : HIF5340DBT
Category : Hi-Fi System