
KDC-DAB4557U - DAB Car Radio KENWOOD - Free user manual and instructions
Find the device manual for free KDC-DAB4557U KENWOOD in PDF.

| Product Type | DAB car radio with CD receiver |
| Brand | KENWOOD |
| Model | KDC-DAB4557U |
| Dimensions (W × H × D) | 182 × 53 × 160 mm |
| Weight | 1.2 kg |
| Operating voltage | 14.4 V (11 – 16 V allowable) |
| Max current consumption | 10 A |
| Max output power | 50 W × 4 |
| DIN output power | 22 W × 4 (DIN 45324, +B=14.4 V) |
| Speaker impedance | 4 – 8 Ω |
| Radio bands | DAB (Band III and L), FM, MW, LW |
| Compatible audio formats | MP3, WMA, AAC-LC |
| Playback media | CD/CD-R/RW, USB, iPod/iPhone, AUX |
| USB interface | USB 1.1/2.0 full speed, 5 V DC max 1 A |
| Auxiliary input | 3.5 mm stereo mini-jack |
| DAB antenna | SMB connector, 14.4 V supply (<100 mA) |
| Audio settings | Bass, mid, treble, preset EQ, bass boost, loudness |
| Display | Backlit display, color adjustment (depending on model) |
| Clock | Display and manual setting, DAB synchronization |
| Safety functions | Detachable faceplate, reset, short-circuit protection |
| Maintenance | Clean with a dry silicone cloth; clean the connector with a cotton swab |
| Included accessories | Faceplate, trim ring, sleeve, wiring harness, keys, DAB antenna (depending on model) |
Frequently Asked Questions - KDC-DAB4557U KENWOOD
User questions about KDC-DAB4557U KENWOOD
0 question about this device. Answer the ones you know or ask your own.
Ask a new question about this device
Download the instructions for your DAB Car Radio in PDF format for free! Find your manual KDC-DAB4557U - KENWOOD and take your electronic device back in hand. On this page are published all the documents necessary for the use of your device. KDC-DAB4557U by KENWOOD.
USER MANUAL KDC-DAB4557U KENWOOD
Digital Audio Broadcasting

Designed for
Windows Media™

Made for


Contents
Contents 2
About the Quick Start Guide......2
Safety 2
Preparation/ Getting Started ....3
Basic Operations....3
CD/USB/iPod 4
Analog Radio 4
Digital Radio (DAB)......5
Audio Adjustments/Function Settings....6
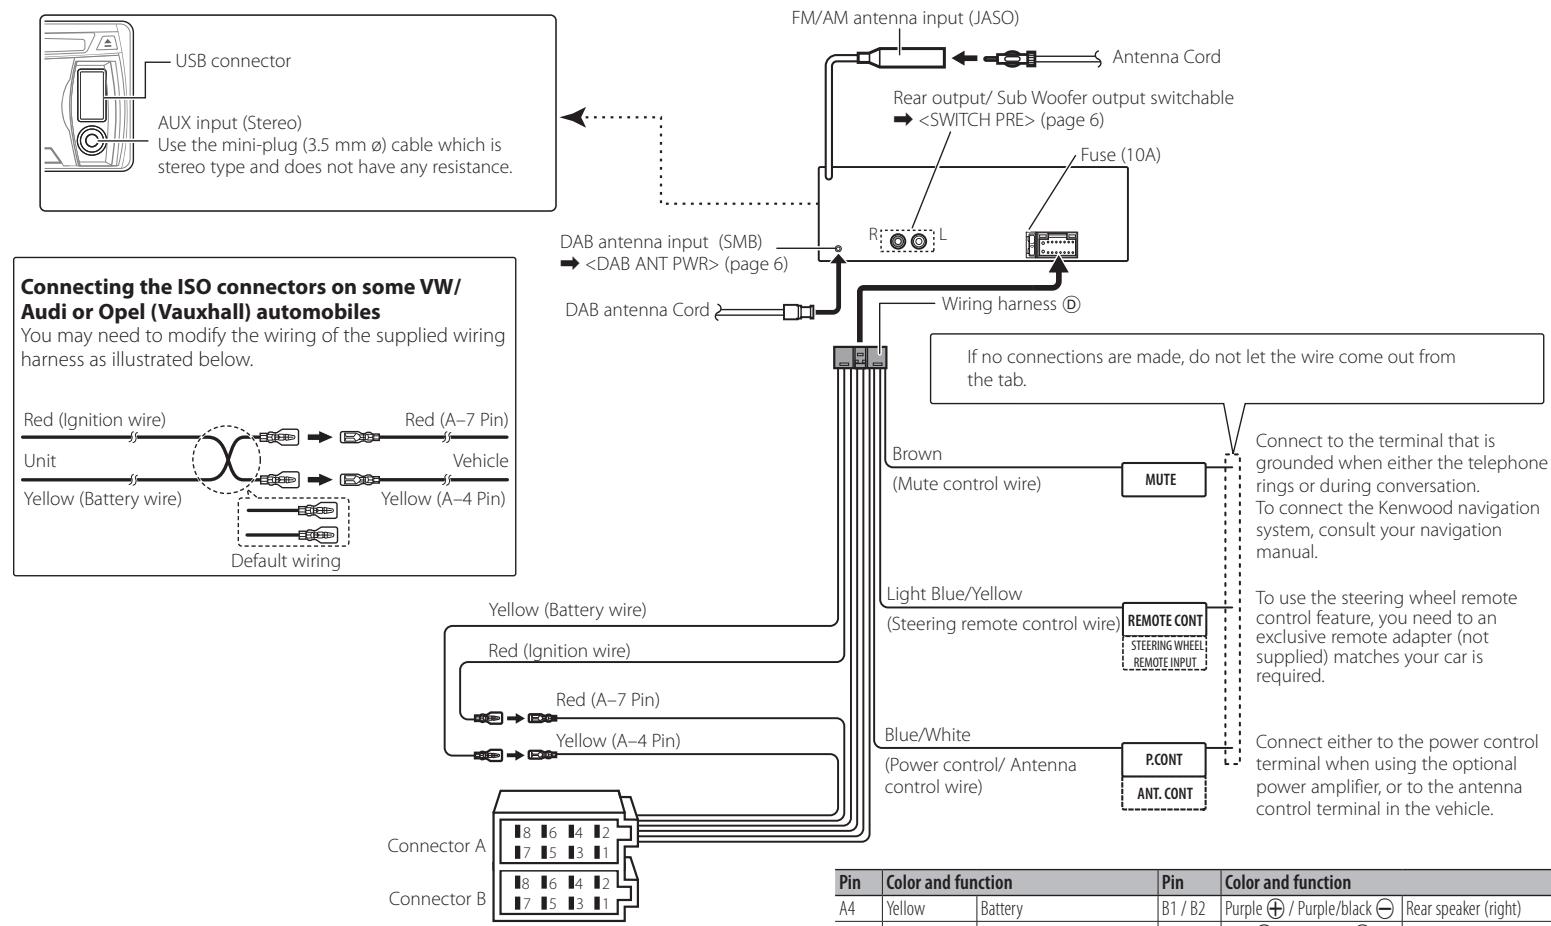
Installation/ Connection....7
Wiring connection 8
Installing the Unit....9
Removing the Unit....9
Installing DAB antenna (KDC-DAB43U only)....10
Specifications....12
Appendix 13
The illustrations of the display and panel appearing in this manual are examples used to explain more clearly how the controls are used. Therefore, what appears on the display in the illustrations may differ from what appears on the display on the actual equipment, and some of the images on the display may be inapplicable.
About the Quick Start Guide
This Quick Start Guide describes basic functions of this unit.
For functions not described in this Guide, refer to the Instruction Manual stored in the enclosed CD-ROM.
To refer to the Instruction Manual, a browser such as Internet Explorer 7 or later, Firefox 3.6 or later, Chrome 20 or later, Safari 5.1 or later, iOS Safari 4.0 or later, or Android 2.2 or later is required.
The Instruction Manual is subject to change for modification of specifications, etc. The latest Instruction Manual can be downloaded from the following website:
manual.kenwood.com/edition/im367/

Safety
WARNING
Do not operate any function that takes your attention away from safe driving.
CAUTION
Volume setting:
- Adjust the volume so that you can hear sounds outside the car to prevent accident.
- Lower the volume before playing digital sources to avoid damaging the speakers by the sudden increase of the output level.
General:
- Avoid using the USB device or iPod/ iPhone if it might hinder driving safety.
- Make sure all important data has been backed up. We shall bear no responsibility for any loss of recorded data.
- Never put or leave any metallic objects (such as coins or metal tools) inside the unit, to prevent a short circuit.
- If a disc error occurs due to condensation on the laser lens, eject the disc and wait for the moisture to evaporate.
Maintenance
- Cleaning the unit: Wipe off the dirt on the panel with a dry silicon or soft cloth.
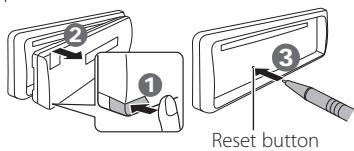
- Cleaning the connector: Detach the faceplate and clean the connector with a cotton swab gently, being careful not to damage the connector.

Connector (on the reverse side of the faceplate)
Handling discs
- Do not touch the recording surface of the disc.
- Do not stick tape etc. on the disc, or use a disc with tape stuck on it.
- Do not use any accessories for the disc.
- Clean from the center of the disc and move outward.
- Clean the disc with a dry silicon or soft cloth. Do not use any solvents.
- When removing discs from this unit, pull them out horizontally.
- Remove the rims from the center hole and disc edge before inserting a disc.
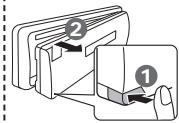
How to reset your unit
If this unit fails to operate properly, press the reset button. The unit returns to the factory settings when the reset button is pressed.
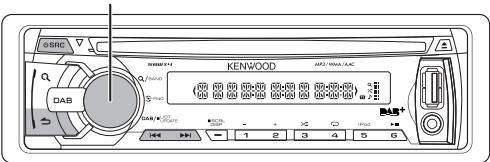
Preparation/ Getting Started
Turns the power ON
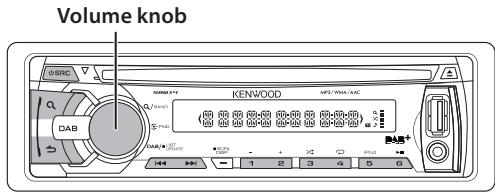
Volume knob
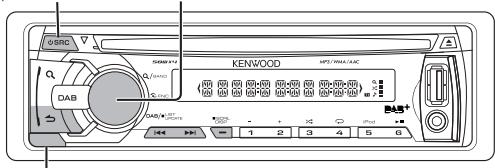
Detaches the faceplate
How to read this manual
Operations explained mainly using buttons on the faceplate.
• [] indicates the buttons on the panel.
• XX indicates the selected items.
How to attach/detach the faceplate
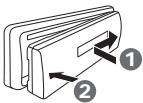
- Do not expose the faceplate to direct sunlight, excessive heat, or humidity. Also avoid places with too much dust or the possibility of water splashing.
- Keep the faceplate in its casing while detached.
- The faceplate is a precision component of the unit and can be damaged by shocks or jolts.
- To prevent deterioration, do not touch the terminals of the unit and faceplate with your fingers.
Cancel the display demonstration
The display demonstration is always turned on unless you cancel it.
When you turn on the power (or after you reset the unit), the display shows:
"CANCEL DEMO" → "PRESS" → "VOLUME KNOB"
1 Press the volume knob.
"YES" is selected for the initial setting.
2 Press the volume knob again. "DEMO OFF" appears.
- If no operation is done for about 15 seconds or if you turn the volume knob to select "NO" in step 2, "DEMO MODE" appears and the display demonstration starts.
Setting the clock
1 Press [SCRL DISP] repeatedly to select the clock.
2 Press and hold [SCRL DISP] to enter clock adjustment mode.
3 Turn the volume knob to adjust the hour, then press to enter minute adjustment.
4 Turn the volume knob to adjust the minute, then press the knob.
- Press [◀◀] / [▶▶▶] to move between the hour and minute adjustment.
Basic Operations
Volume knob
USB terminal
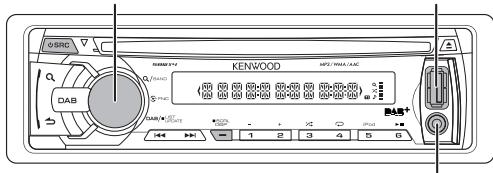
Auxiliary input
Turning the power ON/OFF
Press [☐SRC] to turn the power on. Press and hold [☐SRC] to turn the power off.
Selecting a source
Press [☐SRC] repeatedly to select your desired source.
Digital radio ("DAB") → Analog radio ("TUNER") → USB or iPod ("USB" or "iPod") → CD ("CD") → Auxiliary input ("AUX") → Standby ("STANDBY")
Adjusting the volume
Turn the volume knob to adjust the sound volume.
Switching display
Press [SCRL DISP] repeatedly to select an information.
Auxiliary input
1 Open the cover.
2 Connect a portable audio device using a stereo mini-plug (3.5 mm ) audio cable.
USB terminal
1 Open the cover.
2 Connect a USB device or iPod to the USB terminal.
(USB terminal Maximum Supply current: DC 5 V = 1 A)
USB device
CA-U1EX (500 mA Max.: optional accessory) is recommended to connect a USB device.
iPod

KCA-iP102 connector (optional accessory) is required to connect an iPod.
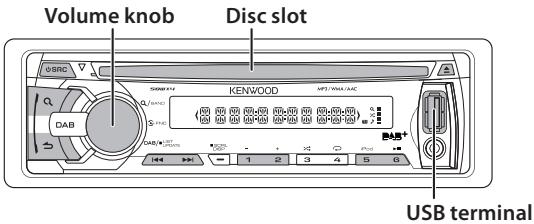
Playing a disc
Insert a disc in the Disc slot.
Playback starts automatically.
Playing a USB device or iPod
Connect a USB device or iPod to the USB terminal.
The source automatically switches, and playback starts.
Selecting a Song
Press [|◀◀] or [▶▶].
Selecting an audio file folder
Press [1 -] or [2 +].
Fast-forwarding or fast-backwarding
a Song
Press and hold [◀◀◀] or [▶▶▶].
Pause and play
Press [6 ▶II].
Selecting App & iPod Control Mode
Press [5 iPod] repeatedly to select the control mode.
MODE ON : From the iPod *. "APP&iPod" appears on the display.
MODE OFF : From the unit.
* You can still select an audio file, play/pause and fast-forward/fast-reverse a song of audio file in the iPod from the unit.
Music Search
1 Press [Q] to enter Music Search mode.
2 Turn the volume knob to select a folder/ track/ file, then press the knob.
- To skip songs, press [I◄◄] / [►►] Holding [I◄◄] / [►►] for 3 seconds or longer skips songs at 10% regardless of the selected skip ratio. This operation is effective only for the iPod, KME-Light/ KMC media.
- To return to the root folder (audio file), top menu (iPod, KME-Light/ KMC media) or first track (audio CD), press [5].
- To return to the previous folder, press [ ↗].
To cancel the Music search mode Press and hold [ ↗ ].
Removing the disc
Press [▲] to eject a disc.
Removing the USB device or iPod
1 Press [☐SRC] to select a source other than "USB" or "iPod".
2 Remove the USB device or iPod.
Search for a service
1 Press [☐SRC] to select TUNER.
2 Press [Q] repeatedly to select a band (FM1, FM2, FM3, MW/LW).
3 Press [◀◀] / [▶▶] to select a station.
- The tuning mode can be changed. Refer to
Station Preset Memory
Press and hold [1] to [6] to memorize the current station.
Recall the stations in the memory Press [1] to [6] to recall memorized station.
Changing the analog radio settings
1 Press the volume knob to enter Function mode.
2 Turn the volume knob to select SETTINGS, then press the knob.
3 Turn the volume knob to select a desired setting item, then press the knob.
See table below for selection.
4 Press and hold [ ] to exit.
| Item | Selectable setting (Preset: *) |
| SEEK MODE | AUTO1*: Automatically search for a station.; AUTO2: Search in the order of the stations in the preset memory.; MANUAL: Manually search for a station. |
| AUTO MEMORY | YES: Automatically starts memorizing 6 stations with good reception.; NO: Disables automatic memorization. |
| MONO SET | ON: Improves the FM reception (but the stereo effect may be lost).; OFF*: Does not improve FM reception but resumes stereo effect.(Not applicable if “MW/LW” is selected) |
| TI | ON*: Temporarily switches to Traffic Information.;OFF: Does not switch to Traffic information(Not applicable if “MW/LW” is selected) |
- For details, see the Instruction Manual.
Volume knob

Preparations
Press and hold [DAB] to start Service List update.
"LIST UPDATE" appears and update starts. "UPDATED" appears when update completes.
Press and hold [DAB] to cancel Service List update.
Search for a service
1 Press [DAB] to enter DAB source.
2 Press [Q] repeatedly to select a band (DB1, DB2, DB3).
3 Press and hold [|◀◀] / [▶▶] to search for an ensemble.
4 Press [◀◀] / [▶▶] to select an ensemble, service or component to listen.
- The tuning mode can be changed. Refer to
Service Preset Memory
Press and hold [1] to [6] to memorize the current service.
Recall the service in the memory
Press [1] to [6] to recall memorized service.
Selecting a service
1 Press [DAB] to enter Service Search mode.
2 Turn the volume knob to select a service, then press the knob.
- To skip a character at a time, press [I◀◀] / [▶▶▶].
- Turning the volume knob fast in the Service Search mode allows you to enter the alphabet search mode.
- "NO LIST" appears when no Service List is obtained.
To cancel the Service Search mode Press [ ↗ ].
Alphabet Search for service
1 Press [DAB] to enter Service Search mode.
2 Press [Q] to enter Alphabet Search mode.
“< ABCDEFGHIJK >” appears.
3 Turn the volume knob to select the character to be searched for.
- Press [I◄◄] / [►►I] to scroll up or down by a page.
4 Press the volume knob to start searching.
After this step, see step 2 of
To cancel the Alphabet search mode Press [Q].
To cancel the Service Search mode Press [ ↗ ].
Changing the digital radio settings
1 Press the volume knob to enter Function mode.
2 Turn the volume knob to select SETTINGS, then press the knob.
3 Turn the volume knob to select a desired setting item, then press the knob.
See table below for selection.
4 Press and hold [ ] to exit.
| Item | Selectable setting (Preset: *) | ||
| SEEK MODE | Press ◀◀/ ▶▶I | Press and hold ◀◀/ ▶▶I | |
| AUTO1 * | Select an ensemble, service or component. | Automatically searches for an ensemble. | |
| AUTO2 | Search in the order of the services in the preset memory. | — | |
| MANUAL | Select an ensemble, service or component. | Manually search for an ensemble. | |
| TI | ON*: Temporarily switches to Traffic Information.;OFF: Does not switch to Traffic information | ||
- For details, see the Instruction Manual.
Audio Adjustments/ Function Settings
Volume knob
1 Press [☐SRC] to select a source.
- AUDIO CTRL : Other than "STANDBY"
- SETTINGS : Any source
- INITIAL SET : "STANDBY"
2 Press the volume knob to enter Function mode.
3 Turn the volume knob to select AUDIO CTRL, SETTINGS or INITIAL SET, then press the knob.
4 Turn the volume knob to select a desired setting item, then press the knob.
– See table below for selection.
- Repeat step 4 until the desired item is selected/activated.
- Press [→] to return to the previous item.
5 Press and hold [ ] to exit.
Note
- For details, see the Instruction Manual.
AUDIO CTRL
| Item | Selectable setting (Preset: *) |
| SUB-W LEVEL | -15 — 0 * — +15 : Adjust the subwoofer output level. |
| BASS LEVEL | -8 — 0 * — +8 : Source tone memory: Adjust the level to memorize in each source. (Before making an adjustment, select the source you want to adjust.) |
| MID LEVEL | |
| TRE LEVEL | |
| EQ PRO | See the Instruction Manual. |
| PRESET EQ | NATURAL */ USER/ ROCK/ POPS/ EASY/ TOP40/ JAZZ/ POWERFUL: Select a preset sound mode suitable to the music genre. (Select [USER] to use the customized bass, middle, and treble settings.) |
| BASS BOOST | B.BOOST LV1/ B.BOOST LV2/ B.BOOST LV3: Select your preferred bass boost level. ; B.BOOST OFF *: Disables level selection. |
| LOUDNESS | LOUD LV1 */ LOUD LV2: Select your preferred low and high frequencies boost to produce a well-balanced sound at a low volume level. ; LOUD OFF: Disables level selection. |
| BALANCE | L15 — 0 * — R15: Adjust the left and right speaker output balance. |
| FADER | R15 — 0 * — F15: Adjust the rear and front speaker output balance. |
| SUB-W SET | ON *: Turns on the subwoofer output. ; OFF: Turns off the subwoofer output. |
| DETAIL SET | See the Instruction Manual. |
- "SUB-W LEVEL" is selectable only if "SUB-W SET" is set to "ON".
- "SUB-W LEVEL"/ "SUB-W SET" is selectable only if "SWITCH PRE" is set to "SUB-W".
SETTINGS
| Item | Selectable setting (Preset: *) |
| AUX NAME | AUX */ DVD/ PORTABLE/ GAME/ VIDEO/ TV: Select the desired name for the connected component. (Selectable only if “AUX” is selected as the source.) |
| CLOCK | |
| CLOCK ADJ | 1. Turn the volume knob to adjust the hour, then press to enter minute adjustment. Clock minutes flashes on the display.2. Turn the volume knob to adjust the minute, then press the knob. Press [I◄◄] / [►►] to move between the hour and minute adjustment. |
| TIME SYNC | ON *: The clock time is automatically set using the Clock Time (CT) data in DAB signal. ; OFF: Cancels. |
| DISP & KEY (for KDC-DAB43U) | |
| COLOR SEL | VARI SCAN */ COLOR 01 – COLOR 24/ USER: Selects your preferred key illumination color. |
| DISP DIMMER | ON: Dims the display illumination. ; OFF *: Does not dim. |
| TEXT SCROLL | AUTO */ ONCE: Select to scroll the display information automatically, or scroll only once. ; OFF: Disables scroll function. |
| KEY DIMMER | LV1: Dims the key illumination. ; LV2: Dims the key illumination darker than LV1. ; OFF *: Does not dim. |
| DISPLAY (for KDC-DAB4557U) | |
| DISP DIMMER | ON: Dims the display illumination. ; OFF *: Does not dim. |
| TEXT SCROLL | AUTO */ ONCE: Select to scroll the display information automatically, or scroll only once. ; OFF: Disables scroll function. |
INITIAL SET
| Item | Selectable setting (Preset: *) |
| PRESET TYPE | See the Instruction Manual. |
| KEY BEEP | ON */ OFF: Activates/deactivates tone emission when a key is pressed. |
| RUSSIAN SET | ON: Displayed in Russian (if applicable). (Folder name/ file name/ song title/ artist name/ album name) ;OFF *: Not displayed in Russian. |
| P-OFF WAIT | Set the duration until the unit will automatically turns off (while in standby mode) to save the battery.---- : Cancels ; 20M *: 20 minutes ; 40M: 40 minutes ; 60M: 60 minutes |
| BUILTIN AUX | ON *: Enables “AUX” in source selection. Sound of the connected external component is produced through the car speakers. ;OFF: Disables “AUX” in source selection. |
| CD READ | 1 *: Automatically distinguishes between audio file disc and music CD. ; 2: Forces to play as a music CD. No sound can be heard if an audio file disc is played. |
| DAB L-BAND | ON: Receives L-BAND ensemble with DAB source. ;OFF *: Set when there is no L-BAND broadcast station. Ensemble search and Service List information update will be faster. |
| DAB ANT PWR | ON *: Supplies power to the DAB antenna. Set when using the antenna included with KDC-DAB43U. ;OFF: Does not supply power. Set when using passive antenna without booster. |
| SWITCH PRE | REAR */ SUB-W: Select whether rear speakers or a subwoofer are connected to the line out terminals on the rear of the unit (through an external amplifier). |
| SP SELECT | OFF * / 5/4 / 6×9/6 / OEM: Select the speaker size for optimum performance. |
| F/W UPDATE | See the Instruction Manual. |
Part list for installation:
Ⓐ Faceplate....(×1)
⑧ Trim plate....(×1)
© Mounting sleeve....(×1)
(D) Wiring harness....(×1)
⑤ Extraction key....(×2)
⑤ DAB antenna film *1....(×1)
© DAB antenna amplifier *1....(×1)
⑧ Cord clamper *1....(×3)
① Cleaner *1 (×1)
*1 KDC-DAB43U only
Basic procedure
1 Remove the key from the ignition switch, then disconnect the ⊖ terminal of the car battery.
2 Install the DAB antenna.
→
3 Make proper input and output wire connections.
→
4 Install the unit to your car.
→
5 Reconnect the ⊖ terminal of the car battery.
6 Reset the unit. (page 2)
WARNING
- The unit can only be installed in a car with a 12 V DC power supply, negative ground.
- If you connect the ignition wire (red) and the battery wire (yellow) to the car chassis (ground), you may cause a short circuit, that in turn may start a fire. Always connect those wires to the power source running through the fuse box.
- Disconnect the battery's negative terminal and make all electrical connections before installing the unit.
• Insulate unconnected wires with vinyl tape or other similar material. To prevent a short circuit, do not remove the caps on the ends of the unconnected wires or the terminals. - Be sure to ground this unit to the car's chassis again after mounting.
- If the power is not turned ON ("PROTECT" is displayed), the speaker wire may have a short-circuit or touched the chassis of the vehicle and the protection function may have been activated. Therefore, the speaker wire should be checked.
CAUTION
- If your car's ignition key switch does not have an ACC position, connect the ignition wires to a power source that can be turned on and off with the ignition key. If you connect the ignition wires to a constant-voltage power source, as with battery wires, the battery may die.
- Do not use your own screws. Use only the screws provided.
• Install this unit in the console of your vehicle. Make sure the faceplate will not hit the lid of the console (if any) when closing and opening.
• After the installing the unit, check whether the brake lamps, blinkers, wipers, etc. on the car are working properly. - Mount the unit so that the mounting angle is 30^ or less.
- If the fuse blows, first make sure the wires are not touching other parts to cause a short circuit, and then replace the old fuse with one with new one with the same rating.
- Connect the speaker wires correctly to the corresponding terminals. The unit may be damaged or fail to work if you share the wires or ground them to any metal part in the car.
- When only two speakers are being connected to the system, connect the connectors either to both the front output terminals or to both the rear output terminals (do not mix front and rear).
- Mounting and wiring this product requires skills and experience. For safety's sake, leave this work to professionals. If you experience problems during installation, consult your Kenwood dealer.

CAUTION
Install this unit in the console of your vehicle.
Do not touch the metal part of this unit during and shortly after the use of the unit. Metal part such as the heat sink and enclosure become hot.
Wiring connection
flowchart
graph TD
    A["USB connector"] --> B["AUX input (Stereo)"]
    B --> C["Use the mini-plug (3.5 mm ø) cable which is stereo type and does not have any resistance."]
    C --> D["Connecting the ISO connectors on some VW/Audi or Opel (Vauxhall) automobiles"]
    D --> E["Red (Ignition wire)"]
    E --> F["Unit Yellow (Battery wire)"]
    F --> G["Yellow (A-4 Pin)"]
    G --> H["Default wiring"]
    H --> I["Red (A-7 Pin)"]
    I --> J["Vehicle"]
    J --> K["DAB antenna input (SMB)"]
    K --> L["<DAB ANT PWR> (page 6)"]
    L --> M["DAB antenna Cord"]
    M --> N["Wiring harness ®"]
    N --> O["FM/AM antenna input (JASO)"]
    O --> P["Antenna Cord"]
    P --> Q["Rear output/ Sub Woofer output switchable"]
    Q --> R["<SWITCH PRE> (page 6)"]
    R --> S["Fuse (10A)"]
    S --> T["R"]
    T --> U["L"]
    U --> V["Green meter"]
    V --> W["Blue/White (Power control/ Antenna control wire)"]
    W --> X["P.CONT"]
    X --> Y["ANT.CONT"]
    Y --> Z["Brown (Mute control wire)"]
    Z --> AA["MUTE"]
    AA --> AB["Light Blue/Yellow (Steering remote control wire)"]
    AB --> AC["REMOTE CONT"]
    AC --> AD["STEERING WHEEL: REMOTE INPUT"]
    AD --> AE["Blue/White"]
    AE --> AF["P.CONT"]
    AF --> AG["ANT.CONT"]
    AG --> AH["Blue/White"]
    AH --> AI["Blue/White"]
    AI --> AJ["Blue/White"]
    AJ --> AK["Blue/White"]
    AK --> AL["Blue/White"]
    AL --> AM["Blue/White"]
    AM --> AN["Blue/White"]
| Pin | Color and function | Pin | Color and function | ||
| A4 | Yellow | Battery | B1 / B2 | Purple ⊕ / Purple/black ⊖ | Rear speaker (right) |
| A5 | Blue/White | Power control | B3 / B4 | Gray ⊕ / Gray/black ⊖ | Front speaker (right) |
| A7 | Red | Ignition (ACC) | B5 / B6 | White ⊕ / White/black ⊖ | Front speaker (left) |
| A8 | Black | Earth (ground) connection | B7 / B8 | Green ⊕ / Green/black ⊖ | Rear speaker (left) |
Installing the Unit
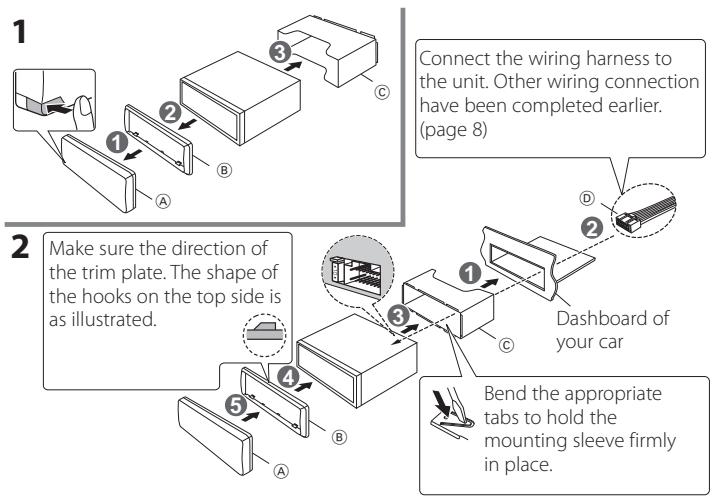
flowchart
graph TD
    A["1: Connect the wiring harness to the unit. Other wiring connection have been completed earlier. (page 8)"] --> B["2: Make sure the direction of the trim plate. The shape of the hooks on the top side is as illustrated."]
    B --> C["3: Connect the wiring harness to the unit. Other wiring connection have been completed earlier. (page 8)"]
    C --> D["4: Build a rectangular component into a car with a switch"]
    D --> E["5: Bend the appropriate tabs to hold the mounting sleeve firmly in place."]
    E --> F["6: Dashboard of your car"]
    F --> G["7: Bend the appropriate tabs to hold the mounting sleeve firmly in place."]
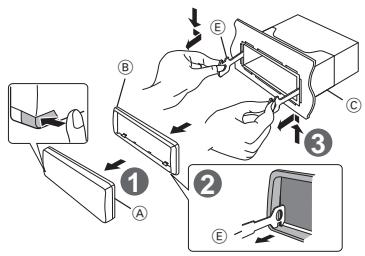
Removing the Unit
1 Detach the faceplate Ⓐ.
2 Engage the catch pin on the extraction key Ⓔ into the holes on both sides of the trim plate Ⓑ, then pull it out.
3 Insert the extraction key Ⓔ deeply into the slots on each side, then follow the arrows instructions as shown on the right.
Installing DAB antenna (KDC-DAB43U only)
CAUTION
- This film antenna is exclusively for use inside the vehicle.
- Do not install at the following locations:
– Where it may block driver's view
– Where it may obstruct operation of safety devices such as air bags
- On movable glass surface such as rear hatch
• Signal strength will decrease at the following locations:
- On IR reflecting glass or where covered with mirror type glass film
– Where it overlaps with genuine radio antenna (pattern)
– Where it overlaps with window heating wires
- At side of vehicle (e.g. door, front quarter window)
- On rear window
- When glass that blocks radio signals (e.g. IR reflecting glass, thermal insulation glass) is used
– Reception may decrease due to noise when windshield wiper, air conditioner, or motor is operating.
– Reception may decrease depending on the direction of the broadcast station with respect to the vehicle (antenna).
- Be sure to check the installation location of film antenna Ⓕ before installing. Film antenna cannot be re-pasted.
- Thoroughly wipe oil and dirt from the pasting surface with the included cleaner ①.
- Do not bend or damage the film antenna Ⓕ.
- Warm the pasting surface by turning on the heater for example, before applying.
- It may not be possible to install on some type of vehicle.
- Check the cable routing of the film antenna Ⓕ and amplifier Ⓖ before pasting.
Installation overview
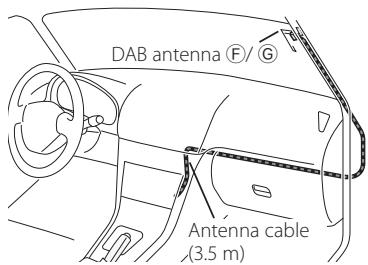
- The antenna should be installed on the passenger side for safety.
- Use cord clamper Ⓗ to secure the antenna to the pillar at several locations.
- The direction of the antenna film Ⓕ changes depending on whether the film antenna Ⓕ is installed on the right side or left side.
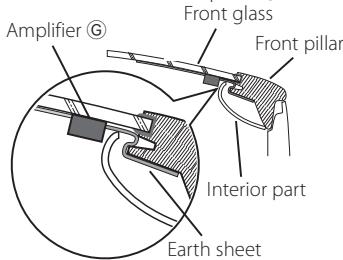
- Separate the antenna film (F) from the ceramic line (black part) at the top of the front glass by 150 mm.
Also, place it about 70 mm inside the ceramic line at the side end of the front glass. (where the earth sheet of the amplifier can be pasted on the metal part of the front pillar)
- Separate from other antennas by at least 100 mm.
- Do not paste the amplifier Ⓖ on the ceramic line (black part) around the front glass. Because there is not enough adhesion.
Determining the antenna installation location
- When installing the antenna on the left side
- When installing the antenna on the right side
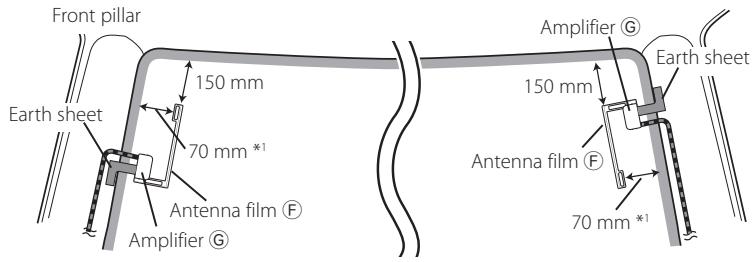
- *1 Where the earth sheet of Amplifier © can be pasted on the metal part of the front pillar.
Antenna Installation
1 Check the installation location.
2 Wipe the area where antenna film Ⓕ, amplifier unit Ⓖ, and earth sheet are pasted with the included cleaner Ⓘ.
The coating on the metal surface need not be removed.
- Wait until the glass surface is completely dry before pasting.
– If the glass surface is cold, such as during winter, warm it with defroster or dryer.
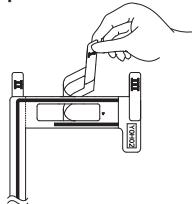
3 Remove the separator (tag I) of antenna film Ⓕ horizontally and paste the antenna on the front glass.
natural_image
Line drawing of a hand using a tool to cut or adjust a mechanical component (no text or symbols present)- Remove the separator gently.
- Do not touch the pasting surface (adhesive side) of the antenna film Ⓕ.
4 Remove the separator (tag II) of antenna film Ⓕ vertically and paste the antenna gently while applying pressure.
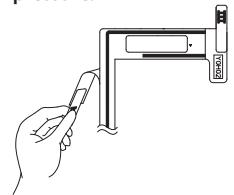
natural_image
Line drawing of a hand holding a pen next to a vertical pipe or bracket (no text or symbols)5 After pasting, rub the element in the glass surface in the direction of the arrow shown in the figure to bond it.
natural_image
Pure mechanical linkage diagram without any text, numbers, or symbols6 Remove the application film (tag III). - Do not touch the feeder terminal of the element. Also, do not apply any glass cleaner.

7 Match the protrusion of the amplifier Ⓖ with the ▲ on the antenna film Ⓕ and paste.
- Do not touch the feeder terminal or the pasting surface (adhesive side) of the amplifier.
- When installing the antenna on the right side
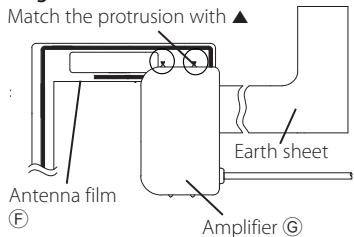
- When installing the antenna on the left side
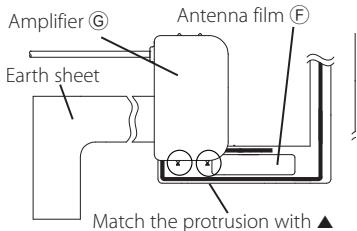
8 Remove the film covering the earth sheet and paste the earth sheet on the metal part of the vehicle.
Provide sufficient leeway for the earth sheet so that it does not interfere with the interior parts (front pillar cover). Also take care that the interior parts do not interfere with the amplifier ⑥.
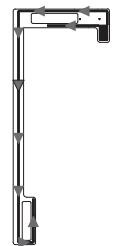
9 Wire the antenna cables.
Use cord clamper Ⓗ to secure the antenna to the pillar at several locations.
Notes
Take the following precautions when passing the antenna cable inside the front pillar where the air bag is installed.
• Install the amplifier part of the antenna cable in front or above the air bag so that the antenna and the air bag do not interfere.
- The front pillar cover is secured with a special clip which may need to be replaced when the front pillar cover is removed.
Contact your vehicle dealer for details on replacing the front pillar cover and availability of replacement parts.
Select the DAB antenna power
Set "INITIAL SET" > "DAB ANT PWR" to "ON" in STANDBY mode. (page 6)
Specifications
DAB tuner section
Frequency range
L Band: 1452.960 MHz — 1490.624
MHz
Band III: 174.928 MHz — 239.200
MHz
Sensitivity
:-100 dBm
Signal to Noise ratio
:80dB
FM tuner section
Frequency range (50 kHz step)
: 87.5 MHz — 108.0 MHz
Usable sensitivity (S/N = 26dB)
: 1 μV/75 Ω
Quieting Sensitivity (S/N = 46dB)
: 2.5 μV/75 Ω
Frequency response (±3 dB)
: 30 Hz – 15 kHz
Signal to Noise ratio (MONO)
:63dB
Stereo separation (1 kHz)
:40dB
MW tuner section
Frequency range (9 kHz step)
: 531 kHz – 1611 kHz
Usable sensitivity (S/N = 20dB)
: 36 μV
LW tuner section
Frequency range (9 kHz step)
: 153 kHz – 279 kHz
Usable sensitivity (S/N = 20dB)
: 57 μV
CD player section
Laser diode
:GaAlAs
Digital filter (D/A)
: 8 Times Over Sampling
D/A Converter
: 24 Bit
Spindle speed (Audio files)
: 500 – 200 rpm (CLV)
Wow & Flutter
: Below Measurable Limit
Frequency response (±1 dB)
: 20 Hz – 20 kHz
Total harmonic distortion (1 kHz)
: 0.01 %
Signal to Noise ratio (1 kHz)
: 105 dB
Dynamic range
: 93 dB
MP3 decode
: Compliant with MPEG-1/2 Audio
Layer-3
WMA decode
: Compliant with Windows Media
Audio
AAC decode
: AAC-LC ".m4a" files
USB interface
USB Standard
: USB1.1/ 2.0 (Full speed)
File System
: FÀT16/ 32
Maximum Supply current
: DC 5 V = 1 A
MP3 decode
: Compliant with MPEG-1/2 Audio
Layer-3
WMA decode
: Compliant with Windows Media
Audio
AAC decode
: AAC-LC ".m4a" files
Audio section
Maximum output power
:50 W x 4
Output power (DIN 45324, +B=14.4V)
:22 W x 4
Speaker Impedance
:4-8Ω
Tone action
Bass : 100 Hz ±8 dB
Middle : 1 kHz ±8 dB
Treble : 12.5 kHz ±8 dB
Preout level/ Load (CD)
: 2500 mV/10 kΩ
Preout impedance
:≤600Ω
Auxiliary input
Frequency response (±3 dB)
: 20 Hz – 20 kHz
Input Maximum Voltage
: 1200 mV
Input Impedance
: 10 kΩ
DAB Antenna Connector
Connector type
: SMB
Output Voltage
: 14.4 V (11 V — 16 V)
Maximum Current
:<100 mA
General
Operating voltage
: 14.4 V (11 - 16V allowable)
Maximum Current consumption
: 10 A
Installation Size (W x H x D)
: 182 x 53 x 160 mm
Weight
: 1.2 kg
Discs that cannot be used
• This unit can only play the CDs with

• A disc that is not round.
- A disc with coloring on the recording surface or a disc that is dirty.
- You cannot play a Recordable/ReWritable disc that has not been finalized. (For the finalization process, refer to the instruction manual that came with your disc writing software or your disc recorder.)
- 3-inch CD cannot be used. An attempt to insert using an adapter can cause malfunction.
About the Audio file
- Playable Audio files: MP3 (.mp3), WMA (.wma), AAC-LC (.m4a)
- Playable disc media: CD-R/RW/ROM
- Playable disc file formats: ISO 9660 Level 1/2, Joliet, Romeo, Long file name.
- Playable USB devices: USB mass storage class
- Playable USB device file systems: FAT16, FAT32
Detailed information and notes about the playable audio files are stated in an online manual on the following site:
www.kenwood.com/cs/ce/audiofile/
About USB device
- This unit can play audio files stored on a USB mass storage class device.
• Install the USB device in a place where it does not interfere with your driving. - Make sure all important data has been backed up to avoid losing the data.
About compatible iPod/iPhone
Made for
- iPod touch (4th generation)
- iPod touch (3rd generation)
- iPod touch (2nd generation)
- iPod touch (1st generation)
- iPod classic
- iPod with video
- iPod nano (6th generation)
- iPod nano (5th generation)
- iPod nano (4th generation)
- iPod nano (3rd generation)
- iPod nano (2nd generation)
- iPod nano (1st generation)
- iPhone 4S
- iPhone 4
- iPhone 3GS
- iPhone 3G
- iPhone
Latest compatible list of iPod/iPhone.
For details, see:
www.kenwood.com/cs/ce/ipod
About "KENWOOD Music Editor Light" and "KENWOOD Music Control"
- This unit supports the PC application "KENWOOD Music Editor Light" (hereinafter "KME-Light"), and Android™ application "KENWOOD Music Control" (hereinafter "KMC").
- When you use the audio file with database information added by the "KENWOOD Music Editor Light" or "KENWOOD Music Control", you can search for a file by title, album or artist name using Music Search.
- "KENWOOD Music Editor Light" and "KENWOOD Music Control" are available from the following web site: www.kenwood.com/cs/ce/
CE
Declaration of Conformity with regard to the EMC Directive 2004/108/EC Manufacturer:
JVC KENWOOD Corporation
3-12, Moriyacho, Kanagawa-ku, Yokohama-shi, Kanagawa 221-0022, Japan
EU Representative's:
Kenwood Electronics Europe BV Amsterdamseweg 37, 1422 AC UITHOORN, The Netherlands
Information on Disposal of Old Electrical and Electronic Equipment and Batteries (applicable for EU countries that have adopted separate waste collection systems)

Products and batteries with the symbol (crossed-out wheeled bin) cannot be disposed as household waste.
Old electrical and electronic equipment and batteries should be recycled at a facility capable of handling these items and their waste byproducts.
Contact your local authority for details in locating a recycle facility nearest to you.
Proper recycling and waste disposal will help conserve resources whilst preventing detrimental effects on our health and the environment.
Notice: The sign "Pb" below the symbol for batteries indicates that this battery contains lead.
The marking of products using lasers
CLASS 1
LASER PRODUCT
The label is attached to the chassis/case and says that the component uses laser beams that have been classified as Class 1. It means that the unit is utilizing laser beams that are of a weaker class. There is no danger of hazardous radiation outside the unit.
- The "AAC" logo is a trademark of Dolby Laboratories.
- “Made for iPod” and “Made for iPhone” mean that an electronic accessory has been designed to connect specifically to iPod, or iPhone, respectively, and has been certified by the developer to meet Apple performance standards. Apple is not responsible for the operation of this device or its compliance with safety and regulatory standards. Please note that the use of this accessory with iPod, or iPhone may affect wireless performance.
- iPhone, iPod, iPod classic, iPod nano, and iPod touch are trademarks of Apple Inc., registered in the U.S. and other countries.
- IOS is a trademark or registered trademark of Cisco in the U.S. and other countries and is used under license.
- Android and Chrome are trademark of Google Inc.
- Internet Explorer and Windows Media are registered trademark of Microsoft Corporation in the United States and other countries.
- Firefox is a registered trademark of Mozilla Foundation in the United States and other countries.
Table des matières
Installation/raccordement 19
Sécurité
▲AVERTISSEMENT
"CANCEL DEMO" → "PRESS" → "VOLUME KNOB"
Installation de l'antenne DAB (KDC-DAB43U uniquement)
ATTENTION
natural_image
Line drawing of a hand using a tool to cut or adjust a mechanical component (no text or symbols)natural_image
Line drawing of a hand holding a tool near a vertical pipe or channel (no text or symbols)Section Disque Compact
Diode laser : GaAlAs
- iPod touch (4th generation)
- iPod touch (3rd generation)
- iPod touch (2nd generation)
- iPod touch (1st generation)
- iPod classic
- iPod with video
- iPod nano (6th generation)
- iPod nano (5th generation)
- iPod nano (4th generation)
- iPod nano (3rd generation)
- iPod nano (2nd generation)
- iPod nano (1st generation)
- iPhone 4S
- iPhone 4
- iPhone 3GS
- iPhone 3G
- iPhone
- The "AAC" logo is a trademark of Dolby Laboratories.
- “Made for iPod” and “Made for iPhone” mean that an electronic accessory has been designed to connect specifically to iPod or iPhone, respectively, and has been certified by the developer to meet Apple performance standards. Apple is not responsible for the operation of this device or its compliance with safety and regulatory standards. Please note that the use of this accessory with iPod or iPhone may affect wireless performance.
- iPhone, iPod, iPod classic, iPod nano, and iPod touch are trademarks of Apple Inc., registered in the U.S. and other countries.
- IOS is a trademark or registered trademark of Cisco in the U.S. and other countries and is used under license.
- Android and Chrome are trademark of Google Inc.
- Internet Explorer and Windows Media are registered trademark of Microsoft Corporation in the United States and other countries.
- Firefox is a registered trademark of Mozilla Foundation in the United States and other countries.
Inhalt
Inhalt....26
Sicherheit
⚠️WARNUNG
Rückstelltaste
"CANCEL DEMO" → "PRESS" → "VOLUME KNOB"
⚠️ ACHTUNG
natural_image
Line drawing of a hand using a tool to adjust or install a component, with no visible text or symbols.natural_image
Line drawing of a hand holding a pen, next to a vertical pipe with a label (no text or symbols on the diagram itself)3-12, Moriyacho, Kanagawa-ku,
Yokohama-shi, Kanagawa 221-0022, Japan
EU-Vertreter:
Kenwood Electronics Europe BV
- The "AAC" logo is a trademark of Dolby Laboratories.
- “Made for iPod” and “Made for iPhone” mean that an electronic accessory has been designed to connect specifically to iPod, or iPhone, respectively, and has been certified by the developer to meet Apple performance standards. Apple is not responsible for the operation of this device or its compliance with safety and regulatory standards. Please note that the use of this accessory with iPod, or iPhone may affect wireless performance.
- iPhone, iPod, iPod classic, iPod nano, and iPod touch are trademarks of Apple Inc., registered in the U.S. and other countries.
- IOS is a trademark or registered trademark of Cisco in the U.S. and other countries and is used under license.
- Android and Chrome are trademark of Google Inc.
- Internet Explorer and Windows Media are registered trademark of Microsoft Corporation in the United States and other countries.
- Firefox is a registered trademark of Mozilla Foundation in the United States and other countries.
Inhoud
Inhoud 38
Over de snelstartgids....38
Veiligheid....38
Voorbereiding/Starten 39
Basisbewerkingen 39
CD/USB/iPod 40
Analoge radio 40
Digitale radio (DAB)......41
Veiligheid
⚠ WAARSCHUWING
"CANCEL DEMO" → "PRESS" → "VOLUME KNOB"
1 Druk op de volumeknop.
"YES" is de fabrieksinstelling.
LET OP
natural_image
Line drawing of a hand using a tool to cut or adjust a mechanical component (no text or symbols)natural_image
Line drawing of a hand holding a pen, interacting with a device (no text or symbols visible)CLASS 1 LASER PRODUCT
- The "AAC" logo is a trademark of Dolby Laboratories.
- “Made for iPod” and “Made for iPhone” mean that an electronic accessory has been designed to connect specifically to iPod, or iPhone, respectively, and has been certified by the developer to meet Apple performance standards. Apple is not responsible for the operation of this device or its compliance with safety and regulatory standards. Please note that the use of this accessory with iPod, or iPhone may affect wireless performance.
- iPhone, iPod, iPod classic, iPod nano, and iPod touch are trademarks of Apple Inc., registered in the U.S. and other countries.
- IOS is a trademark or registered trademark of Cisco in the U.S. and other countries and is used under license.
- Android and Chrome are trademark of Google Inc.
- Internet Explorer and Windows Media are registered trademark of Microsoft Corporation in the United States and other countries.
- Firefox is a registered trademark of Mozilla Foundation in the United States and other countries.
Sommario
Sommario....50
Sicurezza
▲AVVISO
Tasto di ripristino
"CANCEL DEMO" → "PRESS" → "VOLUME KNOB"
natural_image
Line drawing of a hand using a tool to cut or mark a component, no text or symbols presentnatural_image
Line drawing of a hand holding a pen, next to a vertical bar with a magnified inset showing a small object (no text or symbols): USB1.1/ 2.0 (Full speed)
File System
: FÀT16/ 32
CLASS 1 LASER PRODUCT
- The "AAC" logo is a trademark of Dolby Laboratories.
- “Made for iPod” and “Made for iPhone” mean that an electronic accessory has been designed to connect specifically to iPod, or iPhone, respectively, and has been certified by the developer to meet Apple performance standards. Apple is not responsible for the operation of this device or its compliance with safety and regulatory standards. Please note that the use of this accessory with iPod, or iPhone may affect wireless performance.
- iPhone, iPod, iPod classic, iPod nano, and iPod touch are trademarks of Apple Inc., registered in the U.S. and other countries.
- IOS is a trademark or registered trademark of Cisco in the U.S. and other countries and is used under license.
- Android and Chrome are trademark of Google Inc.
- Internet Explorer and Windows Media are registered trademark of Microsoft Corporation in the United States and other countries.
- Firefox is a registered trademark of Mozilla Foundation in the United States and other countries.
Índice
Índice 62
Radio digital (DAB)......65
Seguridad
ADVERTENCIA
Botón de reposición
"CANCEL DEMO" → "PRESS" → "VOLUME KNOB"
PRECAUCIÓN
natural_image
Line drawing of a hand using a tool to cut or adjust a mechanical component (no text or symbols present)natural_image
Line drawing of a hand holding a pen, next to a vertical tube with a label (no text or symbols on the diagram itself)Graves: 100 Hz ±8 dB
- iPod touch (4th generation)
- iPod touch (3rd generation)
- iPod touch (2nd generation)
- iPod touch (1st generation)
- iPod classic
- iPod with video
- iPod nano (6th generation)
- iPod nano (5th generation)
- iPod nano (4th generation)
- iPod nano (3rd generation)
- iPod nano (2nd generation)
- iPod nano (1st generation)
- iPhone 4S
- iPhone 4
- iPhone 3GS
- iPhone 3G
- iPhone
CLASS 1 LASER PRODUCT
- The "AAC" logo is a trademark of Dolby Laboratories.
- "Made for iPod" and "Made for iPhone" mean that an electronic accessory has been designed to connect specifically to iPod, or iPhone, respectively, and has been certified by the developer to meet Apple performance standards. Apple is not responsible for the operation of this device or its compliance with safety and regulatory standards. Please note that the use of this accessory with iPod, or iPhone may affect wireless performance.
- iPhone, iPod, iPod classic, iPod nano, and iPod touch are trademarks of Apple Inc., registered in the U.S. and other countries.
- IOS is a trademark or registered trademark of Cisco in the U.S. and other countries and is used under license.
- Android and Chrome are trademark of Google Inc.
- Internet Explorer and Windows Media are registered trademark of Microsoft Corporation in the United States and other countries.
- Firefox is a registered trademark of Mozilla Foundation in the United States and other countries.