
Cafe Aromax KA500 - Coffee maker Eldom - Free user manual and instructions
Find the device manual for free Cafe Aromax KA500 Eldom in PDF.


| Product Type | Coffee maker with integrated grinder (bean-to-cup and ground coffee) |
| Brand | Eldom |
| Model | Cafe Aromax KA500 |
| Power Supply | 230V ~50Hz, 1050W |
| Capacity | 10 cups (1.2 L water tank) |
| Max Ground Coffee Capacity | 60 g |
| Max Water Level | Marked "MAX" on water level gauge |
| Functions | Brewing with coffee beans or ground coffee, automatic start (timer), clock setting, keep-warm function (approx. 30 min), auto shut-off after 40 min |
| Grinder | Integrated, operates for approx. 55 seconds per grind |
| Heating Panel | Keeps coffee warm for approx. 30 minutes |
| Display | LCD (backlit) |
| Controls | Buttons for programming, time setting, coffee beans, ground coffee |
| Brewing Unit | Removable, includes grinder, coffee container, and filter |
| Jug | Glass, removable, dishwasher-safe |
| Cleaning and Maintenance | Brewing unit (grinder, container, filter) dishwasher-safe; jug dishwasher-safe; body clean with damp cloth; descale monthly with citric acid or tartaric acid |
| Safety Features | Cannot operate without water; auto shut-off; do not open cover during operation; do not immerse in water; children aged 8+ only under supervision |
| Included Accessories | Original accessories (jug, brewing unit, filter) |
| Warranty | Household use only; modifications or non-original parts void warranty |
Frequently Asked Questions - Cafe Aromax KA500 Eldom
User questions about Cafe Aromax KA500 Eldom
0 question about this device. Answer the ones you know or ask your own.
Ask a new question about this device
Download the instructions for your Coffee maker in PDF format for free! Find your manual Cafe Aromax KA500 - Eldom and take your electronic device back in hand. On this page are published all the documents necessary for the use of your device. Cafe Aromax KA500 by Eldom.
USER MANUAL Cafe Aromax KA500 Eldom
natural_image
Exterior view of a modern coffee maker with digital display and glass jar (no visible text or symbols)


WARUNKI BEZPIECZEŃSTWA
natural_image
Technical line drawing of a mechanical device with a top component and base (no text or symbols)CZYSZCZENIE I KONSERWACJA
Please read all these instructions carefully before using this appliance.
- Plug the power cord only to a wall socket equipped with an earthing pin and with parameters compliant with those in the instructions
- Always disconnect the appliance from the mains by pulling the plug, not the power cord.
- Pay attention not to add too many receivers to one power circuit.
- Do not operate the appliance in the open air.
- Do not place the appliance near sources of heat.
- Place the appliance on a stable and dry surface.
- Before turning on the appliance, make sure that there is water in the jug. Do not operate the appliance without water.
- Do not pour water above the maximum level indicated on the jug. Excessive water level may cause hot water flow out uncontrollably (hazard of short circuit due to submerging of electrical connections).
- Unplug the appliance when it is not in use and before cleaning.
- Do not carry or move the appliance during use.
- Do not touch the hot parts of the appliance.
-
The appliance can be used by children aged 8 and older, by persons with limited physical and mental capabilities, and by persons who have no experience nor knowledge of the equipment, only under supervision or if instructed on the safe use of the appliance in way that guarantees that the associated risks are understood. Children shall not play with the appliance. Children should not clean nor maintain the appliance without supervision.
-
Never leave the appliance unattended.
- The jug can pose hazards to children when left unattended while plugged in or if filled with hot water.
- Do not hold the appliance with wet hands.
- Do not immerse the appliance in water during cleaning.
- Use only the supplied original accessories.
- Pay attention to the scalding steam escaping from the appliance while cooking.
- The appliance is designed for household use only. Industrial use, misuse or failure to observe these instructions will render the warranty null and void and will waive the liability of the seller.
- To avoid any risks, if the power cord is damaged, it should be replaced with a new one at an authorised Manufacturer's Servicing Point. The list of Servicing Points can be found in the attachment and on www.eldom.eu.
- The appliance can be repaired only at an authorised servicing centre. Any upgrades or the use of non-original spare parts or components is forbidden and poses a hazard for the user.
- Eldom Sp. z o. o. is not liable for any damage resulting from improper use of the appliance.
EN
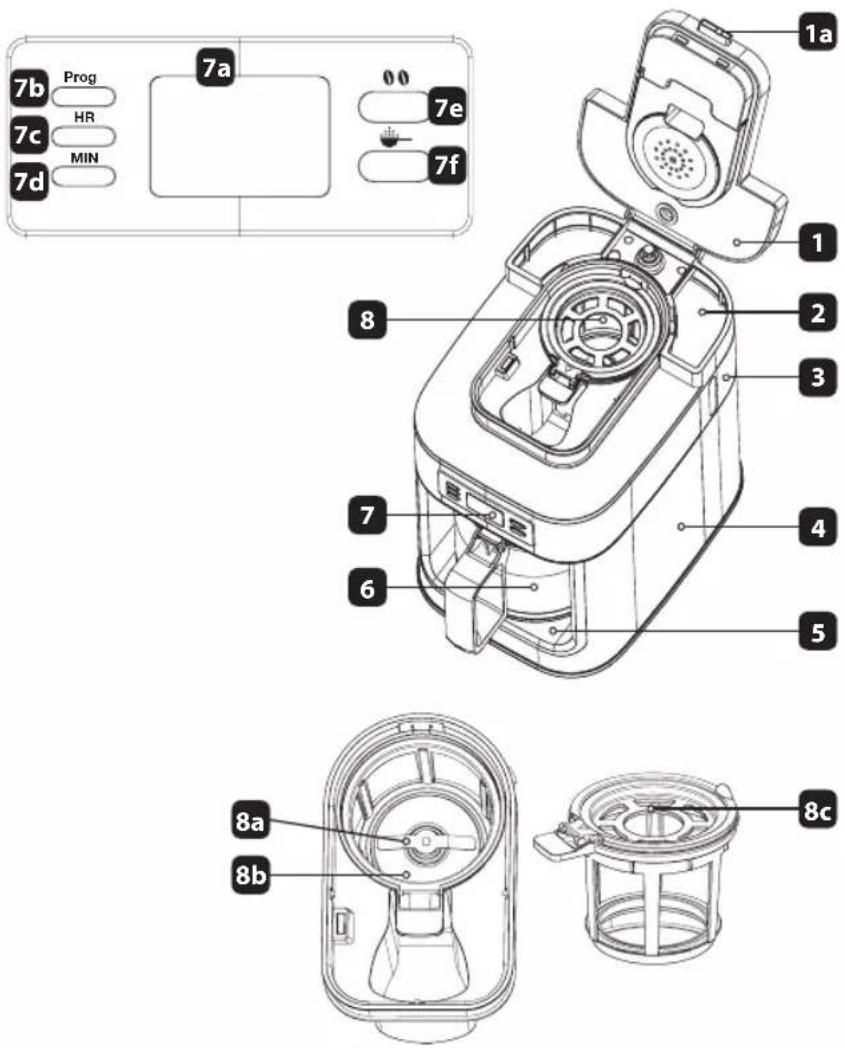
- Water tank
- Water level gauge
- Body
- Heating panel
- Jug
- Control panel
a. LCD display
b. Programming
c. Time settings
d. Setting minutes
e. Coffee beans
f. Ground coffee
- Brewing unit with grinder
a. Grinder
b. Coffee container
c. Filter
TECHNICAL DATA
- Power: 1050W
- Supply voltage: 230V \~50Hz
- Capacity: 10 cups, 1,2 l
- Ground coffee: 60g
■ INSTRUCTIONS OF USE
- Place the coffee machine on a flat and stable surface and connect the plug to a power outlet with the parameters specified in the manual.
- Before the first use, pour water into the tank (2) and switch on the device without adding coffee – it will be rinsed out.
CAUTION: During operation, a small amount of water vapor may escape from the machine.
Warning: Do not open the cover (1) when the device is in the operating mode, as this may cause danger. Opening the cover (1) during operation will interrupt operation.
- Then remove the jug (6) and the brewing unit (8) and wash them thoroughly (see CLEANING AND MAINTANANCE).
HANDLING
CLOCK setting
- Press the button (7b) – the display will light up and "CLOCK" will appear on it.
- Set the time using the button (7c).
- Set the minutes using the button (7d).
- Press the button (7b) twice to accept.
Coffee beans
- Press the lock (1a) and lift the cover (1). Pour cold water into the tank (2) in the amount corresponding to the number of cups of coffee you want to get.
Caution: Do not pour water above the "MAX" level marked on the indicator (3). - Make sure that the brewing unit (8) is correctly installed.
- Lift the filter cover (8c) and pour in coffee beans, then close the filter cover.
Caution: The maximum capacity of the container is about 60g. Do not pour coffee above the "MAX" level indicated inside the filter (8c).
- Close and lock the cover (1).
- Place the jug (6) on the heating panel (5).
- To turn on the device, press the button (7e) once – the grinder will start. When the coffee is ground, the coffee machine will automatically start the brewing process.
Caution: Regardless of the amount of coffee, grinding takes about 55 seconds.
- Switching on and operation of the device is signaled by a sign ⏻ and the indicator lamp (7e).
- The heating panel (5) guarantees a constant coffee temperature for approx. 30 minutes.
Ground coffee
- Press the lock (1a) and lift the cover (1). Pour cold water into the tank (2) in the amount corresponding to the number of cups of coffee you want to get.
Caution: Do not pour water above the "MAX" level marked on the indicator (3).
- Make sure that the brewing unit (8) is correctly installed.
- Lift the filter cover (8c) and pour in ground coffee, then close the filter cover.
Caution: The maximum capacity of the container is about 60g. Do not pour coffee above the "MAX" level indicated inside the filter (8c).
- Close and lock the cover (1).
- Place the jug (6) on the heating panel (5).
- To turn on the device, press the button (7e) once – after several seconds from switching on the coffee starts dripping.
- Switching on and operation of the device is signaled by a sign ▼ and the indicator lamp (7e).
- The heating panel (5) guarantees a constant coffee temperature for approx. 30 minutes.
CAUTION: The device will turn off automatically 40 minutes after switching on.
Automatic start function
The coffee machine can be programmed to start brewing coffee at a specific time.
- Make sure that the correct time is set.
-
To start programming the automatic start, follow steps 1-5 (depending on whether you want the coffee to be in beans or already ground).
-
The next step is to:
a. for coffee beans, press the button (7e) twice – the button light will start blinking, b. for ground coffee, press the button (7f) twice – the button light will start blinking.
-
Press the button (7b) twice – "TIMER" will appear on the display.
-
Then set the start time using the buttons (7c) and (7d) and confirm with the button (7b).
-
Activation of the function is signaled by a blinking light in the button (7e) or (7f) and the backlight of the display (7a).
-
To deactivate the function, press the blinking button (7e) or (7f).
natural_image
Technical line drawing of a mechanical device with a top component and base (no text or symbols)CLEANING AND MAINTENANCE
- Remove the plug from the power outlet and allow to cool down before cleaning the unit.
- The device must not be submerged in water.
- Do not use any sharp cleaning agents for cleaning as they may damage the surface of the housing.
- The body of the device can be cleaned with a slightly damp cloth.
- To remove the brewing unit (8), press the lock (1a) and lift the cover.
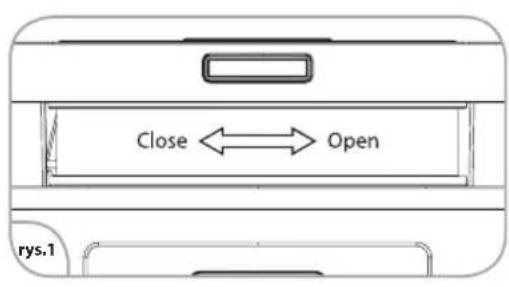
- Then move the housing of the unit according to the markings (fig. 1) and pull it out of the body.
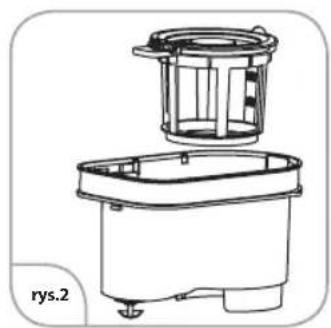
- Pull out the filter (8c) – fig. 2.
- The coffee container (8a) with grinder and the filter (8c) can be washed in a dishwasher.
- The jug (6) can be washed like any glass container
- Once a month remove the sediment from the appliance by using cleaning agents available on the market (e.g. citric acid or tartaric acid).
ENVIRONMENTAL PROTECTION
The appliance is made of materials which can be recovered or recycled. The blanket should be handed over to the appropriate centre of collection and recycling of electrical and electronic equipment.
WARRANTY
- The appliance is intended for personal use at a household.
- It is not intended for professional purposes.
- In case of misuse, the warranty is rendered null and void.
BEZPEČNOSTNÍ PODMÍNKY
natural_image
Technical line drawing of a mechanical device with a top component and base (no text or symbols)ČIŠTĚNÍ A ÚDRŽBA
natural_image
Line drawing of a mechanical device with a top component and base, labeled 'rys.2' (no text or symbols on the diagram itself)natural_image
Technical line drawing of a mechanical device with internal components (no text or symbols)natural_image
Line drawing of a mechanical device with a top component and base, labeled 'rys.2' (no text or symbols on the diagram itself)ČISTENIE A ÚDRŽBA
- Vytiahnite filter (8c) - obr. 2.
natural_image
Technical line drawing of a mechanical device with a top component and base (no text or symbols)natural_image
Technical line drawing of a mechanical device with a top component and base (no text or symbols)■ LIMPIEZA Y MANTENIMIENTO

- WARUNKI BEZPIECZEŃSTWA
- CZYSZCZENIE I KONSERWACJA
- EN
- TECHNICAL DATA
- ■ INSTRUCTIONS OF USE
- HANDLING
- CLOCK setting
- Coffee beans
- Ground coffee
- Automatic start function
- CLEANING AND MAINTENANCE
- ENVIRONMENTAL PROTECTION
- WARRANTY
- BEZPEČNOSTNÍ PODMÍNKY
- ČIŠTĚNÍ A ÚDRŽBA
- ČISTENIE A ÚDRŽBA
- ■ LIMPIEZA Y MANTENIMIENTO
Brand : Eldom
Model : Cafe Aromax KA500
Category : Coffee maker