
LX500c - Label printer PRIMERA - Free user manual and instructions
Find the device manual for free LX500c PRIMERA in PDF.


| Product Type | Color label printer |
| Model | LX500c (with integrated cutter) |
| Print Method | Inkjet |
| Print Resolutions | 4800 x 1200 dpi, 1200 x 1200 dpi, 600 x 600 dpi |
| Colors | 16.7 million (CMY) |
| Ink Cartridge | #53374 Color (CMY) |
| Media Types | Roll-fed pressure-sensitive labels, roll-fed tags |
| Media Sensing | Moveable see-through sensor for die-cut labels; reflective for black stripe sensing |
| Max Label Width | 4.25" (108 mm) |
| Min Label Width | 0.75" (19 mm) |
| Max Label Length | 24" (609.6 mm) |
| Min Label Length | 0.75" (19 mm) |
| Dimensions (closed) | 10.4" x 15.3" x 7.1" (W x D x H) |
| Weight | 7 lbs (3.2 kg) |
| Power Requirements | 100-240VAC, 50/60 Hz, 60 watts; 12VDC, 5.0A adapter included |
| Connectivity | USB 1.1/2.0 (6' cable included) |
| Operating Systems | Windows 7/8/10, Mac OS X |
| Included Software | BarTender UltraLite edition, Primera PrintHub (Windows), Color Label 500 Utility (Mac) |
| Cutter | Integrated (cut between labels) |
| Indicator Lights | Power, Ink |
| Controls | Ink, Load/Feed, Unload |
| Certifications | UL, UL-C, CE, FCC Class B |
| Warranty | One year, parts and labor |
Frequently Asked Questions - LX500c PRIMERA
User questions about LX500c PRIMERA
0 question about this device. Answer the ones you know or ask your own.
Ask a new question about this device
Download the instructions for your Label printer in PDF format for free! Find your manual LX500c - PRIMERA and take your electronic device back in hand. On this page are published all the documents necessary for the use of your device. LX500c by PRIMERA.
USER MANUAL LX500c PRIMERA
natural_image
Line drawing of a white electronic device with a handle and ventilation slots (no text or symbols)LX500
COLOR LABEL PRINTER
LX500c
COLOR LABEL PRINTER
RX500
COLOR RFID PRINTER
User's Manual
Notices: The information in this document is subject to change without notice. NO WARRANTY OF ANY KIND IS MADE WITH REGARD TO THIS MATERIAL, INCLUDING, BUT NOT LIMITED TO, THE IMPLIED WARRANTIES OF MERCHANTABILITY AND FITNESS FOR A PARTICULAR PURPOSE. No liability is assumed for errors contained herein or for incidental or consequential damages in connection with the furnishing, performance, or use of this material. This document contains proprietary information that is protected by copyright. All rights are reserved. No part of this document may be photocopied, reproduced, or translated into another language without prior written consent.
Trademark Acknowledgments: Windows is a registered trademark of Microsoft Corporation. All other trademarks are the property of their respective owners.
Printing History
Edition 1.0, #032719, Copyright 2019 All rights reserved.
FCC Compliance Statement: This device complies with part 15 of the FCC rules. Operation is subject to the following two conditions: (1) this device may not cause harmful interference, and (2) this device must accept any interference received, including interference that may cause undesired operation.
For Users in the United States: This product is intended to be supplied by a UL listed Direct Plug-In Power Supply marked "Class 2" or a UL listed ITE Power Supply marked "LPS" with output rated 12VDC, 4.5A or higher. This equipment has been tested and found to comply with the limits for a Class A digital device, pursuant to Part 15 of the FCC Rules. In a domestic environment this product may cause radio interference, in which case the user may be required to take adequate measures. This equipment generates, uses, and can radiate radio frequency energy and, if not installed and used in accordance with the instructions, may cause harmful interference to radio communications. However, there is no guarantee that interference will not occur in a particular installation. If this equipment does cause harmful interference to radio or television reception, which can be determined by turning the equipment off and on, the user is encouraged to try to correct the interference by one or more of the following measures:
- Re-orient or relocate the receiving antenna.
- Increase the separation between the equipment and receiver.
- Connect the equipment into an outlet on a circuit different from that to which the receiver is connected.
- Consult the dealer or an experienced radio/TV technician for help.
Use of shielded cables is required to comply with the Class B limits of Part 15 of the FCC Rules. You are cautioned that any changes or modifications not expressly approved in this manual could void your authority to operate and/or obtain warranty service for this equipment.
THIS PRODUCT CONTAINS A LASER DIODE OF A HIGHER CLASS THAN 1. TO ENSURE CONTINUED SAFETY, DO NOT REMOVE ANY COVERS OR ATTEMPT TO GAIN ACCESS TO THE INSIDE OF THIS PRODUCT. REFER ALL SERVICING TO QUALIFIED PERSONNEL. THE FOLLOWING LABEL APPEARS INSIDE YOUR UNIT: CLASS 1 LASER PRODUCT LASER KLASSE 1
CAUTION!
USE OF CONTROLS OR ADJUSTMENTS OR PERFORMANCE OF PROCEDURES OTHER THAN THOSE SPECIFIED HEREIN MAY RESULT IN HAZARDOUS RADIATION.
Interactive Feature in this PDF Document
There are interactive features that allow you to jump to different locations within the document. Each listing in the Table of Contents is interactive. Place the cursor on either the words or the page number. A small hand with a pointing finger icon appears. Click on the line with the icon and the document will jump to that page. If you want to return to the Table of Contents, move the icon to the top of the page and click on the arrow marked TOC. Navigating to the Index (if there is one) is similar. Place the icon on one of the listings or page numbers, click on it, and it will move to that page. Returning to the Index can be done by clicking on the arrow marked Index.
Table of Contents
Section 1: Getting Started....1
A. Choosing a Good Location....1
B. Unpacking and Inspection 2
C. Identifying the Parts....3
Section 2: Hardware and Software Setup ....5
A. Installing Label Stock....5
B. Adjusting the Stock Gap Sensor Position....7
C. Using Fan-fold Label Stock....10
D. Installing the Ink Cartridge....10
E. Aligning the Ink Cartridge....13
Section 3: Primera PrintHub....14
A. Monitoring Ink Levels 15
B. Using the Cost Estimator....16
C. Set the Stock Sensor Mode 17
D. Set the Present or Cut Mode (Cutter Models Only)......18
E. Adjusting Print Alignment....21
F. Settings....22
Section 4: Using RFID (PC Only) ......26
A. Setup RFID....26
B. Printing and Encoding....27
C. Tag Specifications....28
Section 5: Printing Using a PC....30
A. Using BarTender® 30
B. Add Text, Barcodes and Graphics to BarTender Label......34
C. Printing from BarTender® 35
D. Printer Driver Settings (PC) 36
E. Printing from other Programs 39
Section 6: Printing from a Mac....41
A. Printer Utility Settings (Color Label 500 Utility)....41
B. Adjusting Print Alignment/Label Offsets 43
C. Set the Stock Sensor Mode 45
D. Set the Output Mode......46
E. Printing from Belight Labels and Addresses....48
F. Create a Custom Label Size/Print from other Programs......55
G. Creating a Full Bleed Print....56
H. Printer Driver Settings....57
Section 7: Troubleshooting....60
A. Solving Offset/Alignment Problems....60
B. Creating a Full Bleed Print....62
C. Clearing a Label Jam....63
D. Maintenance....63
E. Cleaning the Ink Cartridge 65
F. Technical Support 68
Section 8: Label and Roll Specifications ....69
Section 9: Technical Specifications....72
Index 73
Section 1: Getting Started
THANK YOU...
...for choosing an LX500/LX500c/RX500 Color Label Printer. The LX500 Printer will print razor-sharp text and barcodes, vibrant colors, and even stunning photo-realistic photographs directly onto rolls of labels, card stock and fan-fold stock. The LX500c adds an integrated cutter to cut between each label. The RX500 adds the ability to encode to label stock with integrated RFID chips. It has a built-in cutter.
This User's Manual is your complete step-by-step guide to quickly and easily setting up and printing with your new Color Label Printer!
A. CHOOSING A GOOD LOCATION
- Place the printer on a flat surface in a location with adequate air circulation to prevent internal heat build up.
- Do not place the printer near heat sources such as radiators or air ducts, or in a place subject to direct sunlight, excessive dust, mechanical vibration or shock.
- Allow for adequate clearance in front of the printer to accommodate the printed label stock as it is leaving the printer to avoid the possibility of binding or jamming of the label stock.
- Allow for adequate overhead clearance for opening the top cover to allow easy access to the label stock and ink cartridge.
B. UNPACKING AND INSPECTION
While unpacking your printer, inspect the carton to ensure that no damage has occurred during shipping. Make sure that all supplied accessories are included with your unit. The following items should be included:
- Printer
- Power Adapter
- Separate Power Cord
- 6' USB Cable (If other USB cable is used, it must be 6' (2 M) or less.)
• Color Ink Cartridge - Starter roll of high gloss label stock
• Warranty Statement and Registration Card
• This manual and other printed information
Save the carton and packing materials. They will come in handy when transporting the printer.

natural_image
Illustration of a portable printer with attached cable, connector, and power cord (no text or symbols)C. IDENTIFYING THE PARTS
This illustration shows the front of the printer with its control buttons and LED indicator lights.

The Ink Low LED will illuminate when a cartridge has 10% or less of its ink remaining.
The Power LED indicates that the printer is on and ready to receive print jobs.
The Ink Button moves the carriage to the center to allow for loading of the ink cartridge. Once the cartridge is loaded, press the ink button again.
The Load/Feed Button is pressed in order to load label stock or form feed the label stock through the printer.
The Unload Button will unload the installed label stock by reversing it through the printer. Make sure to tear off the printed labels before pressing the Unload Button.
The Label Tear Bar is a serrated edge for conveniently tearing your finished labels from the printer.
This illustration shows the input ports and power switch found on the rear panel of the printer.
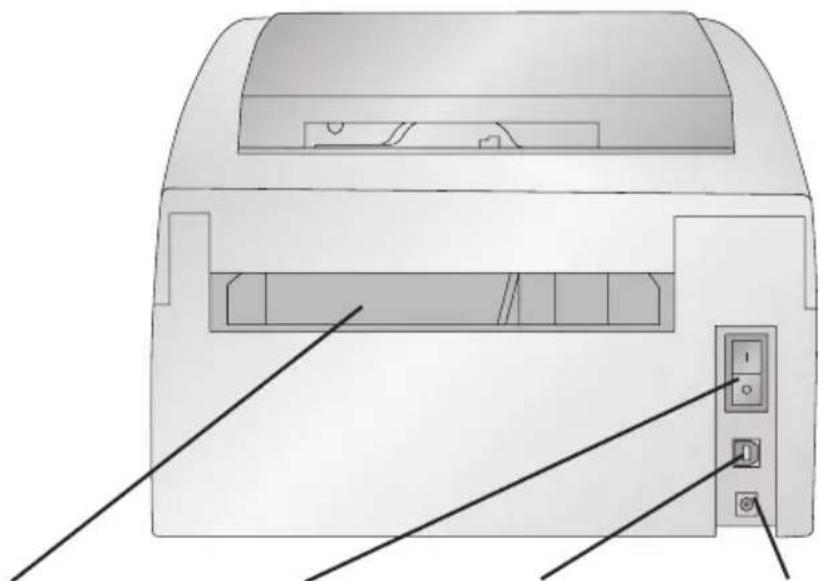
natural_image
Diagram of a printer front panel with labeled ports and connectors (no text or symbols present)Fan-fold Label Slot
USB PortPower Switch Power Input Port
Section 2: Hardware and Software Setup
A. INSTALLING LABEL STOCK
Your printer will utilize a wide variety of paper label stock. As long as the label stock is paper and can receive ink jet
printing and is within the allotted size, it will work in the printer. Primera carries a large variety of paper label stock that has been converted and ready for use with your printer.
- Open the Top Cover.
- Pull the spring loaded label stock guide out far enough to fit the label stock.
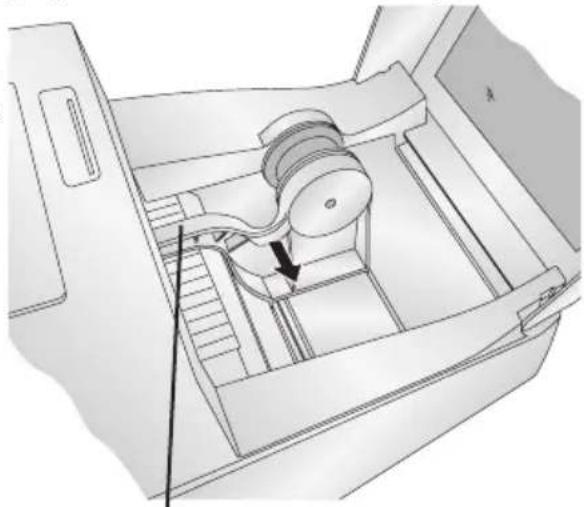
natural_image
Technical line drawing of a mechanical device interior with no visible text or symbolsLabel Stock Guide
- Remove any shipping tape from your label stock roll to ensure that it can unroll freely, making certain that no adhesive portion is exposed. It is important to note that any exposed adhesive surface can attach itself to the inner workings of the print mechanism and cause a media jam.
Note: If you are using fan-fold label stock or label stock other than standard square / rectangular die cut labels, see Sections 2B and 2C for additional instructions.

- Place the label stock between the stock guide rollers and release the spring loaded stock guide to hold the label stock. The stock guide rollers allow the label stock roll to move freely.

natural_image
Technical line drawing of a mechanical device with internal components (no text or symbols)- Place the leading edge of the label stock between the throat guide and the side of the printer.

- Quickly continue feeding the label stock further into the printer until you feel resistance from the feed rollers. The printer will sense the label and automatically feed it through the printer. If the printer fails to feed the label stock, press the Load/Feed button to manually engage the feed roller while continuing to guide the label stock into the printer.
Tip! To ensure that the label stock is fed straight be sure to push the label stock into the printer quickly until the entire front edge of the stock is touching the feed roller. For wider stock use both hands to feed the stock to maintain even forward pressure while you are pushing the stock into the printer.
B. ADJUSTING THE LABEL STOCK GAP SENSOR POSITION
The stock gap sensor (TOF Sensor) "sees" the gap between label stock by shining light from the top of the label and attempting to read that light from a sensor on the bottom. By default, this sensor is set to read the gap .5" from the left side of the label stock. If the gap in your label stock intersects with gap position as shown on the slide bar you do not need to adjust this and you can skip this section. This does not need to be adjusted for most label stock.

If you are using label stock other than standard square / rectangular die cut labels such as circular die-cut labels or through-hole stock use the instructions below to adjust the label stock TOF sensor.

bar
| Category | Value | |---|---| | in. | 0.5 | | mm | 12.7 | | 1.0 | 1.5 | | 2.0 | 38.1 | | 2.0 | 50.8 |Gap Sensor Slide Bar

Circular Labels
If you are using Circular Labels you must adjust the Stock Gap sensor to correspond with the very top of the label where the circles are closest together. If the sensor is too far to the right or the left the printer will still sense the label but the image may be offset downward because the printer will start printing at the wrong position. If you are using stock that has multiple labels across make sure the sensor corresponds to a place on the stock that has a label and not a vertical gap.
The Sensor Bar has a guide in inches and millimeters that will help you identify where to set the bar to align the sensor over any identifying mark or top of a circular shape. To do this, measure the distance from the edge of the label stock to the correct position on the stock. Set the sensor bar to this measurement. For example, if you have a two inch circular die-cut label, measure from the edge of the label stock to the center of the circle. For this example it should be about 1 1/8 inches. Set the Sensor Bar to this value.

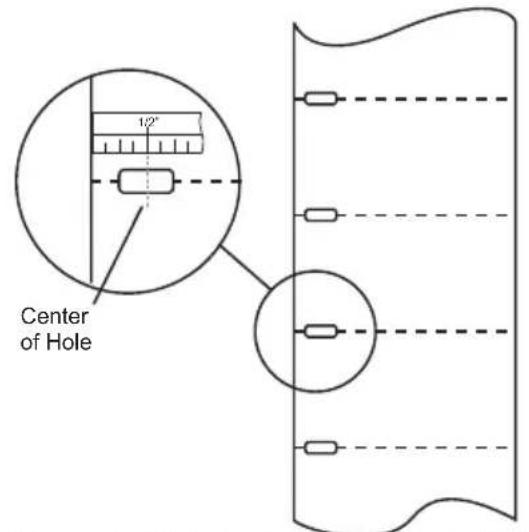
Through-Hole LabelsCircular Labels
Through Hole Labels
If you are using card stock or label stock that has a hole punch or a notch to identify a transition from backing to label, you can adjust the Sensor Bar to position it over the identifying mark.
To adjust the sensor position use a pen to move the slide bar to the correct position.

C. USING FAN-FOLD LABEL STOCK
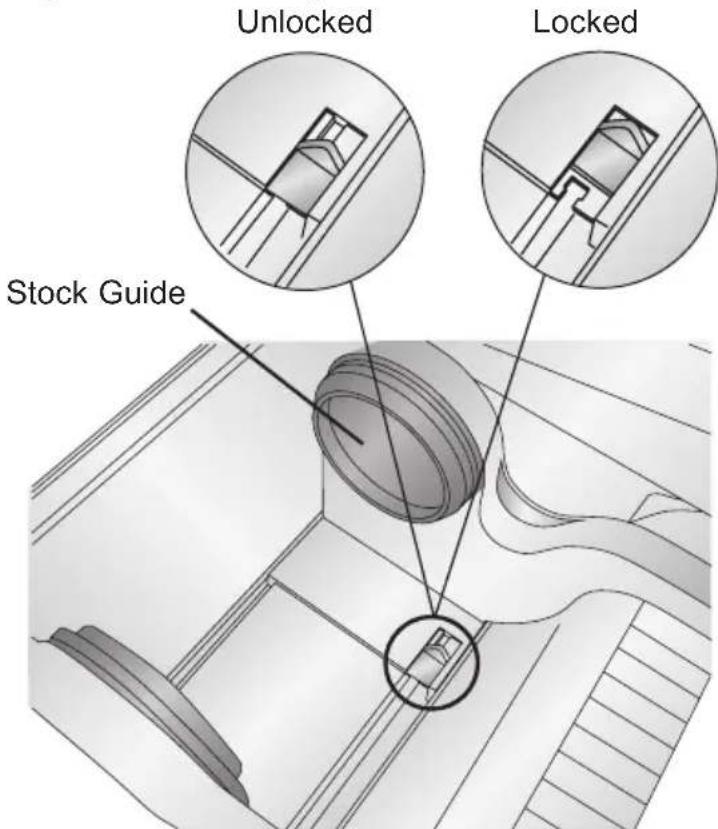
It is possible to use fan-fold label stock by feeding it through the fan-fold slot in the the back of the printer.
Before feeding the fan-fold stock through the back of the printer, lock the stock guide in the out position so the stock
guide rollers will not interfere with the label stock. The stock guide is spring loaded and under normal circumstances it will pinch any label stock roll inserted into the printer.
To lock the stock guide push the tab located on the bottom of the moveable stock guide to the out/locked position.
D. INSTALLING THE INK CARTRIDGE
When the cartridge reaches 10% remaining you will be prompted via the Status Monitor to replace the cartridge. If quality still looks acceptable you can choose to ignore this warning. However, you may waste labels if the cartridge runs out of ink before the next warning at 0%. If you choose to replace the cartridges follow the procedure below.
After installing a new cartridge, you may choose to run an alignment print to achieve maximum quality. However, this will require cancelling the print job. If you would like to enable smooth transitions between ink cartridge changes, you may choose to disable alignment print warnings. (See the next section).
-
Open the Top Cover of the printer.
-
Press the Ink Button on the printer.

-
The Cartridge Carrier will align itself to the center of the print area.
-
Press the Cartridge Cover Release to open the Cartridge Holder. Remove the cartridge (if installed).
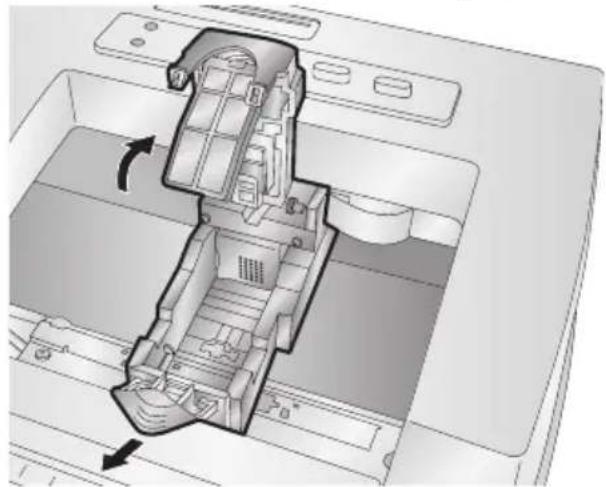
natural_image
Technical diagram of a mechanical assembly showing internal components and directional arrows (no text or labels)- Remove the new Cartridge from its packaging. Be sure to remove the protective tape covering the copper contacts.
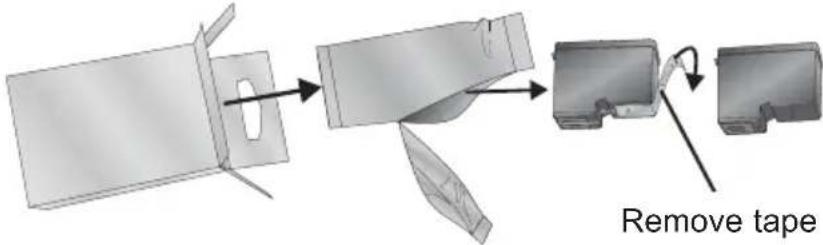
- Replace/install the cartridge copper end first.

natural_image
Technical diagram of a mechanical assembly with internal components and a directional arrow indicating flow or movement (no text or symbols present)- Push cartridge cover downward until it snaps in place.

natural_image
Diagram of a printer's internal structure showing a mechanical component with an arrow indicating rotation (no text or symbols present)Note: Ink Cartridge Levels are estimates based on analysis of the printed images by the driver during spooling. This analysis estimates the number of ink droplets(spits) required to print the image and subtracts that amount from the total amount in the cartridge. It displays the total remaining spits as a percentage. In other words, there is no real time sensor that shows the actual amount of ink in the cartridge.
- Press the Ink button on the printer to indicate the new cartridge is now installed. You will be prompted to align the cartridge. A warning will appear stating that you must have installed label stock that is equal to or larger than 4" x 2" (101.6 mm x 50.8 mm). If your label stock meets this requirement click OK to align the cartridge. If your stock does not meet this size requirement see the next section before clicking OK.

E. ALIGNING THE INK CARTRIDGE
Cartridge alignment will align the Color Cartridge for bidirectional printing and calibrate the printer to each individual cartridge. You will automatically be prompted to perform this alignment each time you install a new cartridge. You may also manually align the cartridge via the status monitor.
For Alignment you will need to have installed label stock that is equal to or larger than 4" x 2" (101.6 mm x 50.8 mm). If your stock does not meet this requirement you can use the sample roll that came with the printer for this purpose. You may also choose to disable alignment via the settings area of the status monitor.
Disable Alignment: If you would like to enable smooth transitions between ink cartridge changes, you may choose to disable alignment print warnings. Alignment improves print quality if Bidirectional printing is enabled. It is not necessary if Bidirectional printing is disabled via the printer driver.
You can disable alignment via the status monitor.
- Open the status monitor.
- Select the settings tab (fifth tab).
- Uncheck "Require cartridge alignment for best quality."

Section 3: Primera PrintHub
Primera PrintHub is used to interact with the printer for gathering ink levels, maintenance, alignment, cost calculation and several other functions. You can use it to manage these functions on multiple LX500/RX500 printers and other Primera label printer models.
PrintHub automatically installs with your printer driver and can be accessed through the printer driver preferences or as a program on your Windows start menu.
-
Connect the printer via USB and turn on the power. The PrintHub accesses most of the information it uses from the printer itself so the printer must be turned on and communicating for the program to be useful.
-
Go to Start - Programs - Primera Technology - Primera PrintHub.

A. Adjust alignment, sensor mode, output mode, RFID settings and advanced settings.
B. If you have multiple Primera printers connected, they will be listed here.
C. Past jobs will show the last 5 jobs along with cost information. Click the document icon to view a cost report.
D. Application Settings
E. Print Queue shows the currently printing job.
F. Order Link
G. Frequent Activities
H. Current Ink Levels
A: MONITORING INK LEVELS
Ink levels can be monitored at any time by using the PrintHub. Immediately after printing starts the PrintHub will display the ink levels in the upper right corner of the application. Ink is displayed in 10% increments. Example 100% to 90% to 80%.

B. USING THE COST ESTIMATOR
The cost estimator is found under the queue section on the first tab of the PrintHub. The last five job costs are stored in the list. Each job will show the cost per label based on the cost per cartridge entered below the list. Enter the actual cost of the cartridge you paid. Prints remaining on the currently installed cartridge and total prints on new cartridge are both displayed.

To see a printable/savable report click on the document icon next to the job you want to see. A report will display the information. You can print or save the report from this screen. You can also change the currency using the drop down, change the job name or adjust the cost from this screen.
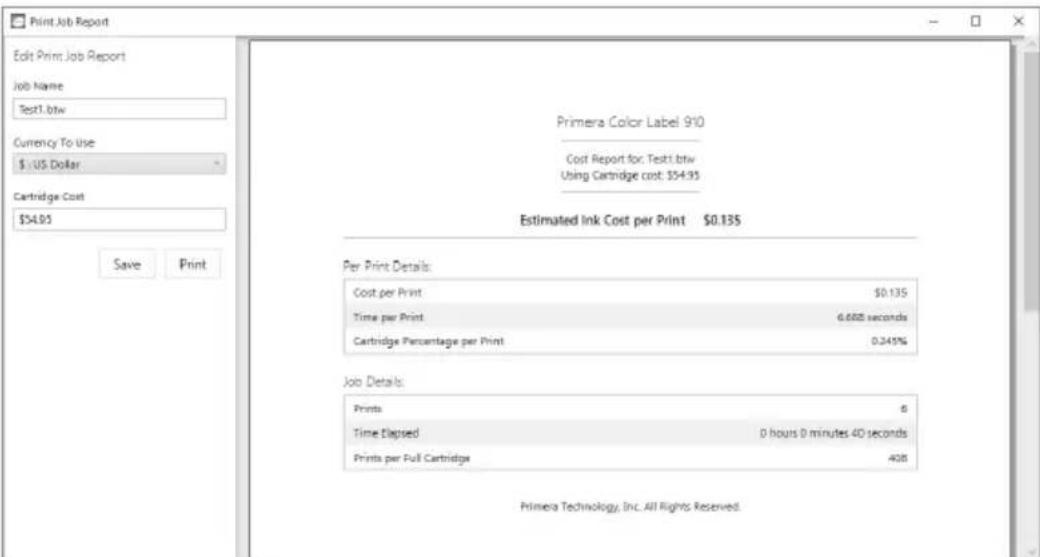
Important Note: The cost per label represents the average cost per label over an entire run of labels. This means that the per label cost will decrease and become more accurate as the number of labels printed increases. This is because the ink that is used for periodic cartridge maintenance is divided into a larger number of labels. Primera recommends printing at least 5 labels for an accurate per label cost.
C. SET THE STOCK SENSOR MODE
The stock sensor mode refers to the method the printer will use to detect the print starting position for each label. To adjust the stock sensor mode, open the PrintHub. In most cases you will NOT need to change this setting. By default, it is set to sense standard die-cut labels. It is only necessary to change this setting if you are using clear labels or any label with a black sensing mark on the back.
-
Connect the printer via USB and turn on the power. The Stock Sensor Mode setting is stored in the printer's internal memory so you will not be able to access it unless the printer is turned on and properly communicating with the computer.
-
Go to Start - Programs - Primera Technology - Primera PrintHub.
-
Click on the Label Feed (3rd tab from left).
-
Select the Stock Sensor Mode by clicking on the graphic that most closely corresponds to the stock you intend to install.
-
Load the label stock after you have set the sensor mode.

There are three sensor modes:
Die-Cut (Default). If you are using standard die-cut labels that look similar to the graphic, use this setting regardless of the size of the label. Also, use this setting for Through-hole label material where a hole is punched through each label or a notch is cut in the side.
Reflective. Use Reflective for label material where a black pre-printed line (black mark) on the back of the label stock indicates the break between labels. Black marks are required on clear label stock rolls, or label where the label waste matrix (waste) is left on the liner. Black marks can also be used for irregular shaped labels, circles larger than 4 inches or on any stock where the print starting position cannot be sensed using the label itself.
Continuous. (Sensor off) If you have continuous stock with no die-cut, reflective mark or holes, set the sensor type to Continuous. This will turn off the stock sensor. In this mode there is no way to set the print starting position. The printer will simply start printing the first label and print each subsequent label immediately after that previous one. To produce a gap between prints simply add the desired amount of white space to the end of the label being printed.
Important Note: You must also set the Stock Sensor Position (Section 2B) so that the sensor is sensing the correct point on the label stock.
D. SET THE PRESENT OR CUT MODE (CUTTER MODELS ONLY)
Use the Present/Cut Mode to adjust how the printer presents labels after they are printed or if/when they are cut after printing. To adjust the Present/Cut Mode, open the PrintHub program.
- Connect the printer via USB and turn on the power. The Output/Cut Mode Setting is stored on the printer main board so you will not be able to access it unless the printer is turned on and properly communicating with the computer.
- Go to Start - Programs - Primera Technology - Primera PrintHub.
-
Click on the Label Feed Tab.
-
Click on the Output/Cut Mode button. There are different options available which change if the Cutter is enabled or disabled. If the Cutter is disabled, the label present options will be available. If the Cutter is enabled the present options are no longer available but cut options become available.
Cutter Options

Cut after button press. This setting will cut after you press the Load/Feed button on the printer. This can be used after one label or an entire job. This feature is useful if you will not be present at the end of the print to catch the cut label.
Cut after label count. This option will cut after the number of labels specified in the toggle box that appears when this option is selected. This is useful if you have front/back labels or sets of labels.
Cut after no activity. This setting will cut at the end of a print job if the printer does not receive another print job within one second of the last print job in the queue. You can use this feature to cut at the end of multi-copy job, multi-page job or multiple individual jobs in the queue.
Cut every label. This setting will cut after every label.
Present Options

Do not present. In this mode the label stock does not move after the last label is printed. This means that part of the last label printed is still in the printer. This should be used only if you have a label rewinder attached.
Present after no activity. This setting will present (feed all printed labels past the tear off point) at the end of a print job if the printer does not receive another print job within one second of the last print job in the queue. You can use this feature to present at the end of a multi-copy job, a multi-page job or multiple individual jobs in the queue.
Present Timer. (Works only with Present after no activity option) Set the time delay from the end of the job to when the label is presented. Increasing this value can resolve issues with unnecessary present actions between jobs.
E. ADJUSTING PRINT ALIGNMENT
If your previous experience with printing is limited to printing letters and cards to 8.5 inch by 11 inch paper you probably are not familiar with an essential part of a label printing - Print Alignment. Standard printers feed a sheet and start printing based on the start of the sheet. They also prohibit printing to the edge of the sheet. This is to avoid any need for alignment. The LX500/RX500 senses the beginning of the label with an optical sensor and is capable of printing to top, bottom, left and right edge. Because of this it is necessary to align the printer to work with specific types of label stock.
The LX500/RX500 comes factory calibrated to print exactly to the edge of Primera label stock. However, due to variations in the left margins and other variables it may be necessary to fine tune these settings at the beginning of each roll. This is especially true for other non-Primera brand label stock.
Adjust print alignment using the PrintHub. Go to the Print Alignment Tab (second tab).
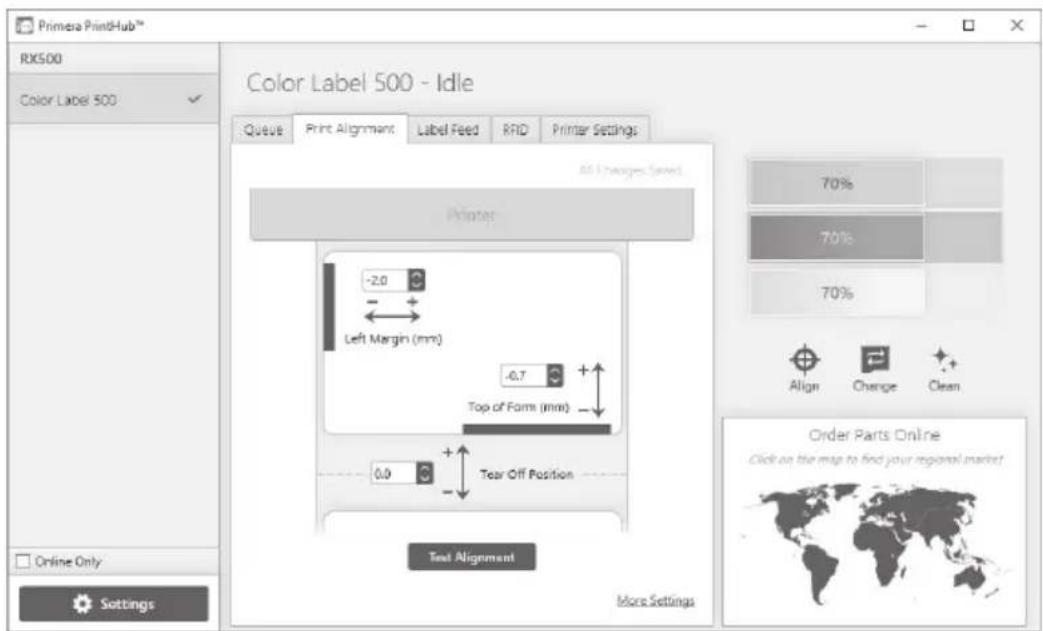
Important Note! Before adjusting any values, print the Test Alignment to see how close you are to alignment. The on screen graphic is the same as the print which makes it easier to adjust these values.
Three items can be adjusted here:
1. Tear off/Cut
Position. This value adjusts the position of the last label printed after it has been presented for tear off or for cutting. This only applies if the output mode is set to
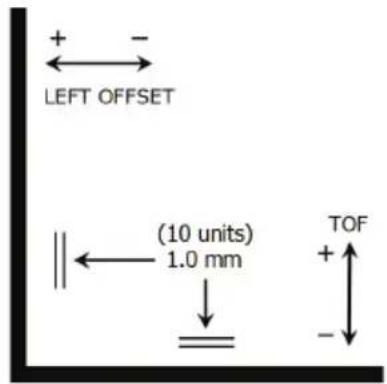
"Present the label." Add to the current value to move the tear point closer to the printer. Subtract from the current value to move the tear point away from the printer. The value is automatically saved as soon as you set it.
-
Left Margin Offset. This value moves the printed label left or right. Add to the current value to move the printed label to the right. Subtract from the current value to move the printed label to the left.
-
Top of Form (TOF). This value moves the print start position up or down on the label. Add to the current value to move the printed label down or toward the printer. Subtract from the current value to move the printed label up or away from the printer. The value is automatically saved as soon as you set it. You may have to make several adjustments to one or more of these values. After each adjustment you can click the Test Alignment button to print a small test pattern on the label. This will help you find the proper alignment value.
F. SETTINGS
There are two areas with Settings in PrintHub.
General application settings that apply to the software and all printers can be found by clicking the blue "Settings" button in the lower left. Printer specific settings can be found on the "Printer Settings" Tab.
General Settings
Language. Typically, the language is set to match the language setting in the operating system. However, you can override currency settings on the Language Tab.
Automatic Updates. Automatic Updates will update PrintHub, the printer driver and the printer firmware. Every 7 days you will be prompted to update the software if there are any newer versions. You can choose to increase or decrease that automate check. You can also perform a check for updates immediately by clicking the “Check for Updates” button. Finally, if you would like to receive beta software check the “Check for Beta updates” box.

Printing Preferences. You can choose to close PrintHub after printing completes by checking the “Close this application after printing completes” box. PrintHub automatically opens whenever you send a print job to the printer. If you do not want PrintHub to open in front of other programs, you can check the “Launch minimized during print” option.
Support. Click the "Generate Support Report" button to generate a zip file on your desktop containing all recent log files. Send this to tech support so they can help solve any printing problems.
Advanced. Check the "Generate Printer Status XML" box to create an XML at
"C:\ProgramData\PTI\PrintHub\PrinterStatus.xml".
Software developers can use this file to display status information such as error messages and ink levels in 3rd party applications.
Printer Settings
Information. This section displays all current driver, software and firmware versions.
Cartridge Maintenance. Here you can adjust the frequency of certain maintenance operations. Increasing the value of "Seconds between Maintenance Spits" will decrease ink usage but could also cause poor quality printing.
Increasing or Pages between Maintenance Wipes will speed up printing but could also cause poor quality printing.
Check the Suppress Alignment message to prevent the window from appearing which prompts you to align the cartridge every time a new cartridge is installed. Skipping the alignment is faster but can result in poor print quality.
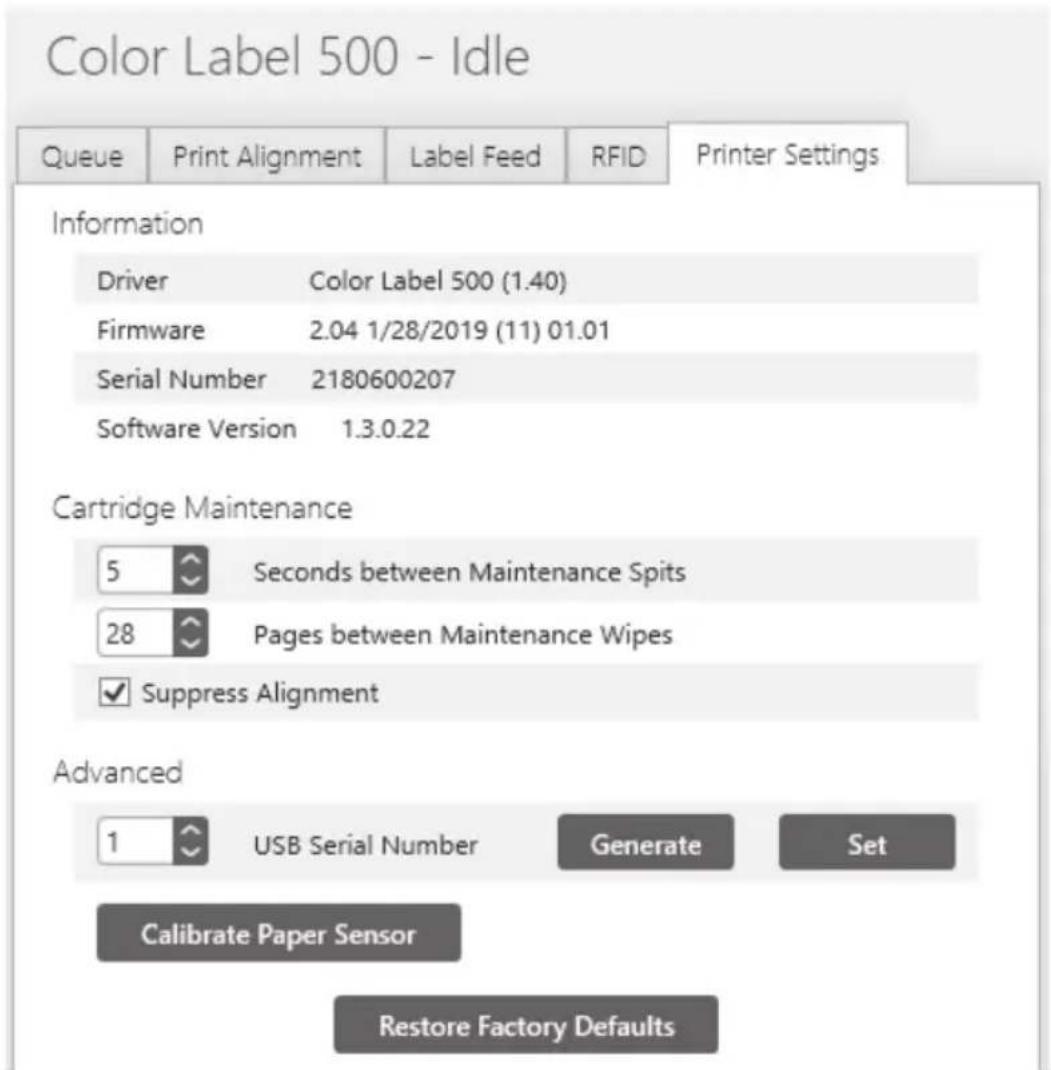
Multiple Printer Support. You can install multiple printers to the same computer and use them simultaneously. To do so you will need to change the USB serial number identifier of one of the two printers, two of three printers, three of four printers etc. To change serial numbers:
- Connect each new printer one at a time. The current USB Serial Number will be displayed.
- Click Generate. It will find the next available USB Serial Number based on the currently connected printers. For the first one it should set it to 2 and for the next printer 3 and so on.
- Click Set. You will hear the printer reset and the settings window will turn gray. After it resets you will be able to see the settings window again. Keep the printer connected.
- Now you can connect the next printer. Windows will automatically install a new driver for that new printer and name it Color Label 500 (Copy 1). You can rename it later by editing the printer properties in the Windows printer list.
- You will now see a second printer appear in the left column – Color Label 500 (Copy 1). Click on it to display information about this printer. If this is the last printer, you will connect you are done. If you wish to connect additional printers follow through steps 2-4.
Calibrate Paper Sensor. Calibrate the paper sensor if you are receiving TOF errors. The calibration process will prompt you to remove all paper/stock from the printer before calibrating.
Restore Factory Defaults. This will set all Print alignment and other calibration settings back to factory defaults.
Section 4: Using RFID (PC Only)
A. SETUP RFID
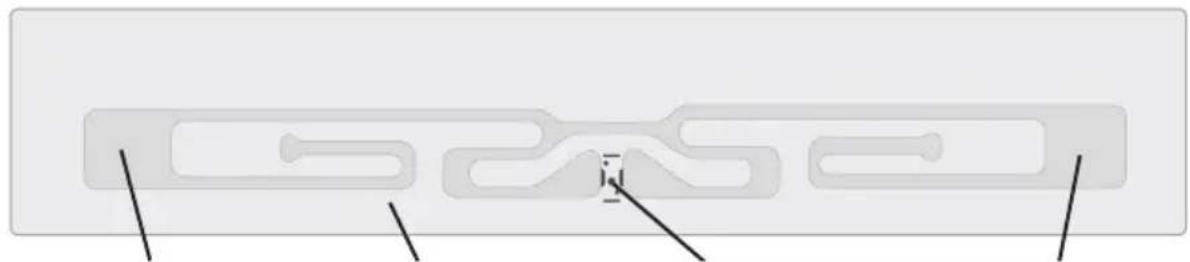
Label Stock should have an antennae imbedded between the label adhesive layer and the liner. The antennae should be oriented to the front of the label stock and centered within the label.
natural_image
Pure diagram of a mechanical component with no text, numbers, or symbolsAntenna Label RFID Chip Antenna
The RX500 has a fixed RFID Encoder/Sensor which is in the middle of the print area. Each time a job with RFID encoding is sent to the printer the printer will automatically find and calibrate to the installed tag. If you would like to determine if the RFID Tags are detected before then you can check on the RFID tab within Primera PrintHub.
To test the RFID stock, click the Start Read/Write button.
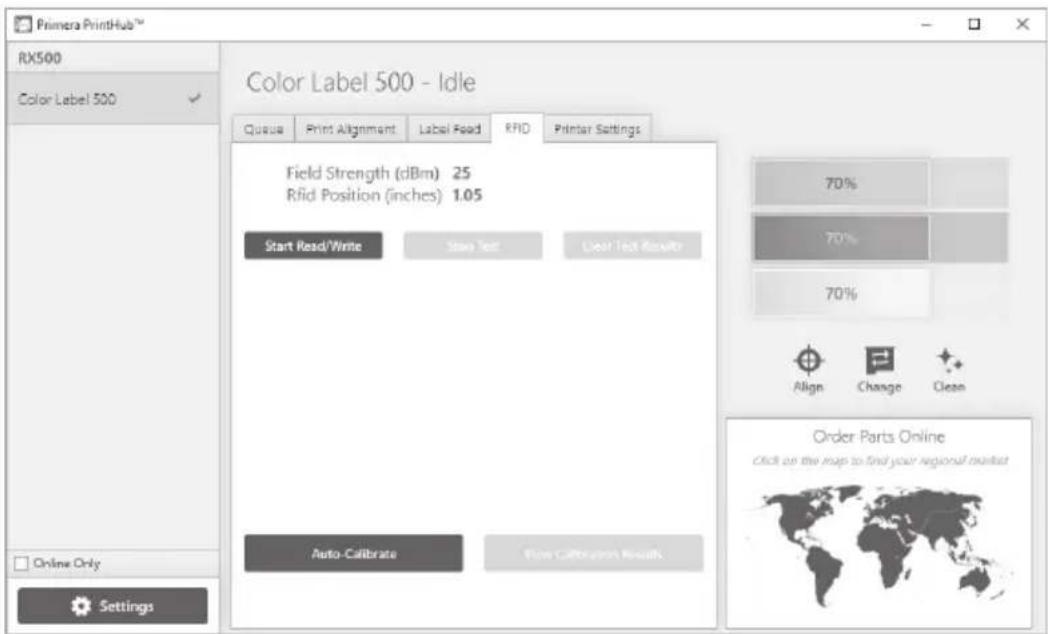
The RX500 will write and read the chip until you press the "Stop Test" button.

If successful, you will see the Success entry for each attempt.
If the stock fails the test for any reason, stop the test and try pressing the Auto-Calibrate button. If the stock is still not writing/reading refer to the RFID tag specifications at the end of this section to make sure your stock is compatible.
B. PRINTING AND ENCODING
Once you have a successful write test, you are ready to print from your RFID equipped software program! Refer to the printing application's documentation for details on RFID printing. A trial version of Bartender is included on the installation disc. You will have to start the 30-day trial on at least the Professional version to encode RFID.

To add RFID encoding to a label design using Bartender, once the label size has been chosen and the blank label is on screen, click the Standard RFID button on the lower left to display all RFID options. Simply drag the desired data format to the area around the label. Double click on the icon that appears to set the data or data source.
Note on Encoding Errors: During printing from any application if an encoding error appears, PrintHub will appear and display an error. It will try to encode again after making calibration adjustments. If it fails to encode, by default a series of XXXXs will automatically be printed on the label to indicate that it was not encoded properly. The job will then continue.
![BarTender Enterprise Automation, - [Format1.btw *] File Edit View Create Modify Arrange Administer Tools Window Standard RFID 4 × Format1.btw * DoD-64 DoD-96 GDTI-96 GDTI-113 GIAI-64 GIAI-96 GIAI-202 GID-96 GRAI-64 GRAI-96 GIAI-202 Sample Text](/content/2026/05/835993/images/f87dacce3fb0d82cc47e4909b20b8543d09b77569ee6dd708cd15a7a7f388c4c.jpg)
C. TAG SPECIFICATIONS
Tags must meet the following specifications to be encoded using the RX500:
• EPC Gen 2 (v1.2.0) compliant
• ISO/IEC 18000-6C compliant
• 915 MHz (UHF) for USA (Requires USA version of RX500)
• 867 Mhz (UHF) for Europe (Requires European version of RX500)
RX500 encodes only to EPC memory which can store from 96 bits to 480 bits depending on the tag that is chosen.
The chip (ICs) for Gen 2 tags contain four types of memory:
- Reserved memory
- EPC memory
- TID memory
- User memory
Reserved Memory:
This memory bank stores the kill password and the access password (each are 32 bits). The kill password permanently disables the tag (very rarely used), and the access password is set to lock and unlock the tag's read/write capabilities. This memory bank is only writable if you want to specify a certain password. Most users do not use this memory area unless their applications contain sensitive data. It cannot store information besides the two codes.
EPC Memory (RX500 Only Encodes this Memory):
This memory bank stores the EPC code, or the Electronic Product Code. It has a minimum of 96 bits of writable memory. The EPC memory is what is typically used in most applications if they only need 96 bits of memory. There are some tags that have the capability of allocating more bits to the EPC memory from the user memory. EPC memory is your first writable memory bank.
TID Memory:
This memory is used only to store the unique tag ID number by the manufacturer when the IC is manufactured. Typically, this memory portion cannot be changed.
User Memory:
If the user needs more memory than the EPC section has available, certain ICs have extended user memory which can store more information. When it comes to user memory, there is no standard in how many bits of memory are writable on each tag. Typically, the extended memory is no more than 512 bits, but there are some high memory tags with up to 4K or 8K bytes of memory. This is the second writable memory bank for Gen 2 ICs.
Note: For specs on the physical placement of the tag on the label please see Label and Roll Specifications.
Section 5: Printing Using a PC
A. USING BARTENDER®
Primera Special Edition BarTender UltraLite is included with the printer. Other programs can be used to print. If printing from other programs please follow the guidelines in Section 3D.
When you open BarTender you will be given the choice to select an existing label or create a new one using a wizard. Use the following instructions as a general guide for standard labels.
- Choose "Start a new BarTender document..."

- Select "Blank Template". Click "Next".

- Select "Color Label 500". Click "Next".
- Select "Specify Custom Settings". Click "Next".

- Set the page size, width and height to match labels installed in the printer. Click "Next".
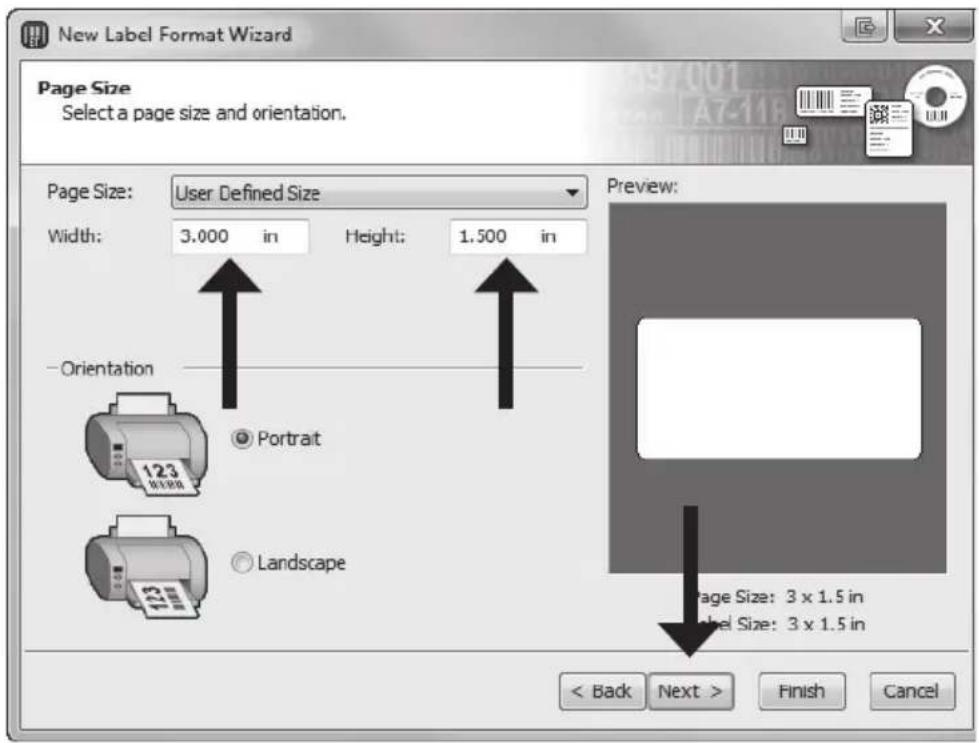
- Check the "Picture" box to add a background photo or graphic to your label. Click "Next". If you click "Finish", the remaining default wizard options will be set and no picture will be added.

- Select "Embedded Picture". Click the "File" Button to browse to the location of your photo/graphic file. Set the Size Method to "Stretch". Note the preview to the right. Click "Next" if you are satisfied with the layout of the photo or graphic.

- Review the label setup summary. If it is correct, click "Finish". Your blank label will be displayed.
After you click Finish, you can always go back and change any of these settings, by going to the File Menu and selecting "Page Setup". Basic and advanced settings are available on the various tabs.

B. ADD TEXT, BARCODES AND GRAPHICS TO A BARTENDER LABEL
Once you have created your label size you will need to add text, a barcode and/or graphics. This can be done using one of the buttons on the button bar at the top of the screen.

Add Text. Click the Text button. Now click anywhere on your label. "Sample Text" will appear. Edit the text on screen or double click it to open up text settings to change font, size and other settings.

Add Graphic. Click the Image button. Now click anywhere on your label. An Image icon will appear. Double-click it to open up image settings and browse to the image/graphic that you would like to insert.
![8aTender Enterprise Automation - [Format1.btw *] File Edit View Create Modify Arrange Administer Tools Window Help B I U W Format1.btw * 0 1 2 This is a Test This is a Test PRIMERA 11121354614](/content/2026/05/835993/images/6b1b04bfb3a3e6628648f34a2f991b0771ab0ecd777b0d478884367ade947dbc.jpg)

Add Barcode. Click the Barcode button. Now click anywhere on your label. A barcode settings window will appear. Here you can choose any type of barcode and enter the value.
Print. Click the Print button to start printing.
Page Setup. Click the Page Setup button to change your label size, adjust corner radius or change the shape.
Lines. Click the Line button to add a horizontal or vertical line.
Tip! Double-click any object to open settings for that object.
Tip! Go to the Help menu to access the BarTender Manual and Tutorials.
C. PRINTING FROM BARTENDER
- To print, click the Print button

Menu and select "Print". The Print Dialog window will appear.
![Print [Test Label.btw] Print Object Print Method Printer Name: Color Label 500 Status: Ready Document Properties... Model: Color Label 500 Port: USB023 Printer Properties... Location: Print on Both Sides Comment: Print to File Quantity Options Copies: 1 Test Print Print Preview Close Cancel Help](/content/2026/05/835993/images/ede55651dca6bfe2cb3e58eaa3d2b260261ccc4e1a3bd2ebcddc119d4faedc2f.jpg)
- Select the Color Label 500.
- Set the number of copies.
- Click "Document Properties" to adjust print quality settings. These settings are explained in the next section.
- Click "Print".
D. PRINTER DRIVER SETTINGS (PC)
Settings changed via the method below will apply to all new designs created in BarTender or other programs after the preferences were changed. Existing labels saved in BarTender will not be affected since the preferences are saved with the label. To change these preferences you will have to change printer preferences through BarTender before printing by clicking the "Document Properties" button.
To find Driver Settings:
Click the Start button, choose Printers and Faxes. Right-click on the Color Label 500 Icon and select Printing Preferences from the drop-down menu.

The preferences screen will appear.

NOTE on PC Settings:
Most applications allow you to change these same printer driver options from their "Print" screens. Some applications such as BarTender save your settings with the label, others use settings only for the current print job just sent to the printer.
Paper Size
If you are using BarTender, this setting is adjusted during the label setup wizard. If you are using a program other than BarTender you will need to set this to the dimensions of your label. Keep in mind that the dimensions are always relative to the width and height of the actual label in the printer. Orientation of an image on the label should not change this setting. See Section 6 for minimum and maximum label sizes.
Orientation
There are two settings for orientation, Portrait and Landscape. If your text and graphics print left to right or as shown on the screen, select portrait. If you wish your printing to rotate 90 degrees from what you see on the screen so it is printing horizontally, select landscape as your orientation. Remember, this does not change the width and height in the Paper Size setting. It is only a tool for viewing a label upright on screen that will be printed sideways on the printer.

natural_image
Two identical blue silhouette icons of a hockey player in action, shown in two different angles (no text or symbols)Portrait

natural_image
Four identical blue silhouette icons of a person in motion, arranged vertically (no text or symbols)Landscape
Print Quality
There are 4 levels of print quality in the driver. The lower the Quality, the faster the print. Quality 1 provides the fastest print available while Quality 4 provides the best quality. It is recommended that you experiment with the different levels when designing your label to find a good balance between print quality and print speed.
Color Matching
Best for Graphics mode is best used for graphical images where accurate color reproduction is not as essential. Images printed in this mode will look more vibrant because more ink is being used to produce them. However, printing images of people may produce skin tones that have a reddish tint.
Best for Photos mode is best used for photographic images where accurate color reproduction is very essential. Images printed in this mode will look lighter than those printed in Photo mode. Skin tones especially will look more natural in this mode.
NOTE: Exact color matching of the printed labels to the screen may never be possible since there are factors that affect this out of the drivers control. The surface of the label reacts with the ink in the cartridge to produce the color. For this reason, when printing the same image to different types of labels with different surfaces the printed output can look entirely different.
Ink Saturation
This option controls the amount of ink used when printing an image. The default setting is 100%, which will provide the most accurate color matching. If the ink is not drying fast enough or is bleeding, you can decrease the Ink Saturation to lessen the amount of ink that is applied to the label.
Enable Bidi (Bidirectional) Printing
Set to "Yes" for fastest print speed. Requires an alignment print after every cartridge change. Set to "No" for better quality print (in some cases).
Launch Status Monitor
Click here to open the LX500 Status Monitor. See section 3 for more details.
Details/Print Counter
Clicking on the Details button will allow you to view information about printer settings stored on the printer. There is also a print counter in the details window to help you count the number of labels printed since the last time it was reset.
Click Reset Counter to set the counter to zero.
E. PRINTING FROM OTHER PROGRAMS
Since this printer uses a standard Windows printer driver you can print from any application you would like. There are just a few things to remember that will make it much easier.
- Set the Page/Label Size in the Driver. BarTender automatically prompts you for the size of the label that you are using. When printing from any other program you must do this manually. Before you print, simply set the Paper Size just as you would set print quality in the printing preferences. In the example below the label size is 4" x 4" so the custom page size is set to 400 x 400 (displayed in .01 inch units).
![Print Printer: Color Label 500 Copies: 1 Pages to Print All Current page Pages - 52 More Options Page Sizing & Handling Size Size Options: Fit Actual size Shrink oversized pages Choose paper source by Orientation: Auto portrait/landscape Properties Advanced Color Label 500 Properties Options Color Label 500 Settings Paper Size: Custom Custom Page Size Orientation: Portrait Custom Form Size Width: 400 [ 75 .. 425 ] Height: 400 [ 75 .. 2400 ] Units 0.01 Inches 0.1 Millimeters OK Cancel](/content/2026/05/835993/images/9f62251cbf5abe4a7a531c08d4bc0a098780ff732e851f822a6a26feb63e4efb.jpg)
-
Check the image or document size. The image size or document size should correspond to the Page/Label Size set in the driver. If you have set your page size n the driver to 4" x 4" but your image is actually 5" x 3" the printer driver will automatically shrink your image to fit inside the 4" x 4" label. The result is that the actual printed label is 4" x 2.4". Avoid this by setting your page size in the driver and image size in the printing application to match the label size installed in the printer.
-
Choose the right printing program. There are many different applications that are capable of printing to the LX500. However there are only a few that are ideal printing applications. For example, Adobe Illustrator is an excellent design program but is not always the best printing program. It can be difficult to find the printing preferences or to know the exact size of the art board. It is best to save as a PDF file and print from Adobe Reader or export as a 300 dpi JPG and print from BarTender.
Section 6: Printing from a Mac
A. PRINTER UTILITY SETTINGS (COLOR LABEL 500 UTILITY)
The Color Label 500 Utility is used to interact with the printer for gathering ink levels, maintenance, alignment, and several other functions.
To Find Color Label 500 Utility:
Color Label 500 Utility automatically installs with your printer driver and can be accessed through the Printer & Scanners in Mac under Apple Icon – System Preferences.
-
Connect the printer via USB and turn on the power. The Color Label 500 Utility accesses most of the information it uses from the printer itself so the printer must be turned on and communicating for the program to open.
-
Go to the Apple Icon – System Preferences - Printers and Scanners, select the PTI Color_Label_500, click on, Options & Supplies, and Open Printer Utility. Or you may simply print to the printer and the Utility will open. The Color Label 500 Utility has 4 tabs that are arranged on the top of the window. Each tab opens a screen that has various similar functions.


- Status Tab (First Tab). Displays ink levels, print counter and any error messages.
- Cartridge Tab (Second Tab). Use for aligning the cartridge, cleaning the cartridge, and changing cartridge.
- Alignment Tab (Third Tab). Adjusts vertical and horizontal print alignment. Changes the Stock Sensor Mode and toggles the Output/Cut Mode.
- Settings Tab (Fourth Tab). Displays printer information including firmware version, driver version, and software version. Check for updates and set other advanced settings.

B. ADJUSTING PRINT ALIGNMENT/LABEL OFFSETS
If your previous experience with printing is limited to printing letters and cards to 8.5 inch by 11 inch paper you probably are not familiar with an essential part of label printing – Print Alignment. Standard printers feed a sheet and start printing based on the start of the sheet. They also prohibit printing to the edge of the sheet. This is to avoid any need for alignment. The LX500 senses the beginning of the label with an optical edge. Because of this it is necessary to align the printer to work with specific types of label stock.
The LX500 comes from the factory calibrated to print exactly to the edge of Primera label stock. However, due to variability it may be necessary to fine tune these settings at the beginning of each roll. This is especially true for other non-Primera brand label stock.
Important Note: Before adjusting alignment settings first print one label at the quality level you intend for the entire print job. This will ensure the label stock is moving at the same speed and the stock sensor will sense the gap in the same way.
Adjust print alignment using the Color Label 500 Utility. Click on the Alignment Tab (Third Tab).

Three items can be adjusted here:
* Tear off Position. This value adjusts the position of the last label printed after it has been presented for tear off. This only applies if the output mode is set to "Present." Add to the current value to move the tear point closer to the printer. Subtract from the current value to move the tear point away from the printer. After adjusting the value click the Set Offsets button to send the value to the printer.
* Left Margin Offset. This value moves the printed label left or right. Add to the current value to move the printed label to the right. Subtract from the current value to move the printed label to the left. After adjusting the value, click the Set Offsets button to send the value to the printer.
Note: Before adjusting this value make sure the label stock is properly loaded so that there is no gap between the edge of the liner and the fixed throat guide. Any gap at this point will greatly affect the Left Margin Offset value needed to align the label. Also, if you adjust the value with improperly loaded label stock you will have to adjust it again if you load the label stock correctly the next time.
* Top of Form (TOF). This value moves the print start position up or down on the label. Add to the current value to move the printed label down or toward the printer. Subtract from the current value to move the printed label up or away from the printer. After adjusting the value click the Set Offsets button to send the value to the printer.
You may have to make several adjustments to one or more of these values. After each adjustment you can click the Test Offsets button to print a small test pattern on the label. This will help you find the proper alignment value.
C. SET THE STOCK SENSOR MODE
The stock sensor mode refers to the method the printer will use to detect the print starting position for each label. To access the Stock Sensor Mode, click on the Alignment button, then select Stock Sensor Mode. In most cases you will not need to change this setting.

Important Note: Set the Stock Sensor Mode BEFORE loading label stock! You must also set the Stock Sensor Position (Section 2B) so that the sensor is sensing the correct point on the label stock.
Die Cut (Default). If you are using standard die-cut labels that look similar to the graphic use this setting regardless of the size of the label. Also, use this setting for through-hole label material where a hole is punched through each label or a notch is cut on the side.
Reflective. Use Reflective for label material where a black pre-printed line (black mark) on the back of the label stock indicates the break between labels. Black marks are required on clear label stock rolls, or labels where the label waste matrix (waste) is left on the liner. Black marks can also be used for irregular shaped labels, circles larger than 4.6 inches or on any stock where the print starting position can not be sensed using the label itself.
Continuous. (Sensor off.) If you have continuous stock with no die-cut, reflective mark or holes, set the Sensor Type to Continuous. This will turn off the stock sensor. In this mode there is no way to set the print starting position. The printer will simply start printing the first label and print each subsequent label immediately after the previous. To produce a gap between prints simply add the desired amount of white space to the end of the label being printed.
D. SET THE OUTPUT MODE
Use the Present/Cut Mode to adjust how the printer presents labels after they are printed or if/when they are cut after printing. There are different options available which change if the Cutter is enabled or disabled. If the Cutter is disabled the label present options will be available. If the Cutter is enabled the present options are no longer available but cut options become available.
Cut Options (Check Cutter Enabled):
Cut after no activity. This setting will cut at the end of a print job if the printer does not receive another print job within one second of the last print job in the queue. You can usethis feature to cut at the end of multi-copy job, multi-page job or multiple individual jobs in the queue.
Cut after button press. This setting will cut after you press the Load/Feed button on the printer. This can be used after one label or an entire job. This feature is useful if you will not be present at the end of the print to catch the cut label.
Cut every label. This setting will cut after every label.
Cut after label count. This option will cut after the number of labels specified in the toggle box that appears when this option is selected. This is useful if you have front/back labels or sets of labels.
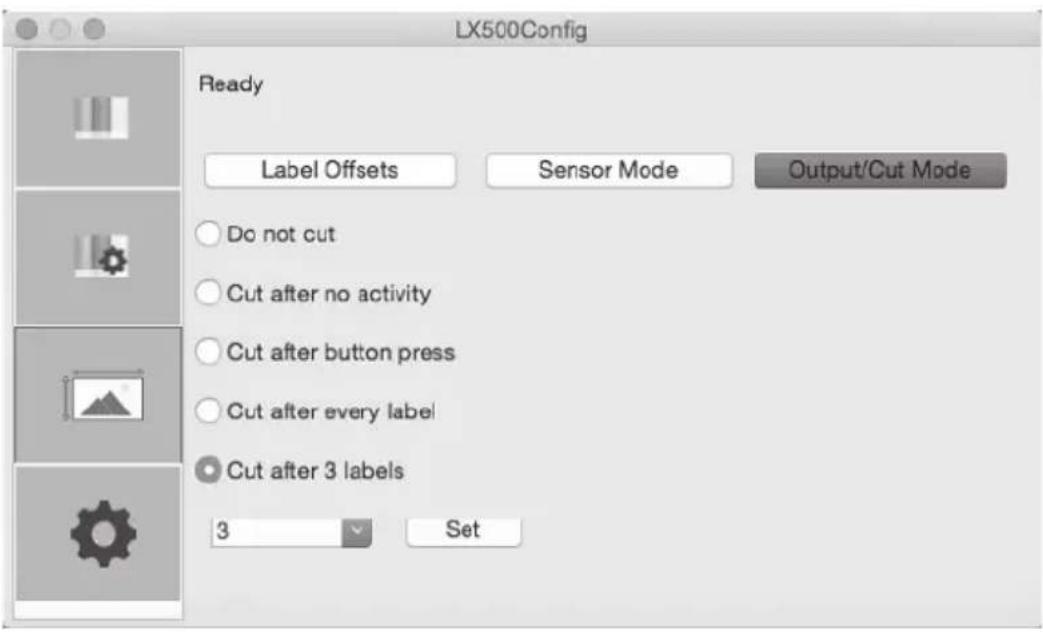
Present Options (Uncheck Cutter Enabled)
Do not present. In this mode the label stock does not move after the last label is printed. This means that part of the last label printed is still in the printer. This should be used only if you have a label rewinder attached.
Present after no activity. This setting will present (feed all printed labels past the tear off point) at the end of a print job if the printer does not receive another print job within one second of the last print job in the queue. You can use this feature to present at the end of a multi-copy job, a multi-page job or multiple individual jobs in the queue.

E. PRINTING FROM BELIGHT LABELS AND ADDRESSES
You can print to the printer from any program. However, Belight's Labels and Addresses is an affordable program that we recommend. It saves time by eliminating the need to setup a custom page size for each label. You may download a trial version at their website: www.belightsoft.com
To setup a label and print follow these instructions.
- When you open the program for the first time, a label assistant will be displayed. You may choose a predefined label if your label size is on the list.

- If your size is not on the list, select ANY label and click Choose. You will have to setup a new label before it will appear on the Custom tab. Click on the information icon to display label size information. Click on Change Layout...

- Click on the Custom Tab. Choose Create New. Click OK.
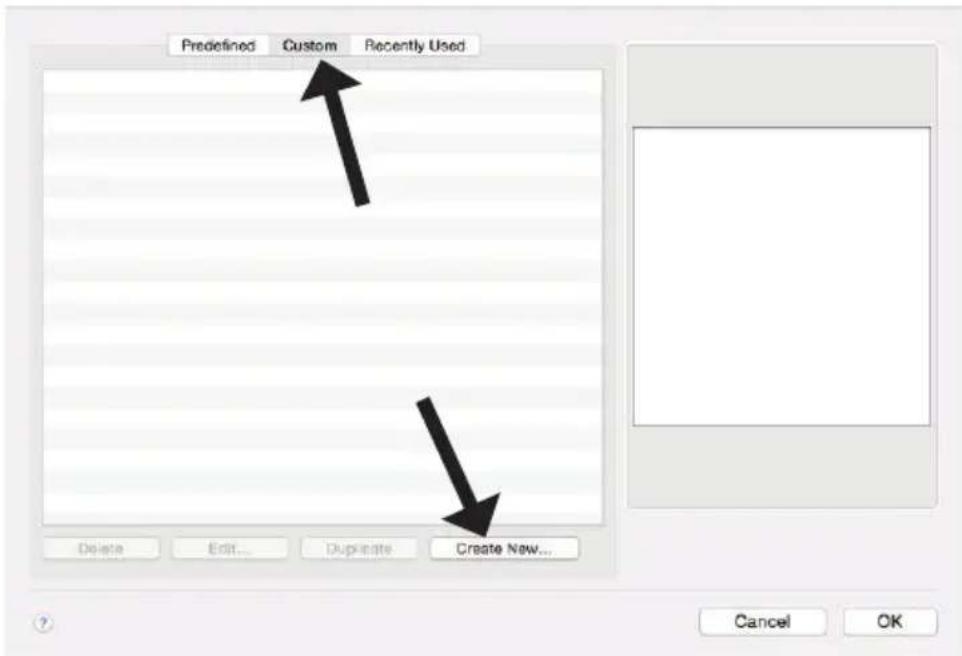
- The setup will contain a default name and setup. All of this information needs to be changed. First change the name to match your label size.
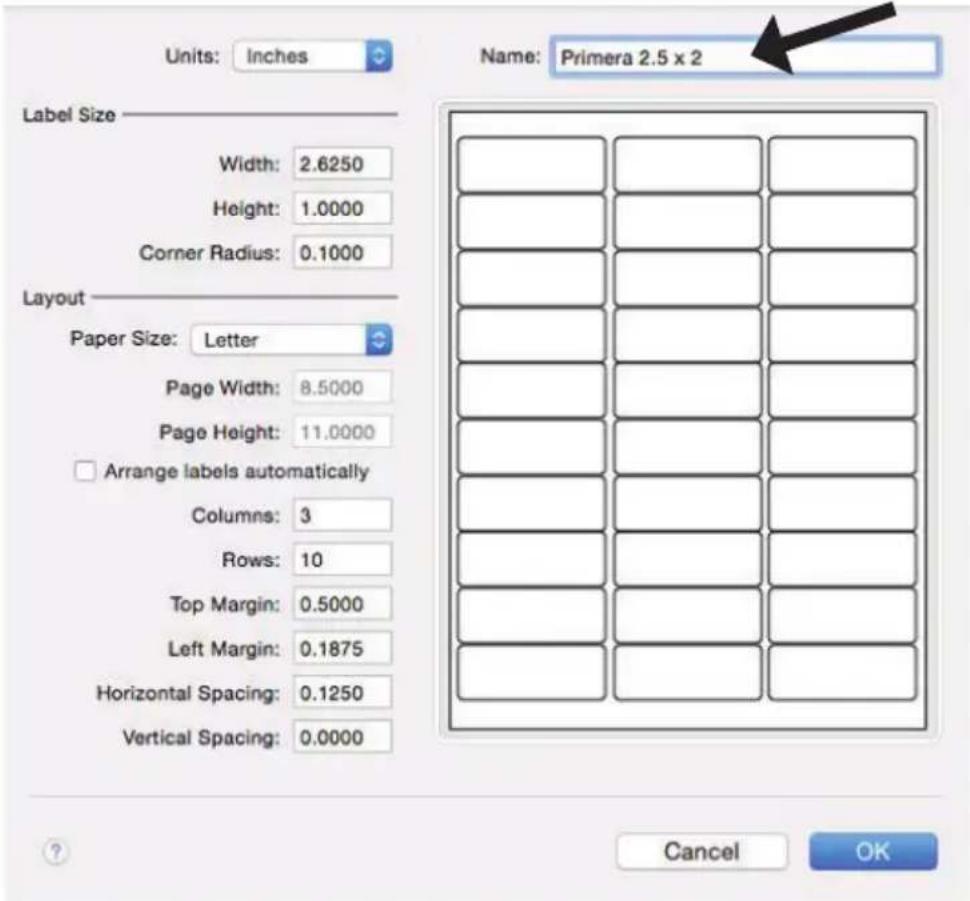
-
Change the Label Size and Layout. Use this information as a guide. In this example we will setup a 2.5" wide x 2" high label.
-
Label Width and Height should match Page Width and Height
• A standard corner radius (rounded corner) is .125
• Paper Size should be set to "Other" - Rows and Columns should be set to 1
• All Margins should be set to zero
• All Spacing should be set to zero
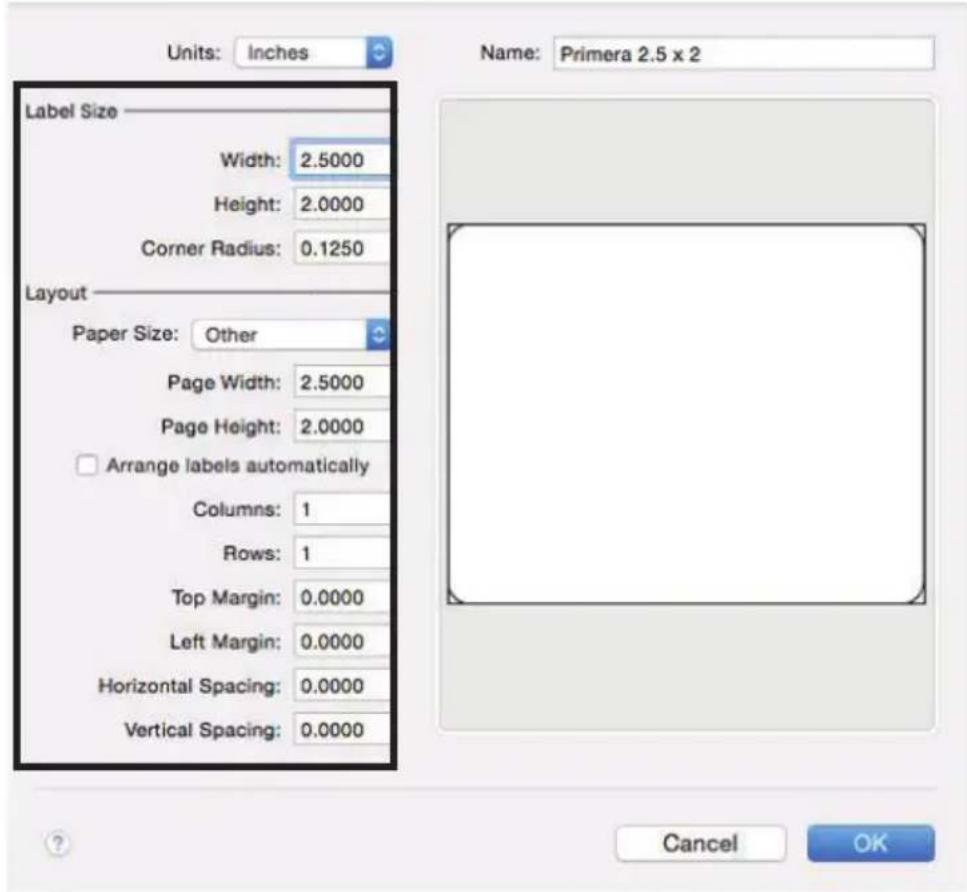
- Click OK when the label is setup. Now select the label you setup from the Custom Tab. Click OK.

- Add images, barcodes or text using the buttons across the top ribbon. For more information on how to setup a label and use the software, contact Belight or visit the Help menu. When you are ready to print, go to the file menu – print.

- Choose the Color Label 500 as the printer and click Next.

- You may print at this point. However, if you wish to adjust print settings, click on the Show Details button.

- Next click on the Layout menu to reveal additional menu options. Choose Saturation/Ink/Quality.
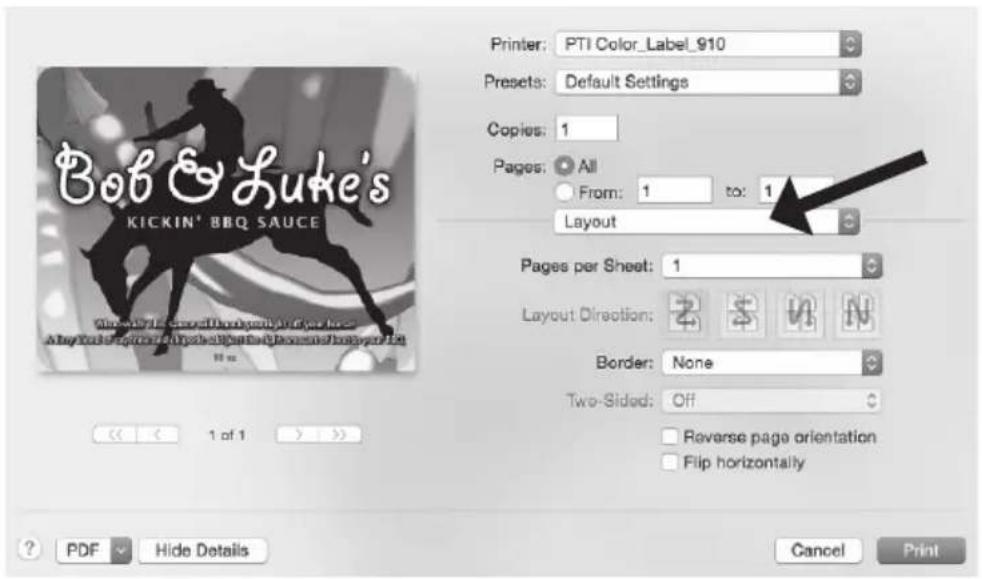
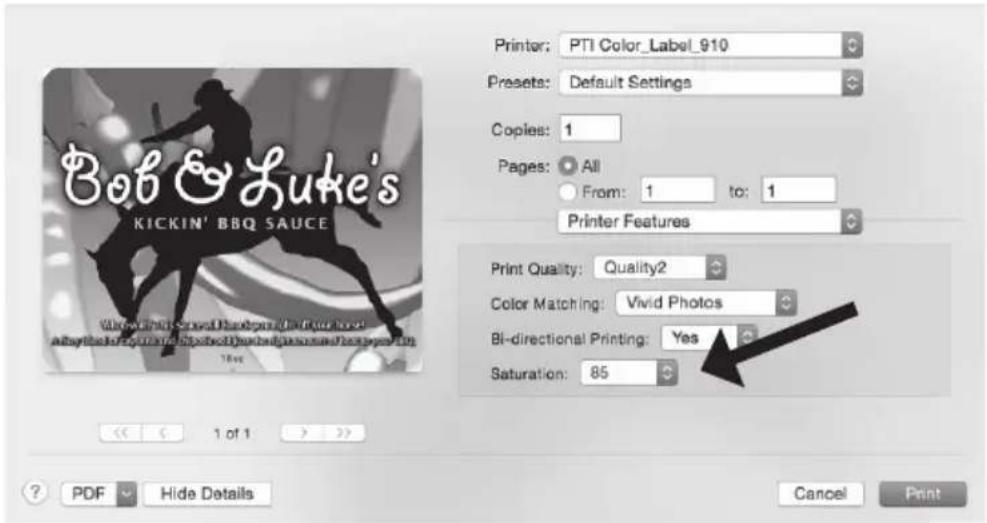
- Set your Saturation, Ink and Quality settings according to the guide in section 5F. Click Print.
F. CREATE A CUSTOM LABEL SIZE /PRINTING FROM OTHER PROGRAMS
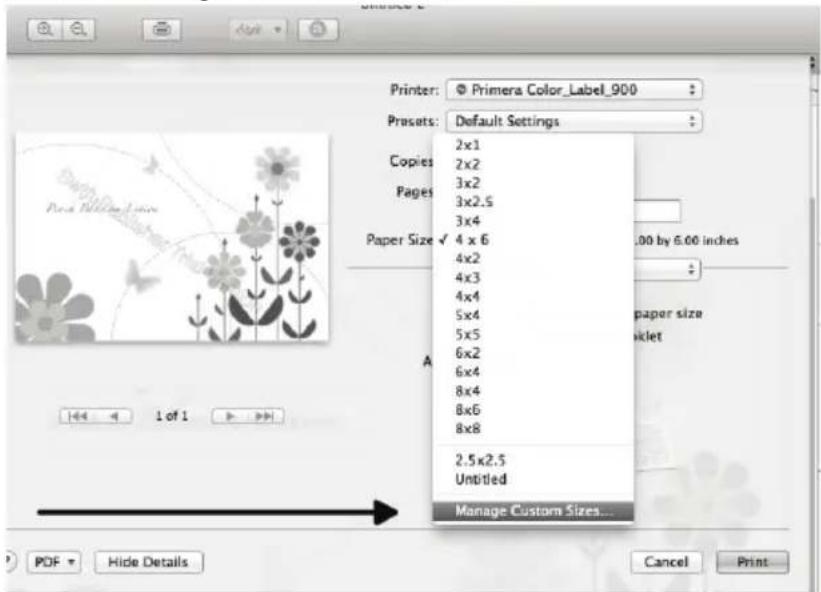
In many programs such as Adobe Illustrator, Photoshop or Acrobat Reader you will need to choose your label/page size before you print. If the label size you need to use is not already on the list of available pages sizes you will need to create a new custom size.
- Open the program you would like to print from and select File – Page Setup. Using the Paper Size drop down menu select Manage Custom Sizes.
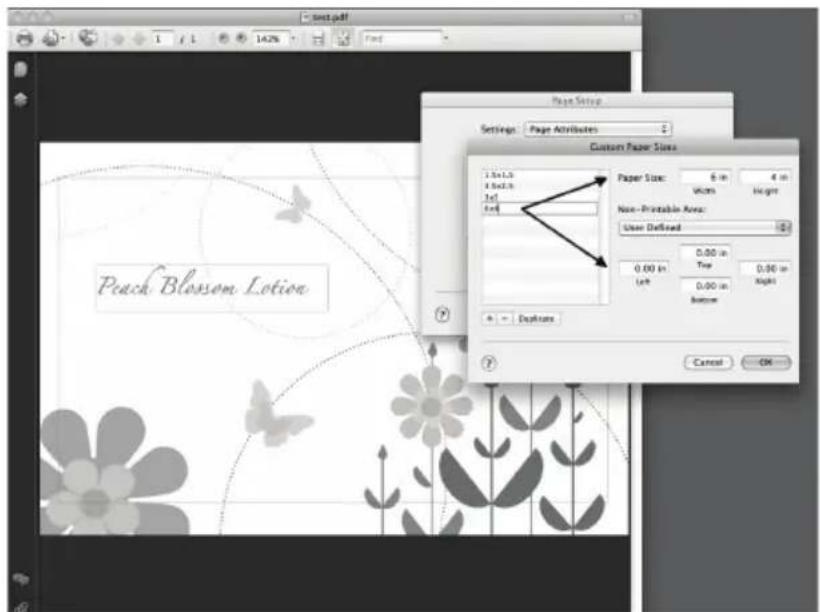
- Add a New Custom Paper Size. Click the plus (+) button to add a new custom paper size. Enter the size on the right. Be sure to adjust the top, bottom, left and right margins to 0. Change the name from "untitled" to the size of your custom page (W x H).
G. CREATING A FULL BLEED PRINT
- If you are having trouble making the image cover the entire label, first make sure the image is printing at least as big as the label size you have selected. Increase the selected page size by .03 inches on the width and .03 inches on the height to create an over bleed.
Note: Make sure under scaling options to select 'Fit to Page' in the print dialogue box if printing from Illustrator.
Left Margin Offset. You must decrease the Left Margin Offset to center the over bleed on the label. If you over bleed by .03 inches, you will need to decrease the Left Margin Offset by 4. This will center the page size increase so there is an over bleed on both the left and right sides.
TOF. Increase the Top Of Form by 4. This will cause the printer to start printing before the label and ensure a fully printed label.

Note: It is best to over bleed as little as possible to avoid excess ink on the label backing. Also, over bleeding too much will cause the printer to skip labels. This is because the printer stops printing too late to sense the next label.
H. PRINTER DRIVER SETTINGS
Printer driver settings are accessible on the print window of any application right before you click print.
Printing from Preview:
Click on the Layout dropdown menu and choose Printer Features.


Printing from Adobe Reader:
First click on Printer... to access settings. Click on the Layout dropdown menu and choose Printer Features.


Print Quality
There are 4 levels of print quality in the driver. The lower the Quality, the faster the print. Quality 1 provides the fastest print available while Quality 4 provides the best quality. It is recommended that you experiment with the different levels when designing your label to find a good balance between print quality and print speed.
Color Matching
Best for Graphics mode is best used for graphical images where accurate color reproduction is not as essential. Images printed in this mode will look more vibrant because more ink is being used to produce them. However, printing images of people may produce skin tones that have a reddish tint.
Best for Photos mode is best used for photographic images where accurate color reproduction is very essential. Images printed in this mode will look lighter than those printed in Photo mode. Skin tones especially will look more natural in this mode.
NOTE: Exact color matching of the printed labels to the screen may never be possible since there are factors that affect this out of the drivers control. The surface of the label reacts with the ink in the cartridge to produce the color. For this reason, when printing the same image to different types of labels with different surfaces the printed output can look entirely different.
Ink Saturation
This option controls the amount of ink used when printing an image. The default setting is 100%, which will provide the most accurate color matching. If the ink is not drying fast enough or is bleeding, you can decrease the Ink Saturation to lessen the amount of ink that is applied to the label.
Enable Bidi (Bidirectional) Printing
Set to "Yes" for fastest print speed. Requires an alignment print after every cartridge change. Set to "No" for better quality print (in some cases).
Section 7: Troubleshooting
A. SOLVING OFFSET/ALIGNMENT PROBLEMS
Image is Vertically Offset
(White space can be seen on the top or bottom of the label)
The LX500 decides where to start printing by detecting the start of a die-cut label, detecting a black mark on the back or detecting a thru-hole that corresponds to the start of the label.
The following items can cause the label sensor to improperly detect the start of a label:
-
TOF Offset. TOF stands for Top of Form and this setting allows you to fine tune the alignment of your printing on your label stock. This will be factory calibrated. If fine tuning is needed, increase this setting to move the image down on the label; decrease this setting to move the image up on the label. The unit of measure is 0.1mm.
-
Nonstandard / Non-translucent Backing Material. Test the unit with the label sample material that came with the unit. If it prints correctly, your label stock may not be compatible. The label sensor needs to see the difference between a label and a backing material by seeing through the label stock for light variations. If it can not see through the label, problems will arise. If you must use this type of backing, try label stock that has a black mark on the back to show where the label begins. You will need to change the Sensor Type setting in the driver preferences to Reflective if you switch to a label with a black mark on the back.
-
Improper Label Gap Distance. See Section 8 for label specifications.
-
Page Size is Bigger than Label Stock Size. If the page size set in the driver is larger than the actual label stock, ink will be printed on the gaps and the sensor will start looking for a gap too late. This can cause label skipping or inconsistent print starting points.
-
Portrait / Landscape. If the Portrait / Landscape setting does not correspond to the label stock installed this will also cause the printer to print over the gap and onto the next label. Make sure this is set correctly.
-
Sensor Position. Circular, nonstandard label shapes or multiple labels across will require precise adjustment of the label sensor. If you are using circular or other non rectangular die-cut labels see Section 2B for instructions.
The image is printing horizontally offset
(White space is seen on the left or right side of the label)
Two printer driver settings can affect this issue.
Left Margin Offset. This adjustment is found in the Status Monitor. If you see white space on the right side of the label and overlap on the opposite side, increase the number. If you see white space on the left side of the label and overlap on the opposite side decrease the number (Negative numbers are allowed).
Note: Usually a space on the right side indicates a margin around the label that is not being accounted for. The printer is factory calibrated for a 2mm margin. A larger margin around the label will cause a right side space.
Page Size. Often the page size is not large enough for the label. If this is the case you may see white space on the right side of the label and no image overlap on the opposite side. This indicates that the page size needs to be increased.
Increase the page size through the printer preferences enough to cover the label.

B. CREATING A FULL BLEED PRINT
-
If you are having trouble making the image cover the entire label, first make sure the image is printing at least as big as the label size you have selected. To accomplish this using BarTender, make the image a few millimeters larger than the label by dragging the image over the edge of the label on all sides. The bounding box around the image will turn red when it is over the edge of the label. Try printing again to see if it covers the entire label. If not, move on to step two.
-
Adjust these settings in the printer driver preferences:
Page Size. Increase the page size width in the driver preferences by .05 inches. Increase the height by .05 inches. If you are using BarTender, simply change the size under the File Menu - Label Setup. Increase the size of the image to fit the new larger page size. If you are using other graphics programs you will need to change the page size in the application and in the printer driver preferences.
Left Margin Offset. Decrease the Left margin offset by half the increase of the page size width. In this case you would decrease the value by 6 (which corresponds to .025 inches). This will center the page size increase so there is a .025 inch over bleed on both left and right sides.
TOF. Increase the Top of form by 6. This will cause the printer to start printing before the label and ensure a fully printed label.

Note: It is best to over bleed as little as possible to avoid excess ink on the label backing. Also, over bleeding too much will cause the printer to skip labels. This is because the printer stops printing too late to sense the next label.
62 Troubleshooting
C. CLEARING A LABEL JAM
If there is a label jam in the printer mechanism first attempt to remove the jam by opening the cover and removing the jam from the printer feed output area.
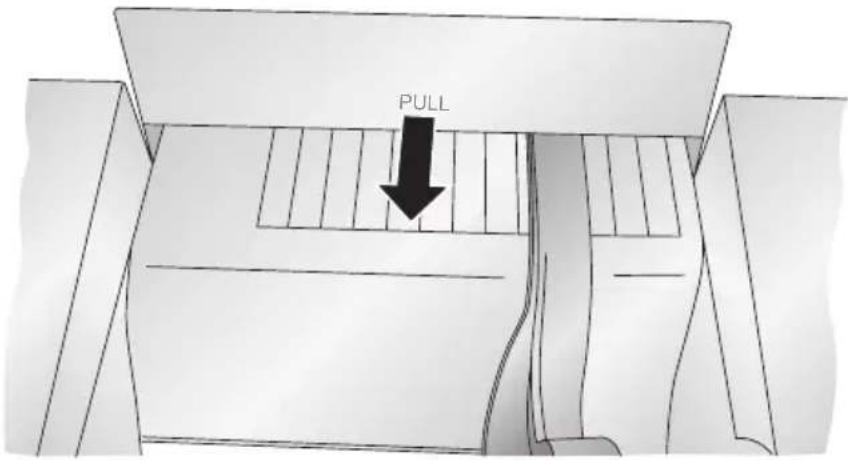
If the jam can not be located, it is possible to remove a cover over the feed input area. Pull on the center of the cover as shown below to release the tabs on the sides.
To prevent future jams, use rubbing alcohol to remove any adhesive left in the printer feed area.
D. MAINTENANCE
Cleaning the Printer
The case of the printer can be cleaned with an ammonia based window cleaner and a lint-free cloth.
Over time, ink overspray may gather at the base of the printer. The printer is designed using a vacuum system to gather most of this ink on a series of saturation pads. Eventually, these pads may need to be replaced. Contact tech support to determine if pad replacement is necessary.
Maintenance Station Cleaning/Wiper Replacement
Check the Maintenance (Capping) Station for ink build up / Replace Wipers. The capping station is where the cartridges dock when not printing. The rubber cap just naturally builds up ink over time. There can also be ink residue on the wiper. Wipe off the capping station components occasionally with a damp cloth. The components that need cleaning include the cap itself as well as the rubber wiper just to the right of the cap.
Wiper Replacement.
If you notice that the first few labels print fine and then the colors fade away, the wiper may actually need replacement. Wipers last approximately 30,000 prints. However, actual wear will depend on several factors including the size of the label you are printing. For this reason, the wiper should be cleaned and checked for wear every 10,000 prints. A replacement wiper can be purchased from the replacement parts store. SKU: 626367 Instructions for replacement can also be found on the parts store.
How will I know a wiper is worn?
The wiper has blades at the top that can get rounded over time. This rounding can be very subtle when viewing only the worn wiper but when comparing a worn wiper to a new wiper the difference is noticeable.
Note: These same symptoms can be caused by an empty cartridge. Please ensure the cartridge has at least 20% ink remaining. If not, please try a new cartridge.
E. POOR PRINT QUALITY - CLEANING THE CARTRIDGE
It may be necessary to clean the ink cartridge nozzles if you notice reduced print quality, or if you suspect a cartridge nozzle has become slightly dried out or clogged. If the cartridge has been left out of the printer more than 30 minutes, the ink in the print head nozzles may have dried. If you are having print quality problems, follow the steps below:
-
Before moving on to the next step, ensure that the ink level of the color cartridge is more than 10%. If the ink level is lower than 10%, replace the cartridge.
-
Try cleaning the cartridge using the clean function in the PrintHub or Printer Utility (Mac).

- Determine if printing is now acceptable by printing your image.
If the sample has missing colors or voids within a color strip, remove the cartridge from the printer and proceed to step 4.
- Prepare items needed for procedure.
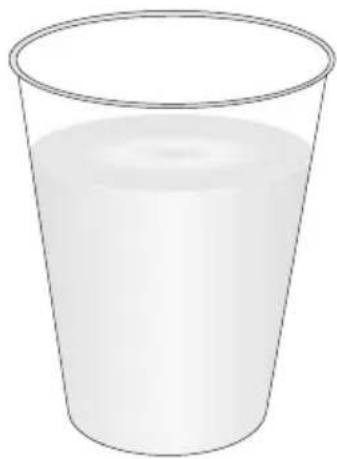
Two Paper Towels folded four times each

natural_image
Illustration of a closed book with visible pages and spine (no text or symbols)A Glass of Water
natural_image
Simple line drawing of a glass filled with milk, no text or symbols present- Soak the paper towels in water for 5 seconds.
Note: Do not squeeze water from paper towels after removing from water.

natural_image
Illustration of a hand pouring liquid into a glass with a small container (no text or symbols)
natural_image
Illustration of a hand pouring liquid into a glass with a paper (no text or symbols)- Place one paper towel on cartridge nozzles. Gently press the paper towel with your finger. Leave the paper towel on the nozzles for 30-40 seconds.

flowchart
graph LR
    A["Place one paper towel on nozzles"] --> B["Gently press paper towel with finger"]
    B --> C["Leave paper towel on nozzles for 30-40 seconds"]
    D["Cartridge Nozzles"] --> A
- Wipe nozzles.
natural_image
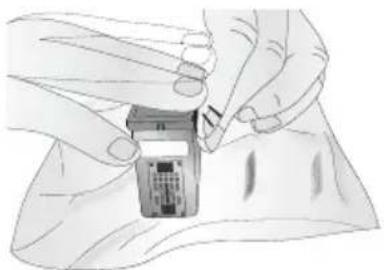
Illustration of hands installing or adjusting a small electronic device on a surface (no text or symbols visible)A. Place second paper towel on flat/hard surface.
B. Press the nozzles into the paper towel.
C. Firmly tap the top of the cartridge three times to force the ink out.
natural_image
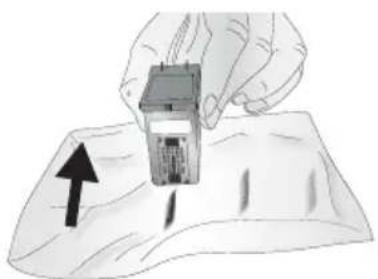
Illustration of a hand using a stamp to mark a surface with an arrow indicating direction (no text or symbols present)D. Wipe/Drag the cartridge in the direction indicated.
E. Repeat until all colors are seen on the paper towel.

natural_image
Simple line drawing of a vertical colored stripe on white background (no text or symbols)After wiping the nozzles, the paper towel should show all three colors.
If all three colors are present, proceed to step 8.
If the paper towel doesn't show all three colors, then repeat step 7.
If paper towel still doesn't show all three colors repeating step 7, then replace the cartridge.
- Dry cartridge.

natural_image
3D rendering of a rectangular electronic device with ventilation slots and a label pointing to the front panel (no text or symbols on the device itself)Dry excess water from cartridge. Ensure cartridge contacts are completely dry. Printer damage may result if cartridge contacts are not completely dry.
- Verify cartridge is now functioning properly by printing your label.
F. TECHNICAL SUPPORT
If you have difficulties operating your Printer, contact technical support using one of the methods listed below.
| Source | Location |
| Primera Knowledge Base www.primera.com/kb | |
| BarTender Software Help files Open the software. Click on the Help Menu - BarTender Help | |
| Email Support www.primera.com/contact_tech_support.cfm | |
| Phone Support 763-475-6669 (Mon - Fri 8 a.m. - 6 p.m CST) | |
| Chat support.php (Mon - Fri 8 a.m. - 6 p.m CST) | http://www.primera.com/contact_tech_ |
Section 8: Label and Roll Specifications
Important! Test all custom made label stock with the intended printer before ordering large quantities! Primera will only assume responsibility for custom label stock ordered from Primera.

Note: See table below for Max and Min values in inches and mm..
| Max Min | ||
| Label/Print width 4.25" (108mm) | 0.75" (19mm) | |
| Liner width 4.25" (108mm) 1" (25.4mm) | ||
| Label height/length 24" (609.6mm) | 0.75" (19mm) | |
| Gap between labels 0.75" (19mm) | 0.10" (2.5mm) | |
| Width of thru-hole opening 0.5" (12.7mm) | 0.375" (9.5mm) | |
| Distance from edge of media 1.90" to edge of thru-hole | (48.3mm) 0.20" (5.1mm) | |
| Reflective/Black Mark Width* | Equal to distance between labels | 0.10" (2.5mm) |
| Max Outer Diameter (OD) | 5.0"(127mm) N/A | |
| Inner Core Diameter (ID) | see roll specifications below | |
| Stock Thickness** | .0010" (10 mil) | N/A |
| Distance from edge of media to edge of label | Printer driver assumes 2 mm gap. However, this is adjustable via the left margin offset. | |
* The Reflective/Black Mark should be opaque to infrared light. The mark should be between the labels. The end of the mark should correspond with the beginning of the next label.
**This is the recommended maximum. There are two factors that determine whether the printer will accept any particular stock thickness.
- The ability for the printer to pull the paper through the print area.
- The ability for the sensor to read through the backing if the sensor is set to die-cut.
If you are printing in continuous or reflective label sensing mode number 2 does not apply. The fact that the printer must read through the backing in die-cut mode will limit the thickness much more than the printer's ability to pull the paper through the print area. However, if you adjust opacity level of the liner enough to allow the label to be seen by the stock sensor, the thickness will only be limited by the printer's ability to pull it through the printer area. For these reasons the weight or thickness of the liner is a variable that can not easily be defined. Primera recommends and uses 40# liner with all label stock.
Roll Specifications

Notes:
-
Label height ≤1.5" requires a 2.00" I.D. x 3.00" O.D. core. Label height >1.5" requires a 2.00" I.D. x 2.25" O.D. core.
-
Turret glue or 1/2"-wide 3M 928 double-sided removable tape must be used to attach stock to core. Removable tape must be positioned across full width of core. Other types of tape are not allowed.
-
End face of liner must align with end of core on both sides within 0.030". (Core width should be the same as liner width.)
-
Masking tape or equivalent may be used to secure label stock to outside of roll.
Section 9: Technical Specifications
Print Method: Inkjet
Print Resolutions: 4800 x 1200 dpi, 1200 x 1200 dpi, 600 x 600 dpi
Ink Cartridge: #53374 Color (CMY)
Colors: 16.7 million
Media Types: Roll-fed pressure-sensitive labels, roll-fed tags
Media Sensing: Moveable see-through sensor for die-cut labels and reflective for tags with black stripe sensing
Ink Level Warning: Calculates actual number of prints remaining based upon ink usage of graphics being printed (patent-pending)
Indicator Lights: Power, Ink
Controls: Ink, Load/Feed, Unload
Operating Systems: Windows 7/8/10, Macintosh OS X
Data Interface: USB 1.1
Minimum System: Pentium® IV computer or better, 512MB RAM, 5GB free hard drive space, USB 1.1/2.0 port
Label Design BarTender Ultralite Edition.
Software: Can also be used with most other popular Windows and Macintosh label design software programs
RFID Module: Compliant with EPC Global Class 1 Gen 2 and ISO 18000 -6B and -6C
Electrical Rating: 12VDC, 5.0A
Power Requirements: 100-240VAC, 50/60 Hz, 60 watts
Certifications: UL, UL-C, CE, FCC Class B
Weight: 7 lbs.
Dimensions: 10.4" wide X 15.3" deep X 7.1" high (closed) 17.4" high (open)
Warranty: One year, parts and labor
Index
Automatic Update 23
Calibrate....13, 25
Cartridge Alignment....13
Cleaning Ink Cartridge 65
Cost Estimator....16
Cut Mode....18
High Gloss Label Stock....2
Ink Low LED....3
Installing the Ink Cartridge....10
Installing Label Stock....5
Label Size 28,62
Label Tear Bar....3
Left Margin Offset 22, 61, 62
Load/Feed Button 3
Multiple Printers....25
Offsets....43, 44
Orientation....37
Power LED....3
Print Counter....39
PrintHub 14
Print Quality....13, 24, 65
Printer Driver Settings....61
Printing....27
Sensor Type....18, 60
RFID....26
Roll Specifications....71
Tag Specifications....28
TOF Offset 60
Troubleshooting....60
Unload Button....3
Using BarTender 28,62
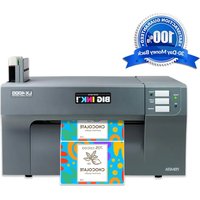
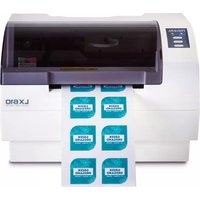
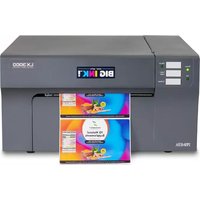
- LX500
- LX500c
- RX500
- Printing History
- CAUTION!
- Interactive Feature in this PDF Document
- Table of Contents
- Section 1: Getting Started....1
- Section 2: Hardware and Software Setup ....5
- Section 3: Primera PrintHub....14
- Section 4: Using RFID (PC Only) ......26
- Section 5: Printing Using a PC....30
- Section 6: Printing from a Mac....41
- Section 7: Troubleshooting....60
- Section 8: Label and Roll Specifications ....69
- Section 9: Technical Specifications....72
- Index 73
- Section 1: Getting Started
- THANK YOU...
- CHOOSING A GOOD LOCATION
- UNPACKING AND INSPECTION
- IDENTIFYING THE PARTS
- Section 2: Hardware and Software Setup
- INSTALLING LABEL STOCK
- ADJUSTING THE LABEL STOCK GAP SENSOR POSITION
- Circular Labels
- Through Hole Labels
- USING FAN-FOLD LABEL STOCK
- INSTALLING THE INK CARTRIDGE
- ALIGNING THE INK CARTRIDGE
- Section 3: Primera PrintHub
- A: MONITORING INK LEVELS
- USING THE COST ESTIMATOR
- SET THE STOCK SENSOR MODE
- SET THE PRESENT OR CUT MODE (CUTTER MODELS ONLY)
- Cutter Options
- Present Options
- ADJUSTING PRINT ALIGNMENT
- Tear off/Cut
- SETTINGS
- General Settings
- Printer Settings
- Section 4: Using RFID (PC Only)
- SETUP RFID
- PRINTING AND ENCODING
- TAG SPECIFICATIONS
- Reserved Memory:
- TID Memory:
- User Memory:
- Section 5: Printing Using a PC
- USING BARTENDER®
- ADD TEXT, BARCODES AND GRAPHICS TO A BARTENDER LABEL
- PRINTING FROM BARTENDER
- PRINTER DRIVER SETTINGS (PC)
- To find Driver Settings:
- NOTE on PC Settings:
- Paper Size
- Orientation
- Print Quality
- Color Matching
- Ink Saturation
- Enable Bidi (Bidirectional) Printing
- Launch Status Monitor
- Details/Print Counter
- PRINTING FROM OTHER PROGRAMS
- Section 6: Printing from a Mac
- PRINTER UTILITY SETTINGS (COLOR LABEL 500 UTILITY)
- To Find Color Label 500 Utility:
- ADJUSTING PRINT ALIGNMENT/LABEL OFFSETS
- SET THE OUTPUT MODE
- Cut Options (Check Cutter Enabled):
- Present Options (Uncheck Cutter Enabled)
- PRINTING FROM BELIGHT LABELS AND ADDRESSES
- CREATE A CUSTOM LABEL SIZE /PRINTING FROM OTHER PROGRAMS
- CREATING A FULL BLEED PRINT
- PRINTER DRIVER SETTINGS
- Printing from Preview:
- Printing from Adobe Reader:
- Section 7: Troubleshooting
- SOLVING OFFSET/ALIGNMENT PROBLEMS
- Image is Vertically Offset
- The image is printing horizontally offset
- CREATING A FULL BLEED PRINT
- Troubleshooting
- CLEARING A LABEL JAM
- MAINTENANCE
- Cleaning the Printer
- Maintenance Station Cleaning/Wiper Replacement
- Wiper Replacement.
- How will I know a wiper is worn?
- POOR PRINT QUALITY - CLEANING THE CARTRIDGE
- TECHNICAL SUPPORT
- Section 8: Label and Roll Specifications
- Roll Specifications
- Notes:
- Section 9: Technical Specifications
- Index
Brand : PRIMERA
Model : LX500c
Category : Label printer