GP800 - Water pump Cotech - Free user manual and instructions
Find the device manual for free GP800 Cotech in PDF.


| Product Type | Water Pump |
| Brand | Cotech |
| Model | GP800 / GP800-UK |
| Rated Power | 800 W |
| Rated Voltage | 230 V AC, 50 Hz |
| Pump Capacity | 3180 l/h |
| Maximum Pressure | 4 bars |
| Maximum Pressure Head | 40 m |
| Maximum Suction Head | 8 m |
| Hose Connections | R25 (25 mm) for suction; 19 mm (3/4") recommended for pressure |
| Dimensions (W x H) | 36 x 26.5 cm |
| Weight | 6.6 kg |
| Max Liquid Temperature | 35 °C |
| Motor Protection | Built-in thermal overload protection (auto reset) |
| Safety Requirement | Must be used with an RCD (tripping current <30 mA) |
| Intended Use | Domestic: watering gardens, pumping clean water from wells/containers |
| Not for | Corrosive, flammable, or explosive liquids; grease, oil, saltwater, sewage |
| Minimum Suction Head | 0 m (but avoid dry running) |
| Dry Running | Prohibited – increases wear and voids warranty |
Frequently Asked Questions - GP800 Cotech
User questions about GP800 Cotech
0 question about this device. Answer the ones you know or ask your own.
Ask a new question about this device
Download the instructions for your Water pump in PDF format for free! Find your manual GP800 - Cotech and take your electronic device back in hand. On this page are published all the documents necessary for the use of your device. GP800 by Cotech.
USER MANUAL GP800 Cotech
Read the entire instruction manual carefully and make sure that you fully understand it before you use the equipment. Keep the manual for future reference.
Viktig information:
natural_image
Black industrial pump with visible branding and control panel (no text or symbols on the pump body)ART.NO MODEL
18-3065 GP800-UK
30-9764 GP800
Ver. 200809
Garden Pump 800 W
ART.NO: 18-3065 MODEL: GP800-UK
30-9764 GP800
Please read the entire instruction manual before using the product and save it for future reference. We apologise for any text or photographic errors and any changes in technical data. If you have any questions concerning technical problems please contact our Customer Service Department (see address on reverse).
Safety
- Only use the pump as described in this instruction manual.
- Always use a residual current device (RCD or RCCB) which trips at < 30 mA between the pump and the power supply.
- Always inspect the pump before using it, especially the power lead and plug. Never use the pump if any of the parts is damaged.
- Make sure that the pump and all electrical connections (extension lead, RCD, etc) are placed in a dry place and protected from rain, moisture and overflows. The temperature should not exceed 35 °C.
- Do not expose the mains lead to extreme heat, oil or sharp edges.
- Keep children and animals away from the pump when it is running.
- The pump must not be used in corrosive, flammable or explosive liquids such as petrol, kerosene or thinners. Neither must the pump be used for grease, oil, saltwater, urine or toilet sewage water.
- The temperature of the pumped liquid must not be greater than 35^ .
- Keep everyone out of the water (pool, etc.) which is being pumped.
- The operator of the pump is responsible for the safety of the pump and all applications.
• Always unplug the pump before adjusting or repairing it. - Do not expose the pump to jets of water.
- The pump should only be repaired by a qualified electrician using original parts.
- The pump must not be run dry, as it will wear out the pump. Turn the pump off as soon as water has stopped coming out of the hose. The guarantee will be void if the pump is damaged due to dry running.
- The pump must only be used by those who have read the instruction manual. Keep children and animals away from the pump, especially if it is under pressure.
Product Description
Operating Range
The pump is intended for domestic use; in the home and garden. Suitable uses:
• Watering gardens, crops, lawns, etc.
- Pumping water from springs, wells, water containers, etc.
Note: The pump is only designed for pumping clean water, but not drinking water.
Parts
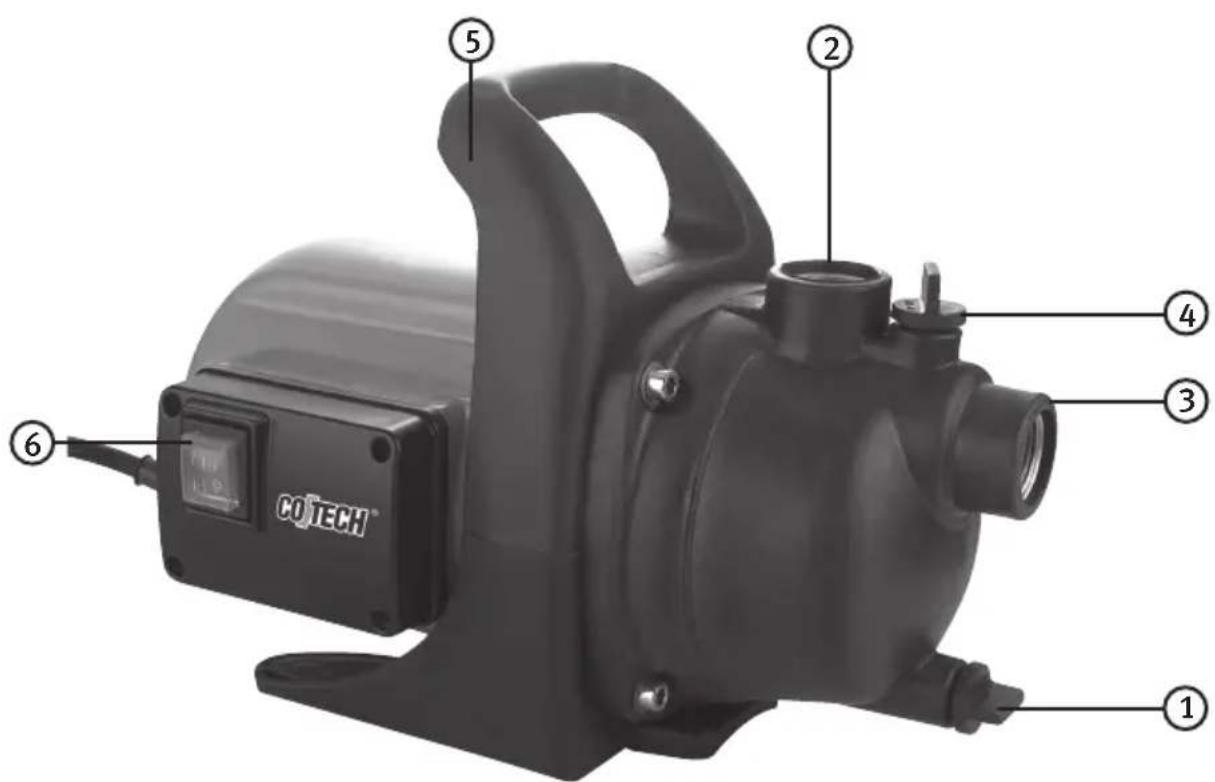
- Drain Plug
- Pressure Hose Connection (R25)
- Suction Hose Connection (R25)
- Filler Plug
- Handle
- Power Switch
Before Use
Location
Prevent water damage, think before it happens!
Leaking in pump and pipes may occur through frost damage, incorrect installation, pressure surges, etc. The pump should therefore be placed in a waterproof environment that your insurance company has approved in the insurance policy. Contact your insurance company if you are unsure.
- Place the pump on a firm, hard surface, well protected from water spray.
Suction Hose Connection
- Connect a 25 mm (1") diameter hose to the suction hose connection (R25) on the pump.
- The suction hose should be fitted with a foot valve or non-return valve.
- Place the suction hose so that it slopes upwards from the water to the pump inlet connection.
- The suction hose must always be on a lower level than the inlet to the pump. Air-pockets in the hose could disrupt the operation of the pump.
- Hoses or pipes must not be connected in such a way as to exert any pulling strain or tensile stress on the pump unit.
- Fit the foot valve at the end of the suction hose (pipe).
- The foot valve should be anchored to the bottom so that the pump does not run dry if the water level drops.
- The suction hose assembly must be air-tight to prevent air from being sucked into the pump.
- A filter should be fitted to suction hose to prevent sand, mud, etc from being sucked into the pump.
Pressure Hose Connection (Outlet)
- Connect a 19 mm (3/4") spiral-reinforced high-pressure hose to the outlet hose connection. Smaller hoses can reduce the suction power.
Connecting to the Power Supply
- Connect the mains lead to an earthed socket which is protected by an RCD.
- The pump has a built-in thermal motor protection and automatically shuts off when it overheats (the motor starts again when it has cooled).
Starting the Pump
- Place the pump on a firm, hard surface, well protected from water spray.
- Connect the suction hose to the connection (3).
- Connect the mains lead to an earthed socket which is protected by an RCD.
- Fill the pump with water via the filler hole (4).
- Connect the pressure hose to the connection (2).
- Turn the pump on using the on/off switch (6) It can take from four to six minutes for the pump to reach maximum effectiveness, depending on the pressure head, and amount of air on the suction side. Fill the pump with water via the filler hole (4) once more if the pump does not work satisfactorily after six minutes.
- If the pump is detached and reattached the pump unit should be filled with water via the filler hole (4).
Maintenance
• Always unplug the pump before carrying out any kind of maintenance.
- Use a soft lightly moistened cloth to clean the plastic parts of the pump. Never use solvents or strong detergents.
- If there is a risk of frost or if the pump is not to be used during winter it should be emptied of water. Store the pump in a dry place.
- If the pump has not been run for a while it is a good idea to check that the rotor moves freely by quickly switching the pump on and off.
- The pump should be regularly checked. Check the operation and inspect it for any damage.
Useful Advice
- Dry running of the pump should be avoided because it increases wear.
- Pull the plug not the lead when unplugging the pump from the power supply.
- Never lift or carry the pump by its power lead.
- Sand and other abrasive substances in the liquid that is pumped will increase the wear and tear and reduce the capacity of the pump.
- Make sure that the recommended suction head (8 m) is not exceeded.
- Protect the pump from frost.
- The pump is designed for intermittent use, not continual operation such as for a fountain.
Troubleshooting
| Problem Possible Cause Remedy | ||
| The pump does not start. | Inlet water pressure is greater than the starting pressure of the pump. | Check. |
| No power supply, the overload protection has tripped. | Check fuses and RCD. | |
| Dirt in the pump. Remove any dirt or deposits. | ||
| The thermal protection decive has tripped. | Unplug and clean the pump.Remember that the max liquid temperature is 35 °C. | |
| The pump runs but doesn't pump | Pump is drawing air. Open all nozzles and valves to let the air escape. | |
| The suction hose is above the water level. | Move it so that it is below the water level. | |
| Leaking hose. Tighten, or seal the leak. | ||
| Max. suction head exceeded. | Check suction head (max. 8 m). | |
| Max. pressure head exceeded. | Check pressure head (max. 40 m). | |
| Low capacity, low pressure. | Max. suction head exceeded. | Check suction head (max. 8 m). |
| Max. pressure head exceeded. | Check pressure head (max. 40 m). | |
| The suction hose is above the water level. | Move it so that it is below the water level. | |
| Dirt in the pump. Remove any dirt or deposits. | ||
| Pump stops suddenly. | The thermal protection device has tripped. | Pull out the plug, clean the pump unit, wait for the pump to cool down. Max water temp. 35°C. |
Disposal
Follow local ordinances when disposing of this product. If you are unsure about how to dispose of this product contact your municipality.
Specifications
Type GP800-UK/GP800
Rated Power 800 W
Rated Voltage 230 V AC, 50 Hz
Pump Capacity 3,180 l/h
Maximum Pressure 4 bars
Pressure Head 40 metres
Max. Suction Head 8 metres
Hose Connections R25 (25 mm)
Size 36 x 26.5 cm
Weight 6.6 kg
Trädgårdspump 800 W
ART.NO: 18-3065 MODEL: GP800-UK
30-9764 GP800
- Plugg for tapping
- Tilkobling for trykkslange (R25)
- Tilkobling for sugeslange (R25)
- Plugg for påfylling
- Håndtak
- Strømbryter
Før bruk
Plassering
For consumer contact, please visit www.clasohlson.co.uk and click on customer service.
INTERNET www.clasohlson.co.uk


- Viktig information:
- Garden Pump 800 W
- Safety
- Product Description
- Operating Range
- Parts
- Before Use
- Location
- Prevent water damage, think before it happens!
- Suction Hose Connection
- Pressure Hose Connection (Outlet)
- Connecting to the Power Supply
- Starting the Pump
- Maintenance
- Useful Advice
- Disposal
- Specifications
- Trädgårdspump 800 W
- Før bruk
- Plassering
Brand : Cotech
Model : GP800
Category : Water pump