
MOE-LR02-120 - Hedge Trimmer Cotech - Free user manual and instructions
Find the device manual for free MOE-LR02-120 Cotech in PDF.


| Product Type | Hedge Trimmer |
| Brand | Cotech |
| Model | MOE-LR02-120 |
| Power Source | Corded Electric |
| Power Rating | 600 W |
| Blade Length | 60 cm (24") |
| Cutting Diameter | 20 mm |
| Weight | 4.5 kg |
| Blade Type | Double Action, Laser Cut |
| Safety Features | Two-Hand Start, Blade Guard, Safety Switch |
| Ergonomics | Soft Grip Handle, 360° Rotating Rear Handle |
| Warranty | 2 Years |
| Included Accessories | Blade Cover, User Manual |
| Noise Level (LWA) | 96 dB(A) |
| Vibration Level (ah) | 8 m/s² |
| Dimensions (L x W x H) | 100 x 30 x 25 cm |
| Maintenance | Regular blade cleaning and lubrication |
| Ease of Repair | Replaceable blades; spare parts available |
Frequently Asked Questions - MOE-LR02-120 Cotech
User questions about MOE-LR02-120 Cotech
0 question about this device. Answer the ones you know or ask your own.
Ask a new question about this device
Download the instructions for your Hedge Trimmer in PDF format for free! Find your manual MOE-LR02-120 - Cotech and take your electronic device back in hand. On this page are published all the documents necessary for the use of your device. MOE-LR02-120 by Cotech.
USER MANUAL MOE-LR02-120 Cotech
Read the entire instruction manual carefully and make sure that you fully understand it before you use the equipment. Keep the manual for future reference.
Viktig information:
natural_image
3D rendered illustration of a mechanical device with gear-like blades and a handle (no text or symbols)ART.NO
18-3126
40-6001
MODEL
MOE-LR02-120-UK
MOE-LR02-120
Ver. 20131003
Original instructions
Bruksanvisning i original
MODEL MOE-LR02-120-UK
MOE-LR02-120
Please read the entire instruction manual before using the product and save it for future reference. We reserve the right for any errors in text or images and any necessary changes made to technical data. If you have any questions regarding technical problems please contact our Customer Services (see address on reverse).
Table of Contents
| Safety | 3 |
| Product Description 7 | |
| Operation | 7 |
| Care and maintenance 10 | |
| Disposal | 10 |
| Specifications | 10 |
Safety
General safety instructions for rechargeable hand tools
Caution: Read all instructions. Failing to adhere to the following instructions may lead to electric shock, fire and/or serious injury. The term “electrical hand tools” in the warning text below refers to your mains operated or battery operated hand tool.
SAVE THESE INSTRUCTIONS.
1) The Work Area
a) Keep the work space clean and well illuminated. Cluttered and poorly lit areas invite accidents.
b) Do not use electrical hand tools in explosive environments, i.e. nearby flammable liquids, gases or dust. Electrical hand tools generate sparks that could easily ignite dust or fumes.
c) Keep away from children and other bystanders while using the electrical hand tool. Disturbances can cause you to lose your concentration and control.
2) Electrical Safety
a) The electrical hand tool's plug must fit correctly into the wall socket. Never modify the plug in any way. Never use an adaptor together with earthed electrical hand tools. Unmodified plugs and suitable wall sockets decrease the risk of electric shock.
b) Avoid physical contact with earthed objects, such as pipes, radiators, ovens or refrigerators. There is an increased risk of electrical shock if your body is earthed.
c) Do not expose the electrical hand tool to rain or other wet conditions. If water gets inside an electrical hand tool it increases the risk of electrical shock.
d) Do not abuse the lead. Never use the lead to carry the tool, drag or pull the plug out of the wall socket. Keep the lead away from heat, oil, sharp edges and movable parts. Damaged or tangled leads increase the risk of electrical shock.
e) When using an electrical hand tool outdoors use an extension lead that is suitable for this purpose. Use of an extension lead for outdoor use decreases the risk of electrical shock.
3) Personal safety
a) Pay attention to your actions and use common sense when using electrical hand tools. Never use an electrical hand tool if you are tired or under the influence of drugs, alcohol or medication. One moment of inattention while using an electrical hand tool may result in serious injury.
b) Use protective equipment. Always wear safety glasses. Using protective clothing such as a face mask, non-slip safety shoes, a helmet and ear defenders when needed decreases the risk of injury.
c) Avoid accidental starts. Make sure that the power switch is set to OFF before you connect the device to the wall socket. Never carry an electrical hand tool with one finger on the trigger or never connect the hand tool to a wall socket when the switch is set to ON, since it may result in injury.
d) Remove all tools/keys before switching on the hand tool. A forgotten tool left on moving parts of the electrical hand tool may result in injury.
e) Do not overreach. Make sure you stand steady and have good balance at all times. This will allow you to have more control in unexpected situations.
f) Wear suitable clothing. Do not wear loose fitting clothing or jewellery. Keep hair, clothes and gloves away from moving parts. Loose fitting clothes, jewellery or long hair could get caught in moving parts.
g) If the equipment for dust extraction or collection is available make sure that it is connected and used properly. Using technical aids may decrease dust related hazards.
4) Use and maintenance of the electrical hand tool
a) Do not force the hand tool. Use a hand tool suitable for the work you are about to perform. The correct electrical hand tool will perform the task better and safer if used at the correct feed rate.
b) Never use the electrical hand tool if the power switch does not switch the tool on and off properly. All electrical hand tools that can not be controlled by the power switch are dangerous and must be repaired.
c) Unplug the lead from the wall socket before making any adjustments, changing accessories or storing the electrical hand tool. These precautions reduce the risk of the electrical hand tool starting unexpectedly.
d) Store electrical hand tools that are not being used out of children's reach. Do not allow people who are unfamiliar with the tool or its functions to operate the tool. Electrical hand tools can be dangerous if they get into the hands of inexperienced users.
e) Maintaining electrical hand tools. Check for any incorrect settings, catching moving parts, broken parts anything else which may cause the electrical hand tool to malfunction. If something is damaged it must be repaired before use. Many accidents are caused by poorly maintained electrical hand tools.
f) Keep the tools sharp and clean. Properly maintained cutting tools with sharp blades are less likely to jam and are easier to control.
g) Use the electrical hand tool, accessories and such according to the instructions and in a way suitable for the type of electrical hand tool used. Also take into consideration your work environment and the type of work to be done. Using the electrical hand tool for purposes other than what it is suited for could result in a dangerous situation.
5) Use and service of the rechargeable electrical hand tool
a) Make sure that the power switch is set to OFF before mounting the battery. Mounting a battery onto an electrical hand tool when the power switch set to ON is an open invitation to an an accident.
b) Only charge the battery using a charger approved by the manufacturer. A charger suitable for one type of battery can constitute a fire hazard if used for another type of battery.
c) Only use the rechargeable electric hand tool with the correct batteries. The use of another type of battery can create the risk for damage or fire.
d) When not in use, the battery should be stored away from other metal objects such as paper clips, coins, keys, nails, screws or any small objects that could bridge the gap between the battery terminals. A short circuit of the battery terminals can cause burns or fires.
e) If the battery is abused it can leak acid; avoid contact with the acid. If you accidentally come into contact with the acid, rinse with water. If the acid comes into contact with your eyes, consult a doctor. Battery acid can cause irritation and burns.
6) Service
a) Repairs and service should only be performed by qualified persons, and only with original spare parts. This guarantees that the safety of the electrical hand tool is maintained.
Safety instructions specific to hedge trimmers
- Make sure that there are no foreign objects like fencing, etc. in the hedge/bush that you wish to trim.
- Always hold the hedge trimmer firmly. If the trimmer is equipped with two handles, they should both be used.
- Do not expose the tool to rain.
- Always keep all bodily parts at a safe distance from the blades. Never clean the blades while they are in motion. Never hold onto the branches and twigs that you are cutting. Make sure that the power button is in the OFF position before cleaning the blades of debris. One moment of inattention during use can result in serious personal injury.
- Carry the hedge trimmer by the handle. The blades must not be in motion when the trimmer is being carried. The blade guard must always be used for transport or storage. Correct use of the hedge trimmer minimises the risk of personal injury caused by the blades.
- Keep the blades away from the power lead. During use the power lead and can easily become hidden in the bushes/hedges and be unintentionally cut.
Product Description

Operation
Charging
Note:
• Never use the charger if the lead is damaged.
• Never use the charger in rain or a damp environment.
- First connect the charger to the trimmer and then connect the plug to a wall socket. A red LED will light indicating charging.
- After about 5 hrs. of charging the charger will shut off automatically to prevent overcharging. Three green LEDs light when charging is complete.
- Always disconnect the charger from wall socket when it is not in use.
- Never open or modify the battery.
Changing the blades
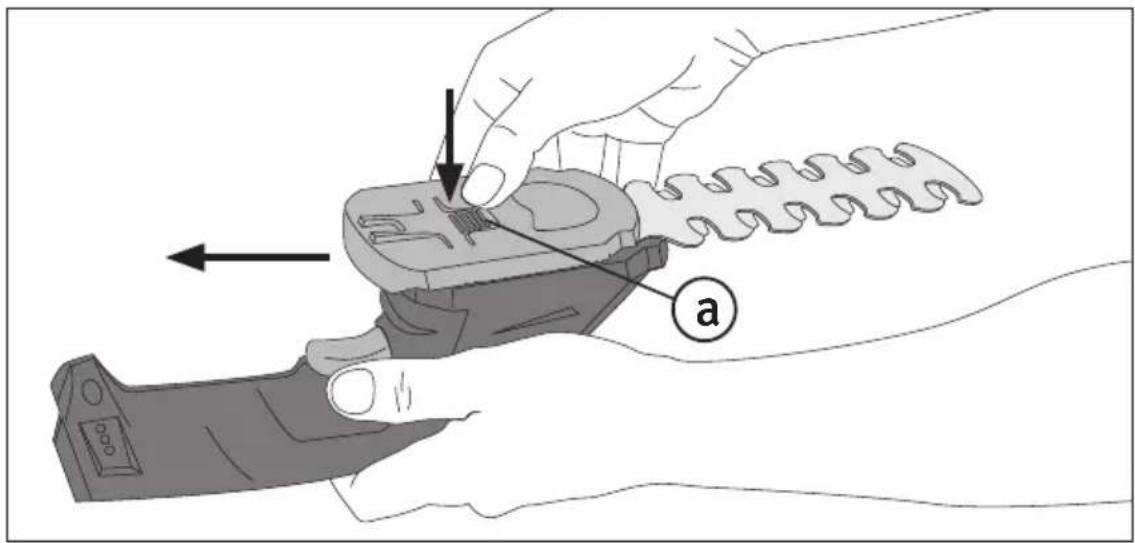
- Remove the shoe by pressing in the grooved locking tab (a) and sliding the shoe in the direction of the arrow as shown in the picture. The blade can now be removed.
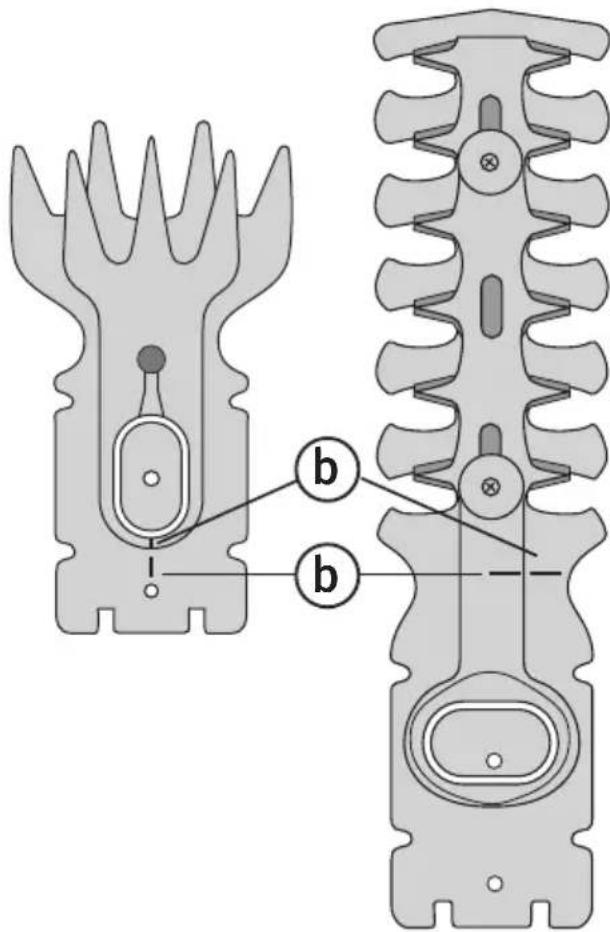
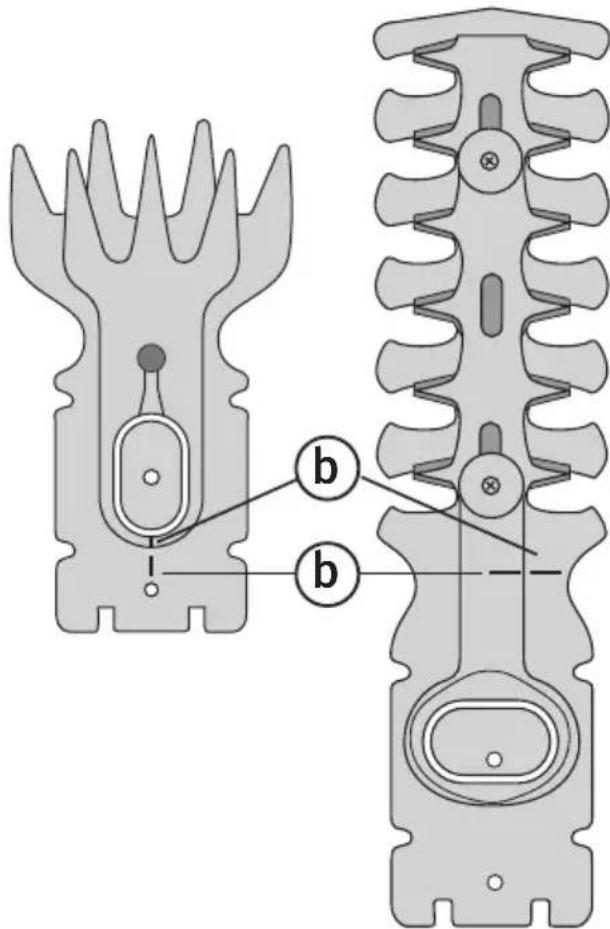
- Line up the markings (b) on the blade.
- Turn the cog until the red arrow (c) points to the red marking (d) on the right.


- Fitting the new blade: First slide the blade under the tabs at the back of the trimmer (e) and then lower the blade so that the holes fits over the plugs (f) and it lies flush against the trimmer.


- Then fit the shoe back onto the trimmer by sliding it in the direction of the arrow as shown in the picture.

natural_image
Illustration of a hand using a power tool to adjust or install a device, showing mechanical components and motion arrows (no text or symbols)Care and maintenance
• Before each use make sure that the blades are correctly mounted.
• Regularly check that all screws and nuts are securely tightened.
- For a longer operating life make sure the blades are lubricated when necessary.
• Use the blade guard when transporting and storing.
- Store the trimmer out of children’s reach when not in use.

Disposal
Follow local ordinances when disposing of this product. If you are unsure of how to dispose of this product, please contact your municipality.
Specifications
Weight 0.6 kg
Rechargeable Li-Ion battery Rated Voltage 7.2 V DC
Capacity 1.5 Ah
Operating time approx. 40 min.
AC/DC adaptor In 240 V AC, 50 Hz
Out 7.2 V DC
Hedge trimmer blades Length 120 mm
Capacity (twig thickness) Max. 8 mm
Grass edging blades Cutting width 80 mm
Noise level (LpA) 62.6 dB(A) K: 3 dB
(LwA) 82.6 dB(A) K: 3 dB
Vibration ah 1.346 m/s² K: 1.5 m/s²
Multitrimmer
ART.NR. 18-3126
40-6001
MODELL MOE-LR02-120-UK
MOE-LR02-120
natural_image
Illustration of a hand holding a handheld device with arrows indicating motion or force (no text or symbols)ART.NR. 18-3126 MODELL MOE-LR02-120-UK 40-6001 MOE-LR02-120
- Plasser knivenes markeringer (b) mot hverandre.
- Drei tannhjulet slik at den røde pilen (c) peker mot den røde markeringen (d) på den høyre siden.

natural_image
Illustration of a hand holding a handheld device with arrows indicating motion or force direction (no text or symbols)TUOTENRO. 18-3126 MALLI MOE-LR02-120-UK
40-6001
MOE-LR02-120

natural_image
Illustration of a hand using a handheld device to adjust a tool, showing motion arrows (no text or symbols)Huolto ja ylläpito
ART.NR. 18-3126 MODELL MOE-LR02-120-UK
40-6001
MOE-LR02-120

natural_image
Illustration of hands using a handheld tool to adjust or install a mechanical component, with arrows indicating motion (no text or symbols present)Pflege und Wartung
Declaration of Conformity
Cordless Hedge Trimmer
Cotech 18-3126 / 40-6001 MoE-LR02-120-UK / MoE-LR02-120
Machinery directive 2006/42/EC
EN 60745-1:2006 EN 60745-2-15:2006
EMC directive 2004/108/EC
EN 55014-1:2006 EN 55014-2/A1:2001 EN 61000-6-3:2007

Klas Balkow President
Insjön, Sweden, 2012-12-11
SVERIGE
KUNDTJÄNST Tel: 0247/4 45 00
Fax: 0247/4 45 09
E-post: kundservice@clasohlson.se
INTERNET www.clasohlson.se
BREV Clas Ohlson AB, 793 85 INSJÖN
NORGE
KUNDESENTER Tlf.: 23 21 40 00
Faks: 23 21 40 80
E-post: kundesenter@clasohlson.no
INTERNETT www.clasohlson.no
POST Clas Ohlson AS, Postboks 485 Sentrum, 0105 OSLO
SUOMI
ASIAKASPALVELU Puh.: 020 111 2222
POSTAL 10 – 13 Market Place
Kingston Upon Thames
Surrey
KT1 1JZ
DEUTSCHLAND

- Viktig information:
- Table of Contents
- Safety
- General safety instructions for rechargeable hand tools
- 1) The Work Area
- 2) Electrical Safety
- 3) Personal safety
- 4) Use and maintenance of the electrical hand tool
- 5) Use and service of the rechargeable electrical hand tool
- 6) Service
- Safety instructions specific to hedge trimmers
- Product Description
- Operation
- Charging
- Note:
- Changing the blades
- Care and maintenance
- Disposal
- Specifications
- Multitrimmer
- Huolto ja ylläpito
- Pflege und Wartung
- Declaration of Conformity
- Cordless Hedge Trimmer
- SVERIGE
- NORGE
- SUOMI
- DEUTSCHLAND
Brand : Cotech
Model : MOE-LR02-120
Category : Hedge Trimmer