
HC-JOY-G3 - Regulator HuddleCamHD - Free user manual and instructions
Find the device manual for free HC-JOY-G3 HuddleCamHD in PDF.


| Product Type | PTZ Camera Controller |
| Model | HC-JOY-G3 |
| Brand | HuddleCamHD |
| Dimensions (Approx.) | 7.9 x 5.9 x 2.4 in (200 x 150 x 60 mm) |
| Weight | 1.1 lb (500 g) |
| Power Supply | 12V DC, 1A (via included adapter) |
| Connectivity | RS-232, RS-422/485, USB |
| Control Interface | 3-axis joystick, pan/tilt/zoom |
| Preset Positions | Up to 255 presets |
| Protocol Support | VISCA, Pelco-D, Pelco-P |
| Display | Backlit LCD for camera address and settings |
| Buttons | Numeric keypad, function keys for preset, focus, iris |
| Compatible Cameras | HuddleCamHD and other PTZ cameras with VISCA/Pelco |
| Cleaning Instructions | Wipe with a soft, dry cloth. Do not use liquids. |
| Safety Notes | Use only supplied power adapter; avoid moisture. |
| Spare Parts Availability | Contact HuddleCamHD support for replacement cables or adapters. |
| Repairability | No user-serviceable parts. Refer to authorized service. |
| Operating Temperature | 32°F to 104°F (0°C to 40°C) |
| Warranty | 1 year limited warranty |
Frequently Asked Questions - HC-JOY-G3 HuddleCamHD
User questions about HC-JOY-G3 HuddleCamHD
0 question about this device. Answer the ones you know or ask your own.
Ask a new question about this device
Download the instructions for your Regulator in PDF format for free! Find your manual HC-JOY-G3 - HuddleCamHD and take your electronic device back in hand. On this page are published all the documents necessary for the use of your device. HC-JOY-G3 by HuddleCamHD.
USER MANUAL HC-JOY-G3 HuddleCamHD
HuddleCamHD Serial Joystick Controller
Model Number: HC-JOY-G3
Joystick Keyboard Installation & Operation Manual

natural_image
Blue HuddleCamHD digital camera control panel with rotary knob and keyboard (no readable text or symbols beyond branding)Easy pan, tilt & zoom controls for any RS-232, RS485, RS422 VISCA, Pelco-P or Pelco-D protocol camera!
Controls pan & tilt with variable speed.
Uses 3-Dimensional joystick with "twist" control for variable zoom.
Key Product Features
- All Metal housing.
• VISCA, PELCO-D and PELCO-P protocol support.
• Large LCD Menu display.
• Key-press "BEEP" confirmation (optional - set on or off). - Pan, tilt, zoom, iris and focus control.
- Variable speed control of pan, tilt, zoom, focus, and presets.
• Auto/Manual Focus and Iris. - Cameras #1-6 'Quick Key' Select buttons.
• Quick preset set & call (1 - 9) - Preset Save, Call and Clear.
• Real time display of the current status. - Short circuit and overcurrent protection.
• Automatic recovery program for the communication port(s).
• 2 Year Warranty
Key Technical Specifications
- Control Interfaces:
RS232 full-duplex, RS485 semi duplex, RS422 full-duplex.
• Variable Baud Rate 1200 to 19200 bps. - Maximum communication distance: RS485: 3,937ft [1200m] using 24 gauge twisted pair cabling
- Can control a maximum 255 cameras via Pelco-D/P.
- Voltage: 12VDC.
• Power Consumption: 6W Max. - Display: LCD.
- Working Temperature: 14^ F 122^ F [-10^ +50^ C] .
- Working Humidity: 10 \~ 90% (non-condensation).
• Weight 3.3 lbs. [1.5 kg] - Dimensions: 12.6"(W) x 7.1"(D) x 4.3"(H) [320mm x 181mm x 110mm].

HuddleCamHD
152 Robbins Rd, Downingtown, PA, 19335, USA - HuddleCamHD.com | 1 800 - 486-5276
In the Box
- Keyboard with three-axis control joystick.
- 5p screw terminal plug (RS422/RS485).
• 12VDC Power Supply. - RS232 Cable.
- This Manual.
Installation
- Power Supply Interface (5.5mm x 12mm center pin JEITA style jack): 12VDC / 2000mA power supply.
- RS485/422 interface (5p screw terminal):
1:485+/422TxA, 2:485-/422TxB, 3:422RxA, 4:422RxB, 5:485/422Gnd.
• RS232 interface (DB9M port): 2:Rx, 3:Tx, 5:Gnd.
Hardware Features
• Keys: momentary push buttons (keys).
- Joystick: 3-axis joystick.
• Digital display: LCD display.
Control Mode
• VISCA, PELCO-P and PELCO-D protocol support.
• Control interfaces:
- 5p Screw Terminal (RS485/RS422).
○ DB9 (RS232).
• Baud rate: 1200, 2400, 4800, 9600, 19200.
• Parameters: 8 bits, 1 stop bit, No parity.

HuddleCamHD
152 Robbins Rd, Downingtown, PA, 19335, USA - HuddleCamHD.com | 1 800 - 486-5276
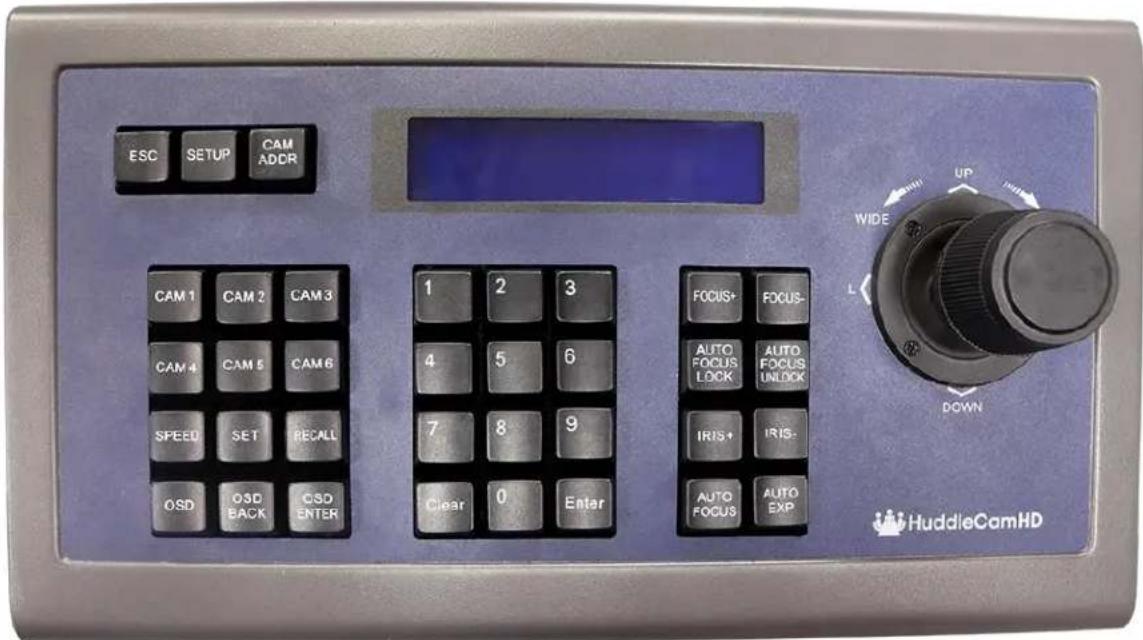
Keyboard/Joystick Operation
Basic Control
- Pan & Tilt Control
- Joystick movement provides variable speed pan and tilt of the camera head.
- Zoom Control
- Rotation of the joystick controls variable speed zoom of the lens.
- Clockwise rotation of the joystick = zoom in.
- Counter-clockwise rotation of the joystick = zoom out.
Manual Control Options
- Focus Control - (VISCA Only, Pelco-P &-D do not provide for "Man Foc")
○ Incremental Focus control can also be achieved using the following keys: “Focus+”, “Focus-” (“Man Foc” is auto enabled upon pressing Focus+ or Focus-).
○ Auto Focus can be enabled by pressing the “Auto Focus” key.

HuddleCamHD
152 Robbins Rd, Downingtown, PA, 19335, USA - HuddleCamHD.com | 1 800 - 486-5276
- Iris Control - (VISCA Only, Pelco-P &-D do not provide for "Man Exp")
○ Incremental Iris control can also be achieved using the following keys: “Iris+”, “Iris-” (manual exposure is auto enabled upon pressing Iris+ or Iris-).
Note: Some cameras do not have an “Iris” (or manual Iris) mode. For this reason, Manual Exposure is used. Therefore, for best results, use the camera’s IR remote to first select a desired shutter speed before using “Man Exp”, “Iris+” and “Iris-“
- Speed Control
- Speed control can be adjusted by pressing the "Speed" button.
- You can adjust the Pan (0 - 24), Tilt (0 - 20), Zoom (1 - 7), Focus (1 - 7), and Preset Speed (1 - 24).
Selecting a Camera
- Input Number Keys
- For entering numbers use the "0" through "9" keys.
- Press "Enter" key to complete commands.
- Press the “Clear” key to clear entries before confirming with “Enter” key.
- Set the Camera ID to be controlled by joystick
- Press “Cam Addr” key, desired “Number” key and then “Enter” key.
○ Alternatively, you can use the "Cam 1" through "Cam 6" quick-select buttons to quickly access cameras 1-6.
PTZ Presets
- Set a PTZ Preset
Use joystick and keyboard to set up the desired preset shot. Press the "Set" key, press a "Number" key and then the "Enter" key. To leave "Set" mode, press the "Esc" key.
○ Alternatively, you can press and hold numeric 1-9 keys for 3+ seconds for quick storing presets
- Call a PTZ Preset
o Press the "Call" key, press a "Number" key, then the "Enter" key.
○ Alternatively, you can quick press numeric keys 1-9 for quick calling presets

HuddleCamHD
152 Robbins Rd, Downingtown, PA, 19335, USA - HuddleCamHD.com | 1 800 - 486-5276
- You may leave the unit in "Call" mode and continue to enter sequential preset calls. To leave "Call" mode, press the "Esc" key.
- Clear a PTZ Preset
- Press “Esc” key to return to main menu. Press the “Clear” key, press a “Number” key and then the “Enter” key. To leave “Clear” mode, press the “Esc” key.
- Send camera to its "Home" PTZ Position
- Press the “Home” key. Note: When in Pelco-P or -D, this button will call preset 0, instead of Home. Pelco-P and -D do not provide for a “Home” position. You must first set preset 0 to use this feature with Pelco)
Notes on using presets with VISCA:
For your convenience, the HC-JOY-G3 uses the same preset numbers whether ‘set’, ‘called’ or ‘cleared’ via hand-held IR remote, VISCA, Pelco-P or Pelco-D. This is in contrast to Sony’s traditional offset of -1 between IR remote commands and VISCA commands. If you are used to Sony’s traditional method, you no longer need to make this adjustment.
Keyboard/Joystick Configuration - LCD Menu
- Go to Main Menu or Backup up one Menu Level
o Press "Esc" key to return to main menu. Note: Repeated presses may be required depending on how deep you are in a menu.
- Configure Keyboard/Joystick
- Press and Hold the "Setup" key for 3 seconds.
- Enter the password. "8888" is the default password.
- Press the "Enter" key.
- Keyboard Menu
○ "Set >>" Menu
○ Move joystick "left" and "right" to select between 1(CAM) or 2(SYS)
- Press "Enter" key to confirm the choice.
○ “SET >>CAM” : Menu
- Move Joystick "left" and "right" or simply type camera ID to select camera to configure.
- Press "Enter" key to confirm the choice.
- Move Joystick "up" and "down" to choose between setting either the control protocol or baud rate settings.

HuddleCamHD
152 Robbins Rd, Downingtown, PA, 19335, USA - HuddleCamHD.com | 1 800 - 486-5276
- Move Joystick “left” and “right” to select the desired control protocol or baud rate (to match that of camera).
- Repeat for all camera IDs required.
- Press “Esc” to return to previous menu level.
○ “SET >>SYS” : Menu
- Move Joystick "left" and "right" to select system parameter to configure.
-
Press “Enter” key to confirm the choice.
■ 1(EDIT PW) -
OLD PW: Using "Number" keys, enter the current password (default = "8888"). Press "Enter" key to confirm.
- NEW PW: Using "Number" keys, enter the desired password (4 numeric keys) Press "Enter" key to confirm.
- AGAIN PW: Using “Number” keys, re-enter the desired password (4 numeric keys) Press “Enter” key to confirm.
■ 2(FACTORY)
- Press "Enter" key to confirm.
- SURE?: Press "Enter" key to confirm.
■ 3(LOAD ISP)
- Press "Enter" key to confirm.
- SURE?: Press "Enter" key to confirm.
■ 4(SOUND)
- Move Joystick "left" and "right" to turn key beep ON or OFF.
- Press "Enter" key to confirm.
■ 5(KB ID)
- KB ID: Using "Number" keys, enter the desired ID. Press "Enter" key to confirm.
■ 6(LOCK SET)
- Move Joystick "left" and "right" to turn KB lock ON or OFF. Press "Enter" key to confirm.
- LOCK PW: Using "Number" keys, enter the desired password (4 numeric keys). Press "Enter" key to confirm.
- To unlock Keyboard/Joystick
- Press "Esc" key until LCD shows "LOCKED"

HuddleCamHD
152 Robbins Rd, Downingtown, PA, 19335, USA - HuddleCamHD.com | 1 800 - 486-5276
- LOCK PW: Using "Number" keys, enter the desired password (4 numeric keys). Press "Enter" key to confirm.
○ LCD screen will go Black. Press "Enter" key again. - OPEN LOCK: Using "Number" keys, enter the desired password (4 numeric keys). Press "Enter" key to confirm.

HuddleCamHD
152 Robbins Rd, Downingtown, PA, 19335, USA - HuddleCamHD.com | 1 800 - 486-5276
Keyboard/Joystick Connection Wiring and Indicators

Indicators:
- "PW" illuminates Red when unit is powered
- “TXD” flashes green when unit is transmitting commands
- “RXD” flashes green when unit is receiving responses
Power:
- Keyboard/Joystick requires external 12VDC. Use only the 12VDC power supply shipped with the unit.
The Keyboard/Joystick may be connected to cameras via RS232, RS485 or RS422.
- For RS232, connect the DB9 port of the KB to the miniDin8 (VISCA) port of the camera with pin-out as follows:
○ KB Tx - Pin 3---- Camera Rx - Pin 5
○ KB Rx - Pin 2---- Camera Tx - Pin 3
○ KB Gnd - Pin 5---- Camera Gnd - Pin 4

HuddleCamHD
152 Robbins Rd, Downingtown, PA, 19335, USA - HuddleCamHD.com | 1 800 - 486-5276
- For RS485, connect the 5p screw terminal port of the KB to the RS485 port of the camera with pin-out as follows:
○ KB Ta - Pin 1---- Camera (+)
○ KB Tb - Pin 2---- Camera (-)
○ KB Gnd - Pin 5---- Camera (G) (if present - some cameras will not require a G)
- For RS422, connect the 5p screw terminal port of the KB to the RS422 port of the camera with pin-out as follows:
○ KB Ta - Pin 1---- Camera (Rx-)
○ KB Tb - Pin 2---- Camera (Rx+)
○ KB Ra - Pin 3---- Camera (Tx-)
○ KB Rb - Pin 4---- Camera (Tx+)
○ KB Gnd - Pin 5---- Camera (G) (if present - some cameras will not require a G)
Troubleshooting
- Cannot Control Camera at all
- Check that LCD is in the Main Menu. Press “Esc” key to return to main menu, if needed. Note: Repeated presses may be required depending on how deep you are in a menu, e.g. this can often happen after setting presets and then attempting to Call presets without exiting the Set menu.
- Check that PW Indicator is solid Red. If not, check power supply connection to KB and AC Mains. If still unlit, power supply or the KB may be damaged.
- Check both KB settings and camera settings to ensure that the following ALL match:
■ Camera ID (e.g. 01, 02, etc...)
■ Camera Protocol (e.g. VISCA, PELCO-P, PELCO-D)
■ Baud Rate (e.g. 9600)
- Check all KB-camera connections and cabling per “Connection Wiring and Indicators” section above.
○ Check TXD Indicator for Green flickering when cam is moved using the joystick. If not flickering, KB or its joystick may be damaged.
- Controlling more than 1 camera at a time.
- Check all cameras to ensure that each has a unique ID.
- Check all camera settings in KB menu to make sure that the protocol setting for that camera ID matches that of the actual camera.
Note, you cannot typically mix VISCA, Pelco-P or Pelco-D cameras in the same daisy chain. - Check control wiring.
- For RS232, cabling must flow from KB into the VISCA-in port of the first camera and then from VISCA-out port of first camera to VISCA-in port of next camera, etc... With daisy chained RS232, no terminator is required on the last camera. A VISCA cross-over cable must be used for all camera to camera connections. These are available from HuddleCamHD in various lengths as well as from other sources.
- For RS485 and RS422, all connections are in parallel (e.g. all cams' 485+ are connected to KB's 485+ and all cams' 485- are connected to KB's 485-) and termination may be required depending upon overall cabling distances involved.

- HuddleCamHD Serial Joystick Controller
- Joystick Keyboard Installation & Operation Manual
- Key Product Features
- Key Technical Specifications
- HuddleCamHD
- In the Box
- Installation
- Hardware Features
- Control Mode
- Keyboard/Joystick Operation
- Basic Control
- - Pan & Tilt Control
- - Zoom Control
- Manual Control Options
- Selecting a Camera
- PTZ Presets
- - Clear a PTZ Preset
- - Send camera to its "Home" PTZ Position
- Notes on using presets with VISCA:
- Keyboard/Joystick Configuration - LCD Menu
- - Go to Main Menu or Backup up one Menu Level
- - Configure Keyboard/Joystick
- - Keyboard Menu
- Robbins Rd, Downingtown, PA, 19335, USA - HuddleCamHD.com | 1 800 - 486-5276
- Keyboard/Joystick Connection Wiring and Indicators
- Indicators:
- Power:
- Troubleshooting
Brand : HuddleCamHD
Model : HC-JOY-G3
Category : Regulator