
S90HD - Soundbar EDIFIER - Free user manual and instructions
Find the device manual for free S90HD EDIFIER in PDF.


| Product Type | Soundbar |
| Dimensions (Soundbar) | 1000 x 100 x 80 mm |
| Dimensions (Subwoofer) | 200 x 200 x 400 mm |
| Weight (Soundbar) | 2.5 kg |
| Weight (Subwoofer) | 4.2 kg |
| Power Output | 80 W RMS (Soundbar) + 60 W RMS (Subwoofer) |
| Frequency Response | 40 Hz - 20 kHz |
| Audio Formats | Dolby Atmos, Dolby Digital, DTS |
| Connectivity | HDMI ARC, Bluetooth 5.0, Optical, USB |
| Speaker Configuration | 2.1 channel |
| Remote Control | Included (infrared) |
| Wall Mountable | Yes (brackets included) |
| Power Supply | 100-240 V AC, 50/60 Hz |
| Cleaning | Wipe with a soft, dry cloth |
| Safety Instructions | Do not expose to rain or moisture; keep away from heat sources |
| User Serviceable Parts | None; refer to qualified service personnel |
| Warranty | 2 years (depending on region) |
Frequently Asked Questions - S90HD EDIFIER
User questions about S90HD EDIFIER
0 question about this device. Answer the ones you know or ask your own.
Ask a new question about this device
Download the instructions for your Soundbar in PDF format for free! Find your manual S90HD - EDIFIER and take your electronic device back in hand. On this page are published all the documents necessary for the use of your device. S90HD by EDIFIER.
USER MANUAL S90HD EDIFIER
Wireless active subwoofer

Remote control

Left rear surround speaker (SL)

Right rear surround speaker (SR)

Fiber optic input audio cable

Audio cable

Adapter audio cable


Speaker connecting cable for rear surround speakers

Plastic wall anchor x10

Rubber pad x4

Screws for bracket x4

Screws for wall mounting brackets x10

Bracket x2

User manual

- Connect to right rear surround speaker (SR)
- HDMI 1 input
- HDMI 2 input
- HDMI ARC output (Audio Return Channel)
- Optical input
- Coaxial input
- Line in input
- AUX input
- Subwoofer/SR speaker pairing button on soundbar
- Display window
- Master volume control/input selector
Rotate: Volume +/-
Press: Audio source selection (HDMI1→HDMI 2→HDMI ARC→Line in→AUX→Bluetooth→Optical→Coaxial)
Press: Power ON
Press and hold: Standby
- Status indicator
- Soundbar pairing button on the subwoofer
- Power switch
- Power cable
- Soundbar pairing button on the SR speaker
- Status indicator
- Connect to left rear surround speaker (SL)
- Power cable
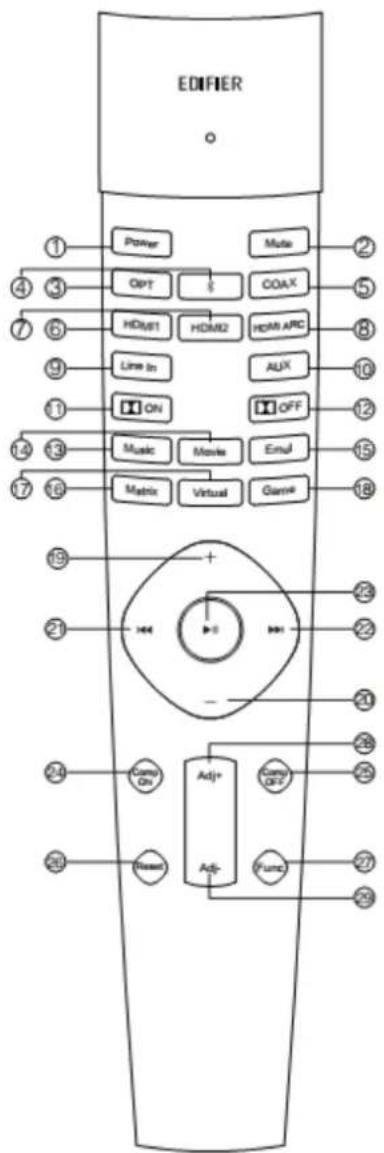
- Power ON/standby
- Mute/mute off
- Optical input
- Bluetooth input(press and hold to disconnect Bluetooth)
- Coaxial input
- HDMI 1 input
- HDMI 2 input
- HDMI ARC output
- Line in input
- AUX input
- Dolby sound effect enabled
- Dolby sound effect disabled
- Music mode
- Movie mode
- Emulate mode
- Matrix mode
- Virtual mode
- Game mode
- Volume up
- Volume down
- Bluetooth mode: Previous track
- Bluetooth mode: Next track
- Bluetooth mode: Play/pause
- Dolby Compression enabled
- Dolby Compression disabled
- Reset: press and hold to restore to factory settings
- Multifunctional tuning
- Adj+ : Each component increase progressively
- Adj - : Each component decrease progressively

• How to operate remote control
-
Point the remote control to the IR window on soundbar.
-
The optimum operational distance is within 7 meters.
-
The optimum operational scope is within a 60 degree angle.
• Install the battery
Please refer to the illustration to open the battery compartment, load the batteries and close the compartment.
Note:
-
Do not place the remote control in places that are hot and humid.
-
Do not charge the batteries.
-
Remove the batteries when unused for extended periods.
-
The battery should not be exposed to excessive heat such as direct sun, fire or related.
-
Danger of explosion if battery is incorrectly replaced. Replace only with the same or equivalent type.
1. Soundbar
① Drill hole in wall

Drill 4 holes (Depth: 40mm/1.5", Hole size: 8mm/1/4") in the wall using the wall mount bracket as a template, then knock wall anchor into holes.
Note:
Dimension of hole may vary depending on wall materials, therefore please adjust drill size to existing conditions for proper installation.
② Attach wall mount bracket
![graph LR A["Input Sequence"] --> B["Processing Unit"] B --> C["Feedback Loop"] style A fill:#f9f,stroke:#333 style B fill:#bbf,stroke:#333 style C fill:#dfd,stroke:#333](/content/2026/05/830472/images/1573304aaa7d2b7579acd88a2639f844bca3aba7c3fd43d29c453fb2a444031b.jpg)
Align mounting bracket to the holes and use screws to attach wall mount bracket
Wall Mount Bracket Installation
③ Place soundbar onto the wall mount bracket

Please make sure all audio cable connections are secure before mounting the speaker.
Warning: Please follow installation instructions to avoid damage to your product.
2. Rear surround speakers
① Drill hole in wall
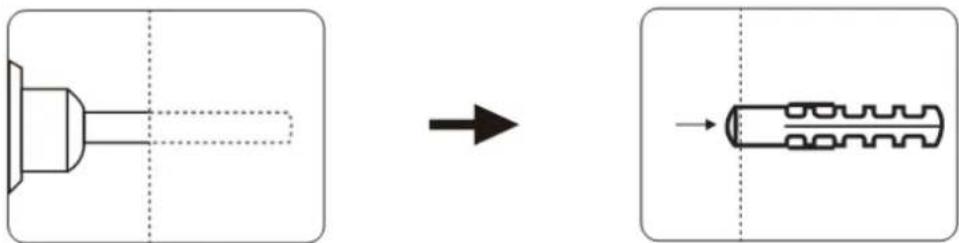
For each rear surround speaker, drill 2 holes (Depth: 40mm/1.5", Hole size: 8mm/1/4") in the wall using the bracket as a template, then knock wall anchor into holes.
Note:
Dimension of hole may vary depending on wall materials, therefore please adjust drill size to existing conditions for proper installation.
② Fix bracket on the wall
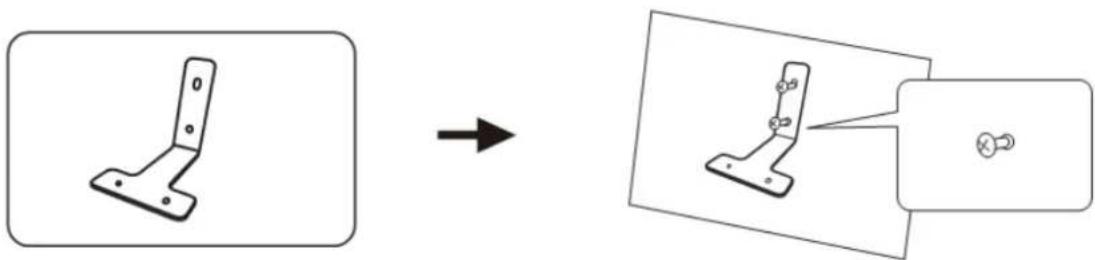
Align bracket to the holes and use screws to attach.
③ Attach rear surround speakers to wall bracket
Place rubber pad between rear surround speakers and brackets to prevent vibration. Align rubber pads to the holes on the bracket; then align screws on the bottom of speakers to the rubber pad holes on the brackets and tighten the screws.
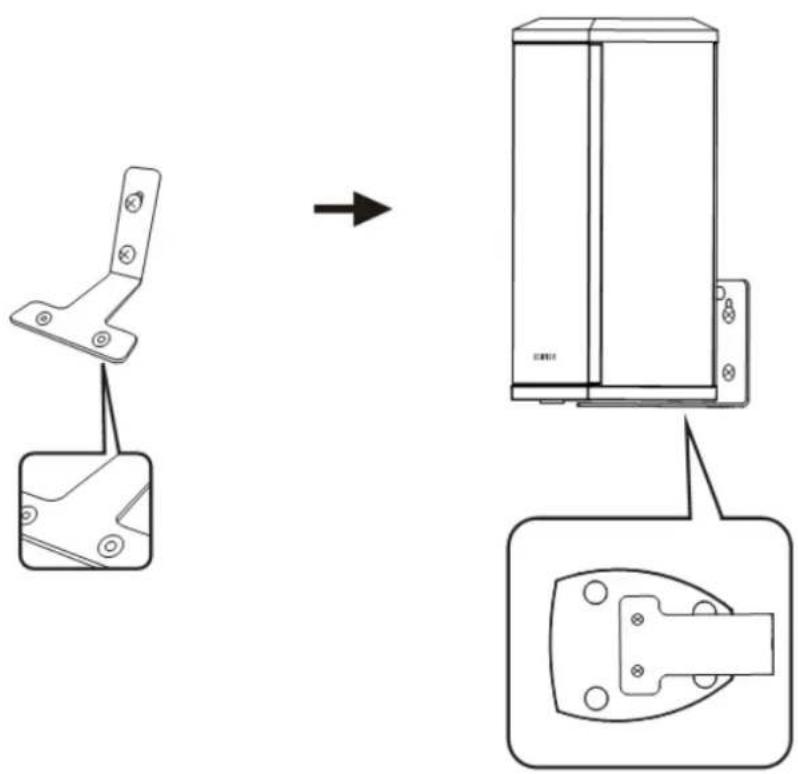
Warning: Please follow installation instructions to avoid damage to your product.

- As the illustration shows, connect to audio source using the corresponding audio cable.
- As the illustration shows, connect speakers to power source using the corresponding power cable.
- Turn on main power switch and your speakers should be ready to go.
Pair soundbar with wireless active subwoofer

Soundbar has been paired with subwoofer before leaving the factory. Hence the wireless connection will resume automatically when both soundbar and subwoofer are powered on and the red indicator is lit. If the wireless connection fails to resume, please follow these steps below to re-pair.
- Power on the subwoofer, the red indicator should blink in a breathing pattern, which means no active wireless connection.
- Press and hold the "Pair" button on back panel of the subwoofer for 2 seconds to put it into pairing mode. The red indicator will blink rapidly.
- Press and hold the "Pair" button on back panel of soundbar to put it into pairing mode.
- Wait until the red indicator on subwoofer is lit constantly. The pairing is complete and wireless connection is made.
LED indicator blinks in a breathing pattern: subwoofer is disconnected and enters standby mode LED indicator blinks rapidly: subwoofer enters pairing mode
LED indicator is constantly lit: subwoofer is connected.
S70DB
Pair soundbar with right rear surround speaker (SR)
Right rear surround speaker (SR)

Soundbar has been paired with right rear surround speaker before leaving the factory. Hence the wireless connection will resume automatically when both soundbar and SR speaker are powered on and the red indicator is lit. If the wireless connection fails to resume, please follow these steps below to re-pair.
- Power on SR speaker, the red indicator should blink in a breathing pattern, which means no active wireless connection.
- Press and hold the "Pair" button on back panel of SR speaker for 2 seconds to put it into pairing mode. The red indicator will blink rapidly.
- Press and hold the "Pair" button on back panel of soundbar to put it into pairing mode.
- Wait until the red indicator on SR speaker is lit constantly. The pairing is complete and wireless connection is made.
LED indicator blinks in a breathing pattern: SR speaker is disconnected and enters standby mode
LED indicator blinks rapidly: SR speaker enters pairing mode
LED indicator is constantly lit: SR speaker is connected
- Press the “Master volume control/input selector” knob on soundbar or the corresponding audio source button on the remote control to select audio source.
![graph TD A["OPT"] --> B["HDMI1"] C["*"] --> D["HDMI2"] E["COAX"] --> F["HDMI ARC"] G["Line In"] --> H["AUX"] I["-->"] --> J["Bluetooth"] K["HDMI 1"] --> L["HDMI 2"] M["HDMI 2"] --> N["HDMI ARC"] O["HDMI ARC"] --> P["LINE IN"] Q["AUX"] --> R["Optical"] S["COAXIAL"] --> T["Line In"]](/content/2026/05/830472/images/5bc3fc425091931df59542548a666e2a0750790c5e28bf41fd54e0d974aab048.jpg)
- Play music and adjust to the comfortable volume.
![graph LR A["Music Note"] --> B["Play Button"] B --> C["Screen with 20+ o'clock indicators"] style A fill:#f9f,stroke:#333 style B fill:#ccf,stroke:#333 style C fill:#cfc,stroke:#333](/content/2026/05/830472/images/32717c480fa0459f3c417ee4642d9241cbf97687f2666d4ca081ef63defc9803.jpg)
Note:
Only the standard PCM audio signals (44.1KHz/48KHz/96KHz) and Dolby/DTS audio coded signals function in optical/coaxial mode.
Bluetooth® Bluetooth input
![graph LR A["OPT"] --> B["COAX"] C["OR"] --> D["Mobile Device"] D --> E["Bluetooth"] E --> F["Mobile Device"] E --> G["Mobile Device"] E --> H["Mobile Device"] E --> I["Mobile Device"]](/content/2026/05/830472/images/9a5ab181ac100026cb5f4102f2383c9cd8c4386ccca3e510961bd2fe1d9428e4.jpg)
- Press the "Master volume control/input selector" knob on soundbar or "*" button on the remote control to select Bluetooth mode. The display window shows Bluetooth mode.
- Set your Bluetooth device (mobile phone, tablet etc.) to search for and connect to "EDIFIER S90HD".
- PIN code for connection is "0000" if needed.
- To disconnect Bluetooth, please press and hold " ✗" button on the remote control
Note:
- Bluetooth connectivity and compatibility may be different between different source devices, depending on the software versions of source devices.
- To enjoy all Bluetooth functions of this product, please ensure your mobile device has A2DP profile.

HDMI input/output

HDMI 1/HDMI 2 mode
- Press the "Master volume control/input selection" knob on soundbar or the "HDMI 1" / "HDMI 2" button on the remote control to select HDMI 1/HDMI 2 mode. The display window shows "HDMI 1" / "HDMI 2".
- Connect audio source (like DVD) to "HDMI 1" or "HDMI 2" input port on the back panel of soundbar using HDMI cable.
- Connect HDMI connector on the TV to "HDMI ARC" output port on the back panel of soundbar using another HDMI cable. Audio source video signal will output to TV. (Note: You have been supplied with one HDMI cable; additional cables may be necessary.)
HDMI ARC mode
- Press the "Master volume control/input selection" knob on soundbar or the "HDMI ARC" button on the remote control to select HDMI ARC mode. The display window shows "HDMI ARC".
- Connect HDMI ARC connector on the TV to "HDMI ARC" output port on the back panel of soundbar using HDMI cable.
- HDMI ARC will return audio signal to the speaker via HDMI cable.
Power output: R/L (Treble): 12W+12W
R/L (Mid-range): 32W+32W
SR/SL (Mid-range): 22W+22W
SW: 70W
Frequency response: 40Hz\~20KHz
Input: HDMI/AUX/LINE IN/Bluetooth/Optical/Coaxial
Note:
Reference frequency used for electrical parameter during test: treble is 10KHz; mid-range and bass is 500Hz;

DOLBY
AUDIO
Manufactured under license from Dolby Laboratories.
Dolby, Dolby Audio, Pro Logic, and the double-D symbol are trademarks of Dolby Laboratories.

dts
Digital Surround
For DTS patents, see http://patents.dts.com. Manufactured under license from DTS Licensing Limited. DTS, the Symbol, DTS and the Symbol together, and Digital Surround are registered trademarks and/or trademarks of DTS, Inc. in the United States and/or other countries. © DTS, Inc. All Rights Reserved.
HDMI
"The terms HDMI and HDMI High-Definition Multimedia Interface, and the HDMI Logo are trademarks or registered trademarks of HDMI Licensing Administrator, Inc. in the United States and other countries." This sentence may be translated into local languages upon approval by HDMI Licensing Administrator, Inc.




Brand : EDIFIER
Model : S90HD
Category : Soundbar