
BDINF20 - Uncategorized BLACK & DECKER - Free user manual and instructions
Find the device manual for free BDINF20 BLACK & DECKER in PDF.


| Product Type | Multi-purpose inflator |
| Brand | Black & Decker |
| Model | BDINF20 |
| Power Source | AC cord (120-220V, 50/60 Hz depending on variant), 12V DC vehicle connector, 20V MAX* lithium-ion battery (LBXR20LD120BAT) |
| Maximum Pressure | 160 PSI |
| Pressure Units | PSI, BAR, kPa |
| Duty Cycle (High Pressure) | 10 minutes on, 20 minutes off (above 100 PSI) |
| Duty Cycle (65 PSI) | 2 minutes on, 5 minutes off |
| Modes | High-pressure (tire symbol), high-volume (air mattress symbol), deflate |
| Auto Shut-off | Yes, preset pressure (high-pressure mode only) |
| Pressure Gauge | LCD display with manual preset buttons |
| Included Accessories | High-volume hose, high-pressure hose, universal valve adapter, tapered nozzle, brass coupler adapter, inflator needle valve |
| Intended Use | Household consumer use: inflating car/bike tires, balls, rafts, air mattresses, swimming pool floats |
| Weight (approximate) | 2.5 lbs (without battery) |
| Dimensions (approximate) | 10 x 8 x 6 inches (unit only) |
| Safety Features | Double insulated, automatic shut-off, pressure relief |
| Maintenance | Clean with dry cloth; no user-serviceable parts inside |
| Storage | Cool, dry place away from direct sunlight; allow 30 min cool down before storing |
Frequently Asked Questions - BDINF20 BLACK & DECKER
User questions about BDINF20 BLACK & DECKER
0 question about this device. Answer the ones you know or ask your own.
Ask a new question about this device
Download the instructions for your Uncategorized in PDF format for free! Find your manual BDINF20 - BLACK & DECKER and take your electronic device back in hand. On this page are published all the documents necessary for the use of your device. BDINF20 by BLACK & DECKER.
USER MANUAL BDINF20 BLACK & DECKER
natural_image
Line drawing of a black and decker electric shock absorber device (no text or symbols on the device itself)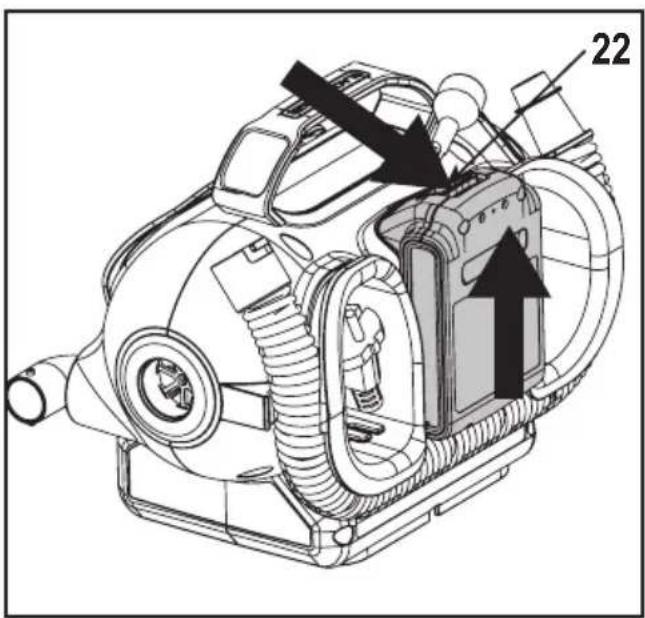
DO NOT RETURN THIS PRODUCT TO THE STORE, first contact your local BLACK+DECKER office or nearest authorized service center.
GENERAL SAFETY RULES
⚠ Warning! Read and understand all instructions. Failure to follow all instructions listed below, may result in electric shock, fire and/or serious personal injury.
SAVE THESE INSTRUCTIONS

SAFETY INSTRUCTIONS
General power tool safety warnings. Warning! Read all safety warnings and
all instructions. Failure to follow the warnings and instructions listed below may result in electric shock, fire and/or serious injury.
Save all warnings and instructions for future reference.
The term “power tool” in all of the warnings listed below refers to your mains operated (corded) power tool or battery operated (cordless) power tool.
1. Work area safety
a. Keep work area clean and well lit. Cluttered and dark areas invite accidents.
b. Do not operate power tools in explosive atmospheres, such as in the presence of flammable liquids, gases or dust. Power tools create sparks which may ignite the dust or fumes.
c. Keep children and bystanders away while operating a power tool. Distractions can cause you to lose control.
2. Electrical safety
a. Power tool plugs must match the outlet. Never modify the plug in any way. Do not use any adapter plugs with earthed (grounded) power tools. Unmodified plugs and matching outlets will reduce risk of electric shock.
b. Avoid body contact with earthed or grounded surfaces such as pipes, radiators, ranges and refrigerators. There is an increased risk of electric shock if your body is earthed or grounded.
c. Do not expose power tools to rain or wet conditions. Water entering a power tool will increase the risk of electric shock.
d. Do not abuse the cord. Never use the cord for carrying, pulling or unplugging the power tool. Keep cord away from heat, oil, sharp edges or moving parts. Damaged or entangled cords increase the risk of electric shock.
e. When operating a power tool outdoors, use an extension cord suitable for outdoor use. Use of
a cord suitable for outdoor use reduces the risk of electric shock.
f. If operating a power tool in a damp location is unavoidable, use a residual current device (RCD) protected supply. Use of an RCD reduces the risk of electric shock. Note: The term "Residual Current Device (RCD)" can be replaced by "Ground Fault Circuit Interrupter (GFCI)" or by "Earth Leakage Circuit Breaker (ELCB)".
3. Personal safety
a. Stay alert, watch what you are doing and use common sense when operating a power tool. Do not use a power tool while you are tired or under the influence of drugs, alcohol or medication. A moment of inattention while operating power tools may result in serious personal injury.
b. Use personal protective equipment. Always wear eye protection. Protective equipment such as dust mask, non-skid safety shoes, hard hat, or hearing protection used for appropriate conditions will reduce personal injuries.
c. Prevent unintentional starting. Ensure the switch is in the off-position before connecting to power source and/or battery pack, picking up or carrying the tool. Carrying power tools with your finger on the switch or energizing power tools that have the switch on invites accidents.
d. Remove any adjusting key or wrench before turning the power tool on. A wrench or a key left attached to a rotating part of the power tool may result in personal injury.
e. Do not overreach. Keep proper footing and balance at all times. This enables better control of the power tool in unexpected situations.
f. Dress properly. Do not wear loose clothing or jewelry. Keep your hair, clothing and gloves away from moving parts. Loose clothes, jewelry or long hair can be caught in moving parts.
g. If devices are provided for the connection of dust extraction and collection facilities, ensure these are connected and properly used. Use of these devices can reduce dust related hazards.
a. Do not force the power tool. Use the correct power tool for your application. The correct power tool will do the job better and safer at the rate for which it was designed.
b. Do not use the power tool if the switch does not turn it on and off. Any power tool that cannot be controlled with the switch is dangerous and must be repaired.
c. Disconnect the plug from the power source and/or the battery pack from the power tool before making any adjustments, changing accessories,
4. Power tool use and care
or storing power tools. Such preventive safety measures reduce the risk of starting the power tool accidentally.
d. Store idle power tools out of the reach of children and do not allow persons unfamiliar with the power tool or these instructions to operate the power tool. Power tools are dangerous in the hands of untrained users.
e. Maintain power tools. Check for misalignment or binding of moving parts, breakage of parts and any other condition that may affect the power tools operation. If damaged, have the power tool repaired before use. Many accidents are caused by poorly maintained power tools.
f. Keep cutting tools sharp and clean. Properly maintained cutting tools with sharp cutting edges are less likely to bind and are easier to control.
g. Use the power tool, accessories and tool bits, etc. in accordance with these instructions, taking into account the working conditions and the work to be performed. Use of the power tool for operations different from those intended could result in a hazardous situation.
- Battery tool use and care
a. Recharge only with the charger specified by the manufacturer. A charger that is suitable for one type of battery pack may create a risk of fire when used with another battery pack.
b. Use power tools only with specifically designated battery packs. Use of any other battery packs may create a risk of injury and fire.
c. When battery pack is not in use, keep it away from other metal objects, like paper clips, coins, keys, nails, screws, or other small metal objects, that can make a connection from one terminal to another. Shorting the battery terminals together may cause burns or a fire.
d. Under abusive conditions, liquid may be ejected from the battery; avoid contact. If contact accidentally occurs, flush with water. If liquid contacts eyes, additionally seek medical help.
Liquid ejected from the battery may cause irritation or burns.
- Service
a. Have your power tool serviced by a qualified repair person using only identical replacement parts. This will ensure that the safety of the power tool is maintained.
- Electrical safety

Your tool is double insulated; therefore no earth wire is required. Always check that the main voltage corresponds to the voltage on the rating plate.

Warning! If the power cord is damaged, it must be replaced by the manufacturer, authorized BLACK+DECKER Service Center or an equally qualified person in order to avoid damage or injury. If the power cord is replaced by an equally qualified person, but not authorized by BLACK+DECKER, the warranty will not be valid.
- Labels on tool
The label on your tool may include the following symbols:

Read Instructions Manual

Alternating Current

Visible Radiation

Use Eye Protection

Direct Current
.../min..
Revolutions or Reciprocation per minute

Use Ear Protection

AC/DC Alternating or Direct Current
BPM......
beats per minute

Use proper respiratory protection

No-Load Speed
IPM......
mpacts per minute
V ..... Volts
A ...... Amperes
Hz ..... Hertz
W ...... Watts
min ..... minutes

Class I Construction (grounded)
RPM......
Revolutions per minute

Class II Construction
sfpm......
surface feet per minute

Earthing Terminal
SPM......
strokes per minute

Safety Alert Symbol
n.....
rated speed
FEATURES (Fig. A)
- AC/DC power switch
- Mode power switch
- LCD display
- Pressure setting button
- Pressure mode / Reset button
- Handle
- High-volume hose
- Tapered nozzle
- Universal valve adapter
- High-pressure hose
- High-volume pump deflate connection
- High volume pump inflator connection
- AC cord
- 12V vehicle connector
- 20V MAX* battery slot
- Inflator needle valve
- Brass coupler adapter
- Tapered nozzle
SAVE THESE INSTRUCTIONS
△Warnings!
- Read these instructions.
- Keep these instructions.
- Heed all warnings.
- Follow all instructions.
-
Do not use this apparatus near water. Keep the case dry at all times.
-
Clean only with dry cloth.
- Do not block any ventilation openings. Install in accordance with the manufacturer's instructions.
- Do not place near any heat sources such as radiators, heat registers, stoves or other apparatus (including amplifiers) that produce heat.
- Do not defeat the safety purpose of the polarizedor grounding-type plug. A polarized plug has two blades with one wider than the other. A grounding type plug has two blades and a third grounding prong. The wide blade or the third prong are provided for your safety. If the provided plug does not fit into your outlet, consult an electrician for replacement of the obsolete outlet.
- Protect the cord from being walked on or pinched particularly at plugs, convenience receptacles, and the point where they exit from the apparatus.
- Only use attachments / accessories specified by the manufacturer.
- Unplug unit when lightning is in the area or when unit is not in use.
- Refer all servicing to qualified service personnel. Servicing is required when the apparatus has been damaged in any way, such as power-supply cord or plug is damaged, liquid has been spilled or objects have fallen into the apparatus, the apparatus has been exposed to rain or moisture, does not operate normally, or has been dropped.
- Do not expose to dripping or splashing. Warnings! To reduce the risk of fire or electric shock, do not expose this apparatus to rain or moisture.
- Do not operate near flammable materials, fumes or gases.
- Do not disassemble product, no user serviceable parts. Incorrect reassembly may result in a risk of electric shock or fire.
- Provide adequate ventilation and refrain from placing items on or around the product during operation.
- Do not incinerate the battery even if it is severely damaged or is completely worn out. The battery can explode in a fire. Check with local codes for possible special disposal instructions.
- If any leakage of liquid from the battery cells occurs, discontinue use immediately and return the battery to your local BLACK+DECKER Service Center or authorized service facility.
- Never attempt to open the battery for any reason. If the plastic housing of the battery breaks or cracks, immediately discontinue use and do not recharge.
- Keep this product out of the reach of children.
- Since the vibration produced by the inflator may cause it to "walk", do not operate on a high shelf or other surface. Operate at ground or bench level only.
GENERAL SAFETY RULES
▶ Keep work area clean. Cluttered areas and benches invite injuries.
▶ Consider work area environment. Don't expose power tools to rain. Don't use power tools in damp or wet locations. Keep work area well lit. Do not use tool in presence of flammable liquids, dust, or gases.
▶ Guard against electric shock. Prevent body contact with grounded surfaces. For example; pipes, radiators, ranges, and refrigerator enclosures.
- Keep children away. Do not let visitors contact tool or extension cord. All visitors should be kept away from work area.
▶ Store idle tools. When not in use, tools should be stored in dry, and high or locked-up place — out of reach of children.
- Don't force tool. It will do the job better and safer at the rate for which it was intended.
▶ Use right tool. Don't force small tool or attachment to do the job of a heavy-duty tool. Don't use tool for purpose not intended.
▶ Dress properly. Do not wear loose clothing or jewelry. They can be caught in moving parts. Rubber gloves and non-skid footwear are recommended when working outdoors. Wear protective hair covering to contain long hair.
▶ Use safety glasses. Also use face or dust mask if operation is dusty.
- Don't abuse cord. Never carry tool by cord or yank it to disconnect from receptacle. Keep cord from heat, oil, and sharp edges.
- Secure work. Use clamps or a vise to hold work. It's safer than using your hand and it frees both hands to operate tool.
- Don't overreach. Keep proper footing and balance at all times.
- Maintain tools with care. Keep tools sharp and clean for better and safer performance. Follow instructions for lubricating and changing accessories. Inspect tool cords periodically and if damaged, have repaired by authorized service facility. Inspect extension cords periodically and replace if damaged. Keep handles dry, clean, and free from oil and grease.
▶ Disconnect or lock off tools when not in use, before servicing, and when changing accessories, such as blades, bits, cutters.
▶ Remove adjusting keys and wrenches. Form habit of checking to see that keys and adjusting wrenches are removed from tool before turning it on.
- Avoid unintentional starting. Don't carry tool with finger on switch. Be sure switch is off when plugging in.
▶ Outdoor use extension cords. When tool is used outdoors, use only extension cords intended for use outdoors and so marked.
▶ Stay alert. Watch what you are doing. Use common sense. Do not operate tool when you are tired.
▶ Check damaged parts. Before further use of the tool, a guard or other part that is damaged should be carefully checked to determine that it will operate properly and perform its intended function. Check for alignment of moving parts, binding of moving parts, breakage of parts, mounting, and any other conditions that may affect its operation. A guard or other part that is damaged should be properly repaired or replaced by an authorized service center unless otherwise indicated elsewhere in this instruction manual. Have defective switches replaced by authorized service center. Do not use tool if switch does not turn it on and off.
▶ Do not operate portable electric tools near flammable liquids or in gaseous or explosive atmospheres. Motors in these tools normally spark, and the sparks might ignite fumes.
ADDITIONAL SAFETY WARNINGS FOR YOUR INFLATOR
⚠ Warning! For home and car use only:
▶ Inflate bike tires, balls, rafts, swimming pool floats, air mattresses, and more in and around the home. Recommended maximum continuous duty at 65 psi is 2 minutes on with 5 minutes off.
⚠ Warning! Risk to breathing:
▶ The compressed air from your inflator is not safe for breathing. Never inhale air from your inflator or from a breathing device connected to the inflator.
⚠ Warning! Risk of bursting:
- Too much air pressure causes a hazardous risk of bursting. Check the manufacturer's maximum pressure rating for objects being inflated.
▶ Do not leave inflator running unattended. It could burst tires or other items.
▶ Use a tire gauge to check the tires pressure before each use and while inflating tires; see the tire sidewall for the correct tire pressure.
⚠ Warning! Risk of unsafe operation.
▶ Do not modify or attempt to repair. Never drill into, weld, or make any modifications to the inflator or its attachments.
▶ Operate only with the accessories included or air handling parts acceptable for not less than 160 psi. The use of any accessory not recommended for use with this tool could be hazardous.
▶ Never "horseplay." High pressure air is dangerous. Don't direct air-flow at yourself or others.
⚠ Warning! Always leave the valve adaptor lever open when not in use.
⚠ Warning! Risk of fire:
▶ Inflator can become hot during use. Allow inflator to cool 30 minutes before storing away.
LIQUID CRYSTAL DISPLAY FLUID (FIRST AID MEASURES)
If liquid crystal comes in contact with your skin:
▶ Wash area off completely with plenty of water.
Remove contaminated clothing.
If liquid crystal gets into your eye:
▶ Flush the affected eye with clean water and then seek medical attention.
If liquid crystal is swallowed:
- Flush your mouth thoroughly with water. Drink large quantities of water and induce vomiting. Then seek medical attention.
BATTERIES AND CHARGERS (Not include)
The battery pack is not fully charged out of the carton. Before using the battery pack and charger, read the safety instructions below and then follow charging procedures outlined. When ordering replacement battery packs, be sure to include the catalog number and voltage.
Your tool uses a BLACK+DECKER charger. Be sure to read all safety instructions before using your charger. Consult the chart at the end of this manual for compatibility of chargers and battery packs.
IMPORTANT SAFETY INSTRUCTIONS FOR ALL BATTERY PACKS
⚠ Warning! Read all safety warnings and all instructions for the battery pack, charger and power tool. Failure to follow the warnings and instructions may result in electric shock, fire and/or serious injury.
▶ Do not charge or use the battery pack in explosive atmospheres, such as in the presence of flammable liquids, gases or dust. Inserting or removing the battery pack from the charger may ignite the dust or fumes.
▶ Never force the battery pack into the charger. Do not modify the battery pack in any way to fit into a non-compatible charger as battery pack may rupture causing serious personal injury. Consult the chart at the end of this manual for compatibility of batteries and chargers.
▶ Charge the battery packs only in designated BLACK+DECKER chargers.
▶ Do not splash or immerse in water or other liquids.
▶ Do not store or use the tool and battery pack in locations where the temperature may reach or exceed 104 °F (40 °C) (such as outside sheds or
metal buildings in summer). For best life store battery packs in a cool, dry location.
Note: Do not store the battery packs in a tool with the trigger switch locked on. Never tape the trigger switch in the ON position.
▶ Do not incinerate the battery pack even if it is severely damaged or is completely worn out. The battery pack can explode in a fire. Toxic fumes and materials are created when lithium ion battery packs are burned.
▶ If battery contents come into contact with the skin, immediately wash area with mild soap and
water. If battery liquid gets in to the eye, rinse water over the open eye for 15 minutes or until irritation ceases. If medical attention is needed, the battery electrolyte is composed of a mixture of liquid organic carbonates and lithium salts.
- Contents of opened battery cells may cause respiratory irritation. Provide fresh air. If symptoms persist, seek medical attention.
⚠ Warning! Burn hazard. Battery liquid may be flammable if exposed to spark or flame.
⚠ Warning! Fire hazard. Never attempt to open the battery pack for any reason. If the battery pack case is cracked or damaged, do not insert into the charger. Do not crush, drop or damage the battery pack. Do not use a battery pack or charger that has received a sharp blow, been dropped, run over or damaged in any way (e.g., pierced with a nail, hit with a hammer, stepped on). Damaged battery packs should be returned to the service center for recycling.
IMPORTANT SAFETY INSTRUCTIONS FOR ALL BATTERY CHARGER
⚠ Warning! Read all safety warnings and all instructions for the battery pack, charger and power tool. Failure to follow the warnings and instructions may result in electric shock, fire and/or serious injury.
- Do not attempt to charge the battery pack with any chargers other than the ones in this manual. The charger and battery pack are specifically designed to work together.
These chargers are not intended for any uses other than charging BLACK+DECKER rechargeable
batteries. Any other uses may result in risk of fire, electric shock or electrocution.
▶ Do not expose the charger to rain or snow.
▶ Pull by the plug rather than the cord when disconnecting the charger. This will reduce the risk of damage to the electric plug and cord.
▶ Make sure that the cord is located so that it will not be stepped on, tripped over or otherwise
subjected to damage or stress.
▶ Do not use an extension cord unless it is absolutely necessary. Use of improper extension cord could result in risk of fire, electric shock or electrocution.
▶ When operating a charger outdoors, always provide a dry location and use an extension cord suitable for outdoor use. Use of a cord suitable for outdoor use reduces the risk of electric shock.
▶ An extension cord must have adequate wire size (AWG or American Wire Gauge) for safety.
The smaller the gauge number of the wire, the greater the capacity of the cable, that is, 16 gauge has more capacity than 18 gauge. An undersized cord will cause a drop in line voltage resulting in loss of power and overheating. When using more than one extension to make up the total length, be sure each individual extension contains at least the minimum wire size. The following table shows the correct size to use depending on cord length and nameplate ampere rating. If in doubt, use the next heavier gauge. The lower the gauge number, the heavier the cord.
Minimum Gauge for Cord Sets
| Volts Tota | Length of Cord in Feet (meters) | ||||
| 120 V | 25 (7.6) | 50 (15.2) | 100 (30.5) | 150 (45.7) | |
| 240 V | 50 (15.2) | 100 (30.5) | 200 (61.0) | 300 (91.4) | |
| Ampere Rating | American Wire Gauge | ||||
| More than | Not more than | ||||
| 0 | 6 | 18 | 16 | 16 | 14 |
| 6 | 10 | 18 | 16 | 14 | 12 |
| 10 | 12 | 16 | 16 | 14 | 12 |
| 12 | 16 | 14 | 12 | Not Recommended | |
▶ Do not place any object on top of the charger or place the charger on a soft surface that might block the ventilation slots and result in excessive internal heat. Place the charger in a position away from any heat source. The charger is ventilated through slots in the top and the bottom of the housing.
▶ Do not operate the charger with a damaged cord or plug.
▶ Do not operate the charger if it has received a sharp blow, been dropped or otherwise damaged in any way. Take it to an authorized service center.
▶ Do not disassemble the charger; take it to an authorized service center when service or repair is required. Incorrect reassembly may result in a risk of electric shock, electrocution or fire.
▶ Disconnect the charger from the outlet before attempting any cleaning. This will reduce the risk of electric shock. Removing the battery pack will not
reduce this risk.
▶ Never attempt to connect 2 chargers together.
The charger is designed to operate on standard 120V household electrical power. Do not attempt to use it on any other voltage. This does not apply to the vehicular charger.
⚠ Warning! Shock hazard. Do not allow any liquid to get inside the charger. Electric shock may result.
⚠ Warning! Burn hazard. Do not submerge the battery pack in any liquid or allow any liquid to enter the battery pack. Never attempt to open the battery pack for any reason. If the plastic housing of the battery pack breaks or cracks, return to a service center for recycling.
Caution! Burn hazard. To reduce the risk of injury, charge only BLACK+DECKERrechargeable battery packs. Other types of batteries may overheat and burst resulting in personal injury and property damage.
Notice: Under certain conditions, with the charger plugged into the power supply, the charger can be shorted by foreign material. Foreign materials of a conductive nature, such as, but not limited to, grinding dust, metal chips, steel wool, aluminum foil or any buildup of metallic particles should be
kept away from the charger cavities. Always unplug the charger from the power supply when there is no battery pack in the cavity. Unplug the charger before attempting to clean.
CHARGING A BATTERY
BLACK+DECKER chargers are designed to charge BLACK+DECKER battery packs.
Note: To ensure maximum performance and life of lithium ion battery packs:
▶ Charge the battery pack fully before first use
▶ Recharge discharged batteries as soon as possible after every use.
▶ Do not discharge batteries fully.
-
Plug the charger into an appropriate outlet before inserting the battery pack.
-
Insert the battery pack into the charger.
-
The green LED will flash indicating that the battery is being charged.
-
The completion of charge is indicated by the green LED remaining on continuously. The pack is fully charged and may be used at this time or left on the charger.
Leaving the battery in the charger
The charger and battery pack can be left connected with the green LED glowing indefinitely. The charger will keep the battery pack fresh and fully charged.
CHARGER CLEANING INSTRUCTIONS
⚠ Warning! Shock hazard. Disconnect the charger from the AC outlet before cleaning. Dirt and grease may be removed from the exterior of the charger using a cloth or soft non-metallic brush. Do not use water or any cleaning solutions.
IMPORTANT CHARGING NOTES
- Longest life and best performance can be obtained if the battery pack is charged when the air temperature is between 65 °F and 75 °F (18 ° – 24 °C). DO NOT charge the battery pack in an air temperature below +40 °F (+4.5 °C), or above +104 °F (+40 °C). This is important and will prevent serious damage to the battery pack.
- The charger and battery pack may become warm to the touch while charging. This is a normal condition, and does not indicate a problem. To facilitate the cooling of the battery pack after use, avoid placing the charger or battery pack in a warm environment such as in a metal shed or an uninsulated trailer.
- If the battery pack does not charge properly:
a. Check operation of receptacle by plugging in a lamp or other appliance;
b. Check to see if receptacle is connected to a light switch which turns power off when you turn out the lights;
c. Move the charger and battery pack to a location where the surrounding air temperature is approximately 65^ F – 75^ F ( 18^ – 24^ C);
d. If charging problems persist, take the tool, battery pack and charger to your local service center.
- The battery pack should be recharged when it fails to produce sufficient power on jobs which were easily done previously. DO NOT CONTINUE to use under these conditions. Follow the charging procedure.
You may also charge a partially used pack whenever you desire with no adverse effect on the battery pack.
-
Foreign materials of a conductive nature such as, but not limited to, grinding dust, metal chips, steel wool, aluminum foil, or any buildup of metallic particles should be kept away from charger cavities. Always unplug the charger from the power supply when there is no battery pack in the cavity. Unplug the charger before attempting to clean.
-
Do not freeze or immerse the charger in water or any other liquid.
STORAGE RECOMMENDATIONS
- The best storage place is one that is cool and dry, away from direct sunlight and excess heat or cold.
- For long storage, it is recommended to store a fully charged battery pack in a cool dry place out of the charger for optimal results.
Note: Battery packs should not be stored completely depleted of charge. The battery pack will need to be recharged before use.
MOTOR
Be sure your power supply agrees with the nameplate marking. Voltage decrease of more than 10% will cause loss of power and overheating. BLACK+DECKER tools are factory tested; if this tool does not operate, check power supply.
INTENDED USE
Your BLACK+DECKER inflation station is designed to be used AC corded, cordless or in most vehicles to inflate car and bike tires, balls, rafts, air mattresses, swimming pool floats, etc. This product is intended for household, consumer use only.
THIS PRODUCT USES THE BATTERY AND CHARGER LISTED IN THE CHART BELOW.
| Description Catalog | Number |
| 20V Max* lithium-ionBattery: | LBXR20LD120BAT |
| 20V Max* lithium-ionBattery Charger: | LCS20 |
ASSEMBLY AND ADJUSTMENTS
⚠ Warning! To reduce the risk of serious personal injury, turn unit off and disconnect it from power source remove the battery pack before making any adjustments or removing/installing attachments or accessories. An accidental start-up can cause injury.
12V Vehicle connector storage
▶ Wrap the 12V vehicle connector around the cord retainer located in the base of the inflator and snap the 12V vehicle connector (14) into its storage location on the cord retainer.
AC Cord storage
▶ Coil the AC cord into its storage location located on the back of the inflator.
Air hose storage
The high-pressure hose (10) is located in a storage channel around the face of the unit. Wrap the high-pressure hose inside the channel.
High-volume hose storage
The high-volume hose (7) is located in a storage channel around the back of the unit. Wrap the high-
volume hose inside the channel.
Accessories storage
The accessories (16, 17, 18) are stored in the back of the unit inside the accessory storage area.
FITTING THE ACCESSORIES Universal valve adapter (Fig. B)
Your inflator is supplied with the standard tapered nozzle (18), a brass coupler (17), and the inflator needle valve (16), located on the back of the unit.
▶ To use the universal valve adaptor (9), make sure the lever is in the up position.
▶ Place the valve adapter over the stem of the inflator needle valve, brass coupler adaptor or tapered nozzle.
▶ Press the lever (19) on the universal valve adapter down to lock it in place.
▶ Place the inflator needle valve, brass coupler adapter or tapered nozzle into the item to be inflated.
Note: Always make sure that the lever is in the up position when not in use. Operate your inflator only with the universal valve adaptor or with the included nozzles.
Note: Make sure the universal valve adapter is firmly locked in place before turning the inflator on.
High-volume hose (Fig. C)
▶ Remove the high-volume hose (7) from the storage location.
▶ Line up the notches (20) of the hose with the nubs (21) of the high volume pump inflator connection (12). Then, slide the hose on and twist counter-clockwise to secure.
▶ To remove, twist the hose clockwise and slide hose off.
Many inflatables have an internal flap that prevents air loss during inflation, especially air mattresses. Unless this flap is displaced by the nozzle the inflatable will not inflate. Push the nozzle firmly into the valve to make sure that you push this flap out of the way.
Warning! Risk of Bursting. Excessive air pressure may cause a hazardous risk of bursting or personal injury. Check the manufacturer's maximum pressure rating for items being inflated.
Note: If the pressure rating for the item being inflated is above 100 psi, note that the maximum run time is 10 minutes, leave to rest for 20 minutes before reusing.
OPERATION
⚠ Warning! To reduce the risk of serious personal injury, turn unit off and disconnect it from power source and remove the battery pack before making any adjustments or removing/installing ments or accessories. An accidental start-up can cause injury.
⚠ Warning! Do not operate the inflator when the car engine is running.
Note: Make sure that your 12 Volt accessory socket is live. On some vehicles the accessory socket may only become live when the ignition key is in the accessory position.
INSTALLING AND REMOVING THE BATTERY PACK (Fig. D, E)
Note: For best results, make sure your battery pack is fully charged.
To install the battery pack into the battery port (15), align the battery pack with the rails inside the battery port and slide it into the handle until the battery pack is firmly seated in the tool and ensure that it does not disengage. To remove the battery pack from the tool, press the release button (22) and firmly pull the battery pack out of the tool handle. Insert it into the charger as described in the charger section of this manual.
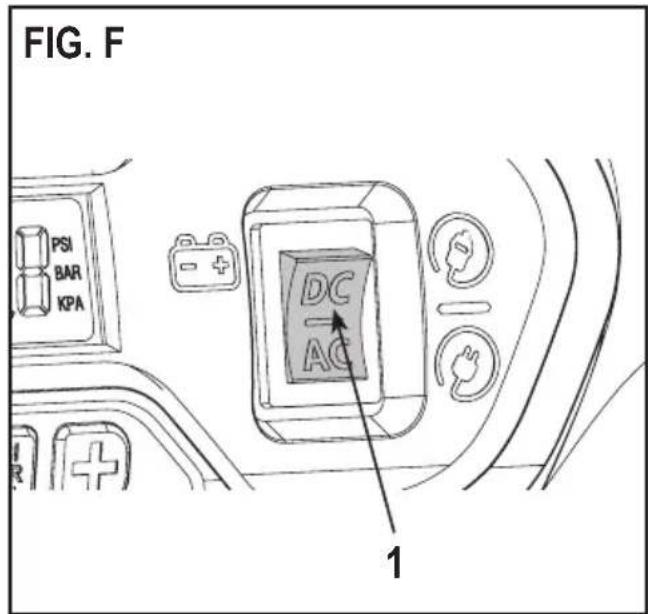
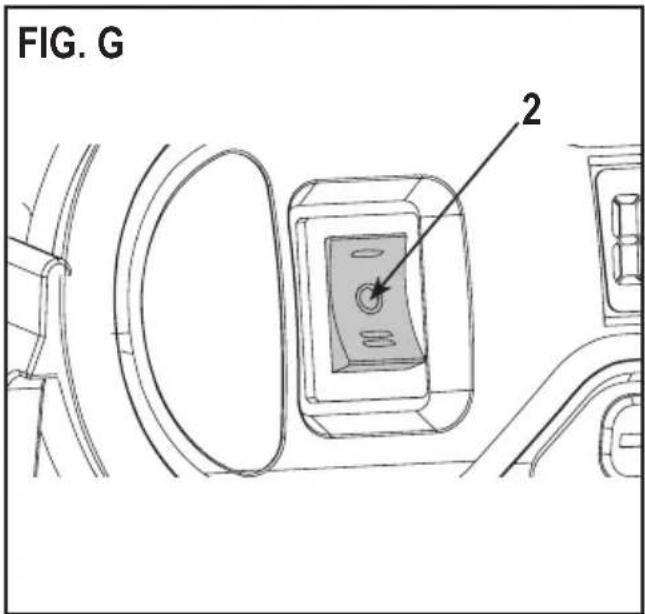
SWITCHING ON (Fig. F, G)
⚠ Warning! Risk of Bursting. Do not leave unit running unattended. Overinflation of tires and other items could result in serious injury and property damage.
Note: When power is supplied to the inflator by 12V vehicle connector, 20V MAX* batteryy, or AC cord the LCD display (3) will remain on for approximately 10 minutes before the display shuts off/goes into sleep mode. This occurs when the unit is not operating. To wake up the system, the user will need to push the pressure mode / reset button (5). At this time the LCD will turn on and the inflator is ready for use.
▶ Before switching your inflator on decided which power source you will be using; 12V vehicle connector, AC plug or a 20V MAX* battery pack.
▶ To use the 12V vehicle connector, or 20V MAX* battery pack press the AC/DC power switch (1) located on the front of the unit to DC.
▶ If using the 12V vehicle connector, always fully extend the cord before each use.
- Connect the 12V vehicle connector (14) into your vehicles 12V accessory socket.
To use the AC cord, press the AC/DC switch (1) located on the front of the unit to AC.
▶ If using the AC cord (13), always fully extend the cord before each use.
- Connect the AC plug (13) into either a wall outlet or an appropriate sized extension cord that is plugged into a wall outlet.
To turn on high-volume
The high-volume hose is meant to be used for objects that hold large amounts of air, such as air mattresses, rafts, and swimming pool floats.
Note: The high-volume mode DOES NOT have an auto shut-off feature.
- Attach the high-volume hose (7) to the high volume pump inflator connection (12) as described in the "High volume hose" section.
- Insert the high-volume hose (7), or it's tapered nozzle (8) into the object being inflated.
- Press the high-volume side of the mode power switch (2), indicated by the air mattress symbol.
- To turn off, push the power switch to the center position.
To turn on high-pressure
The high-pressure hose is meant to be used for objects that need more air pressure, such as tires and basketballs.
- Remove the high-pressure hose (10) from the storage.
- Attach a nozzle as described in the "Universal valve adapter" section.
- Insert the nozzle into the object being inflated.
- Press the high-pressure side of the mode power switch (2), indicated by the tire symbol.
- To turn off, push the power switch to the center position.
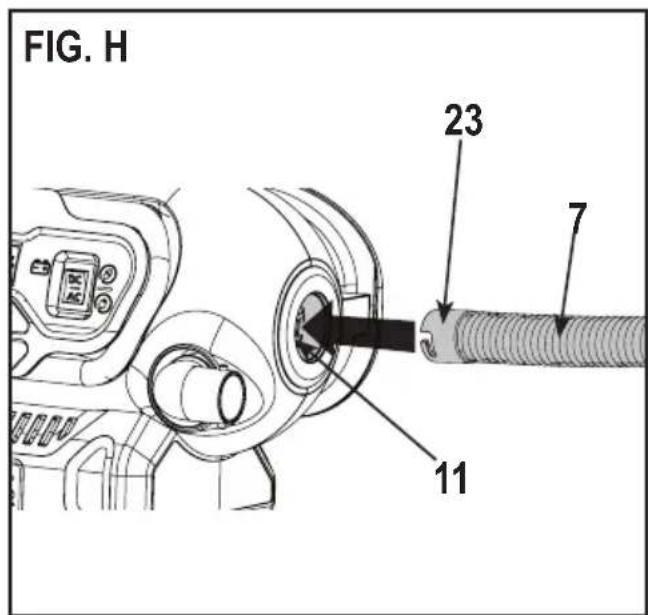
DEFLATE USING THE HIGH-VOLUME HOSE (Fig. H)
⚠ Warning! Beware of objects being ejected.
When deflating, large amounts of air will exit the high volume pump inflator connection (12). Ensure the universal valve adapter is not pointed at anyone or anything.
- Remove the high-volume hose (7) from the storage location.
▶ Line up the hose end (23) with the high-volume pump deflate connection (11). Then, firmly slide in the hose so it is securely in place. - Insert the hose, or it's tapered nozzle (8) into the object being deflated.
- Press the high-volume side of the mode power switch (2), as shown in (Fig. G), indicated by the air mattress symbol.
- To turn off, push the power switch to the center position.
- To remove the hose, twist the hose clockwise and slide hose off.
SETTING THE AUTOMATIC SHUT-OFF PRESSURE
Note: The LCD will only show inflation pressures when the inflator is being used. In both inflation and pump mode the unit will show battery status.
- To switch between the different units (psi, bar or kPa), press the pressure mode button (5) until the required units are displayed.
- Press the - or + pressure setting buttons (4) until the required pressure is displayed.
- After 3 seconds the display will flash and return to a reading of "0.0". This is normal.
- Connect the universal valve adaptor and accessories,
if required, to the item to be inflated, making sure that the lever of the valve adaptor is in the down position to lock it in place.
- To start the inflator press the mode power switch (2), towards the side of the tire symbol.
- When the item to be inflated has reached the preset value the unit will automatically turn off.
Note: You may notice the actual pressure reading may drop after a couple of seconds. This is normal.
- To stop the inflator at any time, press the main power button back to the center position.
Note: If the AC/DC power switch is turned off, all settings will be lost and will need to be reentered. This is a safety feature to prevent the risk of items OVER INFLATING.
USING THE INFLATOR AS A PRESSURE GAUGE
1 Connect the universal valve adaptor (9) to the item to be checked.
2. Press the mode power switch (2), on the side of the tire symbol.
3. The LCD will display the item's pressure.
4. After checking, press the mode power switch (2) back to the center position and return the air hose to the storage location.
MAINTENANCE
Use only a dry cloth to clean the tool. Never let any liquid get inside the tool; never immerse any part of the tool into a liquid. Your BLACK+DECKER tool has been designed to operate over a long period of time with a minimum of maintenance. Continuous satisfactory operation depends upon proper tool care and regular cleaning. Your charger does not require any maintenance apart from regular cleaning.
⚠ Warning! Before performing any maintenance on the tool, remove the battery from the tool. Unplug the charger before cleaning it.
▶ Regularly clean the ventilation slots in your tool and charger using a soft brush or dry cloth.
▶ Regularly clean the motor housing using a damp cloth. Do not use any abrasive or solvent-based cleaner.
▶ Regularly open the chuck and tap it to remove any dust from the interior.
▲ Important! To ensure product SAFETY and RELIABILITY, repairs, maintenance and adjustment (other than those listed in this manual) should be performed by authorized service centers or other qualified organizations, always using identical replacement parts. Unit contains no user service able parts inside.
ACCESSORIES
Recommended accessories for use with your tool are available at extra cost from your local dealer or authorized service center.
⚠ Warning! The use of any accessory not recommended for use with this tool could be hazardous.
PROTECTING THE ENVIRONMENT

Separate collection. This product must not be disposed of with normal household waste. Should you find one day that your BLACK+DECKER product needs replacement, or if it is of no further use to you, do not dispose of it with household waste. Make this product available for separate collection.

Separate collection of used products and packaging allows materials to be recycled and used again. Re-use of recycled materials helps prevent environmental pollution and reduces the demand for raw materials. Local regulations may provide for separate collection of electrical products from the household, at municipal waste sites or by the retailer when you purchase a new product.
BATTERIES

BLACK+DECKER batteries can be recharged many times. At the end of their useful life, discard batteries with due care for our environment:
▶ Run the battery down completely, then remove it from the tool.
▶ NiCd, NiMH and Li-Ion batteries are recyclable.
Take them to any authorized repair agent or a local recycling station.
TECHNICAL DATA
| MULTI-PURPOSE INFLATOR | BDINF20 | |
| Maximum pressure | PSI 160 | |
AC POWER CORD
| TYPE | -AR | -B2C | -B3 | -B2 | -BR | |
| Voltage | V | 220 | 220 | 120 | 220 | 127 |
| Frequency | Hz | 50 | 50 | 60 | 60 | 60 |
| VEHICLE CONNECTOR | V | 12 DC |
| BATTERY | LD120BAT |
| Voltage V | 20 V == MA |
* Maximum initial battery pack voltage (Measured without a workload) is 20 volts. Measured under a workload, nominal voltage is 18V.
⚠ Warning! This device shouldn't be use by persons (including children) whose have a physical capacity, sensory, mental abilities different or reduced, or person without experience or knowledge unless they can receive supervision or training to operation the device by someone responsible for your safety.
CNPJ: 53.296.273/0001-91
Insc. Est.: 701.948.711.00-98
S.A.C.: 0800.703.4644
Col. Santa Fé, Alvaro Obregón
- GENERAL SAFETY RULES
- SAVE THESE INSTRUCTIONS
- SAFETY INSTRUCTIONS
- Save all warnings and instructions for future reference.
- Work area safety
- Electrical safety
- Personal safety
- Power tool use and care
- ADDITIONAL SAFETY WARNINGS FOR YOUR INFLATOR
- LIQUID CRYSTAL DISPLAY FLUID (FIRST AID MEASURES)
- BATTERIES AND CHARGERS (Not include)
- IMPORTANT SAFETY INSTRUCTIONS FOR ALL BATTERY PACKS
- IMPORTANT SAFETY INSTRUCTIONS FOR ALL BATTERY CHARGER
- CHARGING A BATTERY
- Leaving the battery in the charger
- CHARGER CLEANING INSTRUCTIONS
- IMPORTANT CHARGING NOTES
- STORAGE RECOMMENDATIONS
- MOTOR
- INTENDED USE
- ASSEMBLY AND ADJUSTMENTS
- 12V Vehicle connector storage
- AC Cord storage
- Air hose storage
- High-volume hose storage
- Accessories storage
- FITTING THE ACCESSORIES Universal valve adapter (Fig. B)
- High-volume hose (Fig. C)
- OPERATION
- INSTALLING AND REMOVING THE BATTERY PACK (Fig. D, E)
- SWITCHING ON (Fig. F, G)
- To turn on high-volume
- To turn on high-pressure
- DEFLATE USING THE HIGH-VOLUME HOSE (Fig. H)
- ⚠ Warning! Beware of objects being ejected.
- SETTING THE AUTOMATIC SHUT-OFF PRESSURE
- USING THE INFLATOR AS A PRESSURE GAUGE
- MAINTENANCE
- ACCESSORIES
- PROTECTING THE ENVIRONMENT
- BATTERIES
Brand : BLACK & DECKER
Model : BDINF20
Category : Uncategorized