VG40 - Cooktop ROSIERES - Free user manual and instructions
Find the device manual for free VG40 ROSIERES in PDF.

| Product type | Gas hob |
| Brand | ROSIERES |
| Model | VG40 |
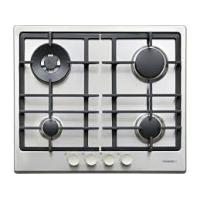
| Number of burners | 4 gas burners |
| Burner types | 1 rapid burner 3 kW (front left), 1 rapid burner 3 kW (rear right), 2 semi-rapid burners 1.8 kW Mijorose (rear left, front right) |
| Total gas power | 9.6 kW |
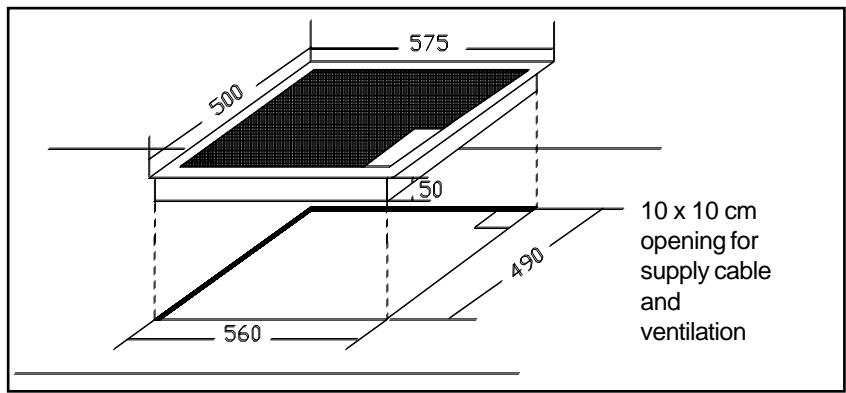
| Dimensions (W x D x H) | 575 x 500 x 50 mm |
| Cut-out dimensions (W x D) | 560 x 490 mm |
| Power supply | 220-240 V ~ 50/60 Hz |
| Ignition | Integrated electronic (spark ignition) |
| Safety | Thermocouple on each burner (gas shut-off in case of flame failure) |
| Surface material | Ceramic glass |
| Material of grates and caps | Enameled cast iron |
| Burner adjustment | Progressive, from maximum power to minimum |
| Compatible gas types | Natural gas (G20/G25), Butane (G30), Propane (G31) |
| Injectors supplied | Yes, for gas conversion |
| Gas connection | Rigid or flexible connection (GAZINOX type recommended) |
| Built-in class | Class 3 (per IEC 335-2.6) |
| Country of compliance | France (official stamp) |
| Warranty | 1 year parts (excluding labor and travel) |
| Routine maintenance | Ceramic glass cleaning cream, soapy water for burners |
Frequently Asked Questions - VG40 ROSIERES
User questions about VG40 ROSIERES
0 question about this device. Answer the ones you know or ask your own.
Ask a new question about this device
Download the instructions for your Cooktop in PDF format for free! Find your manual VG40 - ROSIERES and take your electronic device back in hand. On this page are published all the documents necessary for the use of your device. VG40 by ROSIERES.
USER MANUAL VG40 ROSIERES
*A thermocouple safety device 16
*A tap with progressive setting 16
*An automatic ignition integrated 16
* The "Mijorose" burner 16
* The ignition 17
* The choice of burner 17
*Cleaning 17
SURFACE UNIT RADIANT HILIGHT
- Safety 18
- How to operate the surface unit 18
- The different power level settings 19
* Recommendations for cooking with surface unit 19
* The choice of cookware 20
CLEANING AND MAINTENANCE of the vitroceramic cooktop 20
INSTALLATION
*Built-in 21
* GAS CONNECTION 22
* ELECTRICAL CONNECTION 24
GUARANTEE 24
TECHNICAL DATA
| VG 40 | VM 41 | |
| Overall dimensions | ||
| Width | 575 mm | 575 mm |
| Depth | 500 mm | 500 mm |
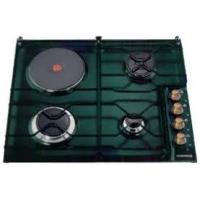
| The cooktop | Gas | 3 gas burners + 1 surface unit radiant hilight |
| Front left | Gas fast 3 kW | radiant hilight 1,8 kW - Ø 175 |
| Rear left | Gas semi-fast 1,8 kW Mijorose | Gas semi-fast 1,8 kW Mijorose |
| Rear right | Gas fast 3 kW | Gas fast 3 kW |
| Front right | Gas semi-fast 1,8 kW Mijorose | Gas semi-fast 1,8 kW Mijorose |
| Total power consumption | ||
| Gas | 9,6 kW | 6,6 kW |
| Electrical | --- | 1,8 kW |
| Class | 3 | 3 |
| Supply voltage | 220/240 Volts | 220/240 Volts |
All these characteristics are given for information with a constant concern for improving production quality, ROSIERES may make modifications to the appliance to incorporate technical improvements.

VM 41 - VG 40 : in conformity with directives 89/336/CEE, 73/23/CEE and 90/396/CEE.
THE CONTROL PANEL
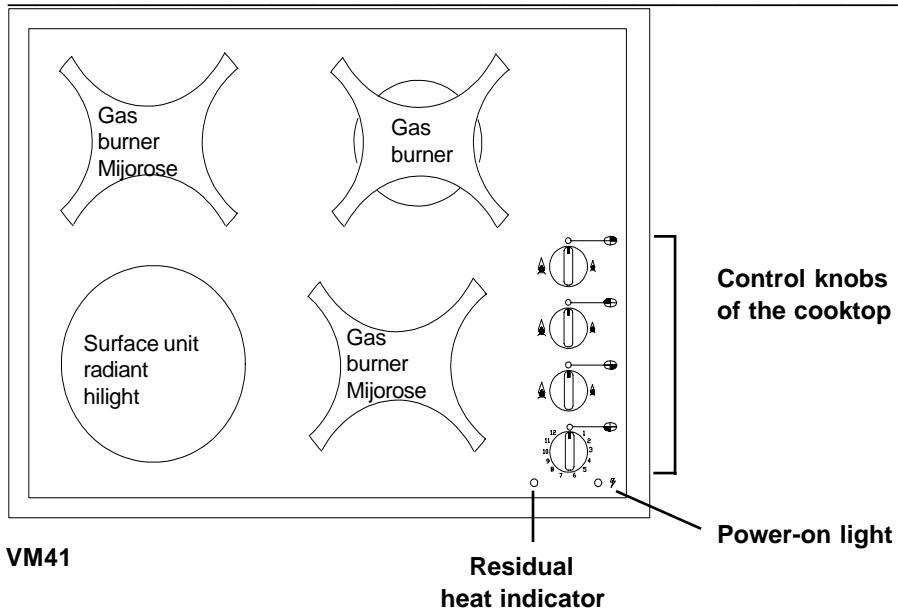
VG 40 : same model as VM 41 except that the model VG 40 is fitted with 4 gas burners (the surface unit radiant hilight is replaced by the fast gas burner).
THE GAS BURNERS
A THERMOCOUPLE SAFETY DEVICE : each burner is fitted with a thermocouple safety device which stops automatically the gas tap in case the flame may go off.
A TAP WITH PROGRESSIVE SETTING : each burner is controlled by a tap with progressive setting allowing :
- a wider choice of settings from the maximum position to the slowest and accurate one,
- a better handling to adjust the flame according to the pan diameter,
- no risk of break off or switch off when the flame is turned down quickly.
AN AUTOMATIC IGNITION INTEGRATED : the ignition can be made with one hand, while you have the pan in the other hand.
THE "MIJOROSE" BURNER : The pan supports fitting with the burners of 1,8 kW are as the Mijorose when the burner is on slow position.
On slow position the flame will not be in contact with the pan but with pan support which emits heat towards the latter.
The比我 rose is a heat diffuser, despatching evenly thanks to the thickness of cast-iron. It is ideal for stewings and slow cookings, without sticking in the bottom of the pan.
IGNITION OF THE BURNERS :
- Turn on the gas tap,
- Locate the sign corresponding to the requested heating zone


- Press and turn the knob on to the left till position "high flame". When you maintain the pression on the control knob for a few seconds, you will start the safety device as well as the ignition sparks of the burners.
- As soon as the flame appears, it is necessary to adjust it according to the pan diameter and your cooking.
- In case of no ignition the first time, repeat the ignition operation.
Recommendation :
. When the burners are not being used the mains gas supply valve should be closed.
. To save gas, make sure that the flames do not overlap the bottom of the pan.
THE CHOICE OF BURNER :
The hob is fitted with burners of different sizes and heat ratings. It is important to know how to make use of resulting differences in power.
- Use the large burner for bringing to the boil, for cooking large quantities, and generally for all foods requiring rapid cooking.
- Use the Miorose for simmering and for sauces.
- Avoid boiling food too intensely. Food is not cooked any more quickly this way. In fact it is subjected to severe agitation which may cause the food to lose some of its flavour.
CLEANING:
Caution :
Switch off supply before any operation of cleaning or dismounting.
Allow the cooktop to cool completely before cleaning.
The burners caps and pan supports of pan :
Two enamelled solid cast-iron elements for a maximum protection and an easy cleaning.
They are simply placed. Just lift them off and clean with a damp, slightly soapy sponge. Do not immerse them in cold water immediately after use to avoid cracking the enamel from the thermal shock.
The use of abrasive cleansers is not recommended as they scratch and dull the enamel. If the holes are clogged, brush the caps using soapy water and dry with a clean cloth.
Take care when re-fitting the burner caps and the pan supports.
The burner caps are fitted with thumb indexes to receive the pan supports.
The re-fitting must be perfect because a bad positioning can bring serious anomalies in the combustion.
The vitroceramic hob is slightly curved at the level of gas burners to drain the overflows far from the flame and heating zones, and which permits an easy cleaning.
For the cleaning of the vitroceramic hob, see page 20.
SURFACE UNIT RADIANT HILIGHT
SAFETY
- The hob is hot when in use. Hob temperatures increase. Surface temperatures are high so be careful when touching the hob. Keep children away.
- Never cook directly on the glass ceramic hob. Always use cookware.
- Always place the pan on the centre of the unit you are cooking on.
- Do not use the surface as a cutting board.
- Do not slide cookware across the hob.
- Do not store heavy items above the hob. If they drop onto the hob, they can cause damage.
- Do not use the hob as a working surface.
- Do not use the hob for storage of any items.
- Aluminium foil and plastic pans mustn't be placed on heating zones.
- When cooking with fats or oils, never leave surface unit unattended. Overheated fats or oils can quickly catch fire.
- In the unlikely event of a surface crack appearing, do not use the hob. Immediately disconnect the hob from the electrical power supply and call the After Sales Service.
HOW TO OPERATE THE SURFACE UNIT :
- Locate the sign corresponding to the surface unit radiant hilight

front left (only VM 41 model)
- Turn the control knob until the required cooking position is set.
It is recommended to heat the pan on "high" level until properly warmed up and then lower to desired cooking setting.
- The residual heat indicator lights up when the surface unit temperature is 60^ and above. It will stay on, even if the unit is switched off, until the surface has cooled down. It will switch off when the temperature of the surface falls below 60^ .
- The power-on indicator light comes on and stays on throughout cooking. It will switch off when the control knob is on stop position.
THE DIFFERENT POWER LEVEL SETTINGS
0 Stop
1-2 Very slow To keep a dish hot, melt butter and chocolate ...
3-4 Slow Slow cooking, bechamel, stews, rice in milk, poached eggs ...
5-6 Moderate Dry beans,frozen foods,fruit,boiling water ...
7-8 Medium Steamed apples,fresh vegetables,pasta,crepes,fish ...
9-10 High More intense slow cooking, omelettes, steacks, tripe ...
11-12 Very high Steaks,chops,frying....
RECOMMENDATIONS FOR COOKING WITH A VITROCERAMIC COOKTOP
To obtain the maximum performance from your appliance it is absolutely essential to take certain precautions or respect certain conditions. For example :
- Always use good quality cookware with perfectly flat bottoms : using cookware with perfectly flat bottoms will prevent hot spots that cause foods to stick. Thick metal pots and pans will provide an even distribution of heat.
- Ensure that the base of the pot or pan is dry : make sure that cookware bottoms are dry. When filling pots with liquid or using a pan that has been stored in the refrigerator, make sure that the bottom of the pan is completely dry before placing it on the hob. This is to avoid staining the hob.
- Use pans whose diameter is wide enough to completely cover the surface unit : the size of the pan should be no smaller than the surface unit. If it is slightly wider the energy will be wasted.
THE CHOICE OF COOKWARE
The following information will help you to choose cookware which will give good performance.
Stainless Steel : highly recommended. Especially good with a sandwich clad bottom. The sandwich bottom combines the benefits of stainless steel (appearance, durability and stability) with the advantages of aluminium or copper (heat conduction, even heat distribution).
Aluminium: heavy weight recommended. Good conductivity. Aluminium residues sometimes appear as scratches on the hob, but can be removed if cleaned immediately. Because of its slow melting point, thin weight aluminium should not be used.
CastIron: usable, but not recommended. Poor performance. May scratch the surface.
Copper Bottom : heavy weight recommended. Good performance, but copper may leave residues which can appear as scratches. The residues can be removed, as long as the hob is cleaned immediately. However, do not let these pots boil dry. Overheated metal can bond to glass hobs. An overheated copper pot will leave a residue that will permanently stain the hob.
Porcelain/enamel: Good performance only with a thin, flat, smooth bottom.
Glass-ceramic : notrecommended. Poor performance. May scratch the surface.
Stoneware: usable, but not recommended. Poor performance. May scratch the surface.
CLEANING and MAINTENANCE
- Avoid spillages :
Liquids spillages will burn on to the hob and will be very difficult to remove.
Keep all objects that could melt far from the glass hob, such as plastics, tinfoil, sugar. If something should fall on to the glass hob it must be removed immediately (while the surface is still hot) to avoid damaging the surface. Take care when removing hot substances.
- For normal, light stains :
When the surface is cool, rub a few drops of cleaning liquid (readily available in the shops) in to the stain with a damp paper towel. Buff with a dry paper towel until both stain and cleaning liquid are removed.
Frequent cleaning leaves a protective coating which is essential in preventing scratches and abrasions.
- For heavy, burned on stains :
When the surface is cool, apply a few drops of the cleaning liquid to the stain. As with any burned on spillage, this may require some effort. Carefully scrape soil with a razor scraper. Hold the scraper at a 30^ angle against the hob.
If the stain remains, repeat the above process. For additional protection, after all stains have been removed, polish the entire surface with the cleaning cream. Buff with a dry paper towel.
Carefully scrape stain with a razor scraper. Hold the scraper at a 30^ angle against the hob. (store the razor scraper out of reach of children).
If any soil remains, repeat the steps listed above. For additional protection, after all soil has been removed, polish the entire surface with the cleaning cream. Buff with a dry paper towel. Any product for cleaning glass is also a good protection.
N.B.:
Do not use a sponge that is excessively wet.
Never use steel tools such as knives or screwdrivers.
If you want to take the knobs off for a full cleaning, take care not to let water go into the open zone, and then check carefully that you completely re-seat the control knob.
Using a razor scraper will not damage the surface if the 30^ angle is maintained.
Do not leave the razor scraper within reach of children.
INSTALLATION-BUILT-IN
The cabinet in which your hob will be installed and all adjacent furniture, should be made of materials which can withstand temperatures of up 100^ . In addition, all decorative laminates must be fixed with the heat-resistant glue.
Take care to keep a minimum 5 cm between the appliance and adjacent furniture.
To ensure proper ventilation around the hob, allow at least 1 cm between the underside of the hob and the cabinet, and a 10 × 10 cm opening as illustrated.
When placing the hob, make sure that the joint (fiited with the hob) between the surrounding edge of the appliance and the worktop is properly sealed and that spillages cannot leak into any gap.
Worktop cut-out dimensions :
Length 560 mm
Width 490mm
Built-in:
Type "X" installation
conforms to CEI 335.2.6
These technical instructions are specially for the installers.
This appliance is not connected to an evacuation system for residual products. It must be installed according to outstanding installation rules. You will have specially to take care to the rules for ventilation. The airflow necessary to the combustion must be 2m^3 /h by kW of power. Before installation, check that local supply conditions, type and gas pressure are compatible with the appliance.
GAS CONNECTION : it must be made according to the rules applied in the country where installed. In any cases, install on the pipe of the gas supply a stop tap, a pressure cooker, or a pressure reducer release for LPG. Only use taps, pressure-reducers and flexible pipes according to the official trademark in the country where installed.
CONNECTION BY RIGID HOSE : fitting the appliance directly, connect to the threaded end of the harness link.
CONNECTION BY RIGID HOSE WITH MECHANICAL NOZZLES : fitting the first on the harness link, secondly on the stop tap of the pipe.
- We recommend this type of connection
CONNECTION BY RUBBER FLEXIBLE PIPE :
Screw the standard butt corresponding to the gas type used that you will have got. Mount the corresponding flexible on the butt and so on the pressure-reducer.
- We do not recommend this type of connection
In any cases, check that there is a sealing gasket when all connections are made, control the tightness with soaped water (control with flame is forbidden).
APPLIANCE IN THE FIXED KITCHEN UNITS
Butane Rigid - Flexible hose with mechanical nozzles (2) - Rubber flexible pipe (1) -
Propane Rigid - Flexible hose with mechanical nozzles (2) - Rubber flexible pipe (1) - Natural gas Rigid - Flexible hose with mechanical nozzles (2) -
(1) provided that the flexible pipe can be visited overall length. Its length will not exceed 1,5m . It will be fitted with clamping bands adjusted to the ends.
(2) provided that the flexible hose will be visited overall length.
(1) (2) The flexible pipes and flexible hoses with mechanical nozzles must be installed in such a way that they must in no case be in contact with the flames, neither spoiled by the gas of combustion nor by hot parts of appliances.
GAS CHANGE :
The hob is set on a type of gas which is mentioned on the packaging and reminded on the appliance sticker.
If you intend to connect to another type of gas, it is necessary to adapt the appliance as follows:
Place the suitable jet (which will ensure a normal flow), and set the idling.
Do not forget to update the label with the new setting.
REPLACING THE INJECTORS :
Pull the pan support off, take the burner caps out. Unscrew the jets with a special key.
In the same way, place the right one and screw it home.
SETTING OF THE IDLING :
- Remove the control knobs by pulling upwards,
- Natural gas : Screw the by-pass screw fully home and then unscrew it two full turns.
Ignit the burner on minimum output (mark small flame) The low setting is well controlled when the flames are reduced to a measurement of 3 to 4mm and do not extinguish when passing from maximum to low setting.
- butane propane gas: the setting is obtained by screwing by the by-pass screw fully home.
BURNERS CHARACTERISTICS
| Flow of burner | 3 kW | 1,8 kW | |
| Natural | Jet | 142 | 105 |
| G 20 20 mbar | Main flow | 285 l/h | 171 l/h |
| G 25 25 mbar | Setting of the air ring | without setting | without setting |
| Butane | Jet | 87 | 71 |
| G 30 | Main flow | 218 g/h | 131 g/h |
| 28-30 mbar | Setting of the air ring | without setting | without setting |
| Propane | Jet | 87 | 71 |
| G31-37 mbar | Main flow | 214 g/h | 129 g/h |
| Setting of the air ring | without setting | without setting |
INSTALLATION - ELECTRICAL CONNECTION
"The installation must be in conformity with standard directives".
Rosières declines all responsibility for any damage that may be caused by unsuitable or unreasonable use.
Connection to the power supply should be made through an earthed, three-pin wall socket or an omnipole cut-out switch with an opening gap of at least 3mm .
The electrical installation should be protected by a fuse, properly earthed, and includes wires of a sufficient section to supply the product correctly.
This appliance is supplied with main cable as well as a plug allowing exclusively the connection at voltages of 220-240 V between phases or between phases and neutral.
Connect on a plug with 10/16 A after checking voltage indicated on the meter, the setting of the circuit-breaker and the calibre of fuse (10 A).
Attention : always check the continuity of the connection to the installation before any electrical operation. Rosières cannot be held responsible for any accidents resulting from the use of an appliance which is not connected to earth, or as a faulty earth connection continuity.
For any matter relative to the supply cord, ask for After sales service or for a qualified technician.
GUARANTEE
The guarantee contract consists simply and solely in exchanging or replacing any part considered by us to be defective, or repairing it after examination by our Technical Assistance, to the exclusion of all other indemnities of whatever kind.
Duration : the appliance is guaranteed for one year from the date of delivery to the first purchaser.
Conditions: the appliance should only be used for the purposes for which it has been designed and as described in this booklet. You should always contact your installer who is responsible for After-Sales service and who sold you the appliance. The removal expenses, costs of transport, labour, packing resulting from guarantee operations will be taken in charge by the user or by the installer according to the conditions of sale.
After the guarantee : get in touch with the retailer who sold you the appliance. They will immediately place on order with our Parts Department for the required components.
Legal guarantee : the conditions of guarantee do not affect your statutory rights.
When making a claim, or when ordering a part, tell your retailer the exact type of appliance and the serial number shown on the specification plate, and the name of the part.
To be certain of getting the correct specification, guaranteed for maximum reliability and safety, ask scpecifically for "CERTIFIED MANUFACTURERS PARTS".
INDICE
DATI TECNICI 26