KW-NT1 - Car stereo JVC - Free user manual and instructions
Find the device manual for free KW-NT1 JVC in PDF.


User questions about KW-NT1 JVC
0 question about this device. Answer the ones you know or ask your own.
Ask a new question about this device
Download the instructions for your Car stereo in PDF format for free! Find your manual KW-NT1 - JVC and take your electronic device back in hand. On this page are published all the documents necessary for the use of your device. KW-NT1 by JVC.
USER MANUAL KW-NT1 JVC
trafficmaster traffic
DOLBY DIGITAL



Maps

text_image
JVC


Bluetooth®

Made for iPod

Works with iPhone
Radio Data System
For installation and connections, refer to the separate manual.
Declaration of Conformity with regard to the R&TTE Directive 1999/5/EC
C €0984
English:
Hereby, JVC, declares that this KW-NT1 is in compliance with the essential requirements and other relevant provisions of Directive 1999/5/EC.
Deutsch:
Thank you for purchasing a JVC product.
Please read all instructions carefully before operation, to ensure your complete understanding and to obtain the best possible performance from the unit.
IMPORTANT FOR LASER PRODUCTS
- CLASS 1 LASER PRODUCT
-
CAUTION: Do not open the top cover. There are no user serviceable parts inside the unit; leave all servicing to qualified service personnel.
-
CAUTION: Visible and/or invisible class 1M laser radiation when open. Do not view directly with optical instruments.
-
REPRODUCTION OF LABEL: CAUTION LABEL, PLACED OUTSIDE THE UNIT.
| CAUTION | ATTENTION | AVISO | VARNING | 注意 |
| VISIBLE AND/OR INVISIBLE CLASS 1M LASER DIZATION WHEN OPEN. DO NOT VERIFY DIRECTLY WITH OPTICAL INSTRUMENTS (EC06825-1:2001 (ENG) | RAYONNEMENT LASER VISIBLE ET/OU INVISIBLE DE CLASSE LIME FOIS OUVERT, PAGESBÄRGER, DIRECTMENT AVE DES INSTRUMENTS OPTIQUES. (FRA) | RADIACION LÄSER DE CLASE 1M VISIBLE Y/O INVISIBLE CUANDO ESTA ALABOGA NO MIRAR DIRECTAMENTE CON INSTRUMENTAL OPTICO. (ESP) | SYNUG OCH/ELLER OSYNLIG LÄSER STRÄLNING, KLST AS N, NÄR DENNA DESPÄRTEKTAJ ESTRÄLEN MED OPTISKÄ INSTRUMENT. (SWE) | BEIJING AND/OR INVISIBLE CLASS II LASER DIZATION WHEN OPEN. DO NOT VERIFY DIRECTLY WITH OPTICAL INSTRUMENTS (EC06825-1:2001 (ENG) |
Information for Users on Disposal of Old Equipment and Batteries
[European Union only]
These symbols indicate that the product and the battery with this symbol should not be disposed as general household waste at its end-of-life.
If you wish to dispose of this product and the battery, please do so in accordance with applicable national legislation or other rules in your country and municipality.
By disposing of this product correctly, you will help to conserve natural resources and will help prevent potential negative effects on the environment and human health.
Notice:
The sign Pb below the symbol for batteries indicates that this battery contains lead.

Products

Battery
Cautions on the monitor:
- The monitor built in this unit has been produced with high precision, but it may have some ineffective dots. This is inevitable and is not malfunction.
- Do not expose the monitor to direct sunlight.
- Do not operate the touch panel using a ball-point pen or similar tool with the sharp tip.
Touch the buttons on the touch panel with your finger directly (if you are wearing a glove, take it off).
- When the temperature is very cold or very hot...
– Chemical changes occur inside, causing malfunction.
— Pictures may not appear clearly or may move slowly. Pictures may not be synchronized with the sound or picture quality may decline in such environments.
WARNINGS:
To prevent accidents and damage
- DO NOT install any unit or wire any cable in a location where;
— it may obstruct the steering wheel and gearshift lever operations.
– it may obstruct the operation of safety devices such as air bags.
– it may obstruct visibility. - DO NOT operate the unit while driving. If you need to operate the unit while driving, be sure to look around carefully.
- The driver must not watch the monitor while driving.
For security reasons, a numbered ID card is provided with this unit, and the same ID number is imprinted on the unit's chassis. Keep the card in a safe place, as it will help the authorities to identify your unit if stolen.
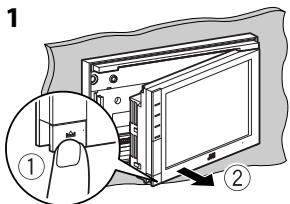
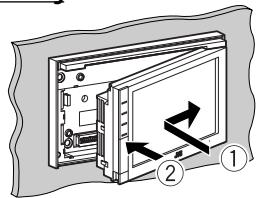
Detaching/attaching the monitor panel
Detaching
text_image
1 ① ②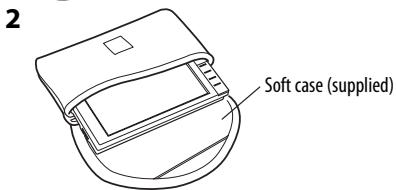
text_image
2 Soft case (supplied)Attaching
text_image
Diagram showing a device with labeled components and directional arrows indicating movement or forceCaution:
- Hold the monitor panel securely so as not to drop it accidentally.
- Fit the monitor panel onto the attaching plate until it is firmly locked.
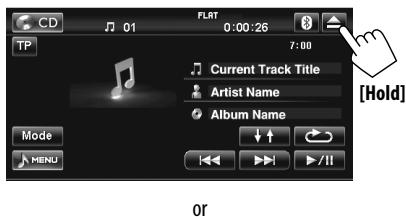
How to forcibly eject a disc
AV screen
text_image
CD 01 FLAT 0:00:26 TP 7:00 Current Track Title Artist Name Album Name Mode MENU or [Hold]Map screen

text_image
DISP JVC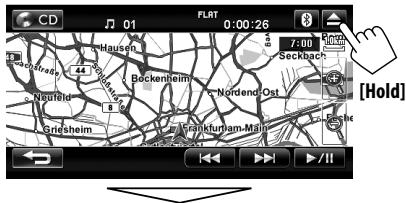
text_image
CD 01 FLRT 0:00:26 [Hold]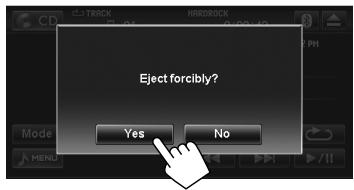
text_image
Eject forcibly? Yes No- Be careful not to drop the disc when it ejects.
- If this does not work, detach the monitor panel then attach it.
For safety...
- Do not raise the volume level too much, as this will block outside sounds, making driving dangerous.
- Stop the car before performing any complicated operations.
Temperature inside the car...
If you have parked the car for a long time in hot or cold weather, wait until the temperature in the car becomes normal before operating the unit.
How to read this manual:
- < indicates the variable screens/menus/operations/settings that appear on the touch panel.
• [ ] indicates the buttons on the touch panel.

natural_image
Illustration of a hand holding a document with a key and car icon above (no text or symbols)Detaching/attaching the monitor panel 3
How to forcibly eject a disc .... 3
Introduction......7
Installation settings 7
Parts identification....8
Basic operations 9
- Turning on the power 9
- Displaying monitor setting bars 9
Switching screens 10

natural_image
Silhouette of a car with a winding road, enclosed in a rounded square frame (no text or symbols)Navigation System 13
Safety instructions for the Navigation System 13
Basic operations 14
- To change the map scale.... 15
- To scroll the map.... 15
- To display your current position 16
• To change the map view 16
Registering your home/favourite points 17
- Registering your home/favourite points 17
• Editing registration.... 18
Searching for a place.... 19
- About search screens and input screens.... 19
- Setting a destination on the map.... 20
- Setting a destination using the Destination Menu .... 20
• To go home....21 - By address 21
- By telephone number
23 - By coordinates
...... 23 - POI near a place/route
...... 24 - From the list of POI
25
• From your favourites26 - From previous destinations
26 - Quick Search 27

natural_image
Illustration of a house and a teacup on a saucer (no text or symbols)




Starting guidance....29
- Starting guidance to the destination 29
• To cancel guidance....29 - Changing route options 29
Arranging your route 31
- Adding places to stop by 31
- Avoiding a congestion ahead.... 32

natural_image
Symbolic icon of a musical note and clef inside a rounded square frame (no text or symbols)



How you are guided 33
- Getting information on your route and places 35
- Customizing how you are guided.... 36
- Adjusting the vehicle position.... 36
Traffic information on the map — TMC....37
• How TMC information is reflected in navigation 37
- Checking the TMC information.... 38
Checking the information of the navigation system....39
Initializing memories/navigation settings 40
Navigation menu items....41
Additional information 42
AV Operations.... 44
Common operations on AV screens....44
- Selecting the playback source 44
- Turning off the AV source.... 44
Listening to the radio 45
- Storing stations in memory.... 46
- Selecting a preset station.... 46
- Reducing the interference.... 47
- Searching for FM Radio Data System programme—PTY Search..... 47
- Activating/deactivating TA/PTY Standby Reception...... 48
- Tracing the same programme—Network-Tracking Reception...... 49
• Automatic station selection—Programme Search 49
Disc operations....50
- Playable disc types....51
- Selecting playback modes....56
- Settings for the disc playback....57
SD/USB operations....58
Listening to the iPod/iPhone device....60
- Selecting a track/video from menu on the iPod/iPhone...... 62
Using other external components 63
- Front AV-IN 63
• AV-IN 63 - Selecting aspect ratio....63
Sound equalization....64
AV menu items 65
Additional information 68
natural_image
Illustration of a vintage mobile phone with a screen and keypad, emitting sound waves (no text or symbols)Phone Operations....73
Using Bluetooth ^® mobile phone 73
- Bluetooth mobile phone settings....74
- Connecting a Bluetooth mobile phone....75
- Receiving a call .... 76
- Ending the call/stopping ringing (canceling the outgoing call) ..... 77
- Adjusting the volume 77
- Switching between handsfree mode and phone mode.... 77
- Making a call....78
- Switching the calls on call waiting....79
- Disconnecting a Bluetooth mobile phone 79
- Deleting a registered Bluetooth mobile phone .... 79
Editing the phone number memory 80
- Copying the phone book 80
- Deleting the memory in the
80
natural_image
Illustration of a hand holding a steering wheel over a road ahead (no text or symbols)Rear View Camera Operations...... 81
Using a rear view camera 81
- Activating/deactivating the rear view camera 81
- Checking the rear view.... 81

natural_image
Abstract icon with three large black question marks inside a rounded square frame (no text or symbols)References...... 82
Maintenance 82
Troubleshooting....83
Specifications 89
Importing POI information
You can import POI information on Google Maps through an SD. For details, visit http://www.jvc-exad.com.
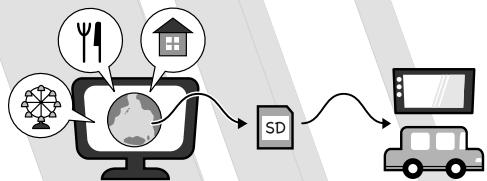
flowchart
graph LR
    A["Computer monitor with icons for food, kitchen, household"] --> B["SD"]
    B --> C["Mobile device"]
    C --> D["Car"]
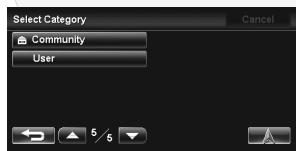
text_image
Select Category Cancel Community User- When the SD card is ejected, the imported POI cannot be used.
Installation settings
When you turn on the unit for the first time, the initial setup screen appears.
1 Turn on the ignition switch.
The power is turned on, and the opening screen is displayed for about 5 seconds, then the language selection screen is displayed.
2 Select the language you want for the display and the voice guidance.
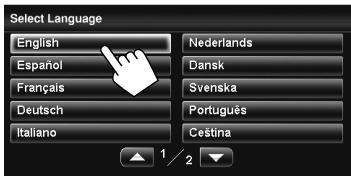
text_image
Select Language English Espanol Français Deutsch Italiano Nederlands Dansk Svenska Português Cestina- You can also select the system language through
3 Display installation settings screen.
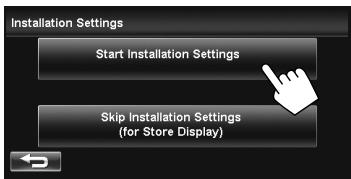
text_image
Installation Settings Start Installation Settings Skip Installation Settings (for Store Display)- If you select [Skip Installation Settings (for Store Display)], the System starts in the navigation demonstration mode for stores. You need to make the installation settings next time you turn on the power or detach the monitor panel (then attach it).
- When selecting [Start Installation Settings],
is set to . (page 66)
4 Adjust the settings.
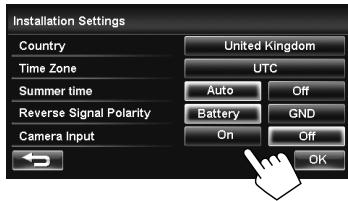
text_image
Installation Settings Country Time Zone Summer time Reverse Signal Polarity Camera Input United Kingdom UTC Auto Off Battery GND On Off OK| Country | Select the country where you are now. |
| Time Zone*1 | Select your residential area for automatic clock adjustment by GPS signal. |
| Summer time*1 | Selectif your residential area is subject to Summer time. |
| Reverse Signal Polarity*1 | Select the reverse signal polarity (or) according to the connection of your car. |
| Camera Input*2 | Selectwhen connecting the rear view camera to the CAMERA IN jack. |
*1 *2 You can also change these settings through
*2: page 66)
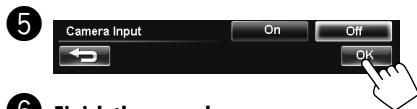
text_image
5 Camera Input On Off ← OK 6 Finish the procedure6 Finish the procedure.
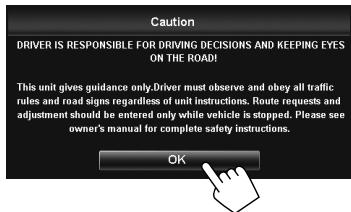
text_image
Caution DRIVER IS RESPONSIBLE FOR DRIVING DECISIONS AND KEEPING EYES ON THE ROAD! This unit gives guidance only. Driver must observe and obey all traffic rules and road signs regardless of unit instructions. Route requests and adjustment should be entered only while vehicle is stopped. Please see owner's manual for complete safety instructions. OK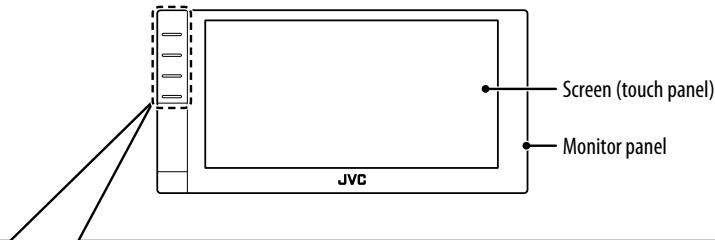
text_image
Screen (touch panel) Monitor panel JVCTouch pad controls
You can operate the unit by touching the appropriate part of the touch pad controls.
natural_image
Line drawing of a finger pressing down on a door panel (no text or symbols)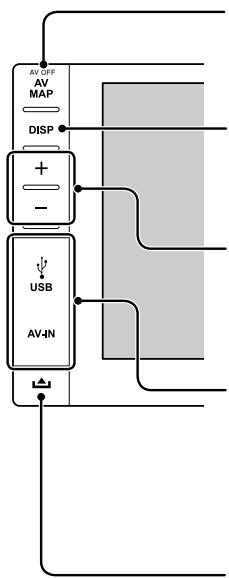
flowchart
graph TD
    A["AV-UP"] --> B["AV MAP"]
    B --> C["DISP"]
    C --> D["+"]
    D --> E["-"]
    E --> F["USB"]
    F --> G["AV-4N"]
    G --> H["+"]
    H --> I["Output"]
AV MAP/AV OFF button
- Switches the screen between the map screen and AV screen. ( page 10)
- Turns off/on the AV function. [Hold] (page 44)
DISP button
• Shows the AV control bars while the map is displayed. ( page 10)
- Displays the monitor setting bars. [Hold] (page 9)
+/- buttons
Adjusts the audio volume.
- About the adjustable volume range, page 65.
- To adjust the guidance volume, page 36.
Input terminals ("USB," "iPod" and "Front AV-IN")
text_image
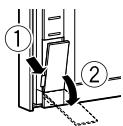
Diagram showing two labeled steps (① and ②) of a mechanical or architectural component with directional arrows indicating movement.- If it is difficult to open the cover on the input terminals, detach the monitor panel, open the cover, then attach it.
(Detach) button
Detaches the monitor panel. ( page 3)
Turning on the power
Turn on the ignition switch.
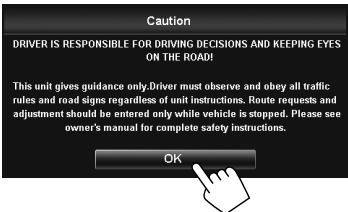
- When displaying the map screen for the first time after turning on the power, the screen below appears. Pay sufficient attention when operating the unit and make sure of safe driving. - If [OK] is not pressed on the caution screen, the same screen appears each time you switch to the map screen. To use the map screen, press [OK].
text_image
Caution DRIVER IS RESPONSIBLE FOR DRIVING DECISIONS AND KEEPING EYES ON THE ROAD! This unit gives guidance only.Driver must observe and obey all traffic rules and road signs regardless of unit instructions. Route requests and adjustment should be entered only while vehicle is stopped. Please see owner's manual for complete safety instructions. OK- The power is turned off when the ignition switch is turned off.
Messages about the status of GPS signal reception
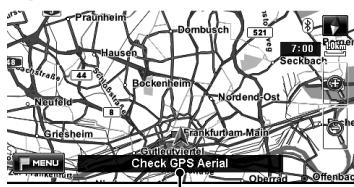
Current status of the GPS signal reception
| “Check GPS Aerial” | Check the connection of the GPS aerial. |
| “Acquiring GPS Signal” | · Acquiring GPS signals. Wait until signal reception is completed.· GPS signals cannot be received. Move to the place where the System receives the GPS signals. |
Displaying monitor setting bars
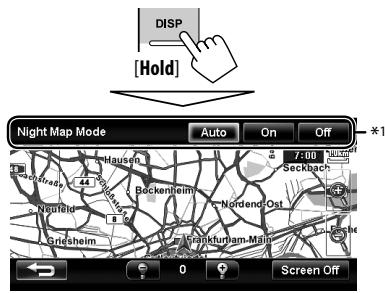
text_image
DISP [Hold] Night Map Mode Auto On Off 7:00 Seckbach Bockenheim Nordend Ost Grijsheim Frankfurtam-Main Screen Off| Night Map Mode*1 | Changes the map to the night colour. • Auto: Activates the night mode when you turn on the headlights.*2 • On: Activates the night mode. • Off: Cancels. |
| Adjusts the brightness. (-5 to +5) | |
| Screen Off | Turns off the screen. • To turn on the screen, perform one of the followings: - Press AV MAP. - Press and hold DISP. - Touch the screen. |
To hide the monitor setting bars, perform one of the followings:
- Press DISP.
- Press [←].
- Touch the area other than the monitor setting bars.
*1 Appears only when the map screen is displayed.
*2 The ILLUMINATION CONTROL lead connection is required. (Installation/Connection Manual)
Switching screens
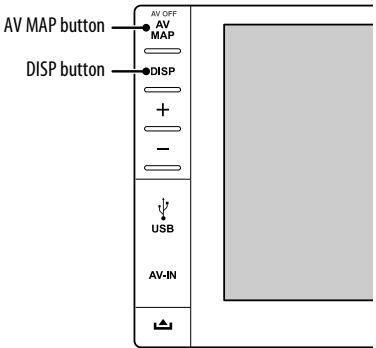
text_image
AV OFF AV MAP button DISP button + - USB AV-INMap screen
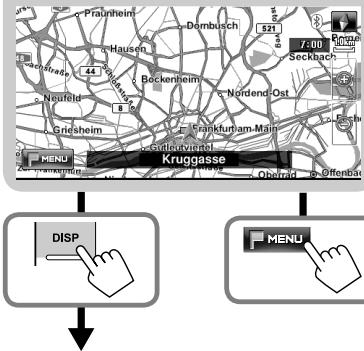
text_image
Kruggasse Dr. Pauernheim Hausen Dombusch 521 Seckhaz F-000 Neufeld Bockenheim Nordend-Ost Grijsheim Frankfurtam-Main Oberfrad Offenbat MENU DISP MENUMap screen with AV control bars
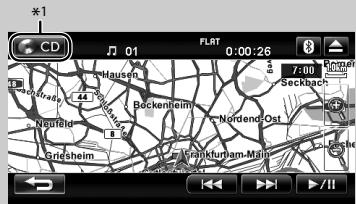
text_image
CD 01 FLRT 0:00:26 Hausen Bockenheim Nordend Ost Seckbach Neufelde Grücheim Frankfurtmann-Maih 7:00- AV control bars are also displayed as you insert a disc or connecting a USB device or iPod/iPhone.
- Operations on the map are not available while the AV control bars are displayed.
- You can also display the AV control bars even when the screen is turned off.
To hide the AV control bars, perform one of the followings:
- Press DISP.
- Press [←].
- Touch the map area.
While driving at a speed greater than 10 km/h, some screens on the navigation menus are not available.
- Press [←] to return to the previous screen.
- On navigation screens only: press [ ] to display the current position on the map.
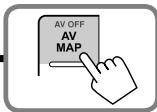
text_image
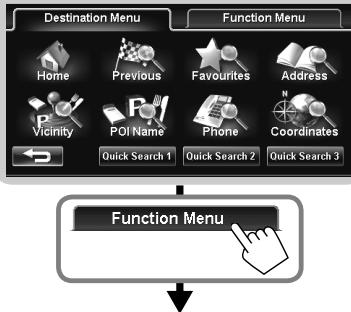
AV OFF AV MAPDestination Menu
Searches for the destination.
flowchart
graph TD
    A["Destination Menu"] --> B["Home"]
    A --> C["Previous"]
    A --> D["Favourites"]
    A --> E["Address"]
    A --> F["Vicinity"]
    A --> G["POI Name"]
    A --> H["Phone"]
    A --> I["Coordinates"]
    J["Function Menu"] --> K["Next Step 1"]
    J --> L["Next Step 2"]
    J --> M["Next Step 3"]
Function Menu
Shows the information about the navigation system.
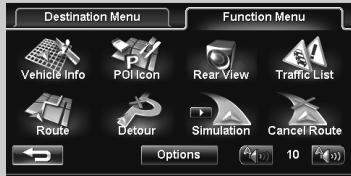
text_image
Destination Menu Vehicle Info Poly Icon Rear View Traffic List Route Detour Simulation Cancel Route Options 10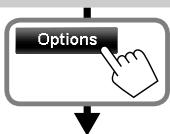
text_image
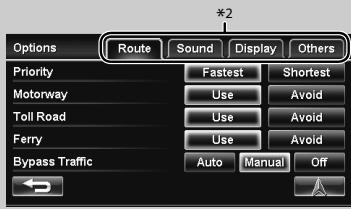
OptionsOptions
Changes the detailed settings. ( page 41)
text_image
Options Route Sound Display Others Priority Fastest Shortest Motorway Use Avoid Toll Road Use Avoid Ferry Use Avoid Bypass Traffic Auto Manual OffAV screen
text_image
CD 01 FLRT 0:00:26 7:00 Current Track Title Artist Name Album Name Mode MENU
text_image
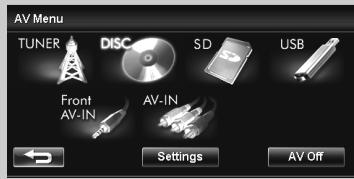
MENUAV Menu
Changes or turns off the AV source.
text_image
AV Menu TUNER DISC SD USB Front AV-IN AV-IN Settings AV Off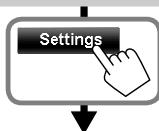
text_image
SettingsSettings
Changes the detailed settings. ( page 65)
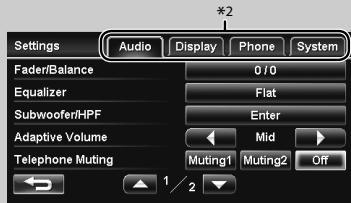
text_image
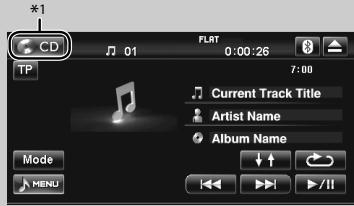
Settings Audio Display Phone System Fader/Balance 0 / 0 Equalizer Flat Subwoofer/HPF Enter Adaptive Volume Mid Telephone Muting Muting1 Muting2 Off*1 You can change the source by pressing the AV source icon.
*2 Switches the category by pressing the corresponding tab.
When items on the menu are not available
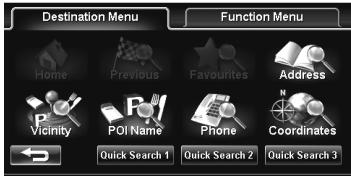
text_image
Destination Menu Function Menu Home Previous Favourites Address Vicinity POI Name Phone Coordinates Quick Search 1 Quick Search 2 Quick Search 3• Non-available items will be shaded.
To change the page of menu/list
Menu
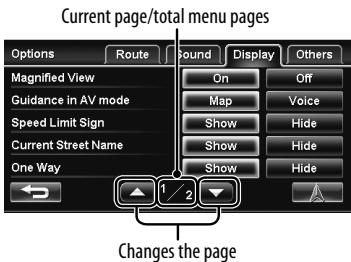
text_image
Current page/total menu pages Options Route Sound Display Others Magnified View Guidance in AV mode Speed Limit Sign Current Street Name One Way On Off Map Voice Show Hide Show Hide Show Hide Changes the pageList
Ex.: Folder/track list
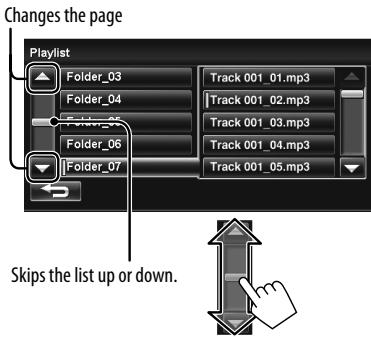
text_image
Changes the page Playlist Folder_03 Track 001_01.mp3 Folder_04 Track 001_02.mp3 Folder_06 Track 001_03.mp3 Folder_07 Track 001_04.mp3 Track 001_05.mp3 Skips the list up or down.To select folder/track on the list
Select a folder (①), then a track (②).
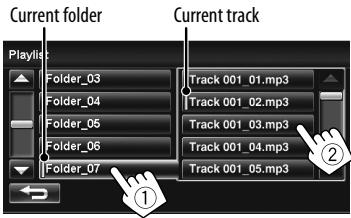
text_image
Current folder Current track PlayList: Folder_03 Track 001_01.mp3 Folder_04 Track 001_02.mp3 Folder_05 Track 001_03.mp3 Folder_06 Track 001_04.mp3 Folder_07 Track 001_05.mp3Characters you can use
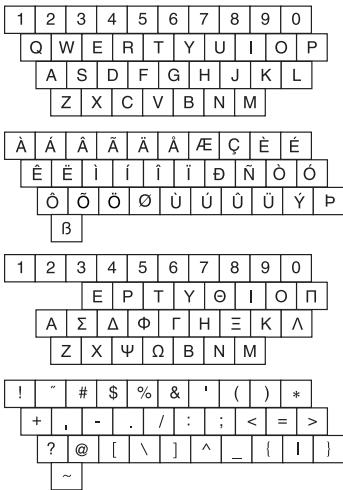
text_image
1 2 3 4 5 6 7 8 9 0 Q W E R T Y U I O P A S D F G H J K L Z X C V B N M À Á Â Ä Ä Ä AΕ Ç È É Ê Ê ì í í í Ï Ñ Ó Ó Ô Ô Ö Ø Û Ú Û Ü Ù Ý P β 1 2 3 4 5 6 7 8 9 0 E P T Y Θ I O Π A Σ Δ Φ Γ H ≡ K ∧ Z X Ψ Ω B N M ! " # $ % & ' ( ) * + , - . / : ; < = > ? @ [ \ ] ^ _ { I } ~Safety instructions for the Navigation System
SAFETY INSTRUCTIONS
Use of the Navigation System is only permitted if the traffic conditions are suitable and you are absolutely sure that no risk, obstruction or inconvenience will be incurred to you, your passengers or other road users. The requirements of the Road Traffic Regulations must always be followed. The destination must not be entered while driving the car.
The Navigation System serves solely as an aid to navigation. It never releases the drivers from their duties to drive carefully and to make own judgement in road traffic. Inaccurate or incorrect instructions may happen to be given due to changing traffic conditions. The actual road signs and traffic regulations must therefore always be observed. In particular, the Navigation System cannot be used as an aid to orientation when visibility is poor.
This Navigation System must only be used for its intended purpose. The volume of the car radio/Navigation System must be adjusted so that external noise is still audible.
Navigation guidance is performed, based on the database, therefore, it may not be applicable to the current situation because of changes in traffic conditions (e.g. changes in tollroads, principal roads, one-way traffic, or other traffic regulations). In this case, observe the current traffic signs or regulations.
- Traffic signs should be observed carefully while driving using the Navigation System. Navigation System is only an aid. Driver must always decide whether or not to heed the information provided.
- Traffic guidance is restricted to passenger vehicles only. Special driving recommendations and regulations for other vehicles (e.g. commercial vehicles) are not included.
- Do not operate the unit while driving.
JVC does not accept liability for erroneous data provided by the Navigation System.
Terms of licence
You are granted a non-exclusive licence to use the database for your personal purposes. The present licence does not authorise the granting of sublicenses. Use of the data is only permitted in this specific JVC system. It is forbidden to extract or make further use of significant parts of the database content, or to duplicate, modify, adapt, translate, analyse, decompile or reverse-engineer any part thereof.
WARNING:
Road traffic regulations always take priority when a vehicle is being driven in traffic. Navigation System is only an aid. Errors may occur in individual data items/entries. At all times, the driver must decide whether or not to heed the information provided.
JVC does not accept liability for erroneous data provided by the Navigation System.
© Tele Atlas BV. 2008 All rights reserved.
When replacing/rotating the tyres:
It is required to clear all the accumulated calibration data which is important for accurate navigation. To clear the data, perform
Basic operations
Your position is always at the centre of the map.
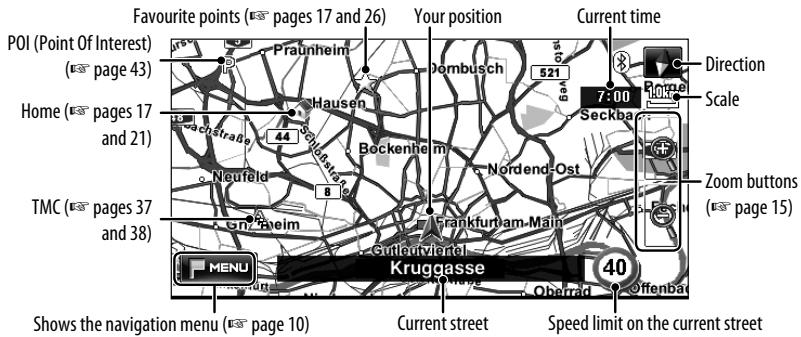
text_image
Favourite points (pages 17 and 26) Your position Current time POI (Point Of Interest) (page 43) Praunheim Dombusch 521 7:00 Direction Home Scale Home (pages 17 and 21) Hausen Beckenheim Nordend-Ost Neufeld Frankfurtam-Main Zoom buttons (page 15) TMC (pages 37 and 38) Gnzeheim Gutleutviortel Kruggasse 40 MENU Oberrad Offenba Shows the navigation menu (page 10) Current street Speed limit on the current street- The information on the map (such as street name, the POI information, and speed limit) may not be always displayed depending on the condition (for example, if the System does not have the information of the position).
Icons on the map
- Home (💡) and favourite point (★) icons are displayed after home/favourite points are registered.
- POI icons are displayed on the map depending on the
setting (below) and the map scale is between 25 m and 250 m.
- The following icons are displayed when the map scale is between 25 m and 1 km:
– Airport and ferry terminal icons in the travel category
– Golf course icon in the leisure category
– Petrol station icons
- POI icons may not be displayed correctly when the System displays the wide area of map. In this case, zoom in the map to display the detailed map.
To display/hide POI icons on the map
1

flowchart
graph LR
    A["MENU"] --> B["Function Menu"]
2
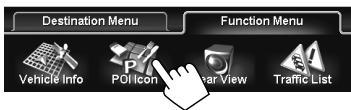
text_image
Destination Menu Function Menu Vehicle Info POI Icon View Traffic List3 Select categories (①) and sub-categories (②) of POI which you want to be displayed on the map.
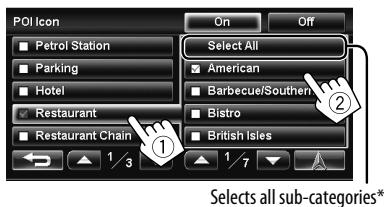
text_image
POI Icon Petrol Station Parking Hotel Restaurant Restaurant Chain Select All American Barbecue/Southern Bistro British Isles 1/3 1/7 ② Selects all sub-categories*- The selected items are marked with "✓."
4 Activate or deactivate the POI icons of the selected categories.
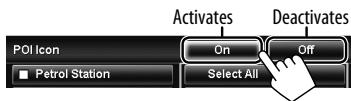
text_image
POI Icon Petrol Station Activates On Select All Deactivates Off* When all sub-category is selected, the button is automatically changed to [Deselect All]. Press [Deselect All] to cancel the selection of all sub-categories.
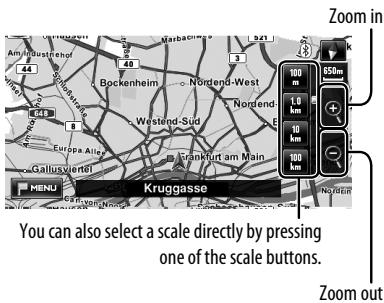
To change the map scale
1 Display the zoom buttons and scale buttons.
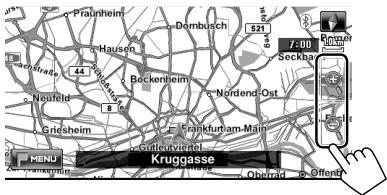
text_image
Praunheim Dombusch 521 7:00 Bromer Seckhau 44 Hausen Beckenheim Nordend-Ost Neufeld Griesheim Kroniklum-am-Mai sulcurverlei Kruggasse MENU MENI Abbrad Offent2
text_image
Zoom in 100 mm 650mm 1.0 mm 10 mm 100 mm Nordend-Sud Nordend-West Bockenheim Beckenheim Nordend- Europa Alte Frankfurt am Main Gallusvortel MENJ Krugasse You can also select a scale directly by pressing one of the scale buttons. Zoom outTo scroll the map
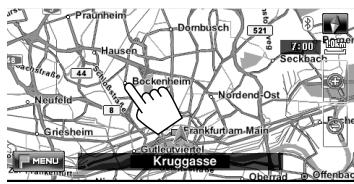
text_image
Pratelnheim Dombusch 521 7:00 Seckbach 44 Hausen Beckerheim Neufeld Grijsheim Frankfurt-Vorpommel Frankfurt-am-Main MENI Krugurverhof Rekggasse Obhrad OffenbacThe position you touched is centred on the map.
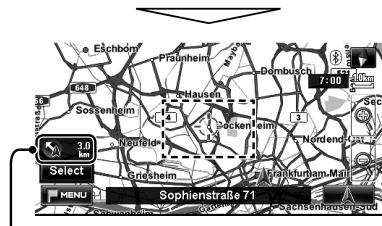
Direction and distance from your current position
- Touch and hold the map to keep scrolling the map.
- The scrolling speed varies depending on the position you are touching and holding:
– Inner area: slow - Outer area: fast
To display your current position
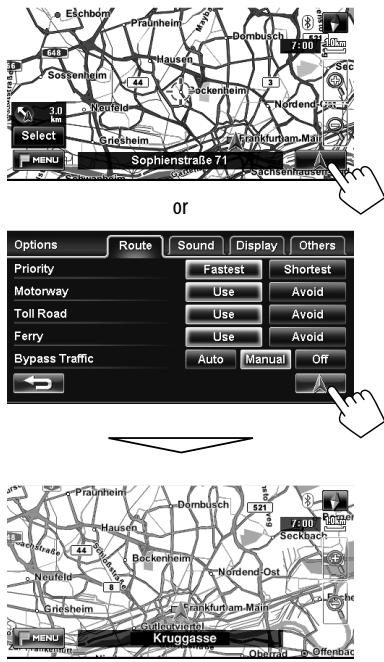
text_image
Eschbaum Praunheim Dombusch 7:00 Sostenheim Neufeld Sockenheim Nordend Select Sriegshim Frankfurtam-Mar Sachsenhausen Sophienstraße 71 or Options Route Sound Display Others Priority Fastest Shortest Motorway Use Avoid Toll Road Use Avoid Ferry Use Avoid Bypass Traffic Auto Manual Off Krupgasse Brundau Oberia Seckbach Praunheim Dombusch 521 Neufeld Beckenheim Nordend Ost Sriegshim Frankfurtam-Mar MENKL Brundau Oberia SeckbachTo change the map view
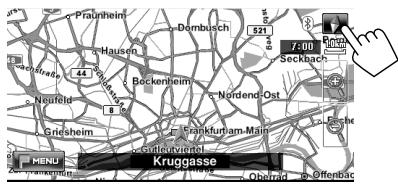
text_image
Praunheim Dembusch 521 Hausen Bäckenheim Neufeld Grijsheim Frankfurt am Main MENU Kruggasse Seckbach Nordend Ost Oberland OffenBis 7400
2D Heading Up
The map rotates so that you are always displayed heading "upwards."
- The icon shows the direction of north.


3D Map
The three dimensional map is displayed in "heading up."
- The icon shows the direction of north.


2D North Up
The map view is oriented with north "upwards," as in usual paper maps.
- The icon shows the direction of the car.
Registering your home/favourite points
Registering your home/favourite points
You can register one point as your home and 100 favourite points.
1 Touch the position where you want to select as a destination. ( page 15)
- To search the destination using
2
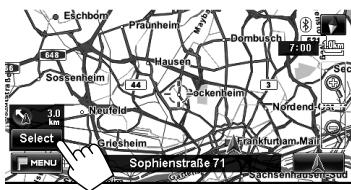
- If there are several POIs on the selected position, select one from the list.
- The list appears only when
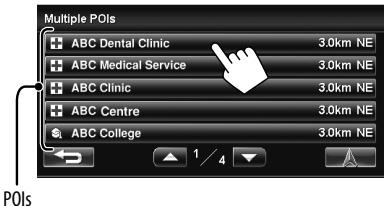
text_image
Multiple POIs ABC Dental Clinic 3.0km NE ABC Medical Service 3.0km NE ABC Clinic 3.0km NE ABC Centre 3.0km NE ABC College 3.0km NE 1/4 POIs3
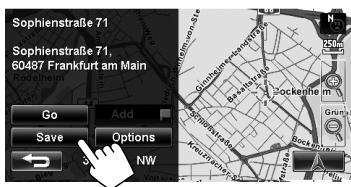
- For details about the information screen, page 30.
4
text_image
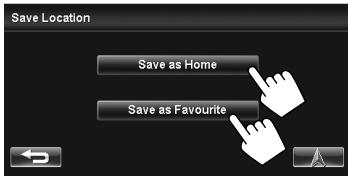
Save Location Save as Home Save as Favourite[Save as Home]:
The selected position is saved as home and the home is marked with 📋 icon on the map.
- When the home is already registered, you are asked if you want to replace the old home. Press [Yes] to replace, or press [No] to cancel.
[Save as Favourite]:
The selected position is saved as a favourite point and the favourite point is marked with ★ icon on the map.
• To edit the registration, page 18.
- For guidance to your home, page 21.
- For guidance to a favourite point, page 26.
Editing registration
1 Select a registered point you want to edit. To select your home
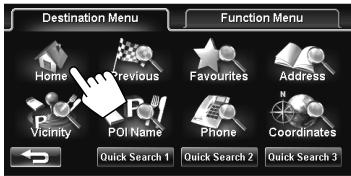
text_image
Destination Menu Home Previous Favourites Address Vicinity POI Name Phone Coordinates Quick Search 1 Quick Search 2 Quick Search 3To select a favourite point
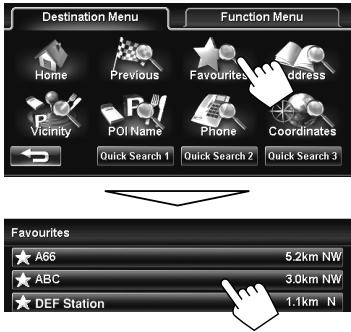
text_image
Destination Menu Home Previous Favourites Address Vicinity POI Name Phone Coordinates Quick Search 1 Quick Search 2 Quick Search 3 Favourites A66 5.2km NW ABC 3.0km NW DEF Station 1.1km N2
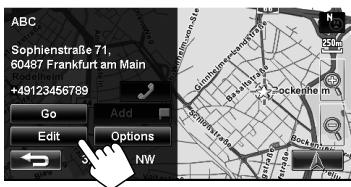
text_image
ABC Sophienstraße 71, 60487 Frankfurt am Main +49123456789 Go Edit Options NW3 Edit the information.
Ⓐ Displays the name editing screen

text_image
Edit Location Edit Name ABC Edit Phone Number +49123456789 Delete Sophienstraße 71, 60487 Frankfurt am Main © Displays the phone number editing screen © Deletes the registrationⒶ To edit the name
- You can use up to 30 characters.
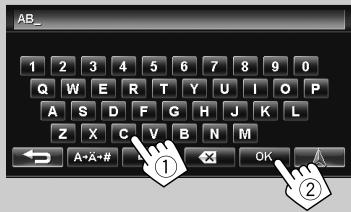
text_image
AB_ 1 2 3 4 5 6 7 8 9 0 Q W E R T Y U I O P A S D F G H J K L Z X C V B N M A-Å-# OK- For details about input screen, page 19.
⑧ To edit the phone number
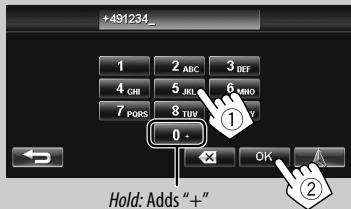
text_image
+491234_ 1 2 ABC 3 DEF 4 GHI 5 JKU 6 MNO 7 PORS 8 TUY V 0 - Hold: Adds " + " OK- For details about input screen, page 19.
© To delete the registration
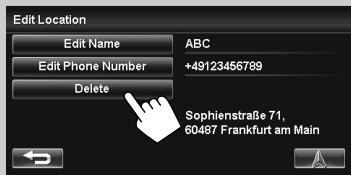
text_image
Edit Location Edit Name ABC Edit Phone Number +49123456789 Delete Sophienstraße 71, 60487 Frankfurt am MainA confirmation message appears.
To delete all registered items, page 40.
Searching for a place
About search screens and input screens
Read through the following instructions for using search screens and input screens before using
To enter names, addresses, or numbers
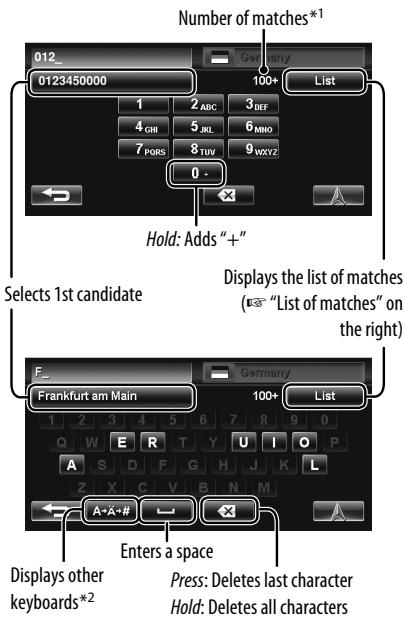
text_image
Number of matches*1 012_ 0123450000 1 2 ABC 3 INF 4 CHI 5 JL 6 MNO 7 PORS 8 TUV 9 WXYZ 0 - Hold: Adds "+" Selects 1st candidate Displays the list of matches (ES = "List of matches" on the right) Frankfurt am Main Germany 100+ List 1 2 3 4 5 6 7 8 9 0 Q W E R T Y U I O P A S D F G H J K L Z X C V B N M A+A# # Enters a space Displays other keyboards*2 Press: Deletes last character Hold: Deletes all characters- Buttons vary depending on the input item.
- Non-available items will be shaded on the menu screen.
- For some input screens, available characters are automatically narrowed down as the System searches its database for matches.
- Lower cases are not available.
*1 When there are more than 100 matches, "100+" is displayed and only first 100 matches are displayed.
*2 For available characters, page 12.
Country selecting screen
You can change the country if the selecting button appears on the screen.
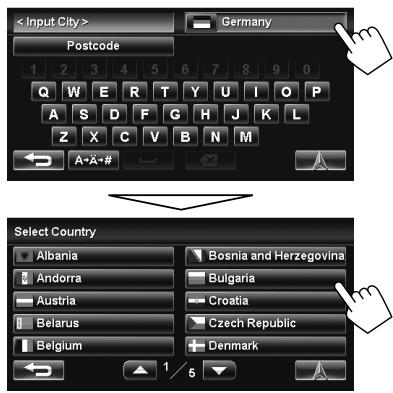
text_image
Postcode Germany Q W E R T Y U I O P A S D F G H J K L Z X C V B N M ← A-Ä+# → Select Country Albania Bosnia and Herzegovina Andorra Bulgaria Austria Croatia Belarus Czech Republic Belgium Denmark ← 1 5 ↓List of matches
When you press [List] on the input screen, the list of matches appears. Select desired item from the list.
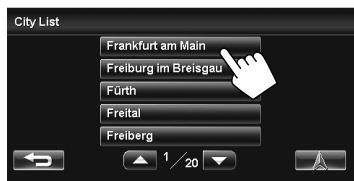
- When the number of matches is 5 or less, the list of matches automatically appears.
Setting a destination on the map
1 Touch the position where you want to select as a destination. ( page 15)
2
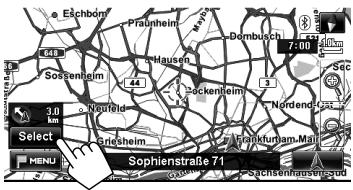
text_image
Eichbom Praunheim Dombusch 7:00 Sostenheim Hausen Pockenheim Nordend Sec 3.0 Neufeld Select Enrheim Frankfurtam-Mal MENU Sophienstraße 71 Sachsenhaussgud- If there are several POIs on the selected position, select one from the list.
- The list appears only when
is set to . ( page 14)
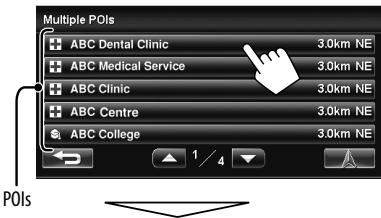
text_image
Multiple POIs ABC Dental Clinic 3.0km NE ABC Medical Service 3.0km NE ABC Clinic 3.0km NE ABC Centre 3.0km NE ABC College 3.0km NE 1/4 POIs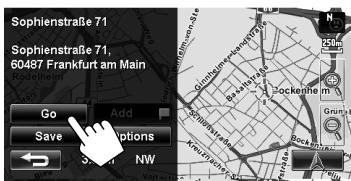
text_image
Sophienstraße 71 Sophienstraße 71, 60487 Frankfurt am Main Go Add Save Options S NW- For details about the information screen, page 30.
- To start guidance, page 29.
- To set the selected position as via point, page 31.
- To change route options, page 29.
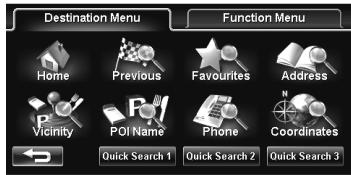
Setting a destination using the Destination Menu
1

2
text_image
Destination Menu Home Previous Favourites Address Vicinity POI Name Phone Coordinates Quick Search 1 Quick Search 2 Quick Search 3| Home* | Goes to your home ( page 21) |
| Previous* | Searches from the history of previous destinations and via points ( page 26) |
| Favourites* | Searches from your favourite points ( page 26) |
| Address | Searches by an address ( page 21) |
| Vicinity | Searches for POIs (Point Of Interest) around your current position, the position selected on the map, the destination, or the route you are taking ( page 24) |
| POI Name | Searches from the database of POI ( page 25) |
| Phone | Searches by a telephone number ( page 23) |
| Coordinates | Searches by coordinates of the destination ( page 23) |
| Quick Search 1 – 3 | Searches for POIs of a registered category ( pages 27 and 28) |
* Selectable only when at least one place is registered.
To go home
When you have registered your home ( page 17), you can easily get guided to home.
While not guided...
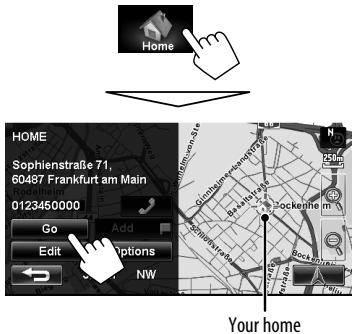
text_image
Home Sophienstraße 71, 60487 Frankfurt am Main 0123450000 Go Edit Options NW Your home- For details about the information screen, page 30.
• To start guidance, page 29.
- To set the selected position as via point, page 31.
- To change route options, page 29.
By address
1
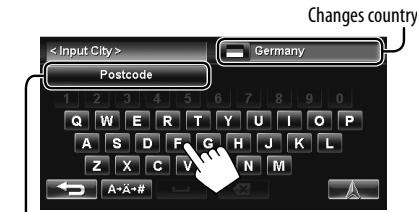
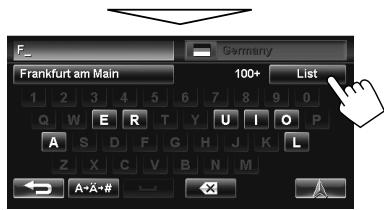
2 Enter the city name, then select from the list ( page 19).
text_image
Postcode Changes country GermanySpecifies the postcode (☐ "To specify the postcode" below)
text_image
F_ Germany Frankfurt am Main 100+ List 1 2 3 4 5 6 7 8 9 0 Q W E R T Y U I O P A S D F G H J K L Z X C V B N M ← A-Ä-# → ✖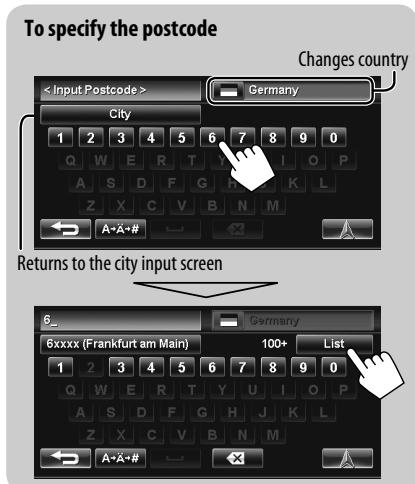
text_image
To specify the postcode < Input Postcode > City 1 2 3 4 5 6 7 8 9 0 Q W E R T Y I O P A S D F G H K L Z X C V B N M A-Ä-# Changes country Returns to the city input screen β_ 6xxxx (Frankfurt am Main) 100+ List 1 2 3 4 5 6 7 8 9 0 Q W E R T Y U I O P A S D F G H J K L Z X C V B N M A-Ä-# XContinued on the next page
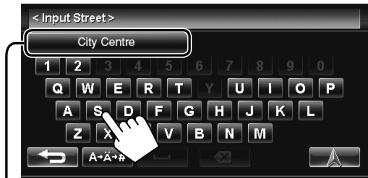
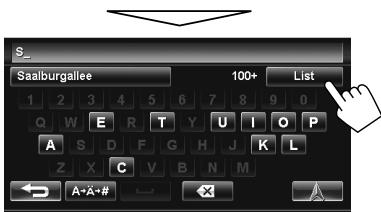
3 Enter the street name, then select from the list (page 19).
text_image
City Centre 1 2 3 4 5 6 7 8 9 0 Q W E R T Y U I O P A S D F G H J K L Z X V B N M A+A+PSelects the centre of the city (Then, go to step 5.)
text_image
S_ Saalburgallee 100+ List 1 2 3 4 5 6 7 8 9 0 Q W E R T Y U I O P A S D F G H J K L Z X C V B N M ← A-Ä-# → ✅4 Enter the house number, then select from the list (page 19).
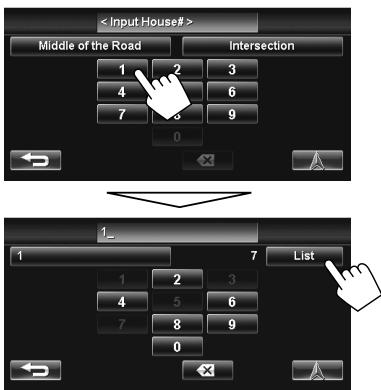
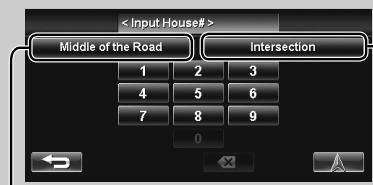
- If no data of house number for the selected street is available in the database, select [Middle of the Road] or [Intersection].
text_image
Middle of the Road Intersection 1 2 3 4 6 7 9 0 1 7 List 1 2 3 4 5 6 7 8 9 0To select the centre of the street or intersection on the street
Specifies the crossing street to select intersection on the street
text_image
Middle of the Road Intersection 1 2 3 4 5 6 7 8 9 0Selects the centre of the street
5
text_image
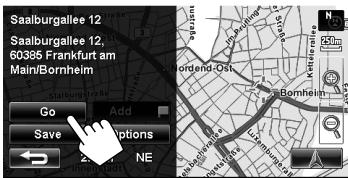
Saalburgallee 12 Saalburgallee 12, 60385 Frankfurt am Main/Bornheim Go Add Save Options NE- For details about the information screen, page 30.
- To start guidance, page 29.
- To set the selected position as via point, page 31.
- To change route options, page 29.
By telephone number
1
2 Enter the telephone number, then select from the list (page 19).
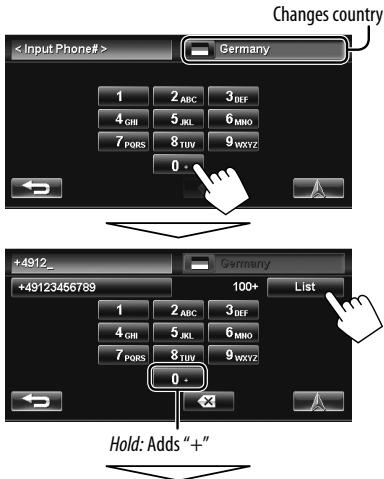
text_image
Germany 1 2 ABC 3 DEF 4 GHI 5 JKL 6 MHO 7 PQRS 8 TUV 9 WXYZ 0 * Changes country +4912_ Germany +49123456789 100+ List 1 2 ABC 3 DEF 4 GHI 5 JKL 6 MHO 7 PQRS 8 TUV 9 WXYZ 0 * Hold: Adds "+"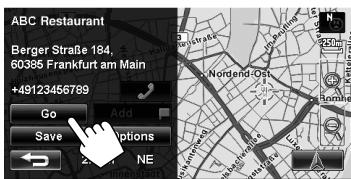
text_image
ABC Restaurant Berger Straße 184, 60385 Frankfurt am Main +49123456789 Go Add Save Options NE- For details about the information screen, page 30.
- To start guidance, page 29.
- To set the selected position as via point, page 31.
- To change route options, page 29.
By coordinates
1
text_image
N50'7'26", E8'42'22" N S W E 1 2 3 4 5 7 8 " 0 ① ②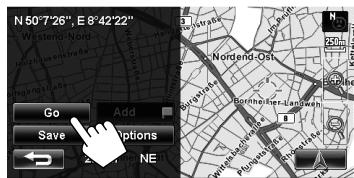
text_image
N 50°7'26", E 8°42'22" Westend-Nord Go Add Save Options NE- For details about the information screen, page 30.
- To start guidance, page 29.
- To set the selected position as via point, page 31.
- To change route options, page 29.
POI near a place/route
The System has a huge database of POIs (Point Of Interest), such as restaurants, petrol stations, hospitals, etc.
You can search for a POI around the place where you are now. While guided, you can also search for a POI near the destination or along the route.
1

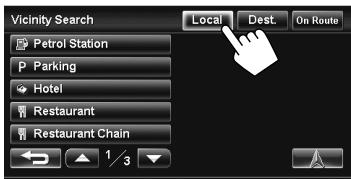
2 Select the area to search.
text_image
Vicinity Search Petrol Station P Parking Hotel Restaurant Restaurant Chain Local Dest. On Route 1/3| Local | Within 20 km of your current position or the position selected on the map. If no POI is found in this area, the System expands the area to search. |
| Dest. | Within 20 km of the destination. If no POI is found in this area, the System expands the area to search. |
| On Route | • On motorway: 300 km along the route you are taking.• Others: 25 km along the route you are taking. |
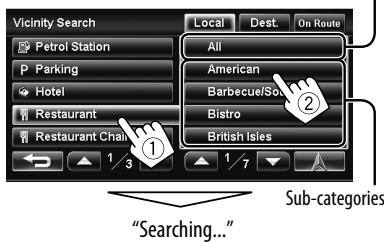
3 Select a category, then a sub-category for the POI.
Searches from all sub-categories
text_image
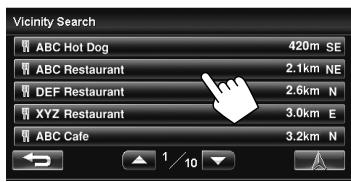
Vicinity Search Petrol Station P Parking Hotel Restaurant Restaurant Chain Local Dest. On Route All American Barbecue/Sou Bistro British Isles 1 3 1 7 Sub-categories "Searching..."4 Select a POI from the list.
text_image
Vicinity Search ABC Hot Dog 420m SE ABC Restaurant 2.1km NE DEF Restaurant 2.6km N XYZ Restaurant 3.0km E ABC Cafe 3.2km N• The System displays up to 50 POIs.
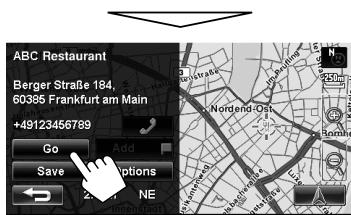
text_image
ABC Restaurant Berger Straße 184, 60385 Frankfurt am Main +49123456789 Go Add Save Options 2.41 NE- For details about the information screen, page 30.
• To start guidance, page 29.
- To set the selected position as via point, page 31.
- To change route options, page 29.
From the list of POI
1
2 Enter the POI name, then select from the list (page 19).
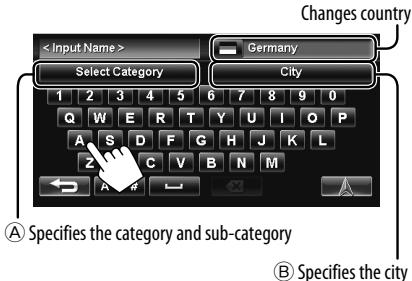
text_image
Select Category Changes country Germany City 1 2 3 4 5 6 7 8 9 0 Q W E R T Y U I O P A S D F G H J K L Z C V B N M ← A # ← ① Specifies the category and sub-category ② Specifies the city
To specify the category and sub-category
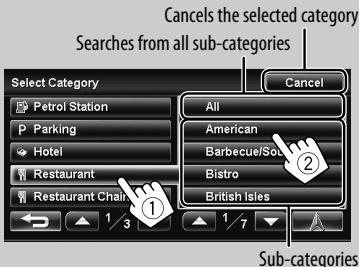
text_image
Cancels the selected category Searches from all sub-categories Select Category Petrol Station Parking Hotel Restaurant Restaurant Chain Cancel All American Barbecue/Sou Bistro British Isles 1 3 1 7 Sub-categories
To specify the city
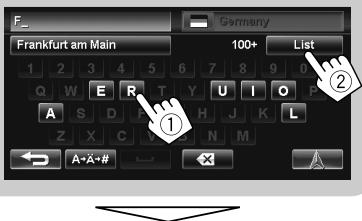
text_image
Frankfurt am Main 100+ List A B C D E F G H I J K L M N O P Q R S T U V W X Y Z A+A#- ① ②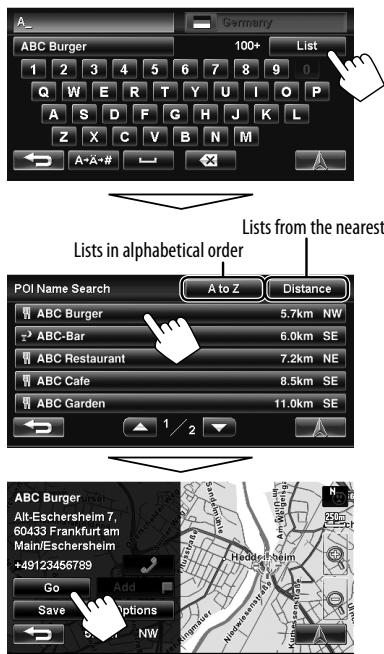
text_image
ABC Burger 100+ List Q W E R T Y U I O P A S D F G H J K L Z X C V B N M ← A→A→# ← Lists from the nearest POI Name Search A to Z Distance ABC Burger 5.7km NW ABC-Bar 6.0km SE ABC Restaurant 7.2km NE ABC Cafe 8.5km SE ABC Garden 11.0km SE 1/2 ABC Burger Alt-Eschersheim 7, 60433 Frankfurt am Main/Eschersheim +49123456789 Go Save Options ← B→B→ NW- For details about the information screen, page 30.
• To start guidance, page 29.
- To set the selected position as via point, page 31.
- To change route options, page 29.
From your favourites
- For registering your favourite points, 📋 page 17.
1

2 Select a favourite point from the list.
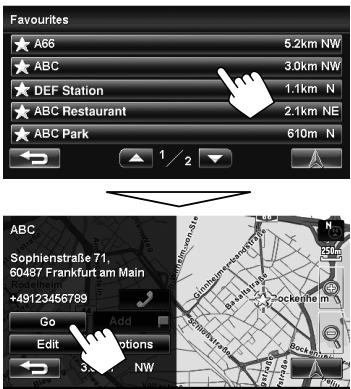
text_image
Favourites A66 5.2km NW ABC 3.0km NW DEF Station 1.1km N ABC Restaurant 2.1km NE ABC Park 610m N ABC Sophienstraße 71, 60487 Frankfurt am Main +49123456789 Go Add Edit Options 3.5 km NW- For details about the information screen, page 30.
- To start guidance, page 29.
- To set the selected position as via point, page 31.
- To change route options, page 29.
From previous destinations
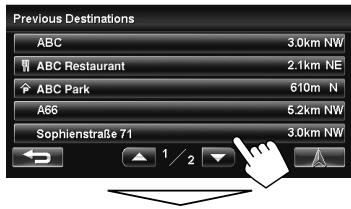
You can select a place from the last 50 destinations and via points.
1
2 Select a place from the list of the previous destinations/via points.
text_image
Previous Destinations ABC 3.0km NW ABC Restaurant 2.1km NE ABC Park 610m N A66 5.2km NW Sophienstraße 71 3.0km NW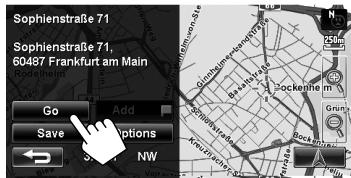
- For details about the information screen, page 30.
- To start guidance, page 29.
- To set the selected position as via point, page 31.
- To change route options, page 29.
To delete all the places in the list of previous destinations/via points, page 40.
Quick Search
You have three [Quick Search] buttons in
To register a category to the buttons
1 Select one of the [Quick Search] buttons to register the category.
![JVC KW-NT1 - Select one of the [Quick Search] buttons to register the category. - 1](/content/2025/01/82912/images/8c4f1a7ab7fbe79884e8ef63ae165c33a3375c5b62272e186fdab070d5d86cb8.jpg)
text_image
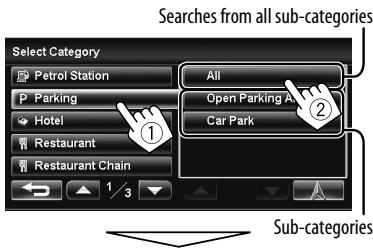
Destination Menu Home Previous Favourites Address Vicinity POI Name Phone Coordinates Quick Search 1 Quick Search 2 Quick Search 32 Select a category, then a sub-category of the POI.
text_image
Searches from all sub-categories Select Category Petrol Station Parking Hotel Restaurant Restaurant Chain All Open Parking A Car Park ① ② Sub-categoriesThe search for the selected category starts to register it to the [Quick Search] button.
3
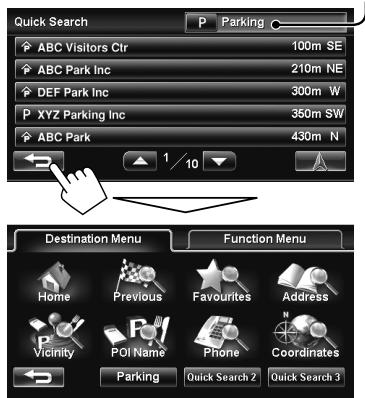
Registered category
text_image
Quick Search P Parking ABC Visitors Ctr 100m SE ABC Park Inc 210m NE DEF Park Inc 300m W P XYZ Parking Inc 350m SW ABC Park 430m N 1/10 Destination Menu Function Menu Home Previous Favourites Address Vicinity POI Name Phone Coordinates Parking Quick Search 2 Quick Search 34 Repeat steps 1 to 3 until three categories are registered.
The selected category (or sub-category) name is assigned to the button.
- The selected category is registered to [Quick Search] button even if you cancel the searching before the search is completed.
Searching for a place
To change a category assigned to the Quick Search button
1 Select one of the [Quick Search] buttons whose category you want to change.
![JVC KW-NT1 - Select one of the [Quick Search] buttons whose category you want to change. - 1](/content/2025/01/82912/images/18e6d737ba4c56b31a5d5a44ba5efc9a003f32d70de0262a8e672f141c6738ae.jpg)
text_image
Destination Menu Function Menu Home Previous Favourites Address Vicinity POI Name Phone Coordinates ← Parking Restaurant Petrol Station Quick Search P Parking Searching... or Quick Search P Parking ABC Visitors Ctr 100m SW ABC Park Inc 210m NE DEF Park Inc 300m W XYZ Parking Inc 350m SW ABC Park 430m N2 Perform steps 2 and 3 of "To register a category to the buttons" (page 27).
To use Quick Search
1
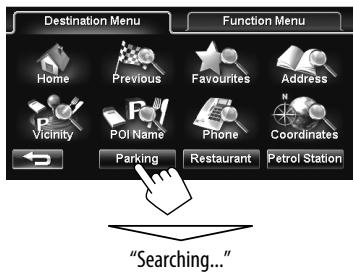
text_image
Destination Menu Function Menu Home Previous Favourites Address Vicinity POI Name Phone Coordinates Parking Restaurant Petrol Station "Searching..."2 Select a POI from the list.
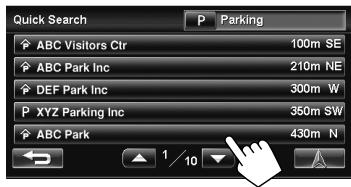
text_image
Quick Search P Parking ABC Visitors Ctr 100m SE ABC Park Inc 210m NE DEF Park Inc 300m W XYZ Parking Inc 350m SW ABC Park 430m N• The System displays up to 50 search results.
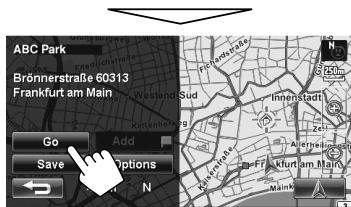
text_image
ABC Park Brönnerstraße 60313 Frankfurt am Main Go Add Save Options N-
For details about the information screen, page 30.
-
To start guidance, page 29.
- To set the selected position as via point, page 31.
- To change route options, page 29.
Starting guidance
Starting guidance to the destination
1 Select a destination. (pages 19 to 28)
2
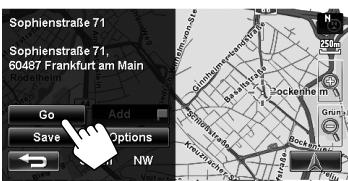
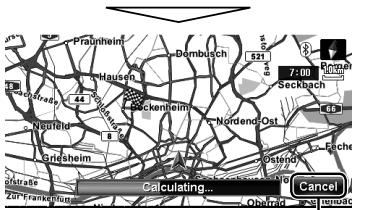
The System starts calculating the route to the selected destination, and guidance starts.
text_image
Pralnheim Bönbuch 521 6 7:00 Pomach Seckbach Schlussstadt 44 Neutfeld Sriehelm Nordend Ost Ostendyl 13-1 Reche Ustrasse 25th Frankfurt Calculating... Cancel Obsheld IniquacCancels the calculation
- To add via points, page 31.
To cancel guidance
1

flowchart
graph LR
    A["MENU"] --> B["Function Menu"]
2
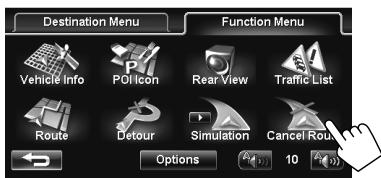
text_image
Destination Menu Function Menu Vehicle Info POLIcon Rear View Traffic List Route Detour Simulation Cancel Route Options 10A confirmation message appears.
Changing route options
1 Select a destination. (→ pages 19 to 28)
2
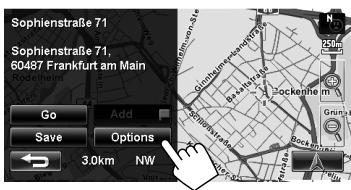
text_image
Route Options Priority Fastest Shortest Motorway Use Avoid Toll Road Use Avoid Ferry Use Avoid Bypass Traffic Auto Manual Off| Priority | Select the priority for route calculation (Fastest: fastest route/Shortest: shortest route). |
| Motorway | Select whether to use (Use) or avoid (Avoid) these types of options to go to the destination. |
| Toll Road | |
| Ferry | |
| Bypass Traffic | Select the route calculation method with TMC information.( page 37) |
- You can also change these settings through
. (page 41) - The settings are effective next time the System calculates a route.
4
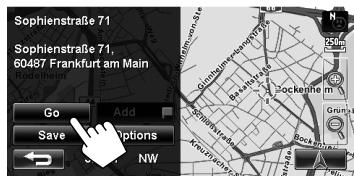
The System starts calculating the route under the condition you assigned and starts guidance.
About information screen
After pressing [Select] on the map screen, you can do various operations by pressing one of the buttons on the information screen. Available buttons vary according to the type of the selected position and the navigation status.
[Go]: Starts guidance to a position.
(page 29)
[Replace]: Changes the destination to the selected position.
[Save]: Saves a position as a favourite point.
(page 17)
[Edit]: Edits the information of a position.
(page 18)
[Add]: Adds a position to via points.
(page 31)
[Options]: Modifies the route options. ( page 29)
Information on the cursor-pointed position
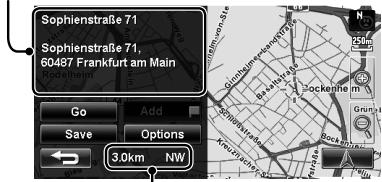
text_image
Sophienstraße 71 Sophienstraße 71, 60487 Frankfurt am Main Go Add Save Options 3.0km NWDistance and direction from your position
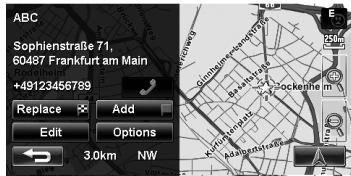
text_image
ABC Sophienstraße 71. 60487 Frankfurt am Main +49123456789 Replace Add Edit Options 3.0km NW- You can change the map scale by pressing the zoom buttons ( page 15).
- You can display the map of selected area on whole screen by touching the map part once. (If you press more than once, the map scrolls.) To display the information screen again, press [Select].
- The information screen is always displayed with the 2D North Up map view regardless of the current map view setting. ( page 16)
Arranging your route
- Motorways are always used to calculate the route if distance to a destination exceeds a certain distance.
- If the destination cannot be reached without using motorways, ferries, or toll roads, they are used to calculate the route without respect to the
settings. ( page 41)
Adding places to stop by
After selecting your destination, you can select up to four places ("via points") to stop by.
To add via points
After guidance has started...
1 Select a place you want to stop by.
(→ pages 19 to 28)
2
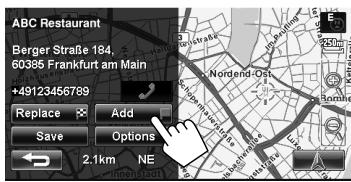
text_image
ABC Restaurant Berger Straße 184, 60385 Frankfurt am Main +49123456789 Replace Add Save Options 2.1km NE3
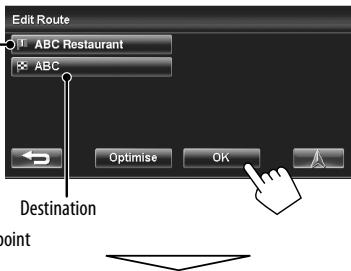
text_image
Edit Route ABC Restaurant ABC Destination pointThe System starts calculating the new route, and guidance starts.
To change the sequence of the destination/via points
1

flowchart
graph LR
    A["MENU"] --> B["Function Menu"]
2
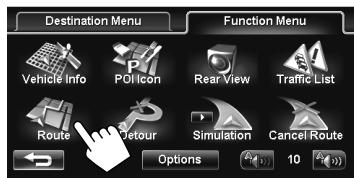
text_image
Destination Menu Vehicle Info POL Icon Rear View Traffic List Route Retour Simulation Cancel Route Options 103
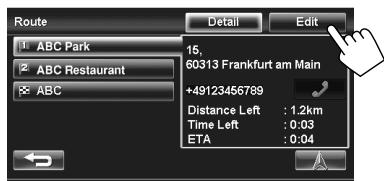
text_image
Route Detail Edit ABC Park 15, 60313 Frankfurt am Main ABC Restaurant +49123456789 Distance Left : 1.2km Time Left : 0.03 ETA : 0.04Continued on the next page
4 Change the sequence of the destination/via points.
To optimise the sequence
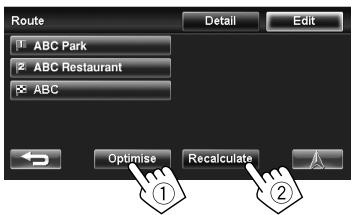
text_image
Route ABC Park ABC Restaurant ABC Detail Edit Optimise Recalculate ① ②To rearrange the sequence manually
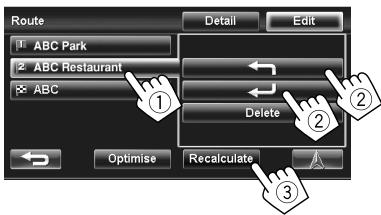
text_image
Route Detail Edit ABC Park ABC Restaurant ABC Delete Optimise Recalculate[←]: Moves up the order of selected point
[←]: Moves down the order of selected point
- Repeat ① and ② to move other via points before pressing [Recalculate].
The System starts calculating the new route, and guidance starts.
To delete a via point
Press [Delete] after selecting the item you want to delete, then press [Recalculate] in step 4.
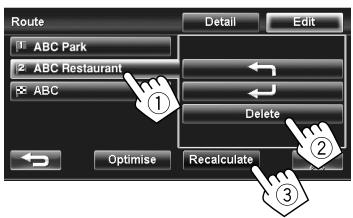
text_image
Route ① ABC Park ② ABC Restaurant ABC Delete Optimise Recalculate EditAvoiding a congestion ahead
If you realize a congestion exists ahead...
While being guided...
1

text_image
MENU Function Menu2
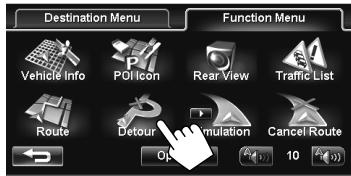
text_image
Destination Menu Function Menu Vehicle Info POLIcon Rear View Traffic List Route Detour Simulation Cancel Route OK 103 Select the distance to avoid.
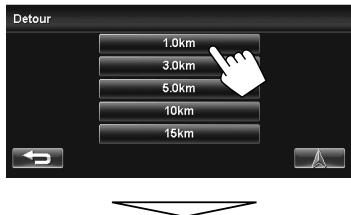
text_image
Detour 1.0km 3.0km 5.0km 10km 15kmA detour is calculated, and guidance starts.
- A detour may not be calculated with
Screen while guided
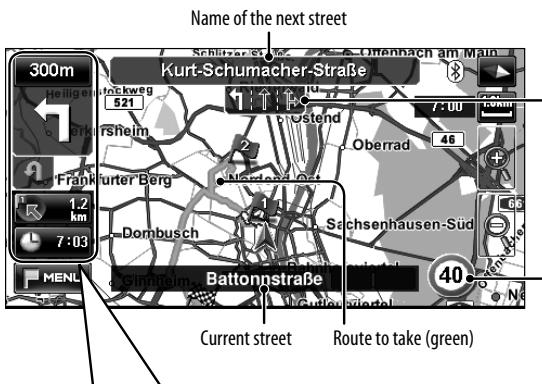
text_image
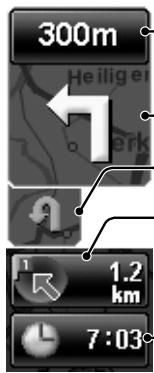
Name of the next street Kurt-Schumacher-Straße 300m Heiligeneckweg 521 Schrisheim Frankfurter Berg 1.2 km 7:03 Dombusch Battonnstraße Current street Route to take (green) Schlitzer-Dr. Ostenbach am Main 7:00 Oberrad 46 Sachsenhausen-Süd 40Lanes to take*
• Yellow: Recommended lane
- White: The lane leading to the destination
- Grey: Not the lane for the destination
Speed limit on the current street
text_image
300m Heiliger 1.2 km 7:03Distance to the next turn
- Press to listen to the last voice guidance again.
Next turn to make*
The second turn to make (if any)*
Direction and distance to the destination (☒) or a via point (☐)
- Press to change the information of distance and time to that of the next via point.
: Estimated time of arrival (ETA)
: Remaining time to the selected destination or a via point
- Press to switch the information between estimated time of arrival (ETA) and remaining time.
* Appears when coming within 5 km of it.
- The information on the map (such as street name, the POI information, and speed limit) may not be always displayed depending on the condition (for example, if the System does not have the information of the position).
- To cancel guidance, page 29.
- For settings of guidance and map display, ➕ pages 41 and 42.
Guidance at turns
When you approach a turn, the System guides you with voice guidance and indications on the screen.
• Guidance voice comes out only through the front speakers (and the FRONT OUT jacks on the rear).
The voice guides you several times as you approach the turn.
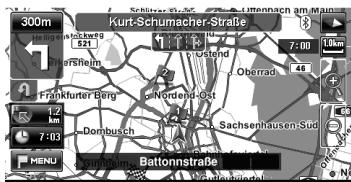
At the place close to the next turn
When you do not have to make a turn, the System gives no guidance.
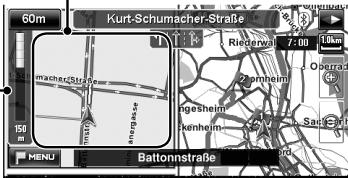
At the place closer to the next turn
Magnified map of the turn*
text_image
60m Kurt-Schumacher-Strasse Rückgang 7:00 10km Operas Bathonnstraße Langshheim Rikenheim Sachsh MENU 150 mAt the turn
"Turn right now."
Indicates the distance to the next turn
* You can select whether or not to display the magnified map through
- You can remove the magnified map by touching the map part on the right side of the screen.
What if I miss a turn?
Don't worry. The System calculates a new route quickly and guides you to the destination.
- When you reach the area approximately within 40 m around the destination/via point, the Navigation System considers you to have reached your destination/via point.
Getting information on your route and places
To check the entire route
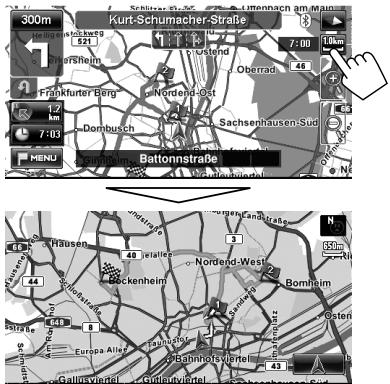
To check the information on the destination and via points
1

2
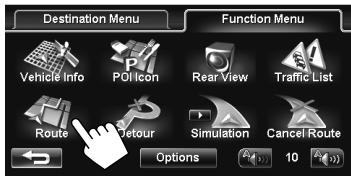
text_image
Destination Menu Vehicle Info Pollicon Rear View Traffic List Route Detour Simulation Cancel Route Options 103 Select a desired point to check its detailed information.
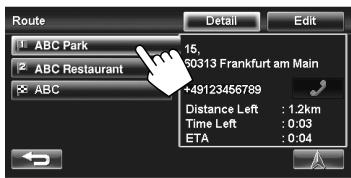
text_image
Route ABC Park ABC Restaurant ABC 15, 90313 Frankfurt am Main +49123456789 Distance Left : 1.2km Time Left : 0.03 ETA : 0.04To confirm how your trip will go
1

flowchart
graph LR
    A["MENU"] --> B["Function Menu"]
2
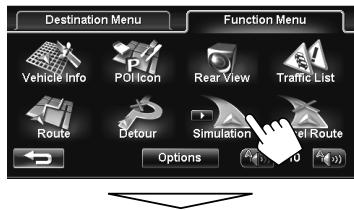
text_image
Destination Menu Function Menu Vehicle Info POL icon Rear View Traffic List Route Detour Simulation Travel Route Options 24 (1) 10 (2) (1)Drive simulation starts.
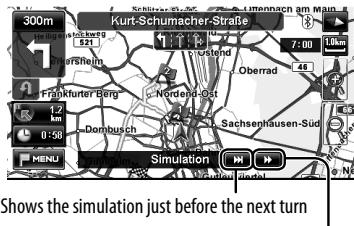
text_image
300m Kurt-Schumacher-Straße 7:00 10km Frankfurter Berg Nordend-Gast Oberrad 1.2 km Dombusch Sachsenhausen-Süd MENU Simulation Shows the simulation just before the next turnChanges the speed of the drive simulation (normal/faster)
To cancel the simulation and resume guidance

• A confirmation message appears.
Customizing how you are guided
To adjust the volume of the voice guidance
Adjust the volume level on
- About the adjustable volume range, page 65.
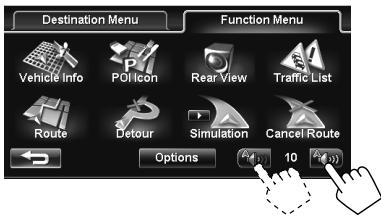
text_image
Destination Menu Function Menu Vehicle Info POL Icon Rear View Traffic List Route Detour Simulation Cancel Route Options 10To customize how the map is displayed at turns
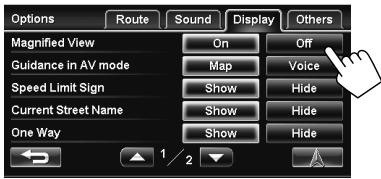
text_image
Options Route Sound Display Others Magnified View On Off Guidance in AV mode Map Voice Speed Limit Sign Show Hide Current Street Name Show Hide One Way Show Hide| On | The display is split into two, and a magnified map of the next turn is displayed in the left pane. |
| Off | No magnified map is displayed. |
To customize the guidance on an AV screen
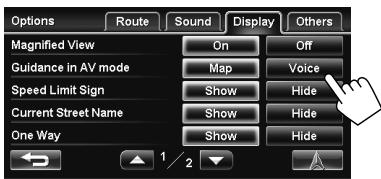
text_image
Options Route Sound Display Others Magnified View On Off Guidance in AV mode Map Voice Speed Limit Sign Show Hide Current Street Name Show Hide One Way Show Hide| Map | The screen automatically switches to the map screen when you approach a turn. |
| Voice | Only voice guidances sound. |
Adjusting the vehicle position
If you find your current position is displayed on a wrong place on the map, use this setting to correct your position.
1

flowchart
graph LR
    A["MENU"] --> B["Function Menu"]
    B --> C["Options"]
2
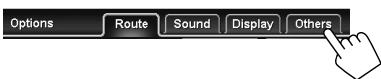
text_image
Options Route Sound Display Others3
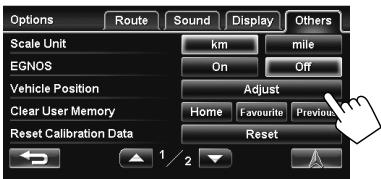
text_image
Options Route Sound Display Others Scale Unit km mile EGNOS On Off Vehicle Position Adjust Clear User Memory Home Favourite Previous Reset Calibration Data Reset 1/24 Move the cursor to the position where you want to set as current position.
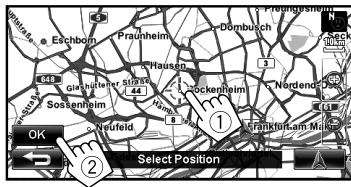
text_image
Praunheim Dombuch Sostenheim Neufeld Frankfurt-Laim-Maheim Select Position5 Adjust the direction.
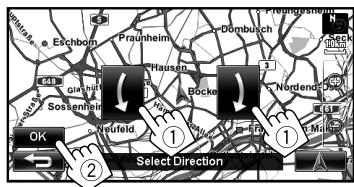
text_image
Eschborn Praunheim Dombuch Sossenheim Bocke Nordend OK Neufeld Select DirectionTraffic information on the map — TMC
What is TMC?
TMC (Traffic Message Channel) is a technology for delivering real-time traffic information to drivers. The traffic information sent by a TMC radio station is received and analyzed by the System.
This unit can receive the TMC information provided by Trafficmaster and V-Trafic. It can also receive free TMC information.
• TMC is not available in some countries.
- You do not have to tune in to a special radio station to receive the TMC information.
As the TMC information is transmitted by radio stations, JVC cannot assume responsibility for the completeness or accuracy of the information.
TMC information on the map
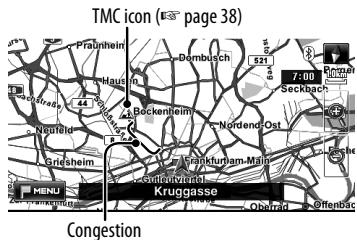
- TMC icons and congested lines are displayed on the map when
setting is activated. ( page 42) - TMC icons and congested lines are displayed on the map when its scale is between 25 m and 2.5 km.
How TMC information is reflected in navigation
The TMC information is reflected in navigation differently according to
1

flowchart
graph LR
    A["MENU"] --> B["Function Menu"]
    B --> C["Options"]
2
text_image
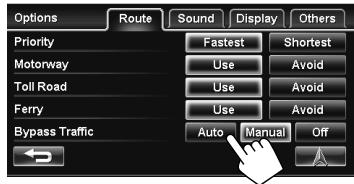
Options Route Sound Display Others Priority Fastest Shortest Motorway Use Avoid Toll Road Use Avoid Ferry Use Avoid Bypass Traffic Auto Manual Off| Auto | The System automatically calculates a new route when you approach a traffic event. |
| Manual | Operating buttons appear on the screen when you approach a traffic event. Recalculate the route manually. (u38 below) |
| Off | The System does not take TMC information into account. |
- It may not avoid a congestion even if
When
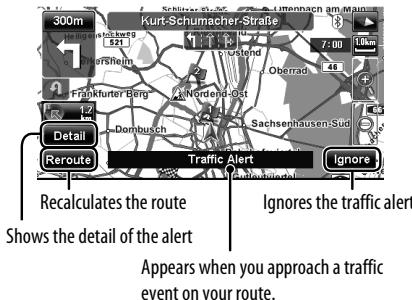
text_image
300m Kurt-Schumacher-Straße 7:00 10% Frankfurter Berg Nordend-Est Oberrad Sachsenhausen-Sud Detail Reroute Traffic Alert Ignore Recalculates the route Ignores the traffic alert Shows the detail of the alert Appears when you approach a traffic event on your route.- The traffic alert indication disappears while you are checking due to a change of traffic conditions. The traffic alert indication also disappears if you do not confirm the rerouting in one minute.
Checking the TMC information
From
1

flowchart
graph LR
    A["MENU"] --> B["Function Menu"]
2
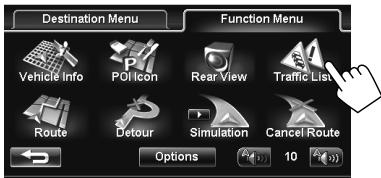
text_image
Destination Menu Function Menu Vehicle Info POLIcon Rear View Traffic List Route Detour Simulation Cancel Route Options 103 Select a list, then a traffic alert.
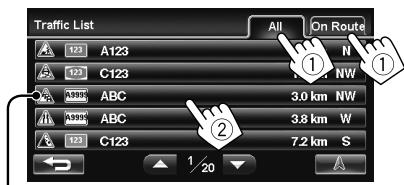
text_image
Traffic List All On Route A123 C123 ABC ABC C123 3.0 km NW 3.8 km W 7.2 km S 1 20The icons of traffic alert which are not on your route are shown in grey when all the information is displayed.
[All]: Lists all the information
[On Route]: Lists the information on your route
Details of the selected alert are displayed.
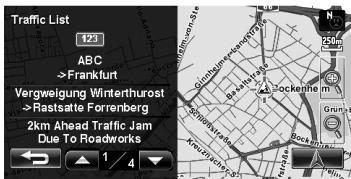
text_image
Traffic List 123 ABC >Frankfurt Vergweigung Winterthurost >Rastatte Forrenberg 2km Ahead Traffic Jam Due To RoadworksOn the map
1 Touch the TMC icon.
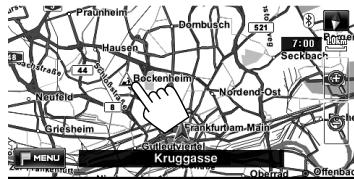
- If there are several POIs on the selected position, select one from the list.
- The list appears only when
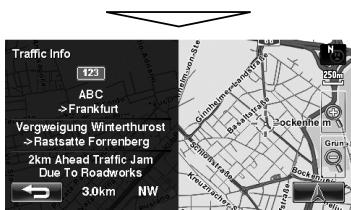
text_image
Traffic Info 123 ABC >Frankfurt Vergweigung Winterthurost >Rastate Forrenberg 2km Ahead Traffic Jam Due To Roadworks 3.0km NWList of TMC icons


Stationary traffic
Queuing traffic
Roadworks
Road is blocked or closed


Narrow lanes
Condition
Strong winds
Cold weather


People on the road
Animals on the road
Other caution event
Checking the information of the navigation system
1

flowchart
graph TD
    A["MENU"] --> B["Function Menu"]
    B --> C["Destination Menu"]
    C --> D["Function Menu"]
    D --> E["Vehicle Info"]
    D --> F["O Icon"]
    D --> G["Rear View"]
    D --> H["Traffic List"]
GPS

text_image
Vehicle Information Speed : 60km/h Heading : NW Lat. : N40° 0'0" Lon. : W80° 0'0" Alt. : 82m 2009-3-1 7:00 GPS System 1 2 3 4 5Satellites
(Green): Receiving the GPS signals and used for the calculation.
(Yellow): Receiving the GPS signals.
(Grey): Not receiving the GPS signals.
1 Current speed*1
2 Direction of the car ^1
3 Latitude and longitude of your current position ^1
4 Altitude of your current position*1
5 Date/Local time
- When the System cannot receive the GPS signals, the value of each item above are shown as “--.”
System
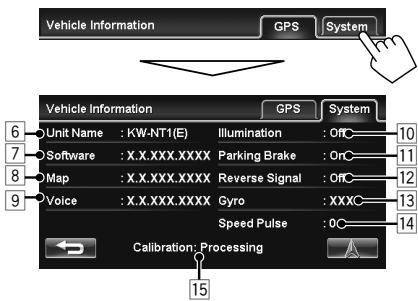
text_image
Vehicle Information GPS System Vehicle Information GPS System Unit Name : KW-NT1(E) Illumination : Off Software : X.X.XXX.XXXX Parking Brake : On Map : X.X.XXX.XXXX Reverse Signal : Off Voice : X.X.XXX.XXXX Gyro : XXXC Speed Pulse : 0 Calibration: Processing 156 Name of the unit
7 Version of the software
2
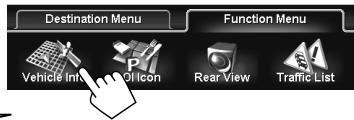
text_image
Destination Menu Function Menu Vehicle Info Icon Rear View Traffic List8 Version of the map database
9 Version of the voice guidance database
10 Connection status of the ILLUMINATION CONTROL lead
<0n>: The illumination signal is detected.
11 Connection status of the PARKING BRAKE lead
<0n>: The parking brake is engaged.
12 Connection status of the REVERSE GEAR SIGNAL lead
<0n>: Reverse gear signal is detected.
- If the rear view screen is displayed when shifting the gear to the reverse (R) position, the reverse gear signal is detected (<0n>).
13 Status of the gyroscope
14 Speed pulse rate
15 Status of calibration ^23
*1 These information may not be shown correctly when the reception of GPS signals is poor.
*2 The calibration does not function without the connection of GPS aerial and the speed signal lead. For the connection, Installation/Connection Manual (separate volume).
*3 Driving under various conditions completes the calibration faster. If
Initializing memories/navigation settings
1

flowchart
graph LR
    A["MENU"] --> B["Function Menu"]
    B --> C["Options"]
2
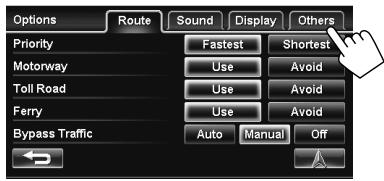
text_image
Options Route Sound Display Others Priority Fastest Shortest Motorway Use Avoid Toll Road Use Avoid Ferry Use Avoid Bypass Traffic Auto Manual Off
Memories of home, favourite points or previous destination/via points
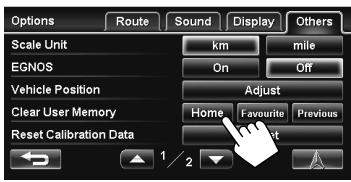
text_image
Options Route Sound Display Others Scale Unit km mile EGNOS On Off Vehicle Position Adjust Clear User Memory Home Favourite Previous Reset Calibration Data 1 2| Home | Deletes your home. |
| Favourite | Deletes all favourite points. |
| Previous | Deletes all the places in the list of previous destinations/via points. |
Calibration Data
The Navigation System is gradually optimised by automatic calibration.
Reset the calibration data in the following cases:
- When you reinstall the unit in another car.
- When you replace or rotate the tyres.
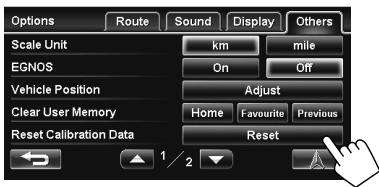
text_image
Options Route Sound Display Others Scale Unit km mile EGNOS On Off Vehicle Position Adjust Clear User Memory Home Favourite Previous Reset Calibration Data Reset 1/2Navigation settings
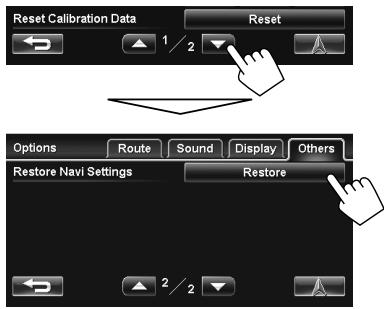
text_image
Reset Calibration Data Reset 1/2 Options Route Sound Display Others Restore Navi Settings RestoreThe settings you have made in navigation menus and Quick Search registration are initialized.
A confirmation message appears.
Navigation menu items
Function Menu—Options
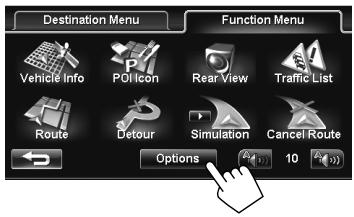
text_image
Destination Menu Vehicle Info POI Icon Rear View Traffic List Route Detour Simulation Cancel Route Options 10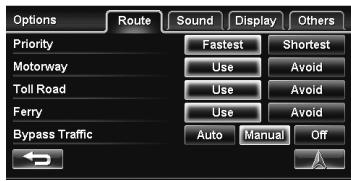
text_image
Options Route Sound Display Others Priority Fastest Shortest Motorway Use Avoid Toll Road Use Avoid Ferry Use Avoid Bypass Traffic Auto Manual OffInitial: Underlined
| Menu items | Selectable settings | |
| Route | Priority | Fastest, Shortest ( page 29) |
| Motorway | Use, Avoid ( page 29) | |
| Toll Road | ||
| Ferry | ||
| Bypass Traffic | Auto, Manual, Off ( page 37) | |
| Sound | Attention Tone* | Select the type of attention tone, coming out before the voice guidance by pressing [◀] or [▶].Off, Normal, Prompt, A.I. |
| Output* | Select the guidance output channel.L ch., L+R ch., R ch. | |
| Speed Alert | The System sounds an alarm when you surpass the speed limit of the current road by the set value. Press [+] or [−] to select the value. The unit ("km/h" or "mph") follows thesetting. ( page 42)Off, 5km/h (3mph), 10km/h (6mph), 15 km/h (10mph), 25km/h (15 mph), 35km/h (20mph) | |
| POI Alert | Alert sounds when you approach a POI of the selected category.To select categories for POI alert, press [Edit], then select categories and sub-categories (the selected items are marked with "√"). To activate POI alert for selected categories, press [On]. To deactivate it, press [Off].- You can select up to 3 categories. | |
| Display | Magnified View | On, Off ( page 36) |
| Guidance in AV mode | Map, Voice ( page 36) | |
| Speed Limit Sign | Select whether to show or hide the speed limit icon on the map.Show, Hide ( page 33) | |
| Current Street Name | Select whether to show or hide the current street name on the map.Show, Hide ( page 33) |
* When adjusting these items, test tone is produced.
Continued on the next page
Initial: Underlined
| Menu items | Selectable settings | |
| Display | One Way | Select whether to show or hide the information of one way road on the map.Show, Hide |
| Vehicle Icon | Select the icon for your current position. | |
| Traffic Icon | Select whether to show or hide the TMC icon on the map.Show, Hide ( page 38) | |
| Others | Scale Unit*1 | Select the measuring units for distance.km, mile |
| EGNOS (European Geostationary Navigation Overlay Service)*2 | Select whether to use EGNOS to increase the accuracy of positioning.For some areas or conditions, the position accuracy may not be improved even ifis selected. In this case, select. On, Off | |
| Vehicle Position | page 36 | |
| Clear User Memory | page 40 | |
| Reset Calibration Data | page 40 | |
| Restore Navi Settings | page 40 |
*1 The unit setting you find at your first access to the menu varies depending on your country selection in the initial settings ( page 7); when
*2 EGNOS is the supplemental system for GPS which improves position accuracy.
Additional information
How you are guided
- If GPS signal reception is poor, navigation guidance may not be correct.
- The System may not receive GPS signals in the following places...
– in a tunnel or car park in a building
– under an overhead road
– in a place surrounded by high buildings or by closely standing trees
- Make sure to connect reverse signal lead (Installation/Connection Manual); otherwise, your current position may not be displayed correctly.
-
The position of your car may not be detected correctly in the following cases...
-
when driving on a road close to the other one (e.g. a motorway and ordinary road running in parallel)
- when turning at an almost straight fork in the road
- when driving on a gridiron road
Additional information
– after taking a ferry, etc.
– when driving on a steep mountain road
– when driving on a spiral road
- when turning left or right after running on a long straight road
– when driving in a zigzag line on a broad road
- when starting your car shortly after starting the engine
- when driving for the first time after installing the unit
- when changing tyres or attaching chains on the tyres
– when tyre slip occurs continuously and frequently
– after driving on areas other than a road (e.g. private lands or car parks)
– after driving in underground or tower type car parks
– after rotating your car on a turntable
– after frequent stops and starts in a congestion
- when the accuracy of GPS is deteriorated intentionally
– when driving on a road constructed recently
- The route calculated by the System is one of the possible routes to your destination. The route is not always the most appropriate one.
- If no-exit roads (only entering the roundabout from the roads is allowed) exist on the roundabout, the no-exit roads can neither be shown in the route guidance on the display nor counted in the route guidance voice message.
- The following phenomena may occur even if the System is working correctly...
- It may guide to a closed road or to a route requiring U-turn.
- It may not guide to your destination if there is only a narrow road or no road to your destination.
– It may show a different road name. - It may not ask you to turn at a junction even if you need to.
– It may give guidance different from the actual road conditions.
– It may give incorrect distance information.
List of POI icons

text_image
Petrol Station Parking Open Parking Areas Car Park Hotel Restaurant Restaurant Chain Leisure Amusement Park Camping Ground Golf Course Marina Recreation Facility Shopping Tourist Attraction Travel Agency Zoo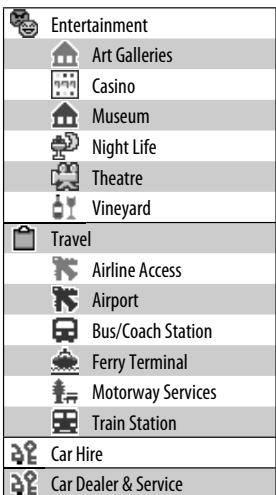
text_image
Entertainment Art Galleries Casino Museum Night Life Theatre Vineyard Travel Airline Access Airport Bus/Coach Station Ferry Terminal Motorway Services Train Station Car Hire Car Dealer & Service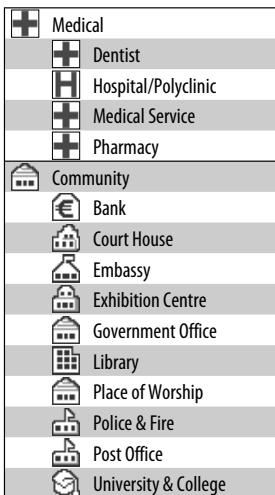
text_image
Medical + Dentist + Hospital/Polyclinic + Medical Service + Pharmacy Community + Bank + Court House + Embassy + Exhibition Centre + Government Office + Library + Place of Worship + Police & Fire + Post Office + University & CollegeCommon operations on AV screens
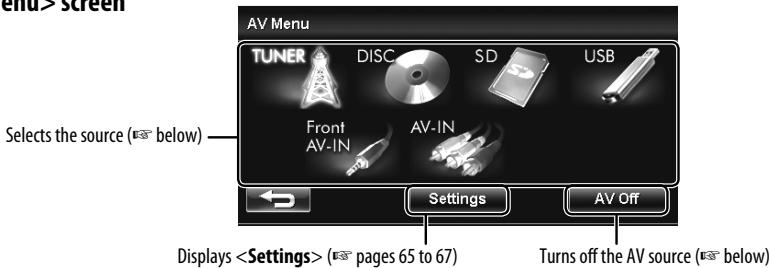
text_image
end> screen AV Menu TUNER DISC SD USB Front AV-IN AV-IN Settings AV Off Selects the source (below) DisplaysSelecting the playback source
- Available sources depend on the external components you have connected, media you have attached and the
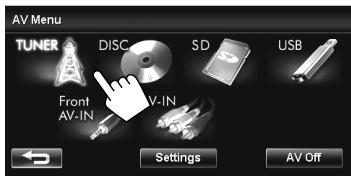
text_image
AV Menu TUNER DISC SD USB Front AV-IN V-IN Settings AV Off| TUNER | Switches to the radio broadcast (https pages 45 to 49) |
| DISC | Plays a disc (https pages 50 to 57) |
| SD | Plays files on an SD card (https pages 58 and 59) |
| USB* | Plays files on a USB device (https pages 58 and 59) |
| iPod* | Plays an iPod/iPhone (https pages 60 to 62) |
| Front AV-IN | Switches to an external component connected to the AV-IN jack on the monitor panel (https page 63) |
| AV-IN | Switches to an external component connected to VIDEO IN/LINE IN jacks on the rear panel (https page 63) |
* "iPod" is shown as the source instead of "USB" when an iPod/iPhone is connected.
You can also change the source by pressing the current source icon on the AV screen repeatedly.
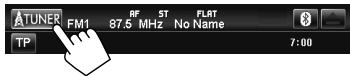
text_image
ATUNER FM1 87.5 MHz No Name TP 7:00Turning off the AV source
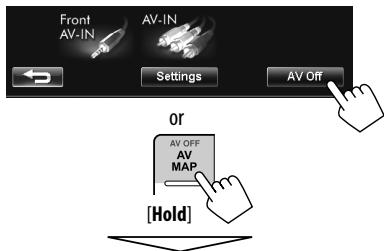
text_image
Front AV-IN AV-IN Settings AV Off or AV OFF AV MAP [Hold]AV source is turned off.
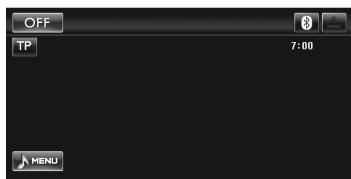
text_image
OFF TP 7:00 MENU- To activate AV function, press [OFF], or press and hold AV MAP.
Listening to the radio
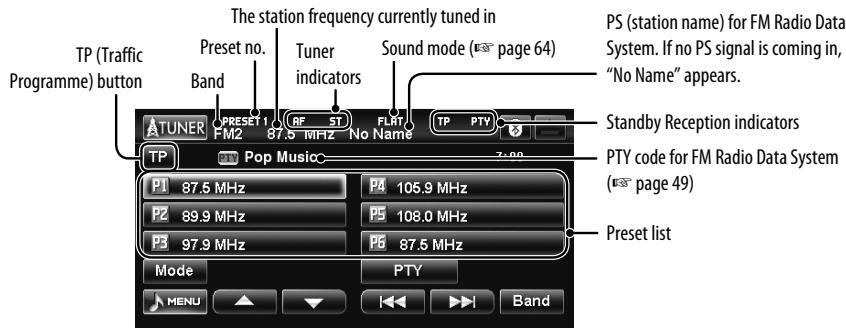
text_image
TP (Traffic Programme) button The station frequency currently tuned in Preset no. Band Tuner indicators Sound mode (page 64) ATUNER PRESET 1 FM2 87.5 MHz RF ST No Name TP PTY PS (station name) for FM Radio Data System. If no PS signal is coming in, "No Name" appears. Standby Reception indicators PTY code for FM Radio Data System (page 49) P1 87.5 MHz P2 89.9 MHz P3 97.9 MHz P4 105.9 MHz P5 108.0 MHz P6 87.5 MHz Mode PTY MENU Band1 Select "TUNER" as the source.

flowchart
graph LR
    A["Hand Click"] --> B["Menu Icon"]
    C["Hand Click"] --> D["TUNER Tower Display"]
② Select the band.
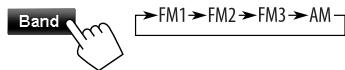
text_image
Band →FM1→FM2→FM3→AM③ Search for a station.
Auto search:
Manual search:


Search mode ("Auto Search" or "Manual Search")

text_image
TUNER FM1 92.5 MHz FLAT Auto Search TP 7:00- The ST indicator lights up when receiving an FM stereo broadcast with sufficient signal strength.
Storing stations in memory
You can preset six channels for each band.
Automatic presetting—SSM (Strong-station Sequential Memory) (For FM only)
1
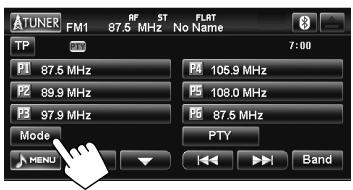
text_image
ATUNER FM1 87.5 MHz No Name TP 7:00 P1 87.5 MHz P2 89.9 MHz P3 97.9 MHz Mode P4 105.9 MHz P5 108.0 MHz P6 87.5 MHz PTY MENU Band2
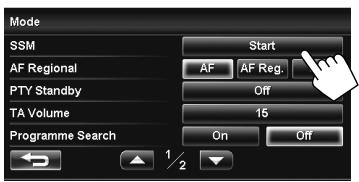
text_image
Mode SSM AF Regional PTV Standby TA Volume Programme Search Start AF AF Reg. Off 15 On OffA confirmation message appears.
Local FM stations with the strongest signals are searched and stored automatically in the FM band.
Manual presetting
1 Tune in to a station you want to preset.
(page 45)
Band The station frequency you want to preset
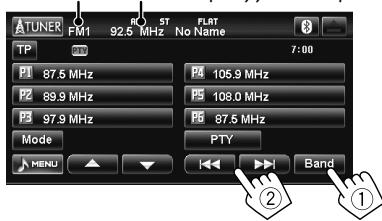
text_image
ATUNER FM1 92.5 MHz No Name TP P1 87.5 MHz P4 105.9 MHz P2 89.9 MHz P5 108.0 MHz P3 97.9 MHz P6 87.5 MHz Mode MENU Band ② ①2 Select a preset number.
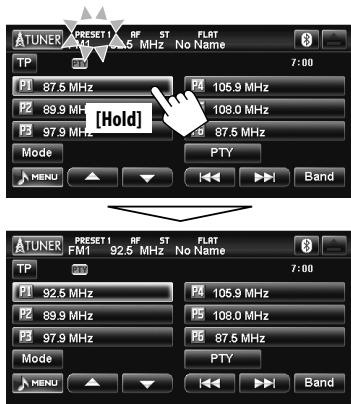
text_image
ATUNER PRESET 1 RF ST FLAT 7:00 TP P1 87.5 MHz P4 105.9 MHz P2 89.9 MHz 108.0 MHz P3 97.9 MHz 87.5 MHz Mode MENU Band ATUNER PRESET 1 RF ST FLAT 7:00 TP P1 92.5 MHz P4 105.9 MHz P2 89.9 MHz 108.0 MHz P3 97.9 MHz 87.5 MHz Mode MENU BandThe station selected in step 1 is stored.
Selecting a preset station
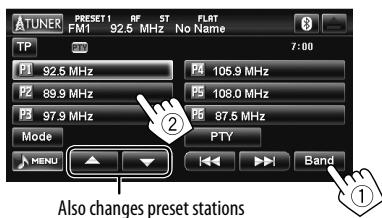
text_image
ATUNER PRESET 1 RF ST FLAT FM1 92.5 MHz No Name TP 7:00 PI 92.5 MHz P4 105.9 MHz P2 89.9 MHz P5 108.0 MHz P3 97.9 MHz P6 87.5 MHz Mode PTY MENU Band Also changes preset stationsReducing the interference
1
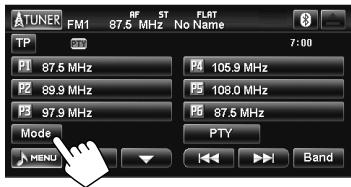
text_image
TUNER FM1 RF 5T FLAT 87.5 MHz No Name TP 7:00 P1 87.5 MHz P4 105.9 MHz P2 89.9 MHz P5 108.0 MHz P3 97.9 MHz P6 87.5 MHz Mode PTV MENU Band2
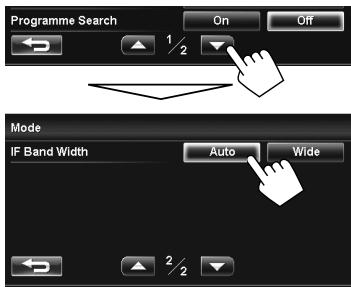
text_image
Programme Search On Off 1/2 Mode IF Band Width Auto Wide 2/2| Auto | Increases the tuner selectivity to reduce interference noises between adjacent stations. (Stereo effect may be lost.) |
| Wide | Subject to the interference from adjacent stations, but sound quality will not be degraded and the stereo effect will remain. |
The following features are available only for FM Radio Data System stations.
Searching for FM Radio Data System programme—PTY Search
1
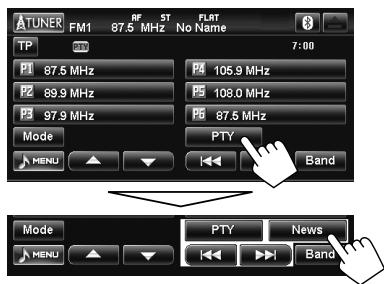
text_image
TUNER FM1 87.5 MHz No Name TP P1 87.5 MHz P4 105.9 MHz P2 89.9 MHz P5 108.0 MHz P3 97.9 MHz P6 87.5 MHz Mode MENU PTY Band Mode MENU PTY News Band2 Select a PTY code
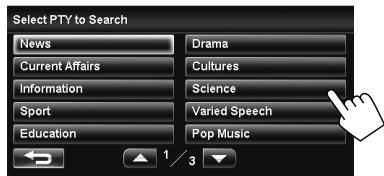
text_image
Select PTY to Search News Drama Current Affairs Cultures Information Science Sport Varied Speech Education Pop Music3
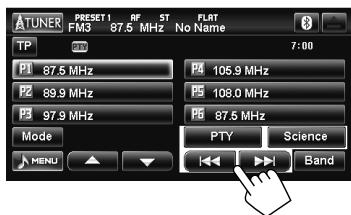
text_image
TUNER PRESET 1 RF ST FLAT FM3 87.5 MHz No Name TP 7:00 PI 87.5 MHz P4 105.9 MHz P2 89.9 MHz P5 108.0 MHz P3 97.9 MHz P6 87.5 MHz Mode PTV Science MENU BandPTY Search starts.
If there is a station broadcasting a programme of the same PTY code as you have selected, that station is tuned in.
To erase PTY search operation buttons, press [PTY].
- For available PTY codes, page 49.
Activating/deactivating TA/PTY Standby Reception
The following functions are not available when AM is selected as the source.
TA Standby Reception
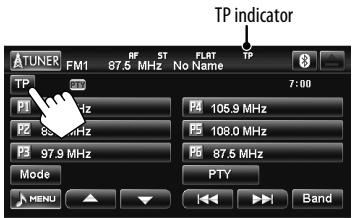
text_image
TP indicator TUNER FM1 RF ST FLAT TP 87.5 MHz No Name TP P1 92 Hz P2 85.0 MHz P3 97.9 MHz Mode MENU 105.9 MHz 108.0 MHz 87.5 MHz PTY Band| TP indicator | TA Standby Reception |
| Lights up | The System will temporarily switch to Traffic Announcement (TA) if available. • The volume changes to the preset TA volume level if the current level is lower than the preset level (“To adjust the TA volume” below). |
| Flashes | Not yet activated. Tune in to another station providing the Radio Data System signals. |
| Goes off | Deactivated. |
To adjust the TA volume
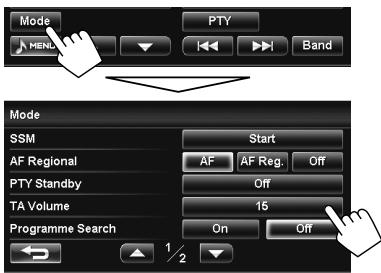
text_image
Mode MEN. PTY Band Mode SSM AF Regional PTY Standby TA Volume Programme Search Start AF AF Reg. Off Off 15 On OffAdjust the TA volume level between 00 to 30 or 50* (initial: 15) by pressing [+] or [-] .
* Depends on the amplifier gain control. ( page 65)
PTY Standby Reception
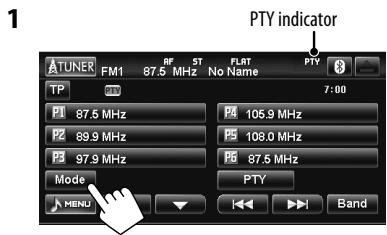
text_image
1 ATUNER FM1 RF 5T FLAT PTY TP 87.5 MHz No Name 7:00 P1 87.5 MHz P2 105.9 MHz P2 89.9 MHz P3 108.0 MHz P3 97.9 MHz P4 87.5 MHz Mode PTY MENU Band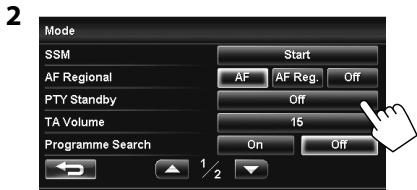
text_image
2 Mode SSM Start AF Regional AF AF Reg. Off PTY Standby Off TA Volume 15 Programme Search On Off 1/2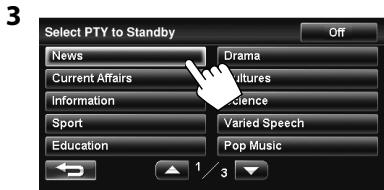
text_image
Select PTY to Standby News Current Affairs Information Sport Education Drama Cultures Science Varied Speech Pop Music Off 1 3| PTY indicator | PTY Standby Reception |
| Lights up | The System will temporarily switch to your favourite PTY programme. |
| Flashes | Not yet activated. Tune in to another station providing the Radio Data System signals. |
| Goes off | To deactivate, press [Off] in step 3. |
To change the PTY code for PTY Standby Reception, repeat the above procedure.
Tracing the same programme—Network-Tracking Reception
When driving in an area where FM reception is not sufficient enough, this unit automatically tunes in to another FM Radio Data System station of the same network, possibly broadcasting the same programme with stronger signals.
Programme A broadcasting on different frequency areas (01 – 05)
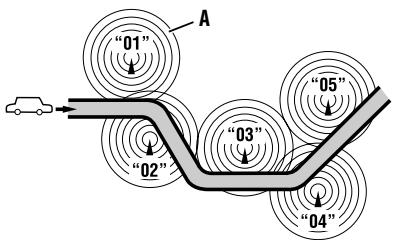
flowchart
graph TD
    A["Car"] --> B["Sensor Point 02"]
    B --> C["Sensor Point 03"]
    C --> D["Sensor Point 04"]
    D --> E["Sensor Point 05"]
    E --> F["Sensor Point 01"]
    style A fill:#f9f,stroke:#333
    style B fill:#ccf,stroke:#333
    style C fill:#cfc,stroke:#333
    style D fill:#fcc,stroke:#333
    style E fill:#cff,stroke:#333
    style F fill:#ffc,stroke:#333
When shipped from the factory, Network-Tracking Reception is activated.
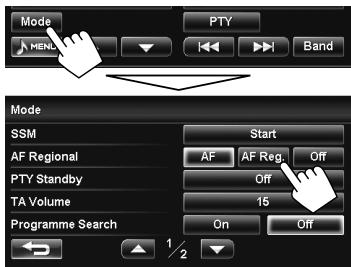
To change the Network-Tracking Reception setting
text_image
Mode MENL PTY Band Mode SSM AF Regional PTY Standby TA Volume Programme Search Start AF AF Reg. Off Off 15 On Off 1/2| AF | Switches to another station. The programme may differ from the one currently received (the AF indicator lights up). |
| AF Reg. | Switches to another station broadcasting the same programme. The REG indicator lights up. |
| Off | Cancels. |
Automatic station selection—Programme Search
Usually when you select preset stations, the preset station is tuned in.
If the signals from the FM Radio Data System preset station are not sufficient for good reception, this unit, using the AF data, tunes in to another station broadcasting the same programme as the original preset station is broadcasting.
To activate Programme Search
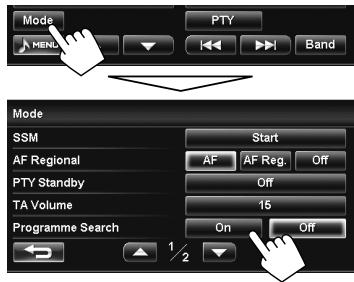
text_image
Mode MENU PTY Band Mode SSM AF Regional PTY Standby TA Volume Programme Search Start AF AF Reg. Off Off 15 On Off- The unit takes some time to tune in to another station using programme search.
To deactivate, select <0ff>.
Available PTY codes:
News, Current Affairs, Information, Sport, Education, Drama, Cultures, Science, Varied Speech, Pop Music, Rock Music, Easy Listening, Light Classics M, Serious Classics, Other Music, Weather & Metr, Finance, Children's Progs, Social Affairs, Religion, Phone In, Travel & Touring, Leisure & Hobby, Jazz Music, Country Music, National Music, Oldies Music, Folk Music, Documentary
① Insert a disc.
The source changes to "DISC" and playback starts.

text_image
Label sideCaution on volume setting:
Discs produce very little noise compared with other sources. Lower the volume before playing a disc to avoid damaging the speakers by the sudden increase of the output level.
- If a disc does not have any disc menu, all tracks on it will be played repeatedly until you change the source or eject the disc.
If "⊗" appears on the screen, the unit cannot accept the operation you have tried to do.
- In some cases, without showing “∅,” operations will not be accepted.
When playing back a multi-channel encoded disc, the multi-channel signals are downmixed.
- You can fully enjoy multi-channel sound by connecting an amplifier or a decoder compatible with these multi-channel sources. (☑ also page 71)
To eject a disc
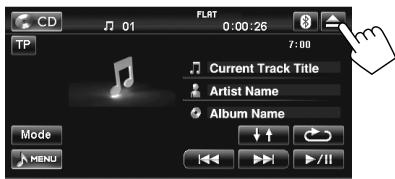
text_image
CD 01 FLRT 0:00:26 TP 7:00 Current Track Title Artist Name Album Name Mode MENU ↓↑ ▶/II- You can eject a disc when playing other AV source.
- If the ejected disc is not removed within 15 seconds, the disc is automatically inserted again into the loading slot to protect it from dust.
To prohibit disc ejection

2 Press and hold AV MAP and any part of the screen.
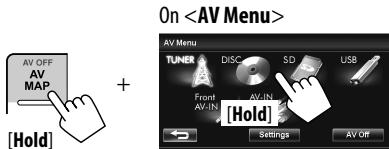
text_image
OnA confirmation message appears.
To cancel the prohibition, repeat the same procedure.
playable disc types
| Disc type | Recording format, file type, etc. | Playable |
| DVD• DTS sound cannot be reproduced or output from this unit. | DVD Video (Region Code: 2) [IMAGE] | √OK |
| DVD Audio | ×NO | |
| DVD-ROM | ||
| DVD Recordable/Rewritable (DVD-R/-RW*1, +R/+RW*2)• DVD Video: UDF bridge• DVD-VR• DivX/MPEG1/MPEG2/MP3/WMA/WAV: ISO 9660 level 1, level 2, Romeo, Joliet | DVD Video | √OK |
| DVD-VR*3 | ||
| DivX/MPEG1/MPEG2 | ||
| MP3/WMA/WAV | ||
| JPEG | ×NO | |
| AAC | ||
| MPEG4 | ||
| DVD+VR | ||
| DVD-RAM | ||
| Dual Disc | DVD side | √OK |
| Non-DVD side | ×NO | |
| CD/VCD | Audio CD/CD Text (CD-DA) | √OK |
| VCD (Video CD) | ×NO | |
| DTS-CD | ||
| SVCD (Super Video CD) | ||
| CD-ROM | ||
| CD-I (CD-I Ready) | ||
| CD Recordable/Rewritable (CD-R/-RW)• ISO 9660 level 1, level 2, Romeo, Joliet | CD-DA | √OK |
| DivX/MPEG1/MPEG2 | ||
| MP3/WMA/WAV | ||
| AAC | ×NO | |
| JPEG | ||
| MPEG4 |
*1 DVD-R recorded in multi-border format is also playable (except for dual layer discs). DVD-RW dual layer discs are not playable.
*2 It is possible to play back finalized +R/+RW (Video format only) discs. "DVD" is selected as its disc type when a +R/+RW disc is loaded. +RW double layer discs are not playable.
*3 This unit cannot play back contents protected with CPRM (Content Protection for Recordable Media).
Only for DVD Video/DVD-VR/DivX/MPEG1/MPEG2:
Pressing DISP or touching the screen shows the operating buttons and playback information on the screen. The operating buttons and playback information disappear by pressing DISP or when no operation is done for about 5 seconds.
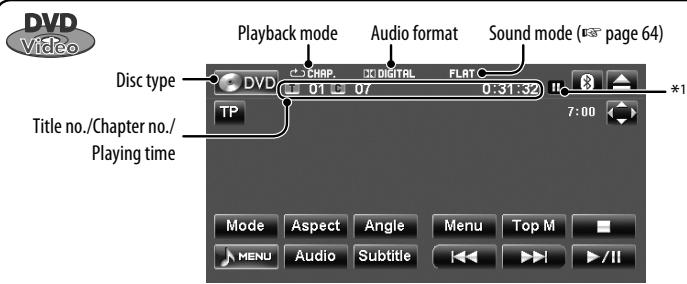
text_image
DVD Video Playback mode Audio format Sound mode (page 64) Disc type DVD 01 07 0:31:32 TP Title no./Chapter no./ Playing time 7:00 Mode Aspect Angle Menu Top M MENU Audio Subtitle I/II[▶ / Ⅲ]
[□]

[Aspect]
[Angle]
[Audio]
Starts playback/pauses
Stops playback
Press: Selects chapter
Hold: Reverse/forward search ^*2
Selects aspect ratio ( page 70)
Selects view angle
Selects audio language
[Subtitle]
[Menu] [Top M]

[Mode]
Selects subtitle language
Displays the disc menu
Displays the menu selecting screen (below)
- Selects repeat playback mode (page 56)
- Changes the settings for disc playback ( finger page 57)
Using the menu selecting screen
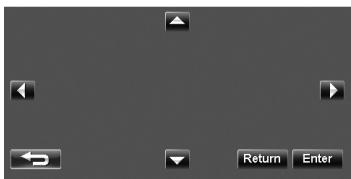
text_image
Return Enter[▲] [▼] [◀] [▶]
[Enter]
[Return]
Selects the menu items
Confirms the selection
Returns to the previous menu
*1 Playback status (■: pause/■: stop)
*2 Search speed: x2 ⇔ x10
Caution for DualDisc playback
The Non-DVD side of a "DualDisc" does not comply with the "Compact Disc Digital Audio" standard. Therefore, the use of Non-DVD side of a DualDisc on this product may not be recommended.

Program no. (or Playlist no.)/Chapter no. (or file no.)/Playing time
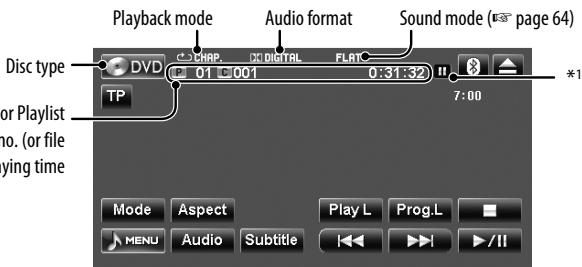
text_image
Playback mode Audio format Sound mode (page 64) Disc type or Playlist no. (or file aying time DV 01 001 0:31:32 TP 7:00 Mode Aspect Play L Prog.L MENU Audio Subtitle I/II[▶ / Ⅲ]
Starts playback/pauses
[□]
Stops playback
[◀◀] [▶▶]
Press: Selects chapter
Hold: Reverse/forward search*2
[Aspect]
Selects aspect ratio ( page 70)
[Audio]
Selects audio channel (ST: stereo,
L: left, R: right)
[Subtitle]
Shows (ON)/hides (OFF) the subtitle
[Play L]
Displays the Playlist (below)
[Prog.L]
Displays the Original Program (below)
[Mode]
- Selects repeat playback mode (page 56)
- Changes the settings for disc playback ( finger page 57)
- For details about DVD-VR format and Playlist, refer to the instructions supplied with the recording equipment.
Using the list screens
You can use Original Program or Playlist screen anytime while playing DVD-VR with its data recorded.
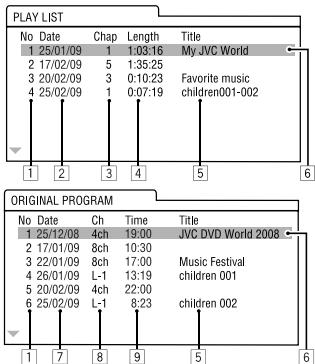
text_image
PLAY LIST No Date Chap Length Title 1 25/01/09 1 1:03:16 My JVC World 2 17/02/09 5 1:35:25 3 20/02/09 3 0:10:23 Favorite music 4 25/02/09 1 0:07:19 children001-002 ORIGINAL PROGRAM No Date Ch Time Title 1 25/12/08 4ch 19:00 JVC DVD World 2008 2 17/01/09 8ch 10:30 3 22/01/09 8ch 17:00 Music Festival 4 26/01/09 L-1 13:19 children 001 5 20/02/09 4ch 22:00 6 25/02/09 L-1 8:23 children 002 1 7 8 9 51 Original Program/Playlist number
2 Creating date of playlist
3 Total number of chapters included in the playlist
4 Playback time
5 Title of the program/playlist*3
6 Highlight bar (current selection)
7 Recording date
8 Recording source (TV station, the input terminal of the recording equipment, etc.)
9 Start time of recording
[▲] [▼] Selects the menu items
[Enter] Returns to the DVD-VR playback
- When selecting an item from the Playlist, the item is automatically played back repeatedly. To change to another item, select it from the Playlist.
*1 Playback status (■: pause/■: stop)
*2 Search speed: x2 ⇔ x10
*3 The title of the Original Program or playlist may not be displayed depending on the recording equipment.


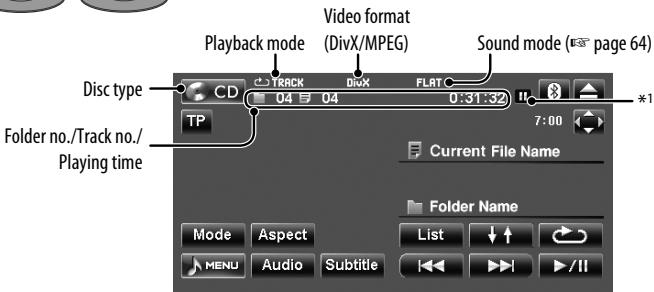
text_image
Playback mode Video format (DivX/MPEG) Sound mode (page 64) Disc type CD 04 04 0:31:32 TP Folder no./Track no./ Playing time Current File Name Folder Name Mode Aspect List ↓ ↑ MENU Audio Subtitle /II[▶ / Ⅲ]

Starts playback/pauses
Press: Selects track
Hold: Reverse/forward search ^*2
[Aspect]
[Audio]
[Subtitle]
Selects aspect ratio ( page 70)
Selects audio language ^*3
Selects subtitle language ^*3

Displays the menu selecting screen ( page 52)

Selects playback modes ( finger page 56)
[Mode]
Changes the settings for disc playback ( page 57)
[List] Displays Folder/Track Lists (page 12)

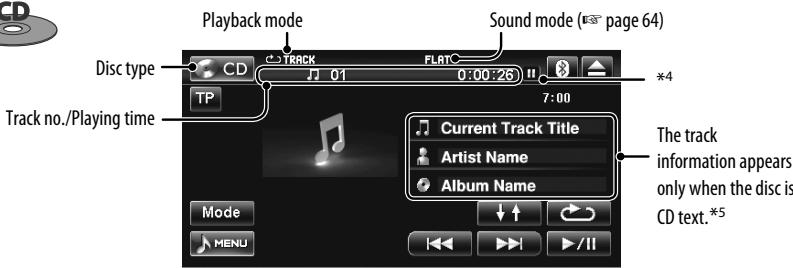
text_image
Playback mode Sound mode (page 64) Disc type CD FLAT 0:00:26 TP 7:00 Track no./Playing time Current Track Title Artist Name Album Name The track information appears only when the disc is CD text.*5 Mode MENU[▶ / Ⅱ]

Starts playback/pauses
Press: Selects track
Hold: Reverse/forward search*6
[↓↑] [→]
[Mode]
Selects playback modes ( finger page 56)
Changes the settings for disc playback (page 57)
MP3/WMA/

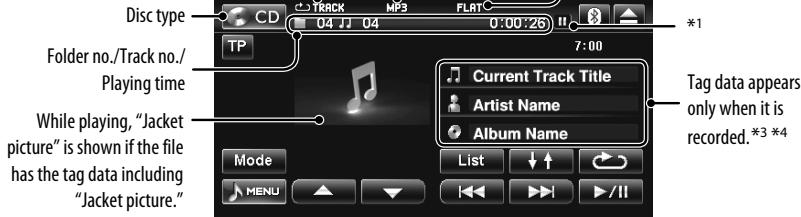
text_image
Disc type CD 04 JJ 04 0:00:26 TP Folder no./Track no./ Playing time While playing, "Jacket picture" is shown if the file has the tag data including "Jacket picture." Mode MENU Current Track Title Artist Name Album Name List ↓ ↑ / / Tag data appears only when it is recorded. *3 *4


Starts playback/pauses
Press: Selects track
Hold: Reverse/forward search ^*2
Selects folder


Selects playback modes ( page 56)
Changes the settings for disc playback (→ page 57)
Displays Folder/Track Lists (page 12)
*1 Playback status (■: pause)
*2 Search speed: x2 ⇌ x10
*3 Current folder name and file name appear if not recorded.
*4 When switching the folder, the folder name and file name appear for about 5 seconds even if tag data is recorded.
Playing Recordable/Rewritable discs
- This unit can recognize a total of 5 000 files and 250 folders (a maximum of 999 files per folder).
- Use only "finalized" discs.
- This unit can play back multi-session discs; however, unclosed sessions will be skipped while playing.
- Some discs or files may not be played back due to their characteristics or recording conditions.
Selecting playback modes
For DVD/DVD-VR
1
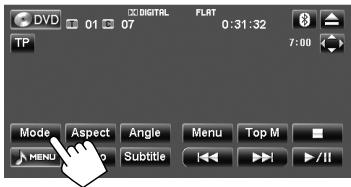
text_image
DVD 01 07 DIGITAL FLAT 0:31:32 TP Mode Aspect Angle Menu Top M MENU Subtitle /II2 Select Repeat mode.
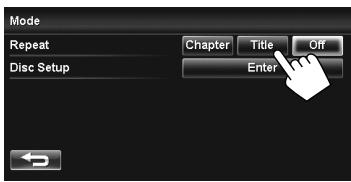
text_image
Mode Repeat Chapter Title Off Disc Setup Enter- For DVD:
| Chapter | Repeats current chapter. |
| Title | Repeats current title. |
- For DVD-VR
| Chapter | Repeats current chapter. |
| Programme | Repeats current program (not available for Playlist playback). |
To cancel, select <0ff>.
For CD/DivX/MPEG1/MPEG2/MP3/WMA/WAV
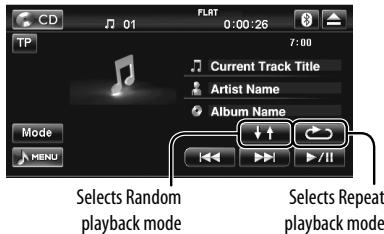
text_image
CD 01 FLRT 0:00:26 7:00 TP Current Track Title Artist Name Album Name Mode MENU Selects Random playback mode Selects Repeat playback mode- You cannot activate the repeat mode and the random mode at the same time.
- For CD:
| →TRACK | Repeats current track. |
| ↓↑DISC | Randomly plays all tracks. |
• For DivX/MPEG1/MPEG2/MP3/WMA/WAV:
| TRACK | Repeats current track. |
| FOLDER | Repeats all tracks of the current folder. |
| ↓ ↑ FOLDER | Randomly plays all tracks of current folder, then tracks of next folders. |
| ↓ ↑ DISC | Randomly plays all tracks. |
- Press the button repeatedly until the desired playback mode is selected.
To cancel, press the button repeatedly until playback mode indicator disappears.
Settings for the disc playback
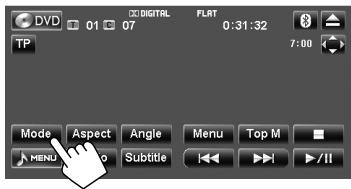
text_image
DVD 01 07 DIGITRAL FLAT 0:31:32 TP 7:00 Mode Aspect Angle Menu Top M MENU Subtitle /II
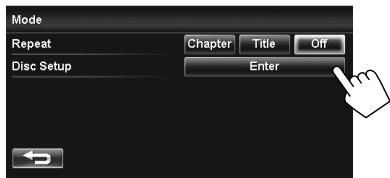
text_image
Mode Repeat Chapter Title Off Disc Setup EnterInitial: Underlined
| Disc Setup items | Selectable settings |
| Menu Language | Select the initial disc menu language; Initial English (also page 72). |
| Audio Language | Select the initial audio language; Initial English (also page 72). |
| Subtitle Language | Select the initial subtitle language or erase the subtitle (Off); Initial English (also page 72). |
| Video Output Format | Select the colour system of the external monitor.NTSC, PALThis setting is valid only to the external monitor connected. |
Monitor Type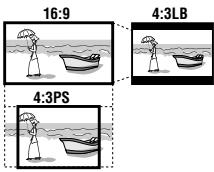 | Select the monitor type to watch a wide screen picture on the external monitor.16:9: Select when the aspect ratio of the external monitor is 16:9.4:3LB (Letterbox)/4:3PS (Pan Scan): Select when the aspect ratio of the external monitor is 4:3.When you select <16:9> for a picture whose aspect ratio is 4:3, the picture slightly changes due to the process for converting the picture width.Even if <4:3PS> is selected, the screen size may become <4:3LB> for some discs. |
| D. Range Compres. | You can enjoy a powerful sound at a low volume level while playing Dolby Digital software.Auto: Select to apply the effect to multi-channel encoded software.On: Select to always use this function. |
| D. Audio Output | Select the signal format emitted through the DIGITAL OUT (optical) terminal.(also page 71)Stream: Select this when connecting an amplifier or a decoder compatible with Dolby Digital or MPEG Audio.Dolby D: Select this when connecting an amplifier or a decoder compatible with Dolby Digital.PCM: Select this when connecting an amplifier or a decoder incompatible with Dolby Digital or MPEG Audio, or when connecting to a recording device. |
| DivX Registration | This unit has its own Registration Code. Once you have played back a file with which the Registration Code recorded, this unit's Registration Code is overwritten for copyright protection. |
SD/USB operations
This unit can play the MP3/WMA files stored in SD card/USB mass storage class device.
- All tracks in the SD card/USB device will be played repeatedly until you change the source.
- Make sure all important data has been backed up.
Inserting SD card
1 Detach the monitor panel.
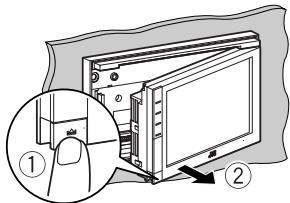
text_image
Diagram showing a device being inserted into a screen, with labeled parts and an inset magnified view of the device's handle.2 Insert an SD card.
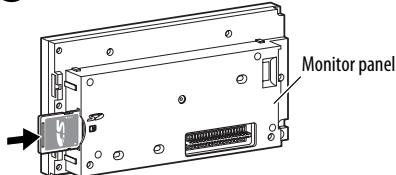
text_image
Monitor panelPush in the SD card until you hear a clicking sound.
3 Attach the monitor panel.
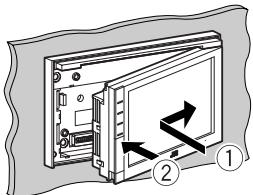
text_image
Diagram showing a device with labeled parts and directional arrows indicating movement or flowThe source changes to "SD" and playback starts.
To eject the SD card
Detach the monitor panel, then push in the SD card lightly.
Connecting USB device
You can connect a USB mass storage class device such as a USB memory, Digital Audio Player, etc. to the unit.
- You cannot connect a computer or portable HDD to the USB (⚡) terminal of the unit.
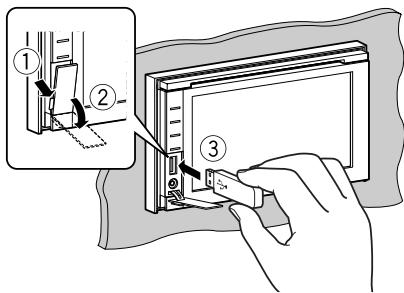
text_image
Diagram illustrating a step-by-step installation of a device with labeled components and directional arrowsThe source changes to "USB" and playback starts.
Caution:
- Avoid using the USB device if it might hinder your safety driving.
- Do not start the car engine if a USB device is connected.
- Do not pull out and attach the USB device repeatedly while "File Check" is shown on the screen.
- Disconnect a USB device while playback is paused or another source is selected.
- Electrostatic shock at connecting a USB device may cause abnormal playback of the device. In this case, disconnect the USB device then reset this unit and the USB device.
- Do not leave a USB device in the car, expose to direct sunlight, or high temperature to avoid deformation or cause damages to the device.
- For more details about USB operations, page 70.


Source type ("SD" or "USB")
Folder no./Track no./Playing time
While playing, "Jacket picture" is shown if the file has the tag data including "Jacket picture."
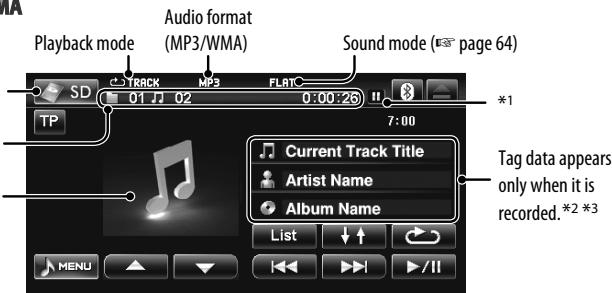
text_image
Playback mode Audio format (MP3/WMA) Sound mode (E® page 64) SD 1 01 1 2 MP3 FLATC 0:00:26 TP 7:00 *1 Current Track Title Artist Name Album Name List TAG data appears only when it is recorded. *2 *3 MENU MENU /II[▶ / Ⅲ]
[◀◀] [▶▶]
[▲][▼]
[↓↑]
Starts playback/pauses
Press: Selects track
Hold: Reverse/forward search*4
Selects folder
Selects Random playback mode*5*6
- ↓ ↑ FOLDER: Randomly plays all tracks of the folder.
- ↓ ↑ SD/↓ ↑ USB: Randomly plays all tracks.
[←]
[List]
Selects Repeat playback mode*5*6
- TRACK: Repeats current track.
- FOLDER: Repeats all tracks of the current folder.
Displays Folder/Track Lists
*1 Playback status (■: pause)
*2 Current folder name and file name appear if not recorded.
*3 When switching the folder, the folder name and file name appear for about 5 seconds even if tag data is recorded.
*4 Search speed: x10
*5 To cancel random or repeat mode, press the button repeatedly until the indicator disappears.
*6 You cannot activate the repeat mode and the random mode at the same time.
- This unit can recognize a total of 5 000 files and 999 folders (a maximum of 999 files per folder).
Listening to the iPod/iPhone device
Preparation
Connecting iPod/iPhone
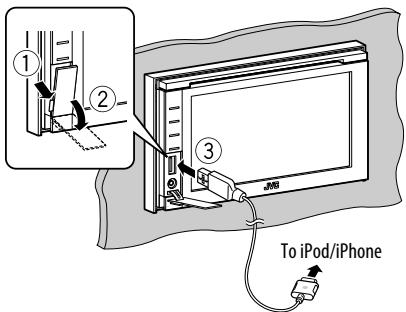
text_image
① ② ③ To iPod/iPhone- You can control the following iPod/iPhone models:
- iPod with video (5th Generation)*
- iPod classic*
- iPod nano (1st Generation)
- iPod nano (2nd Generation)
- iPod nano (3rd Generation)*
- iPod nano (4th Generation)*
- iPod touch*
- iPod touch (2nd Generation)*
- iPhone/iPhone 3G*
- Use the following cables:
- To listen to the music: USB 2.0 cable (accessory of the iPod/iPhone)
- To watch the video: USB Audio and Video cable for iPod/iPhone—KS-U29 (not supplied)
Installation/Connection Manual (separate volume)
* To watch the video with its audio, connect the iPod/ iPhone using USB Audio and Video cable (KS-U29, not supplied).
For some iPod/iPhone models, the performance may be abnormal or unstable during operation. In this case, disconnect the iPod/iPhone device, then check its condition.
If the performance is not improved or slow, reset your iPod/iPhone.
Setting the iPod control mode and the speed of the audio books
When the source is "iPod"...
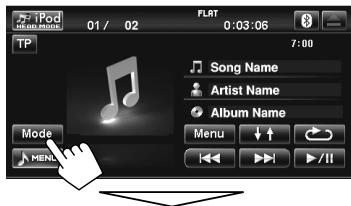
text_image
iPod 01 / 02 FLRT 0:03:06 TP 7:00 Song Name Artist Name Album Name Menu MENL //II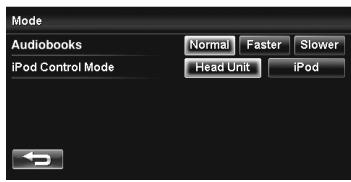
text_image
Mode Audiobooks iPod Control Mode Normal Faster Slower Head Unit iPodAudiobooks
Select the speed of audio books.
| Normal | Plays at normal speed. |
| Faster | Plays faster. |
| Slower | Plays slower. |
iPod Control Mode
Select the unit controlling playback of the iPod/iPhone.
| Head Unit | Controls playback from this unit. |
| iPod | Controls playback from the iPod/ iPhone.· Not available when using iPod nano (1st Generation) or iPod with video (5th Generation). |
- The corresponding iPod control mode indicator appears—"HEAD MODE" for and "iPod MODE" for
. - The operations explained in this manual are under .
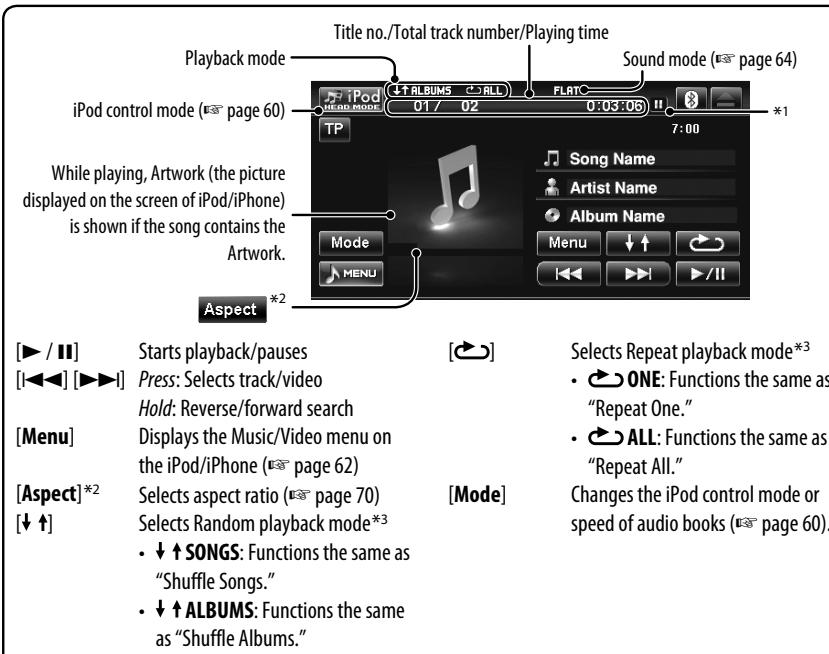
text_image
Title no./Total track number/Playing time Playback mode Sound mode ( page 64 ) iPod control mode ( page 60 ) TP 7:00 While playing, Artwork (the picture displayed on the screen of iPod/iPhone) is shown if the song contains the Artwork. Mode MENU Song Name Artist Name Album Name Menu ↓ ↑ ▶ / II Aspect *2 [► / II] [◄◄◄] [►►I] Starts playback/pauses Press: Selects track/video Hold: Reverse/forward search [Menu] Displays the Music/Video menu on the iPod/iPhone ( page 62) [Aspect]*2 [↓ ↑] Selects aspect ratio ( page 70 ) Selects Random playback mode*3 ↓ ↑ SONGS: Functions the same as "Shuffle Songs." ↓ ↑ ALBUMS: Functions the same as "Shuffle Albums." [Mode] Selects Repeat playback mode*3 ONE: Functions the same as "Repeat One." ALL: Functions the same as "Repeat All." Changes the iPod control mode or speed of audio books ( page 60 ).1 Select "iPod" as the source.

text_image
MENU iPodPlayback starts automatically.
② Select a track/video.

natural_image
Two black button icons with left-pointing arrow symbols and a pointing hand gesture (no text or symbols)- You cannot resume playback for video sources under some conditions.
- Select "iPod" as the source when watching a video. Though selecting "Front AV-IN" may also show pictures from an iPod/iPhone, they may be played back abnormally (for example, no sound comes out).
- If the iPod/iPhone does not play correctly, update your iPod/iPhone software to the latest version. For details about updating your iPod/iPhone, visit http://www.apple.com.
*1 Playback status (■: pause/■: stop)
*2 [Aspect] appears only when video is played back.
*3 To cancel, press the button repeatedly until playback mode indicator disappears.
Selecting a track/video from menu on the iPod/iPhone
1
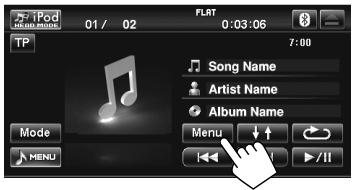
text_image
iPod 01 / 02 FLAT 0:03:06 TP 7:00 Song Name Artist Name Album Name Menu MENU //II2 Select the menu (Music or Video) (①), a category (②), then a desired item (③).
Music menu:
Select the item in the selected layer until a desired track starts playing.
Corresponding icon lights in orange. (♪: Music / 📋: Video)
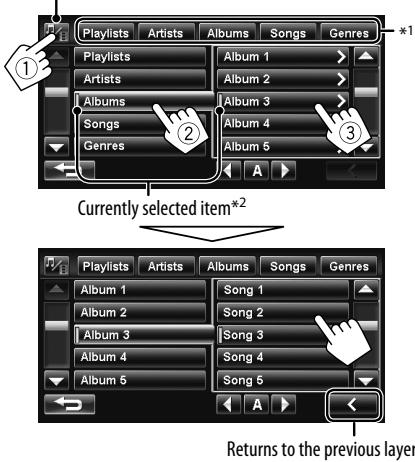
text_image
Playlists Artists Albums Songs Genres Album 1 Albums Album 2 Albums Album 3 Songs Album 4 Genres Album 5 A Currently selected item* 2 Playlists Artists Albums Songs Genres Album 1 Song 1 Album 2 Song 2 Album 3 Song 3 Album 4 Song 4 Album 5 Song 5 Returns to the previous layerVideo menu:
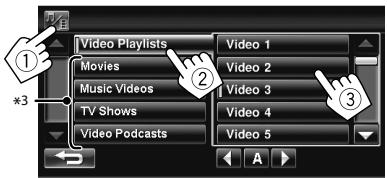
text_image
Video Playlists Movies Music Videos TV Shows Video Podcasts Video 1 Video 2 Video 3 Video 4 Video 5• Available categories depend on the type of your iPod/iPhone.
*1 You can also select the category by pressing the corresponding tab.
*2 During random playback, the indicator does not appear for the song currently played.
*3 These categories are shown in the language selected on your iPod/iPhone.
Searching items in the selected category by alphabet and number:
1 Select the alphabet or number of the beginning of the item's title you want to search.
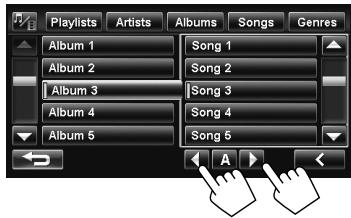
text_image
Playlists Artists Albums Songs Genres Album 1 Song 1 Album 2 Song 2 Album 3 Song 3 Album 4 Song 4 Album 5 Song 5 A2 Start searching.
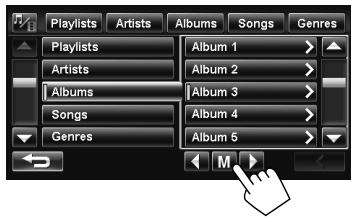
text_image
Playlists Artist Albums Songs Genres Playlists Album 1 Artists Album 2 Albums Album 3 Songs Album 4 Genres Album 5 MThe items whose name started with the selected alphabet are listed.
3 Select the desired item from the list.
Using other external components
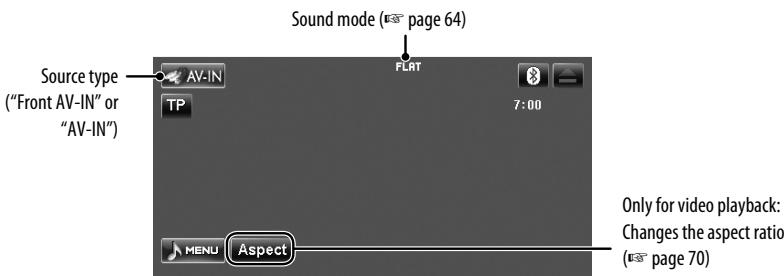
text_image
Sound mode (page 64) Source type ("Front AV-IN" or "AV-IN") AV-IN FLAT TP 7:00 MENU Aspect Only for video playback: Changes the aspect ratio (page 70)- Only for video playback: Pressing DISP or touching the screen shows the operating buttons on the screen. The operating buttons disappear by pressing DISP or when no operation is done for about 5 seconds.
- Select an appropriate setting on
or . (page 66)
Front AV-IN
1 Connect an external component.
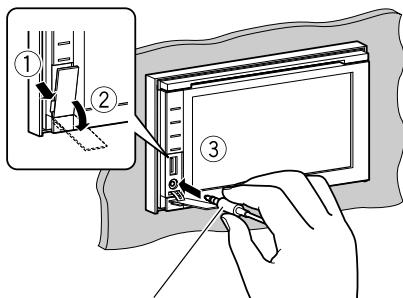
text_image
Diagram showing a hand inserting a device into a screen, with three labeled steps and directional arrows indicating movement.② Select "Front AV-IN" as the source.

text_image
MENU Front AV-IN3 Turn on the connected component and start playing the source.
AV-IN
You can connect an external component to the LINE IN/VIDEO IN jacks. (Installation/Connection Manual)
1 Select "AV-IN" as the source.

flowchart
graph LR
    A["MENU"] --> B["AV-IN"]
2 Turn on the connected component and start playing the source.
Selecting aspect ratio
Only for video playback:

text_image
AV-IN TP 7:00 MENU AspectSound equalization
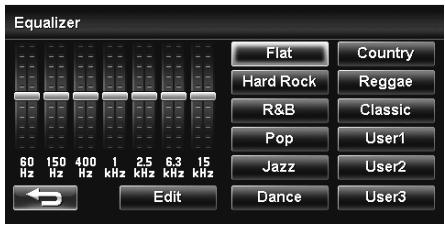
text_image
Equalizer 60 Hz 150 Hz 400 Hz 1 kHz 2.5 kHz 6.3 kHz 15 kHz Flat Country Hard Rock Reggae R&B Classic Pop User1 Jazz User2 Edit Dance User3
text_image
1 MENU Settings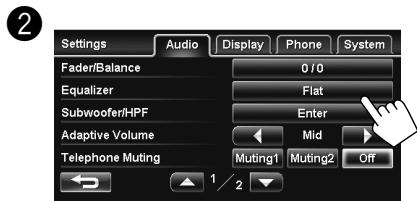
text_image
Settings Audio Display Phone System Fader/Balance 0 / 0 Equalizer Flat Subwoofer/HPF Enter Adaptive Volume Mid Telephone Muting Muting1 Muting2 Off3 Select a sound mode.
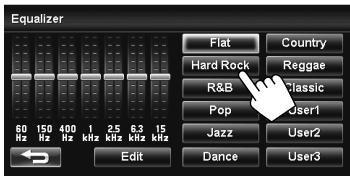
text_image
Equalizer 60 Hz 150 Hz 400 Hz 1 kHz 2.5 kHz 6.3 kHz 15 kHz Flat Country Hard Rock Reggae R&B Classic Pop User1 Jazz User2 Dance User3 EditStoring your own adjustments
You can store your adjustments into
1 Repeat steps ① and ②, then in step ③...
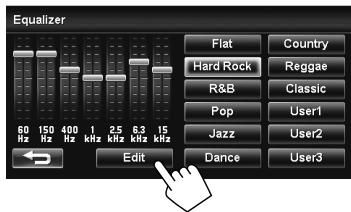
text_image
Equalizer 60 Hz 150 Hz 400 Hz 1 kHz 2.5 kHz 6.3 kHz 15 kHz Edit Flat Country Hard Rock Reggae R&B Classic Pop User1 Jazz User2 Dance User32 Adjust (①), then store (②).
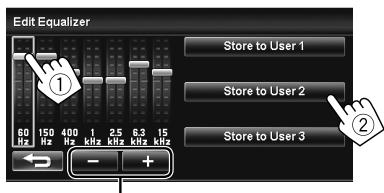
text_image
Edit Equalizer Store to User 1 Store to User 2 Store to User 3 ① 60 Hz 150 Hz 400 Hz 1 kHz 2.5 kHz 6.3 kHz 15 kHz ② - +Also adjusts the frequency level
| Menu items | Selectable settings | |
| Audio | Fader/Balance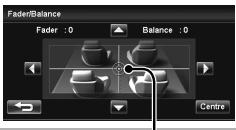 Cursor Cursor | Fader: Adjust the front and rear speaker output balance.F6 to R6; Initial0- When using a two-speaker system, set the fader to the centre (0).Balance: Adjust the left and right speaker output balance.L6 to R6; Initial0Press [▲/▼/◄/►] or drag the cursor to adjust.To set the fader and balance to the centre (0), press [Centre]. |
| Equalizer | Flat/Hard Rock/R&B/Pop/Jazz/Dance/Country/Reggae/Classic/User1/User2/User3 (E® page 64) | |
| Subwoofer/HPF | Adjust the subwoofer output level, Cross Over, and High Pass Filter.Press [Enter] to adjust each setting.Level: Adjust the subwoofer output level.-6 to +8; Initial0Cross Over: Adjust the crossover frequency between the front/rear speakers and the subwoofer.80Hz, 120Hz, 150HzHigh Pass Filter:On: Select when the subwoofer is connected.Through: Select when the subwoofer is not connected. | |
| Adaptive Volume | When this function is activated, the System automatically increases the volume level (both for guidance and audio) as the car speeds up.Off, Min, Mid, Max | |
| Telephone Muting* | Muting1, Muting2: Select either one which mutes the sounds while using the mobile phone.Off: Cancels. | |
| Amplifier Gain | You can change the maximum volume level of this unit.High: VOL 0 to 20 (for guidance)/VOL 00 to 50 (for audio)Low: VOL 0 to 15 (for guidance)/VOL 00 to 30 (for audio)(Select this if the peak power of the speakers is less than 50 W.)Off: Deactivates the built-in amplifier (VOL 0 to 20 for guidance/VOL 00 to 50 for audio.)If you change this setting from/ltowhile the volume level is set higher than the maximum level of, the unit automatically lowers the volume level (guidance: VOL 15/ audio: VOL 30). |
* The TEL MUTING lead connection is required. (Installation/Connection Manual)
| Menu items | Selectable settings | |
| Audio | Front AV Input*1 | You can determine the use of the AV-IN jack on the monitor panel.( page 63)AV: Select when connecting an AV component such as a camcorder.Audio: Select when connecting an audio component such as a portable audio player.Off: Select when no component is connected (“Front AV-IN” is skipped while selecting the source). |
| AV Input*2 | You can determine the use of the LINE IN and VIDEO IN jacks.( page 63)AV: Select when connecting an AV component such as a camcorder.Audio: Select when connecting an audio component such as a portable audio player.Off: Select when no component is connected (“AV-IN” is skipped while selecting the source). | |
| Display | Dimmer | Off: Cancels.On: Activates dimmer.Auto: Dims the monitor when you turn on the headlights.*3Time: Activates the Dimmer Time setting below. |
| Dimmer Time | Sets the Dimmer On/Off times. | |
| Camera Input*4 | On, Off ( page 81) | |
| Demonstration *4 | On: Activates the demonstration on the screen. To stop it temporarily, touch the screen.Off: Cancels. |
*1 Not selectable when "Front AV-IN" is selected as the source.
*2 Not selectable when "AV-IN" is selected as the source.
*3 The ILLUMINATION CONTROL lead connection is required. (Installation/Connection Manual)
*4 The setting varies depending on the installation settings ( page 7).
For
Initial: Underlined
| Menu items | Selectable settings |
| Language*5 | Select the language used for on-screen information and voice guidance.English, Español, Français, Deutsch, Italiano, Nederlands, Dansk, Svenska, Português, Ceština, Suomi, Norsk, Polski, Türkçe, Ελληνικα, Magyar |
| Time Format | Select either 12-hour system or 24-hour system.12 Hours, 24 Hours |
| Local Time Adjust | Selectto set your time zone for clock adjustment.Auto, ManualWhen selecting, set your time zone throughand.When the time zone is not adjusted correctly by selecting, change the setting toand set your time zone manually. |
| Time Zone*5 | Select your residential area from one of the following time zones for clock adjustment.UTC, UTC+01:00, UTC+02:00 |
| Summer time*5 | Activate this if your residential area is subject to summer time.Auto: Activates summer time.Off: Cancels. |
| Beep | On: Activates the key-touch tone.Off: Cancels. |
| Startup Message*6 | Edit the voice message at startup/shutdown of the System. |
| Shutdown Message*6 | To edit the message, press [Edit], enter the message, then press [OK].*7 You can listen to the edited message by pressing [Test]. |
| Reverse Signal Polarity*5 | Battery, GND ( page 7) |
| Restore Factory Default | Initialize all settings you have made. Press [Restore] to initialize the settings.When restoring the settings, adjust the settings on installation setting screen ( page 7). |
*5 The setting varies depending on the installation settings ( page 7).
*6 The languages available for the message are: English, Spanish, French, German, Italian, Dutch, Portuguese, Danish and Swedish.
*7 For entering the characters, page 12.
General
- This unit can display only one-byte characters. No other characters can be correctly displayed.
Disc
- In this manual, words "track" and "file" are interchangeably used.
- This unit can only play back audio CD (CD-DA) files if different type of audio files (MP3/WMA/WAV) are recorded on the same disc.
File playback
Playing DivX files (Discs only)
- This unit can play back DivX files with the extension code <.divx> , <.div> , or <.avi> (regardless of the letter case—upper/lower).
• Audio stream should conform to MP3 or Dolby Digital. - The file encoded in the interlaced scanning mode may not be played back correctly.
- The maximum bit rate for video signals (average) is 4 Mbps.
Playing MPEG1/MPEG2 files (Discs only)
- This unit can play back MPEG1/MPEG2 files with the extension code <.mpg> , <.mpeg> , or <.mod> *.
* <.mod> is an extension code used for the MPEG2 files recorded by JVC Everio camcorders. The MPEG2 files with the <.mod> extension code cannot be played back when stored on a USB mass storage class device.
- The stream format should conform to MPEG system/program stream. The file format should be MP@ML (Main Profile at Main Level)/SP@ML (Simple Profile at Main Level)/MP@LL (Main Profile at Low Level).
- Audio streams should conform to MPEG1 Audio Layer-2 or Dolby Digital.
- The maximum bit rate for video signals (average) is 4 Mbps.
Playing MP3/WMA/WAV\* files
- This unit can play back files with the extension code <.mp3> , <.wma> , or <.wav> (regardless of the letter case—upper/lower). - This unit can play back the files meeting the conditions below:
- Bit rate: MP3/WMA: 32 kbps — 320 kbps
- Sampling frequency: MP3: 48 kHz, 44.1 kHz, 32 kHz 24 kHz, 22.05 kHz, 16 kHz WMA: 48 kHz, 44.1 kHz, 32 kHz, 22.05 kHz WAV: 44.1 kHz
- This unit can show ID3 Tag Version 1.0/1.1/2.2/2.3/2.4 (for MP3).
– ID3 Tag Version 2.4 is not available for SD/USB playback.
• This unit can also show WAV/WMA Tag. - This unit can play back files recorded in VBR (variable bit rate).
- Files recorded in VBR have a discrepancy in elapsed time indication.
- This unit cannot play back the following files:
- MP3 files encoded with MP3i and MP3 PRO format.
- MP3 files encoded with Layer 1/2.
– WMA files encoded with lossless, professional, and voice format. - WMA files which are not based upon Windows Media® Audio.
– WMA files copy-protected with DRM.
* WAV files are played only when recorded on a disc.
Disc information shown on the external monitor
The following screens appear only on the external monitor.
• CD
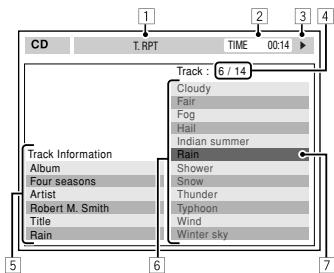
text_image
CD T.RPT TIME 00:14 Track : 6 / 14 Cloudy Fair Fog Hail Indian summer Rain Shower Snow Thunder Typhoon Wind Winter sky Track Information Album Four seasons Artist Robert M. Smith Title Rain1 Selected playback mode
2 Elapsed playing time of the current track
3 Operation status
4 Current track number/total number of tracks on the disc
5 Track information
6 Track list
7 Current track (highlighted bar)
• DivX/MPEG1/MPEG2/MP3/WMA/WAVdiscs
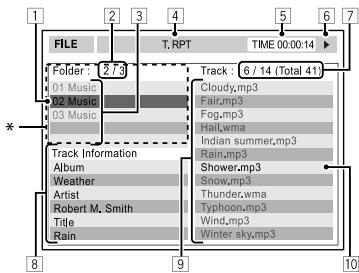
text_image
FILE 2 / 3 01 Music 02 Music 03 Music Track Information Album Weather Artist Robert M. Smith Title Rain T. RPT TIME 00:00:14 Track : 6 / 14 (Total 41) Cloudy.mp3 Fair.mp3 Fog.mp3 Hall.wma Indian summer.mp3 Rain.mp3 Shower.mp3 Snow.mp3 Thunder.wma Typhoon.mp3 Wind.mp3 Winter sky.mp31 Current folder (highlighted bar)
2 Current folder number/total folder number
3 Folder list
4 Selected playback mode
5 Elapsed playing time of the current track
6 Operation status
7 Current track number/total number of tracks in the current folder (total number of tracks on the disc)
8 Track information (Only for MP3/WMA/WAV)
9 Track list
10 Current track (highlighted)
* If tag data includes "Jacket Picture" (baseline JPEG), it will be displayed.
USB
- This unit cannot recognize a USB device whose rating is other than 5 V and exceeds 500 mA.
- While playing from a USB device, the playback order may differ from other players.
- This unit may be unable to play back some USB devices or some files due to their characteristics or recording conditions.
- USB devices equipped with special functions such as data security functions cannot be used with the unit.
- Do not use a USB device with 2 or more partitions.
- Depending on the shape of the USB devices and connection ports, some USB devices may not be attached properly or the connection might be loose.
- When connecting a USB device, refer also to its instructions.
- Connect only one USB device to the unit at a time. Do not use a USB hub.
- This unit may not recognize a memory card inserted into the USB card reader.
- When connecting with a USB cable, use the USB 2.0 cable.
- This unit may not play back files in a USB device properly when using a USB extension cord.
- This unit cannot assure proper functions or supply power to all types of the devices.
iPod/iPhone operations
- When you turn on this unit, the iPod/iPhone is charged through the unit.
- The text information may not be displayed correctly.
- Do not press any keys during the first 5 seconds or more of playing back any track containing Artwork*. It takes 5 seconds or more to display artwork and no operations are available while loading it.
Notice:
When operating an iPod/iPhone, some operations may not be performed correctly or as intended. In this case, visit the following JVC web site: http://www.jvc.co.jp/english/car/ (English website only)
* The picture displayed on the screen of iPod/iPhone while playing back a track.
Aspect setting for video playback
| Setting items | Aspect ratio of incoming signal | |
| 4:3 | 16:9 | |
| Regular:For 4:3 original pictures |  |  |
| Full:For 16:9 original pictures |  |  |
| Auto: | • For “DISC” only: Aspect ratio is automatically selected to match to the incoming signals. | |
Sound signals emitted through the rear terminals
Through the analog terminals (Speaker out/LINE OUT)
2-channel signal is emitted. When playing multi-channel encoded disc, multi-channel signals are downmixed.
• DTS sound cannot be reproduced.
Through the DIGITAL OUT terminal
Digital signals (Linear PCM, Dolby Digital, and MPEG Audio) are emitted.
- To reproduce the multi-channel sounds such as Dolby Digital and MPEG Audio, connect an amplifier or a decoder compatible with these multi-channel sources to this terminal.
• DTS sound cannot be emitted.
| Playback disc | Output signals | |||
| DVD | 48 kHz, 16/20/24 bits Linear PCM | 48 kHz, 16 bits stereo Linear PCM* | ||
| 96 kHz, Linear PCM | 48 kHz, 16 bits stereo Linear PCM | |||
| with Dolby Digital | Dolby Digital bitstream | 48 kHz, 16 bits stereo Linear PCM | ||
| with MPEG Audio | MPEG bitstream | 48 kHz, 16 bits stereo Linear PCM | ||
| Audio CD | 44.1 kHz, 16 bits stereo Linear PCM | |||
| DivX/MPEG | with Dolby Digital | Dolby Digital bitstream | 48 kHz, 16 bits stereo Linear PCM | |
| with MPEG Audio | 32/44.1/48 kHz, 16 bits Linear PCM | |||
| MP3/WMA | 32/44.1/48 kHz, 16 bits Linear PCM | |||
| WAV | 44.1 kHz, 16 bits Linear PCM | |||
* Digital signals may be emitted at 20 or 24 bits (at their original bit rate) through the DIGITAL OUT terminal if the discs are not copy-protected.
Language codes (for DVD/DivX language selection)
| Code | Language | Code | Language | Code | Language | Code | Language | Code | Language |
| AA | Afar | FA | Persian | KK | Kazakh | NO | Norwegian | ST | Sesotho |
| AB | Abkhazian | FI | Finnish | KL | Greenlandic | OC | Occitan | SU | Sundanese |
| AF | Afrikaans | FJ | Fiji | KM | Cambodian | OM | (Afan) Oromo | SW | Swahili |
| AM | Ameharic | FO | Faroese | KN | Kannada | OR | Oriya | TA | Tamil |
| AR | Arabic | FY | Frisian | KO | Korean (KOR) | PA | Panjabi | TE | Telugu |
| AS | Assamese | GA | Irish | KS | Kashmiri | PL | Polish | TG | Tajik |
| AY | Aymara | GD | Scots Gaelic | KU | Kurdish | PS | Pashto, Pushto | TH | Thai |
| AZ | Azerbaijani | GL | Galician | KY | Kirghiz | QU | Quechua | TI | Tigrinya |
| BA | Bashkir | GN | Guarani | LA | Latin | RM | Rhaeto-Romance | TK | Turkmen |
| BE | Byelorussian | GU | Gujarati | LN | Lingala | RN | Kirundi | TL | Tagalog |
| BG | Bulgarian | HA | Hausa | LO | Laothian | RO | Rumanian | TN | Setswana |
| BH | Bihari | HI | Hindi | LT | Lithuanian | RW | Kinyarwanda | TO | Tonga |
| BI | Bislama | HR | Croatian | LV | Latvian, Lettish | SA | Sanskrit | TR | Turkish |
| BN | Bengali, Bangla | HU | Hungarian | MG | Malagasy | SD | Sindhi | TS | Tsonga |
| BO | Tibetan | HY | Armenian | MI | Maori | SG | Sangho | TT | Tatar |
| BR | Breton | IA | Interlingua | MK | Macedonian | SH | Serbo-Croatian | TW | Twi |
| CA | Catalan | IE | Interlingue | ML | Malayalam | SI | Singhalese | UK | Ukrainian |
| CO | Corsican | IK | Inupiak | MN | Mongolian | SK | Slovak | UR | Urdu |
| CS | Czech | IN | Indonesian | MO | Moldavian | SL | Slovenian | UZ | Uzbek |
| CY | Welsh | IS | Icelandic | MR | Marathi | SM | Samoan | VI | Vietnamese |
| DZ | Bhutani | IW | Hebrew | MS | Malay (MAY) | SN | Shona | VO | Volapuk |
| EL | Greek | JA | Japanese | MT | Maltese | SO | Somali | WO | Wolof |
| EO | Esperanto | JI | Yiddish | MY | Burmese | SQ | Albanian | XH | Xhosa |
| ET | Estonian | JW | Javanese | NA | Nauru | SR | Serbian | YO | Yoruba |
| EU | Basque | KA | Georgian | NE | Nepali | SS | Siswati | ZU | Zulu |
Using Bluetooth® mobile phone

Bluetooth®
Bluetooth is a short-range wireless radio communication technology for the mobile device such as mobile phones, portable PCs, and other devices. The Bluetooth devices can be connected without cables and communicate with each other.
- Refer to the list (included in the box) to see the countries where you may use the Bluetooth® function.
Bluetooth profile
This unit supports the following Bluetooth profiles;
• HFP (Hands-Free Profile) 1.5
- OPP (Object Push Profile) 1.1
- While driving, do not perform complicated operation such as dialing the numbers, using phone book, etc. When you perform these operations, stop your car in a safe place.
- Some Bluetooth devices may not be connected to this unit depending on the Bluetooth version of the device.
- This unit may not work for some Bluetooth devices.
- Connecting condition may vary depending on circumstances around you.
- When the unit is turned off, the device is disconnected.
Warning messages for Bluetooth operations
| “Cannot connect. Please connect from your phone.” | The device is registered but the connection has failed. Connect from your phone, or useto connect the device again (page 76). |
| “System can not connect with this device. Please disconnect current device, then connect from this device.” | The device cannot be connected. Disconnect the current device, then connect the device again. |
| “Pairing Error.” | The operation you have tried cannot be completed. Try the operation again. If the message appears again, check if the device supports the function you have tried. |
| “Connect error.” | |
| “Disconnect error.” | |
| “Delete error.” | |
| “Memory full.” | You have tried to copy a 101st phone book entry. Delete unwanted names before copying. |
Bluetooth Information:
If you wish to receive more information about Bluetooth, visit the following JVC web site:
http://www.jvc.co.jp/english/car/ (English website only)
Bluetooth mobile phone settings
1
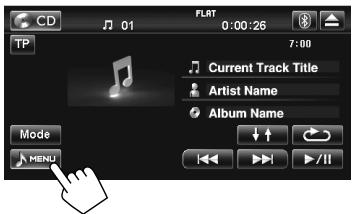
text_image
CD 01 FLAT 0:00:26 TP 7:00 Current Track Title Artist Name Album Name Mode MENU2
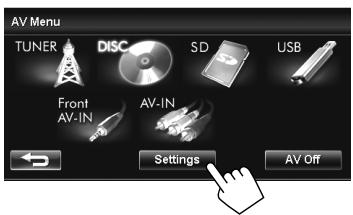
text_image
AV Menu TUNER DISC SD USB Front AV-IN AV-IN Settings AV Off3
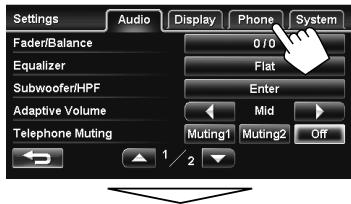
text_image
Settings Audio Display Phone System Fader/Balance 0/0 Equalizer Flat Subwoofer/HPF Enter Adaptive Volume Mid Telephone Muting Muting1 Muting2 Off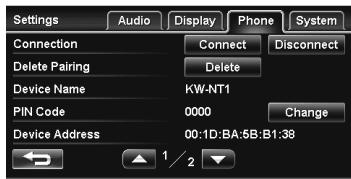
text_image
Settings Audio Display Phone System Connection Connect Disconnect Delete Pairing Delete Device Name KW-NT1 PIN Code 0000 Change Device Address 00:1D:BA:5B:B1:38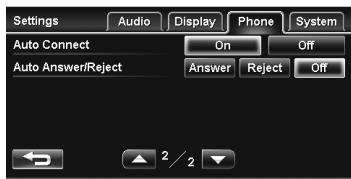
text_image
Settings Audio Display Phone System Auto Connect On Off Auto Answer/Reject Answer Reject OffInitial: Underlined
| Menu items | Selectable settings |
| Connection | Connect: pages 75 and 76Disconnect: page 79 |
| Delete Pairing | page 79 |
| Device Name | Shows the device name to be shown on the mobile phone — “KW-NT1.” |
| PIN Code | Displays the PIN code of the unit.To change the PIN code, press [Change], enter new PIN code, then press [OK]. |
| Device Address | Shows the MAC address of the unit. |
| Auto Connect | On: The connection is automatically established when the unit is turned on.Off: Cancels. |
| Auto Answer/Reject | Answer: The unit answers the incoming calls automatically.Reject: The unit rejects all incoming calls.Off: The unit does not answer the calls automatically. Answer the calls manually. |
Connecting a Bluetooth mobile phone
To connect a Bluetooth mobile phone for the first time
When you connect a Bluetooth mobile phone to the unit for the first time, make pairing between the unit and the mobile phone. Pairing allows Bluetooth mobile phone to communicate each other.
- Once the connection is established, it is registered in the unit even if you reset the unit. Up to 5 devices can be registered in total.
- Only one Bluetooth mobile phone can be connected at a time.
- To use the Bluetooth function, you need to turn on Bluetooth function of the mobile phone.
To check the connection status of a Bluetooth mobile phone
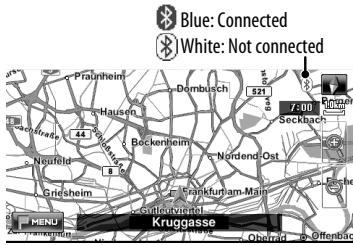
text_image
Blue: Connected White: Not connected 7-900 Seckbach Bockenheim Nordend-Ost Kaufurttram-Mai MENJ Bruggasse Obraid OfferbacWhen a call comes in/making a call
On map screen:
The mobile phone control bars appear.
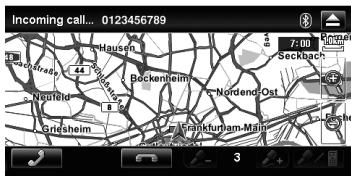
text_image
Incoming call... 0123456789 Seckbach Neufeld Griesheim Bockenheim Nordend Ost Frankfurt-Hamburg-MalwayOn AV screen:
AV source is turned off.
- AV source is turned on when ending the call or stopping ringing.
1 Operate the Bluetooth mobile phone to turn on its Bluetooth function.
2

flowchart
graph LR
    A["MENU"] --> B["Settings"]
    B --> C["Phone"]
3 Change the PIN code.
- If you skip changing PIN code, go to step 4.
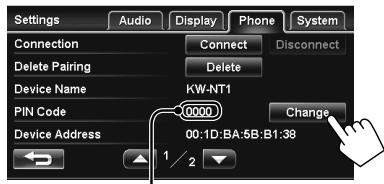
text_image
Settings Audio Display Phone System Connection Connect Disconnect Delete Pairing Delete Device Name KW-NT1 PIN Code 0000 Change Device Address 00:1D:BA:5B:B1:38PIN code (initial: 0000)
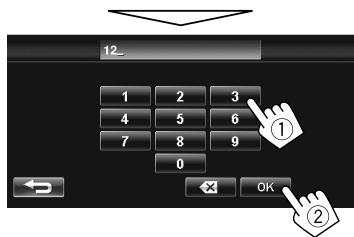
text_image
12_ 1 2 3 4 5 6 7 8 9 0 ← OK ① ②4

text_image
Settings Audio Display Phone System Connection Connect Disconnect Delete Pairing Delete Device Name KW-NT1 PIN Code 1234 Change Device Address 00:1D:BA:5B:B1:385
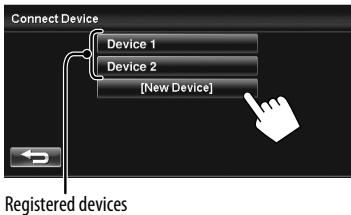
text_image
Connect Device Device 1 Device 2 [New Device] Registered devices6 Operate the Bluetooth mobile phone to connect.
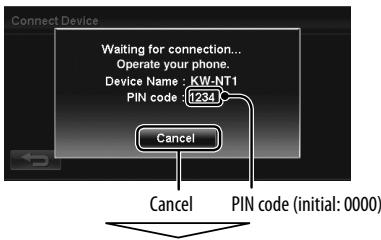
text_image
Connect Device Waiting for connection... Operate your phone. Device Name : KW-NT1 PIN code 1234 Cancel Cancel PIN code (initial: 0000)"Connected" appears. Press [OK] to confirm the operation.
Now connection is established and you can use the mobile phone through the unit.
The mobile phone remains registered even after you disconnect the mobile phone. Use
To connect a registered mobile phone
1

flowchart
graph LR
    A["MENU"] --> B["Settings"]
    B --> C["Phone"]
2
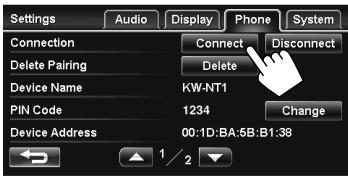
text_image
Settings Audio Display Phone System Connection Connect Disconnect Delete Pairing Delete Device Name KW-NT1 1234 Change PIN Code Device Address 00:1D:BA:5B:B1:383 Select the device you want to connect.
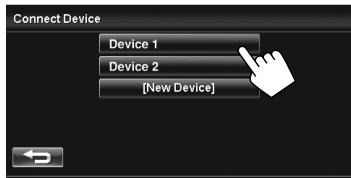
text_image
Connect Device Device 1 Device 2 [New Device]"Connected" appears. Press [OK] to confirm the operation.
Receiving a call
When a call comes in...
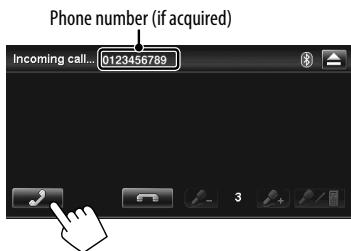
text_image
Phone number (if acquired) Incoming call... 0123456789When
The unit answers the incoming call automatically.
(page 74)
Ending the call/stopping ringing (canceling the outgoing call)
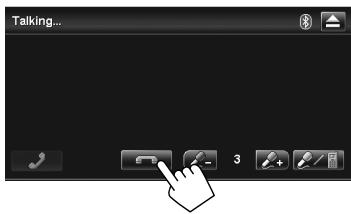
text_image
Talking...Adjusting the volume
Volume of calls/earpiece
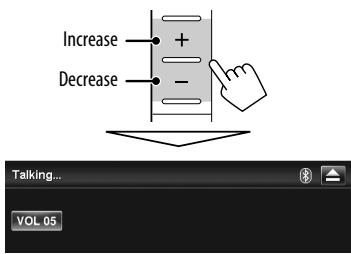
text_image
Increase Decrease Talking... VOL 05- This adjustment does not affect the volume level of the other sources.
- About the adjustable volume range, page 65.
Volume of the microphone
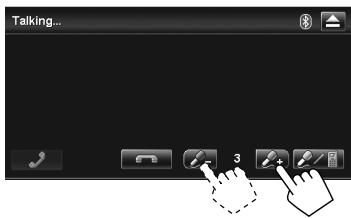
text_image
Talking... 3Switching between handsfree mode and phone mode
You can switch the talking method between handsfree mode and phone mode.
While talking...
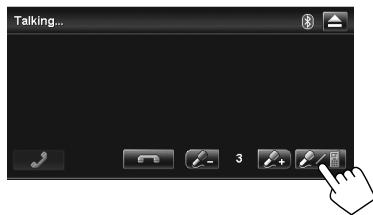
text_image
Talking...Each time you press the button, the talking method is switched. The corresponding indicator lights in orange (☐: handsfree mode / ☐: phone mode).
- The call may end automatically when switching to the phone mode, depending on the type of mobile phone.
Making a call
- On the map screen, display the AV control bars by pressing DISP.
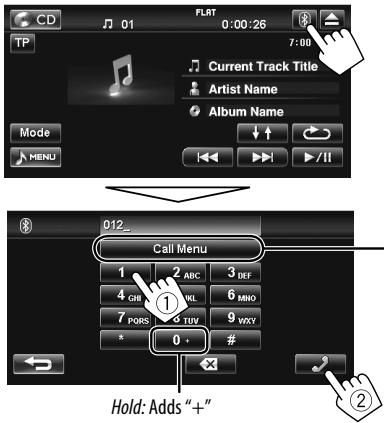
text_image
CD 01 FLRT 0:00:26 7:00 Current Track Title Artist Name Album Name Mode MENU Call Menu 1 2 ABC 3 DEF 4 GHW 5 MNO 7 PORS 8 TUV 9 VXY * 0 * Hold: Adds "+"- You can enter up to 32 numbers.
Making a call while operating on the navigation system
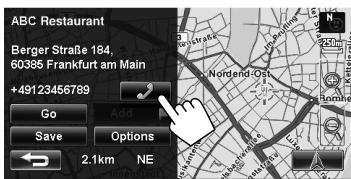
text_image
ABC Restaurant Berger Straße 184, 60385 Frankfurt am Main +49123456789 Go Add Save Options 2.1km NEor
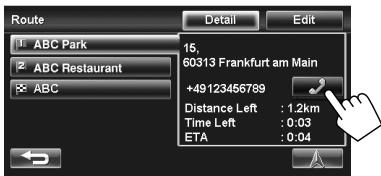
text_image
Route Detail Edit ABC Park 15, ABC Restaurant 60313 Frankfurt am Main +49123456789 Distance Left : 1.2km Time Left : 0.03 ETA : 0.04Using
From dialed calls
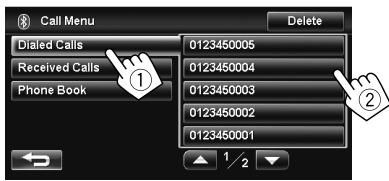
text_image
Call Menu Deleted Dialled Calls 0123450005 Received Calls 0123450004 Phone Book 0123450003 0123450002 0123450001 1/2From received calls
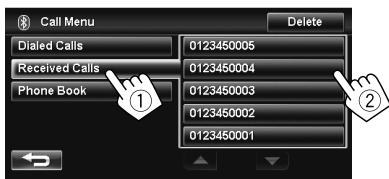
text_image
Call Menu Deleted Dialed Calls 0123450005 Received Calls 0123450004 Phone Book 0123450003 0123450002 0123450001From phone book
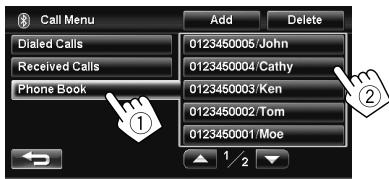
text_image
Call Menu Add Delete Dialed Calls 0123450005/John Received Calls 0123450004/Cathy Phone Book 0123450003/Ken 0123450002/Tom 0123450001/Moe- For copying the phone book, page 80.
Switching the calls on call waiting
You can switch the call to talk when another call comes in while you are talking.
When a call comes in while talking...
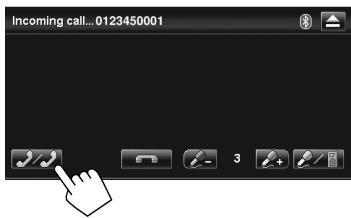
text_image
Incoming call... 0123450001The call is switched.
- To switch the call again, press the same button or end the current call by pressing [☐].
Disconnecting a Bluetooth mobile phone
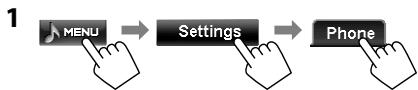
flowchart
graph LR
    A["MENU"] --> B["Settings"]
    B --> C["Phone"]
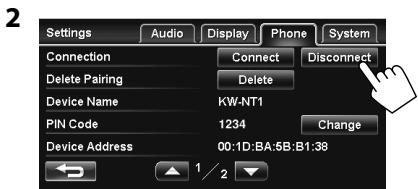
text_image
Settings Audio Display Phone System Connection Connect Disconnect Delete Pairing Delete Device Name KW-NT1 PIN Code 1234 Change Device Address 00:1D:BA:5B:B1.38A confirmation message appears.
Deleting a registered Bluetooth mobile phone
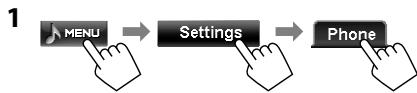
flowchart
graph LR
    A["MENU"] --> B["Settings"]
    B --> C["Phone"]
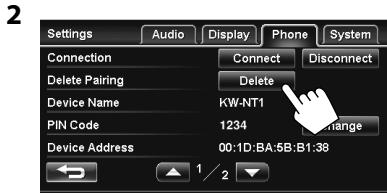
text_image
Settings Audio Display Phone System Connection Connect Disconnect Delete Pairing Delete Device Name KW-NT1 PIN Code 1234 Change Device Address 00:1D:BA:5B:B1:383 Select a device whose registration you want to delete.
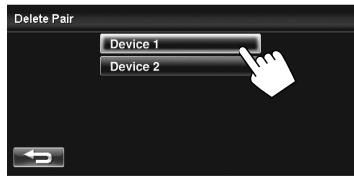
text_image
Delete Pair Device 1 Device 2A confirmation message appears.
Editing the phone number memory
Copying the phone book
You can copy the phone book memory of a mobile phone into the unit (up to 100 memories).
1 Display
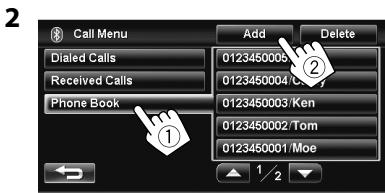
text_image
2 Call Menu Add Delete Dialed Calls 0123450005 Received Calls 0123450004/CK Phone Book 0123450003/Ken 0123450002/Tom 0123450001/Moe ① ② ① 1/23 Operate the target mobile phone.
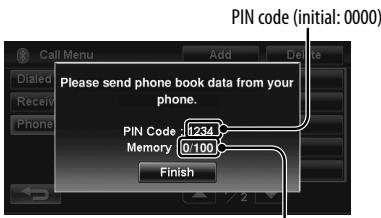
text_image
PIN code (initial: 0000) Please send phone book data from your phone. PIN Code 1234 Memory 0.100 FinishNumbers of the phone book memories copied
• To cancel the transfer, press [Finish].
4 Finish the procedure.
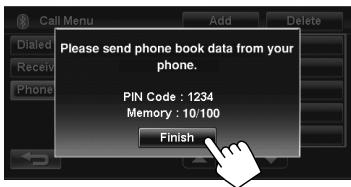
text_image
Please send phone book data from your phone. PIN Code : 1234 Memory : 10/100 FinishThe phone book memory is copied from the mobile phone.
- If you try to copy a 101st phone book entry, "Memory Full" appears. Delete unwanted names before copying.
- Once you start copying the phone book, you cannot make/receive call while

- When
Deleting the memory in the
1 Display
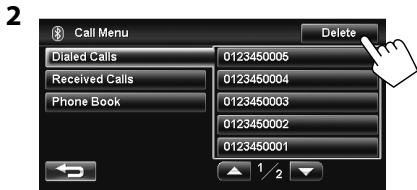
text_image
Call Menu Deleted Dialled Calls 0123450005 Received Calls 0123450004 Phone Book 0123450003 0123450002 0123450001 1/23 Select the items (①, ②), to delete them (③).
- The selected items are marked with "✓."

text_image
Selects all phone numbers in the selected item Delete Memory Dialed Calls Received Calls Phone Book Select All 0123450005/John 0123450004/Cathy 0123450003/Ken 0123450002/TomA confirmation message appears.
Rear View Camera Operations
Using a rear view camera
- To use a rear view camera, the REVERSE GEAR SIGNAL lead connection is required. For connecting a rear view camera, Installation/Connection Manual.
Activating/deactivating the rear view camera
1 On AV screen

flowchart
graph LR
    A["MENU"] --> B["Settings"]
    B --> C["Display"]
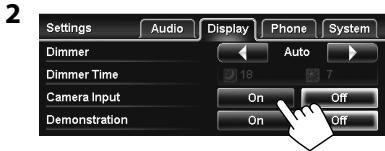
text_image
Settings Audio Display Phone System Dimmer Auto Dimmer Time 18 7 Camera Input On Off Demonstration On Off| On | Select when connecting a rear view camera to the CAMERA IN jack. The picture from the camera is displayed as it is taken. |
| Off | Select when no rear view camera is connected to the CAMERA IN jack. |
When <0n> is selected, the rear view screen is displayed when you shift the gear to the reverse (R) position.
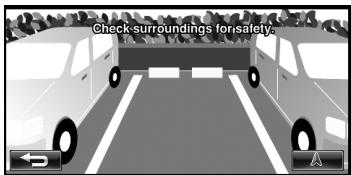
text_image
Check surroundings for safety- When you perform one of the following operations, the rear view screen is cleared and you cannot go back to the rear view screen.
- Press [←] or [A].
- Press AV MAP.
- Shifting the gear to another position other than the reverse (R) position.
Checking the rear view
1 On map screen

flowchart
graph LR
    A["MENU"] --> B["Function Menu"]
2
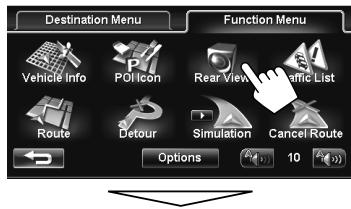
text_image
Destination Menu Vehicle Info POL Icon Rear View Traffic List Route Detour Simulation Cancel Route Options 10
text_image
Check surroundings for safetyMaintenance
Caution on cleaning the unit
Do not use any solvent (for example, thinner, benzine, etc.), detergent, or insecticide. This may damage the monitor or the unit.
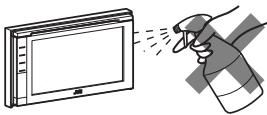
natural_image
Illustration of a hand spraying a spray bottle onto a screen (no text or symbols)Recommended cleaning method:
Gently wipe the panel with a soft, dry cloth.
How to clean the connector
Frequent detachment will deteriorate the connectors. To minimize this possibility, periodically wipe the connectors with a cotton swab or cloth moistened with alcohol, being careful not to damage the connectors.
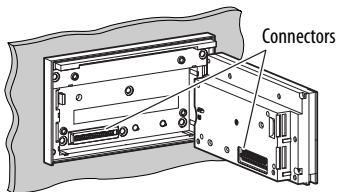
text_image
ConnectorsMoisture condensation
Moisture may condense on the lens inside the unit in the following cases:
• After starting the heater in the car.
- If it becomes very humid inside the car.
Should this occur, the unit may malfunction. In this case, eject the disc and leave the unit turned on for a few hours until the moisture evaporates.
How to handle discs
When removing a disc from its case, press down the
centre holder of the case and lift the disc out, holding it by the edges.
Centre holder
• Always hold the disc by the edges. Do not touch its recording surface.

When storing a disc into its case,
gently insert the disc around the centre holder (with the printed surface facing up).
- Make sure to store discs into the cases after use.
To keep discs clean
A dirty disc may not play correctly. If a disc does become dirty, wipe it with a soft cloth in a straight line from centre to edge.

- Do not use any solvent (for example, conventional record cleaner, spray, thinner, benzine, etc.) to clean discs.
To play new discs
New discs may have some rough spots around the inner and outer edges. If such a disc is used, this unit may reject the disc.

To remove these rough spots, rub the edges with a pencil or ball-point pen, etc.
Do not use the following discs:
Single CD—8 cm disc

Unusual shape

Warped disc
C-thru Disc (semi-transparent disc)

Sticker and sticker residue

Stick-on label

Transparent or semi-transparent on its recording area

Troubleshooting
What appears to be trouble is not always serious. Check the following points before calling a service centre.
- For operations with the external components, refer also to the instructions supplied with the adapters used for the connections (as well as the instructions supplied with the external components).
| Symptoms | Remedies/Causes | |
| General | No sound comes out of the speakers. | Adjust the volume to the optimum level.Check the cords and connections. |
| The screen is not clear and legible. | Sunshine from the windscreen may cause this symptom.Adjust the brightness on the monitor setting screen.(page 9) | |
| The unit does not work at all. | Detach the monitor panel, then attach it.(page 3) | |
| The touch panel does not respond properly. | Keep your hands and the touch panel clean and dry.Eliminate static electricity and do not place magnetic items near the unit.Leave the unit until the temperature becomes stable in the car.A rubber mat on the floor may cause this symptom. In this case, do not use the rubber mat. | |
| Navigation guidance or AV source is hard to listen to. | Surround noise interferes. Increase thelevel.(page 65) | |
| setting has no effect even though it is activated. | Reset the calibration data by selecting.(page 40) | |
| “System start up failed.” | The System cannot start up. Detach the monitor panel, then attach it.(page 3) | |
| “No Signal” | Change the source.Start the playback on the external component connected to AV-IN jack on the monitor panel or VIDEO IN/LINE IN jacks on the rear panel.Check the cords and connections.Signal input is too weak. | |
| Navigation | Guidance does not start. | The System proceeds calibration. Wait until calibration is completed. When calibration is completed, the guidance starts. |
| You cannot operate some functions of an AV source on the map screen. | On the map screen, you can operate some limited functions of the current source only. Press AV MAP and operate the source on the AV screen. | |
| Route calculation seems to have stopped. | Route calculation may take long depending on the route. Wait for a while. | |
| Navigation | Navigation voice cannot be heard from the speakers. | Guidance volume level is set to the minimum level. Adjust it to the optimum level. ( page 36) |
| The voice guidance does not come out from the speaker on the driver's side. | Change thesetting. ( page 41) | |
| Navigation guidance is sometimes incorrect. | Reversing signal/speed signal leads are not connected. Connect them correctly ( Installation/Connection Manual—separate volume). | |
| A POI found usingin theis not within the selected city. | This is not a malfunction. The System may also search areas around the selected city. | |
| The current position displayed on the map remains wrong for more than 30 minutes. | Check the connection of the following leads.- GPS aerial- Speed signal leadIf any disconnection is found, connect the lead again.If no problems are found with connections, reset the calibration data by selecting. ( page 40) | |
| The distance and estimated time in the guidance are inaccurate after replacing/rotating the tyres. | Performto clear the accumulated calibration data. ( page 40) | |
| "Check GPS Aerial" | Check the connection of the GPS aerial. | |
| "Acquiring GPS Signal" | Acquiring GPS signals. Wait until signal reception is completed.GPS signals cannot be received. Move to the place where the System receives the GPS signals. | |
| "Route calculation failed." | Failed to calculate the route. The destination/via point is too far from any road. Select another destination/via point where is close to a road. | |
| "Route calculation is aborted because destination is too far." | The destination/via point is too far from the current position. Select another destination/via point where is nearer to the current position. | |
| "Specified destination is not found." | Valid information is not found in the database. Search for another place. Press [ ] and search again with different conditions (such as different category or place). | |
| Navigation | “There is no available traffic information now.” | No valid TMC information is available now. Try one of the followings:Move to the place where you can receive TMC service.No TMC information on your route. Display the list of all TMC information. ( page 38) |
| “Selected coordinates are out of map area.Please input again.” | The coordinates you have entered are not available. Press [OK] and input the coordinates again. | |
| FM/AM | SSM automatic presetting does not work. | Store stations manually. ( page 46) |
| Static noise while listening to the radio. | Connect the aerial firmly. | |
| Disc in general | Disc can be neither recognized nor played back. | Eject the disc forcibly. ( page 3) |
| Disc cannot be ejected. | Unlock the disc. ( page 50) | |
| Recordable/Rewritable discs cannot be played back.Tracks on the Recordable/Rewritable discs cannot be skipped. | Insert a finalized disc.Finalize the discs with the component which you used for recording. | |
| Playback does not start. | Insert the disc correctly again.The format of files is not supported by the unit. | |
| Sound and pictures are sometimes interrupted or distorted. | Stop playback while driving on rough roads.Change the disc. | |
| No playback picture is shown and caution message about parking brake appears on the screen, even when the parking brake is engaged. | Parking brake lead is not connected properly.( Installation/Connection Manual) | |
| No picture appears on the external monitor. | Connect the video cord correctly.Select the correct input on the external monitor. | |
| “Read error” | A disc is inserted upside down. Replace the disc.A disc has no playable files. | |
| “No Disc” | Disc is not inserted. Insert a disc or select another playback source. | |
| “Eject Error”“Loading Error” | Eject the disc forcibly. ( page 3)Check the disc. | |
| “Region code error” | Region code is not correct. ( page 51) | |
| DivX/MPEG1/MPEG2/MP3/WMA/WAV | Disc cannot be played back. | · Change the disc.· Record the tracks using a compliant application on the appropriate discs. ( page 51)· Add appropriate extension codes to the file names. |
| Noise is generated. | The track played back is not a playable file format. Skip to another file. | |
| Tracks are not played back as you have intended them to play. | Playback order may differ from the one played back using other players. | |
| Elapsed playing time is not correct. | This sometimes occurs during playback. This is caused by how the tracks are recorded. | |
| "Error" | The track is unplayable. | |
| SD/USB | Noise is generated. | The track played back is not a playable file format. Skip to another file. |
| Tracks cannot play back as you have intended them to play. | Playback order may differ from the one played back using other players. | |
| Correct characters are not displayed (e.g. album name). | For available characters, page 12. | |
| While playing a track, sound is sometimes interrupted. | The tracks are not properly copied into the SD card/USB device. Copy tracks again, and try again. | |
| "No Files" | The SD card/USB device has no playable files. Change the SD card/USB device. | |
| "No SD Card" | No SD card is inserted. Insert an SD card or select another playback source. | |
| "No USB Device" | No USB device is connected. Connect a device or select another playback source. | |
| "Read error" | The file has not been formatted correctly. | |
| "Error" | The track is unplayable. | |
| iPod/iPhone | The iPod/iPhone does not turn on or does not work. | Check the connection.Charge the battery.Check whetheroris correctly selected.(is correctly selected.(page 60)Reset the iPod/iPhone. |
| Sound is distorted. | Deactivate the equalizer either on this unit or the iPod/iPhone. | |
| Playback pauses. | The headphones are disconnected during playback withset to.Restart playback. | |
| No operations are available when playing back a track containing artwork. | It takes a long time to loading an artwork. Operate the unit after the artwork is loaded.(page 70) | |
| Video is not played back. | Check the connection of USB Audio and Video cable (KS-U29, not supplied). | |
| “Disconnected” | Check the connection. |
Troubleshooting
| Symptoms | Remedies/Causes | |
| AV-IN/Front AV-IN | “No Signal” | Turn on the video component if it is not on.Connect the video component correctly.Check whetherorsetting is correct. (page 66) |
| Bluetooth | Bluetooth mobile phone does not detect the unit. | This unit can be connected with one Bluetooth mobile phone at a time.While connected to a device, this unit cannot be detected from another device. Disconnect currently connected device and search again. |
| The unit does not detect the Bluetooth device. | Check the Bluetooth setting of the device. | |
| Echo or noise occurs. | Adjust the microphone unit position. | |
| Phone sound quality is poor. | Reduce the distance between the unit and the Bluetooth mobile phone.Move the car to place where you can get a better signal reception. | |
| Rear view camera | The rear view screen is not displayed when the gear is shifted to the reverse (R) position. | Setting. (page 81)Check the connection. |
| “No Signal” | Check the connection. |
Specifications
Design and specifications are subject to change without notice.
| NAVIGATION SYSTEM | System & Service | L1, C/A codeGlobal Positioning SystemStandard Positioning Service | |
| Reception System | 12-channel multi-channel reception system | ||
| Reception Frequency | 1 575.42 MHz | ||
| Sensitivity | -130 dBm | ||
| Update Rate | 1/second, continuous | ||
| GPS Aerial | Polarization | Right Handed Circular Polarization | |
| Dimensions (approx.) (W × H × D) | 41.0 mm × 15.0 mm × 57.0 mm | ||
| Cable (approx.) | 5.0 m | ||
| AMPLIFIER | Maximum Power Output: | Front/Rear | 50 W per channel |
| Continuous Power Output (RMS) | Front/Rear | 20 W per channel into 4 Ω, 40 Hz to 20 000 Hz at no more than 0.8% total harmonic distortion | |
| Load Impedance: | 4 Ω (4 Ω to 8 Ω allowance) | ||
| Equalizer Control Range: | Frequencies: | 60 Hz, 150 Hz, 400 Hz, 1 kHz, 2.5 kHz, 6.3 kHz, 15 kHz | |
| Level: | ±10 dB | ||
| Signal-to-Noise Ratio: | 70 dB | ||
| Audio Output LevelLINE OUT (FRONT/REAR),SUBWOOFER: | Line-Out Level/Impedance: | 2.5 V/20 kΩ load (full scale) | |
| Output Impedance: | 1 kΩ | ||
| Colour System: | PAL | ||
| Video Output (composite): | 1 Vp-p/75 Ω | ||
| Other Terminals: | Input: | USB (↓), Front AV-IN, LINE IN, VIDEO IN, CAMERA IN, Aerial input, MIC IN | |
| Output: | VIDEO OUT | ||
| Others: | OE REMOTE, DIGITAL OUT | ||
| FM/AM TUNER | Frequency Range: | FM | 87.5 MHz to 108.0 MHz |
| AM | (MW) 522 kHz to 1 620 kHz (LW) 144 kHz to 279 kHz | ||
| FM Tuner | Usable Sensitivity: | 11.3 dBf (1.0 μV/75 Ω) | |
| 50 dB Quieting Sensitivity: | 16.3 dBf (1.8 μV/75 Ω) | ||
| Alternate Channel Selectivity (400 kHz): | 65 dB | ||
| Frequency Response: | 40 Hz to 15 000 Hz | ||
| Stereo Separation: | 35 dB | ||
| MW Tuner | Sensitivity/Selectivity: | 20 μV/40 dB | |
| LW Tuner | Sensitivity | 50 μV | |
| DVD/CD | Signal Detection System: | Non-contact optical pickup (semiconductor laser) | |
| Frequency Response: | DVD, fs=48 kHz/96 kHz: | 16 Hz to 22 000 Hz | |
| CD: | 16 Hz to 20 000 Hz | ||
| Dynamic Range: | 93 dB | ||
| Signal-to-Noise Ratio: | 95 dB | ||
| Wow and Flutter: | Less than measurable limit | ||
| SD | Compatible File System: | FAT 32/16/12 | |
| Capacity: | 8 Mbytes to 2 Gbytes | ||
| Data Transfer Rate: | Maximum 10 Mbps | ||
| USB | USB Standards: | USB 2.0 Full Speed | |
| Data Transfer Rate | Full Speed: Maximum 12 MbpsLow Speed: Maximum 1.5 Mbps | ||
| Compatible Device: | Mass storage class | ||
| Compatible File System: | FAT 32/16/12 | ||
| Max. Current: | DC 5 V = 500 mA | ||
| BLUETOOTH | Version | Bluetooth 1.2 certified | |
| Output Power | +4 dBm Max. (Power class 2) | ||
| Service Area | Within 10 m (10.9 yd) | ||
| Profile | HFP (Hands-Free Profile) 1.5OPP (Object Push Profile) 1.1 | ||
| MONITOR | Screen Size: | 6.1 inch wide liquid crystal display | |
| Number of Pixel: | 336 960 pixels: 480 × 3 (horizontal) × 234 (vertical) | ||
| Drive Method: | TFT (Thin Film Transistor) active matrix format | ||
| Colour System: | PAL/NTSC | ||
| Aspect Ratio: | 16:9 (wide) | ||
| 100 | Power Requirement: | Operating Voltage: | DC 14.4 V (11 V to 16 V allowance) |
| Grounding System: | Negative ground | ||
| Allowable Storage Temperature: | - 10^ C to + 60^ C | ||
| Allowable Operating Temperature: | 0^ C to + 40^ C | ||
| Dimensions (W × H × D): | Installation Size (approx.): | 182 mm × 111 mm × 161 mm | |
| • With trim plate and sleeve attached | Panel Size (approx.): | 188 mm × 117 mm × 10 mm | |
| Mass (approx.): | 2.4 kg (including trims and sleeve) | ||
- Manufactured under license from Dolby Laboratories. Dolby and the double-D symbol are trademarks of Dolby Laboratories.
- "DVD Logo" is a trademark of DVD Format/Logo Licensing Corporation registered in the US, Japan and other countries.
- DivX ^ is a registered trademark of DivX, Inc., and is used under license.
- Plays DivX® video
- ABOUT DIVX VIDEO: DivX® is a digital video format created by DivX, Inc. This is an official DivX Certified or DivX Ultra Certified device that plays DivX video.
- ABOUT DIVX VIDEO-ON-DEMAND: This DivX® Certified device must be registered in order to play DivX Video-on-Demand (VOD) content. First generate the DivX VOD registration code for your device and submit it during the registration process. [Important: DivX VOD content is protected by a DivX DRM (Digital Rights Management) system that restricts playback to registered DivX Certified devices. If you try to play DivX VOD content not authorized for your device, the message "Authorization Error" will be displayed and your content will not play.] Learn more at www.divx.com/vod.
- Microsoft and Windows Media are either registered trademarks or trademarks of Microsoft Corporation in the United States and/or other countries.
- The Bluetooth word mark and logos are owned by the Bluetooth SIG, Inc. and any use of such marks by Victor Company of Japan, Limited (JVC) is under license. Other trademarks and trade names are those of their respective owners.
- "Made for iPod" means that an electronic accessory has been designed to connect specifically to iPod and has been certified by the developer to meet Apple performance standards.
- "Works with iPhone" means that an electronic accessory has been designed to connect specifically to iPhone and has been certified by the developer to meet Apple performance standards.
- Apple is not responsible for the operation of this device or its compliance with safety and regulatory standards.
- iPod is a trademark of Apple Inc., registered in the U.S. and other countries.
- iPhone is a trademark of Apple Inc.
- This product incorporates copyright protection technology that is protected by U.S. patents and other intellectual property rights. Use of this copyright protection technology must be authorized by Macrovision, and is intended for home and other limited viewing uses only unless otherwise authorized by Macrovision. Reverse engineering or disassembly is prohibited.
- Google is a registered trademark of Google Inc.
• SD Logo is a trademark.
text_image
Diagram showing a device with labeled parts and directional arrows indicating movement or force, marked as ① and ②.Achtung:
natural_image
Illustration of a hand holding a document with a key and car icon above (no text or symbols)natural_image
Icon of a car with a winding road, enclosed in a rounded square frame (no text or symbols)natural_image
Icon of a musical note and eighth note inside a rounded square frame (no text or symbols)



natural_image
Illustration of a vintage mobile phone with a screen and keypad, emitting sound waves (no text or symbols)natural_image
Illustration of a hand holding a steering wheel over a road ahead (no text or symbols)natural_image
Black question mark icons inside a rounded square frame (no text or symbols)Referenzen 82
Wartung 82
Störungssuche....83
Technische Daten 89
natural_image
Line drawing of a hand pressing down on a door panel (no text or symbols)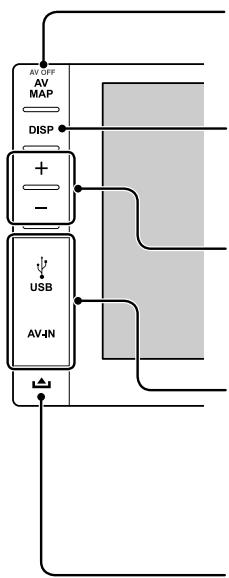
flowchart
graph TD
    A["AV-UP"] --> B["AV MAP"]
    B --> C["DISP"]
    C --> D["+"]
    D --> E["-"]
    E --> F["USB"]
    F --> G["AV-4N"]
    G --> H["+"]
    H --> I["Output"]
AV MAP/AV OFF-Taste
text_image
Diagram showing two labeled steps (① and ②) of a mechanical or architectural component with directional arrows indicating movement.text_image
Mehrere POI's ABC Dental Clinic 3.0km NE ABC Medical Service 3.0km NE ABC Clinic 3.0km NE ABC Centre 3.0km NE ABC College 3.0km NESonderzielen
3
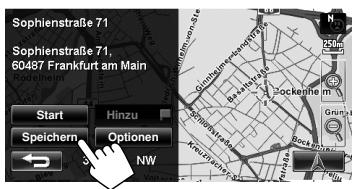
text_image
AB_ 1 2 3 4 5 6 7 8 9 0 Q W E R T Y U I O P A S D F G H J K L Z X C V B N M A-Å-# OKtext_image
Mehrere POI's ABC Dental Clinic 3.0km NE ABC Medical Service 3.0km NE ABC Clinic 3.0km NE ABC Centre 3.0km NE ABC College 3.0km NE Sonderzielen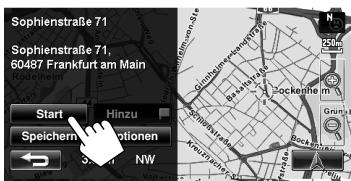
text_image
N50'7'26", E8'42'22" N S W E 1 2 3 4 5 7 8 " 0 ① ②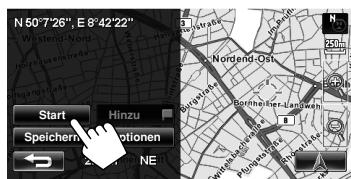
text_image
N 50°7'26", E 8°42'22" Westend-Nord Nordend-Ost Start Hinzu Speichern Optionen ← NEtext_image
Schnellsuche P Parkplate ABC Visitors Ctr 100m SE ABC Park Inc 210m NE DEF Park Inc 300m W P XYZ Parking Inc 350m SW ABC Park 430m N
text_image
Schnellsuche P Parkplatz ABC Visitors Ctr 100m SE ABC Park Inc 210m NE DEF Park Inc 300m W XYZ Parking Inc 350m SW ABC Park 430m Ntext_image
Diagram showing a device being inserted into a screen, with labeled parts and an inset magnified view of the device's interior.text_image
Diagram showing a device with labeled parts and directional arrows indicating movement or flowtext_image
Diagram illustrating a step-by-step installation of a device with labeled components and directional arrowstext_image
① ② ③ An iPod/iPhonetext_image
Equalizer 60 Hz 150 Hz 400 Hz 1 kHz 2.5 kHz 6.3 kHz 15 kHz Flat Country Hard Rock Reggae R&B Classic Pop User1 Jazz User2 Editieren Dance User3
text_image
1 MENU Einstellung.
text_image
Einstellung. Audio Display Telefon System Fader/Balance 0 / 0 Equalizer Flat Subwoofer/HPF Enter Lautstärke anpassen Mittl. Tel-Stummschalt Stumm.1 Stumm.2 Austext_image
Equalizer 60 Hz 150 Hz 400 Hz 1 kHz 2.5 kHz 6.3 kHz 15 kHz Flat Country Hard Rock Reggae R&B Classic Pop User1 Jazz User2 Editieren Dance User3text_image
Equalizer 60 Hz 150 Hz 400 Hz 1 kHz 2.5 kHz 6.3 kHz 15 kHz Flat Country Hard Rock Reggae R&B Classic Pop User1 Jazz User2 Dance User3 EditierenMP3: 48 kHz, 44,1 kHz, 32 kHz 24 kHz, 22,05 kHz, 16 kHz WMA: 48 kHz, 44,1 kHz, 32 kHz, 22,05 kHz WAV: 44,1 kHz
text_image
CD T.RPT TIME 00:14 Track : 6 / 14 Cloudy Fair Fog Hail Indian summer Rain Shower Snow Thunder Typhoon Wind Winter sky Track Information Album Four seasons Artist Robert M. Smith Title Raintext_image
Anschlüssenatural_image
Illustration of a hand spraying a spray bottle onto a screen (no text or symbols)Umgang mit Discs
text_image
2 Étui souple (fourni)Attachment
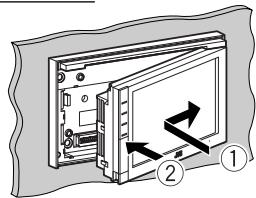
text_image
Diagram showing a device with labeled parts and directional arrows indicating movement or force, marked as ① and ②.Attention:
natural_image
Illustration of a hand holding a document with a key and car icon above (no text or symbols)natural_image
Silhouette of a car with a winding road, enclosed in a rounded square frame (no text or symbols)natural_image
Illustration of a house and a teacup with a star on the cup (no text or symbols)




natural_image
Icon of a musical note and eighth note inside a rounded square frame (no text or symbols)

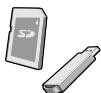


natural_image
Illustration of a vintage mobile phone with a screen and keypad, emitting sound waves (no text or symbols)natural_image
Icon with two large question marks inside a rounded square frame (no text or symbols)Références.... 82
Entretien 82
Dépannage 83
Spécifications 89
flowchart
graph TD
    A["Computer monitor with icons for food, kitchen, home, fan, and globe"] --> B["SD"]
    B --> C["Mobile device"]
    C --> D["Car"]
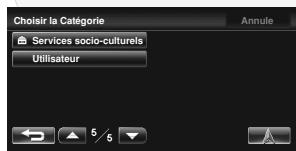
natural_image
Line drawing of a hand pressing down on a door panel (no text or symbols)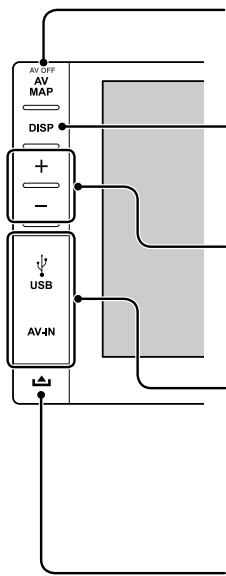
flowchart
graph TD
    A["AV-FF"] --> B["AV MAP"]
    B --> C["DISP"]
    C --> D["+"]
    D --> E["-"]
    E --> F["USB"]
    F --> G["AV-4N"]
    G --> H["+"]
    H --> I["Output"]
Touche AV MAP/AV OFF
text_image
Diagram showing two labeled steps (① and ②) of a mechanical or architectural component with directional arrows indicating movement.flowchart
graph TD
    A[" "] --> B[" "]
    B --> C[" "]
    C --> D["NW"]
text_image
AB_ 1 2 3 4 5 6 7 8 9 0 Q W E R T Y U I O P A S D F G H J K L Z X C V B N M ← A-Å-# ① OK ②text_image
text_image
N50'7'26", E8'42'22" N S W E 1 2 3 4 5 7 8 " 0 ① ②