KD-G425 - Car stereo JVC - Free user manual and instructions
Find the device manual for free KD-G425 JVC in PDF.
Download the instructions for your Car stereo in PDF format for free! Find your manual KD-G425 - JVC and take your electronic device back in hand. On this page are published all the documents necessary for the use of your device. KD-G425 by JVC.
USER MANUAL KD-G425 JVC
For installation and connections, refer to the separate manual. Para la instalaciôn y las conexiones, reférase al manual separado. Pour l'installation et les raccordements, se référer au manuel séparé.
For customer Use: Enter below the Model No. and Serial No. which are located on the top or bottom of the cabinet.
INSTRUCTIONS Retain this information for future reference. MANUAL DE INSTRUCCIONES MANUEL D'INSTRUCTIONS Model No. Serial No.
GETO349-001A QI Cover KD-AR370 320{J2indd 2 10/21/05 _4:47:02 PM |
| RE | & CERN Con | INFORMATION (For U.S.A.) Thank you for purchasing a JVC product.
Please read all instructions carefully before operation, to ensure your complete understanding and to obtain the best possible performance from the unit.
This equipment has been tested and found to comply with the limits for a Class B digital device, pursuant to Part 15 ofthe FCC Rules. These limits are designed to provide reasonable protection against harmful interference in a residential installation.
This equipment generates, uses, and can &1 radiate radio frequency energy and, if not + FE installed and used in accordance with the
ENGLISH Eh How to reset your unit
instructions, may cause harmful interference
to radio communications. However, there + Your preset adjustments will also be erased. is no guarantee that interference will not + Ifa disc is loaded, it will eject. Be careful not to occur in a particular installation. If this drop the disc.
equipment does cause harmful interference to radio or television reception, which can
be determined by turning the equipment Eli How to forcbly eject a disc off and on, the user is encouraged to try to
correct the interference by one or more of on 4 the following measures:
- Reorient or relocate the receiving antenna.
- Increase the separation between the equipment and receiver.
à - Connect the equipment into an outlet on
& a circuit different from that to which the receiver is connected.
- Consult the dealer or an experienced Di How to use the MODE button
radio/TV technician for help. If you press MODE, the unit goes into functions
mode, then the number buttons and A/Ww
buttons work as different function buttons. Changes or modifications not approved
by JVC could void the users authority to
operate the equipment. ©
IMPORTANT FOR LASER PRODUCTS D _ = MIRE MON
1. CLASS 1 LASER PRODUCT am£=2 VULIINUI
2. CAUTION: Do not open the top cover. 1
There are no user serviceable parts inside the unit; leave all servicing to qualified
+ Ifthis does not work, reset your unit. + Be careful not to drop fhe disc when it ejects.
Ex: When number button 2 works as MO (monaural) button.
Time countdown indicator
service personnel. To use these buttons for their original 3. CAUTION: Visible and invisible laser functions again after pressing MODE, wait for radiation when open and interlock failed or 5 seconds without pressing any of these buttons defeated. Avoid direct exposure to beam. until the functions mode is cleared or press MODE again.
Eh How to read this manual CONTENTS
+ Button operations are mainly explained with
the illustrations in the table below. Z + Some related tips and notes are explainedin Control panel —Ko-Ar370andt0-6320 4 en “More about this unit” (s s 20 - 22). O re about this unit (see pages ) Remote controller — rmnuso.…....… 5 2 LU Getting started... 6 Press briefly. Basic operations 6 Radio operations .… 7 Press repeatedly. : . Disc operations. 8 : Playing a disc in the unit . 8 & Press either Playing discs in the CD changer 9 one. Sound adjustment
Press and hold until your desired response begins.
General settings — PSM... Satellite radio operations... iPod°/D. player operations … Other external component operations. 20 More about this unit . 20 Maintenance
Troubleshooting… : Indicator displayed for the
corresponding operation. Specifications …
Press and hold both buttons at the same time.
The following marks are used to indicate... : Built-in CD player operations.
: External CD changer operations.
panel If you need to operate the unit while driving, be sure to look ahead carefully or you may be involved in a traffic accident. Detaching...
+ Do not raise the volume level too much, as this will block outside sounds, making driving dangerous.
+ Stop the car before performing any complicated operations.
Temperature inside the car...
If you have parked the car for a long time in hot
or cold weather, wait until the temperature in the car becomes normal before operating the unit.
ZT a a a : ü | Parts identification Z rm n Li Display window Bi & 3 24 Rs] 26 27 Ka MPSEH DISC) (RND @ Be RFT)? LOUD ee C7) — Ne SP V DD CDD D EE Pf) | & B) [1 ag M 5 418 fé 1 18 DT He mA buttons Display window L21° @1 ATT (standby/on attenuator) button Bi] Disc information indicators— TAG (ID3 B1 A (up) / v (down) buttons Tag), 5 (folder), 7 (track/file) [4] Loading slot 2 Disc type indicators— WMA, MP3 El Display window 13 Playback source indicators— [6] A (eject) button CH: Lights up only when CD-CH is [1 EQ (equalizer) button selected as the playback source. [8] Remote sensor DISC: Lights up for the built-in CD player. DO NOT expose the remote sensor to strong [ Playback mode / item indicators—
light (direct sunlight or artificial lighting). RND (random), © (disc), @ (folder), [9] SRC (source) button RPT (repeat) fo] BAND button
B3 LOUD (loudness) indicator
Hi} Control dial B8| EQ (equalizer) indicator 12] SEL (select) button (1 Sound mode (C-EQ: custom equalizer) 13] MO (monaural) button indicators—JAZZ, CLASSIC, HIP HOP, f4] SSM (Strong-station Sequential Memory) POPS, ROCK, USER
| RE T | & CR ER | |
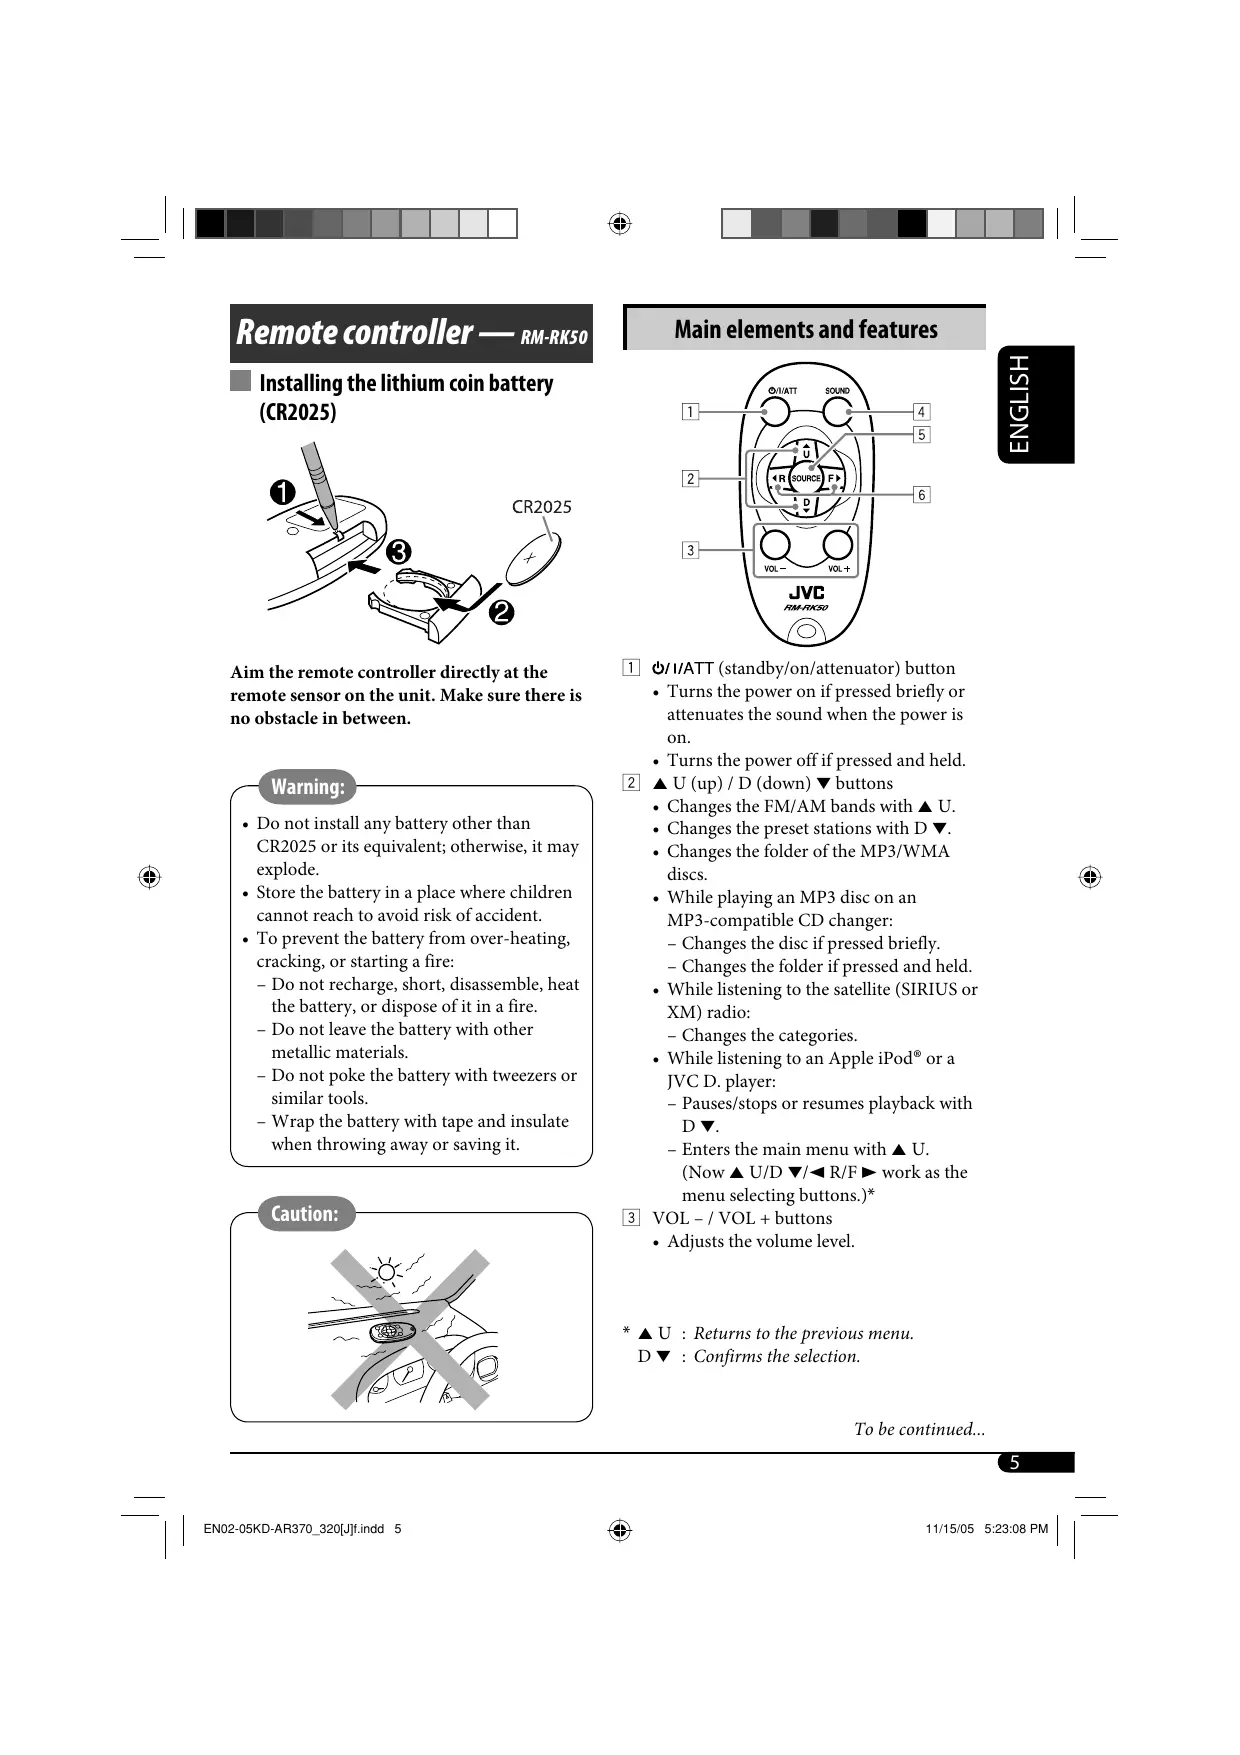
Remote controller — »u.rx50 | Main elements and features
I installing the lithium coin battery (CR2025)
Aim the remote controller directly at the [1] G/I/ATT (standby/on/attenuator) button remote sensor on the unit. Make sure there is + Turns the power on if pressed briefly or no obstacle in between. attenuates the sound when the power is
on. + Turns the power off if pressed and held. ED ——— E2] A U (up) / D (down) buttons Changes the FM/AM bands with À U. Changes the preset stations with D w. Changes the folder of the MP3/WMA
+ Do not install any battery other than CR2025 or its equivalent: otherwise, it may
+ Store the battery in a place where children + While playing an MP3 disc on an cannot reach to avoid risk of accident. MP3-compatible CD changer:
+ To prevent the battery from over-heating, — Changes the disc if pressed briefly. cracking, or starting a fire: — Changes the folder if pressed and held. — Do not recharge, short, disassemble, heat + While listening to the satellite (SIRIUS or
the battery, or dispose ofit in a fire. XM) radio: — Do not leave the battery with other -— Changes the categories.
metallic materials. + While listening to an Apple iPod® or a - Do not poke the battery with tweezers or JVC D. player:
similar tools. - Pauses/stops or resumes playback with — Wrap the battery with tape and insulate DY.
when throwing away or saving it. - Enters the main menu with A U.
(Now À U/D w/<4R/F» work as the menu selecting buttons.)* 1 VOL -/ VOL + buttons + Adjusts the volume level.
* AU : Returns to the previous menu. D Y : Confirms the selection.
+ Selects the sound mode (C-EQ: custom (3) KEAND equalizer). +
I CR 15] SOURCE button DR: Sciects the source. + For FM/AM tuner A 6) <R (reverse) / F (forward) æ buttons EM1—> EM2 > F3 ED Searches for stations if pressed bricfy. CT + Fast-forwards or reverses the track if | pressed and held. + For SIRIUS radio + Changes the tracks if pressed briefly. SIRIUS1 > SIRIUS2 + While listening to the satellite radio: SIRIUS3
- Changes the channels if pressed briefly. A - Changes the channels rapidly if pressed + For XM radio
and held. LMI AM2 7 XMST]
+ While listening to an iPod or a D. player in menu selecting mode): - Select an item if pressed briefly. (Then, [4 Adjust the volume. press D Y to confirm the selection.) + = Skips 10 items at a time if pressed and /
held. K Volume level appears.
Getting started ET ? FE Dal nm e
w CU Basicoperations ms Volume level ndicator
Turn on the power. © P © sus the sound as you want. (See
LC7I] LAON pages 11 and 12.) (2) LE nn | Caution on volume setting;
TS FHV/E MES AM Discs produce very little noise compared ’ with other sources. Lower the volume SIRIUST/SIRID S2/SIRIUSS before playing a disc to avoid damaging XM1/XM2/XM3* the speakers by the sudden increase of the
DISC* Ÿ CD-CH*/IPOD*/D.PLAYER* - (or EXT IN) To drop the volume in a —— moment (ATT) gr * You cannot select these sources if they To restore the sound, press & are not ready or not connected. it again.
To turn offthe power FR
+ See also “General settings — PSM” on pages 12-14.
[1] Canceling the display demonstrations Select “DEMO,” then “DEMO OFF.” [2] Setting the clock Select “CLOCK H” (hour), then adjust the hour. Select “CLOCK M” (minute), then adjust the minute.
3 Finish the procedure.
& To check the current clock TE time when the power is turned off
(2) FM T FMI FM2 = FM3
SEE SLT AM Lights up when receiving an FM stereo broadcast with suffcent signal strength
Selected band appears.
© su searching for a station.
ENGLISH When a station is received, searching stops.
To stop searching, press the same button again.
To tune in to a station manually In step @ above...
[21 Select a desired station frequency.
When an FM stereo broadcast is hard to receive
I Lights up when monaural mode is activated.
Reception improves, but stereo effect will be lost.
To restore the stereo effect, repeat the same procedure. “MONO OFF” appears and the MO indicator goes off.
| ENO-11KD-AR370_320{J2.indd 7
| RRRRRRN | & CHR DEN | | Storing stations in memory | Listening to a preset station BD ou can preset six stations for each band. 1 ea) P : à FM FM2 > FM3 2 TRS + D | 2 I FM station automatic presetting— + FD SsM (Strong-station Sequential 2 Select the preset station (1 - 6) you want. Memory) 7 on vu pur une À Select the FM band (FM1 - FM3) you enlever ]er)er)a) want to store into. Sa > FM1—> FM2 > FM3 ME am = —] or 22 2 < uone 3 os “SSM” flashes, then disappears when listening to an FM or AM stai automatic presetting is over. n Local FM stations with the strongest signals are N (oct Frequency ) n & searched and stored automatically in the FM © band. I Manual presetting Disc operations Ex: Storing FM station of 92.5 MHz into preset number 4 ofthe FMI band. Playing a disc in the unit ms
EM FD > FN All tracks will be played repeatedly until you M change the source or eject the disc.
Preset number flashes for a while. . Stop play and eject the (ESX SC
All discs in the magazine will be played repeatedly until you change the source. + Ejecting the magazine will also stop playing.
O0 qisRe ç D DH (EXT IN) > 2 Es =
* 1f you have changed the external input setting to “EXT IN” (see page 14), you cannot select the CD changer.
For disc number from 01 - 06:
For disc number from 07 - 12:
About MP3 and WMA discs
MP3 and WMA “tracks” (words “file” and “track” are used interchangeably) are recorded in “folders.”
About the CD changer
It is recommended to use a JVC MP3-compatible CD changer with your unit. + You can also connect other CH-X series CD changers (except CH-X99 and CH-X100). These units are not compatible with MP3 discs.
You cannot play any WMA disc in the CD changer.
You cannot use the KD-MK series CD changers with this unit.
Disc text information recorded in the CD Text can be displayed when a JVC CD Text compatible CD changer is connected.
For connection, see Installation/Connection Manual (separate volume).
To fast-forward or reverse the track
To go to the next or previous tracks
To go to the next or previous folders (only for
For MP3 discs: For WMA disc:
To locate a particular track (for CD) or folder
(for MP3 or WMA discs) directly
To select a number from 01 - 06:
To select a number from 07 - 12:
+ To use direct folder access on MP3/WMA dises, it is required that folders are assigned with 2-digit numbers at the beginning of their folder names—01, 02, 03, and so on.
To select a particular track in a folder (for MP3 or WMA discs):
Other main functions
I Skipping tracks quickly during play
ENGLISH Only possible on JVC MP3-compatible CD changer
+ For MP3 or WMA discs, you can skip tracks within the same folder.
Ex: To select track 32 while playing a track whose number is a single digit (1 to 9)
Dé Tradk1 more] C D +20
: Each time you press the button, you can & skip 10 tracks. + After the last track, the first track will be selected and vice versa.
I Prohibiting disc ejection
You can lock a disc in the loading slot.
To cancel the prohibition, repeat the same procedure.
A Tadk31>=- >... S x) SSS
| Changing the display information
PLU I While playing an audio CD or a CD Text
CA ]-—-nisctitie/performer* À Ÿ
I While playing an MP3 or a WMA‘: disc
+ When “TAG DISP” is set to “TAG ON? (see page 14)
[A] Album name / performer
! (folder name*) Ÿ <= Tradktitle (file name*)
+ When “TAG DISP” is set to “TAG OFF”
CA]-—- folder name (as) OO) À Ÿ
CA] : Clock with the current track number CB ] : Elapsed playing time with the current track number
Ifthe current disc is an audio CD,
Only for the built-in CD player.
1fan MP3/WMA file does not have Tag information, folder name and file name appear. In this case, the TAG indicator will not light up.
| Selecting the playback modes
You can use only one of the following playback ; Z modes at a time” You can select a preset sound mode suitable to [EI the music genre (C-EQ: custom equalizer). Ü 1 Z GE BR USER > ROCK -> CLASSIC mi “au JAZZ <-HIP HOP < POPS 2 Select your desired playback mode. & DT FES e NT L = Repeat play FR OCK + Ex: When "ROCK is selected Mode Plays repeatedly Presetwalues| pas | TRE | LOUD TRKRPT :Th ttrack. ŒD FLDRRPT* : AI traces of the @ Indication (For) (bass) | (treble) |(loudness) folder. D ED USER 0 | 00 | orr DISCRPT* _: All tracks of the current (Flat sound) ee ROCK +03 | +01 | ON RPT OFF: Cancels. (Rock or disco music) . m Randomplay 2" Casse +01 | -02 | OFF > (Classical music) " POPS & Mode Plays at random (Light music) +04 | +01 | OFF FLDR RND*'_: All tracks of the current HIP HOP folder, then tracks of the (unk or rap music) | *02 | 00 | ON next folder and so on. P œæ JAZZ +02 | +03 | OFF DISCRND _ : All tracks ofthe current Uazz music) MAG RND*?_: All tracks ofthe inserted discs. D Fr RNDOFF _: se | Adjusting the sound #1 Only while playing an MP3 or a WMA You can adjust the sound characteristics to your dise. preference. #2 Only while playing discs in the CD Changer. pores 1 D MS TE FAO BAL ER< VOL < SUB.W — LOUD N To be continued...
2 (@) General settings — PSM K You can change PSM (Preferred Setting Mode) items (except “SID”) listed in the table that follows.
ENGLISH Indication [Range]
BAS* (bass) 1 ŒnN Adjust the bass. [-06 to +06]
TRE*! (treble) Adjust the treble. [-06 to +06]
FAD* (fader) Adjust the front and rear speaker balance. [RO6 to F06]
BAL*: (balance) Adjust the left and right speaker balance. [LO6 to RO6]
Boost low and high frequencies to produce 3 Adjust the PSM item selected. a well-balanced sound at low volume level. [LOUD ON or LOUD OFF] / SUB.W“*: (subwoofer) K O] Adjust the subwoofer output level. [00 to 08] VOL (volume) : Adjust the volume. [00 to 30 or 50*%] 4 Repeat steps 2 and 3 to adjust other
PSM items if necessary. *1_ When you adjust the bass, treble, or loudness,
the adjustment you have made is stored for the currently selected sound mode (C-EQ)
including “USER.” ER #2_]f you are using a two-speaker system, set the
fader level to “00.”
#3 This adjustment cannot affect the subwoofer output.
#4 This takes effect only when a subwoofer is
Displayed only when “L/O MODE" is set to
“WOOFER” (see page 14).
Depending on the amplifier gain control
setting. (See page 14 for details.)
5 Finish the procedure.
| EN12-17KD-AR370_320Uindd 12 11/23/05 11250 a | |
| RE T | & CR ER | |
Indications Selectable settings, [reference page]
DEMO DEMOON : [Initial]; Display demonstration will be activated ZT Display automatically if no operation is done for about 20 seconds, [Een
demonstration [71. OU DEMO OFF : Cancels. Z ii CLOCKH 1-12, [7] Hour adjustment {Initial: 1 (1:00)] CLOCKM 00 - 59, [7] Minute adjustment {Initial: 00 (1:00)]
CLK ADJ*! AUTO : [Initial]; The built-in clock is automatically adjusted using
Clock adjustment the clock data provided via the satellite radio channel. OFF : Cancels.
T-ZONE*1, *? Select your residential area from one of the following time zones for clock
Time zone adjustment.
EASTERN [Initial] — ATLANTIC — NEWFOUND — ALASKA — PACIFIC — MOUNTAIN — CENTRAL — (back to the beginning)
DST*!, *? Activate this if your residential area is subject to DST. Daylight savings ON : [Initial]; Activates daylight savings time. time OFF : Cancels. & sID* The 12-digit SIRIUS identification number scrolls on the display 5 seconds Sa SIRIUS ID after “SID” is selected, [15]. + Press SEL to resume the previous display. DIMMER on ? Dims the display illumination of this unit. Dimmer OFF : [Initial]; Cancels. TEL“ MUTING 1/MUTING 2: Select either one which mutes the sounds while Telephone muting using a cellular phone. OFF : [Initial]; Cancels. SCROLL* ONCE : {Initial}: Scrolls the disc information once. Scroll AUTO : Repeats scrolling (5-second intervals in between). OFF : Cancels.
+ Pressing DISP for more than one second can scroll the display regardless of the setting.
#1 Displayed only when SIRIUS Satellite radio or XM Satellite radio is connected.
#2 Displayed only when “CLK ADJ" is set to “AUTO.”
# Displayed only when SIRIUS Satellite radio is connected.
#1 Only for KD-AR370.
#5 Some characters or symbols will not be shown correctly (or will be blanked) on the display.
| RE T | & CR ER | |
Indications Selectable settings, [reference page] ee WOOFER*! LOW : Frequencies lower than 90 Hz are sent to the subwoofer. 2 Subwoofer cutoff MID : [Initial]; Frequencies lower than 135 Hz are sent to the OÙ frequency subwoofer. Z HIGH : Frequencies lower than 180 Hz are sent to the subwoofer. EXTIN* CHANGER _: [Initial]; To use a JVC CD changer, [9], a JVC compatible External input satellite (SIRIUS/XM) tuner, [15], an Apple iPod or a JVC D. player, [18]. EXTIN + To use any other external component than the above, [20]. L/0 MODE When connecting amplifiers and/or subwoofer, set this correctly. Line output mode REAR : [Initial]; Select if the both LINE OUT terminals are used for connecting the speakers through the external amplifiers. WOOFER : Select ifthe FRONT LINE OUT terminals are used for connecting a subwoofer through an external amplifier. TAG DISP TAGON : {Initial}; Shows the Tag information while playing MP3/ Tag display WMA tracks, [10]. TAG OFF : Cancels. AMP GAIN You can change the maximum volume level of this unit. Amplifier gain LOWPWR _: VOL 00 - VOL 30 (Select this if the maximum power of O] control the speaker is less than 50 W to prevent them from being damaged.) HIGH PWR _ : [Initial]; VOL 00 - VOL 50 AREA AREA US : [Initial]; When using in North/Central/South America. Tuner channel AM/FM intervals are set to 10 kHz/200 kHz. interval AREA SA : When using in South American countries where FM
interval is 100 kHz. AM interval is set to 10 KHz. AREAEU : When using in any other areas. AM/FM intervals are set to 9 KHZ/50 kHz (100 kHz during auto search).
*1 Displayed only when “L/O MODE” is set to “WOOFER.” +2 Displayed only when one of the following sources is selected—FM, AM, or DISC.
| EN12-17KD-AR370_320{{indd 14 11721105 ro28:13 a | |
| RE T | & CR ER | |
Satellite radio operations
This unit is satellite (SAT) Radio Ready— compatible with both SIRIUS Satellite radio and XM Satellite radio.
Before operating your satellite radio: + For connection, see Installation/Connection Manual (separate volume).
Refer also to the Instructions supplied with your SIRIUS Satellite radio or XM Satellite radio.
“SIRIUS” and the SIRIUS dog logo are registered trademarks of SIRIUS Satellite Radio Inc.
XM and its corresponding logos are registered trademarks of XM Satellite Radio Inc.
“SAT Radio,” the SAT Radio logo and all related marks are trademarks of SIRIUS Satellite Radio Inc., and XM Satellite Radio, Inc.
I Listening to the satellite radio Connect either one of the following (separately purchased) to the CD changer jack on the rear of this unit.
+ JVC SIRIUS radio DLP—Down Link Processor, for listening to the SIRIUS Satellite radio.
+ XMDirect" Universal Tuner Box using a JVC Smart Digital Adapter—XMDJVC100 (not supplied), for listening to the XM Satellite radio.
GCI (Global Control Information) update:
If channels are updated after subscription, updating starts automatically. “UPDATING” flashes and no sound can be heard.
Update takes a few minutes to complete. During update, you cannot operate your satellite radio.
Activate your SIRIUS subscription after connection:
2 SRE > SIRIUSI/SIRIUS2/SIRIUS3 En u
Once completed, JVC DLP tunes in to the preset channel, CH184.
(31 Check your SIRIUS ID, see page 13.
[4] Contact SIRIUS on the internet at <http://activate.siriusradio.com/> to activate your subscription, or you can call SIRIUS toll-free at 1-888-539- SIRIUS (7474).
“SUB UPDT PRESS ANY KEY” scrolls on the display once subscription has been completed.
Activate your XM subscription after conne
+ Only Channel 0, 1, and 247 are available before activation.
XMDirect® Universal Tuner Box starts updating all the XM channels. “Channel 1” is tuned in automatically.
(31 Check your XM Satellite radio 1D labelled on the casing of the XMDirect" Universal Tuner Box, or tune into “Channel 0” (see page 17).
[4] Contact XM Satellite radio on the internet at <http://xmradio. com/activation/> to activate your subscription, or you can call 1-800- XM-RADIO (1-800-967-2346). Once completed, the unit tunes in to one
of the available channels (Channel 4 or higher).
| Listening to the SIRIUS Satellite radio
3 Select a category.
You can tune in to all the channels of every category by selecting “ALL.”
Selecting a particular category (SPORTS, ENTERTAINMENT, etc.) allows you to enjoy only the channels from the selected category.
4 Select a channel for listening.
Holding the button changes the channels rapidly.
+ When changing the category or channel, invalid and unsubscribed channels are skipped.
| Listening to the XM Satellite radio
2 > > ñ XM1— XM2 > XM3 ABANDE SL 7]
3 Select a channel for listening.
Holding the button changes the channels rapidly.
I Searching for category/channel
You can search for programs by category (Category Search) or channel number (Channel Search).
In Category Search, you can tune in to the channels of the selected category. Category
Search begins from the currently selected channel. The selected channel number flashes on the display.
+ In Channel Search, you can tune in to all channels (including non-categorised channels).
À Select a category (Category Search).
+ For Channel Search, skip this step.
2 Select a channel for listening.
KANR Current channel number
| Storing channels in memory
You can preset six channels for each band.
Ex: Storing a channel into preset number 4.
ENGLISH Tune in to a channel you want.
Ex: When you select "COUNTRY" for Category Search
If no operation is done for about 15 seconds, Category Search is canceled.
In Channel Search, channel name and channel number appear on the display during search.
+ While searching, invalid and unsubscribed
channels are skipped.
I Checking the XM Satellite radio ID ® While selecting “XM1,” “XM2,” or “XM3,” select “Channel 0.”
The display alternately shows “RADIO ID and the 8-digit (alphanumeric) ID number.
To cancel the ID number display, select any channel other than “Channel 0.”
Preset number flashes for a while.
| Listening to a preset channel
À Select either SIRIUS Satellite radio or XM Satellite radio.
3 Select the preset channel (1 - 6) you want.
To change the display information while listening to a channel
iPod player operations O Adjust the sound as you want. (See pages 11 and 12.)
ZT : ; PAR This unit is ready for operating an Apple iPod + Meke sure the equalizer on the iPod or CR ©1200 D. player from the control panel. D. player is deactivated, Z D Before operating your iPod or D. player: Connect either one ofthe following (separately To pause*! or purchased) to the CD changer jack on the rear stop”? playback of this unit. To resume + Interface adapter for iPod®—KS-PD100 for layback, press it “ A playback, press i controlling an iPod. again. + D. player interface adapter—KS-PD500 for controlling a D. player. To fast-forward or reverse the track + For connection, see Installation/Connection Manual (separate volume). « For details, refer also to the manual supplied To go to the next with the interface adapter. or previous tracks #1 For iPod Make sure to turn off this unit or turn offthe | *? For D. player vehicle’s ignition switch before connecting ® or disconnecting the iPod or D. player. Selecting a track from the menu
Preparations: 1 Make sure “CHANGER” is selected for the
external input setting, see page 14.
Playback starts automatically from 2 Select the desired menu. where it has been paused*! or stopped*? SK, Nez N D
<— TRACK<—+ (back to the beginning)
| EN18-23KD-AR370_320{indd 18 11721105 1o20:18 a | |
3 Confirm the selection. 12 RAD
To move back to the previous €) menu, press A. D Z | ALBM RND:: D D) O Functions the same as “Shuffle Albums” of [ea + Ifa track is selected, playback starts the iPod. automatically. + Ifthe selected item has another layer, you SONG RND/RND ON D will enter the layer. Repeat steps 2 and 3 Functions the same as “Shuffle Songs” of the until the desired track is played. iPod or “Random Play On” of the D. player. + Holding #4 V/1 A can skip 10 RND OFF items at a time. Cancels. + The menu selecting mode will be canceled: X1 For iPod: Only if you select “ALL” in = If no operations are done for about “ALBUMS” of the main “MENU.”
5 seconds. = When you confirm the selection of a track. To check other information while listening to aniPod or a D. player
| Selecting the playback modes
2 Select your desired playback mode.
ONE RPT ŒD Functions the same as “Repeat One” of the iPod or “Repeat Mode One” for the D. player.
ALL RPT Functions the same as “Repeat All” of the iPod or “Repeat Mode AI” for the D. player.
You can connect an external component to
the CD changer jack on the rear using the Line
Input Adapter—KS-U57 (not supplied) or AUX Input Adapter—KS-U58 (not supplied).
+ For connection, see Installation/Connection Manual (separate volume).
For listening to the satellite radio, iPod, or D. player, refer to pages 15 - 19.
gi EXTIN (or CD-CH) > — .
IF “EXT IN” does not appear, see page 14 and select the external input (“EXT IN”).
[2] Turn on the connected component and start playing the source.
© aus the volume. + 4
K O Adjust the sound as you want. (See pages 11 and 12.)
To check the other information while listening to an external component
More about this unit
Basic operations Turning on the power
+ By pressing SRC on the unit, you can also turn on the power. Ifthe source is ready, playback also starts.
Turning off the power
+ If you turn off the power while listening to a disc, disc play will start from where playback has been stopped previously, next time you turn on the power.
Storing stations in memory
+ During SSM search...
- All previously stored stations are erased and stations are stored newly.
- Received stations are preset in No. 1 (lowest frequency) to No. 6 (highest frequency).
— When SSM is over, the station stored in No. 1 will be automatically tuned in.
When storing a station manually, the
previously preset station is erased when a new
station is stored in the same preset number.
Caution for DualDisc playback
The Non-DVD side of a “DualDisc” does not comply with the “Compact Disc Digital Audio” standard. Therefore, the use of Non- DVD side of a DualDisc on this product may not be recommended.
‘This unit has been designed to reproduce CDs/CD Texts, and CD-Rs (Recordable)/ CD-RW (Rewritable) in audio CD (CD-DA), MP3 and WMA formats.
When a disc had been loaded, selecting
“DISC” for the playback source starts disc play.
| EN18-23KD-AR370_320{J{indd 20
Inserting a disc Playing an MP3/WMA
+ When a disc is inserted upside down, the disc + This unit can play back MP3/WMA files automatically ejects. with the extension code <.mp3> or <-wma> Z
+ Do not insert 8 cm (3-3/16") discs (single CD) (regardless of the letter case—upper/lower). lei and unusual shape discs (heart, flower, etc.) + This unit can show the names of albums, OU into the loading slot. artists (performer), and Tag (Version 1.0, 1.1, Z
2.2, 2.3, or 2.4) for MP3 files and for WMA Playing a disc files.
+ This unit can display only one-byte characters. No other characters can be correctly displayed.
+ While fast-forwarding or reversing on an MP3 or WMA dise, you can only hear intermittent
sounds. + This unit can play back MP3/WMA files A meeting the conditions below:
Playing a CD-R or CD-RW Dit rate: 8 kbps — 320 kbps
+ Use only “finalized” CD-Rs or CD-RWs. - Sampling frequency:
+ This unit can play back only files of the same 48 kHz, 44.1 kHz, 32 kHz (for MPEG-1) type which are first detected if a disc includes 24 kHz, 22.05 kHz, 16 kHz (for MPEG-2) both audio CD (CD-DA) files and MP3/ — Disc format: ISO 9660 Level 1/Level 2, WMA files. Romeo, Joliet, Windows long file name
+ This unit can play back multi-session discs; + The maximum number of characters for file/ however, unclosed sessions will be skipped folder names vary among the disc format used while playing. includes 4 extension characters—<.mp3> or
+ Some CD-Rs or CD-RWs may not play <wma>). back on this unit because of their disc — ISO 9660 Level 1: up to 12 characters
& characteristics, or for the following reasons: — ISO 9660 Level 2: up to 31 characters Ÿ — Discs are dirty or scratched. — Romeo: up to 128 characters
- Moisture condensation occurs on the lens — Joliet: up to 64 characters inside the unit. - Windows long file name: up to 128
= The pickup lens inside the unit is dirty. characters
- CD-R/CD-RW on which the files are + This unit can play back files recorded in VBR written with “Packet Write” method. (variable bit rate).
- There are improper recording conditions Files recorded in VBR have a discrepancy (missing data, etc.) or media conditions in elapsed time display, and do not show (stained, scratched, warped, ete.). the actual elapsed time. Especially, after
+ CD-RWSs may require a longer readout time performing the search function, this since the reflectance of CD-RW is lower than difference becomes noticeable. that of regular CDs. + This unit can recognize a total of 512 files, of
+ Do not use the following CD-Rs or CD-RWs: 200 folders, and of 8 hierarchies.
- Discs with stickers, labels, or a protective seal stuck to the surface.
- Discs on which labels can be directly printed by an ink jet printer.
Using these discs under high temperatures or
high humidities may cause malfunctions or
+ This unit cannot play back the following files: - MP3 files encoded with MP3i and MP3 PRO format. - MP3 files encoded in an inappropriate format. - MP3 files encoded with Layer 1/2. - WMA files encoded with lossless, professional, and voice format. - WMA files which are not based upon Windows Media® Audio. - WMA files copy-protected with DRM. - Files which have the data such as WAVE, ATRACS, etc. + The search function works but search speed is not constant.
+ If you change the source, playback also stops (without ejecting the disc). Next time you select “DISC” for the playback source, disc play starts from where it has been stopped previously.
+ Ifthe ejected disc is not removed within 15 seconds, the disc is automatically inserted again into the loading slot to protect it from dust. (Disc will not play this time.)
General settings —PSM sm
«_If you change the “AMP GAIN” setting from “HIGH PWR” to “LOW PWR” while the volume level is set higher than “VOL 30,” the
unit automatically changes the volume level to “VOL 30.”
Satellite radio operations mm
+ You can also connect the JVC SIRIUS radio PnP (Plug and Play), using the JVC SIRIUS radio adapter, KS-U100K (not supplied) to the CD changer jack on the rear.
By turning on/off the power of the unit, you can turn on/off the JVC PnP. However, you cannot control it from this unit.
+ To know more about SIRIUS Satellite radio or to sign up, visit chttp://www.sirius.com».
+ For the latest channel listings and programming information, or to sign up for XM Satellite radio, visit «http://www.xmradio. com».
iPod° or D. player operations sm
+ When you turn on this unit, the iPod or D. player is charged through this unit.
+ While the iPod or D. player is connected, all operations from the iPod or D. player are disabled. Perform all operations from this unit.
+ The text information may not be displayed correctly.
-— Some characters such as accented letters cannot be shown correctly on the display. - Depends on the condition of communication between the iPod or D. player and the unit.
+ Ifthe text information includes more than 8 characters, it scrolls on the display (see also page 13). This unit can display up to 40 characters.
Notice: When connecting an iPod or a D. player, some operations may not be performed correctly or as intended. In this case, visit the following JVC web site: For iPod users: <http://www.jvc.co.jp/ english/car/support/ks-pd100/index.html> For D. player users: <http://www.jvc.co.jp/ english/car/support/ks-pd500/index.html>
Microsoft and Windows Media are either registered trademarks or trademarks of Microsoft Corporation in the United States and/or other countries.
iPod is a trademark of Apple Computer, Inc., registered in the U.S. and other countries.
| EN18-23KD-AR370_320{indd 22
I To keep discs clean Maintenance A dirty dise may not play correctly. pe
Ifa disc does become dirty, wipe it (Sà Z I How to clean the connectors with a soft cloth in a straight line - Frequent detachment will deteriorate the from center to edge. 2 connectors. + Do not use any solvent (for example, Z To minimize this possibility, periodically wipe conventional record cleaner, spray, thinner, the connectors with a cotton swab or cloth benzine, etc.) to clean discs. moistened with alcohol, being careful not to damage the connectors. D To play new discs
New discs may have some rough spots around the inner and outer edges. Ifsuch a disc is used, this unit may reject the disc.
To remove these rough spots, rub the edges with a pencil or ball-point pen, etc.
I Moisture condensation
Moisture may condense on the lens inside the CD player in the following cases:
+ After starting the heater in the car. + Ifit becomes very humid inside the car. Warped disc Xe Should this oceur, the CD player may
Do not use the following discs:
Oo) malfunction. In this case, eject the disc and Ÿ leave the unit turned on for a few hours until Sticker Stickerresidue the moisture evaporates. SES D How to handle discs Suomi S<— Stick-on label When removing a disc from Centerholder 62) its case, press down the center
holder of the case and lift the disc out, holding it by the edges. + Always hold the disc by the
edges. Do not touch its recording surface. When storing a disc into its case, gently insert the disc around the center holder (with the printed surface facing up).
+ Make sure to store discs into the cases after use.
I ÉAR What appears to be trouble is not always serious. Check the following points before calling a service o ES Z LU Symptoms Remedies/Causes - | * Sound cannot be heard from the + Adjust the volume to the optimum level. S| speakers. + Check the cords and connections. 5 S |, The unit does not work at all. Reset the unit (see page 2). + SSM automatic presetting does not | Store stations manually. g|_ wok Ê | Static noise while listening to the Connect the antenna firmly. radio. + Disc cannot be played back. Insert the disc correctly. + CD-R/CD-RW cannot be played + Insert a finalized CD-R/CD-RW. back. + Finalize the CD-R/CD-RW with the component + Tracks on the CD-R/CD-RW cannot which you used for recording. 5 . S | beskipped. & Ë skippe Æ | + Disc can be neither played backnor + Unlock the disc (see page 10). S| cjected. + Eject the disc forcibly (see page 2). ë + Disc sound is sometimes interrupted. | » Stop playback while driving on rough roads. + Change the disc. + Check the cords and connections. + “NO DISC” appears on the display. | Insert a playable disc into the loading slot. + Disc cannot be played back. + Use a disc with MP3/WMA tracks recorded in the format compliant with ISO 9660 Level 1, Level 2, Romeo, or Joliet. Ë + Add the extension code <.mp3> or <.wma> to Es the file names. s & | + Noiseis generated. Skip to another track or change the disc. (Do not Ë add the extension code <.mp3> or <.wma> to S non-MP3 or WMA tracks.) = + A longer readout time is required Do not use too many hierarchies and folders. (‘CHECK keeps flashing on the display).
| EN24-27KD-AR370_320{{indd 24 1148105 sarorpu | |
& CHR DEN | Symptoms Remedies/Causes + Tracks do not play back in the order Playback order is determined when the files are I | you have intended them to play. recorded. 2 A © | + Elapsed playing time is not correct. This sometimes occurs during play. Thisis caused. [Al £ by how the tracks are recorded on the disc. om = & | + NO FILES” appears on the display. | Insert a dise that contains MP3/WMA tracks. Ed Æ |. Correct characters are not displayed | This unit can only display letters (upper case), e.g. album name). numbers, and a limited number of symbols. + “NO DISC” appears on the display. ‘Insert a disc into the magazine. + “NO MAG” appears on the display. Insertthe magazine. D] + “RESET 8” appears on the display. Connect this unit and the CD changer correctly £ and press the reset button of the CD changer. S |. <RESET 1°-“RESET 7 appears on Press the reset button ofthe CD changer. the display. + The CD changer does not work at all. Reset the unit (see page 2). + “CALL 1-888-539-SIRIUS TO Starts subscribing SIRIUS Satellite radio (see page SUBSCRIBE” scrolls onthe display 15). while listening to the SIRIUS Satellite & : © radio. + No sound can be heard. The unit is updating the channel information and “UPDATING” appears on the it takes a few minutes to complete. display. + Either “NO SIGNAL scrolls or Move to an area where signals are stronger. $ “NO SIGNL” appears on the display. & | + Either “NO ANTENNA” scrollsor Connect the antenna firmly. E “ANTENNA” appears on the display. |. “NO CH” appears on the display for No broadcast on the selected channel. about 5 seconds, then returnstothe Select another channel or continue listening to the previous display while listeningto previous channel. the SIRIUS Satellite radio. + “NO (information)*” scrolls onthe No text information for the selected channel. display while listening to the SIRIUS Satellite radio. + “--" appears on the display while listening to the XM Satellite radio.
Symptoms Remedies/Causes I + “--" appears on the display for Selected channel is no longer available or is 2 about 2 seconds, then returnstothe | unauthorized. D previous channel while listening to | Select another channel or continue listening to the Z the XM Satellite radio. previous channel. LU
£ | + “OFF AIR” appearsonthe display Selected channel is not broadcasting at this time.
É| whilelisteningtothe XM Satellite Select another channel or continue listening to the
£| radio. previous channel.
& | + “LOADING” appears on the display The unit is loading the channel information while listening to the XM Satellite | andaudio. Text information are temporarily radio. unavailable.
+ “RESET 8” appears onthe display. Reconnect this unit and the satellite radio + Satellite radio does not work at all. correctly, then reset the unit. + The iPod or D. player does notturn + Check the connecting cable and its connection. on or does not work. + Update the firmware version. + Change the battery. + Buttons do not work as intended. The functions of the buttons have been changed. Press MODE before performing the operation. + The sound is distorted. Deactivate the equalizer either on the unit or the iPod/D. player. + “NO IPOD” or “NO DP” appears on Check the connecting cable and its connection. the display. + Playback stops. ‘The headphones are disconnected during Ë playback. Restart the playback operation using the É control panel (see page 18). É 3 | + No sound can be heard when Disconnect the headphones from the iPod nano. £ connecting an iPod nano.
S | + No sound can be heard. Disconnect the adapter from the D. player. Then,
& | + “ERROROlappearsonthedisplay connectit again. when connecting a D. player.
+ “NO FILES” or “NO TRACK” No tracks are stored. Import tracks to the iPod or appears on the display. D. player.
+ “RESET 1” -“RESET 7” appearson Disconnect the adapter from both the unit and the display. iPod/D. player. Then, connect it again.
+ “RESET 8” appears on the display. | Check the connection between the adapter and
+ The iPod's or D. player controls do Reset the iPod or D. player. not work after disconnecting from this unit.
I AUDIO AMPLIFIER SECTION I CD PLAYER SECTION Type: Compact disc player
Power Output Signal Detection System: Non-contact optical 18 W RMS x 4 Channels at : ’ NADINE $ pickup (semiconductor laser)
< Æ | Number of Channels: 2 channels (stereo)
Signal to Noise Ratio: ua
80 dBA (reference: 1 W into 4 Q)
Load Impedance: 4 Q (4 Q to 8 Q allowance) Tone Control Range:
Bass: +10 dB at 100 Hz
Treble: +10 dB at 10 kHz Frequency Response: 40 Hz to 20 000 Hz Line-Out Level/Impedance:
2.5 V /20 kQ load (full scale)
Output Impedance: 1 kQ Frequency Response: _ 5 Hz to 20 000 Hz Dynamic Range: 96 dB Signal-to-Noise Ratio: 98 dB Wow and Flutter: Less than measurable limit MP3 Decoding Format:
I TUNER SECTION Frequency Range: FM: 87.5 MHz to 107.9 MHz (with channel interval set to 100 kHz or 200 kHz) 87.5 MHz to 108.0 MHz (with channel interval set to 50 KHz) AM: 530 kHz to 1 710 kHz (with channel interval set to 10 kHz) 531 kHz to 1 602 kHz (with channel interval set to 9 kHz)
IFM Tuner] Usable Sensitivity: 11.3 dBf (1.0 uV/75 Q) 50 dB Quieting Sensitivity: 16.3 dBf (1.8 uV/75 Q) Alternate Channel Selectivity (400 kHz): 65 dB Frequency Response: 40 Hz to 15 000 Hz Stereo Separation: 35 dB Capture Ratio: 1.5 dB
Sensitivity: 20 uV Selectivity: 35 dB DC 144 V (11 V to 16 V allowance) Grounding System: Negative ground Allowable Operating Temperature:
O°C to +40°C (32°F to 104°F) Dimensions (W x H x D):
Installation Size (approx.): 182 mm x 52 mm X 150 mm (7-3/16"X 2-1/16" x 5-15/16")
Panel Size (approx.): 188 mm x 58 mm X 11 mm (7-7/16" x 2-5/16" x 7/16")
Mass (approx.): 14 kg (3.1 Ibs) (excluding accessories)
Design and specifications are subject to change without notice.
If a kit is necessary for your car, consult your telephone directory for the nearest car audio speciality shop.
FF e CN EE Having TROUBLE with operation? Please reset your unit
Refer to page of How to reset your unit
Still having trouble?? h USA ONLY ®
http://www.jvc.com We can help you!
JVC LE #2 EN, sP,FR © 2005 Victor Company of Japan, Limited 1105DTSMDTJEIN
| Rear_KD-AR370_320{iindd 2 & 11908 4:17:58 PM |
1105DTSMDTJEIN EN, SP,FR © 2005 Victor Company of Japan, Limited
ENGLISH ESPANOL FRANÇAIS This unit is designed to operate on 12 V DC, NEGATIVE ground electrical systems. If your vehicle does not have this system, a voltage inverter is required, which can be purchased at JVC car audio dealers.
WARNINGS Esta unidad est diseñada para funcionar con 12 V de CC, con
ADVERTENCIAS Cet appareil est conçu pour fonctionner sur des sources de courant continu de 12 V à masse NEGATIVE. Si votre véhicule n'offre pas ce type d'alimentation, il vous faut un convertisseur de tension, que vous pouvez acheter chez un revendeur d'autoradios JVC.
AVERTISSEMENTS To prevent short circuits, we recommend that you disconnect the
battery’s negative terminal and make all electrical connections before
installing the unit.
+ Be sure to ground this unit to the car’s chassis again after installation.
Replace the fuse with one of the specified rating. If the fuse bl frequently, consult your JVC car audio dealer.
Itis recommended to connect to the speakers with maximum power of more than 50 W (both at the rear and at the front, with an
impedance of 4 Q to 8 Q). Ifthe maximum power is less than 50 W, change “AMP GAIN” setting to prevent the speakers from being damaged (see page 14 oftthe INSTRUCTIONS).
To prevent short-circuit, cover the terminals of the UNUSED leads with insulating tape.
The heat sink becomes very hot after use. Be careful not to touch it when removing this unit.
Heat sink Sumidero térmico Dissipateur de chaleur
PRECAUTIONS on power supply and speaker
+ DO NOT connect the speaker leads of the power cord to the car battery; otherwise, the unit will be seriously damaged.
+ BEFORE connecting the speaker leads of the power cord to the speakers, check the speaker wiring in your car.
PRECAUCIONES sobre las conexiones de la fuente de alimentaciôn y de los altavoces:
The following parts are provided for this unit. Ifany item is missing, consult your JVC car audio dealer immediately.
INSTALLATION (MONTAGE DANS LE TABLEAU DE BORD)
The following illustration shows a typical installation. If you have any
questions or require information regarding installation kits, consult
your JVC car audio dealer or a company supplying kits.
+_If you are not sure how to install this unit correctly, have it installed by a qualified technician.
La siguiente ilustraciôn muestra una instalaciôn tipica. Si tiene alguna
#1 When you stand the unit, be careful not to damage the fuse on the rear.
Before removing the unit, release the rear section.
Flat type screws—M5 x 8 mm
Note : When installing the unit on the mounting bracket, make sure to use the 8 mm (3/8") -long screws. Iflonger
+ Are the red and black leads connected correctly? + Power cannot be turned on.
+ Is the yellow lead connected?
+ No sound from the speakers.
* Is the speaker output lead short-circuited?
+ Sound is distorted.
* Is the speaker output lead grounded?
* Are the “_” terminals of Land R speakers grounded in common?
+ Noise interfere with sounds. * Is the rear ground terminal connected to the cars chassis using shorter and thicker cords?
* Is the speaker output lead grounded?
* Are the “-” terminals of Land R speakers grounded in common? + This unit does not work at all.
* Have you reset your unit?
| Instait-2_KD-AR37OUJ{indd 2
Rear ground terminal —L_) n [O) | © ©
#2 Roi mn To a live terminal in the fuse block connecting to the car battery 2 Ds (bypassing the ignition switch) (constant 12 V) jaune
To an accessory terminal in the fuse block Fac Aun terminal accesorio del bloque de fusibles Vers borne accessoire du porte-fusible
#2 Before checking the operation of this unit prior to installation, this lead must be connected, otherwise power cannot be turned on.
You can connect amplifiers to upgrade your car stereo system. Usted podrä conectar amplificadores para mejorar el sistema estéreo Vous pouvez connecter des amplificateurs pour améliorer votre + Connect the remote lead (blue with white stripe) to the remote de su automévil système autoradio. lead of the other equipment so that it can be controlled through + Conecte el conductor remoto (azul con rayas blancas) al conductor + Connectez le fil de commande à distance (bleu avec bande blanche) this unit. remoto del otro equipo para poderlo controlar a través de esta unidad. au fil de commande à distance de l'autre appareil de façon qu'il + Disconnect the speakers from this unit, connectthemtothe - Desconecte los altavoces de esta unidad y conéctelos al puisse être commandé via cet appareil. amplifier. Leave the speaker leads of this unit unused. amplificador. Los cables de los altavoces de esta unidad + Déconnectez les enceintes de cet appareil et connectez-les quedan sin usar. à l'amplificateur. Laissez les fils d'enceintes de cet appareil Remote lead Y-connector (not supplied for this unit) inutilisés. Cable remoto Conector en Y (no suministrado con esta unidad) #3 Firmly attach the ground wire to the metallic Fil d'alimentation à distance Connecteur Y (non fourni avec cet appareil) body or to the chassis of the car—to the place 1 uncoated with paint (if coated with paint, remove
the paint before attaching the wire). Failure to do
so may cause damage to the unit.
Fije firmemente el cable de tierra a la carroceria
Set “L/0 MODE” to “REAR” (See page 14 of the INSTRUCTIONS.) Altavoces delanteros
+ Turning on/off the unit can also turns on/off the JVC PnP. KD-AR370 —— pue he
#10 AUX Input Adapter KS-U58 (not supplied for this
Thank you for purchasing a JVC product. Please read all instructions carefully before operation, to ensure your complete understanding and to obtain the best possible performance from the unit.
IMPORTANT FOR LASER PRODUCTS
1. CLASS 1 LASER PRODUCT
2. CAUTION: Do not open the top cover. There are no user serviceable parts inside the unit leave all servicing to qualified service personnel.
3. CAUTION: Visible and invisible laser radiation when open and interlock failed or defeated. Avoid direct exposure to beam.
4. REPRODUCTION OF LABEL: CAUTION LABEL, PLACED OUTSIDE THE UNIT.
ASE: Su UARINS + no TI ter sie lserstäing en Egpas 5 opel Beta à rer sl
ENGLISH Es How to use the MODE button
If you press MODE, the unit goes into functions mode, then the number buttons and A/Ww buttons work as different function buttons.
Ex: When number button 2 works as MO (monaural) button.
+ Your preset adjustments will also be erased.
Ii How to forcibly eject a disc
T ©/1 Time countdown indicator NTI + To use these buttons for their original
functions again after pressing MODE, wait for 5 seconds without pressing any of these buttons until the functions mode is cleared or press MODE again.
+ Ifthis does not work, reset your unit. + Be careful not to drop fhe disc when it ejects.
Ii How to detach/attach the control panel
Detaching.. Attaching..
Eh How to read this manual
+ Button operations are mainly explained with
the illustrations in the table below. Z + Some related tips and notes are explainedin | Control panel … 4 “More about this unit” (see pages 21 - 23). . O Getting started... 5 2
n h LU Basic operations 5
Press briefly. Radio operations …. … 6
FM RDS operations. co
R Press repeatedly. Searching for your favorite FM RDS programme … 7
Did Disc operations … . 9
© © . Playing a disc in the unit 9
© » & Press either Playing discs in the CD changer 9
‘ Sound adjustments… se 12
& Press and hold until your | |General settings — PSM. eu 13
desired response begins. DAB tuner operations. . 16
iPod° Press and hold both iPod°/D. player operations … sn 17 Hu buttons at the same time. | | Otherexternal component operations. 19
Remote controller — rwkéo … 20
More about this unit : Built-in CD player operations. " Per o Maintenance
: External CD changer operations.
® The following marks are used to indicate.
Troubleshooting… © : Indicator displayed for the ificati corresponding operation. Specifications … If you need to operate the unit while driving, be sure to look ahead carefully or you may be involved in a traffic accident. For safety.
+ Do not raise the volume level too much, as this will block outside sounds, making driving dangerous.
+ Stop the car before performing any complicated operations.
Note: Only for [EX] model users in UK and
For security reasons, a numbered ID card
is provided with this unit, and the same ID
number is imprinted on the unit’s cha .
Keep the card in a safe place, as it will helpthe Temperature inside the car...
authorities to identify your unit if stolen. If you have parked the car for a long time in hot or cold weather, wait until the temperature in the car becomes normal before operating the unit.
Getting started © aiust the sound as you want. (See pages 12 and 13.)
ZT + + ea) Basic operations = ä [1] Turn on the power. To drop the volume in a £ oA moment (ATT) CA ATT( AT To restore the sound, press itagain. [2] To turn off the power on & [Hot] Rss DAB1/DAB2/DAB3* CD-CHYIPOD*/ —<— DIsc* un D.PLAYER*(or EXT IN) Basic settings * You cannot select these sources if they are not ready or not connected. + See also “General settings — PSM” on pages 13-15. 9 NES à + For FM/AM tuner FM1-> EM2 > FM3 : & ET AM C2 + _ For DAB tuner DAB1 —> DAB2 : : DAB3 [1] Canceling the display demonstrations O Adjust the volume. Select “DEMO,” then “DEMO OFF.” [2] Setting the clock / Select “CLOCK H” (hour), then adjust the hour. K Volume level Select “CLOCK M” (minute), then SAME AREA adjust the minute. = > Select “24H/12H,” then “24H” (hour) or < TK “Er un € 12H” (hour). C2 NUL Cu Volume level indicator 3 Finish the procedure. En Caution on volume setting: Discs produce very little noise compared with other sources. Lower the volume To checkthe current dock before playing a disc to avoid damaging : : [EF : time when the power is the speakers by the sudden increase of the output level. turned off
[2] P FMT> FM2 > FMS NRC SES SR AM N Lights up when receiving an FM stereo broadcast with suffient signal strength.
T Selected band appears.
[3] Start searching for a station.
When a station is received, searching stops.
To stop searching, press the same button again.
To tune in to a station manually In step @ above...
— DMT æ 925 AXES [21 Select a desired station frequency.
PO SAR When an FM stereo broadcast is hard to receive
LE MONO N Lights up when monaural mode is acivated.
Reception improves, but stereo effect will be lost.
To restore the stereo effect, repeat the same procedure. “MONO OFF” appears and the MO indicator goes off.
| Storing stations in memory
You can preset six stations for each band.
D FM station automatic presetting— SSM (Strong-station Sequential Memory)
À Select the FM band (FM1 - FM3) you want to store into.
7 FM1-> FM2 > FM3 BAND: IR ae —] 2 = MODE 3 os TE = AT PARLES PITITTS
“SSM” flashes, then disappears when automatic presetting is over.
Local FM stations with the strongest signals are searched and stored automatically in the FM band.
| ENO-11KD-G421EX EUjtindd 6
I Manual presetting Ex: Storing FM station of 92.5 MHz into preset
number 4 of the FMI band. Z What you can do with RDS = RDS (Radio Data System) allows FM stations OU NC LiEs ss F3 to send an additional signal along with their Z regular programme signals. By receiving the RDS data, this unit can do the Re ——— | following: e— ; q 7 G + Programme Type (PTY) Search (see the CR C3 following) + TA (Traffic Announcement) and PTY 3 me © Standby Receptions (see pages 8 and 14) BNVI eu G + Tracing the same programme automatically Dm ae 5e 92 —Network-Tracking Reception (see page 9) u + Programme Search (see page 14) Preset number flashes for a while. Searching for your favorite | Listening to a preset station FM RDS programme You can tune in to a station broadcasting your NTRCN FM nue 17 favorite programme by searching for a PTY à | + To store your favorite programme types, see & ) v prog ypes, Q @ 2 Select the preset station (1 - 6) you page 8. ù want. Ur) enles/erles)as)er, Ke à pop & DM dt FUN DE The last selected PTY code appears. To check the current dock time while (2) Select one of your favorite preset listening to an FM (non-RDS) or AM station programme types. + For FM RDS stations, see page 9. ou sou 0 vw wm DSP SAS Frequency <> Clock Éd or Select one of the PTY codes (see page 9). To be continued…
| ENO-11KD-G421EX EUjtindd 8
© sut searching for your favorite programme.
= SERRCH OR Ifthere is a station broadcasting a programme of the same PTY code as you have selected, that station is tuned in.
Storing your favorite programme types
You can store six favorite programme types.
Preset programme types in the number buttons
1 2 3 4 5 6 POP M | ROCK M] EASY M [CLASSICS| AFFAIRS] VARIED
2 Select the preset number (1 - 6) you want to store into.
RS CCKH M * MEMORY Ex: When "ROCK M"is selected
3 Repeat steps 1 and 2 to store other PTY codes into other preset numbers.
4 Finish the procedure.
| Using the standby receptions I TA Standby Reception
TA Standby Reception allows the unit to switch temporarily to Traffic Announcement (TA) from any source other than AM.
The volume changes to the preset TA volume level if the current level is lower than the preset level (see page 14).
To activate TA Standby Reception ve The TP (Traffic Programme) indicator either lights up or flashes.
+ Ifthe TP indicator lights up, TA Standby Reception is activated.
Ifthe TP indicator flashes, TA Standby Reception is not yet activated. (This occurs when you are listening to an FM station without the RDS signals required for TA Standby Reception.)
To activate TA Standby Reception, tune in to another station providing these signals. The TP indicator will stop flashing and remain lit.
To deactivate the TA Standby Reception tr The TP indicator goes off.
I PTY Standby Reception
PTY Standby Reception allows the unit to switch temporarily to your favorite PTY programme from any source other than AM.
To activate and select your favorite PTY code for PTY Standby Reception, see page 14.
The PTY indicator either lights up or flashes. Ifthe PTY indicator lights up, PTY Standby Reception is activated.
Ifthe PTY indicator flashes, PTY Standby Reception is not yet activated.
To activate PTY Standby Reception, tune in to another station providing these signals. The PTY indicator will stop flashing and remain lit.
To deactivate the PTY Standby Reception, select “OFF” for the PTY code (see page 14). The PTY indicator goes off.
Network-Tracking Reception TZ When driving in an area where FM reception Playing a discin the unit mm O is not sufficient enough, this unit automatically AI tracks will be played repeatedly until you Z
s $ LU tunes in to another FM RDS station of the change the source or eject the disc. same network, possibly broadcasting the same / programme with stronger signals (see the illustration below). When shipped from the factory, Network- Tracking Reception is activated. To change the Network-Tracking Reception setting, see “AF-REG” on page 14. To stop play and eject the Programme À broadcasting on different frequency areas di PP'ay J (01-05) 5e Playing discs in the CD changer ms A discs in the magazine will be played repeatedly until you change the source. + Ejecting the magazine will also stop playing. ® o TE LP SDW (Or IN mp - . . * If you have changed the external input To check the current dock time while setting to “EXT IN” (see page 15), you tening to an FM RDS station cannot select the CD changer. Station name (PS) — Station (2) Select a disc. sb | Frequency —> Programme type For disc number from 01 - 06: {PTY) —+ Clock — (back to the 7e eu ou 10 nr m0 beginning) aplerlevles)ar]er,) PTY codes For disc number from 07 - 12: NEWS, AFFAIRS, INFO, SPORT, EDUCATE, DRAMA, CULTURE, CT) D] en] D] ŒD SCIENCE, VARIED, POP M (music), ROCK M (music), EASY SES M (music), LIGHT M (music), CLASSICS, OTHER M (music), LHold… WEATHER, FINANCE, CHILDREN, SOCIAL, RELIGION, PHONE El IN, TRAVEL, LEISURE, JAZZ, COUNTRY, NATION M (music), OLDIES, FOLK M (music), DOCUMENT To be continued...
| ENO-11KD-G421EX EUjtindd 9
& CHR DEN | About MP3 and WMA discs To locate a particular track (for CD) or folder MP3 and WMA “tracks” (words “file” and (for MP3 or WMA discs) directl TZ “rack” are used interchangeably) are recorded eh io folders. To select a number from 01 - 06: et] 7e ou ou 1 er tm Z About the CD changer MAG It is recommended to use a JVC MP3- SX
compatible CD changer with your unit. + You can also connect other CH-X series CD changers (except CH-X99 and CH-X100). sw oo nur em
These units are not compatible with MP3 aw/47/2Vv/€7)2V)43)
+ You cannot play any WMA disc in the CD To select a number from 07 - 12:
+ You cannot use the KD-MK series CD + To use direct folder access on MP3/WMA changers with this unit. discs, it is required that folders are assigned
+ Disc text information recorded in the CD with 2-digit numbers at the beginning of their Text can be displayed when a JVC CD Text folder names—01, 02, 03, and so on.
compatible CD changer is connected. + For connection, see Installation/Connection Manual (separate volume).
To select a particular track in a folder (for MP3 or WMA discs):
& To fast-forward or reverse the track ® =)
To go to the next or previous tracks
To go to the next or previous folders (only for
MP3 or WMA discs) NE 1)
Other main functions I Skipping tracks quickly during play
Only possible on JVC MP3-compatible CD changer
+ For MP3 or WMA discs, you can skip tracks within the same folder.
Ex: To select track 32 while playing a track whose number is a single digit (1 to 9)
LC? prrmdte9-=radcre = @)<20
Each time you press the button, you can
+ After the last track, the first track will be selected and vice versa.
Où Trad 31>- >. Der Dr
ES I Prohibiting disc ejection
You can lock a disc in the loading slot.
KE: + EX T'OÉLERT TR DEC TL Æ
EUECTE To cancel the prohibition, repeat the same procedure.
| Changing the display information aosré NN I While playing an audio CD or a CD Text CA]- — Disctitle /performer*:
D While playing an MP3 or a WMA‘ disc + When “TAG DISP” is set to “TAG ON” (see page 15)
AJ-[6] _ Album name / performer Ù (folder name*:)
Tradk title (file mame*:) J
+ When “TAG DISP” is set to
—> Folder name D CA}>
CA] : Elapsed playing time with the current track number Clock with the current track number
Ifthe current disc is an audio CD,
Only for the built-in CD player.
Ifan MP3/WMA file does not have Tag information, folder name and file name appear. In this case, the TAG indicator will not light up.
| Selecting the playback modes
You can use only one of the following playback modes at a time.
1 MODE 2 Select your desired playbackmode. 2 USER -> ROCK + CLASSIC D Ey NS JAZZ HIP HOP <-POPS 11 8er F ï reset values! Bas | TRE | LOUD ES Indication (For) bass) | (treble) | (loudness) USER oo | 00 | OFF Mode Plays repeatedly (Flat sound) TRKRPT _: The current track on iscomusie) | “5 | +01 | ON FLDR RPT*! : Al tracks of the current OCE O7 PISE MUSIC folder. ŒD) ED CLASSIC so | | 'orr DISC RPT* : All tracks ofthe current disc. (Classical music) ® POPs +04 | +01 | OFF KZ RPTOFF : Cancels. (Light music) m_Random play HIP HOP 40 | 00 | oN emo (Funk or rap music) JAZZ > Jazz music) +02 | +03 | OFF Mode Plays at random FLDR RND*': Al tracks of the current Adjusting the sound folder, then tracks ofthe next; dustth characteristics t folder and so on. ED > ou can adjust the sound characteristics to your DISCRND _: Alltracks ofthe current dise. Préférence. MAG RND* : Al tracks of the inserted 1 = BAS-> TRE -> FAD discs. ŒRD EX E yo = roun = sa RNDOFF _: Cancels. N\ #1 Only while playing an MP3 or a WMA disc. # Only while playing discs in the CD changer.
Ex.: When “TRE” is selected
BAS*1 (bass) Adjust the bass. [-06 to +06]
TRE*! (treble) Adjust the treble. [-06 to +06]
FAD* (fader) Adjust the front and rear speaker balance. [RO6 to F06]
BAL (balance) Adjust the left and right speaker balance. [L06 to RO6]
® LOUD*! (loudness) Boost low and high frequencies to produce a well-balanced sound at low volume level. [LOUD ON or LOUD OFF]
VOL (volume) Adjust the volume. [00 to 30 or 50*]
#1_ When you adjust the bass, treble, or loudness, the adjustment you have made is stored for the currently selected sound mode (C-EQ) including “USER.”
#2 If you are using a two-speaker system, set the fader level to “00.”
+ Depending on the amplifier gain control setting (See page 15 for details.)
General settings — PSM You can change PSM (Preferred Setting Mode) items listed in the table that follows.
2 Select a PSM item. ON =
POI] Ex: When “DIMMER" is selected
3 Adjust the PSM item selected.
4 Repeat steps 2 and 3 to adjust the other PSM items if necessary.
5 Finish the procedure.
ENGLISH Indications Selectable settings, [reference page] DEMO DEMOON : [Initial]; Display demonstration will be activated Display demonstration automatically if no operation is done for about 20 seconds, [5]. DEMO OFF : Cancels. CLOCKH 0-23(1-12),[5] Hour adjustment [Initial: 0 (0:00)] CLOCKM 00 - 59, [5] Minute adjustment [Initial: 00 (0:00)] 24H/12H 12H 2 24H, [5] Time display mode [initial: 24H] CLK ADJ*t AUTO : [initial]; The built-in clock is automatically adjusted Clock adjustment using the CT (clock time) data in the RDS signal. OFF : Cancels. AF-REG*! When the received signals from the current FM RDS station or DAB Alternative frequency/ service become weak... regionalization reception AF : [Initial]; Switches to another station (or service) the programme may differ from the one currently received), [9, 17]. + The AF indicator lights up. AFREG : Switches to another station broadcasting the same programme. + The AF and REG indicators light up. OFF : Cancels (not selectable when “DAB AF” is set to “AF ON”). PTY-STBY*! Activates PTY Standby Reception with one of the PTY codes, [8]. PTY standby OFF [Initial] + PTY codes, [9] + (back to the beginning) TA VOL*! [Initial: VOL 15]; VOL 00 — VOL 30 or 50*, [8, 21] Traffic announcement volume P-SEARCH*! ON : Using the AF data, the unit tunes in to another
frequency broadcasting the same programme as the original preset RDS station is if the preset station signals are not sufficient.
OFF : [Initial]; Cancels.
#1 Only for FM RDS stations.
+2 Depends on the amplifier gain control.
Indications Selectable settings, [reference page]
DAB AF* AFON : [Initial]; Traces the programme among DAB services Alternative frequency and FM RDS stations, [9, 17]. reception AF OFF : Cancels.
DAB VOL* DAB volume adjustment
You can adjust the volume level (VOL -12 — VOL +12) of DAB tuner to match the FM sound level and store it in memory. Lnitial: VOL 00]
DIMMER on + Dims the display illumination of this unit. Dimmer OFF : [Initial]; Cancels. TEL MUTING 1/MUTING 2 : Select either one which mutes the sounds
while using a cellular phone.
OFF : [Initial]; Cancels. SCROLL* ONCE : [Initial]; Scrolls the disc information once. Scroll AUTO + Repeats scrolling (5-second intervals in between). OFF + Cancels. + Pressing DISP for more than one second can scroll the display regardless ofthe setting. EXT IN CHANGER: [Initial]; To use a JVC CD changer, [9], an Apple iPod
or a JVC D. player, [17].
Amplifier gain control
: VOL 00 - VOL 30 (Select this if the maximum power
of the speaker is less than 50 W to prevent them from being damaged.)
: [Initial]; VOL 00 - VOL 50
IF BAND Intermediate frequency filter
: [Initial]; Increases the tuner selectivity to reduce
interference noises between close stations. (Stereo effect may be lost.)
: Subject to interference noises from adjacent stations,
but sound quality will not be degraded and the sterco effect will remain.
*#° Displayed only when DAB tuner is connected. # Some characters or symbols will not be shown correctly (or will be blanked) on the display. # Displayed only when one of the following sources is selected FM, AM, or DISC.
| RE T | & CR ER | |
DAB tuner operation: S O Select a service (either primary or secondary) to listen to. h:
What is DAB system? d Digital Audio Broadcasting (DAB) can deliver digital quality sound without any annoying interference and signal distortion. Furthermore, it can carry text, pictures, and data. When transmitting, DAB combines several programmes (called “services”) to form one “ensemble.” In addition, each “service” —called “primary service” —can also be divided into its components (called “secondary service”). A
typical ensemble has six or more programmes [1 à (services) broadcast at the same time. 4 À By connecting the DAB tuner, this unit can do A ÉHod…|
the following: + Tracing the same programme automatically — Alternative Frequency Reception (see “DAB AF” on page 15). It is recommended to use DAB tuner KT-DB1000 with your unit. If you have another DAB tuner, consult your JVC IN-CAR ENTERTAINMENT dealer. ® + Refer also to the Instructions supplied for
ENGLISH To tune in to an ensemble manually
Start searching for an ensemble, as in step @ on the left column.
[2] Select the desired ensemble frequencies.
| Storing DAB services in memory
your DAB tuner. You can preset six DAB services (primary) for each band.
À Select a service you want (see steps ®
d to @ on the left column).
Oo SRG Ç par D /DAB2/DAB3 > = .
2] 4 DAB1 —> DAB2 2 Select the preset number (1 - 6) you BAND? P: Y Ron 2
© sur searching for an ensemble. a CI) Z
-) TT > pi — LE nuErt 5 When an ensemble is received, searching Ë F x f 1 E p IN € tops. Preset number flashes for a while. To stop searching, press the same button again.
| EN16-23KD-G421[EX EUjindd 16 11/22/05 sass1 pu | |
| Tuning in to a preset DAB service
DAB1 —> DAB2 DAB3 «7
2 Select the preset DAB service (primary) number (1 - 6) you want.
If the selected primary service has some secondary services, pressing the same button again will tune in to the secondary services.
Trading the same programme— Alternative Frequency Reception
You can keep listening to the same programme by activating the Alternative Frequency Reception.
+ While receiving a DAB service:
When driving in an area where a service cannot be received, this unit automatically tunes in to another ensemble or FM RDS station, broadcasting the same programme. While receiving an FM RDS station:
When driving in an area where a DAB service is broadcasting the same programme as the FM RDS station is broadcasting, this unit automatically tunes in to the DAB service.
When shipped from the factory, Alternative Frequency Reception is activated.
To deactivate the Alternative Frequency Reception, see page 14 and 15.
To change the display information while tuning to an ensemble
Service name — Ensemble name —» Channel number» Frequency -> Clock — (back to the beginning)
iPod°/D. player operations
This unit is ready for operating an Apple iPod or a JVC D. player from the control panel.
Before operating your iPod or D. player:
Connect either one of the following (separately
purchased) to the CD changer jack on the rear
+ Interface adapter for iPod®—KS-PD100 for controlling an iPod.
+ D. player interface adapter—KS-PD500 for controlling a D. player.
+ For connection, see Installation/Connection Manual (separate volume).
+ For details, refer also to the manual supplied with the interface adapter.
Make sure to turn off this unit or turn off the vehicle’s ignition switch before connecting or disconnecting the iPod or D. player.
Preparations: Make sure “CHANGER” is selected for the
external input setting, see page 15.
Playback starts automatically from where it has been paused*! or stopped*? previously.
© anse the volume. + r
K To be continued...
O Adjust the sound as you want. (See pages 12 and 13.)
+ Make sure the equalizer on the iPod or D. player is deactivated. To pause“! or stop”? playback €) To resume playback, press it again. To fast-forward or = reverse the track { 7 = To go to the next PANN or previous tracks S SS C7 Ld #1 For iPod #2 For D. player Selecting a track from the menu
1 Enter the main menu.
Now the A/V/ 4 V/»B1 A buttons work as the menu selecting buttons*?.
Confirm the selection.
To move back to the previous menu, press À.
+ Ifa track is selected, playback starts automatically.
+ Ifthe selected item has another layer, you will enter the layer. Repeat steps 2 and 3 until the desired track is played.
+ Holding 4 V/RB1 A can skip 10 items at a time.
The menu selecting mode will be canceled: = Ifno operations are done for about
5 seconds. = When you confirm the selection of a track.
Selecting the playback modes
Select your desired playback mode.
a PT ES ONE RPT Functions the same as “Repeat One” of the iPod or “Repeat Mode One” for the D. player.
ALLRPT Functions the same as “Repeat AI” of the
iPod or “Repeat Mode All” for the D. player.
For iPod: PLAYLIST <> ARTISTS +» ALBUMS +» SONGS + GENRES <—» COMPOSER <> (back to the beginning)
For D. player: PLAYLIST ++ ARTIST <> ALBUM +» GENRE
<TRAGK + (back to the beginning)
= Random play 12 AND Other external component H ZT LG operations a — ALEM RND- DD) 4 Youcan connect an external componentto Mel Functions the same as “Shuffle Albums” of {he CD changer jack on the rear usingthe Line [fm the iPod. Input Adapter—KS-U57 (not supplied) or AUX Input Adapter—KS-U58 (not supplied). SONG RND/RND ON œ er + For connection, see Installation/Connection Functions the same as “Shuffle Songs” ofthe nul (separate volume) iPod or “Random Play On” of the D. player. P : RND OFF For listening to the iPod or D. player, refer to Cancels. pages 17 - 19. * For iPod: Only if you select “ALL” in “ALBUMS” of the main “MENU.” 01] OETT EXTIN(or CD-CH) —»--. VE | To check other information while listening to Ld T aniPod or a D. player IFEXT IN” does not appear, see page 15 and select the external input (“EXT IN”). LOSPS\ (2) Turn on the connected component NS and start playing the source. O] [3] Adjust the volume. ” + C4] Adjust the sound as you want. (See pages 12 and 13.) To check the clock time while listening to an external component De NS 19
This unit can be remotely controlled as
Remote controller — ru.rx6o | Main elements and features
instructed here (with an optionally purchased remote controller). We recommend that you use remote controller RM-RK60 with your unit.
M installing the lithium coin battery (CR2025)
Aim the remote controller directly at the remote sensor on the unit. Make sure there is no obstacle in between.
+ Do not install any battery other than CR2025 or its equivalent; otherwise, it may explode. Store the battery in a place where children cannot reach to avoid risk of accident. + To prevent the battery from over-heating, cracking, or starting a fire: — Do not recharge, short, disassemble, heat the battery, or dispose ofit in a fire. — Do not leave the battery with other metallic materials. — Do not poke the battery with tweezers or similar tools.
— Wrap the battery with tape and insulate when throwing away or saving it.
[1] 1 ATT (standby/on attenuator) button + Turns the power on if pressed briefly or attenuates the sound when the power is on. + Turns the power offif pressed and held. [2] SRC (source) button + Selects the source. [1 R (reverse) / F (forward) buttons + Searches for stations (or services) if pressed briefly. + Searches for ensembles if pressed and held. + Fast-forwards or reverses the track if pressed and held. + Changes the tracks if pressed briefly. + While listening to an Apple iPod or a JVC D. player (in menu selecting mode): — Selects an item if pressed briefly. (Then, press D (down) to confirm the selection.) — Skips 10 items at a time if pressed and held. [4] SOUND button + Selects the sound mode (C-EQ} custom equalizer).
[5] U (up) / D (down) buttons + Changes the FM/AM/DAB bands with More about this uni U (up).
ZT + Changes the preset stations with Basic operations sms ft) — D (down). : G + Changes the folder of the MP3/WMA Tuning on the power > discs. + By pressing SRC button on the unit, you can [el + While playing an MP3 disc on an also turn on the power. If the source is ready, MP3-compatible CD changer: playback also starts.
— Changes the disc if pressed briefly. — Changes the folder if pressed and held. Turningoffthe power + While listening to an iPod or a D. player: — Pauses/stops or resumes playback with D (down). —_ Enter the main menu with U (up). (Now U/D/R/E work as the menu selecting buttons.)*
i | [6] VOLUME - /+ buttons Tuner operations
+ Adjusts the volume level.
+ If you turn offthe power while listening to a disc, disc play will start from where playback has been stopped previously, next time you turn on the power.
+ During SSM search... - All previously stored stations are erased and stations are stored newly. — Received stations are preset in No. 1 (lowest frequency) to No. 6 (highest frequency). O] — When SSM is over, the station stored in
* U(up) : Returns to the previous menu. D (down) : Confirms the selection.
The unit is equipped with the steering wheel
remote control function.
+ See the Installation/Connection Manual (separate volume) for connection.
No. 1 will be automatically tuned in.
+ When storing a station manually, the previously preset station is erased when a new station is stored in the same preset number.
+ Network-Tracking Reception requires
two types of RDS signals—PI (Programme Identification) and AF (Alternative Frequency) to work correctly. Without receiving these data correctly, Network- Tracking Reception will not operate correctly. Ifa Traffic Announcement is received by TA Standby Reception, the volume level automatically changes to the preset level (TA. VOL) if the current level is lower than the preset level.
+ When Alternative Frequency Reception
is activated (with AF selected), Network- Tracking Reception is also activated automatically. On the other hand, Network- Tracking Reception cannot be deactivated without deactivating Alternative Frequency Reception. (See page 14.)
If you want to know more about RDS, visit <http//www.rds.orguko.
Caution for DualDisc playback
+ The Non-DVD side of a “DualDisc” does not comply with the “Compact Disc Digital Audio” standard. Therefore, the use of Non- DVD side of a DualDisc on this product may not be recommended.
+ This unit has been designed to reproduce CDs/CD Texts, and CD-Rs (Recordable)/ CD-RWs (Rewritable) in audio CD (CD-DA), MP3 and WMA formats.
+ When a disc had been loaded, selecting “DISC” for the playback source starts disc
is inserted upside down, the disc automatically ejects.
+ Do not insert 8 cm discs (single CD) and unusual shape dises (heart, flower, etc.) into the loading slot.
+ While fast-forwarding or reversing on an MP3 or WMA disc, you can only hear intermittent sounds.
Playing a CD-R or CD-RW
+ Use only “finalized” CD-Rs or CD-RWs.
+ This unit can play back only files of the same type which are first detected if a disc includes both audio CD (CD-DA) files and MP3/ WMA files.
+ This unit can play back multi-session discs; however, unclosed sessions will be skipped while playing.
+ Some CD-Rs or CD-RWSs may not play back on this unit because of their disc characteristics, or for the following reasons: - Discs are dirty or scratched.
-— Moisture condensation occurs on the lens
= The pickup lens inside the unit is dirty.
- CD-R/CD-RW on which the files are written with “Packet Write” method.
- There are improper recording conditions (missing data, etc.) or media conditions (stained, scratched, warped, etc.).
+ CD-RWSs may require a longer readout time
since the reflectance of CD-RW is lower than
that of regular CDs.
Do not use the following CD-Rs or CD-RWs:
- Discs with stickers, labels, or a protective seal stuck to the surface.
- Discs on which labels can be directly printed by an ink jet printer.
Using these discs under high temperatures or
high humidities may cause malfunctions or
Playing an MP3/WMA disc This unit can play back MP3/WMA files with the extension code <.mp3> or <wma> (regardless of the letter case—upper/lower). This unit can show the names of albums, artists (performer), and Tag (Version 1.0, 1.1, 2.2, 2.3, or 2.4) for MP3 files and for WMA files. This unit can display only one-byte characters. No other characters can be correctly displayed. + This unit can play back MP3/WMA files meeting the conditions below: - Bit rate: 8 kbps — 320 kbps - Sampling frequency: 48 kHz, 44.1 kHz, 32 kHz (for MPEG-1) 24 kHz, 22.05 kHz, 16 kHz (for MPEG-2) - Disc format: ISO 9660 Level 1/Level 2, Romeo, Joliet, Windows long file name
+ The maximum number of characters for file/
folder names vary among the disc format used
(includes 4 extension characters—<.mp3> or
— ISO 9660 Level 1: up to 12 characters
— ISO 9660 Level 2: up to 31 characters
- Romeo: up to 128 characters
- Joliet: up to 64 characters
- Windows long file name: up to 128 characters
This unit can play back files recorded in VBR
(variable bit rate).
Files recorded in VBR have a discrepancy
in elapsed time display, and do not show
the actual elapsed time. Especially, after
performing the search function, this
difference becomes noticeable.
This unit can recognize a total of 512 files, of
200 folders, and of 8 hierarchies.
This unit cannot play back the following files:
- MP3 files encoded with MP3i and MP3 PRO format.
- MP3 files encoded in an inappropriate format.
- MP3 files encoded with Layer 1/2.
- WMA files encoded with lossless, professional, and voice format.
- WMA files which are not based upon Windows Media® Audio.
- WMA files copy-protected with DRM.
- Files which have the data such as WAVE, ATRAC3, etc.
The search function works but search speed is
If you change the source, playback also stops (without ejecting the disc).
Next time you select “DISC” for the playback source, disc play starts from where it has been
+ Ifthe ejected disc is not removed within 15 seconds, the disc is automatically inserted again into the loading slot to protect it from dust. (Disc will not play this time.)
General settings —PSM sm
+ If you change the “AMP GAIN” setting from “HIGH PWR” to “LOW PWR” while the volume level is set higher than “VOL 30,” the
unit automatically changes the volume level to
DAB tuner operations Sn
+ Only primary DAB services can be presetted even when you store a secondary service.
+ A previously preset DAB service is erased when a new DAB service is stored in the same preset number.
iPod® or D. player operations mm
+ When you turn on this unit, the iPod or D. player is charged through this unit.
+ While the iPod or D. player is connected, all operations from the iPod or D. player are disabled. Perform all operations from this unit.
+ The text information may not be displayed correctly.
— Some characters such as accented letters cannot be shown correctly on the display. - Depends on the condition of communication between the iPod or D. player and the unit.
+ Ifthe text information includes more than 8 characters, it scrolls on the display (see also page 15). This unit can display up to 40 characters.
When operating an iPod or a D. player,
some operations may not be performed
correctly or as intended. In this case, visit the
following JVC web site:
For iPod users: <http://www.jvc.co.jp/ english/car/support/ks-pd100/index.html>
I How to clean the connectors
Frequent detachment will deteriorate the connectors.
To minimize this possibility, periodically wipe the connectors with a cotton swab or cloth moistened with alcohol, being careful not to damage the connectors.
Connector I Moisture condensation
Moisture may condense on the lens inside the CD player in the following cases:
+ After starting the heater in the car.
+ Ifit becomes very humid inside the car. Should this occur, the CD player may malfunction. In this case, eject the disc and leave the unit turned on for a few hours until the moisture evaporates.
I How to handle discs When removing a disc from Centerholder its case, press down the center holder of the case and lift the disc AN out, holding it by the edges. + Always hold the disc by the
edges. Do not touch its recording surface.
When storing a disc into its case, gently insert
the disc around the center holder (with the
printed surface facing up).
+ Make sure to store discs into the cases after use.
I To keep discs clean
A dirty disc may not play correctly.
If a disc does become dirty, wipe it
with a soft cloth in a straight line
from center to edge.
+ Do not use any solvent (for example, conventional record cleaner, spray, thinner, benzine, etc.) to clean discs.
New discs may have some rough spots around the inner and outer edges. If such a disc is used, this | unit may reject the disc.
To remove these rough spots, rub the edges with a pencil or ball-point pen, etc.
Do not use the following discs:
Sticker A2 Sticker residue C2 Stick-on label
What appears to be trouble is not always serious. center.
Check the following points before calling a service
Symptoms Remedies/Causes - | * Sound cannot be heard from the + Adjust the volume to the optimum level. S| speakers. + Check the cords and connections. & S |, The unit does not work at all. Reset the unit (see page 2). + SSM automatic presetting does not Store stations manually.
S| work £ Æ | + Static noise while listening to the Connect the acrial firmly.
@ CERN Con | Symptoms Remedies/Causes + Disc cannot be played back. Insert the disc correctly. ZT un + CD-R/CD-RW cannot be played + Insert a finalized CD-R/CD-RW. = back. + Finalize the CD-R/CD-RW with the component | + Tracks on the CD-R/CD-RW cannot which you used for recording. tm H be skipped. Æ | + Disc can be neither played back nor + Unlock the disc (see page 11). H| cjected. + Ejectthe disc forcibly (see page 2). ë + Disc sound is sometimes interrupted. | + Stop playback while driving on rough roads. + Change the disc. + Check the cords and connections. + “NO DISC” appears on the display. | Insert a playable dise into the loading slot. + Disc cannot be played back. + Use a disc with MP3/WMA tracks recorded in the format compliant with ISO 9660 Level 1, Level 2, Romeo, or Joliet. + Add the extension code <.mp3> or <wma> to the file names. + Noise is generated. Skip to another track or change the disc. (Do not add the extension code <.mp3> or <.wma> to à $ non-MP3 or WMA tracks.) O) £ Æ | + Alongerreadouttimeisrequired Do not use too many hierarchies and folders. Z | (‘CHECK keeps flashing on the É display). © | + Tracks do not play backin the order | Playback order is determined when the files are you have intended them to play. recorded. + Elapsed playing time is not correct. This sometimes occurs during play. This is caused by how the tracks are recorded on the disc. + “NO FILES” appears on the display. Insert a disc that contains MP3/WMA tracks. + Correct characters are not displayed | This unit can only display letters (upper case), (e.g. album name). numbers, and a limited number of symbols. + “NO DISC” appears on the display. Insert a disc into the magazine. + “NO MAG” appears on the display. Insertthe magazine. $ | + “RESET 8” appears on the display. Connect this unit and the CD changer correctly £ and press the reset button of the CD changer. S |. <RESET 1°-“RESET 7” appearson Press the reset button ofthe CD changer. the display. + The CD changer does not work at all. Resetthe unit (see page 2). To be continued.
“noSIGNAL” appears on the display.
Move to an area with stronger signals.
“RESET 8” appears on the display.
Connect this unit and the DAB tuner correctly and reset the unit (see page 2).
a & | + “ANTENANG appears on the Check the cords and connections. display. + The DAB tuner does not work at all. | Reconnect this unit and the DAB tuner correctly and reset the unit (see page 2). + The iPod or D. player does notturn | + Check the connecting cable and its connection. on or does not work. + Update the firmware version. + Change the battery. + Buttons do not work as intended. The functions of the buttons have been changed. Press MODE before performing the operation. + The sound is distorted. Deactivate the equalizer either on the unit or the iPod/D. player. + “NO IPOD” or “NO DP” appears on Check the connecting cable and its connection. the display. | * Playback stops. The headphones are disconnected during È playback. Restart the playback operation using A the control panel (see page 18). & 5 | + No sound can be heard when Disconnect the headphones from the iPod nano. Æ |] connectingan iPod nano. à S | + No sound can be heard. Disconnect the adapter from the D. player. Then, & | + “ERROROl”appearsonthe display connectit again.
when connecting a D. player.
“NO FILES” or “NO TRACK” appears on the display.
No tracks are stored, Import tracks to the iPod or D. player.
“RESET 1” - the display.
“RESET 7” appears on
Disconnect the adapter from both the unit and iPod/D. player. Then, connect it again.
“RESET 8” appears on the display.
Check the connection between the adapter and this unit.
The iPod's or D. player’s controls do not work after disconnecting from this unit.
Reset the iPod or D. player.
| EN24-27KD-G421[EX EUjindd 26
I AUDIO AMPLIFIER SECTION Maximum Power Output: Front: 50 W per channel Rear: 50 W per channel Continuous Power Output (RMS): Front: 19 W per channel into 4 Q, 40 Hz to 20 000 Hz at no more than 0.8% total harmonic distortion. Rear: 19 W per channel into 4 Q, 40 Hz to 20 000 Hz at no more than 0.8% total harmonic distortion. Load Impedance: 4 Q (4 Q to 8 Q allowance) Tone Control Range: Bass: +10 dB at 100 Hz Treble: +10 dB at 10 kHz Frequency Response: 40 Hz to 20 000 Hz Signal-to-Noise Ratio: 70 dB Line-Out Level/Impedance: 2.5 V/20 kQ load (full scale) Output Impedance: 1 kQ Other Terminals: CD changer, Steering wheel remote input
I TUNER SECTION Frequency Range: FM: 87.5 MHz to 108.0 MHz AM: (MW) 522 kHz to 1 620 kHz
(LW) 144 KHz to 279 KHz
IFM Tuner] Usable Sensitivity: 11.3 dBf (1.0 uV/75 Q) 50 dB Quieting Sensitivity: 16.3 dBf (1.8 uV/75 Q) Alternate Channel Selectivity (400 kHz): 65 dB Frequency Response: 40 Hz to 15 000 Hz
Stereo Separation: 30 dB Capture Ratio: 1.5 dB IMW Tuner] Sensitivity: 20 uV Selectivity: 35 dB ILW Tuner]
Sensitivity: 50 UV I CD PLAYER SECTION Type: Compact dise player Signal Detection System: Non-contact optical pickup (semiconductor laser) Number of Channels: 2 channels (stereo) Frequency Response: 5 Hz to 20 000 Hz Dynamic Range: 96 dB Signal-to-Noise Ratio: 98 dB Wow and Flutter: Less than measurable limit MP3 Decoding Format: MPEG1/2 Audio Layer 3 Max. Bit Rate: 320 kbps WMA (Windows Media® Audio) Decoding Format: Max. Bit Rate: 192 kbps
I GENERAL Power Requirement: Operating Voltage:
DC 144 V (11 V to 16 V allowance) Grounding System: Negative ground Allowable Operating Temperature:
0°C to +40°C Dimensions (W x H x D):
Installation Size (approx.): 182 mm x 52 mm x 150 mm Panel Size (approx):
188 mm x 58 mm x 11 mm Mass (approx.}:
14 kg (excluding accessories)
Design and specifications are subject to change without notice.
+ Microsoft and Windows Media are either registered trademarks or trademarks of Microsoft Corporation in the United States and/or other countries.
iPod is a trademark of Apple Computer, Inc., registered in the US. and other countries.
Having TROUBLE with operation? Please reset your unit
Refer to page of How to reset your unit
Vous avez des PROBLÈMES de ® fonctionnement?
© 2005 Victor Company of Japan, Limited 1105DTSMDTJEIN
JV GETO352-010A [EXEU]
1105DTSMDTJEIN EN, FR © 2005 Victor Company of Japan, Limited
ENGLISH FRANÇAIS This unit is designed to operate on 12 V DC, NEGATIVE ground electrical systems. If your vehicle does not have this system, a voltage inverter is required, which can be purchased at JVC IN-CAR ENTERTAINMENT dealers.
WARNINGS Cet appareil est conçu pour fonctionner sur des sources de courant continu de 12 V à masse NEGATIVE. Si votre véhicule n'offre pas ce type d'alimentation, il vous faut un convertisseur de tension, que vous pouvez acheter chez un revendeur d'autoradios JVC.
AVERTISSEMENTS To prevent short circuits, we recommend that you disconnect the battery’s negative terminal and make all electrical connections before installing the unit. - Be sure to ground this unit to the car’s chassis again after installation.
+ Replace the fuse with one of the specified rating. If the fuse blows frequently, consult your JVC IN-CAR ENTERTAINMENT dealer.
+ Itis recommended to connect to the speakers with maximum power of more than 50 W (both at the rear and at the front, with an impedance of 4 Q to 8 Q). Ifthe maximum power is Less than 50 W, change “AMP GAIN” setting to prevent the speakers from being damaged (see page 15 ofthe INSTRUCTIONS).
+ To prevent short-circuit, cover the terminals of the UNUSED leads with insulating tape.
+ The heat sink becomes very hot after use. Be careful not to touch it when removing this unit.
EL Heat sink Ir [l Dissipateur de chaleur
+ Le dissipateur de chaleur devient très chaud après usage. Faire attention de ne pas le toucher en retirant cet appareil.
PRECAUTIONS on power supply and speaker connections:
+ DO NOT connect the speaker leads of the power cord to the car battery; otherwise, the unit will be seriously damaged.
+ BEFORE connecting the speaker leads of the power cord to the speakers, check the speaker wiring in your car.
PRECAUTIONS sur l'alimentation et la connexion des enceintes:
Parts list for installation and connection
The following parts are provided for this unit. If any item is missing, consult your JVC IN-CAR ENTERTAINMENT dealer immediately.
@1® © Hard case/Control panel Sleeve Etui de transport/Panneau Manchon
Ô CHER PEN INSTALLATION (MONTAGE DANS LE TABLEAU DE BORD)
The following illustration shows a typical installation. If you have any questions or require information regarding installation kits, consult your JVC IN-CAR ENTERTAINMENT dealer or a company supplying kits.
+ If you are not sure how to install this unit correctly, have it installed by a qualified technician.
#1 When you stand the unit, be careful not to damage the use on the rear.
#1 Lorsque vous mettez l'appareil à la verticale, faire attention de ne pas endommager le fusible situé sur l'arrière.
Before removing the unit, release the rear section.
Retrait de l'appareil
Avant de retirer l'appareil, libérer la section arrière.
Insert the two handles, then pull them as illustrated so that the unit can be removed.
Install the unit at an angle of less than 30°.
+ When installing the unit on the mounting bracket, make sure to use the 8 mm-long screws. Iflonger screws are
+ Lors de l'installation de l'appareil sur le support de montage, s'assurer d'utiliser des vis d'une longueur de 8 mm.
used, they could damage the unit.
TROUBLESHOOTING EN CAS DE DIFFICULTES
* Are the red and black leads connected correctly? + Power cannot be turned on.
* Is the yellow lead connected?
+ No sound from the speakers. * Is the speaker output lead short-circuited?
+ Soundis distorted. * Is the speaker output lead grounded?
* Are the “_” terminals of Land R speakers grounded in common?
-+ Noise interfere with sounds.
* Is the rear ground terminal connected to the car’s chassis using shorter and thicker cords?
+ This unit becomes hot. * Is the speaker output lead grounded?
* Are the “_” terminals of Land R speakers grounded in common?
+ This unit does not work at all. * Have you reset your unit?
| instait-2_ KD-G421_O1OA findd 2
You may need to modify the wiring of the supplied power cord as illustrated. + Contact your authorized car dealer before installing this unit.
serious damage to this unit.
Î Cut the ISO connector.
3 Connect the aerial cord.
4 Finally connect the wiring harness to the unit.
Before connecting: Check the wiring in the vehicle carefully. Incorrect connection may cause
The leads of the power cord and those of the connector from the car body may be different in color.
2 Connect the colored leads ofthe power cord in the order specified in the illustration below.
LB | Connections without using the ISO connectors / Connexions sans l’utilisation des connecteurs ISO Avant de commencer la connexion: Vérifiez attentivement le câblage du véhicule. Une connexion incorrecte peut endommager sérieusement l'appareil.
TONI Rear ground terminal
#2 Before checking the operation of this unit prior to installation, this lead must be connected, otherwise power
cannot be turned on.
#2 pour vérifier le fonctionnement de cet appareil avant installation, ce fil doit être raccordé, sinon l'appareil ne peut pas être mis sous tension.
ee To a live terminal in the fase block connecting to the car battery (bypassing the D ignition switch) (constant 12 V)
Q © To cellular phone system
Connecting the external amplifier / Connexion d’un ampl
You can connect an amplifier to upgrade your car stereo system.
+ Connect the remote lead (blue with white stripe) to the remote lead of the other equipment so that it can be controlled through this unit.
+ Disconnect the speakers from this unit, connect them to the ampli leads of this unit unused.
r. Leave the speaker
#5. Cut the rear speaker leads of the car's ISO connector and connect them to the amplifier
(not supplied for this unit)
#9. AUX Input Adapter KS-U58 (not supplied for this unit) *9_ Adaptateur d'entrée AUX KS-U58 (non fourni avec cet autoradio)
If your car is equipped with the steering wheel remote controller, you can operate this unit using the
Si votre voiture est munie d'une télécommande de volant, vous pouvez commander cet autoradio en utilisant la télécommande. Pour le faire, un adaptateur pour télécommande au volant JVC (non fourni) correspondant à votre voiture est nécessaire. Consultez votre revendeur d'autoradio JVC pour les détails.
LE | Connecting to the steering wheel remote controller / Connexion de la télécommande de volant
controller. To do it, a JVC's OE remote adapter (not supplied) which matches with your car is required.
OE remote adapter (not supplied)
Stcering wheel remote input Adaptateur pour télécommande au volant (non fourni)
Thank you for purchasing a JVC product. Please read all instructions carefully before operation, to ensure your complete understanding and to obtain the best possible performance from the unit.
IMPORTANT FOR LASER PRODUCTS
1. CLASS 1 LASER PRODUCT
2. CAUTION: Do not open the top cover. There are no user serviceable parts inside the unit leave all servicing to qualified service personnel.
3. CAUTION: Visible and invisible laser radiation when open and interlock failed or defeated. Avoid direct exposure to beam.
4. REPRODUCTION OF LABEL: CAUTION LABEL, PLACED OUTSIDE THE UNIT.
ASE: Su UARINS + no TI ter sie lserstäing en Egpas 5 opel Beta à rer sl
ENGLISH Es How to use the MODE button
If you press MODE, the unit goes into functions mode, then the number buttons and A/Ww buttons work as different function buttons.
Ex: When number button 2 works as MO (monaural) button.
+ Your preset adjustments will also be erased.
Ii How to forcibly eject a disc
T ©/1 Time countdown indicator NTI + To use these buttons for their original
functions again after pressing MODE, wait for 5 seconds without pressing any of these buttons until the functions mode is cleared or press MODE again.
+ Ifthis does not work, reset your unit. + Be careful not to drop fhe disc when it ejects.
Ii How to detach/attach the control panel
Detaching.. Attaching..
Eh How to read this manual
+ Button operations are mainly explained with
the illustrations in the table below. Z + Some related tips and notes are explainedin | Control panel … 4 “More about this unit” (see pages 21 - 23). . O Getting started... 5 2
n h LU Basic operations . 5
Press briefly. Radio operations …. … 6
FM RDS operations. co
R Press repeatedly. Searching for your favorite FM RDS programme … 7
Did Disc operations … . 9
© © . Playing a disc in the unit 9
© » & Press either Playing discs in the CD changer 9
‘ Sound adjustments… se 12
& Press and hold until your | |General settings — PSM. eu 13
desired response begins. DAB tuner operations. . 16
iPod° Press and hold both iPod°/D. player operations … sn 17 Hu buttons at the same time. | | Otherexternal component operations. 19
Remote controller — rwkéo … 20
More about this unit : Built-in CD player operations. " Per o Maintenance
: External CD changer operations.
® The following marks are used to indicate.
Troubleshooting… © : Indicator displayed for the ificati corresponding operation. Specifications … If you need to operate the unit while driving, be sure to look ahead carefully or you may be involved in a traffic accident. For safety.
+ Do not raise the volume level too much, as this will block outside sounds, making driving dangerous.
+ Stop the car before performing any complicated operations.
For security reasons, a numbered ID card
is provided with this unit, and the same ID
number is imprinted on the unit’s chassis.
Keep the card in a safe place, as it will help the
authorities to identify your unit if stolen. Temperature inside the car... If you have parked the car for a long time in hot or cold weather, wait until the temperature in the car becomes normal before operating the unit.
Getting started © aiust the sound as you want. (See pages 12 and 13.)
ZT + + ea) Basic operations = ä [1] Turn on the power. To drop the volume in a £ oA moment (ATT) CA ATT( AT To restore the sound, press itagain. [2] To turn off the power on & [Hot] Rss DAB1/DAB2/DAB3* CD-CHYIPOD*/ —<— DIsc* un D.PLAYER*(or EXT IN) Basic settings * You cannot select these sources if they are not ready or not connected. + See also “General settings — PSM” on pages 13-15. 9 NES à + For FM/AM tuner FM1-> EM2 > FM3 : & ET AM C2 + _ For DAB tuner DAB1 —> DAB2 : : DAB3 [1] Canceling the display demonstrations O Adjust the volume. Select “DEMO,” then “DEMO OFF.” [2] Setting the clock / Select “CLOCK H” (hour), then adjust the hour. K Volume level Select “CLOCK M” (minute), then SAME AREA adjust the minute. = > Select “24H/12H,” then “24H” (hour) or < TK “Er un € 12H” (hour). C2 NUL Cu Volume level indicator 3 Finish the procedure. En Caution on volume setting: Discs produce very little noise compared with other sources. Lower the volume To checkthe current dock before playing a disc to avoid damaging : : [EF : time when the power is the speakers by the sudden increase of the output level. turned off
[2] P FMT> FM2 > FMS NRC SES SR AM N Lights up when receiving an FM stereo broadcast with suffient signal strength.
T Selected band appears.
[3] Start searching for a station.
When a station is received, searching stops.
To stop searching, press the same button again.
To tune in to a station manually In step @ above...
— DMT æ 925 AXES [21 Select a desired station frequency.
PO SAR When an FM stereo broadcast is hard to receive
LE MONO N Lights up when monaural mode is acivated.
Reception improves, but stereo effect will be lost.
To restore the stereo effect, repeat the same procedure. “MONO OFF” appears and the MO indicator goes off.
| Storing stations in memory
You can preset six stations for each band.
D FM station automatic presetting— SSM (Strong-station Sequential Memory)
À Select the FM band (FM1 - FM3) you want to store into.
7 FM1-> FM2 > FM3 BAND: IR ae —] 2 = MODE 3 os TE = AT PARLES PITITTS
“SSM” flashes, then disappears when automatic presetting is over.
Local FM stations with the strongest signals are searched and stored automatically in the FM band.
| ENO-11KD-G421EX EUjtindd 6
I Manual presetting Ex: Storing FM station of 92.5 MHz into preset
number 4 of the FMI band. Z What you can do with RDS = RDS (Radio Data System) allows FM stations OU NC LiEs ss F3 to send an additional signal along with their Z regular programme signals. By receiving the RDS data, this unit can do the Re ——— | following: e— ; q 7 G + Programme Type (PTY) Search (see the CR C3 following) + TA (Traffic Announcement) and PTY 3 me © Standby Receptions (see pages 8 and 14) BNVI eu G + Tracing the same programme automatically Dm ae 5e 92 —Network-Tracking Reception (see page 9) u + Programme Search (see page 14) Preset number flashes for a while. Searching for your favorite | Listening to a preset station FM RDS programme You can tune in to a station broadcasting your NTRCN FM nue 17 favorite programme by searching for a PTY à | + To store your favorite programme types, see & ) v prog ypes, Q @ 2 Select the preset station (1 - 6) you page 8. ù want. Ur) enles/erles)as)er, Ke à pop & DM dt FUN DE The last selected PTY code appears. To check the current dock time while (2) Select one of your favorite preset listening to an FM (non-RDS) or AM station programme types. + For FM RDS stations, see page 9. ou sou 0 vw wm DSP SAS Frequency <> Clock Éd or Select one of the PTY codes (see page 9). To be continued…
| ENO-11KD-G421EX EUjtindd 8
© sut searching for your favorite programme.
= SERRCH OR Ifthere is a station broadcasting a programme of the same PTY code as you have selected, that station is tuned in.
Storing your favorite programme types
You can store six favorite programme types.
Preset programme types in the number buttons
1 2 3 4 5 6 POP M | ROCK M] EASY M [CLASSICS| AFFAIRS] VARIED
2 Select the preset number (1 - 6) you want to store into.
RS CCKH M * MEMORY Ex: When "ROCK M"is selected
3 Repeat steps 1 and 2 to store other PTY codes into other preset numbers.
4 Finish the procedure.
| Using the standby receptions I TA Standby Reception
TA Standby Reception allows the unit to switch temporarily to Traffic Announcement (TA) from any source other than AM.
The volume changes to the preset TA volume level if the current level is lower than the preset level (see page 14).
To activate TA Standby Reception ve The TP (Traffic Programme) indicator either lights up or flashes.
+ Ifthe TP indicator lights up, TA Standby Reception is activated.
Ifthe TP indicator flashes, TA Standby Reception is not yet activated. (This occurs when you are listening to an FM station without the RDS signals required for TA Standby Reception.)
To activate TA Standby Reception, tune in to another station providing these signals. The TP indicator will stop flashing and remain lit.
To deactivate the TA Standby Reception tr The TP indicator goes off.
I PTY Standby Reception
PTY Standby Reception allows the unit to switch temporarily to your favorite PTY programme from any source other than AM.
To activate and select your favorite PTY code for PTY Standby Reception, see page 14.
The PTY indicator either lights up or flashes. Ifthe PTY indicator lights up, PTY Standby Reception is activated.
Ifthe PTY indicator flashes, PTY Standby Reception is not yet activated.
To activate PTY Standby Reception, tune in to another station providing these signals. The PTY indicator will stop flashing and remain lit.
To deactivate the PTY Standby Reception, select “OFF” for the PTY code (see page 14). The PTY indicator goes off.
Network-Tracking Reception TZ When driving in an area where FM reception Playing a discin the unit mm O is not sufficient enough, this unit automatically AI tracks will be played repeatedly until you Z
s $ LU tunes in to another FM RDS station of the change the source or eject the disc. same network, possibly broadcasting the same / programme with stronger signals (see the illustration below). When shipped from the factory, Network- Tracking Reception is activated. To change the Network-Tracking Reception setting, see “AF-REG” on page 14. To stop play and eject the Programme À broadcasting on different frequency areas di PP'ay J (01-05) 5e Playing discs in the CD changer ms A discs in the magazine will be played repeatedly until you change the source. + Ejecting the magazine will also stop playing. ® o TE LP SDW (Or IN mp - . . * If you have changed the external input To check the current dock time while setting to “EXT IN” (see page 15), you tening to an FM RDS station cannot select the CD changer. Station name (PS) — Station (2) Select a disc. sb | Frequency —> Programme type For disc number from 01 - 06: {PTY) —+ Clock — (back to the 7e eu ou 10 nr m0 beginning) aplerlevles)ar]er,) PTY codes For disc number from 07 - 12: NEWS, AFFAIRS, INFO, SPORT, EDUCATE, DRAMA, CULTURE, CT) D] en] D] ŒD SCIENCE, VARIED, POP M (music), ROCK M (music), EASY SES M (music), LIGHT M (music), CLASSICS, OTHER M (music), LHold… WEATHER, FINANCE, CHILDREN, SOCIAL, RELIGION, PHONE El IN, TRAVEL, LEISURE, JAZZ, COUNTRY, NATION M (music), OLDIES, FOLK M (music), DOCUMENT To be continued...
| ENO-11KD-G421EX EUjtindd 9
& CHR DEN | About MP3 and WMA discs To locate a particular track (for CD) or folder MP3 and WMA “tracks” (words “file” and (for MP3 or WMA discs) directl TZ “rack” are used interchangeably) are recorded eh io folders. To select a number from 01 - 06: et] 7e ou ou 1 er tm Z About the CD changer MAG It is recommended to use a JVC MP3- SX
compatible CD changer with your unit. + You can also connect other CH-X series CD changers (except CH-X99 and CH-X100). sw oo nur em
These units are not compatible with MP3 aw/47/2Vv/€7)2V)43)
+ You cannot play any WMA disc in the CD To select a number from 07 - 12:
+ You cannot use the KD-MK series CD + To use direct folder access on MP3/WMA changers with this unit. discs, it is required that folders are assigned
+ Disc text information recorded in the CD with 2-digit numbers at the beginning of their Text can be displayed when a JVC CD Text folder names—01, 02, 03, and so on.
compatible CD changer is connected. + For connection, see Installation/Connection Manual (separate volume).
To select a particular track in a folder (for MP3 or WMA discs):
& To fast-forward or reverse the track ® =)
To go to the next or previous tracks
To go to the next or previous folders (only for
MP3 or WMA discs) NE 1)
Other main functions I Skipping tracks quickly during play
Only possible on JVC MP3-compatible CD changer
+ For MP3 or WMA discs, you can skip tracks within the same folder.
Ex: To select track 32 while playing a track whose number is a single digit (1 to 9)
LC? prrmdte9-=radcre = @)<20
Each time you press the button, you can
+ After the last track, the first track will be selected and vice versa.
Où Trad 31>- >. Der Dr
ES I Prohibiting disc ejection
You can lock a disc in the loading slot.
KE: + EX T'OÉLERT TR DEC TL Æ
EUECTE To cancel the prohibition, repeat the same procedure.
| Changing the display information aosré NN I While playing an audio CD or a CD Text CA]- — Disctitle /performer*:
D While playing an MP3 or a WMA‘ disc + When “TAG DISP” is set to “TAG ON” (see page 15)
AJ-[6] _ Album name / performer Ù (folder name*:)
Tradk title (file mame*:) J
+ When “TAG DISP” is set to
—> Folder name D CA}>
CA] : Elapsed playing time with the current track number Clock with the current track number
Ifthe current disc is an audio CD,
Only for the built-in CD player.
Ifan MP3/WMA file does not have Tag information, folder name and file name appear. In this case, the TAG indicator will not light up.
| Selecting the playback modes
You can use only one of the following playback modes at a time.
1 MODE 2 Select your desired playbackmode. 2 USER -> ROCK + CLASSIC D Ey NS JAZZ HIP HOP <-POPS 11 8er F ï reset values! Bas | TRE | LOUD ES Indication (For) bass) | (treble) | (loudness) USER oo | 00 | OFF Mode Plays repeatedly (Flat sound) TRKRPT _: The current track on iscomusie) | “5 | +01 | ON FLDR RPT*! : Al tracks of the current OCE O7 PISE MUSIC folder. ŒD) ED CLASSIC so | | 'orr DISC RPT* : All tracks ofthe current disc. (Classical music) ® POPs +04 | +01 | OFF KZ RPTOFF : Cancels. (Light music) m_Random play HIP HOP 40 | 00 | oN emo (Funk or rap music) JAZZ > Jazz music) +02 | +03 | OFF Mode Plays at random FLDR RND*': Al tracks of the current Adjusting the sound folder, then tracks ofthe next; dustth characteristics t folder and so on. ED > ou can adjust the sound characteristics to your DISCRND _: Alltracks ofthe current dise. Préférence. MAG RND* : Al tracks of the inserted 1 = BAS-> TRE -> FAD discs. ŒRD EX E yo = roun = sa RNDOFF _: Cancels. N\ #1 Only while playing an MP3 or a WMA disc. # Only while playing discs in the CD changer.
Ex.: When “TRE” is selected
BAS*1 (bass) Adjust the bass. [-06 to +06]
TRE*! (treble) Adjust the treble. [-06 to +06]
FAD* (fader) Adjust the front and rear speaker balance. [RO6 to F06]
BAL (balance) Adjust the left and right speaker balance. [L06 to RO6]
® LOUD*! (loudness) Boost low and high frequencies to produce a well-balanced sound at low volume level. [LOUD ON or LOUD OFF]
VOL (volume) Adjust the volume. [00 to 30 or 50*]
#1_ When you adjust the bass, treble, or loudness, the adjustment you have made is stored for the currently selected sound mode (C-EQ) including “USER.”
#2 If you are using a two-speaker system, set the fader level to “00.”
+ Depending on the amplifier gain control setting (See page 15 for details.)
General settings — PSM You can change PSM (Preferred Setting Mode) items listed in the table that follows.
2 Select a PSM item. ON =
POI] Ex: When “DIMMER" is selected
3 Adjust the PSM item selected.
4 Repeat steps 2 and 3 to adjust the other PSM items if necessary.
5 Finish the procedure.
ENGLISH Indications Selectable settings, [reference page] DEMO DEMOON : [Initial]; Display demonstration will be activated Display demonstration automatically if no operation is done for about 20 seconds, [5]. DEMO OFF : Cancels. CLOCKH 0-23(1-12),[5] Hour adjustment [Initial: 0 (0:00)] CLOCKM 00 - 59, [5] Minute adjustment [Initial: 00 (0:00)] 24H/12H 12H 2 24H, [5] Time display mode [initial: 24H] CLK ADJ*t AUTO : [initial]; The built-in clock is automatically adjusted Clock adjustment using the CT (clock time) data in the RDS signal. OFF : Cancels. AF-REG*! When the received signals from the current FM RDS station or DAB Alternative frequency/ service become weak... regionalization reception AF : [Initial]; Switches to another station (or service) the programme may differ from the one currently received), [9, 17]. + The AF indicator lights up. AFREG : Switches to another station broadcasting the same programme. + The AF and REG indicators light up. OFF : Cancels (not selectable when “DAB AF” is set to “AF ON”). PTY-STBY*! Activates PTY Standby Reception with one of the PTY codes, [8]. PTY standby OFF [Initial] + PTY codes, [9] + (back to the beginning) TA VOL*! [Initial: VOL 15]; VOL 00 — VOL 30 or 50*, [8, 21] Traffic announcement volume P-SEARCH*! ON : Using the AF data, the unit tunes in to another
frequency broadcasting the same programme as the original preset RDS station is if the preset station signals are not sufficient.
OFF : [Initial]; Cancels.
#1 Only for FM RDS stations.
+2 Depends on the amplifier gain control.
Indications Selectable settings, [reference page]
DAB AF* AFON : [Initial]; Traces the programme among DAB services Alternative frequency and FM RDS stations, [9, 17]. reception AF OFF : Cancels.
DAB VOL* DAB volume adjustment
You can adjust the volume level (VOL -12 — VOL +12) of DAB tuner to match the FM sound level and store it in memory. Lnitial: VOL 00]
DIMMER on + Dims the display illumination of this unit. Dimmer OFF : [Initial]; Cancels. TEL MUTING 1/MUTING 2 : Select either one which mutes the sounds
while using a cellular phone.
OFF : [Initial]; Cancels. SCROLL* ONCE : [Initial]; Scrolls the disc information once. Scroll AUTO + Repeats scrolling (5-second intervals in between). OFF + Cancels. + Pressing DISP for more than one second can scroll the display regardless ofthe setting. EXT IN CHANGER: [Initial]; To use a JVC CD changer, [9], an Apple iPod
or a JVC D. player, [17].
Amplifier gain control
: VOL 00 - VOL 30 (Select this if the maximum power
of the speaker is less than 50 W to prevent them from being damaged.)
: [Initial]; VOL 00 - VOL 50
IF BAND Intermediate frequency filter
: [Initial]; Increases the tuner selectivity to reduce
interference noises between close stations. (Stereo effect may be lost.)
: Subject to interference noises from adjacent stations,
but sound quality will not be degraded and the sterco effect will remain.
*#° Displayed only when DAB tuner is connected. # Some characters or symbols will not be shown correctly (or will be blanked) on the display. # Displayed only when one of the following sources is selected FM, AM, or DISC.
| RE T | & CR ER | |
DAB tuner operation: S O Select a service (either primary or secondary) to listen to. h:
What is DAB system? d Digital Audio Broadcasting (DAB) can deliver digital quality sound without any annoying interference and signal distortion. Furthermore, it can carry text, pictures, and data. When transmitting, DAB combines several programmes (called “services”) to form one “ensemble.” In addition, each “service” —called “primary service” —can also be divided into its components (called “secondary service”). A
typical ensemble has six or more programmes [1 à (services) broadcast at the same time. 4 À By connecting the DAB tuner, this unit can do A ÉHod…|
the following: + Tracing the same programme automatically — Alternative Frequency Reception (see “DAB AF” on page 15). It is recommended to use DAB tuner KT-DB1000 with your unit. If you have another DAB tuner, consult your JVC IN-CAR ENTERTAINMENT dealer. ® + Refer also to the Instructions supplied for
ENGLISH To tune in to an ensemble manually
Start searching for an ensemble, as in step @ on the left column.
[2] Select the desired ensemble frequencies.
| Storing DAB services in memory
your DAB tuner. You can preset six DAB services (primary) for each band.
À Select a service you want (see steps ®
d to @ on the left column).
Oo SRG Ç par D /DAB2/DAB3 > = .
2] 4 DAB1 —> DAB2 2 Select the preset number (1 - 6) you BAND? P: Y Ron 2
© sur searching for an ensemble. a CI) Z
-) TT > pi — LE nuErt 5 When an ensemble is received, searching Ë F x f 1 E p IN € tops. Preset number flashes for a while. To stop searching, press the same button again.
| EN16-23KD-G421[EX EUjindd 16 11/22/05 sass1 pu | |
| Tuning in to a preset DAB service
DAB1 —> DAB2 DAB3 «7
2 Select the preset DAB service (primary) number (1 - 6) you want.
If the selected primary service has some secondary services, pressing the same button again will tune in to the secondary services.
Trading the same programme— Alternative Frequency Reception
You can keep listening to the same programme by activating the Alternative Frequency Reception.
+ While receiving a DAB service:
When driving in an area where a service cannot be received, this unit automatically tunes in to another ensemble or FM RDS station, broadcasting the same programme. While receiving an FM RDS station:
When driving in an area where a DAB service is broadcasting the same programme as the FM RDS station is broadcasting, this unit automatically tunes in to the DAB service.
When shipped from the factory, Alternative Frequency Reception is activated.
To deactivate the Alternative Frequency Reception, see page 14 and 15.
To change the display information while tuning to an ensemble
Service name — Ensemble name —» Channel number» Frequency -> Clock — (back to the beginning)
iPod°/D. player operations
This unit is ready for operating an Apple iPod or a JVC D. player from the control panel.
Before operating your iPod or D. player:
Connect either one of the following (separately
purchased) to the CD changer jack on the rear
+ Interface adapter for iPod®—KS-PD100 for controlling an iPod.
+ D. player interface adapter—KS-PD500 for controlling a D. player.
+ For connection, see Installation/Connection Manual (separate volume).
+ For details, refer also to the manual supplied with the interface adapter.
Make sure to turn off this unit or turn off the vehicle’s ignition switch before connecting or disconnecting the iPod or D. player.
Preparations: Make sure “CHANGER” is selected for the
external input setting, see page 15.
Playback starts automatically from where it has been paused*! or stopped*? previously.
© anse the volume. + r
K To be continued...
O Adjust the sound as you want. (See pages 12 and 13.)
+ Make sure the equalizer on the iPod or D. player is deactivated. To pause“! or stop”? playback €) To resume playback, press it again. To fast-forward or = reverse the track { 7 = To go to the next PANN or previous tracks S SS C7 Ld #1 For iPod #2 For D. player Selecting a track from the menu
1 Enter the main menu.
Now the A/V/ 4 V/»B1 A buttons work as the menu selecting buttons*?.
Confirm the selection.
To move back to the previous menu, press À.
+ Ifa track is selected, playback starts automatically.
+ Ifthe selected item has another layer, you will enter the layer. Repeat steps 2 and 3 until the desired track is played.
+ Holding 4 V/RB1 A can skip 10 items at a time.
The menu selecting mode will be canceled: = Ifno operations are done for about
5 seconds. = When you confirm the selection of a track.
Selecting the playback modes
Select your desired playback mode.
a PT ES ONE RPT Functions the same as “Repeat One” of the iPod or “Repeat Mode One” for the D. player.
ALLRPT Functions the same as “Repeat AI” of the
iPod or “Repeat Mode All” for the D. player.
For iPod: PLAYLIST <> ARTISTS +» ALBUMS +» SONGS + GENRES <—» COMPOSER <> (back to the beginning)
For D. player: PLAYLIST ++ ARTIST <> ALBUM +» GENRE
<TRAGK + (back to the beginning)
= Random play 12 AND Other external component H ZT LG operations a — ALEM RND- DD) 4 Youcan connect an external componentto Mel Functions the same as “Shuffle Albums” of {he CD changer jack on the rear usingthe Line [fm the iPod. Input Adapter—KS-U57 (not supplied) or AUX Input Adapter—KS-U58 (not supplied). SONG RND/RND ON œ er + For connection, see Installation/Connection Functions the same as “Shuffle Songs” ofthe nul (separate volume) iPod or “Random Play On” of the D. player. P : RND OFF For listening to the iPod or D. player, refer to Cancels. pages 17 - 19. * For iPod: Only if you select “ALL” in “ALBUMS” of the main “MENU.” 01] OETT EXTIN(or CD-CH) —»--. VE | To check other information while listening to Ld T aniPod or a D. player IFEXT IN” does not appear, see page 15 and select the external input (“EXT IN”). LOSPS\ (2) Turn on the connected component NS and start playing the source. O] [3] Adjust the volume. ” + C4] Adjust the sound as you want. (See pages 12 and 13.) To check the clock time while listening to an external component De NS 19
This unit can be remotely controlled as
Remote controller — ru.rx6o | Main elements and features
instructed here (with an optionally purchased remote controller). We recommend that you use remote controller RM-RK60 with your unit.
M installing the lithium coin battery (CR2025)
Aim the remote controller directly at the remote sensor on the unit. Make sure there is no obstacle in between.
+ Do not install any battery other than CR2025 or its equivalent; otherwise, it may explode. Store the battery in a place where children cannot reach to avoid risk of accident. + To prevent the battery from over-heating, cracking, or starting a fire: — Do not recharge, short, disassemble, heat the battery, or dispose ofit in a fire. — Do not leave the battery with other metallic materials. — Do not poke the battery with tweezers or similar tools.
— Wrap the battery with tape and insulate when throwing away or saving it.
[1] 1 ATT (standby/on attenuator) button + Turns the power on if pressed briefly or attenuates the sound when the power is on. + Turns the power offif pressed and held. [2] SRC (source) button + Selects the source. [1 R (reverse) / F (forward) buttons + Searches for stations (or services) if pressed briefly. + Searches for ensembles if pressed and held. + Fast-forwards or reverses the track if pressed and held. + Changes the tracks if pressed briefly. + While listening to an Apple iPod or a JVC D. player (in menu selecting mode): — Selects an item if pressed briefly. (Then, press D (down) to confirm the selection.) — Skips 10 items at a time if pressed and held. [4] SOUND button + Selects the sound mode (C-EQ} custom equalizer).
[5] U (up) / D (down) buttons + Changes the FM/AM/DAB bands with More about this uni U (up).
ZT + Changes the preset stations with Basic operations sms ft) — D (down). : G + Changes the folder of the MP3/WMA Tuning on the power > discs. + By pressing SRC button on the unit, you can [el + While playing an MP3 disc on an also turn on the power. If the source is ready, MP3-compatible CD changer: playback also starts.
— Changes the disc if pressed briefly. — Changes the folder if pressed and held. Turningoffthe power + While listening to an iPod or a D. player: — Pauses/stops or resumes playback with D (down). —_ Enter the main menu with U (up). (Now U/D/R/E work as the menu selecting buttons.)*
i | [6] VOLUME - /+ buttons Tuner operations
+ Adjusts the volume level.
+ If you turn offthe power while listening to a disc, disc play will start from where playback has been stopped previously, next time you turn on the power.
+ During SSM search... - All previously stored stations are erased and stations are stored newly. — Received stations are preset in No. 1 (lowest frequency) to No. 6 (highest frequency). O] — When SSM is over, the station stored in
* U(up) : Returns to the previous menu. D (down) : Confirms the selection.
The unit is equipped with the steering wheel
remote control function.
+ See the Installation/Connection Manual (separate volume) for connection.
No. 1 will be automatically tuned in.
+ When storing a station manually, the previously preset station is erased when a new station is stored in the same preset number.
+ Network-Tracking Reception requires
two types of RDS signals—PI (Programme Identification) and AF (Alternative Frequency) to work correctly. Without receiving these data correctly, Network- Tracking Reception will not operate correctly. Ifa Traffic Announcement is received by TA Standby Reception, the volume level automatically changes to the preset level (TA. VOL) if the current level is lower than the preset level.
+ When Alternative Frequency Reception
is activated (with AF selected), Network- Tracking Reception is also activated automatically. On the other hand, Network- Tracking Reception cannot be deactivated without deactivating Alternative Frequency Reception. (See page 14.)
If you want to know more about RDS, visit <http//www.rds.orguko.
Caution for DualDisc playback
+ The Non-DVD side of a “DualDisc” does not comply with the “Compact Disc Digital Audio” standard. Therefore, the use of Non- DVD side of a DualDisc on this product may not be recommended.
+ This unit has been designed to reproduce CDs/CD Texts, and CD-Rs (Recordable)/ CD-RWs (Rewritable) in audio CD (CD-DA), MP3 and WMA formats.
+ When a disc had been loaded, selecting “DISC” for the playback source starts disc
is inserted upside down, the disc automatically ejects.
+ Do not insert 8 cm discs (single CD) and unusual shape dises (heart, flower, etc.) into the loading slot.
+ While fast-forwarding or reversing on an MP3 or WMA disc, you can only hear intermittent sounds.
Playing a CD-R or CD-RW
+ Use only “finalized” CD-Rs or CD-RWs.
+ This unit can play back only files of the same type which are first detected if a disc includes both audio CD (CD-DA) files and MP3/ WMA files.
+ This unit can play back multi-session discs; however, unclosed sessions will be skipped while playing.
+ Some CD-Rs or CD-RWSs may not play back on this unit because of their disc characteristics, or for the following reasons: - Discs are dirty or scratched.
-— Moisture condensation occurs on the lens
= The pickup lens inside the unit is dirty.
- CD-R/CD-RW on which the files are written with “Packet Write” method.
- There are improper recording conditions (missing data, etc.) or media conditions (stained, scratched, warped, etc.).
+ CD-RWSs may require a longer readout time
since the reflectance of CD-RW is lower than
that of regular CDs.
Do not use the following CD-Rs or CD-RWs:
- Discs with stickers, labels, or a protective seal stuck to the surface.
- Discs on which labels can be directly printed by an ink jet printer.
Using these discs under high temperatures or
high humidities may cause malfunctions or
Playing an MP3/WMA disc This unit can play back MP3/WMA files with the extension code <.mp3> or <wma> (regardless of the letter case—upper/lower). This unit can show the names of albums, artists (performer), and Tag (Version 1.0, 1.1, 2.2, 2.3, or 2.4) for MP3 files and for WMA files. This unit can display only one-byte characters. No other characters can be correctly displayed. + This unit can play back MP3/WMA files meeting the conditions below: - Bit rate: 8 kbps — 320 kbps - Sampling frequency: 48 kHz, 44.1 kHz, 32 kHz (for MPEG-1) 24 kHz, 22.05 kHz, 16 kHz (for MPEG-2) - Disc format: ISO 9660 Level 1/Level 2, Romeo, Joliet, Windows long file name
+ The maximum number of characters for file/
folder names vary among the disc format used
(includes 4 extension characters—<.mp3> or
— ISO 9660 Level 1: up to 12 characters
— ISO 9660 Level 2: up to 31 characters
- Romeo: up to 128 characters
- Joliet: up to 64 characters
- Windows long file name: up to 128 characters
This unit can play back files recorded in VBR
(variable bit rate).
Files recorded in VBR have a discrepancy
in elapsed time display, and do not show
the actual elapsed time. Especially, after
performing the search function, this
difference becomes noticeable.
This unit can recognize a total of 512 files, of
200 folders, and of 8 hierarchies.
This unit cannot play back the following files:
- MP3 files encoded with MP3i and MP3 PRO format.
- MP3 files encoded in an inappropriate format.
- MP3 files encoded with Layer 1/2.
- WMA files encoded with lossless, professional, and voice format.
- WMA files which are not based upon Windows Media® Audio.
- WMA files copy-protected with DRM.
- Files which have the data such as WAVE, ATRAC3, etc.
The search function works but search speed is
If you change the source, playback also stops (without ejecting the disc).
Next time you select “DISC” for the playback source, disc play starts from where it has been
+ Ifthe ejected disc is not removed within 15 seconds, the disc is automatically inserted again into the loading slot to protect it from dust. (Disc will not play this time.)
General settings —PSM sm
+ If you change the “AMP GAIN” setting from “HIGH PWR” to “LOW PWR” while the volume level is set higher than “VOL 30,” the
unit automatically changes the volume level to
DAB tuner operations Sn
+ Only primary DAB services can be presetted even when you store a secondary service.
+ A previously preset DAB service is erased when a new DAB service is stored in the same preset number.
iPod® or D. player operations mm
+ When you turn on this unit, the iPod or D. player is charged through this unit.
+ While the iPod or D. player is connected, all operations from the iPod or D. player are disabled. Perform all operations from this unit.
+ The text information may not be displayed correctly.
— Some characters such as accented letters cannot be shown correctly on the display. - Depends on the condition of communication between the iPod or D. player and the unit.
+ Ifthe text information includes more than 8 characters, it scrolls on the display (see also page 15). This unit can display up to 40 characters.
When operating an iPod or a D. player,
some operations may not be performed
correctly or as intended. In this case, visit the
following JVC web site:
For iPod users: <http://www.jvc.co.jp/ english/car/support/ks-pd100/index.html>
I How to clean the connectors
Frequent detachment will deteriorate the connectors.
To minimize this possibility, periodically wipe the connectors with a cotton swab or cloth moistened with alcohol, being careful not to damage the connectors.
Connector I Moisture condensation
Moisture may condense on the lens inside the CD player in the following cases:
+ After starting the heater in the car.
+ Ifit becomes very humid inside the car. Should this occur, the CD player may malfunction. In this case, eject the disc and leave the unit turned on for a few hours until the moisture evaporates.
I How to handle discs When removing a disc from Centerholder its case, press down the center holder of the case and lift the disc AN out, holding it by the edges. + Always hold the disc by the
edges. Do not touch its recording surface.
When storing a disc into its case, gently insert
the disc around the center holder (with the
printed surface facing up).
+ Make sure to store discs into the cases after use.
I To keep discs clean
A dirty disc may not play correctly.
If a disc does become dirty, wipe it
with a soft cloth in a straight line
from center to edge.
+ Do not use any solvent (for example, conventional record cleaner, spray, thinner, benzine, etc.) to clean discs.
New discs may have some rough spots around the inner and outer edges. If such a disc is used, this | unit may reject the disc.
To remove these rough spots, rub the edges with a pencil or ball-point pen, etc.
Do not use the following discs:
Sticker A2 Sticker residue C2 Stick-on label
What appears to be trouble is not always serious. center.
Check the following points before calling a service
Symptoms Remedies/Causes - | * Sound cannot be heard from the + Adjust the volume to the optimum level. S| speakers. + Check the cords and connections. & S |, The unit does not work at all. Reset the unit (see page 2). + SSM automatic presetting does not Store stations manually.
S| work £ Æ | + Static noise while listening to the Connect the acrial firmly.
@ CERN Con | Symptoms Remedies/Causes + Disc cannot be played back. Insert the disc correctly. ZT un + CD-R/CD-RW cannot be played + Insert a finalized CD-R/CD-RW. = back. + Finalize the CD-R/CD-RW with the component | + Tracks on the CD-R/CD-RW cannot which you used for recording. tm H be skipped. Æ | + Disc can be neither played back nor + Unlock the disc (see page 11). H| cjected. + Ejectthe disc forcibly (see page 2). ë + Disc sound is sometimes interrupted. | + Stop playback while driving on rough roads. + Change the disc. + Check the cords and connections. + “NO DISC” appears on the display. | Insert a playable dise into the loading slot. + Disc cannot be played back. + Use a disc with MP3/WMA tracks recorded in the format compliant with ISO 9660 Level 1, Level 2, Romeo, or Joliet. + Add the extension code <.mp3> or <wma> to the file names. + Noise is generated. Skip to another track or change the disc. (Do not add the extension code <.mp3> or <.wma> to à $ non-MP3 or WMA tracks.) O) £ Æ | + Alongerreadouttimeisrequired Do not use too many hierarchies and folders. Z | (‘CHECK keeps flashing on the É display). © | + Tracks do not play backin the order | Playback order is determined when the files are you have intended them to play. recorded. + Elapsed playing time is not correct. This sometimes occurs during play. This is caused by how the tracks are recorded on the disc. + “NO FILES” appears on the display. Insert a disc that contains MP3/WMA tracks. + Correct characters are not displayed | This unit can only display letters (upper case), (e.g. album name). numbers, and a limited number of symbols. + “NO DISC” appears on the display. Insert a disc into the magazine. + “NO MAG” appears on the display. Insertthe magazine. $ | + “RESET 8” appears on the display. Connect this unit and the CD changer correctly £ and press the reset button of the CD changer. S |. <RESET 1°-“RESET 7” appearson Press the reset button ofthe CD changer. the display. + The CD changer does not work at all. Resetthe unit (see page 2). To be continued.
“noSIGNAL” appears on the display.
Move to an area with stronger signals.
“RESET 8” appears on the display.
Connect this unit and the DAB tuner correctly and reset the unit (see page 2).
a & | + “ANTENANG appears on the Check the cords and connections. display. + The DAB tuner does not work at all. | Reconnect this unit and the DAB tuner correctly and reset the unit (see page 2). + The iPod or D. player does notturn | + Check the connecting cable and its connection. on or does not work. + Update the firmware version. + Change the battery. + Buttons do not work as intended. The functions of the buttons have been changed. Press MODE before performing the operation. + The sound is distorted. Deactivate the equalizer either on the unit or the iPod/D. player. + “NO IPOD” or “NO DP” appears on Check the connecting cable and its connection. the display. | * Playback stops. The headphones are disconnected during È playback. Restart the playback operation using A the control panel (see page 18). & 5 | + No sound can be heard when Disconnect the headphones from the iPod nano. Æ |] connectingan iPod nano. à S | + No sound can be heard. Disconnect the adapter from the D. player. Then, & | + “ERROROl”appearsonthe display connectit again.
when connecting a D. player.
“NO FILES” or “NO TRACK” appears on the display.
No tracks are stored, Import tracks to the iPod or D. player.
“RESET 1” - the display.
“RESET 7” appears on
Disconnect the adapter from both the unit and iPod/D. player. Then, connect it again.
“RESET 8” appears on the display.
Check the connection between the adapter and this unit.
The iPod's or D. player’s controls do not work after disconnecting from this unit.
Reset the iPod or D. player.
| EN24-27KD-G421[EX EUjindd 26
I AUDIO AMPLIFIER SECTION Maximum Power Output: Front: 50 W per channel Rear: 50 W per channel Continuous Power Output (RMS): Front: 19 W per channel into 4 Q, 40 Hz to 20 000 Hz at no more than 0.8% total harmonic distortion. Rear: 19 W per channel into 4 Q, 40 Hz to 20 000 Hz at no more than 0.8% total harmonic distortion. Load Impedance: 4 Q (4 Q to 8 Q allowance) Tone Control Range: Bass: +10 dB at 100 Hz Treble: +10 dB at 10 kHz Frequency Response: 40 Hz to 20 000 Hz Signal-to-Noise Ratio: 70 dB Line-Out Level/Impedance: 2.5 V/20 kQ load (full scale) Output Impedance: 1 kQ Other Terminals: CD changer, Steering wheel remote input
I TUNER SECTION Frequency Range: FM: 87.5 MHz to 108.0 MHz AM: (MW) 522 kHz to 1 620 kHz
(LW) 144 KHz to 279 KHz
IFM Tuner] Usable Sensitivity: 11.3 dBf (1.0 uV/75 Q) 50 dB Quieting Sensitivity: 16.3 dBf (1.8 uV/75 Q) Alternate Channel Selectivity (400 kHz): 65 dB Frequency Response: 40 Hz to 15 000 Hz
Stereo Separation: 30 dB Capture Ratio: 1.5 dB IMW Tuner] Sensitivity: 20 uV Selectivity: 35 dB ILW Tuner]
Sensitivity: 50 UV I CD PLAYER SECTION Type: Compact dise player Signal Detection System: Non-contact optical pickup (semiconductor laser) Number of Channels: 2 channels (stereo) Frequency Response: 5 Hz to 20 000 Hz Dynamic Range: 96 dB Signal-to-Noise Ratio: 98 dB Wow and Flutter: Less than measurable limit MP3 Decoding Format: MPEG1/2 Audio Layer 3 Max. Bit Rate: 320 kbps WMA (Windows Media® Audio) Decoding Format: Max. Bit Rate: 192 kbps
I GENERAL Power Requirement: Operating Voltage:
DC 144 V (11 V to 16 V allowance) Grounding System: Negative ground Allowable Operating Temperature:
0°C to +40°C Dimensions (W x H x D):
Installation Size (approx.): 182 mm x 52 mm x 150 mm Panel Size (approx):
188 mm x 58 mm x 11 mm Mass (approx.}:
14 kg (excluding accessories)
Design and specifications are subject to change without notice.
+ Microsoft and Windows Media are either registered trademarks or trademarks of Microsoft Corporation in the United States and/or other countries.
iPod is a trademark of Apple Computer, Inc., registered in the US. and other countries.
Having TROUBLE with operation? Please reset your unit
Refer to page of How to reset your unit
Haben Sie PROBLEME mit dem Betrieb? © Bitte setzen Sie Ihr Gerät zurück
© 2005 Victor Company of Japan, Limited 1105DTSMDTJEIN
PyKoBOACTBO no YCTAHOBKe/NOAKNIHOA4EHULO GETO352-013A [EV]
1105DTSMDTJEIN EN, GE, RU © 2005 Victor Company of Japan, Limited
ENGLISH DEUTSCH PYCCKUH This unit is designed to operate on 12 V DC, NEGATIVE ground electrical systems. If your vehicle does not have this system, a voltage inverter is required, which can be purchased at JVC IN-CAR ENTERTAINMENT dealers.
WARNINGS Dieses Gerät ist für einen Betrieb in elektrischen Anlagen mit 12 V Gleichstrom und (-) Erdung ausgelegt. Verfügt Ihr Fahrzeug nicht über diese Anlage, ist ein Spannungsinverter erforderlich, der bei JVC Autoradiohändler erworben werden kann.
WARNUNGEN Dro ycrpoñcrso pazpa6oraHo ana >Kcnayarauuu Ha 12 B ROCTOAHHOrO HANPAKEHUA € MUHYCOM Ha Macce. Ecru Bauu aBTOMOGHNE He HMEET 3TOÏ CUCTEMbI, TPEÔYETCA UHBEPTOP HAnPAKEHHA, KOTOPbI MOXET ÉbiTb NPAOËPETEH y AUEPA agromo6unero cneunanucra JVC.
NPEAYNPEXKAEHUA To prevent short circuits, we recommend that you disconnect the
batterys negative terminal and make all electrical connections before
installing the unit.
+ Be sure to ground this unit to the car’s chassis again after installation.
+ Replace the fuse with one oftthe specified rating. Ifthe fuse blows frequently, consult your JVC IN-CAR ENTERTAINMENT dealer.
+ Itis recommended to connect to the speakers with maximum power of more than 50 W (both at the rear and at the front, with an impedance of 4 Q to 8 Q). If the maximum power is less than 50 W, change “AMP GAIN” setting to prevent the speakers from being damaged (see page 15 of the INSTRUCTIONS).
+ To prevent short-circuit, cover the terminals of the UNUSED leads with insulating tape.
+ The heat sink becomes very hot after use. Be careful not to touch it when removing this unit.
Heat sink |] Abstrahlblech Paavarop
PRECAUTIONS on power supply and speaker
+ DO NOT connect the speaker leads of the power cord to the car battery; otherwise, the unit will be seriously damaged.
+ BEFORE connecting the speaker leads of the power cord to the speakers, check the speaker wiring in your car.
Parts list for installation and connection The following parts are provided for this unit. If any item is missing, consult your JVC IN-CAR ENTERTAINMENT dealer immediately.
EINBAU (IM ARMATURENBRETT)
YCTAHOBKA (YCTAHOBKA B NPHABOPHY1H0 NAHEJIb)
The following illustration shows a typical installation. If you have
any questions or require information regarding installation kits,
consult your JVC IN-CAR ENTERTAINMENT dealer or a company
+ If you are not sure how to install this unit correctly, have it installed by a qualified technician.
© Do the required electrical connections.
*1_ When you stand the unit, be careful not to damage the fuse on the rear.
Beim Aufstellen des Geräts darauf achten, daf die Sicherung auf der Rückseite nicht beschädigt wird! Ycranasnugañre ycTpoñcr8o Takum 06pa3om, TOGbi He noBpequTE NPEROXPAHUTEND, pacnonoxeHHbI c3anm.
Bend the appropriate tabs to hold the sleeve firmly in place.
Die geeigneten Zapfen biegen, um die Manschette sicher festzuhalten. Ororaure coorBercreyioe dukcaTOPbI, NpeAHaZHANEHHLIE ANA npOuHOÏ YCTAHOBKH KOPnyCa.
Before removing the unit, release the rear section.
Ausbau des Geräts Vor dem Ausbau des Geräts den hinteren Teil freigeben.
Yaanenue ycrpoücrBa Nepea yaanenuem ycrpoñcTea ocBOGOAUTE 3anHIOIO UACTb.
Insert the two handles, then pull them as illustrated so that the unit can be
* Are the red and black leads connected correctly?
+ Power cannot be turned on.
+ Is the yellow lead connected?
+ No sound from the speakers.
* Is the speaker output lead short-circuited?
+ Soundis distorted.
* Is the speaker output lead grounded?
* Are the “_” terminals of Land R speakers grounded in common?
+ Noise interfere with sounds.
* Is the rear ground terminal connected to the cars chassis using shorter and thicker cords?
+ This unit becomes hot.
* Is the speaker output lead grounded?
* Are the “_” terminals of Land R speakers grounded in common?
- This unit does not work at all. * Have you reset your unit?
| instalt-2_ KD-G421_O1SA findd 2
+ Muranne He BKniouaeTcA.
#2 Yellow To a live terminal in the fuse block connecting to the car battery (by passing the en _ ignition switch) (constant 12 V)
+2 Before checking the operation of this unit prior to installation, rot Sicherungsblock this lead must be connected, otherwise power cannot be KpacHi © … Lamaccesen terminal in the fuse block Bnok npenoxpanurenn turned on.
" . 1 Tothe remote lead of other equipment or power aerial ifany (200 mA max.) Cu € 6enoñ nonocon … (U)
Brown Braun Kopuunespii Q) To cellular phone system
( ee) UN White with black stripe EE White Gray with black stripe OR© Gray Green with black stripe EC Green Purple with black stripe & Purple
c | Connec ier / Ansch
You can connect an amplifier to upgrade your car stereo system.
+ Connect the remote lead (blue with white stripe) to the remote lead of the other equipment so that it can be controlled through this unit.
+ Disconnect the speakers from this unit, connect them to the amplifier. Leave the speaker leads of this unit unused.
g the external ampl Ben des externen Verstärkers / Moakniouenne BHewHero ycunuTena
To the remote lead of other equipment or power aerial if any
+ metallic body or to the chassis of'the 4 car—to the place uncoated with paint (if
You can connect these components in series as illustrated below. The iPod*S or D. player can be connected using an interface adapter (not supplied)—KS-PD100 (for iPod) or KS-PD500 (for D. player).
If your car is equipped with the steering wheel remote controller, you can operate this unit using the controller. To do it, a JVC's OE remote adapter (not supplied) which matches with your car is required. Consult your JVC IN-CAR ENTERTAINMENT dealer for details.
For installation and connections, refer to the separate manual.
Cover KD-G424{UIindd 2 & 11/24/05 9:42:13 AM |
Thank you for purchasing a JVC product. Please read all instructions carefully before operation, to ensure your complete understanding and to obtain the best possible performance from the unit.
IMPORTANT FOR LASER PRODUCTS
1. CLASS 1 LASER PRODUCT
2. CAUTION: Do not open the top cover. There are no user serviceable parts inside the unit leave all servicing to qualified service personnel.
3. CAUTION: Visible and invisible laser radiation when open and interlock failed or defeated. Avoid direct exposure to beam.
4. REPRODUCTION OF LABEL: CAUTION LABEL, PLACED OUTSIDE THE UNIT.
RTE DARMRE = Se où ren eos lsersténg
Ii How to forcibly eject a disc
If you need to operate the unit while driving, Qi + be sure to look ahead carefully or you may be involved in a trafic accident. + Ifthis does not work, reset your unit.
+_ Be careful not to drop the disc when it ejects.
Caution on volume setting:
Eh How to detach/attach the control
Dises produce very little noise compared p ù p panel
with other sources. Lower the volume
before playing a disc to avoid damaging the speakers by the sudden increase of the output level.
Ii How to reset your unit
&/1 Detaching.. + EX
+ Your preset adjustments will also be erased. + Ifa disc is loaded, it will eject. Be careful not to drop the disc.
Eh How to read this manual
+ Button operations are mainly explained with the illustrations in the table below.
+ Some related tips and notes are explained in “More about this unit” (see pages 17 - 19).
NS Press either one.
Press and hold until your desired response begins.
+ Press and hold both buttons at the same time.
The following marks are used to indicate...
Built-in CD player operations. : External CD changer operations.
: Indicator displayed for the corresponding operation.
Eh How to use the MODE button
If you press MODE, the unit goes into functions mode, then the number buttons and A/W buttons work as different function buttons.
Ex: When number button 2 works as MO (monaural) button.
T Time countdown indicator
To use these buttons for their original functions again after pressing MODE, wait for 5 seconds without pressing any of these buttons until the functions mode is cleared or press MODE again.
CONTENTS Control panel … Remote controller — rwso…
Getting started... Basic operations
Disc operations. Playing a disc in the unit . Playing discs in the CD changer
+ Do not raise the volume level too much, as this will block outside sounds, making driving dangerous.
+ Stop the car before performing any complicated operations.
Temperature inside the car...
If you have parked the car for a long time in hot or cold weather, wait until the temperature in the car becomes normal before operating the unit.
| ENO2-05 KD-G424{UIJt.indé 3
OT He m1 À buttons Display window L21° @1 ATT (standby/on attenuator) button Bi] Disc information indicators— TAG (ID3 GB] A (up) / w (down) buttons Tag), 5 (folder), 2 (track/file) [4] Loading slot 2 Disc type indicators— WMA, MP3 [5] Display window 13 Playback source indicators— [6] A (eject) button CH: Lights up only when CD-CH is [1 EQ (equalizer) button selected as the playback source. [8] Remote sensor DISC: Lights up for the built-in CD player. DO NOT expose the remote sensor to Strong Playback mode / item indicators— light (direct sunlight or artificial lighting). RND (random), @ (disc), & (folder), [9] SRC (source) button RPT (repeat) Ho] BAND button B5 LOUD (loudness) indicator fi] Control dial B6 EQ (equalizer) indicator F2] SEL (select) button L7 Sound mode (C-EQ: custom equalizer) 13] MO (monaural) button indicators—JAZZ, CLASSIC, HIP HOP, f4] SSM (Strong-station Sequential Memory) POPS, ROCK, USER button B8 ‘Tr (track) indicator Ï| Number buttons B| Source display / Volume level indicator fé] RPT (repeat) button B0 Main display 7 RND (random) button E1] Tuner reception indicators—ST (stereo), 18] MODE button MO (monaural) H9 DISP (display) button 20 144 (control panel release) button
I installing the lithium coin battery (CR2025)
Aim the remote controller directly at the remote sensor on the unit. Make sure there is no obstacle in between.
+ Do not install any battery other than CR2025 or its equivalent; otherwise, it may explode.
+ Store the battery in a place where children cannot reach to avoid risk of accident.
+ To prevent the battery from over-heating, cracking, or starting a fire:
— Do not recharge, short, disassemble, heat the battery, or dispose of it in a fire.
— Do not leave the battery with other metallic materials.
— Do not poke the battery with tweezers or
similar tools. G] — Wrap the battery with tape and insulate when throwing away or saving it. el
Main elements and features
OZ UATT (standby/on/attenuator) button + Turns the power on if pressed briefly or attenuates the sound when the power is
+ Turns the power offif pressed and held. A U (up) /D (down) # buttons
Changes the FM/AM bands with À U. Changes the preset stations with D w.
Changes the folder of the MP3/WMA While playing an MP3 disc on an MP3-compatible CD changer:
- Changes the dis. - Changes the folder if pressed and held. While listening to an Apple iPod® or a JVC D. player:
- Pauses/stops or resumes playback with
— Enters the main menu with À U. (Now A U/D vw/<ÆR/F work as the menu selecting buttons.)*
+ Adjusts the volume level.
+ Selects the sound mode (C-EQ}: custom equalizer).
+ Selects the source.
[6] R (reverse) / F (forward) » buttons
+ Searches for stations if pressed briefly.
+ Fast-forwards or reverses the track if
+ Changes the tracks if pressed briefly. While listening to an iPod or a D. player (in menu selecting mode):
- Selects an item if pressed briefly. (Then, press D Y to confirm the selection.)
— Skips 10 items at a time if pressed and held.
Basic operations ms 01] Turn on the power.
* You cannot select these sources if they are not ready or not connected.
Volume level appears.
Volume level indicator
(5) Adjust the sound as you want. (See pages 11 and 12.)
To drop the volume in a moment (ATT) @1 AT, To restore the sound, press & it again.
To turn off the power
Basic settings + See also “General settings — PSM” on pages 12 and 13. 1 2
[1] Canceling the display demonstrations Select “DEMO,” then “DEMO OFF.” [2] Setting the clock Select “CLOCK H” (hour), then adjust the hour. Select “CLOCK M” (minute), then adjust the minute.
3 Finish the procedure.
To check the current clock time when the power is turned off
© L— ass LP FUEMAIEMS/AM > [2] = FU FN 7H
ue, up when receiving an FM stereo broadcast with sufient signal strength. ;
T Selected band appears.
(3) Start searching for a station.
When a station is received, searching stops.
To stop searching, press the same button again.
To tune in to a station manually In step @ above...
When an FM stereo broadcast is hard to receive
Lights up when monaural mode is acivated.
Reception improves, but stereo effect will be lost.
To restore the stereo effect, repeat the same procedure. “MONO OFF” appears and the MO indicator goes off.
| Storing stations in memory
You can preset six stations for each band.
I FM station automatic presetting—
SSM (Strong-station Sequential & Memory) À Select the FM band (FM1 - FM3) you want to store into. à FMI F2 > FM3 SE ae] 2 MODE 3 = Eur ES » A Hold. AR ILES TT OATITTTS
“SSM” flashes, then disappears when automatic presetting is over.
Local FM stations with the strongest signals are searched and stored automatically in the FM band.
| ENO6-11_KD-G424{UIJt.indd 7
Ex: Storing FM station of 92.5 MHz into preset number 4 of the FM1 band.
| Listening to a preset station
Select the preset station (1 - 6) you want.
Playing a disc in the unit mms
All tracks will be played repeatedly until you change the source or eject the disc.
(EN Playing discs in the CD changer ms
All dises in the magazine will be played repcatedly until you change the source. + Ejecting the magazine will also stop playing.
A © JESRCG > CD-CH* (orEXT IN)->
* If you have changed the external input setting to “EXT IN” (see page 13), you cannot select the CD changer.
For disc number from 01 - 06:
To stop play and eject the disc
For disc number from 07 - 12:
About MP3 and WMA discs To go to the next or previous folders (only for MP3 and WMA “tracks” (words “file” and MP3 or WMA discs)
“track” are used interchangeably) are recorded | in “folders.” For MP3 discs: For WMA disc:
About the CD changer
It is recommended to use a JVC MP3-compatible CD changer with your unit.
+ You can also connect other CH-X series CD changers (except CH-X99 and CH-X100). These units are not compatible with MP3
+ You cannot play any WMA disc in the CD changer. To locate a particular track (for CD) or folder
+ You cannot use the KD-MK series CD (for MP3 or WMA discs) directly changers with this unit. To select a number from 01 - 06:
+ Disc text information recorded in the CD 7 ou ou 6 nur œ ne Text can be displayed when a JVC CD Text laplev]er]er]ar)a) compatible CD changer is connected.
+ For connection, see Installation/Connection &
Manual (separate volume). To select a number from 07 - 12:
aw/«v/«v/ev]a) To fast-forward or reverse the track G [Hold] = u
+ To use direct folder access on MP3/WMA discs, it is required that folders are assigned with 2-digit numbers at the beginning of their
To go to the next or previous tracks folder names—01, 02, 03, and so on.
A To select a particular track in a folder (for MP3 or WMA discs):
I Skipping tracks quickly during play Dot
Only possible on JVC « : 3 =} MP3-compatible CD changer I While playing an audio CD or a CD Text CAI— Disctitle / performer*! + For MP3 or WMA discs, you can skip tracks À Ÿ
within the same folder.
<—_ Tradktitle”! GT)
I While playing an MP3 or a WMA‘: disc
+ When “TAG DISP” is set to “TAG ON” 1 (see page 13)
MODE, CA] Album name / performer
1 (folder name”) Gxc2) Ÿ <= Tradktitle (file name”)
+ When “TAG DISP” is set to “TAG OFF”
Ex: To select track 32 while playing tracks whose number is a single digit (1 to 9)
LT prie 9-2 rad 10 +20
: Each time you press the button, you can A —— Folder name Ç oO ) & skip 10 tracks. n + After the last track, the first track will be , selected and vice versa. Filename D 3 = Tak31>- > CE CE CA ] : Clock with the current track number ZAR 2 : Elapsed playing time with the current track number
M Prohibiting disc ejection You can lock a disc in the loading slot. *1 1fthe current disc is an audio CD, “NO NAME? appears. Ti + EX #2 Only for the built-in CD player. * Ifan MP3/WMA file does not have Tag
information, folder name and file name appear. In this case, the TAG indicator will not light up.
VALLILIT AT IN [Ted nt
| RE T | & CR ER | |
| Selecting the playback modes Sound adjustments
You can use only one of the following playback modes at a time.
JAZZ <HIP HOP < POPS
2 Select your desired playback mode.
= Repeatphy < ROCH 22 Ex: When “ROCK” is selected
Mode Plays repeatediy TRKRPT n © Preset values| Bas | TRE | LOUD : The current track. FD b: treble) |(loudi FLDR RPT# : AI tracks of the current Indication (For) (ss) | (ce) ous) folder. D) ED | USER 0 | 00 | or DISC RPT* : All tracks of the current disc. (Flat sound)
ROCK RPTOFF : Cancels. +03 | +01 ON
(Rock or disco music) = Random play je An CLASSIC
(Light music) FLDR RND*: Al tracks ofthe current
folder, then tracks of the next HIP HOP +02 00 ON
folder andsoon D) (nor rap music) DISCRND : Alltracks ofthe current disc. JAZZ
(Jazz music) MAG RND : All tracks of the inserted
+02 | +03 OFF ANDOFF _: Ces | Adjusting the sound
# Only while playing an MP3 or a WMA
disc. You can adjust the sound characteristics to your * Only while playing discs in the CD preference. changer.
1 = LI BAS TRE FAD-> BAL SEL,
BAS*! (bass) Adjust the bass. [-06 to +06]
TRE*! (treble) Adjust the treble. [-06 to +06]
FAD* (fader) Adjust the front and rear speaker balance. [RO6 to F06]
BAL* (balance) Adjust the left and right speaker balance. [LO6 to RO6]
LOUD*1 (loudness) Boost low and high frequencies to produce a well-balanced sound at low volume level. [LOUD ON or LOUD OFF]
SUB.W*: (subwoofer) Adjust the subwoofer output level. [00 to 08]
VOL (volume) Adjust the volume. [00 to 30 or 50*3]
*1_ When you adjust the bass, treble, or loudness, the adjustment you have made is stored for the currently selected sound mode (C-EQ) including “USER.”
2 If you are using a two-speaker system, set the
fader level to “00.”
This adjustment cannot affect the subwoofer
This takes effect only when a subwoofer is
Displayed only when “L/O MODE" is set to
“WOOFER” (see page 13).
Depending on the amplifier gain control
setting. (See page 13 for details.)
General settings — PSM You can change PSM (Preferred Setting Mode) items listed in the table that follows.
Sr 2 Select a PSM item. ON ENS
3 Adjust the PSM item selected.
410 an When “DIMMER" is selected
4 Repeat steps 2 and 3 to adjust other PSM items if necessary.
5 Finish the procedure.
| EN12-17_KD-G424{UItindd 12
| RE T | & CR ER | |
Indications Selectable settings, [reference page]
DEMO DEMO ON : {Initial]; Display demonstration will be activated Display automatically if no operation is done for about 20 seconds, demonstration [6].
CLOCKH 1-12, (6] Hour adjustment (Initial: 1 (1:00)] CLOCK M 00 - 59, [6]
Minute adjustment {{nitial: 00 (1:00)]
DIMMER oN + Dims the display illumination of this unit. Dimmer OFF + [Initial]: Cancels. SCROLL*s ONCE : {Initial}; Scrolls the disc information once. Scroll AUTO : Repeats scrolling (5-second intervals in between). OFF + Cancels.
+ Pressing DISP for more than one second can scroll the display regardless of the setting.
WOOFER*7 Low + Frequencies lower than 90 Hz are sent to the subwoofer. Subwoofer cutoff MID + [Initial]: Frequencies lower than 135 Hz are sent to the frequency subwoofer.
HIGH + Frequencies lower than 180 Hz are sent to the subwoofer. as)
® EXT IN*S CHANGER : {Initial}; To use a JVC CD changer, [8], an Apple iPod or a External input JVC D. player, [14].
EXTIN _: To use any other external component than the above, [16]. L/O MODE When connecting the amplifier or subwoofer, set this correctly.
[Initial]; Select if the REAR LINE OUT terminals are used for connecting the speakers through an external amplifier.
Line outputmode REAR WOOFER _: Select if the REAR LINE OUT terminals are used for connecting a subwoofer through an external amplifier. TAG DISP TAGON _: {Initial}; Shows the Tag information while playing MP3/ Tag display WMA tracks, [10]. TAGOFF : Cancels. AMP GAIN You can change the maximum volume level of this unit. Amplifier gain LOWPWR : VOL 00 - VOL 30 (Select this if the maximum power of control the speaker is less than 50 W to prevent them from being damaged.)
HIGH PWR : [Initial]: VOL 00 - VOL 50
# Some characters or symbols will not be shown correctly (or will be blanked) on the display. *7 Displayed only when “L/O MODE” is set to “WOOFER.” * Displayed only when one of the following sources is selected FM, AM, or DISC.
| EN12-17_KD-G424{UItindd 13 11723105 72840 pu | |
This unit is ready for operating an Apple iPod or a JVC D. player from the control panel.
Before operating your iPod or D. player:
Connect either one of the following (separately
purchased) to the CD changer jack on the rear
+ Interface adapter for iPod®—KS-PD100 for controlling an iPod.
+ D. player interface adapter—KS-PD500 for controlling a D. player.
+ For connection, see Installation/Connection Manual (separate volume).
+ For details, refer also to the manual supplied with the interface adapter.
Make sure to turn off this unit or turn off the vehicle’s ignition switch before connecting or disconnecting the iPod or D. player.
Preparations: Make sure “CHANGER” is selected for the
external input setting, see page 13.
0: 0 : Y —— IPOD/D-PLATER > -
Playback starts automatically from where it has been paused*! or stopped*? previously.
O Adjust the sound as you want. (See pages 11 and 12.) + Make sure the equalizer on the iPod or D. player is deactivated.
To pause*: or stop”? playback To resume playback, press it again.
To fast-forward or reverse the track
To go to the next or previous tracks
*1 For iPod * For D. player
Selecting a track from the menu
1 Enter the main menu.
Now the A/w/H44 V/»»1 A buttons work as the menu selecting buttons*3.
3 Confirm the selection. = Random play E To move back to the previous C' menu, press A. D ALBM RND*: RD >) Functions the same as “Shuffle Album” of + Ifa track is selected, playback starts the iPod. automatically. + Ifthe selected item has another layer, you SONGRND/RND ON D will enter the layer. Repeat steps 2 and 3 Functions the same as “Shuffle Songs” of the until the desired track is played. iPod or “Random Play On” of the D. player. + Holding 44 V/»æ1 A can skip 10 RND OFF items at a time. =. Cancels. #3 The menu selecting mode will be canceled: #4 For iPod: Only if you select “ALL” in = Ifno operations are done for about “ALBUMS” of the main “MENU.”
5 seconds. - When you confirm the selection of a track.
To check the other information while listening to an iPod or a D. player
| Selecting the playback modes 1
2 Select your desired playback mode.
ONE RPT ŒD Functions the same as “Repeat One” of the iPod or “Repeat Mode One” for the D. player.
ALL RPT Functions the same as “Repeat All” of the iPod or “Repeat Mode AI” for the D. player.
Other external component operations
You can connect an external component to
the CD changer jack on the rear using the Line
Input Adapter—KS-U57 (not supplied) or AUX Input Adapter—KS-U58 (not supplied).
+ For connection, see Installation/Connection Manual (separate volume).
For listening to the iPod or D. player, refer to pages 14 and 15.
o ATEN = BATIN (or D-cH) >
ES IF “EXT IN” does not appear, see page 13 and select the external input (“EXT IN”).
[2] Turn on the connected component and start playing the source.
(3) Adjust the volume. + 1 K
4) Adjust the sound as you want. (See pages 11 and 12.)
To check the other information while listening to an external component
D How to clean the connectors
Frequent detachment will deteriorate the connectors.
To minimize this possibility, periodically wipe the connectors with a cotton swab or cloth moistened with alcohol, being careful not to damage the connectors.
I Moisture condensation
Moisture may condense on the lens inside the CD player in the following cases:
+ After starting the heater in the car.
+ Ifit becomes very humid inside the car. Should this oceur, the CD player may malfunction. In this case, eject the disc and leave the unit turned on for a few hours until the moisture evaporates.
D How to handle discs
When removing a disc from Center holder its case, press down the center holder of the case and lift the AN disc out, holding it by the edges. + Always hold the disc by the edges. Do not touch its recording surface. When storing a disc into its case, gently insert the disc around the center holder (with the printed surface facing up). + Make sure to store discs into the cases after use.
I To keep discs clean
A dirty disc may not play correctly. 5.
If a disc does become dirty, wipe it
with a soft cloth in a straight line
from center to edge.
+ Do not use any solvent (for example, conventional record cleaner, spray, thinner, benzine, etc.) to clean discs.
| EN12-17_KD-G424{UItindd 16
| RE T | & CR ER | |
I To play new discs Disc operations mms
New discs may have some rough Caution for DualDisc playback
spots around the inner and outer + The Non-DVD side of a “DualDisc” does edges. If such a disc is used, this not comply with the “Compact Disc Digital unit may reject the disc. Audio” standard. Therefore, the use of Non- To remove these rough spots, rub the edges with DVD side of a DualDisc on this product may a pencil or ball-point pen, etc. not be recommended.
Do not use the following discs: General + This unit has been designed to reproduce Warped disc Xe CDs/CD Texts, and CD-Rs (Recordable)/ CD-RWs (Rewritable) in audio CD (CD-DA), Sticker &- Stickerresidue MP3 and WMA formats. + When a disc has been Loaded, selecting
“DISC” for the playback source starts disc
2x Stick-on label play.
+ When a disc is inserted upside down, the disc
automatically ejects. + Do not insert 8 cm discs (single CD) and More about this unit unusual shape discs (heart, flower, etc.) into
il i the loading slot. Basic operations mm Playine a di Tuning on the power Playing a disc
nus | + While fast-forwarding or reversing on an MP3 + By pressing SRC on the unit, you can also turn
on the power. Ifthe source is ready, playback also starts.
Turning offthe power
+ If you turn offthe power while listening to a dise, disc play will start from where playback has been stopped previously, next time you turn on the power.
or WMA disc, you can only hear intermittent sounds.
Playing a CD-R or CD-RW
+ Use only “finalized” CD-Rs or CD-RWs.
+ This unit can play back only files of the same type which are first detected if a disc includes both audio CD (CD-DA) files and MP3/ WMA files.
This unit can play back multi-session discs;
Tuner operations Sn however, unclosed sessions will be skipped
Storing stations in memory while playing. cc Some CD-Rs or CD-RWSs may not play + During SSM search...
ù . back on this unit because of their disc - All previously stored stations are erased and : . characteristics, or for the following reasons: stations are stored newly. : k . — Discs are dirty or scratched. — Received stations are preset in No. 1 (lowest . . - Moisture condensation occurs on the lens frequency) to No. 6 (highest frequency). inside the unit — When SSM is over, the station stored in ô S ticdi ù à ' = The pickup lens inside the unit is dirty. No. 1 will be automatically tuned in. + When storing a station manually, the previously preset station is erased when a new station is stored in the same preset number.
- CD-R/CD-RW on which the files are written with “Packet Write” method.
- There are improper recording conditions (missing data, etc.) or media conditions stained, scratched, warped, etc.).
CD-RWSs may require a longer readout time
since the reflectance of CD-RW is lower than
that of regular CDs.
Do not use the following CD-Rs or CD-RWs:
- Discs with stickers, labels, or a protective seal stuck to the surface.
- Dises on which labels can be directly printed by an ink jet printer.
Using these discs under high temperatures or
high humidities may cause malfunctions or
Playing an MP3/WMA disc
This unit can play back MP3/WMA files with the extension code <.mp3> or <wma> (regardless of the letter case—upper/lower). This unit can show the names of albums, artists (performer), and Tag (Version 1.0, 1.1, 2.2, 2.3, or 2.4) for MP3 files and for WMA files. This unit can display only one-byte characters. No other characters can be correctly displayed. This unit can play back MP3/WMA files meeting the conditions below: - Bit rate: 8 kbps — 320 kbps - Sampling frequency: 48 kHz, 44.1 kHz, 32 kHz (for MPEG-1) 24 kHz, 22.05 kHz, 16 kHz (for MPEG-2) - Disc format: ISO 9660 Level 1/Level 2, Romeo, Joliet, Windows long file name The maximum number of characters for file/ folder names vary among the disc format used (includes 4 extension characters—<.mp3> or <wma>). — ISO 9660 Level 1: up to 12 characters — ISO 9660 Level 2: up to 31 characters - Romeo: up to 128 characters — Joliet: up to 64 characters - Windows long file name: up to 128 characters
+ This unit can play back files recorded in VBR (variable bit rate). Files recorded in VBR have a discrepancy in elapsed time display, and do not show the actual elapsed time. Especially, after performing the search function, this difference becomes noticeable. This unit can recognize a total of 512 files, of 200 folders, and of 8 hierarchies. + This unit cannot play back the following files: - MP3 files encoded with MP3i and MP3 PRO format. - MP3 files encoded in an inappropriate format. - MP3 files encoded with Layer 1/2. - WMA files encoded with lossless, professional, and voice format. - WMA files which are not based upon Windows Media® Audio. - WMA files copy-protected with DRM. - Files which have the data such as WAVE, ATRACG, etc. + The search function works but search speed is not constant.
+ If you change the source, playback also stops (without ejecting the disc). Next time you select “DISC” for the playback source, disc play starts from where it has been
stopped previously. Ejecting a disc
+ Ifthe ejected disc is not removed within 15 seconds, the disc is automatically inserted again into the loading slot to protect it from dust. (Disc will not play this time.
General settings —PSM mm
+ If you change the “AMP GAIN” setting from “HIGH PWR to “LOW PWR” while the volume level is set higher than “VOL 30,” the unit automatically changes the volume level to “VOL 30.”
| EN18-21 KD-G424{UItindd 18
iPod” or D. player operations
+ When you turn on this unit, the iPod or D. player is charged through this unit.
+ While the iPod or D. player is connected, all operations from the iPod or D. player are disabled. Perform all operations from this unit.
+ Ifthe text information includes more than 8 characters, it scrolls on the display (see also page 13). This unit can display up to 40 characters.
What appears to be trouble is not always serious.
When operating an iPod or a D. player,
some operations may not be performed
correctly or as intended. In this case, visit the
following JVC web site:
For iPod users: <http://www.jvc.co.jp/ english/car/support/ks-pd100/inde
For D. player users: <http://www.jve.c english/car/support/ks-pd500/index.html>
Check the following points before calling a service
center. Symptoms Remedies/Causes + Sound cannot be heard from the + Adjust the volume to the optimum level. speakers. + Check the cords and connections.
The unit does not work at all.
Reset the unit (see page 2).
SSM automatic presetting does not work.
Store stations manually.
Static noise while listening to the radio.
Connect the antenna firmly.
+ Disc cannot be played back.
Insert the disc correctly.
+ CD-R/CD-RW cannot be played back. + Tracks on the CD-R/CD-RW cannot be
+ Insert a finalized CD-R/CD-RW. + Finalize the CD-R/CD-RW with the component
E | _stipped. which you used for recording.
À | » Disc can be neîther played back nor | + Unlock the disc (see page 10).
| _cjected. + Ejectthe disc forcibly (see page 2).
& | + Disc sound is sometimes interrupted. | « Stop playback while driving on rough roads.
+ Change the disc. + Check the cords and connections.
“NO DISC” appears on the display.
Insert a playable disc into the loading slot.
+ Disc cannot be played back.
+ Use a disc with MP3/WMA tracks recorded in the format compliant with ISO 9660 Level 1, Level 2, Romeo, or Joliet.
+ Add the extension code <.mp3> or <.wma> to the file names.
+ Noiseis generated.
(‘CHECK keeps flashing on the display).
+ A longer readout time is required
Do not use too many hierarchies and folders.
you have intended them to play.
+ Tracks do not play back in the order
Playback order is determined when the files are recorded.
+ Elapsed playing time is not correct.
This sometimes occurs during play. This is caused by how the tracks are recorded on the disc.
+ “NO FILES” appears on the display.
Insert a disc that contains MP3/WMA tracks.
+ Correct characters are not displayed
This unit can only display letters (upper case), numbers, and a limited number of symbols.
+ “NO DISC” appears on the display.
Insert a disc into the magazine.
+ “NO MAG? appears on the display.
Insert the magazine.
+ “RESET 8° appears on the display.
+ “RESET 1” - “RESET 7” appears on
Press the reset button of the CD changer.
+ The CD changer does not work at all.
Reset the unit (see page 2).
on or does not work.
+ The iPod or D. player does not turn
+ Check the connecting cable and its connection. + Update the firmware version. + Change the battery.
Buttons do not work as intended.
The functions of the buttons have been changed. Press MODE before performing the operation.
The sound is distorted.
Deactivate the equalizer either on the unit or the iPod/D. player.
“NO IPOD” or “NO DP” appears on
Check the connecting cable and its connection.
The headphones are disconnected during playback. Restart the playback operation using the control panel (see page 14).
No sound can be heard when connecting an iPod nano.
Disconnect the headphones from the iPod nano.
No sound can be heard.
iPod/D. player playbad
when connecting a D. player.
“ERROR 01” appears on the display
Disconnect the adapter from the D. player. Then, connect it again.
“NO FILES” or “NO TRACK” appears on the display.
No tracks are stored. Import tracks to the iPod or D. player.
“RESET 1” - “RESET 7” appears on
Disconnect the adapter from both the unit and iPod/D. player. Then, connect it again.
“RESET 8” appears on the display.
Check the connection between the adapter and this unit.
The iPod's or D. players controls do not work after disconnecting from
Reset the iPod or D. player.
| EN18-21 KD-G424{UItindd 20
I AUDIO AMPLIFIER SECTION Maximum Power Output: Front: 50 W per channel Rear: 50 W per channel Continuous Power Output (RMS): Front: 19 W per channel into 4 Q, 40 Hz to 20 000 Hz at no more than 0.8% total harmonic distortion. Rear: 19 W per channel into 4 Q, 40 Hz to 20 000 Hz at no more than 0.8% total harmonic distortion. Load Impedance: 4 Q (4 Q to 8 Q allowance) Tone Control Range: Bass: +10 dB at 100 Hz Treble: +10 dB at 10 kHz Frequency Response: 40 Hz to 20 000 Hz Signal-to-Noise Ratio: 70 dB Line-Out Level/Impedance: 2.5 V/20 kQ load (full scale) Subwoofer-Out Level/Impedance: 2.0 V/20 kQ load (full scale) Output Impedance: 1 kQ Other Terminal: CD changer
I TUNER SECTION Frequency Range: FM: 87.5 MHz to 108.0 MHz AM: 531 kHz to 1 602 kHz
IFM Tuner] Usable Sensitivity: 11.3 dBf (1.0 uV/75 Q) 50 dB Quieting Sensitivity: 16.3 dBf (1.8 uV/75 Q) Alternate Channel Selectivity (400 kHz): 65 dB Frequency Response: 40 Hz to 15 000 Hz Stereo Separation: 30 dB Capture Ratio: 1.5 dB
Sensitivity: 20 uV Selectivity: 35 dB I CD PLAYER SECTION Type: Compact dise player Signal Detection System: Non-contact optical pickup (semiconductor laser) Number of Channels: 2 channels (stereo) Frequency Response: 5 Hz to 20 000 Hz Dynamic Range: 96 dB Signal-to-Noise Ratio: 98 dB Wow and Flutter: Less than measurable limit MP3 Decoding Format:
Max. Bit Rate: 320 kbps WMA (Windows Media® Audio) Decoding Format:
Max. Bit Rate: 192 kbps
I GENERAL Power Requirement: Operating Voltage:
DC 144 V (11 V to 16 V allowance) Grounding System: Negative ground Allowable Operating Temperature:
O°C to +40°C Dimensions (W x H x D): Installation Size (approx.): 182 mm x 52 mm X 150 mm Panel Size (approx.):
188 mm x 58 mm X 11 mm Mass (approx.):
14 kg (excluding accessories)
Design and specifications are subject to change without notice.
+ Microsoft and Windows Media are either registered trademarks or trademarks of Microsoft Corporation in the United States and/or other countries.
iPod is a trademark of Apple Computer, Inc., registered in the US. and other countries.
| EN18-21 KD-G424{UItindd 21 11724105 surse au | |
FF e CN EE Having TROUBLE with operation? ® Please reset your unit
Refer to page of How to reset your unit
© 2005 Victor Company of Japan, Limited 1105DTSMDTJEIN
| Rear_KD-G424{UItindé 2 & 11723105 72947 pu | |
Installation/Connection Manual
JV GETO351-002A 1105DTSMDTJEIN [ui EN © 2005 Victor Company of Japan, Limited
INSTALLATION (IN-DASH MOUNTING)
The following illustration shows a typical installation. If you have any questions or require information regarding installation kits, consult your JVC car audio dealer or a company supplying kits. + If you are not sure how to install this unit correctly, have it installed by a qualified technician.
This unit is designed to operate on 12 V DC, NEGATIVE ground electrical systems. If your vehicle does not have this system, a voltage inverter is required, which can be purchased at JVC car audio dealers.
WARNINGS To prevent short circuits, we recommend that you disconnect the battery”’s negative terminal and make all electrical connections before installing the unit. + Be sure to ground this unit to the car's chassis again after installation.
+ Replace the fuse with one ofthe specified rating. If the fuse blows frequently, consult your JVC car audio dealer.
+ Itis recommended to connect to the speakers with maximum power of more than 50 W (both at the rear and at the front, with an impedance of 4 Q to 8 Q). Ifthe maximum power is less than 50 W, change “AMP GAIN” setting to prevent the speakers from being damaged (see page 13 of the INSTRUCTIONS).
+ To prevent short-circuit, cover the terminals of the UNUSED leads with insulating tape.
+ The heat sink becomes very hot after use. Be careful not to touch it when removing this unit.
PRECAUTIONS on power supply and speaker connections:
+ DO NOT connect the speaker leads ofthe power cord to the car battery; otherwise, the unit will be seriously damaged. + BEFORE connecting the speaker leads of the power cord to the speakers, check the speaker wiring in
Parts list for installation and connection The following parts are provided for this unit. After checking them, please set them correctly.
- The fuse blows. * Are the red and black leads connected correctly?
+ Power cannot be turned on. * Is the yellow lead connected?
+ No sound from the speakers. * Is the speaker output lead short-circuited?
+ Sounds distorted. * Is the speaker output lead grounded?
* Are the “” terminals of Land R speakers grounded in common?
+ Noise interfere with sounds.
* Is the rear ground terminal connected to the cars chassis using shorter and thicker cords?
+ This unit becomes hot. * Is the speaker output lead grounded?
* Are the “” terminals of Land R speakers grounded in common?
+ This unit does not work at all. * Have you reset your unit?
| Instait-2_KD-G424_002A tindd 1
Do the required electrical connections.
When you stand the unit, be careful not to damage the fuse on the rear.
Bend the appropriate tabs to hold the sleeve firmly in place.
Before removing the unit, release the rear section.
Insert the two handles, then pull them as
illustrated so that the unit can be removed.
When using the optional stay
Install the unit at an angle of less than 30°.
When installing the unit without using the sleeve
In a Toyota car for example, first remove the car radio and install the unit in its place.
#2 Not supplied for this unit.
Flat type screws (M5 x 8 mm)*2
When installing the unit on the mounting bracket, make sure to use the 8 mm-long screws. Iflonger screws are used, they could damage the unit.
1172405 102853 am | |
ELECTRICAL CONNECTIONS A | Typical connections
Before connecting: Check the wiring in the vehicle carefully. Incorrect connection may cause serious damage to this unit. The leads of the power cord and those of the connector from the car body may be different in color.
T Connect the colored leads of the power cord in the order specified in the illustration below. 2 Connect the antenna cord.
3 Finally connect the wiring harness to the unit.
To external components (see diagram M)
Not supplied for this unit. Hgnition switch
® ** live terminal in the fuse block connecting to the car battery (bypassing the ignition switch) (constant 12 V)
() To an accessory terminal in the fuse block oo
« O)] To the automatic antenna if any (250 mA max.) +]
: " Blue with white stripe 2 Before checking the operation of this unit prior to P
installation, this lead must be connected, otherwise _ power cannot be turned on. @)
©] (G) To the remote lead of other equipment (200 mA max.)
White with black stripe White Gray with black stripe Gray Green with black stripe Green Purple with black stripe Purple Oo «) oO © Oo Oo 4
Right speaker (front) Left speaker (rear)
Left speaker (front) Right speaker (rear)
8 | Connecting the external amplifier or subwoofer #3 Firmly attach the ground wire to the metallic body or to the chassis of the car—to the place uncoated with paint (if You can connect an amplifier to upgrade your car stereo system. coated with paint, remove the paint before attaching the + Connect the remote lead (blue with white stripe) to the remote lead of the other equipment so that it can be controlled through this unit. wire). Failure to do so may cause damage to the unit. + Disconnect the speakers from this unit, connect them to the amplifier. Leave the speaker leads of this unit unused.
[ #4 Signal cord (not supplied for this unit) |
Remote lead Y-connector (not supplied for this unit) LE To the remote lead of other equipment or automatic antenna if any
[ Set “L/0 MODE” to “REAR” (See page 13 of the INSTRUCTIONS.)
You can connect a po
et “L/0 MODE” to “WOOFER" (See page 13 ofthe INSTRUCTIONS. fou can also connect a subwoofer to the REAR LINE OUT erminals.
Remote lead (Blue with white stripe)
ver amplifier for rear speakers.
E AS Connecting the external components
CD changer, Apple iPod”, or JVC D. player + Set “CHANGER” for the external input setting (See page 13 of the INSTRUCTIONS.)
You can connect these components as illustrated below. Apple iPod The iPod*5 or D. player can be connected using an interface adapter (not supplied) — KS-PD100 (separately purchased) KS-PD100 (for iPod) or KS-PD500 (for D. player). 7 CAUTION :
+ Before connecting the external components, make sure that the unit is turned off.
#5 iPod is a trademark of Apple Computer, Inc, registered in the U.S. and other countries.
JVC D. player separately purchased)
Li *6 Connecting cord supplied for your CD changer
Other external component
+ Set “EXT IN” for the external input setting (See page 13 of the INSTRUCTIONS.)
#7 Line Input Adapter KS-U57 (not supplied for this unit)
For installation and connections, refer to the separate manual.
Thank you for purchasing a JVC product. Please read all instructions carefully before operation, to ensure your complete understanding and to obtain the best possible performance from the unit.
IMPORTANT FOR LASER PRODUCTS
1. CLASS 1 LASER PRODUCT
2. CAUTION: Do not open the top cover. There are no user serviceable parts inside the unit leave all servicing to qualified service personnel.
3. CAUTION: Visible and invisible laser radiation when open and interlock failed or defeated. Avoid direct exposure to beam.
4. REPRODUCTION OF LABEL: CAUTION LABEL, PLACED OUTSIDE THE UNIT.
Ii How to forcibly eject a disc
If you need to operate the unit while driving, Qi + be sure to look ahead carefully or you may be involved in a trafic accident. + Ifthis does not work, reset your unit.
+_ Be careful not to drop the disc when it ejects.
Caution on volume setting:
Eh How to detach/attach the control
Dises produce very little noise compared p ù p panel
a) >) ê with other sources. Lower the volume
before playing a disc to avoid damaging the speakers by the sudden increase of the output level.
Ii How to reset your unit
&/1 Detaching.. + EX
+ Your preset adjustments will also be erased. + Ifa disc is loaded, it will eject. Be careful not to drop the disc.
Eh How to read this manual
+ Button operations are mainly explained with the illustrations in the table below.
+ Some related tips and notes are explained in “More about this unit” (see pages 17 - 19).
Press and hold until your desired response begins.
Press and hold both buttons at the same time.
CLS The following marks are used to indicate...
Built-in CD player operations. : External CD changer operations.
: Indicator displayed for the corresponding operation.
Eh How to use the MODE button
If you press MODE, the unit goes into functions mode, then the number buttons and A/W buttons work as different function buttons.
Ex: When number button 2 works as MO (monaural) button.
T Time countdown indicator
To use these buttons for their original functions again after pressing MODE, wait for 5 seconds without pressing any of these buttons until the functions mode is cleared or press MODE again.
CONTENTS Control panel … Remote controller — rm-Rkso.
Getting started... Basic operations
Playing a disc in the unit . Playing discs in the CD changer
Sound adjustment General settings — PSM... 12 iPod®/D. player operations … 14 Other external component operations. 16 Maintenance... 16 More about this unit Troubleshooting… Specifications …
+ Do not raise the volume level too much, as this will block outside sounds, making driving dangerous.
+ Stop the car before performing any complicated operations.
Temperature inside the car...
If you have parked the car for a long time in hot or cold weather, wait until the temperature in the car becomes normal before operating the unit.
| ENO2-05_KD-G425[U_UHJtindd 3
Remote controller — »u.rx50 | Main elements and features
[1 @rI/ATT (standby/on/attenuator) button + Turns the power on if pressed briefly or
Aim the remote controller directly at the attenuates the sound when the power is remote sensor on the unit. Make sure there is on. no obstacle in between. + Turns the power of if pressed and held.
2] A U (up) / D (down) # buttons + Changes the FM/AM bands with À U.
ED ——— + Changes the preset stations with D W.
+ Changes the folder of the MP3/WMA + Do not install any battery other than dis
CR2025 or its equivalent; otherwise, it may
+ While playing an MP3 disc on an
® explode. MP3-compatible CD changer: + Store the battery in a place where children — Changes the disc if pressed briefly. cannot reach to avoid risk of accident. — Changes the folder if pressed and held. + To prevent the battery from over-heating, + While listening to an Apple iPod® or a cracking, or starting a fire: JVC D. player: — Do not recharge, short, disassemble, - Pauses/stops or resumes playback with heat the battery, or dispose ofit in a fire. DY.
— Do not leave the battery with other - Enters the main menu with À U.
metallic materials. (Now A U/D w/4 R/F» work as the — Do not poke the battery with tweezers or menu selecting buttons.)*
similar tools. B] VOL -/VOL + buttons — Wrap the battery with tape and insulate + Adjusts the volume level. when throwing away or saving it. [4] SOUND button + Selects the sound mode (C-EQ}: custom
equalizer). [5] SOURCE button + Selects the source.
[6] R (reverse) / F (forward) » buttons
+ Searches for stations if pressed briefly.
+ Fast-forwards or reverses the track if
+ Changes the tracks if pressed briefly. While listening to an iPod or a D. player (in menu selecting mode):
- Selects an item if pressed briefly. (Then, press D Y to confirm the selection.)
— Skips 10 items at a time if pressed and held.
Basic operations ms 01] Turn on the power.
* You cannot select these sources ifthey are not ready or not connected.
Volume level appears.
Volume level indicator
[5] Adjust the sound as you want. (See pages LI and 12.)
To drop the volume in a moment (ATT) @1 AT, To restore the sound, press & it again.
To turn off the power
Basic settings + See also “General settings — PSM” on pages 12 and 13. 1
[1] Canceling the display demonstrations Select “DEMO,” then “DEMO OFF.” [2] Setting the clock Select “CLOCK H” (hour), then adjust the hour. Select “CLOCK M” (minute), then adjust the minute.
3 Finish the procedure.
To check the current clock time when the power is turned off
When an FM stereo broadcast is hard to Radio operations receive
8 no I a © TES 3 SES FM1/FM2/FM3/AM > Ÿ LU [2] ER, | FMI is F3 Lights up when monaural mode is activated. re up when receiving an FM stereo Reception improves, but stereo effect will be broadcast with suffcent signal strength. 65t, RER — < 8 8. 3 5 To restore the stereo effect, repeat the same CU procedure. “MONO OFF” appears and the MO Selected band appears. indicator goes off. (3 Start searching for a station. = — | Storing stations in memory =) You can preset six stations for each band. When a station is received, searching I FM station automatic presetting— ® stops. . SSM (Strong-station Sequential & To stop searching, press the same button Memory) again. To tune in to a station manuall T Select the FM band (FM1 - FM3) you want to store into. In step @ above... à FMI F2 > FM3 BAND Rs ae] N 2 MODE 3 ossu >, TR » Ye Hold. AR ILES TT ATITTTS —— “SSM” flashes, then disappears when automatic presetting is over. Local FM stations with the strongest signals are searched and stored automatically in the FM band.
| ENO6-11_KD-G42[U_UHJtindd 7 11/9105 2:52:44 pu | |
I Manual presetting Ex: Storing FM station of 92.5 MHz into preset Disc operations
number 4 of the FM1 band. . . . Playing a disc in the unit mms
> FM1—> EM2 > FM3 PANN
3 _v RER ——5 ; DIN AI tracks will be played repeatedly until you eds AG change the source or eject the disc. ol : = Preset number flashs for a while. To stop play and eject the (EX disc
| ÉTUDE Playing discs in the CD changer ms
à FM1—- FM2 > FM3 AI discs in the magazine will be played BANDE ge: Paye NY ane] repeatedly until you change the source.
à peatedly until y gs 2 2 NS + . + Ejecting the magazine will also stop playing. _ ® Select the preset station (1 - 6) you ®
NE ou ou © ve eue © PER > @W (ET IN) Cole ares) ares, Fe Li
& * If you have changed the external input setting to “EXT IN” (see page 13), you
cannot select the CD changer.
For disc number from 01 - 06:
For disc number from 07 - 12:
About MP3 and WMA discs
MP3 and WMA “tracks” (words “file” and “track” are used interchangeably) are recorded in “folders.”
About the CD changer
It is recommended to use a JVC MP3-compatible CD changer with your unit. You can also connect other CH-X series CD changers (except CH-X99 and CH-X100). These units are not compatible with MP3 discs.
You cannot play any WMA disc in the CD changer.
You cannot use the KD-MK series CD changers with this unit.
Disc text information recorded in the CD Text can be displayed when a JVC CD Text compatible CD changer is connected.
For connection, see Installation/Connection Manual (separate volume).
To fast-forward or reverse the track
To go to the next or previous tracks
To go to the next or previous folders (only for
For MP3 discs: For WMA discs:
To locate a particular track (for CD) or folder {for MP3 or WMA discs) directly
To select a number from 01 - 06:
SN To select a number from 07 - 12:
+ To use direct folder access on MP3/WMA discs, it is required that folders are assigned
with 2-digit numbers at the beginning of their
folder names—01, 02, 03, and so on.
To select a particular track in a folder (for MP3 or WMA discs):
& CHR DEN | Other main functions | Changing the display information ä I Skipping tracks quickly during play DEPS = à 22 g mu Only possible on JVC k I While playing an audio CD or a CD Text = MP3-compatible CD changer p'aying CAI— Disctitle / performer*! + For MP3 or WMA discs, you can skip tracks À Ÿ within the same folder. <—_ Tradktitle”! GT) Ex: To select track 32 while playing tracks . . 4 whose number is a single digit (1 to 9) D While playing an MP3 or a WMA disc + When “TAG DISP” is set to “TAG ON” 1 Te (see page 13) CA] Album name / performer folder name*) (Œ) 2 ZT > trak1t09-> Trad 10 ! Ÿ CS OS 2 < Track title (file name*) + When “TAG DISP” is set to “TAG OFF” à Each time you press the button, you can CA ]-—- folder name D & skip 10 tracks. n + After the last track, the first track will be . selected and vice versa. Filename 7) 3 = Trak31> 9 > CR CE CA ] : Clock with the current track number AN: : Elapsed playing time with the current track number
M Prohibiting disc ejection You can lock a disc in the loading slot. **_ Ifthe current disc is an audio CD, ‘NO NAME” appears. NE information, folder name and file name appear. In this case, the TAG indicator will not light up.
VALLILIT AT IN ETT CALE] Eu Li
To cancel the prohibition, repeat the same procedure.
| ENO6-11_KD-G42S[U_UH]indd 10 1148105 «3903 pu | |
| RE T | & CR ER | |
| Selecting the playback modes Sound adjustments
You can use only one of the following playback ; Z modes at a time” You can select a preset sound mode suitable to [EI the music genre (C-EQ: custom equalizer). Ü Z 1 NODE BR C USER > ROCK > CLASSIC mi “au JAZZ <HIP HOP < POPS 2 Select your desired playback mode. & DT = Repeat pl: pas à NL epeat play FR OCK ES Ex: When "ROCK is selected Mod Pl tedi erre _ TEpeare " Preset values! BAS | TRE | LOUD : The current track. @D FLDR RPT* : All tracks ofthe current Indication (For) (bass) | reble) | (oudness) folder. ©) ED USER 0 | 00 | orr DISC RPT* : All tracks ofthe current disc. (Flat sound) ROCK RPTOFF : Cancel +03 | +01 | ON : Cancels. (Rock or disco music) m Randomplay 2" CLASSIC ; +01 -02 OFF > (Classical music) " POPS & Mode Plays at random (Light music) +04 | +01 | OFF FLDR RND*': All tracks of the current HIP HOP folder, then tracks of the next (funk +02 | 00 | ON folder andsoon D) (nor rap music) DISCRND : Alltracks ofthe current disc. JAZZ (Jazz music) +02 | +03 | OFF MAG RND* : All tracks of the inserted RNDOFF _ : Cancel. Fr | Adjusting the sound * Only while playing an MP3 or a WMA disc. You can adjust the sound characteristics to your *# Only while playing discs in the CD preference. changer. 1 s " 7 BAS > TRE >FAD > SEL, Qi ER< VOL <- SUB. W <- LOUD N To be continued...
K Indication [Range]
BAS*! (bass) Adjust the bass. [-06 to +06]
TRE*! (treble) Adjust the treble. [-06 to +06]
FAD* (fader) Adjust the front and rear speaker balance. [RO6 to F06]
BAL* (balance) Adjust the left and right speaker balance. [LO6 to RO6]
LOUD*1 (loudness) Boost low and high frequencies to produce a well-balanced sound at low volume level. [LOUD ON or LOUD OFF]
SUB.W*: (subwoofer) Adjust the subwoofer output level. [00 to 08]
VOL (volume) Adjust the volume. [00 to 30 or 50*3]
*1_ When you adjust the bass, treble, or loudness, the adjustment you have made is stored for the currently selected sound mode (C-EQ) including “USER.”
2 If you are using a two-speaker system, set the
fader level to “00.”
This adjustment cannot affect the subwoofer
This takes effect only when a subwoofer is
Displayed only when “L/O MODE" is set to
“WOOFER” (see page 13)
Depending on the amplifier gain control
setting. (See page 13 for details.)
General settings — PSM You can change PSM (Preferred Setting Mode) items listed in the table that follows.
Sr 2 Select a PSM item. ON ENS
3 Adjust the PSM item selected.
410 Ex fe “DIMMER" is selected
4 Repeat steps 2 and 3 to adjust other PSM items if necessary.
5 Finish the procedure.
| EN12-17_KD-G42S[U_UH]indd 12
| RE T | & CR ER | |
Indications Selectable settings, [reference page]
DEMO DEMO ON : {Initial]; Display demonstration will be activated ZT Display automatically if no operation is done for about 20 seconds, [en demonstration [6]. OÙ
DEMO OFF : Cancels. Z ii CLOCKH 1-12, [6] Hour adjustment [initial: 1 (1:00)] CLOCKM 00 - 59, [6]
Minute adjustment [Initial: 00 (1:00)]
DIMMER oN + Dims the display illumination of this unit. Dimmer OFF + [Initial]: Cancels. SCROLL*s ONCE : {Initial}; Scrolls the disc information once. Scroll AUTO : Repeats scrolling (5-second intervals in between). OFF + Cancels.
+ Pressing DISP for more than one second can scroll the display regardless of the setting.
WOOFER*7 Low + Frequencies lower than 90 Hz are sent to the subwoofer. Subwoofer cutoff MID + [Initial]: Frequencies lower than 135 Hz are sent to the frequency subwoofer.
HIGH + Frequencies lower than 180 Hz are sent to the subwoofer. as)
® EXT IN*S CHANGER : {Initial}; To use a JVC CD changer, [8], an Apple iPod or a External input JVC D. player, [14].
EXTIN _: To use any other external component than the above, [16]. L/O MODE When connecting the amplifier or subwoofer, set this correctly.
[Initial]; Select if the REAR LINE OUT terminals are used for connecting the speakers through an external amplifier.
Line outputmode REAR WOOFER _: Select if the REAR LINE OUT terminals are used for connecting a subwoofer through an external amplifier. TAG DISP TAGON _: {Initial}; Shows the Tag information while playing MP3/ Tag display WMA tracks, [10]. TAGOFF : Cancels. AMP GAIN You can change the maximum volume level of this unit. Amplifier gain LOWPWR : VOL 00 - VOL 30 (Select this if the maximum power of control the speaker is less than 50 W to prevent them from being damaged.)
HIGH PWR : [Initial]: VOL 00 - VOL 50
# Some characters or symbols will not be shown correctly (or will be blanked) on the display. *7 Displayed only when “L/O MODE” is set to “WOOFER.” * Displayed only when one of the following sources is selected FM, AM, or DISC.
| EN12-17_KD-G42S[U_UH]indd 13 11/22/05 g:21:41 nu | |
iPod player operations O Adjust the sound as you want. (See pages 11 and 12.)
I PR his unit is ready for operating an Apple iPod + Make sure the equalizer on the iPod ar D ©: 21VC D. player from the control panel. D. player is deactivated. Z D Before operating your iPod or D. player: To pause”: or Connect either one of the following (separately | stop: playback purchased) to the CD changer jack on the rear To resume Of this unit. layback, press it + Interface adapter for iPod°—KS-PD100 for P' controlling an iPod. ge + D. player interface adapter —KS-PD500 for To fast-forward or controlling a D. player. reverse the track + For connection, see Installation/Connection Manual (separate volume). To goto the next + For details, refer also to the manual supplied or previous tracks with the interface adapter. #1 For iPod
Make sure to turn off this unit or turn off the
vehicle’ ignition switch before connecting
® or disconnecting the iPod or D. player. Selecting a track from the menu
1 Enter the main menu.
Preparations: Make sure “CHANGER” is selected for the /2
external input setting, see page 13. €) 0 ::
AT & Now the A/V/H4 vw» A buttons work as the menu selecting buttons*3. (2) ALLAN 7 IPOD/D-PLAVER =>
Playback starts automatically from where it has been paused*! or stopped*?
2 Select the desired menu.
<— TRACK<— (back to the beginning)
| EN12-17_KD-G425[U_UH]indd 14 11/22/05 sz252 au | |
3 Confirm the selection. = Random play E To move back to the previous — C' menu, press A. D a | ALBM RND*: END >) U Functions the same as “Shuffle Albums” of [ea + Ifa track is selected, playback starts the iPod. automatically. + Ifthe selected item has another layer, you SONGRND/RND ON D will enter the layer. Repeat steps 2 and 3 Functions the same as “Shuffle Songs” ofthe until the desired track is played. iPod or “Random Play On” of the D. player. + Holding #4 V/1 A can skip 10 RND OFF items at a time. =. Cancels. # The menu selecting mode will be canceled: #4 For iPod: Only if you select “ALL” in = If no operations are done for about “ALBUMS” of the main “MENU.”
5 seconds. - When you confirm the selection of a track.
To check the other information while listening to an iPod or a D. player
| Selecting the playback modes =
2 Select your desired playback mode.
ONE RPT ŒD Functions the same as “Repeat One” of the iPod or “Repeat Mode One” for the D. player.
ALL RPT Functions the same as “Repeat All” of the iPod or “Repeat Mode AI” for the D. player.
You can connect an external component to
the CD changer jack on the rear using the Line
Input Adapter—KS-U57 (not supplied) or AUX Input Adapter—KS-U58 (not supplied).
+ For connection, see Installation/Connection Manual (separate volume).
For listening to the iPod or D. player, refer to pages 14 and 15.
o ATEN = BATIN (or D-cH) >
ES IF “EXT IN” does not appear, see page 13 and select the external input (“EXT IN”).
[2] Turn on the connected component and start playing the source.
© aus the volume. + 4 K
4) Adjust the sound as you want. (See pages 11 and 12.)
To check the other information while listening to an external component
D How to clean the connectors
Frequent detachment will deteriorate the connectors.
To minimize this possibility, periodically wipe the connectors with a cotton swab or cloth moistened with alcohol, being careful not to damage the connectors.
I Moisture condensation
Moisture may condense on the lens inside the CD player in the following cases:
+ After starting the heater in the car.
+ Ifit becomes very humid inside the car. Should this oceur, the CD player may malfunction. In this case, eject the disc and leave the unit turned on for a few hours until the moisture evaporates.
D How to handle discs
When removing a disc from Center holder its case, press down the center holder of the case and lift the AN disc out, holding it by the edges. + Always hold the disc by the edges. Do not touch its recording surface. When storing a disc into its case, gently insert the disc around the center holder (with the printed surface facing up). + Make sure to store discs into the cases after use.
I To keep discs clean
A dirty disc may not play correctly. 5.
If a disc does become dirty, wipe it
with a soft cloth in a straight line
from center to edge.
+ Do not use any solvent (for example, conventional record cleaner, spray, thinner, benzine, etc.) to clean discs.
| EN12-17_KD-G42S[U_UH]indd 16
| RE T | & CR ER | |
I To play new discs Disc operations mms
New discs may have some rough Caution for DualDisc playback
spots around the inner and outer + The Non-DVD side of a “DualDisc” does edges. If such a disc is used, this not comply with the “Compact Disc Digital unit may reject the disc. Audio” standard. Therefore, the use of Non- To remove these rough spots, rub the edges with DVD side of a DualDisc on this product may a pencil or ball-point pen, etc. not be recommended.
ENGLISH Do not use the following discs: General + This unit has been designed to reproduce Warped disc Xe CDs/CD Texts, and CD-Rs (Recordable)/ CD-RWs (Rewritable) in audio CD (CD-DA), Sticker &- Stickerresidue MP3 and WMA formats. + When a disc has been Loaded, selecting
“DISC” for the playback source starts disc
2x Stick-on label play.
+ When a disc is inserted upside down, the disc
automatically ejects. + Do not insert 8 cm discs (single CD) and More about this unit unusual shape discs (heart, flower, etc.) into
. : the loading slot. Basic operations mn . h : Playing a disc Turninq on the power ere . | + While fast-forwarding or reversing on an MP3 + By pressing SRC on the unit, you can also turn Gr WMA disc, you can only hear intermittent on the power. Ifthe source is ready, playback
sounds. also starts.
Turning offthe power
+ If you turn offthe power while listening to a dise, disc play will start from where playback has been stopped previously, next time you turn on the power.
Playing a CD-R or CD-RW
+ Use only “finalized” CD-Rs or CD-RWs.
+ This unit can play back only files of the same type which are first detected if a disc includes both audio CD (CD-DA) files and MP3/ WMA files.
This unit can play back multi-session discs;
Tuner operations Sn however, unclosed sessions will be skipped
Storing stations in memory while playing. cc Some CD-Rs or CD-RWSs may not play + During SSM search...
ù . back on this unit because of their disc - All previously stored stations are erased and : . characteristics, or for the following reasons: stations are stored newly. : k . — Discs are dirty or scratched. — Received stations are preset in No. 1 (lowest . . - Moisture condensation occurs on the lens frequency) to No. 6 (highest frequency). inside the unit — When SSM is over, the station stored in ô S ticdi ù à ' = The pickup lens inside the unit is dirty. No. 1 will be automatically tuned in. + When storing a station manually, the previously preset station is erased when a new station is stored in the same preset number.
- CD-R/CD-RW on which the files are written with “Packet Write” method.
- There are improper recording conditions (missing data, etc.) or media conditions stained, scratched, warped, etc.).
+ CD-RWSs may require a longer readout time
since the reflectance of CD-RW is lower than
that of regular CDs.
Do not use the following CD-Rs or CD-RWs:
- Discs with stickers, labels, or a protective seal stuck to the surface.
- Dises on which labels can be directly printed by an ink jet printer.
Using these discs under high temperatures or
high humidities may cause malfunctions or
Playing an MP3/WMA disc
+ This unit can play back MP3/WMA files with the extension code <.mp3> or <wma> (regardless of the letter case—upper/lower).
+ This unit can show the names of albums,
artists (performer), and Tag (Version 1.0, 1.1,
2.2, 2.3, or 2.4) for MP3 files and for WMA
This unit can display only one-byte
characters. No other characters can be
correctly displayed.
This unit can play back MP3/WMA files
meeting the conditions below:
- Bit rate: 8 kbps — 320 kbps
- Sampling frequency: 48 kHz, 44.1 kHz, 32 kHz (for MPEG-1) 24 kHz, 22.05 kHz, 16 kHz (for MPEG-2)
- Disc format: ISO 9660 Level 1/Level 2, Romeo, Joliet, Windows long file name
The maximum number of characters for file/
folder names vary among the disc format used
(includes 4 extension characters—<.mp3> or
— ISO 9660 Level 1: up to 12 characters
— ISO 9660 Level 2: up to 31 characters
- Romeo: up to 128 characters
— Joliet: up to 64 characters
- Windows long file name: up to 128 characters
+ This unit can play back files recorded in VBR
(variable bit rate).
Files recorded in VBR have a discrepancy
in elapsed time display, and do not show
the actual elapsed time. Especially, after
performing the search function, this
difference becomes noticeable.
This unit can recognize a total of 512 files, of
200 folders, and of 8 hierarchies.
This unit cannot play back the following files:
- MP3 files encoded with MP3i and MP3 PRO format.
- MP3 files encoded in an inappropriate format.
- MP3 files encoded with Layer 1/2.
- WMA files encoded with lossless, professional, and voice format.
- WMA files which are not based upon Windows Media® Audio.
- WMA files copy-protected with DRM.
- Files which have the data such as WAVE, ATRACG, etc.
+ The search function works but search speed is not constant.
+ If you change the source, playback also stops (without ejecting the disc). Next time you select “DISC” for the playback source, disc play starts from where it has been stopped previously.
+ Ifthe ejected disc is not removed within 15 seconds, the disc is automatically inserted again into the loading slot to protect it from dust. (Disc will not play this time.
General settings —PSM mm
+ If you change the “AMP GAIN” setting from “HIGH PWR to “LOW PWR” while the volume level is set higher than “VOL 30,” the unit automatically changes the volume level to “VOL 30.”
iPod” or D. player operations
+ When you turn on this unit, the iPod or D. player is charged through this unit.
+ While the iPod or D. player is connected, all operations from the iPod or D. player are disabled. Perform all operations from this unit.
+ Ifthe text information includes more than 8 characters, it scrolls on the display (see also page 13). This unit can display up to 40 characters.
What appears to be trouble is not always serious.
When operating an iPod or a D. player,
some operations may not be performed
correctly or as intended. In this case, visit the
following JVC web site:
For iPod users: <http://www.jvc.co.jp/ english/car/support/ks-pd100/inde
For D. player users: <http://www.jve.c english/car/support/ks-pd500/index.html>
Check the following points before calling a service
center. Symptoms Remedies/Causes + Sound cannot be heard from the + Adjust the volume to the optimum level. speakers. + Check the cords and connections.
The unit does not work at all.
Reset the unit (see page 2).
SSM automatic presetting does not work.
Store stations manually.
Static noise while listening to the radio.
Connect the antenna firmly.
+ Disc cannot be played back.
Insert the disc correctly.
+ CD-R/CD-RW cannot be played back. + Tracks on the CD-R/CD-RW cannot be
+ Insert a finalized CD-R/CD-RW. + Finalize the CD-R/CD-RW with the component
E | _stipped. which you used for recording.
À | » Disc can be neîther played back nor | + Unlock the disc (see page 10).
| _cjected. + Ejectthe disc forcibly (see page 2).
& | + Disc sound is sometimes interrupted. | « Stop playback while driving on rough roads.
+ Change the disc. + Check the cords and connections.
“NO DISC” appears on the display.
Insert a playable disc into the loading slot.
+ Disc cannot be played back.
+ Use a disc with MP3/WMA tracks recorded in the format compliant with ISO 9660 Level 1, Level 2, Romeo, or Joliet.
+ Add the extension code <.mp3> or <.wma> to the file names.
+ Noiseis generated.
(‘CHECK keeps flashing on the display).
+ A longer readout time is required
Do not use too many hierarchies and folders.
you have intended them to play.
+ Tracks do not play back in the order
Playback order is determined when the files are
+ Elapsed playing time is not correct.
This sometimes occurs during play. This is caused by how the tracks are recorded on the disc.
+ “NO FILES” appears on the display.
Insert a disc that contains MP3/WMA tracks.
+ Correct characters are not displayed
This unit can only display letters (upper case), numbers, and a limited number of symbols.
+ “NO DISC” appears on the display.
Insert a disc into the magazine.
+ “NO MAG? appears on the display.
Insert the magazine.
+ “RESET 8° appears on the display.
+ “RESET 1” - “RESET 7” appears on
Press the reset button ofthe CD changer.
+ The CD changer does not work at all.
Reset the unit (see page 2).
on or does not work.
+ The iPod or D. player does not turn
+ Check the connecting cable and its connection. + Update the firmware version. + Change the battery.
+ Buttons do not work as intended.
The functions of the buttons have been changed. Press MODE before performing the operation.
+ The sound is distorted.
Deactivate the equalizer either on the unit or the iPod/D. player.
“NO IPOD” or “NO DP” appears on
Check the connecting cable and its connection.
The headphones are disconnected during playback. Restart the playback operation using the control panel (see page 14).
No sound can be heard when connecting an iPod nano.
Disconnect the headphones from the iPod nano.
No sound can be heard.
iPod/D. player playbad
when connecting a D. player.
“ERROR 01” appears on the display
Disconnect the adapter from the D. player. Then, connect it again.
“NO FILES” or “NO TRACK” appears on the display.
No tracks are stored. Import tracks to the iPod or
“RESET 1” - “RESET 7” appears on
Disconnect the adapter from both the unit and iPod/D. player. Then, connect it again.
“RESET 8” appears on the display.
Check the connection between the adapter and
The iPod's or D. players controls do not work after disconnecting from
Reset the iPod or D. player.
| EN18-21 KD-G42S[U_UH]indd 20
I AUDIO AMPLIFIER SECTION Maximum Power Output: Front: 50 W per channel Rear: 50 W per channel Continuous Power Output (RMS): Front: 19 W per channel into 4 Q, 40 Hz to 20 000 Hz at no more than 0.8% total harmonic distortion. Rear: 19 W per channel into 4 Q, 40 Hz to 20 000 Hz at no more than 0.8% total harmonic distortion. Load Impedance: 4 Q (4 Q to 8 Q allowance) Tone Control Range: Bass: +10 dB at 100 Hz Treble: +10 dB at 10 kHz Frequency Response: 40 Hz to 20 000 Hz Signal-to-Noise Ratio: 70 dB Line-Out Level/Impedance: 2.5 V/20 kQ load (full scale) Subwoofer-Out Level/Impedance: 2.0 V/20 kQ load (full scale) Output Impedance: 1 kQ Other Terminal: CD changer
I TUNER SECTION Frequency Range: FM: 87.5 MHz to 108.0 MHz AM: 531 kHz to 1 602 kHz
[FM Tuner] Usable Sensitivity: 11.3 dBf (1.0 uV/75 Q) 50 dB Quieting Sensitivity: 16.3 dBf (1.8 1/75 Q) Alternate Channel Selectivity (400 kHz): 65 dB Frequency Response: 40 Hz to 15 000 Hz Stereo Separation: 30 dB Capture Ratio: 1.5 dB
Sensitivity: 20 uV Selectivity: 35 dB I CD PLAYER SECTION Type: Compact dise player Signal Detection System: Non-contact optical pickup (semiconductor laser) Number of Channels: 2 channels (stereo) Frequency Response: 5 Hz to 20 000 Hz Dynamic Range: 96 dB Signal-to-Noise Ratio: 98 dB Wow and Flutter: Less than measurable limit MP3 Decoding Format:
Max. Bit Rate: 320 kbps WMA (Windows Media® Audio) Decoding Format:
Max. Bit Rate: 192 kbps
I GENERAL Power Requirement: Operating Voltage:
DC 144 V (11 V to 16 V allowance) Grounding System: Negative ground Allowable Operating Temperature:
0°C to +40°C Dimensions (W x H x D): Installation Size (approx): 182 mm X 52 mm X 150 mm Panel Size (approx.):
188 mm X 58 mm X 11 mm Mass (approx.}:
14 kg (excluding accessories)
Design and specifications are subject to change without notice.
+ Microsoft and Windows Media are either registered trademarks or trademarks of Microsoft Corporation in the United States and/or other countries.
iPod is a trademark of Apple Computer, Inc., registered in the US. and other countries.
| Rear_KD-G425{U_UHJind 2
Having TROUBLE with operation? Please reset your unit
Refer to page of How to reset your unit
© 2005 Victor Company of Japan, Limited 1105DTSMDTJEIN
Installation/Connection Manual
JV GET0350-006A [U/UH]
1105DTSMDTJEIN EN, TH © 2005 Victor Company of Japan, Limited
This unit is designed to operate on 12 V DC, NEGATIVE ground electrical systems. If your vehicle does not have this system, a voltage inverter is required, which can be purchased at JVC car audio dealers.
To prevent short circuits, we recommend that you disconnect the battery”s negative terminal and make all electrical connections before installing the unit. - Be sure to ground this unit to the cars chassis again after installation.
+ Replace the fuse with one of the specified rating. If the fuse blows frequently, consult your JVC car audio dealer.
+ Itis recommended to connect to the speakers with maximum power of more than 50 W (both at
the rear and at the front, with an impedance of 4 Q to 8 Q). Ifthe maximum power is less than 50 W, change “AMP GAIN” setting to prevent the speakers from being damaged (see page 13 ofthe INSTRUCTION + To prevent short-circuit, cover the terminals of the UNUSED leads with insulating tape.
+ The heat sink becomes very hot after use. Be careful not to touch it when removing this unit.
+ umpanonmionnsionnmmnannls sas houthl dutafonongnlenout
PRECAUTIONS on power supply and speaker connections:
+ DO NOT connect the speaker leads ofthe power cord to the car battery; otherwise, the unit will be seriously damaged.
+ BEFORE connecting the speaker leads of the power cord to the speakers, check the speaker wiring in your car.
dans dmiumanaunainamanuaratus: amnatansinianäuadtnniuuummnañonun fou pahenaeslaianmndomenn noufesnomunsiniaäredimnntuin mansoumaiumenlémilusorenaluouseutunou
Parts list for installation and connection
The following parts are provided for this unit. After checking them, please set them correctly.
@I® © Hard case/Control panel Sleeve ura/mnla Laon [Q] [Q]
© Trim plate uaulansvounn
INSTALLATION (IN-DASH MOUNTING) and (malsnauaumnimunn)
The following illustration shows a typical installation. If you have any questions or require information mnfounadhuanaäamsnéunnthl mnatilnméonnmmionatentugnats npumfnnngunentort regarding installation kits, consult your JVC car audio dealer or a company supplying kits.
+ If you are not sure how to install this unit correctly, have it installed by a qualified technician.
uvsouun INC some qu srse rs ee + gmenou mquibunilonéntgmlenoutgnnontoli himmatennaniunänés
Do the required electrical connections.
In a Toyota car for example, first remove the car radio and install the unit in its place.
+ The fuse blows. + ihdina
* Are the red and black leads connected correctly? + fimiSou unsätrarduavoungnnoniolu + Power cannot be turned on. . ‘iannsaulauria dla
* Is the yellow lead connected? * fimasoumunrMämäontol
+ No sound from the speakers. * Is the speaker output lead short-circuited?
«‘hidgwaanqnätus + monsMauiioonmatuñialhhämannol
+ Sounds distorted. * Is the speaker output lead grounded?
* Are the “_” terminals of Land R speakers grounded in common?
cdauñen * munanioonmetnanoauroli # mobau “— vohinmunonannoaumnlnäniolu
- Noise interfere with sounds.
* Is the rear ground terminal connected to the cars chassis using shorter and thicker cords? + avsumau
2 fimrléemodun em nonmriornuäats huuflunnméatutéauunéolu - This unit becomes hot. % * Is the speaker output lead grounded? + gaenonsanihu * Are the “_” terminals of Land R speakers grounded in common? * munghauioonmaenmonsnfolu
A | Typical connections / avudlaunauumnina
Before connecting: Check the wiring in the vehicle carefully. Incorrect connection may cause serious damage to this unit. The leads of the power cord and those of the connector from the car body may be different in color.
T Connect the colored leads of the power cord in the order specified in the illustration below. 2 Connect the antenna cord.
3 Finally connect the wiring harness to the unit.
namhmauiiauna: nano onmân iinmnungounaninns ourifanmalamaninonnogminenongnf maanonoñanmaonitannutonumnnnguns
#2 Before checking the operation of this unit prior to installation, this lead must be connected, otherwise power cannot be turned on.
Blue with white stripe
To the remote lead of other equipment (200 mA max.)
White with black stripe funuou
Gray with black stripe éimuou
Purple with black stripe Anauous
Right speaker (rear)
Left speaker (front) éiimaun Gé)
Right speaker (front)
E Connecting the external amplifier or subwoofer /aauauläimaasmiaiunimasaiuua
You can connect an amplifier to upgrade your car stereo system. quemmanoñntonnämutoos florfuan mmumiueuumnoilonorsounun + Connect the remote lead (blue with white stripe) to the remote lead of the other equipment so that it nounsinitena Guam) numensieusinauorqunre du a dlossanamumilaugenls: can be controlled through this unit. nouëla
+ Disconnect the speakers from this unit, connect them to the amplifier. Leave the speaker leads of this unit unused.
- aandfimaannngmhsnaud uanaunänaiaaune fhansMätuinangmiisnaut
Remote lead Y-connector (not supplied for this unit) ru)
aunsansuz/lnn donogl Y Chilshnnnnl
Set “L/0 MODE” to “REAR” (See page 13 of the INSTRUCTIONS.) Remote lead (Blue with white stripe) ésan “L/0 MODE” ufu “REAR” (am 13 éuusii) aomshancuctan (hhBtme)
To the remote lead of other equipment or automatic antenna ifany
You can connect a power amplifier for rear speakers. mumnionoinlosunudounduiinanesla
Firmly attach the ground wire to the metallic body or to the chassis of the car—to the place uncoated with paint (if coated with paint, remove the paint before attaching the wire). Failure to do so may cause damage
CAUTION / nana: + Before connecting the external components, make sure that the unit is turned off. OC)
Apple iPod (separately purchased) Apple iPod (uündimne)
IVCD, payer (separately purchased)
© L External component © R qlnsaimauan
Thank you for purchasing a JVC product. Please read all instructions carefully before operation, to ensure your complete understanding and to obtain the best possible performance from the unit.
IMPORTANT FOR LASER PRODUCTS
1. CLASS 1 LASER PRODUCT
2. CAUTION: Do not open the top cover. There are no user serviceable parts inside the unit leave all servicing to qualified service personnel.
3. CAUTION: Visible and invisible laser radiation when open and interlock failed or defeated. Avoid direct exposure to beam.
4. REPRODUCTION OF LABEL: CAUTION LABEL, PLACED OUTSIDE THE UNIT.
Ii How to forcibly eject a disc
If you need to operate the unit while driving, Qi + be sure to look ahead carefully or you may be involved in a trafic accident. + Ifthis does not work, reset your unit.
+_ Be careful not to drop the disc when it ejects.
Caution on volume setting:
Eh How to detach/attach the control
Dises produce very little noise compared p ù p panel
a) >) ê with other sources. Lower the volume
before playing a disc to avoid damaging the speakers by the sudden increase of the output level.
Ii How to reset your unit
&/1 Detaching.. + EX
+ Your preset adjustments will also be erased. + Ifa disc is loaded, it will eject. Be careful not to drop the disc.
Eh How to read this manual
+ Button operations are mainly explained with the illustrations in the table below.
+ Some related tips and notes are explained in “More about this unit” (see pages 17 - 19).
Press and hold until your desired response begins.
Press and hold both buttons at the same time.
CLS The following marks are used to indicate...
Built-in CD player operations. : External CD changer operations.
: Indicator displayed for the corresponding operation.
Eh How to use the MODE button
If you press MODE, the unit goes into functions mode, then the number buttons and A/W buttons work as different function buttons.
Ex: When number button 2 works as MO (monaural) button.
T Time countdown indicator
To use these buttons for their original functions again after pressing MODE, wait for 5 seconds without pressing any of these buttons until the functions mode is cleared or press MODE again.
CONTENTS Control panel … Remote controller — rm-Rkso.
Getting started... Basic operations
Playing a disc in the unit . Playing discs in the CD changer
Sound adjustment General settings — PSM... 12 iPod®/D. player operations … 14 Other external component operations. 16 Maintenance... 16 More about this unit Troubleshooting… Specifications …
+ Do not raise the volume level too much, as this will block outside sounds, making driving dangerous.
+ Stop the car before performing any complicated operations.
Temperature inside the car...
If you have parked the car for a long time in hot or cold weather, wait until the temperature in the car becomes normal before operating the unit.
| ENO2-05_KD-G425[U_UHJtindd 3
Remote controller — »u.rx50 | Main elements and features
[1 @rI/ATT (standby/on/attenuator) button + Turns the power on if pressed briefly or
Aim the remote controller directly at the attenuates the sound when the power is remote sensor on the unit. Make sure there is on. no obstacle in between. + Turns the power of if pressed and held.
2] A U (up) / D (down) # buttons + Changes the FM/AM bands with À U.
ED ——— + Changes the preset stations with D W.
+ Changes the folder of the MP3/WMA + Do not install any battery other than dis
CR2025 or its equivalent; otherwise, it may
+ While playing an MP3 disc on an
® explode. MP3-compatible CD changer: + Store the battery in a place where children — Changes the disc if pressed briefly. cannot reach to avoid risk of accident. — Changes the folder if pressed and held. + To prevent the battery from over-heating, + While listening to an Apple iPod® or a cracking, or starting a fire: JVC D. player: — Do not recharge, short, disassemble, - Pauses/stops or resumes playback with heat the battery, or dispose ofit in a fire. DY.
— Do not leave the battery with other - Enters the main menu with À U.
metallic materials. (Now A U/D w/4 R/F» work as the — Do not poke the battery with tweezers or menu selecting buttons.)*
similar tools. B] VOL -/VOL + buttons — Wrap the battery with tape and insulate + Adjusts the volume level. when throwing away or saving it. [4] SOUND button + Selects the sound mode (C-EQ}: custom
equalizer). [5] SOURCE button + Selects the source.
[6] R (reverse) / F (forward) » buttons
+ Searches for stations if pressed briefly.
+ Fast-forwards or reverses the track if
+ Changes the tracks if pressed briefly. While listening to an iPod or a D. player (in menu selecting mode):
- Selects an item if pressed briefly. (Then, press D Y to confirm the selection.)
— Skips 10 items at a time if pressed and held.
Basic operations ms 01] Turn on the power.
* You cannot select these sources ifthey are not ready or not connected.
Volume level appears.
Volume level indicator
[5] Adjust the sound as you want. (See pages LI and 12.)
To drop the volume in a moment (ATT) @1 AT, To restore the sound, press & it again.
To turn off the power
Basic settings + See also “General settings — PSM” on pages 12 and 13. 1
[1] Canceling the display demonstrations Select “DEMO,” then “DEMO OFF.” [2] Setting the clock Select “CLOCK H” (hour), then adjust the hour. Select “CLOCK M” (minute), then adjust the minute.
3 Finish the procedure.
To check the current clock time when the power is turned off
When an FM stereo broadcast is hard to Radio operations receive
8 no I a © TES 3 SES FM1/FM2/FM3/AM > Ÿ LU [2] ER, | FMI is F3 Lights up when monaural mode is activated. re up when receiving an FM stereo Reception improves, but stereo effect will be broadcast with suffcent signal strength. 65t, RER — < 8 8. 3 5 To restore the stereo effect, repeat the same CU procedure. “MONO OFF” appears and the MO Selected band appears. indicator goes off. (3 Start searching for a station. = — | Storing stations in memory =) You can preset six stations for each band. When a station is received, searching I FM station automatic presetting— ® stops. . SSM (Strong-station Sequential & To stop searching, press the same button Memory) again. To tune in to a station manuall T Select the FM band (FM1 - FM3) you want to store into. In step @ above... à FMI F2 > FM3 BAND Rs ae] N 2 MODE 3 ossu >, TR » Ye Hold. AR ILES TT ATITTTS —— “SSM” flashes, then disappears when automatic presetting is over. Local FM stations with the strongest signals are searched and stored automatically in the FM band.
| ENO6-11_KD-G42[U_UHJtindd 7 11/9105 2:52:44 pu | |
I Manual presetting Ex: Storing FM station of 92.5 MHz into preset Disc operations
number 4 of the FM1 band. . . . Playing a disc in the unit mms
> FM1—> EM2 > FM3 PANN
3 _v RER ——5 ; DIN AI tracks will be played repeatedly until you eds AG change the source or eject the disc. ol : = Preset number flashs for a while. To stop play and eject the (EX disc
| ÉTUDE Playing discs in the CD changer ms
à FM1—- FM2 > FM3 AI discs in the magazine will be played BANDE ge: Paye NY ane] repeatedly until you change the source.
à peatedly until y gs 2 2 NS + . + Ejecting the magazine will also stop playing. _ ® Select the preset station (1 - 6) you ®
NE ou ou © ve eue © PER > @W (ET IN) Cole ares) ares, Fe Li
& * If you have changed the external input setting to “EXT IN” (see page 13), you
cannot select the CD changer.
For disc number from 01 - 06:
For disc number from 07 - 12:
About MP3 and WMA discs
MP3 and WMA “tracks” (words “file” and “track” are used interchangeably) are recorded in “folders.”
About the CD changer
It is recommended to use a JVC MP3-compatible CD changer with your unit. You can also connect other CH-X series CD changers (except CH-X99 and CH-X100). These units are not compatible with MP3 discs.
You cannot play any WMA disc in the CD changer.
You cannot use the KD-MK series CD changers with this unit.
Disc text information recorded in the CD Text can be displayed when a JVC CD Text compatible CD changer is connected.
For connection, see Installation/Connection Manual (separate volume).
To fast-forward or reverse the track
To go to the next or previous tracks
To go to the next or previous folders (only for
For MP3 discs: For WMA discs:
To locate a particular track (for CD) or folder {for MP3 or WMA discs) directly
To select a number from 01 - 06:
SN To select a number from 07 - 12:
+ To use direct folder access on MP3/WMA discs, it is required that folders are assigned
with 2-digit numbers at the beginning of their
folder names—01, 02, 03, and so on.
To select a particular track in a folder (for MP3 or WMA discs):
& CHR DEN | Other main functions | Changing the display information ä I Skipping tracks quickly during play DEPS = à 22 g mu Only possible on JVC k I While playing an audio CD or a CD Text = MP3-compatible CD changer p'aying CAI— Disctitle / performer*! + For MP3 or WMA discs, you can skip tracks À Ÿ within the same folder. <—_ Tradktitle”! GT) Ex: To select track 32 while playing tracks . . 4 whose number is a single digit (1 to 9) D While playing an MP3 or a WMA disc + When “TAG DISP” is set to “TAG ON” 1 Te (see page 13) CA] Album name / performer folder name*) (Œ) 2 ZT > trak1t09-> Trad 10 ! Ÿ CS OS 2 < Track title (file name*) + When “TAG DISP” is set to “TAG OFF” à Each time you press the button, you can CA ]-—- folder name D & skip 10 tracks. n + After the last track, the first track will be . selected and vice versa. Filename 7) 3 = Trak31> 9 > CR CE CA ] : Clock with the current track number AN: : Elapsed playing time with the current track number
M Prohibiting disc ejection You can lock a disc in the loading slot. **_ Ifthe current disc is an audio CD, ‘NO NAME” appears. NE information, folder name and file name appear. In this case, the TAG indicator will not light up.
VALLILIT AT IN ETT CALE] Eu Li
To cancel the prohibition, repeat the same procedure.
| ENO6-11_KD-G42S[U_UH]indd 10 1148105 «3903 pu | |
| RE T | & CR ER | |
| Selecting the playback modes Sound adjustments
You can use only one of the following playback ; Z modes at a time” You can select a preset sound mode suitable to [EI the music genre (C-EQ: custom equalizer). Ü Z 1 NODE BR C USER > ROCK > CLASSIC mi “au JAZZ <HIP HOP < POPS 2 Select your desired playback mode. & DT = Repeat pl: pas à NL epeat play FR OCK ES Ex: When "ROCK is selected Mod Pl tedi erre _ TEpeare " Preset values! BAS | TRE | LOUD : The current track. @D FLDR RPT* : All tracks ofthe current Indication (For) (bass) | reble) | (oudness) folder. ©) ED USER 0 | 00 | orr DISC RPT* : All tracks ofthe current disc. (Flat sound) ROCK RPTOFF : Cancel +03 | +01 | ON : Cancels. (Rock or disco music) m Randomplay 2" CLASSIC ; +01 -02 OFF > (Classical music) " POPS & Mode Plays at random (Light music) +04 | +01 | OFF FLDR RND*': All tracks of the current HIP HOP folder, then tracks of the next (funk +02 | 00 | ON folder andsoon D) (nor rap music) DISCRND : Alltracks ofthe current disc. JAZZ (Jazz music) +02 | +03 | OFF MAG RND* : All tracks of the inserted RNDOFF _ : Cancel. Fr | Adjusting the sound * Only while playing an MP3 or a WMA disc. You can adjust the sound characteristics to your *# Only while playing discs in the CD preference. changer. 1 s " 7 BAS > TRE >FAD > SEL, Qi ER< VOL <- SUB. W <- LOUD N To be continued...
K Indication [Range]
BAS*! (bass) Adjust the bass. [-06 to +06]
TRE*! (treble) Adjust the treble. [-06 to +06]
FAD* (fader) Adjust the front and rear speaker balance. [RO6 to F06]
BAL* (balance) Adjust the left and right speaker balance. [LO6 to RO6]
LOUD*1 (loudness) Boost low and high frequencies to produce a well-balanced sound at low volume level. [LOUD ON or LOUD OFF]
SUB.W*: (subwoofer) Adjust the subwoofer output level. [00 to 08]
VOL (volume) Adjust the volume. [00 to 30 or 50*3]
*1_ When you adjust the bass, treble, or loudness, the adjustment you have made is stored for the currently selected sound mode (C-EQ) including “USER.”
2 If you are using a two-speaker system, set the
fader level to “00.”
This adjustment cannot affect the subwoofer
This takes effect only when a subwoofer is
Displayed only when “L/O MODE" is set to
“WOOFER” (see page 13)
Depending on the amplifier gain control
setting. (See page 13 for details.)
General settings — PSM You can change PSM (Preferred Setting Mode) items listed in the table that follows.
Sr 2 Select a PSM item. ON ENS
3 Adjust the PSM item selected.
410 Ex fe “DIMMER" is selected
4 Repeat steps 2 and 3 to adjust other PSM items if necessary.
5 Finish the procedure.
| EN12-17_KD-G42S[U_UH]indd 12
| RE T | & CR ER | |
Indications Selectable settings, [reference page]
DEMO DEMO ON : {Initial]; Display demonstration will be activated ZT Display automatically if no operation is done for about 20 seconds, [en demonstration [6]. OÙ
DEMO OFF : Cancels. Z ii CLOCKH 1-12, [6] Hour adjustment [initial: 1 (1:00)] CLOCKM 00 - 59, [6]
Minute adjustment [Initial: 00 (1:00)]
DIMMER oN + Dims the display illumination of this unit. Dimmer OFF + [Initial]: Cancels. SCROLL*s ONCE : {Initial}; Scrolls the disc information once. Scroll AUTO : Repeats scrolling (5-second intervals in between). OFF + Cancels.
+ Pressing DISP for more than one second can scroll the display regardless of the setting.
WOOFER*7 Low + Frequencies lower than 90 Hz are sent to the subwoofer. Subwoofer cutoff MID + [Initial]: Frequencies lower than 135 Hz are sent to the frequency subwoofer.
HIGH + Frequencies lower than 180 Hz are sent to the subwoofer. as)
® EXT IN*S CHANGER : {Initial}; To use a JVC CD changer, [8], an Apple iPod or a External input JVC D. player, [14].
EXTIN _: To use any other external component than the above, [16]. L/O MODE When connecting the amplifier or subwoofer, set this correctly.
[Initial]; Select if the REAR LINE OUT terminals are used for connecting the speakers through an external amplifier.
Line outputmode REAR WOOFER _: Select if the REAR LINE OUT terminals are used for connecting a subwoofer through an external amplifier. TAG DISP TAGON _: {Initial}; Shows the Tag information while playing MP3/ Tag display WMA tracks, [10]. TAGOFF : Cancels. AMP GAIN You can change the maximum volume level of this unit. Amplifier gain LOWPWR : VOL 00 - VOL 30 (Select this if the maximum power of control the speaker is less than 50 W to prevent them from being damaged.)
HIGH PWR : [Initial]: VOL 00 - VOL 50
# Some characters or symbols will not be shown correctly (or will be blanked) on the display. *7 Displayed only when “L/O MODE” is set to “WOOFER.” * Displayed only when one of the following sources is selected FM, AM, or DISC.
| EN12-17_KD-G42S[U_UH]indd 13 11/22/05 g:21:41 nu | |
iPod player operations O Adjust the sound as you want. (See pages 11 and 12.)
I PR his unit is ready for operating an Apple iPod + Make sure the equalizer on the iPod ar D ©: 21VC D. player from the control panel. D. player is deactivated. Z D Before operating your iPod or D. player: To pause”: or Connect either one of the following (separately | stop: playback purchased) to the CD changer jack on the rear To resume Of this unit. layback, press it + Interface adapter for iPod°—KS-PD100 for P' controlling an iPod. ge + D. player interface adapter —KS-PD500 for To fast-forward or controlling a D. player. reverse the track + For connection, see Installation/Connection Manual (separate volume). To goto the next + For details, refer also to the manual supplied or previous tracks with the interface adapter. #1 For iPod
Make sure to turn off this unit or turn off the
vehicle’ ignition switch before connecting
® or disconnecting the iPod or D. player. Selecting a track from the menu
1 Enter the main menu.
Preparations: Make sure “CHANGER” is selected for the /2
external input setting, see page 13. €) 0 ::
AT & Now the A/V/H4 vw» A buttons work as the menu selecting buttons*3. (2) ALLAN 7 IPOD/D-PLAVER =>
Playback starts automatically from where it has been paused*! or stopped*?
2 Select the desired menu.
<— TRACK<— (back to the beginning)
| EN12-17_KD-G425[U_UH]indd 14 11/22/05 sz252 au | |
3 Confirm the selection. = Random play E To move back to the previous — C' menu, press A. D a | ALBM RND*: END >) U Functions the same as “Shuffle Albums” of [ea + Ifa track is selected, playback starts the iPod. automatically. + Ifthe selected item has another layer, you SONGRND/RND ON D will enter the layer. Repeat steps 2 and 3 Functions the same as “Shuffle Songs” ofthe until the desired track is played. iPod or “Random Play On” of the D. player. + Holding #4 V/1 A can skip 10 RND OFF items at a time. =. Cancels. # The menu selecting mode will be canceled: #4 For iPod: Only if you select “ALL” in = If no operations are done for about “ALBUMS” of the main “MENU.”
5 seconds. - When you confirm the selection of a track.
To check the other information while listening to an iPod or a D. player
| Selecting the playback modes =
2 Select your desired playback mode.
ONE RPT ŒD Functions the same as “Repeat One” of the iPod or “Repeat Mode One” for the D. player.
ALL RPT Functions the same as “Repeat All” of the iPod or “Repeat Mode AI” for the D. player.
You can connect an external component to
the CD changer jack on the rear using the Line
Input Adapter—KS-U57 (not supplied) or AUX Input Adapter—KS-U58 (not supplied).
+ For connection, see Installation/Connection Manual (separate volume).
For listening to the iPod or D. player, refer to pages 14 and 15.
o ATEN = BATIN (or D-cH) >
ES IF “EXT IN” does not appear, see page 13 and select the external input (“EXT IN”).
[2] Turn on the connected component and start playing the source.
© aus the volume. + 4 K
4) Adjust the sound as you want. (See pages 11 and 12.)
To check the other information while listening to an external component
D How to clean the connectors
Frequent detachment will deteriorate the connectors.
To minimize this possibility, periodically wipe the connectors with a cotton swab or cloth moistened with alcohol, being careful not to damage the connectors.
I Moisture condensation
Moisture may condense on the lens inside the CD player in the following cases:
+ After starting the heater in the car.
+ Ifit becomes very humid inside the car. Should this oceur, the CD player may malfunction. In this case, eject the disc and leave the unit turned on for a few hours until the moisture evaporates.
D How to handle discs
When removing a disc from Center holder its case, press down the center holder of the case and lift the AN disc out, holding it by the edges. + Always hold the disc by the edges. Do not touch its recording surface. When storing a disc into its case, gently insert the disc around the center holder (with the printed surface facing up). + Make sure to store discs into the cases after use.
I To keep discs clean
A dirty disc may not play correctly. 5.
If a disc does become dirty, wipe it
with a soft cloth in a straight line
from center to edge.
+ Do not use any solvent (for example, conventional record cleaner, spray, thinner, benzine, etc.) to clean discs.
| EN12-17_KD-G42S[U_UH]indd 16
| RE T | & CR ER | |
I To play new discs Disc operations mms
New discs may have some rough Caution for DualDisc playback
spots around the inner and outer + The Non-DVD side of a “DualDisc” does edges. If such a disc is used, this not comply with the “Compact Disc Digital unit may reject the disc. Audio” standard. Therefore, the use of Non- To remove these rough spots, rub the edges with DVD side of a DualDisc on this product may a pencil or ball-point pen, etc. not be recommended.
ENGLISH Do not use the following discs: General + This unit has been designed to reproduce Warped disc Xe CDs/CD Texts, and CD-Rs (Recordable)/ CD-RWs (Rewritable) in audio CD (CD-DA), Sticker &- Stickerresidue MP3 and WMA formats. + When a disc has been Loaded, selecting
“DISC” for the playback source starts disc
2x Stick-on label play.
+ When a disc is inserted upside down, the disc
automatically ejects. + Do not insert 8 cm discs (single CD) and More about this unit unusual shape discs (heart, flower, etc.) into
. : the loading slot. Basic operations mn . h : Playing a disc Turninq on the power ere . | + While fast-forwarding or reversing on an MP3 + By pressing SRC on the unit, you can also turn Gr WMA disc, you can only hear intermittent on the power. Ifthe source is ready, playback
sounds. also starts.
Turning offthe power
+ If you turn offthe power while listening to a dise, disc play will start from where playback has been stopped previously, next time you turn on the power.
Playing a CD-R or CD-RW
+ Use only “finalized” CD-Rs or CD-RWs.
+ This unit can play back only files of the same type which are first detected if a disc includes both audio CD (CD-DA) files and MP3/ WMA files.
This unit can play back multi-session discs;
Tuner operations Sn however, unclosed sessions will be skipped
Storing stations in memory while playing. cc Some CD-Rs or CD-RWSs may not play + During SSM search...
ù . back on this unit because of their disc - All previously stored stations are erased and : . characteristics, or for the following reasons: stations are stored newly. : k . — Discs are dirty or scratched. — Received stations are preset in No. 1 (lowest . . - Moisture condensation occurs on the lens frequency) to No. 6 (highest frequency). inside the unit — When SSM is over, the station stored in ô S ticdi ù à ' = The pickup lens inside the unit is dirty. No. 1 will be automatically tuned in. + When storing a station manually, the previously preset station is erased when a new station is stored in the same preset number.
- CD-R/CD-RW on which the files are written with “Packet Write” method.
- There are improper recording conditions (missing data, etc.) or media conditions stained, scratched, warped, etc.).
+ CD-RWSs may require a longer readout time
since the reflectance of CD-RW is lower than
that of regular CDs.
Do not use the following CD-Rs or CD-RWs:
- Discs with stickers, labels, or a protective seal stuck to the surface.
- Dises on which labels can be directly printed by an ink jet printer.
Using these discs under high temperatures or
high humidities may cause malfunctions or
Playing an MP3/WMA disc
+ This unit can play back MP3/WMA files with the extension code <.mp3> or <wma> (regardless of the letter case—upper/lower).
+ This unit can show the names of albums,
artists (performer), and Tag (Version 1.0, 1.1,
2.2, 2.3, or 2.4) for MP3 files and for WMA
This unit can display only one-byte
characters. No other characters can be
correctly displayed.
This unit can play back MP3/WMA files
meeting the conditions below:
- Bit rate: 8 kbps — 320 kbps
- Sampling frequency: 48 kHz, 44.1 kHz, 32 kHz (for MPEG-1) 24 kHz, 22.05 kHz, 16 kHz (for MPEG-2)
- Disc format: ISO 9660 Level 1/Level 2, Romeo, Joliet, Windows long file name
The maximum number of characters for file/
folder names vary among the disc format used
(includes 4 extension characters—<.mp3> or
— ISO 9660 Level 1: up to 12 characters
— ISO 9660 Level 2: up to 31 characters
- Romeo: up to 128 characters
— Joliet: up to 64 characters
- Windows long file name: up to 128 characters
+ This unit can play back files recorded in VBR
(variable bit rate).
Files recorded in VBR have a discrepancy
in elapsed time display, and do not show
the actual elapsed time. Especially, after
performing the search function, this
difference becomes noticeable.
This unit can recognize a total of 512 files, of
200 folders, and of 8 hierarchies.
This unit cannot play back the following files:
- MP3 files encoded with MP3i and MP3 PRO format.
- MP3 files encoded in an inappropriate format.
- MP3 files encoded with Layer 1/2.
- WMA files encoded with lossless, professional, and voice format.
- WMA files which are not based upon Windows Media® Audio.
- WMA files copy-protected with DRM.
- Files which have the data such as WAVE, ATRACG, etc.
+ The search function works but search speed is not constant.
+ If you change the source, playback also stops (without ejecting the disc). Next time you select “DISC” for the playback source, disc play starts from where it has been stopped previously.
+ Ifthe ejected disc is not removed within 15 seconds, the disc is automatically inserted again into the loading slot to protect it from dust. (Disc will not play this time.
General settings —PSM mm
+ If you change the “AMP GAIN” setting from “HIGH PWR to “LOW PWR” while the volume level is set higher than “VOL 30,” the unit automatically changes the volume level to “VOL 30.”
iPod” or D. player operations
+ When you turn on this unit, the iPod or D. player is charged through this unit.
+ While the iPod or D. player is connected, all operations from the iPod or D. player are disabled. Perform all operations from this unit.
+ Ifthe text information includes more than 8 characters, it scrolls on the display (see also page 13). This unit can display up to 40 characters.
What appears to be trouble is not always serious.
When operating an iPod or a D. player,
some operations may not be performed
correctly or as intended. In this case, visit the
following JVC web site:
For iPod users: <http://www.jvc.co.jp/ english/car/support/ks-pd100/inde
For D. player users: <http://www.jve.c english/car/support/ks-pd500/index.html>
Check the following points before calling a service
center. Symptoms Remedies/Causes + Sound cannot be heard from the + Adjust the volume to the optimum level. speakers. + Check the cords and connections.
The unit does not work at all.
Reset the unit (see page 2).
SSM automatic presetting does not work.
Store stations manually.
Static noise while listening to the radio.
Connect the antenna firmly.
+ Disc cannot be played back.
Insert the disc correctly.
+ CD-R/CD-RW cannot be played back. + Tracks on the CD-R/CD-RW cannot be
+ Insert a finalized CD-R/CD-RW. + Finalize the CD-R/CD-RW with the component
E | _stipped. which you used for recording.
À | » Disc can be neîther played back nor | + Unlock the disc (see page 10).
| _cjected. + Ejectthe disc forcibly (see page 2).
& | + Disc sound is sometimes interrupted. | « Stop playback while driving on rough roads.
+ Change the disc. + Check the cords and connections.
“NO DISC” appears on the display.
Insert a playable disc into the loading slot.
+ Disc cannot be played back.
+ Use a disc with MP3/WMA tracks recorded in the format compliant with ISO 9660 Level 1, Level 2, Romeo, or Joliet.
+ Add the extension code <.mp3> or <.wma> to the file names.
+ Noiseis generated.
(‘CHECK keeps flashing on the display).
+ A longer readout time is required
Do not use too many hierarchies and folders.
you have intended them to play.
+ Tracks do not play back in the order
Playback order is determined when the files are
+ Elapsed playing time is not correct.
This sometimes occurs during play. This is caused by how the tracks are recorded on the disc.
+ “NO FILES” appears on the display.
Insert a disc that contains MP3/WMA tracks.
+ Correct characters are not displayed
This unit can only display letters (upper case), numbers, and a limited number of symbols.
+ “NO DISC” appears on the display.
Insert a disc into the magazine.
+ “NO MAG? appears on the display.
Insert the magazine.
+ “RESET 8° appears on the display.
+ “RESET 1” - “RESET 7” appears on
Press the reset button ofthe CD changer.
+ The CD changer does not work at all.
Reset the unit (see page 2).
on or does not work.
+ The iPod or D. player does not turn
+ Check the connecting cable and its connection. + Update the firmware version. + Change the battery.
+ Buttons do not work as intended.
The functions of the buttons have been changed. Press MODE before performing the operation.
+ The sound is distorted.
Deactivate the equalizer either on the unit or the iPod/D. player.
“NO IPOD” or “NO DP” appears on
Check the connecting cable and its connection.
The headphones are disconnected during playback. Restart the playback operation using the control panel (see page 14).
No sound can be heard when connecting an iPod nano.
Disconnect the headphones from the iPod nano.
No sound can be heard.
iPod/D. player playbad
when connecting a D. player.
“ERROR 01” appears on the display
Disconnect the adapter from the D. player. Then, connect it again.
“NO FILES” or “NO TRACK” appears on the display.
No tracks are stored. Import tracks to the iPod or
“RESET 1” - “RESET 7” appears on
Disconnect the adapter from both the unit and iPod/D. player. Then, connect it again.
“RESET 8” appears on the display.
Check the connection between the adapter and
The iPod's or D. players controls do not work after disconnecting from
Reset the iPod or D. player.
| EN18-21 KD-G42S[U_UH]indd 20
I AUDIO AMPLIFIER SECTION Maximum Power Output: Front: 50 W per channel Rear: 50 W per channel Continuous Power Output (RMS): Front: 19 W per channel into 4 Q, 40 Hz to 20 000 Hz at no more than 0.8% total harmonic distortion. Rear: 19 W per channel into 4 Q, 40 Hz to 20 000 Hz at no more than 0.8% total harmonic distortion. Load Impedance: 4 Q (4 Q to 8 Q allowance) Tone Control Range: Bass: +10 dB at 100 Hz Treble: +10 dB at 10 kHz Frequency Response: 40 Hz to 20 000 Hz Signal-to-Noise Ratio: 70 dB Line-Out Level/Impedance: 2.5 V/20 kQ load (full scale) Subwoofer-Out Level/Impedance: 2.0 V/20 kQ load (full scale) Output Impedance: 1 kQ Other Terminal: CD changer
I TUNER SECTION Frequency Range: FM: 87.5 MHz to 108.0 MHz AM: 531 kHz to 1 602 kHz
[FM Tuner] Usable Sensitivity: 11.3 dBf (1.0 uV/75 Q) 50 dB Quieting Sensitivity: 16.3 dBf (1.8 1/75 Q) Alternate Channel Selectivity (400 kHz): 65 dB Frequency Response: 40 Hz to 15 000 Hz Stereo Separation: 30 dB Capture Ratio: 1.5 dB
Sensitivity: 20 uV Selectivity: 35 dB I CD PLAYER SECTION Type: Compact dise player Signal Detection System: Non-contact optical pickup (semiconductor laser) Number of Channels: 2 channels (stereo) Frequency Response: 5 Hz to 20 000 Hz Dynamic Range: 96 dB Signal-to-Noise Ratio: 98 dB Wow and Flutter: Less than measurable limit MP3 Decoding Format:
Max. Bit Rate: 320 kbps WMA (Windows Media® Audio) Decoding Format:
Max. Bit Rate: 192 kbps
I GENERAL Power Requirement: Operating Voltage:
DC 144 V (11 V to 16 V allowance) Grounding System: Negative ground Allowable Operating Temperature:
0°C to +40°C Dimensions (W x H x D): Installation Size (approx): 182 mm X 52 mm X 150 mm Panel Size (approx.):
188 mm X 58 mm X 11 mm Mass (approx.}:
14 kg (excluding accessories)
Design and specifications are subject to change without notice.
+ Microsoft and Windows Media are either registered trademarks or trademarks of Microsoft Corporation in the United States and/or other countries.
iPod is a trademark of Apple Computer, Inc., registered in the US. and other countries.
| EN18-21_KD-G42S[U_UHJtindd 21 11723105 ssosepu | |
FF e CN EE Having TROUBLE with operation? Please reset your unit
Refer to page of How to reset your unit
Ada MASALAH dengan cara ® pengoperasian? Setel kembali unit Anda
Lihat halaman mengenai Bagaimana mereset unit anda
© 2005 Victor Company of Japan, Limited 1105DTSMDTJEIN
JV GETO350-009A [UN]
1105DTSMDTJEIN EN, IN © 2005 Victor Company of Japan, Limited
ENGLISH INDONESIA This unit is designed to operate on 12 V DC, NEGATIVE ground electrical systems. If your vehicle does not have this system, a voltage inverter is required, which can be purchased at JVC car audio dealers.
WARNINGS Alat penerima ini didisain untuk beroperasi hanya pada 12 V DC, sistem listrik tanah NEGATIVE. Jika Kendaraan anda tidak memiliki sistem ini, sebuah pembalik tegangan diperlukan, yang mana dapat dibeli di penyalur-penyalur audio mobil JVC.
PERINGATAN To prevent short circuits, we recommend that you disconnect the battery”s negative terminal and make all electrical connections before installing the unit. - Be sure to ground this unit to the cars chassis again after installation.
+ Replace the fuse with one ofthe specified rating. If the fuse blows frequently, consult your JVC car audio dealer.
+ Itis recommended to connect to the speakers with maximum power of more than 50 W (both at the rear and at the front, with an impedance of 4 Q to 8 Q). If the maximum power is less than 50 W, change “AMP GAIN” setting to prevent the speakers from being damaged (see page 13 ofthe INSTRUCTIONS).
+ To prevent short-circuit, cover the terminals of the UNUSED leads with insulating tape.
+ The heat sink becomes very hot after use. Be careful not to touch it when removing this unit.
+ Pendingin menjadi sangat panas setelah digunakan. Hati-hati untuk tidak menyentuhnya ketika memindahkan alat penerima ini.
PRECAUTIONS on power supply and speaker connections:
+ DO NOT connect the speaker leads ofthe power cord to the car battery; otherwise, the unit will be seriously damaged.
+ BEFORE connecting the speaker leads of the power cord to the speakers, check the speaker wiring in your car.
TINDAKAN-TINDAKAN PENCEGAHAN pada suplai power dan
Parts list for installation and connection
The following parts are provided for this unit. After checking them, please set them correctly.
@1® © Hard case/Control panel Sleeve Kotak keras/Panel kontrol Selongsong
© Power cord Kabel power
Ô CHER PEN PEMASANGAN (BINGKAI-DALAM DASH)
The following illustration shows a typical installation. If you have any questions or require information regarding installation kits, consult your JVC car audio dealer or a company supplying kits. + If you are not sure how to install this unit correctly, have it installed by a qualified technician.
*1_ When you stand the unit, be careful not to damage the fuse on the rear.
Ilustrasi berikut menunjukkan sebuah tipe pemasangan. Jika anda mempunyai suatu pertanyaan atau
Bend the appropriate tabs to hold the sleeve firmly in place.
*1° Ketika anda memberdirikan alat penerima, hati-hati untuk tidak merusak sekring di belakang.
Before removing the unit, release the rear section.
Memindahkan alat penerima Sebelum memindahkan alat penerima, lepaskan seksi belakang.
Insert the two handles, then pull them as illustrated so that the unit can be removed. Sisipkan kedua pemegang dan tarik alat penerima
Install the unit at an angle of less than 30°.
Pasang penerima pada suatu sudut Kkurang dari 30°.
When installing the unit without using the sleeve / Ketika memasang alat penerima tanpa menggunakan selongsong
In a Toyota car for example, first remove the car radio and install the unit in its place.
Note + When installing the unit on the mounting bracket, make sure to use the 8 mm-long screws. Iflonger screws are used, they could damage the unit.
TROUBLESHOOTING PEMECAHAN MASALAH
+ The fuse blows. * Are the red and black leads connected correctly?
+ Power cannot be turned on. * Is the yellow lead connected?
+ No sound from the speakers. * Is the speaker output lead short-circuited?
+ Sounds distorted. * Is the speaker output lead grounded? * Are the “_” terminals of Land R speakers grounded in common?
- Noise interfere with sounds.
* Is the rear ground terminal connected to the car’s chassis using shorter and thicker cords?
+ This unit becomes hot. * Is the speaker output lead grounded? * Are the “_” terminals of Land R speakers grounded in common?
- This unit does not work at all. * Have you reset your unit?
+ Sekring meledak. # Apakah ujung-ujung merah dan hitam tersambung dengan benar?
Rear ground terminal
Hitam . To metallic body or chassis ofthe car Fa
Ke besi bodi atau casis dari mobil tersebut +—S Yellow *2 Kuning*2 To a live terminal in the fuse block connecting to the car battery ® (bypassing the ignition switch) (constant 12 V) Lo o— Ke sebuah tempat terminal dalam blok sekring disambungkan ke baterai mobil (abaikan saklar kontak) (konstant 12 V)
+00 Fuse block Blok sekring To an accessory terminal in the fuse block
Ke sebuah terminal aksesoris dalam blok sekring
#2 Before checking the operation of this unit prior to installation, this lead must be connected, otherwise power cannot be turned on.
Oo oO @ oO oO Left speaker (front) Speaker kiri (depan)
[ — Set “L/0 MODE” to “REAR” (See page 13 of the INSTRUCTIONS.)
Setel “L/0 MODE ” ke “REAR ” (Lihat halaman 13 dari BUKU PETUNJUK.) Remote lead (Blue with white stripe) Ujung jauh (Biru dengan strip putih)
To the remote lead of other equipment or automatic antenna if any
Speaker-speaker belakang Speaker-speaker depan
! Set “L/0 MODE” to “WOOFER” (See page 13 of the INSTRUCTIONS.) ! Setel “L/0 MODE ” ke “WOOFER ” (Lihat halaman 13 dari BUKU PETUNJUK.
! You can also connect a subwoofer to the REAR LINE OUT terminals. } Anda juga dapat menghubungkan subwoofer ke terminal REAR LINE : OUT.
! Firmly attach the ground wire to the metallic body or
! to the chassis of the car—to the place uncoated with
ï paint (if coated with paint, remove the paint before
ï attaching the wire). Failure to do so may cause damage ! to the unit.
Î INPUT | JVC Amplifier Qi) Penguat JVC © [ )
Signal cord (not supplied for this unit)
® ] ED = @) WMA MP3 ©
For canceling the display demonstration, see page 6.
HORARHRE » SRE 6 EX °
For installation and connections, refer to the separate manual.
Cover KD-G425 005A findd 2 & 11/22/05 7:41:52 PM |
Thank you for purchasing a JVC product. Please read all instructions carefully before operation, to ensure your complete understanding and to obtain the best possible performance from the unit.
IMPORTANT FOR LASER PRODUCTS
1. CLASS 1 LASER PRODUCT
2. CAUTION: Do not open the top cover. There are no user serviceable parts inside the unit leave all servicing to qualified service personnel.
3. CAUTION: Visible and invisible laser radiation when open and interlock failed or defeated. Avoid direct exposure to beam.
4. REPRODUCTION OF LABEL: CAUTION LABEL, PLACED OUTSIDE THE UNIT.
Ii How to forcibly eject a disc
If you need to operate the unit while driving, Qi + be sure to look ahead carefully or you may be involved in a trafic accident. + Ifthis does not work, reset your unit.
+_ Be careful not to drop the disc when it ejects.
Caution on volume setting:
Eh How to detach/attach the control
Dises produce very little noise compared p ù p panel
a) >) ê with other sources. Lower the volume
before playing a disc to avoid damaging the speakers by the sudden increase of the output level.
Ii How to reset your unit
&/1 Detaching.. + EX
+ Your preset adjustments will also be erased. + Ifa disc is loaded, it will eject. Be careful not to drop the disc.
Eh How to read this manual
+ Button operations are mainly explained with the illustrations in the table below.
+ Some related tips and notes are explained in “More about this unit” (see pages 17 - 19).
Press and hold until your desired response begins.
Press and hold both buttons at the same time.
CLS The following marks are used to indicate...
Built-in CD player operations. : External CD changer operations.
: Indicator displayed for the corresponding operation.
Eh How to use the MODE button
If you press MODE, the unit goes into functions mode, then the number buttons and A/W buttons work as different function buttons.
Ex: When number button 2 works as MO (monaural) button.
T Time countdown indicator
To use these buttons for their original functions again after pressing MODE, wait for 5 seconds without pressing any of these buttons until the functions mode is cleared or press MODE again.
CONTENTS Control panel … Remote controller — rm-Rkso.
Getting started... Basic operations
Playing a disc in the unit . Playing discs in the CD changer
Sound adjustment General settings — PSM... 12 iPod®/D. player operations … 14 Other external component operations. 16 Maintenance... 16 More about this unit Troubleshooting… Specifications …
+ Do not raise the volume level too much, as this will block outside sounds, making driving dangerous.
+ Stop the car before performing any complicated operations.
Temperature inside the car...
If you have parked the car for a long time in hot or cold weather, wait until the temperature in the car becomes normal before operating the unit.
| ENO2-05_KD-G425[U_UHJtindd 3
Remote controller — »u.rx50 | Main elements and features
[1 @rI/ATT (standby/on/attenuator) button + Turns the power on if pressed briefly or
Aim the remote controller directly at the attenuates the sound when the power is remote sensor on the unit. Make sure there is on. no obstacle in between. + Turns the power of if pressed and held.
2] A U (up) / D (down) # buttons + Changes the FM/AM bands with À U.
ED ——— + Changes the preset stations with D W.
+ Changes the folder of the MP3/WMA + Do not install any battery other than dis
CR2025 or its equivalent; otherwise, it may
+ While playing an MP3 disc on an
® explode. MP3-compatible CD changer: + Store the battery in a place where children — Changes the disc if pressed briefly. cannot reach to avoid risk of accident. — Changes the folder if pressed and held. + To prevent the battery from over-heating, + While listening to an Apple iPod® or a cracking, or starting a fire: JVC D. player: — Do not recharge, short, disassemble, - Pauses/stops or resumes playback with heat the battery, or dispose ofit in a fire. DY.
— Do not leave the battery with other - Enters the main menu with À U.
metallic materials. (Now A U/D w/4 R/F» work as the — Do not poke the battery with tweezers or menu selecting buttons.)*
similar tools. B] VOL -/VOL + buttons — Wrap the battery with tape and insulate + Adjusts the volume level. when throwing away or saving it. [4] SOUND button + Selects the sound mode (C-EQ}: custom
equalizer). [5] SOURCE button + Selects the source.
[6] R (reverse) / F (forward) » buttons
+ Searches for stations if pressed briefly.
+ Fast-forwards or reverses the track if
+ Changes the tracks if pressed briefly. While listening to an iPod or a D. player (in menu selecting mode):
- Selects an item if pressed briefly. (Then, press D Y to confirm the selection.)
— Skips 10 items at a time if pressed and held.
Basic operations ms 01] Turn on the power.
* You cannot select these sources ifthey are not ready or not connected.
Volume level appears.
Volume level indicator
[5] Adjust the sound as you want. (See pages LI and 12.)
To drop the volume in a moment (ATT) @1 AT, To restore the sound, press & it again.
To turn off the power
Basic settings + See also “General settings — PSM” on pages 12 and 13. 1
[1] Canceling the display demonstrations Select “DEMO,” then “DEMO OFF.” [2] Setting the clock Select “CLOCK H” (hour), then adjust the hour. Select “CLOCK M” (minute), then adjust the minute.
3 Finish the procedure.
To check the current clock time when the power is turned off
When an FM stereo broadcast is hard to Radio operations receive
8 no I a © TES 3 SES FM1/FM2/FM3/AM > Ÿ LU [2] ER, | FMI is F3 Lights up when monaural mode is activated. re up when receiving an FM stereo Reception improves, but stereo effect will be broadcast with suffcent signal strength. 65t, RER — < 8 8. 3 5 To restore the stereo effect, repeat the same CU procedure. “MONO OFF” appears and the MO Selected band appears. indicator goes off. (3 Start searching for a station. = — | Storing stations in memory =) You can preset six stations for each band. When a station is received, searching I FM station automatic presetting— ® stops. . SSM (Strong-station Sequential & To stop searching, press the same button Memory) again. To tune in to a station manuall T Select the FM band (FM1 - FM3) you want to store into. In step @ above... à FMI F2 > FM3 BAND Rs ae] N 2 MODE 3 ossu >, TR » Ye Hold. AR ILES TT ATITTTS —— “SSM” flashes, then disappears when automatic presetting is over. Local FM stations with the strongest signals are searched and stored automatically in the FM band.
| ENO6-11_KD-G42[U_UHJtindd 7 11/9105 2:52:44 pu | |
I Manual presetting Ex: Storing FM station of 92.5 MHz into preset Disc operations
number 4 of the FM1 band. . . . Playing a disc in the unit mms
> FM1—> EM2 > FM3 PANN
3 _v RER ——5 ; DIN AI tracks will be played repeatedly until you eds AG change the source or eject the disc. ol : = Preset number flashs for a while. To stop play and eject the (EX disc
| ÉTUDE Playing discs in the CD changer ms
à FM1—- FM2 > FM3 AI discs in the magazine will be played BANDE ge: Paye NY ane] repeatedly until you change the source.
à peatedly until y gs 2 2 NS + . + Ejecting the magazine will also stop playing. _ ® Select the preset station (1 - 6) you ®
NE ou ou © ve eue © PER > @W (ET IN) Cole ares) ares, Fe Li
& * If you have changed the external input setting to “EXT IN” (see page 13), you
cannot select the CD changer.
For disc number from 01 - 06:
For disc number from 07 - 12:
About MP3 and WMA discs
MP3 and WMA “tracks” (words “file” and “track” are used interchangeably) are recorded in “folders.”
About the CD changer
It is recommended to use a JVC MP3-compatible CD changer with your unit. You can also connect other CH-X series CD changers (except CH-X99 and CH-X100). These units are not compatible with MP3 discs.
You cannot play any WMA disc in the CD changer.
You cannot use the KD-MK series CD changers with this unit.
Disc text information recorded in the CD Text can be displayed when a JVC CD Text compatible CD changer is connected.
For connection, see Installation/Connection Manual (separate volume).
To fast-forward or reverse the track
To go to the next or previous tracks
To go to the next or previous folders (only for
For MP3 discs: For WMA discs:
To locate a particular track (for CD) or folder {for MP3 or WMA discs) directly
To select a number from 01 - 06:
SN To select a number from 07 - 12:
+ To use direct folder access on MP3/WMA discs, it is required that folders are assigned
with 2-digit numbers at the beginning of their
folder names—01, 02, 03, and so on.
To select a particular track in a folder (for MP3 or WMA discs):
& CHR DEN | Other main functions | Changing the display information ä I Skipping tracks quickly during play DEPS = à 22 g mu Only possible on JVC k I While playing an audio CD or a CD Text = MP3-compatible CD changer p'aying CAI— Disctitle / performer*! + For MP3 or WMA discs, you can skip tracks À Ÿ within the same folder. <—_ Tradktitle”! GT) Ex: To select track 32 while playing tracks . . 4 whose number is a single digit (1 to 9) D While playing an MP3 or a WMA disc + When “TAG DISP” is set to “TAG ON” 1 Te (see page 13) CA] Album name / performer folder name*) (Œ) 2 ZT > trak1t09-> Trad 10 ! Ÿ CS OS 2 < Track title (file name*) + When “TAG DISP” is set to “TAG OFF” à Each time you press the button, you can CA ]-—- folder name D & skip 10 tracks. n + After the last track, the first track will be . selected and vice versa. Filename 7) 3 = Trak31> 9 > CR CE CA ] : Clock with the current track number AN: : Elapsed playing time with the current track number
M Prohibiting disc ejection You can lock a disc in the loading slot. **_ Ifthe current disc is an audio CD, ‘NO NAME” appears. NE information, folder name and file name appear. In this case, the TAG indicator will not light up.
VALLILIT AT IN ETT CALE] Eu Li
To cancel the prohibition, repeat the same procedure.
| ENO6-11_KD-G42S[U_UH]indd 10 1148105 «3903 pu | |
| RE T | & CR ER | |
| Selecting the playback modes Sound adjustments
You can use only one of the following playback ; Z modes at a time” You can select a preset sound mode suitable to [EI the music genre (C-EQ: custom equalizer). Ü Z 1 NODE BR C USER > ROCK > CLASSIC mi “au JAZZ <HIP HOP < POPS 2 Select your desired playback mode. & DT = Repeat pl: pas à NL epeat play FR OCK ES Ex: When "ROCK is selected Mod Pl tedi erre _ TEpeare " Preset values! BAS | TRE | LOUD : The current track. @D FLDR RPT* : All tracks ofthe current Indication (For) (bass) | reble) | (oudness) folder. ©) ED USER 0 | 00 | orr DISC RPT* : All tracks ofthe current disc. (Flat sound) ROCK RPTOFF : Cancel +03 | +01 | ON : Cancels. (Rock or disco music) m Randomplay 2" CLASSIC ; +01 -02 OFF > (Classical music) " POPS & Mode Plays at random (Light music) +04 | +01 | OFF FLDR RND*': All tracks of the current HIP HOP folder, then tracks of the next (funk +02 | 00 | ON folder andsoon D) (nor rap music) DISCRND : Alltracks ofthe current disc. JAZZ (Jazz music) +02 | +03 | OFF MAG RND* : All tracks of the inserted RNDOFF _ : Cancel. Fr | Adjusting the sound * Only while playing an MP3 or a WMA disc. You can adjust the sound characteristics to your *# Only while playing discs in the CD preference. changer. 1 s " 7 BAS > TRE >FAD > SEL, Qi ER< VOL <- SUB. W <- LOUD N To be continued...
K Indication [Range]
BAS*! (bass) Adjust the bass. [-06 to +06]
TRE*! (treble) Adjust the treble. [-06 to +06]
FAD* (fader) Adjust the front and rear speaker balance. [RO6 to F06]
BAL* (balance) Adjust the left and right speaker balance. [LO6 to RO6]
LOUD*1 (loudness) Boost low and high frequencies to produce a well-balanced sound at low volume level. [LOUD ON or LOUD OFF]
SUB.W*: (subwoofer) Adjust the subwoofer output level. [00 to 08]
VOL (volume) Adjust the volume. [00 to 30 or 50*3]
*1_ When you adjust the bass, treble, or loudness, the adjustment you have made is stored for the currently selected sound mode (C-EQ) including “USER.”
2 If you are using a two-speaker system, set the
fader level to “00.”
This adjustment cannot affect the subwoofer
This takes effect only when a subwoofer is
Displayed only when “L/O MODE" is set to
“WOOFER” (see page 13)
Depending on the amplifier gain control
setting. (See page 13 for details.)
General settings — PSM You can change PSM (Preferred Setting Mode) items listed in the table that follows.
Sr 2 Select a PSM item. ON ENS
3 Adjust the PSM item selected.
410 Ex fe “DIMMER" is selected
4 Repeat steps 2 and 3 to adjust other PSM items if necessary.
5 Finish the procedure.
| EN12-17_KD-G42S[U_UH]indd 12
| RE T | & CR ER | |
Indications Selectable settings, [reference page]
DEMO DEMO ON : {Initial]; Display demonstration will be activated ZT Display automatically if no operation is done for about 20 seconds, [en demonstration [6]. OÙ
DEMO OFF : Cancels. Z ii CLOCKH 1-12, [6] Hour adjustment [initial: 1 (1:00)] CLOCKM 00 - 59, [6]
Minute adjustment [Initial: 00 (1:00)]
DIMMER oN + Dims the display illumination of this unit. Dimmer OFF + [Initial]: Cancels. SCROLL*s ONCE : {Initial}; Scrolls the disc information once. Scroll AUTO : Repeats scrolling (5-second intervals in between). OFF + Cancels.
+ Pressing DISP for more than one second can scroll the display regardless of the setting.
WOOFER*7 Low + Frequencies lower than 90 Hz are sent to the subwoofer. Subwoofer cutoff MID + [Initial]: Frequencies lower than 135 Hz are sent to the frequency subwoofer.
HIGH + Frequencies lower than 180 Hz are sent to the subwoofer. as)
® EXT IN*S CHANGER : {Initial}; To use a JVC CD changer, [8], an Apple iPod or a External input JVC D. player, [14].
EXTIN _: To use any other external component than the above, [16]. L/O MODE When connecting the amplifier or subwoofer, set this correctly.
[Initial]; Select if the REAR LINE OUT terminals are used for connecting the speakers through an external amplifier.
Line outputmode REAR WOOFER _: Select if the REAR LINE OUT terminals are used for connecting a subwoofer through an external amplifier. TAG DISP TAGON _: {Initial}; Shows the Tag information while playing MP3/ Tag display WMA tracks, [10]. TAGOFF : Cancels. AMP GAIN You can change the maximum volume level of this unit. Amplifier gain LOWPWR : VOL 00 - VOL 30 (Select this if the maximum power of control the speaker is less than 50 W to prevent them from being damaged.)
HIGH PWR : [Initial]: VOL 00 - VOL 50
# Some characters or symbols will not be shown correctly (or will be blanked) on the display. *7 Displayed only when “L/O MODE” is set to “WOOFER.” * Displayed only when one of the following sources is selected FM, AM, or DISC.
| EN12-17_KD-G42S[U_UH]indd 13 11/22/05 g:21:41 nu | |
iPod player operations O Adjust the sound as you want. (See pages 11 and 12.)
I PR his unit is ready for operating an Apple iPod + Make sure the equalizer on the iPod ar D ©: 21VC D. player from the control panel. D. player is deactivated. Z D Before operating your iPod or D. player: To pause”: or Connect either one of the following (separately | stop: playback purchased) to the CD changer jack on the rear To resume Of this unit. layback, press it + Interface adapter for iPod°—KS-PD100 for P' controlling an iPod. ge + D. player interface adapter —KS-PD500 for To fast-forward or controlling a D. player. reverse the track + For connection, see Installation/Connection Manual (separate volume). To goto the next + For details, refer also to the manual supplied or previous tracks with the interface adapter. #1 For iPod
Make sure to turn off this unit or turn off the
vehicle’ ignition switch before connecting
® or disconnecting the iPod or D. player. Selecting a track from the menu
1 Enter the main menu.
Preparations: Make sure “CHANGER” is selected for the /2
external input setting, see page 13. €) 0 ::
AT & Now the A/V/H4 vw» A buttons work as the menu selecting buttons*3. (2) ALLAN 7 IPOD/D-PLAVER =>
Playback starts automatically from where it has been paused*! or stopped*?
2 Select the desired menu.
<— TRACK<— (back to the beginning)
| EN12-17_KD-G425[U_UH]indd 14 11/22/05 sz252 au | |
3 Confirm the selection. = Random play E To move back to the previous — C' menu, press A. D a | ALBM RND*: END >) U Functions the same as “Shuffle Albums” of [ea + Ifa track is selected, playback starts the iPod. automatically. + Ifthe selected item has another layer, you SONGRND/RND ON D will enter the layer. Repeat steps 2 and 3 Functions the same as “Shuffle Songs” ofthe until the desired track is played. iPod or “Random Play On” of the D. player. + Holding #4 V/1 A can skip 10 RND OFF items at a time. =. Cancels. # The menu selecting mode will be canceled: #4 For iPod: Only if you select “ALL” in = If no operations are done for about “ALBUMS” of the main “MENU.”
5 seconds. - When you confirm the selection of a track.
To check the other information while listening to an iPod or a D. player
| Selecting the playback modes =
2 Select your desired playback mode.
ONE RPT ŒD Functions the same as “Repeat One” of the iPod or “Repeat Mode One” for the D. player.
ALL RPT Functions the same as “Repeat All” of the iPod or “Repeat Mode AI” for the D. player.
You can connect an external component to
the CD changer jack on the rear using the Line
Input Adapter—KS-U57 (not supplied) or AUX Input Adapter—KS-U58 (not supplied).
+ For connection, see Installation/Connection Manual (separate volume).
For listening to the iPod or D. player, refer to pages 14 and 15.
o ATEN = BATIN (or D-cH) >
ES IF “EXT IN” does not appear, see page 13 and select the external input (“EXT IN”).
[2] Turn on the connected component and start playing the source.
© aus the volume. + 4 K
4) Adjust the sound as you want. (See pages 11 and 12.)
To check the other information while listening to an external component
D How to clean the connectors
Frequent detachment will deteriorate the connectors.
To minimize this possibility, periodically wipe the connectors with a cotton swab or cloth moistened with alcohol, being careful not to damage the connectors.
I Moisture condensation
Moisture may condense on the lens inside the CD player in the following cases:
+ After starting the heater in the car.
+ Ifit becomes very humid inside the car. Should this oceur, the CD player may malfunction. In this case, eject the disc and leave the unit turned on for a few hours until the moisture evaporates.
D How to handle discs
When removing a disc from Center holder its case, press down the center holder of the case and lift the AN disc out, holding it by the edges. + Always hold the disc by the edges. Do not touch its recording surface. When storing a disc into its case, gently insert the disc around the center holder (with the printed surface facing up). + Make sure to store discs into the cases after use.
I To keep discs clean
A dirty disc may not play correctly. 5.
If a disc does become dirty, wipe it
with a soft cloth in a straight line
from center to edge.
+ Do not use any solvent (for example, conventional record cleaner, spray, thinner, benzine, etc.) to clean discs.
| EN12-17_KD-G42S[U_UH]indd 16
| RE T | & CR ER | |
I To play new discs Disc operations mms
New discs may have some rough Caution for DualDisc playback
spots around the inner and outer + The Non-DVD side of a “DualDisc” does edges. If such a disc is used, this not comply with the “Compact Disc Digital unit may reject the disc. Audio” standard. Therefore, the use of Non- To remove these rough spots, rub the edges with DVD side of a DualDisc on this product may a pencil or ball-point pen, etc. not be recommended.
ENGLISH Do not use the following discs: General + This unit has been designed to reproduce Warped disc Xe CDs/CD Texts, and CD-Rs (Recordable)/ CD-RWs (Rewritable) in audio CD (CD-DA), Sticker &- Stickerresidue MP3 and WMA formats. + When a disc has been Loaded, selecting
“DISC” for the playback source starts disc
2x Stick-on label play.
+ When a disc is inserted upside down, the disc
automatically ejects. + Do not insert 8 cm discs (single CD) and More about this unit unusual shape discs (heart, flower, etc.) into
. : the loading slot. Basic operations mn . h : Playing a disc Turninq on the power ere . | + While fast-forwarding or reversing on an MP3 + By pressing SRC on the unit, you can also turn Gr WMA disc, you can only hear intermittent on the power. Ifthe source is ready, playback
sounds. also starts.
Turning offthe power
+ If you turn offthe power while listening to a dise, disc play will start from where playback has been stopped previously, next time you turn on the power.
Playing a CD-R or CD-RW
+ Use only “finalized” CD-Rs or CD-RWs.
+ This unit can play back only files of the same type which are first detected if a disc includes both audio CD (CD-DA) files and MP3/ WMA files.
This unit can play back multi-session discs;
Tuner operations Sn however, unclosed sessions will be skipped
Storing stations in memory while playing. cc Some CD-Rs or CD-RWSs may not play + During SSM search...
ù . back on this unit because of their disc - All previously stored stations are erased and : . characteristics, or for the following reasons: stations are stored newly. : k . — Discs are dirty or scratched. — Received stations are preset in No. 1 (lowest . . - Moisture condensation occurs on the lens frequency) to No. 6 (highest frequency). inside the unit — When SSM is over, the station stored in ô S ticdi ù à ' = The pickup lens inside the unit is dirty. No. 1 will be automatically tuned in. + When storing a station manually, the previously preset station is erased when a new station is stored in the same preset number.
- CD-R/CD-RW on which the files are written with “Packet Write” method.
- There are improper recording conditions (missing data, etc.) or media conditions stained, scratched, warped, etc.).
+ CD-RWSs may require a longer readout time
since the reflectance of CD-RW is lower than
that of regular CDs.
Do not use the following CD-Rs or CD-RWs:
- Discs with stickers, labels, or a protective seal stuck to the surface.
- Dises on which labels can be directly printed by an ink jet printer.
Using these discs under high temperatures or
high humidities may cause malfunctions or
Playing an MP3/WMA disc
+ This unit can play back MP3/WMA files with the extension code <.mp3> or <wma> (regardless of the letter case—upper/lower).
+ This unit can show the names of albums,
artists (performer), and Tag (Version 1.0, 1.1,
2.2, 2.3, or 2.4) for MP3 files and for WMA
This unit can display only one-byte
characters. No other characters can be
correctly displayed.
This unit can play back MP3/WMA files
meeting the conditions below:
- Bit rate: 8 kbps — 320 kbps
- Sampling frequency: 48 kHz, 44.1 kHz, 32 kHz (for MPEG-1) 24 kHz, 22.05 kHz, 16 kHz (for MPEG-2)
- Disc format: ISO 9660 Level 1/Level 2, Romeo, Joliet, Windows long file name
The maximum number of characters for file/
folder names vary among the disc format used
(includes 4 extension characters—<.mp3> or
— ISO 9660 Level 1: up to 12 characters
— ISO 9660 Level 2: up to 31 characters
- Romeo: up to 128 characters
— Joliet: up to 64 characters
- Windows long file name: up to 128 characters
+ This unit can play back files recorded in VBR
(variable bit rate).
Files recorded in VBR have a discrepancy
in elapsed time display, and do not show
the actual elapsed time. Especially, after
performing the search function, this
difference becomes noticeable.
This unit can recognize a total of 512 files, of
200 folders, and of 8 hierarchies.
This unit cannot play back the following files:
- MP3 files encoded with MP3i and MP3 PRO format.
- MP3 files encoded in an inappropriate format.
- MP3 files encoded with Layer 1/2.
- WMA files encoded with lossless, professional, and voice format.
- WMA files which are not based upon Windows Media® Audio.
- WMA files copy-protected with DRM.
- Files which have the data such as WAVE, ATRACG, etc.
+ The search function works but search speed is not constant.
+ If you change the source, playback also stops (without ejecting the disc). Next time you select “DISC” for the playback source, disc play starts from where it has been stopped previously.
+ Ifthe ejected disc is not removed within 15 seconds, the disc is automatically inserted again into the loading slot to protect it from dust. (Disc will not play this time.
General settings —PSM mm
+ If you change the “AMP GAIN” setting from “HIGH PWR to “LOW PWR” while the volume level is set higher than “VOL 30,” the unit automatically changes the volume level to “VOL 30.”
iPod” or D. player operations
+ When you turn on this unit, the iPod or D. player is charged through this unit.
+ While the iPod or D. player is connected, all operations from the iPod or D. player are disabled. Perform all operations from this unit.
+ Ifthe text information includes more than 8 characters, it scrolls on the display (see also page 13). This unit can display up to 40 characters.
What appears to be trouble is not always serious.
When operating an iPod or a D. player,
some operations may not be performed
correctly or as intended. In this case, visit the
following JVC web site:
For iPod users: <http://www.jvc.co.jp/ english/car/support/ks-pd100/inde
For D. player users: <http://www.jve.c english/car/support/ks-pd500/index.html>
Check the following points before calling a service
center. Symptoms Remedies/Causes + Sound cannot be heard from the + Adjust the volume to the optimum level. speakers. + Check the cords and connections.
The unit does not work at all.
Reset the unit (see page 2).
SSM automatic presetting does not work.
Store stations manually.
Static noise while listening to the radio.
Connect the antenna firmly.
+ Disc cannot be played back.
Insert the disc correctly.
+ CD-R/CD-RW cannot be played back. + Tracks on the CD-R/CD-RW cannot be
+ Insert a finalized CD-R/CD-RW. + Finalize the CD-R/CD-RW with the component
E | _stipped. which you used for recording.
À | » Disc can be neîther played back nor | + Unlock the disc (see page 10).
| _cjected. + Ejectthe disc forcibly (see page 2).
& | + Disc sound is sometimes interrupted. | « Stop playback while driving on rough roads.
+ Change the disc. + Check the cords and connections.
“NO DISC” appears on the display.
Insert a playable disc into the loading slot.
+ Disc cannot be played back.
+ Use a disc with MP3/WMA tracks recorded in the format compliant with ISO 9660 Level 1, Level 2, Romeo, or Joliet.
+ Add the extension code <.mp3> or <.wma> to the file names.
+ Noiseis generated.
(‘CHECK keeps flashing on the display).
+ A longer readout time is required
Do not use too many hierarchies and folders.
you have intended them to play.
+ Tracks do not play back in the order
Playback order is determined when the files are
+ Elapsed playing time is not correct.
This sometimes occurs during play. This is caused by how the tracks are recorded on the disc.
+ “NO FILES” appears on the display.
Insert a disc that contains MP3/WMA tracks.
+ Correct characters are not displayed
This unit can only display letters (upper case), numbers, and a limited number of symbols.
+ “NO DISC” appears on the display.
Insert a disc into the magazine.
+ “NO MAG? appears on the display.
Insert the magazine.
+ “RESET 8° appears on the display.
+ “RESET 1” - “RESET 7” appears on
Press the reset button ofthe CD changer.
+ The CD changer does not work at all.
Reset the unit (see page 2).
on or does not work.
+ The iPod or D. player does not turn
+ Check the connecting cable and its connection. + Update the firmware version. + Change the battery.
+ Buttons do not work as intended.
The functions of the buttons have been changed. Press MODE before performing the operation.
+ The sound is distorted.
Deactivate the equalizer either on the unit or the iPod/D. player.
“NO IPOD” or “NO DP” appears on
Check the connecting cable and its connection.
The headphones are disconnected during playback. Restart the playback operation using the control panel (see page 14).
No sound can be heard when connecting an iPod nano.
Disconnect the headphones from the iPod nano.
No sound can be heard.
iPod/D. player playbad
when connecting a D. player.
“ERROR 01” appears on the display
Disconnect the adapter from the D. player. Then, connect it again.
“NO FILES” or “NO TRACK” appears on the display.
No tracks are stored. Import tracks to the iPod or
“RESET 1” - “RESET 7” appears on
Disconnect the adapter from both the unit and iPod/D. player. Then, connect it again.
“RESET 8” appears on the display.
Check the connection between the adapter and
The iPod's or D. players controls do not work after disconnecting from
Reset the iPod or D. player.
| EN18-21 KD-G42S[U_UH]indd 20
I AUDIO AMPLIFIER SECTION Maximum Power Output: Front: 50 W per channel Rear: 50 W per channel Continuous Power Output (RMS): Front: 19 W per channel into 4 Q, 40 Hz to 20 000 Hz at no more than 0.8% total harmonic distortion. Rear: 19 W per channel into 4 Q, 40 Hz to 20 000 Hz at no more than 0.8% total harmonic distortion. Load Impedance: 4 Q (4 Q to 8 Q allowance) Tone Control Range: Bass: +10 dB at 100 Hz Treble: +10 dB at 10 kHz Frequency Response: 40 Hz to 20 000 Hz Signal-to-Noise Ratio: 70 dB Line-Out Level/Impedance: 2.5 V/20 kQ load (full scale) Subwoofer-Out Level/Impedance: 2.0 V/20 kQ load (full scale) Output Impedance: 1 kQ Other Terminal: CD changer
I TUNER SECTION Frequency Range: FM: 87.5 MHz to 108.0 MHz AM: 531 kHz to 1 602 kHz
[FM Tuner] Usable Sensitivity: 11.3 dBf (1.0 uV/75 Q) 50 dB Quieting Sensitivity: 16.3 dBf (1.8 1/75 Q) Alternate Channel Selectivity (400 kHz): 65 dB Frequency Response: 40 Hz to 15 000 Hz Stereo Separation: 30 dB Capture Ratio: 1.5 dB
Sensitivity: 20 uV Selectivity: 35 dB I CD PLAYER SECTION Type: Compact dise player Signal Detection System: Non-contact optical pickup (semiconductor laser) Number of Channels: 2 channels (stereo) Frequency Response: 5 Hz to 20 000 Hz Dynamic Range: 96 dB Signal-to-Noise Ratio: 98 dB Wow and Flutter: Less than measurable limit MP3 Decoding Format:
Max. Bit Rate: 320 kbps WMA (Windows Media® Audio) Decoding Format:
Max. Bit Rate: 192 kbps
I GENERAL Power Requirement: Operating Voltage:
DC 144 V (11 V to 16 V allowance) Grounding System: Negative ground Allowable Operating Temperature:
0°C to +40°C Dimensions (W x H x D): Installation Size (approx): 182 mm X 52 mm X 150 mm Panel Size (approx.):
188 mm X 58 mm X 11 mm Mass (approx.}:
14 kg (excluding accessories)
Design and specifications are subject to change without notice.
+ Microsoft and Windows Media are either registered trademarks or trademarks of Microsoft Corporation in the United States and/or other countries.
iPod is a trademark of Apple Computer, Inc., registered in the US. and other countries.
| EN18-21_KD-G42S[U_UHJtindd 21 11723105 ssosepu | |
Having TROUBLE with operation? Please reset your unit
Refer to page of How to reset your unit
1105DTSMDTJEIN EN, CT © 2005 Victor Company of Japan, Limited
This unit is designed to operate on 12 V DC, NEGATIVE ground electrical systems. If your vehicle does AE {ET (fR ÈS 12 V + > RSR © LÉ HE FE — » DRE —UE
not have this system, a voltage inverter is required, which can be purchased at JVC car audio dealers. Æ + HIDE JVC WARNINGS ES CO)
To prevent short circuits, we recommend that you disconnect the battery’s negative terminal and make all Æ51E #84 » HAE ZAR RE pi + BBA NÉ UE + AGDE ER ARRET «
electrical connections before installing the unit. : RRTBÉPUNSAÉMMRENMRERS 0
- Be sure to ground this unit to the cars chassis again after installation.
Notes: o ARR] + ART JVC ÉRT EPSIRG AE ° + Replace the fuse with one of the specified rating. If the fuse blows frequently, consult your JVC car audio KT AZ XKS 50 W 40-80 ° HAT X
dealer. 50 W : “AMP GAIN” SE lé * DABSIE #3 RICE FSU AUS 13 :) + Itis recommended to connect to the speakers with maximum power of more than 50 W (both at + APE + A RÉEUT D 'ERME
the rear and at the front, with an impedance of 4 Q to 8 Q). If the maximum power is less than + ARE à BCP ARE © ER + RSR + ND EAU »
50 W, change “AMP GAIN” setting to prevent the speakers from being damaged (see page 13 ofthe INSTRUCTIONS).
+ To prevent short-circuit, cover the terminals of the UNUSED leads with insulating tape.
+ The heat sink becomes very hot after use. Be careful not to touch it when removing this unit.
PRECAUTIONS on power supply and speaker connections: SRNSSREÉRISSIE. + DO NOT connect the speaker leads of the power cord to the car battery; otherwise, the unit * DZIOSMRN MERE ’ SA RER °
will be seriously damaged. + BEFORE connecting the speaker leads of the power cord to the speakers, check the speaker wiring in your car.
F Parts list for installation and connection RRRRMÉRMTIHES The following parts are provided for this unit. After checking them, please set them correctly. FU CEEREAR HEART o MEMEDU + TERÉRONEHESEN e @1® © O Hard case/Control panel Sleeve Trim plate RE IENR PHARES MEANTHE © ® © ® ) Power cord Washer (05) S Lock nut (M5) Mounting bo (MS x 20 rm) D HRLAUR SARA (05) —7 SERRE (MS) BAÈREE (MS x 20 mm) Où N
The following illustration shows a typical installation. If you have any questions or require information regarding installation kits, consult your JVC car audio dealer or a company supplying kits. + If you are not sure how to install this unit correctly, have it installed by a qualified technician.
*1_ When you stand the unit, be careful not to damage the fuse on the rear.
AIRE RU + ANDRE MORT RER ©
Do the required electrical connections. HETT AT RERR ARE °
Bend the appropriate tabs to hold the sleeve firmly in place.
FRS ROBIN + HERO E TER ZX HP Removing the unit Before removing the unit, release the rear section.
FRET EMEA HE à RENARD CNT AU RUE RTE RENTNAEE à
Insert the two handles, then pull them as illustrated so that the unit can be removed. BARON HAN A BURRE A HAE» 4
In a Toyota car for example, first remove the car radio and install the unit in its place. DURE (TOYOTA) ÉCL A P: CRAN EUNCRERE + PACA OR CEE HURLE «
SÉRARRARET (M5 x 8 mm)*2
Bracket*2 rime Install the unit at an angle of less SC | . than 30”. Note : When installing the unit on the mounting bracket, make sure to use the 8 mm-long screws. If longer screws are RUMEUR 307 ÉÉUIE à used, they could damage the unit. FERRER 3OT HSE #E 2 HMS AE LUS + HEDAUME 8 mm FENOMR ST « AOL ANMMAAET à CHU « TROUBLESHOOTING DEEE « The fuse blows. + PRRARIEEN ° * Are the red and black leads connected correctly? Fe RRÉEAT ER AREA SAS BE EE 6 BA IE ME? + Power cannot be turned on. + ERTÉAÈRSE * Is the yellow lead connected? RÉ CR ARE FREE? + No sound from the speakers. .BERLÉBE * Is the speaker output lead short-circuited? FRE PE OS AR BEN AT? + Soundis distorted. .BÈRkÉ ©
* Is the speaker output lead grounded? * Are the “_” terminals of Land R speakers grounded in common?
- Noise interfere with sounds.
* Is the rear ground terminal connected to the car’s chassis using shorter and thicker cords?
- This unit becomes hot. * Is the speaker output lead grounded? * Are the “_” terminals of Land R speakers grounded in common?
- This unit does not work at all. * Have you reset your unit?
Ë RE ELECTRICAL CONNECTIONS A | Typical connections / HAE À
damage to this unit.
T Connect the colored leads of the power cord in the order specified in the illustration below. 2 Connect the antenna cord.
3 Finally connect the wiring harness to the unit.
Before connecting: Check the wiring in the vehicle carefully. Incorrect connection may cause serious: Æ4RB : REC PI HUAREE »
The leads of the power cord and those of the connector from the car body may be different in color.
FA To external components (see diagram (I)
#2 Before checking the operation of this unit prior to installation, this lead must be connected, otherwise pover cannot be turned on.
#1 Not supplied for this unit. A ARRÉAERERE ©
SEX BAR To metallic body or chassis of the car
BE ERREUR To a live terminal in the fuse block connecting to the car battery ing the isniion switch) (consent 12 V)
8 JP] RALTCH EURE To an accessory erminal in the fuse block
® ; Fe CPAM Te the automatic antenna if any (250 mA max.)
Blue with htc ie sripe
To the remote lead of other equipment (200 mA max.)
HE — ARRETE AR (REX 200 mA )
White with black stripe
À Eu ACL White hË RÉ
cr with black stripe
Left speaker (front)
Right speaker (front)
ET Green with black stripe Green PR ÉLATE R EEAX ke
Purple with black stripe
ERP A ERA Right speaker (rear)
HER (RE Left speaker
E Connecting the external amplifier or subwoofer/ ÉÉÆSJMITÉEMARLEERERES You can connect an amplifier to upgrade your car stereo system. + Connect the remote lead (blue with white stripe) to the remote lead of the other equipment so that it can be controlled through this unit. + Disconnect the speakers from this unit, connect them to the amplifier. Leave the speaker leads of this unit unused. Remo!
You can connect a power amplifier for rear speakers. LT A EP tir RE ED #1
To the remote lead of other equipment or automatic antenna ifany RES ARR NÉE
Remote lead (Blue with white stripe)
#3 Firmly attach the ground wire to the metallic body or to the chassis of the car—to the place uncoated with paint (if coated with paint, remove the paint before attaching the wire). Failure to do so may cause damage to the unit
#4 Signal cord (not supplied for this unit)
Fa RERERAE CR REREHE You can connect these components as illustrated below. The iPod*5 or D. player can be connected using an interface adapter (not supplied) —KS-PD100 (for iPod) or KS-PD500 (for D. player).
fore connecting the e
Apple iPod (separately purchased) Apple iPod (53#HIH#)
or Li JVC D. player (separately purchased)
JVC D. player (53 # HE)
JVC CD changer JVC CD He
#5 iPod #£ Apple Computer, Inc.
iPod is a trademark of Apple Computer, Inc, registered in the U.S. and other countries.
*6 Connecting cord supplied for your CD changer
CEUR *6 fig CD Hair Ru MRAT AREA
#7 Line Input Adapter KS-U57 (not supplied for this unit)
For installation and connections, refer to the separate manual. VKa3aHHA 110 YCTAHOBKE H BINOIHEHHIO COCHUHEHM NPHBOHATCA B OTHCAHOÏË HHCTPYKLUH.
Thank you for purchasing a JVC product. Please read all instructions carefully before operation, to ensure your complete understanding and to obtain the best possible performance from the unit.
IMPORTANT FOR LASER PRODUCTS
1. CLASS 1 LASER PRODUCT
2. CAUTION: Do not open the top cover. There are no user serviceable parts inside the unit leave all servicing to qualified service personnel.
3. CAUTION: Visible and invisible laser radiation when open and interlock failed or defeated. Avoid direct exposure to beam.
4. REPRODUCTION OF LABEL: CAUTION LABEL, PLACED OUTSIDE THE UNIT.
ENGLISH ASE: Su UARINS + no TI ser ecsnlg lserstling en Egpas 5 opel Beta à rer sl
Es How to use the MODE button
If you press MODE, the unit goes into functions mode, then the number buttons and A/Ww buttons work as different function buttons.
Ex: When number button 2 works as MO (monaural) button.
+ Your preset adjustments will also be erased.
Ii How to forcibly eject a disc
T ©/1 Time countdown indicator NTI + To use these buttons for their original
functions again after pressing MODE, wait for 5 seconds without pressing any of these buttons until the functions mode is cleared or press MODE again.
+ Ifthis does not work, reset your unit. + Be careful not to drop fhe disc when it ejects.
D How to detach/attach the control panel
Detaching.. Attaching..
| ENO2-05KD-G427[EEJIindé 2 11/22/05 5200 pu | |
| RE T | & CR ER | |
Eh How to read this manual
+ Button operations are mainly explained with
CONTENTS Searching for your favorite FM RDS programme …
the illustrations in the table below. Z + Some related tips and notes are explainedin Control panel … 1
“More about this unit” (see pages 21 - 23). OU Remote controller — rw«5o … ss F Getting started... 6
Press briefly. Basic operations. 6
Radio operations .… om
R Press repeatedly. FM RDS operations. …… 8
(@) Press either Disc operations … NS “ one. Playing a discin the unit ° Playing discs in the CD changer. Press and hold until your | | Sound adjustments…. desired response begins.
General settings — PSM ‘ Ho
Press and hold both DAB tuner operations. & The following marks are used to indicate...
buttons at the same time. | iPod®/D. player operations … Other external component operations. 20 More about this unit
: Built-in CD player operations. " Per o Maintenance
: External CD changer operations.
Troubleshooting… Specifications …
ee) : Indicator displayed for the
corresponding operation.
If you need to operate the unit while driving,
be sure to look ahead carefully or you may be | Forsafety.….
involved in a traffic accident.
+ Do not raise the volume level too much, as this will block outside sounds, making driving dangerous.
Caution on volume setting: + Stop the car before performing any
complicated operations.
Discs produce very little noise compared with other sources. Lower the volume
before playing a disc to avoid damaging Temperature inside the car...
the speakers by the sudden increase of the If you have parked the car for a long time in hot
output level. or cold weather, wait until the temperature in the car becomes normal before operating the unit.
Remote controller — »u.rx50 | Main elements and features
I installing the lithium coin battery (CR2025)
Aim the remote controller directly at the remote sensor on the unit. Make sure there is no obstacle in between.
+ Do not install any battery other than CR2025 or its equivalent; otherwise, it may explode.
+ Store the battery in a place where children cannot reach to avoid risk of accident.
+ To prevent the battery from over-heating, cracking, or starting a fire:
— Do not recharge, short, disassemble, heat the battery, or dispose of it in a fire.
— Do not leave the battery with other metallic materials.
— Do not poke the battery with tweezers or similar tools.
— Wrap the battery with tape and insulate when throwing away or saving it.
ENGLISH A] G/VATT (standby/on/attenuator) button + Turns the power on if pressed briefly or attenuates the sound when the power is on. + Turns the power offif pressed and held. 2] A U (up) / D (down) # buttons + Changes the FM/AM/DAB bands with
Changes the preset stations with D w.
Changes the folder of the MP3/WMA
While playing an MP3 disc on an
MP3-compatible CD changer:
— Changes the disc if pressed briefly.
- Changes the folder if pressed and held.
While listening to an Apple iPod” or a
- Pauses/stops or resumes playback with D y.
- Enter the main menu with À U. (Now A U/D v/4R/F» work as the menu selecting buttons.)*
B] VOL -/ VOL + buttons
[6] 4R (reverse) / F (forward) » buttons Volume level appears. + Searches for stations (or services) if pressed briefly. + Searches for ensembles if pressed and held. + Fast-forwards or reverses the track if pressed and held. + Changes the tracks of the disc if pressed (5) Adjust the sound as you want. (See bricfly. pages 13 and 14.) + While listening to an iPod or a D. player QJ menu slecling mode} se cr To drop the volume ina - Selects an item if pressed briefly. (Then, press D Y to confirm the selection.) moment (ATT) Fe - Skips 10 items at a time if pressed and To restore the sound, press held. itagain.
To turn off the power o1 Getting started Sn
C1] Turn on the power. + See also “General settings — PSM” on pages
CD-CHY/IPODY —— DIsc*
D.PLAYER*(or EXT IN) * You cannot select these sources ifthey [1] Canceling the display are not ready or not connected. demonstrations
Fa} Select “DEMO,” then “DEMO OFF.” NBANDE [2] Setting the clock N_æ Select “CLOCK H” (hour), then adjust
the hour. + For FM/AM tuner Select “CLOCK M” (minute), then
FM1-> FM2 > FM3 adjust the minute. a < — Select “24H/12H,” then “24H” (hour) or + For DAB tuner “12H” (hour).
DAB1 —> DAB2 3 Finish the procedure. CT pp8s ÆS O Adjust the volume. ER ù
/ To check the current dock 5 K time when the power is SX
| RE T | & CR ER | |
When an FM stereo broadcast is hard to Radio operations receive
I a 0 x à (ZALLAY Fm FM1/FM2/FN3/AM > OU ES Le. Z LU [2] EMT-> FM2 > FM3 ! SP AM < Light up when monaural mode is acivated. 22 Lights up when receiving an FM stereo Reception improves, but stereo effect will be broadcast with sufficient signal strength. lost. sr 5 H = _ To restore the stereo effect, repeat the same 9 93 T4 procedure. “MONO OFF” appears and the MO L indicator goes off. Selected band appears. (3 Start searching for a station. | Storing stations in memory EX You can preset six stations for each band. ° | | D FMstation automatic presetting— Ds a station is received, searching SSM (Strong-station Sequential A 2 ® To stop searching, press the same button Memory) again À Select the FM band (FM1 - FM3) you Note want to store into. FMI and FM2: 87.5 MHz - 108.0 MHz à FM1—> FM2 > FM3 BAND: EM3: 65.00 MHz - 74.00 MHz | SK > a 1 To tune in to a station manually 2 MODE In step @ above... 7 à 3 ossu — Rem ER, nov » Ye LI PARIRE AT — 5 Q pe Lu DM 7 E “SSM” flashes, then disappears when C2 2} is automatic presetting is over. [2] Select a desired station frequency. Local FM stations with the strongest signals are searched and stored automatically in the FM VAN band.
| ENO-11KD-G427EEJindé 7 11/22/05 ss247 pu | |
I Manual presetting Ex: Storing FM station of 92.5 MHz into preset FMRDS operations
number 4 of the FM1 band. What you can do RDS RDS (Radio Data System) allows FM stations es FM M 237 to send an additional signal along with their regular programme signals. By receiving the RDS data, this unit can do the following: Programme Type (PTY) Search (see the ŒN + following) TA (Traffic Announcement) and PTY 3 10 em Standby Receptions (see pages 9 and 15) Tracing the same programme automatically —Network-Tracking Reception (see page 10) Programme Search (see page 15)
LA Preset number flashes for a while.
Searching for your favorite
Listening to a preset station FM RDS programme ms You can tune in to a station broadcasting your SL FMI FM > FM RC Tu favorite programme by searching for a PTY code. à) + To store your favorite programme types, see & ) " prog ypes, ® @ 2 Select the preset station (1 - 6) you page 9. ù want. 0 en/es) ares) es] Rue POP X The last selected PTY code appears. To check the current clock time while (2) Select one of your favorite preset listening to an FM (non-RDS) or AM station programme types. + For FM RDS stations, see page 10. ou sw sur emo
Select one of the PTY codes (see page 10).
© sut searching for your favorite
| Using the standby receptions
I TA Standby Reception
TA Standby Reception allows the unit to switch temporarily to Traffic Announcement (TA) from any source other than AM.
The volume changes to the preset TA volume level if the current level is lower than the preset level (see page 15).
ENGLISH LS sen! RREH ER Ifthere is a station broadcasting a programme of the same PTY code as you 7e have selected, that station is tuned in.
To activate TA Standby Reception
The TP (Traffic Programme) indicator cither lights up or flashes.
Storing your favorite programme types
You can store six favorite programme types.
Ifthe TP indicator lights up, TA Standby Reception is activated.
Ifthe TP indicator flashes, TA Standby Reception is not yet activated. (This occurs when you are listening to an FM station without the RDS signals required for TA Standby Reception.)
ï G Gi A E ñ To activate TA Standby Reception, tune in to
another station providing these signals. The O] POP M | ROCK M | EASY M CLASSICSIAFFRIRS] VARIED TP indicator will stop flashing and remain lit.
À Select a PTY code (see page 8).
Preset programme types in the number buttons
To deactivate the TA Standby Reception 7 The TP indicator goes off.
2 Select the preset number (1 - 6) you want to store into.
I PTY Standby Reception
PTY Standby Reception allows the unit to switch temporarily to your favorite PTY
alé programme from any source other than AM. _ To activate and select your favorite PTY code ROCH M) 1e M MED Mn for PTY Standby Reception, see page 15. Ut The PTY indicator either lights up or flashes.
Ifthe PTY indicator lights up, PTY Standby Reception is activated.
Ifthe PTY indicator flashes, PTY Standby Reception is not yet activated.
To activate PTY Standby Reception, tune in to another station providing these signals. The
PTY indicator will stop flashing and remain TP lit.
Ex: When "ROCK M"is selected
3 Repeat steps 1 and 2 to store other PTY codes into other preset numbers.
4 Finish the procedure.
To deactivate the PTY Standby Reception, select “OFF” for the PTY code (see page 15). The PTY indicator goes off.
| ENO6-11KD-G427[EEJIind 11/22/05 ss24e pu | |
Trading the same programme— Disc operations Network-Tracking Reception
Playing a disc in the unit mms
When driving in an area where FM reception is not sufficient enough, this unit automatically tunes in to another FM RDS station of the same network, possibly broadcasting the same
ENGLISH All tracks will be played repeatedly until you change the source or eject the disc.
programme with stronger signals (see the illustration below).
When shipped from the factory, Network- Tracking Reception is activated.
To change the Network-Tracking Reception setting, see “AF-REG” on page 15.
To stop play and eject the Programme À broadcasting on different frequency areas PP'ay 1 (ESX (01-05)
Playing discs in the CD changer ms
All dises in the magazine will be played repcatedly until you change the source.
® + Ejecting the magazine will also stop playing. & © PTE > or ——>n > . …. * 1f you have changed the external input To check the current dock time while setting to “EXT IN” (see page 16), you ening to an FM RDS station cannot select the CD changer. Station name (PS) — Station (2) Select a disc. à | Frequency —> Programme type For disc number from 01 - 06: (PV) —+ Glock (back to the Ju ou ou 0 ver um beginning) DOG PTY codes For disc number from 07 - 12: NEWS, AFFAIRS, INFO, SPORT, EDUCATE, DRAMA, CULTURE, éplerlerler)er)er) SCIENCE, VARIED, POP M (music, ROCK M (musi) EASY (as M musi, LIGHT M (music, CLASSICS, OTHER M (musi, CM WEATHER, FINANCE, CHILDREN, SOCIAL, RELIGION, PHONE u IN, TRAVEL, LEISURE, JAZZ, COUNTRY, NATION M (music), OLDIES, FOLK M (musi), DOCUMENT ED
| ENOG-11KD-G427EEJindé 10 11/22/05 ss20 pu | |
| RE T | & CR ER | |
About MP3 and WMA discs To locate a particular track (for CD) or folder MP3 and WMA “tracks” (words “file” and (for MP3 or WMA discs) directl “track” are used interchangeably) are recorded TZ in “folders.” To select a number from 01 - 06: 5 760 guo sou 4 tar 1m et] About the CD changer aw/av)«v]/ev/2>) & It is recommended to use a JVC MP3- Si compatible CD changer with your unit. + You can also connect other CH-X series CD To select a number from 07 - 12: changers (except CH-X99 and CH-X100). 7e on oo 0 war emo These units are not compatible with MP3 aw/«V/«v]/ev/2>) discs. SSS + You cannot play any WMA disc in the CD changer. « You cannot use the KD-MK series CD + To use direct folder access on MP3/WMA changers with this unit. dises, it is required that folders are assigned + Disc text information recorded in the CD with 2-digit numbers at the beginning of their Text can be displayed when a JVC CD Text folder names—01, 02, 03, and so on.
compatible CD changer is connected.
+ For connection, see Installation/Connection Manual (separate volume). To select a particular track in a folder (for
To fast-forward or reverse the track
To go to the next or previous tracks
To go to the next or previous folders (only for
Rx: | CR LUE Other main functions | Changing the display information I Skipping tracks quickly during play TE (
I While playing an audio CD or a CD Text Only possible on JVC CAJ-CE-- visctitie/performer*:
MP3-compatible CD changer Tradktitie* 72) _
+ For MP3 or WMA discs, you can skip tracks
within the same folder. I While playing an MP3 or a WMA‘ disc + When “TAG DISP” is set to
“TAG ON? (see page 16)
CAJ- Album name / performer 1 P L (folder name*:) (523) Tradk title (file name*) a y + When “TAG DISP” is set to 2 AL to9-> Track 10 : 2TAG OFF” +20 CAJ-[CB ]-- Folder name 5)
© Each time you press the button, you can © pu p y File name 7) ”
skip 10 tracks. + After the last track, the first track will be selected and vice versa. CA] : Elapsed playing time with the current track number 3 : Clock with the current track number
ENGLISH Ex: To select track 32 while playing a track whose number is a single digit (1 to 9)
Ifthe current disc is an audio CD, a de aia ct “NO NAME” appears.
M Prohibiting disc ejection 2 Only fer the butin CD player.
Ifan MP3/WMA file does not have Tag
information, folder name and file name
A7 appear. In this case, the TAG indicator will CM not light up.
You can lock a disc in the loading slot.
To cancel the prohibition, repeat the same procedure.
| Selecting the playback modes Sound adjustments
You can use only one of the following playback ; ZT modes at a time. You can select a preset sound mode suitable to 2] É the music genre (C-EQ: custom equalizer). O 1 Z MODE 1 mu < ace 2 Select your desired playback mode. 2 USER -> ROCK > CLASSIC D My SNS I —IAZZ <-HIP HOP — POPS 1 mer F5 I A reset values| Bas | TRE | LOUD N Indication (For) (bass) | (treble) | (loudness) USER 00 00 OFF Mode Plays repeatedly (Flat sound) TRKRPT : The current track. Rock ., | +03 | +01 | ON FLDR RPT* : All tracks of the current (Rock or disco music) folder. ®) ED CLASSIC so Lo | or DISC RPT* : AlL tracks ofthe current disc. (Classical music) & ® POPS +04 | +01 | OFF KZ RPTOFF : Cancels. (Light music) m_Random play HIP HOP 402 | oo | oN no (Funk or rap music) JAZZ ES (Jazz music) +02 | +03 | OFF Mode Plays at random FLDR RND*: All tracks of the current | Adjusting the sound folder, then tracks ofthenext Hjust the sound characteristics t folder and so on. D Æ) ou can adjust the sound characteristics to your DISC RND _ : All tracks ofthe current dise. Préférence. 1 MAG RND* : Al tracks of the inserted 2 . BAS-> TRE -> FAD j, SEI dises. EX, VOL < LOUD < BAL J RNDOFF _ : Cancel. ° *° Only while playing an MP3 or a WMA disc. #2 Only while playing discs in the CD changer. To be continued...
| EN12-18KD-G427EEJindé 13 11/22/05 5320 pu | |
2/ General settings — PSM K You can change PSM (Preferred Setting Mode) items listed in the table that follows.
ÊTRE ES Ex: When ‘TRE is selected
2 Select a PSM item.
BAS*! (bass) Adjust the bass. [-06 to +06]
TRE*! (treble) sn LES Adjust the treble. [-06 to +06] < ATMM & CHERE 1E P pe FAD* (fader) Ex: When "DIMMER"is selected
Adjust the front and rear speaker balance.
RO6 to F06] TRoG to O6 3 Adjust the PSM item selected.
Adjust the left and right speaker balance. / [LO6 to RO6] O] " ss K LOUD* (loudness) Boost low and high frequencies to produce L a well-balanced sound at low volume level. Æ Repeat steps 2 and 3 to adjust the [LOUD ON or LOUD OFF] other PSM items if necessary. VOL (volume) . Adjust the volume. [00 to 30 or 50*] 5 Finish the procedure.
*1_ When you adjust the bass, treble, or loudness,
the adjustment you have made is stored for the currently selected sound mode (C-EQ) including “USER.”
#2 If you are using a two-speaker system, set the fader level to “00.”
+ Depending on the amplifier gain control setting, (See page 16 for details.)
Selectable settings, [reference page]
DEMO Display demonstration
DEMO ON : {Initial}; Display demonstration will be activated automatically if no operation is done for about 20 seconds, [6].
CLOCKH Hour adjustment
0-23(1- 12), [6] Lnitial: 0 (0:00)]
CLOCKM Minute adjustment
00 - 59, [6] Lnitial: 00 (0:00)]
24H/12H Time display mode
12H 2 24H, [6] Unitial: 24H]
CLK ADJ* Clock adjustment
AUTO : [Initial]; The built-in clock is automatically adjusted using the CT (clock time) data in the RDS signal.
AF-REG*! Alternative frequency/ regionalization reception
When the received signals from the current FM RDS station or DAB service become weak. AF : [Initial]; Switches to another station (or service) (the programme may differ from the one currently received), [10, 18]. + The AF indicator lights up.
AFREG : Switches to another station broadcasting the same programme. + The AF and REG indicators light up. OFF : Cancels (not selectable when “DAB AF” is set to “AF ON"). PTY-STBY*: Activates PTY Standby Reception with one of the PTY codes, [9]. PTY standby OFF [Initial] -> PTY codes, [10] — (back to the beginning) TA VOL*: Lnitial: VOL 15]; VOL 00 — VOL 30 or 50*?, [9, 21] Traffic announcement volume P-SEARCH*: oN + Using the AF data, the unit tunes in to another
frequency broadcasting the same programme as the original preset RDS station is if the preset station signals are not sufficient.
OFF : [Initial]; Cancels.
#1 Only for FM RDS stations.
#2 Depends on the amplifier gain control.
| RE T | & CR ER | |
Indications Selectable settings, [reference page] Em DABAF" AFON + [Initial]; Traces the programme among DAB services 2 Alternative frequency and FM RDS stations, [10, 18]. GA reception AFOFF : Cancel. Z [MD DAB VOL“ You can adjust the volume level (VOL -12 — VOL +12) of DAB DAB volume adjustment tuner to match the FM sound level and store it in memory. [nitial: VOL 00] DIMMER ON : Dims the display illumination of this unit. Dimmer OFF : [Initial]; Cancels. TEL MUTING 1/MUTING 2 : Select either one which mutes the sounds Telephone muting while using a cellular phone. OFF : [Initial]; Cancels. SCROLL** ONCE : [Initial]; Scrolls the disc information once. Scroll AUTO : Repeats scrolling (5-second intervals in between). OFF : Cancels. + Pressing DISP for more than one second can scroll the display regardless of the setting. EXTINS CHANGER: [Initial]; To use a JVC CD changer, [10], an Apple External input iPod or a JVC D. player, [18]. EXTIN _: To use any other external component than the above, & 120]. TAG DISP TAGON _: {Initial}; Shows the Tag information while playing Tag display MP3/WMA tracks, [12]. TAGOFF : Cancels. AMP GAIN You can change the maximum volume level of this unit.
Amplifier gain control LOWPWR : VOL 00 - VOL 30 (Select this if the maximum power of the speaker is less than 50 W to prevent them from being damaged.)
HIGH PWR : [Initial]; VOL 00 - VOL 50
IF BAND AUTO : [Initial]; Increases the tuner selectivity to reduce Intermediate frequency interference noises between close stations. (Stereo filter effect may be lost.)
WIDE : Subject to interference noises from adjacent stations,
but sound quality will not be degraded and the stereo effect will remain.
# Displayed only when DAB tuner is connected. #1 Some characters or symbols will not be shown correctly (or will be blanked) on the display. + Displayed only when one of the following sources is selected—FM, AM, or DISC.
| EN16-23KD-G427EEJindé 16 11/22/05 ssa4opu | |
DAB tuner operations 4) Select a service (either primary or secondary) to listen to.
Digital Audio Broadcasting (DAB) can deliver digital quality sound without any annoying interference and signal distortion. Furthermore, it can carry text, pictures, and data. When transmitting, DAB combines several programmes (called “services”) to form one “ensemble.” In addition, each “service” —called | | u “primary service”_can also be divided into its Start searching for an ensemble, as in step @ on
components (called “secondary service”). À the left column.
typical ensemble has six or more programmes [ll (services) broadcast at the same time. By connecting the DAB tuner, this unit can do A Lou
the following: + Tracing the same programme automatically
— Alternative Frequency Reception (see AN DAB AF” on page 16). gs de CIN +
ENGLISH To tune in to an ensemble manually
[21 Select the desired ensemble frequencies.
Itis recommended to use DAB tuner KT-DB1000 with your unit. If you have another DAB tuner, consult your JVC IN-CAR ENTERTAINMENT dealer.
® + Refer also to the Instructions supplied for
| Storing DAB services in memory
your DAB tuner. You can preset six DAB services (primary) for each band.
o CRE on mer ou — 1 Select a service you want (see steps ®
É to @ on the left column).
(2 SR 7 PART DAB2 2 Select the preset number (1 - 6) you
DAB3 want to store into. © start searching for an ensemble. ew/es)/er/er)er]as) Lou.
T Preset number flashes for a while.
When an ensemble is received, searching stops. To stop searching, press the same button again.
| EN16-23KD-G427EEJindd 18
| Tuning in to a preset DAB service
1 DABT —> DAB2 Re DaB3 <— > 2 Select the preset DAB service (primary) number (1 - 6) you want.
Ifthe selected primary service has some secondary services, pressing the same button again will tune in to the secondary services.
Trading the same programme— Alternative Frequency Reception
You can keep listening to the same programme by activating the Alternative Frequency Reception.
+ While receiving a DAB service:
When driving in an area where a service cannot be received, this unit automatically tunes in to another ensemble or FM RDS station, broadcasting the same programme. While receiving an FM RDS station:
When driving in an area where a DAB service is broadcasting the same programme as the FM RDS station is broadcasting, this unit automatically tunes in to the DAB service.
When shipped from the factory, Alternative Frequency Reception is activated.
To deactivate the Alternative Frequency Reception, see page 15 and 16.
To change the display information while tuning to an ensemble
number —» Frequency —» Clock — (back to the
Service name —» Ensemble name —> Channel | beginning)
iPod°/D. player operations
This unit is ready for operating an Apple iPod or a JVC D. player from the control panel.
Before operating your iPod or D. player:
Connect either one of the following (separately
purchased) to the CD changer jack on the rear
+ Interface adapter for iPod®—KS-PD100 for controlling an iPod.
+ D. player interface adapter—KS-PD500 for controlling a D. player.
+ For connection, see Installation/Connection Manual (separate volume).
+ For details, refer also to the manual supplied with the interface adapter.
Make sure to turn off this unit or turn offthe
vehicle’s ignition switch before connecting or disconnecting the iPod or D. player.
Preparations: Make sure “CHANGER” is selected for the
external input setting, see page 16.
0:& Es q 1POD/D.PLAYER —>
Playback starts automatically from where it has been paused*! or stopped*? previously.
© siust the sound as you want. (See? Confirm the selection.
pages 13 and 14.) To move back to the previous … ges + Make sure the equalizer on the iPod or 6' menu, press A. ñ D. player is deactivated. = O Z LU " + Ifa track is selected, playback starts To pause" or automatically. stop”: playback & + Ifthe selected item has another layer, you To resume will enter the layer. Repeat steps 2 and 3 playback, press it Ç until the desired track is played. again. + Holding 4 V/»R1 A can skip 10 To fast-forward or = items at a time. reverse the track C7 #3 The menu selecting mode will be canceled: — Ifno operations are done for about 5 seconds To go tothe next = When you confirm the selection of a track. or previous tracks # = For iPod | Selecting the playback modes #2 For D. player _ . 1 MODE C2] Selecting a track from the menu T Enter the main menu. 2 Select your desired playback mode. = Repeat play m1 RPT 22 Now the A/V/ 4 V/»»1 A buttons ONE RPT work as the menu selecting buttons. Functions the same as “Repeat One” of the iPod or “Repeat Mode One” for the 2 Select the desired menu. D: player. PK, ALLRPT ©) ‘ Ÿ-> Ç Functions the same as “Repeat AÏl” of the ZIK iPod or “Repeat Mode Al” for the D. player. ForiPod: RPTOFF PLAYLIST <> ARTISTS <—+ ALBUMS <— SONGS Cancels. <—+ GENRES <> COMPOSER <> (back to the beginning) For D. player: PLAYLIST <> ARTIST <> ALBUM +» GENRE <— TRACK ++ (back to the beginning) To be continued. — &
| EN16-23KD-G427EEJindé 19 11/22/05 ss240 pu | |
= Random play 12 BND & d | © AO) D Functions the same as “Shuffle Albums” of the iPod.
SONG RND/RND ON ŒND Functions the same as “Shuffle Songs” of the iPod or “Random Play On” ofthe D. player.
1° For iPod: Only if you select “ALL” in “ALBUMS” of the main “MENU.”
To check other information while listening to an iPod or a D. player
Other external component operations
You can connect an external component to
the CD changer jack on the rear using the Line
Input Adapter—KS-U57 (not supplied) or AUX Input Adapter—KS-U58 (not supplied).
+ For connection, see Installation/Connection Manual (separate volume).
For listening to the iPod or D. player, refer to pages 18 - 20.
EXT IN(or CD-CH) —--
IF<EXT IN” does not appear, see page 16 and select the external input (“EXT IN”).
[2] Turn on the connected component and start playing the source.
K O Adjust the sound as you want. (See pages 13 and 14.)
To check the dock time while listening to an external component
| EN16-23KD-G427EEJindé 20
1172505 120606 Put | |
More about this unit
Basic operations SE Turning on the power
+ By pressing SRC button on the unit, you can also turn on the power. If the source is ready, playback also starts.
Turning offthe power
+ If you turn offthe power while listening to a dise, disc play will start from where playback has been stopped previously, next time you turn on the power.
Tuner operations SR Storing stations in memory + During SSM search... - All previously stored stations are erased and stations are stored newly. - Received stations are preset in No. 1 (lowest frequency) to No. 6 (highest frequency). — When SSM is over, the station stored in No. 1 will be automatically tuned in. + When storing a station manually, the previously preset station is erased when a new station is stored in the same preset number.
Network-Tracking Reception requires
two types of RDS signals—PI (Programme Identification) and AF (Alternative Frequency) to work correctly. Without receiving these data correctly, Network- Tracking Reception will not operate correctly. If a Traffic Announcement is received by TA Standby Reception, the volume level automatically changes to the preset level (TA. VOL) if the current level is lower than the preset level.
+ When Alternative Frequency Reception
is activated (with AF selected), Network- Tracking Reception is also activated automatically. On the other hand, Network- Tracking Reception cannot be deactivated without deactivating Alternative Frequency Reception. (See page 15.)
If you want to know more about RDS, visit dhttpi//www.rds.org.uk.
Caution for DualDisc playback
+ The Non-DVD side of a “DualDisc” does not comply with the “Compact Disc Digital Audio” standard. Therefore, the use of Non- DVD side of a DualDisc on this product may not be recommended.
+ This unit has been designed to reproduce CDs/CD Texts, and CD-Rs (Recordable)/ CD-RWs (Rewritable) in audio CD (CD-DA), MP3 and WMA formats.
+ When a disc had been loaded, selecting
“DISC” for the playback source starts disc play.
Inserting a disc + When a disc is inserted upside down, the disc automatically ejects.
+ Do not insert 8 cm di
s (single CD) and unusual shape dises (heart, flower, etc.) into the loading slot.
+ While fast-forwarding or reversing on an MP3 or WMA disc, you can only hear intermittent sounds.
+ Use only “finalized” CD-Rs or CD-RWs.
+ This unit can play back only iles of the same type which are first detected if a disc includes both audio CD (CD-DA) files and MP3/ WMA files.
This unit can play back multi-session discs; however, unclosed sessions will be skipped while playing.
Some CD-Rs or CD-RWs may not play
back on this unit because of their disc characteristics, or for the following reasons: - Discs are dirty or scratched.
- Moisture condensation occurs on the lens
— The pickup lens inside the unit is dirty.
- CD-R/CD-RW on which the files are written with “Packet Write” method.
- There are improper recording conditions (missing data, etc.) or media conditions stained, scratched, warped, etc.).
+ CD-RWSs may require a longer readout time since the reflectance of CD-RW is lower than that of regular CDs.
+ Do not use the following CD-Rs or CD-RWs: - Discs with stickers, labels, or a protective
seal stuck to the surface.
- Discs on which labels can be directly printed by an ink jet printer.
Using these discs under high temperatures or
high humidities may cause malfunctions or
Playing an MP3/WMA disc
+ This unit can play back MP3/WMA files with the extension code <.mp3> or <wma> (regardless of the letter case—upper/lower).
+ This unit can show the names of albums, artists (performer), and Tag (Version 1.0, 1.1, 2.2, 2.3, or 2.4) for MP3 files and for WMA files.
+ This unit can display only one-byte characters. No other characters can be correctly displayed.
This unit can play back MP3/WMA files
meeting the conditions below:
- Bit rate: 8 kbps — 320 kbps
- Sampling frequency: 48 kHz, 44.1 kHz, 32 kHz (for MPEG-1) 24 kHz, 22.05 kHz, 16 kHz (for MPEG-2)
- Disc format: ISO 9660 Level 1/Level 2, Romeo, Joliet, Windows long file name
The maximum number of characters for file/
folder names vary among the disc format used
includes 4 extension characters—<.mp3> or
— ISO 9660 Level 1: up to 12 characters
— ISO 9660 Level 2: up to 31 characters
- Romeo: up to 128 characters
— Joliet: up to 64 characters
- Windows long file name: up to 128 characters
This unit can play back files recorded in VBR
(variable bit rate).
Files recorded in VBR have a discrepancy
in elapsed time display, and do not show
the actual elapsed time. Especially, after
performing the search function, this
difference becomes noticeable.
This unit can recognize a total of 512 files, of
200 folders, and of 8 hierarchies.
This unit cannot play back the following files:
- MP3 files encoded with MP3i and MP3 PRO format.
- MP3 files encoded in an inappropriate format.
- MP3 files encoded with Layer 1/2.
- WMA files encoded with lossless, professional, and voice format.
- WMA files which are not based upon Windows Media® Audio.
- WMA files copy-protected with DRM.
- Files which have the data such as WAVE, ATRACG, etc.
The search function works but search speed is
& Changing the source Notice: lotice: « If you change the source, playback also stops When operating an iPod or a D. player, (without ejecting the disc). some operations may not be performed Z Next time you select “DISC” for the playback correctly or as intended. In this case, visit the | Ie source, disc play starts from where it has been following JVC web site: U stopped previously. For iPod users: <http://1www.jvc.co.jp/ Z english/car/support/ks-pd100/index.html> Ejecting a disc For D. player users: <http:/Awww:jvc.co.jp/ + Ifthe ejected disc is not removed within english/car/support/ks-pd500/index.html> 15 seconds, the disc is automatically inserted again into the loading slot to protect it from dust. (Disc will not play this time.) Available characters on the displa
Available characters
General settings PSM ue [ pisplay indications + If you change the “AMP GAIN” setting from NEBRTEREAARAN “HIGH PWR” to ‘LOW PWR” while the volume level is set higher than “VOL 30,” the RÉDIEL GMIMIKTAIM] unit automatically changes the volume level to RIT ul “VOL 30.” Hon Ty® CRT] (HTGIR DAMCILENC [Tu] DAB tuner operations IE GIE + Only primary DAB services can be presetted hr LE ee AE F B EME nu even when you store a secondary service. CTMTLOTETAIETATSIETIETF] © + A previously preset DAB service is erased GHIJKLMNoOPaRSs sh DAB service is stored in th nd services soredin thesame | LETTRE [MIN OIPIO IPS spn 4e : TUVWXYZ012345 iPod° or D. player operations CEPHXNEELEBNE]
+ When you turn on this unit, the iPod or D. player is charged through this unit. + While the iPod or D. player is connected, all operations from the iPod or D. player are disabled. Perform all operations from this unit. The text information may not be displayed correctly. — Some characters such as accented letters cannot be shown correctly on the display. - Depends on the condition of communication between the iPod or D. player and the unit. If the text information includes more than 8 characters, it scrolls on the display (see also page 16). This unit can display up to 40 characters.
I How to clean the connectors
Frequent detachment will deteriorate the connectors.
To minimize this possibility, periodically wipe the connectors with a cotton swab or cloth moistened with alcohol, being careful not to damage the connectors.
Connector I Moisture condensation
Moisture may condense on the lens inside the CD player in the following cases:
+ After starting the heater in the car.
+ Ifit becomes very humid inside the car. Should this occur, the CD player may malfunction. In this case, eject the disc and leave the unit turned on for a few hours until the moisture evaporates.
I How to handle discs When removing a disc from Centerholder its case, press down the center holder of the case and lift the disc AN out, holding it by the edges. + Always hold the disc by the
edges. Do not touch its recording surface.
When storing a disc into its case, gently insert
the disc around the center holder (with the
printed surface facing up).
+ Make sure to store discs into the cases after use.
I To keep discs clean
A dirty disc may not play correctly.
If a disc does become dirty, wipe it
with a soft cloth in a straight line
from center to edge.
+ Do not use any solvent (for example, conventional record cleaner, spray, thinner, benzine, etc.) to clean discs.
New discs may have some rough spots around the inner and outer edges. If such a disc is used, this | unit may reject the disc.
To remove these rough spots, rub the edges with a pencil or ball-point pen, etc.
Do not use the following discs:
Sticker A2 Sticker residue C2 Stick-on label
What appears to be trouble is not always serious. center.
Check the following points before calling a service
Symptoms Remedies/Causes - | * Sound cannot be heard from the + Adjust the volume to the optimum level. S| speakers. + Check the cords and connections. & S |, The unit does not work at all. Reset the unit (see page 2). + SSM automatic presetting does not Store stations manually.
S| work £ Æ | + Static noise while listening to the Connect the acrial firmly.
Disc cannot be played back.
Insert the disc correctly.
CD-R/CD-RW cannot be played back.
Tracks on the CD-R/CD-RW cannot be skipped.
+ Insert a finalized CD-R/CD-RW.
+ Finalize the CD-R/CD-RW with the component
which you used for recording.
ENGLISH Disc can be neither played back nor ejected.
+ Unlock the disc (see page 12). + Ejectthe disc forcibly (see page 2).
Disc sound is sometimes interrupted.
+ Stop playback while driving on rough roads.
+ Change the disc. + Check the cords and connections.
“NO DISC” appears on the display.
Insert a playable disc into the loading slot.
Disc cannot be played back.
+ Use a disc with MP3/WMA tracks recorded in the format compliant with ISO 9660 Level 1,
Level 2, Romeo, or Joliet.
Skip to another track or change the disc. (Do not add the extension code <.mp3> or <.wma> to
non-MP3 or WMA tracks.)
A longer readout time is required (‘CHECK keeps flashing on the display).
Do not use too many hierarchies and folders.
+ Tracks do not play back in the order you have intended them to play.
Playback order is determined when the files are
Elapsed playing time is not correct.
This sometimes occurs during play. This is caused
by how the tracks are recorded on the disc.
“NO FILES” appears on the display.
Insert a disc that contains MP3/WMA tracks.
+ Correct characters are not displayed (e.g. album name).
This unit can only display letters (upper case), numbers, and a limited number of symbols.
“NO DISC” appears on the display.
Insert a disc into the magazine.
+ “NO MAG” appears on the display.
Insert the magazine.
“RESET 8” appears on the display.
Connect this unit and the CD changer correctly and press the reset button of the CD changer.
“RESET 1” - “RESET 7” appears on the display.
Press the reset button of the CD changer.
+ The CD changer does not work at all.
Reset the unit (see page 2).
+ “noSIGNAL” appears on the display.
Move to an area with stronger signals.
“RESET 8” appears on the display.
Connect this unit and the DAB tuner correctly and reset the unit (see page 2).
& & | + “ANTENANG? appears on the Check the cords and connections. display. + The DAB tuner does not workat all. Reconnect this unit and the DAB tuner correctly and reset the unit (see page 2). + The iPod or D. player does not turn + Checkthe connecting cable and its connection. on or does not work. + Update the firmware version. + Change the battery. + Buttons do not work as intended. The functions of the buttons have been changed. Press MODE before performing the operation. + The sound is distorted. Deactivate the equalizer either on the unit or the iPod/D. player. + “NO IPOD” or “NO DP” appears on Check the connecting cable and its connection. the display. Re | * Playback stops. The headphones are disconnected during FH playback. Restart the playback operation using 5 the control panel (see page 19). Es 5 | + No sound can be heard when Disconnect the headphones from the iPod nano. L connecting an iPod nano. cs S | + No sound can be heard. Disconnect the adapter from the D. player. Then, & | + “ERROR O1 appears onthe display connect it again.
when connecting a D. player.
+ “NO FILES” or “NO TRACK” appears on the display.
No tracks are stored. Import tracks to the iPod or D. player.
“RESET 1” - “RESET 7” appears on the display.
Disconnect the adapter from both the unit and iPod/D. player. Then, connect it again.
+ “RESET 8° appears on the display.
Check the connection between the adapter and this unit.
+ The iPod”s or D. players controls do not work after disconnecting from this unit.
Reset the iPod or D. player.
| EN24-27KD-G427[EEJindé 25
I AUDIO AMPLIFIER SECTION Maximum Power Output: Front: 50 W per channel Rear: 50 W per channel Continuous Power Output (RMS): Front: 19 W per channel into 4 Q, 40 Hz to 20 000 Hz at no more than 0.8% total harmonic distortion. Rear: 19 W per channel into 4 Q, 40 Hz to 20 000 Hz at no more than 0.8% total harmonic distortion. Load Impedance: 4 Q (4 Q to 8 Q allowance) Tone Control Range: Bass: +10 dB at 100 Hz Treble: +10 dB at 10 kHz Frequency Response: 40 Hz to 20 000 Hz Signal-to-Noise Ratio: 70 dB Line-Out Level/Impedance: 2.5 V/20 kQ load (full scale) Output Impedance: 1 kQ Other Terminal: CD changer
I TUNER SECTION Frequency Range: FM1/FM2: 87.5 MHz to 108.0 MHz FM3: 65.00 MHz to 74.00 MHz AM: (MW) 522 kHz to 1 620 kHz (LW) 144 kHz to 279 kHz
IFM Tuner] Usable Sensitivity: 11.3 dBf (1.0 uV/75 Q) 50 dB Quieting Sensitivity: 16.3 dBf (1.8 uV/75 Q) Alternate Channel Selectivity (400 kHz): 65 dB Frequency Response: 40 Hz to 15 000 Hz
Stereo Separation: 30 dB Capture Ratio: 1.5 dB IMW Tuner] Sensitivity: 20 uV Selectivity: 35 dB ILW Tuner]
Sensitivity: 50 UV I CD PLAYER SECTION Type: Compact dise player Signal Detection System: Non-contact optical pickup (semiconductor laser) Number of Channels: 2 channels (stereo) Frequency Response: 5 Hz to 20 000 Hz Dynamic Range: 96 dB Signal-to-Noise Ratio: 98 dB Wow and Flutter: Less than measurable limit MP3 Decoding Format: MPEG1/2 Audio Layer 3 Max. Bit Rate: 320 kbps WMA (Windows Media® Audio) Decoding Format: Max. Bit Rate: 192 kbps
I GENERAL Power Requirement: Operating Voltage:
DC 144 V (11 V to 16 V allowance) Grounding System: Negative ground Allowable Operating Temperature:
0°C to +40°C Dimensions (W x H x D):
Installation Size (approx.): 182 mm x 52 mm x 150 mm Panel Size (approx):
188 mm x 58 mm x 11 mm Mass (approx.}:
14 kg (excluding accessories)
Design and specifications are subject to change without notice.
+ Microsoft and Windows Media are either registered trademarks or trademarks of Microsoft Corporation in the United States and/or other countries.
iPod is a trademark of Apple Computer, Inc., registered in the US. and other countries.
Having TROUBLE with operation? Please reset your unit
Refer to page of How to reset your unit
SaTPyAHEHUA NPU 3KCNIIYATAUUU?
Moxanyücra, nepesarpy3ute Baume ycTpoñcTBO Ana nonyueHua uHbopmauuu o nepesarpyske Bawuero ycrpoñcTBa
© 2005 Victor Company of Japan, Limited 1105DTSMDTJEIN
PyKoBOACTBO no YCTAHOBKe/NOAKNHOUEHULO D 1105DTSMDTJEIN GETO353-002A EN, RU
[EE] © 2005 Victor Company of Japan, Limited
ENGLISH PYCCKUH This unit is designed to operate on 12 V DC, NEGATIVE ground electrical systems. If your vehicle 3ro ycrpoñcreo paspaorano ana sKennyarauuu Ha 12 B noCTOAHHOrO HaANPAKEHMA € MAHYCOM Ha does not have this system, a voltage inverter is required, which can be purchased at JVC IN-CAR macce, Ecru Bali a8TOMOGUn He MEET 3TOÏ CUCTMbI, TPEÉYETCA AHBEPTOP HANPAKEHHUA, KOTOPbIA ENTERTAINMENT dealers. MOXeT 6bITb npuoGpeTEH y AUnepa asTOMOËUNHETO cneuuanucra JVC.
WARNINGS NPEAYNPEXKAEHUA To prevent short circuits, we recommend that you disconnect the battery’s negative terminal and make all Ana npenorepauenua KopoTkux 3aMbIKaHU Mbi pekoMeHqyem BaM OTCOEAUHUTE OTPULATENLHPIA electrical connections before installing the unit. Pa3beM aKKYMYNATOPA 4 OCYLECTBUTE BCE NOAKNIOUEHUA nepez YCTAHOBKOË YCTPOACTBA. + Be sure to ground this unit to the car's chassis again after installation. + Mocne ycraHosku 06a3aTenbHo 3a3eMnUTe HaHHOe YCTPOÏCTBO Ha LACCU ABTOMOËMAA.
Notes: Npumeuanua: + Replace the fuse with one of the specified rating, Ifthe fuse blows frequently, consult your JVC IN-CAR + 3ameHaüTe npegoxpaHuTenb ApyrM npenoxpaHyTeneM yKa3aHHOO KaCca. EC npenoxpaHuTenb ENTERTAINMENT dealer. cropaer CULIKOM 4acTo, O6paTUTect k jUnepy asTOMOGANHETO cneuyanucra JVC. + Itis recommended to connect to the speakers with maximum power of more than 50 W (both at + PekoMeHAyeTCA NOAKNMIOUATE AUHAMUKH € MaKCUManbHOÏË MOLHOCTBIO 6onee 50 Br (k aagHeû u the rear and at the front, with an impedance of 4 Q to 8 Q). Ifthe maximum power is less than nepegHeñ naHenu yCTPOACTBA, € nonHbIM conporugneyem oT 4 Q no 8 Q). Ecru MakcUManbHaA 50 W, change “AMP GAIN” setting to prevent the speakers from being damaged (see page 16 of the MOLHOCTE aUHamykoB meHee 50 Br, nepeñaure 8 pexum "AMP GAIN”, uToGbi npenoTBpaTUTE Ux INSTRUCTIONS). nogpexgenue (cm. UHCTPYKLIMU NO 3KCHAYATALUHU Ha cp. 16). + To prevent short-circuit, cover the terminals of the UNUSED leads with insulating tape. + Ana npenorepauenua Koporkoro 3ambikaHun 3akneÿre HEACTONb3YEMIE koHubI 130nupytouei + The heat sink becomes very hot after use. Be careful not to touch it when removing this unit. nexToü.
PagvaTop 80 BpeMA HENONE3OBAHAA CUnbHO Harpesaerca. Crapañrecb ero He TPOraTb BO BPEMA yAaneHuA yCTpOñCTBA.
Heat sink Pagnarop PRECAUTIONS on power supply and speaker connections: NPEAOCTEPEXKEHUA no nuTaHui y noaknoueHuo + DO NOT connect the speaker leads of the power cord to the car battery; otherwise, the unit rpomkoroBopuTeneÿ: will be seriously damaged. + HE nogkniouañTe npoBoga rpomkoroBopuTeneñ K aKKYMynATOpy AE TOMOËUNA, HAE + BEFORE connecting the speaker leads of the power cord to the speakers, check the speaker wiring in ycrpoücTs0 6yAeT nospexyeno. Your car. + NEPEA nonknioueHuem npOBOAOB rPoMKOroBOpuTenen k KaGENIO NATAHUA FPOMKOOBOPATENA
The following illustration shows a typical installation. If you have any questions or require information regarding installation kits, consult your JVC IN-CAR ENTERTAINMENT dealer or a company supplying
Ha cnegyiouux unniocTpauax nokasaHa TAnoBañ ycraHoBka. Ecnu y Bac ecrb Kakue-n160 Bonpocbi, KaCalOLJUECA yCTaHoBkH, o6paruTecb k Bauemy aunepy aBromoGunHero cneuvanncra JVC unu 8
+ If you are not sure how to install this unit correctly, have it installed by a qualified technician.
careful not to damage the fuse
Do the required electrical connections. BbINONHUTE HEOÉXOAUMbIE NOAKTIOUEHUR KOHTAKTOB, KaK NOKa3aHO Ha OÉOPOTHOÏ cropone 3Toû UHCTPYKUUA.
Bend the appropriate tabs to hold the sleeve firmly in place.
Ororaure coorBercrayiomue dukcaTOpbi, npenHazHAAEHHbIE ANA npouHoÏ ycraHOBKU KOpnyca.
Before removing the unit, release the rear section.
Yaanenue ycrpoücrBa Nepen ynaneuem ycrpoñcTsa ocBo6OqUTE 3anHioIO daCTb.
Insert the two handles, then pull them as illustrated so that the unit can be removed.
UCNONb30BAHUA MyTbI In a Toyota car for example, first remove the car radio and install the unit in its place.
&. Flat type screws (M5 x 8 mm)*2 D N D— KpenexHbie BuHTbi (M5 X 8 mm)*2 Pocket Kapman Bracket*2 Kponureñn”*? Note + When installing the unit on the mounting bracket, make sure to use the 8 mm-long screws. If longer screws are used, they could damage the unit. Npumeuanue _: llpu ycraHogke yCTpoïñcTBa Ha kpenekHbIù KPOHLITEÏH, ACHON3VÜTE TONbKO BUHTBI JIAHOÏ 8 MM.
Npu cnonbzoBaHuu Éonee anuHHbIX BAHTOB MOXHO IIOBPEUTE YCTPOACTBO.
TROUBLESHOOTING BbIABJIEHUE HEUCTIPABHOCTEU
+ The fuse blows. * Are the red and black leads connected correctly?
+ Power cannot be turned on. * Is the yellow lead connected?
+ No sound from the speakers. * Is the speaker output lead short-circuited?
+ Sounds distorted. * Is the speaker output lead grounded?
* Are the “_” terminals of Land R speakers grounded in common?
- Noise interfere with sounds. * Is the rear ground terminal connected to the car’s chassis using shorter and thicker cords?
+ Unit becomes hot. * Is the speaker output lead grounded?
* Are the “_” terminals of Land R speakers grounded in common?
- This unit does not work at all. * Have you reset your unit?
| Instait-2_KD-G427[EENindd 2
You may need to modify the wiring of the supplied power cord as illustrated. + Contact your authorized car dealer before installing this unit.
KOMNAEKT NOCTABKH View from the lead side Bu co cToponbi BbIBONOB
Yÿ {> Y: Yellow R: Red Henroii KpacHbii
R Before connecting: Check the wiring in the vehicle carefully. Incorrect connection may cause serious damage to this unit. The leads of the power cord and those of the connector from the car body may be different in color.
Î Cut the 1SO connector. 2 Connect the colored leads of the power cord in the order specified in the illustration below. 3 Connect the aerial cord.
4 Finally connect the wiring harness to the unit.
LB | Connections without using the ISO connectors / Moakniouenue 6e3 ucnonb3oBaHua pazbemos ISO Mepea Hauanom nogkniouenyñ: TuarenbHo npoBgepbTe npoBOHKy 8 aBTOMOGUNE. HenpasunbHoe nogknioueHue MOKET NPABECTH K CEPHE3HOMY NOBPEXAEHHIO YCTPOÏCTBA. Kunbi cunoBoro kaGeNA u KUANbI COCAUHUTENA OT K30Ba aBTOMOGUNA MOFYT bITb PA3HOTO LIBETA.
Line out (see diagram OI) K 8bxony (cm. cxemy
#2 Before checking the operation of this unit prior to Red installation, this lead must be connected, otherwise power
cannot be turned on. #2 Nepea nposepkoï paborbi YCTPOÏCTEA NOAKAIOUATE ITOT nPOBOA, HHAUE NATAHUE HE BKMOUUT CA.
Blue with white stripe CuHuÿ c 6enoÿ nonocoù
To metallic body or chassis of the car
K Merannecxomy KOPnyCy MA LLACCH ABTOMOËMAA To a live terminal in the fuse block connecting to the car battery (bypassing the ignition switch) (constant 12 V)
K pazvemy Gasbi 8 6noKe npeaoxpaHuTens (MuHya ÉnOK sakUraHUR) {nocroaHHebi 12 B)
To an accessory terminal in the fuse block K BcnomorarenbHomy pazbemy 8 6noKe npenoxpaHuTenz
@ 4) 2° 1e remote lead of other equipment or power aeral irany (200 mA max O)] K yaaneHHomy npoBogy apyroro oÉopyAOBaHAA nu aHTEHHbI (Makc. 200 MA)
To cellular phone system
K cucreme corogoro renegona
You can connect an amplifier to upgrade your car stereo system.
+ Connect the remote lead (blue with white stripe) to the remote lead of the other equipment so that it can be controlled through this unit.
+ Disconnect the speakers from this unit, connect them to the amplifier. Leave the speaker leads of this unit unused.
— To the remote lead of other equipment or power
#3 Firmly attach the ground wire to the metallic body or to the chassis of the car—to the place uncoated with paint (if coated with paint, remove the paint
+ You can connect both components in series as illustrated below. The iPod* or D. player can be connected using an interface adapter (not supplied)—KS-PD100 (for iPod) or KS-PD500 (for D. player).
iPod is a trademark of Apple Computer, Inc, registered in the U.S. and other countries. iPod agnaerca Toprosoÿ mapkoï Apple Computer, Inc, saperucrpuposanHoë 8 LA y apyrux crpanax.
CAUTION /IPEAOCTEPEKEHUE:
+ Before connecting the external components, make sure that the unit is turned of. + Nepea nogknioueHyem BHELIHUX KOMTIOHEHTOB YÉeuTECE B TOM, UTO VCTPOMCTBO BbIKTIOHEHO.