KDS7R - Car stereo JVC - Free user manual and instructions
Find the device manual for free KDS7R JVC in PDF.
Download the instructions for your Car stereo in PDF format for free! Find your manual KDS7R - JVC and take your electronic device back in hand. On this page are published all the documents necessary for the use of your device. KDS7R by JVC.
USER MANUAL KDS7R JVC
ENGLISH Position And Reproduction Of Labels
IMPORTANT FOR LASER PRODUCTS Precautions:1. CLASS 1 LASER PRODUCT 2. DANGER: Invisible laser radiation when open and interlock failed or defeated. Avoiddirect exposure to beam.3. CAUTION: Do not open the top cover.There are no user-serviceable parts inside.Leave all servicing to qualified servicepersonnel. 4. CAUTION: This CD player uses invisible laser radiation and is equipped with safetyswitches to prevent radiation emissionwhen unloading CDs. It is dangerous todefeat the safety switches. 5. CAUTION: Use of controls, adjustments or performance of procedures other thanthose specified herein may result inhazardous radiation exposure.Note:For security reasons, a numbered ID card is provided with this unit, and the same ID number isimprinted on the unit’s chassis. Keep the card in a safe place, as it will help the authorities toidentify your unit if stolen. How to reset your unit Press and hold both the SEL (Select) and (Standby/On/ATT) buttons at the same time forseveral seconds.This will reset the built-in microcomputer.NOTES: Your preset adjustments — such as presetchannels or sound adjustments — will also beerased.If a CD is in the unit, it will eject when you resetthe unit. Pay attention not to drop the CD.(Standby/On/ATT)SEL (Select)BEFORE USE ★ For safety....• Do not raise the volume level too much, as thiswill block outside sounds, making drivingdangerous.• Stop the car before performing any complicatedoperations. ★ Temperature inside the car....If you have parked the car for a long time in hotor cold weather, wait until the temperature in thecar becomes normal before operating the unit.Name/Rating plateDANGER: Invisible laser radiation when open and interlock failed or defeated. AVOID DIRECT EXPOSURETO BEAM. (e)ADVARSEL: Usynlig laser-stråling ved åbning, når sikkerhedsafbrydere er ude af funktion. Undgåudsæt-telse for stråling. (d)VARNING: Osynlig laser-strålning när denna del är öppnad och spärren är urkopplad. Betrakta ej strålen. (s)VARO : Avattaessa ja suo-jalukitus ohitettaessa olet alttiina näkymättömälle lasersäteilylle. Älä katso säteeseen. (f) CLASS 1
LASER PRODUCT Caution:This product contains a laser component of higher laser class than Class 1.
Bottom panel of the main unit EN02-04.KD-S70R/S7R[E] 25/3/05, 4:32 AM2ENGLISH
Thank you for purchasing a JVC product. Please read all instructions carefully before operation, to
ensure your complete understanding and to obtain the best possible performance from the unit.
CONTENTS BASIC OPERATIONS 4
Listening to the radio 5
Storing stations in memory6
FM station automatic preset: SSM 6
Tuning into a preset station 8
What you can do with RDS EON 9
(Network-Tracking Reception) 9
Selecting Your Favorite Programme for
Searching Your Favorite Programme 12
Automatic selection of the station
when using the number buttons 15
Changing the display mode while listening to an FM station 15
Setting the TA volume level 15
Automatic clock adjustment 16
Locating a track or a particular portion on a CD 18
Selecting CD playback modes 19
Prohibiting CD ejection 19
SOUND ADJUSTMENTS 20
Adjusting the sound20
Turning on/off the loudness function 21
Using the Sound Control Memory 22
Selecting and storing the sound modes 22
Recalling the sound modes 23
Canceling Advanced SCM 24
Storing your own sound adjustments 25
OTHER MAIN FUNCTIONS 26
Setting the clock 26
Selecting the level display 28
Changing the general settings 29
Detaching the control panel 32
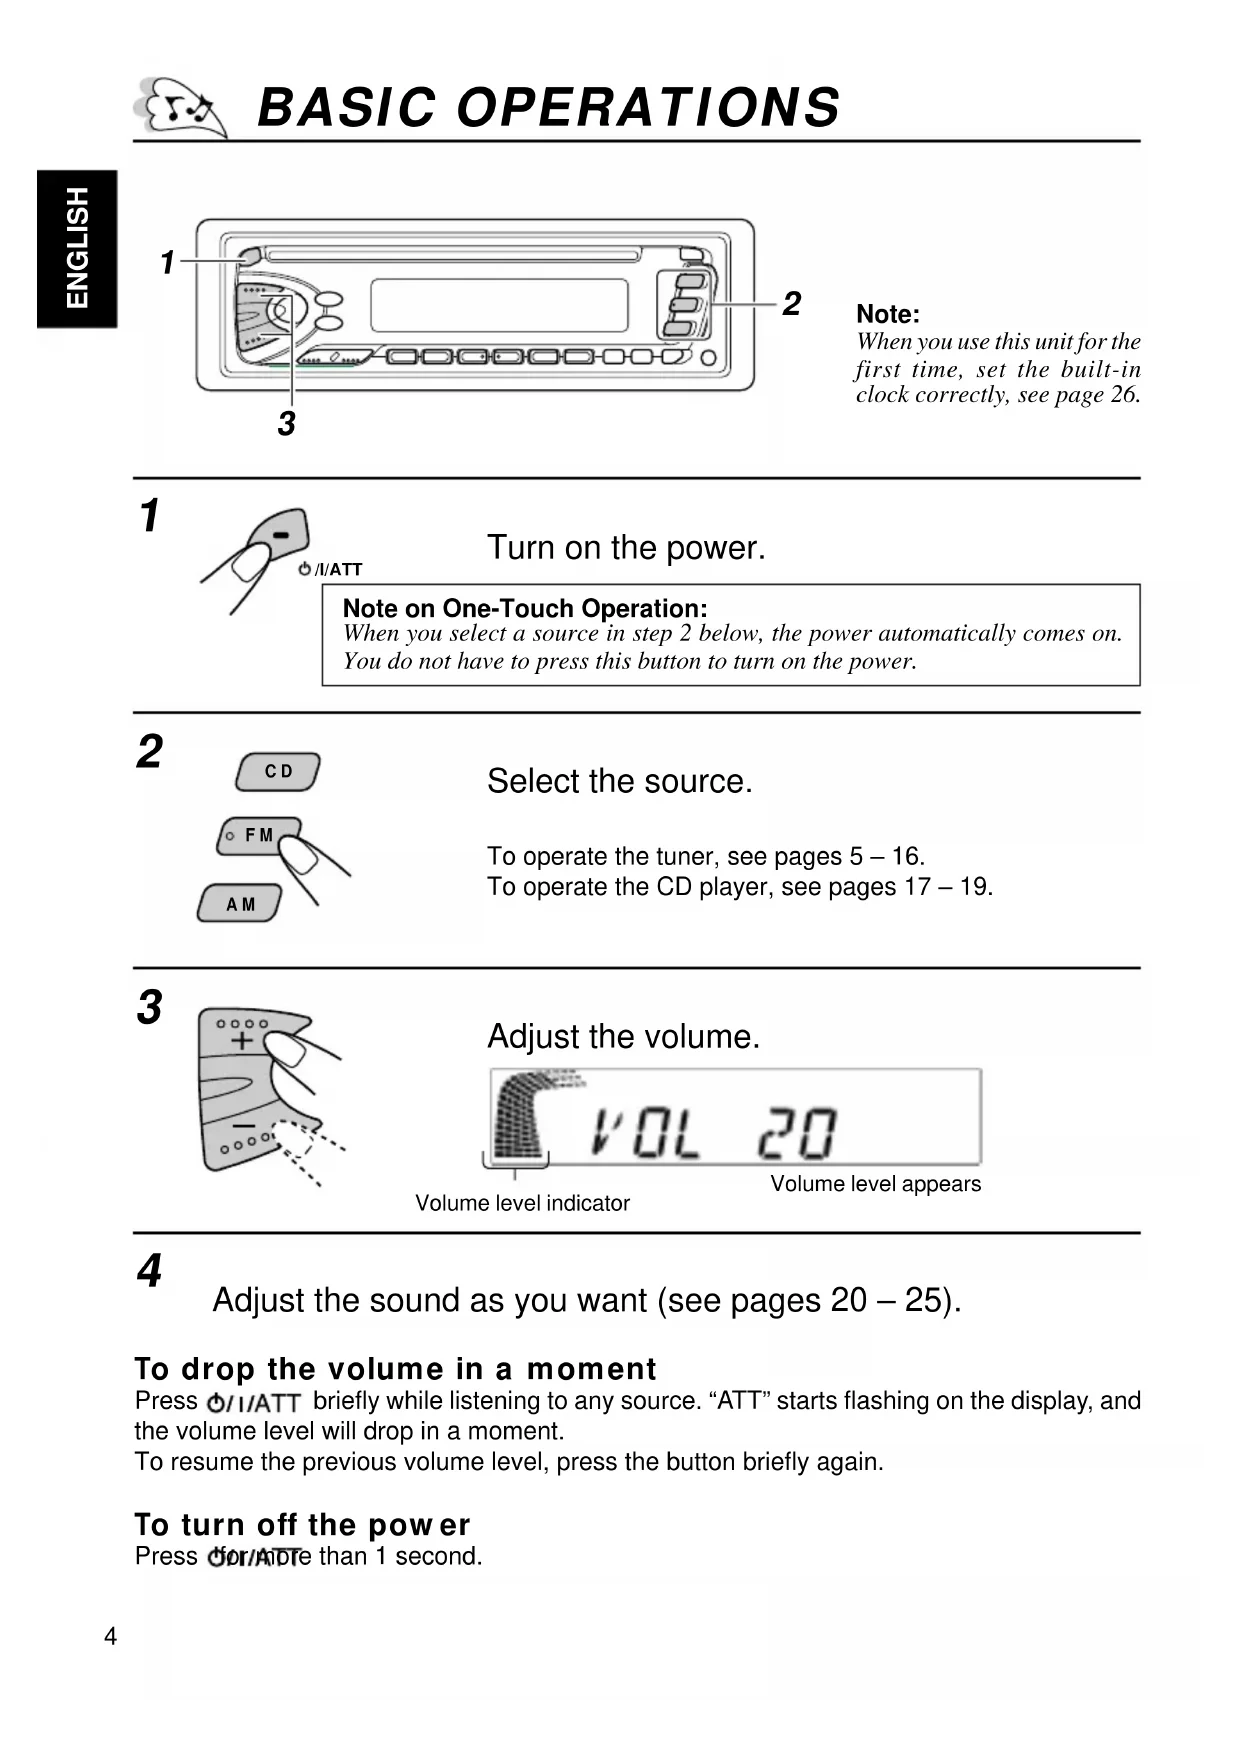
Select the source. To operate the tuner, see pages 5 – 16.To operate the CD player, see pages 17 – 19. 3
Adjust the sound as you want (see pages 20 – 25).
To drop the volume in a moment
Press briefly while listening to any source. “ATT” starts flashing on the display, and the volume level will drop in a moment.To resume the previous volume level, press the button briefly again. To turn off the power Press for more than 1 second. BASIC OPERATIONS Note:When you use this unit for thefirst time, set the built-inclock correctly, see page 26.Note on One-Touch Operation:When you select a source in step 2 below, the power automatically comes on.You do not have to press this button to turn on the power. 1
Start searching a station. When a station is received, searching stops.To stop searching before a station is received, press the same button you have pressedfor searching. To tune in a particular frequency without searching: 1 Press FM or AM to select the band.2 Press and hold
until “M” starts flashing on the display.Now you can manually change the frequency while “M” is flashing.3 Press
repeatedly until the frequency you want is reached.• If you hold down the button, the frequency keeps changing (in 50 kHz intervals for FM and9 kHz intervals for AM – MW/LW ) until you release the button.
RADIO OPERATIONS Listening to the radio
Select the band (FM1, FM2, FM3 or AM). You can select any one of FM1, FM2 and FM3 to listen to anFM station.To search stationsof higherfrequencies.To search stationsof lowerfrequencies.FM1 FM2 FM3
selected band appears
EN05-08.KD-S70R/S7R[E] 25/3/05, 4:34 AM56 ENGLISH F M
Select the FM band number (FM1, FM2 or
FM3) you want to store FM stations into.
Press and hold the both buttons for more than
2 seconds. Local FM stations with the strongest signals are searched and stored automatically in theband number you have selected (FM1, FM2 or FM3). These stations are preset in the numberbuttons — No. 1 (lowest frequency) to No. 6 (highest frequency).When automatic preset is over, the station stored in number button 1 will be automaticallytuned in. Storing stations in memory You can use one of the following two methods to store broadcasting stations in memory.• Automatic preset of FM stations: SSM (Strong-station Sequential Memory)• Manual preset of both FM and AM stations FM station automatic preset: SSM You can preset 6 local FM stations in each FM band (FM1, FM2, and FM3).FM1 FM2 FM3 1
2 “SSM” appears, then disappears whenautomatic preset is over. EN05-08.KD-S70R/S7R[E] 25/3/05, 4:34 AM67
Select the FM1 band.
Tune into a station of 88.3 MHz. See page 5 to tune into a station. 3
Press and hold the button for more than 2
Repeat the above procedure to store other stations into other
preset numbers. Notes:• A previously preset station is erased when a new station is stored in the same preset number.• Preset stations are erased when the power supply to the memory circuit is interrupted (for example,during battery replacement). If this occurs, preset the stations again.
F M Manual preset You can preset up to 6 stations in each band (FM1, FM2, FM3 and AM) manually.EXAMPLE: Storing an FM station of 88.3 MHz into the preset number 1 of the FM1 band 1
3 “P1” flashes for a few seconds. EN05-08.KD-S70R/S7R[E] 25/3/05, 4:34 AM78 ENGLISH Tuning into a preset station You can easily tune into a preset station.Remember that you must store stations first. If you have not stored them yet, see pages 6and 7. 1
Select the band (FM1, FM2, FM3
Select the number (1 – 6) for the preset station
To change the display information while receiving an FM RDS
station Press DISP. Each time you press the button, the display changes as follows:
MO/RND DISP PS NAME (Station name)
PTY (Programme type)
FREQ (Station frequency)
CLOCK (Clock time) When an FM stereo broadcast is hard to receive:Press MO/RND (mono/random) while listening to an FM stereo broadcast. The MO (mono)indicator lights up on the display. The sound you hear becomes monaural but receptionwill be improved.To restore the stereo effect, press the button again. Lights up when receiving an FM broadcast in stereo
MO/RND EN05-08.KD-S70R/S7R[E] 25/3/05, 4:34 AM89
ENGLISH What you can do with RDS EON RDS (Radio Data System) allows FM stations to send an additional signal along with theirregular programme signals. For example, the station send their station names, as well asinformation about what type of programme they broadcast, such as sports or music, etc.Another advantage of RDS function is called “EON (Enhanced Other Networks).” The EONindicator lights up while receiving an FM station with the EON data. By using the EON datasent from a station, you can tune into a different station of a different network broadcastingyour favorite programme or traffic announcement while listening to another programme or toanother source such as CD.By receiving the RDS data, this unit can do the following:• Tracing the same programme automatically (Network-Tracking Reception)• Standby Reception of TA (Traffic Announcement) or your favorite programme• PTY (Programme Type) search• TP (Traffic Programme) search• And some other functions Tracing the same programme automatically (Network-
Tracking Reception) When driving in an area where FM reception is not good, the tuner built in this unit automaticallytune in another RDS station, broadcasting the same programme with stronger signals. So,you can continue to listen to the same programme in its finest reception, no matter where youdrive. (See the illustration on the next page.)Two types of the RDS data are used to make Network-Tracking Reception work correctly —PI (Programme Identification) and AF (Alternative Frequency).Without receiving these data correctly from the RDS station you are listening to, Network-Tracking Reception will not operate.To use Network-Tracking Reception, press and hold TP/RDS(Traffic Programme/Radio Data System) for more than 1 second.Each time you press and hold the button, Network-TrackingReception modes change as follows:
RDS OPERATIONS Mode 1 Mode 2 Mode 3
TP RDS AF REGAF indicator REG indicator EN09-16.KD-S70R/S7R[E] 25/3/05, 4:36 AM910
The AF indicator lights up but the REG indicator does not.
Network-Tracking is activated with Regionalization set to “off.”
Switches to another station within the same network when the receiving
signals from the current station become weak.
In this mode, the programme may differ from the one currently received.
Both the AF indicator and the REG indicator light up.
Network-Tracking is activated with Regionalization set to “on.”
Switches to another station, within the same network, broadcasting the same
programme when the receiving signals from the current station become weak.
Neither the AF indicator nor the REG indicator lights up.
Network-Tracking is deactivated.
The same programme can be received on different frequencies.
Programme 1 broadcasting
on frequency A Programme 1 broadcasting on
frequency B Programme 1 broadcasting on frequency E Programme 1 broadcasting on frequency D Programme 1 broadcasting on frequency C EN09-16.KD-S70R/S7R[E] 25/3/05, 4:36 AM1011
ENGLISH Using Standby Reception
Standby Reception allows the unit to switch temporarily to your favorite programme (PTY:
Programme Type) and Traffic Announcement (TA) from the current source (another FM station
Standby Reception will not work if you are listening to an AM station.
TA Standby Reception
• When you press TP/RDS while listening to an FM station, the TP indicator
is lit during reception of a TP (Traffic Programme) station and the TA standby
When the station being received is not a TP station, the TP indicator flashes. Press
to engage the TA standby mode. “SEARCH” appears on the
display, and TP station search starts. When a TP station is tuned in, the TP indicator
• If you are listening to a CD, and wish to listen to a TP station, press TP/
RDS to enter the TA standby mode. (The TP indicator lights up.)
If a traffic programme starts broadcasting while the TA standby mode is active,
“TRAFFIC” appears and the playback source changes to the FM band. The
volume increases to the preset TA volume level and the traffic programme
can be heard (see page 15).
To deactivate the TA standby mode, press TP/RDS again.
PTY Standby Reception
• When you press PTY while listening to an FM station, the PTY indicator is
lit during reception of a PTY station and the PTY standby mode is engaged.
The selected PTY name stored on page 13 flashes for 5 seconds.
When the station being received is not a PTY station, the PTY indicator flashes.
to engage the PTY standby mode. “SEARCH” appears on
the display, and PTY station search starts. When a PTY station is tuned in, the PTY
• If you are listening to a CD, and wish to listen to a selected PTY broadcast,
press PTY to enter the PTY standby mode. (The PTY indicator lights up.)
If the selected PTY programme starts broadcasting while the PTY standby
mode is active, the selected PTY name appears and the playback source
changes to the FM band. The selected PTY programme can then be heard.
To deactivate the PTY standby mode, press PTY again.
PTY TP RDS EN09-16.KD-S70R/S7R[E] 25/3/05, 4:37 AM1112
ENGLISH Selecting Your Favorite Programme for PTY Standby
Reception You can select your favorite programme for PTY Standby Reception to store in memory.When shipped from the factory, “NEWS” is stored as the programme type for PTY StandbyReception. 1
Press and hold SEL for more than 2 seconds
to enter the general setting mode (see page
Select one of twenty-nine PTY codes. (See
page 16.) Selected code name appears on the display and is storedinto memory. 4
Searching Your Favorite Programme You can search one of your 6 favorite programme types stored in memory.When shipped from the factory, the following 6 programme types have been stored in thenumber buttons (1 to 6).To change the factory preset settings, see page 13.To search your favorite programme, see page 14. SEL POP M 1
ENGLISH To store your favorite programme types
Press and hold SEL for more than 2 seconds
to call up the general setting mode (see page
Select “PTY SRCH (search)” if not shown on
Select one of twenty-nine PTY codes.
(See page 16.) Selected code name appears on the display.• If the code already stored in memory is selected, it willflash on the display. 4
Press and hold the number button for more than 2 seconds to
store the PTY code selected into the preset number you want. The selected code name will flash on the display. 5
EN09-16.KD-S70R/S7R[E] 25/3/05, 4:37 AM1314 ENGLISH 2
To search your favorite programme type
PTY Ex. When “ROCK M” is stored in preset number button 2.
Press and hold PTY for more than 1 second
while listening to an FM station. The last selected PTY code appears. 2
Select one of PTY codes stored in preset
number buttons (1 to 6). PTY search for your favorite programme starts after 5seconds.• If there is a station broadcasting a programme of the same PTY code you have selected,that station is tuned in.• If there is no station broadcasting a programme of the same PTY code you have selected,the station will not change.Note:In some areas, the PTY search will not work correctly. EN09-16.KD-S70R/S7R[E] 25/3/05, 4:37 AM1415
ENGLISH Other convenient RDS functions and adjustments
Automatic selection of the station when using the number
Usually when you press the number button, the preset station is tuned in.
However, when the preset station is an RDS station, something different will happen. If the
signals from that preset station are not sufficient for good reception, this unit, using the AF
data, tunes in another frequency broadcasting the same programme as the original preset
station is broadcasting. In case no other station is tuned in, you can also search all receivable
frequencies for the same programme. (Programme search) To activate programme search,
follow the procedure below.
• Programme search takes a while.
• See also “Changing the general settings” on page 29.
1. Press and hold SEL (select) for more than 2 seconds to call up the general setting mode.
¢ or 4 to select “P(programme)-SEARCH.”
3. Press the + button and set to "ON".
Now programme search is activated.
To cancel programme search, repeat the same procedure and select “OFF” in step 3 by
turning the control dial counterclockwise.
Changing the display mode while listening to an FM
You can change the initial indication on the display to station name (PS NAME), station
frequency (FREQ), or clock time (CLOCK) while listening to an FM RDS station.
• See also “Changing the general settings” on page 29.
1. Press and hold SEL (select) for more than 2 seconds to call up the general setting mode.
to select “DISPMODE (display mode).”
3. Press + or – to set to the desired indication — PS NAME (station name), FREQ (station
frequency), or CLOCK (clock time).
By pressing DISP, you can also change the display while listening to an FM RDS station.
Each time you press the button, the following information appears on the display:
* Then, the display goes back to the original indication in several seconds.
Setting the TA volume level
You can preset the volume level for TA Standby Reception. When a traffic programme is
received, the volume level automatically changes to the preset level.
• See also “Changing the general settings” on page 29.
1. Press and hold SEL (select) for more than 2 seconds to call up the general setting mode.
to select “TA VOL (volume).”
3. Press + or – to the desired volume.
PS NAME (Station name)
PTY (Programme type)
FREQ (Station frequency)
RELIGION: Programmes dealing with
or the nature of existence or
PHONE IN: Programmes where people
can express their views
either by phone or in a
TRAVEL: Programmes about travel
destinations, package tours,
and travel ideas and
LEISURE: Programmes concerned with
recreational activities such
as gardening, cooking,
COUNTRY: Country music
NATION M: Current popular music from
another nation or region, in
that country’s language
OLDIES: Classic pop music
DOCUMENT: Programmes dealing with
factual matters, presented in
an investigative style
AFFAIRS: Topical programmes
expanding on current news
INFO: Programmes which impart
advice on a wide variety of
EDUCATE: Educational programmes
SCIENCE: Programmes on natural
science and technology
VARIED: Other programmes like
comedies or ceremonies
LIGHT M: Light music
CLASSICS: Classical music
OTHER M: Other music
WEATHER: Weather information
FINANCE: Reports on commerce,
trading, the Stock Market,
CHILDREN: Entertainment programmes
Automatic clock adjustment
When shipped from the factory, the clock built in this unit is set to be readjust automatically
using the CT (Clock Time) data in the RDS signal.
If you do not want to use automatic clock adjustment, follow the procedure below.
• See also “Changing the general settings” on page 29.
1. Press and hold SEL (select) for more than 2 seconds to call up the general setting mode.
to select “AUTO ADJ (adjust).”
3. Press – to select “ADJ OFF.”
Now automatic clock adjustment is canceled.
To reactivate clock adjustment, repeat the same procedure and select “ADJ ON” in step 3
by pressing the + button.
It takes about 2 minutes to adjust the time using the CT data. So, you must tune to the station for more
than 2 minutes continuously; otherwise, the clock time will not be adjusted.
EN09-16.KD-S70R/S7R[E] 25/3/05, 4:37 AM1617
ENGLISH CD OPERATIONS Playing a CD
1 Insert a disc into the loading slot.The unit turns on, draws a CD and starts playbackautomatically.• When a CD is inserted upside down, the CD ejectsautomatically.To stop play and eject the CDPress 0.CD play stops and the CD automatically ejects from the loading slot. The source changes tothe tuner (you will hear the last received station).If you change the source to AM or FM, the CD play also stops (without ejecting the CD thistime).• If the ejected disc is not removed for about 15 seconds, the disc is automatically inserted again intothe loading slot to protect it from dust. (CD play will not start this time.)• You can eject the CD even when the unit is turned off.Total track numberof the inserted discTotal playing time ofthe inserted discElapsed playing time Current trackCAUTION on Volume SettingCDs produces very little noise compared with other sources. If the volume level is adjustedfor the tuner, for example, the speakers may be damaged by the sudden increase in theoutput level. Therefore, lower the volume before playing a CD and adjust it as requiredduring playback.Note on One-Touch Operation:When a CD is already in the loading slot, pressing CD turns on the unit and starts playbackautomatically.
ENGLISH Locating a track or a particular portion on a CD
Number buttons To fast forward or reverse the track
Press and hold ¢, while playing a CD, to fast forward the track.
, while playing a CD, to reverse the track.
To go to the next track or the previous track
briefly, while playing a CD, to go ahead to the beginning of
the next track. Each time you press the button consecutively, the beginning
of the next tracks is located and played back.
briefly, while playing a CD, to go back to the beginning of the
current track. Each time you press the button consecutively, the beginning
of the previous tracks is located and played back.
To go to a particular track directly
Press the number button corresponding to the track number to start its
• To select a track number from 1 – 6:
Press 1 (7) – 6 (12) briefly.
• To select a track number from 7 – 12:
Press and hold 1 (7) – 6 (12) for more than 1 second.
EN17-19.KD-S70R/S7R[E] 25/3/05, 4:39 AM1819
ENGLISH To play back tracks at random (Random Play)
You can play back all tracks on the CD at random.
Each time you press MO/RND (Mono/Random) while playing a CD, CD
random play mode turns on and off alternatively.
When the random mode is turned on, the RND indicator lights up on the
display and a track randomly selected starts playing.
• To select the next track at random, press
Selecting CD playback modes
MO/RND MO/RND Prohibiting CD ejection
You can prohibit the CD ejection and can “lock” a CD in the loading slot.
Press and hold CD and 0 for more than 2 seconds.
“EJECT” flashes on the display for about 5 seconds, and the CD is “locked.”
To cancel the prohibition and “unlock” the CD, press and hold CD and 0 for more than 2
seconds again. The CD ejects automatically.
EN17-19.KD-S70R/S7R[E] 25/3/05, 4:39 AM1920 ENGLISH Adjusting the sound You can adjust the sound characteristics to your preference.Equalization pattern indicator SOUND ADJUSTMENTS
Select the item you want to adjust. Indication To do: RangeBAS Adjust the bass –6 (min.) — +6 (max.)(Bass)TRE Adjust the treble –6 (min.) — +6 (max.)(Treble)FAD Adjust the front and rear speaker R6 (rear only) — F6 (front only)(Fader)* balance BAL Adjust the left and right speaker L6 (left only) — R6 (right only) (Balance) balanceLOUD See page 21 See page 21(Loudness)VOL Adjust the volume 00 (min.) — 50 (max.)(Volume)Note:* If you are using a two-speaker system, set the fader level to “00.” 2
Adjust the level. Note:Normally the + and – buttons work as the volume control buttons.So you do not have to select “VOL” to adjust the volume level. 21 Equalization pattern changes asyou adjust the bass or treble EN20-25.KD-S70R/S7R[E] 25/3/05, 4:39 AM2021
ENGLISH Turning on/off the loudness function
The human ear is less sensitive to low and high frequencies at low volumes.
The loudness function can boost these frequencies to produce well-balanced sound at low
Each time you press + or –, the loudness function turns on and off alternatively.
@A EN20-25.KD-S70R/S7R[E] 25/3/05, 4:39 AM2122 ENGLISH Using the Sound Control Memory You can select and store a preset sound adjustment suitable to each playback source.(Advanced SCM) Selecting and storing the sound modes Once you select a sound mode, it is stored in memory, and will be recalled every time youselect the same source. A sound mode can be stored each of the following sources — FM1,FM2, FM3, AM and CD.• If you do not want to store the sound mode separately for each playback source, but wantto use the same sound mode for all the sources, see “Canceling Advanced SCM” on page 24.
Select the sound mode you want. Each time you press the button, the sound mode changes as follows.• If the “Link” indicator is lit on the display (with “SCM LINK” set to“LINK ON” — see page 24), the selected sound mode can be storedin memory for the current source, and the effect applies to the currentsource.• If the “Link” indicator is NOT lit on the display (with “SCM LINK” set to“LINK OFF”), the selected sound mode effect applies to any source.Indication For: Preset valuesBass Treble LoudnessSCM OFF (Flat sound) 00 00 OnBEAT Rock or disco music +02 00 OnSOFT Quiet background music +01 –03 OffPOP Light music +04 +01 Off SCM
C D A M F M Recalling the sound modes
Select the source while the “Link” indicator
is lit on the display. The “Link” indicator starts flashing, and the sound modestored in memory for the selected source is recalled.Notes:• You can adjust each sound mode to your preference, and store it in memory.If you want to adjust and store your original sound mode, see “Storing your own sound adjustments”on page 25.• To adjust the bass and treble reinforcement levels or to turn on/off the loudness function temporarily,see pages 20 and 21. (Your adjustments will be cancelled if another source is selected.)Equalization pattern of theselected sound mode appearsSound modeindicator EN20-25.KD-S70R/S7R[E] 25/3/05, 4:39 AM2324 ENGLISH Canceling Advanced SCM You can cancel the Advanced SCM (Sound Control Memory), and unlink the sound modesand the playback sources.When shipped from the factory, a different sound mode can be stored in memory for eachsource so that you can change the sound modes simply by changing the sources.LINK ON: Advanced SCM (different SCMs for different sources)LINK OFF: Conventional SCM (one SCM for all sources) 3
Press and hold SEL for more than 2 seconds
to call up the general setting mode (see page
EN20-25.KD-S70R/S7R[E] 25/3/05, 4:39 AM2425 ENGLISH Storing your own sound adjustments You can adjust the sound modes (BEAT, SOFT, POP: see page 22) to your preference andstore your own adjustments in memory. 1
Call up the sound mode you want to adjust. See page 22 for details. 2
Select “BAS”, “TRE” or “LOUD.”
Adjust the bass or treble level or turn the
loudness function ON/OFF. See page 20 for details. 4
Press and hold SCM until the sound mode
you have selected in step 1 flashes on the
display. Your setting is stored in memory. 5
Repeat the same procedure to store other settings.
To reset to the factory settings Repeat the same procedure and reassign the preset values listed in the table on page 22.Within5 secondsWithin5 secondsWithin5 seconds SEL
Press and hold SEL for more than 2 seconds to call
up the general setting mode (see page 29).
1 Select “CLOCK M (Minute).”
2 Adjust the minute.
OTHER MAIN FUNCTIONS 2, 3, 4 1, 5 2, 3, 4 Setting the clock You can also set the clock system either to 24 hours or 12 hours. EN26-32.KD-S70R/S7R[E] 25/3/05, 4:40 AM2627
ENGLISH To check the current clock time (changing the display mode)
Press DISP repeatedly. Each time you press the button, the display mode changes as follows.
• If the unit is not in use when you press DISP, the power turns on, the clock time is shown for
5 seconds, then the power turns off. During tuner operation:During CD operation:ClockFrequency ClockElapsed playing time 4
Set the clock system.
2 Select “24H” or “12H.”
2 Note:For the indication change during RDS operation,see page 15. EN26-32.KD-S70R/S7R[E] 25/3/05, 4:40 AM2728 ENGLISHYou can select the level display according to your preference.When shipped from the factory, “VOL 2” is selected.VOL 1: Shows the volume level indicator and the equalization pattern indicator.VOL 2: Alternates “VOL 1” setting and illumination display.OFF: Erase the volume level indicator and the equalization pattern indicator. 1
Press and hold SEL for more than 2 seconds
to call up the general setting mode (see page
Select the desired mode — “VOL 1”, “VOL 2”
2 Volume level indicatorEqualization pattern indicator Selecting the level display
EN26-32.KD-S70R/S7R[E] 25/3/05, 4:40 AM2829 ENGLISHYou can change the items listed on the next page to your preference. Basic Procedure
Changing the general settings
Press and hold SEL for more than 2 seconds to
call up the general setting mode.
Select the item you want to adjust.
Adjust the item selected above.
EN26-32.KD-S70R/S7R[E] 25/3/05, 4:40 AM2930
ENGLISH CLOCK H Hour adjustment
CLOCK M Minute adjustment
SCM LINK Sound control
AUTO ADJ Automatic setting of
TA VOL Traffic announcement
P-SEARCH Programme search
cellular phone system
SEL Finish the setting
ON OFF EN26-32.KD-S70R/S7R[E] 25/3/05, 4:40 AM3031
ENGLISH Selecting the telephone muting
This mode is used when a cellular phone system is connected. Depending on the phone
system used, select either “MUTING 1” or “MUTING 2,” whichever mutes the sounds from
this unit. When shipped from the factory, this mode is deactivated.
• MUTING 1: Select this if this setting can mute the sounds.
• MUTING 2: Select this if this setting can mute the sounds.
• OFF: Cancels the telephone muting.
1. Press and hold SEL (select) for more than 2 seconds to call up the general setting mode.
The telephone muting mode changes as follows:
OFF EN26-32.KD-S70R/S7R[E] 25/3/05, 4:40 AM3132
ENGLISH How to detach the control
panel Before detaching the control panel, be sureto turn off the power. 1
Unlock the control panel.
Lift and pull the control panel
Put the detached control
panel into the case provided.
How to attach the control
Insert the left side of the
control panel into the groove
on the panel holder.
Press the right side of the
control panel to fix it to the
panel holder. Note on cleaning the connectors:If you frequently detach the control panel, theconnectors will deteriorate.To minimize this possibility, periodically wipethe connectors with a cotton swab or clothmoistened with alcohol, being careful not todamage the connectors.ConnectorsYou can detach the control panel when leaving the car.When detaching or attaching the control panel, be careful not to damage the connectors onthe back of the control panel and on the panel holder. Detaching the control panel
EN26-32.KD-S70R/S7R[E] 25/3/05, 4:40 AM3233
ENGLISH Center holder
COMPACTDIGITAL AUDIO MAINTENANCE Handling CDs
This unit has been designed only to reproduce the CDs bearing the mark.
Other discs cannot be played back.
When removing a CD from its case, press down the center holder of the case
and lift the CD out, holding it by the edges.
• Always hold the CD by the edges. Do not touch its recording surface.
When storing a CD into its case, gently insert the CD around the center
holder (with the printed surface facing up).
• Make sure to store CDs into the cases after use.
A dirty CD may not play correctly. If a CD does becomes dirty, wipe it with a soft
cloth in a straight line from center to edge.
New CDs may have some rough spots around the inner and outer edges. If such
a CD is used, this unit may reject the CD.
To remove these rough spots, rub the edges with a pencil or ball-point pen, etc.
Moisture condensation
Moisture may condense on the lens inside the CD player in the following cases:
• After starting the heater in the car.
• If it becomes very humid inside the car.
Should this occur, the CD player may malfunction. In this case, eject the CD and leave the unit turned on
for a few hours until the moisture evaporates.
• Do not insert 8cm (3 3/16") CDs (single CDs) into the loading slot. (Such CDs cannot be ejected.)
• Do not insert any CD of unusual shape – like a heart or flower; otherwise, it will cause a malfunction.
• Do not expose CDs to direct sunlight or any heat source or place them in a place subject to high temperature
and humidity. Do not leave them in a car.
• Do not use any solvent (for example, conventional record cleaner, spray, thinner, benzine, etc.) to clean
When playing a CD-R (Recordable)
You can play back your original CD-Rs on this recevier.
• Before playing back CD-Rs, read their instructions or cautions carefully.
• Some CD-Rs recorded on CD recorders may not be played back on this receiver because of their disc
characteristics, and of the following reasons:
– Discs are dirty or scratched.
– Moisture condensation occurs on the lens inside the unit.
– The pickup lens inside the CD player is dirty.
• Use only “finalized” CD-Rs.
• CD-RWs (Rewritable) cannot be played back on this recevier.
Mistracking may result from driving on extremely rough roads. This does not damage the unit and
the CD, but will be annoying.
We recommend that you stop CD play while driving on such rough roads.
EN33-35.KD-S70R/S7R[E] 25/3/05, 4:41 AM3334
ENGLISH TROUBLESHOOTING What appears to be trouble is not always serious. Check the following points before calling a
• CD cannot be played back.
• CD sound is sometimes
• “NO DISC” appears on the
• Sound cannot be heard from
• SSM (Strong-station
automatic preset does not
• Static noise while listening
• CD can be neither played
• The unit does not work at
Stop CD play while driving on
Insert a CD into the loading
Insert it correctly.
Adjust it to the optimum level.
Store stations manually.
Connect the antenna firmly.
same time for more than 2
seconds. Be careful not to
drop CD when it is ejected.
the same time for more than 2
seconds to reset the unit. (The
clock setting and preset
stations stored in memory are
erased.) (See page 2.)
CD is inserted upside down.
You are driving on rough
Connections are incorrect.
No CD is in the loading slot.
CD is inserted incorrectly.
The volume control is turned
to the minimum level.
Connections are incorrect.
Signals are too weak.
The antenna is not connected
The CD player may function
The built-in microcomputer
Front: 40 W per channel
Rear: 40 W per channel
Continuous Power Output (RMS):
Front: 16 W per channel into 4 Ω, 40 Hz
to 20 000 Hz at no more than 0.8%
total harmonic distortion.
Rear: 16 W per channel into 4 Ω, 40 Hz
to 20 000 Hz at no more than 0.8%
total harmonic distortion.
Load Impedance: 4 Ω (4 Ω to 8 Ω allowance)
Bass: ±10 dB at 100 Hz
Treble:±10 dB at 10 kHz
Frequency Response: 40 Hz to 20 000 Hz
TUNER SECTION Frequency Range
FM: 87.5 MHz to 108.0 MHz
AM: (MW) 522 kHz to 1 620 kHz
(LW) 144 kHz to 279 kHz
Usable Sensitivity: 11.3 dBf (1.0 µV/75 Ω)
50 dB Quieting Sensitivity:
16.3 dBf (1.8 µV/75 Ω)
Alternate Channel Selectivity (400 kHz):
Stereo Separation: 30 dB Capture Ratio: 1.5 dB
Sensitivity: 20 µV Selectivity: 35 dB
Sensitivity: 50 µV CD PLAYER SECTION Type: Compact disc player
Signal Detection System: Non-contact optical
pickup (semiconductor laser)
Number of channels: 2 channels (stereo)
Frequency Response: 5 Hz to 20 000 Hz
Dynamic Range: 96 dB Signal-to-Noise Ratio: 98 dB Wow and Flutter: Less than measurable limit
GENERAL Power Requirement
Operating Voltage: DC 14.4 volts (11 V to
Allowable Working Temperature:
0°C to +40°C Grounding System: Negative ground
Dimensions (W x H x D)
182 mm x 52 mm x 150 mm
Panel Size: 188 mm x 58 mm x 14 mm
Mass: 1.3 kg (excluding accessories)
Design and specifications subject to change
MO/RND DISP PS NAME (Sendername)
PS NAME (Sendername)
(FM1, FM2, FM3 of AM).
(treble) tonen in of activeer de loudness-
• Automatisch instellen van
zenders – SSM (Strong-
station Sequential Memory)
– functioneert niet.
SPECIFICATIES NL33-35.KD-S70R/S7R[E]f 28/12/00, 5:29 PM351200HISFLEJES J V C EN, GE, FR, NL VICTOR COMPANY OF JAPAN, LIMITED Having TROUBLE with operation?
Please reset your unit
Refer to page of How to reset your unit
Haben Sie PROBLEME mit dem Betrieb?