
HG07610 - Uncategorized Livarno Lux - Free user manual and instructions
Find the device manual for free HG07610 Livarno Lux in PDF.


| Product Type | Battery-Operated LED Lamp |
| Brand | Livarno Lux |
| Model | HG07610 |
| Power Source | Battery (3 x AA, not included) |
| Battery Type | AA (1.5V each) |
| Number of Batteries | 3 |
| Light Source | LED (non-replaceable) |
| Luminous Flux | Approx. 30 lumens |
| Color Temperature | Warm White (3000K) |
| Material | Plastic housing, metal accents |
| Dimensions (L x W x H) | 20 x 5 x 3 cm |
| Weight | 200 g (including batteries) |
| Color | White/Black available |
| Switch Type | Slide switch (On/Off) |
| Mounting Type | Freestanding or adhesive back |
| IP Rating | IP20 (indoor use only) |
| Safety Class | III (SELV) |
| Cleaning and Maintenance | Wipe with a dry cloth; do not use water or solvents |
| Spare Parts Availability | Batteries are user-replaceable; LED unit not replaceable |
| Warranty | 2 years |
| Certifications | CE, RoHS |
Frequently Asked Questions - HG07610 Livarno Lux
User questions about HG07610 Livarno Lux
0 question about this device. Answer the ones you know or ask your own.
Ask a new question about this device
Download the instructions for your Uncategorized in PDF format for free! Find your manual HG07610 - Livarno Lux and take your electronic device back in hand. On this page are published all the documents necessary for the use of your device. HG07610 by Livarno Lux.
USER MANUAL HG07610 Livarno Lux
natural_image
Close-up of a metallic shower faucet with glossy finish and handle (no text or symbols visible)SHOWER MIXER TAP
GB CY
SHOWER MIXER TAP
Assembly, operating and safety instructions
RS
JEDNORUČNA BATERIJA ZA TUŠ KABINU
Introduction......Page 6
Proper use....Page 6
Description of parts....Page 6
Technical data......Page 6
Safety advice....Page 6
Installation......Page 7
Installing the tap....Page 7
Operation Page 7
Bringing into use....Page 7
Setting the temperature limiter....Page 7
Water-saving function....Page 8
Energy-saving function....Page 8
Maintenance and cleaning......Page 8
Tap care and cleaning Page 8
Disposal Page 8
Information......Page 8
Potability of mains water Page 8
Warranty Page 9
Warranty claim procedure....Page 9
Service Page 9
Shower mixer tap
- Introduction
We congratulate you on the purchase of your new product. You have chosen a high quality product. Familiarise yourself with the product before using it for the first time. In addition, please carefully refer to the operating instructions and the safety advice below. Only use the product as instructed and only for the indicated field of application. Keep these instructions in a safe place. If you pass the product on to anyone else, please ensure that you also pass on all the documentation with it.
• Proper use
This product is suitable for all pressure-tight hot water systems such as central heating boilers, instantaneous water heaters, pressurised boilers and the like. It is not suitable for low-pressure water heaters such as wood or coal burning bath geysers, oil or gas bath geysers, open electrically heated water tanks. If in doubt please seek the advice of a plumber or heating engineer. Any use other than that described here or modification to the product is not permitted and may lead to damage to persons or property. There is also the risk of injury and loss of life. The product is intended for personal use only and not for medical or commercial use. The manufacturer accepts no liability for loss or damage arising from improper use.
• Description of parts
1 2 S-connectors 2 2 Rosettes 3 2 Sealing rings 4 2 Nuts (for S-connectors) 5 1 Cap 6 1 Locking screw 7 1 Control lever 8 1 Cartridge end ring 9 1 Cartridge licking ring 10 1 Cartridge 11 1 Setting ring
12 1 Tap body
12d 1 Threaded connector (for the shower hose)
●Technicaldata
Connectionspacing:136-164mm
Connections (Shower hose): G ^1/2 "
(approx. 21 mm)
Water connection nut: approx. 28.5 mm

Safety advice
RISK OF VORNING! OF LIFE OR ACCIDENT TO INFANTS AND CHILDREN! Never leave children unsupervised with the packaging materials. Danger of suffocation. Keep the product away from children. The product is not a toy.
CAUTION - RISK OF ELECTRIC SHOCK! Leaks or the escape of water can lead to danger to life from electric shock. Check all connections for leaks carefully. In addition, ensure that all cables from electrical devices are correctly and safely installed.
■ CAUTION! RISK OF INJURY! Please ensure that no parts are damaged and that all parts are correctly assembled. Incorrect assembly could lead to injury. Please note that seals are wear parts and therefore will require to be replaced from time to time. Damaged parts could adversely affect safety and proper function.
■ CAUTION! RISK OF DAMAGE TO PROPERTY! Have the installation done by experienced persons only. Leaks or escape of water can lead to serious damage to buildings or household fittings and furniture. Check all connections for leaks carefully.
■ Ensure that all seals are correctly seated to prevent leakage of water.
■ CAUTION! DANGER OF SCALDING! When making the hot water setting please ensure that the temperature of the water is not too high.
Before installation, make yourself familiar with all the existing services, e.g. water connection and stopcocks.
Please read carefully through these operating instructions before installing and using the product. Keep all the safety advice and instructions in a safe place for future reference!
●Installation
• Installing the tap
Note: To protect the parts from scratches while being screwed together cover them with a damp cloth or use plastic clamps.
■ Before you start installation turn off the main water supply to prevent serious leakage of water.
☐ Install the tap at the wall connection as shown in Figure A.
Connecting the accessories (shower head and shower hose)\*:
Note: So that the parts do not get scratched while being screwed together, protect them with a damp cloth or use plastic clamps.
☐ Screw an ordinary shower hose* firmly on to the thread 12a .
☐ Attach an ordinary shower head* to the shower hose*.
□ Observe the installation instructions for the accessories.
* (not included)
Operation
- Bringing into use
Note: If the tap has not been used for a long period flush the pipes through thoroughly in order to avoid stagnation and build-up of residues in the drinking water supply.
□ Open the main water supply.
☐ Lift the control lever 7 and swivel it to the right or left to regulate the strength or temperature of the water flow.
Hot water:
□ Swivel the control lever to the left.
Cold water:
□ Swivel the control lever to the right.
☐ Check that the mixer tap is working properly. To do this, swivel the lever into all the possible positions. Please check the connections regularly for leaks.
- Setting the temperature limiter
The cartridge 10 in this unit has a temperature limiter. This function is not activated in the factory (neutral setting).
CAUTION! Change the temperature limiter setting only after the tap has been installed.
☐ Turn off the main water supply.
☐ Remove the cap 5 carefully by a small flat screwdriver (see Fig. B).
☐ Release the locking screw 6 by turning it anticlockwise using a hexagonal key.
CAUTION! Do not take the screw completely out; just loosen it until the control lever 7 can be easily taken off.
☐ Take off the control lever 7.
☐ Loosen the cartridge end ring 8 by hand, then screw off the cartridge locking ring 9 by using a pipe wrench.
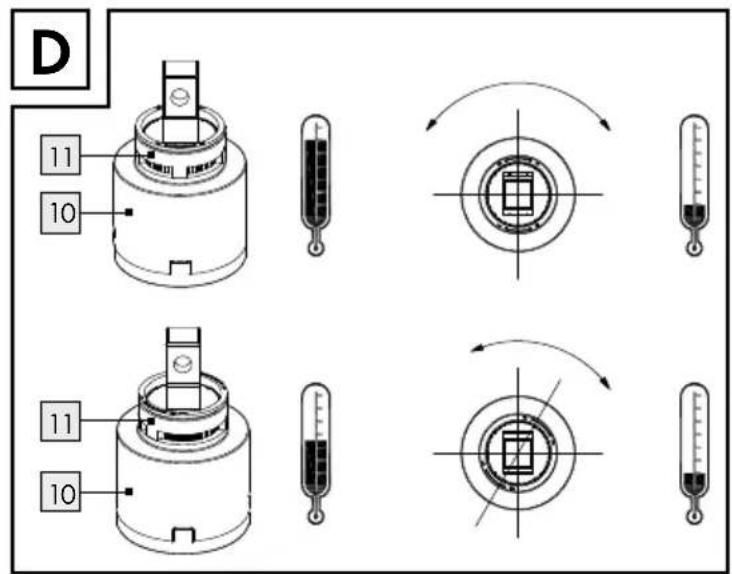
☐ Now pull the setting ring 11 upwards with the help of a screwdriver.
Note: Do not remove the cartridge.
Place the setting ring 11 in the desired position as shown in Fig. D.
Note: The setting ring can limit the turning angle of the handle, so that the amount of hot water can be limited.
☐ Tighten the cartridge locking ring 9 onto the tap body 12 again by using a pipe wrench, then tighten the cartridge end ring 8 by hand.
Place the control lever 7 back on to the tap body 12 and tighten the locking screw by turning it clockwise using a hexagon socket screw key.
☐ Press the cap 5 into the opening.
☐ Turn on the main water supply and check the temperature limiter.
Water-savingfunction
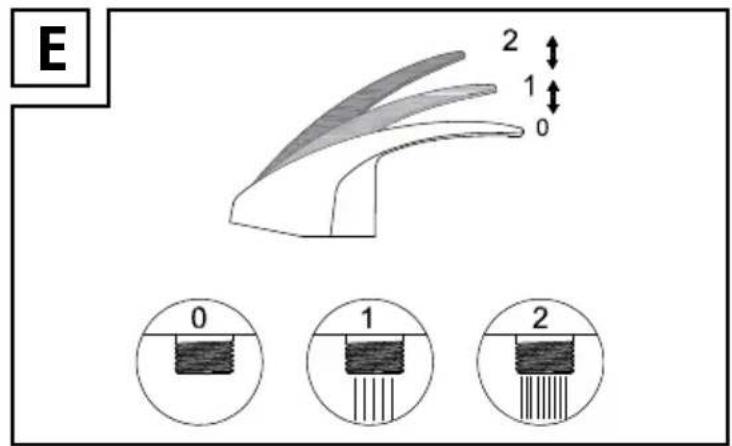
☐Thecartridge 10 in this tap has an Eco-Click function. This feature limits the water flow through the tap. This means you can save up to 50 % water (see fig. E).
☐ Lift the lever 7 until you notice a slight resistance. This resistance will cause a stop in case of partial opening and will therefore simply limit the flow of water.
☐ If you want to increase the flow rate, exert slight pressure on the lever 7 until you overcome the resistance.
Energy-savingfunction
☐Thecartridge 10 in the tap has an energy saving function.
☐ Only cold water will flow out when the control lever 7 is set to middle position and thus reduce energy consumption (see fig. C).
● Maintenance and cleaning
Tap care and cleaning
Please note that sanitary fittings require special care and attention. Therefore you should follow the following advice:
■ Never use corrosive or alcohol-based materials for cleaning, as these could damage the product.
☐ Clean your fittings with clean water, mild detergent and a soft cloth or leather only.
Non-observance of the above care advice can be expected to result in damage to the surface of the fittings. In this event your rights under the warranty may be invalidated.
●Disposal
The packaging is made entirely of recyclable materials, which you may dispose of at local recycling facilities.
Contact your local refuse disposal authority for more details of how to dispose of your worn-out product.
Information
- Potability of mains water
☐ Find out about the potability of your mains water supply. Your local water authority or water supply company will be able to inform you.
The following general recommendations apply to the potability of the water from your pipework:
Let the water run freely for a short time if it has been stagnating in the pipework for more than four hours. Do not use any of this stagnant water in the preparation of food or for drinking. This applies particularly as far as babies and infants are concerned. Failure to observe this advice may result in risks to health. Fresh water can be readily distinguished from stagnant as fresh water is noticeably cooler.
Do not use stagnant water from chromium-plated pipework for the preparation of food or for drinking or for personal hygiene if you are allergic to nickel. This water may contain high quantities of nickel and trigger an allergic reaction.
Do not use water from lead pipework for preparing food or drink for babies or infants. Do not use it for preparing food or drink during pregnancy. Lead dissolves in drinking water and is particularly damaging to the health of babies and young children.
- Warranty
The product has been manufactured to strict quality guidelines and meticulously examined before delivery. In the event of product defects you have legal rights against the retailer of this product. Your legal rights are not limited in any way by our warranty detailed below.
The warranty for this product is 5 years from the date of purchase. The warranty period begins on the date of purchase. Please keep the original sales receipt in a safe location. This document is required as your proof of purchase.
Should this product show any fault in materials or manufacture within 5 years from the date of purchase, we will repair or replace it – at our choice – free of charge to you. This warranty becomes void if the product has been damaged, or used or maintained improperly.
The warranty applies to defects in material or manufacture. This warranty does not cover product parts subject to normal wear, thus possibly considered consumables (e.g. batteries) or for damage to fragile parts, e.g. switches, rechargeable batteries or glass parts.
- Warranty claim procedure
To ensure quick processing of your case, please observe the following instructions:
Please have the till receipt and the item number (e.g. IAN 123456_7890) available as proof of purchase.
You will find the item number on the rating plate, an engraving on the front page of the instructions for use (bottom left), or as a sticker on the rear or bottom of the product.
If functional or other defects occur, please contact the service department listed either by telephone or by e-mail.
You can return a defective product to us free of charge to the service address that will be provided to you. Ensure that you enclose the proof of purchase (till receipt) and information about what the defect is and when it occurred.
Service
GB Service Great Britain
Tel.: 08000569216
E-Mail: owim@lidl.co.uk
CYServiceCyprus
Tel.: 8009 4211
E-Mail: owim@lidl.com.cy
Uvod....Stranica 11
- SHOWER MIXER TAP
- JEDNORUČNA BATERIJA ZA TUŠ KABINU
- Introduction......Page 6
- Safety advice....Page 6
- Installation......Page 7
- Operation Page 7
- Maintenance and cleaning......Page 8
- Disposal Page 8
- Information......Page 8
- Warranty Page 9
- - Introduction
- • Proper use
- • Description of parts
- ●Technicaldata
- Safety advice
- ●Installation
- • Installing the tap
- Connecting the accessories (shower head and shower hose)\*:
- Operation
- - Bringing into use
- Hot water:
- Cold water:
- - Setting the temperature limiter
- CAUTION! Change the temperature limiter setting only after the tap has been installed.
- CAUTION! Do not take the screw completely out; just loosen it until the control lever 7 can be easily taken off.
- Water-savingfunction
- Energy-savingfunction
- ● Maintenance and cleaning
- Tap care and cleaning
- ●Disposal
- Information
- - Potability of mains water
- The following general recommendations apply to the potability of the water from your pipework:
- - Warranty
- - Warranty claim procedure
- Service
- GB Service Great Britain
- CYServiceCyprus
- Uvod....Stranica 11
Brand : Livarno Lux
Model : HG07610
Category : Uncategorized