
IAN 89560 - Hose reel POWERFIX - Free user manual and instructions
Find the device manual for free IAN 89560 POWERFIX in PDF.


| Product Type | Compressed Air Hose Drum |
| Brand | Powerfix (IAN 89560) |
| Hose Length | Approx. 20 m |
| Hose Diameter (inner/outer) | 6.3 mm / 11.3 mm |
| Operating Pressure | Max. 15 bar |
| Working Temperature | -20°C to +60°C |
| Connections | Brass connection nipple and one-hand quick release coupling |
| Hose Material | Soft PVC with fabric lining, transparent blue |
| Frame Material | Galvanised tubing with hose guide |
| Housing Material | Plastic |
| Dimensions (HxWxD) | 35.5 x 28.5 x 19 cm |
| Article Number | 10190 |
| Guarantee | 36 months |
| Manufacturer | Uni-Elektra GmbH |
| Intended Use | Workshop, garden, renovation, automotive work with compressed air devices |
| Safety | Read instructions; do not open/tamper; check leak-tightness; disconnect before cleaning; inspect for damage |
| Cleaning | Use slightly damp cloth; no abrasive materials or chemicals |
| Maintenance | Inspect before each use; disconnect from compressor before maintenance |
| Disposal | Environmentally friendly materials, 100% recyclable |
| Certification | GS symbol (German equipment and product safety act) |
| Service Address | Uni-Elektra GmbH, Jahnstr. 20, 72513 Hettingen, service@uni-elektra.de, +49 7577 93382-16 |
Frequently Asked Questions - IAN 89560 POWERFIX
User questions about IAN 89560 POWERFIX
0 question about this device. Answer the ones you know or ask your own.
Ask a new question about this device
Download the instructions for your Hose reel in PDF format for free! Find your manual IAN 89560 - POWERFIX and take your electronic device back in hand. On this page are published all the documents necessary for the use of your device. IAN 89560 by POWERFIX.
USER MANUAL IAN 89560 POWERFIX
natural_image
Coiled blue industrial hose with coiled cable, no visible text or symbols| Bęben z wężem pneumatycznym Instrukcja użytkowania | PL | Strona | 2-7 |
| Sűrített levegős tömlő tárolódob Használati útmutató | HU | Oldal | 8-13 |
| Navijalni boben za cev za stisnjen zrak Navodilo za uporabo | SI | Stran | 14-20 |
| Hadicový buben Návod k použití | CZ | Strana | 21-26 |
| Bubon s pneumatickou hadicou Návod na použitie | SK | Strana | 27-32 |
| Druckluftschlauchtrommel Gebrauchsanleitung | DE/AT/CH | Seite | 33-38 |
| Compressed air hose drum Instructions for use | GB | Page | 39-44 |
natural_image
Spool of blue and white coiled cable with metal handle, no visible text or symbols
natural_image
Coiled blue industrial hose with coiled cable, mounted on a black metal frame (no text or symbols visible)
natural_image
Coiled blue industrial hose with coiled cable, mounted on black frame (no text or symbols visible)
natural_image
Spool of blue mesh hose with coiled cable, mounted on metal frame (no text or symbols visible)
natural_image
Coiled blue industrial cable with coiled hose and fittings, mounted on black frame (no text or symbols visible)
Compressed air hose drum
natural_image
Coiled blue industrial cable with coiled hose and fittings, mounted on black frame (no text or symbols visible)
Operating Instructions
IMPORTANT:
Read through these Operating Instructions carefully and keep them handy. Note and observe the safety instructions.
Contents
1 Introduction Page 41
2 Use in accordance with these instructions Page 41
3 Safety instructions Page 41
4 Scope of supply Page 42
5 Technical data Page 42
6 Product overview Page 42
7 Commissioning and operation Page 43
7.1 Commissioning Page 43
8 Defect list Page 43
9 Cleaning Page 43
10 Maintenance Page 43
11 Disposal Page 43
12 Guarantee and Service Page 43
13 Certificate and Manufacturer Page 44
1 Introduction
Everybody who uses, cleans or disposes of this product must be familiar with the contents of these Operating Instructions.
These Operating Instructions form part of this product.
Always observe all safety instructions.
If you have questions please contact your local agent or the Service Department (for address see Chapter 12).
2 Use in accordance with these instructions
This compressed air hose drum is intended for universal use in the workshop, in the garden, for renovation work or in automotive work. It is compatible with all current compressed air devices.
It is not permissible to use the product for any other purpose than those described in these Operating Instructions. This may lead to damage to the product.
3 Safety Instructions
IMPORTANT: When using the compressed air hose drum, please note the following instructions. This will minimise personal danger or damage to property.
If there is any damage which is caused by the non-observance of these Operating Instructions the guarantee will become invalid.
No liability will be accepted for any damage to property, injuries to people, or consequential damage.
The key words and symbols used in these Operating Instructions have the following meanings.
| Symbol | Key word / meaning |
 | DANGER:Non-observance causes considerable risk of injury to people and danger to life |
 | WARNING:Non-observance causes medium risk of injury to people |
 | TAKE CARE:Low risk of injury to people and danger of damage to goods or to the product |
 | IMPORTANT:What you need to pay attention to |
 | INFORMATION:Detailed explanations |
Tab.1: Symbol table
Danger: Danger to life and injury if disregarded.
- Keep these Operating Instructions carefully and if necessary pass them onto third parties Keep the instruction manual and pass it on to the subsequent owner with the compressed air hose drum.
- Do not open/tamper with the compressed air hose drum. Never open, tamper with or modify the compressed air hose drum.
- Check for leak-tightness. Compare the information on the type plate that on the compressor.
Make sure that the maximum air pressure does not exceed the
information on the type plate.
If you fail to observe these instructions, there is a risk of the compressed air hose bursting or of a defect in the connections.
- If a defect is discovered, put the unit out of service.
Put the compressed air hose drum out of service if malfunctions, defects or damage are discovered.
Defects could occur, for example, if cuts and bruises are received from the hose.
Have the compressed air hose drum inspected, and if necessary repaired, before putting it back into service.

Take Care: Avoid damage to perty.
- Protect the compressed air hose.
Protect the compressed air hose from oil, acids, sharp edges and high temperatures. If you fail to observe this, there is the possibility of a defect occurring.
4 Scope of supply
Immediately after unpacking check the goods supplied to see that they are complete and in a satisfactory condition.
1 x Compressed air hose drum
5 Technical Data
| Product: | Compressed | |
| hose drum | ||
| Article number: | 10190 | |
| Classification: | Soft | PVC |
| compressed air hose, transparent blue with fabric lining | ||
| Working temperature: | -20°C to +60°C | |
| Hose length: | Approx. 20m | |
| Diameter: | 6,3 / 11,3 mm | |
| Operating pressure: | Max. 15 bar | |
Connections: Brass connection nipple and one-hand quick release coupling
Frame: Galvanised
tubing with hose guide
Housing: Plastic
Dimensions (HxDxW):
35,5 × 19 × 28,5 cm
reel
6 Product overview
This Chapter gives an overview of the operating devices and indicators of the product and a short functional description. In the following Chapter (Chapter 7) the operation will be described in more detail.

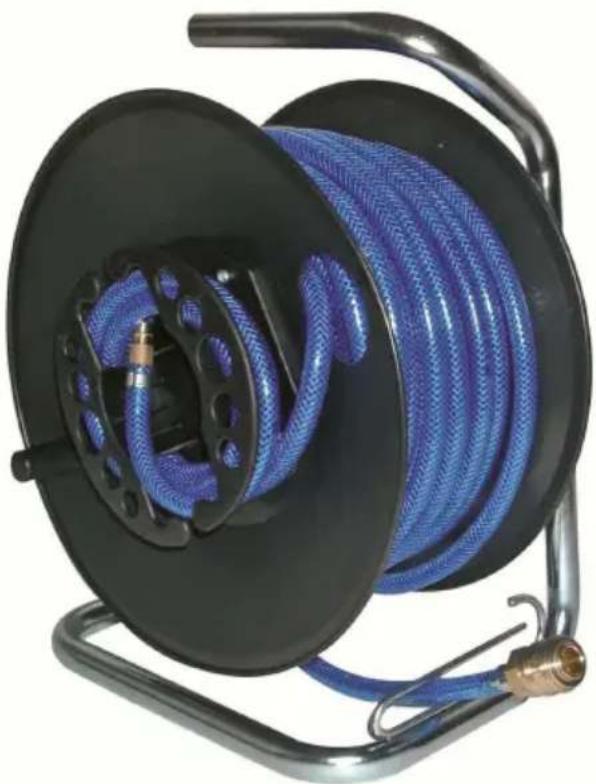
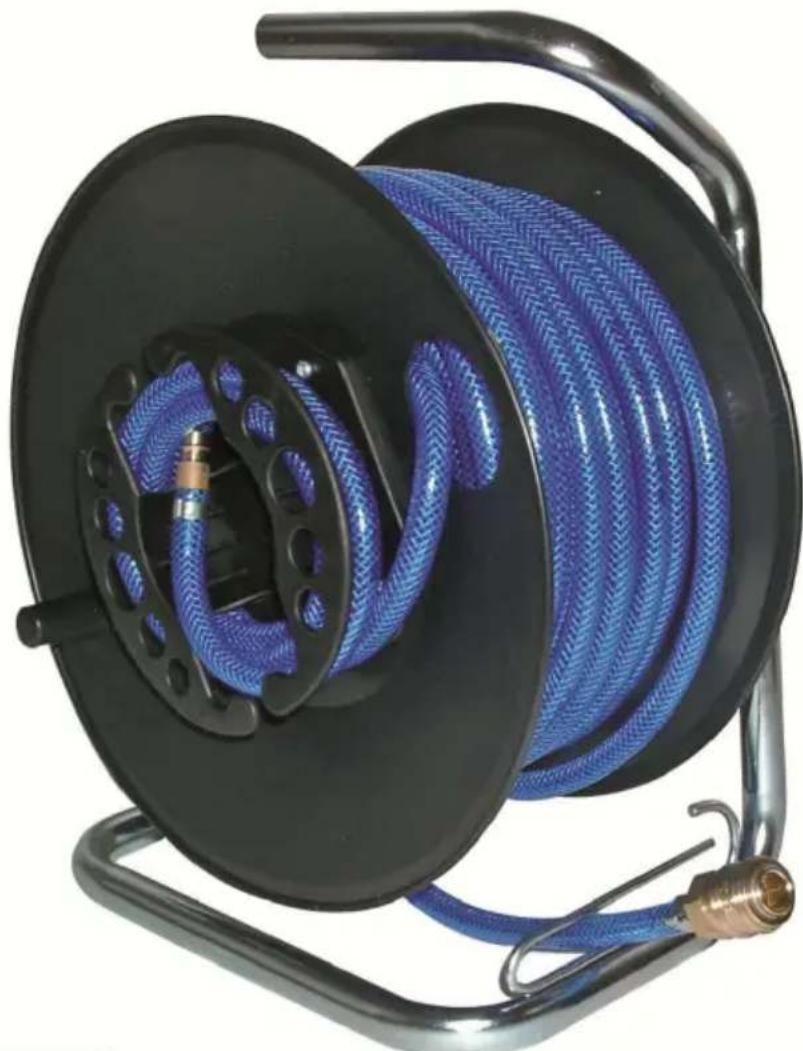
Figure 1: Equipment overview – Compressed air hose drum
| Item | Designation | Function |
| 1 air | Frame with hose guide | Facilitates the winding and unwinding of the compressed air hose |
| 2 | Compressed air hose | Connecting the tool with the compressor |
| 3 | Connections | One-hand operation |
Tab.2: The parts of the compressed air hose drum
7 Commissioning and Operation
IMPORTANT: This Chapter describes the basic functions of the compressed air hose drum.
Read through the Chapter carefully, in order to understand and be able to use the opportunities and functions.
Note the following information and especially the safety instructions in order to avoid incorrect operation and possible defects. If there are problems look in the defect list (Chapter 8) or contact our Service Department (Contact: see Chapter 12).
Observe the safety instructions (see Chapter 3).
7.1. Commissioning
| 1 | Connection to the compressed air tool |
| Connect the end of the compressed air hose to the compressed air tool via the quick release coupling. | |
| 2 | Connection to the compressor |
| Connect the other end of the compressed air hose to the compressor via the connection nipple. |
Tab.3: Commissioning
8 Defect list
| Problem/ defect | Possible cause(s) | Remedy |
| Com-pressed air hose drum not working properly | - Com-pressed air hose defective- Com-pressed air hose coupling is not properly connected | - Check the com-pressed air hose for damage- Check the proper fit of the connections |
| to the compressor or compressed air device |
Tab.4: Defect list
9 Cleaning
⚠️ DANGER: For safety reasons, the product must be disconnected from the compressor before cleaning! Only use a slightly damp cloth for cleaning tasks.
IMPORTANT: Do not use an abrasive cleaning material or chemicals.
10 Maintenance
IMPORTANT: Inspect the product for damage, each time before it is used. Before any maintenance or repair work, the compressed air hose drum must be disconnected from the compressor.
11 Disposal
INFORMATION: The packaging and the packaging material consist of environmentally friendly materials and are 100% recyclable.
12 Guarantee and Service
INFORMATION: With this product you get a 36 month guarantee from date of purchase. The product was carefully produced and conscientiously tested before delivery.
If in spite of this there are material and production defects during the guarantee period contact your dealer immediately.
Damage due to unsuitable handling, non-observance of the Operating Instructions or work done by
unauthorised people are not covered by the guarantee.
Most functional defects are caused by faulty operation.

INFORMATION: If a functional defect appears look in the Operating Instructions first.
Contact us before sending the product back. Only after speaking to us can the product be accepted. Goods returned to us with delivery unpaid will not be accepted.
In the event of a guarantee claim being made the guarantee time of 36 months will be neither extended nor renewed.
Article number: 10190
(It is essential to quote this number)
Service address:
Uni-Elektra GmbH
Jahnstr. 20
D-72513 Hettingen
service@uni-elektra.de
Tel: +49 7577 93382-16
13 Certificate and Manufacturer
The product complies with the requirements of the German equipment and product safety act
(§7 Para. 1 Art. 2 GPSG) with respect to ensuring health and safety.
In line with this, the GS symbol has been attached to it:

The certificate is held by the manufacturer.
Manufacturer:
Uni-Elektra GmbH
Jahnstr. 20
D-72513 Hettingen
www.uni-elektra.de
Bedienungshinweis / Mode d'emploi / Istruzioni d'uso / Instrucciones de uso / Instructions for use / Instruções de uso / Gebruiksaanwijzingen / Oδηγίες / Instrukcje użytkowania / Käyttöohje / Návod k použití / Bruksanvisningar / Návod na použitie / Használati útmutató / Brugsanvisninger / Upute za korištenje / Navodila za uporabo / Instructiuni de folosire

natural_image
Close-up of a blue cable with two brass connectors and directional arrows indicating movement (no text or symbols)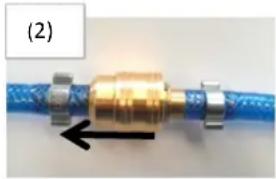
natural_image
Close-up of a blue and gold-colored pipe fitting with a black arrow pointing to a component (no text or symbols visible)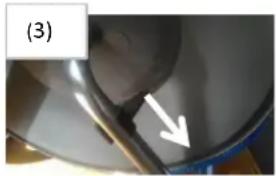
natural_image
Close-up of a metallic cylindrical object with a white arrow pointing to a small feature, labeled (3) in the corner (no readable text or symbols)
natural_image
Close-up of a black mechanical component with a white arrow pointing to a detail (no text or symbols visible)| DEATCH | Druckluschlauch anschließen bzw. abnehmen:(1) Zum Verbinden die Kupplung auf das Verbindungsstück stecken. (2) Zum Lösen die äußere Hülle der Kupplung zurückziehen!Feststellbremsen einstellen bzw. lösen:(3) Zum Einstellen der Feststellbremse, die Feststellbremse nach unten schieben. (4) Zum Lösen der Feststellbremse, die Feststellbremen nach oben schieben.Hinweis: Vor jeder Verwendung unbedingt auf Beschädigungen prüfen! |
| FRCHBE | L'accouplement, respecvement le désaccouplement du tuyau d'air comprimé:(1) Pour l'accouplement, pousser le couplage vers le connecteur. (2) Pour de désaccouplement, rer l'enveloppe extérieure à l'arrière!Acvaon et désacvaon du disposif de freinage:(3) Pour acver le disposif, appliquer les freines en bas. (4) Pour désacver le disposif, pousser les freines en haut.Important: Avant toute ulisaon, il est obligatoirement nécessaire de vérier tout éventuel dégât! |
| ITCH | Accoppiamento, rispevamente disaccoppiamento del tubo d'aria compressa:(1) Per accoppiare, spingere l'accoppiatore verso il connore. (2) Per disaccoppiare, rare indietro il mantello esterno del connore!Avare e disavare il dispositivo del freno:(3) Per avare il dispositivo, premere il freno verso il basso. (4) Per disavare il dispositivo, spingere il freno verso l'alto.Importante: Prima di ogni uso, vericare necessariamente qualsiasi danno potenziale! |
| ES | El acoplamiento, y el desacoplamiento del tubo de aire comprimido:(1) Por el acoplamiento, empuje el acoplamiento hacia el conector. (2) Por el desacoplamiento, ra la carcasa exterior del conector hacia atrás!La acvación y la desacvación del dispositivo de frena:(3) Para la acvación del dispositivo, presione el freno hacia abajo. (4) Para la desacvación del dispositivo, presione el freno hacia arriba.jImportante: Antes de cada uso, se requiere verificar cualquier daño potencial! |
| GBIECY | Connecng and disconnectng the compressed air hose,respectively:(1) To connect, push the plug into the connector. (2) To disconnect, pull back on the connector's outer sheath!Applying and removing the drum brake:(3) To apply the brake, push it downwards. (4) To release the brake, push it upwards.Noce: Inspect the system before every use and check for any damage! |
| PT | Acoplamento, respectivamente desacoplamento do tubo de ar comprimido:(1) Para acoplar, empurre o acoplamento para o conector. (2) Para desacoplar, re a manga exterior do conector para atrás!Acvação e desacvação do dispositivo de frenagem:(3) Para acvar o dispositivo, aperte o freio para abaixo. (4) Para desacvar o dispositivo, empurre o freio para acima.Importante: Antes da cada utilização, deve verificar obrigatoriamente quaisquer eventuais avarias! |
| NLBE | Persluchtslang aankoppelen en ontkoppelen:(1) Om te aankoppelen, duw het kopellingselement naar de connector. (2) Om te ontkoppelen, trek de buitenkabel van de connector naar achteren!Aan – en uitschakelen van het remmechanisme:(3) Om het mechanisme aan te schakelen, druk de rem naar beneden. (4) Om het mechanisme uit te schakelen, duw de rem naar boven.Belangrijk: Vóór gebruik, check voor eventuele schade! |
| GRCY | Σύζευξη, αποσύνδεση του πεπιεσμένο αέρα σωλήνα:(1) Για τη σύζευξη, ωθήσετε την σύζευξη πρός το σύνδεσμος. (2) Για την αποσύνδεση,, τραβήξτε προς τα πίσω το εξωτερικό περίβλημα σύνδεσης!Ενεργοποίηση και απενεργοποίηση της πέδησης:(3) Για να ενεργοποιήσετε τη συσκευή, πατήστε το φρένο κάτω. (4) Για να απενεργοποιήσετε τη συσκευή, πιέστε το φρένο επάνω.Σημαντικό: Πριν από τη χρήση, ελέγξτε απαιτείται οποιαδήποτε πιθανή βλάβη! |
| PL | Podłączenie, względnie rozłączenie weża spreżonego powietrza:(1) Aby podłączyć, wcisnąć sprzęgło stałe do złączki. (2) Aby rozłączyć, ciągnąć zewnętrzną osłonę złączki do tyłu!Uruchamianie i zatrzymanie mechanizmu hamującego:(3) Aby uruchamiać mechanizm, nacisnąć na hamulec w dół. (4) Aby zatrzymać mechanizm, pchnąć hamulec do góry.Ważne: Przed każdym użytkowaniem obowiązkowo sprawdzić jakichkolwiek możliwych awarii. |
| FI | Paineilmaletkun kytkeminen ja avaaminen:(1) Kytkemistä varten paina paineilmaletkun liin kytkimeen. (2) Avaamista varten vedä kytkimen ulkorenkaasta takaisinpäin!Jarrulaieen aseaminen ja avaaminen:(3) Laieen aseamista varten, työnnä jarru alas. (4) Laieen avaamista varten, työnnä jarru ylös.Huom: Tarkista ehdoomas ennen jokaista käyöä mahdolliset vauriot. |
| CZ | Připojení, respekve odpojení hadice stlačeného vzduchu:(1) Při připojení, posuňte spojku směrem ke konektoru. (2) Při odpojení, potáhnete dozadu vnější plášť konektoru!Akvace a dezakvace brzdícího zařízení:(3) Za účelem akvace zařízení potlačte brzdu směrem dolů. (4) Za účelem dezakvace zařízení potlačte brzdu směrem nahoru.Významné: Před každým použim má být provedena kontrola veškerých možných poškození! |
| SE | Koppling och frikoppling av tryckluslang:(1) För a koppla slangen, måste man pressa kopplingsanordningen mot nippeln. (2) För a frikoppla slangen, måste man dra bakát det yre höljet av nippeln!Akvering och inakvering av bromsanordning:(3) För a akvera anordningen, måste man trycka bromsen nedát. (4) För a inakvera anordningen, måste man trycka bromsen uppát.Vikgt: Före varje användning, måste man kontrollera om det nns eventuella skador! |
| SK | Pripojenie, respekvne odpojenie hadice na stlačený vzduch:(1) Pri zapojení posuňte spojku ku konektoru. (2) Pri odpojení poahnite dozadu vonkajšie opláštenie konektora!Akvácia a dezakvácia brzdiaceho zariadenia:(3) Pre akváciu zariadenia potlačte brzdu smerom dole. (4) Pre dezakváciu zariadenia potlačte brzdu smerom hore.Významné: Pred každým použim, povinné je skontrolovať všetky možné poškodenia! |
| HU | A sűríte levegő tömlő csatlakoztatása és kioldása:(1) Csatlakoztatáshoz tolja a csatlakoztatót az összekötő elemre. (2) Kioldáshoz, húzza hátra az összekötő elem köpenyét!Fékező berendezés be és kikapcsolása:(3) Működtetéshez, nyomja le a féket. (4) Kikapcsoláshoz, nyomja fel a féket.Fontos: Minden használat elő, ellenőrizze az esetleges meghibásodásokat! |
| DK | Tilkobling og frakobling af tryklusslange:(1) Til at Ikoble, skal koblingen skubbes I konnektoren. (2) Til at frakoble, skal konnektorens ydre kappe trækkes lbage!Engagere og frigøre bremsesystemet:(3) Til at engagere bremsesystemet, skal bremsen trykkes ned. (4) Til at frigøre bremsesystemet, skal bremsen trykkes op.Viggt: Før hver ibrugtagelse, skal der være obligatorisk at eerse for eventuelle fejl eller skader! |
| HR | Kvačenje, odnosno odkvačivanje crijeva za komprimirani zrak:(1) Za kvačenje, pogurajte kvačilo prema konektoru. (2) Za odkvačivanje, povucite vanjski omot konektora prema nazad!Akviranje i dezakviranje uređaja za kočenje:(3) Za akviranje uređaja, prisnite kočnicu prema dolje. (4) Za dezakviranje uređaja, pogurajte kočnicu prema gore.Važno: Prije svakog korištenja, obavezno provjerite bilo kakve moguće kvarove! |
| SI | Vklop, oziroma izklop cev za ssnjen zrak:(1) Za vklop, prisnite spojko v priključek. (2) Za izklop, potegnite zunanje ohišje priključka nazaj!Vključitev in izključitev zavorne naprave:(3) Za vključitev naprave, prisnite zavoro navzdol. (4) Za izključitev naprave, prisnite zavoro navzgor.Pomembno: Pred vsako uporabo, obvezno preverite vse morebitne napake! |
| RO | Cuplarea, respecv decuplarea furtunului de aer comprimat:(1) Pentru cuplare, împingeți acuplajul către conector. (2) Pentru decuplare, trageți mantaua exterioară a conectorului în spate!Acvarea și dezacvarea dispozivului de frânare:(3) Pentru acvarea dispozivului, apăsați frâna în jos. (4) Pentru dezacvarea dispozivului, împingeți frâna în sus.Important: Înaintea ecărei folosiri, vericați obligatoriu orice eventuale avarii! |
Serviceadresse / L'adresse de l'unité de service / Indirizzo dell'unità di service / La dirección de la unidad de servicio / Address of repair shop / Morada da empresa de serviço pós-venda / Adres van het servicepunt / H διεύθυνση της υπηρεσίας / Adres jednostki serwisowej / Huolto-osoite / Adresa servisní služby / Adressen av serviceverkstaden / Adresa servisnej služby / Szerviz egység címe / Serviceenhedens adresse / Adresa servisne jedinice / Naslov servisne enote / Adresa unității de service:
Uni-Elektra GmbH
Jahnstr. 20, 72513 Hengen
Deutschland

+49 (0) 7577 - 933 82-0

service@uni-elektra.de
IAN 89560
Druckluschlauchtrommel ca. 20m/ Tambour pour le tuyau d'air comprimé, cca. 20 m/ Avvolgitore per tubo aria compressa, circa. 20 m/ Carrete por tubo de aire comprimido, aprox. 20 m/ Compressed air hose drum -approx. 20 m/ Tambor para tubo de ar comprimido, aprox. 20 m/ Haspel voor persluchtslang, ca. 20 m/ Πεπιεσμένου αέρα σωλήνα περίπου κύλυνδρο. 20 μ./ Bęben na wąż sprężonego powietrza, ok. 20 m/ Paineilmaletkukela, noin 20 m/ Buben na hadicu pro stlačený vzduch, cca. 20 m/ Tryckluslangvinda, cirka 20 m/ Bubon na hadicu pre stlačený vzduch, cca. 20 m/ Súríte levegő tömlódob kb. 20 m/ Tromle I tryklusslange, ca. 20 m/ Bubanj za crijevo za komprimirani zrak, cca. 20 m/ Boben za cev za ssnjen zrak, pribl. 20 m/ Tambur pentru furtun de aer comprimat, cca. 20 m
- Compressed air hose drum
- Operating Instructions
- IMPORTANT:
- Contents
- Introduction
- Use in accordance with these instructions
- Safety Instructions
- - If a defect is discovered, put the unit out of service.
- Take Care: Avoid damage to perty.
- - Protect the compressed air hose.
- Scope of supply
- Product overview
- Commissioning and Operation
- Commissioning
- Cleaning
- Maintenance
- Disposal
- Guarantee and Service
- Certificate and Manufacturer
- Bedienungshinweis / Mode d'emploi / Istruzioni d'uso / Instrucciones de uso / Instructions for use / Instruções de uso / Gebruiksaanwijzingen / Oδηγίες / Instrukcje użytkowania / Käyttöohje / Návod k použití / Bruksanvisningar / Návod na použitie / Használati útmutató / Brugsanvisninger / Upute za korištenje / Navodila za uporabo / Instructiuni de folosire
Brand : POWERFIX
Model : IAN 89560
Category : Hose reel