
MC-600 - Hi-Fi System Vivax - Free user manual and instructions
Find the device manual for free MC-600 Vivax in PDF.

| Product Type | Hi-Fi System |
| Model | MC-600 |
| Power Supply | 110-240V AC, 50/60Hz, 20W Max |
| Amplifier Power Output | 2 x 5W RMS |
| Speaker Type | Wooden speakers (detachable) |
| Frequency Response (Audio) | 40Hz - 16kHz (+/-3dB) |
| Total Harmonic Distortion | <0.7% |
| Signal-to-Noise Ratio (CD/Audio) | >80dB |
| Channel Separation | >40dB |
| Bass/Treble Adjustment | -10dB to +10dB |
| CD Player | Audio CD, MP3/WMA playback |
| Radio Bands | FM 87.5 - 108 MHz |
| Radio Presets | 30 stations |
| Bluetooth Version | Compatible with Bluetooth-enabled devices (range 8-10m) |
| USB Playback | Supports FAT16/32, up to 999 files (MP3/WMA) |
| Audio Inputs | RCA Line-in, FM antenna socket |
| Audio Output | Analog: 1.0-2.0V (10kΩ), Headphone (3.5mm) |
| Remote Control | Included (battery type: 2x AAA) |
| Dimensions (Main unit with speakers) | Approx. 415 x 200 x 210 mm (LxWxH) |
| Auto Standby | After 15 minutes of no audio input |
| Safety Class | Class II (double insulation) |
| Included Accessories | Main unit, 2 speakers, remote, 2xAAA batteries, FM antenna, user manual |
| Warranty | 12 months (24 months for some regions as per local laws) |
Frequently Asked Questions - MC-600 Vivax
User questions about MC-600 Vivax
0 question about this device. Answer the ones you know or ask your own.
Ask a new question about this device
Download the instructions for your Hi-Fi System in PDF format for free! Find your manual MC-600 - Vivax and take your electronic device back in hand. On this page are published all the documents necessary for the use of your device. MC-600 by Vivax.
USER MANUAL MC-600 Vivax
natural_image
Black VIMLE audio amplifier with digital display and control knob (no visible text or symbols)Specifikacije:
- 2x 5W RMS Audio Snaga pojačala
- Drveni zvučnici
- Kvalitetan i čist zvuk i snažni duboki i dinamični duboki tonovi
- Bluetooth funkcija za bežično spajanje sa različitih Bluetooth vanjskih uređaja kao što su Smartphone, Notebook, iPhone ili iPad
- Brzo i sigurno BT uparivanje
- 10 metara BT bežični domet
- USB priključak
- PLL FM Radio sa memoriranjem stanica
- Linijski Audio ulaz, pogodan za spajanje vanjskih uređaja kao što su PC, MID, TV i drugi audio uređaji
- CD/MP3 Reproduktor
- Daljinski upravljač
Sadržaj pakiranja:
VAŽNA SIGURNOSNA UPOZORENJA
Kada se ovaj uređaj koristi ispravno i u skladu sa ovim uputama, uređaj je dizajniran i proizveden tako da je potpuno siguran za korištenje. Međutim, nepravilna uporaba može dovesti do potencijalnih opasnosti kao što je električni udar ili požar. Pročitajte sve upute o sigurnosti i uporabi pažljivo prije instalacije i uporabe, i držati ove upute pri ruci za buduće potrebe. Pridržavajte se svih upozorenja navedenih u ovim uputama, i na uređaju.
OPREZ: KAKO BI SE SMANJILA OPASNOST OD ELEKTRIČNOG UDARA, NEMOJTE UKLANJATI STRAŽNJI POKLOPAC UREĐAJA. UNUTAR UREĐAJA NEMA DIJELOVA ILI KOMANDI KOJE SU NAMJENJENI UGAĐANJU OD STRANE KRAJNJEG KORISNIKA. ZA POPRAVAK KONTAKTIRAJTE OVLAŠTENI SEVIS.

PRIPREMA ZA UPORABU
Otvaranje pakiranja i postavljanje
flowchart
graph TD
    A["Speaker OUT"] --> B["FR"]
    A --> C["FL"]
    D["VIVAX"] --> E["Control buttons: 1, 2, 3, 4, 5, 6, 7, 8, 9, 10, 11, 12, 13, 14, 15, 16, 17, 18, 19, 20, 21, 22, 23, 24, 25, 26, 27, 28, 29, 30"]
    E --> F["Control buttons: 1, 2, 3, 4, 5, 6, 7, 8, 9, 10, 11, 12, 13, 14, 15, 16, 17, 18, 19, 20"]
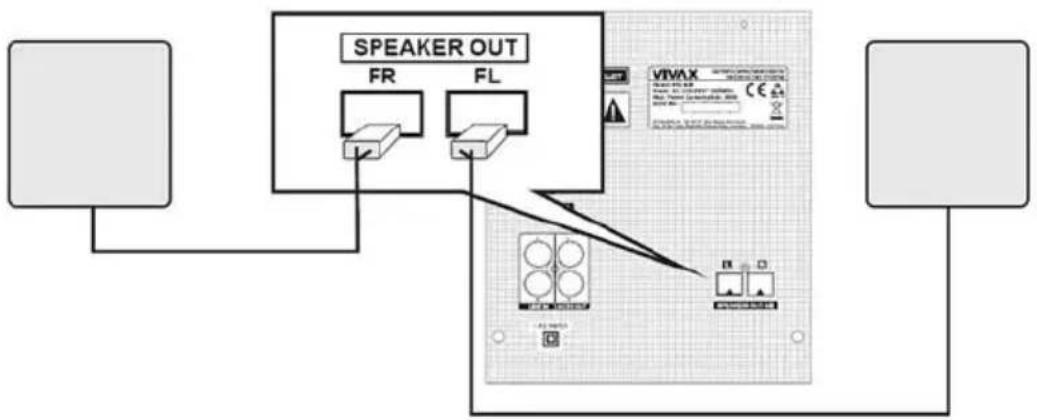
- Postavite zvučne kutije na čvrstu i horizontalnu podlogu.
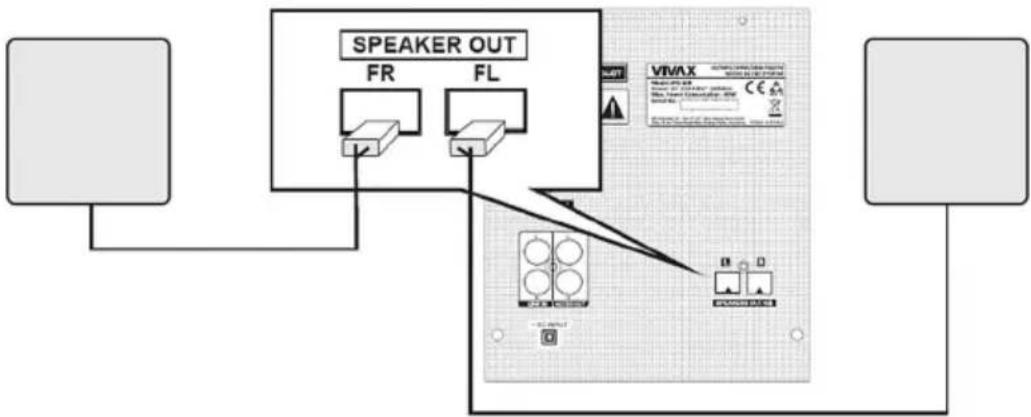
- Priključite kablove iz svakog zvučnika u SPEAKER OUT priključke na stražnjoj strani uređaja. Lijevi zvučnik u FL priključak, Desni zvučnik u FR priključak.
FM ŽIČANA ANTENA
natural_image
Black and white crossed-out symbol on white background, featuring plastic bottles and a box (no text or symbols)natural_image
Black and white photo of a vintage audio workstation (no visible text or symbols)Specifikacije:
- 2x 5W RMS Audio Snaga pojačala
- Drveni zvučnici
- Kvalitetan i čist zvuk i snažni duboki i dinamični tonovi
- Bluetooth funkcija za bežično spajanje sa različitih Bluetooth spoljne uređaje kao što su Smartfon, Nootebook, iPhone ili iPad
- Brzo i sigurno BT uparivanje
- 10 metara BT bežični domet
- USB slot
- PLL FM Radio sa memorisanjem stanica
- Linijski Audio ulaz, podesan za spajanje spoljnih uređaja kao što su PC, MID, TV i drugi audio uređaji
- CD/MP3 Reproduktor
- Daljinski upravljač
Sadržaj pakovanja:
- Uređaj sa dvije odvojive zvučne kutije
- Daljinski upravljač
- Baterije 2x AAA
- Žičana FM Antena
- Uputstvo za upotrebu s Izjavom o saobraznosti
VAŽNA SIGURNOSNA UPOZORENJA
Uređaj je tako dizajniran i proizveden da je potpuno siguran za upotrebu ukoliko se njime pravilno rukuje. Međutim, nepravilna upotreba može da dovede do potencijalnih opasnosti kao što su električni udar ili požar. Pažljivo pročitajte sva uputstva o bezbednosti i upotrebi pre instalacije i upotrebe i pridržavajte se svih upozorenja navedenih u priručniku kao i na uređaju.
OPREZ: KAKO BI SE SMANJILA OPASNOST OD ELEKTRIČNOG UDARA, NEMOJTE DA OTVARATE UREĐAJ. U UREĐAJU NEMA DELOVA ILI KOMANDI KOJE SU NAMJENJENE PODEŠAVANJU OD STRANE KORISNIKA. ZA POPRAVKE KONTAKTIRAJTE OVLAŠĆENI SERVIS.
- Voda i vlaga – Uređaj ne sme da se upotrebljava u blizini vode ili u prostorijama sa visokom vlažnošću vazduha - npr. u blizini kade, umivaonika, sudopera, bazena ili u vlažnom podrumu, perionici i slično.
- Ventilacija – Uređaj treba postaviti tako da se ne ometa pravilna ventilacija uređaja. Npr. uređaj ne sme da se stavlja na krevet, kauč, tepih i slične površine koje mogu blokirati ventilacijske otvore. Također, ne sme da se stavlja u ugrađene instalacije, poput polica za knjige ili ormariće, koje mogu ometati ili blokirati protok zraka kroz ventilacijske otvore.
- Vrućina – Uređaj smestite dalje od izvora toplote kao što su radijatori, grejalice, peći i drugi uređaji (uključujući i pojačala) koji stvaraju toplinu.
- Izvor napajanja – Uređaj sme da se priključi samo na električno napajanje koje je navedeno u uputstvima i koje je naznačeno na uređaju.
- Zaštita kabla za napajanje – Kabl za napajanje treba da bude smešten tako da nije verovatno da će se po njemu gaziti ili ga pritiskati drugim predmetima. Nemojte da uvijate, gnječite ili savijate kabl ili da vučete uređaj za kabl. Ukoliko uočite da je kabl napajanja ili utikač oštećen, odmah odspojite uređaj sa napajanja i obratite se ovlašćenom servisu koji će da zameni oštećeni kabl.
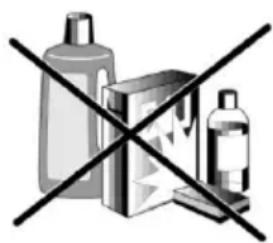
- Čišćenje – Uređaj čistite mekanom vlažnom krpom. Nemojte da koristite rastvarače ili abrazivna sredstva. To može nepovratno da ošteti uređaj.
- Strani predmeti i ulazak tećnosti – Pazite da strani predmeti ne padnu na uređaj. Isto tako pazite da se na uređaj ne prospe voda ili neka druga tečnost. Ukoliko se to dogodi, odmah isključite uređaj i kontaktirajte servis.
- Dodaci – Nemojte da koristite bilo kakve dodatke na uređaju, osim ako ih nije odobrio ili preporučio proizvođač.
-
Grmljavina i zaštite od strujnog udara – Odspojite uređaj iz zidne utičnice i odspojite antenski sustav (ukoliko postoji) za vreme oluje ili kada ostavljate uređaj bez nadzora ili ako nećete da koristite uređaj duže vreme. To će da spreči oštećenje proizvoda zbog grmljavine ili prenaponskog udara.
-
Preopterećenje napajanja – Nemojte da preopteretite zidne utičnice i produžne kablove jer tako povećavate rizik od izbijanja požara kao i od strujnog udara.
- Oštećenja koja zahtevaju servis – Uređaj treba da se dostavi na servis u sledećim slučajevima:

PRIPREMA ZA UPOTREBU
Otvaranje pakovanja i postavljanje
- Pažljivo izvucite uređaj iz kartonskog pakovanja i uklonite sve ostatke ambalaže i pakovanja sa samog uređaja.
- Uklonite sve opisne etikete koje se mogu nalaziti na prednjoj ili gornjoj strani uređaja. Ne uklaniajte nalepnice koje se nalaze na stražnjoj strani ili na tasterima uređaja.
- Pritisnite oznaku na poklopcu "CD door OPEN" kako biste otvorili pretinac za CD. U pretincu za CD se nalazi bela kartica koja je namenjena sprečavanju pomeranja delova unutar pretinca prilikom transporta. (ne syi modeli)
- Uklonite belu karticu iz pretinca za CD pre prve upotrebe (ukoliko postoji).
POSTAVLJANJE
NAPAJANJE
Proverite odgovara li napon, prikazan na pločici na stražnjem delu uređaja, vašem izvoru napajanja. Ako to nije slučaj, molimo kontaktirajte za savet prodavca ili ovlašćeni servis
- Priključite utikač AC kabla napajanja u ispravnu utičnicu napajanja.
- Kako biste u potpunosti isključili uređaj, izvucite utikač iz utičnice.
- Izvucite utikač iz utičnice kako biste zaštitili sebe i uređaj tokom grmljavinskog nevremena.
PRIKLJUČENJE ZVUČNIKA
flowchart
graph TD
    A["Device 1"] --> B["Speaker OUT FR"]
    C["Device 2"] --> B
    B --> D["FL"]
    D --> E["VIVAX Display"]
    E --> F["Control Panel"]
    style A fill:#f9f,stroke:#333
    style C fill:#f9f,stroke:#333
    style B fill:#ccf,stroke:#333
    style D fill:#ccf,stroke:#333
    style E fill:#dfd,stroke:#333
    style F fill:#dfd,stroke:#333
- Postavite zvučne kutije na čvrstu i horizontalnu podlogu.
- Priključite kablove iz svakog zvučnika u SPEAKER OUT priključke na stražnjoj strani uređaja. Levi zvučnik u FL priključak, Desni zvučnik u FR priključak.
FM ŽIČANA ANTENA
Kako biste postigli bolji radio prijem, priključite FM antenu koju ste dobili u kompletu u FM priključak na stražnjoj ploči.
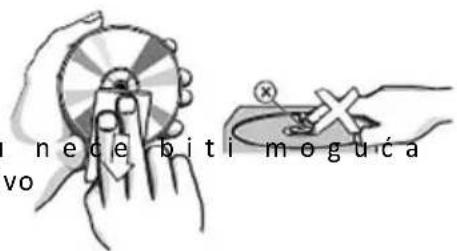
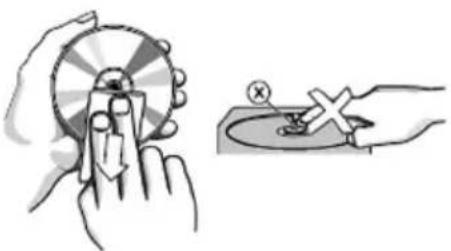
Održavanje dela za reprodukciju CD-a
- Sočivo za učitavanje CD zapisa ne sme ni u kom slučaju da se dodiruje!
- Nagle promene u temperaturi okoline mogu da uzrokuju kondenzaciju koja može negativno uticati na
funkciju sočiva. U tom slučaju reprodukcija CD-a. Nemojte pokušati da čistite sočivo ručno, već stavite uređaj u toplu prostoriju kako bi vlaga na sama isparila.
natural_image
Black VIMLE audio amplifier with digital display and control knob (no visible text or symbols)Спецификации:
natural_image
Black and white photo of a vintage audio workstation (no visible text or symbols)Specifikimet:
natural_image
Black and white crossed-out symbol on white background, featuring three items: bottles, a box, and a bottle (no text or labels)natural_image
Black VIMLE audio amplifier with digital display and control knob (no visible text or symbols)Features:
- 2x 5W RMS Audio power
- Wooden Speakers
- Super clear Sound and Powerfull Bass, Dynamic sound effect
- Fast and Secure pairing for user-friendly operating
- 10 meters BT operating range
- USB supporting
- PLL FM Radio with memory
- Line-In function, suitable for PC, MID, TV and other audio device
- CD/MP3 Player
-
Remote controller
-
Bluetooth for Music wireless streaming from any Bluetooth enabled device such as your Smartphone, Notebook, iPhone or iPad
Box contence:
- Main unit with 2 remote speaker boxes
- Remote controller
- Batteries 2x AAA
- FM Antenna wire
- User manual with warranty
ERP2 - (Energy related products)
This product with ecodesign complies with the stage 2 requirements of Commission Regulation (EC) NO. 1275/2008 implementing Directive 2009/125/EC regard to standby and off mode electric power consumption of electronic household and office equipment. After 15 minutes without any audio input, the system will automatically switch into standby mode. Follow up the instruction manual to resume the operation.

The flash with the symbol of arrowhead, inside an equilateral triangle alerts the user about the presence of a dangerous tension not isolated inside the product which can be sufficiently powerful to constitute a risk of electrocution.

The point of exclamation inside an equilateral triangle alerts the user about the presence of important operating instructions and maintenance in the document enclosed in the package.

CAUTION

RISK OF ELECTRIC SHOCK
DO NOT OPEN
Do not open the back cover. In no case the user is allowed to operate inside the product. Only a qualified technician from the manufacture is entitled to operate.

Main plug is used as the disconnect device, the disconnect device shall remain ready for operating.
Incorrect replacement of the battery may lead to the risk, including the replacement of another similar or the same type. Do not expose batteries to heat such as sun or fire or something like that.

The device should not be exposed to dripping and spraying and it can not be placed under objects filled with liquids.
Please read the following safeguards for your unit and retain for future reference. Always follow all warnings and instructions marked on the product.
Children do not always correctly recognize possible danger situations.
Swallowing batteries can be fatal. Keep batteries out of the reach of small children. If the battery is swallowed, immediate contact medical help.
Packaging equipment and protective bags keep away from children. There is a risk of suffocation
Welcome
Thank you for purchasing the Micro Audio system VIVAX MC-600.
It is important to read this user manual prior to using your new product for the first time.
In order to fully benefit from this product, please follow the instructions in this user manual very carefully. Store this user manual in a safe place for future reference. We are sure your new Micro Audio system will satisfy your needs.
IMPORTANT SAFETY INSTRUCTIONS
When used in the directed manner, this unit has been designed and manufactured to ensure your personal safety. However, improper use can result in potential electrical shock or fire hazards. Please read all safety and operating instructions carefully before installation and use, and keep these instructions handy for future reference. Take special note of all warnings listed in these instructions and on the unit.
CAUTION: TO REDUCE THE RISK OF ELECTRIC SHOCK, DO NOT REMOVE COVER. NO USER SERVICEABLE PARTS INSIDE, REFER SERVICING TO QUALIFIED SERVICE PERSONNEL.
- Water and Moisture – The unit should not be used near water. For example: near a bathtub, washbowl, kitchen sink, laundry tub, swimming pool or in a wet basement.
- Ventilation – The unit should be situated so that its location or position does not interfere with its proper ventilation. For example, it should not be situated on a bed, sofa, rug or similar surface that may block ventilation openings. Also, it should not be placed in a built-in installation, such as a bookcase or cabinet, which may impede the flow of air through the ventilation openings.
- Heat – The unit should be situated away from heat sources such as radiators, heat registers, stoves or other appliances (including amplifiers) that produce heat.
- Power Sources – The unit should be connected to a power supply only of the type described in the operating instructions or as marked on the appliance.
- Power-Cable Protection – Power supply cables should be routed so that they are not likely to be walked on or pinched by items placed upon or against them. It is always best to have a clear area from where the cable exits the unit to where it is plugged into an AC socket.
- Cleaning – The unit should be cleaned only using a warm damp cloth. Do not use solvents, etc.
- Objects and Liquid Entry – Care should be taken so that objects do not fall and liquids are not spilled into any openings or vents located on the product. In that case, immediately disconnect power supply and contact authorized service.
- Attachments – Do not use attachments not recommended by the product manufacturer.
-
Lightning and Power Surge Protection – Unplug the unit from the wall socket and disconnect the antenna or cable system during a lightning storm or when it is left unattended and unused for long periods of time. This will prevent damage to the product due to lightning and power-line surges.
-
Overloading - Do not overload wall sockets, extension cords, or integral convenience receptacles as this can result in a risk of fire or electric shock.
-
Damage Requiring Service – The unit should be serviced by qualified service personnel when:
A. The power supply cable or plug has been damaged.
B. Objects have fallen into or liquid has been spilled into the enclosure.
C. The unit has been exposed to rain.
D. The unit has been dropped or the enclosure damaged.
E. The unit exhibits a marked change in performance or does not operate normally.
- Periods of Non use – If the unit is to be left unused for an extended period of time, such as a month or longer, the power cable should be unplugged from the unit to prevent damage or corrosion. Storage device on dry and dark place.
- Servicing – The user should not attempt to service the unit beyond those methods described in the user's operating instructions. Service methods not covered in the operating instructions should be referred to qualified service personnel.
- WARNING: Remove batteries from Remote controller if exhausted or if they will not be used again for a long period. The incorrect use of batteries can cause electrolyte leakage and will corrode the compartment or cause the batteries to burst, therefore:
- Do not mix battery types, e.g. alkaline with zinc carbonate.
- When inserting new batteries, replace all batteries at the same time.
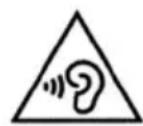
- Using headphones for prolonged periods or at a high volume can damage your hearing permanently. If you experience noise in the ears or other problems immediately stop using the headset. It is recommended to use headphones maximum 1 hour a day at a moderate volume.
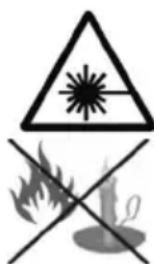
- As the laser beam used in the CD player section is harmful to eyes, do not attempt to disassemble the casing. Refer servicing to qualified personnel only.
- Place exposed to vibration can affect the damage of internal parts of the device. The device should not be placed near open flames and sources of intense heat, such as, electric heaters.
- Grounding - Product equipped with this sign has a double insulation (Class II Protection) and no need additional grounding. To check do you need Grounding socket, check rating plate on the unit back side. If you did not find this sign, than you need grounding socket!
- Do not allow children to play with device!
This appliance is not intended for use by persons (including children) with reduced physical, sensory or mental capabilities, or lack of knowledge and experience to use the appliance, unless they are supervised by a person who is responsible for their safety or you're not received training on the use of appliances. Place the unit on a hard and flat surface so that the unit does not tilt.
- Do not expose the unit, batteries or CD's to humidity, rain, sand or excessive heat caused by heating equipment or direct sunlight.
- Do not cover the unit. Adequate ventilation with a minimum gap of 15cm between the ventilation holes and surrounding surfaces is necessary to prevent heat build-up

PREPARATION FOR USE
Unpacking and Setup
- Carefully remove the unit from the display carton and remove all packing material from the unit itself.
- Remove any descriptive labels that may be found on either the front or top cabinet of the unit. Do not remove any labels located on either the back or button cabinet of the unit.
- Press the CD door OPEN Button to open the CD compartment door. There is a white card in the CD compartment which is intended to prevent the CD pickup from moving during shipment of the product,
- Remove this card from the CD compartment before use.
SETTING UP
POWER SUPPLY
Check if the power voltage, as shown on the type plate located on the back of the set, corresponds to your local AC power supply. If it does not, consult your dealer or service center.
- Connect the power cord to the AC wall outlet, the power supply is now connected and ready for use.
- To switch off completely, unplug the power cord from the wall outlet.
- Unplug the power cord from the wall outlet to protect your set during heavy thunderstorms.
CONNECTION OF THE SPEAKER BOXES
- Put speaker box on the flat and solid surface.
- Connect the speaker wire connector to SPEAKER OUT terminals on the back unit panel.
flowchart
graph TD
    A["Speaker Out"] --> B["FR"]
    A --> C["FL"]
    D["Device 1"] --> E["Switch"]
    F["Device 2"] --> G["Switch"]
    H["Device 3"] --> I["Switch"]
    J["Device 4"] --> K["Switch"]
    L["Device 5"] --> M["Switch"]
    N["Device 6"] --> O["Switch"]
    P["Device 7"] --> Q["Switch"]
    R["Device 8"] --> S["Switch"]
    T["Device 9"] --> U["Switch"]
    V["Device 10"] --> W["Switch"]
    X["Device 11"] --> Y["Switch"]
    Z["Device 12"] --> AA["Switch"]
    AB["Device 13"] --> AC["Switch"]
    AD["Device 14"] --> AE["Switch"]
    AF["Device 15"] --> AG["Switch"]
    AH["Device 16"] --> AI["Switch"]
    AJ["Device 17"] --> AK["Switch"]
    AL["Device 18"] --> AM["Switch"]
    AN["Device 19"] --> AO["Switch"]
    AP["Device 20"] --> AQ["Switch"]
FM AERAL ANTENNA
To achieve better Radio reception, plug in FM Antenna into FM socket on the back panel. The reception will be its best when the end of the aerial is stretched to be in a straight line and horizontal.
Notes:
If TV screen becomes discolored do not place speakers within 30cm from TV.
Be sure to match the speaker cord to the appropriate terminal on the components:+to +and -to-.If the cords are reversed, the sound will be distorted and will lack base.
OVERVIEW OF THE PLAYER
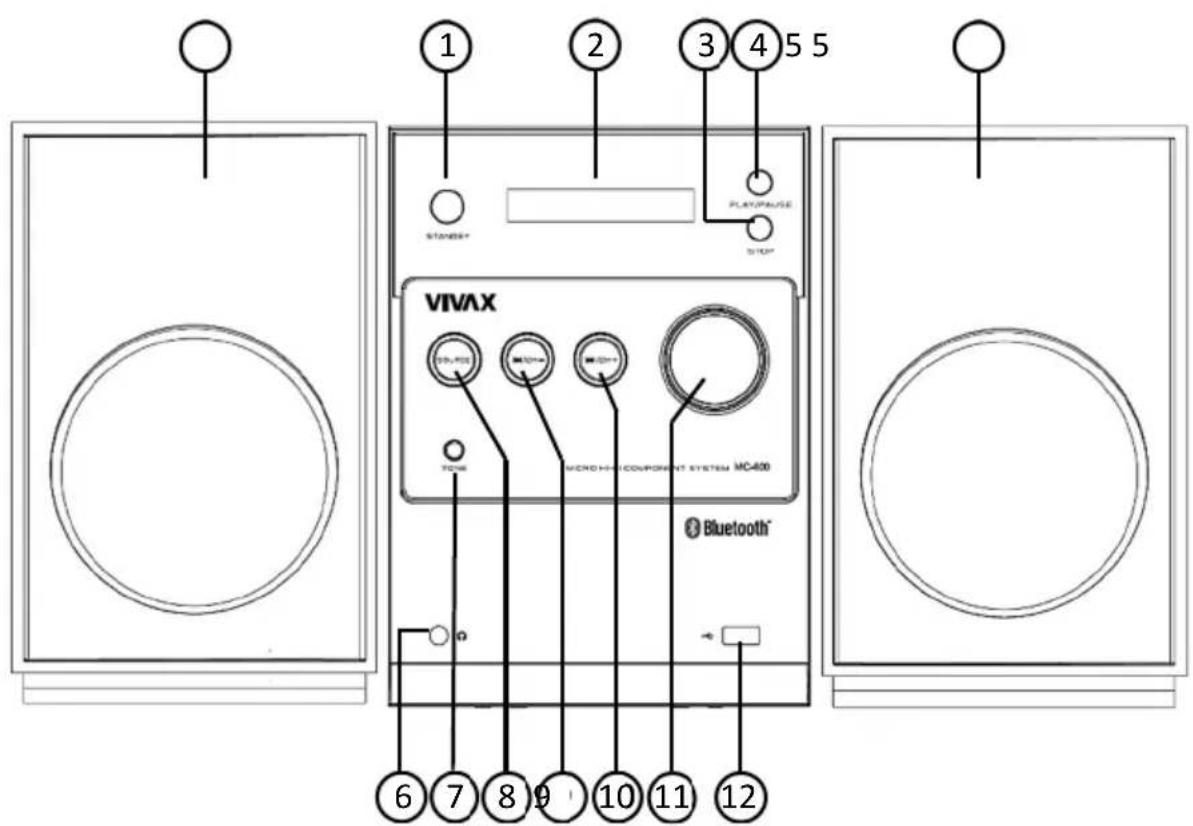
- STANDBY BUTTON
- LCD DISPLAY
- STOP BUTTON
- PLAY/PAUSE BUTTON
- SPEAKER BOX
- HEADPHONE INPUT
- TONE (SOUND EFFECT) BUTTON
- SOURCE BUTTON
- |◀◀/CH-BUTTON
- ▶▶| /CH+ BUTTON
- VOLUME BUTTON
- USB PORT
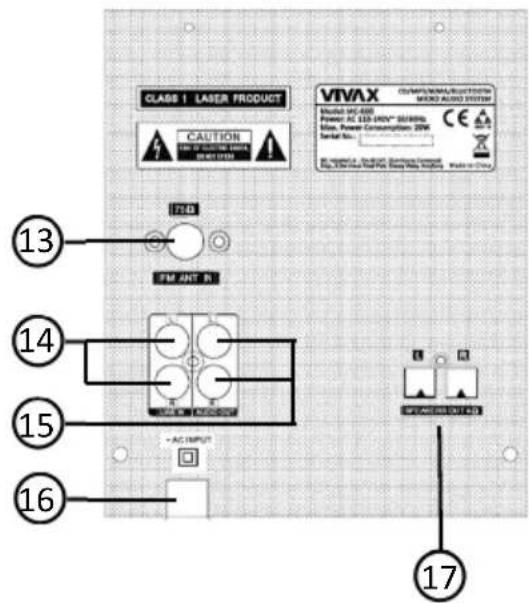
- FM ANTENNA SOCKET
- RCA LINE IN PORTS
- RCA AUDIO OUT
- POWER CABLE
- SPEAKER BOX CONNECTION TERMINALS
BACK SIDE
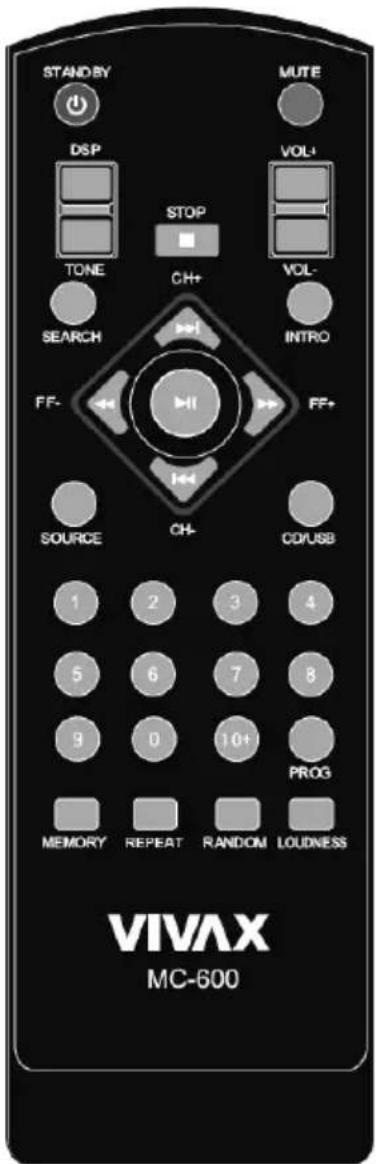
REMOTE CONTROL
| MUTE | Temporarily mute soundPress the button again to return to the previous volume |
| STANDBY | STANDBY On /Off |
| CD/USB | Press this button to CD and USB function switch |
| SOURCE | This key is the CD/LINE IN / FM/BT function to convert the key. |
| SEARCH | Press this button to automatically search for radio stations |
| REPEAT | Can realize the single repeat and repeat the whole disc |
| INTRO | Browser to listen your music tracks for less than 15 seconds |
| RANDOM | Random play audio tracks |
| STOP/ | Stops playback |
| ▶▶| /CH+ |◀◀/CH- ◀◀/FF- ▶▶/FF+ | Radio mod:Select the radio station,Long press: Search Radio frequenciesPlayback modeSearch backward or Forward Skip to the previous/next track |
| ▶|| | Starts or pauses playback |
| Number keys | These figures are key to select music |
| MEMORY | Manual search to FM channel and press the MEMORY button to storage |
| VOLUME | Adjust the volume |
| DSP | Switch EQ the sound balance effect (Flat/Pop/Rock/Classic/Jazz) |
| TONE | Bass and Treble adjustment |
| PROG | You can scroll trough them and select one. Listens to your tracks in any order. |
| LOUDNESS | Enhance the dynamic of the sound to increase bass and trable frequencies |
Battery replacement
Slide the back cover to open the battery compartment of the remote control.
Insert two batteries. Make sure to match the (+) and (-) ends of the batteries with the (+) and (-) ends indicated in the battery compartment.
Close the battery compartment cover.
WARNING:
- Dispose of your batteries in a designated disposal area. Do not throw the batteries into a fire.
- Do not mix battery types or combine used batteries with new ones.
- Remove depleted batteries immediately to prevent battery acid from leaking into the battery compartment.
• If you do not intend to use the remote control for a long time, remove the batteries. - Batteries should not be exposed to excessive heat, such as sunshine, heat registers, or fire.
- Battery chemicals can cause a rash. If the batteries leak, clean the battery compartment with a cloth. If chemicals touch your skin, wash immediately.
OPERATION
1. CD Operations:
On this unit you can Playback: Audio CD and MP3/WMA/CD
| UNIT | REMOTE CONTROL | |
| 1. Open the Disc Tray | ▲ OPEN/CLOSE | -- |
| 2. Insert the CD : label facing up | -- | -- |
| 3. Close the disc tray | ▲ OPEN/CLOSE | -- |
| 4. Select the CD function | SOURCE | SOURCE |
| 5. Start the CD playing :For AUDIO CD , playback starts automatically. | ▶|| ▶|| | |
| 6. To stop a CD playing | ■ | ■ |
Searching the Track
Press and hold | ◀◀/▶▶| on the Unit or press ◀◀/▶▶ on the Remote control during the Playback and release button at the track point you want to listen.
Skipping to another Track
Press | ◀◀◀ / ▶▶▶ | on the Unit or Remote control during the Playback.
Create Playlist
You can make program and play up to 20 tracks on a CD in order.
- Insert a CD and wait for to be read
- Press PROG. button on the remote control in stop status.
- Press | ◀◀/▶▶| on the unit or on the remote control to select a track.
- Repeat steps 2 and 3 to add another Audio track into Playlist
- Press ▶ || on the Unit or Remote control to Play Programmed tracks.
Repeat or Random Playback tracks (files)
- Press RANDOM button on the remote control repeatedly.
Audio tracks will playback repeatedly or randomly.
- To return to normal playback mode, press it repeatedly to select option [OFF].
About MP3/WMA
MP3/WMA Disc compatibility is limited as follows:
• Sampling Frequency: 32-48(MP3/WMA)
- Bit rate: 32-320kbps(MP3),40-320kbps(WMA)
• Do not use special letters such as: / : * ? < > etc
- Even if the total number of files on the disc has more than 1000, it will only be shown up to 999.
2. Playback from External Audio Device
The unit can be used to play the music from many types of external Audio devices.
| UNIT REMOTE | CONTROL | |
| 1. Connect the External Audio Device to the RCALINE IN Connector on the back side of the unit.For connection use appropriate RCA Audio Cable.If your External Audio Device has only one Audio Output (Mono), connect RCA Jack into Left (L) RCA socket on the unit. | -- -- | |
| 2. Select the LINE IN mode by pressingSOURCE button | SOURCE SOURCE |
3. FM Radio Operations
Make sure the FM aerial Antenna is connected to FM Antenna socket on the back of the unit.
| UNIT REMOTE CONTROL | ||
| 1. Select FM (RADIO) working mode. | SOURCE | SOURCE |
| 2. Select the Radio station | ▶▶|/CH+|◀◀/CH- | CH-/CH+/FF-/FF+ |
| 3. Auto search and memory radio stationThe Unit will automatically search all available Radio station and store them into memory. | ▶|| | SEARCH |
Search and Store Radio station
To search some new Radio Station which is not stored in the unit memory, please follow below steps:
- Press CH-/CH+ to select Program memory where you want to store a new Radio Channel.
- Press and hold ▶▶|/CH+/|◀◀/CH- on the unit or FF-/FF+ on the remote control for more then 0.5 second.
- Press MEMORY button on the remote control the tuner will store searched program on desired program memory.
Note: This operation is not possible without using the remote control.
4. USB Device
You can enjoy media files saved on an external USB device by connecting the USB device to the USB port of the unit.
| UNIT REMOTE | CONTROL | |
| 1. Connect the USB device to the USB port. -- | -- | |
| 2. Select the USB working mode. | -- | CD / USB |
| 3. Select Audio Track you want to Play | -- | ▶▶|/ |◀◀▶▶/◀◀or Number key |
| 4. Start Playback USB Audio track. | ▶|| | ▶|| |
| 5. To Stop Playback, press STOP button. | ■ | ■ |
| 6. If you want to remove external USB memory, first change working mode and than remove USB memory unit. | SOURCE SOURCE | |
Compatible USB Devices:
• MP3 player: Flash type MP3 player.
• USB Flash Drive: Supported devices: USB2.0 or USB 1.1.
- The USB function may not be available depending on device. Device which require additional program installation when you have connected it to a computer are not supported.
Notes: Do not extract the USB device while in operation.
For a large capacity USB, it may take longer than a few minutes to be searched. To prevent data loss, back up all data.
If you use a USB extension cable or USB hub, the USB device is not recognized.
NTFS file system is not supported. Only FAT(16/32) file system is supported.
This unit is not supported when the total number of files is 1000 or more.
External HDD or locked devices USB devices are not supported.
5. BLUETOOTH Operations
Press the SOURCE button to switch the audio source to the "BT" (Bluetooth input) mode.
Note: Obstacle between the Unit and the connected device shall be removed.
- After the Bluetooth module is powered on, the BLUE indicator lamp quickly flashes for three times and the prompt "beep" will be heard.
- The RED indicator lamp flashes and the machine enters the Bluetooth active connection mode to search the Bluetooth devices connected last time. The device searched will be automatically connected again.
- If no a such device, the machine will automatically enter the pairing status; at this time, the RED and BLUE indicator lamps flash alternately.
- When the pairing is successful, the BLUE indicator lamp will flash slowly and the "beep" prompt sound will be heard.
- When the machine returns to play mode, the RED and BLUE indicator lamps will flash at the same time; when the play is paused or stopped, the BLUE indicator lamp will flash slowly.
- When making or answering phone calls during music play with Bluetooth connected, the Bluetooth hand-free calls can be realized via the machine, and if you do not want persons in the vicinity to hear your call content, you can disable the Bluetooth call function in the mobile phone interface.
Remarks:
- In case of no obstacle, the range distance for receiving Bluetooth is from 8 to 10m.
- If the Bluetooth version of the cell phone is too old, the cell phone will indicate the user to indicate the password "0 0 0 0" when it is connected for the first time.
- Sometimes when the cell phone Bluetooth is connected with several Bluetooth devices, some unpredictable faults may occur due to too much data stored in the cell phone. At this time, clear the Bluetooth devices stored in the cell phone or restart the cell power for another connection.
- Since the Bluetooth versions for laptops are considerable, the connection methods vary a lot. If the laptop cannot be connected during the first use, the latest Bluetooth driver shall be installed for the laptop. If it is difficult to connect and pair the laptop, call the company's after-sales service department or ask the person who is proficient in computer for help.
- Bluetooth connected back function, after the connection of Bluetooth, you need to disconnect it manually from your mobile, then it can remember your mobile, so when you restart the bluetooth function, they can pair automatically.
- Place the unit on a hard and flat surface so that the unit does not tilt.
- Do not expose the unit to excessive humidity, rain, sand or excessive heat caused by heating equipment or direct sunlight.
- Do not cover the unit. Adequate ventilation to prevent heat build-up.
- To clean the set, use a soft dry cloth. Do not use any cleaning agents containing alcohol, ammonia, benzene or abrasives as these may harm the cabinet.
CD player and CD handling
The lens of the CD player should never be touched!
- Sudden changes in the surrounding temperature can cause condensation to form and the lens of your CD player or cloud over. Playing a CD is then not possible. Do not attempt to clean the lens but leave the set in a warm environment until the moisture evaporates.
- Always close the CD door to keep the CD compartment dust-free. To clean, dust the compartment with a soft dry cloth.
- To clean the CD, wipe in a straight line from the center towards the edge using a soft, lint-free cloth.
- Do not use cleaning agents as they may damage the disc. Never write on a CD or attach any stickers to it.
natural_image
Illustration of a hand using a compass to interact with a circular device, showing mechanical components (no text or symbols)TROUBLESHOOTING
If a fault occurs, it is important you first check the points listed below before taking the unit for repair. If you are unable to remedy a problem by following these hints, consult your dealer or service center.
WARNING: Under no circumstances should you try to repair the unit yourself, as this will invalidate the warranty.
No Sound / Power
- Volume not adjusted
Adjust the VOLUME
- The Power Cord is not plugged
P l u g t h e
- Check weather you select righ working mode
Press SOURCE button and select correct working mode
- Remote Control is not working
The Batteries are Empty. Change batteries
No reaction to operation of any of the controls
- Electrostatic discharge
Switch off the unit. Connect it after a few seconds
into Power soc
TECHNICAL SPECIFICATIONS
| Power Requirement 110-240V/50/60Hz, 20W (MAX.) | |
| Channel separation >40dB | |
| Distortion <0,7% | |
| Dimensions: Unit with Speaker | Approx.415 mm(L)x200mm(W)x210mm(H) |
| Operation temperature +5°C - +35°C | |
| CD SECTION | |
| Frequency range | 20Hz - 20kHz (+/-3dB) |
| Audio S/N >80dB | |
| RECEIVER SECTION | |
| Receiving Bands | FM 87.5-108 MHz |
| Program memories | 30 |
| Bluetooth Range | 2402-2480 MHz, 0,91dBm, 8-10m range (Max) |
| INPUT/OUTPUT | |
| Audio Output (Analog Audio) | 1.0 - 2.0V, R 10k Ohm |
| Audio Output (Digital Audio) | 0,5Vpp, R 75ohm |
| AUDIO SECTION | |
| Output Power Max. 10 W (5W+5W) RMS, 40Hz-16kHz (+/-3dB) | |
| Bass / Treble adjustment -10db - +10dB | |
| S/N >80dB | |
*Design and specifications subject to change without notice.
The Bluetooth® word mark and logos are registered trademarks owned by the Bluetooth SIG, Inc. and any use of such marks by Vivax (MSI) is under license. Other trademarks and trade names are those of their respective owners.

Bluetooth®
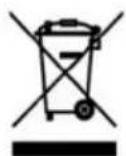
Disposal of Waste Electrical & Electronic Equipment
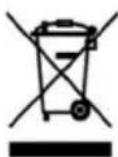
This symbol on the product(s) and / or accompanying documents means that used electrical and electronic products should not be mixed with general household waste.
For proper treatment, recovery and recycling, please take this product(s) to designated collection points where it will be accepted free of charge. Alternatively, in some countries you may be able to return your products to your local retailer upon
purchase of an equivalent new product. Disposing of this product correctly will help save valuable resources and prevent any potential negative effects on human health and the environment, which could otherwise arise from inappropriate waste handling. Please contact your local authority for further details of your nearest designated collection point. Penalties may be applicable for incorrect disposal of this waste, in accordance with your national legislation.
Disposal of waste batteries
Check local regulations for disposal of waste batteries or call your local customer service in order to get instructions on the disposal of old and used batteries. The batteries in this product should not be disposed of with household waste. Be sure to dispose of old batteries in special places for disposal of used batteries that are found in all retail shops where you can buy batteries.
EU Declaration of Conformity
This device is manufactured in accordance with the applicable European standards and in accordance with applicable RED Directives 2014/53/EU and Regulations.
The full text of the EU declaration of conformity is available at the following internet address: www.msan.hr/dokumentacijaartikala

POŠTOVANI!
Zahvaljujemo na kupnji Vivax uređaja i nadamo se da ćete biti zadovoljni odabirom. Ako u jamstvenom roku bude potreban popravak proizvoda, molimo savjetujte se sa ovlaštenim prodavačem koji Vam je proizvod prodao ili nas kontaktirajte na dolje navedene brojeve i adrese. MOLIMO VAS DA PRIJE UPORABE PROIZVODA PAŽLJIVO PROČITATE UPUTE PRILOŽENE UZ PROIZVOD!
JAMSTVENI LIST
VIVAX
HR
MODEL UREĐAJA
SERIJSKI BROJ
DATUM PRODAJE
BROJ RAČUNA PRODAVATELJA
POTPIS I PEČAT PRODAVATELJA
- Ovim jamstvom M SAN Grupa kao davatelj jamstva u Republici Hrvatskoj jamči besplatan popravak istog u skladu s važećim propisima i u skladu s uvjetima opisanim u ovom jamstvenom listu. Ovim jamstvom jamčimo da će predmet ovog jamstva raditi bez pogreške uzrokovane eventualnom lošom izradom ili lošim materijalom izrade. Svi, eventualno nastali, kvarovi biti će besplatno otklonjeni u ovlaštenom servisu u jamstvenom roku.
- UVJETI JAMSTVA Jamstveni rok počinje od dana kupnje proizvoda i traje 12 mjeseci, osim za Vivax Imago televizore (CRT, LCD, PDP) za koje jamstvo traje 24 mjeseca.
- U slučaju kvara na proizvodu koji je predmet ovog jamstva, obvezujemo se da ćemo isti popraviti u najkraćem mogućem roku, a najkasnije u roku od 45 dana. Ako se proizvod ne može popraviti ili se ne popravi u roku od 45 dana, biti će zamijenjen novim. Jamstvo će biti produženo za vrijeme trajanja popravka.
- Jamstvo se priznaje samo uz račun o kupnji, te uz ovaj jamstveni list koji mora biti ispravno popunjen odnosno mora sadržavati datum prodaje, pečat i potpis prodavatelja.
5. JAMSTVO NE OBUHVAĆA
POTPIS I PEČAT PRODAVATELJA
GARANCIJSKA IZJAVA
- Ovom garancijom garantira proizvođač proizvoda, preko KIM TEC d.o.o., kao uvoznika i davatelja garancije u Republici Bosni i Hercegovini besplatan popravak istog u skladu s važećim propisima i u skladu s uvjetima opisanim u ovom garantnom listu. Ovom garancijom garantiramo da će predmet ove garancije raditi bez greške uzrokovane eventualnom lošom izradom i lošim materijalom izrade. Svi eventualno nastali kvarovi biti će besplatno otklonjeni u ovlaštenom servisu u garantnom roku.
UVJETI GARANCIJE:
Garantni rok počinje teći od dana kupnje proizvoda i traje 12 mjeseci, osim za Vivax Imago televizore (CRT, LCD, PDP) za koje jamstvo traje 24 mjeseca
- U slučaju kvara na proizvodu koji je predmet ove garancije, obavezujemo se da ćemo isti popraviti u najkraćem mogućem roku, a najkasnije u roku od 45 dana. Ako se proizvod ne može popraviti ili se ne popravi u roku od 45 dana, biti će zamijenjen novim. Ako popravak proizvoda traje duže od 10 dana, garancija se produljužuje za vrijeme trajanja popravka.
- Garancija se priznaje samo uz račun o kupnji, te uz ovaj garantni list koji mora biti ispravno popunjen odnosno mora sadržavati datum prodaje, pečat i potpis prodavatelja.
- Davalac garancije osigurava servis i rezervne dijelove 7 godina od datuma kupnje.
GARANCIJA NE OBUHVAĆA:
POTPIS I PEČAT PRODAVCA
- Ovom izjavom o saobraznosti proizvođač proizvoda, preko KIM TEC CG d.o.o., kao uvoznika i davaoca prava u Crnoj Gori besplatan popravak istog u skladu s vazećim propisima i u skladu s uslovima opisanim u ovoj izjavi o saobraznosti. Ovom izjavom o saobraznosti istićemo da će predmet ovog prava raditi bez greške uzrokovane eventualnom lošom izradom i lošim materijalom izrade. Svi eventualno nastali kvarovi biće besplatno otklonjeni u ovlašćenom servisu u predviđenom roku za reklamaciju.
- USLOVI REKLAMACIJE: Rok za reklamaciju počinje teći od dana kupovine proizvoda i traje 24 mjeseca.
- U slučaju kvara na proizvodu koji je predmet reklamacije, obavezujemo se da ćemo isti popraviti u najkraćem mogućem roku, a najkasnije u roku od 15 dana. Ako se proizvod ne može popraviti ili se ne popravi u roku od 15 dana, biće zamijenjen novim.
- Pravo na reklamaciju se priznaje uz fiskalni račun o kupovini, ili uz ovu izjavu o saobraznosti koji mora biti ispravno popunjen odnosno mora sadržati datum prodaje, pečat i potpis prodavca.
- Davalac izjave o saobraznosti osigurava servis i rezervne djelove 7 godina od datuma kupovine.
- PRAVO NA REKLAMACIJU NE OBUHVATA
Kosova Electronic Service Center
Kosova Electronic Service Center
VIVAX Air Conditioners; White Goods and Small Home appliances


- Specifikacije:
- Sadržaj pakiranja:
- VAŽNA SIGURNOSNA UPOZORENJA
- OPREZ: KAKO BI SE SMANJILA OPASNOST OD ELEKTRIČNOG UDARA, NEMOJTE UKLANJATI STRAŽNJI POKLOPAC UREĐAJA. UNUTAR UREĐAJA NEMA DIJELOVA ILI KOMANDI KOJE SU NAMJENJENI UGAĐANJU OD STRANE KRAJNJEG KORISNIKA. ZA POPRAVAK KONTAKTIRAJTE OVLAŠTENI SEVIS.
- PRIPREMA ZA UPORABU
- Otvaranje pakiranja i postavljanje
- FM ŽIČANA ANTENA
- Sadržaj pakovanja:
- PRIPREMA ZA UPOTREBU
- Otvaranje pakovanja i postavljanje
- POSTAVLJANJE
- NAPAJANJE
- PRIKLJUČENJE ZVUČNIKA
- Održavanje dela za reprodukciju CD-a
- Спецификации:
- Specifikimet:
- Features:
- Box contence:
- ERP2 - (Energy related products)
- CAUTION
- RISK OF ELECTRIC SHOCK
- DO NOT OPEN
- Welcome
- IMPORTANT SAFETY INSTRUCTIONS
- PREPARATION FOR USE
- Unpacking and Setup
- SETTING UP
- POWER SUPPLY
- CONNECTION OF THE SPEAKER BOXES
- FM AERAL ANTENNA
- Notes:
- OVERVIEW OF THE PLAYER
- Battery replacement
- WARNING:
- OPERATION
- CD Operations:
- Searching the Track
- Skipping to another Track
- Create Playlist
- Repeat or Random Playback tracks (files)
- About MP3/WMA
- Playback from External Audio Device
- FM Radio Operations
- Search and Store Radio station
- USB Device
- Compatible USB Devices:
- BLUETOOTH Operations
- Remarks:
- CD player and CD handling
- TROUBLESHOOTING
- No Sound / Power
- TECHNICAL SPECIFICATIONS
- Disposal of Waste Electrical & Electronic Equipment
- Disposal of waste batteries
- EU Declaration of Conformity
- POŠTOVANI!
- JAMSTVENI LIST
- VIVAX
- HR
- MODEL UREĐAJA
- SERIJSKI BROJ
- DATUM PRODAJE
- BROJ RAČUNA PRODAVATELJA
- POTPIS I PEČAT PRODAVATELJA
- JAMSTVO NE OBUHVAĆA
- GARANCIJSKA IZJAVA
- UVJETI GARANCIJE:
- GARANCIJA NE OBUHVAĆA:
- POTPIS I PEČAT PRODAVCA
Brand : Vivax
Model : MC-600
Category : Hi-Fi System