VC-702 Zeo - Vacuum Cleaner Vivax - Free user manual and instructions
Find the device manual for free VC-702 Zeo Vivax in PDF.

| Product type | Canister vacuum cleaner |
| Brand | Vivax |
| Model | VC-702 Zeo |
| Dimensions (L x W x H) | Approx. 400 x 250 x 300 mm |
| Weight | Approx. 5 kg (12.5 lbs) |
| Power supply | 220-240 V, 50/60 Hz |
| Power consumption | 700 W |
| Dust capacity | 1.5 L (bagless cyclonic) |
| Filtration system | HEPA filter + washable foam filter |
| Noise level | 75 dB (A) |
| Cord length | 5 m |
| Number of power levels | 3 (low, medium, high) |
| Included accessories | Crevice tool, dusting brush, upholstery nozzle, floor brush |
| Energy class | A (on a scale of A to G) |
| Maintenance | Empty dust bin after each use; wash filters monthly; check for blockages |
| Safety features | Overheat protection, automatic shut-off |
| Spare parts / Repairability | Filters, dust bin, brush roll, hose available; user-replaceable parts |
Frequently Asked Questions - VC-702 Zeo Vivax
User questions about VC-702 Zeo Vivax
0 question about this device. Answer the ones you know or ask your own.
Ask a new question about this device
Download the instructions for your Vacuum Cleaner in PDF format for free! Find your manual VC-702 Zeo - Vivax and take your electronic device back in hand. On this page are published all the documents necessary for the use of your device. VC-702 Zeo by Vivax.
USER MANUAL VC-702 Zeo Vivax
natural_image
Exterior view of a modern vacuum cleaner (no visible text or symbols)Za vašu sigurnost i za dugotrajno uživanje u korištenju ovog proizvoda, molimo vas da obavezno pročitate upute prije samog korištenja uređaja
CE

DOBRODOŠLI!
Ovaj uređaj zadovoljava najviše standarde, inovativnu tehnologiju i visoku udobnost i učinkovitost korištenja.
VAŽNA UPOZORENJA I SIGURNOSNE UPUTE

Munja sa simbolom strelice unutar jednakostraničnog trokuta upozorava korisnika na prisutnost opasnog i neizoliranog napona unutar proizvoda koji može biti dovoljno snažan da predstavlja opasnost od strujnog udara.

Uskličnik unutar jednakostraničnog trokuta upozorava korisnika na prisutnost važnih uputa za uporabu i održavanje u dokumentu priloženom uz proizvod.

OPREZ

OPASNOST OD STRUJNOG UDARA NE OTVARATI
Ne skidajte poklopac uređaja. Ni u kojem slučaju korisniku nije dozvoljeno da provodi bilo kakve radnje popravka ili prepravke uređaja. Prepustite taj posao kvalificiranom ovlaštenom serviseru.
MOLIMO PROČITAJTE PAŽLJIVO OVE UPUTE PRIJE KORIŠTENJA, SAČUVAJTE IH I SPREMITE NA ZNANO MJESTO KAKO BISTE IH PO POTREBI MOGLI KORISTITI I U BUDUĆNOSTI.
Sigurnosne upute i upozorenja:
- Preporuča se prije prvog korištenja uređaja pažljivo pročitati upute, te ih sačuvati za buduće korištenje.
- Prije prvog korištenja uređaja, provjerite da li je posuda za prašinu ili vrećica za prašinu pravilno postavljena. Pobrinite se i provjerite da napajanje vašeg domaćinstva odgovara napajanju navedenom na uređaju, u rasponu od 220-240V\~ 50/60Hz.
- Nemojte nikada usisavati vodu ili zapaljive materijale.
- Nemojte usisavati goruće materijale ili pepeo. Kada koristite usisavač za usisavanje pepela, sitnog pijeska, vapna, cementne prašine i slične tvari, pore vrećice za prašinu brzo će se začepiti. Kao rezultat, indikator popunjenosti vrećice za prašinu će pokazati da je vrećica za prašinu puna. Zamijenite vrećicu za prašinu, čak i ako nije do kraja puna!
- Ne uranjajte uređaj u vodu kako biste ga očistili.
- Nikada nemojte koristiti uređaj bez ulaznog filtera za zaštitu motora i vrećice za prašinu koja je pravilno postavljena.
- Molimo, odmah zamijenite vrećicu za prašinu nakon što primjetite da je oštećena ili puna.
- Ne odlažite i ne koristite uređaj u blizini izvora visoke temperature.
- Djeca ne smiju koristiti uređaj kako bi se izbjegle potencijalno opasne situacije.
- U slučaju neobičnih zvukova, mirisa, dima ili bilo kojih
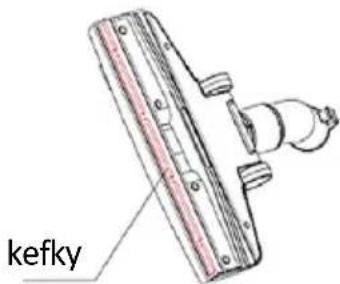
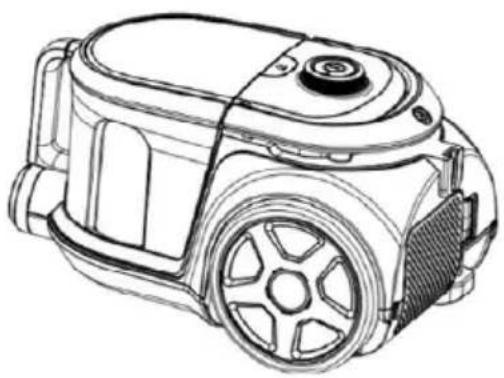
- Dvostruka četka
- Izvlačna metalna cijev
- Posuda za prašinu
- Priključak na crijevu
- Uska i mala četka
- Tipka za uključenje i regulaciju jačine
-
Veliki stražnji kotač
-
Poklopac filtra za izlaza zraka i Hepa Filter
-
Ručka
-
Savitljivo crijevo
-
Tipka za uvlačenje kabela napajanja
-
Tipka za odvajanje posude za prašinu
Oprema uz uređaj:
natural_image
Line drawing of a cable being inserted into a car, showing the cable being inserted (no text or symbols present)Slika 1 Slika 2
natural_image
Diagram of a curved mechanical device with a valve and adjustment mechanism (no text or symbols)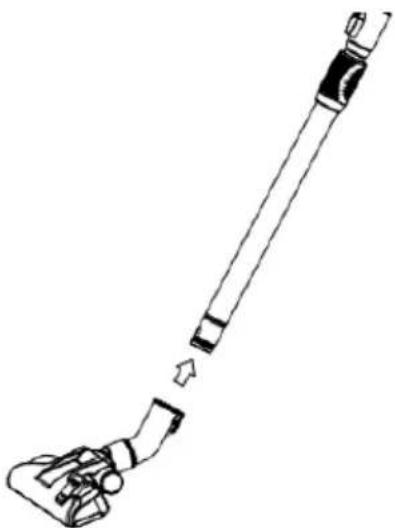
natural_image
Line drawing of a hand holding a long cylindrical object with a small protrusion, no text or symbols presentSlika 3
natural_image
Line drawing of a vacuum cleaner with visible wheels and mounting features (no text or symbols)Slika 4
natural_image
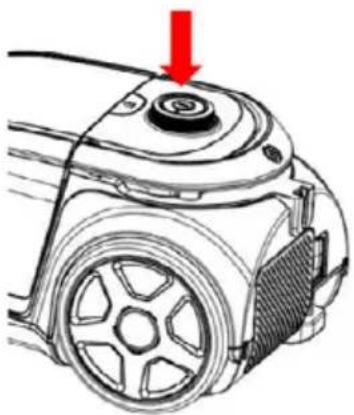
Diagram of a robotic vacuum cleaner with a red arrow pointing to the top component (no text or symbols present)Slika 5 Slika 6

natural_image
Diagram of a robotic vacuum cleaner with red directional arrow indicating rotation (no text or symbols)natural_image
Diagram of a vacuum cleaner's handle and lever mechanism, showing red arrow indicating motion (no text or symbols)Slika 12
Slika 13
Održavanje
Upozorenje
Prije bilo kakvog održavanja ili zamjene dijelova, obavezno odspojite utikač napajanja iz mrežne utičnice.
natural_image
Line drawing of a vacuum cleaner connected to a battery pack with a red curved arrow indicating rotation (no text or symbols)Slika 14 Slika 15
natural_image
Line drawing of a mechanical component with a red arrow indicating rotation (no text or symbols)Slika 16
natural_image
Exploded view diagram of a mechanical device showing internal components and exterior view (no text or labels)Slika 17

natural_image
Line drawing of a container with a tray labeled 'Computer' being poured into it (no text or symbols present)Slika 18 Slika 19
natural_image
Line drawing of a faucet spraying water onto a rectangular basin (no text or symbols)Čišćenje
Preporuča se da povremeno temeljito očistite uređaj.
natural_image
Exterior view of a modern vacuum cleaner (no visible text or symbols)Važno je da pre upotrebe uređaja u potpunosti pročitate ovo uputstvo i sačuvate ga na sigurnom mestu za buduću upotrebu
CE

DOBRODOŠLI!
VAŽNA UPOZORENJA I SIGURNOSNA UPUTSTVA

Munja sa simbolom strelice unutar jednakostraničnog trougla upozorava korisnika na prisutnost opasnog i neizoliranog napona unutar proizvoda koji može biti dovoljno snažan da predstavlja opasnost od strujnog udara.

Uzvičnik unutar jednakostraničnog trougla upozorava korisnika na prisutnost važnih uputstava za upotrebu i održavanje u dokumentu priloženom uz proizvod.

OPREZ

OPASNOST OD STRUJNOG UDARA NE OTVARATI
- Dvostruka četka
- Teleskopska metalna cev
- Posuda za prašinu
- Priključak na crevu
- Uska i mala četka
- Taster za uključenje i regulaciju jačine
-
Veliki zadnji točak
-
Poklopac filtera za izlaza vazduha i Hepa Filter
-
Ručka
-
Savitljivo crevo
-
Taster za uvlačenje kabla napajanja
-
Taster za podizanje posude za prašinu
Oprema uz uređaj:
- Crevo i teleskopska metalna cev
- Četka za usisavanje 2 in1
- Uska i mala četka za usisavanje uglova i sofa
- Uputstva za upotrebu
Upotreba:
natural_image
Line drawing of a cable being inserted into a vehicle, showing the cable being inserted (no text or symbols present)Slika 1 Slika 2

natural_image
Diagram of a curved mechanical device with a valve and adjustment mechanism (no text or symbols)
natural_image
Line drawing of a hand holding a long cylindrical object with a small protrusion, no text or symbols presentSlika 3

natural_image
Line drawing of a vacuum cleaner with visible wheels and mounting features (no text or symbols)Slika 4

natural_image
Diagram of a mechanical device with a red arrow pointing to a circular component (no text or symbols present)Slika 5
natural_image
Diagram of a robotic vacuum cleaner with red directional arrow indicating rotation (no text or symbols)Slika 6
Podešavanje
snage
usisavanja
natural_image
Diagram of a vacuum cleaner's handle and lever mechanism, showing red arrow indicating motion (no text or symbols)Slika 12
Slika 13
Održavanje
Upozorenje
Pre bilo kakvog održavanja ili zamene delova, obavezno isključite utikač napajanja iz mrežne utičnice.
Čišćenje ili zamena izlaznog Hepa filtera: Otvorite poklopac izlaza vazduha i izvadite HEPA filtar.
• Filter treba čistiti dva puta godišnje ili po potrebi kad uočite prljavštinu.
- Morate pravilno postaviti učvrstiti filter pre upotrebe usisivača
- Filter se može čistiti otresanjem ili izduvavanjem komprimovanim vazduhom ili pranjem u blagom rastvoru sapunice. Pre stavljanja filera u usisivač filter mora biti potpuno suv. Ako koristite vlažni filter, smanjiće se snaga usisavanja i može doći do oštećenja motora.
Održavanje
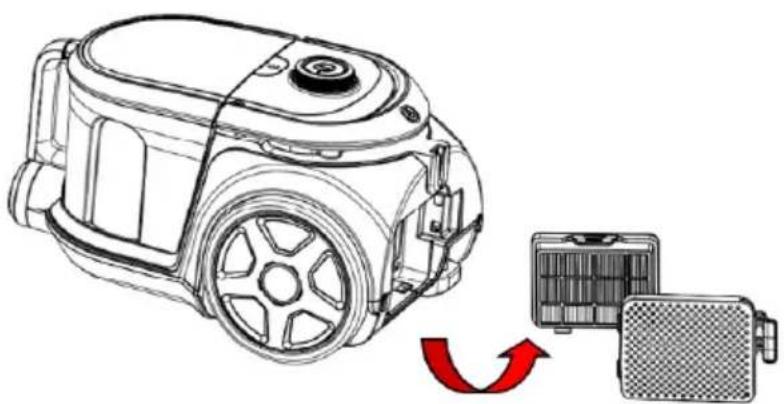
1) Kao što je prikazano na Slici 14, pritisnite osigurač poklopca i izvadite poklopac.
2) Kao što je prikazano na Slici 15, izvadite HEPA filtar iz kućišta uređaja.
3) Kao što je prikazano na Slici 16, izvadite posudu za prašinu i odstranite okvir filtera.
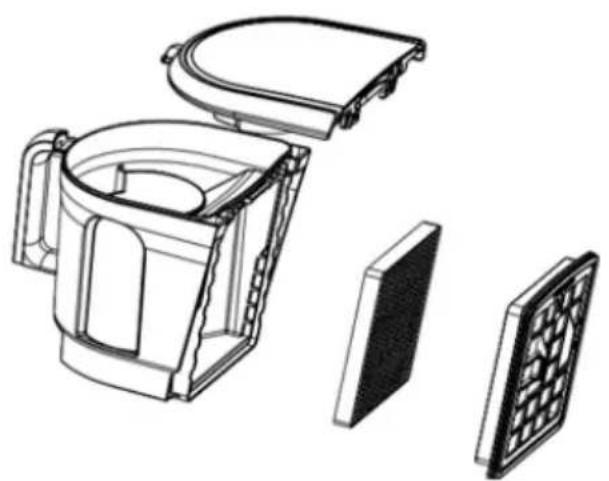
4) Kao što je prikazano na Slici 17, Okvir filtera sastoji se od sunderastog filtera i Hepa membrane.
5) Kao što je prikazano na Slici 18, očistite svaki filter istresanjem ili otprašivanjem komprimovanim vazduhom.
6) Kao što je prikazano na Slici 19, Hepa filter moguće je i oprati.
7) Operite okvir filtera, HEPA membranu i sunšer. Isto tako, operite posudu za prašinu u vodi bez deterdženta i osušite ih pre upotrebe.
8) Vratite HEPA filter u uređaj i zatvorite poklopac izlaza vazduha tako da zazori dobro sednu i „zaključaju“ poklopac.
9) Vratite okvir sa sunderastim filterom i HEPA membranom u zadnju stranu posude za prašinu.
10) Proverite da je okvir filtera potpuno i ispravno nalegao u predviđeno mesto na posudi.
11) Postavite posudu za prašinu u usisivač. Ukoliko začujete zvuk „click“, to znači da je posuda potpuno i ispravno sela u uređaj.
natural_image
Line drawing of a robotic vacuum cleaner with a red circular arrow indicating rotation, alongside a separate box (no text or symbols)Slika 14 Slika 15

natural_image
Line drawing of a mechanical component with a red ribbon indicating rotation (no text or symbols)Slika 16

natural_image
Exploded view diagram of a mechanical device showing internal components and exterior view (no text or labels)Slika 17

natural_image
Line drawing of a container with a calculator above it, showing liquid being poured into it (no text or symbols)Slika 18 Slika 19
natural_image
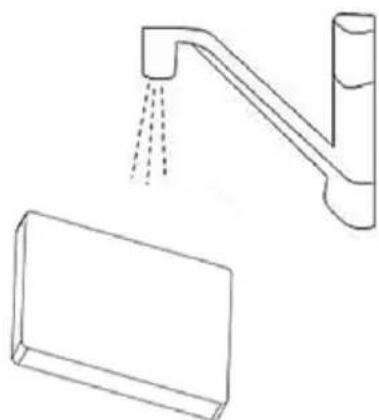
Line drawing of a faucet with liquid spray and a rectangular basin below (no text or symbols)Čišćenje
natural_image
Exterior view of a modern vacuum cleaner (no visible text or symbols)natural_image
Line drawing of a cable being inserted into a vehicle (no text or symbols)Slika 1 Slika 2

natural_image
Diagram of a curved mechanical device with a valve and adjustment mechanism (no text or symbols)
natural_image
Line drawing of a hand holding a long cylindrical object with a small protrusion, no text or symbols presentSlika 3

natural_image
Line drawing of a vacuum cleaner with visible wheels and mounting bracket (no text or symbols)Slika 4

natural_image
Diagram of a robotic vacuum cleaner with a red arrow pointing to the top component (no text or symbols present)Slika 5 Slika 6

natural_image
Diagram of a robotic vacuum cleaner with red directional arrow indicating rotation (no text or symbols)natural_image
Diagram of a vacuum cleaner's handle and lever mechanism, showing red arrow indicating motion (no text or symbols)Slika 12
Slika 13
Vzdrževanje
Opozorilo
natural_image
Line drawing of a robotic vacuum cleaner connected to a compact battery pack with a red curved arrow indicating rotation (no text or symbols present)Slika 14 Slika 15
natural_image
Line drawing of a mechanical component with a red ribbon indicating rotation (no text or symbols)Fig. 16
natural_image
Exploded view diagram of a portable water heater with internal components (no text or labels)Fig. 17

natural_image
Line drawing of a container with a grid-patterned lid above it, no text or symbols presentSlika 18 Slika 19

natural_image
Line drawing of a faucet with liquid spray and a rectangular basin below (no text or symbols)Čiščenje
natural_image
Exterior view of a modern vacuum cleaner (no visible text or symbols)natural_image
Line drawing of a hairless vacuum cleaner connected to a vehicle (no text or symbols)Obrázok 1
natural_image
Diagram of a curved cable or connector with a directional arrow indicating movement (no text or symbols)Obrázok 2

natural_image
Line drawing of a hand holding a long cylindrical object with a small protrusion, no text or symbols presentObrázok 3
natural_image
Line drawing of a vacuum cleaner with visible wheels and mounting features (no text or symbols)Obrázok 4

natural_image
Diagram of a vacuum cleaner's wheel assembly with a red arrow pointing to the top component (no text or symbols present)Obrázok 5

natural_image
Technical line drawing of a mechanical device with a red arrow indicating rotation or force (no text or symbols)natural_image
Diagram of a vacuum cleaner's seatbelt mechanism with red arrow indicating force (no text or symbols)Obrázok 12
Obrázok 13
Údržba
Upozornenie
natural_image
Line drawing of a vacuum cleaner with attached battery pack and fan (no text or symbols)natural_image
Exterior view of a modern vacuum cleaner (no visible text or symbols)natural_image
Line drawing of a vacuum cleaner connected to a vehicle, showing cable attachment and wheel assembly (no text or symbols)Obrázek
natural_image
Diagram of a curved cable or connector with a belt switch and directional arrow (no text or symbols)Obrázek
2
1
natural_image
Line drawing of a handheld vacuum cleaner with a handle and lever mechanism (no text or symbols)Obrázek

natural_image
Line drawing of a vacuum cleaner device with no text or symbolsObrázek
4
3

natural_image
Diagram of a mechanical device with a red arrow pointing to a circular component (no text or symbols present)Obrázek
5
natural_image
Diagram of a mechanical device with a red arrow indicating rotation or movement, no text or symbols present.natural_image
Diagram of a vacuum cleaner's grip and lever mechanism, showing red arrow indicating motion (no text or symbols)Obrázek 12
Obrázek 13
Údržba
Upozornění
natural_image
Line drawing of a vacuum cleaner with a red circular arrow indicating rotation or change (no text or symbols)natural_image
Line drawing of a mug with a red arrow indicating rotation (no text or symbols)Fig. 16 Fig. 17
natural_image
Exploded view diagram of a portable kitchen unit showing internal components and exterior panel (no text or labels)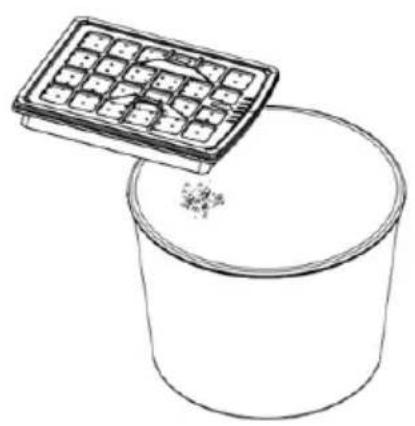
natural_image
Line drawing of a container with a grid-patterned lid above it, no text or symbols presentObrázek Obrázek
natural_image
Line drawing of a faucet with water spray and a rectangular basin below (no text or symbols)Čištění
natural_image
Exterior view of a modern vacuum cleaner (no visible text or symbols)natural_image
Line drawing of a vacuum tube connected to a car, showing the cable being inserted (no text or symbols present)Rys. 1

natural_image
Diagram of a curved mechanical device with a valve and connector, showing motion direction (no text or symbols)Rys 2

natural_image
Line drawing of a cleaning tool with a handle and lever mechanism (no text or symbols)Rys. 3
natural_image
Line drawing of a vacuum cleaner device with no visible text or symbolsRys. 4

natural_image
Diagram of a robotic vacuum cleaner with a red arrow pointing to the top component (no text or symbols present)Rys. 5
natural_image
Diagram of a robotic vacuum cleaner with red directional arrow indicating rotation (no text or symbols)Rys. 6
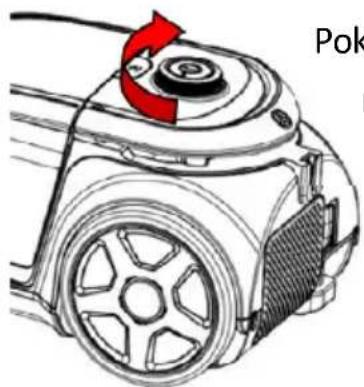
Pokrętło do
regulacji
mocy
natural_image
Diagram showing a device being processed into a multi-cylinder housing, with no visible text or symbols.Rys. 8
natural_image
Line drawings of three objects: a toilet, a mechanical device, and a cup (no text or symbols)Dodatki:
natural_image
Diagram of a vacuum cleaner's handle and lever mechanism, showing red arrow indicating motion (no text or symbols)Rys. 12
Rys. 13
Konserwacja
Ostrzeżenie
natural_image
Line drawing of a vacuum cleaner with attached battery pack and fan (no text or symbols)Rys. 14 Rys. 15
natural_image
Line drawing of a mechanical component with a red ribbon, no text or symbols presentRys. 16 Rys. 17
natural_image
Exploded view diagram of a mechanical device showing internal components and exterior view (no text or labels)
natural_image
Simple line drawing of a container with a tray and granular substance inside (no text or symbols)Rys. 18 Rys. 19
natural_image
Line drawing of a faucet with liquid spray and a rectangular basin below (no text or symbols)Czyszczenie
natural_image
Exterior view of a modern vacuum cleaner (no visible text or symbols)natural_image
Technical line drawing of a vacuum tube connected to a vehicle (no text or symbols)1.kép 2.kép

natural_image
Diagram of a medical or surgical device with a curved tube and connector, showing internal components (no text or symbols)
natural_image
Line drawing of a hand holding a long cylindrical object with a small attached component, showing no text or symbols.3.kép
natural_image
Line drawing of a vacuum cleaner with visible wheels and mounting bracket (no text or symbols)4.kép

natural_image
Diagram of a mechanical device with a red arrow pointing to a circular component (no text or symbols present)5.kép 6.kép

natural_image
Diagram of a mechanical device with a red arrow indicating rotation or force direction (no text or symbols)natural_image
Diagram of a vacuum cleaner's handle and lever mechanism, showing red arrow indicating motion (no text or symbols)12.kép
13.kép
Katbantartás
Figyelmeztetés
natural_image
Line drawing of a vacuum cleaner with a red circular arrow indicating rotation or change (no text or symbols)14.kép
15.kép
natural_image
Line drawing of a mechanical component with a red ribbon, no text or symbols present16.kép
natural_image
Exploded view diagram of a mechanical device showing internal components and exterior view (no text or labels)17.kép
natural_image
Line drawing of a container with a tray labeled 'Grid' being poured into it, no text or symbols present.18.kép 19.kép
natural_image
Line drawing of a faucet with liquid spray and a rectangular basin below (no text or symbols)Tisztítás
natural_image
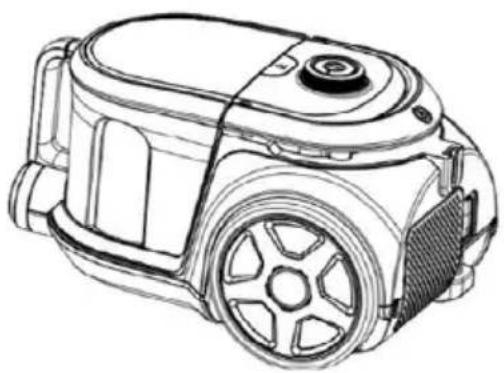
Exterior view of a modern vacuum cleaner (no visible text or symbols)It is important that you read these instructions before using your product and we strongly recommend that you keep them in a safe place for future reference
CE


WELCOME!
This device meets the highest standards, innovative technology and high comfort use.
Read these instructions carefully before using your new unit, and keep it carefully.
If you follow the instructions, your new appliances will provide you with many years of good service.
READ CAREFULLY THIS MANUAL AND KEEP THEM FOR FUTURE REFERENCE!
IF YOU SELL OR TRANSFER DEVICE TO OTHER PEOPLE, BE SURE TO INCLUDE THESE INSTRUCTIONS!
IMPORTANT SAFETY INSTRUCTIONS WARNING

The flash with the symbol of arrowhead, inside an equilateral triangle alerts the user about the presence of a dangerous tension not isolated inside the product which can be sufficiently powerful to constitute a risk of electrocution.

The point of exclamation inside an equilateral triangle alerts the user about the presence of important operating instructions and maintenance in the document enclosed in the package.

CAUTION

RISK OF ELECTRIC SHOCK DO NOT OPEN
Do not open the cover. In no case the user is allowed to operate inside the unit. Only a qualified technician from the manufacture is entitled to operate. By ignoring the safety instructions, the manufacturer cannot be hold responsible for the damage.
PLEASE READ THIS MANUAL CAREFULLY BEFORE USING AND KEEP IT PROPERLY FOR FUTURE USE
Safety directions:
- For the first operation, it is advisable to read the manual carefully before using and keep it properly for future use.
- Before the first operation, make sure the dust cup or the dust bag is properly installed. Make sure the power supply is 220-240V\~50/60Hz.
- Do not vacuum water and inflammable material.
- Do not vacuum burning material and ashes. When you use the vacuum cleaner to vacuum ashes, fine sand, lime, cement dust and similar substances, the pores of the dustbag become clogged. As a result, the dustbag-full indicator will indicate that the dustbag is full. Replace the dust bag, even if it is not full yet!
- Do not immerse unit or power cord into water for cleaning.
- Do not use the machine without a motor protection filter filled.
- Please change the dust bag immediately when it was damaged.
- Do not store or use the machine close to high temperature places.
- Dot not let children use the machine in case of danger.
- If abnormal noise, smell, smoke or any other failure or breakage is found during the operation, you should turn off the switch and unplug it. Then contact with your service center for repair. Do not repair by yourself.
- If the supply cord is damaged, it must be replaced by the manufacturer or its service agent or a similarly qualified
person in order to avoid a hazard.
- This appliance is not intended for use by persons (including children) with reduced physical, sensory or mental capabilities, or lack of experience and knowledge, unless they have been given supervision or instruction concerning use of the appliance by a person responsible for their safety.
- This appliance can be used by children aged from 8 years and above and persons with reduced physical, sensory or mental capabilities or lack of experience and knowledge if they have been given supervision or instruction concerning use of the appliance in a safe way understand the hazards involved.
- Children being supervised not to play with the appliance.
- Children shell not play with the appliance.
- Cleaning and user maintenance shall not be made by children without supervision.
- Close supervision is necessary when any appliance is used by or near children.
- Never unplug the feed cable from the plug by tugging on the cable. Do not touch the feed cable with wet hands Never move the appliance by pulling the cord and make sure the cord cannot become entangled.
- The user must not leave the device unattended while it is connected to the supply.
- This appliance is only to be used for household purposes and only for the purpose it is made for.
- This appliance is intended for indoor use only.
- Do not use this appliance outdoors, near water, in a wet
basement or near a swimming pool. Do not expose the device or power cable to excessive heat or dust, direct sunlight, or humidity.
- Steam cleaner is not to be used for cleaning.
- Children should be supervised to ensure that they do not play with the appliance.
- The plug must be removed from the power socket before any maintenance or replacement.
- Do not point the hose, the tube or any other accessory at the eyes or ears nor put it in your mouth when it is connected to the vacuum cleaner and the vacuum cleaner is switched on.
Warning
- The plug must be removed from the power socket before any maintenance or replacement.
- If the power cord is damaged, replace them only by the factory or maintenance center or similarly qualified persons.
Failure clearance
Less vacuum power of the cleaner
- The cleaner can be used as tip the rubbish out of the full dust cup or the dust bag.
- If blockage is found in ground brush, hose or tubes, the machine can be re-operated only after the blockage is cleared away.
WARNING!
Never use this machine when the suction power becomes very weak.
When this happens:
- Switch off the unit, unplug it and check whether the dust container is full.
- Then check if any part of the floor brush, tube or hose is blocked.
Do not use the vacuum cleaner until the blockage is removed and it operates normally again.
If you cannot solve the problem, contact the after sales support line
Electrical connection
Make sure that the voltage (see name plate) and your home power supply match.
The mains plug should only be inserted into a correctly installed 220-240 V \~ 50 Hz socket.
No user-serviceable parts inside. Refer servicing to qualified service personnel.
A short power-supply cord is provided to reduce the hazards resulting from entanglement or tripping over a long cord. An extension cord may be used with care, however, the marked electrical rating should be at least as great as the electrical rating of this appliance.
The extension cord should not be allowed to drape over the counter or tabletop where it can be pulled by children or tripped over.
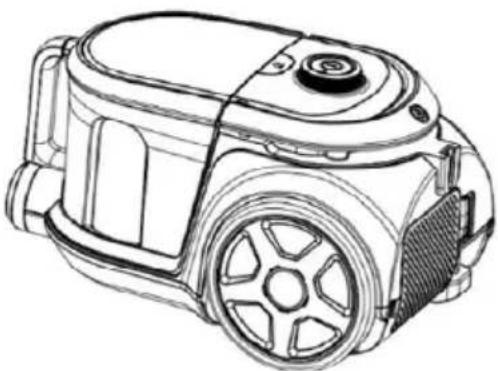
VC-8004AB Galactic Vivax vacuum cleaner of clear lines and structure can produce centralized wind with less noise, adjust the operation speed, indicate full dust, and automatically rewind the wire, multi-level filter exchange, dust cup and dust bag two in one. Being convenient and flexible in cleaning dust, it is reliable and ideal household cleaning tool.
Introduction of Product
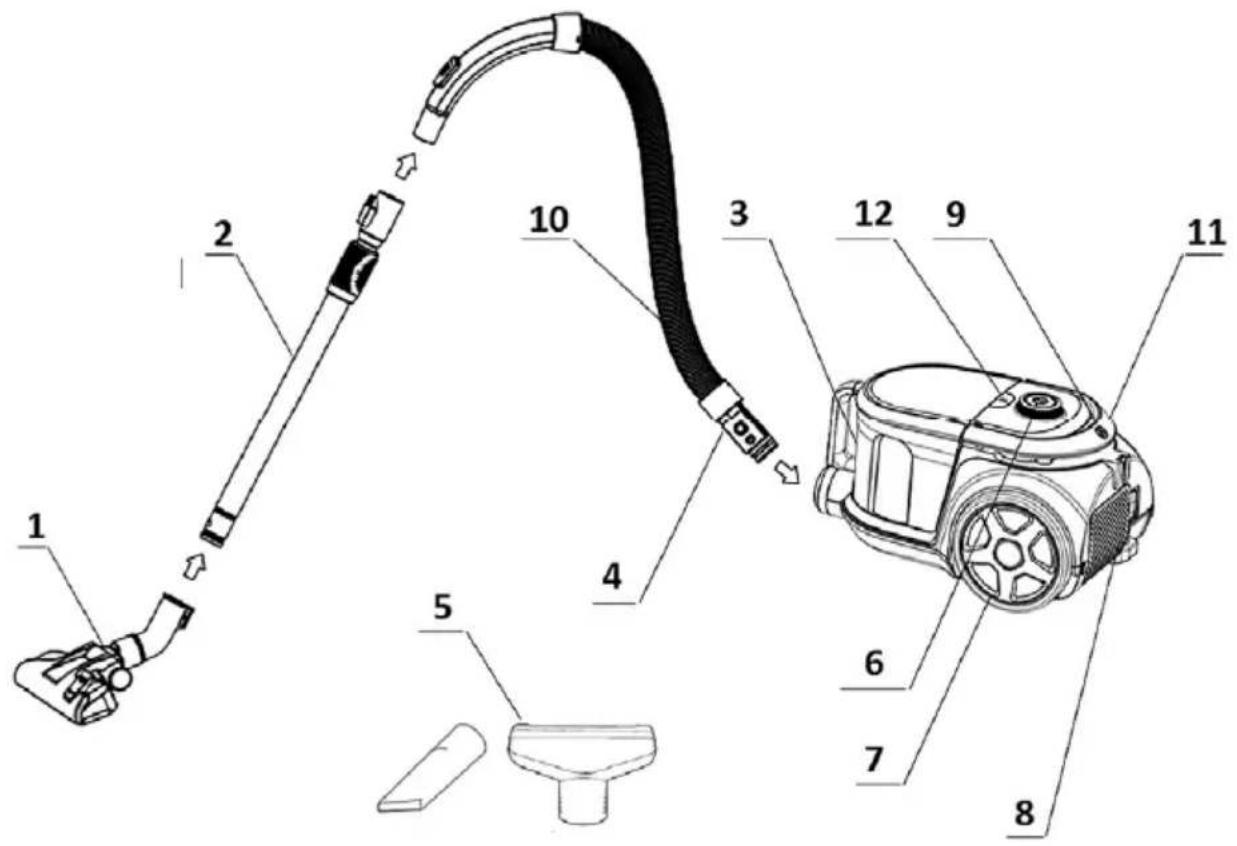
- Dual brush Tool
- Extending metal tube
- Dust Canister
- Hose connector
- Cervic nozzle & Small brush
-
Power button with Power control
-
Big wheel
- Air Exhaust cover & Hepa Filter
- Handle & Cord rewinder
- Flexible Hose
- Cord Rewinding Button
- Canister Detach Button
Accessories:
- Flexible Hoose & Metal Telescopic tube
- 2in1 integrated brush (Floor/Carpet)
- Small brush
- User manual
Operation methods:
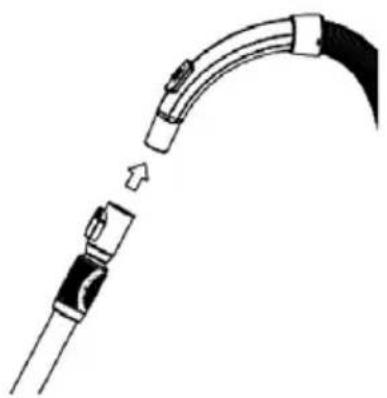
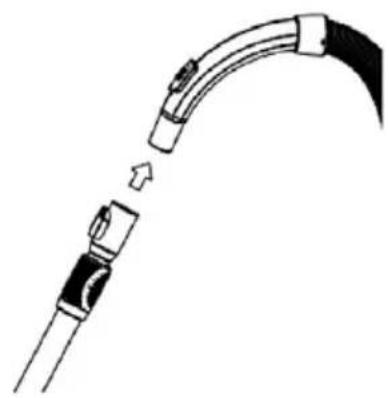
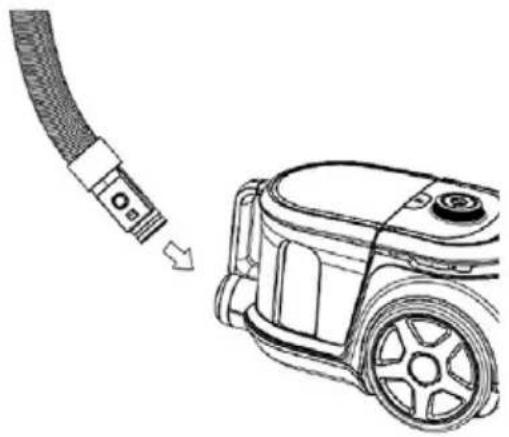
- Fig.1: The connection of the hose and the vacuum cleaner:
Put the hose connector in front of the vacuum cleaner. Then insert it into the inlet hole and turn right. If you want to disassemble it, you can turn the hose connection left and then pull it out.
- Fig.2: The connection of the hose and the extending metal tube:
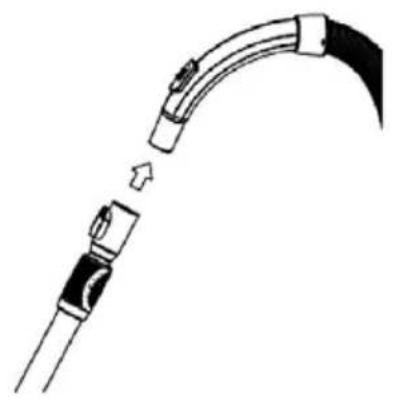
Hold the flexural connector of the hose and put it into the bigger hole of the tube.
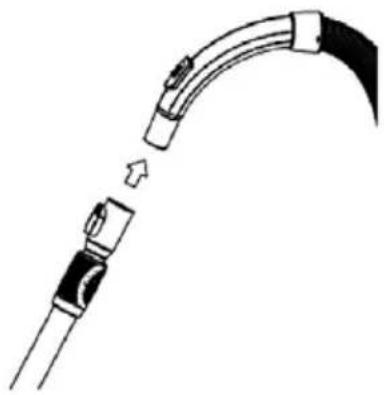
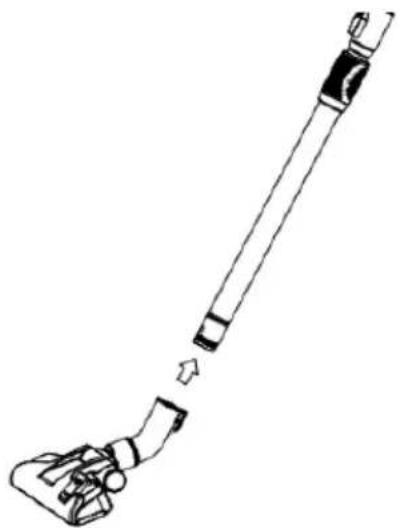
- Fig.3: The connection of the tube and the brush tool:
Put the metal tube into the hole of the brush and rotate it to fasten them.
Note: To detach the hose and brush from the metal tube, press the button at the end of the tube and pull out the hose connector.
- Fig.4: How to check the winding of the power cord.
You can pull the power cord out of the machine and stop it when you see the yellow mark. Make sure the red mark is not out. When your sweep is over, first turn off the power, pull the plug out of the socket, and then push the winding device button until the cord is completely in the machine.
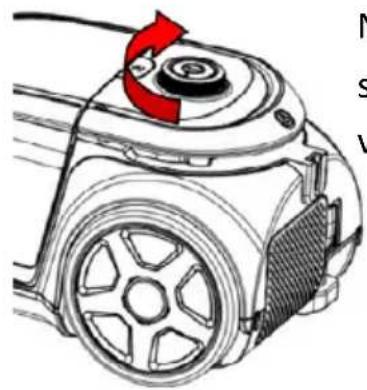
- Fig.5: Power button
Put the plug into the socket, push the power button to control the work of the machine.
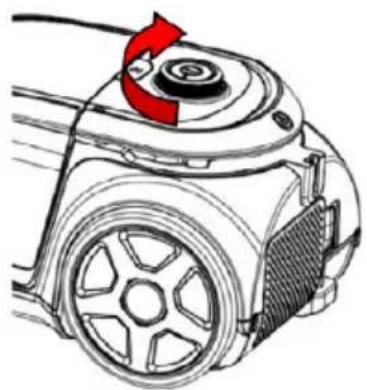
- Fig 6: Suction Power adjustment:
Rotate Button to adjust the Suction power
natural_image
Line drawing of a vacuum tube connected to a car, showing the cable being inserted (no text or symbols present)Fig. 1 Fig. 2
natural_image
Diagram of a curved cable or connector with a directional arrow indicating movement (no text or symbols present)
natural_image
Line drawing of a cleaning tool with a handle and lever mechanism (no text or symbols)Fig. 3

natural_image
Line drawing of a vacuum cleaner device with no visible text or symbolsFig. 4

natural_image
Diagram of a mechanical device with a red arrow pointing to a circular component (no text or symbols present)Fig. 5 Fig. 6
natural_image
Diagram of a robotic vacuum cleaner with red directional arrow indicating rotation (no text or symbols)The knob adjusts the power
Cleaning of the Dust Chamber:
The steps of the chamber cleaning:
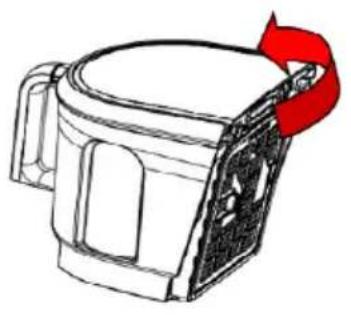
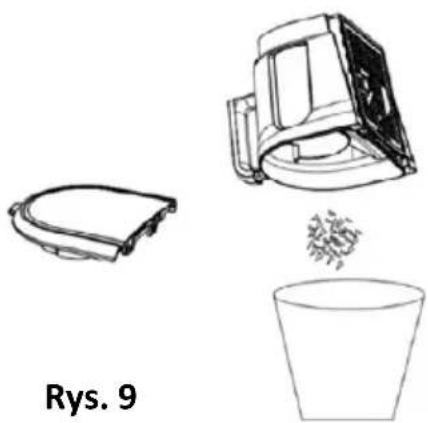
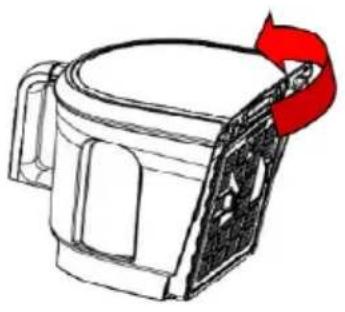
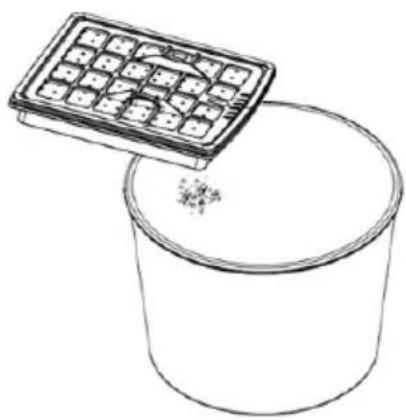
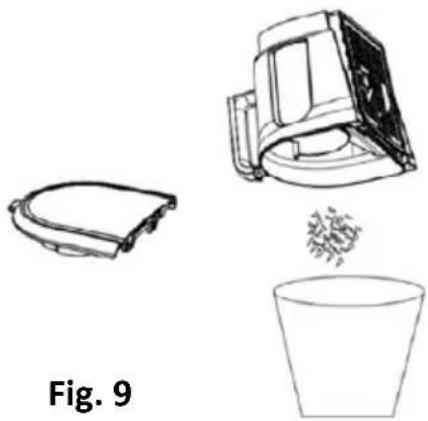
- As in Fig.7, hold the dust canister and handle and push the release button (A).
- As in Fig.7, take the dust canister out of the machine (B).
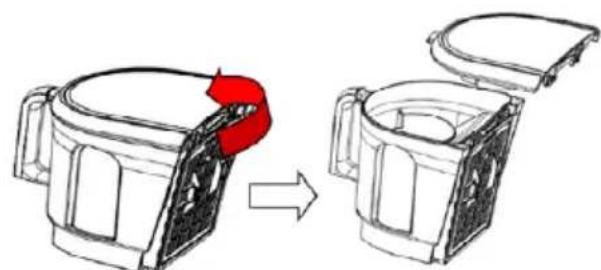
-
As in Fig.8, put the dust canister onto the rubbish bin: Push the release button to open the the dust chamber and drop dust into the bin (Fig.9).
-
Close the dust canister for a circular use after your cleaning.
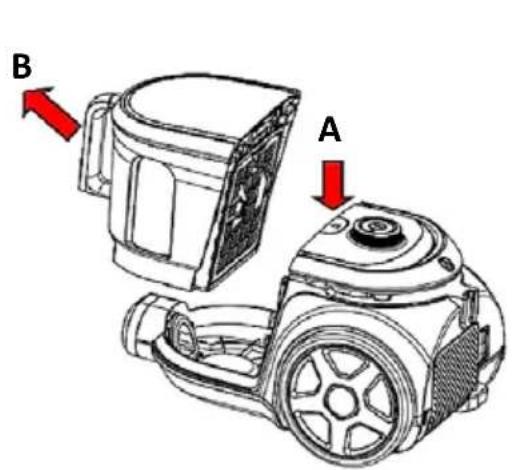
Fig. 7
natural_image
Diagram showing a device being processed from a top component, with no visible text or symbols.Fig. 8
natural_image
Line drawings of three objects: a curved device, a mechanical device with a drop, and a cup (no text or symbols)Attachments:
- As in Fig.10, you can use the cervice nozzle to clean the corner and the aperture.
-
As in Fig.11, attach small brush to clean the sofa, the curtain and the dust on the ornaments.
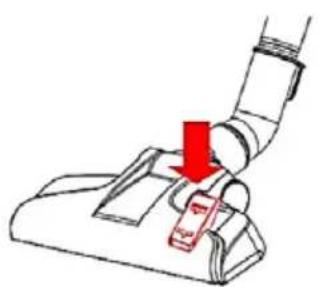
-
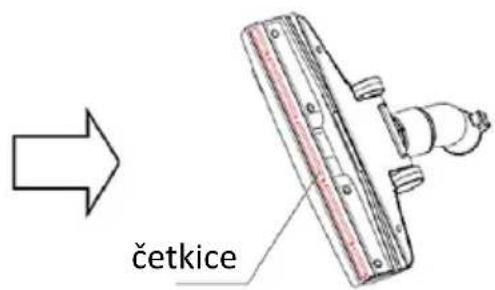
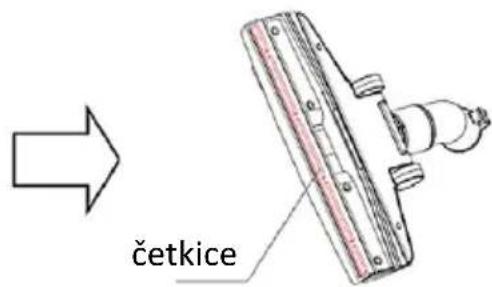
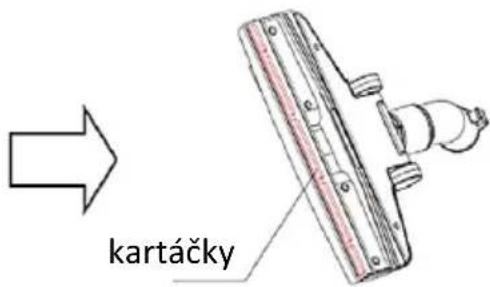
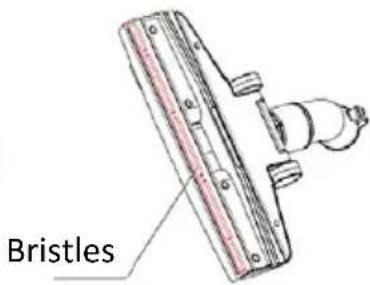
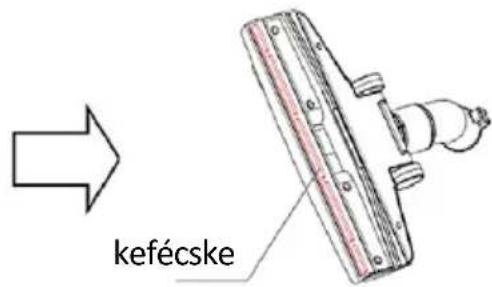
As in Fig.12, tread on the pedal of the brush tool to let the bristles out, and you can clean the floor.
- As in Fig.13, tread on the pedal of the brush tool again to put the bristles in, and you can clean the carpet.
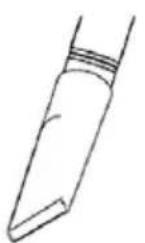
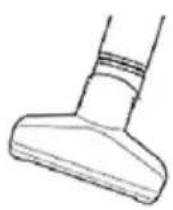
Fig. 10 Fig. 11
natural_image
Diagram of a vacuum cleaner's grip with red arrow indicating force or movement (no text or symbols)Fig. 12
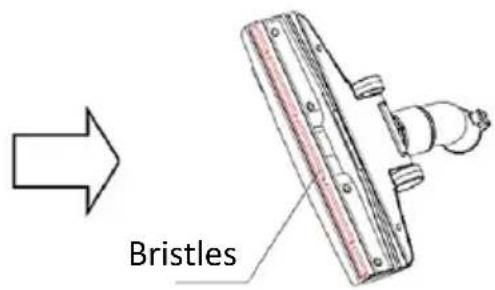
Fig. 13
Maintenance
Warning
The plug must be removed from the power socket before any maintenance or replacement.
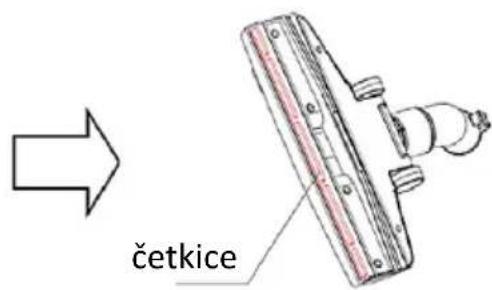
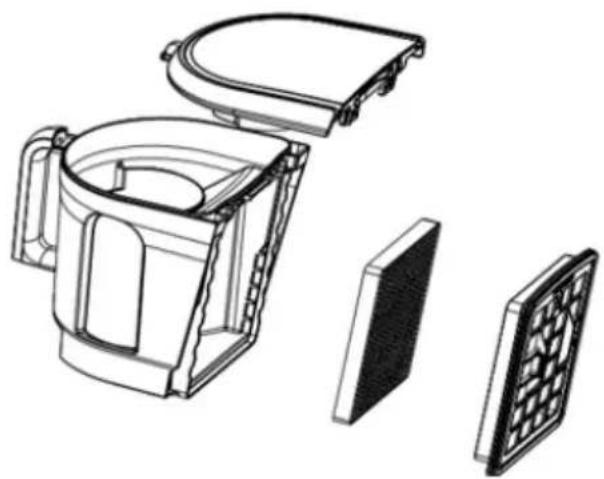
Clean or Exchange the outlet Hepa filter: Open the outlet cover and take out the HEPA frame and filter.
- The filter should be cleaned twice a year, and when there is obvious dirt on the filter.
- You must fix the filter properly before running the vacuum cleaner
- The filter can be cleaned by shaking, baked by the blower or wash in warm soapy water.
- The filter must be fully dry before you put filter back into vacuum cleaner. It will reduce the suction power and damage the motor if you use the wet filter.
Steps for maintenance
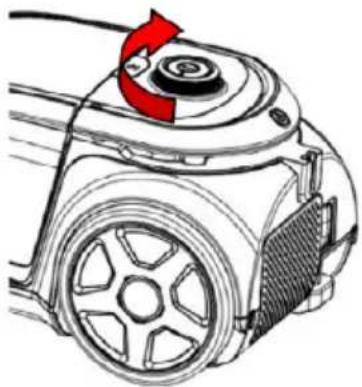
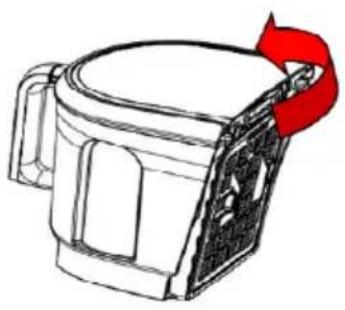
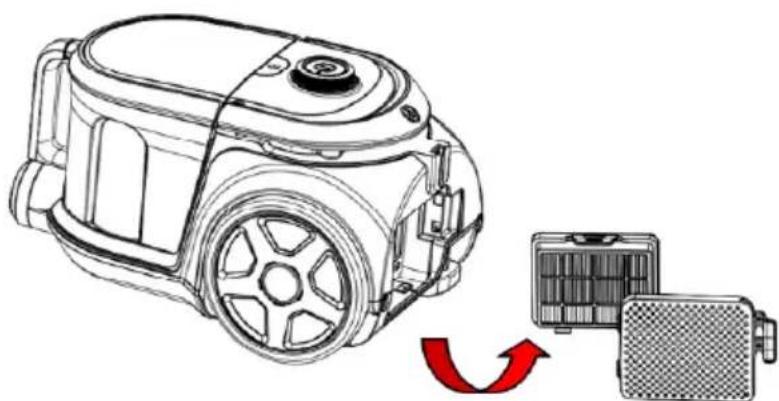
1) As in Fig.14, press the outlet lock to open the outlet board.
2) As in Fig.15, get out the outlet filter.
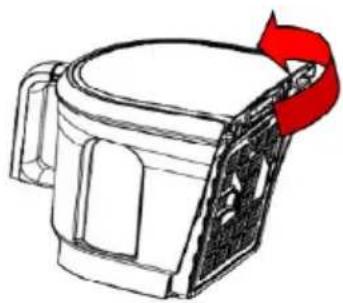
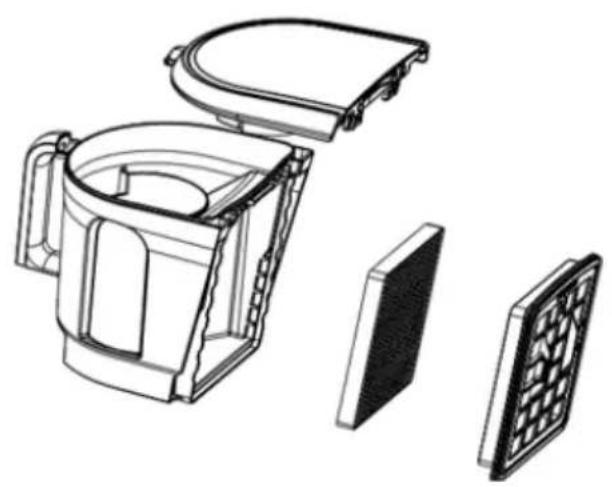
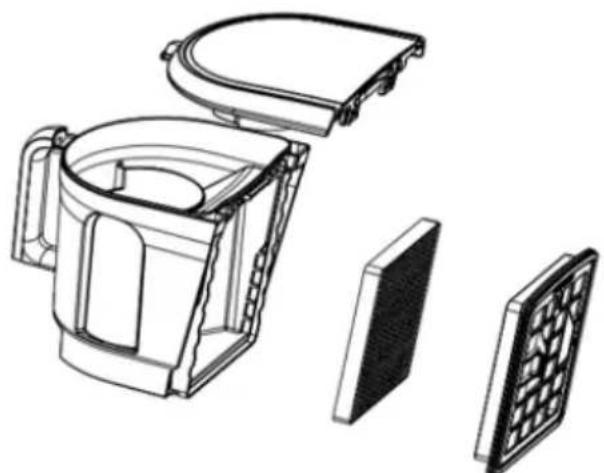
3) As in Fig.16, rotate the HEPA cover to separate it from the chamber cover.
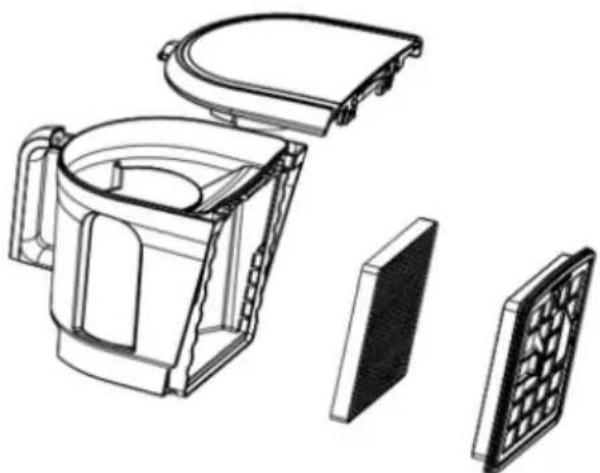
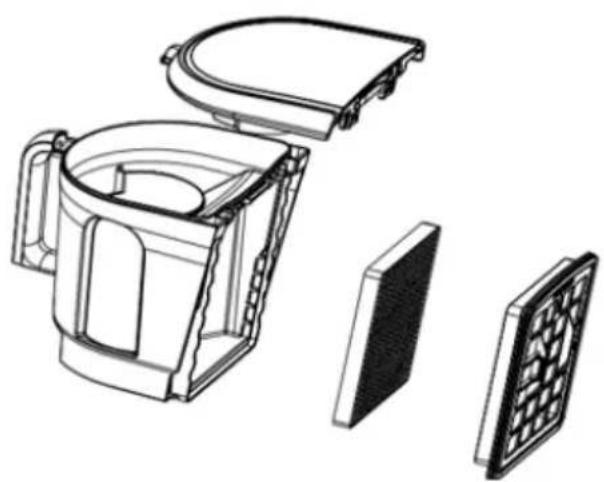
4) As in Fig.17, get the HEPA cover.
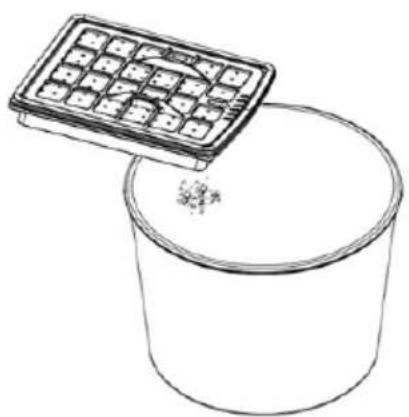
5) As in Fig.18, If you have any hair winding removable cleaning.
6) As in Fig.19, get the HEPA and wash it.
7) Wash the HEPA cover, the HEPA assembly, the outlet sponge and the dust chamber in the water without detergent and dry them before use.
8) Fix the HEPA assembly on the chamber cover and make sure three salient cubes should be stuck in the grooves of the dust chamber.
9) Rotate the HEPA assembly in the direction of the mark on the chamber cover.
10) Assemble the chamber cover assembly and the dust chamber according to the mark outside.
11) As in Fig.20, hit the filter rack with your hand slightly.
12) Put the dust chamber assembly into the machine. And in this process, first you should make the chamber in the right position and then press the handle of the dust chamber, if there is a cluck it means the operation is successful.
natural_image
Line drawing of a robotic vacuum cleaner with a red circular arrow indicating rotation (no text or symbols)Fig. 14 Fig. 15

natural_image
Line drawing of a mug with a red ribbon attached to its side (no text or symbols)Fig. 16
natural_image
Exploded view diagram of a mechanical device showing internal components and exterior view (no text or labels)Fig. 17
natural_image
Line drawing of a container with a grid-patterned lid above it, no text or symbols presentFig. 18 Fig. 19

natural_image
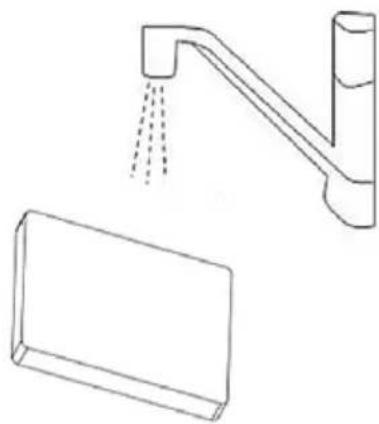
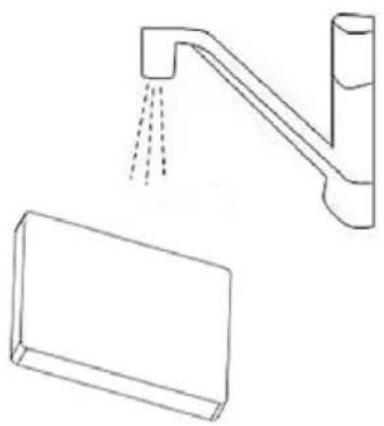
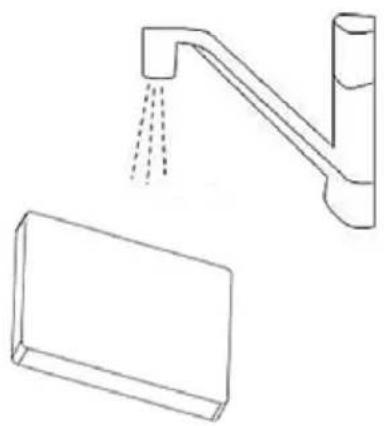
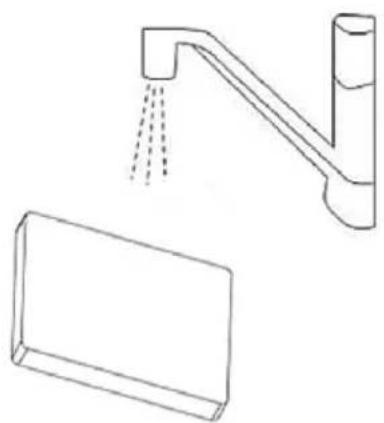
Line drawing of a faucet with liquid pouring from a rectangular basin (no text or symbols)Cleaning
Periodically, it is recommended to clean your unit thoroughly.
- Clean the dust canister interior and outside cabinet with diluted detergent, warm water and a soft cloth.
- Dry the interior and exterior with a clean soft cloth.
Storage
- Slide the tube parts into each other to reduce the tube to its shortest length.
- Switch off the appliance and remove the mains plug from the wall socket.
- Press the cord rewind button to rewind the mains cord.
- To store the appliance in upright position, insert the ridge on the nozzle into the storage slot.
- Keep and store your unit on the dry and dark place. Prevent children to play with unit.
Troubleshooting Low suction Power
| Check Solution | |
| The dust canister is full Empty the dust canister | |
| The filters may be dirty Clean or replace the filters | |
| The suction power may be set to a low setting | Set the suction power to a higher setting |
| The nozzle, tube or hose may be blocked up | To remove the obstruction, disconnect the blocked-up item and connect it (as far as possible) the other way around. Switch on the vacuum cleaner to force the air through the blocked-up item in opposite direction |
Technical specification
Motor Power (max) 800W Protection class: Class II Voltage / frequency 220-240V AC 50/60Hz Max Suction power: >160W Pressure: >16 kPa Noise: <79dB (Max)
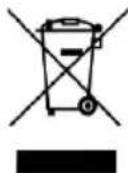
Disposal of Electrical and Electronic Equipment
To protect our environment and to recycle the raw materials used as completely as possible, the consumer is asked to return unserviceable equipment to the public collection system for electrical and electronic.
The symbol of the crossed indicates that this product must be returned to the collection point for electronic waste to feed it by recycling the best possible raw material recycling. By ensuring this product you will prevent possible negative effects on the environment and human health, which could otherwise be caused due to improper disposal of that product. The recycling of materials from this product, you will help to preserve a healthy environment and natural resources.
For detailed information about the collection of EE products contact the dealer where you purchased the product.
EU Declaraton of Conformity
This device is manufactured in accordance with the applicable European standards and in accordance with all applicable Directives and Regulations.

EU declaration of conformity can be downloaded from the following link: www.msan.hr/dokumentacijaartikala
POŠTOVANI!
Zahvaljujemo na kupnji Vivax uređaja i nadamo se da ćete biti zadovoljni odabirom. Ako u jamstvenom roku bude potreban popravak proizvoda, molimo savjetujte se sa ovlaštenim prodavačem koji Vam je proizvod prodao ili nas kontaktirajte na dolje navedene brojeve i adrese. MOLIMO VAS DA PRIJE UPORABE PROIZVODA PAŽLJIVO PROČITATE UPUTE PRILOŽENE UZ PROIZVOD!
JAMSTVENI LIST
VIVAX
HR
MODEL UREĐAJA
SERIJSKI BROJ
DATUM PRODAJE
BROJ RAČUNA PRODAVATELJA
POTPIS I PEČAT PRODAVATELJA
-
Ovim jamstvom M SAN Grupa kao davatelj jamstva u Republici Hrvatskoj jamči besplatan popravak istog u skladu s važećim propisima i u skladu s uvjetima opisanim u ovom jamstvenom listu.
Ovim jamstvom jamčimo da će predmet ovog jamstva raditi bez pogreške uzrokovane eventualnom lošom izradom ili lošim materijalom izrade. Svi, eventualno nastali, kvarovi biti će besplatno otklonjeni u ovlaštenom servisu u jamstvenom roku. -
UVJETI JAMSTVA Jamstveni rok počinje od dana kupnje proizvoda i traje 12 mjeseci, osim za Vivax Imago televizore za koje jamstvo traje 24 mjeseca.
-
U slučaju kvara na proizvodu koji je predmet ovog jamstva, obvezujemo se da ćemo isti popraviti u najkraćem mogućem roku, a najkasnije u roku od 45 dana. Ako se proizvod ne može popraviti ili se ne popravi u roku od 45 dana, biti će zamijenjen novim. Jamstvo će biti produženo za vrijeme trajanja popravka.
-
Jamstvo se priznaje samo uz račun o kupnji, te uz ovaj jamstveni list koji mora biti ispravno popunjen odnosno mora sadržavati datum prodaje, pečat i potpis prodavatelja.
5. JAMSTVO NE OBUHVAĆA
POTPIS I PEČAT PRODAVCA
- Ovom izjavom o saobraznosti proizvođač proizvoda, preko KIM TEC CG d.o.o., kao uvoznika i davaoca prava u Crnoj Gori besplatan popravak istog u skladu s vazećim propisima i u skladu s uslovima opisanim u ovoj izjavi o saobraznosti. Ovom izjavom o saobraznosti istićemo da će predmet ovog prava raditi bez greške uzrokovane eventualnom lošom izradom i lošim materijalom izrade. Svi eventualno nastali kvarovi biće besplatno otklonjeni u ovlašćenom servisu u predviđenom roku za reklamaciju.
- USLOVI REKLAMACIJE: Rok za reklamaciju počinje teći od dana kupovine proizvoda i traje 24 mjeseca.
- U slučaju kvara na proizvodu koji je predmet reklamacije, obavezujemo se da ćemo isti popraviti u najkraćem mogućem roku, a najkasnije u roku od 15 dana. Ako se proizvod ne može popraviti ili se ne popravi u roku od 15 dana, biće zamijenjen novim.
- Pravo na reklamaciju se priznaje uz fiskalni račun o kupovini, ili uz ovu izjavu o saobraznosti koji mora biti ispravno popunjen odnosno mora sadržati datum prodaje, pečat i potpis prodavca.
- Davalac izjave o saobraznosti osigurava servis i rezervne djelove 7 godina od datuma kupovine.
- PRAVO NA REKLAMACIJU NE OBUHVATA
POTPIS I PEČAT PRODAVATELJA
GARANCIJSKA IZJAVA
- Ovom garancijom garantira proizvođač proizvoda, preko KIM TEC d.o.o., kao uvoznika i davatelja garancije u Republici Bosni i Hercegovini besplatan popravak istog u skladu s važećim propisima i u skladu s uvjetima opisanim u ovom garantnom listu. Ovom garancijom garantiramo da će predmet ove garancije raditi bez greške uzrokovane eventualnom lošom izradom i lošim materijalom izrade. Svi eventualno nastali kvarovi biti će besplatno otklonjeni u ovlaštenom servisu u garantnom roku.
UVJETI GARANCIJE:
Garantni rok počinje teći od dana kupnje proizvoda i traje 12 mjeseci, osim za Vivax Imago televizore (CRT, LCD, PDP) za koje jamstvo traje 24 mjeseca
- U slučaju kvara na proizvodu koji je predmet ove garancije, obavezujemo se da ćemo isti popraviti u najkraćem mogućem roku, a najkasnije u roku od 45 dana. Ako se proizvod ne može popraviti ili se ne popravi u roku od 45 dana, biti će zamijenjen novim. Ako popravak proizvoda traje duže od 10 dana, garancija se produljužuje za vrijeme trajanja popravka.
- Garancija se priznaje samo uz račun o kupnji, te uz ovaj garantni list koji mora biti ispravno popunjen odnosno mora sadržavati datum prodaje, pečat i potpis prodavatelja.
- Davalac garancije osigurava servis i rezervne dijelove 7 godina od datuma kupnje.
GARANCIJA NE OBUHVAĆA:
Kosova Electronic Service Center
Kosova Electronic Service Center
VIVAX Air Conditioners; White Goods and Small Home appliances