Ventilato G60012 - Heating G3 Ferrari - Free user manual and instructions
Find the device manual for free Ventilato G60012 G3 Ferrari in PDF.

| Product Type | Fan heater (convection) |
| Model Number | Ventilato G60012 |
| Brand | G3 Ferrari |
| Power Supply | AC 230V ~ 50Hz |
| Maximum Power | 2000 W |
| Heating Levels | 3 (low, medium, high) |
| Thermostat | Adjustable with temperature control knob |
| Fan Mode | Yes, with separate on/off button |
| Timer | 24-hour programmable timer (model G60012 only) |
| Overheating Protection | Automatic switch-off |
| Working Light | Red indicator lamp |
| Mounting Options | Wall-mounting and standing feet |
| Wall-Mounting Distance from Ground | Minimum 40 cm |
| Wall-Mounting Distance from Ceiling | Minimum 80 cm |
| Clearance from Surrounding Objects | At least 0.5 m on all sides |
| Minimum Room Size | 4 square meters |
| Cleaning | Unplug, allow to cool, clean grills with a soft cloth; do not immerse in water |
| Safety Class | Class I (requires earthing/grounding) |
| Repairability | Contact authorized service center; use original spare parts |
| Warranty | Invalidated if tampered or used improperly |
Frequently Asked Questions - Ventilato G60012 G3 Ferrari
User questions about Ventilato G60012 G3 Ferrari
0 question about this device. Answer the ones you know or ask your own.
Ask a new question about this device
Download the instructions for your Heating in PDF format for free! Find your manual Ventilato G60012 - G3 Ferrari and take your electronic device back in hand. On this page are published all the documents necessary for the use of your device. Ventilato G60012 by G3 Ferrari.
USER MANUAL Ventilato G60012 G3 Ferrari
natural_image
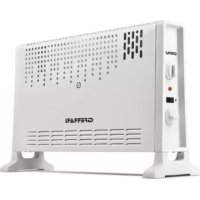
Two white electric heating cabinets with ventilation grilles and control knobs, one labeled 'GFRARI' (no additional text or symbols visible)mod. G60011
Safety instructions.... p. 9
G60011 - G60012....p. 9
Control knobs.... p. 9
Operating.... p. 10
Timer (model G60012 only).... p. 10
Standing feet.... p. 11
Wall mounting.... p. 11
Cleaning.... p. 12
Technical features.... p. 12
Waste of electric and electronic equipment (WEEE
Directive)....p. 17
DEUTCH p. 12
CLASSI DI PROTEZIONE / PROTECTION CLASSES
ATTENZIONE RISCHIO DI SCOSSE ELETTRICHE NON ESPORRE A PIOGGIA E UMIDITA'

WARNING ELECTRIC SHOCK RISK DO NOT EXPOSE TO RAIN OR MOISTURE
ATTENZIONE: NON APRITE L'APPARECCHIO. ALL'INTERNO NON VI SONO COMANDI MANIPOLABILI DALL'UTENTE NE' PARTI DI RICAMBIO. PER TUTTE LE OPERAZIONI DI SERVIZIO RIVOLGERSI AD UN CENTRO DI ASSISTENZA AUTORIZZATO.
This symbol warns the user that un-insulated dangerous voltage inside the system may cause an electrical shock. Do not open the case.
Class I Appliance symbol. This means the appliance must have the chassis connected to electrical earth/ground by an earth conductor.

Caution: this symbol reminds the user to read carefully the important operations and maintenance instructions in this owner's guide.
AVVERTENZE PER L'UTILIZZO
natural_image
Technical line drawing of a mechanical component with internal grid pattern and mounting bracket (no text or symbols)PROTEZIONE CONTRO IL SURRISCALDAMENTO
natural_image
Simple diagram of a rectangular block with a double-headed arrow indicating width (no text or symbols)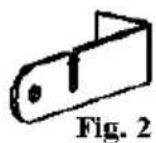

natural_image
Technical diagram showing a mechanical component with arrows indicating direction, labeled Fig. 4 (no text or symbols on the diagram itself)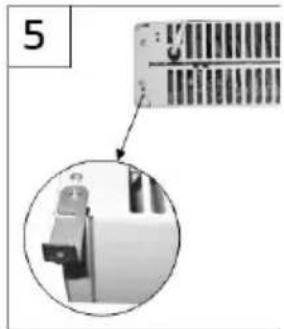
natural_image
Close-up of a mechanical component with a magnified inset showing internal structure (no text or symbols visible)ENGLISH: SAFETY INSTRUCTIONS
The following are important notes on the installation, use and maintenance; save this instruction manual for future reference; use the equipment only as specified in this guide; any other use is considered improper and dangerous; therefore, the manufacturer cannot be held responsible in the event of damages caused by improper, incorrect or unreasonable use; before use, ensure the equipment is undamaged; if in doubt, do not attempt to use it and contact the authorized service center; do not leave packing materials (i.e. plastic bags, polystyrene foam, nails, staples, etc.) within the reach of children as they are potential sources of danger; always remember that they must be separately collected; make sure that the rating information given on the technical label are compatible with those of the electricity grid; the installation must be performed according to the manufacturer's instructions considering the maximum power of the appliance as shown on the label; an incorrect installation may cause damage to people, animals or things, for which the manufacturer cannot be considered responsible thereof; do not leave the unit plugged; better to remove the plug from the mains when the device is not in use; if it is necessary to use adapters, multiple sockets or electrical extensions, use only those that comply with current safety standards; in any case do not exceed the power consumption limits indicated on the electrical adapter and / or extensions, as well as the maximum power shown on multiple adaptor; if the unit is out of order and you do not want to fix it, it must be made inoperable by cutting the power cord.
- Do not handle or touch the appliance with wet hands or bare feet.
- Do not use the appliance in the event of damage to the power cord, plug, or in case of short circuits; to repair the product only address an authorized service center.
- Do not allow the power cord to get closer to sharp objects or in contact with hot surfaces; do not pull it to disconnect the plug.
- Do not expose the appliance to harmful weather conditions such as rain, moisture, frost, etc.. Always store it in a dry place.
- This appliance can be used by children aged from 8 years and above and persons with reduced physical, sensory or mental capabilities or lack of experience and knowledge if they have been given supervision or instruction concerning use of the appliance in a safe way and understand the hazards involved; children shall not play with the appliance; cleaning and user maintenance shall not be made by children without supervision.
- Not for commercial use. Household use only
Cleaning operations should be carried out after unplugging the unit; in case of failure and / or malfunction do not tamper with the unit; to repair the appliance, always contact the service center authorized by the manufacturer and request the use of original spare parts; failure to comply with the above may compromise the unit safety and invalidate the warranty.
GENERAL INFORMATION
WARNING: This appliance includes a heating function. Surfaces, other than the functional surfaces may develop high temperatures. Since temperatures are perceived differently by different people, this device should be used with CAUTION. Hold the appliance exclusively to grip surfaces intended to hold and use such heat protection measures as heat protection Gloves or pot holders.
- This appliance is intended to be used in household and similar applications such as: staff kitchen areas in shops, offices and other working environments; by clients in hotels, motels and other residential type environments; farm houses, bed and breakfast type environments.
- Keep the appliance and its cord out of reach of children less than 8 years.
- The appliances are not intended to be operated by means of an external timer or separate remote-control system.
- Never leave the appliance unattended while it is running. Unplug after each use.
- The appliance must have the chassis connected to electrical earth/ground by an earth conductor
- To unplug the unit, do not pull the power cord.
- Do not immerse the product in water or other liquids and avoid any splashing of liquid reaching the unit. Do not subject the product to strong impacts, serious damage may result.
- Use only approved parts and compatible accessories.
- Installation must be carried out properly, both stand and wall mounting, before operating the equipment.
- Store the unit only when it is completely cold. Before carrying out any cleaning operation, disconnect plug from electrical outlet and wait for complete cooling of each part of the appliance.
- Before using, unroll the power cord.
- Do not insert anything into the ventilation slots. Do not block and leave half a meter from the surrounding objects.
- Attention: the air outlet becomes hot during use.

CAUTION: do not leave the unit unattended while it is running: switch the control knob (4) to OFF or unplug it.
- Place it on solid and stable surfaces. Leave at least half a meter on every sides of the heater.
- Keep unit away from flammable materials, curtains, clothing, paper, hot and cold spots, steam.
- Do not install on the wall on flammable materials such as wood, plastic or synthetic surfaces.
- Do not use in presence of steam or water (sink, shower, toilet ...).
- Do not use as a shelf support for objects.
- Do not cover for any reason, it may overheat.
- Do not use in rooms smaller than 4 square meters.
The product is equipped with an auto switch-off that comes into play in case of overheating. If the unit fails during use, check out the ventilation slots are not blocked, unplug the equipment and allow to cool for 15 minutes before operating.
DESCRIPTION G60011 - G60012
1 Heating slots
2 Handle
3 Temperature control knob
4 Function control knob
5 24 hours timer(mod. G60012 only)
6 Feet
7 Fan power-on button
8 Air outlet grid
9 Main body
CONTROL KNOBS
Turn the temperature control knob (3) clockwise to increase the temperature to be reached before shutting down the heater. The function selection control knob (4) has the following modes:
- "O" means the unit is off
- "I" low power
- "II" medium power
- "III" high heating power
OPERATING
Install the appliance as described in the General and Safety Information paragraphs.
If you are using the product G60012, temporarily disable the timer (5) switching the red button in position "I". Turn the function control knob (4) to the desired position. At first use, the appliance may emit some smoke or strange smell; this is normal and it finishes after a few minutes of use. Turn the temperature control knob (3) clockwise until it stops. At this point, the heater turns on.
TEMPERATURE SETTING
Operate the unit by switching the temperature control knob (3) to the highest position until the desired temperature in the room is reached. Turn the temperature control knob (3) counterclockwise until you turn off the product, then it will turn on periodically to maintain the temperature.
FAN MODE
To obtain a more efficient heating, the product is equipped with an internal fan (8) that can spread heat in the room faster. To operate, switch on the fan power button (7).

natural_image
Technical line drawing of a circular mechanical component with internal grid pattern and mounting holes (no text or symbols)OVERHEATING PROTECTION DEVICE
If you cover the device or there is a malfunction, the product may overheat. A safety device will shut down the unit to prevent overheating. Remove anything blocking the ventilation slots and wait for the complete cooling of the unit, then the appliance works normally.
WORKING LIGHT
The unit is equipped with a red working lamp which lights on when the appliance is running.
TIMER (available for mod. G60012)
24 hours timer (5) is available for the model G60012 only.
The lever for setting the timer (5) is the red one indicated in the figure as "SWITCH".
Move the lever to position "0" to turn off the product.
Move lever to position "1" to operate the product without timer.
Move the lever to the "⑦" position to activate the timer mode.
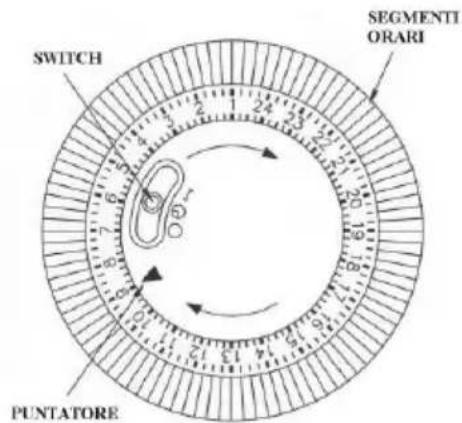
Once you set the desired temperature by adjusting the thermostat (refer to the "SETTING TEMPERATURE" paragraph), use the lever (5) to determine the hours of the day when you want to turn on the heater.
1) Align the pointer drawn black on the timer dial with the current time.
2) Set the hours of the day when you want the unit remains off, leading towards the center of the dial the blue seats corresponding to the hours.
3) Turn on the timer by switching the power button to"①".
4) Every time you disconnect the unit, black arrow must be placed back on the current time.
EXAMPLE
The fan heater will start running when:
- The fan heater is connected to the power outlet.
- The thermostat (control knob 3) is set to a higher temperature than the room one.
- The function selection knob (4) is in position "I", "II" or "III".
- The lever of the timer is in “☐” position and the pointer is over an hour marks for which the corresponding blue switch is in the out position.
STANDING FEET
If you wish to place the fan heater on the ground, you must mount the supporting stands: Align the standing feet with the holes on the bottom of the housing (9) and secure them with the screws.
WALL MOUNTING

Unplug the unit and wait for the complete cooling of each part before starting the wall mounting procedure.
The mounting and wall installation must be done by following a few precautions.
- The product should be placed at a minimum distance of 40 cm from the ground and from the side walls.
- The product should be placed at a minimum distance of 80 cm from the ceiling.
- Do not mount on walls subject to vibration.
- Do not install the foot stand
The wall mounting kit includes: 4 wall plugs, 4 screws, 4 mounting brackets.
Once you have chosen the position where you want to place the unit, follow the steps below:
natural_image
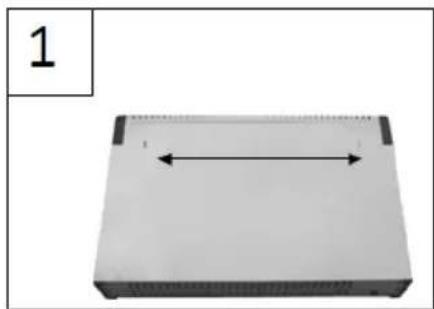
Exterior view of a rectangular electronic device with a central horizontal double-headed arrow (no text or symbols)- Measure the distance between the two slots in the back of appliance, fig. 1, and mark on the wall correspondent positions.
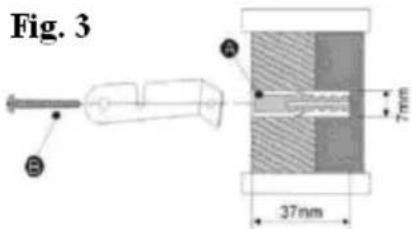
- Make holes (7mm) by drilling the wall at the height of the marks and insert the wall plugs.
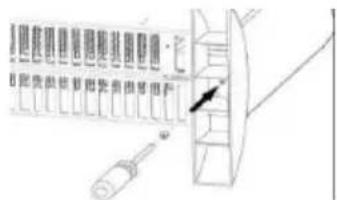
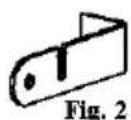
- Support brackets (fig. 2) to the wall so as to correspond the hole located on the short side of the
bracket with the plugs. Screw the tabs to the wall (fig.3).
natural_image
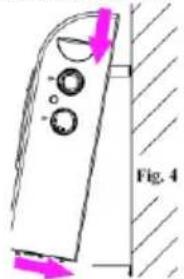
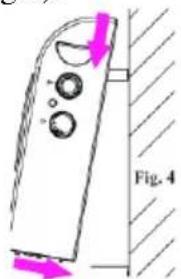
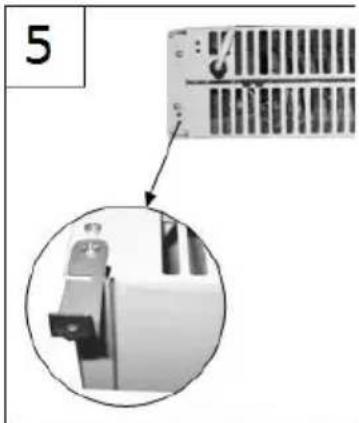
Diagram of a device with directional arrows indicating movement, labeled Fig. 4 (no text or symbols on the device itself)- Mount the other 2 brackets to the holes in the bottom of convector (one on left side and one on right side), as shown in fig 5.
- Take the fan heater to place it on the wall: to this end, put the two upper brackets into the holes in the back of the product, and then place the base of the appliance on the lower tabs, as shown in figure 4.
- Mark the wall inn correspondence of the holes of the bottom brackets, remove the convectore and make two holes in the wall. Insert plug in the holes.
- Mount convector to the wall again and fix the 2 lower brackets to the wall with the screws.
natural_image
Close-up of a mechanical component with a magnified inset showing a bracket detail (no text or symbols visible)CLEANING

Unplug the appliance from the electrical power outlet and wait for the complete cooling of each part of the unit before starting any cleaning operation.
Do not immerse in water. In any case prevent any splashes of water or other liquids reaching the appliance. Regularly clean the heater grid (1) and the air outlet grill (8) to prevent dirt from obstructing the airflow. Do not clean with sponges or abrasive detergents.
TECHNICAL FEATURES
• Power supply: AC 230V\~50Hz. 2000W power max.
- Adjustable thermostat - Working light
• 3 heating levels - Fan option
• 24 hours timer (only for model G60012)
• Automatic switch-off device against overheating
• Wall-mounting - Stand feet
DEUTSCH: HINWEISE
natural_image
Technical line drawing of a mechanical component with internal grid pattern and mounting bracket (no text or symbols)WANDMONTAGE

natural_image
Simple diagram of a rectangular object with a double-headed arrow indicating horizontal dimension (no text or symbols)natural_image
Close-up of a mechanical component with a magnified inset showing a close-up view (no text or symbols visible)natural_image
Symbol of a trash bin with crossed lines and a solid black rectangle below (no text or labels)WASTE OF ELECTRIC AND ELECTRONIC EQUIPMENT
The product is made of non-biodegradable and potentially polluting substances if not properly disposed of; other parts can be recycled. It’s our duty to contribute to the ecological health of the environment following the correct procedures for disposal. The crossed out wheelie bin symbol indicates the product complies with the requirements of the new directives introduced to protect the environment (2002/96/EC, 2003/108/EC, 2002/95/EC) and must be properly disposed at the end of its lifetime. If you need further information, ask for the dedicated waste disposal areas at your place of residence. Who does not dispose of the product as specified in this section shall be liable according to the law.
ENTSORGUNG VON ELEKTRO- UND ELEKTRONIKALTGERÄTEN
To find the nearest service center, please call the telephone number 0541 694246, fax number 0541 756430 or contact us at assistenzatecnica@trevidea.it asking for the service centers supervisor.