
IAN 89364 - Uncategorized Livarno Lux - Free user manual and instructions
Find the device manual for free IAN 89364 Livarno Lux in PDF.


| Product Type | Energy-saving Ceiling Light |
| Brand | Livarno Lux |
| Model Number | IAN 89364 |
| Dimensions (L x W x H) | Approx. 62 x 12 x 4.8 cm |
| Operating Voltage | 230–240 V~, 50 Hz |
| Maximum Power | 2 x 18 W |
| Bulb Type | T8, 220–240 V, 18 W |
| Protection Class | Class I / IP20 (indoor only) |
| Intended Use | Indoor, dry and enclosed spaces, normal flammability ceilings |
| Installation | Ceiling mounting with dowels and screws (included); electrical connection by qualified electrician |
| Bulb Replacement | Remove metal cover, twist bulb 1/4 turn, replace with same type |
| Dimmer Compatibility | Not compatible with dimmers or electronic switches |
| Minimum Distance to Illuminated Material | At least 0.5 m |
| Cleaning | Disconnect power, allow to cool, wipe with dry lint-free cloth; no water or solvents |
| Safety Features | Protective earth connection, overheat protection via distance requirement |
| Spare Parts | Bulbs: T8 18W (available separately); metal cover and terminal block integrated |
| Warranty | 3 years from purchase date, covers material and manufacturing defects |
| Disposal | Separate collection for electrical/electronic equipment (WEEE); do not dispose with household waste |
Frequently Asked Questions - IAN 89364 Livarno Lux
User questions about IAN 89364 Livarno Lux
0 question about this device. Answer the ones you know or ask your own.
Ask a new question about this device
Download the instructions for your Uncategorized in PDF format for free! Find your manual IAN 89364 - Livarno Lux and take your electronic device back in hand. On this page are published all the documents necessary for the use of your device. IAN 89364 by Livarno Lux.
USER MANUAL IAN 89364 Livarno Lux
ENERGY-SAVING CEILING LIGHT
GB IE
ENERGY-SAVING CEILING LIGHT
Assembly and safety advice
SE
ENERGISPARANDETAKLAMPA
Before reading, unfold the page containing the illustrations and familiarise yourself with all functions of the device.
FI
GB / IE Assembly and safety advice Page 5
B
Introduction
Proper use....Page 6
Description of parts and features....Page 6
Technical data....Page 6
Scope of delivery....Page 6
Safety
Safety advice......Page 6
Preparation
Required tools and materials......Page 7
Before installation Page 8
Preparations for use
Mounting the light....Page 8
Replacing a bulb....Page 8
Maintenance and Cleaning......Page 9
Disposal Page 9
Warranty and Service
Warranty Declaration......Page 9
Service address....Page 9
Declaration of conformity....Page 9
Manufacturer....Page 9
Energy-saving Ceiling Light
●Introduction

We congratulate you on the purchase of your new device. You have chosen a high quality product. Please read carefully and completely through these operating instructions. Fold out the page with the illustrations. These instructions are part of the product and contain important information about bringing the product into use and its handling. Always observe all the safety advice. Check that the correct mains voltage is available and that all the parts have been properly assembled before bringing into use. Should you have any questions or be uncertain as to how to operate the device, please get in touch with your dealer or service point. Please keep these instructions in a safe place and hand them on to a third party if necessary.
Properuse
This light is suitable only for interior use, in dry and enclosed spaces. The lamp can be attached to all surfaces officially classified as being of "normal flammability". This device is intended for use only in a domestic, private household environment.
• Description of parts and features
1 Bulb
2 Catch
3 Mains connection cable (external)
4 Terminalblock
5 Lightbase
6 Notch
7 Metalcover
8 Mountingopening
9 Opening for mains connection cable
●Technicaldata
ArticleNo.:6460-186L
Dimensions: approx. 62 x 12 x 4.8 cm
$$ (L \times W \times H) $$
Operating voltage: 230V-240V\~, 50Hz
Bulbs: 220-240V, 18W, T8
Max. nominal output: 2 x 18 W
Protectionclass: 1/ ⊥
Protection class: IP20 (only suitable for indoor use)
- Scope of delivery
1 Ceiling light, model 6460-186L
2 Bulbs 18 W, T8
2Dowels
2Screws
1 Operating instructions
●Safety

Safety advice
Damages due to failure to follow these instructions for use will void the product warranty! We assume no liability for secondary failures! We assume no liability for property or personal damages due to improper handling or failure to observe safety instructions!

Avoid danger to life from electric shock
■ Ensure that a qualified electrician or a person trained to carry out electrical installations performs the electrical installation.
- Check the lamp and the mains lead for damage each time before connecting them. Never use your lamp if you discover that it is damaged in any way.

CAUTION! A damaged mains lead presents a serious danger to life from electric shock. In the event of damage, repairs or other problems with the lamp, please contact the Service Centre or an electrician.
Before installation, remove the fuse for this circuit or switch off the circuit breaker (0 setting) in the fuse box.
Before assembly, ensure that the mains voltage available corresponds to the operating voltage necessary of the light (230-240 V \~).
■ Never let the lamp come into contact with water or other liquids.
■ Never open or insert anything into electrical fittings or equipment. This may result in the danger of death from electric shock.
- Do not attach the light to damp or conductive substrates.

Avoid fire hazards and risk of injury
RISK OF INJURY! Check every bulb for damage immediately upon unpacking. Do not install the light if the bulbs are defective. If they are, contact the service point for a replacement.
RISK OF INJURY FROM BURNS! Ensure the lamp has been switched off and allowed to cool before you touch it. Light bulbs develop a great deal of heat.
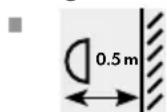
FIRE HAZARD! Fit the light so that it is at least 0.5 m away from the material illuminated. Fire can result development of too much heat.
- Replace any faulty bulbs with new ones immediately. Before replacing the bulb, always remove the fuse or switch the automatic cutout off.
Do not allow the lamp or the packaging materials to lie around unattended. Plastic film or bags, Styrofoam etc. can turn into dangerous toys for children.
Do not use this light for dimmers or electronic switches. It is not suitable for this mode of operation.

Working safely
Only use 220–240 V \~ bulbs with a maximum output of 18 Watt.
- Install the lamp so that it is protected from moisture, wind and dirt.
■ Make careful preparations for the assembly and take sufficient time. Clearly lay out all components and any additional tools or materials that might be required so that they are readily to hand.
- Install the lamp on stable surfaces only (e.g. masonry). Check before mounting the light to the ceiling whether the ceiling is suitable for supporting the light. If necessary seek advice from your local DIY supplier or a construction specialist.
- Examine the ceiling before installation and choose suitable installation fixings. For ceiling installation we have supplied fixings suitable for ordinary solid concrete or masonry construction.
■ Remain alert at all times and always watch what you are doing. Always pay attention to what you are doing and act with common sense. Always proceed with caution and do not assemble the lamp if you cannot concentrate or feel unwell.
●Preparation
- Required tools and materials
The tools and materials referred to are not included in delivery. The details and values given are non-binding and for guidance only. The condition of the material is determined by the individual local conditions.
- Pencil / marking tool
- Voltage tester
- Crosshead screwdriver
- Electric drill
-Drill - Edge cutter
- Ladder
●Beforeinstallation
Important: The electrical connection must be carried out by a qualified electrician or someone trained to perform electrical installations. This person must be familiar with the properties of the light and all connection regulations.
☐ Familiarise yourself with all instructions and diagrams in this manual as well as with the light before installation.
Before installation, ensure that the cable that the light is to be attached to is not live. To do this, remove the fuse or switch off the circuit breaker in the fuse box (0 position).
☐ Use the voltage tester to check that there is no voltage.
● Preparations for use
- Mounting the light
Note: you will need a drill for installation.
⚠️ CAUTION! RISK OF INJURY! Refer to your drill's operating instructions.
☐ Remove both bulbs 1. Remove the respective light bulb 1 by turning it a 14 turn and pulling it out of the socket. Use a clean, lint-free cloth when you are replacing a bulb.
☐ Remove the metal cover 7, releasing it by pressing it lightly out of the fastening.
Note: release the metal covercarefully as this is connected with the protective earth cable of the light by means of a screw.
☐ Hold the light on the required position on the ceiling.
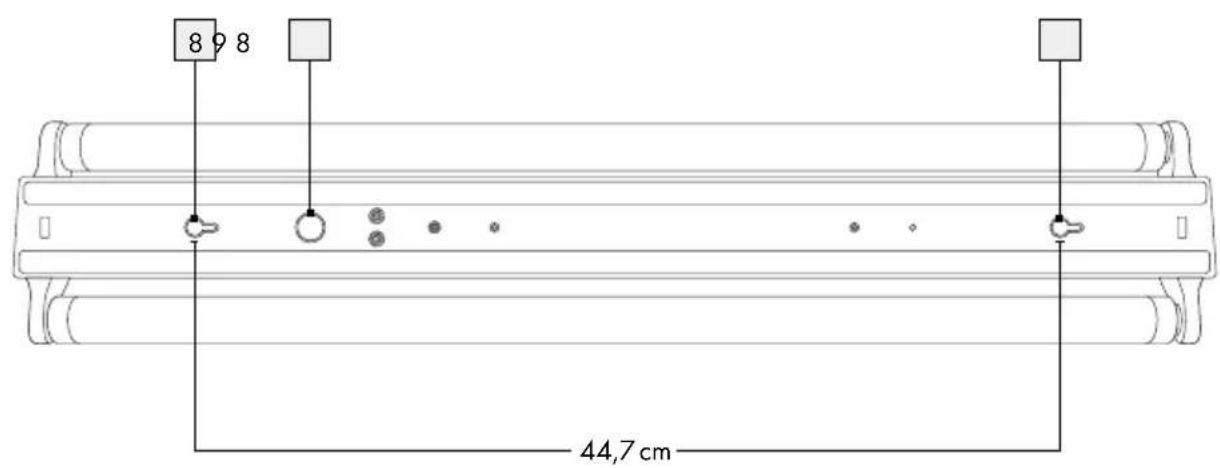
☐ Mark the drill holes for the installation openings 8 (see fig. B).
Drill the holes ( approx. 6 mm, depth approx. 40 mm). Make sure that no electrical wiring is damaged during this operation.
☐ Insert the dowels in the drilled holes. Use a hammer if necessary.
☐ Insert the supplied screws into the dowels and let them project a distance of about 2.0 mm from the ceiling or mounting surface.
Route the mains connection cable (external) 3 through the designed opening 9.
☐ Insert the screws into the relevant mounting openings 8 of the light and align the light by pushing it to the left or to the right. Finally tighten the screws.
☐ Now connect the connection cable of the light to the mains connection cable (external) 3 by means of the terminal block 4 provided.
Note: Ensure that each wire of the mains connection cable (external) is properly connected in the correct place: live wire, black or brown = symbol L, neutral wire, blue = symbol N, protective earth wire, green-yellow = symbol ⊙.
☐ Replace the metal cover 7 by lightly pressing on the light base 5. Ensure that the notches 6 of the metal cover 7 lock into place in the catches 2 of the light base 5. Check for correct fitting.
☐ Insert the two bulbs 1 once again. Insert each bulb 1 into the socket and tighten it with a 14 turn. Check for correct fitting.
☐ Reinsert the fuse or switch the circuit breaker back on.
Your light is now ready for operation.
- Replacing a bulb
CAUTION! RISK OF ELECTRIC SHOCK!
To replace the bulb, first of all disconnect the light from the mains circuit. To do this, remove the fuse or switch off the circuit breaker in the fuse box (0 position).
⚠️ CAUTION! RISK OF BURNS! Allow the lamp to cool down completely.
☐ Replace the bulb 1 only after it has fully cooled. Use a clean, fluff-free cloth when you are replacing a bulb.
☐ Remove the bulb 1 by turning it a 14 turn and pulling it out of the socket.
☐ insert the new bulb 1 into the socket and tighten it with a 14 turn. Check for correct fitting.
● Maintenance and Cleaning
CAUTION! RISK OF ELECTRIC SHOCK!
To clean the light, first of all disconnect it from the mains circuit. To do this, remove the fuse or switch off the circuit breaker in the fuse box (0 position).
⚠️ CAUTION! RISK OF BURNS! Allow the lamp to cool down completely.
CAUTION! RISK OF ELECTRIC SHOCK!
For electrical safety reasons, never clean the light with water or other fluids nor immerse it in water. Only use a dry, lint-free cloth for cleaning.
- Do not use solvents, petrol etc. Otherwise the light will be damaged.
●Disposal
The packaging and ancillary packing consist entirely of environmentally friendly materials. They can be disposed of at your local recycling facility.
The symbol of the wheelie bin with the line through it means that, in the European Union, the product has to be disposed of in a separate refuse collection. This applies to the product and to all components bearing this symbol. Products marked in this way may not be disposed of along with normal domestic waste but have to be handed in at a recycling collection point for electrical and electronic appliances. Recycling helps the reduce the consumption of raw materials and protects the environment.
● Warranty and Service
●WarrantyDeclaration
This product has a 3-year warranty from the date of purchase; the warranty is only valid for the original purchaser and is not transferable. Please keep your receipt as proof of purchase. The warranty applies to material or manufacturing defects only. It does not cover wear parts or damage caused by improper use. The guarantee lapses in cases of unauthorized
tampering. Your statutory rights are not restricted in any way by this warranty. Please contact the service centre by telephone. In the event of any claims under the warranty. This is the only way to ensure that your instrument can be returned free of charge.
●Serviceaddress
Please have your receipt and the product number (e.g. IAN 12345) available for all queries as proof of purchase.
- Declaration of conformity CE
This product conforms to the requirements of the applicable European and national directives (Electromagnetic Compatibility 2004/108/EC, Low Voltage Directive 2006/95/EC, ecodesign directive 2009/125/EC, RoHS directive 2011/65/EU). Conformity has been demonstrated. The relevant declarations and documents are held by the manufacturer.
Manufacturer
- ENERGY-SAVING CEILING LIGHT
- ENERGISPARANDETAKLAMPA
- Introduction
- Safety
- Preparation
- Preparations for use
- Warranty and Service
- ●Introduction
- Properuse
- • Description of parts and features
- ●Technicaldata
- - Scope of delivery
- ●Safety
- Safety advice
- Avoid danger to life from electric shock
- Avoid fire hazards and risk of injury
- Working safely
- ●Preparation
- - Required tools and materials
- ●Beforeinstallation
- ● Preparations for use
- - Mounting the light
- - Replacing a bulb
- CAUTION! RISK OF ELECTRIC SHOCK!
- ● Maintenance and Cleaning
- ●Disposal
- ● Warranty and Service
- ●WarrantyDeclaration
- ●Serviceaddress
- - Declaration of conformity CE
- Manufacturer
Brand : Livarno Lux
Model : IAN 89364
Category : Uncategorized