
SET80101IND2 - Kitchen appliance KKT Kolbe - Free user manual and instructions
Find the device manual for free SET80101IND2 KKT Kolbe in PDF.


| Product Type | Kitchen Appliance |
| Model | SET80101IND2 |
| Brand | KKT Kolbe |
| Dimensions (W x D x H) | Approx. 400 x 300 x 200 mm |
| Weight | Approx. 3.5 kg |
| Power Supply | 220-240 V, 50/60 Hz |
| Power Consumption | 1200 W |
| Main Functions | Mixing, chopping, blending, whisking |
| Speed Settings | Variable speed with pulse function |
| Capacity | 1.5 L bowl |
| Material | Stainless steel blades, plastic body |
| Dishwasher Safe Parts | Bowl, lid, blades (top rack recommended) |
| Cleaning Instructions | Wipe motor unit with damp cloth; wash removable parts in warm soapy water |
| Safety Features | Overheat protection, non-slip feet, safety lock lid |
| Spare Parts Available | Bowl, blades, lid, sealing ring |
| Repairability | Modular design; spare parts easily replaceable |
| Certifications | CE, RoHS |
| Warranty | 2 years |
Frequently Asked Questions - SET80101IND2 KKT Kolbe
User questions about SET80101IND2 KKT Kolbe
0 question about this device. Answer the ones you know or ask your own.
Ask a new question about this device
Download the instructions for your Kitchen appliance in PDF format for free! Find your manual SET80101IND2 - KKT Kolbe and take your electronic device back in hand. On this page are published all the documents necessary for the use of your device. SET80101IND2 by KKT Kolbe.
USER MANUAL SET80101IND2 KKT Kolbe
User's manual → English language
natural_image
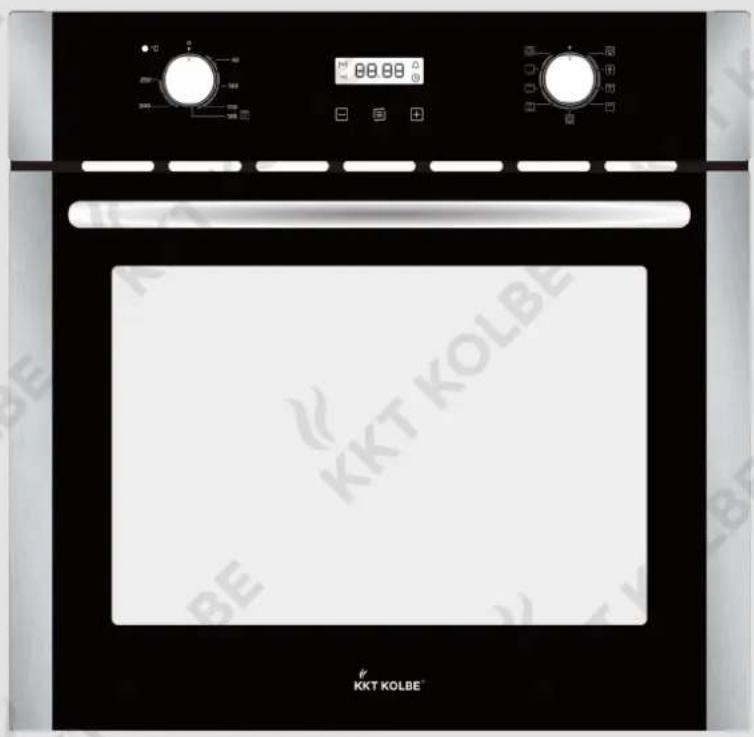
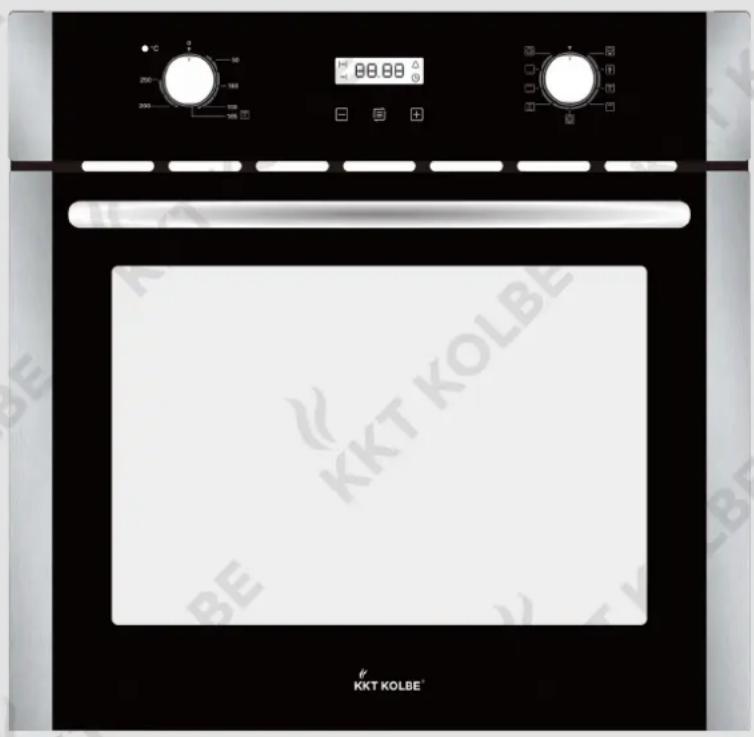
Front view of a KKT KOLBE oven with digital display and control knobs (no text or symbols on main body)
natural_image
Pure wire mesh diagram of a rectangular frame with vertical slats (no text or symbols)Gitterrost
- Grillgerichte
- Kuchenform
- Bratform
natural_image
Pure technical line drawing of a mechanical component without any text, numbers, or symbols
Grill-/Bratsystem
natural_image
Symmetrical abstract line drawing with no text or symbols
Großflächengrill
natural_image
Diagram of a device with a circular dial and directional arrows, no text or symbols present
Pizzastufe
natural_image
Pure mechanical diagram showing symmetrical components with no text or symbols
Umluft
natural_image
Pure diagram of a vehicle wheel with directional arrows indicating flow or movement (no text or symbols)
Ober-/ Unterhitze
natural_image
Diagram of a washing machine with fan and belt, showing directional arrows (no text or symbols)
Heißluft
natural_image
Pure mechanical component diagram without any text, numbers, or symbolsBraten
natural_image
Mechanical assembly diagram showing a belt drive mechanism with a black arrow indicating motion (no text or symbols present)1.2
2.2
natural_image
Technical line drawing of a mechanical assembly with horizontal bars and a central rod (no text or symbols)natural_image
Diagram of a ladder structure with horizontal bars and a downward arrow indicating force or direction (no text or symbols)3.2
natural_image
Diagram of a multi-tiered horizontal ladder structure with an arrow indicating rotation (no text or symbols)3.3
natural_image
Diagram of a ladder structure with directional arrows indicating force or movement (no text or symbols)natural_image
Simple line drawing of a container with a curved arrow indicating rotation (no text or symbols)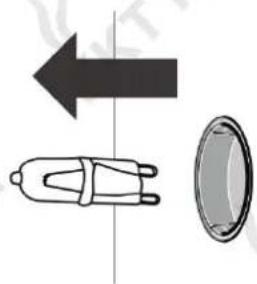
natural_image
Diagram showing a device with an arrow pointing left and a circular component on the right (no text or symbols)Stromanschluss

natural_image
Technical line drawing of three structural components with supporting beams and supports (no text or symbols)Inbetriebnahme
User's manual
for your built-in electric oven
Model: EB8010ED
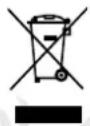
This symbol on the product or its packaging indicates that this product must not be treated as normal household waste, but must be disposed of at a collection point for the recycling of electrical and electronic equipment. (European Directive 2012/19/EU on Waste Electrical and Electronic Equipment (WEEE)).
The environment and health are endangered by incorrect disposal. By ensuring that the appliance is disposed of properly, you help to avoid possible hazards.
For more information about the treatment, recovering and recycling of this product, contact your local council, your waste disposal company or the seller.
Please also dispose of all packaging material with due consideration for the environment.
The packaging of this product is made for protecting your new appliance against damages during transport.
The materials used are selected carefully and should be recycled.
Recycling reduces the use of raw materials and waste.

This icon indicates a hazardous situation.
You will find it in particular in all descriptions of the steps that can pose a danger to persons.
Observe these safety instructions and behave accordingly cautiously. Pass these warnings on to other users as well.

This icon indicates a warning.
You will find it in the description of the work steps which must be particularly observed so that damage to the appliance can be prevented. Also pass on these safety instructions to all appliance users.

This icon indicates an information.
This symbol indicates useful tips and calls attention to proper procedure and behavior.
The observance of the notes mar led with this icon may save you many problems.

Warning
- When the oven is first switched on, it may give off an unpleasant smell. This is due to the bonding agent used for the insulating panels within the oven. This is completely normal, if it does occur, you merely have wait for the smell to clear before putting food into the oven.
- The appliance and its accessible parts become hot during use.
- Care should be taken to avoid touching heating elements.
- Some parts of the appliance may keep its heat for a long time. Before touching any area directly exposed to heat, allow the unit to cool.
- Children less than 8 years of age shall be kept away unless continuously supervised.
- This appliance can be used by children aged from 8 years and above and persons with reduced physical, sensory or mental capabilities or lack of experience and knowledge if they have been given supervision or instruction concerning use of the appliance in a safe way and understand the hazards involved. Children shall not play with the appliance. Cleaning and user maintenance shall not be made by children without supervision.
-
A steam cleaner is not to be used.
-
The appliance must be installed by an authorized technician and put into use. The producer is not responsible for any damage that might be caused by defective placement, and installation by unauthorized personnel.
- The means for disconnection must be incorporated in the fixed wiring in accordance with the wiring specifications.
- If the supply cord is damaged, it must be replaced by qualified persons in order to avoid a hazard.
- Ensure that the appliance is switched off before replacing the oven lamp to avoid the possibility of electric shock.
- If you will not use the appliance for a long time, it is recommended to plug if off.

- The appliance is intended for installation in a built-in cabinet. It is to be used exclusively for the preparation of household food and is not suitable for unattended operation.
- Do not use harsh abrasive cleaners or sharp metal scrapers to clean the glass of the oven. This can scratch the surface and may result in permanent damage to the glass.
- The oven door should not be opened often during the cooking period.
-
When the oven door is open do not leave anything on it, you may unbalance your appliance or break the door.
-
Do not place aluminium foil, baking trays, pans or pots on the bottom of the oven. During operation, the base can be damaged by the heat build-up.
- Fruit juices dripping from the baking tray may leave stains on the enamel which cannot be removed. To avoid this, insert a baking tray at the bottom.
Dear customer,
thank you for the trust placed in us and for the purchase of this KKT KOLBE device. Your new appliance is designed for the requirements in your household.
Please read this user's and instruction manual carefully, which describes the capabilities and operation of your KKT KOLBE-mounted device.
This manual is adapted to different types of devices, so it is possible that you can find some descriptions of functions that does not contain your device.
For damage to persons or objects caused by faulty or improper installation of the device, the manufacturer accepts no liability.
The manufacturer reserves the right to make any necessary modifications to the model types of devices that are used for ease of use and protect the user and the device and correspond to a current technical standards.
Your KKT KOLBE team
Please note that we are constantly updating our manuals.
If you see any discrepancies: You can always find the most recent version of your user manual on our support or product page on www.kolbe.de.
Due to continuous development, we reserve the right to make technical changes including errors or other aberrations without notice.
This is particularly true for measurements and cut-out dimensions respectively.

User's manual
Model EB8010ED
Version 3.2
© KKT KOLBE.
KKT KOLBE is a registered trade mark.
Appliance parts and operation 26
- Oven components and description
- Accessories
- Control panel
- Energy saving tips
- Types of heating / programs / onven functions
Application 30
- Roasting
- Grilling & browning
- Baking
- Boiling down
- Defrost
- Application tables
Programming 32
- Setting the clock
- Setting the timer / alarm
- Setting the cooking time (duration)
- Setting the end of cooking time
- Setting the automatic programmer
Care and cleaning 33
- Case front
- Oven interior
- SteamClean method
- Removing the oven door
- Removing the telescopic runners
- Removing the slide-in racks
- Changing the oven light bulb
Installation and connection of the appliance 36
- Power connection
- Dimension drawing
• Installing the appliance - Starting up the appliance
What to do in case of problems? 37
Technical details / Declaration of conformity 38
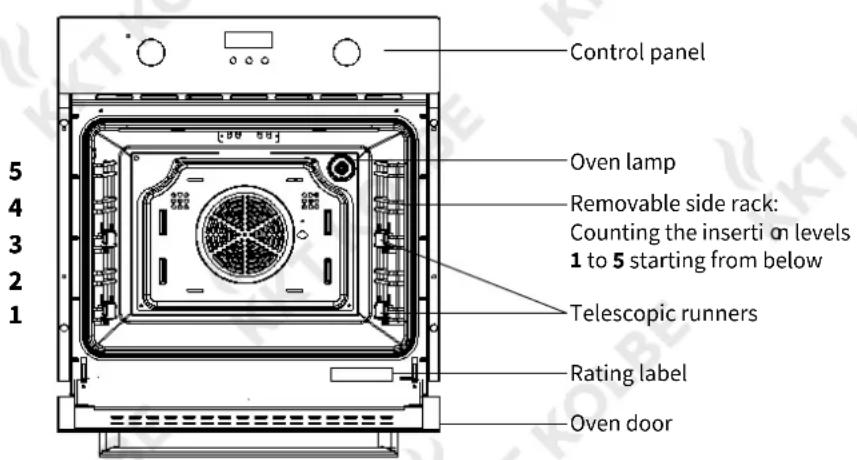
Oven components

Case cooling
The case cooling ensures low temperatures on control panel, knob and oven door handle while the oven is in operation.
The case cooling is turned on when a heating mode is set. The air exits between the oven door and control panel.
Telescopic runners
The oven has slide-in racks with telescopic runners on 2 levels.
- To insert the grate, baking tray or other accessories, first pull out the telescopic runners on one level (on both sides).
- Place the grate / baking tray / accessory on the pulled out rails and push them into the oven by hand up to the stop.
- Do not close the oven door unt lithe telescopic slides are fully inserted.
Accessories
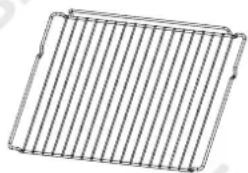
natural_image
Pure wireframe diagram of a rectangular grid structure without any text, numbers, or symbolsGrating
• Gril \$
- Cake mold
- Gridd
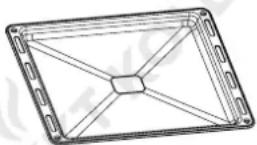
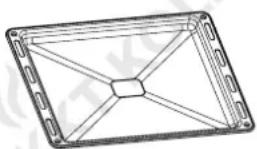
Universal baking trays (Scope of delivery 2 pcs)
- Big cakes
- Biscuits
- Frozen foods
• Fat/juice collection pan
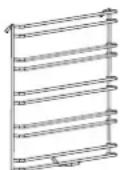
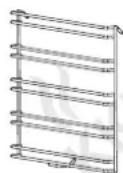
Slide-in racks
• These can be easily removed for cleaning.

Note:
In order to ensure the safe use of grate and tray, it is necessary to insert them the right way round (with the anti-tipper bracket at the rear). This prevents the food from slipping forwards when removed carefully.
Before closing the oven door, make sure that all accessories are correctly positioned and do not touch the oven door.

Oven components and accessories become hot during operation. Use potholders or similar to avoid burns!
Control panel
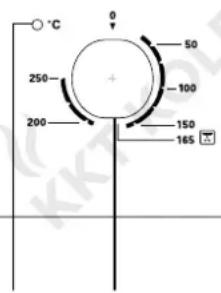
123 567
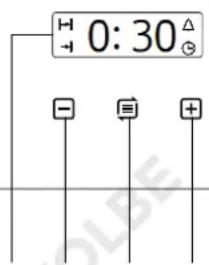
4
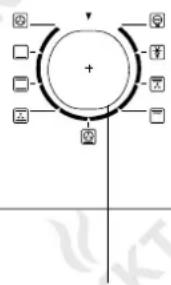
flowchart
graph TD
    A["+"] --> B[" "]
    B --> C[" "]
    C --> D[" "]
    D --> E[" "]
    E --> F[" "]
    F --> G[" "]
    G --> H[" "]
    H --> I[" "]
    I --> J[" "]
    J --> K[" "]
    K --> L[" "]
    L --> M[" "]
    M --> N[" "]
    N --> O[" "]
    O --> P[" "]
    P --> Q[" "]
    Q --> R[" "]
    R --> S[" "]
    S --> T[" "]
    T --> U[" "]
    U --> V[" "]
    V --> W[" "]
    W --> X[" "]
1 Indicator light (lights up during the entire cooking process)
2 Temperature setting knob
3 Main display screen
4 Decrease button
5 Menue button for timer / clock / start / cancel
6 Increase button
7 Function setting knob

Note:
During the circulation of hot air slight sounds or vibrations made by the fan may occur according to the duration of use and heat development. This is normal.

Energy saving tips
- To avoid heat loss, make sure that the oven door is always completely closed during operation and do not open it more often than necessary.
- If possible, use dark black finished or silicone-coated enamelled tins, because they absorb the oven heat particularly well.
- Only preheat the oven if this is specified in the recipe or in the tables.
- When heating up the empty oven, much energy is needed. It can therefore be saved by baking several dishes one after the other energy because the residual heat is used optimally.
- Switch off the oven about 10 minutes before the end of longer baking times to use the residual heat to finish ooking.
- Turn off the power completely when not in use.
• Always keep the oven interior clean.
Types of heating / programs / oven functions

Oven light
This enables the user to observe the progress of cooking without opening the door, but the setting function knob must be operated to turn on the lamp.

Defrost
At room temperature, air circulation can quickly thaw frozen food (without any heat). This is an easy control and fast way to speed up defrosting time and thawing process for ready-made vegetables and butter-filled foods.
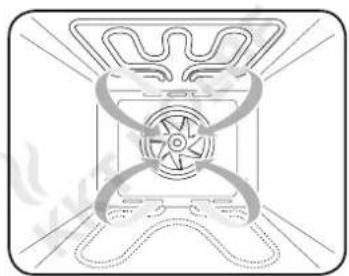
natural_image
Pure technical line drawing of a mechanical component with no text or symbols
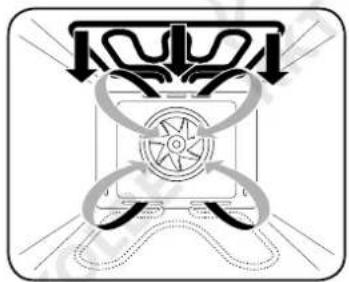
Grilling/Roasting system
The inner heating element and the outer heating element in the top of the oven work with fan.
The temperature can be set in the range of 50^ C to 250^ C. The ideal temperature for this type of heating is 165^ C.
Suitable for grilling large amounts of meat.
natural_image
Pure mechanical component diagram without any text, numbers, or symbols
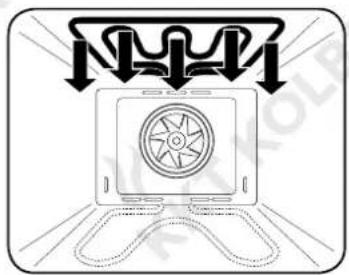
Double grill
The inner heating element and the outer heating element in the top of the oven are working.
The temperature can be set in the range of 50^ C to 250^ C. The ideal temperature for this type of heating is 165^ C.
Suitable for grilling larger quantities.
natural_image
Diagram of a device with a circular dial and directional arrows, no text or symbols present
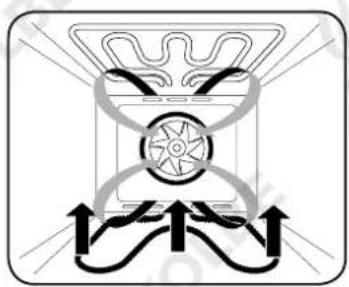
Pizza function
The rear hot air heating element and the lower heating element work at the same time. Rapid heating. The temperature can be set in the range of 50^ C to 250^ C.
Suitable for recipes moist topping and crispy dough, such as pizza, quiche, fruit and cheesecake.
Before you start baking, you should leave the oven preheat.
natural_image
Pure mechanical diagram showing symmetrical components with no text or symbols
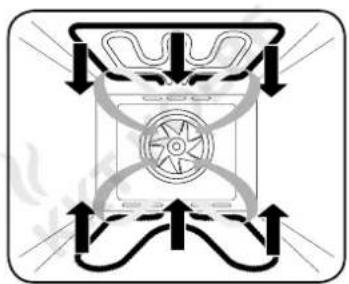
Fan cooking with bottom and top heating elements
The combination of fan and the two heating elements on top and bottom provides more uniform thermal penetration performance and save 30-40% energy.
The dish is browned outside without getting dry inside. Suitable for high temperature roasting or roasting large pieces of meat.
natural_image
Pure diagram of a mechanical or electrical component with directional arrows, no text or symbols present.
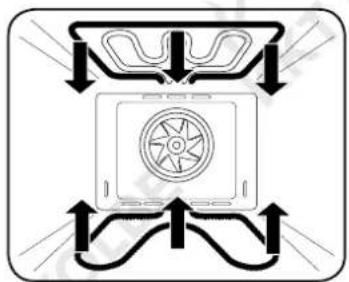
Top-/bottom heat
The top and bottom heating element work together, which can be used for routine cooking operations. Suitable for baking and roasting only at single level.
flowchart
graph TD
    A["Top Circular Component"] --> B["Left Side"]
    A --> C["Right Side"]
    D["Bottom Circular Component"] --> E["Left Side"]
    D --> F["Right Side"]
    G["Center Circular Component"] --> H["Left Side"]
    G --> I["Right Side"]

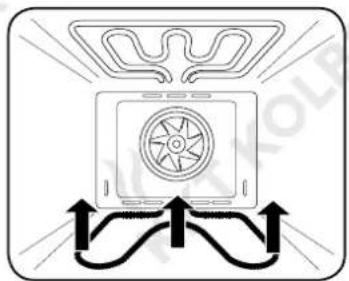
Bottom heat
The concealed element at the bot bm of the oven provides more concentrated heat without browning. Suitable for warming up meals or slow cooking dishes, such as crisp casseroles, stews, pastries and pizza.
natural_image
Diagram of a car air conditioner unit with airflow arrows indicating movement (no text or symbols)
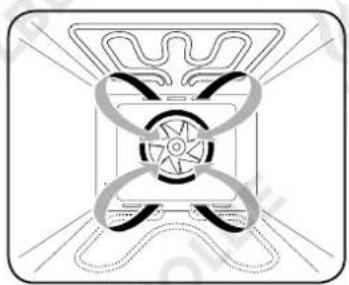
Convection
Components around the convective fan provide an additional heat source and the heat is circulated evenly by the fan, which results in a faster and more economical cooking process.
The temperature can be set in the range of 50^ C to 250^ C.
Suitable for cooking dishes on several levels.
natural_image
Pure mechanical diagram showing a gear-like structure with no text, numbers, or symbolsApplication
Roasting
For roasting the top and bottom heat or hot air can be used.
- Use tableware made of enamel, fire resistant glass, clay (clay pot) or cast iron.
- Stainless steel frying pots are unfavourable because they reflect the heat.
- In open dishes the roast tans faster. For very large roasts, the grate in combination with the fat pan is suitable.
- A covered roast remains juicy and the oven does not get dirty.
Notes
- Roasting times depend on the type, weight and quality of the meat.
• Always ensure that there is sufficient liquid in the frying vessel or the fat pan so that escaping fat and meat juice do not burn (odors). - First place the roast in the pan with the sideboard side and turn after half the cooking time.
- When roasting larger pieces of meat, more steam is generated, which is deposited at the oven door. The function is not affected by this. After frying, wipe dry. Do not allow the roast to cool in a closed oven.
Grilling and browning
For grilling and browning, use the Grilling/Roasting system or the Double grill.

Caution! Risk of burns when operating the grill. Due to the high heat the parts are very hot. Therefore use kitchen gloves and grill tongs.
- Constantly observe the grilling process. Food can burn very rapidly by the intense heat.
• Always keep children away.
Notes
- Food is grilled with the oven door closed. To grill, preheat the grill heating element briefly.
- Brush in the grate with oil, so the grilled food does not stick.
- Place flat pieces of meat on the grate and insert the drip pan to catch the meat juices.
- Turn flat slices only once, larger pieces several times with a grill tongs.
- Dark meat types tan better and faster than light meat from pork or veal.
- After grilling, clean the oven and the accessories, so that the dirt doesn't stick firmly.
Baking
For baking, the top and bottom heat or the hot air may be used. If there are no special types of baked goods specified in the baking table, select information on a similar type of goods.
Top and bottom heat
- Use one rack level.
- The top and bottom heat is particularly suitable for baking dry cakes, bread and biscuit.
- Use dark baking tins. Light baking pans brown worse as they reflect the heat.
- Put baking pans on the grate.
- Convection
- The hot air is particularly suitable for baking on several levels, for moist cakes and fruit cakes.
- For moist sheet cakes (e.g. fruit cakes), insert a maximum of 2 trays due to the formation of steam.
- The baking time can be different for several trays. It may be necessary to remove one sheet earlier than the other.
- Prepare small pastries of the same thickness and size so that they tan evenly.
- If several cakes are baked at the same time, more steam is produced in the oven, which can lead to condensation at the oven door. This cannot be avoided.
Boiling down
Use convection for boiling down.
- Prepare the food to be cooked and the glasses as usual. Use only commercially available preserving jars with rubber rings and glass lids. Glasses with screw or bayonet locks as well as metal cans are unsuitable. The glasses should be the same size and filled with the same contents.
- Use only fresh foods.
- For sufficient moisture pour about 1 liter of water in the drip pan and and put in the glasses so that they do not touch each other.
- Insert the drip pan with the glasses at the bottom and set 180^ and hot air.
- Watch the food until the liquid starts to pearl in the glasses. Then switch off the oven and allow the food to rest for approx. 30 minutes.
Defrost
Use the defrost function. By air circulation at room temperature, thawing of food gets accelerated.
- Cream and butter cream cakes, cakes and pastries, bread and rolls, deep-frozen fruit are suitable for defrosting.
- For a uniform thawing, rotate or stir defrosted in between.
Application table
| Food | Weight in kg | Level | Function setting | Temperature in °C | cooking time in min | Accessories |
| Biscuit 0.5 3 | 200 10-15 baking tray | |||||
| Sandwich 0.2 3 | 180 15-20 baking tray | |||||
| Swiss Roll 0.2 3 | 180 10-18 baking tray | |||||
| Small cake 0.3-0.4 3 | 185 20-25 baking t ay | r | ||||
| small cake 0.3-0.4 3 | 160 20-25 baking tray | |||||
| Sponge cake 0.5 3 | 175 30-35 grate | |||||
| Sponge cake 0.5 3 | 150 | 30-35 grate | ||||
| Pizza | 0.35 3 | 200 | 7-10 | baking tray | ||
| Apple pie | 1.2 3 | 185 | 50-60 | grate | ||
| Apple Pie | 1.2 3 | 185 | 70 | grate | ||
| Toast | 9 pcs | 5 | 240 | 1-2 | baking tray | |
| Beef | 1 | 5 | 200 | first side: 10-15 second side: 8-10 | baking tray | |
| Pork | 2 | 2 | 190 | 110-130 | baking tray | |
| Chicken | 1.2 3 | 200 | 50-60 | baking tray | ||
| Hamburger | 1 | 5 | 240 | first side: 10-20 second side: 5-10 | baking tray |
Setting the clock
Used to display the current time on the screen. The clock must be set before use.
- When the power is turned on, the screen displays „12:00“ and the clock icon flashes. At this time, the oven is not working.
- Press the + button to set the current time. After 5 seconds without any operation, the default setting is completed and the clock icon disappears.
Setting the timer / alarm
For setting the timer / alarm on any function, the setting time range is adjustable up to 23 hours and 59 minutes.
- Press the key until the icon is flashing, then set the timer / alarm:
- Press ☐ or ☐ set the required time (alarm time = current time + set time).
- After 5 seconds without further operation, the setup is completed and the icon lights up constantly.
- When the set time is reached, the alarm function is activated and the △ icon flashes. At this time, press the ⊕, □ or ▽ button to stop the alarming sound. The △ icon disappears. If you do not press any button, the alarming sound will be canceled automatically after 2 minutes.
Setting the cooking time (duration)
Used for cooking for a selected period of time. When the set time has elapsed, the oven switches off automatically. The cooking time is adjustable to max. 10 hours.
- Press the ➕ key until the |→| icon is flashing, then set your desired cooking time:
- Press the ☐ button to set the cooking time you want. After 5 seconds without any operation, the setting is completed and the liebn is lit continuously.
- Set your desired type of heating and temperature using the oven knobs.
- When the cooking time is over, the oven stops working. The bell rings and the don flashes. Pressing +, - or ☑ at this time will stop the alarm. If you don't press any button, the alarm will stop automatically after 2 minutes.
- When the oven is turned off, the current time is displayed on the screen.
Setting the end of cooking time
The oven will be shut off automatically when the set time is reached.
The max. adjustable end of cooking time is the current time + 10 hours, but not later than 23:59 p.m. .
- Press the Key until the icon is flashing, then set your desired end of cooking time:
- Press the 📋 button to set the end time you want. After 5 seconds without any operation, the setting is completed and the 📋 on is lit continuously.
- Set your desired type of heating and temperature using the oven knobs.
- When the set end of cooking time is reached, the oven stops working. The bell rings and the don flashes. Pressing ⊕, ⊖ or ⊖ at this time will stop the alarm. If you don't press any button, the alarm will stop automatically after 2 minutes.
- When the oven is turned off, the current time is displayed on the screen.
Setting the automatic programmer
The oven automatically starts operation at the appropriate time, so that the set cooking time (duration) elapses exactly at the set end of cooking time, and then switches off automatically.
- Press the key until the idon is flashing, then set your desired cooking time:
- Press the button to set the cooking time you want. After 5 seconds without any operation, the setting is completed and the lie on is lit continuously.
- Press the key until the icon is flashing, then set your desired end of cooking time:
- Press the 📋 button to set the end time you want. After 5 seconds without any operation, the setting is completed and the 📋 icon is lit continuously.
- Set your desired type of heating and temperature using the oven knobs.
- The start time for the program is calculated on the basis of the set times (start time = end of cooking time - cooking time / duration) and the oven starts operation automatically at the appropriate time.
- The oven will is operating for the set cooking time and stops working at the set end of cooking time. The bell rings and the icons land light up. To stop the alarm, press +, or at this time. If you don't press any button, the alarm will stop automatically after 2 minutes.
- Turn the knob to the "OFF" position to turn of the oven.
Care and cleaning

- For cleaning, don't use steam cleaners.
- Before cleaning the machine, let it cool down and unplug from the mains.
- Don't use abrasive cleaning agents, abrasive scourers or sharp objects.
Case front
- Please use only commercially available agent according to the manufacturer's instructions for cleaning and maintenance of the front surfaces.
- Stainless steel surfaces can be cleaned and wiped dry with mild detergents (eg soap) and a soft cloth.
- Aggressive cleaning agents (eg vinegar-based cleaners), abrasives, abrasive grit and sharp objects will damage the surface of the device!
- Do not use a steam cleaner to clean the oven!
Oven interior
- The oven is easier to clean when it is still slightly warm, but it should never be hot.
- Remove simple grease splashes with rinsing water.
- Use conventional oven cleaner for stubborn or severe soiling. Rinse thoroughly with cold water to remove all cleaning agents are removed completely.
- When using oven sprays, observe the manufacturer's instructions. Painted, anodized, galvanized surfaces, aluminum parts and radiators may not come in contact due to possible damage and discoloration with these sprays.
- Do not use a steam cleaner to clean the oven!
- Clean the accessories such as baking tray, drip pan, rust, etc. with hot water and a little detergent.
- Note: After using a specific detergent, run the oven for 15-20 minutes with maximum heating settings to remove residues in the oven. In this process, touchable parts may be hotter than usual. Keep children away from the oven.

Steam cleaning method
This function facilitates the oven cleaning essentially, because the dirt can be solved more easily by water vapor and heat.
- Remove accessories such as baking tray and grating.
- Pour about 0.4 litres of water with a little detergent into an oven dish or fat pan and place it on the lowest level.
- Close the oven door. Select bottom heat at 50 °C.
- Switch off the unit after about 30 minutes and disconnect the power. Remove the food residues softened by the evaporated water with a cloth.
- For baked-on soils, note the previous cleaning instructions.
Removing the oven door
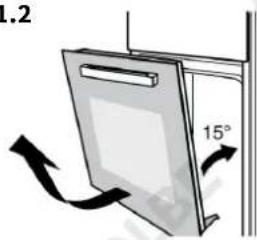
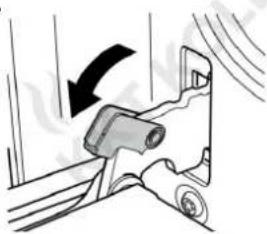
- Open the door to the maximum angle and pull the lock back at the hinge of the door (1.1).
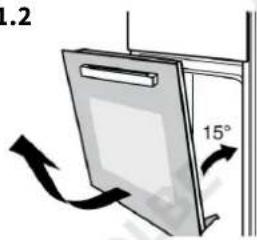
- Close the oven door at about 15 degree, then lift the door and slowly pull out from the oven (1.2).
- To reinstall after cleaning, follow the steps above in reverse order.
1.1
natural_image
Mechanical assembly diagram showing a belt drive mechanism with a black arrow indicating motion (no text or symbols present)1.2
2.1
natural_image
Technical line drawing of a mechanical assembly with labeled component A (no text or symbols present)2.2
natural_image
Technical line drawing of a mechanical assembly with horizontal bars and a bracket (no text or symbols)Removing the telescopic runners
For disassembly on the left side (right side mirror-inverted):
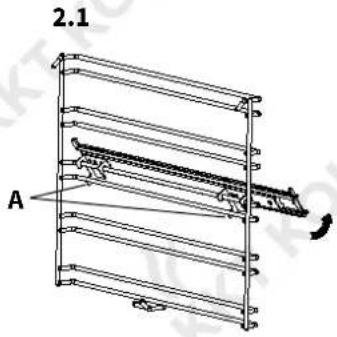
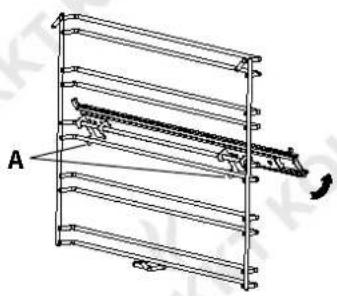
- Press on the hooks of the telescopic slide at the points marked A until they are released from the slide-in grid and then turn the telescopic slide slightly counterclockwise. (2.1)
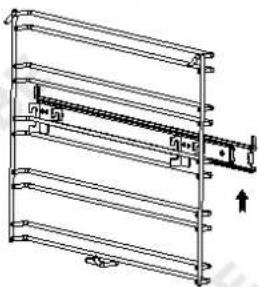
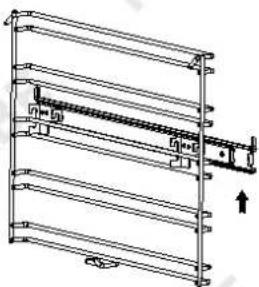
- Lift the telescopic slide slightly so that you can remove it from the grid without the hooks getting caught.
- Now you can remove the telescopic slide from the oven. (2.2)
2.3
natural_image
Technical line drawing of a mechanical assembly with labeled component B (no text or symbols beyond label)2.4
Fixing the telescopic runners
For mounting on the left side (right side mirror-inverted):
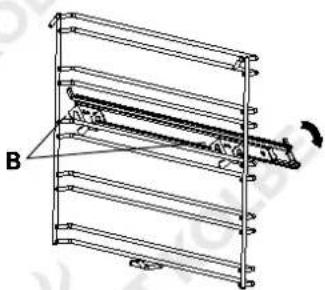
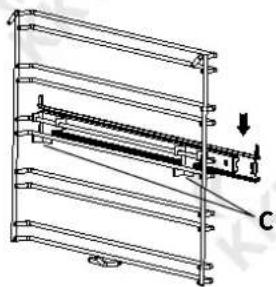
- Place the rail hooks at the points marked B on the upper guide rail of the desired insertion level in the insertion grid and then turn the telescopic rail clockwise. (2.3)
- Press the rail hooks at the points marked C on the lower guide rail until they „snap in“. (2.4)
- Before closing the appliance door, make sure that all telescopic runners are fully inserted.
3.1
natural_image
Diagram of a ladder structure with horizontal bars and a downward arrow indicating compression (no text or symbols)3.2
natural_image
Diagram of a multi-tiered metal rack structure with a curved arrow indicating rotation (no text or symbols)3.3
natural_image
Diagram of a ladder structure with multiple horizontal bars and directional arrows indicating force or movement (no text or symbols)Removing the slide-in racks
To facilitate cleaning of the oven side walls and the slide-in rails, you can remove the slide-in grilles.
- Remove all access skies such as grate, baking tray and telescopic runners.
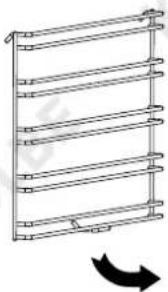
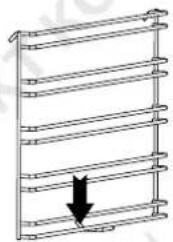
- Slightly push down the hook in racks at the clamping point as shown (3.1).
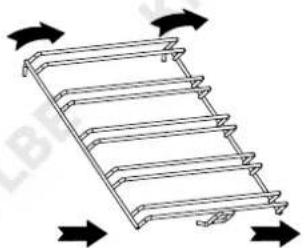
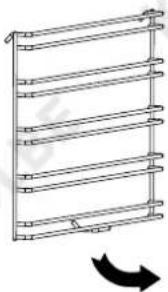
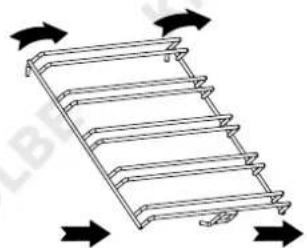
- Swivel the rack inwards to an angle of approx. 90 degrees (3.2-3.3).
- Unhook it at the top and carefully pull it out (3.3).
- To reinstall after cleaning, follow the steps above in reverse order.
Changing the oven light bulb
The light used in oven is a special high temperature resistant light (AC220 V, 25 W).
To replace this, proceed as follows:
- Disconnect in any case the device from the power supply (pull the plug or remove the fuse), because the wording could be live.
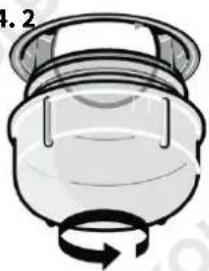
- Turn the glass cover counterclockwise (4.1).
- Remove the light (4.2) and replace it with the same type.
- Screw back the cover glass clockwise.
4.1 4.2
natural_image
Simple line drawing of a container with a curved arrow indicating rotation (no text or symbols)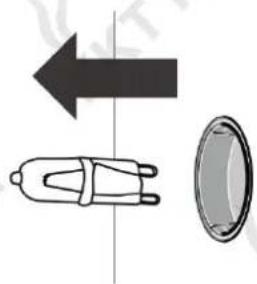
natural_image
Pure diagram of a device with an arrow and circular component, no text or symbols presentPower connection

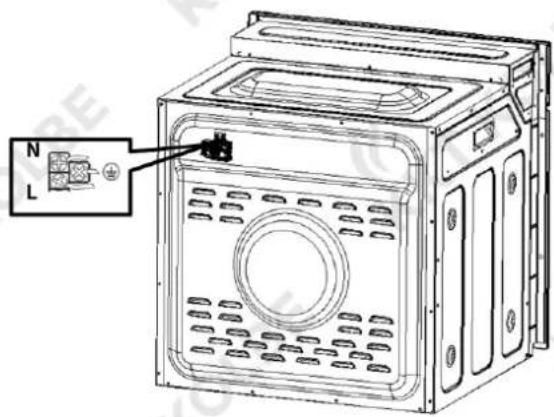
Before connecting, check if the voltage indicated on the type plate corresponds to the mains voltage. The length of the connection cable must be sized so that the device can be connected prior to insertion. The protective conductor must be sized so that it is loaded onto train at the strain relief fails after the live wires of the connection cable.
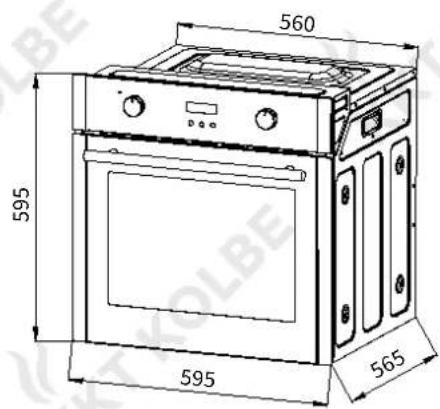
Dimension drawing
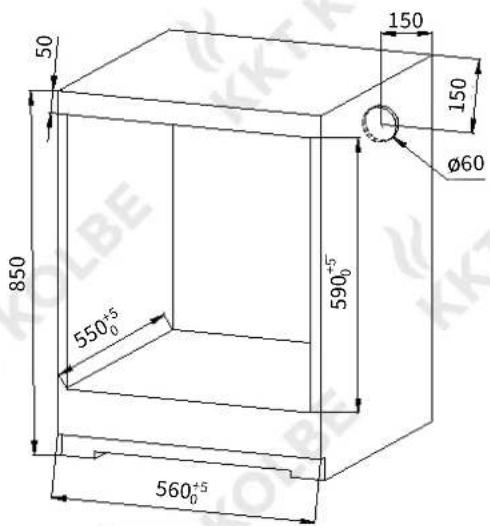
Installing the appliance
• The stability of the furniture must comply with DIN 68930.
- On the built-in niche no back wall may be present, so that the ventilation is ensured.
- Push the device all the way into the niche.
- Open the oven door and fasten the left and right with the supplied screws on the cabinet. Do not overtighten the screws.
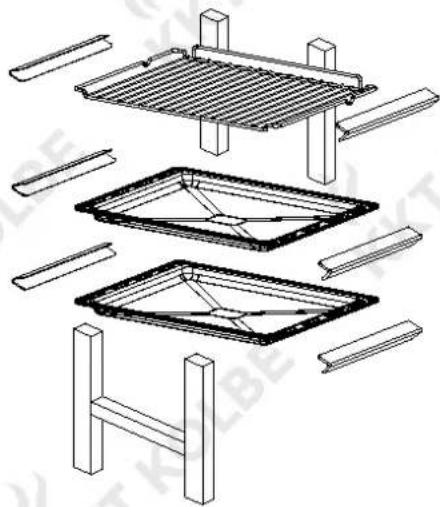
natural_image
Technical line drawing of a structural frame assembly with multiple supports and brackets (no text or symbols)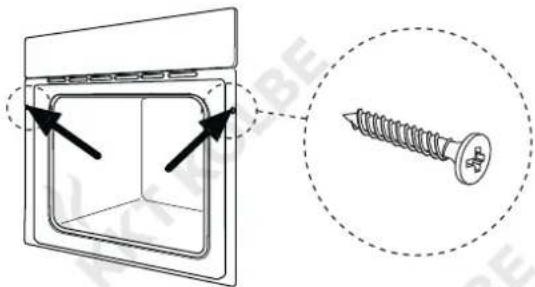
Starting up the appliance
- Remove all packaging materials and possibly remove protective films.
- Clean the oven and accessories with a damp cloth.
- Set the clock to the current time (some models only).
- Operate the empty oven for about 30 minutes with top and bottom heat and maximum temperature. The resulting typical smell of a brand is unavoidable. Please ventilate the room.
What to do in case of problems?

Repairs should only be carried out by a qualified specialist. If unqualified persons carry out repairs and maintenance, there is a risk of electric shock and short circuits!
The oven doesn't heat up.
- Has the fuse been tripped in the house installation?
- Have the temperature controller and the function selector switch been set correctly?
The device fuse keeps blowing.
- Contact the KKT KOLBE customer service or a licensed electrician.
Lighting has failed.
• To replace the lighting, see the relevant chapter.
The baking results are not satisfactory.
- Have the instructions and tips in the „Application“ chapter been observed?
KKT KOLBE customer service
Tel. 0049 9502 667930
→ Further data and documents can be found on our web site under Support-Center.

Technical details
Oven model name EB8010ED
Supplier's name KKT KOLBE
Energy efficiency index (EEI _cavity ) 91.2
Energy class A
Energy consumption per cycle in forced air mode 0.77 KWh / cycle
Energy consumption per cycle in conventional mode 0.80 KWh / cycle
Number of cavities 1
Heat source per cavity Electricity
Volume of each cavity 70 L
EC Declaration of Conformity
CE
Product Description(s):
EB8010ED Built-in electric oven
Manufacturer:
For the product described in this manual, all corresponding EC Declarations of Conformity are available.
The relevant documents can be viewed and downloaded on our website www.kolbe.de on the relevant product page.

Jan Kolbe
Director Product Management

Thank you for reading.
We wish you much pleasure with your appliance.


- Gitterrost
- Grill-/Bratsystem
- Großflächengrill
- Pizzastufe
- Umluft
- Ober-/ Unterhitze
- Heißluft
- Braten
- Stromanschluss
- Inbetriebnahme
- User's manual
- This icon indicates a hazardous situation.
- This icon indicates a warning.
- This icon indicates an information.
- Warning
- Dear customer,
- Your KKT KOLBE team
- Appliance parts and operation 26
- Application 30
- Programming 32
- Care and cleaning 33
- Installation and connection of the appliance 36
- What to do in case of problems? 37
- Technical details / Declaration of conformity 38
- Case cooling
- Telescopic runners
- Grating
- Universal baking trays (Scope of delivery 2 pcs)
- Slide-in racks
- Note:
- Control panel
- Energy saving tips
- Types of heating / programs / oven functions
- Oven light
- Defrost
- Grilling/Roasting system
- Double grill
- Pizza function
- Fan cooking with bottom and top heating elements
- Top-/bottom heat
- Bottom heat
- Convection
- Application
- Roasting
- Notes
- Grilling and browning
- Baking
- Top and bottom heat
- - Convection
- Boiling down
- Setting the clock
- Setting the timer / alarm
- Setting the cooking time (duration)
- Setting the end of cooking time
- Setting the automatic programmer
- Care and cleaning
- Case front
- Oven interior
- Steam cleaning method
- Removing the oven door
- Removing the telescopic runners
- Fixing the telescopic runners
- Removing the slide-in racks
- Changing the oven light bulb
- Power connection
- Dimension drawing
- Installing the appliance
- Starting up the appliance
- What to do in case of problems?
- The oven doesn't heat up.
- The device fuse keeps blowing.
- Lighting has failed.
- The baking results are not satisfactory.
- KKT KOLBE customer service
- Technical details
- EC Declaration of Conformity
- CE
- Thank you for reading.
Brand : KKT Kolbe
Model : SET80101IND2
Category : Kitchen appliance