
A542DSP - Receiver Axton - Free user manual and instructions
Find the device manual for free A542DSP Axton in PDF.


| Product Type | 4-Channel Smart Digital Amplifier with DSP |
| Model | A542DSP |
| RMS Power Output | 32 W x 4 @ 4 ohms |
| Frequency Response | 20 Hz - 20 kHz |
| Audio Sampling Frequency | 192 kHz |
| Distortion (THD) | < 0.001% @ 1 kHz |
| Signal-to-Noise Ratio | > 120 dB |
| Dynamic Range | > 96 dB |
| Supply Voltage Range | 7.5 V - 16.5 V DC |
| Standby Current | 0.23 A |
| Maximum Operating Current | 15 A |
| Dimensions (W x H x D) | 145 x 114 x 40 mm (with antenna: 177 mm) |
| Bluetooth Version | 5.0 with audio streaming |
| Audio Inputs | Optical, Coaxial, Speaker level |
| Audio Outputs | 4 speaker channels, Front/Rear line out (6 V) |
| Remote Control | Optional wired remote for volume, bass, mute |
| App Control | iOS and Android app for DSP settings |
| Auto-Turn-On | Yes (DC offset or remote wire) |
| Warranty | 2 years from original purchase |
Frequently Asked Questions - A542DSP Axton
User questions about A542DSP Axton
0 question about this device. Answer the ones you know or ask your own.
Ask a new question about this device
Download the instructions for your Receiver in PDF format for free! Find your manual A542DSP - Axton and take your electronic device back in hand. On this page are published all the documents necessary for the use of your device. A542DSP by Axton.
USER MANUAL A542DSP Axton
A592DSP | A542DSP
4-CHANNEL SMART DIGITAL AMPLIFIERS
Thank you for purchasing this innovative AXTON amplifier!
To maximize the performance of this amplifier and your complete car audio system installation, we recommend you acquaint yourself thoroughly with all technical features and controlling options of this AXTON amplifier. Please read this manual carefully, before attempting the installation. If, after reading this manual, you still have questions regarding functions or the installation of the amplifier, we recommend you consult your dealer.
SAFETY INSTRUCTIONS
Do not turn on any function which may distract you while driving the vehicle. Functions requiring sustained attention must only be used when the vehicle is at a complete standstill. Make sure to always stop your vehicle in a safe place before operating these functions. There are risks of causing an accident.
- Keep the volume at a low level to be able to hear exterior noises while driving the vehicle. There are risks of causing an accident.
■ Do not open the amplifier or undertake any modification of the product. There is a risk of accident, fire or electric shock.
■ Only use this amplifier with 12V mobile applications. Any use other than for this product intended may lead to fire, electric shock or injury.
■ Use correct amperage fuses. There are risks of fire or electrocution.
■ Do not obstruct radiators and/or vents. Internal overheating may occur and cause a fire.
■ Ensure all connections are properly made. Check the section of cable and the type of cable if it does not correspond with the use. There is a risk of fire, injury and/or damage to the product.
- Do not use screw nuts or fasteners part of the steering or braking systems for ground connection. The fasteners and nuts used for the brake and steering systems (or any other security system) as well as various tanks must never be used for grounding. Use of these parts as ground may deactivate the vehicle's control system and cause a fire or other technical problem.
- Keep all small objects which could be swallowed, such as the fasteners and screws, out of the reach of children. Swallowing such objects may cause serious injuries. In the event of swallowing any of these objects, immediately seek medical advice.
■ Before starting the installation, disconnect the negative terminal of the battery to avoid any risk of injury, fire or damage to the equipment.
TECHNICAL SPECIFICATIONS A592DSP / A542DSP
| A592DSP A542DSP | ||
| Music Power Output:* 150 W x | 4 @ 4/2 ohms 54 W x 4 @ 4 ohms | |
| RMS Power Output:* 76 W x 4 | @ 4/2 ohms 32 W x 4 @ 4 ohms | |
| Music Power Output: 100 W x | 4 @ 4/2 ohms n.a. | |
| RMS Power Output: 50 W x 4 | @ 4/2 ohms n.a. | |
| Frequency response: 20Hz ~ 20 kHz 20Hz ~ 20 kHz | ||
| Audio sampling frequency: 192 kHz 192 kHz | ||
| Distortion: 1 KHz <0.001% | 1 KHz <0.001% | |
| Supply voltage range: | 7.5V - 16.5V | 7.5V - 16.5V |
| Signal to noise ratio: | > 120 dB | > 120 dB |
| Dynamic range: | > 96 dB | > 96 dB |
| Standby current: 0.23 A | 0.23 A | |
| Maximum operating current: | 20 A | 15 A |
| Dimensions (LxWxH): | 185(218**) x 114 x 40 mm | 145(177**) x 114 x 40 mm |
* With additional power supply.
** Including BT antenna.
MAIN FEATURES
■ 4-channel Smart Digital Amplifier with iOS or Android App controlled audio DSP functions
■ DSP-controlled 5-channel Preout (6 Volt) including REM out to control additional amplifiers
■ Bluetooth 5.0 Audio Streaming with automatic source switching
■ Optical and Coaxial input for lossless audio data transmission. If you connect the optionally available AXTON ABT50 device you can listen to your Hi-Res Audio music files losslessly via Bluetooth or by OTG cable.
■ Optional Remote Control with direct Master Volume and Bass Level Control
- Plug'N'Play quick installation system via optional vehicle brand and model specific ISO wire harness
■ Auto-Turn-On function
FUNCTIONALITY & ADJUSTABILITY
■ Bluetooth connection and control of DSP settings via iOS or Android Smartphone App
■ Freely configurable active crossover: High-/Low-/Band-/Bypass with 6/12/18/24dB/Oct. slope for Front, Rear and Subwoofer channel
■ Time Alignment in cm (0 – 420 cm) for front, rear and subwoofer channel
■ 5 channel control: Gain, Phase switch and Mute function for each speaker
■ Freely configurable 10 or 31-band parametric Equalizer for every single front and rear speaker
■ Freely configurable 5-band parametric Equalizer for subwoofer channel
■ Is able to save 5 memories in the amp and unlimited sound settings on the smartphone
■ Dynamic Bass setting for powerful performance without subwoofer
■ Noise Gate function to reduce car stereo background noise
INSTALLATION DIAGRAM A592DSP / A542DSP
![graph TD A["AXTON Streaming Interface ATB50"] --> B["DSP AMPLIFIER A592DSP / A542DSP"] B --> C["ORIGINAL CAR SOCKETS"] B --> D["HEAD UNIT"] E["Smartphone"] --> F["Wireless Signal"] F --> G["Ground"]](/content/2026/05/824120/images/5b5ec793c787244ec5eafb98504ea8d89cbca8f9af92df2f4b10d4a998d01c21.jpg)
DIMENSIONS A592DSP / A542DSP


CONNECTIONS + CONTROLS A592DSP

SPEAKER
| 1* | ACC-in | 11 | GND |
| 2* | Rem-out | 12 | +B |
| 3 | RR-in | 13 | FL+out |
| 4 | RR+in | 14 | FL-out |
| 5 | RL-in | 15 | FR+out |
| 6 | RL+in | 16 | FR-out |
| 7 | FL-in | 17 | RL+out |
| 8 | FL+in | 18 | RL-out |
| 9 | FR-in | 19 | RR+out |
| 10 | FR+in | 20 | RR-out |
1* In some cases with old headunits the Auto-Tum-On function cannot work. If you meet this problem, please connect "ACC-IN" wire to ACC/Amp Remote of the car stereo or another cable which will provide +12 V only when the car stereo is turned on. Secondly select 'REMOTE TURN ON' on the remote switch.
2* REM-Out: Connect this wire to the remote input of a separate amplifier, for example a mono amp for a subwoofer.
① REMOTE CONTROL
Connect the optional RC for convenient operation of Master Volume, Bass Volume and Mute function.
When you are using the ABT50 with OTG for iPhone for lossless audio transmission, the signal is sent directly avoiding any converter. That's awesome. But it also means you are not able to adjust the volume with your iPhone. Therefore you need to connect the separate available RC.
② ANTENNA
External Bluetooth antenna of the audio streaming BT module, called "BT Audio" in your mobile settings. The second BT module, called "A592DSP" is for doing the adjustments only and does not need a separate antenna.
③ POWER TERMINAL
Connect Ground and Battery cables when additional power is necessary or desired.
④ FUSE
If the fuse is broken, replace it with a new fuse of same value.
⑤ COAXIAL
This input provides power for the ABT50 and also receives audio data from this device. It's impossible to connect usual USB sticks.
⑥ SPEAKER IMPEDANCE
Choose according to the connected speakers. If your system is equipped with 3 ohms speakers or less, switch to 2 ohms. Minimum load is 2 ohms.
⑦ OPTICAL
Connect to ABT50 for lossless Hi-Res audio transmission from your smartphone.
⑧ SERVICE
For internal use only.
⑨ LINE OUT
If you only want to use the DSP function of the A592DSP with a separate high performance amplifier, connect the line out of the A592DSP with the RCA input of your amplifier.
This is the main connector for Plug & Play installation.
⑪ REMOTE / SIGNAL TURN ON
Choose if the amp shall turn on by separate ACC+/Remote wire or by DC Offset signal.
⑫ POWER
Two color LED: Green light shows normal operation. Green light blinking shows a current data transfer, i.e. receiving data from the app. Red light shows protection mode, i.e. too low impedance.
MOUNTING INSTRUCTIONS A592DSP
- Before you start with the installation, make sure you know the security code of your headunit (if applicable).
- Remove the headunit from the dashboard and disconnect the main wire harness.
- Find a place for the A592DSP and connect the provided (or optionally available car-specific) wire harness to the amp.
- Optionally: For more power output please follow these steps: Run a 10 mm 2 power wire from the (+) pole of the battery to the (BATT) terminal of the amplifier. Use a fuse with the related value of the cross section of the power wire. The distance between the B+ pole and the fuse holder must be 30 cm or less. Run the minus cable with the same cross section from the (GND) terminal of the amp to the vehicle chassis ground. Make sure that the contact surface is clean in order to get best conductance.
- Optionally: For Hi-Res Sound from your smartphone: Connect the optical and coaxial cables to the inputs of A592DSP and outputs of the AXTON ABT50. Connect your smartphone via Bluetooth to the ABT50 for using APTX-HD standard or use the AXTON OTG cable for absolutely lossless audio transmission: the signal is sent from your smartphone directly to the amplifier without passing any D/A converter.
- Optionally: Connect the remote control for convenient operation of the Master Volume, Bass Extender and Mute function. Recommended when using A592DSP without any headunit.
- Connect the wire to the headunit.
- Install the headunit back in the dashboard.
CONNECTIONS + CONTROLS A542DSP
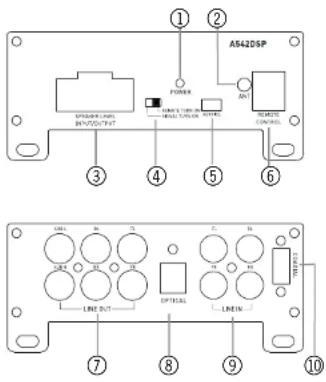
| 1* | ACC-in | 11 | GND |
| 2* | Rem-out | 12 | +B |
| 3 | RR-in | 13 | FL+out |
| 4 | RR+in | 14 | FL-out |
| 5 | RL-in | 15 | FR+out |
| 6 | RL+in | 16 | FR-out |
| 7 | FL-in | 17 | RL+out |
| 8 | FL+in | 18 | RL-out |
| 9 | FR-in | 19 | RR+out |
| 10 | FR+in | 20 | RR-out |
1* In some cases with old headunits the Auto-Tum-On function cannot work. If you meet this problem, please connect "ACC-IN" wire to ACC/Amp Remote of the car stereo or another cable which will provide +12 V only when the car stereo is turned on. Secondly select "REMOTE TURN ON" on the remote switch.
2^ REM-Out: Connect this wire to the remote input of a separate amplifier, for example a mono amp for a subwoofer.
① POWER
Two color LED: Green light shows normal operation. Green light blinking shows a current data transfer, i.e. receiving data from the app. Red light shows protection mode, i.e. too low impedance.
② ANTENNA
External Bluetooth antenna of the audio streaming BT module, called "BT Audio" in your mobile settings. The second BT module, called "A542DSP" is for doing the adjustments only and does not need a separate antenna.
③ SPEAKER LEVEL INPUT/OUTPUT
This is the main connector for Plug & Play installation.
④ REMOTE / SIGNAL TURN ON
Choose if the amp shall turn on by separate ACC+/Remote wire or by DC Offset signal.
⑤ SERVICE
For internal use only.
⑥ REMOTE CONTROL
Connect the optional RC for convenient operation of Master Volume, Bass Volume and Mute function.
When you are using the ABT50 with OTG for iPhone for lossless audio transmission,
the signal is sent directly avoiding any converter. That's awesome. But it also means that you are not able to adjust the volume with your iPhone. Therefore you need to connect the separate available RC.
⑦ FRONT/REAR LINE OUT
If you only want to use the DSP function of the A542DSP with a separate high performance amplifier, connect the line out of the A542DSP with the RCA input of your amplifier.
⑧ OPTICAL
Connect to ABT50 for lossless Hi-Res audio transmission from your smartphone.
⑨ FRONT/ REAR LINE IN
Connect the RCA output of the headunit to these RCA inputs.
⑩ COAXIAL
This input provides power for the ABT50 and also receives audio data from this device. It's impossible to connect usual USB sticks.
MOUNTING INSTRUCTIONS A542DSP
3. Wiring
- Before you start with the installation, make sure you know the security code of your headunit (if applicable).
- Remove the headunit from the dashboard and disconnect the main wire harness.
A) Plug & Play: Find a place for the A542DSP and connect the provided (or optionally available car-specific) wire to the amp, to the headunit and the cars main wire harness. No additional power wiring necessary. B) RCA Line In: If you prefer using low level signal, then disconnect the speaker input cables and connect your headunit and A542DSP with the RCA interconnects. You will also need to use separate remote/ACC+ cable and switch to "Remote Turn On". - For Hi-Res Sound from your smartphone: Connect the optical and coaxial cables to the inputs of A542DSP and outputs of the AXTON ABT50. Connect your smartphone via Bluetooth to the ABT50 for using APTX-HD standard or use the AXTON OTG cable for absolutely lossless audio transmission: the signal is sent from your smartphone directly to the amplifier without passing any D/A converter.
- Connect the remote control for convenient operation of the Master Volume, Bass Extender and Mute function. Recommended when using A542DSP without any headunit.
- Connect the wire to the headunit.
- Install the headunit back in the dashboard.
APP INSTALLATION A592DSP
For Android phones only:
- Download the A592DSP_V1.0.apk by scan of the QR code or download from the Axton website www.axton.de
- Install A592DSP_V1.0.apk to your Android smart phone.
- Turn on Bluetooth on your mobile and make sure that "Location" is permitted.
- Open A592DSP app and click the "Connect" button to connect your mobile to the amplifier.
For iOS smart phones only:
- Visit the Apple AppStore, search for "A592DSP" and install the app.
- Turn on Bluetooth.
- Open the app and press the "Connect" button Connect in order to connect the amp with the app.

Scan to download and install the app from the Apple AppStore

Scan to download and install the app from the Axton homepage www.axton.de
APP INSTALLATION A542DSP
For Android phones only:
- Download the A542DSP_V1.0.apk by scan of the QR code or download from the Axton website www.axton.de
- Install A542DSP_V1.0.apk to your Android smart phone.
- Turn on Bluetooth on your mobile and make sure that "Location" is permitted.
- Open A542DSP app and click the "Connect" button Connect to connect your mobile to the amplifier.
For iOS smart phones only:
- Visit the Apple AppStore, search for "A542DSP" and install the app.
- Turn on Bluetooth.
- Open the app and press the "Connect" button in order to connect the amp with the app.

Scan to download and install the app from the Apple AppStore

Scan to download and install the app from the Axton homepage www.axton.de
BLUETOOTH AUDIO STREAMING
Open the Bluetooth settings on your smartphone and search for "BT Audio" device. Press "connect" and enter the code "1234" to get the amp paired with your mobile. When you start playing music on your mobile, the amp automatically mute the signal from your car stereo. Please note: you cannot hear any warnings or navigation notes from your car stereo.
FUNCTIONS

Connection to the smart mobile
Start the app and touch the Connect "Connect" button. After the connection procedure is done successfully, the app downloads the current settings from the amplifier.

Save to Phone
You can save the settings on your smartphone. To do this, press „Save on Phone“ button , enter the desired filename, and confirm with „OK“.

Save to AMP
When you have done the settings, touch the "Save to Amplifier" button and chose the favorite to transfer the settings to the amplifier. During the saving process do not switch off the amplifier as this may lead to malfunction and/or damage.

Load
Shows a list of files saved on the smartphone. Touch the desired setup to load. If you want to save the loaded setup permanently on the amp, press "Save to Amplifier" button

Favorites
Press the star button at the top right, and select one of the favorites 1 – 5.
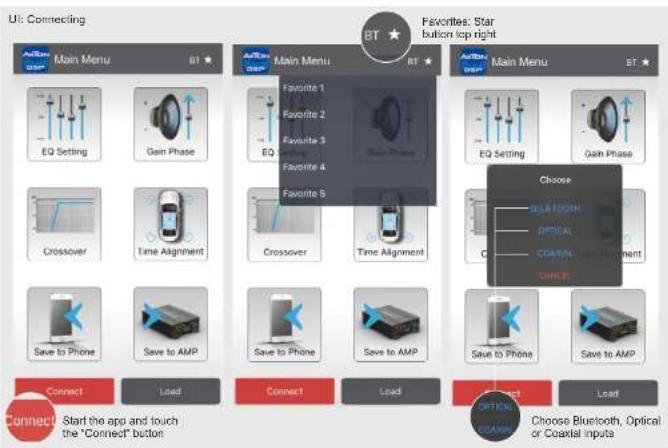

EQ Settings
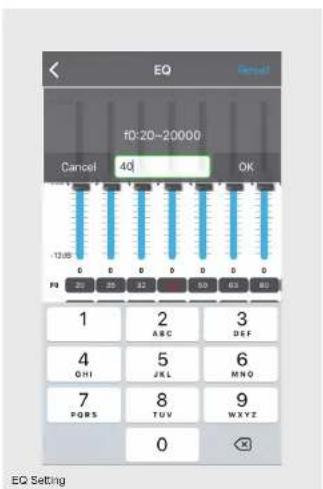
You can build your sound according to your settings in the EQ menu. Depending on the grade of required accuracy, you can chose between a 10 and a 31 band parametric equalizer.
Swipe to the right/ to the left to get to the bands outside of the screen area.

In the line "f0" tap on the band you want to adjust. A pop-up window appears to enter the value of the center frequency you want. Confirm with "Ok" OK
In the line "Q" tap on the band you want to adjust. A pop-up window appears to enter the value of the quality factor you want. Confirm with "Ok" instead you can also touch "-" or "+" to adjust the Q factor in 0.1 steps.
The quality factor (Q factor) determines the effect of the EQ filter (bandwidth) on the frequency band around the chosen center frequency f0.
Example1: f0 = 1000 Hz
desired bandwidth of EQ filter = 1000 Hz (i.e. 500 Hz - 1500 Hz) Q = 1
Example2: f0 = 1000 Hz
desired bandwidth of EQ filter = 200 Hz (i.e. 900 Hz - 1100 Hz) Q = 5
Q factors from 0.3 to 9.9 are possible.
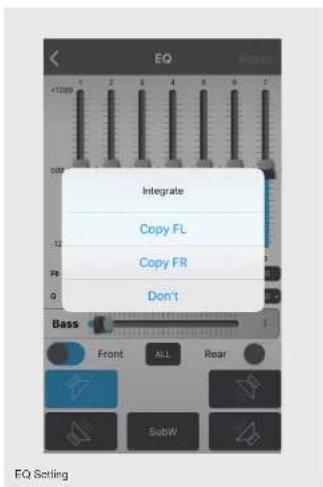
If required, you can choose independent equalizer preferences for the front and rear channels and even for each channel separately. Simply use the slider Front or Rear. When you want to do one setting for all channels (w/o sub) just press the "all" button ALL.
To reset all settings to „0“, press the „Reset“ button in the EQ menu. If you just want to try out the presets and then go back to your personal preferences, exit without saving the app, and then restart. The app will then load your saved preferences from the amplifier.
Dynamic Bass
Located in the EQ menu, the "Bass" slider is a very effective way to increase bass performance without overloading the speakers. Level at "0" = no Dynamic Bass function active.
Level at "1" to "20" = the higher the value the higher the bass increasing. Simultaneously a strong subsonic filter is enabled to protect the speakers from deepest bass frequencies to avoid damage to them.
Dynamic Bass:
The „Bass" slider offers the bass level without overloading the speakers.


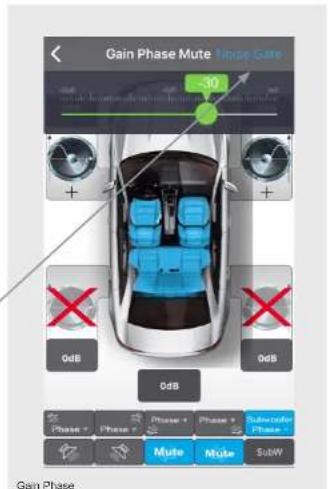
Gain Phase
In this menu you can adjust the following settings for each individual channel: sound level, mute and phase. The sound level settings adjust in the field above and under the respective speaker icons.
In the lower area of the menu, in the top line, are the icons for phase-settings. From left to right: Front left, Front right, Rear left, Rear right, Subwoofer.
In the bottom line are the icons for setting the mute switch. From left to right: Front left, Front right, Rear left, Rear right, Subwoofer.
When you adapted the settings, go back to the main menu, and touch the "Save to Amplifier" button to transfer the settings to the amplifier. During the saving process do not switch off the amplifier as this may lead to malfunction and/or damage. You can also save the settings on your smartphone. To do this, press "Save on Phone", and enter the desired filename.
Noise Gate
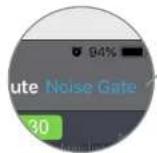
In the upper right corner of the GAIN menu you can find the Noise Gate function. It's intended to reduce the back ground noise of the head unit. If back ground noise of the head unit is audible, increase the Noise Gate level by sliding to the left until the noise disappeared.
Noise Gate function top right


Crossover
In this menu you can assign a frequency band to the connected speakers that corresponds to their recommended operating range. You can choose to adjust each channel separately, combine front and rear speakers and also all speakers together.
In the left half of the diagram you can set the break frequency of the high pass filter as well as its slope. In the right half are the break frequency and slope of the low pass filter. The blue line shows the set slope of the filter. „Bypass" means the signal is unfiltered and contains all frequencies. The filter settings also apply to the corresponding preamp outputs.
When you adapted all settings, go back to the main menu, and touch the "Save to Amplifier" button to transfer the settings to the amplifier. During saving do not switch off the amplifier as this may lead to malfunction and/or damage. You can also save the settings on your smartphone. To do this, press the "Save on Phone" button, and enter the desired filename.
![Crossover [db] HPF LPF 12dB/Oct 80Hz 20Hz Bypass Front FL FR HPF Slope 6dB/Oct 12dB/Oct 1dB/Oct Cancel OK Crossover](/content/2026/05/824120/images/75b56b59aa09ea584e3593239f4fe1bf632972749803fe1b2e6cd83f83d762c2.jpg)

Time Alignment
Press the „Time Alignment“ button to go to the menu. In this menu you can apply a time delay to the speaker signal to simulate an ideal listening position. Note the distance between your listening position and each speaker. Choose the most distant speaker as the reference for the other speakers.
Note the distance between your listening position and each speaker.


With the aid of the following example, calculate the values for your speakers:
(FL) front left is 0.80m from the listening position
(FR) front right is 1.40m from the listening position
(RL) rear left is 0.50m from the listening position
(RR) rear right is 1.30m from the listening position
(SubW) subwoofer is 2.00m from the listening position
Value for FL = SubW - FL → FL = 2.00 - 0.80 m Value for FR = SubW - FR → FL = 2.00 - 1.40 m Value for RL = SubW - RL → RL = 2.00 - 0.50 m Value for RR = SubW - RR → RR = 2.00 - 1.30 m SubW remains at the value .0°
WARRANTY CONDITIONS + LIMITATIONS
Dear customer
Please read the warranty specifications below carefully.
Should your AXTON amplifier require warranty service, please return it to the retailer from whom it was purchased or the distributor in your country. Do not send any product to AXTON. Should you have difficulty in finding an authorized AXTON service center, details are available from your local distributor.
This AXTON amplifier is fully warranted against defective materials or workmanship for a period of two years from date of purchase at retail to the original buyer. Warranty work will not be carried out unless this warranty certificate is presented fully completed with serial number, purchaser's address, purchasing date and dealer stamp together with the original sales slip and either an authorized dealer's confirmation of installation or authorized dealer's installation approval!
This warranty does not cover any damage due to:
- Unauthorized or unapproved installation, incorrect audio or mains connection(s).
- Defects caused by exposure of the amplifier to humidity, water and organic fluids, prolonged exposure to sun rays or excessive dirt or dust.
- Mechanical defects caused by accidents, fall or impact.
- Unauthorized repair attempts and modifications not explicitly authorized by the manufacturer.
This warranty is limited to the repair or the replacement of the defective product at the manufacturer's option and does not include any other form of damage, whether incidental, consequential or otherwise. The warranty does not cover any transport costs or damages caused by transport or shipment of the product. Any additional or further claims and requirements for compensation of auxiliary components that have been damaged by the amp in sequence, directly or indirectly, are strictly excluded.
You can find the warranty slip on page 30.
SPEAKER
| 1 | 2 | 3 | 4 | 5 | 6 | 7 | 8 | 9 | 10 |
| 11 | 12 | 13 | 14 | 15 | 16 | 17 | 18 | 19 | 20 |
| 1* | ACC-in | 11 | GND |
| 2* | Rem-out | 12 | +B |
| 3 | RR-in | 13 | FL+ out |
| 4 | RR+in | 14 | FL-out |
| 5 | RL-in | 15 | FR+out |
| 6 | RL+ in | 16 | FR-out |
| 7 | FL-in | 17 | RL+ out |
| 8 | FL+ in | 18 | RL-out |
| 9 | FR-in | 19 | RR+out |
| 10 | FR+in | 20 | RR-out |
BLUETOOTH AUDIO STREAMING
Dynamic Bass

Gain Phase

Time Alignment
WARRANTY CONDITIONS + LIMITATIONS
What products are covered by AXTON's limited Warranty?
The limited Warranty [the "Warranty"] applies to AXTON products purchased from an authorized dealer by end customers in the European Economic Area or Switzerland ("Territorial Scope").
What is the validity period of AXTON's Warranty?
Under this Warranty, AXTDN warrants, for a period of 2 years, that the product is free from defects in material and/or workmanship at the time of the original purchase. This 2-year period commences on the date of the original purchase as per the original invoice or until receipt. If you have purchased the product as a consumer, and the defect is identified within the first six months after the original purchase (see above), we will assume that the defect already existed at the time of purchase.
Who can claim under the Warranty?
AXTON grants the limited Warranty to natural persons only, who purchased the relevant product primarily for personal use.
What is covered by the Warranty?
AXTON warrants that the product is free from defects in material and/or workmanship at the time of the original purchase. AXTON does not, however, provide a warranty covering every defect and damage that may occur. It only covers the hardware components of the device, and in no event the software used with the device, regardless if this was provided by AXTON or the third-party vendor. The Warranty therefore does not cover the following cases, in particular:
• normal wear and tear (such as to surfaces and protective coverings):
• superficial damage, such as scratches, dents, and damaged plastic, worn or mechanically defective connections:
- misuse, including any treatment resulting in physical or superficial damage, such as a cosmetic defect, to the product:
- damage caused by connecting or using the product for a purpose other than those specified, or a failure to observe the operating and/or installation instructions for the particular model.
- installation or use of the product contrary to the applicable technical standards, or the safety regulations in the country in which the product is installed or used;
• damage caused through an unauthorized attempted repair, or an attempted repair by someone other than a AXTON authorized service partner;
• damage caused by modifications to the product not expressly authorized by the manufacturer,
- damage caused by malicious code ("Software Viruses") or by using software not supplied with the product or which was incorrectly installed,
- use of third-party vendor software programs for editing, modifying, adapting, or extending AXTON's authorized software components as are run on the product.
• use of third-party vendor firmware/operating system software
• damage caused by liquids or chemicals of whatever type, and/or excessive temperatures, moisture, or damp
- accidents, drops or other such effects of extreme accelerating forces
- damage caused by lightning strikes, electrostatic charge, incorrect operating voltage, water, fire, force majeure, inadequate ventilation for other
reasons for which AX TUN is not responsible;
• damage caused by using the device outside of the defined specifications; • damage caused by using the product with other systems or devices, which are not designed to be used with false products.
- damage caused by using the product with other systems of devices, which are not designed to be used with this product, - adjustments or modifications without AXTON's prior written approval, including product upgrades extending beyond the specifications or
Supervisory and non-associative clinical practice, clinical approval, improving privacy and quality, providing advice and variability of characteristics described in the neararing manual.
- modifications of the product for the purpose of adapting it to national or local technical norms or safety standards of countries for which the
product was not expressly designed or manufactured;
• using service or spare parts not produced or distributed by AXTUN;
• using the product in connection with accessories not approved for use with this product
AXTON, moreover, does not warrant (expressly, implicitly, statutorily, or otherwise) the quality, performance, reliability or suitability of the product for a particular purpose except as described, nor the software/firmware installed on the device ex works.
No warranty service will be provided, moreover, if the model number
/serial number/UUID/product number on the product is changed, erased, made illegible or removed. The same applies if the receipt or invoice is incomplete and/or illegible when presented.
Is AXTON liable for other defects or damage? AXTON is not liable for any material or intangible assets. This liability is not to be incurred by the company, and it is not to be responsible for any liability arising from the sale of the product, loss of profits, revenue, data, or relating to the enjoyment of the product or components associated with it, arising directly or indirectly under this Warranty or otherwise in relation to products or services. This likewise applies to loss or damage relating to the impairment or operational failure of the product, or devices associated with it, caused by defects or the non-availability of the product during the time it is with AXTON or AXTON's service partner, as well as to periods of goodwill and business interruptions, in addition to the damage that is not to accept any liability for shipment-related losses – such as the loss or destruction of the product - In connection with the fulfillment of the Warranty.
This disclaimer applies to losses of damage irrespective of the legal basis, especially on the grounds of negligence, other wrongful conduct torts, breach of contract, express or implied guarantees, and strict liability (even if AXTON or its service partner has been advised of the possibility of such damage occurring).
If these disclaimers are prohibited or limited under the applicable law, AXTOR will limit its Warranty and liability to the extent permissible under the applicable regulations. For example, some national laws prohibit the exclusion or limiting of damages payable in connection with negligence, gross negligence, willful wrongcoing, deceitful conduct, and other such acts. For the duration of this Warranty, all liability that cannot be excluded completely will be limited to the extent permissible under the applicable law. Liability under this Warranty is limited to the price paid for the product. If the applicable law only permits higher limits on any liability, this higher limitation will apply.
How do I exercise my Warranty rights?
If you want to exercise your entitlements under this Warranty, please contact the authorized dealer where the product was purchased, and present it with the original copy of the till receipt or invoice. Do not return any products to AXTON directly, otherwise our Warranty obligations cannot be fulfilled. You will find the name of the relevant dealer or reseller on your proof of purchase.
Defective devices sent by the authorized dealer to the service center, must also be accompanied by any accessories with a logical connection to the observed fault. This means, for example, the navigation package on an SD or microSD card supplied or purchased with the device, if problems or functional errors were observed in connection with the navigation function.
How will AXTON fulfil its Warranty?
AXTON or its service partner will choose to either repair or replace the product or its defective parts covered by the Warranty, and assume the costs of material and labor in doing so.
Repairs under the Warranty must be carried out by AXTON or its authorized service partner. Products that are repaired or replaced may contain new and/or refurbished components and devices. Components that are swapped out will become the property of AXTON.
Will incur any costs in connection with the Warranty service?
AXTON assumes the costs of material and labor in connection with its Warranty service. The Warranty holder is responsible for the costs of shipment and bears the risks connected with the shipment (see above). In the product is found to be operating faultlessly, or there is no warranty entitlement because the warrant period has expired or for any other reason, AXTON or its authorized service partner will be entitled to charge a flat rate investigation fee of €30.00.
Do this Warranty affect my statutory or contractual rights?
This Warranty is made voluntarily by AXTON, and it will, in any case, extend your statutory rights. As a consumer, you remain fully entitled to your statutory rights, such as the statutory guarantee. This Warranty also has no effect whatsoever on your contractual rights against the reseller. You may continue to exercise those rights in full.
(EN) Hereby, ACR Brändli + Vögeli AG declares that the type of radio equipment A592DSP/A542DSP complies with the 2014/53/EU Directive. The full text of the EU Declaration of Conformity is available at the following Internet address: http://www.acr.ch/en/ (see link "Product Conformity Documents" in the footer are of the page).


- 4-CHANNEL SMART DIGITAL AMPLIFIERS
- SAFETY INSTRUCTIONS
- MAIN FEATURES
- FUNCTIONALITY & ADJUSTABILITY
- CONNECTIONS + CONTROLS A592DSP
- ① REMOTE CONTROL
- ② ANTENNA
- ③ POWER TERMINAL
- ④ FUSE
- ⑤ COAXIAL
- ⑥ SPEAKER IMPEDANCE
- ⑦ OPTICAL
- ⑧ SERVICE
- ⑨ LINE OUT
- ⑪ REMOTE / SIGNAL TURN ON
- ⑫ POWER
- MOUNTING INSTRUCTIONS A592DSP
- CONNECTIONS + CONTROLS A542DSP
- ① POWER
- ③ SPEAKER LEVEL INPUT/OUTPUT
- ④ REMOTE / SIGNAL TURN ON
- ⑤ SERVICE
- ⑥ REMOTE CONTROL
- ⑦ FRONT/REAR LINE OUT
- ⑧ OPTICAL
- ⑨ FRONT/ REAR LINE IN
- ⑩ COAXIAL
- MOUNTING INSTRUCTIONS A542DSP
- WIRING
- APP INSTALLATION A592DSP
- FOR ANDROID PHONES ONLY
- FOR IOS SMART PHONES ONLY
- APP INSTALLATION A542DSP
- BLUETOOTH AUDIO STREAMING
- FUNCTIONS
- CONNECTION TO THE SMART MOBILE
- SAVE TO PHONE
- SAVE TO AMP
- LOAD
- FAVORITES
- EQ SETTINGS
- DYNAMIC BASS
- GAIN PHASE
- NOISE GATE
- CROSSOVER
- TIME ALIGNMENT
- WARRANTY CONDITIONS + LIMITATIONS
- THIS WARRANTY DOES NOT COVER ANY DAMAGE DUE TO
Brand : Axton
Model : A542DSP
Category : Receiver