
INF-R3000 - Radio INFINITY - Free user manual and instructions
Find the device manual for free INF-R3000 INFINITY in PDF.


| Product Type | Marine Source Unit (Radio) |
| Brand | Infinity |
| Model | INF-R3000 |
| Power Supply | 12V DC (vehicle battery) |
| Bluetooth | Yes, range ~30 ft (10 m), supports audio streaming |
| Radio Bands | FM1, FM2, AM, Weather Band (WB) |
| Preset Stations | 6 per band (FM1, FM2, AM, WB) |
| USB Playback | Yes, supports MP3/WMA files |
| Auxiliary Input | Yes (AUX mode) |
| RCA Outputs | Yes, for external amplifier/subwoofer |
| Audio Controls | Volume, Bass, Treble, Balance, Fader, Equalizer (FLAT/CLASSIC/POP/ROCK), Loudness, I-Vol |
| Display | LCD with adjustable contrast (0-10) |
| Water Resistance | Not specified (designed for marine use; avoid high pressure water spray) |
| Reset Function | Yes, via menu or long press SEL knob |
| Warranty | 1 year from original purchase date (through Prospec Electronics) |
| Compliance | FCC Part 15 Class B |
Frequently Asked Questions - INF-R3000 INFINITY
User questions about INF-R3000 INFINITY
0 question about this device. Answer the ones you know or ask your own.
Ask a new question about this device
Download the instructions for your Radio in PDF format for free! Find your manual INF-R3000 - INFINITY and take your electronic device back in hand. On this page are published all the documents necessary for the use of your device. INF-R3000 by INFINITY.
USER MANUAL INF-R3000 INFINITY
Operation Manual for Users
Model No.: INF-R3000
Product Description 3
This radio features state of the art Bluetooth technology allowing music to wirelessly stream from an audio source to the receiver you just purchased. Why Bluetooth? From a practical standpoint, Bluetooth enables your music device (if applicable) to be placed in a glove box, your overhead console, or even your pocket-places that are dry-without having to install a separate docking station. In addition, Bluetooth audio streaming will work with any Bluetooth enabled device, not just one brand of media. Once connected, you can use your receiver to control your media device and vice versa! Bluetooth has a range of approximately 30', depending upon conditions, so once your boat is parked, feel free to control the stereo through your media device!
The INF-R3000 incorporates the following features:
U.S. and European tuning
Charging through USB
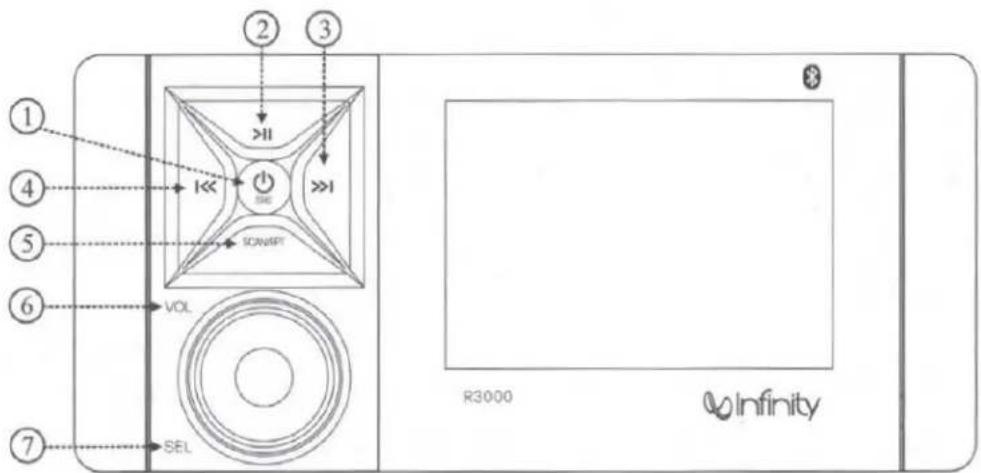
Front Panel | Panel delantero

SRC
1. POWER ON/OFF BUTTON
Power On/Off and Mode Switch
- Press for the first time to turn the unit on. Press and hold for more than 3 seconds to turn the unit off.
- With unit powered on, press _SRC repeatedly to switch mode as follows:

Encendido/apagado y
→FM1 -> FM2 -> AM -> WB -> BT MUSIC -> USB -> AUX
2
>II Play or Pause/Mute/Activate Manual Preset function
• In BT MUSIC and USB mode, press it repeatedly to play or pause track.
- In USB mode, long press it to enter the USB folder list.
- In Radio and AUX mode, press it to mute sound output, press again to resume.
- In Radio mode, long press it to activate Manual Preset function.
- In Radio mode, press it to work as Auto Tune. Press and hold it to activate Manual Tune, then press repeatedly to tune by step. (It will revert to auto tune status if you do not press this button within 5s after Manual tune is activated.) After the Manual Preset function is activated, press this button to select the Preset Number from 1 to 6.
- In BT MUSIC or USB mode, press it to select the next track.
- In USB mode, press and hold it to fast forward.
4
- In Radio mode, press it to work as Auto Tune. Press and hold it to activate Manual Tune, then press it repeatedly to tune by step. (It will revert to auto tune status if you do not press this button within 5s after Manual tune is activated.) After the Manual Preset function is activated, press this button to select the Preset Number from 1 to 6.
• In USB mode, press and hold it to rewind.
- In Radio mode, press it to scan listening to the preset stations.
Long press it to auto preset 6 stations in each band in sequence by signal strength. After Auto Select is completed, it will auto scan every Preset for 10s in sequence. - In USB mode, press it repeatedly to select between Random, Repeat Folder, and Repeat Track.
Long press it to enter Track Number search mode. Turn SEL Knob to set value of Track Number, then press SEL Knob to confirm the selection.
VOL Volume Increase / Decrease Knob
- In all modes, turn the knob clockwise or counter clockwise to adjust volume level (0\~50) in any playing status.
- Press SEL knob to enter 1st setting menu, then press it repeatedly to display features in following sequence:
SEL Perilla Seleccionar
- Long press SEL knob to enter 2nd setting menu, then press it repeatedly to display features in following sequence:
- On each setting, the level can be controlled by turning SEL knob. When the last adjustment is made, after 5 seconds, the display will automatically return to the original mode.
Turn the knob to adjust volume level (0\~50) in any playing status. If the volume is set less than I-VOL, it will memorize the volume set after restarting the unit. If the volume is set higher than I-VOL, it will memorize the I-VOL after restarting the unit.
To adjust the bass tone level, first select the bass mode by pressing knob repeatedly until BASS appears on the display panel. Then turn knob right or left within 5 seconds to adjust the bass level as desired. The bass level will be shown on the display panel from a minimum of BASS-7 to a maximum of BASS+7.
7-3
Treble Control
To adjust the treble tone level, first select the treble mode by pressing knob repeatedly until TREBLE appears on the display panel. Then turn knob right or left within 5 seconds to adjust the treble level as desired. The treble level will be shown on the display panel from a minimum of TREBLE-7 to a maximum of TREBLE+7.
7-4
Balance Control
To adjust the left-right speaker balance, first select the Balance mode by pressing knob repeatedly until BALANCE indication appears on the display panel. Then turn knob right or left within 5 seconds to adjust the balance as desired. The balance position will be shown by the bars on the display panel from BAL 10L (full left) to BAL 10R (full right).
Control de bajos
To adjust the front-rear speaker balance, first select the Fader mode by pressing knob repeatedly until FADER indication appears on the display panel. Then turn knob right or left within 5 seconds to adjust the front-rear speaker level as desired. The fader position will be shown by the bars on the display panel from FAD 10F (full front) to FAD 10R (full rear).
You can select an equalizer curve for 4 music types (FLAT, CLASSIC, POP, ROCK) by turning knob within 5 seconds. Then press knob to confirm the selection.
When listening to music at low volume levels, this feature will boost the bass and treble response. This action will compensate for the reduction in bass and treble performance experienced at low volume. Press knob until LOUD is displayed, then turn knob right or left within 5 seconds to activate or deactivate loudness.
Control de sonido
I-VOL is the volume level the unit will play at when next turned on. To adjust the I-VOL level, press and hold knob until I-VOL appears on the display panel. Then turn knob right or left within 5 seconds to set the volume level (0\~50) as the I-VOL level. The default is 20.
Long press knob to enter 2nd setting menu, then press knob repeatedly until BT VOL appears on the display panel. Turn knob right or left within 5 seconds to set the BT volume level (0\~50). The default is 30.
Long press knob to enter 2nd setting menu, then press knob repeatedly until CONTRAST appears on the display panel. Then turn knob right or left within 5 seconds to adjust level (0\~10) of contrast. The default is 5.
Control de contraste
Long press knob to enter 2nd setting menu, then press knob repeatedly until AREA appears on the display panel. Then turn knob right or left within 5 seconds to adjust area between USA and European.
Long press knob to enter 2nd setting menu, then press knob repeatedly until BEEP appears on the display panel. Then turn knob right or left within 5 seconds to select
BEEP ON, BEEP 2ND or BEEP OFF.
BEEP ON: You can hear the beep sound each time you press the buttons.
BEEP 2ND: You will only hear the beep sound when the buttons are held down formore than 2 seconds.
BEEP OFF: You can not hear the beep sound when you press the buttons.
Control de pitidos
Long press knob to enter 2nd setting menu, then press knob repeatedly until ABOUT System Info. appears on the display panel.
7-14
Reset
Long press knob to enter 2nd setting menu, then press knob repeatedly until RESET appears on the display panel. Then turn knob right or left within 5 seconds to select YES or NO.
Press ⏻ button to access FM1, FM2, AM and WB. Each band has six presets. You can preset station by Auto Preset or Manual Preset, please refer to Page 4 for specific operation.
Selección de BANDA
Please refer to the SEL knob operation in General Operation.
Pressing >>1 button results in a auto search of the next station of strong signal.
Pressing I<< button results in a auto search of the previous station of strong signal.
Long pressing I<< or >>1 of button results in Manual Tune mode, allowing you to search station frequency step by step.
Sintonizar
In radio mode, after pressing SCAN/RPT button, every station of the preset numbers will display and scan every station for 10s. Long press SCAN/RPT button to activate Auto Preset, it will preset 6 stations in each band in sequence by signal strength. Long press >>I button to activate Manual Preset, then press >>I button to select the next preset number, or press I<< button to select the previous number, finally preset in the selected number by long pressing knob.
Adding Preset Stations
In order to enter an AM or FM station as a preset you must first tune to your desired station. Then, long press the play/pause button to initialize the preset process (You will see that Preset #1 is now highlighted). To move to the specific preset number (1-6), short press the fast forward button to move to that appropriate number. Once that numbered determination is complete, long press the rotary button to finalize/lock in the preset. Finally, long press the play/pause button to exit the preset process.
Selecting a Preset Station
In order to select a preset station, long press the play/pause button and short press the fast forward button to navigate to the preset number. To select and play that chosen station, short press the rotary button. To exit the preset selection process, long press the play/pause button again.
Your media device must incorporate the Bluetooth option in order to stream music.
- Search and pick the "R3000" option on your Bluetooth enabled device.
- On successful BT connection, it will display ⚙️ icon on the first line of screen. The BT music will automatically play. While playing track, you can pause the track by pressing >II button, then press again to resume to playback status.
- Features Set Up. Please refer to the SEL knob operation in General Operation.
Note: USB slot is for USB sticks only. For play of other brands of media, please use the auxiliary input or if applicable, utilize Bluetooth mode.
- Insert a USB stick into the USB slot. *Songs must be of the mp3 or wma format.*
- Features Set Up. Please refer to the SEL knob operation in General Operation.
- Play/Pause. Press >11 button to pause playback, and press the button again to resume to playback status.
- Track Up/Down. Press >>1 button to select the next track. Press I<< button within 5 seconds to select the previous track. Press I<< button over 5 seconds to back to the beginning of the track.
- Fast Forward/Rewind. Long press >>1 button to fast forward the current track. Long press I<< button to rewind the current track.
- Play Mode Select / File Search. Press SCAN/RPT button repeatedly to select Random, Repeat Track or Repeat Folder. Long press SCAN/RPT button to enter Track Number search mode, then select the desired track with SEL knob. In another way to select track, enter the folder browse interface by long pressing >11 button, turn knob to browse the folder list then press knob to enter file browse interface to select the desired track by operating with knob.
Description: The use of RCA outputs allow an amplifier or subwoofer to be hooked up.
natural_image
Technical line drawing of a mechanical device with screws and a side panel (no text or symbols)A mounting gasket has been added inside the package for convenience. Trace along the inside edge and this will be your cutout.
Mounting Illustration
- Please install this unit in the place you prefer.
- Use the mounting template and screw to fix the unit.
natural_image
Diagram showing a device with multiple connectors and a prohibition symbol (no text or labels present)To avoid possible water ingress into wire harness area, route the harness in the downward direction as shown below on the left. Do not route the harness in the upward direction as shown on the right.
*Note: In many respects, a stereo acts much like a computer and occasionally requires a reboot. In the unlikely event of product malfunction, a reset can usually fix the issue. Reset: After long pressing SEL knob to enter the 2nd menu, press SEL knob repeatedly until RESET appears on the display screen, then select [YES] and press SEL knob to confirm your selection.
| ISSUE | CAUSE | SOLUTION |
| No power | 1. Incorrect wiring2. Fuse is blown3. Low battery voltage | 1. Double check wiring.2. Replace fuse3. Check voltage of vehicle battery with multimeter. Voltage must be at least 11V. |
| No Sound | 1. Speaker connection came loose2. Bad speaker3. Output blown4. Volume too low | 1. Double check connections.2. Replace bad speaker with known good speaker and connect.3. Send unit in for repair.4. Increase volume of media device |
| No Reception | 1. Antenna not firmly seated in socket. | 1. Insert firmly |
| USB stick not reading | 1. File must be a mp3 or wma file | 1. Convert format to mp3 or wma. |
| While in Bluetooth mode: | ||
| No Connection | 1. You are not connected to the "R3000" address on your portable media device.2. Out of range3. The connection is already in use. | 1. Choose "R3000"2. Bring portable media device closer to the receiver. Device needs to be within 30'.3. Ask your boating buddy who is currently connected to disconnect. |

natural_image
Blue circular logo with a white stylized 'P' and curved line (no text or symbols)PROSPEC
E I e c t r o n i c s
prospecelectronics.com
843.849.9037
natural_image
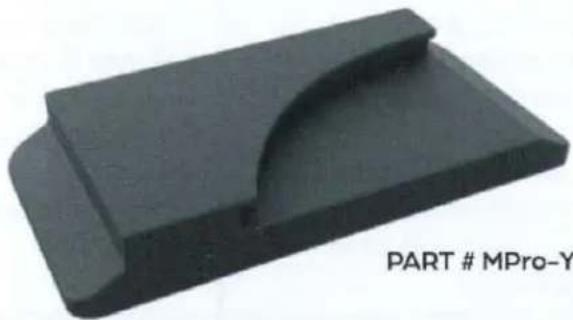
3D black plastic component with a curved cutout, labeled PART # MPro-Y (no other text or symbols)PART # MPro-Y1000/WPC
This Infinity receiver offers a soft silicone rubber cover accessory for additional protection.
Go to our website to purchase this and other accessories.
Infinity® by HARMAN
R3000
Infinity Marine Source Unit Warranty Statement
The Infinity Marine WAKE series source units carry a one year warranty from the original date of purchase. The terms of this warranty are offered through Prospec Electronics of S.C. Inc.
Should the product need repair or replacement (at company discretion) within the terms of this warranty, Prospec will provide said service without charge to the owner. To obtain repairs or replacements, the product shall be returned, shipping postage paid by the owner, to Prospec Electronics. A copy of the receipt at the store where purchased or a copy of the bill of sale of the boat must accompany the returned product. Prospec will return the product at Prospec's expense by ground shipping. Any expedited requests will be at the expense of the owner.
This warranty extends only to the original purchaser. It is not transferable to anyone who subsequently purchases the product from you. ALL MATERIAL RETURNED MUST BE ACCOMPANIED BY A RETURN AUTHORIZATION (RA) NUMBER.
This warranty does not extend to the elimination of static or motor noise, correction of antenna or radio reception problems, costs incurred in the removal or reinstallation of the unit, or damage to the source units. This warranty does not apply to any product or part thereof which has been improperly installed or subjected to misuse, abuse, neglect, alteration (including the cutting or modification of any wires or connectors), accident or to a product which has been used in violation of the operating instructions or which has had the serial number removed or defaced. In addition, damage caused by exposure to high pressure water spray will not be covered.
ANY IMPLIED WARRANTY IS LIMITED TO THE DURATION OF THIS WRITTEN WARRANTY; IN NO EVENT SHALL THE COMPANY BE LIABLE FOR ANY INCIDENTAL OR CONSEQUENTIAL DAMAGES OR LOSSES RESULTING FROM THE USE OR INABILITY TO USE THIS PRODUCT. The warranty gives you specific legal rights which vary from state to state. Some states do not allow the exclusion or limitation on how long an implied warranty lasts, so the above limitations may not apply to you.
FCC Statement:
This equipment has been tested and found to comply with the limits for a Class B digital device, pursuant to Part 15 of the FCC Rules.
These limits are designed to provide reasonable protection against harmful interference in a residential installation. This equipment generates uses and can radiate radio frequency energy and, if not installed and used in accordance with the instructions, may cause harmful interference to radio communications. However, there is no guarantee that interference will not occur in a particular installation. If this equipment does cause harmful interference to radio or television reception, which can be determined by turning the equipment off and on, the user is encouraged to try to correct the interference by one or more of the following measures:
- Reorient or relocate the receiving antenna.
- Increase the separation between the equipment and receiver.
- Connect the equipment into an outlet on a circuit different from that to which the receiver is connected.
- Consult the dealer or an experienced radio/TV technician for help.
FCC RF Warning:
This device complies with part 15 of the FCC Rules. Operation is subject to the following two conditions:
(1) This device may not cause harmful interference, and
(2) this device must accept any interference received, including interference that may cause undesired operation.
Changes or modifications not expressly approved by the party responsible for compliance could void the user's authority to operate the equipment.


- Operation Manual for Users
- Front Panel | Panel delantero
- POWER ON/OFF BUTTON
- Power On/Off and Mode Switch
- Encendido/apagado y
- 2
- >II Play or Pause/Mute/Activate Manual Preset function
- 4
- VOL Volume Increase / Decrease Knob
- SEL Perilla Seleccionar
- 7-3
- Treble Control
- 7-4
- Balance Control
- Control de bajos
- Control de sonido
- Control de contraste
- Control de pitidos
- 7-14
- Reset
- Selección de BANDA
- Sintonizar
- Adding Preset Stations
- Selecting a Preset Station
- Mounting Illustration
- PROSPEC
- E I e c t r o n i c s
- Infinity® by HARMAN
- Infinity Marine Source Unit Warranty Statement
- FCC Statement:
- FCC RF Warning:
Brand : INFINITY
Model : INF-R3000
Category : Radio