
INFPRV90 - Radio INFINITY - Free user manual and instructions
Find the device manual for free INFPRV90 INFINITY in PDF.


| Product Type | Marine/Off-road AM/FM Receiver with Bluetooth |
| Model | INFPRV90 |
| Brand | Infinity by Harman |
| Power Output | 40W x 4 channels (max) |
| Power Supply | 12V DC (negative ground) |
| Tuner Bands | AM/FM with 3 FM and 2 AM bands |
| Tuning Range | USA and Europe (selectable) |
| Bluetooth | Yes, for audio streaming; pairing via BAND button |
| USB Input | For USB flash drives (MP3/WMA) |
| Auxiliary Input | 3.5mm stereo input (requires adapter SEAUSBMINI36 or SEAMINI2) |
| Waterproof Rating | Waterproof faceplate (IP? not specified) |
| Equalizer | Presets: Classic, Pop, Rock, Jazz, Off |
| Audio Settings | Bass, Treble, Balance, Fader, Loudness, Initial Volume |
| Beep Tone | On, 2nd (only on long press), Off |
| Installation Type | DIN size with mounting bracket and studs |
| Included Accessories | Mounting gasket, hardware (jamb nuts, spring washer, outer nuts) |
| Cleaning | Sponge, soap, and water only; no pressure washer or chemicals |
| Reset Function | With power off, press SEEK DOWN then SEEK UP three times |
| Fuse | Replaceable (type not specified) |
Frequently Asked Questions - INFPRV90 INFINITY
User questions about INFPRV90 INFINITY
0 question about this device. Answer the ones you know or ask your own.
Ask a new question about this device
Download the instructions for your Radio in PDF format for free! Find your manual INFPRV90 - INFINITY and take your electronic device back in hand. On this page are published all the documents necessary for the use of your device. INFPRV90 by INFINITY.
USER MANUAL INFPRV90 INFINITY
INFPRV90 Owner's Manual
Infinity HARMA®
by HARMA
TABLE OF CONTENTS
Table of Contents ---- pg 1
Product Description pg 2
Front Panel Layout pg 3
User Operation pg 4
General pg4
Radio pg 4
Auxiliary Input pg 4
USB pg 5
Bluetooth pg 5
Installation pg 6
Wiring pg6
Troubleshooting pg 7
Installation Bulletin ---- pg 8
This radio is another forward thinking [product from Infinity by Harman. Other Harman brands include JBL, JBL Professional, AKG, Mark Levinson, Harman Kardon, and Revel. Harman was purchased by Samsung in 2016. Prospec Electronics is Harman's exclusive distributor to OEM's in the marine, side by side, golf car, and hot tub industries. Our products range from mechless receivers, amplifiers, subwoofers, speakers, and other accessories. Prospec is located in Mount Pleasant, S.C., a stone's throw away from Charleston, S.C. Should you need our expertise, please do not hesitate to give us a call. We're all about the music and this music should resonate from components verified to complement your hard earned off road purchase.
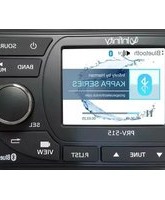
The PRV90 incorporates the following features:

AM/FM

Bluetooth Audio Streaming

USB input (for USB drives only)
Auxiliary input

Waterproof faceplate

40W x 4 amplifier

U.S. and European tuning

Charging through USB
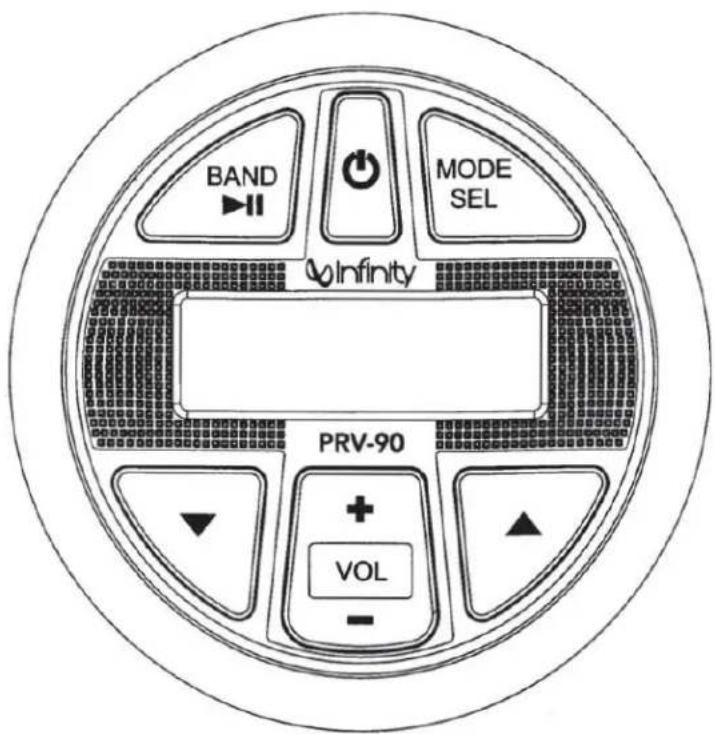
POWER
Power On/Off button.
Short push for the first time to turn the unit on.
With unit powered on, short push for MUTE feature.
Press and hold for more than 2 seconds to turn the unit off.
MODE
Mode Function.
SEL
Switches amongst Radio, USB and Auxiliary mode.
SEL stands for SELECT.
BAND
In Radio mode, this works Band Function.

In MP3 playing mode, it works Play/Pause function.
VOL+
Volume Increase.
VOL -
Volume Decrease.

Track Down / Tune Down / Reverse

Track Up / Tune Up / Fast Forward.
General Operation
A. SEL button
Press and hold this button to enter into SELECT function, then repeatedly short push in succession to access the following menu options: Bass, Treble, Balance, Fader, Loud, EQ, Beep, Initial Volume, Area. Press the VOL+ or VOL- to adjust the options.
- LOUD. Choose between Loud ON or OFF.
- EQ. Choose between Classic, Pop, Rock, Jazz and EQ off.
- Beep. Choose between Beep ON, Beep 2ND, Beep OFF. Beep ON will result in a sound at the press of every button; Beep 2ND will result in the beep sound once the button is long pressed; Beep OFF results in the beep sound off completely.
- Initial Volume. Refers to the loudness level upon start of the receiver.
- AREA. Choose between USA and Europe.
Radio Operation

A. Press▶ button (BAND function) to access FM and AM. There are three FM bands and two AM bands.
B. Tuning. A short press of the ▼ or ▲ button results in a search of the station and stoppage at station of next sufficient signal strength. A long press results in manual tuning mode, allowing you to search one odd digit frequency at a time. (It will revert back to AUTO tune mode without operation in 5 seconds.)
Auxiliary Input Mode
A. Press the Mode button until "AUX" appears on the LCD screen.
B. The use of auxiliary mode allows you to play the portable music device through the headphone jack.
Note: An additional accessory/adaptor must be purchased in order for this to happen.
Prospec's part, SEAMINI2, or SEAUSBMINI36 fulfills this option.
Note: USB slot is for USB flash drives only. For play of other brands of media, please use the auxiliary input or Bluetooth options.
A. Insert a USB flash drives into the USB slot. *Songs must be of the mp3 or wma format.*
B. ▶ll button. Press to pause the track. Press again to resume play.
C. ▼ and ▲ button (Track Up / Track Down)
Short press Track Up or Track Down button to select the next or previous track. Press and hold Track Up or Track Down button to fast forward or rewind the current track respectively.
Bluetooth Operation

Your media device must incorporate the Bluetooth option in order to stream music.
A. First, make sure you are in the BT mode.
B. While in BT mode, press and hold BAND button until PAIRING appears.
C. Next, go to settings on the Bluetooth device and turn the Bluetooth option to "on". Pick the "PRV-90" option on your Bluetooth enabled device
If your stereo does not immediately pair, press BAND. This will allow the pairing process to finalize. A higher pitch frequency noise will alert you to the connection/success! The display will also read "CONN OK" (connection ok).
D. To disconnect your device, press and hold BAND button. "DISCONN" will appear letting you know you have successfully disconnected.
E. While BT Music playing, push ▶ to Pause playback.
Cleaning Note: Do not use a pressure washer or chemicals to clean this faceplate. Use a sponge, soap, and water.
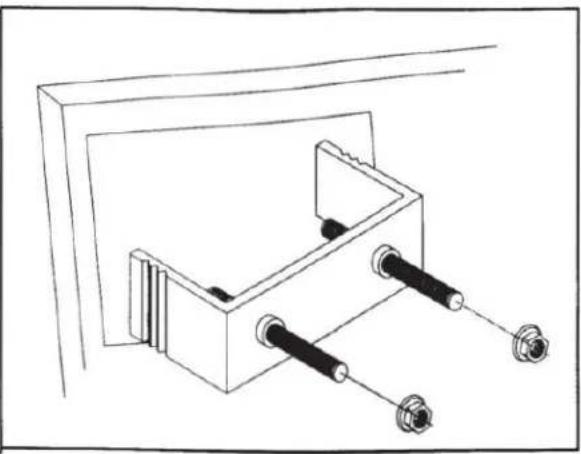
A mounting gasket has been added inside the package for convenience. Trace along the outside edge and this will be your cutout.
Mounting Illustration
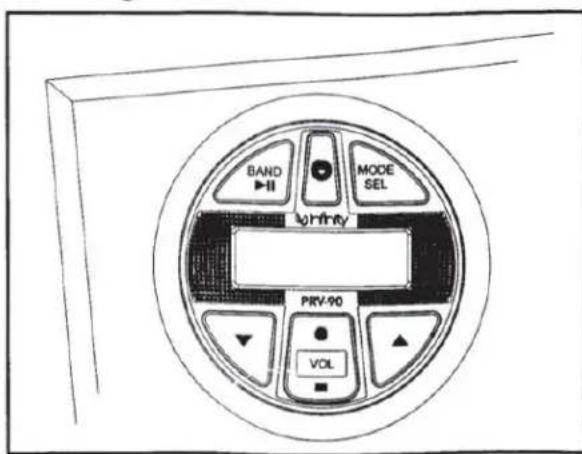
- Do not install beneath cup holders
natural_image
Technical line drawing of a mechanical clamp or bracket assembly (no text or symbols)- See important installation instructions on page 8.
Wiring Identification
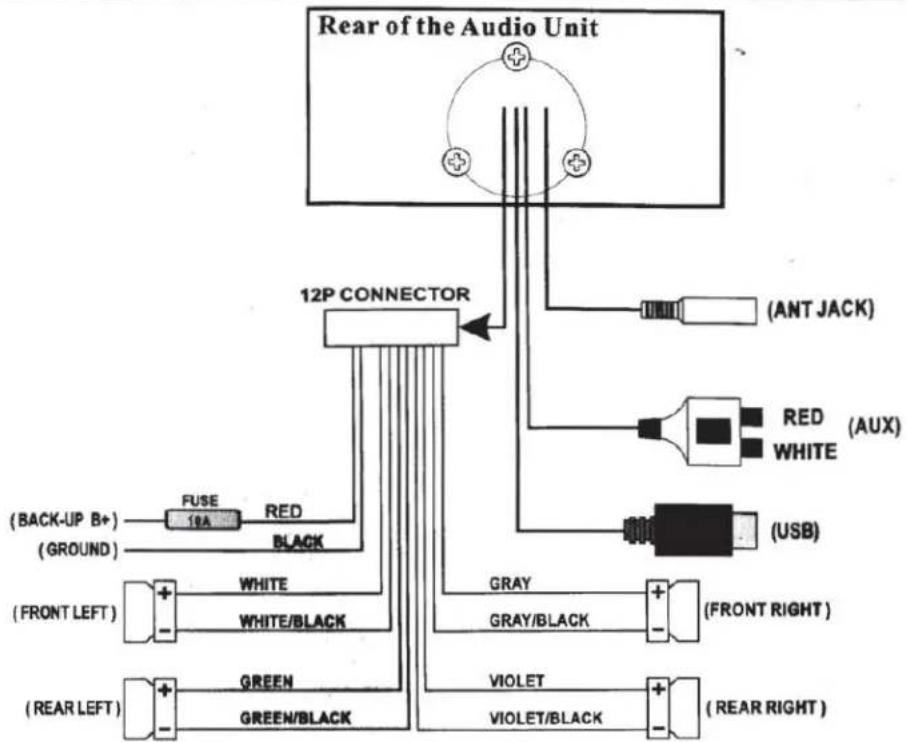
*Note: In many respects, a stereo acts much like a computer and occasionally requires a reboot. In the unlikely event of product malfunction, a reset can usually fix the issue. Reset Function: With the unit powered off, press SEEK DOWN then SEEK UP in succession three times in a row. Once this occurs, the display will read SYS CLR, indicating a successful reset.
| Issue | Cause | Solution |
| No power | Incorrect wiringFuse is blownLow battery voltage | Double check wiringReplace fuseCheck voltage of vehicle battery with multimeter. Voltage must be at least 11V. |
| No Sound | Speaker connection came looseBad speakerOutput blownVolume too low on media device | Double check connections.Replace bad speaker with known good speaker and connect.Send unit in for repair.Increase volume of media device |
| No Reception | Antenna not firmly seated in socket | Insert firmly |
| USB stick not reading | File must be a mp3 or wma file | Convert format to mp3 or wma. |
| While in Bluetooth mode: | ||
| No Connection | You are not connected to the “PRV90” address on your portable media device.Out of rangeThe connection is already in use. | Choose “PRV90”Bring portable media device closer to the receiver. Device needs to be within 30’.Ask the person who first paired to drop out. |
INSTALLATION BULLETIN
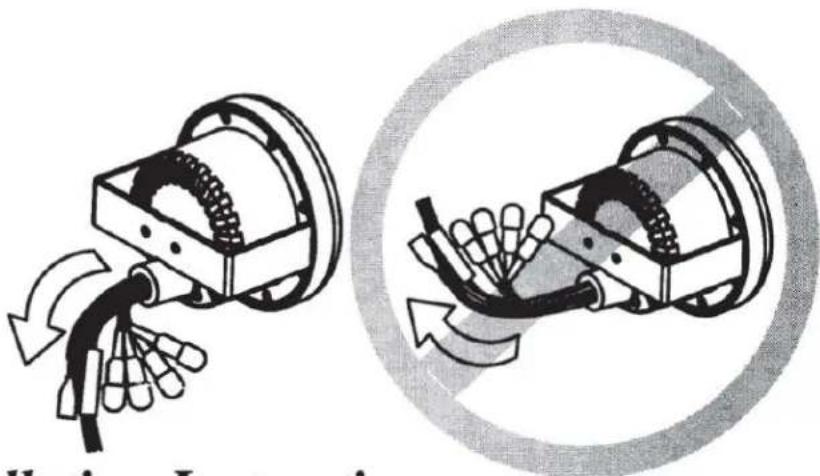
To avoid possible water ingress into wire harness area, route the harness in the downward direction as shown below on the left. Do not route the harness in the upward direction as shown on the right.
natural_image
Diagram showing two mechanical components with rotating parts and directional arrows, no text or symbols present.Installation Instructions
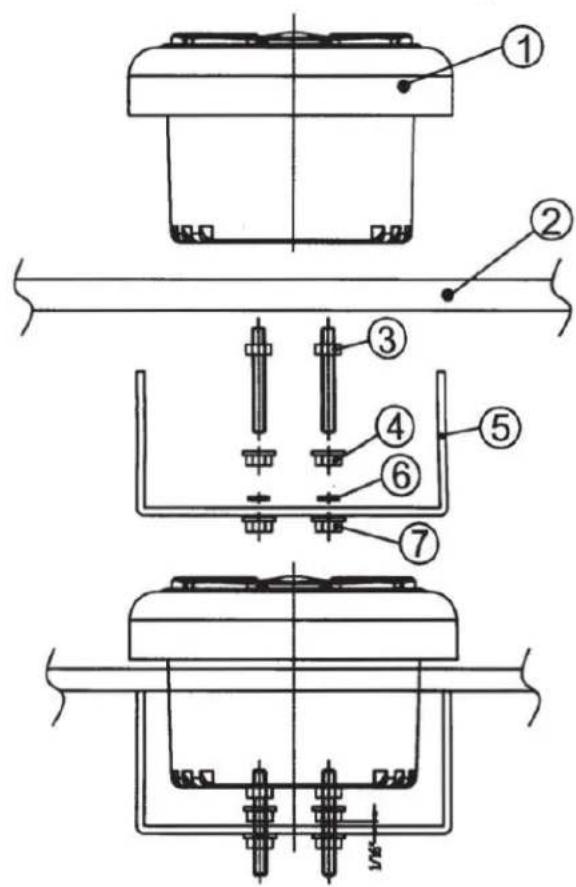
| NO. | PART DESCRIPTION |
| 1 | RADIO |
| 2 | MOUNTING PLATE |
| 3 | MOUNTING STUDS |
| 4 | JAMB NUTS |
| 5 | MOUNTING BRACKET |
| 6 | SPRING WASHER |
| 7 | OUTER NUTS |
Instructions:
- Install jamb nuts (4) loosely on mounting studs (3), so they will not touch mounting brackets (5) when installed.
- Slip mounting bracket (5) on and make flush with mounting surface (2). DO NOT TIGHTEN
- Snug spring washer (6) and outer nuts (7) against mounting plate (2). DO NOT TIGHTEN
- Position jamb nuts (4) approximately 1/16" from mounting bracket.
- Tighten outer nuts (7) completely.

natural_image
Dynamic splash of water with splashes and reflections against a dark background (no text or symbols)

Brand : INFINITY
Model : INFPRV90
Category : Radio