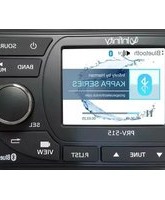
KAPPRV515 - Radio INFINITY - Free user manual and instructions
Find the device manual for free KAPPRV515 INFINITY in PDF.


| Product Type | Car Radio / Stereo |
| Brand | Infinity |
| Model | KAPPRV515 |
| Chassis Size | Single-DIN (approx. 180 x 50 mm) |
| Weight | 0.5 kg |
| Power Supply | 12V DC (negative ground) |
| Tuner Bands | AM / FM |
| Max Power Output | 4 x 50 Watts |
| Audio Sources | USB, AUX, Bluetooth, CD (optional) |
| Bluetooth | Hands-free calling and audio streaming |
| Display | LCD with adjustable backlight |
| Remote Control | Included |
| Audio Settings | Bass, Treble, Balance, Fader, EQ presets |
| Additional Features | RDS, clock, auxiliary input, steering wheel control compatible |
| Maintenance | Wipe gently with a dry, soft cloth; avoid liquids |
| Safety | Fuse protection (blade type, 10A) |
| Spare Parts | Available through authorized dealers or online |
Frequently Asked Questions - KAPPRV515 INFINITY
User questions about KAPPRV515 INFINITY
0 question about this device. Answer the ones you know or ask your own.
Ask a new question about this device
Download the instructions for your Radio in PDF format for free! Find your manual KAPPRV515 - INFINITY and take your electronic device back in hand. On this page are published all the documents necessary for the use of your device. KAPPRV515 by INFINITY.
USER MANUAL KAPPRV515 INFINITY
*This stereo should not be washed with a pressure washer neither should it be washed with chemicals. A wet sponge or damp cloth will suffice.*

Prospec Electronics
Sound Systems For The Outdoor Enthusiast
3325 South Morgans Point Rd. | Mt. Pleasant, SC 29466
P: 843·849·9037 | www.prospecelectronics.com
Table of Contents 1
Product Description 2
Installation Instructions 3
Wiring Configuration 4
General Function of Buttons 5
Sign up Display & Home Menu 6
General Operations 7
General Settings 7
Radio Section Operation 9
SiriusXM® Section Operation 11
Bluetooth Section Operation 15
USB Section Operation 17
iPod/iPhone Operation 19
AUX Section Operation 20
Troubleshooting 21
This radio is another forward thinking product from Infinity by Harman. Other Harman brands include JBL, JBL Professional, AKG, Mark Levinson, Harman Kardon, and Revel. Harman was purchased by Samsung in 2016. Prospec Electronics is Harman's exclusive distributor to OEM's in the marine, side by side, golf car, and hot tub industries. Our products range from mechless receivers, amplifiers, subwoofers, speakers, to other accessories. Prospec is located in Mount Pleasant, S.C., a stone's throw away from Charleston, S.C. Should you need our expertise, please do not hesitate to give us a call. We're all about the music and this music should resonate from components verified to complement your hard earned off road purchase.
The KAPPRV515 incorporates the following features:
| AM/FM/WB/ RBDS | |
| ((sxm)) | SiriusXM-ReadyTM (SiriusXM connect tuner and subscription required) |
| Bluetooth Audio Streaming with ID tagging | |
| USB input and control, iPod/iPhone compatible | |
| Auxiliary input | |
| 3.5" color TFT screen / Waterproof faceplate | |
| 50W x 4 amplifier | |
| Wired remote option | |
| U.S., European and Japan tuning | |
| Charging through USB | |
| 4 pair of RCA output including subwoofer output | |
| Can Bus Control via NMEA2000 | |
| Video input | |
| Multizone Control (Zone 1, Zone 2, Zone 3, Zone 4) | |
| RGB Speaker Control (MIL-LEDPWR required) |
Sirius XM and all related marks and logos are trademarks of Sirius XM Radio Inc. All rights reserved.
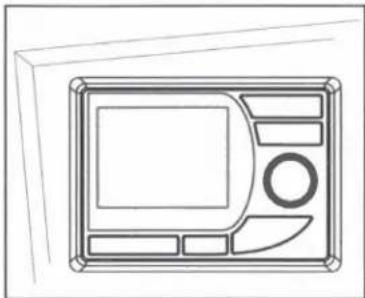
A mounting gasket has been added inside the package for convenience. Trace along the outside edge of the gasket thus revealing your 3 1/2" cutout.
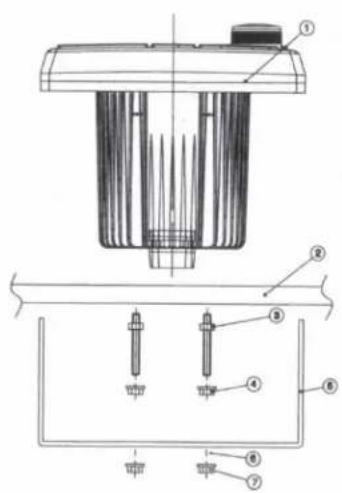
Mounting Illustration
natural_image
Line drawing of a rectangular device with internal compartments and a central screen (no text or symbols)- Avoid installing stereo below cupholders! Make sure mounting substrate is flat to avoid flexing of the plastic.
natural_image
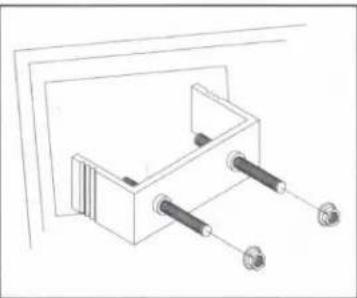
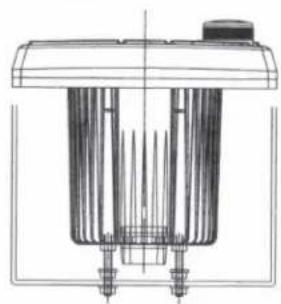
Technical line drawing of a mechanical assembly with two cylindrical components and mounting holes (no text or symbols)- Use the back bracket and studs to affix the unit. Install the U bracket behind the unit, using two nuts per bolt for ultra hold.
natural_image
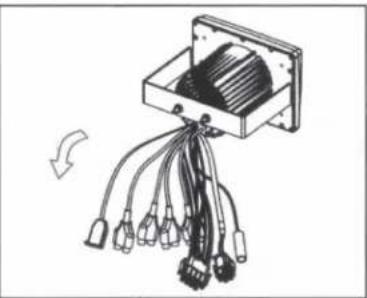
Diagram of a cable connector with multiple wires and connectors, no text or symbols present- To avoid possible water ingress into wire harness area, route the harness in the downward direction as shown above.
natural_image
Technical line drawing of a mechanical component with internal channels and mounting base (no text or symbols)| NO. | PART DESCRIPTION |
| 1 | RADIO |
| 2 | MOUNTING PLATE |
| 3 | MOUNTING STUDS |
| 4 | JAMB NUTS |
| 5 | MOUNTING BRACKET |
| 6 | SPRING WASHER |
| 7 | OUTER NUTS |
Instructions:
-
Install jamb nuts (4) loosely on mounting studs (3), so they will not touch mounting brackets (5) when installed.
-
Slip mounting bracket (5) on and make flush with mounting surface (2). DO NOT TIGHTEN
-
Snug spring washer (6) and outer nuts (7) against mounting plate (2). DO NOT TIGHTEN
-
Position jamb nuts (4) approximately 1/16" from mounting bracket.
-
Tighten outer nuts (7) completely.
flowchart
graph TD
    A["12P CONNECTOR"] --> B["6P REMOTE CONTROL"]
    A --> C["RED (ZONE1)"]
    A --> D["RED (ZONE2)"]
    A --> E["RED (AUX)"]
    A --> F["RED (ZONE3)"]
    A --> G["RED (LED RGB)"]
    A --> H["RED (REAR CAMERA)"]
    A --> I["RED (USB)"]
    A --> J["RED (ZONE4)"]
    A --> K["GREEN (FRONT LEFT)"]
    A --> L["VIOLET (Violet/Black)"]
    A --> M["GREEN (GREEN/BLACK)"]
    A --> N["FUSE (ACC)"]
    A --> O["(REAR LEFT)"]
    A --> P["(REAR CAMERA DET)"]
    A --> Q["(ANT JACK)"]
    A --> R["(SiriusXM)"]
NOTE:
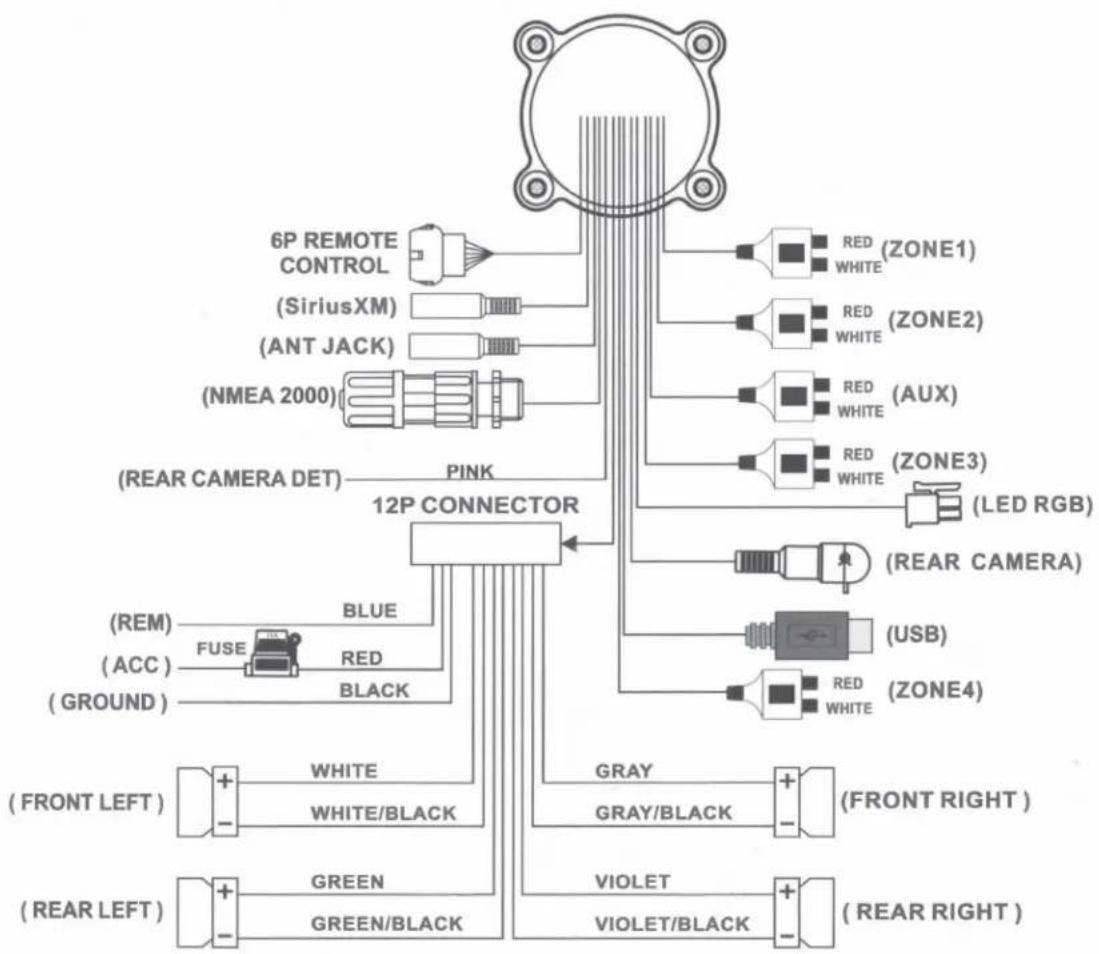
- When wiring, the red lead is recommended to be wired to ACC/ignition power lead.
- Make sure that the black wire on the wiring harness is connected to a good ground point on the boat. If the chassis of the boat is used as a ground point, make sure that the surface is scraped clean of paint before attaching the wire to it. It is recommended to connect the black ground wire directly to negative terminal (-) of the boat battery.
- Before wiring your system, disconnect your boat battery's positive (+) cable. This helps prevent damage in case of a short.
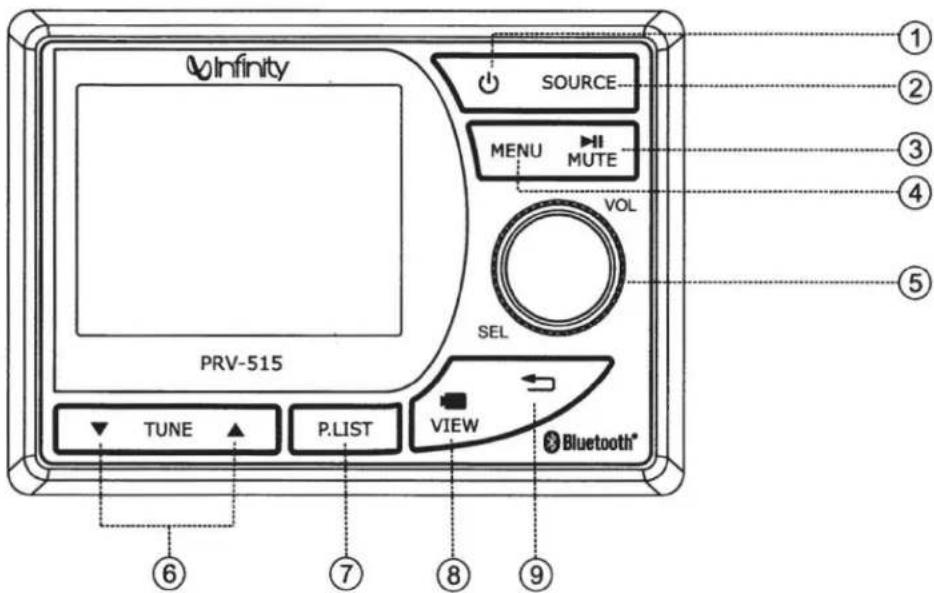
1. POWER
- Press it to power unit on or off.
2. SRC button
- Press SRC button to switch modes among AM/FM/WB/Bluetooth/USB/SXM/AUX.
3. Pause, Mute button
- In USB, BT Music source playing, press to PAUSE playback, press again to resume playback.
- In Radio, SiriusXM, AUX source, press to MUTE sound output, press again to resume sound output.
4. MENU button
- In any source playing, short press to display sub-menu of current source.
- In any source playing, press and hold for 2s to enter Settings.
5. VOL, Selection/Enter button
- At source playing status, turn the knob to increase or decrease volume level.
- In selection status, turn it to scroll move highlight upward/over, so later press again to confirm selection.
6. Tune Up/ Down button
- In Radio (FM/AM/WB) mode playing, short press to select previous or next station.
- In USB/BT Music source playing, short press to select the previous or next track.
- In USB source playing, press and hold to go fast forward or rewind.
- In SXM source playing, short press to select previous or next channel. Press and hold it to rapid browse channels until the button being released.
7. P.LIST button
- In FM, AM, WB, SXM source, press to display Global Preset List.
- In USB source, press to display Fold/ File List.
8. View button
- In any source, press to activate Rear camera display, press again to exit.
9. Return button
- In any status, press to return back to previous screen. Long press to display Home screen.
1. Sign up
Once the unit power on, the introductory home screen appears for 5 seconds, then switches to the last played mode before power off occurred.

2. Home menu (source display)
At Home Menu, turn VOL knob to move to desired source and press rotary button to confirm.
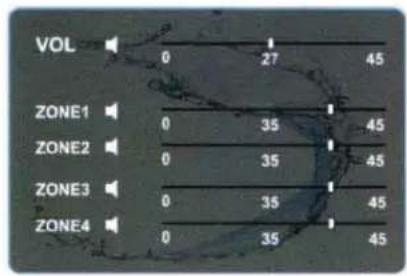
1. VOLUME Control
In any source playing status, turn VOL knob to adjust volume level.
NOTE: VOL refers to main volume. Zone1, Zone2, Zone3, Zone4 level will change along with VOL adjust.
2. MUTE Control
In Radio, SiriusXM, or AUX mode, press MUTE button to mute sound output; press again to resume sound output.
natural_image
Simple speaker icon with a white sound block and 'X' symbol, no text or numbers present.3. SETUP
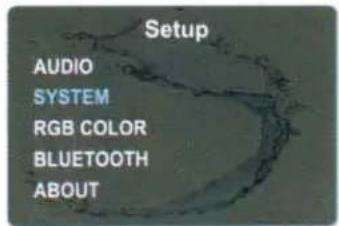
At Home Screen, turn VOL knob and press it to enter SETUP, then turn VOL knob to move amongst Audio, System, RGB Color, and Bluetooth, About. Press the knob at desired feature and turn the knob again to adjust the level. Press the knob again to exit current feature adjustment.
Note: If no operation occurs, it will revert back after 5s. You can also enter Setup by pressing and hold MENU button at any status.
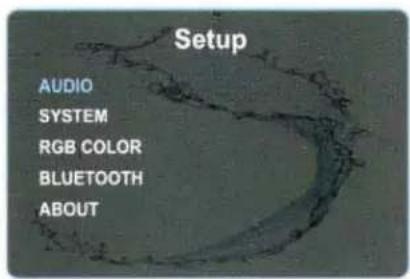
3-1. Audio Settings
At Audio Settings, turn VOL knob and press it to select the sub-item of what you desire to adjust, then turn VOL knob to adjust the level, and press VOL knob again to exit current item adjustment. Then you can repeat above operations to adjust other items to desired value.
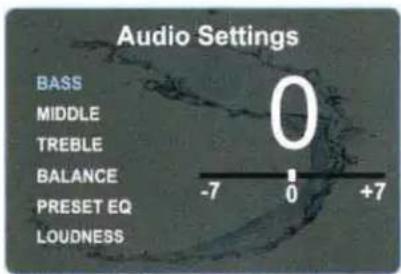
- BASS: Minimum -7 to maximum +7.
- MIDDLE: Minimum -7 to maximum +7.
- TREBLE: Minimum -7 to maximum +7.
- BALANCE : L10 (full left) to R10 (full right).
- PRESET EQ: OFF, JAZZ, POP, CLASSIC, ROCK, VOCAL.
- LOUDNESS: OFF, ON
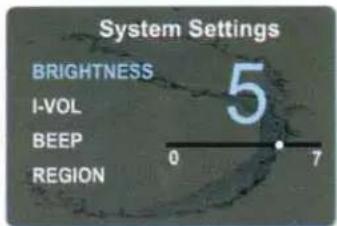
3-2. System Settings
At System Settings, turn VOL knob and press it to select the sub-item of what you desire to adjust, then turn VOL knob to adjust the level, and press VOL knob again to exit current item adjustment. Then you can repeat above operations to adjust other items to desired value.
- BRIGHTNESS: This feature controls the brightness of the display panel. It is adjustable from 0 to 7.
- I-VOL: This feature controls the initial volume level of next power on.
- BEEP: This feature controls the beep sound when button was pressed. With beep 2nd selected, you will hear a beep sound when the button was pressed over 2s; With beep on selected, you will hear a beep sound when any button was pressed; With beep off selected, no beep sound will be heard when button is pressed.
- REGION: The Tuner Region is optional for EURO, USA, JAPAN. (Note: with wrong Region selected, the tuner reception might be affected.)
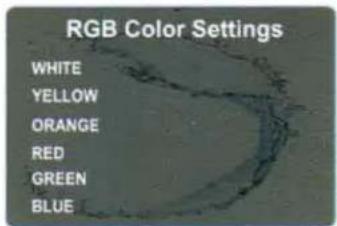
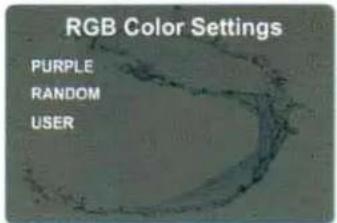
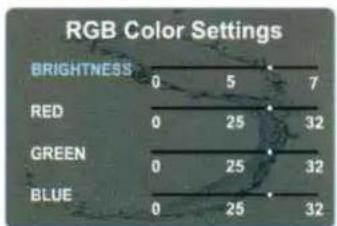
3-3. RGB Color Settings
When MIL-LEDPWR is connected, long press MENU button to enter Setting screen. Turn VOL knob to select RGB Color, thus enabling you to adjust the color which you desire. We provide several preset colors for easy selection and also the user setting for professionals.
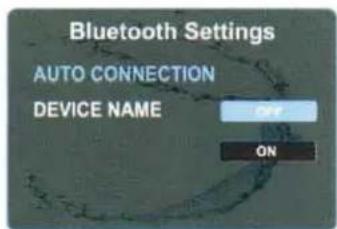
3-4. Bluetooth Settings
At Bluetooth Settings, turn VOL knob and press it to select the sub-item that you desire to adjust, then turn VOL knob to adjust the level, and press VOL knob again to exit current item adjustment.
- Auto Connection: With ON selected, it will try to connect with the last paired BT device once Bluetooth source is selected.
- Device Name: PRV515 will show once you turn VOL knob to Device Name highlighted.
3-5. About
Select About in Setup to show the firmware information of the product.
- FACTORY RESET: The unit works like a computer and may occasionally get "stuck". If encountered, initialize a Factory Reset. With firmware information displayed, press and hold VOL button for more than 5s to display Factory Reset, then press the knob to confirm. (Note: once Factory Reset is carried out, prior presets will be cleared, and you will need to setup the features and Global Presets once again.)
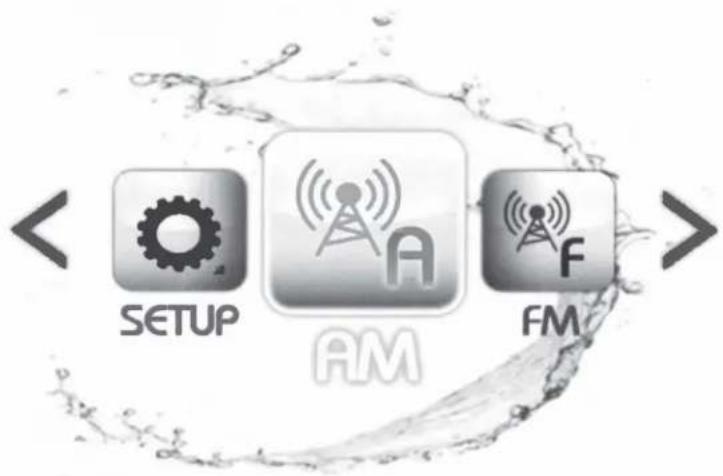
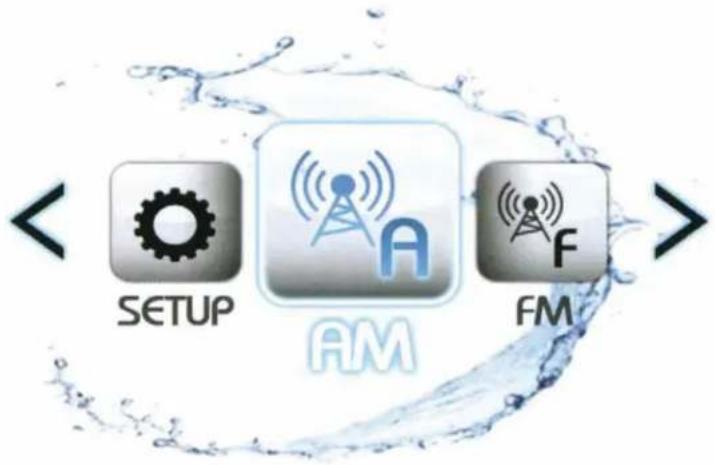
1. To Select Radio mode
At Home Screen, turn VOL knob and press it to select AM, FM or WB source.
(The foreground popup icon refers to the source changing.)
Or simply repeat press SRC button to select the desired source.
flowchart
graph LR
    A["SETUP"] --> B["AM"]
    B --> C["FM"]
    style A fill:#f9f,stroke:#333
    style B fill:#bbf,stroke:#333
    style C fill:#dfd,stroke:#333
2. Radio Screen Description
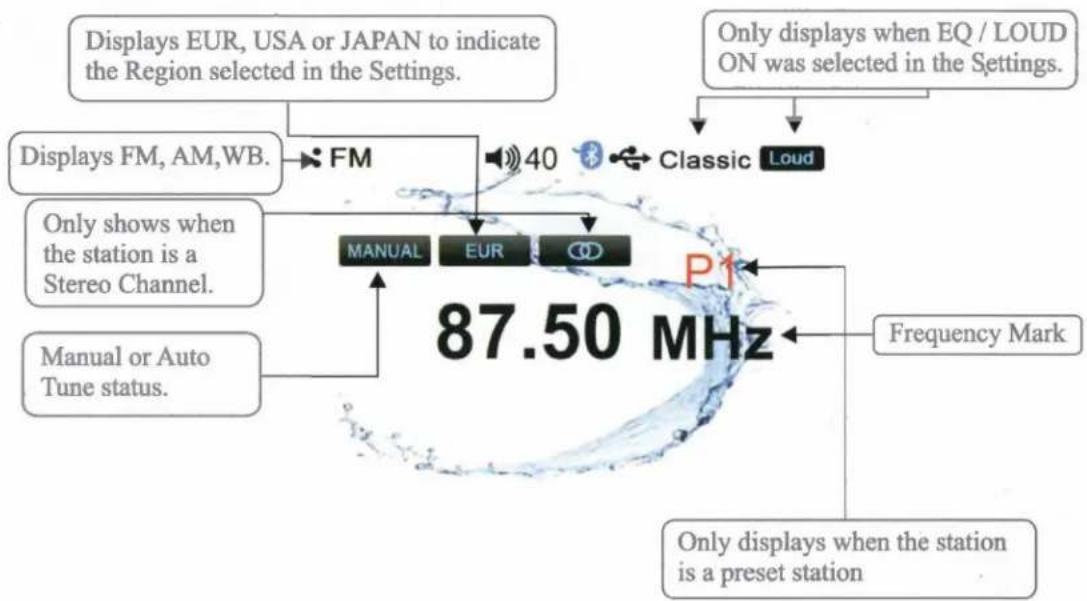
3. Auto Tuning
In AM, FM, WB playing mode, press Tune up or down button to activate auto tune. This results in automatically stopping at next station of sufficient signal strength.
4. Manual Tuning
In AM, FM, WB playing mode, long press Tune up or down button for 2s. This will activate manual tune with MANUAL display on the top area. Then repeatedly press Tune up or down button to tune frequency by steps.
Note: Radio will revert back to AUTO tune mode after 5s without operation.
5. Station Save
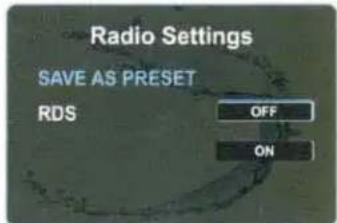
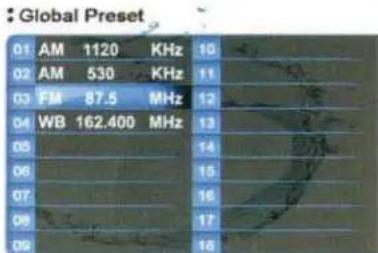
At your favorite station, press MENU button to enter Radio Settings, press VOL knob at SAVE AS PRESET to show the Global Preset List, then turn VOL knob to select a preset No. and press it to save the station into Preset List. The Preset No. will display once the station is saved.
Note: It will revert back to previous display after 5s without operation.
6. Recall Preset Station
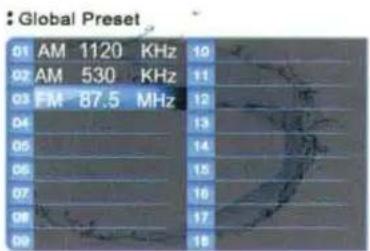
In Radio (FM, AM, WB) or SXM source, press P.LIST button to show the Global Preset List, then turn VOL knob and press it to select the station saved on that Preset No. Once a preset station was selected, it will switch to source playing with the selected station information displayed.
7. RDS Functions
Press MENU button in Radio source playing to display the Radio Settings screen, turn VOL knob and press it at RDS, then turn VOL again and press it to select RDS on or off. With RDS on selected, the station information, such as station name, title, ect would be displayed if the received station is a RDS station.
1. What is SiriusXM
Only SiriusXM® brings you more of what you love to listen to, all in one place. Get over 140 channels, including commercial-free music plus the best sports, news, talk, comedy and entertainment. Welcome to the world of satellite radio. A SiriusXM Vehicle Tuner and Subscription are required. For more information, visit www.siriusxm.com
Activating your SiriusXM Subscription
- After installing your SiriusXM Connect Tuner and antenna, power on your radio and select SiriusXM mode. You should be able to hear the SiriusXM preview channel on Channel 1. If you cannot hear the preview channels, please check the installation instructions to make sure your SiriusXM Connect tuner is properly installed.
For more information on how to install the SiriusXM Connect Vehicle tuner, consult the installation guide included with the tuner.
- After you can hear the Preview channel, tune to Channel 0 to find the Radio ID of your tuner. In addition, the Radio ID is located on the bottom of the SiriusXM Connect Vehicle Tuner and its packaging. You will need this number to activate your subscription. Write the number down for reference.
Note: the SiriusXM Radio ID does not include the letters I, O, S or F.
In the USA, you can activate online or by calling SiriusXM Listener care:
Visit www.siriusxm.com/activatenow
Call SiriusXM Listener Care at 1-866-635-2349
For Canadian Subscriptions, please contact:
Visit www.siriusxm.ca/activatexm
Call XM Customer Care at 1-877-438-9677
As part of the activation process, the SiriusXM satellites will send an activation message to your tuner. When your radio detects that the tuner has received the activation message, your radio will display: Subscription Updated, press Enter to continue. Once subscribed, you can tune to channels in your subscription plan. Note, the activation process usually takes 10 to 15 minutes, but may take up to an hour. Your radio will need to be powered on and receiving the SiriusXM signal to receive the activation message.
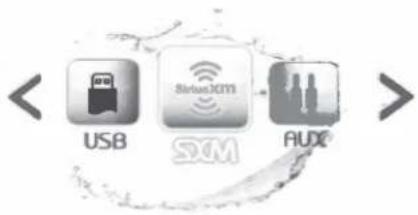
2. To Select SiriusXM Mode
At Home Screen, turn VOL knob and press it to select SXM source. (The foreground popup icon refers to the source changing.)
Or simply repeat press SRC button to select the desired source.
flowchart
graph LR
    A["USB"] --> B["StatusXMTI"]
    B --> C["AUD"]
3. SiriusXM Screen Description
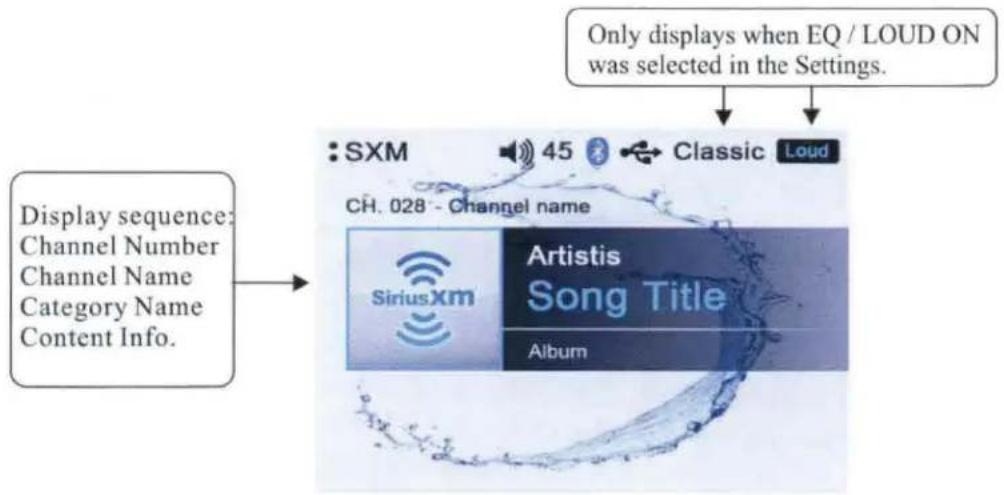
4. To Display Radio ID
Tune to Channel 0 or direct Tune to Channel 0 to display the Radio ID.
5. MUTE
In SiriusXM mode, press the MUTE button to mute sound output, and press it again to resume sound output.
6. To Select Channel
In SiriusXM mode, repeat press TUNE Up or Down button to select the previous or next channel. Press and hold TUNE Up or Down button to rapid tune/browse channels, and release the button when the desired channel is displayed.
7. Storing a Channel as a Preset
In SiriusXM playing mode, tune to or direct tune to a channel which you want to store as a preset, then press P.LIST button. It will display the Global Preset List screen, turn knob to select a preset number and press rotary button to save current channel into Preset List. The unit will revert back to the previous display if no operation is performed in 5s.
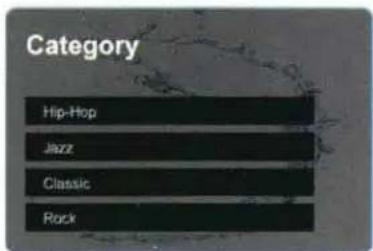
8. Category List
In SiriusXM mode, first press MENU button to activate navigation, then turn the knob to move highlight to Cat.LIST and to display the Category List. Turn the knob to select and press SEL button at your desired Category. Then press SEL button to select a desired channel.
9. Direct Channel Input
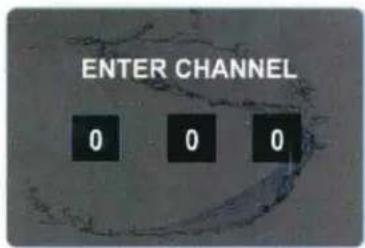
In SiriusXM mode, first press MENU button to activate navigation, then turn VOL knob to move highlight to DIRECT, and press ENTER button. It will display the keyboard. Press VOL Up or Down button to select the desired digit, then press rotary button after each selection to move to next input. After three digit input, press rotary button again to jump to the selected Channel.
Note: If a wrong digit is entered, turn knob to move to previous digit input. Repeat above operation until the correct channel is entered.
10. Preset List Channel Tuning
In SiriusXM play mode, press P.List to display the Global Preset List.
Turn knob to select a desired preset and press SEL button to listen to it. It will let you listen to the selected channel for 10s before it reverts back to source playing screen. During this time, you can select another channel.
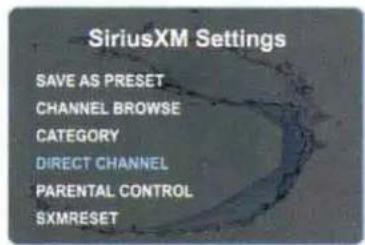
11. Parental Control
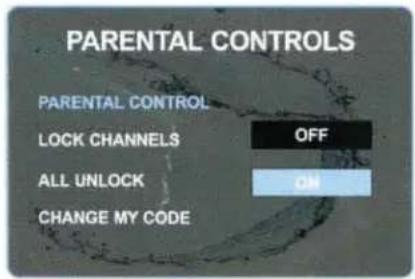
The Parental Control feature allows you to limit access to any SiriusXM channels, including those with mature content. It requires for passcode when you try to enter Parental Control feature. With correct passcode input, it allows you to operate the sub-features by turning or pressing the knob.
- Parental Control On / Off
Turn VOL konb to move highlight to Off, then press the knob to confirm the selection. With Parental Lock Off selected, all the locked channels are temporarily unlocked which will let you listen to the locked channels without inputting the password again.
Note: It will prompt for passcode again when next power on if you try to listen to the locked channels.
- To Lock/Unlock channels one by one
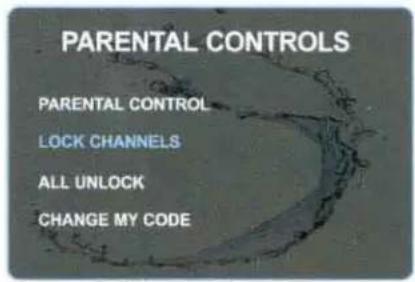
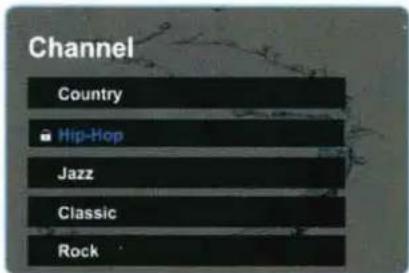
Turn VOL knob to move highlight to LOCK CHANNELS, then press SEL button to display the Channel list, turn VOL knob and push it at desired channel. If the selected channel was locked, then press the knob will result unlock it; and if the selected channel was unlocked, press the knob will result lock it.
- To Unlock all channels
Turn VOL konb to move highlight to ALL UNLOCK, then press the knob to unlock all channels.
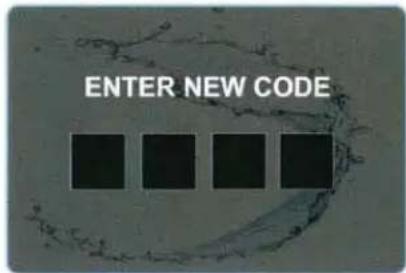
- Change Code
Select CHANGE MY CODE in Parental Controls, then enter your new code by turning and pressing VOL knob. It prompts for the New Code twice.
If a wrong digit is inputted, press Return button to move to previous digit input.
Note: Factory default passcode was 0000.
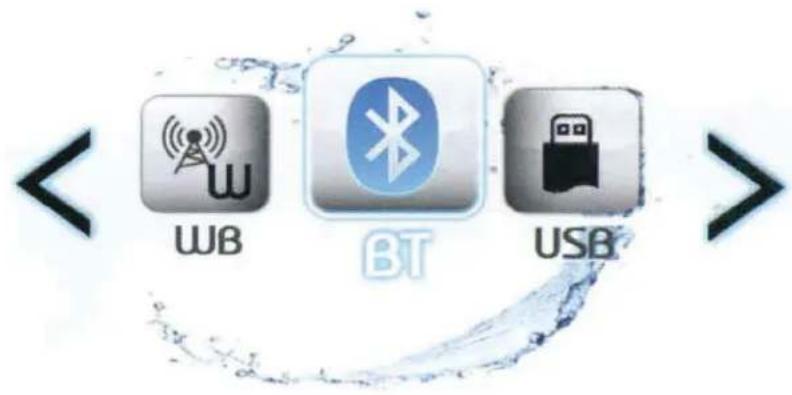
1. To Select Bluetooth mode
At Home Menu, turn VOL knob and press it to select Bluetooth source. (The foreground pop up icon refers to the source changing.)
Or repeat press SRC button to select the desired source.
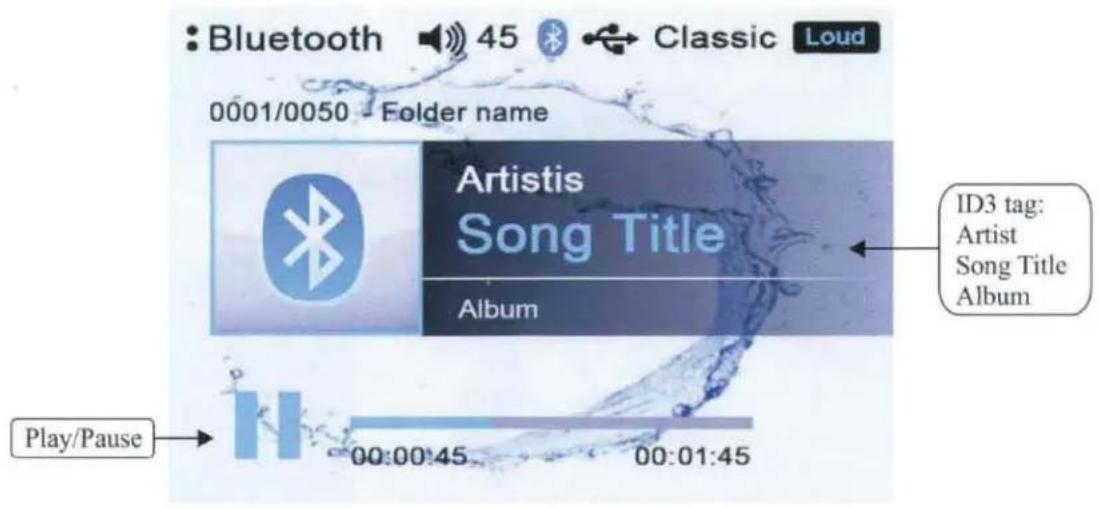
2. Bluetooth Screen Description
3. Pair BT Device
In Bluetooth source, pick "PRV515" option on your Bluetooth enabled device.
(if you are prompted for a password, the code entered will be "0000".)
Note: The Bluetooth pairing only happens with unit in Bluetooth source.
4. Play/Pause Play
Once the BT device being paired is successful, music will begin to play.
Note: For some Bluetooth enabled phones, you may need to activate play from your phone first. It depends on the phone itself.
While BT Music is playing, press the PAUSE button to pause the playback, and press it again to resume playback.
Note: Ⅱ refers to PLAY; ▶ refers to PAUSE.
5. Disconnect
In BT Music playing mode, in order to disconnect the BT device, press MENU to display Bluetooth Settings, turn VOL knob and press it at Disconnect.
Note: When your BT device battery is at low charge, the Bluetooth connection may occasionally be lost. To maintain good connectivity ensure that your BT device battery is adequately charged.
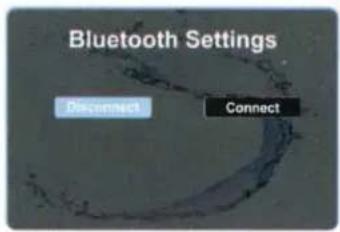
6. Connect
With BT device paired OK, but disconnected, if you want to re-establish the BT connection, press MENU to display Bluetooth Settings, turn VOL knob and press it at Connect. It will send a connect request to the last paired device.
Note: With the Bluetooth connection disconnected, once you power on the unit next time, you should go into Bluetooth mode, then it will establish the Bluetooth connection automatically. Sometimes, with Bluetooth Source not in use for over 1 hour, when you switch to BT Source again, it might take some time (5\~10s) to re-establish the connection by itself.
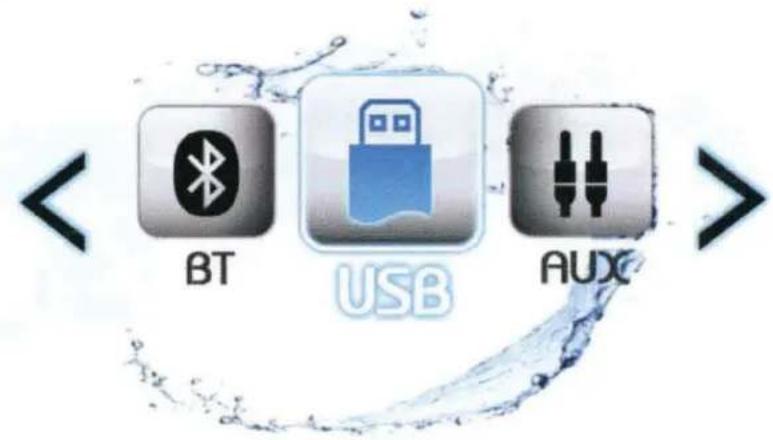
1. To Select USB mode
At Home Screen, turn VOL knob and press it to select BT source. (The foreground pop up icon refers to the source changing.)
Or press SOURCE button to select the desired source.
Note: This input is designed to read and play USB drives (mp3 and wma files), not media or phones except iPod and iPhone.
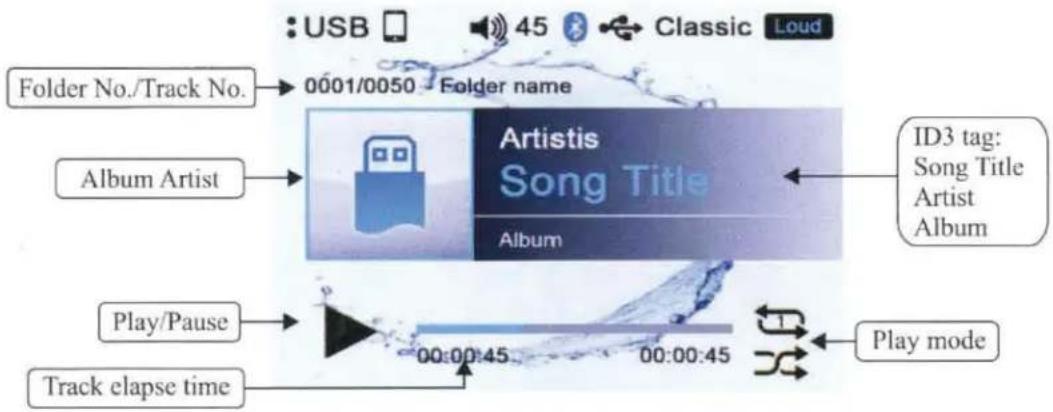
- USB Screen Description
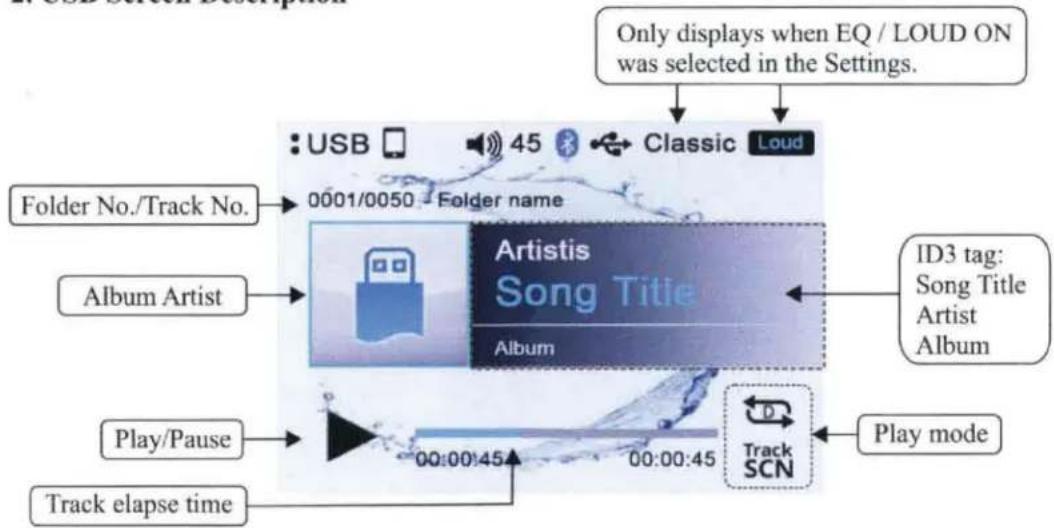
SCAN: Intro Scan play (Track / Directory Scan play)
RPT: Repeat play (Track / Directory Repeat play)
RDM: Random play (Track / Directory Random play)
3. Play/Pause Play
While USB is playing, press the PAUSE button to pause the playback, and press again to resume playback.
Note: Ⅱ refers to PLAY; ▶ refers to PAUSE.
4. Track Up/Down
While USB is playing, simply turn the TUNE button to select the next or previous track. To fast forward or rewind, press and hold TUNE button.
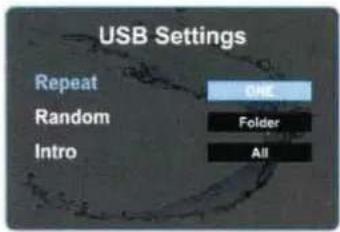
5. Repeat play
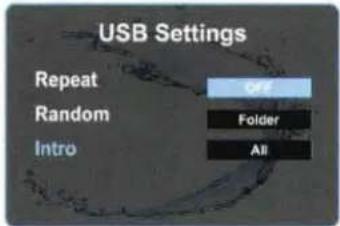
While USB is playing, press MENU button to show USB settings, turn VOL knob and preset it at Repeat, then turn VOL knob to select one, folder or all.
- Select Repeat One to play current track repeatedly.
- Select Repeat Folder to repeatedly play the tracks in current folder.
- Select Repeat All to repeatedly play all the tracks in drive.
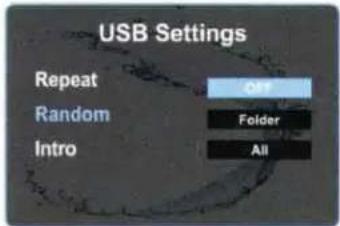
6. Random play
While USB is playing, press MENU button to show USB settings, turn VOL knob and press at Random, then turn VOL knob to select off, folder or all.
- Select Random off to disable Random play.
- Select Random Folder to play the tracks in current folder in a random sequence.
- Select Random All to play all the tracks in the USB device randomly.
5. Intro Play
While USB is playing, simply press MENU button to show USB settings, turn VOL knob and press it at Intro, then turn VOL knob to select off, folder, or all.
- Select Intro off to disable Random play.
- Select Intro Folder to play the first 10s of the tracks in current folder.
- Select Intro All to play the first 10s of all the tracks in current directory.
8. P.LIST (Folder / File Search)
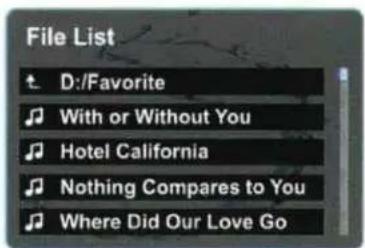
While USB is playing, press P.LIST button to enter track search mode, it will display all the tracks in current playing folder.
- To select other tracks in current folder, turn VOL knob and press it at desired track.
- To select the track in other folders, press rotary button at the desired folder.
Made for

iPhone
iPod
Use of the Made for Apple badge means that an accessory has been designed to connect specifically to the Apple product(s) identified in the badge, and has been certified by the developer to meet Apple performance standards. Apple is not responsible for the operation of this device or its compliance with safety and regulatory standards.
Please note that the use of this accessory with an Apple product may affect wireless performance.
iPhone and Lightning are trademarks of Apple Inc., registered in the U.S. and other countries.
Made for iPhone 8, iPhone 8 Plus, iPhone 7, iPhone 7 Plus, iPhone SE, iPhone 6s, iPhone 6s Plus, iPhone 6, iPhone 6 Plus, and iPod touch (6th generation). Minimum iOS 10.3.2 or later.
1. Connect
Once you connect an iPod/iPhone to the USB input, it will read the files automatically. It can take up to 30 seconds to load all of the files, so please be patient. The more music you have, the longer it will take.
2. Play/Pause Play
While iPod/iPhone is playing, press the PAUSE button to pause the playback, and press it again to resume playback. Ⅱ refers to PLAY; ▶ refers to PAUSE.
3. Track Up/Down
While iPod/iPhone is playing, press TUNE UP/DN button to select the next or previous track.
4. Repeat play
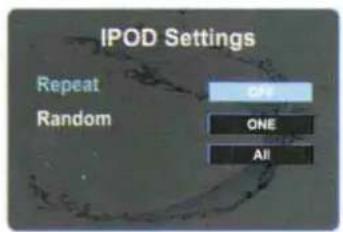
While iPod/iPhone is playing, press MENU button to show IPOD settings, turn VOL knob and preset it at Repeat, then turn VOL knob to select off, one, all.
5. Random play
While iPod/iPhone is playing, press MENU button to show IPOD settings, turn VOL knob and press at Random, then turn VOL knob to select off or on.
Note: Please make sure the iPod/iPhone cable is connected correctly. It is recommended to use the original cable for connection.
1. To Select AUX mode
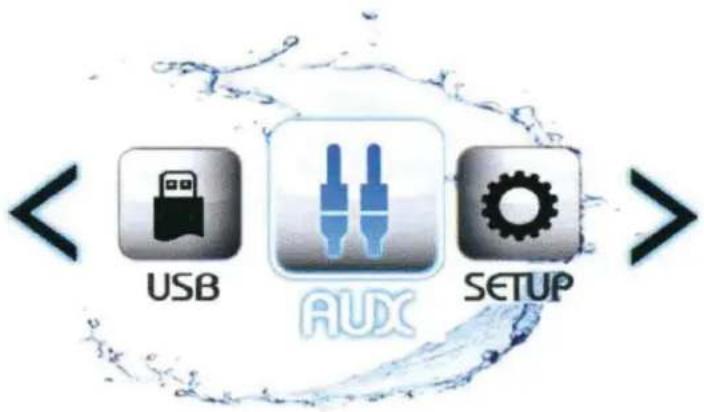
At Home Menu, press TUNE Up or Down to move the highlight to AUX source, then press SEL button to advance into the AUX mode. You can also press SRC button to enter AUX mode.
Note: movement indicated by the icon background change to light blue.
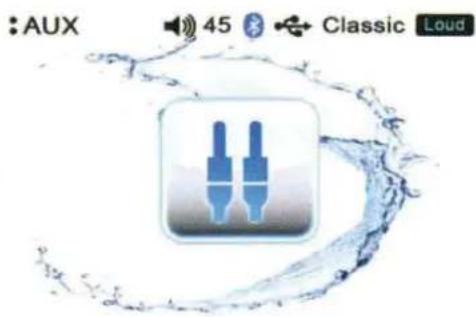
The use of auxiliary mode allows you to play the portable music device through the headphone jack.
Note: An additional accessory/adaptor must be purchased in order for this to happen. Prospec's part, SEAMINI2 or SEAUSBMINI36 fulfills this option.
natural_image
Audio player interface showing two blue audio jack icons inside a water splash graphic (no text or symbols on the icons)*Note: In many respects, a stereo acts much like a computer and occasionally requires a reboot. In the unlikely event of product malfunction, a reset can usually fix the issue. For software reset operation, please refer to page 9.
| Issue | Cause | Solution |
| No power | 1. Incorrect wiring2. Fuse is blown3. Low battery voltage | 1. Double check wiring2. Replace fuse3. Check voltage of vehicle battery with multimeter. Voltage must be at least 11V. |
| No Sound | 1. Speaker connection came loose2. Bad speaker3. Output blown4. Volume too low on media device | 1. Double check connections.2. Replace bad speaker with known good speaker and connect.3. Send unit in for repair.4. Increase volume of media device |
| No Reception | 1. Antenna not firmly seated in socket | 1. Insert firmly |
| USB stick not reading | 1. File must be a mp3 or wma file | 1. Convert format to mp3 or mwa. |
| While in Bluetooth mode: | ||
| No Connection | 1. You are not connected to the “PRV515” address on your portable media device.2. Out of range3. The connection is already in use. | 1. Choose “PRV515”2. Bring portable media device closer to the receiver. Device needs to be within 30’.3. Ask the person who first paired to drop out. |
The following information helps you self-diagnose common issues without the need for contacting SiriusXM support.
| Advisory Name | Recommended Description |
| Check Antenna | The radio has detected a fault with the SiriusXM antenna. The antenna cable may be either disconnected or damaged.Verify that the antenna cable is connected to the SiriusXM Connect Vehicle Tuner.Inspect the antenna cable for damage and kinks. Replace the antenna if the cable is damaged.SiriusXM products are available at your local car audio retailer or online atwww.shop.siriusxm.com. |
| Check Tuner | The radio is having difficulty communicating with the SiriusXM Connect Vehicle Tuner. The tuner may be disconnected or damaged.Verify that the SiriusXM Connect Vehicle Tuner cable is securely connected to the radio. |
| No Signal | The SiriusXM Connect Vehicle Tuner is having difficulty receiving the SiriusXM satellite signal.Verify that your vehicle is outdoors with a clear view of the sky.Verify that the SiriusXM magnetic mount antenna is mounted on a metal surface on the outside of the vehicle.Move the SiriusXM antenna away from any obstructions.Inspect the antenna cable for damage and kinks.Consult the SiriusXM Connect Vehicle tuner installation manual for more information on antenna installation. Replace the antenna if the cable is damaged. SiriusXM products are available at your local car audio retailer or online atwww.shop.siriusxm.com. |
| Subscription Updated | The radio has detected a change in your SiriusXM subscription status. Press ENTER button to clear the message.Visitwww.siriusxm.comor call 866-635-2349 in the USA or 877-438-9677 in Canada if you have questions about your subscription. |
| Channel Not Available | The channel that you have requested is not a valid SiriusXM channel or the channel that you were listening to is no longer available.You may also see this message briefly when first connecting a new SiriusXM Connect Vehicle tuner.Visit www.siriusxm.com for more information about the SiriusXM channel line up. |
| Channel Not Subscribed | The channel that you have requested is not included in your SiriusXM subscription package or the channel that you were listening to is no longer included in your SiriusXM subscription package.In the U.S.A., visit www.siriusxm.com or call 1-866-635-2349 if you have questions about your subscription package or would like to subscribe to this channel. In Canada, visit www.siriusxm.ca or call 1-877-438-9677. |
| Channel Locked | The channel that you have requested is Locked by the radio Parental Control feature. See the description on Parental Control, page 14 for more information on the Parental Control feature and how to access locked channels. |

PROSPEC
Prospec Electronics
Sound Systems For The Outdoor Enthusiast
This product is serviced exclusively by Prospec Electronics Inc. and must be returned to Prospec for in and out of warranty repairs. It can not be serviced under warranty by other Infinity service centers.
For service contact us :
3325 South Morgans Point Road Mt Pleasant SC 29466
Tel 843-849-9037
Or visit: www.prospecelectronics.com



- Prospec Electronics
- Mounting Illustration
- Instructions:
- NOTE:
- POWER
- SRC button
- Pause, Mute button
- MENU button
- VOL, Selection/Enter button
- Tune Up/ Down button
- P.LIST button
- View button
- Return button
- Sign up
- Home menu (source display)
- VOLUME Control
- MUTE Control
- SETUP
- 3-1. Audio Settings
- 3-2. System Settings
- 3-3. RGB Color Settings
- 3-4. Bluetooth Settings
- 3-5. About
- To Select Radio mode
- Radio Screen Description
- Auto Tuning
- Manual Tuning
- Station Save
- Recall Preset Station
- RDS Functions
- What is SiriusXM
- Activating your SiriusXM Subscription
- To Select SiriusXM Mode
- SiriusXM Screen Description
- To Display Radio ID
- MUTE
- To Select Channel
- Storing a Channel as a Preset
- Category List
- Direct Channel Input
- Preset List Channel Tuning
- Parental Control
- - Parental Control On / Off
- - To Lock/Unlock channels one by one
- - To Unlock all channels
- - Change Code
- To Select Bluetooth mode
- Bluetooth Screen Description
- Pair BT Device
- Play/Pause Play
- Disconnect
- Connect
- To Select USB mode
- Play/Pause Play
- Track Up/Down
- Repeat play
- Random play
- Intro Play
- P.LIST (Folder / File Search)
- Connect
- Play/Pause Play
- Track Up/Down
- Repeat play
- Random play
- To Select AUX mode
Brand : INFINITY
Model : KAPPRV515
Category : Radio