
PS752 - Document Camera Lumens - Free user manual and instructions
Find the device manual for free PS752 Lumens in PDF.


| Product Type | Document Camera |
| Model | PS752 |
| Brand | Lumens |
| Image Sensor | 8 MP CMOS |
| Resolution | Up to 3264 x 2448 |
| Frame Rate | 30 fps at full HD |
| Optical Zoom | 12x digital zoom |
| Output Interfaces | HDMI, VGA, USB 2.0 |
| Input Interfaces | Microphone, USB |
| Dimensions (W x H x D) | 180 x 250 x 120 mm |
| Weight | 1.2 kg |
| Power Supply | AC 100-240V, 50/60 Hz |
| Power Consumption | 10 W (max) |
| Key Functions | Live image display, image capture, video recording, annotation, split-screen |
| Image Modes | Text, photo, microscope |
| Lighting | Built-in LED lights |
| Maintenance & Cleaning | Clean lens with soft cloth; avoid solvents |
| Safety | Do not expose to moisture; use approved power adapter |
| Spare Parts & Repairability | Contact Lumens support for replacement parts |
| General Information | Compatible with Windows, Mac, and interactive whiteboards |
Frequently Asked Questions - PS752 Lumens
User questions about PS752 Lumens
0 question about this device. Answer the ones you know or ask your own.
Ask a new question about this device
Download the instructions for your Document Camera in PDF format for free! Find your manual PS752 - Lumens and take your electronic device back in hand. On this page are published all the documents necessary for the use of your device. PS752 by Lumens.
USER MANUAL PS752 Lumens
User Manual – English
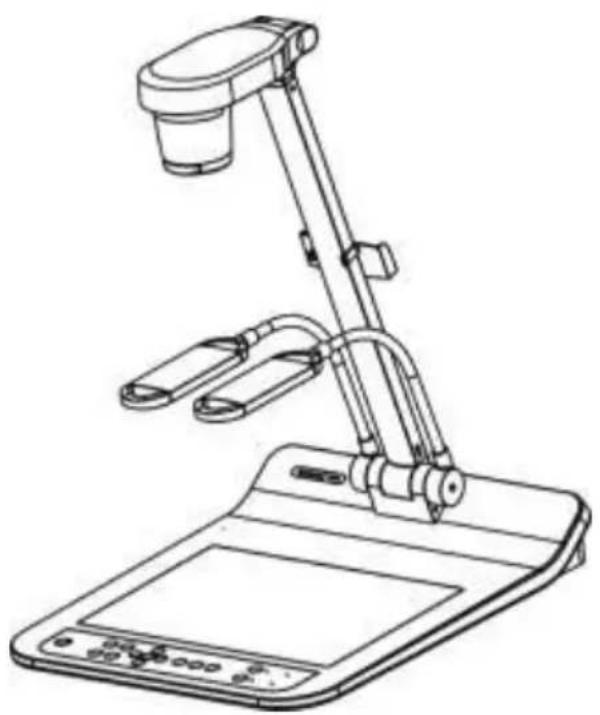
natural_image
Line drawing of a desktop computer with adjustable arm and screen (no text or symbols)[Important]
To download the latest version of Quick Start Guide, multilingual user manual, software, or driver, etc., please visit Lumens™ http://www.MyLumens.com/goto.htm
Table of Contents
Copyright Information....3
Chapter 1 Safety Instructions .... 4
Precautions 5
FCC Warning....5
EN55032 (CE Radiation) Warning 5
Chapter 2 Package Contents....6
Chapter 3 Product Overview ...... 7
3.1 Relative Operation Position....7
Chapter 4 Installation and Connections ....8
4.1 System diagram 8
4.2 Installation and setup....9
4.3 Connecting to a projector or monitor....9
4.4 Connecting to a Computer and Use Lumens™ Software or an Interactive Whiteboard (IWB) 9
4.5 Connecting to an HDTV 10
4.6 For connection to Computer or DVD....10
4.7 Connecting to a computer, projector, and monitor simultaneously .. 11
4.8 Connecting to Audio Input and Output 11
4.9 Connecting to a computer with RS232....12
4.10 Connecting to a TV.... 12
4.11 Installing application software 13
Chapter 5 Start Using....14
Chapter 6 Control Panel/Remote Control and Setting Menu....15
6.1 Functions of control panel and remote control 15
6.2 Setting menu 17
Chapter 7 Descriptions of Major Functions....23
7.1 I would like to automatically adjust the image to have the best brightness and focusing performance....23
7.2 I would like to switch image sources 23
7.3 I would like to set the image source of VGA OUT2 23
7.4 I would like to switch the image mode....23
7.5 I would like to make text clearer and photos more colorful....23
7.6 I would like to zoom in/out images 24
7.7 I would like to use the manual focus 24
7.8 I would like to adjust the brightness 24
7.9 I would like to turn on/off the lamp....24
7.10 I would like to freeze images....24
7.11 I would like to rotate the image....25
7.12 I would like to capture images....25
7.13 I would like to record images....26
7.14 I would like to view captured/recorded images 27
7.15 I would like to delete the captured/recorded images....27
7.16 I would like to adjust the output volume 28
7.17 I would like to automatically delete the stored images whenever it is turned off (Auto Erase)....28
7.18 I would like to enlarge a part of the image (PAN)....28
7.19 I would like to use the MASK and Spotlight function....28
7.20 I would like to play the slides (Slide Show) 29
7.21 I would like to compare images (compare live images with stored image files (PIP))....30
7.22 I would like to reduce the image noise (Projector Type) 31
7.23 I would like to lock/unlock keys 31
7.24 I would like to change the power on image 31
7.25 I would like to use a USB disk....32
7.26 I would like to resume the factory default setting (Factory Reset) ... 32
7.27 Computer-related functions....33
Chapter 8 Connecting to Microscope ....35
Chapter 9 Packing the Machine....37
Chapter 10 DIP switch setting....38
10.1 Connecting to a projector or monitor 38
10.2 Connecting to a TV/DVD 39
Chapter 11 Troubleshooting....40
Appendix 1....43
Copyrights © Lumens Digital Optics Inc. All rights reserved.
Lumens is a trademark that is currently being registered by Lumens Digital Optics Inc.
Copying, reproducing or transmitting this file is not allowed if a license is not provided by Lumens Digital Optics Inc. unless copying this file is for the purpose of backup after purchasing this product.
In order to keep improving the product, Lumens Digital Optics Inc. hereby reserves the right to make changes to product specifications without prior notice. The information in this file is subject to change without prior notice.
To fully explain or describe how this product should be used, this manual may refer to names of other products or companies without any intention of infringement.
Disclaimer of warranties: Lumens Digital Optics Inc. is neither responsible for any possible technological, editorial errors or omissions, nor responsible for any incidental or related damages arising from providing this file, using, or operating this product.
Always follow these safety instructions when setting up and using the Document Camera:
- Do not place Document Camera in tilted position.
- Do not place the Document Camera on an unstable trolley, stand or table.
- Do not use the Document Camera near water or source of heat.
- Use attachments only as recommended.
- Use the type of power source indicated on the Document Camera. If you are not sure of the type of power available, consult your dealer or local electricity company for advice.
- Place the Document Camera on a place that it can be unplugged easily.
-
Always take the following precautions when handling the plug. Failure to do so may result in sparks or fire.
■ Ensure the plug is free of dust before inserting it into a socket.
■ Ensure that the plug is inserted into the socket securely. -
Do not overload wall sockets, extension cords or multi-way plug boards as this may cause fire or electric shock.
-
Do not place the Document Camera where the cord can be stepped on as this may result in fraying or damage to the lead or the plug.
-
Unplug the Document Camera from the wall socket before cleaning. Use a damp cloth for cleaning. Do not use liquid or aerosol cleaners.
-
Do not block the slots and openings in the Document Camera case. They provide ventilation and prevent the Document Camera from overheating. Do not place the Document Camera on a sofa, rug or other soft surface or in a built-in installation unless proper ventilation is provided.
-
Never push objects of any kind through cabinet slots. Never allow liquid of any kind to spill into the Document Camera.
-
Except as specifically instructed in this User Manual, do not attempt to operate this product by yourself. Opening or removing covers may expose you to dangerous voltages and other hazards. Refer all servicing to licensed service personnel.
-
Unplug the Document Camera during thunderstorms or if it is not going to be used for an extended period. Do not place the Document Camera or remote control on top of vibrating equipment or heated objects such as a car, etc.
-
Unplug the Document Camera from the wall outlet and refer serving to licensed service personnel when the following situations happen:
■ If the power cord or plug becomes damaged or frayed.
■ If liquid is spilled into it or the Document Camera has been exposed to rain or water.
■ Precautions
Warning: To reduce the risk of fire or electric shock, do not expose this appliance to rain or moisture.
This Document Camera has a 3-wire AC line Plug. This is a safety feature to ensure that the plug will fit into the power outlet. Do not try to disable this safety feature.
If the Document Camera will not be used for an extended time, unplug it from the power socket.
Note
Risk of Electric Shock Please do not open it by yourself
Caution: To reduce the risk of electric shock, do not remove cover (or back). No user-serviceable parts inside. Refer servicing to licensed service personnel.
This symbol indicates that this equipment may contain dangerous voltage which could cause electric shock.

This symbol indicates that there are important operating and maintenance instructions in this User Manual with this unit.
■ FCC Warning
This Document Camera has been tested and found to comply with the limits for a Class A computer device, pursuant to Article 15-J of FCC Rules. These limits are designed to provide reasonable protection against harmful interference in a commercial installation.
This digital apparatus does not exceed the Class A limits for radio noise emissions from digital apparatus as set out in the interference-causing equipment standard entitled "Digital Apparatus," ICES-003 of Industry Canada.
■ EN55032 (CE Radiation) Warning
Warning: Operation of this equipment in a residential environment could cause radio interference.
Chapter 2 Package Contents
PS752
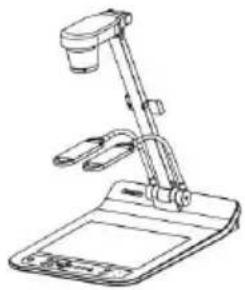
natural_image
Line drawing of a desktop computer with an adjustable arm and screen (no text or symbols)Remote control
Quick Start Guide
(For download of other language versions, please visit Lumens website)
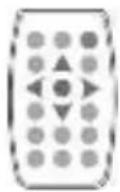
Remote Control
Holder
4-Steps Card

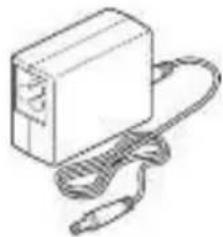
Power Adapter
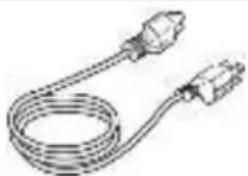
Power cord
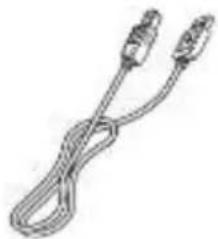
USB cable
natural_image
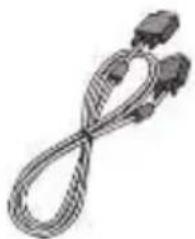
Line drawing of a rectangular electronic device with a coiled cable and connector (no text or symbols)VGA cable
natural_image
Illustration of a coiled electrical plug with two connectors (no text or symbols)Appearance may vary depending on country/region
natural_image
Line drawing of a coiled cable or wire with two connectors (no text or symbols)C-Video Cable
natural_image
Coiled cable with two connectors (no text or symbols visible)Microscope Adapter
Audio Cable


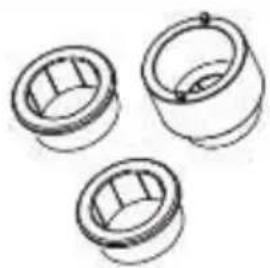
natural_image
Three technical line drawings of ball bearings (no text or symbols)HDMI Cable * 2
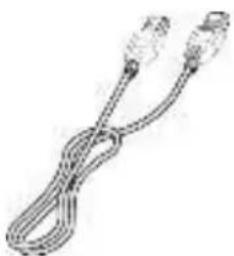
natural_image
Coiled cable or connector with connectors (no text or symbols visible)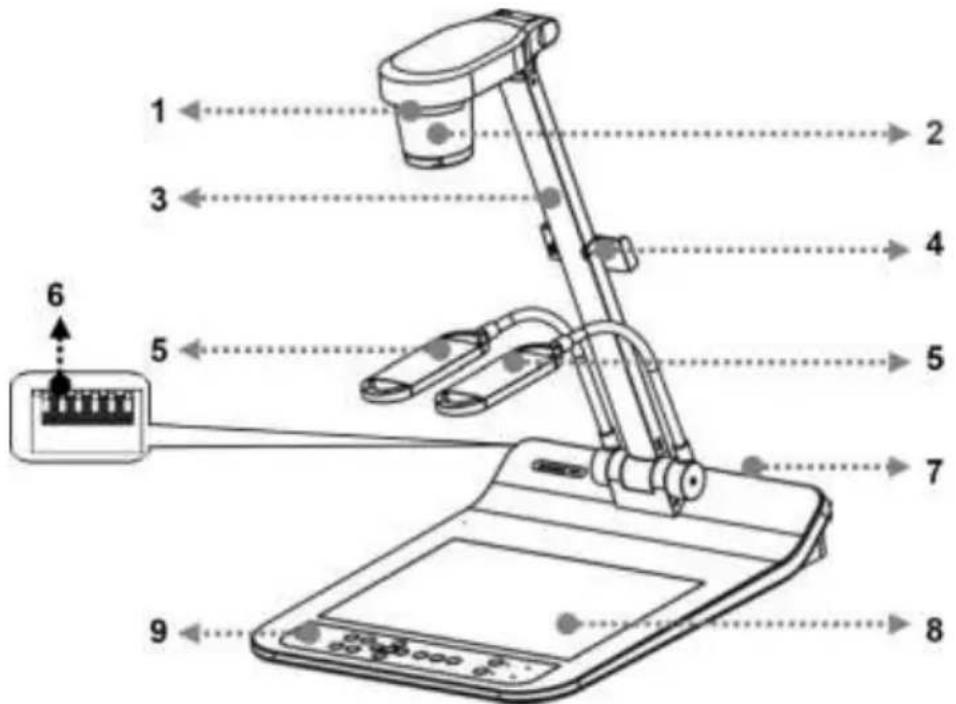
- Remote sensor
- Camera arm
- Auxiliary floodlight and lamp arm
- Input/output port
-
Control panel
-
Lens
- Remote Control Holder
- DIP switch setting
- Backlight
3.1 Relative Operation Position
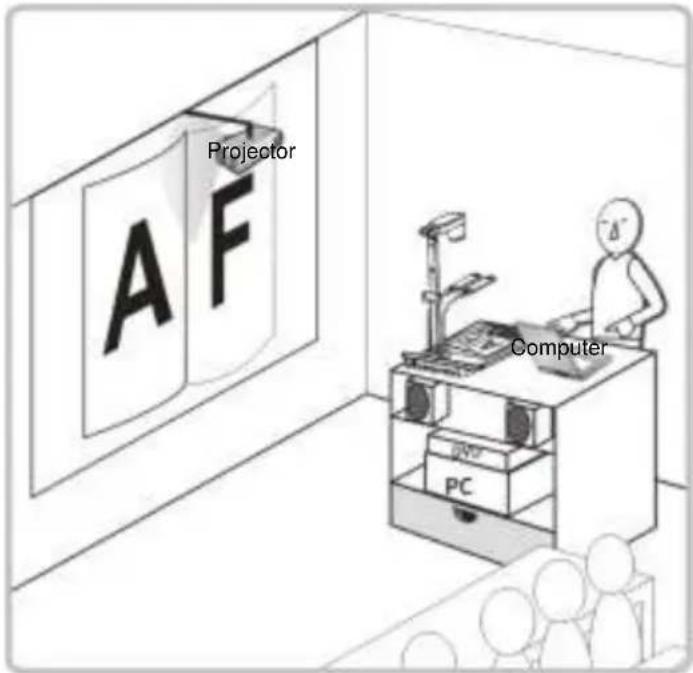
Chapter 4 Installation and Connections
4.1 System diagram
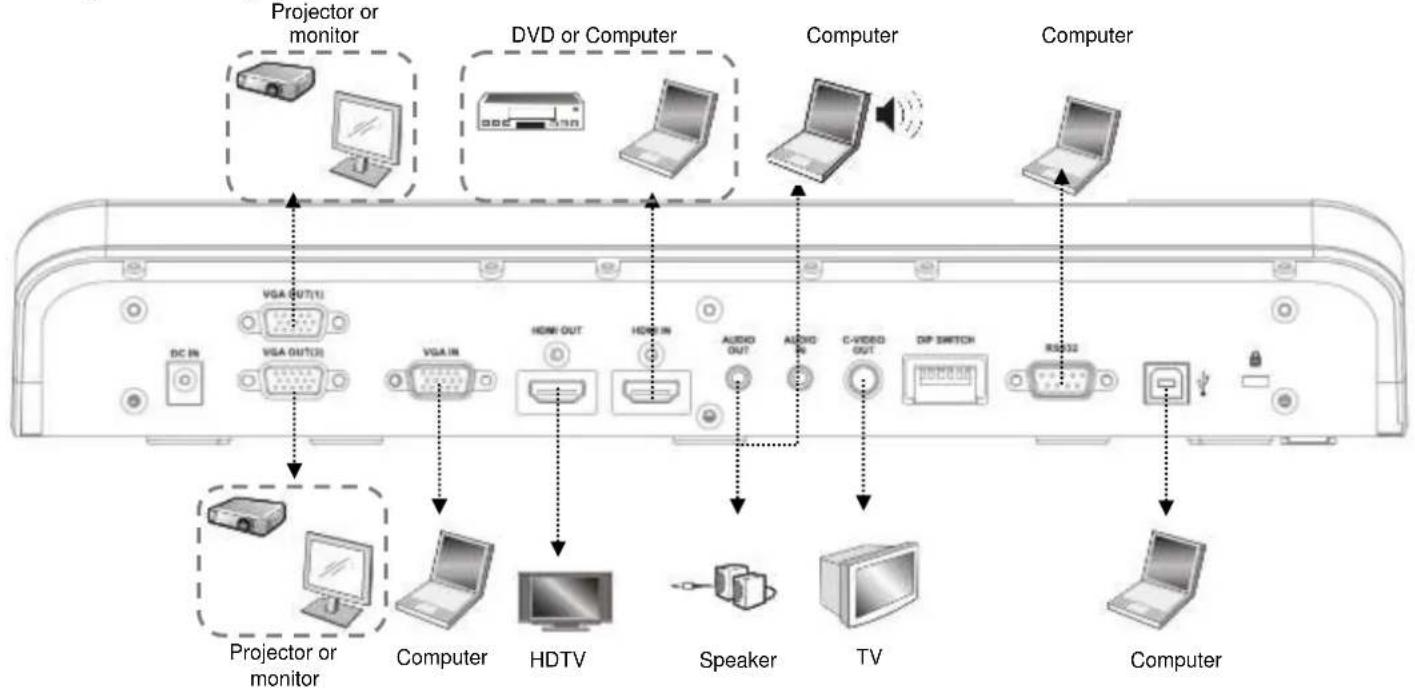
flowchart
graph TD
    A["Projector or monitor"] --> B["VGA OUT(1)"]
    C["DVD or Computer"] --> D["VGA IN"]
    E["Computer"] --> F["HDWR OUT"]
    G["Computer"] --> H["ACO OUT"]
    I["Projector or monitor"] --> J["Projector or monitor"]
    K["Computer"] --> L["HDTV"]
    M["Speaker"] --> N["TV"]
    O["Computer"] --> P["DC IN"]
    Q["Video"] --> R["LDA"]
    S["Audio"] --> T["AUDIO"]
    U["C-VIDEO OUT"] --> V["DIP SWITCH"]
    W["Radio32"] --> X["Radio"]
4.2 Installation and setup
- Please set up the DIP switch setting first. Refer to Chapter 10 DIP Switch Setting.
4.3 Connecting to a projector or monitor
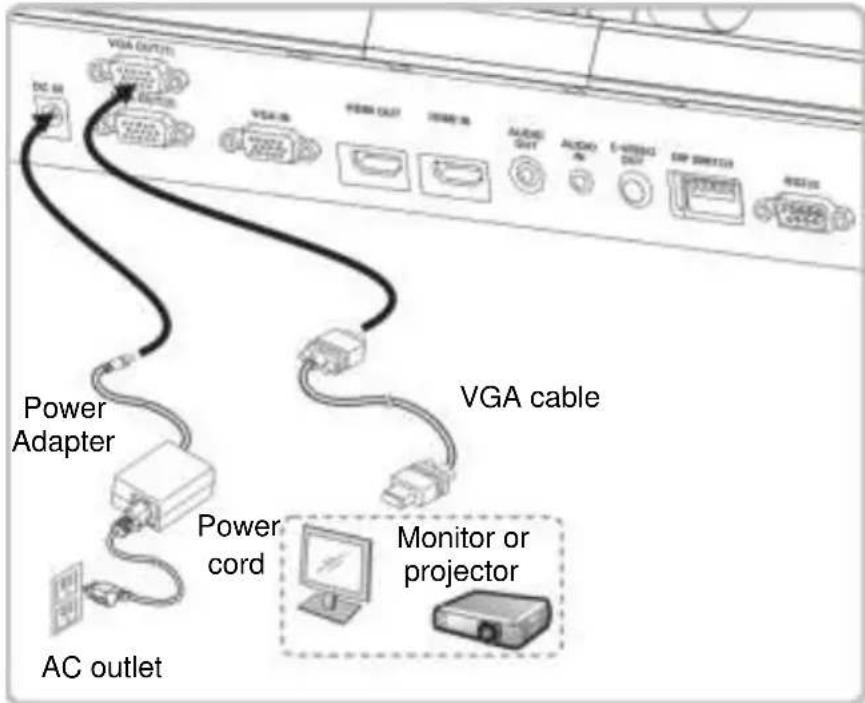
4.4 Connecting to a Computer and Use Lumens™ Software or an Interactive Whiteboard (IWB)
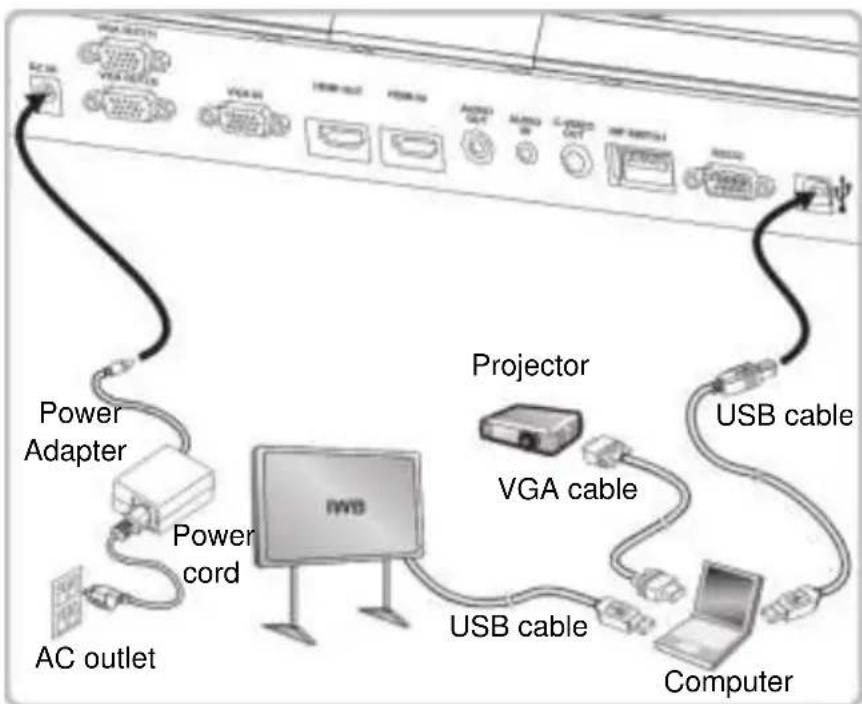
The driver and software can be downloaded from Lumens website.
4.5 Connecting to an HDTV
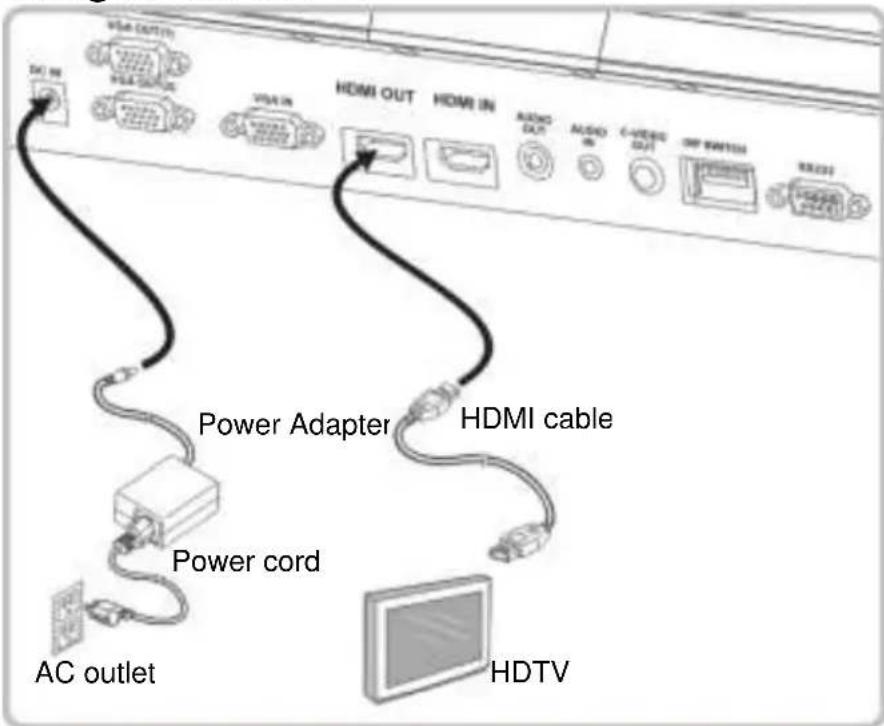
4.6 For connection to Computer or DVD
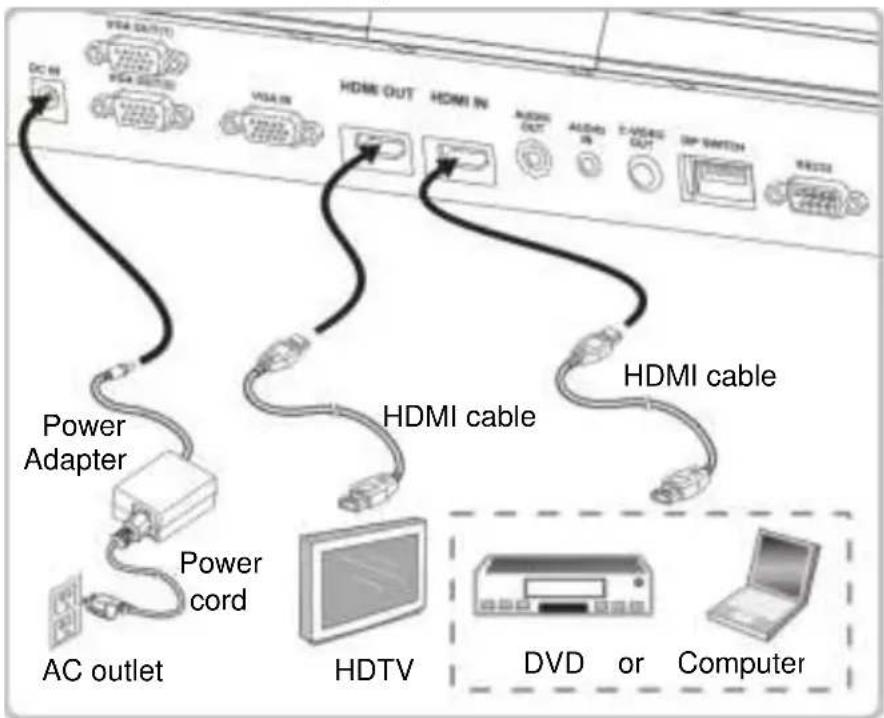
4.7 Connecting to a computer, projector, and monitor simultaneously
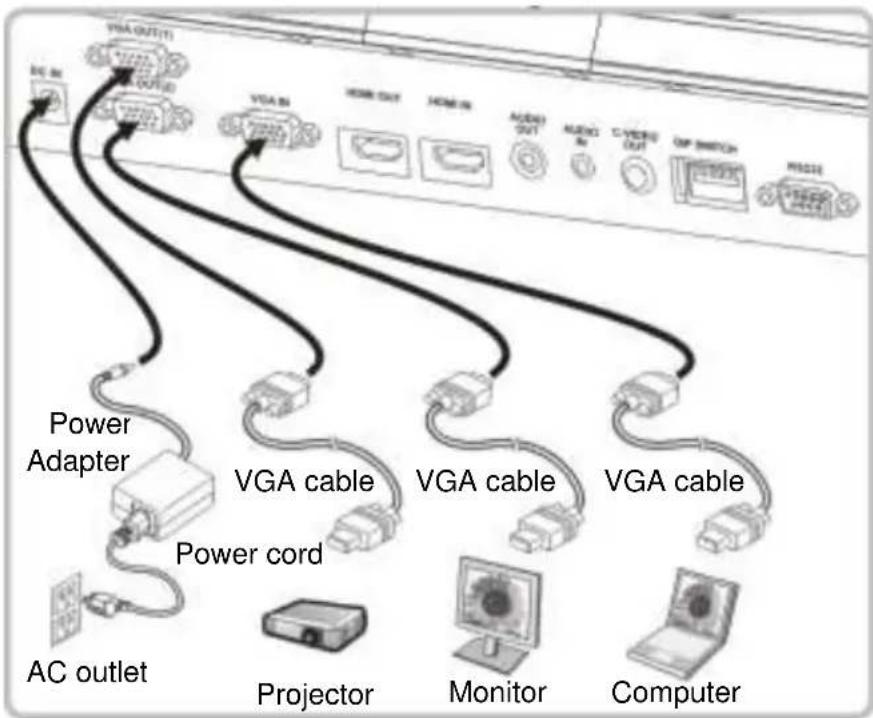
➢ Press [SOURCE] button to switch the image source.
For VGA 1 setting, refer to 7.2 I would like to switch image sources.
For VGA 2 setting, refer to 7.3 I would like to set the image source of VGA OUT2.
4.8 Connecting to Audio Input and Output
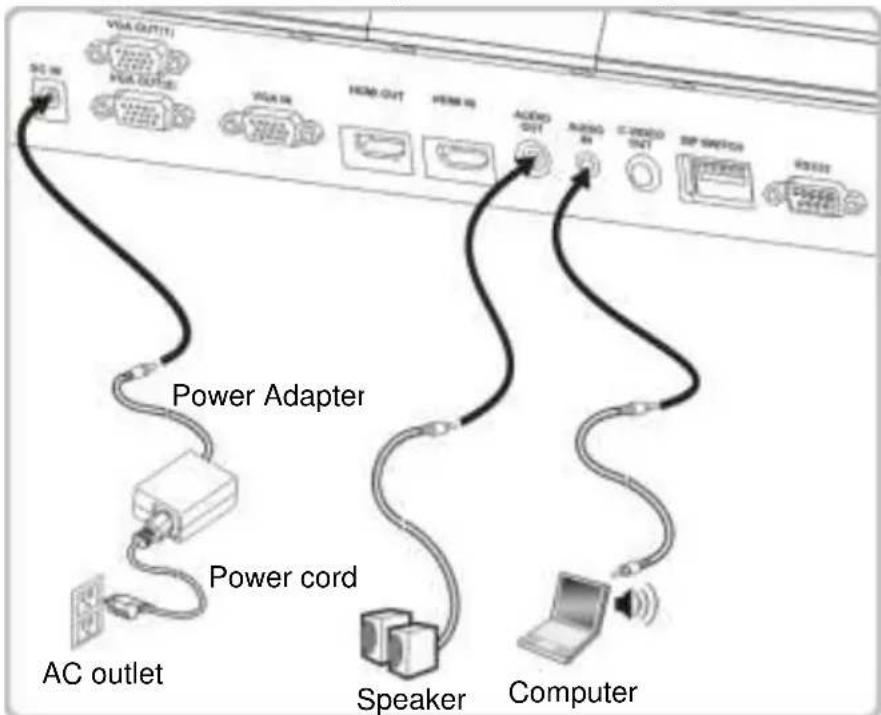
4.9 Connecting to a computer with RS232
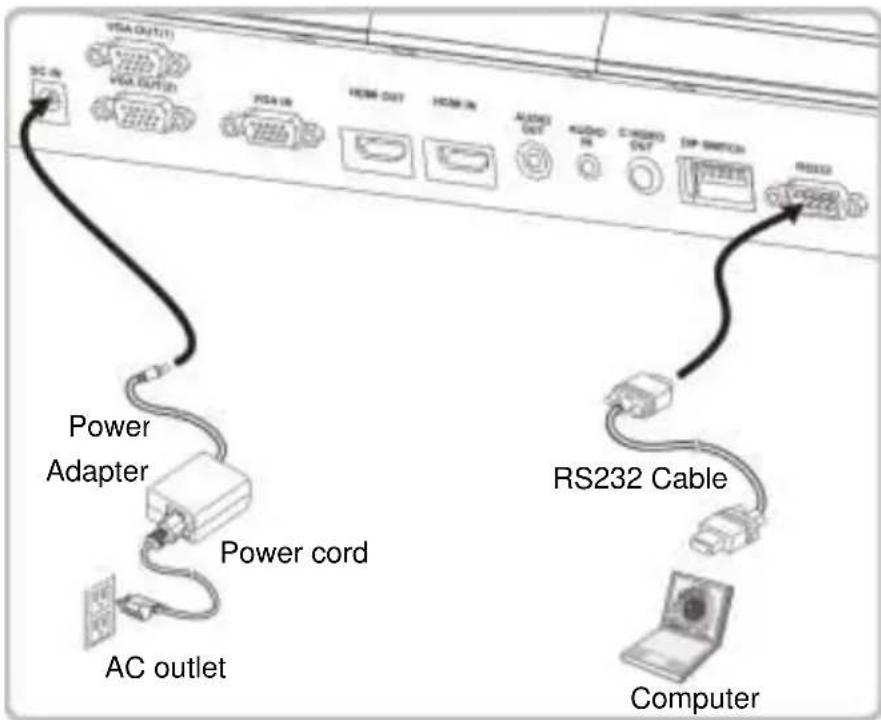
After connecting to the RS232 cable, you can use RS232 commands to control PS752.
4.10 Connecting to a TV
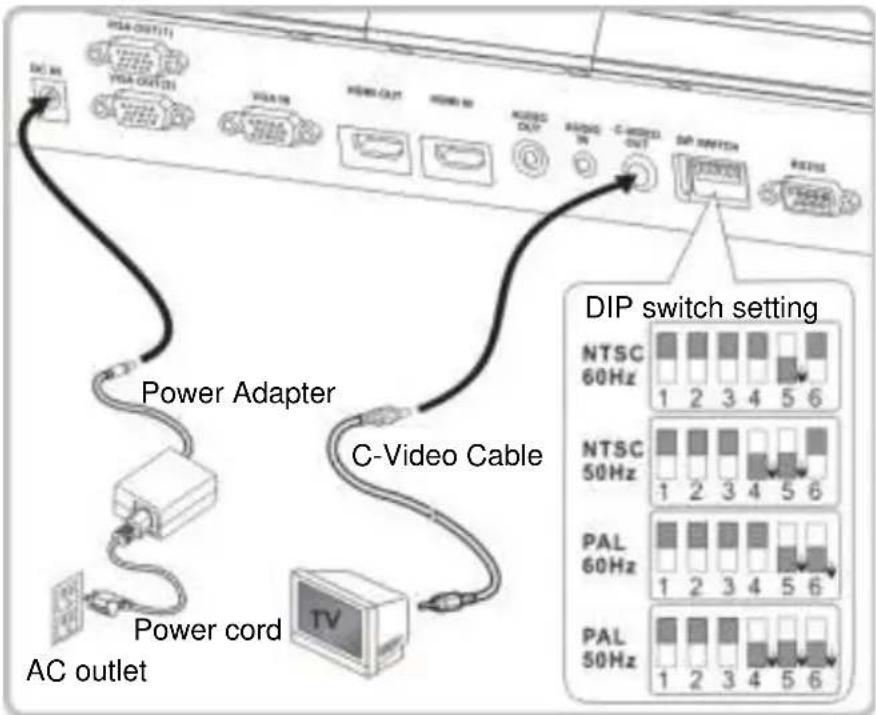
NTSC: USA, Canada, Mexico, Panama, Chile, Japan, Taiwan, Korea, and Philippines.
PAL: Countries/regions not listed above
restart the machine for DIP switch setting to take effect. Once C-VIDEO is enabled, VGA OUT is not supported.
4.11 Installing application software
The application software installed on the computer enables you to:
▶ Control the PS752.
▶ Capture and record images.
➢ Annotate the image, highlight important details and save it.
▶ Support the full screen function.
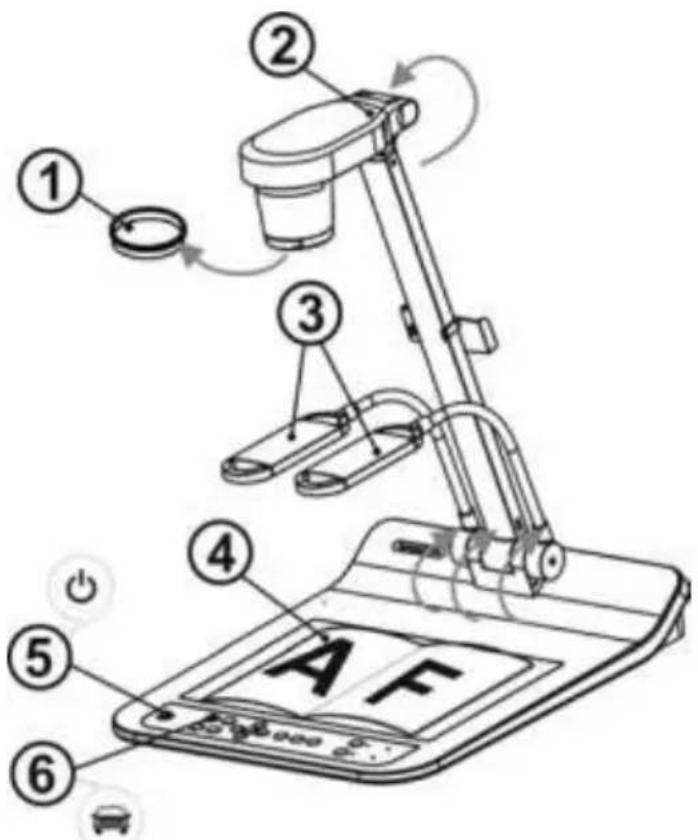
- Remove the lens cap.
- Pull up the lamp arm to a proper position.
- Place an object to be displayed under the camera.
- Press [POWER] on the remote control or control panel to power on.
-
Press control panel [AUTO TUNE] Button to optimize the image.
You are ready to teach/present. -
Each time the camera head is moved, press [AUTO TUNE] on the remote control or control panel to refocus the lens.
- When using the remote control, aim at the remote sensor on the PS752, and press the power button.
- Once PS752 is turned on, the LED on the control panel will flash a few times and stay lit. Please contact your distributor if the LED does not light up.
Chapter 6 Control Panel/Remote Control and Setting Menu
6.1 Functions of control panel and remote control
| Name | Function Descriptions | Operation |
 | Turn on and off the Document Camera. | Remote control/Control panel |
 | Move up, down, left or right to select the needed function. | Remote control/Control panel |
AL   | Automatically adjust the image to have the best brightness and focusing performance. | Remote control/Control panel |
BRT+/- | Adjust the brightness of the image. | Remote control/Control panel |
CAPTURE /DEL | Capture and save images to USB disk (priority) or internal memory while displaying live images.Delete files from the USB disk (priority) or internal memory while reading the stored files (in Playback mode). | Remote control/Control panel |
ENTER | Activate/Enter functions. | Remote control/Control panel |
FREEZE | Freeze the current image to remain temporarily on the screen. Press again to defreeze. | Remote control/Control panel |
LAMP | Lamp mode toggle switch. | Remote control/Control panel |
MASK | Activate Mask/Spotlight mode. | Remote control |
MENU | Activate the setting menu/exit the menu. | Remote control/Control panel |
PAN | Enable/Disable the partial enlarged mode. | Remote control |
PIP | Image comparison (to compare live images with stored image files). | Remote control |
PLAYBACK | Read files stored in the USB disk (priority) or internal memory. | Remote control/Control panel |
RECORD | Record motion images. Press [Record] to record images to USB disk and press [Record] again to stop recording. | Remote control/Control panel |
ROTATE | Screen rotation 0°/180°/Flip/Mirror | Remote control |
SOURCE 1 | Switch between different image sources of VGA OUT (1) and HDMI OUT:1. Live images (default).2. VGA IN / HDMI IN. | Remote control/Control panel |
SOURCE 2 | Switch between different image sources of VGA OUT (2)VGA Out (VGA OUT(1)) / VGA IN | Control panel |
ZOOM +/-  | Increase or decrease the image size. | Remote control/Control panel |
6.2 Setting menu
6.2.1 Main menu
 | Auto TuneAutomatically adjust the image to have the best brightness and focusing performance. |  | Slide ShowShow the photos or videos stored in the USB disk (priority) or internal memory in slide mode. |
 | PANEnable/Disable the partial enlarged mode. |  | Manual FocusManual Focus. |
 | LAMPLamp mode toggle switch. |  | RotateScreen rotation0°/180°/Flip/Mirror |
 | PIPImage comparison (to compare live images with stored image files). |  | SettingsSet up various functions. |
 | BrightnessAdjust the brightness of the image. |  | Photo/TextSelect Photo/Text/Gray Mode. |
 | MaskActivate the mask mode. |  | ZoomIncrease or decrease the image size. |
 | ModeSelect image mode. |  | SpotlightActivate the spotlight mode. |
6.2.2 Setting menu
| 1^st Level Major Items | 2^nd Level Minor Items | 3^rd Level Adjustment Values | Function Descriptions |
| Capture | Capture Mode | Single Capture/ Time Lapse/ Record/Disable | Use the left and right arrow keys to select capture mode. |
| Capture Time | 1. 1 hr2. 2 hr3. 4 hr4. 8 hr5. 24 hr6. 48 hr7. 72 hr | Use the left and right arrow keys to select the capture time.This will be active only when capture mode is set to time lapse | |
| Capture Interval | 1. 3 sec2. 5 sec3. 10 sec4. 30 sec5. 1 min6. 2 min7. 5 min | Use the left and right arrow keys to select the capture interval.This will be active only when capture mode is set to time lapse | |
| Image Quality | 1. High2. Medium3. Low | Use the left and right arrow keys to select the image quality for the captured images and recorded videos | |
| Storage | Slide Show | Enter | Show the photos or videos stored in the USB disk (priority) or internal memory in slide mode. |
| Delay | 1. 0.5 sec2. 1 sec3. 3 sec4. 5 sec5. 10 sec6. Manual | Use the left and right arrow keys to select the delay time.Select manual mode to switch images manually. | |
| Copy To USB Disk | Enter | Use the left and right arrow keys to select, and then press [ENTER] to confirm to copy files from internal memory to USB disk. | |
| Delete All | Yes/No | Use the left and right arrow keys to select, press [ENTER] to confirm the deletion of all images from the USB disk (priority) or internal memory. | |
| Format | Yes/No | Use the left and right arrow keys to select, and then press [ENTER] to format the USB disk (priority) or internal memory. | |
| Control | Auto Exposure | On/Off | Regardless of outside environment, the machine will adjust the brightness to the optimal condition. Use the left and right arrow keys to select. |
| Auto White Balance | Enter | Regardless of outside light or color, the machine will adjust the color to the optimal condition;Press [ENTER] to execute. | |
| Audio Out Volume | 0~A~Max | Use the left and right arrow keys to adjust the volume. | |
| Microphone Levels | 0~A~Max | Use the left and right arrow keys to adjust the volume. | |
| Projector Type | DLP/LCD | Use the left and right arrow keys to select the projector type and reduce image noise. | |
| Digital Zoom | On/Off | Use the left and right arrow keys to turn on/offdigital zoom. | |
| Auto Power On | On/Off | Powers on automatically when connected to power supply | |
| Advanced | LanguageLock Down | 1. English2. 繁體中文3. 简体中文4. Deutsch5. Français6. Español7. Русский8. Nederlands9. Suomi10. Polski11. Italiano12. Português13. Svenska14. dansk15. ČESKY16. ελληνικάOn/Off | EnglishTraditional ChineseSimplified ChineseGermanFrenchSpanishRussianDutchFinnishPolishItalianPortugueseSwedishDanishCzechArabicJapaneseKoreanGreekUse the left and right arrow keys in the Language option to select the preferred language.Use the left and right arrow keys to turn on/off the lock down function.You can set the password when [On] is selected. |
| Auto Erase | On/Off | Use the left and right arrow keys to turn on/off the auto erase function.When [On] is selected, the stored images will automatically be deleted when the system is turned off. | |
| Preset Load | Yes/No | Read the value of the current image mode.Use the left and right arrow keys to select, and then confirm by pressing [ENTER]. | |
| Preset Save | Yes/No | Store the value of the current image mode.Use the left and right arrow keys to select, and then confirm by pressing [ENTER]. | |
| Splash Screen Settings | Enter | Open Splash Screen Setting window | |
| Factory Reset | Yes/No | Use the left and right arrow keys to select, and then confirm by pressing [ENTER] to restore the factory defaults. | |
| Firmware Version | NA | Display FW version |
6.2.3 Mask mode setting menu
| 2^nd Level Major Items | 3rd Level Minor Items | 4^th Level Adjustment Values | Function Descriptions |
| MASK Mode | Live | Enter | Press [ENTER] to return to live image. |
| Transparency | 0~2~3 | Use the left and right arrow keys to adjust the transparency of the mask. | |
| Step | Large/Medium/Small | Use the left and right arrow keys to select the step of the mask. | |
| V Size | 0~A~Max | Use the left and right arrow keys to select the vertical height of the mask. | |
| H Size | 0~A~Max | Use the left and right arrow keys to select the horizontal length of the mask. | |
| Exit | Enter | Press [ENTER] to confirm your selection and exit the mask mode setting menu. |
6.2.4 Spotlight mode setting menu
| 2^nd Level Major Items | 3rd Level Minor Items | 4^th Level Adjustment Values | Function Descriptions |
| Spotlight Mode | Live | Enter | Press [ENTER] to return to live image. |
| Shape | Ellipse/Rectangle | Use the left and right arrow keys to select the shape of the spotlight zone. | |
| Transparency | 0~2~3 | Use the left and right arrow keys to adjust the transparency of the border in the spotlight mode. | |
| Step | Large/Medium/Small | Use the left and right arrow keys to select the step of the spotlight zone. | |
| V Size | 0~A~Max | Use the left and right arrow keys to adjust the height of the spotlight zone. | |
| H Size | 0~A~Max | Use the left and right arrow keys to adjust the width of the spotlight zone. | |
| Exit | Enter | Press [ENTER] to confirm your selection and exit the spotlight mode setting menu. |
6.2.5 Splash Screen Setting
| 2^nd Level Major Items | 3rd Level Minor Items | 4^th Level Adjustment Values | Function Descriptions |
| Splash Screen Setting | Power On Image Setting | Default/Customer | Select to use [Default/ Customer] power on image |
| Power On Logo Show Time | 4 ~ 30 sec | Set up power on logo show time | |
| Power On Image Select | Enter | Select power on image. Only pictures in JPEG format are supported | |
| Exit | Enter | Press [ENTER] to confirm your selection and exit splash screen setting window. |
6.2.6 Annotation Tools
After the mouse is connected, right click or left click and hold the mouse to start the tools.
| Icon | Description |
 | Custom tool 1 |
 | Custom tool 2 |
 | Eraser |
 | Clear all |
 | Open setting menu of the annotation tool |
 | Exit the annotation tool |
6.2.7 Setting menu of the annotation tool
| 2^nd Level Major Items | 3rd Level Minor Items | 4^th Level Adjustment Values | Function Descriptions | |
 | Tools Select | Pen/Line/ Ellipse / Rectangle | Select an annotation tool | |
| Color Select | Red/Blue/Black/ Green/Pink/White/Cyan/Yellow | Select the pen color | ||
| Line Width | 1~3~10 | Select the line width | ||
 | Tools Select | Pen/Line/ Ellipse / Rectangle | Select an annotation tool | |
| Color Select | Red/Blue/Black/ Green/Pink/White/Cyan/Yellow | Select the pen color | ||
| Line Width | 1~3~10 | Select the line width | ||
 | Line Width | 1~3~10 | Select the line width | |
7.1 I would like to automatically adjust the image to have the best brightness and focusing performance Use the remote control or control panel:
- Press [AUTO TUNE] for the best brightness and focusing performance.
7.2 I would like to switch image sources
Live image is the default image source of VGA OUT (1) and HDMI OUT.
Press [SOURCE] on the
remote control or control panel to have
PS752 switch among the following images sources:
- Live images (default).
- VGA IN /HDMI IN
7.3 I would like to set the image source of VGA OUT2
The default of image source is based on VGA OUT (1). Press [SOURCE 2]

on the control panel to have PS752 switch among the following
images sources:
- VGA OUT(1).
- VGA IN.
7.4 I would like to switch the image mode Use the remote control or control panel:
1 Press [MENU] to activate the setting menu.
2 Press [▲], [▼], [▶], or [◀] to select [Image Mode].
3 Press [▶] or [◀] to the [Normal/Film/Slide/Microscope].
4 Press [MENU] to exit.
7.5 I would like to make text clearer and photos more colorful
7.5.1 Photo/Text mode descriptions
The default [Photo/Text] mode is in Photo (Photo mode). To change this setting, please use the remote control or the control panel to activate the options of the setting menu.
- [Photo] (default): for viewing photos or text with photos, making photos more colorful.
- [Text]: for viewing text files, making the text clearer.
- [Gray]: for viewing black & white photos which will make the grayscale differentiation distinct.
7.5.2 Set up Photo/Text mode
To change the settings, please use the remote control or the control panel:
- Press [MENU] to activate the setting menu.
- Press [▲], [▼], [▶], or [◀] to select [Photo/Text]. (Please refer to 7.5.1 Photo/Text mode descriptions to make the best choice.)
- Press [ENTER] to activate.
- Press [▶] or [◀] to select the [Photo/Text/Gray].
- Press [MENU] to exit.
7.6 I would like to zoom in/out images
- Press [ZOOM+] on the remote control or control panel to zoom in images.
- Press [ZOOM-] on the remote control or control panel to zoom out images.
7.7 I would like to use the manual focus Use the remote control or control panel:
- Press [MENU] to activate the setting menu.
- Press [▲], [▼], [▶], or [◀] to select [Manual Focus].
- Press [MENU] to exit.
7.8 I would like to adjust the brightness
If you use the remote control or the control panel:
- Press [BRT +] to make it brighter.
- Press [BRT -] to make it darker.
7.9 I would like to turn on/off the lamp
The default of the lamp is Arm lamp. When using the remote control or control panel:
- Press [LAMP] to switch On/Off. (in the sequence of arm lamp/backlight/OFF)
7.10 I would like to freeze images
- Press [FREEZE] on the remote control or control panel to freeze the
current image on the screen. Press again to defreeze.
7.11 I would like to rotate the image
Remote control:
- Press [ROTATE] key to rotate the screen. (The sequence of switching is: 0^/180^/Flip/Mirror )
Control panel:
- Press [MENU] to activate the setting menu.
- Press [▲], [▼], [▶], or [◀] to select [Rotate].
- Press [ENTER] to activate.
- Press [▶] or [◀] to switch the rotation method. (The sequence of switching is: 0^/180^/Flip/Mirror )
- Press [MENU] to exit.
7.12 I would like to capture images
7.12.1 Capture and save images
- Press [CAPTURE/DEL] on the remote control or control panel to capture and save images.
- You cannot capture images when the capture mode is set to [Disable]. If it is set to [Continuous], you can capture images continuously. Press [CAPTURE/DEL] to start capturing continuously, or press [CAPTURE/DEL] again to exit.
- To change the quality of captured images, please refer to 7.12.2 Setting the quality of captured images.
- To change the settings of captured images, please refer to 7.12.3 Setting continuous capture.
7.12.2 Setting the quality of captured images
- Press [MENU] on the remote control or control panel to activate the setting menu.
- Press [▲], [▼], [▶], or [◀] to select [Setting].
- Press [ENTER] to activate.
- Press [▶] or [◀] to the [Capture] menu.
- Press [▼] to find [Image Quality].
- Press [▶] or [◀] to select among [High/Medium/Low].
- Press [MENU] to exit.
7.12.3 Setting continuous capture
-
Press [MENU] on the remote control or control panel to activate the setting menu.
-
Press [▲], [▼], [▶], or [◀] to select [Setting].
- Press [ENTER] to activate.
- Press [▶] or [◀] to the [Capture] menu.
- Press [▼] to the [Capture Mode].
- Press [▶] or [◀] to select [Time Lapse].
- Press [▼] to find [Capture Time]; Press [▶], or [◀] to set capture time.
- Press [▼] to find [Capture Interval]; Press [▶], or [◀] to set interval time.
- Press [MENU] to exit.
7.13 I would like to record images
7.13.1 Recording motion images
Use the remote control or control panel:
- Press [RECORD] on the remote control to start recording images.
- Record sounds with the built-in microphone of the control panel.
- Press [RECORD] again to stop recording.
7.13.2 Setting the quality of captured images
- Press [MENU] on the remote control or control panel to activate the setting menu.
- Press [▲], [▼], [▶], or [◀] to select [Setting].
- Press [ENTER] to activate.
- Press [▶] or [◀] to the [Capture] menu.
- Press [▼] to find [Image Quality].
- Press [▶] or [◀] to select among [High/Medium/Low].
- Press [MENU] to exit.
7.13.3 Recording setup
- Press [MENU] on the remote control or control panel to activate the setting menu.
- Press [▲], [▼], [▶], or [◀] to select [Setting].
- Press [ENTER] to activate.
- Press [▶] or [◀] to the [Capture] menu.
- Press [▼] to the [Capture Mode].
- Press [▶] or [◀] to select [Record].
- Press [MENU] to exit.
7.13.4 Adjust the volume of microphone
- Press [MENU] on the remote control or control panel to activate the setting menu.
- Press [▲], [▼], [▶], or [◀] to select [Setting].
- Press [ENTER] to activate.
- Press [▶] or [◀] to the [Control] menu.
- Press [▼] to the [MIC Vol.].
- Press [▶] or [◀] to adjust the volume.
- Press [MENU] to exit.
7.13.5 Playing images
- For playing videos, please refer to 7.14 I would like to view captured/recorded images.
7.14 I would like to view captured/recorded images
- Press [PLAYBACK] on the remote control or control panel to display thumbnails of all stored files.
- Press [▲], [▼], [▶], or [◀] to select the thumbnail you want to play.
- Press [ENTER] to play.
- When the video is played, press [FREEZE] to pause/play the video or press [ENTER] to stop playing.
- Press [▶] or [◀] to select the next or previous audio/video file.
- Press [▲] or [▼] to adjust the volume of the video.
- Press [MENU] to exit.
An external speaker must be connected to AUDIO OUT to play sound when you use VGA OUT.
7.15 I would like to delete the captured/recorded images
Use the remote control or control panel:
- Press [PLAYBACK] to show the thumbnails of all stored files.
- Press [▲], [▼], [▶], or [◀] to select the file you want to delete.
- Press [CAPTURE/DEL] to display a [Delete File] window.
- Press [▶] or [◀] to select [Yes].
- Press [ENTER] to delete the selected file.
- Press [MENU] to exit.
7.16 I would like to adjust the output volume
Adjust the volume of the video.
- In PLAYBACK mode, Press [▲] or [▼] to adjust the volume of the video.
7.17 I would like to automatically delete the stored images whenever it is turned off (Auto Erase)
Use the remote control or control panel:
- Press [MENU] to activate the setting menu.
- Press [▲], [▼], [▶], or [◀] to select [Setting].
- Press [ENTER] to activate.
- Press [▶] or [◀] to the [Advanced] menu.
- Press [▲] or [▼] to [Auto Erase].
- Press [▶] or [◀] to select [On].
- Press [MENU] to exit.
7.18 I would like to enlarge a part of the image (PAN)
Use remote control:
- Press [PAN] to activate the partial enlarged mode.
- Press [▲], [▼], [▶], or [◀] to move and view the partial enlarged images.
- Press [MENU] to exit the partial enlarged mode.
Use control panel:
- Press [MENU] to activate the setting menu.
- Press [▲], [▼], [▶], or [◀] to select [PAN].
- Press [ENTER] to execute.
- Press [▲], [▼], [◀], or [▶] to move and view the partial enlarged images.
- Press [MENU] to exit the partial enlarged mode.
7.19 I would like to use the MASK and Spotlight function
7.19.1 I would like to use the mask or spotlight mode
Use remote control:
-
Press [MASK] key to enter the Mask/Spotlight mode menu. Press [◀] or [▶] to select mode.
-
Press [ENTER] to enter the mask or spotlight mode.
-
Press [▲], [▼], [◀], or [▶] to move the zone position.
-
Press [MASK] again to return to live image.
Use control panel:
- Press [MENU] to activate the setting menu.
- Press [▶] or [◀] to select [Mask]. Press [ENTER] to activate mask mode or select [Spotlight] and press [ENTER] to activate spotlight mode.
- Press [▲], [▼], [◀], or [▶] to move the zone position.
- Press [MENU] to activate the image OSD menu.
- Press [▲] or [▼] to select [Live Image].
- Press [ENTER] to return to live image.
7.19.2 I would like to set the size of mask
In Mask mode, use the remote control or control panel:
- Press [MENU] to activate the image OSD menu.
-
Press [▲] or [▼] to select the item to be modified [Transparency/Step/ V Size/H Size]. (For details, please refer to 6.2 Setting Menu.)
-
Press [◀] or [▶] to perform the modification.
-
Press [MENU] to exit the image OSD menu and return to the mask mode.
7.19.3 I would like to set spotlight function
In Spotlight mode, use the remote control or control panel:
- Press [MENU] to activate the image OSD menu.
-
Press [▲] or [▼] to select the item to be modified [Shape/Transparency/ Step/V Size/H Size]. (For details, please refer to 6.2 Setting Menu.)
-
Press [◀] or [▶] to perform the modification.
-
Press [MENU] to exit the image OSD menu and return to spotlight mode.
7.20 I would like to play the slides (Slide Show)
7.20.1 Setting delay time
- Press [MENU] on the remote control or control panel to activate the setting menu.
- Press [▲], [▼], [▶], or [◀] to select [Setting].
- Press [ENTER] to activate.
- Press [▶] or [◀] to the [Storage] menu.
- Press [▼] to find [Delay].
- Press [▶] or [◀] to select the delay time between [0.5 sec/1 sec/
3 sec/5 sec/10 sec/Manual].
- Press [MENU] to exit.
7.20.2 Playing/Pausing/Stopping the slide show Upper limit: The maximum size of single photo is 7 MB. If you use the remote control or the control panel
- Press [MENU] to activate the setting menu.
- Press [▲], [▼], [▶], or [◀] to select [Slide Show].
- Press [ENTER] to play.
- Press [ENTER] again to pause/play.
- Press [MENU] to exit.
7.21 I would like to compare images (compare live images with stored image files (PIP))
This function will compare and contrast a live image with a stored image.
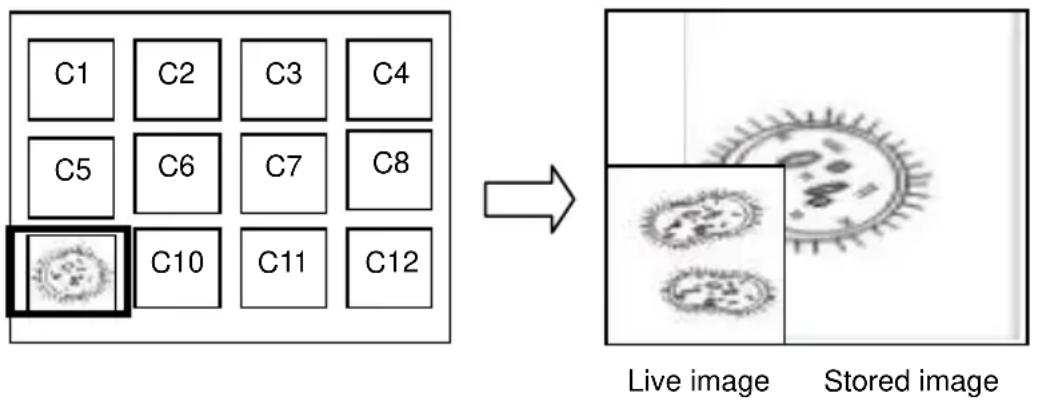
Remote control:
- Press [Playback] to activate the Playback image thumbnails.
- Press [▲], [▼], [◀], or [▶] to select the file to be compared.
- Press [PIP] to execute image comparison.
- Press [▲], [▼], [◀], or [▶] to move the live image.
- Repeat Steps 1 - 3 to change other image files.
- Press [MENU] to exit.
Control panel:
- Press [MENU] to activate the setting menu.
- Press [▲], [▼], [▶], or [◀] to select [PIP].
- Press [ENTER] to activate image comparison.
- Press [▲], [▼], [◀], or [▶] to move the live image.
- Press [MENU] to exit.
7.22 I would like to reduce the image noise (Projector Type)
-
This function enables Document Camera to automatically clear image noise. The noise is especially obvious when Document Camera is connected to a DLP projector. You can set the DLP projector to improve the image quality.
-
If there is special noise when VGA OUT is connected, please set DLP option to improve the image quality.
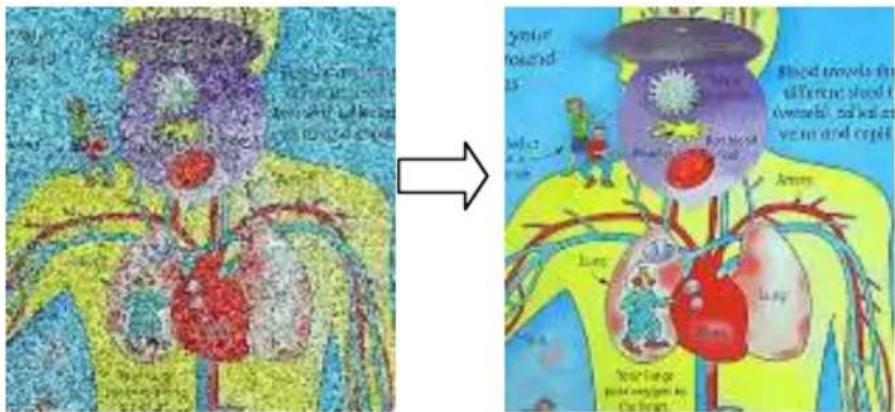
2.1. Press [MENU] on the remote control or control panel to activate the setting menu.
2.2. Press [▲], [▼], [▶], or [◀] to select [Setting].
2.3. Press [ENTER] to activate.
2.4. Press [▶] or [◀] to select [Control].
2.5. Press [▼] to [Projector Type].
2.6. Press [▶] or [◀] to select [LCD/DLP].
2.7. Press [MENU] to exit.
7.23 I would like to lock/unlock keys
Press and hold [ENTER + LAMP] on the control panel for 2 seconds to lock keys. To unlock keys, repeat the above procedure.
7.24 I would like to change the power on image
File path: \DCIM\100MEDIA, for example: J: \DCIM\100MEDIA File name: four English letters+ four numbers, for example: LUMN0001.JPG
- Press [MENU] on the remote control or control panel to activate the setting menu.
- Press [▲], [▼], [▶], or [◀] to select [Setting].
- Press [ENTER] to activate.
- Press [▶] or [◀] to select [Advanced] menu.
- Press [▼] to select [Power On Image Setting].
- Press [ENTER] to activate.
- Press [▲] or [▼] to select [Power On Image Setting] and press [▶] or [◀] to select [Default/Customer].
- Press [▲] or [▼] to select [Power On Logo Show time] and press [▶] or [◀] to set up the time.
- Skip to Step 11 if you select [Default] in Step 7.
- Press [▲] or [▼] to [Power On Image Select] and press [ENTER] to read selected file.
- Press [▼] to [Exit] and press [ENTER] to exit.
7.25 I would like to use a USB disk
- Insert the USB disk and a [Copy To USB Disk] dialog box will appear, and you are asked whether to copy files from PS752 to the USB disk. ➢ Press [▶] or [◀] on the remote control or control panel to select.
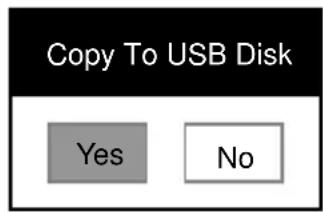
7.26 I would like to resume the factory default setting (Factory Reset)
7.26.1 Using OSD menu
- Press [MENU] on the remote control or control panel to activate the setting menu.
- Press [▲], [▼], [▶], or [◀] to select [Setting].
- Press [ENTER] to activate.
- Press [▶] or [◀] to select [Advanced] menu.
- Press [▼] to select [Factory Reset].
-
Press [▶] or [◀] to select [Yes].
-
Press [ENTER] to execute.
7.26.2 Use Compound Key
- Use the control panel, and press [ENTER] + [MENU] simultaneously to restore the initial value.
7.27 Computer-related functions
Ensure that the USB cable is connected and the drivers are installed before using the computer-related functions. Refer to Chapter 4 Installation and
Connections in this user manual
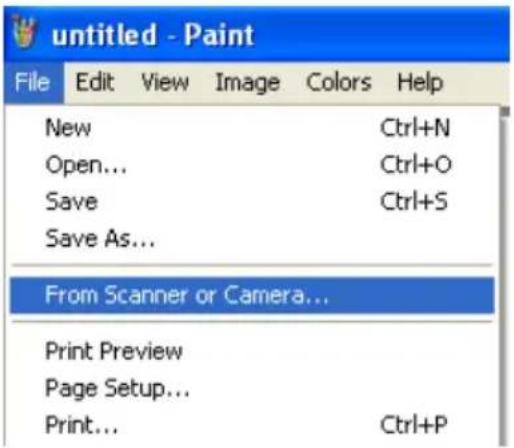
7.27.1 I would like to insert a photo in MS-Paint
- Click [File/From Scanner or Camera] in MS-Paint as shown in the bottom left figure.
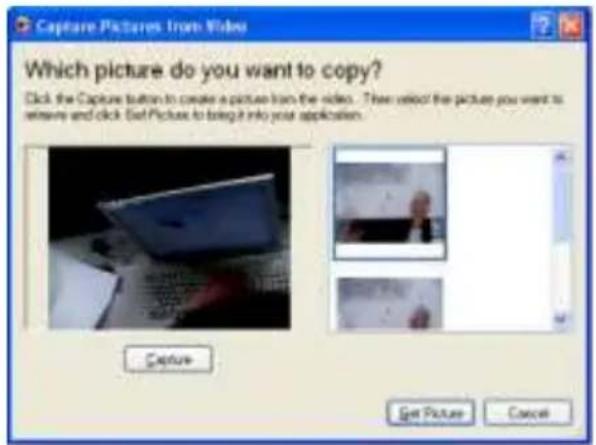
- Click [Capture] to get the live images, as shown in the top right figure.
- Click the image as shown in the right side of the top right figure.
- Click [Get Picture]. It will capture the photo of live image.
Support Windows XP Operation System only.
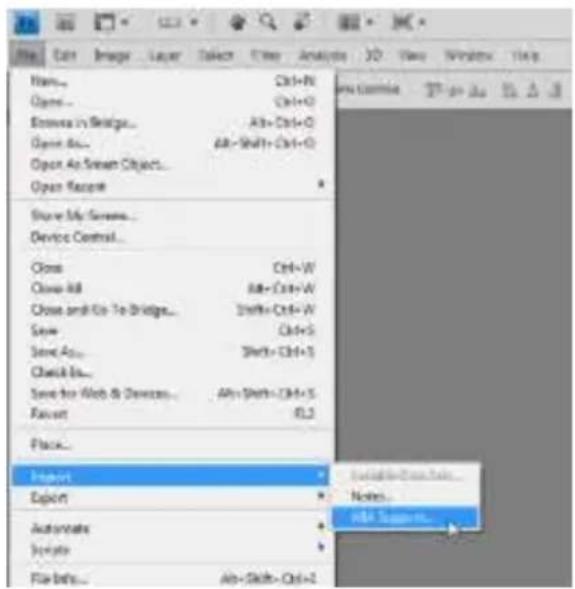
7.27.2 I would like to insert photos in Photoshop
- Click [File/Read-in/WIA-USB Video Device] in Photoshop
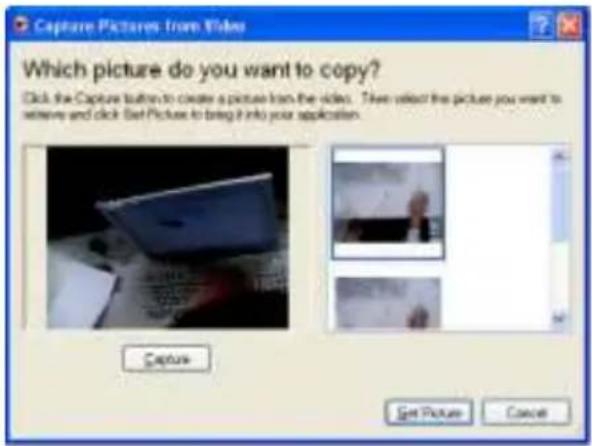
- Click [Capture], and click the image as shown in the right side of the figure below. Then click [Get Picture].
Chapter 8 Connecting to Microscope
1 Mount the microscope adapter accessories onto the microscope
2 The lens of PS752 connects with the microscope adapter
For eyepieces of 33 mm or 34 mm, only fit one microscope adapter (with the greatest diameter).
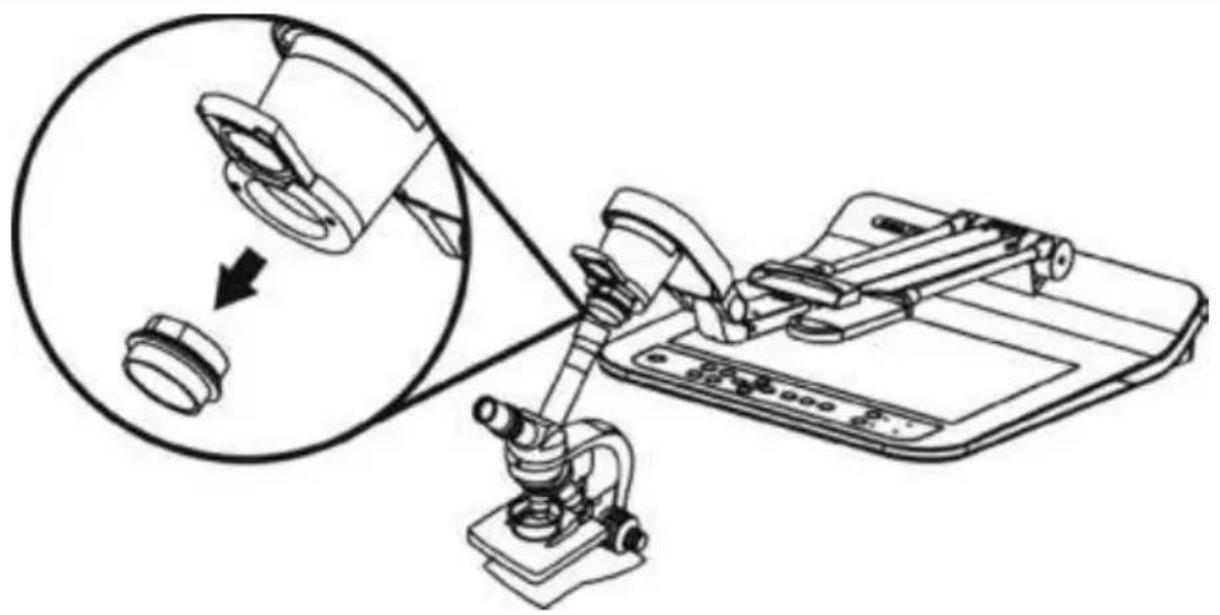
natural_image
Technical line drawing of a mechanical device with a magnified inset showing a close-up of a component (no text or symbols present)For eyepieces of 28 mm or 31 mm, fit one microscope adapter with the greatest diameter along with another appropriate one.
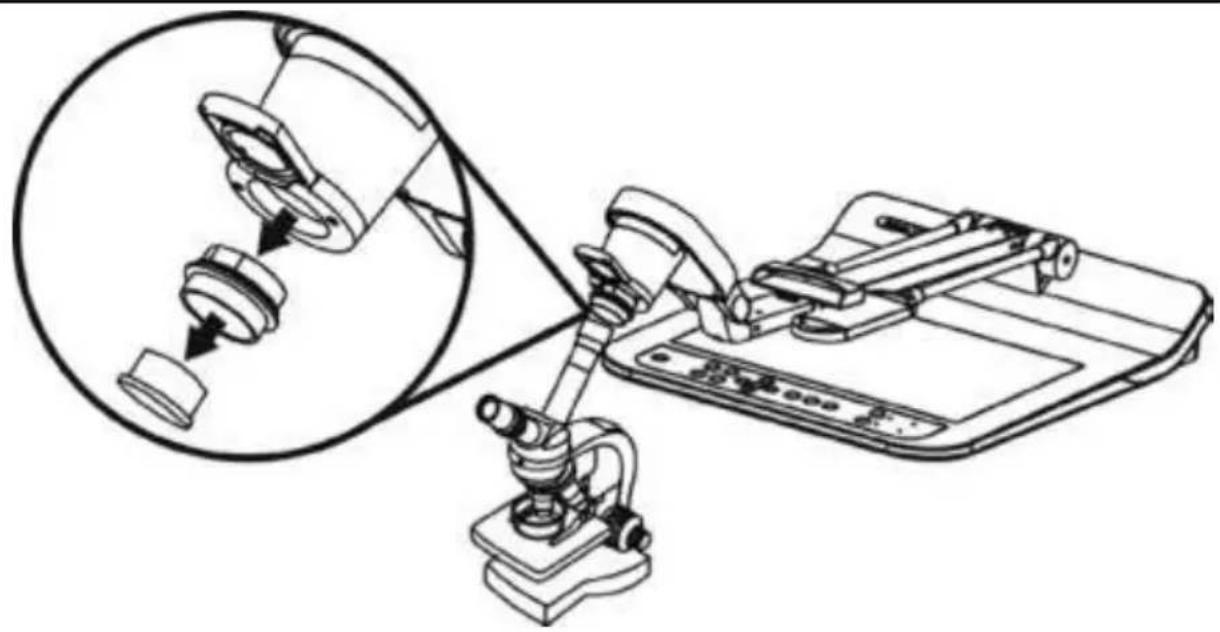
natural_image
Technical line drawing of a mechanical assembly with a magnified inset showing internal components (no text or symbols)3 Select the [Microscope] mode
3.1. If you use the remote control or the control panel
3.1.1. Press [MENU] to enter the setting menu.
3.1.2. Press [▲], [▼], [▶], or [◀] to select [Image Mode].
3.1.3. Press [▶] or [◀] to the [Microscope].
3.1.4. Press [MENU] to exit.
4 If the image is not clear
4.1. Please adjust the focus of microscope
4.2. Press [AUTO TUNE] button on the control panel to activate the auto focus
5 Digital zoom
5.1. If you use the remote control or the control panel
5.1.1. Press [MENU] to enter the setting menu.
5.1.2. Press [▶] or [◀] to the [Control].
5.1.3. Press [▼] to select [Digital Zoom].
5.1.4. Press [▶] or [◀] to the [On].
5.1.5. Press [ZOOM +] / [ZOOM -].
- Press [MENU] on the remote control or control panel to enter the setting menu.
- Press [▲], [▼], [▶], or [◀] to select [Image Mode].
- Press [▶] or [◀] to the [Normal].
- Press [MENU] to exit.
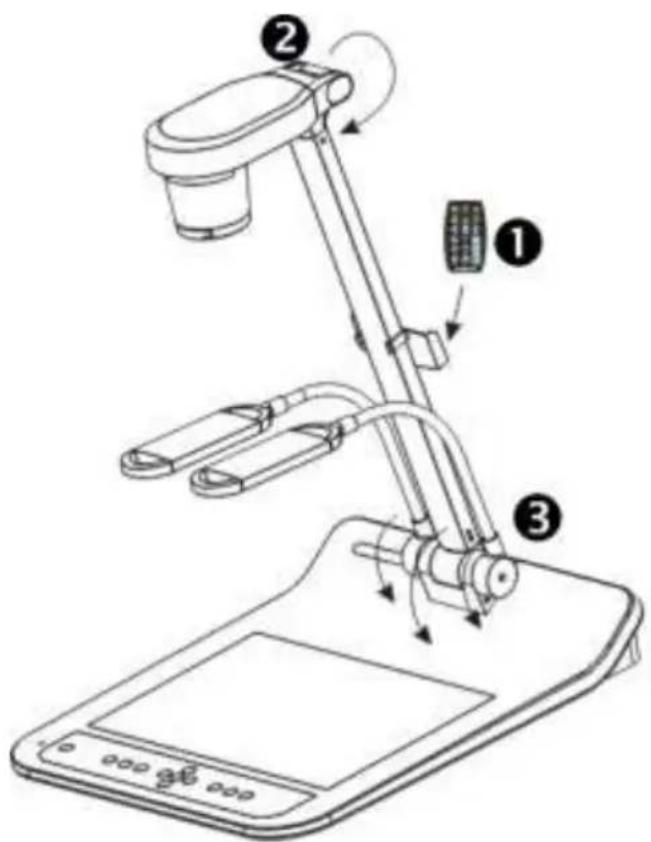
Chapter 9 Packing the Machine
- Put the remote control back to the holder.
- Fold back the camera head to align with the arm.
- Turn the two lamp arms and the arm of camera head down and adjust them to be parallel with the platform.
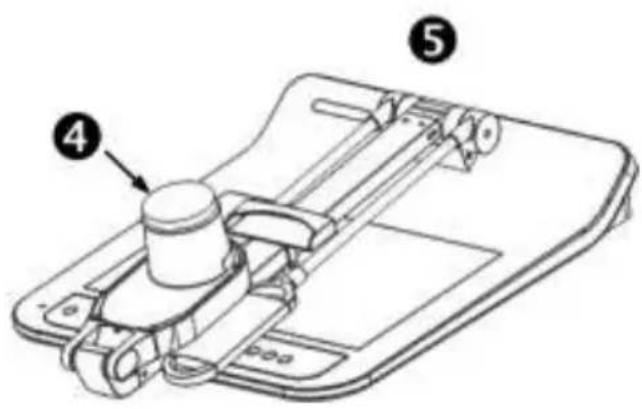
- Put the lens cap on the camera head.
- Finally, fold the machine as in the following figure.
10.1 Connecting to a projector or monitor
10.1.1 XGA 60 Hz output (default values) XGA 50 Hz output
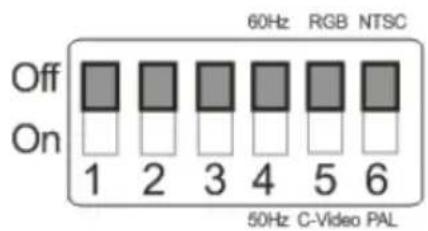
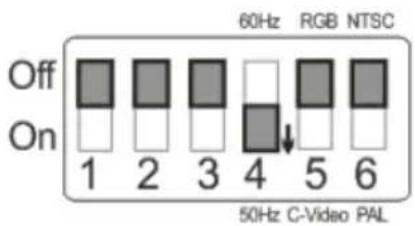
10.1.2 SXGA 60Hz output
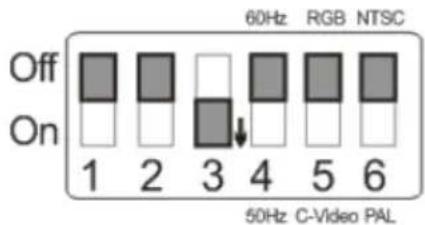
SXGA 50Hz output
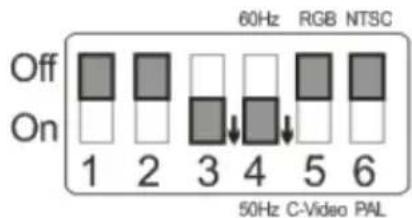
10.1.3 WXGA 60Hz output
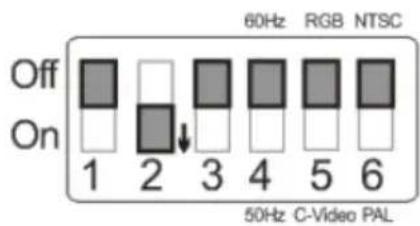
WXGA 50Hz output
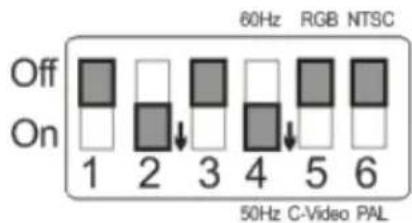
10.1.4 1080P 60Hz output
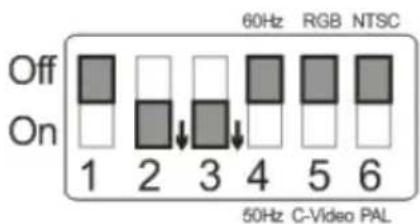
1080P 50Hz output
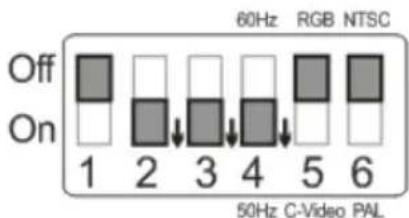
10.2 Connecting to a TV/DVD
10.2.1 NTSC: USA, Taiwan, Panama, Philippines, Canada, Chile, Japan, Korea, and Mexico.
60Hz 50Hz
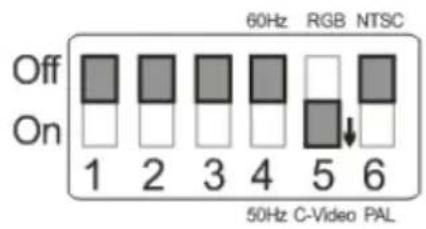
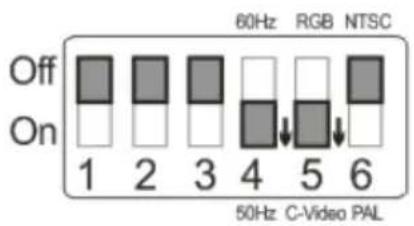
10.2.2 PAL: Countries/regions not listed above.
60Hz 50Hz
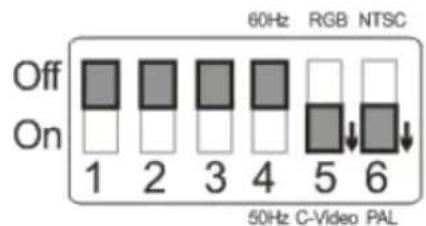
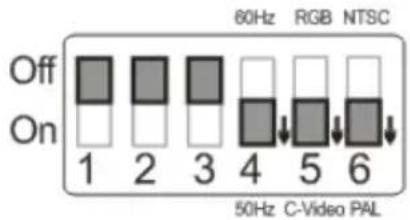
Chapter 11 Troubleshooting
This chapter describes problems you may encounter while using PS752. If you have questions, please refer to related chapters and follow all the suggested solutions. If the problem still occurred, please contact our distributors or service center.
| No. | Problems | Solutions |
| 1 | Boot without power signal | Make sure you have plugged in the power cord. |
| 2 | No image output from the PS752 | 1. Check the power.2. Check all cable connections. Refer to Chapter 4 Installation and Connections in this manual.3. Check the [Source], refer to 7.2 I would like to switch image sources of Chapter 7 Descriptions of Major Functions.4. Check the settings for the source of the projector. Please refer to the user manual of the projector.5. Check if DIP switch is properly set. Please refer to Chapter 10 DIP Switch Setting for related settings. |
| 3 | Unable to focus | Probably the document is too close. Press [ZOOM -] on the remote control or control panel. Or pull away the distance between document and lens, then press [AUTO TUNE] to activate auto focus. |
| 4 | The image is incomplete | Check the Auto Image setting of your projector. Please refer to the user manual of the projector or check for the DIP switch setting. |
| 5 | Lumens Document Camera, Podium ViewTM and other applications cannot be used simultaneously | Lumens Document Camera, Podium ViewTM and other applications cannot be used simultaneously. Only one application can be executed at a time. Please close the currently running applications and then execute the application to be used. |
| 6 | When PS752 is turned on, the auxiliary floodlight do not light | Please make sure the arm lamp is set to [Off]. For the switch-on or -off of arm lamp, please refer to 7.9 I would like to turn on/off the lamp of Chapter 7 Descriptions of Major Functions. |
| 7 | PS752 fails to store images or react | 1. Check to see if the stored data have reached the maximum size of the USB disk (priority) or internal memory.2. Please make sure if the capture function is set to continuous mode or the time for capture is set to belong. For the related setting, please refer to 7.12 I would like to capture images of Chapter 7 Descriptions of Major Functions. |
| 8 | The images outputted from PS752 are too bright, dark or vague. | Press [AUTO TUNE] button to automatically adjust the image to have the best brightness and focusing performance. |
| 9 | Unable to record images | 1. Check to see if the stored data have reached the maximum size of the USB disk.2. The recording function is not supported in the internal memory. Please make sure that USB disk is inserted for image recording. |
| 10 | The operating steps in the manual are not applicable to the machine | The operating steps in the manual may be not applicable to the machine due to improvement in functions. Check to see if the Firmware version of your machine is up-to-date.1 Please go to Lumens official website to check whether the latest version is available for update. www.Mylumens.com/qoto.htm2 The steps to check the FW version are as below:2.1 Press [MENU] on the remote control or control panel to activate the setting menu.2.2 Press [▲], [▼], [▶], or [◀] to select [Setting].2.3 Press [ENTER] to activate.2.4 Press [▶] or [◀] to select [Advanced] menu.2.5 View [Firmware Version].If you are not sure whether it is the latest version, please consult your distributor for advice.http://www.Mylumens.com/en/Request form.php |
| 11 | How to unlock the locked device | 1. Press [MENU] on the remote control or control panel to activate the setting menu.2. Press [▲], [▼], [▶], or [◀] to select [Setting].3. Press [ENTER] to activate.4. Press [▶] or [◀] to select [Advanced] menu.5. Press [▼] to [Lock Down].6. Press [▶] or [◀] to select [Off] and cancel the password setting function. |
| 12 | After using the USB cable to connect to a computer, modify VGA OUT (1) to VGA IN.VGA IN/HDMI IN image output is not available through USB | After using the USB cable to connect to a computer, only Live Image output is available. |
| 13 | The output image is not clear with water ripples | Please refer to theAppendix 1in the manual to confirm the applicable voltage frequency, and reset it according to the instruction inChapter 10 DIP Switch Setting. |
| 14 | The data in the USB flash drive cannot be read. | 1. The USB flash drive with the capacity of 4 G and above is recommended (up to 32 G supported)2. Please make sure the file was saved at the specified path: \DCIM\100MEDIA. (E.g.: J: \DCIM\100MEDIA)3. Please make sure the file is named appropriately, e.g. four English letters + four numbers. (E.g.: LUMN0001.JPG) |
Power frequency for each country in the world
| Region or Country | Frequency | Region or Country | Frequency | Region or Country | Frequency |
| English | English | English | |||
| Afghanistan | 50 | China | 50 | Guam | 60 |
| Algeria | 50 | Colombia | 60 | Grenada | 50 |
| Angola | 50 | Congo | 50 | Guatemala | 60 |
| Antiqua | 50 | Costa Rica | 60 | Guinea | 50 |
| Argentina | 50 | Cuba | 60 | Gayana | 50 |
| Australia | 50 | Cyprus | 50 | Haiti | 60 |
| Austria | 50 | Czechoslov-akia | 50 | Hawaii | 60 |
| Azores | 50 | Dahomey | 50 | Honduras | 60 |
| Bahamas | 60 | Den mark | 50 | Hong Kong | 50 |
| Bahrain | 60 | Dominican | 60 | Hungary | 50 |
| Bangladesh | 50 | Dubai | 50 | Ice land | 50 |
| Babados | 50 | Ecuador | 60 | India | 50 |
| Belgium | 50 | Egypt | 50 | Indonesin | 50 |
| Bermuda | 60 | El Salvador | 60 | Iran | 50 |
| Bolivia | 50 | Equatorial Guinea | 50 | Iraq | 50 |
| Botswana | 50 | Ethiopia | 50 | Ireland | 50 |
| Brazil | 50 60 | Faeroe Island | 50 | Isle of Man | 50 |
| Bulgaria | 50 | Fiji | 50 | Israel | 50 |
| Burma | 50 | Finland | 50 | Italy | 50 |
| Burundi | 50 | France | 50 | Ivory Coast | 50 |
| Cambodia | 50 | French Guiana | 50 | Jamaica | 50 |
| Cameroon | 50 | Gabon | 50 | Japan | 50 60 |
| Canada | 60 | Gambia | 50 | Jordan | 50 |
| CanaryIslan-d | 50 | Germany | 50 | Kenya | 50 |
| Central Africa Rep. | 50 | Ghana | 50 | Korea | 60 |
| Ceylon | 50 | Gibraltar | 50 | Kuwait | 50 |
| Chad | 50 | Great Britain | 50 | Lebanon | 50 |
| Channel Island | 50 | Greece | 50 | Lesotho | 50 |
| Chile | 50 | Greenland | 50 | Liberia | 60 |
| Libya | 50 | Oman | 50 | Syria | 50 |
| Luxembourg | 50 | Pakistan | 50 | Tahiti | 60 |
| Macao | 50 | Panama | 60 | R.O.C. Taiwan | 60 |
| Madeiral | 50 | Paraguay | 50 | Tanzania | 50 |
| Majokca Island | 50 | Peru | 60 | Thailand | 50 |
| Malagasy | 50 | Philippines | 60 | Togo Rep.of | 50 |
| Malawi | 50 | Poland | 50 | Tonga | 50 |
| Malaysia | 50 | Portugal | " | Trinidad | 60 |
| Mali Rep. | 50 | Puerto Rico | 60 | Tobago | 60 |
| Malta | 50 | Qatar | 50 | Tunisia | 50 |
| Martinique | 50 | Rhodesia | 50 | Turkey | 50 |
| Mauritania | 50 | Romania | 50 | Uganda | 50 |
| Mauritius | 50 | Rwanda | 50 | USA. | 60 |
| Mexico | 60 | Saudi Arabia | 50 60 | USSR | 50 |
| Monaco | 50 | Scotland | 50 | United Kingdom | 50 |
| Montserrat | 60 | Senegal | 50 | Upper Volta | 50 |
| Morocco | 50 | Sierra Leone | 50 | Uruguay | 50 |
| Mozambique | 50 | Singapore | 50 | Venezuela | 60 |
| Nepal | 50 | Somalia | 50 | Viet-Nam | 50 |
| Netherlands | 50 | South Africa Rep. | 50 | Virgin Island | 60 |
| New Caledonia | 50 | Spain | 50 | Western Samoa | 50 |
| New Zealand | 50 | Sri Lanka | 50 | Yeman(Aden) | 50 |
| Nicaragua | 60 | Sudan | 50 | Yemen(Arab) | 50 |
| Niger | 50 | Surinam | 60 | Yugoslavia | 50 |
| Nigeria | 50 | Swaziland | 50 | Zaire Rep. of | 50 |
| Norway | 50 | Sweden | 50 | Zambia | 50 |
| Okinawa | 60 | Switzerland | 50 |



- User Manual – English
- [Important]
- Table of Contents
- Copyright Information....3
- Chapter 1 Safety Instructions .... 4
- Chapter 2 Package Contents....6
- Chapter 3 Product Overview ...... 7
- Chapter 4 Installation and Connections ....8
- Chapter 5 Start Using....14
- Chapter 6 Control Panel/Remote Control and Setting Menu....15
- Chapter 7 Descriptions of Major Functions....23
- Chapter 8 Connecting to Microscope ....35
- Chapter 9 Packing the Machine....37
- Chapter 10 DIP switch setting....38
- Chapter 11 Troubleshooting....40
- Appendix 1....43
- ■ Precautions
- ■ FCC Warning
- ■ EN55032 (CE Radiation) Warning
- Chapter 2 Package Contents
- Relative Operation Position
- Chapter 4 Installation and Connections
- Installation and setup
- Connecting to a projector or monitor
- Connecting to a Computer and Use Lumens™ Software or an Interactive Whiteboard (IWB)
- Connecting to an HDTV
- For connection to Computer or DVD
- Connecting to a computer, projector, and monitor simultaneously
- Connecting to Audio Input and Output
- Connecting to a computer with RS232
- Connecting to a TV
- Installing application software
- Chapter 6 Control Panel/Remote Control and Setting Menu
- Functions of control panel and remote control
- Setting menu
- Main menu
- Mask mode setting menu
- Annotation Tools
- Setting menu of the annotation tool
- I would like to automatically adjust the image to have the best brightness and focusing performance Use the remote control or control panel:
- I would like to switch image sources
- I would like to set the image source of VGA OUT2
- I would like to switch the image mode Use the remote control or control panel:
- I would like to make text clearer and photos more colorful
- Photo/Text mode descriptions
- Set up Photo/Text mode
- I would like to zoom in/out images
- I would like to use the manual focus Use the remote control or control panel:
- I would like to adjust the brightness
- I would like to turn on/off the lamp
- I would like to freeze images
- I would like to rotate the image
- Remote control:
- Control panel:
- I would like to capture images
- Capture and save images
- Setting the quality of captured images
- Setting continuous capture
- I would like to record images
- Recording motion images
- Setting the quality of captured images
- Recording setup
- Adjust the volume of microphone
- Playing images
- I would like to view captured/recorded images
- I would like to delete the captured/recorded images
- I would like to adjust the output volume
- I would like to automatically delete the stored images whenever it is turned off (Auto Erase)
- I would like to enlarge a part of the image (PAN)
- I would like to use the MASK and Spotlight function
- I would like to use the mask or spotlight mode
- Use control panel:
- I would like to set the size of mask
- I would like to set spotlight function
- I would like to play the slides (Slide Show)
- Setting delay time
- Playing/Pausing/Stopping the slide show Upper limit: The maximum size of single photo is 7 MB. If you use the remote control or the control panel
- I would like to compare images (compare live images with stored image files (PIP))
- I would like to reduce the image noise (Projector Type)
- I would like to lock/unlock keys
- I would like to change the power on image
- File path: \DCIM\100MEDIA, for example: J: \DCIM\100MEDIA File name: four English letters+ four numbers, for example: LUMN0001.JPG
- I would like to use a USB disk
- I would like to resume the factory default setting (Factory Reset)
- Using OSD menu
- Use Compound Key
- Computer-related functions
- I would like to insert a photo in MS-Paint
- I would like to insert photos in Photoshop
- Chapter 8 Connecting to Microscope
- Select the [Microscope] mode
- Chapter 9 Packing the Machine
- Connecting to a projector or monitor
- Connecting to a TV/DVD
- Chapter 11 Troubleshooting
Brand : Lumens
Model : PS752
Category : Document Camera