
Texas 600 - Receiver BLAUPUNKT - Free user manual and instructions
Find the device manual for free Texas 600 BLAUPUNKT in PDF.

| Product Type | Car Stereo Receiver |
| Brand | Blaupunkt |
| Model | Texas 600 |
| Dimensions (W x H x D) | 178 x 50 x 165 mm (1 DIN) |
| Weight | 1.2 kg |
| Power Supply | 12V DC (negative ground) |
| Max Power Output | 4 x 50 Watts |
| Radio Bands | FM, AM |
| CD Player | Yes |
| USB Port | Yes (front panel) |
| AUX Input | Yes (3.5 mm jack) |
| Bluetooth | Yes (hands-free calling & audio streaming) |
| Display | LCD with white backlight |
| Remote Control | Included |
| Maintenance | Clean with a soft, dry cloth. Do not use solvents. |
| Safety | Disconnect battery before installation. Use proper fuse. |
| Spare Parts | Contact Blaupunkt customer service or authorized dealers. |
| Repairability | Refer to user manual for troubleshooting. Do not open device. |
Frequently Asked Questions - Texas 600 BLAUPUNKT
User questions about Texas 600 BLAUPUNKT
0 question about this device. Answer the ones you know or ask your own.
Ask a new question about this device
Download the instructions for your Receiver in PDF format for free! Find your manual Texas 600 - BLAUPUNKT and take your electronic device back in hand. On this page are published all the documents necessary for the use of your device. Texas 600 by BLAUPUNKT.
USER MANUAL Texas 600 BLAUPUNKT
Press [ ] button to turn on the unit.
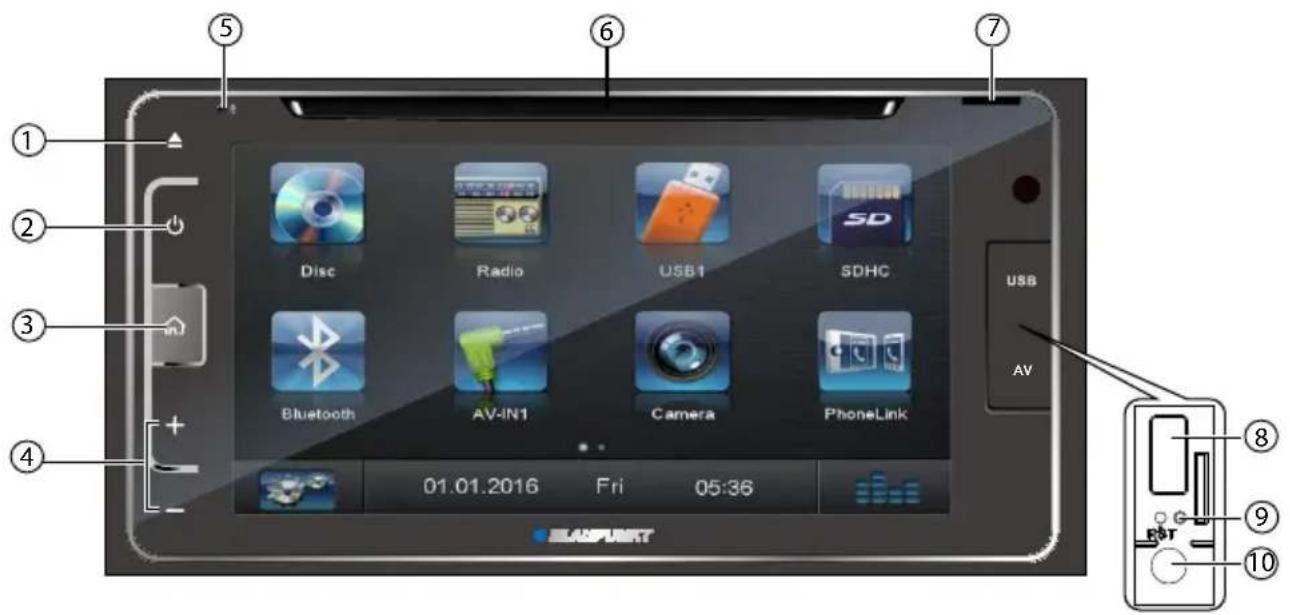
- ▲ Eject disc (when disc inserted)
- [ Button
Short press: Switch on device
In operation: Mute audio source
Long press: Switch off device
- [ ] Button
Short press: Call up main menu
In the main menu: Call up menu of active source.
Long press: Call up Bluetooth® function directly
- Volume + / -
Increase / Decrease the volume
-
Microphone
-
Disc Slot
Insert the disc with label side facing up.
- microSD card reader
The card reader supports microSD cards on which either audio/video files.
- USB Connector
Connect a USB device for playback of music/video files.
- Reset
Load factory settings
- AV IN
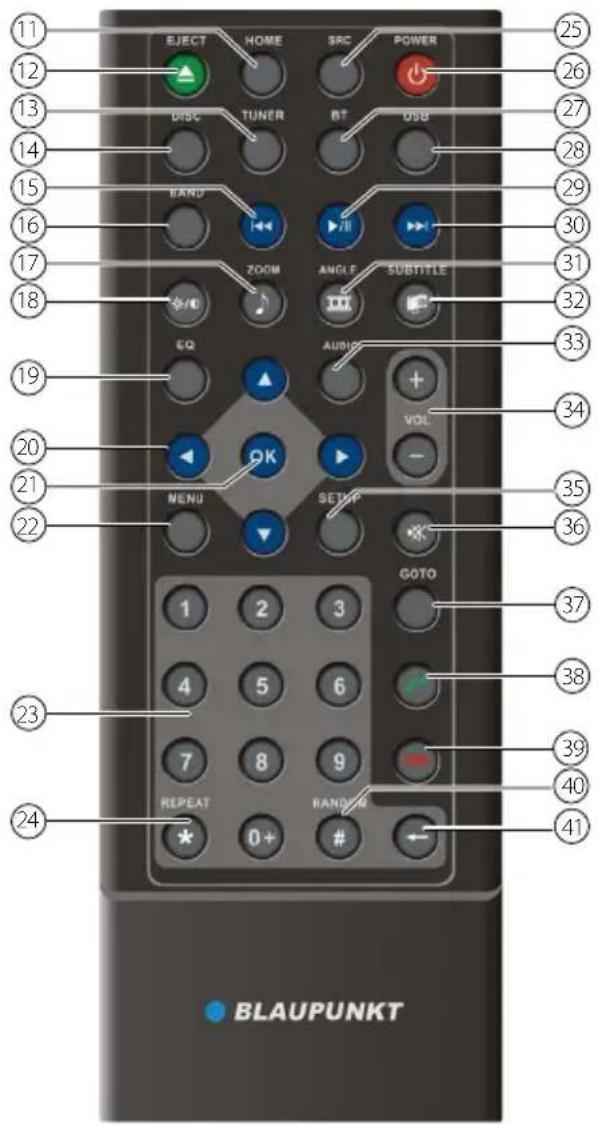
- Return to the home menu
- Eject the disc
- Access to tuner source
- Access to disc source
-
- Search an available radio station by decreasing tuning frequency
-
Select the previous chapter/track for playback
-
Select radio band
-
- Zoom in (Picture menu of CD/USB/SD)
-
Access to music list (Audio menu of music playing)
-
Adjust screen settings
-
Open EQ menu
-
Menu cursor
-
Enter
-
- Open route menu (DVD)
-
Turns on/off PBC (VCD)
-
Digit area
-
Repeat playback
-
Change to next source
-
Power on/off
-
Access to Bluetooth source
-
Access to USB source
-
Pause playback/Start playback
-
- Search an available radio station by increasing tuning frequency
-
Select the next chapter/track for playback
-
- Playback disc in different angle for a scene (DVD)
- Rotate (photo playing)
- Access to video list
-
- Language selection for subtitle (DVD)
- Access to photo list
-
Change the sound channel for disc playback
-
Increase/Decrease volume
-
Access to settings source
-
Mute On/Off Audio Output
-
Activate direct access mode
-
Dial/Receive a call
-
Hang up
-
Play all chapter/tracks in random order
-
- Press to clear the number one by one
- Hold to clear all the numbers
Placing the device in operation....5
Turn on/off the power 5
Mute....5
Adjust the Volume....5
Playing Source Selection 5
Main Menu....5
Setting the reception area .... 5
Radio mode 6
Start radio mode....6
Select One Radio Band....6
Tune....6
Storing stations manually 7
Storing stations automatically (Travelstore)..7
Scanning stations ....7
Adjusting the seek tuning sensitivity......7
DVD/CD/USB media playback 7
Insert a Disc....7
Eject the Disc....7
Connect a USB Device 7
Remove a USB Device....7
Insert/Remove a SD Card....7
Touch Screen Controls....7
DVD movie playback....8
Audio playback from DVD/CD, USB or microSDHC....8
Video playback from DVD/CD, USB or microSDHC....9
Image playback from DVD/CD, USB or audioSDHC....10
Bluetooth mode....10
Pair the Bluetooth-enabled Devices.....10
Disconnect Bluetooth Device....11
Make a Call....11
Answer an Incoming Call....11
Adjust Bluetooth Settings....11
Music Mode....12
PhoneLink 12
Overview of PhoneLink....12
Connect with Android phone....12
Connect with iPhone 13
Sound settings....13
Select Preset Equalizer ....13
Adjust FAD BAL 13
AUX Operations 13
Basic Settings....14
General....14
Video 14
Sound 14
Time....14
Language 14
Bluetooth 14
Volume 14
Notes of connection 15
Scope of delivery 15
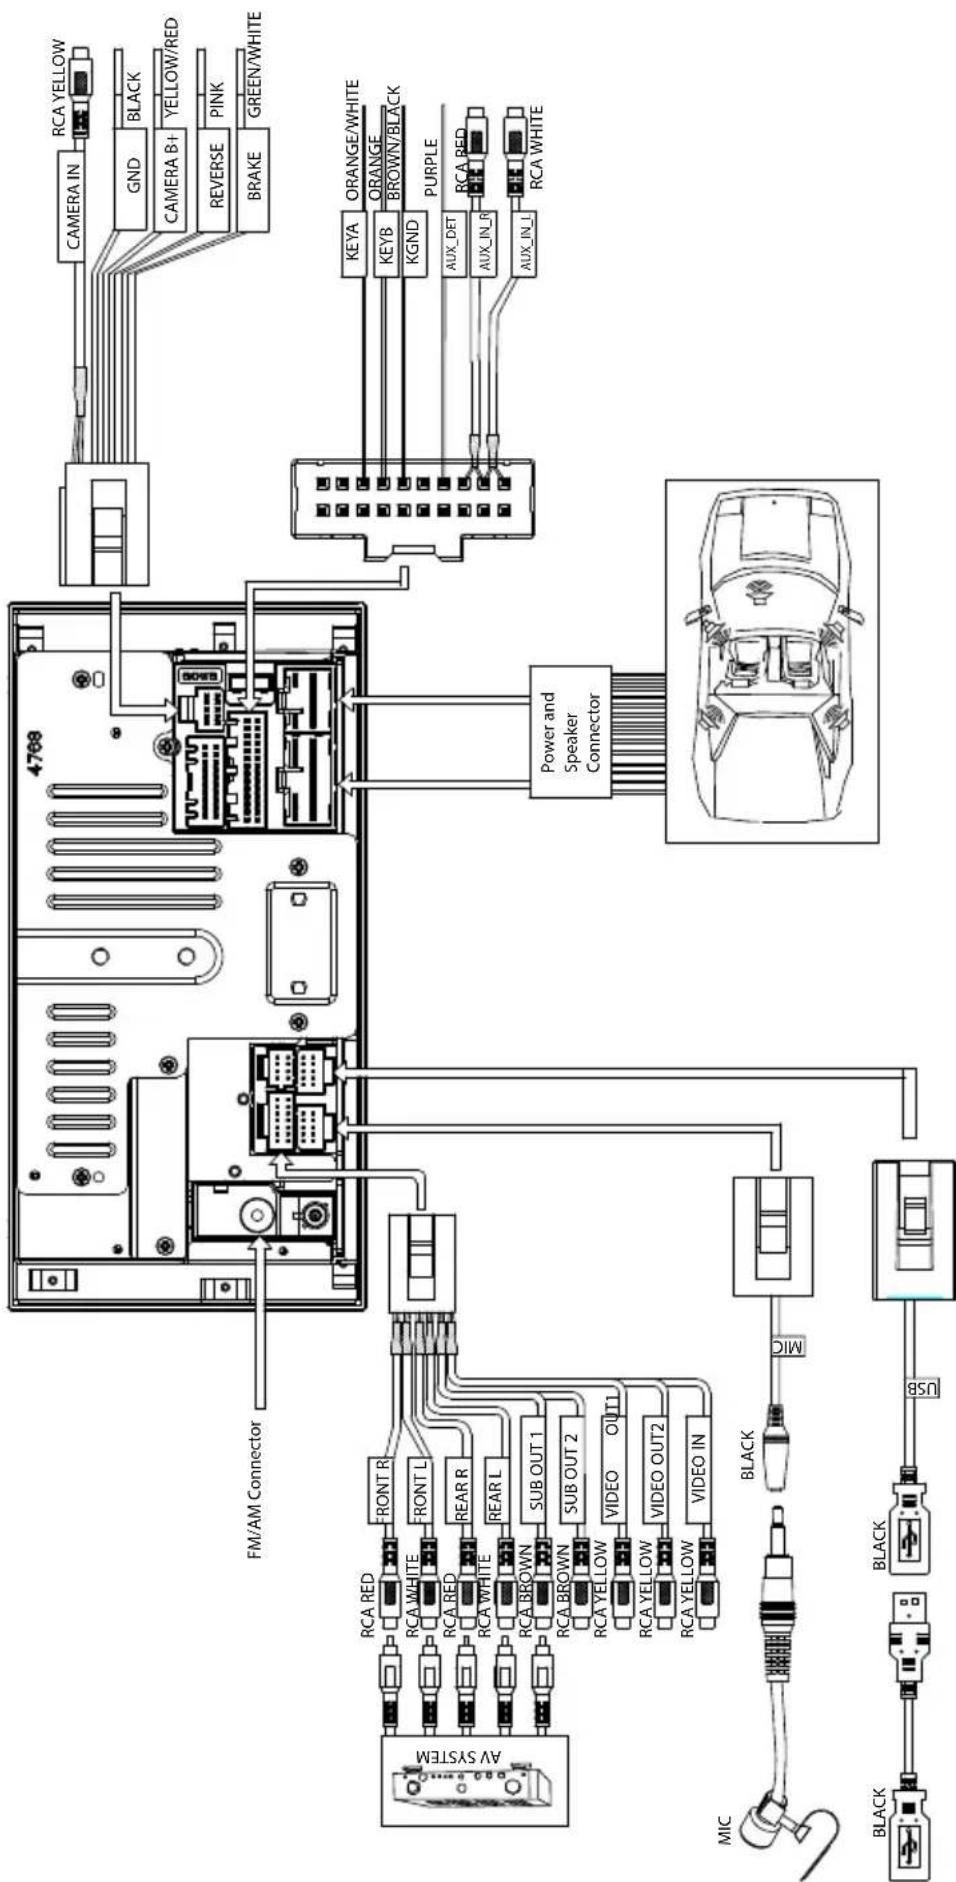
Connection diagram....16
Troubleshooting 17
Supported formats 18
Placing the device in operation
Caution!
Transport securing screws
Ensure that the transport securing screws at the top side of the device are removed before the startup of the device.
Turn on/off the power
Press and release [⏻] button to turn the unit on.
Press and hold the [💡] button to turn the unit off.
Note:
The unit will power on in the same state it was in when powered off.
Mute
Press the [+] button to mute the sound.
Note:
- Pressing the [💡] button again or adjusting volume will unmute.
Adjust the Volume
Press the [+] or [-] button to increase or decrease the volume level.
The adjustable range of volume is 0 to 50.
Playing Source Selection
Press the [ ] button on the panel to show main source menu.
Touch desired icon on the the screen to enter corresponding working mode, such as Disc, Radio, etc.
Drag left/right to scroll.
Note:
- When some devices are not ready, they cannot be selected.
- You should stop switching when the playing source you desired has been selected and wait for some seconds, the unit will auto enter the playing source mode you have selected.
Main Menu
In the main menu, you press the buttons on the touch-screen to call up the different sources and operating modes.
Press the [ ] button to enter main source menu.
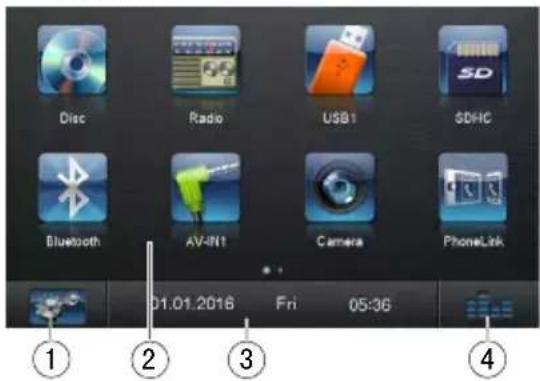
- Enter setting mode.
- Function icons
- Clock
- Touch to access Equalizer level settings menu.
Setting the reception area
This car sound system is designed for operation in different regions with different frequency ranges and station technologies. The factory default of the reception area is "ASIA (FM/AM)". If you operate the car sound system outside of Asia, you may first have to set a suitable reception area in the menu:
In the main menu, press the [ ] button. The Settings menu is displayed.
In the bottom area of the Settings menu, press the [General] button.
The current setting is displayed behind "Radio region".
Tap twice (double-click) on the [ Radio region ] button to display the list of available reception areas.
Select the desired reception area by double-clicking. The list is hidden, the selected reception area is set.
Press the [ ] button. The main menu is displayed again.
Radio mode
Start radio mode
In the main menu, press the [Radio] button. The radio playback menu is displayed.
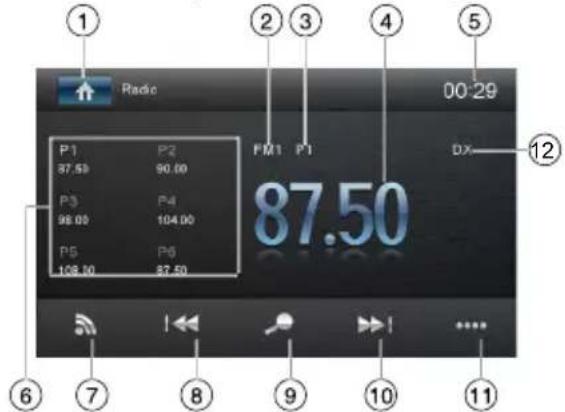
- Return to home menu
- Current radio band
- Current preset radio station
- Current frequency
- Clock
- Broadcaster information stored at the preset
- Band switch
-
Tune backward Auto tune backward. (long press)
-
Search stations automatically
-
Tune forward Auto tune forward. (long press)
-
Touch to view more on-screen buttons
-
LO/DX Seeking
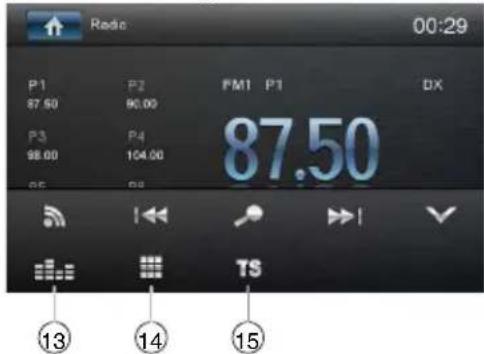
-
Touch for quick access to Equalizer level settings
-
Enter frequency directly
-
Storing stations automatically
Select One Radio Band
Touch the [ north] icon on the user interface to select one radio band among FM1, FM2, FM3, AM1 and AM2.
Tune
Auto Tuning
Hold [◀◀] / [▶▶] icon on the user interface more than 2 second to seek a higher / lower station.
To stop searching, repeat the operation above or press other buttons having radio functions.
Note:
When a station is received, searching stops and the station is played.
Manual Tuning
Method 1:
During manual tuning, the frequency will be changed in steps.
Touch the [◀◀] / [▶◀] icon on the user interface to tune in a higher / lower station.
Method 2:
Press the [....] button to display additional operating options.
Press the [■■■] button.
A numeric keypad is displayed for the frequency input.
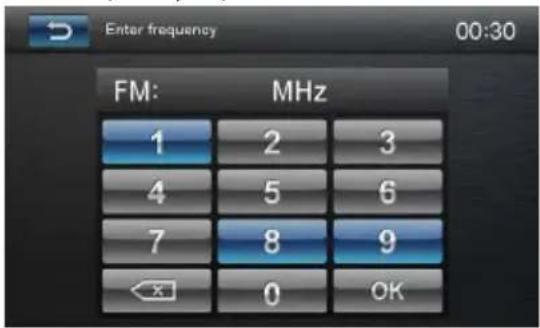
Enter the frequency of the desired station with the numeric keypad.
Press the [OK] button.
The radio playback menu is displayed, the station of the frequency entered is played back.
Storing stations manually
Select the desired memory bank with the [ ] button.
Set the desired station.
Press one of the memory buttons [P1] - [P6] for approx. 2 seconds to store the current station at the button.
The station is stored.
Storing stations automatically (Travelstore)
With Travelstore, you can automatically search for and store the 6 FM stations off ering the strongest reception in the region in the current memory bank. Any previously stored stations in this memory bank are deleted in the process.
Select a memory bank.
Press the [....] button to display additional operating options.
Press the [TS] button.
The tuner starts the automatic station seek tuning. After the storing is completed, the radio plays the station at memory location 1 of the previously selected memory bank.
Scanning stations
You can use the scan function to play all the receivable stations of the current waveband for a few seconds.
Press the [ ] button. The seek tuning searches for stations in the current waveband. Each receivable station is played for a few seconds in the process.
Pressing the [▶] button again selects the currently scanned station and plays it back.
Adjusting the seek tuning sensitivity
The seek tuning sensitivity decides whether the automatic station seek tuning fi nds only strong stations or also weaker stations that may be noisy.
Press the [LO] or [DX] button to adjust the sensitivity of station seek tuning.
If LO is displayed, only stations with a strong signal are found during seek tuning.
If DX is displayed, stations with a strong and weak signal are found during seek tuning.
Insert a Disc
Insert a disc into the slot, and the unit will change to disc mode automatically.
Notes:
- Please confirm whether there is a disc in the unit before you insert another one.
- The unit will exit current playing source and enter DVD mode when one disc is inserted.
- The following disc formats are supported: CD-R, CD-RW, DVD-R, DVD+R, DVD-RW, DVD + RW.
Eject the Disc
Press [▲] on the panel to eject the disc.
Notes:
• After ejecting the disc, the unit reverts to another source automatically.
- If the disc is not removed from the unit within 10 seconds, the disc will be reloaded to prevent accidental damage.
Connect a USB Device
Open the USB door.
Insert the USB device into the USB slot. Play starts automatically.
Remove a USB Device
Select another source in the main menu.
Remove the USB device.
Insert/Remove a SD Card
- Insert
Insert the SD card into the SD card slot, the unit will read the files automatically.
- Remove
Select another source in the main menu.
Press the card until you hear a click sound.
Remove the SD card.
Touch Screen Controls
The touch areas for video/picture playback are outlined below:
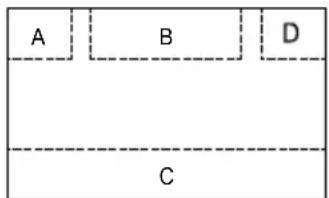
A: Return to the main menu
B: Play the video and display playback
information
C: Display onscreen control menu
D: Time display
DVD movie playback
The car sound system can play video DVDs and VCDs. After inserting the DVD, the playback starts automatically. The DVD menu is displayed.
Touch the touchscreen once to display the playback menu again.
The playback menu is shown.
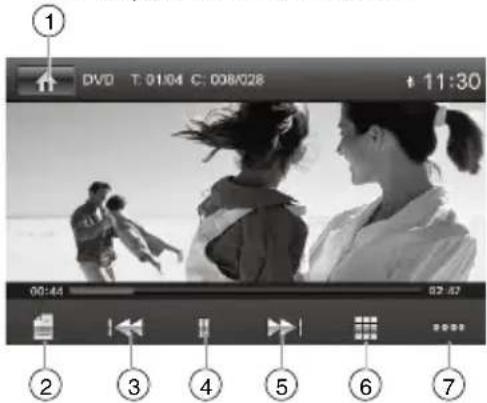
- Return to home menu
- Pause playback, call up DVD menu.
- Select previous chapter.
- Interrupt playback and continue playback.
- Select next chapter.
- Call up keypad for direct selection of titles, chapters.
- Show additional operating options.
Tap on [⋯] to display additional operating options of the playback menu.
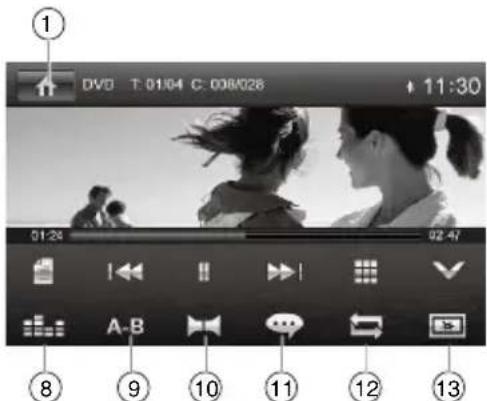
- Display equalizer.
- Define range for repeat function.
- Select playback language
- Show subtitles
- Repeat play
- Adjust image.
Audio playback from DVD/CD, USB or microSDHC
The principles of audio playback (MP3/WMA) from data carriers are identical for all sources.
Select the desired source via the main menu. The device changes to the desired source and the playback starts.
If the playback does not start with the audio playback,
Press the [ ] button to change to the folder/file list.
Press the [ ] button to display all the folders and files of the data carrier.
-Or-
Press the [♪] button to display all the audio files of the data carrier.
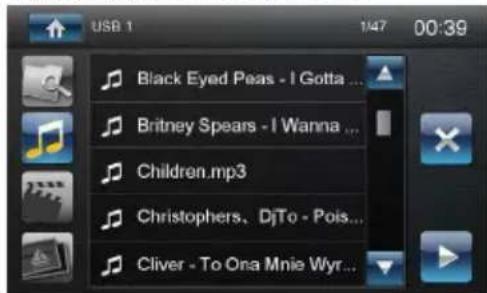
[▲] Scroll through the list page by page.
[▼] Scroll through the list page by page.
[▶] Open selected folder or start titles.
- Or -
Briefly tap twice (double-click) on the name of the folder/track. The folder is opened/the track is started.
[×] Exit the folder/file list.
After starting a title, the playback menu is displayed.
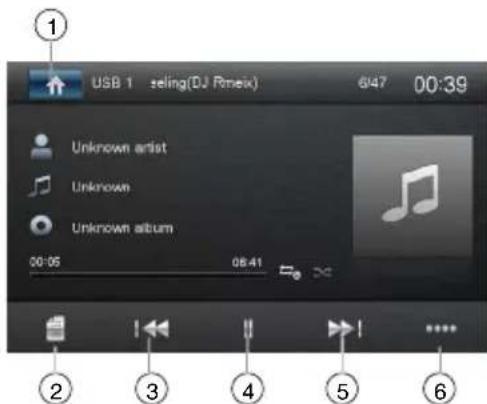
- Return to home menu
- Display the folder/file list.
- Short press: Title selection.
Long press: Fast searching.
- Interrupt playback and continue playback.
- Short press: Title selection.
Long press: Fast searching.
- Show additional operating options.
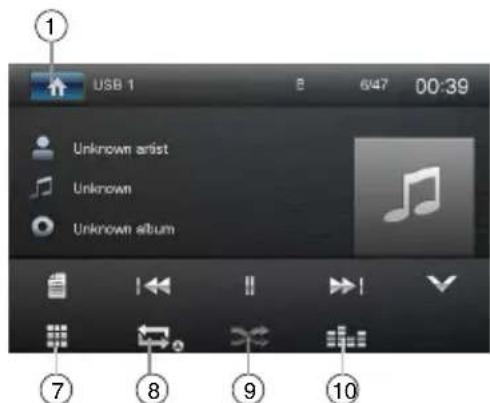
-
Display keypad to directly enter the number of the desired title.
-
Start and end REPEAT function. The REPEAT mode changes each time the [←] button is pressed.
| Display | REPEAT mode |
| Repeat current track | |
| Repeat current folder | |
| Repeat all tracks of data carrier |
- Start MIX random track play and end it again. If the MIX function is switched on, the × symbol is displayed in white.
The MIX mode depends on the selected REPEAT function.
| REPEAT mode display | MIX mode |
| No random track play | |
| Mixing tracks of the current folder | |
| Mixing tracks of the data carrier |
- Display equalizer.
Video playback from USB or microSDHC
Select the desired source via the main menu. The device changes to the desired source and the playback starts.
If the playback does not start with the video playback,
Press the [☐] button to change to the folder/file list.
Press the [ ] button to display all the folders and files of the data carrier.
- Or - Press the [ ] button to display all the
video files of the data carrier.
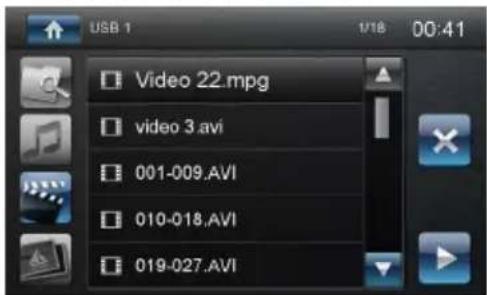
If you selected a movie, the playback is started. During the movie playback, the playback menu is hidden.
Briefly touch the touchscreen once to display the playback menu again. The playback menu is shown.
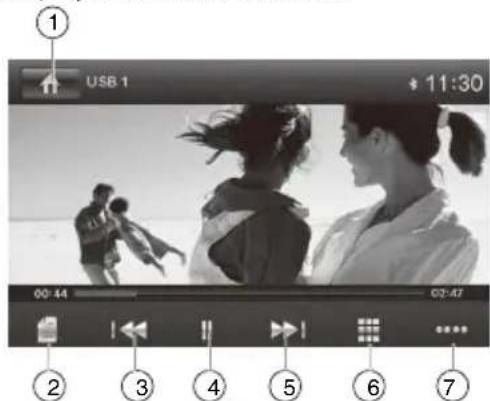
- Return to home menu.
- Display the folder/file list.
- Select previous movie.
- Interrupt playback and continue playback.
- Select next movie.
- Call up keypad for direct selection of movie.
- Show additional operating options.
Tap on [....] to display additional operating options of the playback menu.

- Display equalizer.
- Repeat play
- Adjust image.
- Select audio mode.
- Select subtitles language.
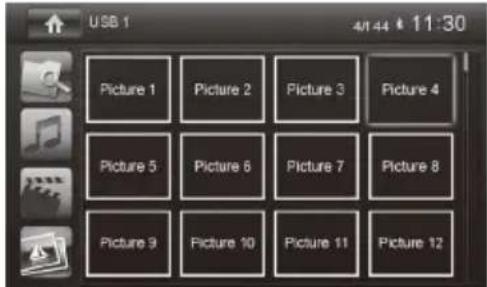
Image playback
Select the desired source via the main menu. The device changes to the desired source and the playback starts.
If the playback does not start with the image playback,
Press the [ ] button to change to the folder/file list.
Press the [ ] button to display all the folders and files of the data carrier. - Or -
Press the [ ] button to display all the images of the data carrier.
Bluetooth mode
You can make or receive phone calls with Bluetooth-enabled phones through the unit. You can also listen to music from a Bluetooth-enabled device.
Pair the Bluetooth-enabled Devices
To connect your Bluetooth device to the unit, you need to pair the device to the unit. Pairing needs only to be done once. You can pair up to five devices. You also can search for Bluetooth devices by mobile phone.
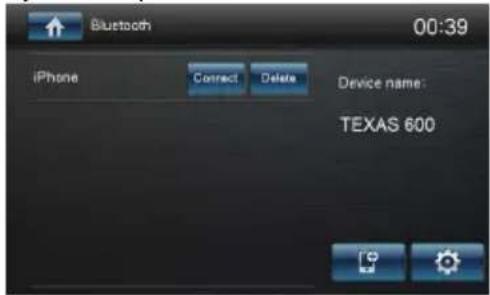
Turn on the Bluetooth function on the device.
Touch [ ] to search for Bluetooth device with the device.
Select the Bluetooth device ID in the pairing list.
Touch [Connect].
Enter default password"1234".
Notes:
- The operational range between this unit and a Bluetooth device is approximately 5 meters.
- Before you connect a Bluetooth device to this unit, familiarize yourself with the Bluetooth capabilities of the device.
- Compatibility with all Bluetooth devices is not guaranteed.
- Any obstacle between this unit and a Bluetooth device can reduce the operational range.
- Keep this unit away from any other electronic device that may cause interference.
Disconnect Bluetooth Device
To disconnect one device, touch [●●●].
Notes:
- The device will also be disconnected when the device is moved beyond the operational range.
• If you want to reconnect the device to the unit, place it within the operational range. - If you do not want to reconnect the device to the unit automatically, touch [💡], then set [Auto Connect] to [Off].
For details, see the "Adjust Bluetooth Settings" section.
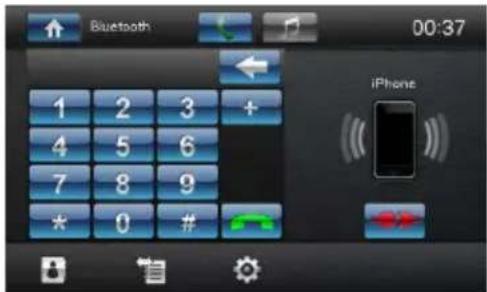
Make a Call
Select Bluetooth function in the home menu.
Pair the phone with the unit.
Search for phone number from the following list:
[8]: Phone Book
[ ]: Call Log
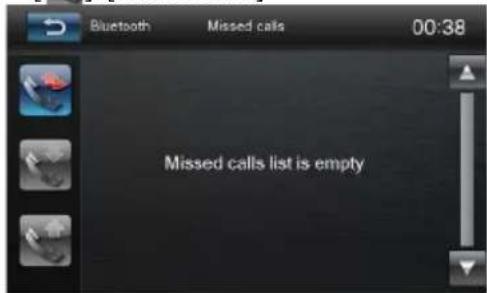
[ ]: [Missed calls]
[ ]: [Received calls]
[ ]: [Dialed calls]
Or touch the number pad directly.
Answer an Incoming Call
By default, all incoming calls are received automatically.
- If there is an incoming call, "Incoming" will appear on the screen.
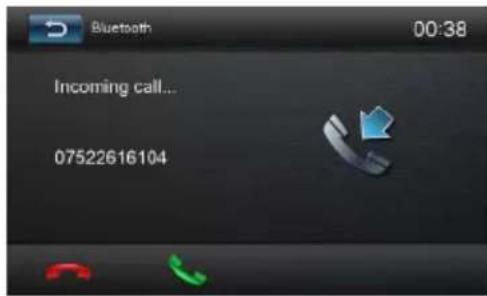
- You may touch the screen to select [Hang up] or [Answer]. Speak into the Bluetooth microphone.
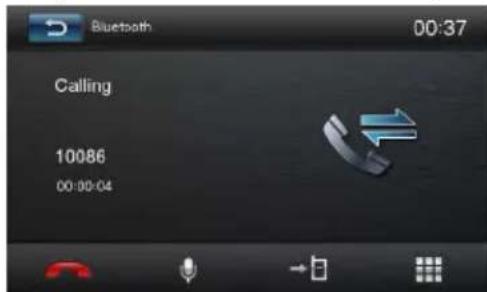
- [图标]: Touch to mute the microphone audio from the unit.
Touch the icon again to restore the microphone audio from the unit.
- [→]: Touch to transfer a call back to the mobile phone.
- [●●]: Touch to access the direct dial screen.
Adjust Bluetooth Settings
In Bluetooth menu,touch [💡]. The option menu is displayed.
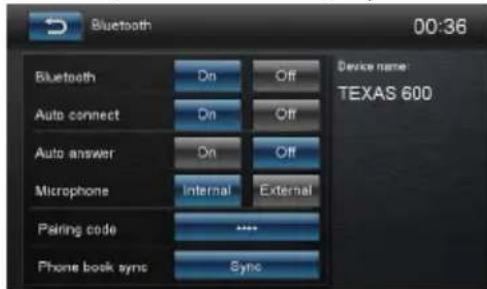
- Touch on the selected option to change the setting.
- [Bluetooth]: To turn on or off "Bluetooth" function.
- [Auto Connect]: If "Auto Connect" is activated, the device automatically connects with known Bluetooth devices as soon as they are in range.
- [Auto Answer]: If "Auto Answer" is activated, incoming phone calls are automatically answered.
-
[Microphone]: Select the microphone to be used for the hands-free system via Bluetooth®.
-
[Pair Password]: Many Bluetooth® devices request the pairing code before establishing the connection. You can define it here.
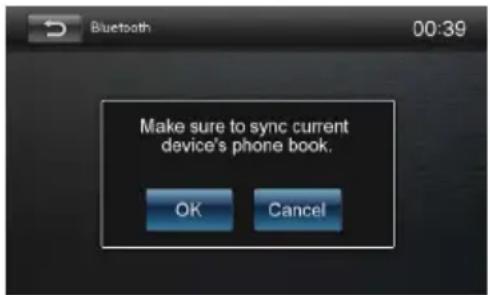
- [Phone Book sync]: To be able to access the phone book of a connected telephone, you must first synchronise it via this menu entry.
Phonebook sync may take several minutes to load on initial setup.
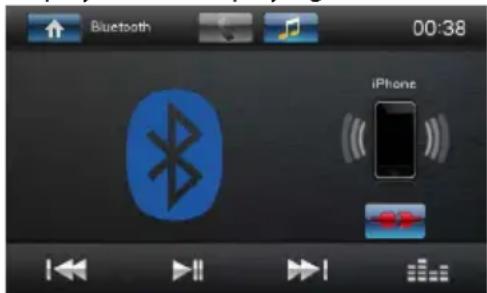
Music Mode
A2DP
A2DP is short for Advanced Audio Distribution Profile. The mobile phones supporting this function can transmit stereo audio, whereas the ones not supporting this function can transmit mono audio only.
AVRCP
AVRCP is short for Audio/Video Remote Control Profile. The mobile phones supporting this function can control the playback of a Bluetooth audio player.
To make a call in music playing mode, press the number keys on the mobile phone and the music player will stop. "Calling" will be displayed on the TFT and once the call is received the caller audio will be transferred to the unit. When the call ends, the screen will display the music playing menu.
If there is an incoming phone call, the music player will stop and the screen will display "Incoming Call". When the call ends, the screen displays the music playing menu.
Overview of PhoneLink
The system of the car device is WinCE version, which supports the connection between the car device and Smart phone.
And you can also control your phone by the car device, such as receiving calls, dialing calls, listening to the music and watching movies or pictures from your phone.
Note:
You can't control your iPhone by the unit. (iPhone mirrors display on screen)
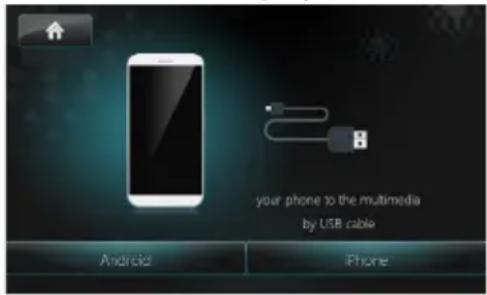
Connect with Android phone
Select "PhoneLink" in the main menu and select "Android" on the screen.
Start Android phone [USB debugging].
The operations of Android phone's entering [Setting] are as follows (since the Android phone versions are not the same, it roughly has two conditions):
1) Existence of [Developer options]: Click [Additional settings]-Click [Developer options]-click to open [Start developer options]-click to open [USB debugging]-determine to allow.
2) Inexistence of [Developer options]: Click system version number (interior version number) for 8 times, then back to setting and click [Developer options]-click to open "Start developer options"-click to open [USB debugging]-determine to allow.
Bluetooth connection.
Scan for Bluetooth devices and select this system for connection.
Correctly connect USB wire.
Finish connection.
(If it is not connected successfully, please replace USB cable or vehicle USB interface, or re-insert USB wire or restart Android phone and re-try).
After connection, operate according to the screen software.
Tip:
- For your driving safety, please do not use the function during driving.
- For normal use, Android 4.0 to Android 6.0 version is recommended. Since Android 2.3X and below version system lacks relevant support, when using the version system to connect the product, some functions (such as: mobile video play, etc.) may not display normally.
- According to the different mobile phone" Media library" and "Video" program support formats, it is not all the video files copied to mobile phone can be identified and played. According to the different equipment function, not all video files of all formats can be played in vehicle terminal smoothly.
- Since the mobile phone data cable performance difference in the market, it is strongly recommended using the original USB data line to connect so as to guarantee the connection stability.
- Due to the difference of mobile phone performance, when using different mobile phones to connect, the performance may be different.
Connect with iPhone
Select "PhoneLink" in the main menu and select "iPhone" on the screen.
Open the Personal Hotspot on the settings menu of your iPhone.
Connect your iPhone to the USB port of the unit.
Open the control center of your iPhone and touch [AirPlay].
Select [EC-Mirror], and turn on the "Mirroring" function.
After connecting successfully, the desktop of you iPhone will display on the screen of the unit.
(If it is not connected successfully, please restart the WiFi of your iPhone, and refresh the hotspot list on the unit.
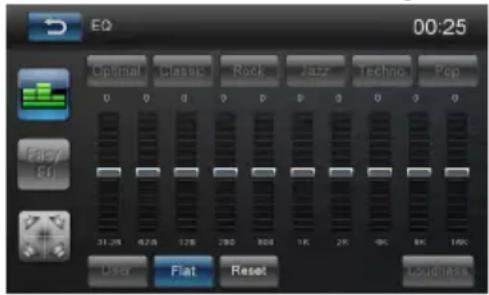
Sound settings
Equalizer
You can adjust the equalizer for all sources.
In the main menu, press the [☐] button.
Select EQ mode
Touch the desired EQ selection: [Optimal] / [
Classic] / [ Rock] / [ Jazz] / [ Techno] / [ Pop ], and the EQ mode will change.
Adjust FAD BAL
You can adjust the volume distribution in the vehicle for all sources.
In the main menu, press the [ ] button. - Or -
On the control bar of the current audio source, press the [■■■] button.
The equalizer menu is displayed.
Press the [×] button.
The menu for fader and balance is displayed.
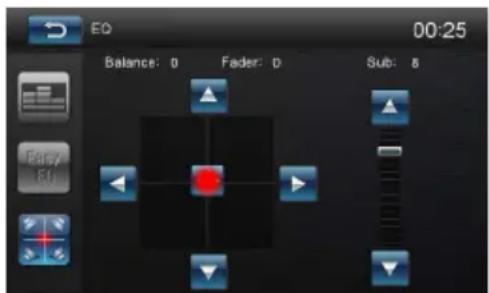
Adjust fader and balance with [▲]/[▼] or [◀]/[▶].
Next, press [→].
The setting is stored, the current source is displayed again.
AUX Operations
Select [ [AV-IN1]/[AV-IN2] on the main menu to visit auxiliary device.
Basic Settings
In the settings menu, you can adjust the basic settings for the different functions of the device to your requirements.
In the main menu, press the [ Settings ] button.
The settings menu is displayed, the General submenu is activated.
Call up the submenus with the buttons in the lower area of the settings menu.
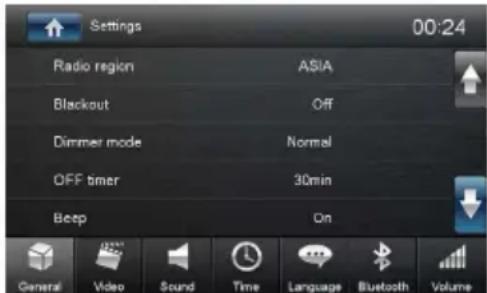
General
The following setting are possible:
Radio region - Select the reception region for the radio reception.
Blackout - Choose screen blackout off, 10s or 20s.
Dimmer mode - Touch the [Dimmer mode], there 4 mode to select: Night/Dark/Normal/Bright.
OFF timer - Setting the switch-off time. To protect the vehicle battery, the device is automatically switched off after the set time period if the vehicle ignition is switched off.
Beep - Switch confirmation beep on/off.
Key color - select the backlight color of the keys.
SWC - The buttons of a connected steering wheel control can be configured here.
Software version - Display of the current software version.
Load factory settings - Resets all personalised settings.
Video
The following settings are possible:
Set password - Define a password if you want to use the parental controls.
Rating level - The rating of DVDs can be defined here. If set to "Adult", all movies can be played back. If a password was configured, the rating level can be changed only with the password.
Video out - Switch video out on/off
Aspect ratio - Full/Normal mode
Parking - If "Parking" is activated, video/pictures will not be displayed during driving. Please set according to local laws.
Sound
The following settings are possible:
Subwoofer - Switch subwoofer on/off
Subwoofer filter - Make the setting according to the subwoofer used (settings: 80/120/160 Hz).
Dynamic sound - Switch dynamic bass on/off.
Time
The following settings are possible:
Date - Set the date.
Clock mode - Selection between 12 and 24-h mode.
Time - Set the time.
Auto clock - Switch automatic clock setting on or off with the time data transmitted via RDS.
Language
The following settings are possible:
OSD - Language for the user interface of the device.
DVD audio - The audio playback of DVDs is started in the language defined here.
DVD subtitle - The subtitles of DVDs are shown in the language defined here.
DVD menu - The DVD menu is displayed in the language defined here.
Bluetooth
The following settings are possible:
Bluetooth - Bluetooth® can be switched on or off. Auto connect - If "Auto Connect" is activated, the device automatically connects with known Bluetooth® devices as soon as they are in range.
Auto answer - Phone calls from connected telephones are automatically answered if this option is enabled.
Pairing code - Many Bluetooth ^® devices request the pairing code before establishing the connection. You can define it here.
Microphone - Select the microphone to be used for the hands-free system via Bluetooth®.
Volume
You can adjust the volume ratio for all audio sources in the volume menu.
Notes of connection
- This unit is designed to be used in a vehicle with a 12-volt battery and negative grounding. Before installing this unit to a recreational vehicle, a bus, or a truck, make sure the battery voltage is appropriate for this unit to be used, otherwise, install a transformer by professional to convert the output voltage to 12V.
- To avoid short circuit in the electrical system, ensure that the negative battery cable is disconnected before installation.
- To prevent short circuit in the wiring and damaging to this unit, secure all wirings with cable clamp or adhesive tape. Route the wirings in a secured, out of heating place without touching any moving parts such as gear shift, handbrake, and seat rails to prevent the wiring insulation being melted / wore off.
- Never pass the yellow power cord through the installation hole into the engine compartment and connect to the car battery. Otherwise, a high possibility of serious short circuit to the electrical system may be occurred.
- Replacing a new fuse with 15A rating when the old one is broken, using no fuse or fuse with improper rating may cause damage to this unit or even fires. If a proper fuse is installed and electrical problems still occur, please contact with any professional car shops for inquiry.
- Do not connect other equipments with the car battery to avoid battery overheating.
- Please make sure all the wiring connections & the cables of the speakers are well-insulated. Otherwise, this unit may be damaged by short circuit.
• If there is no ACC available, Please connect ACC lead to the power supply with a switch. - If an external power amplifier is connected, please don't connect P.CONT lead to the power lead of the external power amplifier, otherwise, electric spark or other damage may be resulted.
• Never ground the speaker output to prevent the damage to the built-in power amplifier.
• The minimum rating of the speakers connected to this unit is 35W with 4 to 8Ω impedance.
Scope of delivery
The scope of delivery includes:
• 1 car sound system
• 1 operating / installation instructions
• 1 external Bluetooth microphone
• 1 remote control (incl. battery)
- 6 connecting cable
• 1 EVA MAT
What appears to be a problem is not always serious. Please check the following points before calling a service center.
| Problem Cause | Corrective action | |
| General | ||
| Unit can not power on | Unit fuse blown. | Install new fuse with correct rating. |
| Car battery fuse blown. | Install new fuse with correct rating. | |
| Illegal operation | Reset the unit. | |
| No/low audio output | Improper audio output connection. | Check wiring and correct. |
| Volume set too low. | Increase volume level. | |
| Speakers damaged. | Replace speakers. | |
| Heavily biased volume balance. | Adjust the channel balance to center position. | |
| Speaker wiring is in contact with metal part of car. | Insulate all speaker wiring connections. | |
| Poor sound quality or distortion | Pirated disc is in use. | Use original disc. |
| Speaker power rating does not match unit. | Replace speakers. | |
| Wrong connections. | Check wiring and correct. | |
| Speaker is shorted. | Check wiring and correct. | |
| Tel-Mute malfunction | MUTE wire is grounded. | Check the 'MUTE' wiring and correct. |
| Unit resets itself when engine is off | Incorrect connection between ACC and BATT. | Check wiring and correct. |
| TFT monitor | ||
| Warning information is shown at all times | Parking break wiring is not correct. | Check wiring and correct. |
| Flashing image or interference appears on screen | The color system of DVD disc does not match the monitor. | Adjust the color system of the DVD disc playing back or the monitor in use. |
| Pirated disc is in use. | Use original disc. | |
| Video cable damaged. | Replace cables. | |
| Improper video signal connections. | Check wiring and correct. | |
| Disc playback | ||
| Cannot insert disc | A disc is already inside the unit. | Eject current disc and insert new one. |
| Disc does not play back | Disc is warped or scratched. | Use disc in good condition. |
| Disc is dirty or wet. | Clean disc with soft cloth. | |
| Incompatible disc is used. | Use compatible disc. | |
| Disc is inserted upside down. | Insert disc with label side up. | |
| Disc region code is not compatible with unit. | Use disc with proper region code. | |
| PBC cannot be used during VCD playback | PBC is not available on the disc. | Use disc with PBC available. |
| Repeat or search function is invalid during VCD playback | PBC is on. | Turn PBC off. |
| Error messages | ||
| No disc | Disc is dirty. | Clean disc with soft cloth. |
| Disc is upside down. | Insert disc with label side up. | |
| No disc inside. | Insert disc. | |
| Bad disc | Disc is dirty. | Clean disc with soft cloth. |
| Disc is upside down. | Insert disc with label side up. | |
| Unknown disc | Disc format is not compatible with this unit. | Use disc with compatible format. |
| Region Error | DVD region code is not compatible with this unit. | Use disc with compatible region code. |
- Video
| File Format | Video Codec | Supported Profile | Supported file extension | Audio Codec | Video bitrate | Audio SampleRate |
| MPEG | MPEG-1MPEG-2 | MPEG-2: Simle, Main, High | *.mpg*.mpeg*.dat*.vob | MPEGAC3PCMMP3 | Bitrate: 40MbpsResolution: 1080pFrameRate: 30fps | MP38KHz/16KHz/1/32KHz11KHz/22K/44KHz12KHz/24K/48KHzDolby AC3EAC332KHz/44.1KHz/48KHzCook44.1KHzAPE8~96KHzFLAC8~192KHzAAC(HE-AAC)8~96KHzMPEG-1 layer1/232KHz/44.1KHz/48KHzMPEG-2 layer1/232KHz/44.1KHz/48KHz |
| AVI | Avi(MPEG2,MPEG4) | MPEG2: Simple, Main, HighMPEG4: | *.avi, *.xvid | MPEGMP3AC3PCM AACFLAC | ||
| RM RV8/9/10 | N/A".rm",".rmvb" | COOK AAC | ||||
| FLV | H264, SH.263 | H.264: Baseline, Main, High | *.flv | PCMMP3AAC | ||
| ASF/WMV | MPEG4, MPEG-1/2, H264, H263 | MPEG4: Advanced Simple, Simple MPEG2: Simple, Main, High | *.asf | MP3, PCM, AC3, AAC, mpeg, aac_pure | ||
| MP4 | MPEG4, H.264, SH. 263, MPEG1/2 | MPEG4: Advanced Simple, Simple H.264: Main, | *.mp4, *.mov | AAC, MP2, MP3, AC3, PCM, AAC_PURE, MPEG | ||
| MKV | MPEG1/2, MPEG4, H264, RV8/9/10, SH.263, H.263 | MPEG2: Simpe, Main, High MPEG4: Advanced | *.mkv | MP2, MP3, AC3, AAC, PCM, mpeg, aac_pure, flac | ||
| OGM | MPEG-2; MPEG-4; H.264; RV8/9/10; H.263 | MPEG2: Main,High MPEG4: Advanced Simple, Simple H.263: Baseline | *.ogm | mp3AC3PCM MPEG AAC, RA_COOK, VOBIS | ||
- Audio
| File Format | Supported file extension | Supported audio | Sample rate |
| MP3 | *.mp1*.mp2*.mp3 | MP1/MP2/MP3 | supported8KHz/16KHz/1/32KHz11KHz/22KHz/44KHz |
| AAC *.aac | AAC | supported8 ~ 96KHz | |
| FLAC | *.flac | FLAC | supported8~192KHz |
| APE *.ape | APE | supported8 ~ 96KHz |
Picture
| File Format | Supported file extension | Limitation |
| JPEG | *.jpg*.jpeg | baseline:width* height <4096*4096 |
| PNG | *.png | width * height <4096*4096 |
| GIF | *.gif | width * height <4096*4096 |
DVD file
- Video
| File Format | Supported video codec | Supported Profile | Supported extension | Supported audio codec | Video bitrate limit | Audio bitrate limit |
| MPEG | MPEG-1 Video MPEG-2 Video | main high | .mpg.mpeg.dat.vob | mpeg, AC3, PCM | MPEG2 Video: 10Mbps MPEG4 Video: 10Mbps | |
| AVI Avi | MPEG2,MPEG4,) | MPEG2: Main, High upto 720*576 MPEG4: Advanced Simple, Simple 800*600 | *.avi, *.xvid | MP2,MP3, AC3,PCM WMA | MPEG2 Video: 10Mbps MPEG4 Video: 10Mbps | |
| ASF | MPEG-4 video | MPEG4: Advanced Simple, Simple 800*600 | *.asf, | MP3, PCM, AC3 | audio (wma) bitrate(32k~192k) | |
| MP4 | MPEG 4 Video | MPEG4: Advanced Simple, Simple800*600. | .mp4, .mov | AAC,MP2, MP3,AC3 | MPEG4 Video: 10Mbps | |
| FLV | H.263 | H.263 main | .flv,.f4v | mpeg | 3Mbps | |
| DAT | MPEG1 | MPEG1 main | .dat | mpeg,pcm,ac3 | 3Mbps | |
| VOB | MPEG2 | MPEG2: Main, High upto 720*576 | .vob | mpeg,pcm,ac3 | 10Mbps | |
| OGM | MPEG2, MPEG4 | MPEG2: Main, High MPEG4: Advanced Simple, Simple | *.ogm | mp3 AC3 LPCM MPEG | MPEG2 Video: 10Mbps MPEG4 Video: 10Mbps |
- Audio
| File Format | Supported file | Supported audio codec | Audio bitrate limit |
| MP3 | .mp3 .mp2 | MP1/MP2/MP3/pcm | 8kbps~320kbps |
| M4A | .m4a | aac | 32Kbps~320Kbps |
| AAC | .aac | aac | 32Kbps~320Kbps |
Picture
| File Format | Supported file | Limitation |
| JPEG | baseline jpeg, progressive jpeg | Decoding source picture size up to 8784x5856 Re-sample to 720x480 and 720x576 |
Designed and enginereed by Blaupunkt

- Placing the device in operation....5
- Radio mode 6
- DVD/CD/USB media playback 7
- Bluetooth mode....10
- PhoneLink 12
- Sound settings....13
- AUX Operations 13
- Basic Settings....14
- Notes of connection 15
- Scope of delivery 15
- Connection diagram....16
- Troubleshooting 17
- Supported formats 18
- Placing the device in operation
- Caution!
- Transport securing screws
- Turn on/off the power
- Note:
- Mute
- Adjust the Volume
- Playing Source Selection
- Main Menu
- Setting the reception area
- Radio mode
- Start radio mode
- Select One Radio Band
- Tune
- Auto Tuning
- Manual Tuning
- Method 1:
- Method 2:
- Storing stations manually
- Storing stations automatically (Travelstore)
- Scanning stations
- Adjusting the seek tuning sensitivity
- Insert a Disc
- Notes:
- Eject the Disc
- Connect a USB Device
- Remove a USB Device
- Insert/Remove a SD Card
- Touch Screen Controls
- DVD movie playback
- Audio playback from DVD/CD, USB or microSDHC
- Video playback from USB or microSDHC
- Image playback
- Bluetooth mode
- Pair the Bluetooth-enabled Devices
- Disconnect Bluetooth Device
- Make a Call
- Answer an Incoming Call
- Adjust Bluetooth Settings
- Music Mode
- A2DP
- AVRCP
- Overview of PhoneLink
- You can't control your iPhone by the unit. (iPhone mirrors display on screen)
- Connect with Android phone
- Tip:
- Connect with iPhone
- Sound settings
- Equalizer
- Adjust FAD BAL
- AUX Operations
- Basic Settings
- General
- Video
- Sound
- Time
- Language
- Bluetooth
- Volume
- Notes of connection
- Scope of delivery
- DVD file
Brand : BLAUPUNKT
Model : Texas 600
Category : Receiver