
Barcelona 240T - Receiver BLAUPUNKT - Free user manual and instructions
Find the device manual for free Barcelona 240T BLAUPUNKT in PDF.


| Product Type | Receiver |
| Brand | Blaupunkt |
| Model | Barcelona 240T |
| Dimensions (W x H x D) | 430 x 150 x 350 mm |
| Weight | 8.5 kg |
| Power Supply | 230 V ~ 50 Hz |
| Power Consumption | 120 W (max) |
| Frequency Range (FM) | 87.5 - 108 MHz |
| Frequency Range (AM) | 531 - 1602 kHz |
| Audio Output Power | 2 x 100 W (RMS) |
| Supported Audio Formats | MP3, WMA, FLAC |
| Connectivity | Bluetooth, USB, AUX, FM/AM antenna, speaker terminals |
| Number of Preset Stations | 40 (FM) + 20 (AM) |
| Remote Control | Included |
| Display Type | LCD with backlight |
| Standby Power Consumption | < 1 W |
| Cleaning Instructions | Wipe with a dry, soft cloth. Avoid solvents. |
| Safety Features | Overheat protection, automatic shutdown |
| Spare Parts Availability | Power cord, remote control, antenna (contact support) |
| Repairability Index | 7.5 / 10 (user replaceable fuse, antenna) |
Frequently Asked Questions - Barcelona 240T BLAUPUNKT
User questions about Barcelona 240T BLAUPUNKT
0 question about this device. Answer the ones you know or ask your own.
Ask a new question about this device
Download the instructions for your Receiver in PDF format for free! Find your manual Barcelona 240T - BLAUPUNKT and take your electronic device back in hand. On this page are published all the documents necessary for the use of your device. Barcelona 240T by BLAUPUNKT.
USER MANUAL Barcelona 240T BLAUPUNKT
CAR RADIO
NAGOYA 120 DSP

Enjoy it.
Safety Notes
This car radio has been produced in accordance with established safety guidelines. Nonetheless, potential hazards may arise if the safety instructions outlined in this manual are not followed. The purpose of this manual is to acquaint users with the essential functions of the car radio. Please read it thoroughly before using the car radio and keep it in a readily accessible location. Furthermore, adhere to the instructions provided for any devices used in conjunction with this car radio.
Road Safety
Always adhere to the following guidelines for road safety:
- The car radio should be used in a manner that prioritizes the safety of the user while driving the vehicle. It is advisable for the user to park in an appropriate location when operating the car radio. While driving, it is not recommended for the user to engage in distracting activities, such as streaming media.
- For radios equipped with navigation features, users are advised to follow the suggested driving routes only if they do not violate any traffic regulations. Local traffic signs and regulations always take precedence over the proposed routes.
- The user is recommended to maintain the car radio volume at a moderate level to protect their ears and enhance the ability to hear any emergency warning signals, such as police and ambulance sirens. It is advised not to increase the car radio volume while it is muted, as it may not be audible. The car radio volume can become excessively loud when unmuted.
General Safety Notes
Always adhere to the following guidelines to ensure protection against injuries:
- This car radio is designed for installation and operation in a vehicle with a 12V system outage. Therefore, the radio unit must be installed in a DIN slot. Please adhere to the output limits of the car radio and avoid dismantling or modifying it. If installation or repairs are required, they should be carried out by a specialist. We disclaim liability for any loss or damage arising from unauthorized disassembly or modification of the product.
- Driving on rough roads for an extended period or using damaged discs can harm the core components of this car radio.
- Avoid using the car radio in extreme temperature conditions (either extremely high or extremely low); ensure the car's interior temperature is within the range of -10°C to 60°C before connecting the car radio to the power supply.
- For any issues, please refer to the "Troubleshooting" section. If the problem persists, press the Reset button to restore factory settings. If further assistance is needed, please contact the respective installer or seller directly for help.
- Due to differences in SD/USB file formats, codecs, bitrate, resolution, and other parameters available in the market, this car radio is limited to playing specific selected media file formats.
- Different cars may have different configurations. It is common for certain CAN-Bus functions to be unavailable because they are not supported by the user's car.
CAUTIONS
- Solvents, cleaning agents, scouring products, as well as dashboard spray and plastics care items may contain substances that can harm the surface and screen of the car radio. To clean the car radio surface and screen, use only a dry or slightly moistened cloth.
Disclaimer
- Under no circumstances shall Blaupunkt be held liable for any direct, indirect, punitive, incidental, or special consequential damages, whether related to property or life, arising out of or connected with the use or misuse of our products, including but not limited to issues of improper storage.
- US & Canada: This product is not intended for sale in the United States and Canada. If acquired in the U.S. or Canada, it is obtained on an "as-is" basis. No warranty, whether express or implied, is provided in the U.S. and Canada.
Disposal Notes
Do not dispose of your old unit in the household trash!
Use the return and collection system available to properly dispose of the old device.
Radios with Detachable Panel - Damage to the control panel
- Never drop the control panel.
- Transport the control panel so that it is protected against impacts and the contacts cannot become dirty.
- Do not expose the control panel to direct sunlight or another heat source.
- Avoid direct skin contact.
Scope of Delivery
- Car Radio
- Operating / Installation instructions
- Power cable
- Release keys
This manual may be updated from time to time without any notice.
Visit www.blaupunkt.com for more information.

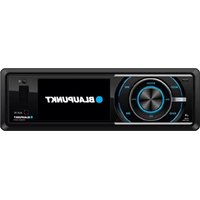
1. ⏻/ MODE Button
- Press to turn on or press and hold to turn off
- Press to change the source during use: Radio, USB (if connected), AUX-In, Bluetooth
2. Microphone
3. Volume Knob / Menu Mode
- Turn knob left/right to increase / decrease volume or press knob to switch between the menu :
- Audio
- Xover
- Data Set
- Clock
- Demo Mode
- Tuner
- Display
4. CLK Button
- Press to view time or press and hold to adjust time setting
5. MicroSD Slot
6. USB (1) Slot
- For Media only
7. USB (2) Slot
- 5V 1.5A charging
8. Aux Port
• 3.5mm external audio input
9. "6+10" Button
- Radio Mode: Use digit to select radio station or press and hold to save the station
- Playback Mode: Press to skip to next 10th song or press and hold to skip to next folder
10. "5-10" Button
- Radio Mode: Use digit to select radio station or press and hold to save the station
- Playback Mode: Press to skip to previous 10th song or press and hold to skip to previous folder
11. "4 RDM" Button
- Radio Mode: Use digit to select radio station or press and hold to save the station
- Playback Mode: Press to turn on or off shuffle play
12. "3 RPT" Button
Radio Mode: Use digit to select radio station or press and hold to save the station
Playback Mode: Press to repeat 1/All
13. "2 INT" Button
- Radio Mode: Use digit to select radio station or press and hold to save the station
- Playback Mode: Press to play the first 10sec of each track.
14. "1 ▶ II" Button
- Radio Mode: Use digit to select radio station or press and hold to save the station
- Playback Mode: Press to PLAY / PAUSE
15. 🏠/Button
- USB / SD / BT Music Mode : Press to next radio selection and track selection • Phone (BT) Mode : Press to answer call
16. 📞/◀Button
- USB / SD / BT Music Mode : Press to previous radio selection and track selection
- Phone (BT) Mode : Press to decline or end call
17. ↩ / BAND Button
- Radio Mode: Press to switch radio station or press and hold to search radio station
- Menu Mode: Press to return to previous menu
- USB Mode: Navigate to the chosen number by adjusting the Volume knob. Identify the corresponding number within the file and verify by pressing the knob.
18. Mute Button
General
Power supply....12V Current consumption......max. 10A Max. power output.... 4 x 50W Dimension (W xD x H) .....100 x 178 x 80mm Weight 0.67kg Operation temperature.... -20°C \~ 65°C
FM Stereo Radio
Frequency range.... 87.5 - 108MHz Preset memory stations....18
AM/MW Radio
Frequency range.... 531~1602KHz Preset memory stations.... 12
Audio Specification
Frequency response.....15Hz-20kHz Speaker impedance....4 - 8 Ω
Input
USB...... Audio : MP3, FLAC
Aux-in.... 3.5mm jack
BT
Hands-Free Calling : Accept/ Hang Up/ Reject Call....HFP Phone Book Access....PBAP Audio Streaming.....A2DP Streaming Audio Control......AVRCP Support for Bluetooth Headset ......HSP
Quick Start
Turn ON/OFF head unit via vehicle ignition. If the car radio system is connected with the vehicle ignition, turning off the ignition key also switches off the device. Switching on the ignition will turn on the device.
1. Short press device ⏻/ MODE to switch on the device.
2. Set Clock and Date
2(a) Clock
- Press Volume knob. Rotate until the [CLOCK] menu is shown.
- Press Volume knob to access the menu.
- Rotate Volume knob right to [CLOCK ADJUST].
- Rotate Volume knob to set Hour.
- Confirm by pressing the Volume knob. Repeat for Minutes.
- Press 1BAND button to return to previous menu.
2(b) Date
- Press Volume knob. Rotate until the [CLOCK] menu is shown.
- Press Volume knob to access the menu.
- Rotate Volume knob right to [DATE SET].
- Rotate Volume knob to set Date, Month, Year. Confirm by pressing the Volume knob.
- Press Volume Knob or 📊BAND button to return to previous menu.
3. Turn off DEMO-mode
- Press Volume knob. Rotate until the [DEMO MODE] menu is shown.
- Press Volume knob to access the menu.
- Choose "OFF"
- Press /BAND button to return to previous menu.
4. BT Pairing
- Press MODE until [BLUETOOTH] shows in the display.
- Open Bluetooth settings on your mobile device. • Find "Nagoya 120".
- Connect your mobile device to the head unit
- Rotate Volume knob right to [CLOCK ADJUST].
AUDIO App Control
For complete control over your head unit and sound system, we recommend downloading the Blaupunkt D1 app. This application establishes a connection and manages compatible receivers through BT. Key features encompass remote control functionality, receiver settings, and display information. Effortlessly make audio adjustments from outside your vehicle. Refer to the App Store and/or Google Play instructions for detailed information.
Memory Function
The head unit is equipped with a memory function that stores radio channels. When the power is turned off, the radio channels are saved and will be displayed again when the power is turned on.
Volume Adjustment
The volume on the head unit can be adjusted in steps ranging from 0 (minimum) to 63 (maximum). Simply modify the volume by turning the Volume knob on the unit.
Storing Radio Station
Choose your preferred preset by using the ↩ / BAND button. Set the desired station by holding down one of the preset buttons [1]-[6] for approximately 3 seconds to save the current station to that button. Each bank (there are 3 banks) can store up to 6 stations, allowing a total of 18 stations to be stored. Press the ↩ / BAND button to switch memory banks, and use the preset buttons [1]-[6] to select the stored station.
USB/SD Media Playback
The car audio system supports playback of MP3, AAC, and FLAC files from a USB drive. Ensure the car audio system is turned off before removing the USB drive. When the USB drive is plugged into the head unit, the source is automatically selected. Utilize preset buttons [1]-[2] for Play/Pause, and pressing preset button [1]-[2] plays the initial 10 seconds of the selected track. Preset button [3] provides repeat options (RPT Track, RPT Folder, RPT OFF), while preset button [4] offers the option to shuffle the playing order of the tracks. Use preset buttons [5]-[6] on the head unit to navigate through folders.
BT
The BT function facilitates the pairing of cell phones and BT-equipped media playback devices with the car audio system. Once a cell phone is connected, you can make phone calls using the built-in hands-free function, and access the last dialled number on your mobile device.
If the connected BT device supports functions such as A2DP and AVRCP, you can play music through the car audio system and control playback. During a call, music playback is paused and resumes automatically after the call is concluded.
EQ SETTINGS
This menu setting provides options to customize the sound system's frequency response by adjusting the equalizer. Navigate through the menu and select the [PRESET EQ] option using the volume knob. There are two distinct settings that you can modify. Once a setting is chosen, use the volume knob to adjust the value. Confirm the change by pushing the volume knob. To return to the previous menu, press the ↩/BAND button on the unit.
PRO EQ
Creates a custom equalizer curve that can be used in the [PRESET EQ] setting.
Equalizer bands are selected in the following order:
30Hz, 60Hz, 80Hz, 100Hz, 120Hz, 160Hz, 250Hz, 400Hz, 600Hz, 800Hz, 1kHz, 1.5kHz, 2kHz, 2.5kHz, 3kHz, 3.5kHz, 4kHz, 4.5kHz, 5kHz, 5.5kHz, 6kHz, 6.5kHz, 7kHz, 7.5kHz, 8kHz, 8.5kHz, 9kHz, 9.5kHz, 10kHz, 11kHz, 12kHz, 13kHz, 14kHz, 15kHz, 16kHz, 17kHz, 18kHz, 19kHz, 20kHz
By pressing the Volume knob while standing on a freq, you access the [LEVEL] menu of the band. Each band can be individually adjusted in level by [-8] to [+8] dB
Menu Options
In the main menu of the head unit, various settings and options are available for adjustment. To access the main menu, press the volume knob. Navigate through the menu by turning the volume knob and press it to select the highlighted menu option. Within the menu, you will find the following options:
- Audio • Demo Mode • Xover • Tuner
- Dta Set
- Display
- Clock
AUDIO
This menu setting offers options to fine-tune the performance of the sound system and audio. Use the volume knob to navigate the menu and select the "AUDIO" option. Within this category, there are ten different settings available for adjustment. After selecting a setting, turn the volume knob to modify the value and confirm the change by pushing the volume knob. To return to the previous menu, press the ↩ / BAND button on the unit.
| Menu Setting | Function | Values |
| [SW LEVEL] | Subwoofer Level | [-8] - [0] (1 Step) |
| [PRESET EQ] | Select equalizer curve from 7 different EQ presets. (Create custom in PRO EQ) | User, Natural, Pop, Classical, Rock, Jazz, Flat, Super Bass |
| [XBASS] | Gain 0-3 | Freq-Off, 60Hz, 80Hz, 120Hz, 160 Hz, 200Hz, 300Hz |
| [3D SURROUND] | 3D Surround Out | Off, On |
| [BASS] | Bass level | [-7] - [0] [+7] (1 Step) |
| [MIDDLE] | Adjust the relative level between left and right speakers | [-7] - [0] [+7] (1 Step) |
| [TREBLE] | Treble level | [-7] - [0] [+7] (1 Step) |
| [BALANCE] | To adjust the audio output to be emitted from the Right, Left, or in a Balanced manner | [L1-L7] [0] [R1-R7] |
| [FADER] | To adjust the audio output to be emitted from the Front, Rear, or in a Balanced manner | [R1-R7] [0] [F1-F7] |
| [AUDIO RESET] | All audio level reset | No, Yes |
| X-OVER NET4. 2 SETTINGS | ||
| FrontHigh pass filter for front speakers | HPF FRQ | Full, 30Hz, 40Hz, 50Hz, 63Hz, 70Hz, 80Hz, 90Hz, 100Hz, 125Hz, 160Hz, 180Hz, 220Hz, 250Hz, 315Hz, 400Hz, 500Hz, 630Hz, 700Hz, 800Hz, FRO Through |
| RearHigh pass filter for rear speakers | HRF SLOPE | 6, 12, 18 dB/OctHide when the HRF FRQ is selected Full |
| LPF FRQ | Full, 630Hz, 700Hz, 800Hz, 1KHz, 1.6KHz, 2.5KHz, 3.15KHz, 4KHz, 5KHz, 6.3KHz, 8KHz, 10KHz, 12.5KHz, FRQ Through | |
| LPF SLOPE | 6, 12, 18 dB/OctHide when the LPF FRQ is selected Full | |
| PHASE | Reverse, Normal | |
| HPF GAIN | -8, -7, -6, -5, -4, -3, -2, -1, 0 dB (1 steps) | |
| SubwooferLow pass filter for subwoofer | LPF FRQ | Full, 30Hz, 40Hz, 50Hz, 63Hz, 70Hz, 80Hz, 90Hz, 100Hz, 125Hz, 160Hz, 180Hz, 220Hz, 250Hz, 315Hz, 400Hz, 500Hz, 630 Hz, 700Hz, 800Hz, FRQ Through |
| LPF SLOPE | 6,12,18 dB/OctHide when LPF FRQ is selected Full | |
| PHASE | Reverse, Normal | |
| LPF GAIN | -8, -7, -6, -5, -4, -3, -2, -1, 0 dB (1 steps) | |
| X-OVER NET 2-WAY SETTINGS | ||
| TweeterHigh pass filter for tweeters | HPF FRQ | Full, 630Hz, 700Hz, 800Hz, 1KHz, 1.6KHz, 2.5KHz, 3.15KHz, 4KHz, 5KHz, 6.3KHz, 8KHz, 10KHz, 12.5KHz, FRQ Through |
| GAIN LEFT, GAIN RIGHT | -8, -7, -6, -5, -4, -3, -2, -1, 0 dB (1 steps) | |
| FrontHigh pass filter for front speakers | HPF FRQ | Full, 30Hz, 40Hz, 50Hz, 63Hz, 70Hz, 80Hz, 90Hz, 100Hz, 125Hz, 160Hz, 180Hz, 220Hz, 250Hz, 315Hz, 400Hz, 500Hz, 630Hz, 700Hz, 800Hz, FRQ Through |
| RearHigh pass filter for rear speakers | HPF SLOPE | 6, 12, 18 dB/OctHide when the HPF FRQ is selected Full |
| HPF GAIN | -8, -7, -6, -5, -4, -3, -2, -1, 0 dB (1 steps) | |
| SubwooferLow pass filter for subwoofer | LPF FRQ | Full, 30Hz, 40Hz, 50Hz, 63Hz, 70Hz, 80Hz, 90Hz, 100Hz, 125Hz, 160Hz, 180Hz, 220Hz, 250Hz, 315Hz, 400Hz, 500Hz, 630 Hz, 700Hz, 800Hz, FRQ Through |
| LPF SLOPE | 6, 12, 18 dB/OctHide when the HPF FRQ is selected Full | |
| PHASE | Reverse, Normal | |
| LPF GAIN | -8, -7, -6, -5, -4, -3, -2, -1, 0 dB (1 steps) | |
| X-OVER NET 3-WAY SETTINGS | ||
| TweeterHigh pass filter for tweeters | HPF FRQ | Full, 630Hz, 700Hz, 800Hz, 1KHz, 1.6KHz, 2.5KHz, 3.15KHz, 4KHz, 5KHz, 6.3KHz, 8KHz, 10KHz, 12.5KHz, FRQ Through |
| HPF SLOPE | 6, 12, 18 dB/OctHide when the HPF FRQ is selected Full | |
| PHASE | Reverse, Normal | |
| GAIN RIGHT | -8, -7, -6, -5, -4, -3, -2, -1, 0 dB (1 steps) | |
| MiddleHigh and Low pass filter for midrange | HPF FRQ | Full, 30Hz, 40Hz, 50Hz, 63Hz, 70Hz, 80Hz, 90Hz, 100Hz, 125Hz, 160Hz, 180Hz, 220Hz, 250Hz, 315Hz, 400Hz, 500Hz, 630Hz, 700Hz, 800Hz, FRQ Through |
| HPF SLOPE | 6, 12, 18 dB/OctHide when the HPF FRQ is selected Full | |
| LPF FRQ | Full, 630Hz, 700Hz, 800Hz, 1KHz, 1.6KHz, 2.5KHz, 3.15KHz, 4KHz, 5KHz, 6.3KHz, 8KHz, 10KHz, 12.5KHz, FRQ Through | |
| HPF SLOPE | ||
| PHASE | Reverse, Normal | |
| HPF GAIN | -8, -7, -6, -5, -4, -3, -2, -1, 0 dB (1 steps) | |
| SubwooferLow pass filter for subwoofer | LPF FRQ | Full, 30Hz, 40Hz, 50Hz, 63Hz, 70Hz, 80Hz, 90Hz, 100Hz, 125Hz, 160Hz, 180Hz, 220Hz, 250Hz, 315Hz, 400Hz, 500Hz, 630 Hz, 700Hz, 800Hz, FRQ Through |
| LPF SLOPE | 6, 12, 18 dB/OctHide when the LPF FRQ is selected Full | |
| PHASE | Reverse, Normal | |
| LPF GAIN | -8, -7, -6, -5, -4, -3, -2, -1, 0 dB (1 steps) | |
| DELAY SETTINGS | |||
| Default settings 2-wayAll (1,2,3,4) | All 110cm, 0dB | ||
| Front Left (1) | FL100cm, -2dB,FL 140cm, 0dB | RL 80cm, -4dB,RR 120cm, -2dB | SUB L 150cm, 0dB,SUB R 150cm, 0dB |
| Front Right (2) | FL 140cm, 0dB,FR 100cm, -2dB | RL120cm, -2dB,RR 80cm, -4dB | SUB L 150cm, 0dB,SUB R 150cm, 0dB |
| Front (1, 2) | FL 120cm, 0dB,FL 120cm, 0dB | RL 100cm, -2dB,RR 100cm, -2dB | SUB L 120cm,0dB,SUB R 120cm, 0dB |
| Position | 1KHz,1.6KHz, 2.5KHz, 4KHz,5KHz, 6.3KHz, 8KHz, 10KHz,12KHz, 15KHz,16,KHz | ||
| Default time alignmentsettings for differentlistening positions | All (1,2,3,4) | 2 4-8, -7, -6,-5,-4,-3,-2,-1, 0dB (1step) | |
| Front Left (1) | |||
| Front Right (2) | 1 3-8, -7, -6, -5, -4, -3, -2,-1, 0dB (1step) | ||
| Front (1,2) | |||
| Distance : X-OverSet the distance betweenthe speakers andlistening position to getcorrect time alignment. | Front L | 0-680cm (1cm step) | |
| Front R | 0-680cm (1cm step) | ||
| Rear L | 0-680cm (1cm step) | ||
| Rear R | 0-680cm (1cm step) | ||
| Sub L | 0-680cm (1cm step) | ||
| Sub R | 0-680cm (1cm step) | ||
| Gain : 2-way X-OverSet gain to increase anddecrease the level on thespeakers. | Front L | -8, -7, -6, -5, -4, -3, -2, -1,0dB (1step) | |
| Front R | |||
| Rear L | -8, -7, -6, -5, -4, -3, -2, -1,0dB (1step) | ||
| Hint : If the referencepoint is at the driver'sposition, all the speakerson the left side should belower in gain. | Sub L | -8, -7, -6, -5, -4, -3, -2, -1,0dB (1step) | |
| Sub R | |||
| Default settings 3-way | |||
| All (1,2,3,4) | TL110cm, 0dB,TR 110cm, 0dB | ML 110cm, 0dB,MR 110cm, 0dB | SUB L 110cm, 0dB,SUB R 110cm, 0dB |
| Front Left (1) | TL 100cm, -2dB,TR 140cm, 0dB | ML 110cm, -2dB,MR 140cm, 0dB | SUB L 150cm, 0dB,SUB R 150cm, 0dB |
| Front Right (2) | TL 140cm, 0dB,TR 100cm, -2dB | ML 140cm, 0dB,MR 110cm, -2dB | SUB L 150cm, 0dB,SUB R 150cm, 0dB |
| Front (1, 2) | TL 110cm, 0dB,TR 110cm, 0db | ML 110cm, 0dB,MR 110cm, 0dB | SUB L 150cm, 0dB,SUB R 150cm, 0dB |
| Distance : 3-way X-Over | |||
| Set the distance betweenthe speakers andlistening position to getcorrect time alignment. | Tweeter LTweeter R | 0-680cm (1cm step)0-680cm (1cm step) | |
| Midrange LMindrange R | 0-680cm (1cm step)0-680cm (1cm step) | ||
| Woofer LWoofer R | 0-680cm (1cm step)0-680cm (1cm step) | ||
| Gain : 2-way X-Over | |||
| Set gain to increase anddecrease the level on thespeakers. | Tweeter LTweeter R | -8, -7, -6, -5, -4, -3, -2, -1,0dB (1step) | |
| Hint : If the referencepoint is at the driver'sposition, all the speakerson the left side should belower in gain. | Midrange LMidrange R | -8, -7, -6, -5, -4, -3, -2, -1,0dB (1step) | |
| Woofer LWoofer R | -8, -7, -6, -5, -4, -3, -2, -1,0dB (1step) | ||
| Delay Reset | |||
| Resets all delay settings. | No / Yes | ||
Clock
| MENU SETTING : CLOCK | ||
| FUNCTION VALUESDISPLAY OPTION | ||
| [CLOCK FORMAT] | Setting of clock format. | 12H, 24H |
| [CLOCK ADJUST] | Change time on the display. | HH:MM:SS |
| [DATE FORMAT] | Setting of date format. | DD/MM/YYMM/DD/YY |
| [DATE ADJUST] | Change date on the display. | DD:MM:YY |
Demo Mode
| MENU SETTING : CLOCK | ||
| FUNCTION VALUESMENU SETTING | ||
| [DEMO MODE] Use demo mode of the unit. | Off, On | |
Tuner
This menu setting provides the option to adjust the settings of the head unit's FM radio. Utilize the volume knob to navigate the menu and select the "TUNER" option. Within this category, there are four different settings available for adjustment. Once a setting is selected, turn the volume knob to modify the value. To return to the previous menu, press the ↩ / BAND button on the unit.
| MENU SETTING : CLOCK | ||
| FUNCTION VALUESMENU SETTING | ||
| [STEREO, MONO] | Improves the FM reception, but the stereo effect may be lost. | Off, On |
| [LOCAL SEEK] | Only stations with a strong signal are found during the seek tuning. | Off, On |
| [RDS SET] | Radio Data System | Off, On |
| [REGIONAL] | Changes only to alternate frequencies of the station with the same regional broadcasting | EUROPA, RUSSIA, ASIA, USA |
TROUBLESHOOTING
If any of the following problem occur, please resort to Troubleshooting for the possible solutions. Consult Blaupunkt authorized dealer if problem persist.
| Problems | Possible Causes | Solutions |
| Unable to start up | Most common issue is either in the wiring or the fuse. | Most common issue is either in the wiring or the fuse. |
| Speaker's cables not connected. | Ensure that the car-specific cable harness you are using is designed for your specific car model. | |
| Power Cable is not inserted into the main body. | Insert the power cable the main body. | |
| Burnt power fuse. | Replace with a new fuse. | |
| Drained car battery. | Charge or replace the car battery. | |
| No sound | Audio cables are not properly connected to the unit. | Ensure proper connection of the audio cables. |
| Mute setting is on. | Unmute the volume. | |
| Low volume. | Adjust the volume | |
| No sound from front, rear, left & right speakers due to Fade-Balance settings. | Select Equalizer from Home Page to adjust setting. | |
| Slow in SD card reading | SD card may contain corrupted files or virus. | Replace it with a new audio SD card with compatible file formats. |
| Unable to search radio stations | Radio's antenna is not well inserted. | Ensure radio antenna is properly installed. |
| Unwanted noise | Damage or connection issue with the wiring. | Make sure the signal cables or speaker cables aren't too close to the power cables. |
| Noise changes with the accelerator. | Make sure that the grounding point is good especially if an external amplifier is used. | |
| Distortion | Damage or connection issue with the wiring. | Check the speaker cables to make sure that polarity isn't reversed on one channel. |

| NO. | WIRE | A | NO. | WIRE | B | NO. | WIRE | C |
| 1 | VIOLET | RR+ | 1 | PINK | SWC GND | 1 | / | RCA-RL |
| 2 | GREY | FR+ | 2 | ORANGE/BLACK | SWC1 | 2 | / | RCA-FL |
| 3 | WHITE | FL+ | 3 | BLUE | ANT | 3 | / | SUB1 |
| 4 | GREEN | RL+ | 4 | RED | ACC | 4 | / | RCA-RR |
| 5 | VIOLET/ BLACK | RR- | 5 | BROWN | SWC2 | 5 | / | RCA-FR |
| 6 | GREY/ BLACK | FR- | 6 | YELLOW | B+ | 6 | / | SUB2 |
| 7 | WHITE/ BLACK | FL- | 7 | / | / | 7 | / | FM THE ANT |
| 8 | GREEN/ BLACK | RL- | 8 | BLACK | GND WIRE | 8 | / | MIC |
INSTALLATION INSTRUCTION
SAFETY
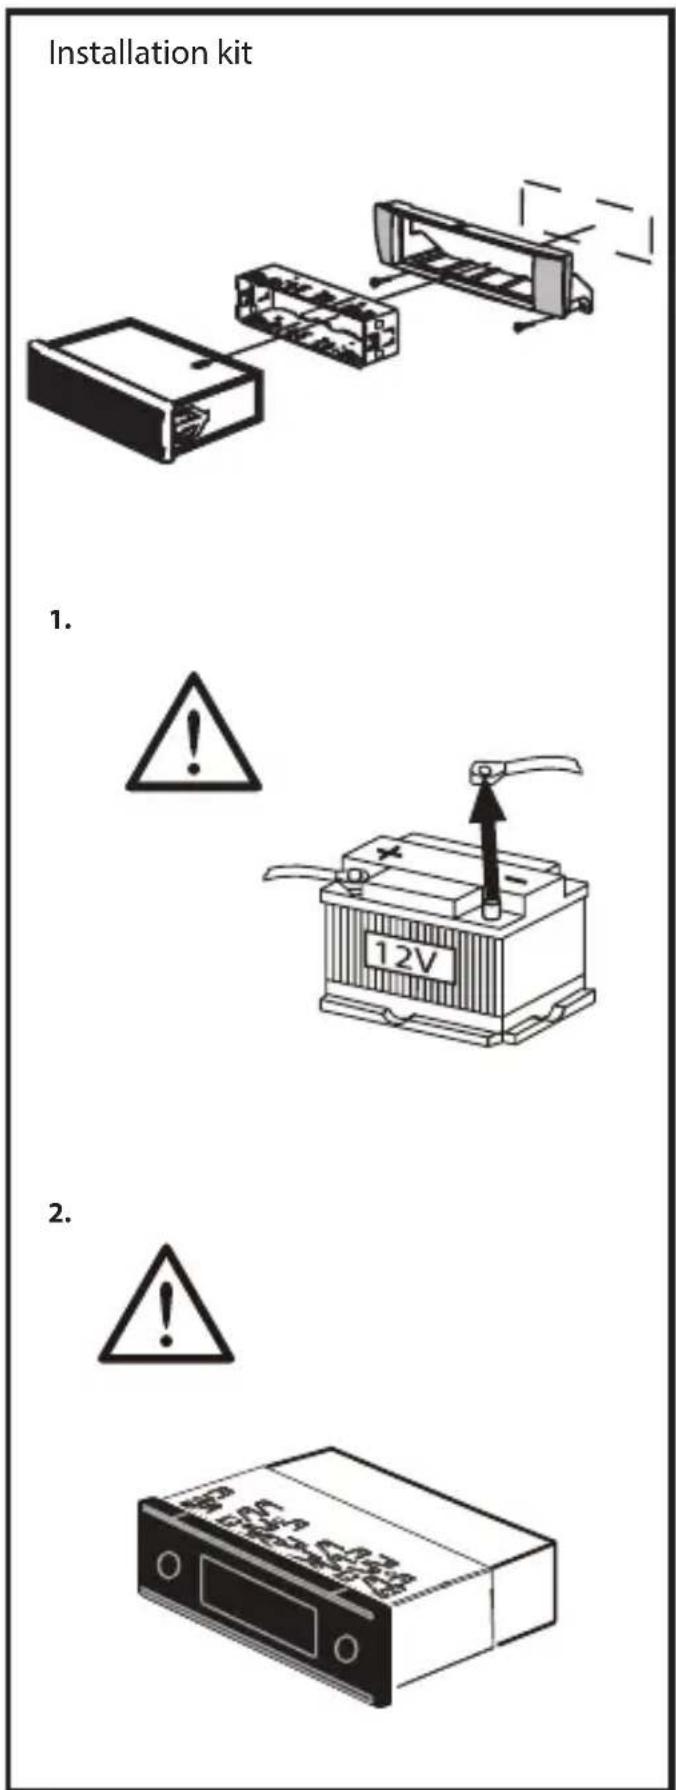
- Assign a mounting location that will not obstruct the driver in any circumstances, or cause injuries to drivers and passengers in case of emergency braking or accidents.
- Ensure all wires are connected properly, and that the unit is functioning well before fitting the unit into the mount.
- Any unauthorized installation and modification may cause malfunction to the unit. Always use only the parts that are included with the unit.

CAUTION
- Disconnect the negative terminal of the battery (refer to vehicle manufacturer's safety instructions). Make sure you do not damage vehicle components when drilling any holes.
- The cross sections of the positive and negative cables must not be less than 1.5 mm².
- Do not connect the vehicle's plug connectors to the radio!
- Your vehicle may differ from the description provided here. Blaupunkt is not liable in case of any damage caused by incorrect installation or connection.
- Please contact Blaupunkt dealers or the vehicle's manufacturer if the information provided here does not fit your specific installation requirement.
When installing the amplifier, first connect the device ground connections before connecting the plugs for the line-out jacks. The ground connection of external devices may not be connected to the ground of the car sound system (housing).
INSTALLATION INSTRUCTION

1.4.


Blaupunkt Car Entertainment - Asia Pacific Competence Centre
- CAR RADIO
- NAGOYA 120 DSP
- SAFETY NOTES
- ROAD SAFETY
- GENERAL SAFETY NOTES
- CAUTIONS
- DISCLAIMER
- DISPOSAL NOTES
- RADIOS WITH DETACHABLE PANEL - DAMAGE TO THE CONTROL PANEL
- SCOPE OF DELIVERY
- ⏻/ MODE BUTTON
- MICROPHONE
- VOLUME KNOB / MENU MODE
- CLK BUTTON
- MICROSD SLOT
- USB (1) SLOT
- USB (2) SLOT
- AUX PORT
- BUTTON
- RDM" BUTTON
- RPT" BUTTON
- INT" BUTTON
- II" BUTTON
- 🏠/BUTTON
- 📞/◀BUTTON
- ↩ / BAND BUTTON
- MUTE BUTTON
- GENERAL
- FM STEREO RADIO
- AM/MW RADIO
- AUDIO SPECIFICATION
- INPUT
- BT
- QUICK START
- SHORT PRESS DEVICE ⏻/ MODE TO SWITCH ON THE DEVICE
- SET CLOCK AND DATE
- (A) CLOCK
- (B) DATE
- TURN OFF DEMO-MODE
- BT PAIRING
- AUDIO APP CONTROL
- MEMORY FUNCTION
- VOLUME ADJUSTMENT
- STORING RADIO STATION
- USB/SD MEDIA PLAYBACK
- EQ SETTINGS
- PRO EQ
- MENU OPTIONS
- AUDIO
- TUNER
- TROUBLESHOOTING
- INSTALLATION INSTRUCTION
- SAFETY
- CAUTION
Brand : BLAUPUNKT
Model : Barcelona 240T
Category : Receiver