Aura Pro 6G - SSD OWC - Free user manual and instructions
Find the device manual for free Aura Pro 6G OWC in PDF.


User questions about Aura Pro 6G OWC
0 question about this device. Answer the ones you know or ask your own.
Ask a new question about this device
Download the instructions for your SSD in PDF format for free! Find your manual Aura Pro 6G - OWC and take your electronic device back in hand. On this page are published all the documents necessary for the use of your device. Aura Pro 6G by OWC.
USER MANUAL Aura Pro 6G OWC
- This process requires a working internet connection on the host computer.
- This guide assumes that the SSD installation process was already followed and completed.
- If the SSD is installed on a laptop, make sure the power adapter is connected before you begin the steps below.
Start with Internet Recovery
This guide provides the information required to format your OWC SSD, as well as options for installing the Mac operating system and migrating your data. The process starts by booting into Internet Recovery, using one of the keyboard shortcuts listed below. Because the shortcut used and the specific Mac determine the OS used by Recovery it is worthwhile to determine the latest compatible OS for your Mac before choosing a method. We have included Apple's official compatibility lists for the last several OS versions (see below).
• macOS 10.15 Catalina-compatible
• macOS 10.12 Sierra-compatible
• Mac OS X 10.10 Yosemite-compatible
• macOS 10.14 Mojave-compatible
• Mac OS X 10.11 El Capitan-compatible
• macOS 10.13 High Sierra-compatible
Recovery Option 1: Cmd-Opt-R (Recommended)
Power on the Mac then immediately press and hold Cmd-Opt-R until you see a screen similar to the one at right (in some cases it may be grey). If you see a Wi-Fi menu, choose your preferred network to continue; you may need to provide network credentials.
This Recovery option ensures that later in the process, if you use the 'Reinstall macOS / OS X' function (i.e. a clean OS install) the latest compatible version will be used.
Exception: If macOS Sierra 10.12.4 or later has never been installed on this Mac, Cmd-Opt-R installs the macOS that originally shipped with your Mac, or the closest version still available. To avoid this, update to 10.12.4+ before running Recovery.

natural_image
Black background with a faint globe icon and a horizontal line, no text or symbols present.Recovery Option 2: Cmd-R
Power on the Mac and immediately press and hold Cmd-R until you see a screen similar to the one shown earlier (in some cases it will be a grey background with a globe). If you see a Wi-Fi menu, choose your preferred network to continue; you may need to provide network credentials.
This option ensures that if you use the 'Reinstall macOS / OS X' function (i.e. a "clean install") later in the process, the most recently installed OS version will be used.
Exception: If you recently had your Mac logic board replaced during a repair, Recovery may install the latest compatible macOS.
Additional Notes:
- OS 10.11 and 10.13 included changes to Disk Utility that will determine which formatting instructions to use (see next page).
- If you want to verify the OS version that you booted into before choosing the formatting instructions, you can use the Terminal. From the main menu at the top of the Recovery screen, choose Utilities >Terminal, then type the command sw_vers and press Return. The OS version that you have booted into will be displayed. If it's the version you expected based on the information provided earlier, you can continue to the Formatting section below. If not, you can try again by choosing Apple Menu >Restart, waiting till the screen turns black and then pressing and holding a different Recovery shortcut, to see if you get the result you want. If you do not it is possible the version of the OS you are looking for is no longer available for your specific Mac.
Formatting the SSD
Once you have booted into Recovery, use the Disk Utility to format the SSD. While the process of formatting your drive is simple in all cases, the appearance and steps within Disk Utility can vary based on the OS version. We have set up examples for each version. Please note: the drive labels or information in this document may differ from your drive, but the processes won't change.
- If the Recovery method selected targets macOS 10.13-10.15, please continue with the steps below.
- If the Recovery method selected targets OS X 10.11 or macOS 10.12, please skip ahead to page 5.
- If the Recovery method selected targets OS X 10.7-10.10, please skip ahead to page 8.
Formatting Steps: 10.13-10.15
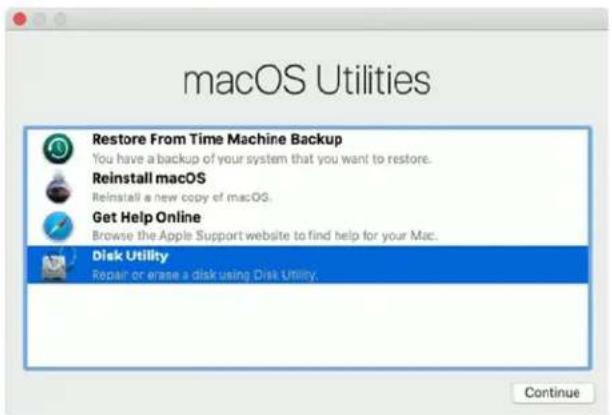
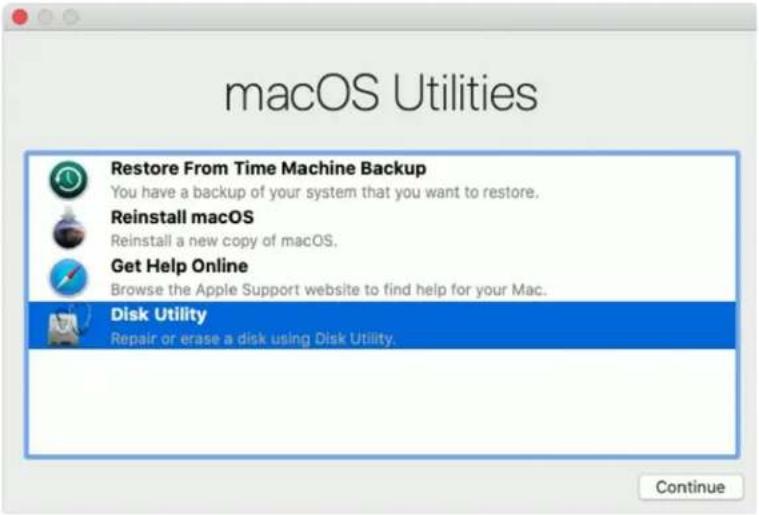
Step 1 – from the macOS Utilities window, select the Disk Utility option and click Continue.
text_image
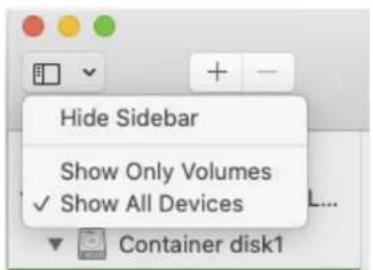
macOS Utilities Restore From Time Machine Backup You have a backup of your system that you want to restore. Reinstall macOS Reinstall a new copy of macOS. Get Help Online Browse the Apple Support website to find help for your Mac. Disk Utility Repair or erase a disk using Disk Utility. ContinueStep 2 – to ensure that all internal devices and volumes are shown from the start, open the View menu widget near the top-left corner of the Disk Utility window and choose 'Show All Devices'.
text_image
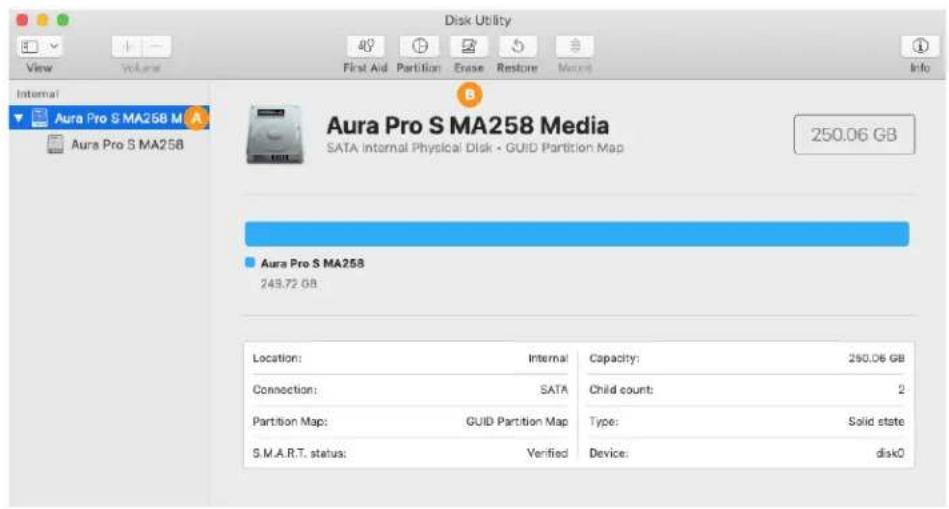
Hide Sidebar Show Only Volumes ✓ Show All Devices Container disk1Step 3 – in the sidebar area at left, select the icon or label for the physical disk (item A at right) Note: some SSDs may also include a factory-formatted volume, listed beneath the physical disk item; this factory volume — or any others on the drive — will be permanently erased.
Step 4 – click the 'Erase' button (item B at right) to continue.
text_image
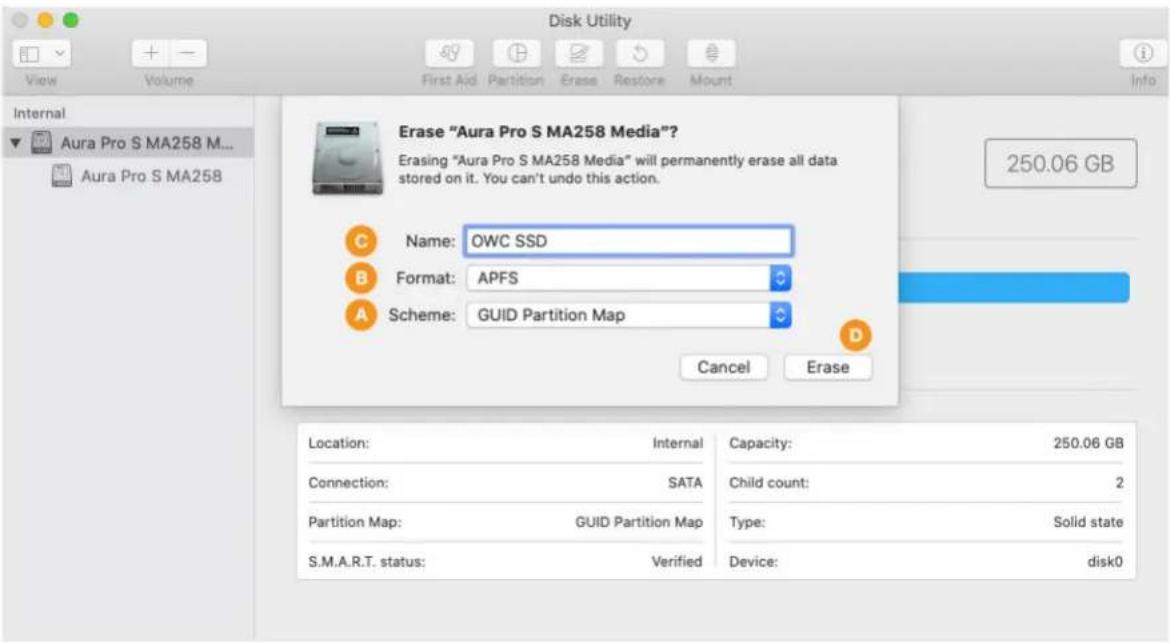
Disk Utility View Volume First Aid Partition Erase Restore More Internal Aura Pro S MA258 M Aura Pro S MA258 Aura Pro S MA258 Media SATA Internal Physical Disk - GUID Partition Map 250.06 GB Aura Pro S MA258 243.72 GB Location: Internal Capacity: 250.06 GB Connection: SATA Child count: 2 Partition Map: GUID Partition Map Type: Solid state S.M.A.R.T. status: Verified Device: disk0Step 5 – a sheet will open containing the settings needed to format the drive. From the 'Scheme' menu (item A below) set the value to 'GUID Partition Map' if it's not already selected (required).
Step 6 – from the 'Format' menu (item B below) choose 'APFS'. This is the recommended format for Mac SSDs in macOS 10.13 and later.
Step 7 – type a name for your new system volume in the field supplied (item C). Note: the volume names shown in later sections will not match the one shown here because the examples are from different sources. However, whatever volume name you choose at this step, will be applicable when choosing a destination for your system and/or data files during the migration process, as well.
Step 8 – click the 'Erase' button (item D) to format the drive. In many cases it will only take a few seconds.
text_image
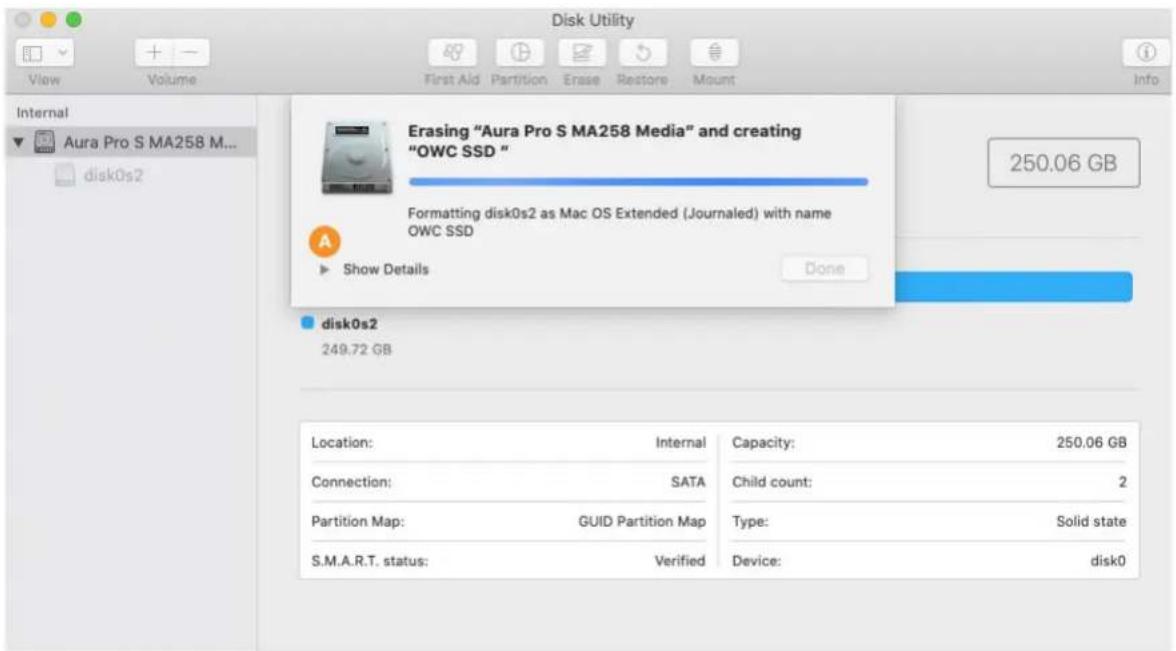
Disk Utility View Volume First Aid Partition Erase Restore Mount Info Internal Aura Pro S MA258 M... Aura Pro S MA258 Erase "Aura Pro S MA258 Media"? Erasing "Aura Pro S MA258 Media" will permanently erase all data stored on it. You can't undo this action. 250.06 GB Name: OWC SSD B Format: APFS A Scheme: GUID Partition Map Cancel Erase Location: Internal Capacity: 250.06 GB Connection: SATA Child count: 2 Partition Map: GUID Partition Map Type: Solid state S.M.A.R.T. status: Verified Device: disk0During the format process, by default the screen will look similar to what you see below. Note that it is possible to see the details of the formatting process by clicking the 'Show Details' widget (item A below), but it is not necessary to complete the process.
text_image
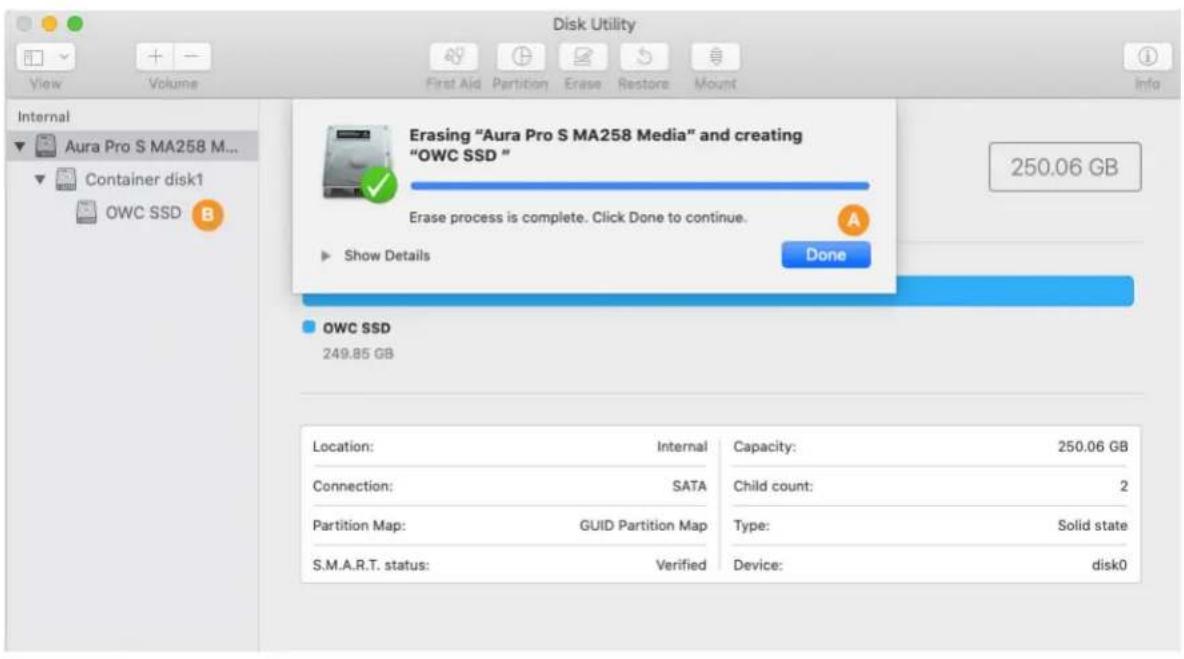
Disk Utility View Volume First Aid Partition Erase Restore Mount Info Internal Aura Pro S MA258 M... disk0s2 Erasing "Aura Pro S MA258 Media" and creating "OWC SSD " Formatting disk0s2 as Mac OS Extended (Journaled) with name OWC SSD Show Details Done disk0s2 249.72 GB Location: Internal Capacity: 250,06 GB Connection: SATA Child count: 2 Partition Map: GUID Partition Map Type: Solid state S.M.A.R.T. status: Verified Device: disk0Step 9 – once the process is complete, click the 'Done' button (item A below). You should now see the newly created volume under the physical disk you selected in Step 3 (here it's called 'OWC SSD', item B below).
When finished you can choose Disk Utility > Quit from the main menu. This will take you back to the main Recovery screen. Please skip ahead to page 11 to begin the process of OS installation and/or data migration.
text_image
Disk Utility View Volume First Aid Partition Erase Restore Mount Internal Aura Pro S MA258 M... Container disk1 OWC SSD B Erase "Aura Pro S MA258 Media" and creating "OWC SSD " Erase process is complete. Click Done to continue. Show Details Done 250.06 GB OWC SSD 249.85 GB Location: Internal Capacity: 250.06 GB Connection: SATA Child count: 2 Partition Map: GUID Partition Map Type: Solid state S.M.A.R.T. status: Verified Device: disk0Formatting Steps: 10.11-10.12
Step 1 – from the macOS Utilities window, select the Disk Utility option and click Continue. If you're using 10.11 the utilities window will say 'OS X Utilities' but the options presented will be the same.
text_image
macOS Utilities Restore From Time Machine Backup You have a backup of your system that you want to restore. Reinstall macOS Reinstall a new copy of macOS. Get Help Online Browse the Apple Support website to find help for your Mac. Disk Utility Repair or erase a disk using Disk Utility.Step 2 – in the sidebar area at left, select the icon or label for the physical disk (item A below). Note: some SSDs may also include a factory-formatted volume, listed beneath the physical disk item; this factory volume — or any others on the drive — will be permanently erased during this process.
Step 3 – click the 'Erase' button (item B below) to continue.
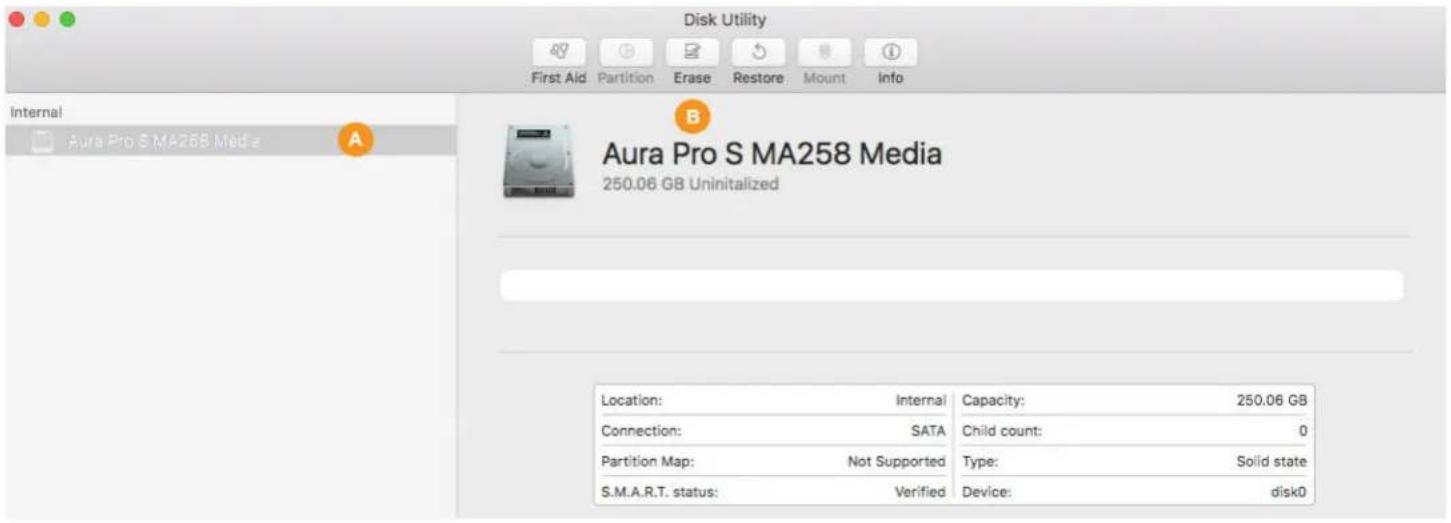
text_image
Disk Utility First Aid Partition Erase Restore Mount Info Internal Aura Pro S MA258 Media Aura Pro S MA258 Media 250.06 GB Uninitialized Location: Internal Capacity: 250.06 GB Connection: SATA Child count: 0 Partition Map: Not Supported Type: Solid state S.M.A.R.T. status: Verified Device: disk0Step 4 – a sheet will open containing the settings needed to format the drive. From the 'Scheme' menu (item A below) set the value to 'GUID Partition Map' if it's not already selected (required).
Step 5 – from the 'Format' menu (item B below) choose 'Mac OS Extended (Journaled)'.
Step 6 – type a name for your new system volume in the field supplied (item C). Note: the volume names shown in later sections will not match the one shown here because the examples are from different sources. However, whatever volume name you choose at this step, will be applicable when choosing a destination for your system and/or data files during the migration process, as well.
Step 7 – click the 'Erase' button (item D) to format the drive. In many cases it will only take a few seconds.
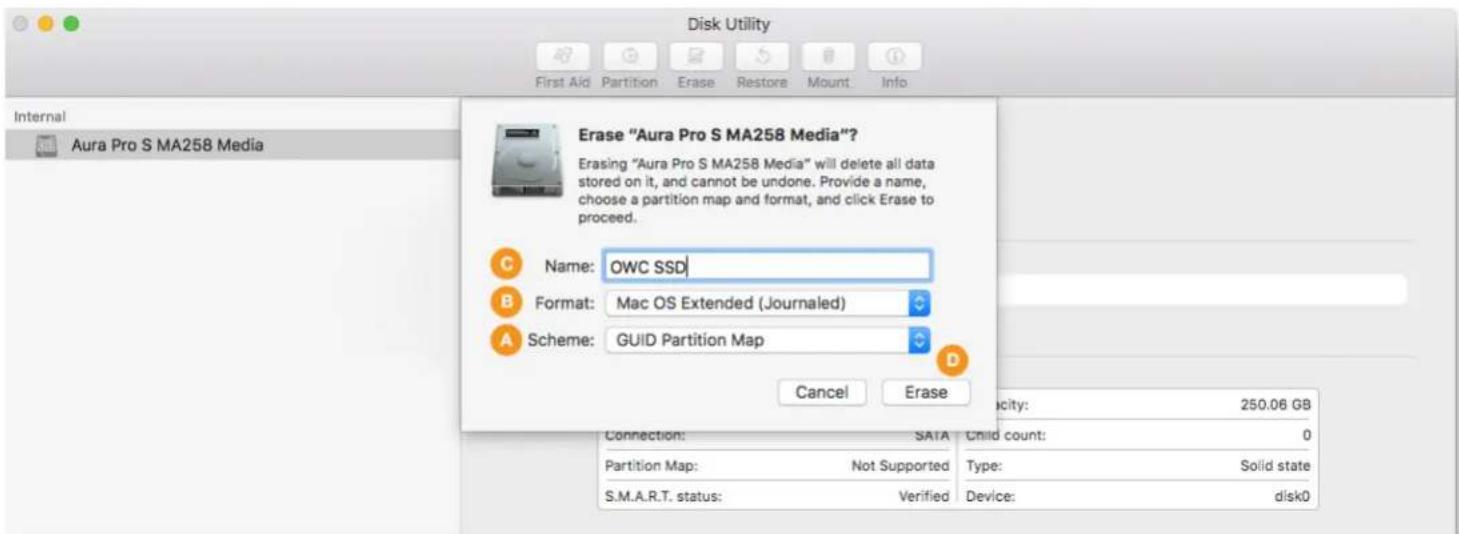
text_image
Disk Utility First Aid Partition Erase Restore Mount Info Internal Aura Pro S MA258 Media Erase "Aura Pro S MA258 Media"? Erasing "Aura Pro S MA258 Media" will delete all data stored on it, and cannot be undone. Provide a name, choose a partition map and format, and click Erase to proceed. Name: OWC SSD Format: Mac OS Extended (Journaled) Scheme: GUID Partition Map Cancel Erase C D Locality: 250.06 GB Connection: SATA Child count: 0 Partition Map: Not Supported Type: Solid state S.M.A.R.T. status: Verified Device: disk0During the format process, by default the screen will look similar to what you see below. Note that it is possible to see the details of the formatting process by clicking the 'Show Details' widget (item A), but it is not necessary to complete the process.
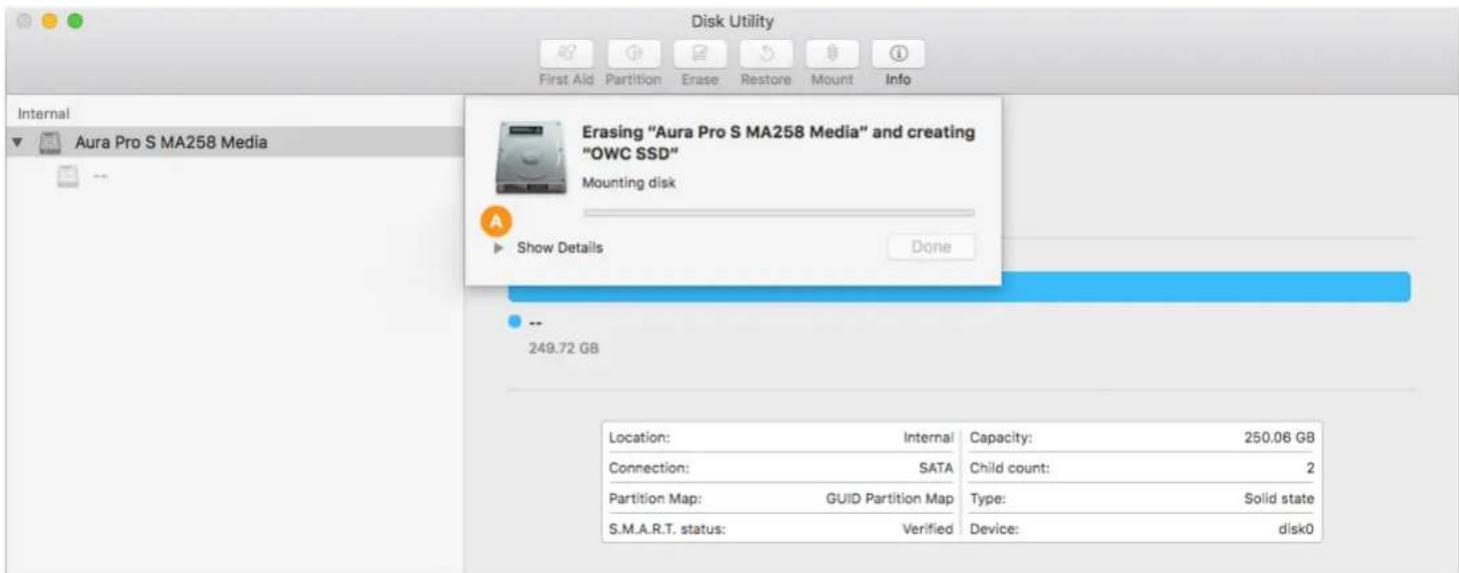
text_image
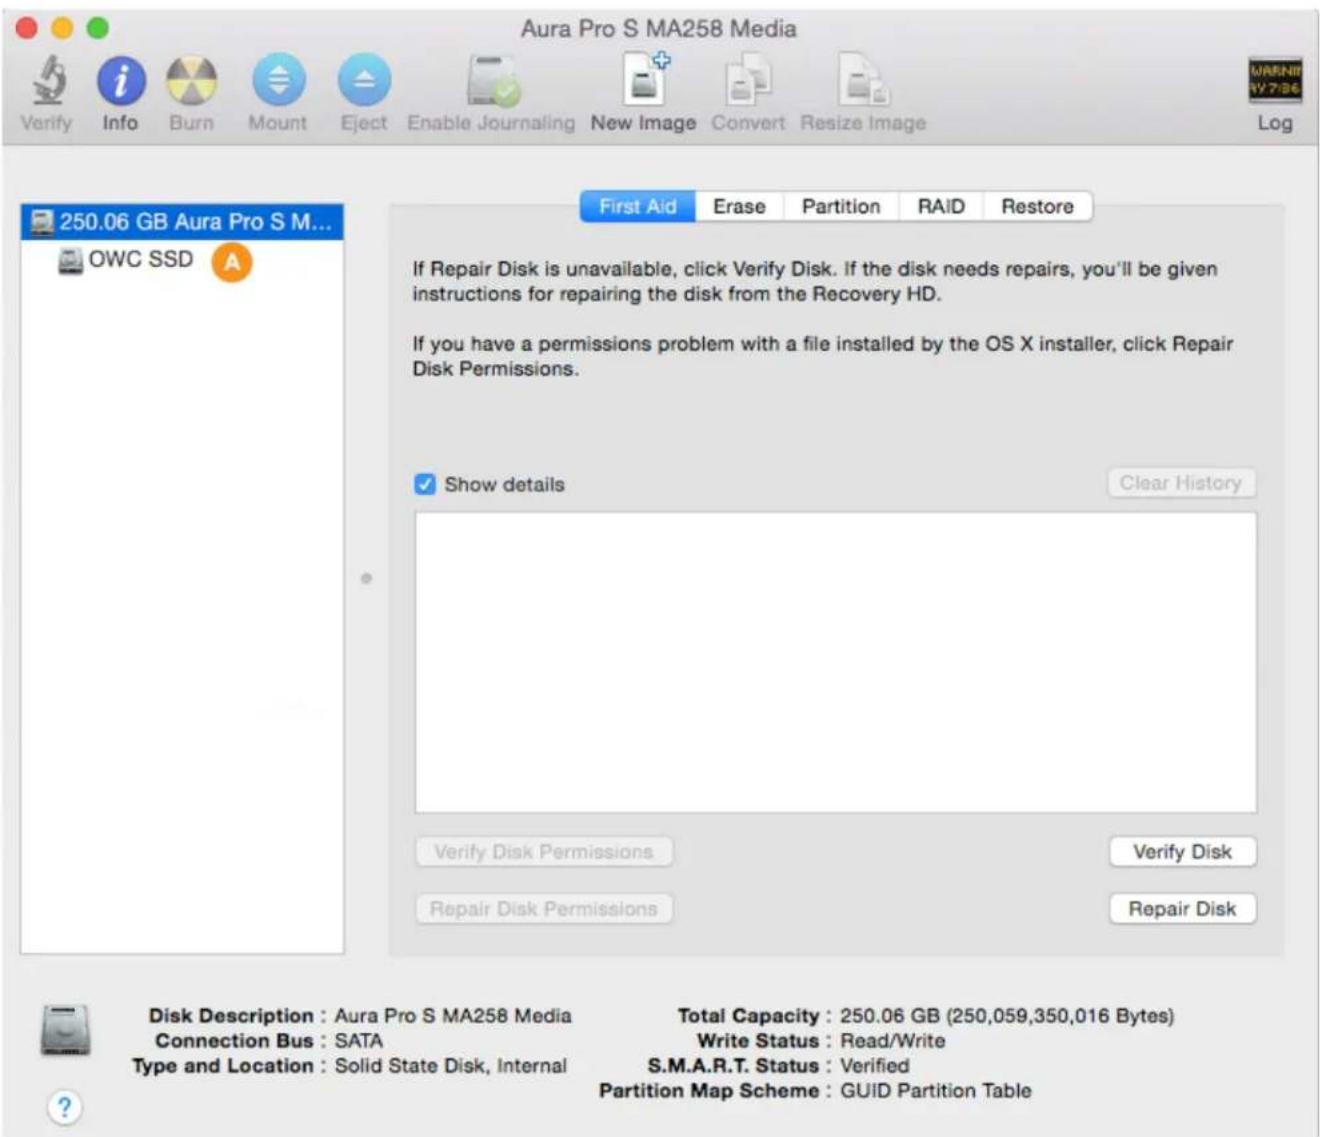
Disk Utility First Aid Partition Erase Restore Mount Info Internal Aura Pro S MA258 Media Erasing "Aura Pro S MA258 Media" and creating "OWC SSD" Mounting disk Show Details Done 249.72 GB Location: Internal Capacity: 250.06 GB Connection: SATA Child count: 2 Partition Map: GUID Partition Map Type: Solid state S.M.A.R.T. status: Verified Device: disk0Step 8 – once the process is complete, click the 'Done' button (item A below). You should now see the newly created volume under the physical disk you selected in Step 2 (in this example it's called 'OWC SSD', item B).
When finished you can choose Disk Utility > Quit from the main menu. This will take you back to the main Recovery screen. Please skip ahead to page 11 to begin the process of OS installation and/or data migration.
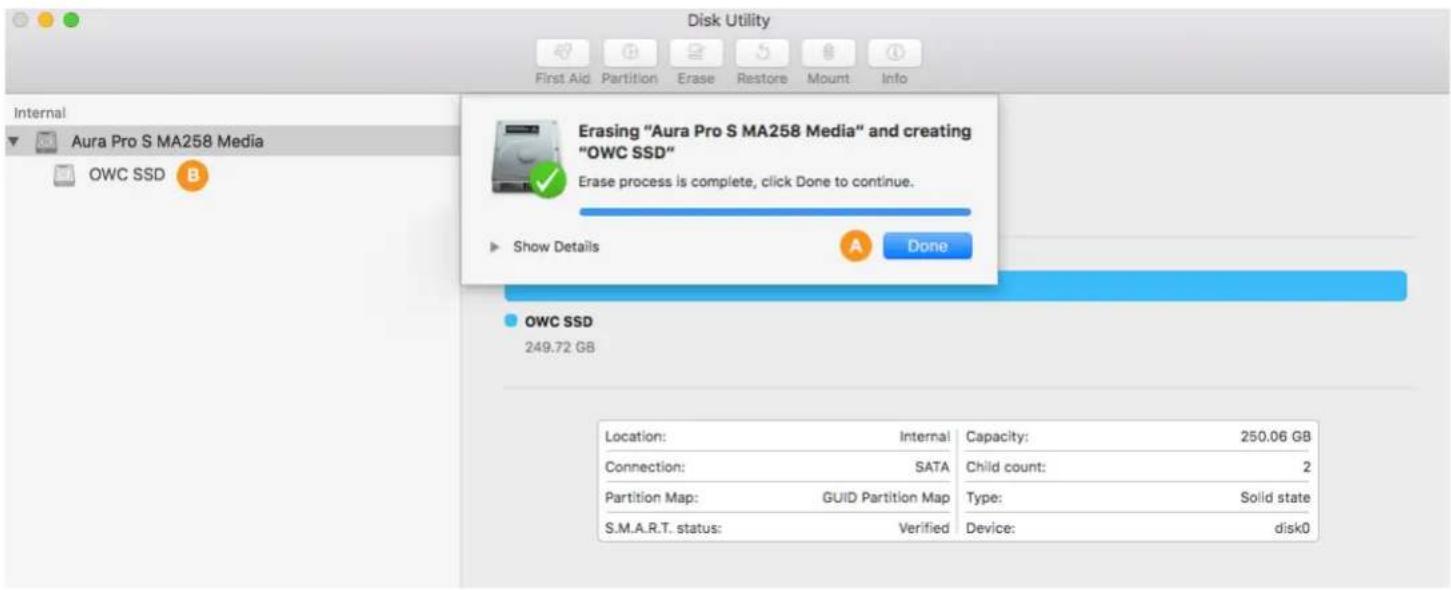
text_image
Disk Utility First Aid Partition Erase Restore Mount Info Internal Aura Pro S MA258 Media OWC SSD B Erasing "Aura Pro S MA258 Media" and creating "OWC SSD" Erase process is complete, click Done to continue. Show Details Done OWC SSD 249.72 GB Location: Internal Capacity: 250.06 GB Connection: SATA Child count: 2 Partition Map: GUID Partition Map Type: Solid state S.M.A.R.T. status: Verified Device: disk0Step 1 – from the OS X Utilities window, select the Disk Utility option (bottom item in the list shown below) and click Continue.
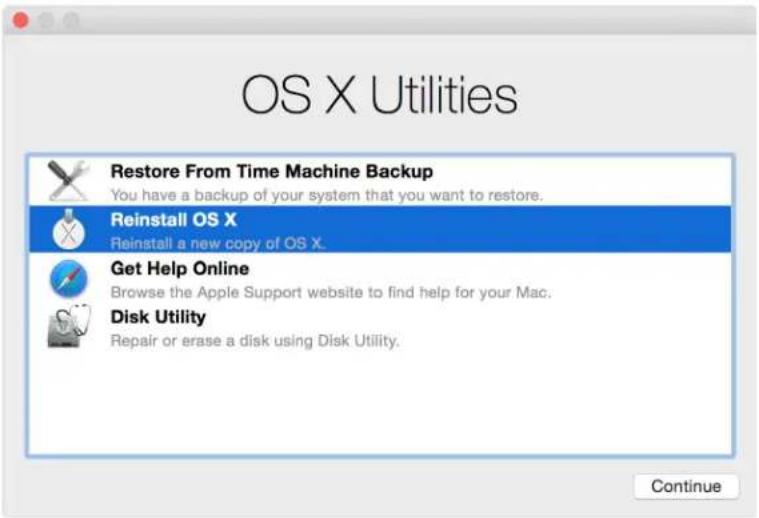
text_image
OS X Utilities Restore From Time Machine Backup You have a backup of your system that you want to restore. Reinstall OS X Reinstall a new copy of OS X. Get Help Online Browse the Apple Support website to find help for your Mac. Disk Utility Repair or erase a disk using Disk Utility. ContinueStep 2 – in the sidebar area at left, select the icon or label for the physical disk (item A below). Note: some SSDs may also include a factory-formatted volume, listed beneath the physical disk item; this factory volume — or any others on the drive — will be permanently erased during this process.
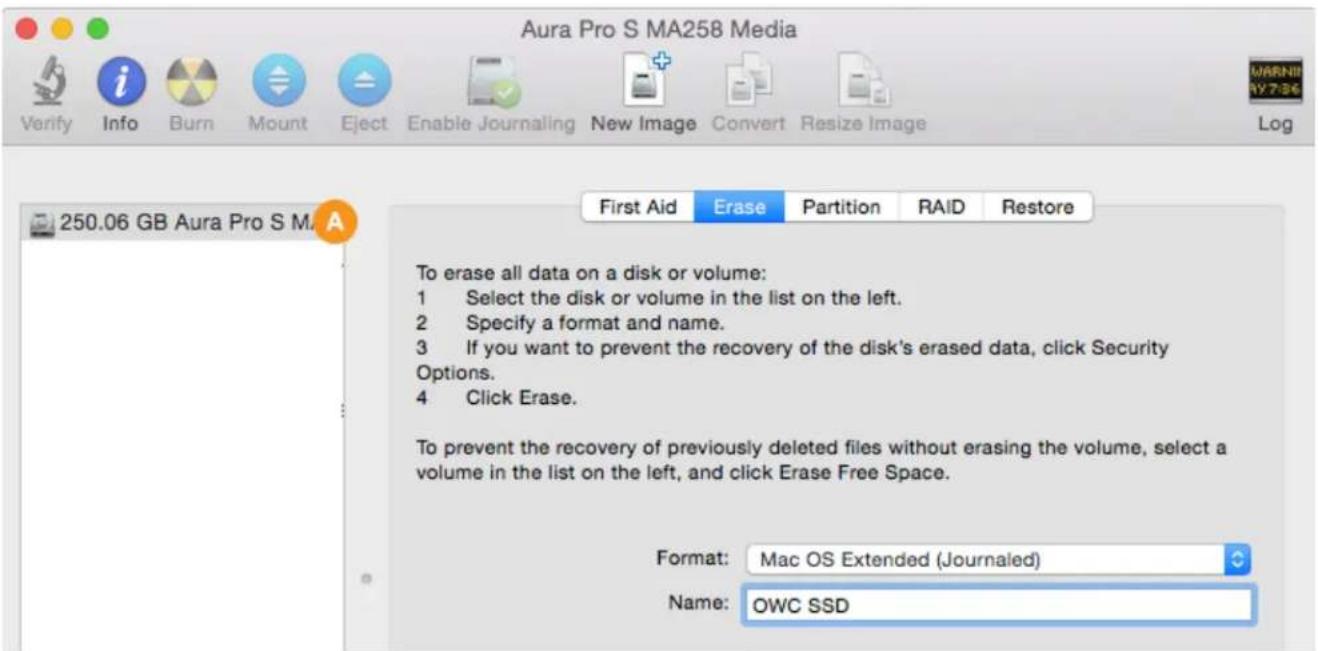
text_image
Aura Pro S MA258 Media Verify Info Burn Mount Eject Enable Journaling New Image Convert Resize Image Log 250.06 GB Aura Pro S M A First Aid Erase Partition RAID Restore To erase all data on a disk or volume: 1 Select the disk or volume in the list on the left. 2 Specify a format and name. 3 If you want to prevent the recovery of the disk's erased data, click Security Options. 4 Click Erase. To prevent the recovery of previously deleted files without erasing the volume, select a volume in the list on the left, and click Erase Free Space. Format: Mac OS Extended (Journalled) Name: OWC SSDStep 3 – if the formatting options are not already visible, click the 'Erase' tab (item A below) to display them.
Step 4 – from the Format menu (item B below) select 'Mac OS Extended (Journaled)'.
Step 5 – in the field provided (item C below) give your new volume a name. Note: the volume names shown in later sections will not match the one shown here because the examples are from different sources. However, whatever volume name you choose at this step, will be applicable when choosing a destination for your system and/or data files during the migration process, as well.
Step 6 – click the 'Erase...' button (item D below) to begin the formatting process.
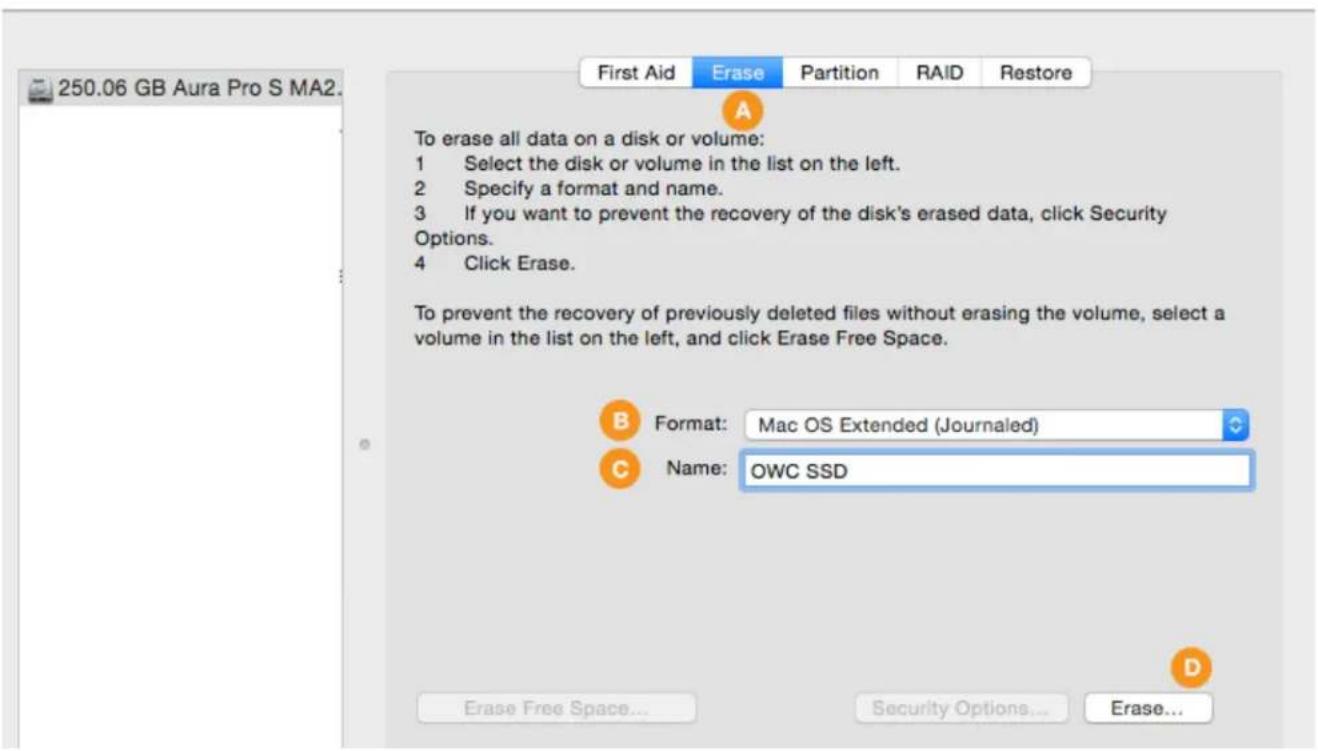
text_image
250.06 GB Aura Pro S MA2. First Aid Erase Partition RAID Restore To erase all data on a disk or volume: 1 Select the disk or volume in the list on the left. 2 Specify a format and name. 3 If you want to prevent the recovery of the disk's erased data, click Security Options. 4 Click Erase. To prevent the recovery of previously deleted files without erasing the volume, select a volume in the list on the left, and click Erase Free Space. B Format: Mac OS Extended (Journaled) C Name: OWC SSD Erase Free Space... Security Options... Erase...While formatting you will see a progress meter (item A below) near the bottom of the window. The process may take several seconds.
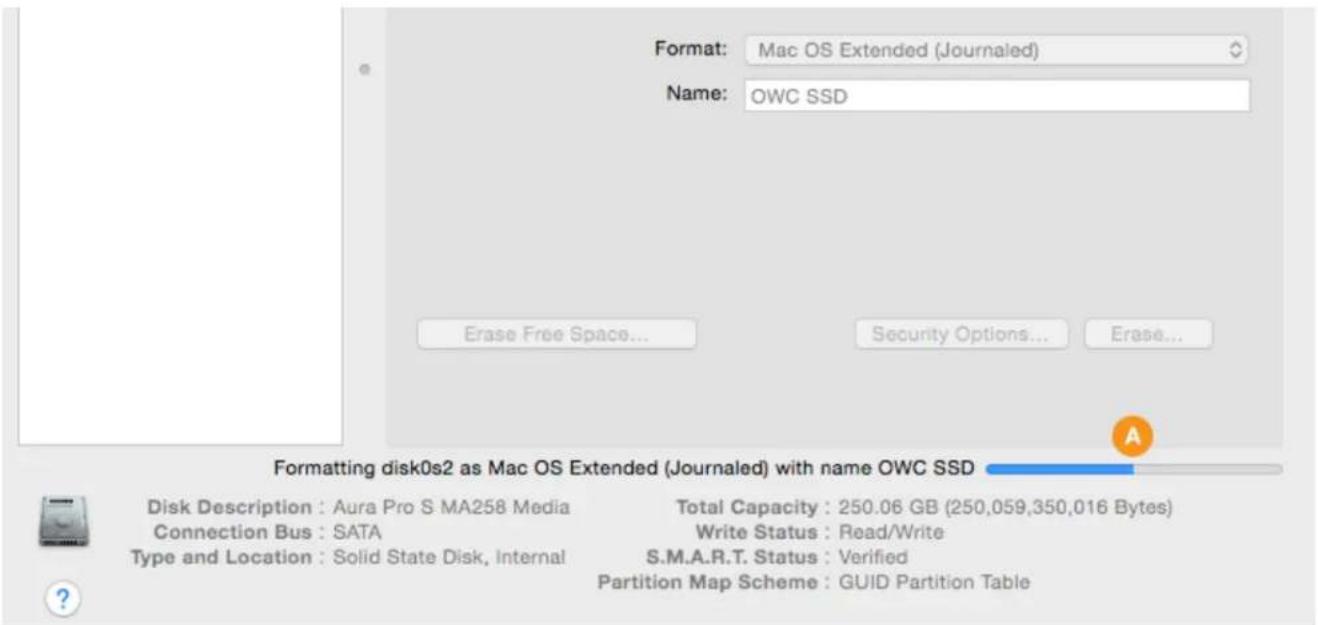
text_image
Format: Mac OS Extended (Journalled) Name: OWC SSD Erase Free Space... Security Options... Erase... Formatting disk0s2 as Mac OS Extended (Journalled) with name OWC SSD Disk Description : Aura Pro S MA258 Media Connection Bus : SATA Type and Location : Solid State Disk, Internal Total Capacity : 250.06 GB (250,059,350,016 Bytes) Write Status : Read/Write S.M.A.R.T. Status : Verified Partition Map Scheme : GUID Partition TableStep 7 – you should now see the newly created volume under the physical disk you selected in Step 2 (in this example it's called 'OWC SSD', item A below). Choose Disk Utility > Quit from the main menu. This will take you back to the main Recovery screen.
OS and data migration options begin on the next page.
text_image
Aura Pro S MA258 Media Verify Info Burn Mount Eject Enable Journaling New Image Convert Resize Image Log 250.06 GB Aura Pro S M... OWC SSD A First Aid Erase Partition RAID Restore If Repair Disk is unavailable, click Verify Disk. If the disk needs repairs, you'll be given instructions for repairing the disk from the Recovery HD. If you have a permissions problem with a file installed by the OS X installer, click Repair Disk Permissions. ✓ Show details Clear History Verify Disk Permissions Verify Disk Repair Disk Permissions Repair Disk Disk Description : Aura Pro S MA258 Media Total Capacity : 250.06 GB (250,059,350,016 Bytes) Connection Bus : SATA Write Status : Read/Write Type and Location : Solid State Disk, Internal S.M.A.R.T. Status : Verified Partition Map Scheme : GUID Partition TableOS Install Methods & Data Migration
Once you have created a new volume on your SSD, there are three methods we typically recommend for setting up a new system drive with your data on it. Which one you choose will depend on your situation and on your preferred backup method. The options are:
- Recovery: 'Reinstall macOS / OS X' (i.e. a clean install) + Migration Assistant (move data after OS install)
- Recovery: (Full) 'Restore from Time Machine Backup' (i.e. transfers system and user data together)
- Transfer system and user data from a Carbon Copy Cloner backup (also transfers both together)
Notes
- If you do not need to set up a clean OS install, please skip ahead to Page 13 to migrate both your system and user data via 'Restore from Time Machine Backup', or to Page 15 if you're using Carbon Copy Cloner.
Option 1: Reinstall the OS + Migration Assistant
Some people choose this option if they were having stability trouble with the macOS around the time it was last backed up, or just for peace of mind that the system will be installed fresh on their new drive. To create a clean install you can stay within Recovery mode and use the macOS Utilities following the steps below.
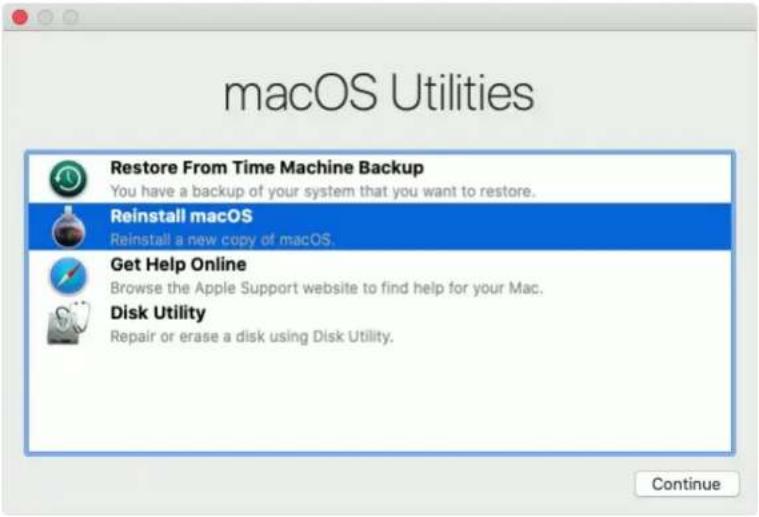
Step 1 – select the 'Reinstall macOS' or 'Reinstall OS X' option from the Utilities window. Reminder: if you're using OS 10.7-10.11, this window will say 'OS X Utilities' but the options provided will be the same. Some of the other screens may look slightly different as well.
text_image
macOS Utilities Restore From Time Machine Backup You have a backup of your system that you want to restore. Reinstall macOS Reinstall a new copy of macOS. Get Help Online Browse the Apple Support website to find help for your Mac. Disk Utility Repair or erase a disk using Disk Utility. ContinueStep 2 – once the macOS installer opens, follow the prompts as you normally would to install the system onto a new drive). Once the installation is complete the system will reboot to your new drive.
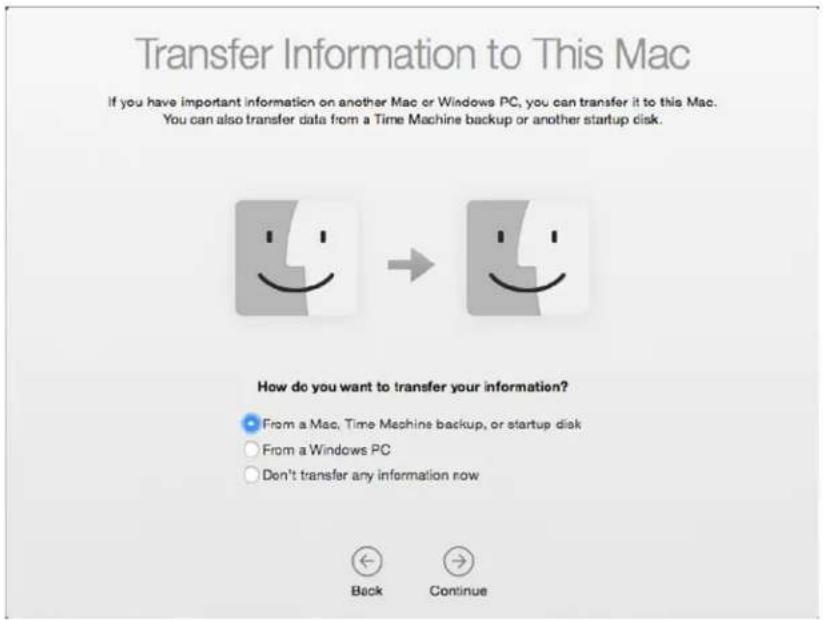
Step 3 – by default the Setup Assistant will open, walking you through a few screens to help get your new system setup. One of these is the Migration Assistant screen (below). While this is optional after a clean OS install, for this guide we assume that you have data to move to your new drive, either from a Time Machine or Carbon Copy Cloner backup. It is also possible to migrate data by connecting your original drive via external enclosure, and then use the 'From a Mac, Time Machine Backup, or startup disk' option.
text_image
Transfer Information to This Mac If you have important information on another Mac or Windows PC, you can transfer it to this Mac. You can also transfer data from a Time Machine backup or another startup disk. How do you want to transfer your information? ● From a Mac, Time Machine backup, or startup disk ○ From a Windows PC ○ Don't transfer any information now Beck ContinueStep 4 – What you do next will depend on the type of backup you have. If you have a Time Machine drive, connect it to your Mac then select the 'From a Mac, Time Machine Backup, or startup disk' option (shown above), and click continue. Follow the remaining prompts to select your Time Machine backup volume and migrate your data. Note: to learn more about the Migration Assistant options, please see this page. When you're finished migrating your data, follow any remaining prompts for the Setup Assistant to finish that process. The same option is also available if you connect your original system drive via external enclosure.
If you're using Carbon Copy cloner, you can connect that disk to the host computer and select it by choosing the 'From a Mac, Time Machine backup, or startup disk' option and following the prompts. More information is available here.
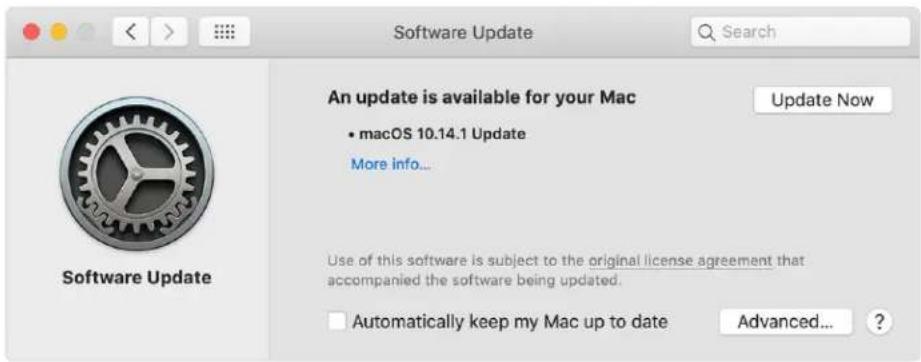
Step 5 (optional) – once the process of installing the OS and migrating data is complete, we strongly recommend you run Software Update to make sure your system resources and apps are fully up-to-date.
text_image
Software Update An update is available for your Mac • macOS 10.14.1 Update More info... Use of this software is subject to the original license agreement that accompanied the software being updated. □ Automatically keep my Mac up to date Update Now Advanced... ?Option 2: (Full) Restore From Time Machine Backup
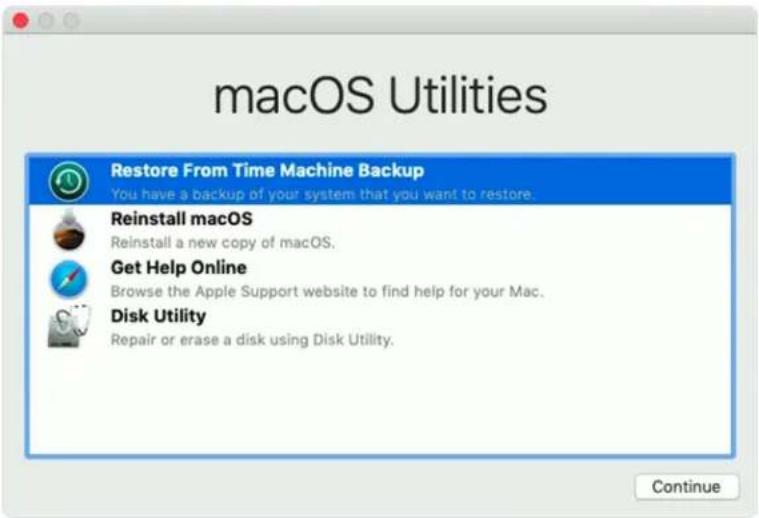
If you have a recent, working Time Machine backup of your entire system drive, the simplest method of migrating all system and user data is to use the Restore from Time Machine option in the macOS Utilities window.
Notes:
- Make sure your Time Machine backup drive is connected and powered on before proceeding.
• The volume icons and names shown in the following steps are examples and differ from those shown earlier.
Step 1 – select the 'Restore from Time Machine Backup' option from the Utilities window. Reminder: if you're using OS 10.7-10.11, this window will say 'OS X Utilities' but the options provided will be the same. Some of the other screens may look slightly different as well.
text_image
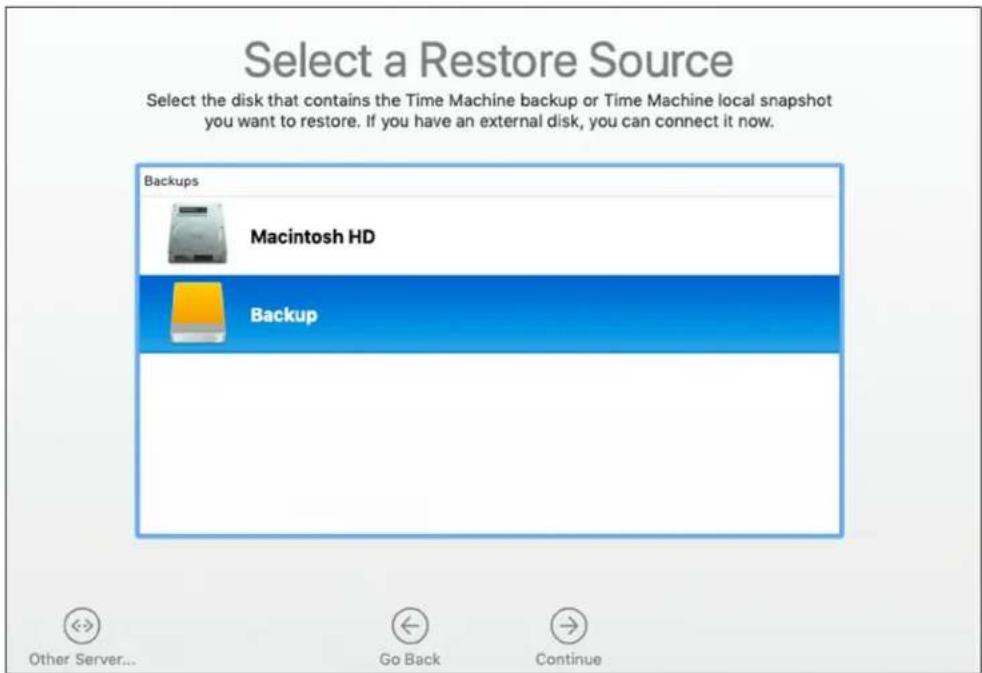
macOS Utilities Restore From Time Machine Backup You have a backup of your system that you want to restore. Reinstall macOS Reinstall a new copy of macOS. Get Help Online Browse the Apple Support website to find help for your Mac. Disk Utility Repair or erase a disk using Disk Utility. ContinueStep 2 – from the 'Select a Restore Source' window (below) select your Time Machine backup disk then click Continue.
text_image
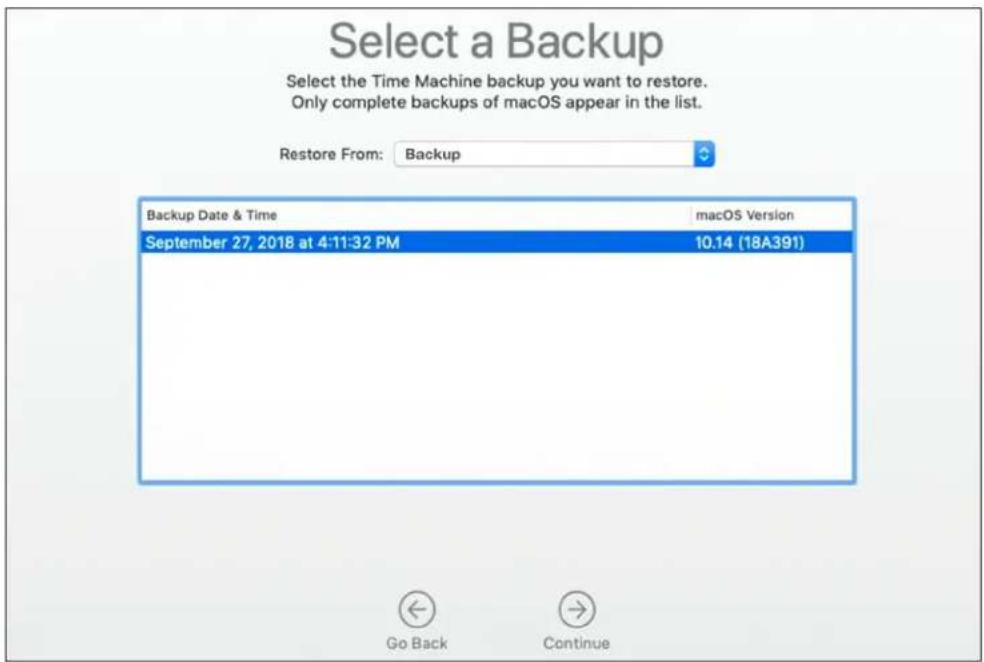
Select a Restore Source Select the disk that contains the Time Machine backup or Time Machine local snapshot you want to restore. If you have an external disk, you can connect it now. Backups Macintosh HD Backup Other Server... Go Back ContinueStep 3 – If your Time Machine disk is encrypted, you will need to unlock it first by providing an administrator password. Otherwise the 'Select a Backup' window will appear. Choose the desired backup instance, then click Continue.
text_image
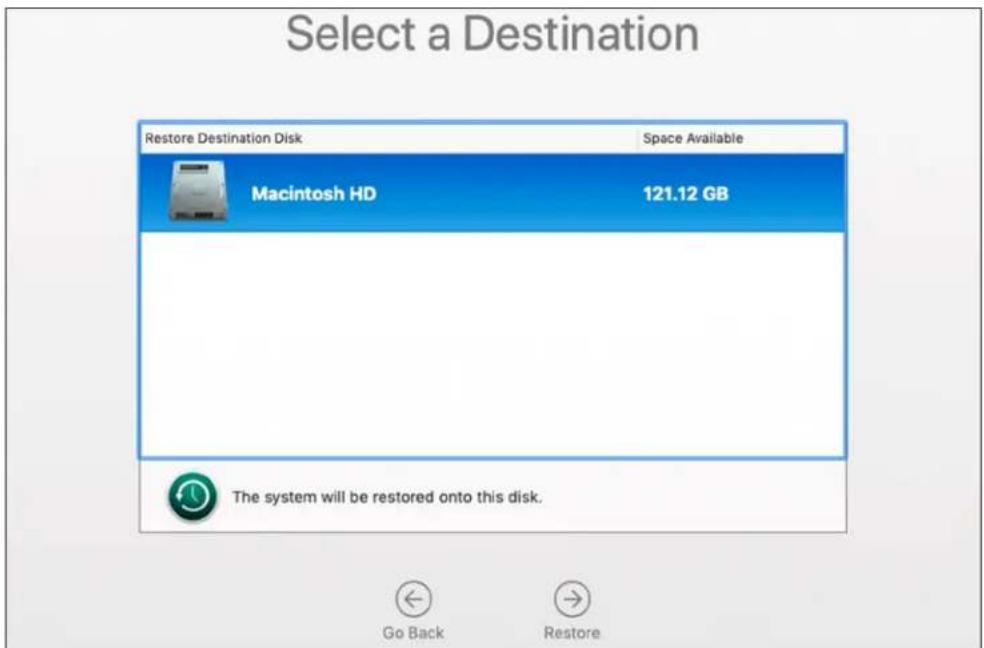
Select a Backup Select the Time Machine backup you want to restore. Only complete backups of macOS appear in the list. Restore From: Backup Backup Date & Time macOS Version September 27, 2018 at 4:11:32 PM 10.14 (18A391) Go Back ContinueStep 4 – from the 'Select a Destination' window, choose the newly created volume on the SSD, then click 'Restore'. When the process is finished, restart to verify that the transfer of your data was successful.
text_image
Select a Destination Restore Destination Disk Space Available Macintosh HD 121.12 GB The system will be restored onto this disk. Go Back RestoreStep 5 (optional) – before using your Mac, we strongly recommend you run Software Update to make sure your system resources and apps are fully up-to-date.
Option 3: Full Restore from Carbon Copy Cloner
If you recently cloned your system drive using Carbon Copy Cloner (CCC), you should be able to boot to your cloned system backup and then migrate data as shown below. These steps are recommended by the developer (Bombich).
Notes:
- Make sure your CCC backup drive is connected and powered on before proceeding.
• The volume icons and names shown in the following steps are examples and differ from those shown earlier.
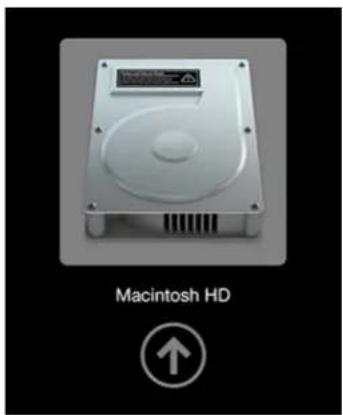
Step 1 – from the Apple menu at the top of the screen, choose 'Restart'. Once the computer restarts and you hear the system chime, hold down the Option key until you see the Startup Manager screen and the available boot drives. Note: the example below shows a typical default boot drive name and icon. The icon for a new OWC SSD will be different than the example below, as well as the name, but the process described is the same.
text_image
Macintosh HDStep 2 – select your Carbon Copy Cloner backup volume from the list and click the arrow (similar to the one shown above) to continue the boot process.
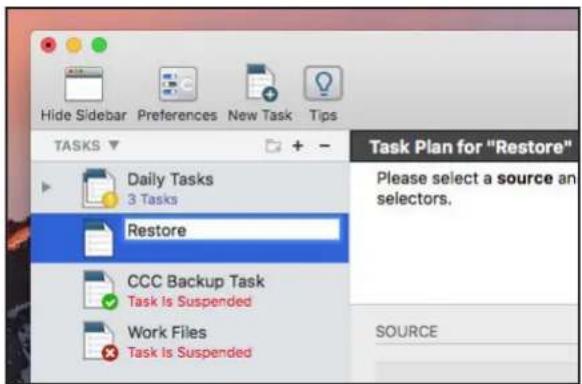
Step 3 – once the Desktop is available, launch the Carbon Copy Cloner application, then click the 'New Task' button in the toolbar (unhide the Sidebar if needed). Name the newly created task (e.g. 'Restore').
text_image
Hide Sidebar Preferences New Task Tips TASKS ▼ Daily Tasks 3 Tasks Restore CCC Backup Task Task Is Suspended Work Files Task Is Suspended Task Plan for "Restore" Please select a source an selectors. SOURCEStep 4 – in the 'Source' area of the window, click on the drive icon and then select the desired backup from the menu.
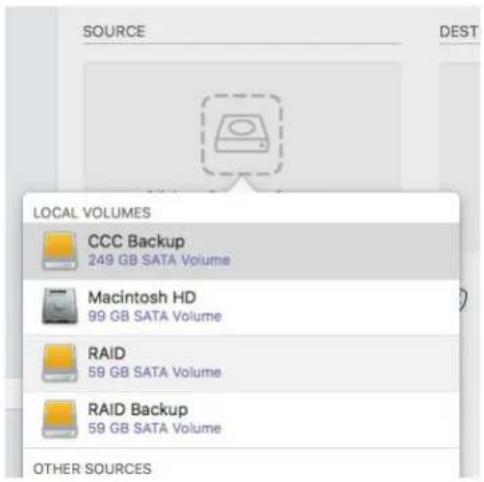
text_image
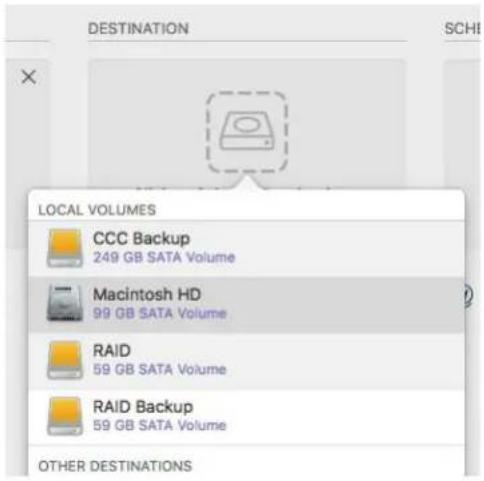
SOURCE DEST LOCAL VOLUMES CCC Backup 249 GB SATA Volume Macintosh HD 99 GB SATA Volume RAID 59 GB SATA Volume RAID Backup 59 GB SATA Volume OTHER SOURCESStep 5 – in the 'Destination' area, click on the drive icon and then select the new volume you created in the Disk Utility.
text_image
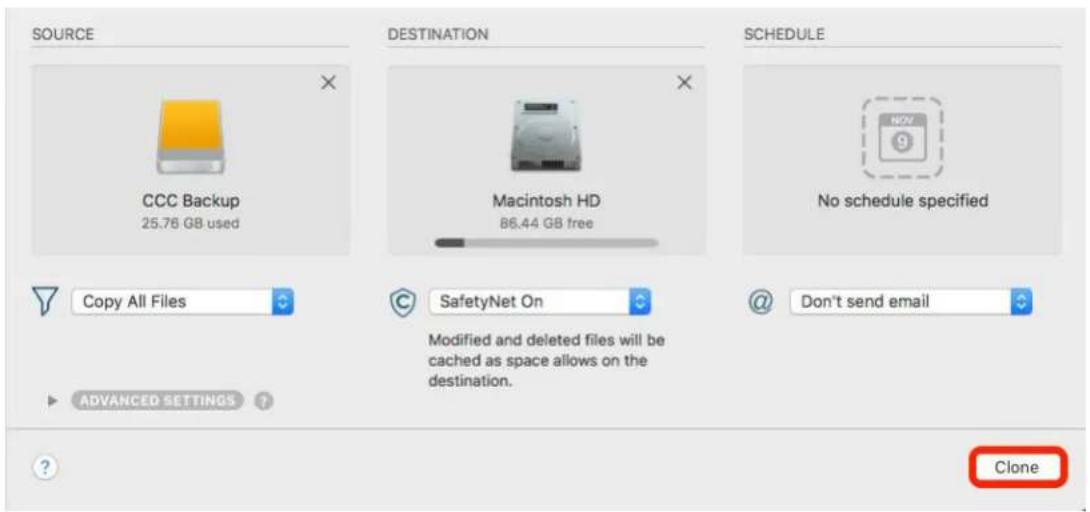
DESTINATION SCH LOCAL VOLUMES CCC Backup 249 GB SATA Volume Macintosh HD 99 GB SATA Volume RAID 59 GB SATA Volume RAID Backup 59 GB SATA Volume OTHER DESTINATIONSStep 6 – click the 'Clone' button (highlighted in red below). The data transfer can take a while depending on the amount of data and the connection type. After the process is complete, go to the System Preferences, choose 'Startup Disk' and select your new startup volume, then restart the computer. Notes:
- You will need to provide administrator credentials to access and set the Startup volume.
• After restarting we strongly recommend you run Software Update to make sure your system is fully up-to-date.