Mercury Helios+E2 - SSD Drive OWC - Free user manual and instructions
Find the device manual for free Mercury Helios+E2 OWC in PDF.


| Product Type | External Thunderbolt PCIe Expansion Chassis |
| Compatible PCIe Cards | Up to x8 (x4 operation), half-length (6.5"), full-height, single-width, AHCI or Thunderbolt-aware drivers |
| Interface | Thunderbolt (1 port on device) |
| System Requirements | Intel Mac with Thunderbolt port, Mac OS X 10.6.8 or later |
| Power Supply | External 120W power brick with AC cable |
| Power Management | Intelligent power on/off with computer; powers on only with DC and active Thunderbolt signal |
| Boot Capability | Bootable with AHCI compliant PCIe cards |
| Daisy Chaining | Up to 6 Thunderbolt devices plus 1 Mini DisplayPort display (must be last) |
| Bus Power Output | Can bus-power one Thunderbolt device (last in chain) |
| Hot Pluggable | Yes, can be connected/disconnected while computer is on (properly eject drives first) |
| Driver Requirement | No driver needed for enclosure; PCIe card may require Thunderbolt-aware drivers |
| PCIe Slot | One full-height, half-length PCIe 2.0 x8 slot (operates at x4) |
| Cooling | Passive ventilation through front and rear grilles |
| Care and Cleaning | Use glass cleaner on exterior; avoid moisture ingress; do not block ventilation |
| Safety Precautions | Use anti-static handling; avoid rain/liquids; unplug during lightning; use only included power supply |
| User Replaceable Parts | PCIe card only (not enclosure components) |
| Warranty | 3-year OWC Solution Warranty with 48-hour turnaround |
| Dimensions | Not specified in manual |
Frequently Asked Questions - Mercury Helios+E2 OWC
User questions about Mercury Helios+E2 OWC
0 question about this device. Answer the ones you know or ask your own.
Ask a new question about this device
Download the instructions for your SSD Drive in PDF format for free! Find your manual Mercury Helios+E2 - OWC and take your electronic device back in hand. On this page are published all the documents necessary for the use of your device. Mercury Helios+E2 by OWC.
USER MANUAL Mercury Helios+E2 OWC
natural_image
Black OWC device with perforated grille and ventilation grille (no visible text or symbols on body)Assembly and Users Manual
Table of Contents
INTRODUCTION
1
SYSTEM REQUIREMENTS
PACKAGE CONTENTS
PORT VIEW
ANTI-STATIC HANDLING
ASSEMBLY
3
QUICK SET-UP 10
GENERAL USAGE GUIDELINES AND FAQ 15
CONTACTING TECHNICAL SUPPORT 18
WARRANTY INFORMATION 18
Introduction
System Requirements
• Intel Macintosh with Thunderbolt port
• The following are the earliest Thunderbolt capable models:
o MacBook Air (Mid 2011)
o MacBook Pro (Early 2011)
o MacBook Pro (Retina, Mid 2012)
• Mac OS X 10.6.8 or later, including 10.7.x and 10.8.x
• Thunderbolt cable (can be purchased from Apple)
- PCIe 2.0 expansion card up to x8 (will be limited to x4 operation), half-length (up-to 6.5"), full-height, single-width, that is either AHCI compliant (requires no drivers) or has Thunderbolt-aware drivers.
For an extensive list of PCIe cards qualified to work with Helios, visit:
http://eshop.macsales.com/tech_center/Thunderbolt/PCIe_Compatibility/
Package Contents
- Helios
- Power brick and cable
①
natural_image
Solid black rectangular surface with no visible text, symbols, or markings
natural_image
Black cable with a small white plug at the bottom, no visible text or symbols
natural_image
Black rectangular electronic device with black cable and ear, labeled with number 2 (no text or symbols on body)Port View
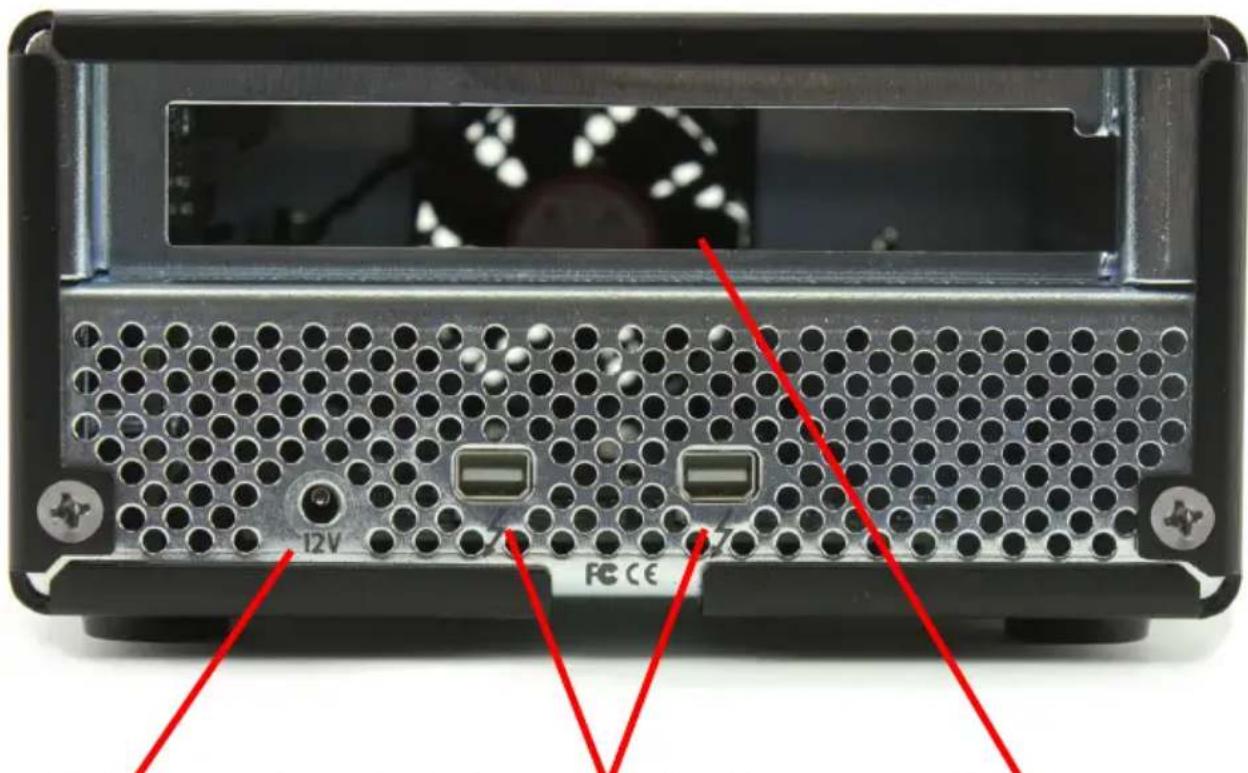
DC Power Thunderbolt Ports PCIe Expansion Slot
Anti-Static handling
Helios and PCIe cards are static-sensitive devices. They are susceptible to invisible damage if not protected during the assembly process.
We recommend proper grounding by using a grounding strap. Make sure to work in a clean and static-free area, and avoid wearing clothing that retains static charges.
For more information, please visit http://www.macsales.com/static
Assembly
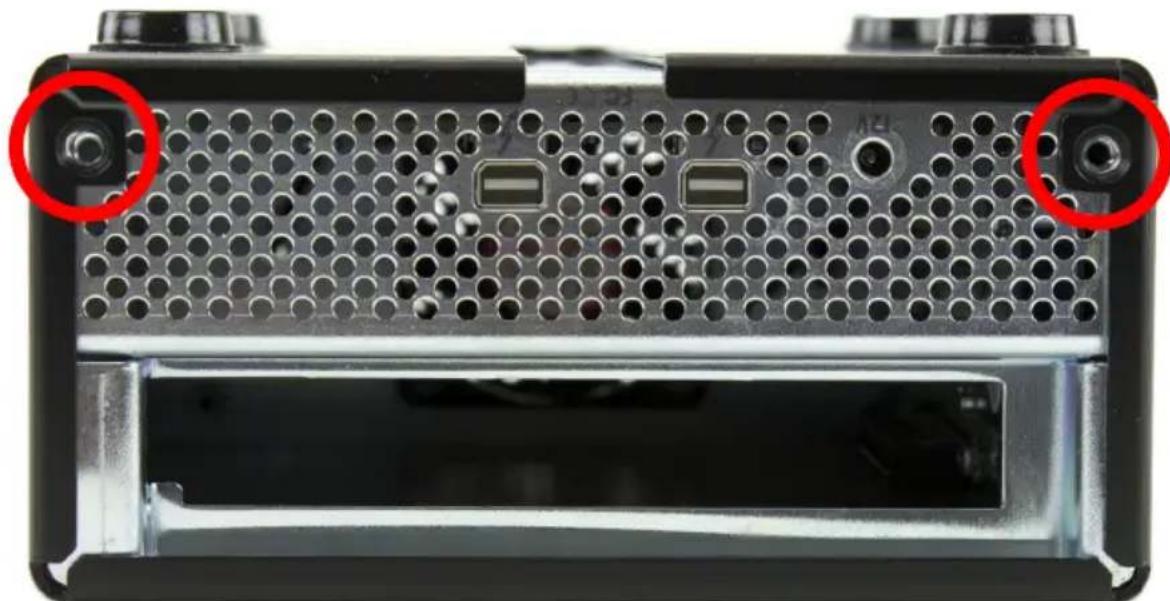
- Place Helios upside-down on a soft surface with the rear facing you.
- Remove the two Phillips PH2 screws from the rear of Helios.
natural_image
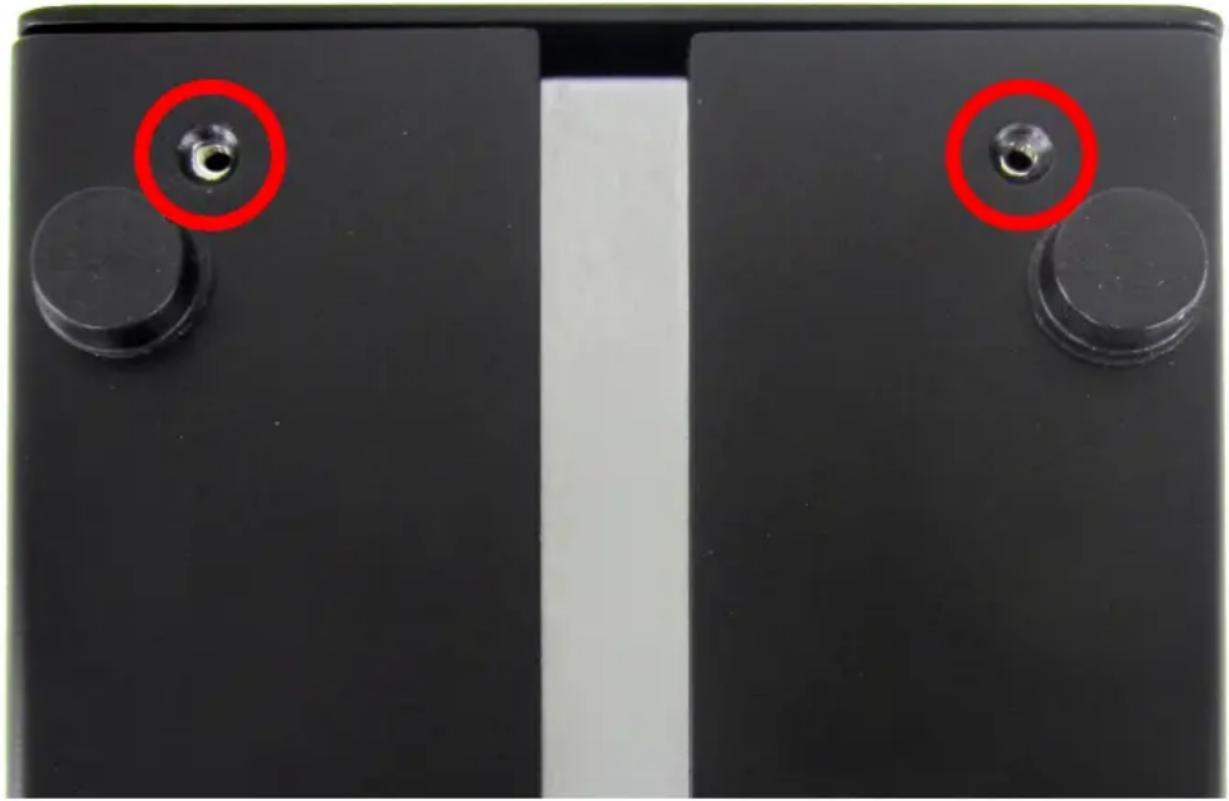
Close-up of a computer RAM module showing internal socket and drive slots (no text or symbols visible)- Remove the two Phillips PH2 screws from the bottom of Helios.
natural_image
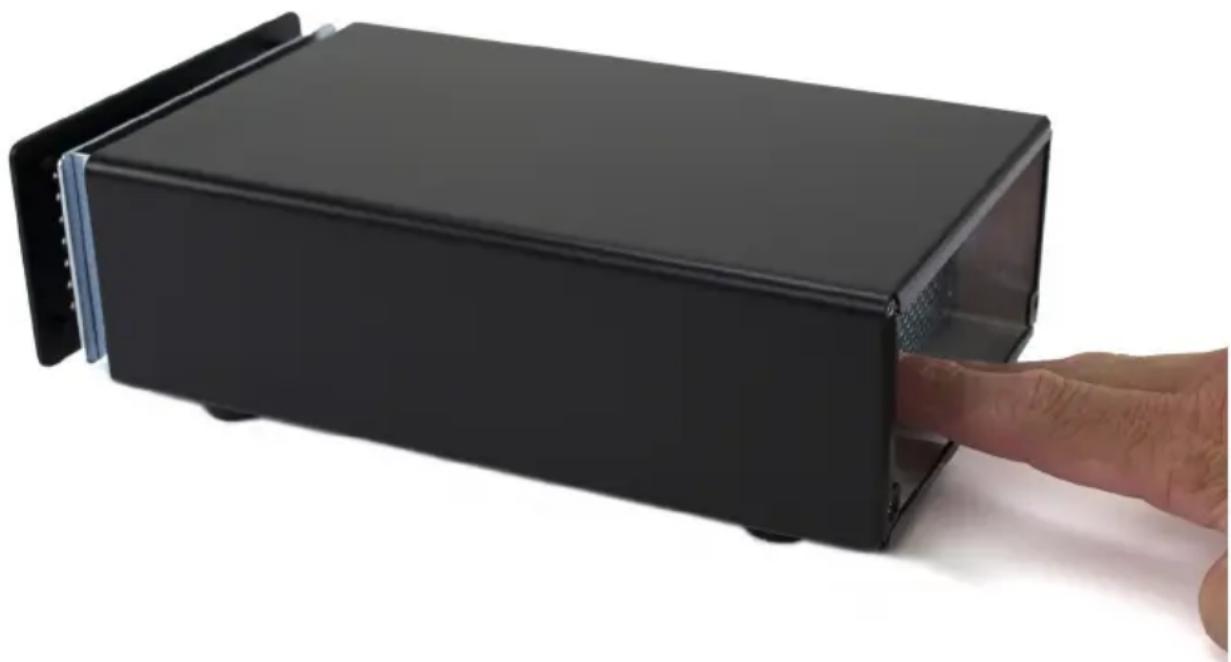
Close-up of two black battery plates with red circular annotations highlighting centers (no text or symbols present)- Turn Helios back over and place it on it's feet. Using your fingers, push the inner chassis out of the outer enclosure. Do not squeeze the sides of the enclosure while doing this.
natural_image
Hand inserting a black plastic device into a black rectangular housing (no text or symbols visible)- Flip Helios over and orient it as shown in the picture.
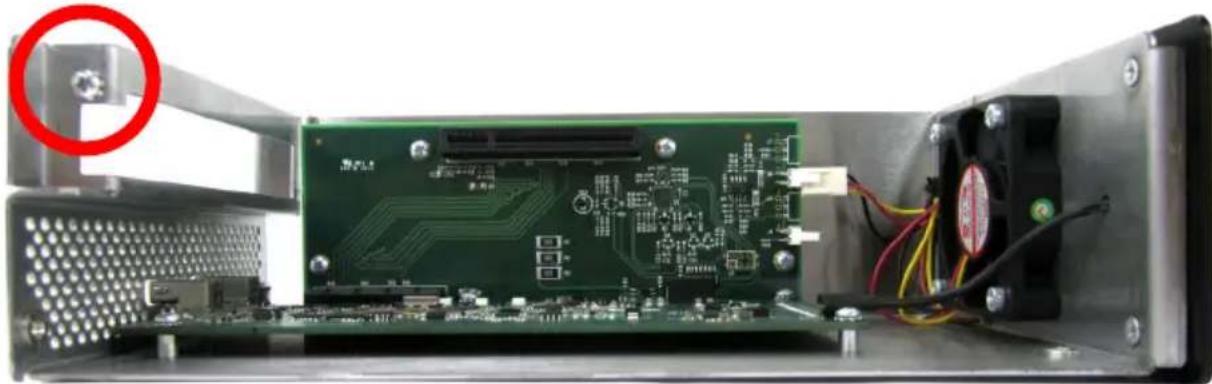
natural_image
Interior view of an electronic device showing a green circuit board with internal components and wiring, no visible text or symbols.Remove the Phillips PH2 screw from the PCIe expansion slot. You are ready to install your PCIe card.
- Note: Only handle the PCIe card by its edges. Never touch the gold contacts or any components on the circuit board.
- Orient your PCIe card so the bracket is to the left and the connector with gold contacts is facing away from you.
- Line up the bracket with the inside edge of Helios and gently insert the PCIe card into the slot.
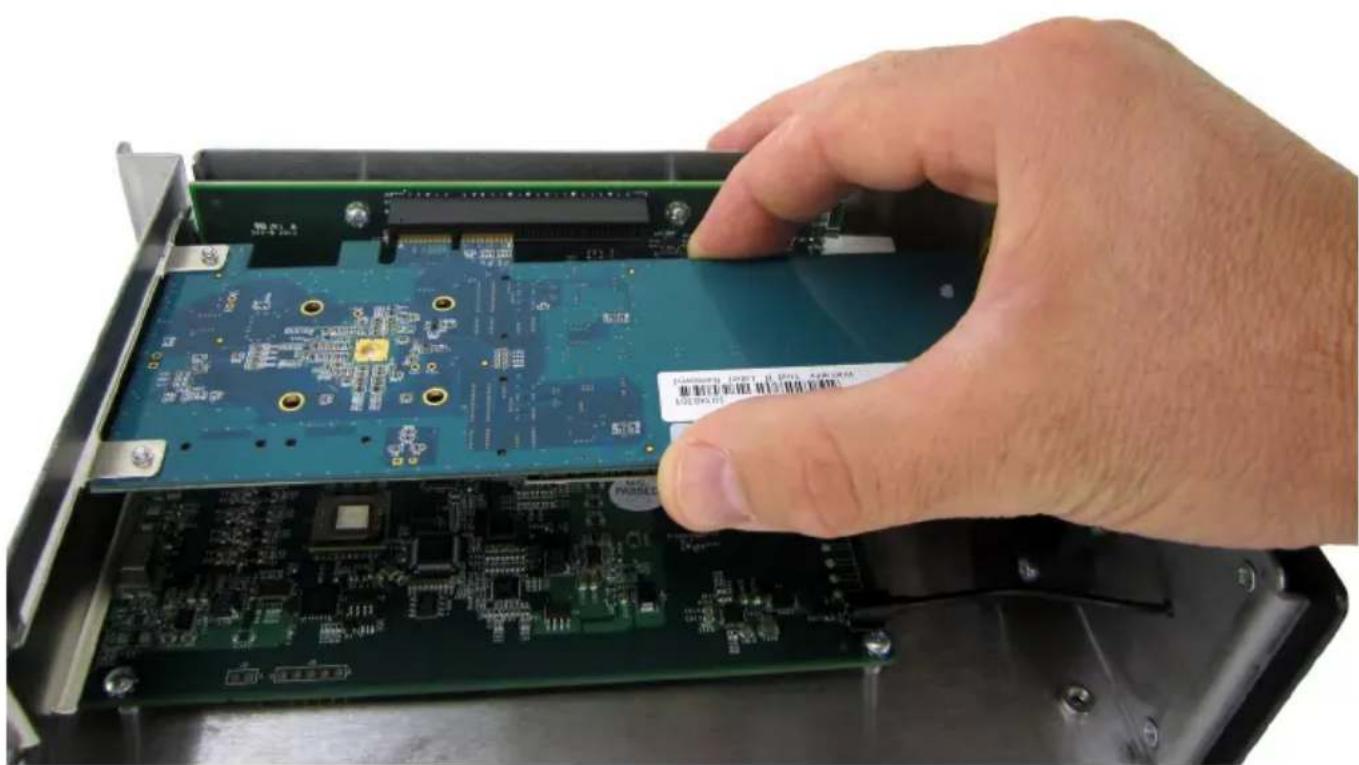
natural_image
Hand inserting a circuit board into an open case, showing internal components and no visible text or symbols.- Make sure the PCIe card is fully seated.
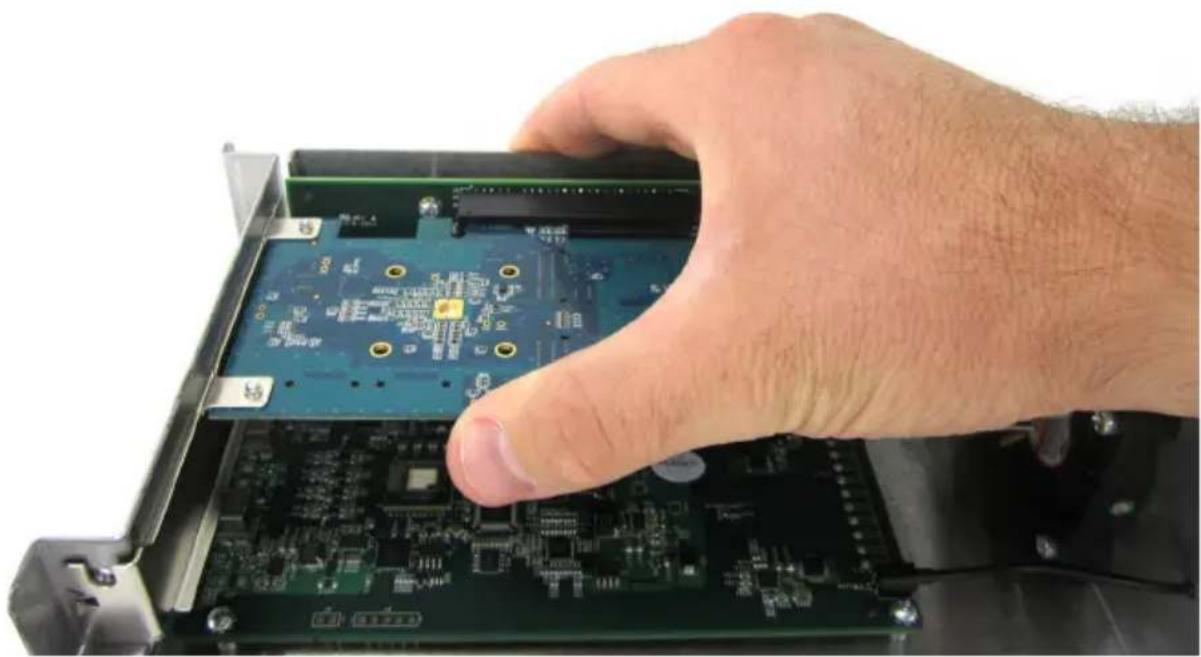
natural_image
Hand inserting a circuit board into an open device (no visible text or symbols)- Replace the PCIe bracket screw. Do not fully tighten the screw.
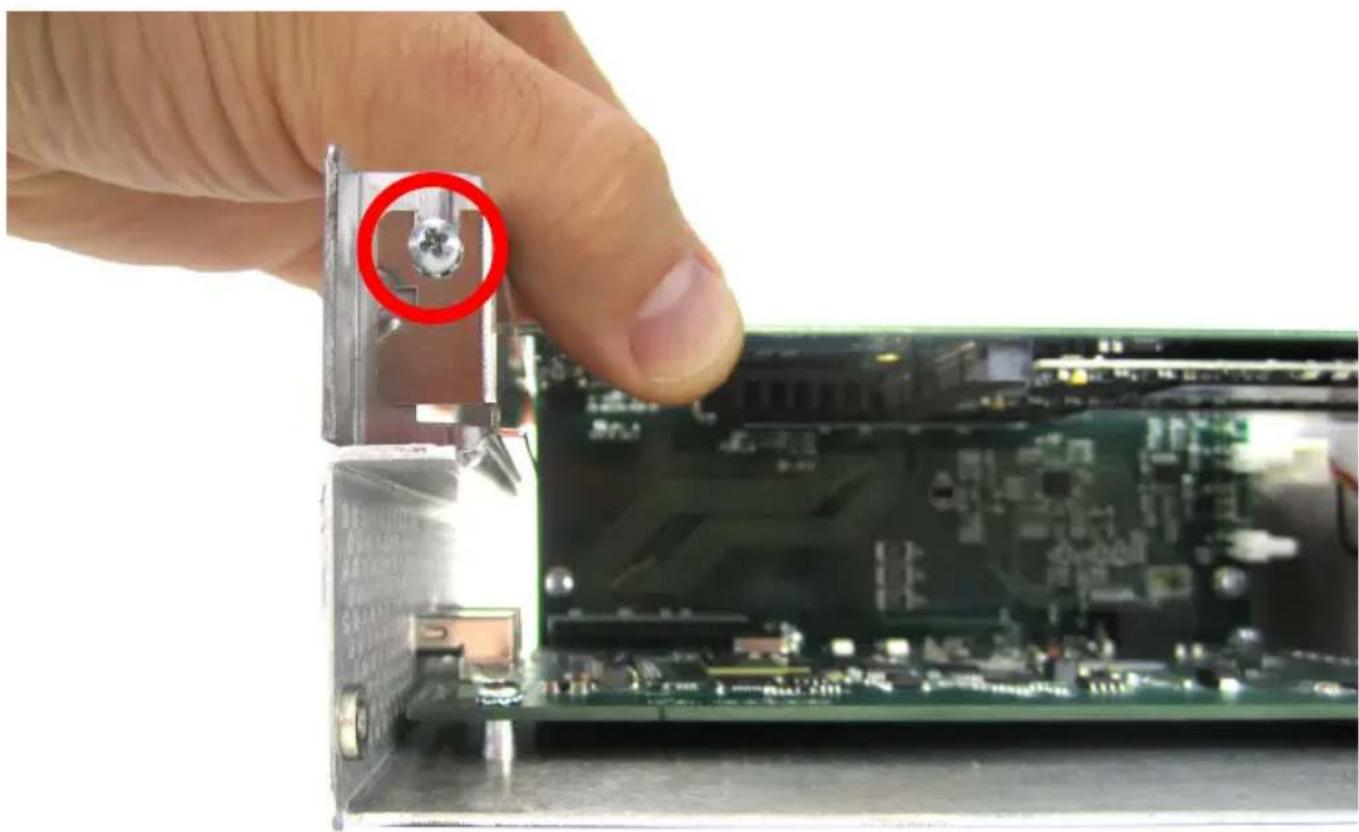
natural_image
Close-up of a hand inserting a component into a circuit board with a red circle highlighting a small electronic component (no text or symbols visible)Carefully lift up the edge of the card until the bracket is stopped by the PCIe bracket screw, then fully tighten the PCIe bracket screw.
- Slide the outer casing back on.
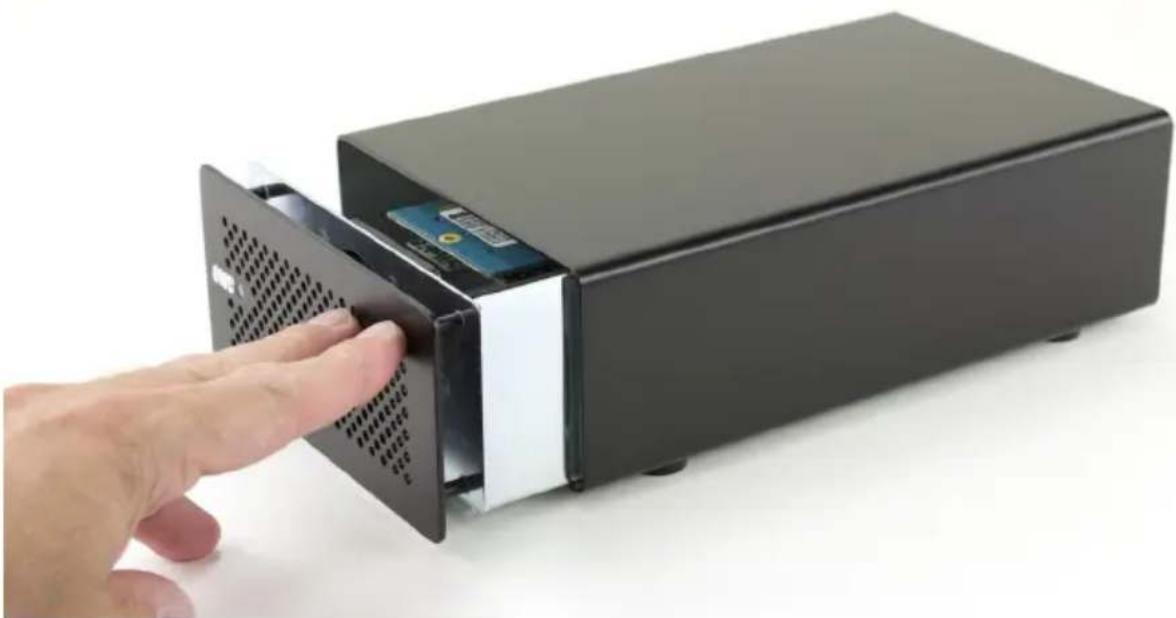
natural_image
Hand inserting a black device into a black rectangular box with a small electronic module, no visible text or symbols.Align the screw holes and replace the bottom screws.
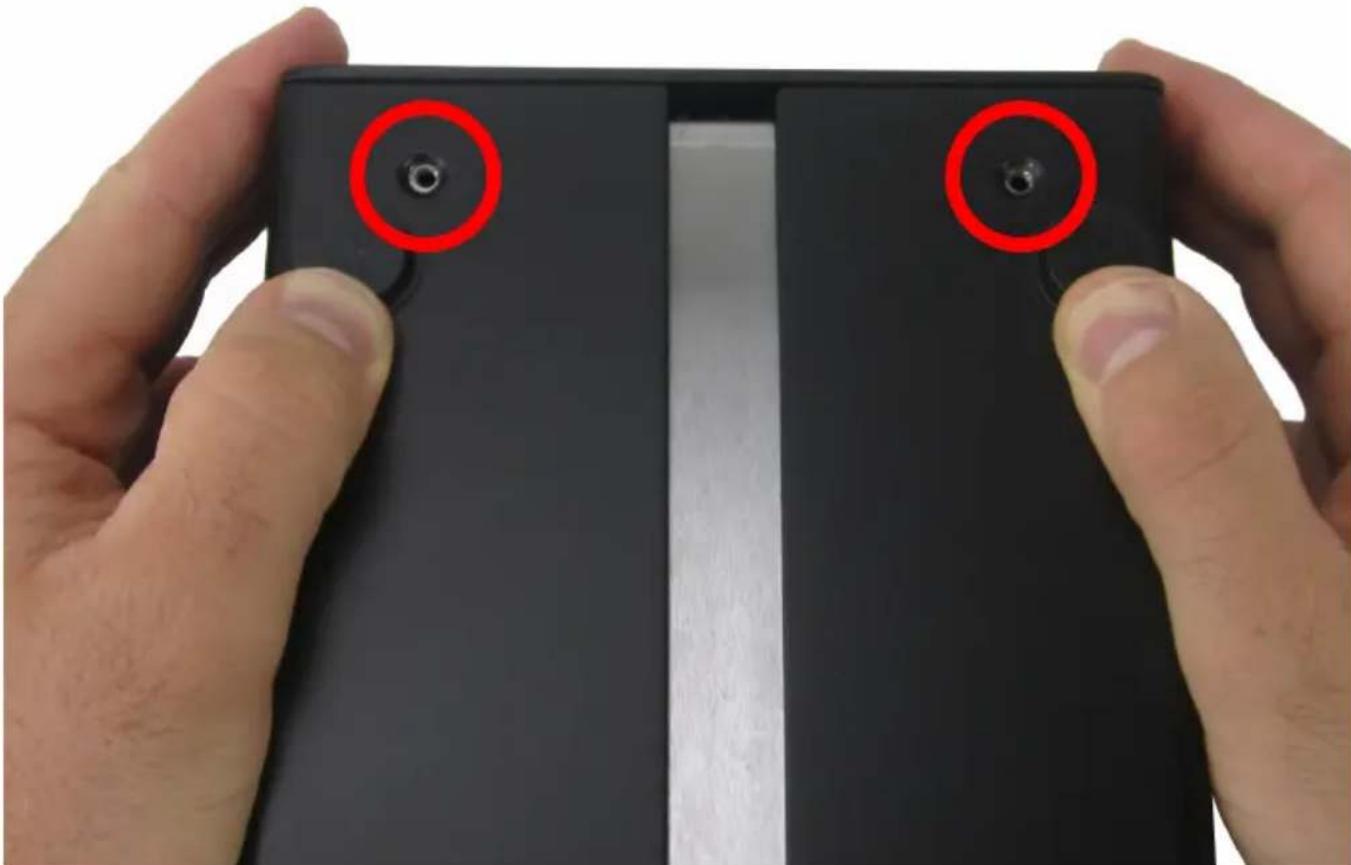
natural_image
Close-up of hands holding a black tablet device with two red circular markers on the left side (no text or symbols visible)- Replace the two rear screws.
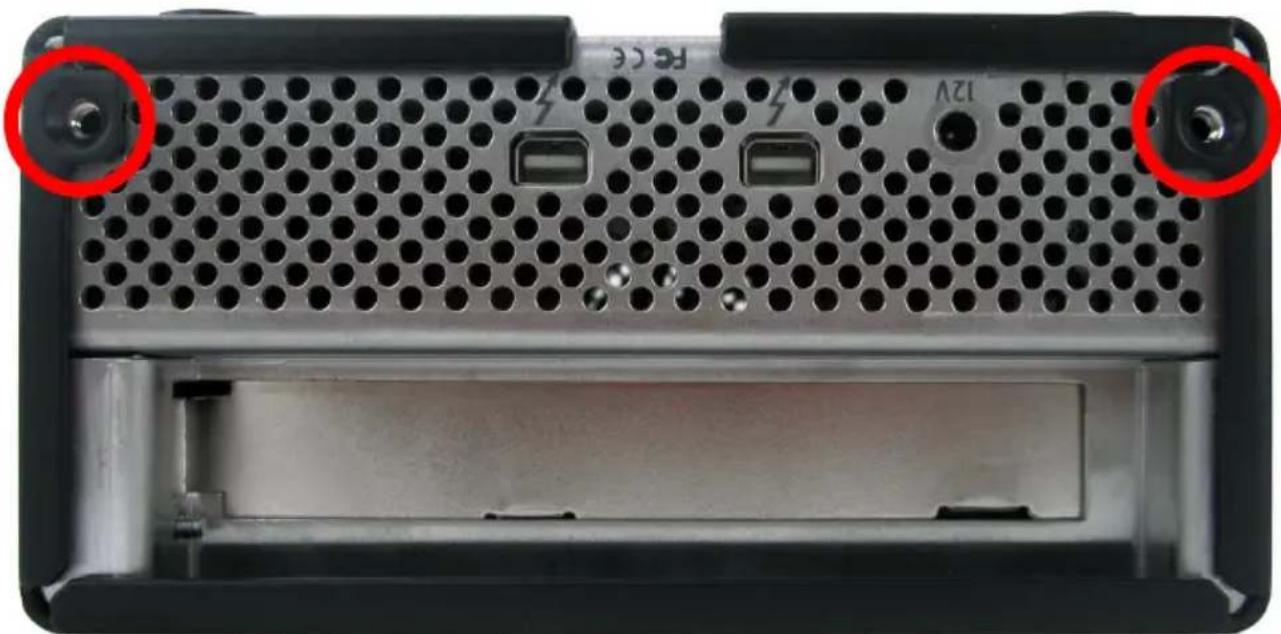
natural_image
Close-up of a server rack with labeled ports and connectors, showing two red-circled points of interest (no text or symbols beyond labels)- Flip Helios over and plug in the DC power cable and Thunderbolt cable.
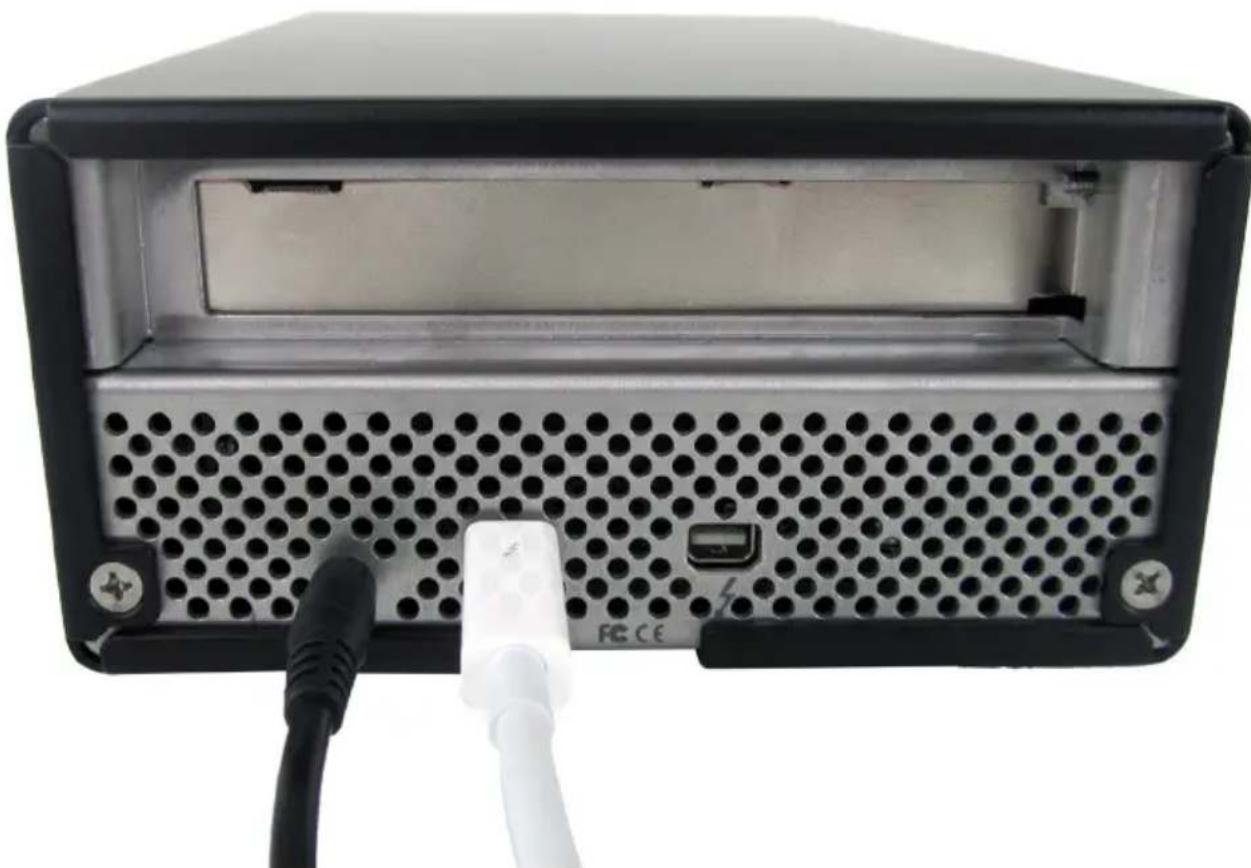
natural_image
Back view of a black server rack with ventilation slots and two white cables inserted (no visible text or symbols)Note: Helios will only power on when it has DC power and is receiving an active Thunderbolt signal.
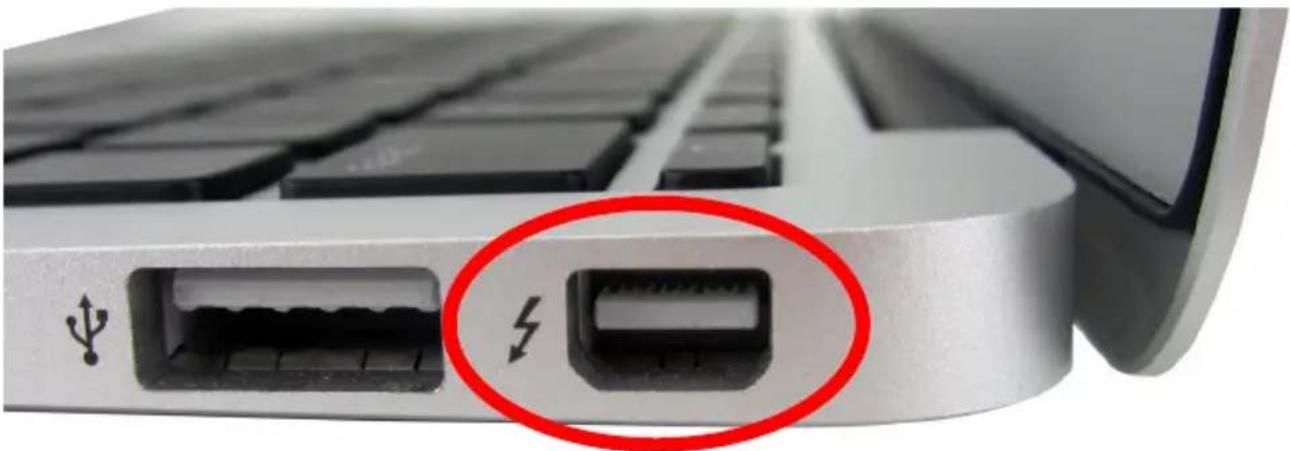
- Plug the other end of the Thunderbolt cable into your Mac.
natural_image
Close-up of a computer keyboard with an attached USB port and a red circle highlighting a specific port (no text or symbols present)Note: Your Mac can be on or off when connecting the Thunderbolt cable. If the PCIe card you are connecting needs to poll external devices before being powered on, make sure to connect those devices to the PCIe card before connecting the Thunderbolt cable.
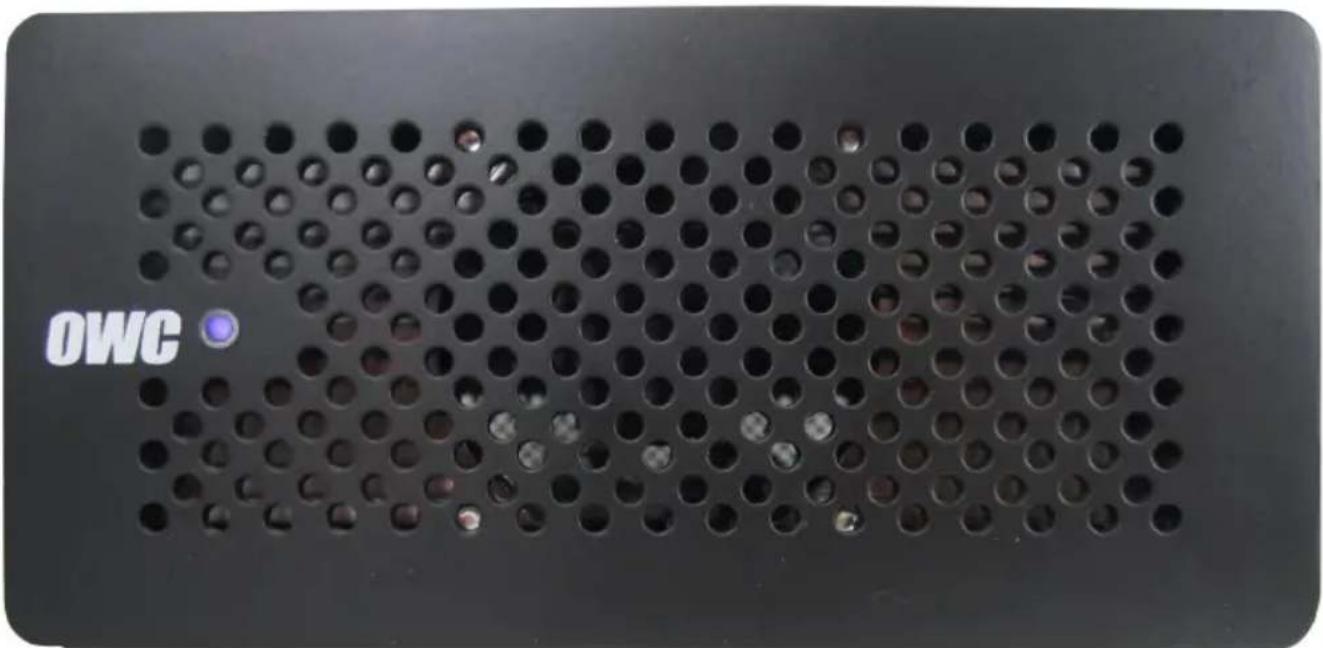
- The power LED on the front of Helios will emit a steady light when the DC power and Thunderbolt cables are connected and there is an active Thunderbolt signal.
Quick Set-Up
- Helios does not require drivers.
- To verify that your PCIe card is being recognized by your Mac and is working correctly, you can look in "System Profiler: (Mac OS X 10.6" or "System Information" (Mac OS X 10.7.x / 10.8.x or later):
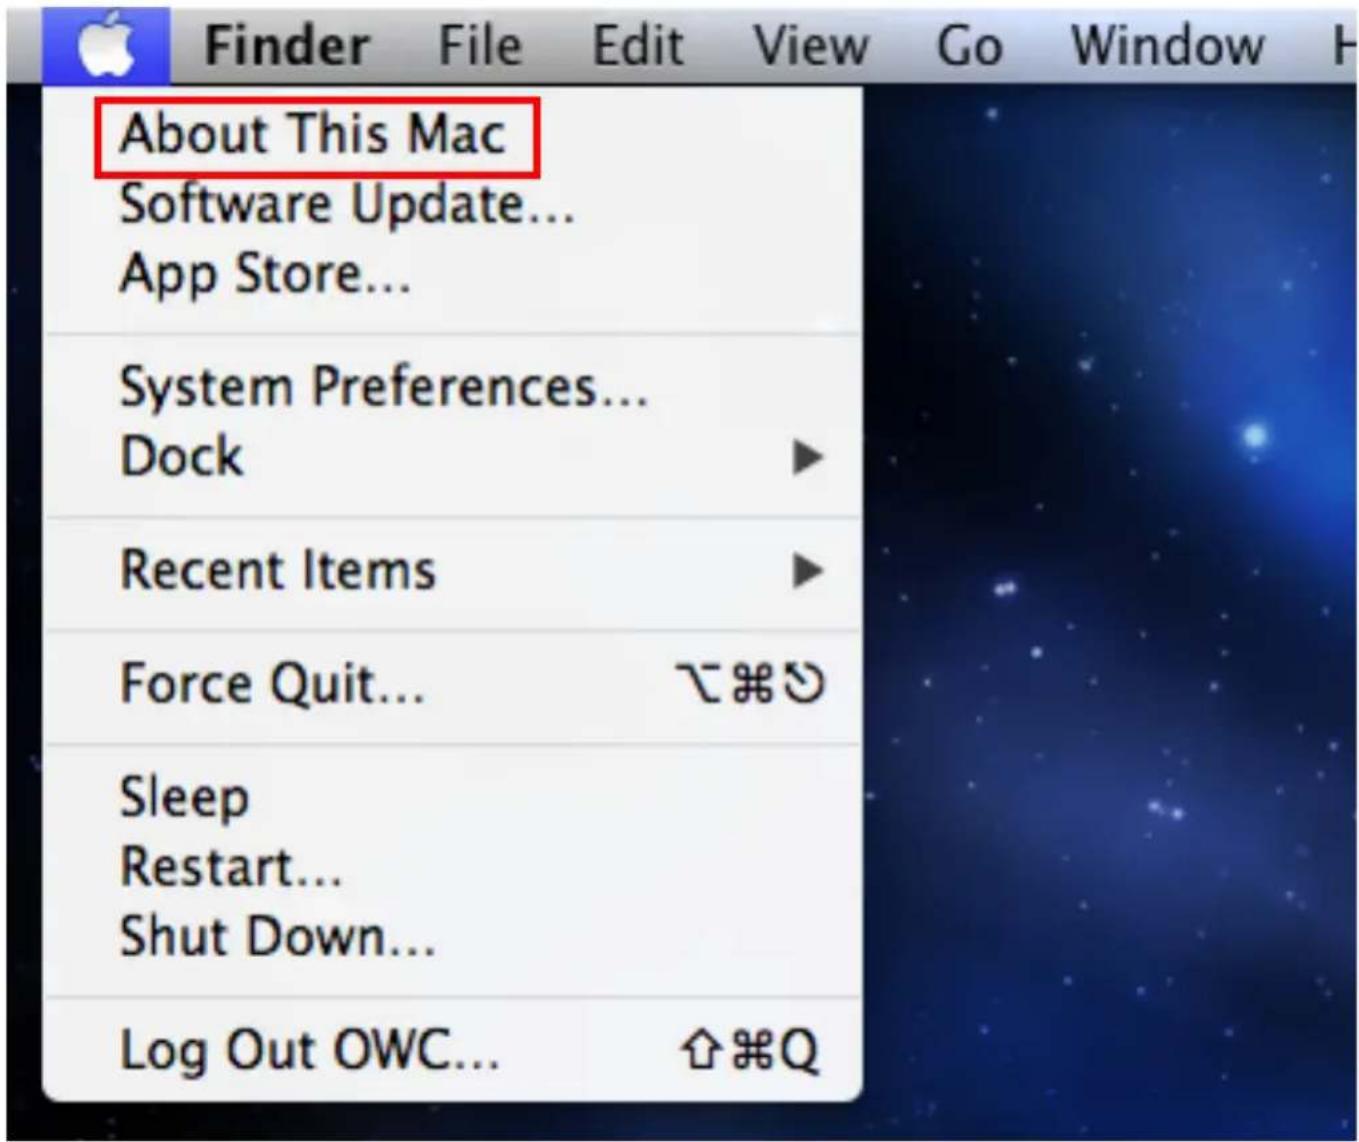
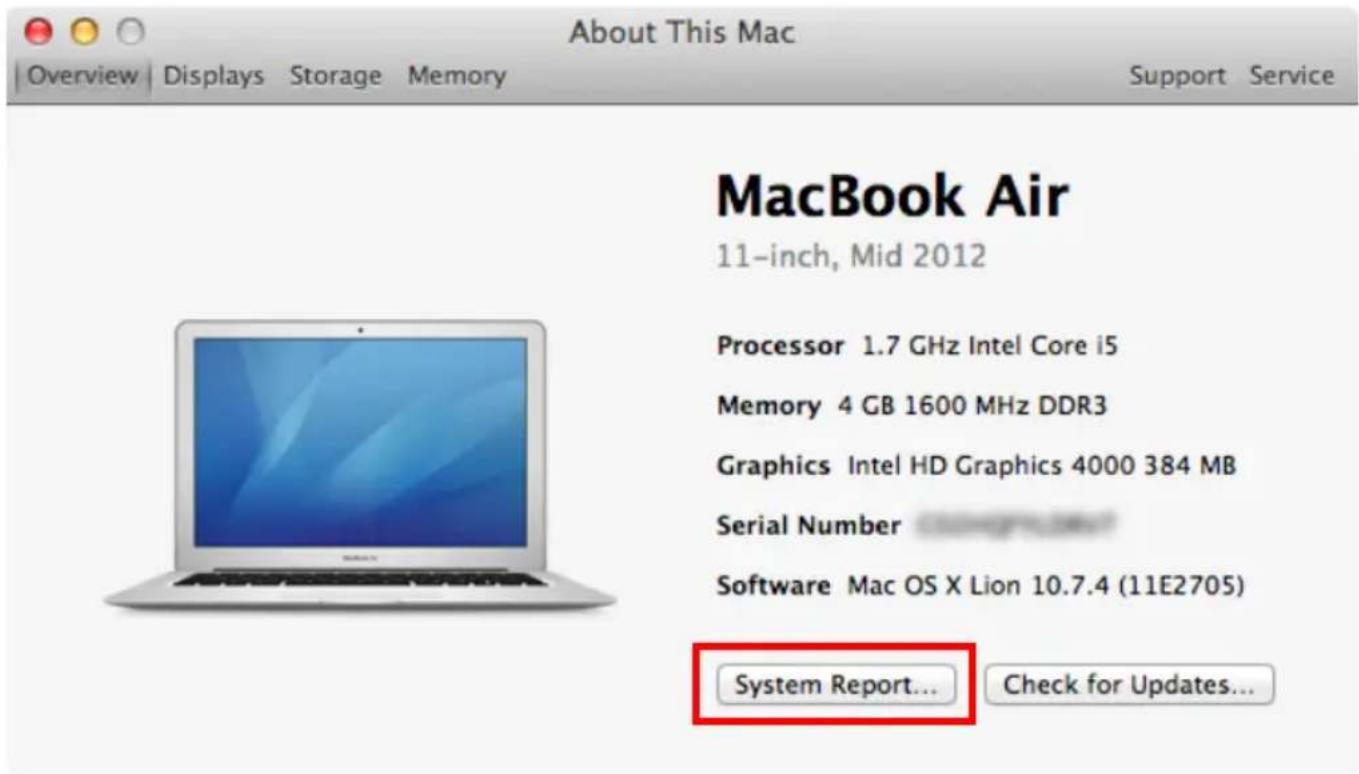
- Click on the Apple icon in the upper left-hand corner of the screen.
- Click "About This Mac".
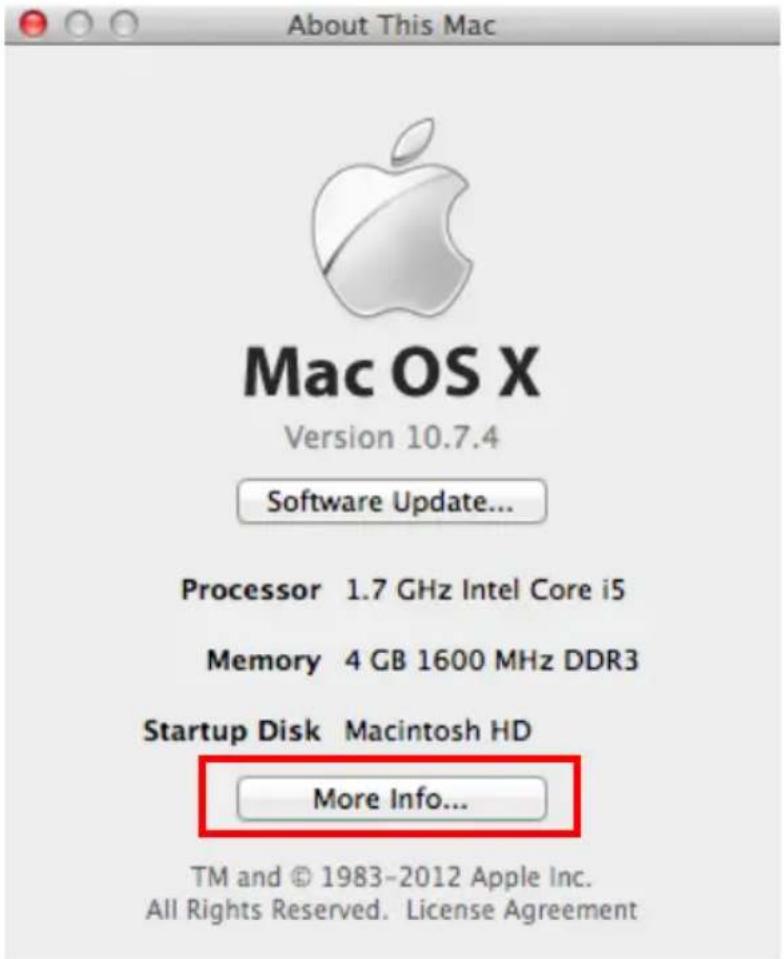
- A window will appear on the screen. Click on "More Info..."
- If your computer is running Mac OS X 10.7.x or Mac OS X 10.8.x, an "About This Mac" window will appear. Click on "System Report...". If your computer is running Mac OS X 10.6.8, this window will not appear.
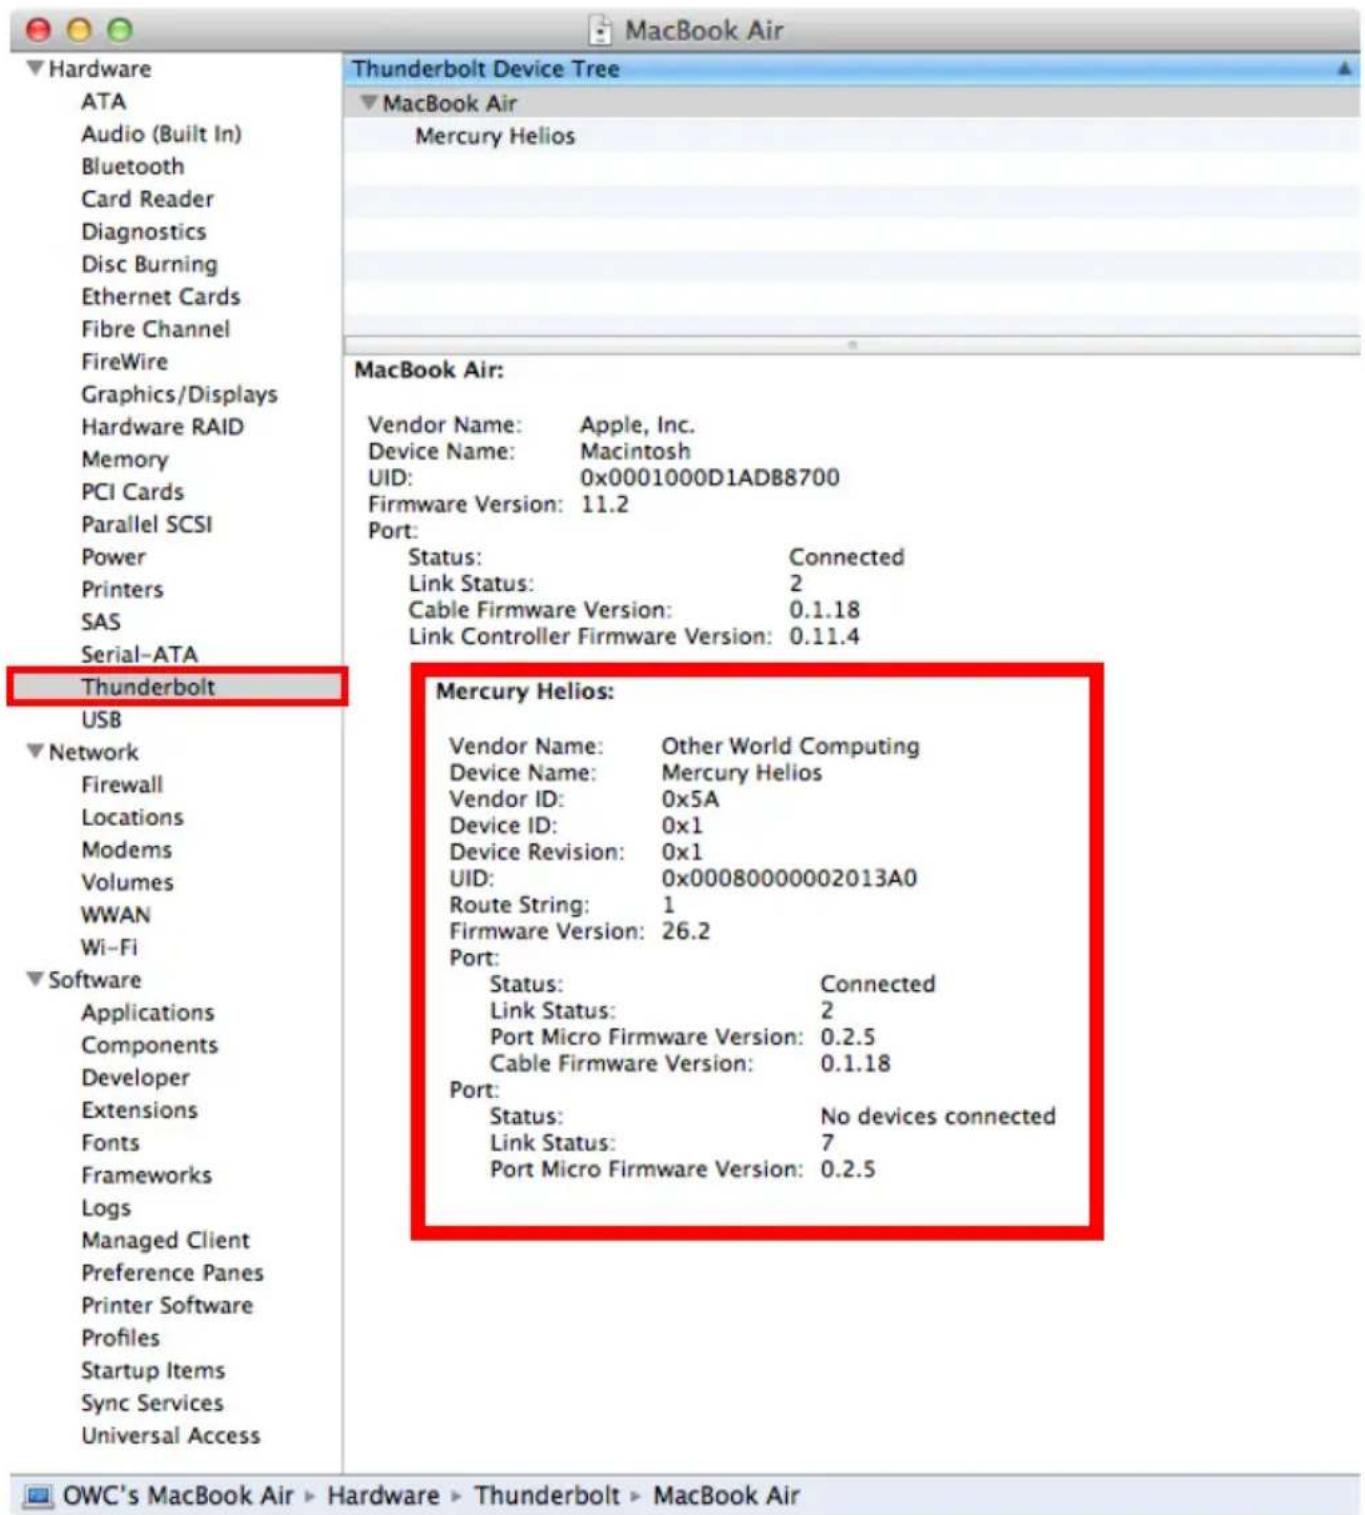
3. Click on "Thunderbolt" to see Helios.
- Click on "PCI Cards" to see the PCIe expansion card installed in Helios.
| Hardware ATA Audio (Built In) Bluetooth Card Reader Diagnostics Disc Burning Ethernet Cards Fibre Channel FireWire Graphics/Displays Hardware RAID Memory | pci1b4b,9230: | |
| Type: | AHCI Controller | |
| Driver Installed: | Yes | |
| Tunnel Compatible: | Yes | |
| MSI: | Yes | |
| Bus: | PCI | |
| Slot: | Thunderbolt@102,0,0 | |
| Vendor ID: | 0x1b4b | |
| Device ID: | 0x9230 | |
| Subsystem Vendor ID: | 0x1b4b | |
| Subsystem ID: | 0x9230 | |
| Revision ID: | 0x0010 | |
| Link Width: | x2 | |
| Link Speed: | 5.0 GT/s | |
| PCI Cards | ||
| Parallel SCSI | ||
| Power | ||
| Printers | ||
| SAS | ||
| Serial-ATA | ||
| Thunderbolt | ||
| USB | ||
| Network | ||
| Firewall | ||
| Locations | ||
| Modems | ||
| Volumes | ||
| WWAN | ||
| Wi-Fi | ||
| Software | ||
| Applications | ||
| Components | ||
| Developer | ||
| Extensions | ||
| Fonts | ||
| Frameworks | ||
| Logs | ||
| Managed Client | ||
| Preference Panes | ||
| Printer Software | ||
| Profiles | ||
| Startup Items | ||
| Sync Services | ||
| Universal Access | ||
Note: If the status of "Tunnel Compatible" (as seen to the right pane above) is "Yes", your PCIe card will function correctly over Thunderbolt. If your card has a "Tunnel Compatible" status of "No", check with the card's manufacturer for a Thunderbolt-aware driver.
Note: Other information about the PCIe card installed in Helios may be seen in another section. For example, the PCIe card we used in this set-up is the OWC Mercury Accelsior PCI Express SSD. The status of the SSD can be seen under the Serial-ATA section.
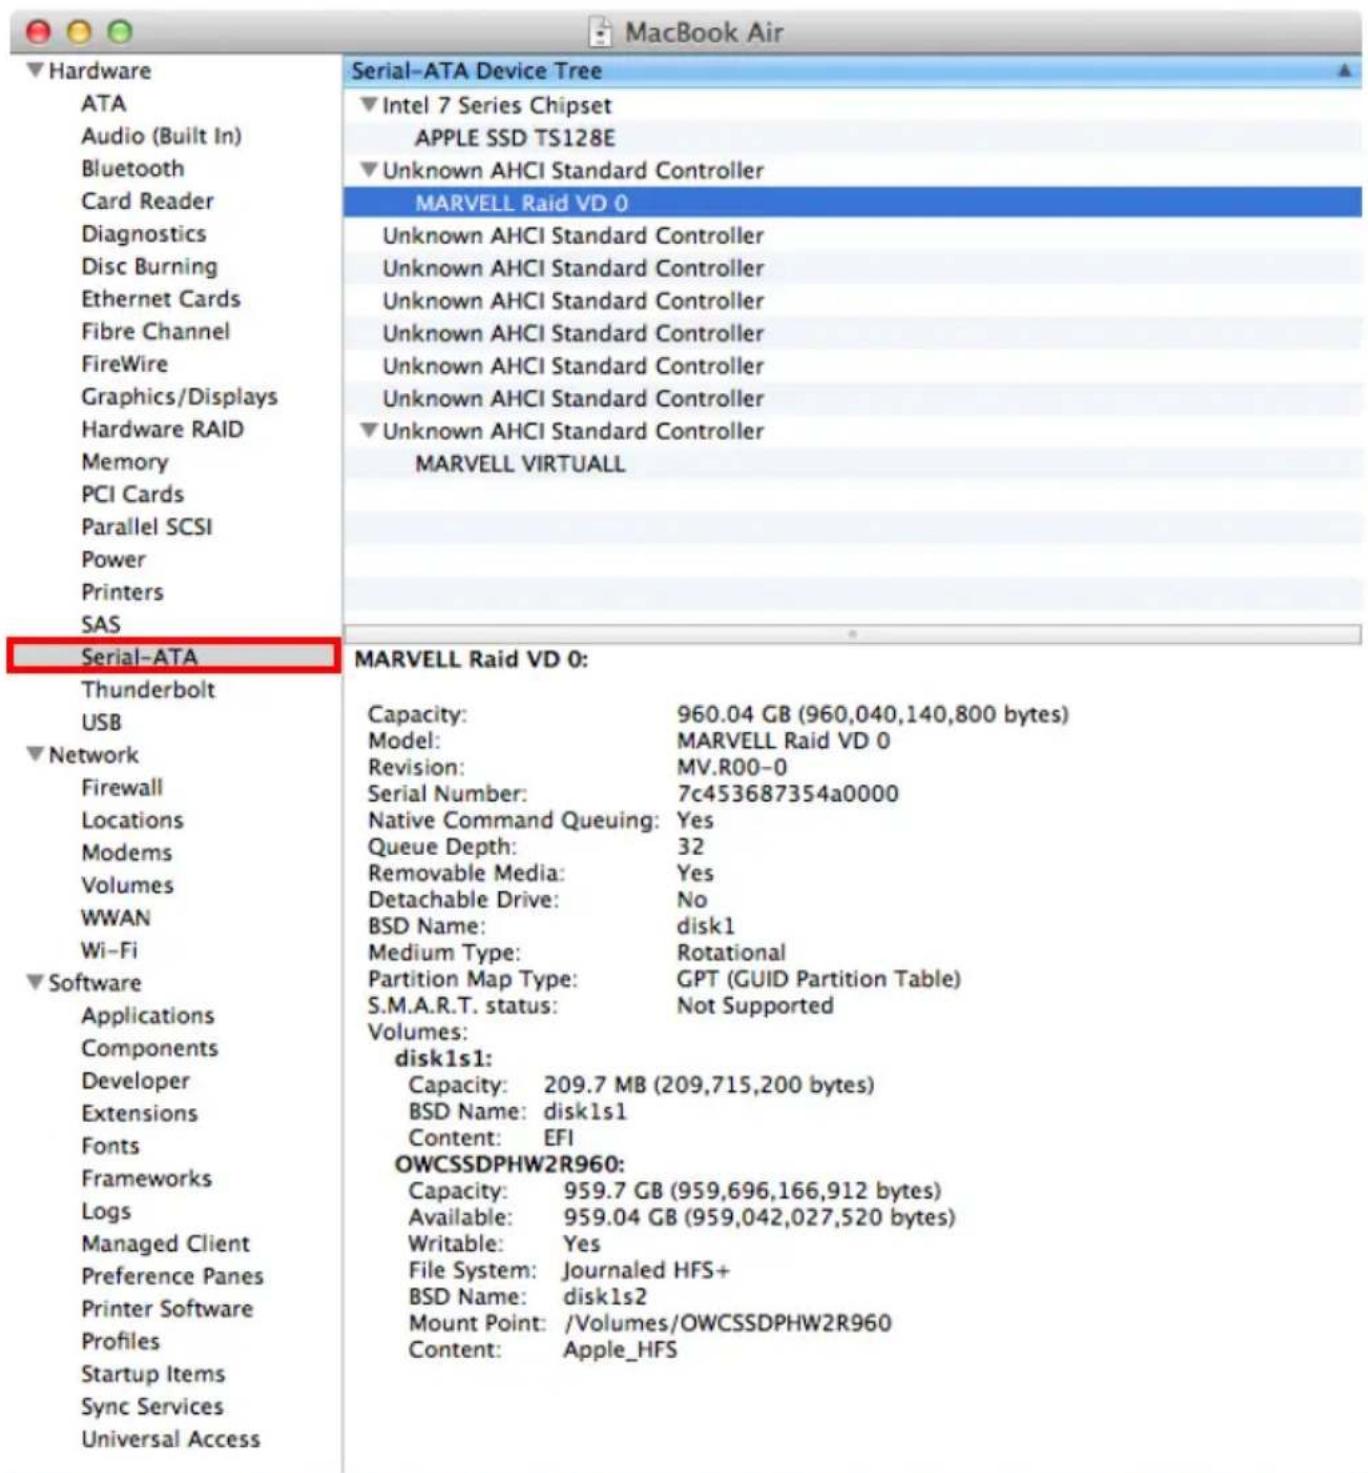
OWC's MacBook Air ▶ Hardware ▶ Serial-ATA ▶ Unknown AHCI Standard Controller ▶ MARVELL Raid VD 0
General Usage Guidelines and FAQ
The OWC Mercury Helios PCIe Thunderbolt Expansion Chassis:
- Will only power on when DC power and an active Thunderbolt signal are present.
- Has intelligent power management, allowing it to power up and down with your computer.
- Is bootable with AHCI compliant PCIe cards.
- Can daisy-chain up to six Thunderbolt devices and one Mini DisplayPort display at the end of the chain.
- Can bus-power one Thunderbolt device that supports bus powering.
Note: The Thunderbolt bus-powered device has to be the last device on the chain, furthest away from the computer.
- Can carry a Mini DisplayPort video signal, but the Mini DisplayPort device has to be the last device on the chain, furthest away from the computer.
- Is driverless; no driver is needed for the enclosure itself. Thunderbolt-aware drivers may be needed for your PCIe card.
- Is hot pluggable, can be connected and disconnected while the computer is on. If any devices are connected to the PCIe card, make sure to properly remove them before disconnecting Helios.
Q. How do I change the installed PCIe card?
Never remove or install a PCIe card while Helios has either DC power or an active Thunderbolt connection. This is a safety precaution for you, the PCIe card, Helios, and your computer.
- If the PCIe card has any hard drives connected to it, make sure to eject or unmount them properly by right-clicking on the icon on the Desktop or in the Sidebar of a Finder window, and select "Eject".
- Unplug the DC power, Thunderbolt cable, and any cables connected to the PCIe card.
- Follow the assembly instructions in reverse to remove the currently installed PCIe card.
- Follow the assembly instructions to install the new PCIe card.
Q. My PCIe card has lower performance than expected when installed in Helios.
- Thunderbolt offers up to 10Gb/s bandwidth for PCIe. This is more than enough bandwidth for most cards. Some cards, however, may require more than 10Gb/s of bandwidth and may not operate at full speed.
- Connecting multiple devices in a Thunderbolt chain can affect the overall performance. Each device added to the Thunderbolt chain will add latency and reduce the bandwidth available in the chain. Higher performing devices, such as Helios, should be as close to the beginning of the chain as possible, closest to the computer.
o Move Helios to the beginning of the chain, closest to the computer.
o Remove one device at a time from the Thunderbolt chain to find the arrangement that provides the best performance for your needs.
Q. I updated to a newer version of OS X and now Helios doesn't work.
- Helios is driverless; no driver is needed for the enclosure itself. - PCIe cards that are not AHCI compliant require Thunderbolt-aware drivers. These may be broken by newer Mac OS X versions.
o Check with the PCIe card's manufacturer to verify the current driver is compatible or for an updated driver before upgrading the Mac OS X version.
Q. I connected the OWC Mercury Helios to my Mac, but it did not power up and is not being seen in System Information.
- Check the power outlet with a known-good device such as a lamp.
- Check the port on your computer to make sure it is a Thunderbolt port. Also check the cable you are using to make sure it is a Thunderbolt cable.
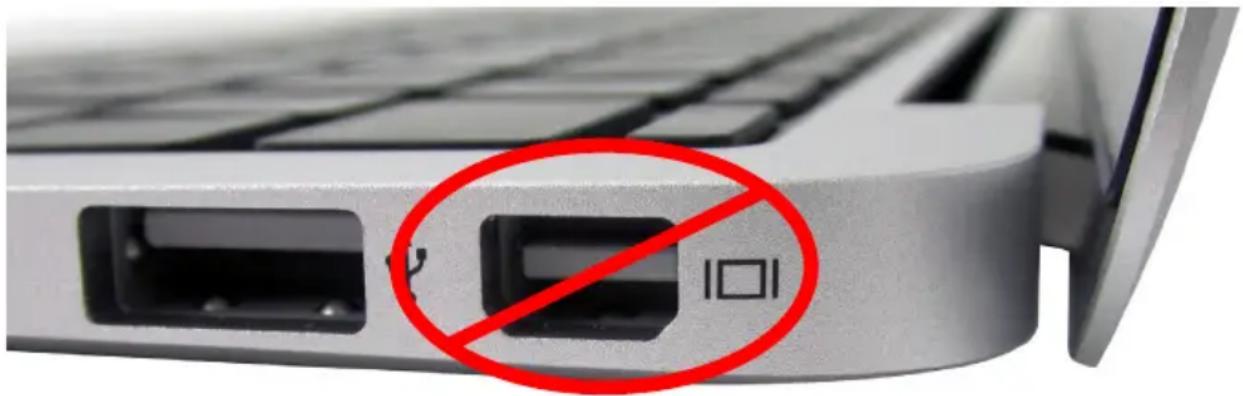
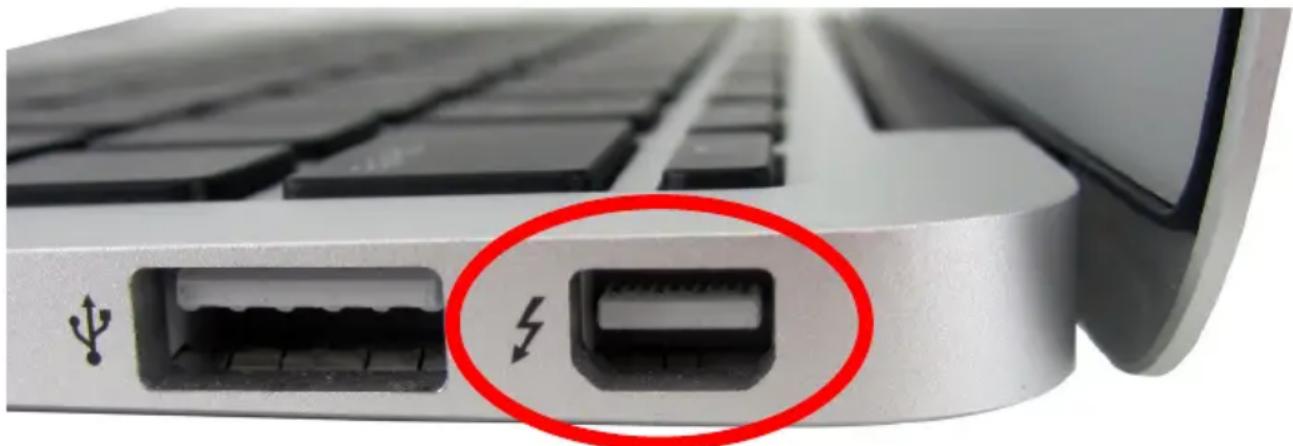
Mini DisplayPort (MDP) has the same physical connection as Thunderbolt. Helios will not work connected to a MDP port or with a MDP cable.
A Mini DisplayPort port has a symbol with two vertical bars surrounding a square.
natural_image
Close-up of a laptop keyboard with two ports and a red prohibition symbol (no text or symbols on the main subject)A Thunderbolt port is marked with a lightning bolt symbol.
natural_image
Close-up of a computer keyboard with an Ethernet port and a USB symbol, highlighting a specific port (no text or labels visible)-
Check the Thunderbolt cable ends to see if the plugs are dirty, corroded, or damaged. Try a different Thunderbolt cable.
-
If Helios is in a Thunderbolt chain:
- Check the other devices to ensure they are working correctly.
- All devices in the chain, except for bus-powered devices, need to have active DC power. If a device in the chain is powered-off, all devices connected after it will not function.
- Move Helios to the beginning of the chain.
- Remove all other devices in the chain and only connect Helios.
Contacting Technical Support
Should you need support, there are three ways to contact our Technical Support team:
o You can submit your email request at:
O http://eshop.macsales.com/Service/ts_email.cfm
- Phone
o 815-338-8685 Option 3
o 8AM – 8PM CST Monday through Friday
o 9AM – 4PM CST Saturday
• Live Chat
o OWC offers live technical assistance at
o 8AM – 8PM CST Monday through Friday
o 9AM – 4PM CST Saturday
Before contacting Technical Support, please have the following available:
• The serial number of Helios.
- Your invoice number.
• What operating system you are using.
• Which kind and model of computer you are using.
• Which PCIe card(s) you want to use with Helios.
Warranty Information
All Helios solutions include an OWC 3-Year Solution Warranty with 48-hour Turnaround Time.
For full details of the warranty, refer to:
http://eshop.macsales.com/Service/warranty_info.cfm
Copyrights:
Copyright © 2002-2012 Other World Computing, Inc. OWC is a trademark of New Concepts Development Corporation, registered in U.S. Patent and Trademark Office and Canada.
Mercury Accelsior, Mercury Helios, Other World Computing and the Other World Computing logo are trademarks of New Concepts Development Corporation.
Mac, the Mac logo, Mac OS, MacBook Air, MacBook Pro, MacBook Pro Retina, Mac mini, Mac mini Server, iMac are trademarks of Apple Inc., registered in the U.S. and other countries.
Thunderbolt and the Thunderbolt logo are trademarks of Intel Corporation in the U.S. and/or other countries
Other marks may be the trademark or registered trademark property of their owners.
Changes:
The material in this document is for information only and subject to change without notice. While reasonable efforts have been made in the preparation of this document to assure its accuracy, Other World Computing assumes no liability resulting from errors or omissions in this document, or from the use of the information contained herein. Other World Computing re- serves the right to make changes or revisions in the product design or the product manual without reservation and without obligation to notify any person of such revisions and changes.
Health And Safety Precautions:
- Use proper anti-static precautions while performing the installation of your PCIe cards into the OWC Mercury Helios. Failure to do so can cause damage to your PCIe cards and/or the OWC Mercury Helios.
- Read this Assembly and Users Guide carefully, and follow the correct procedure when setting up the OWC Mercury Helios.
- Never expose the OWC Mercury Helios to rain, or use it near water, or in damp or wet conditions. Never place objects containing liquids on the OWC Mercury Helios, as they may spill into its openings. Doing so increases the risk of electrical shock, short-circuiting, fire or personal injury.
General Use Precautions:
- Do not expose the OWC Mercury Helios to temperatures outside the range of 5^ to 40^ (41°F to 104^ ). Doing so may damage the enclosure or the installed PCIe card.
- Avoid placing the OWC Mercury Helios near a source of heat or exposing it to sunlight (even through a window). Conversely, placing the OWC Mercury Helios in an environment that is too cold or humid may damage the unit.
- Always unplug the OWC Mercury Helios from the electrical outlet if there is a risk of lightning or if it will be unused for an extended period of time. Otherwise, there is an increased risk of electrical shock, short-circuiting or fire.
• Use only the power supply shipped with the device. - Do not use the OWC Mercury Helios near other electrical appliances such as televisions, radios or speakers. Doing so may cause interference, which will adversely affect the operation of the other products.
• Do not place heavy objects on top of the OWC Mercury Helios.
• If you detect a problem, consult the General Usage Guidelines and FAQ section in this manual. - Protect the OWC Mercury Helios from excessive exposure to dust during use or storage. Dust can build up inside the enclosure, increasing the risk of damage or malfunction.
- Other World Computing recommends the use of normal glass cleaning products to keep the high-luster finish at its finest with this product. Be sure not to get any moisture inside the holes and if you do, allow time to air dry before use.
Do not block the ventilation outlets on the front or rear of the OWC Mercury Helios. These help to keep your PCIe card cool during operation. Blocking the ventilation outlets may cause damage to your PCIe card and cause an increased risk of short-circuiting or fire
- Assembly and Users Manual
- Table of Contents
- INTRODUCTION
- ASSEMBLY
- System Requirements
- Package Contents
- Port View
- Anti-Static handling
- Quick Set-Up
- Click on "Thunderbolt" to see Helios.
- General Usage Guidelines and FAQ
- Never remove or install a PCIe card while Helios has either DC power or an active Thunderbolt connection. This is a safety precaution for you, the PCIe card, Helios, and your computer.
- Contacting Technical Support
- Before contacting Technical Support, please have the following available:
- Warranty Information
- Copyrights:
- Changes:
- Health And Safety Precautions:
- General Use Precautions:
Brand : OWC
Model : Mercury Helios+E2
Category : SSD Drive