cosMik - Microphone ESI - Free user manual and instructions
Find the device manual for free cosMik ESI in PDF.


User questions about cosMik ESI
0 question about this device. Answer the ones you know or ask your own.
Ask a new question about this device
Download the instructions for your Microphone in PDF format for free! Find your manual cosMik - ESI and take your electronic device back in hand. On this page are published all the documents necessary for the use of your device. cosMik by ESI.
USER MANUAL cosMik ESI
Professional Active Reference 5" and 8" Studio Monitor
uniK plus
User's Guide

natural_image
Abstract metallic logo design with stylized 'EST' letters, no text or symbols presentESI - Copyright © 2014
Revision 1, September 2014
ESI uniK plus
INDEX
1. Introduction......4
1.1 What makes uniK plus unique?......4
2. Basics & Installation......4
2.1 Unpacking / Handling....5
2.2 Connection .... 5
3. Placement / Positioning / Setup....5
3.1 Stereo / 2.0 Positioning....6
3.2 Stereo with Subwoofer / 2.1 Positioning....6
3.3 Surround 5.1 Positioning....7
3.4 Surround 7.1 Positioning....7
3.5 Orientation 8
3.6 Additional Comments ....8
3.7 ESI Bass Port Plug ^TM for vent port 8
3.8 Rubber Feet....9
4. Technical Data....10
4.1 Specifications of uniK 05+....10
4.2 Specifications of uniK 08+....10
4.3 Rear Panel....11
5. General Information....14
5.1 Safety Information .... 14
1. Introduction
Congratulations on your purchase of the ESI uniK plus.
Our uniK plus studio monitor is available as a 5" and an 8" version, the uniK 05+ and uniK 08+. This manual describes both models as they have similar functions and features.
The uniK plus studio monitors are the result of extensive development work performed in Germany, to provide a professional active reference monitor that defines a higher level of quality in its class. With its 5" or 8" kevlar low frequency driver and a custom engineered and powerful high frequency magnetostatic tweeter, the uniK plus offers many improvements over our previous successful uniK series of studio monitors and provides unique sound characteristics that allow this monitor to satisfy the highest demands in a professional studio environment.
1.1 What makes uniK plus unique?
The uniK plus studio monitor offers true full range quality with extended low end in a small case and an entirely new signal processing and amplifier unit with a perfect order low-z and low noise design. Mos-Fet Bi-amplification ensures a high slew-rate and fast setting, featuring true analog vintage sound processing with LC-like gyrator technology for a stressless and silky sound.
A completely new feature is the unique one knob sound character adjustment from smooth to bright, allowing you to change parameters for every room and preference. The additional high resolution high and low switches add additional control and of course there is the option to utilize our ESI Bass Port Plug ^TM for further room adjustment, i.e. to control the low frequencies in small rooms or when the speaker is placed in a corner by running uniK plus either as a closed or a bass reflex speaker system.
The uniK plus studio monitor features a real precision gain attenuator, instead of a simple volume control and the new design of the crossover ensures an excellent phase response and safe power limitation, to drive the woofer and tweeter efficiently. The tweeter features a newly upgraded magnetostatic design with extremely low moving mass for extended frequency and fast transient response and high sound resolution. The matching woofer consists of a kevlar composite cone with high stiffness ensuring better piston motion and excellent low-end sound reproduction.
Another special feature is the flexible rubber feet with discrete height adjustment. They are not only helpful to reduce unwanted vibrations, but also allow you to tilt the speaker towards the precise listening point - a great feature for typical near field applications. Other features include standby to save power consumption (can be disabled), an integrated over-load indicator on the power LED that flashes red and a ground lift switch.
2. Basics & Installation
For optimal performance of your uniK plus studio monitor, read the instructions in this manual thoroughly and carefully before you are using the speaker. We tried to keep this manual short so that you are not loosing much time to read through it completely.
ESI uniK plus
2.1 Unpacking / Handling
To remove the monitor from the carton its best to turn the package carefully upside down on the floor or on a table and then lift the carton vertically up slowly to leave the monitor resting in the packaging foam. Make sure that you don't grab the speaker driver units on the front to avoid damage. Now check the monitor for signs of damage that might have occurred in shipping. In the unlikely event of this, please contact the reseller of the product immediately. Be careful when you remove the packaging foam. Please keep all packing materials.
You will when unpacking that the uniK plus is shipped with a power cable, the ESI Bass Port Plug ^TM made from a special acoustic material and with 4 rubber feet that can be installed and removed when required (more on that below in section 3.7 and 3.8).
2.2 Connection
High quality XLR balanced, TRS balanced or TS unbalanced audio cables are recommended for input connection. The monitor typically connects to the line level output of a mixing console or to a computer audio card. Make sure the power of the monitor is switched off before you connect any audio cables.
XLR balanced connection
Connect male side of XLR balanced cable to the balanced XLR input of uniK plus. Make sure the power cable is connected as well. Setup all speakers (i.e. left / right channels) with the same type of cable.
TRS balanced or TS unbalanced connection
Connect male side of TRS balanced or TS unbalanced cable to the input jack of uniK plus. Make sure the power cable is connected as well. Setup all speakers (i.e. left / right channels) with the same type of cable.
3. Placement / Positioning / Setup
The placement of monitoring speakers is very critical and can compromise their performance. This is a general rule for every loudspeaker. To monitor with uniK plus utilizing their maximum capabilities, an appropriate listening environment and a correct placement are important.
Typically you would be using 2 units of uniK plus as one stereo pair – or more in surround setups (i.e. in a 5.1 setup you would use 5 units of uniK plus together with a subwoofer).
uniK plus can also be tilted up and down using rubber feet (3.8) and depending on the room environment you have the option to use them as a closed speaker system or open with bass reflex port utilizing our ESI Bass Port Plug ^TM (3.7).
ESI uniK plus
3.1 Stereo / 2.0 Positioning
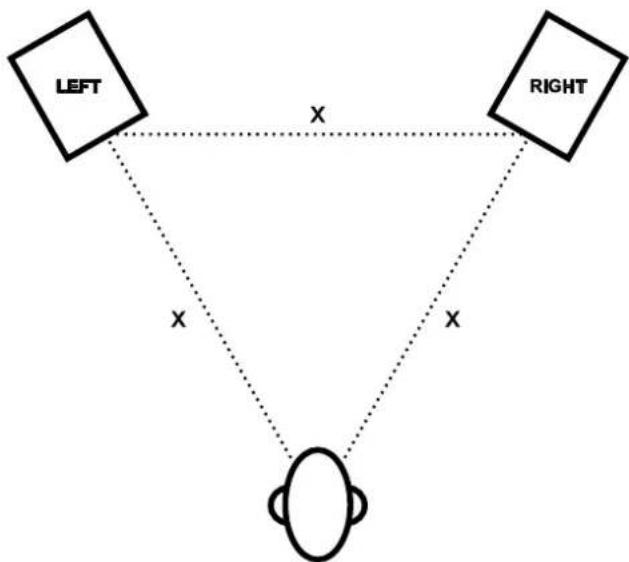
Two units and the listener should be positioned or aligned in a regular triangle form. Please refer to the following diagram to understand how to position your monitors. Each distance x should be identical.
flowchart
graph TD
    A["LEFT"] -->|X| C(( ))
    B["RIGHT"] -->|X| C
    C -->|X| D(( ))
3.2 Stereo with Subwoofer / 2.1 Positioning
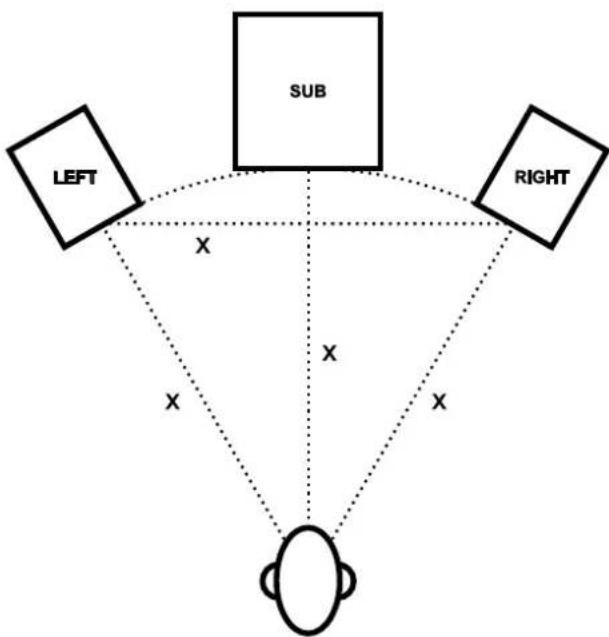
In a stereo setup with an added subwoofer, the subwoofer speaker should be positioned ideally in the middle in front of the listener (with the same distance x). If this is not possible, it should be close to that position.
flowchart
graph TD
    A["LEFT"] -->|X| B["SUB"]
    C["RIGHT"] -->|X| B
    B -->|X| D["Oval"]
    style A fill:#fff,stroke:#000
    style C fill:#fff,stroke:#000
    style B fill:#fff,stroke:#000
    style D fill:#fff,stroke:#000
ESI uniK plus
3.3 Surround 5.1 Positioning
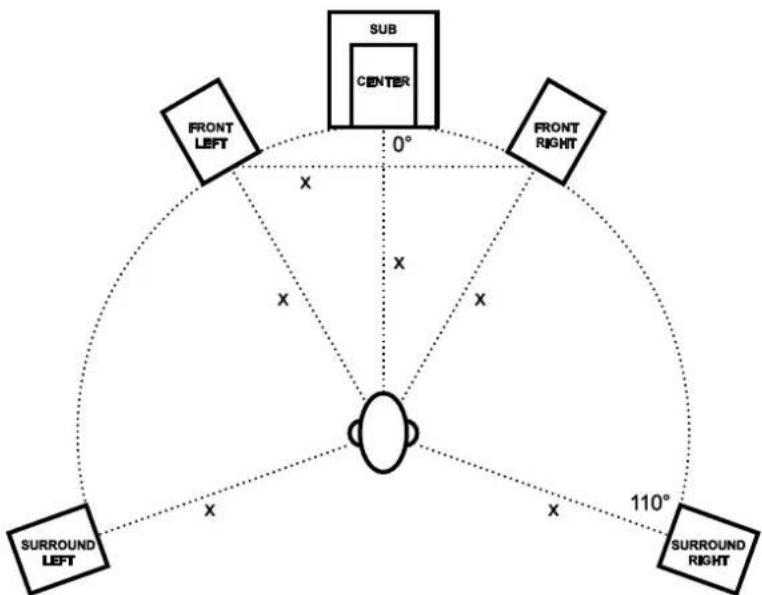
In a 5.1 surround set, the center speaker should ideally be placed on top of the subwoofer. If this is not possible, the subwoofer can be moved to the left or right but should close. The rear surround speakers should be positioned around 110^ from the center speaker (all with the same distance x ).
text_image
FRONT LEFT SUB CENTER 0° FRONT RIGHT SURROUND LEFT X X X X 110° SURROUND RIGHT3.4 Surround 7.1 Positioning
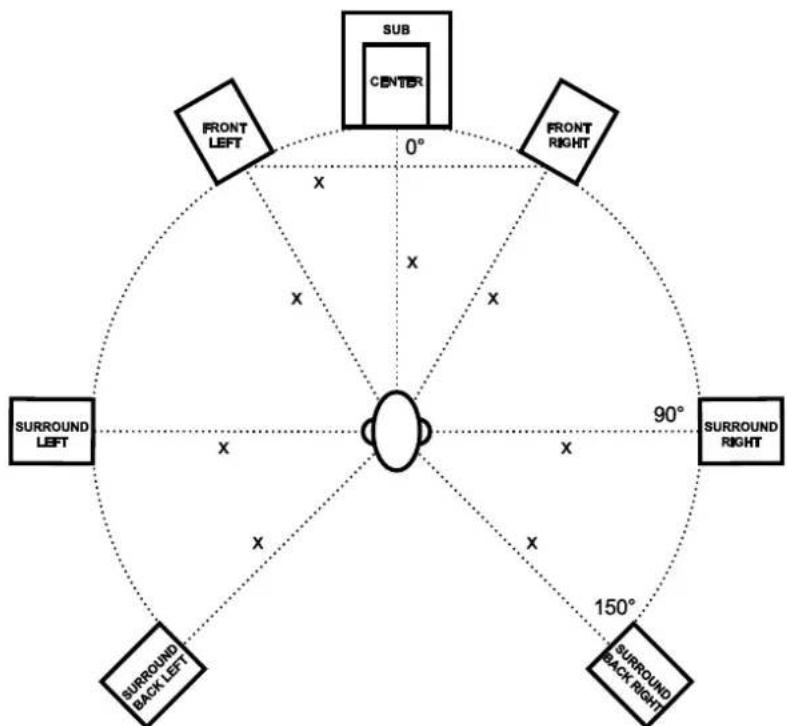
In a 7.1 surround set, the center speaker should also ideally be placed on top of the subwoofer or as close as possible. The surround speakers are best placed 90^ from the center speaker and the back surround speakers are best placed 135^ to 150^ from the center speaker. All speakers should be placed with the same distance x to the listener.
It's strongly suggested to place the uniK plus vertically. Do not place them horizontally.

natural_image
Pure electrical circuit lines without any symbols3.6 Additional Comments
Please also make sure to not place any obstacles that may block the flow of air or that could generate sound reflections (especially highly reflective material including glass or metal) in front of the monitor. Also, don't put plants in pots on top or too close to your monitors.
If possible, avoid placing the speakers into the corner of a room as this may cause reflections from both sides, which may alter the sound. It is best to place them with a 90^ or 0^ angle in reference to the closest wall. If this cannot be avoided, it might be advisable to close the vent port with the included ESI Bass Port Plug ^TM (see below under 3.7).
3.7 ESI Bass Port Plug™ for vent port
uniK plus has a vent port that is conveniently placed on the backside of the unit, making sure that air does not get blown into your face when you listen in a near field situation and to make sure that parasitic frequencies from the inside of the cabinet are sent out through the rear. When uniK plus is placed too close to the wall or especially when placed angled in a room corner, low frequencies could get emphasized a bit too much. As vented speaker systems have this issue more than closed speakers, it can be better to have a closed speaker system when they are used in small rooms, in corners or very close to a wall – while when placed into a larger room, obviously the open system with the vent port is better.
Because of this, ESI developed a truly unique feature: uniK plus are shipped with an ESI Bass Port Plug ^TM . This plug made from a special acoustic material allows you to turn uniK plus either in a completely closed system (ESI Bass Port Plug ^TM inserted into the vent port) or a regular open bass reflex system (vent port is open):
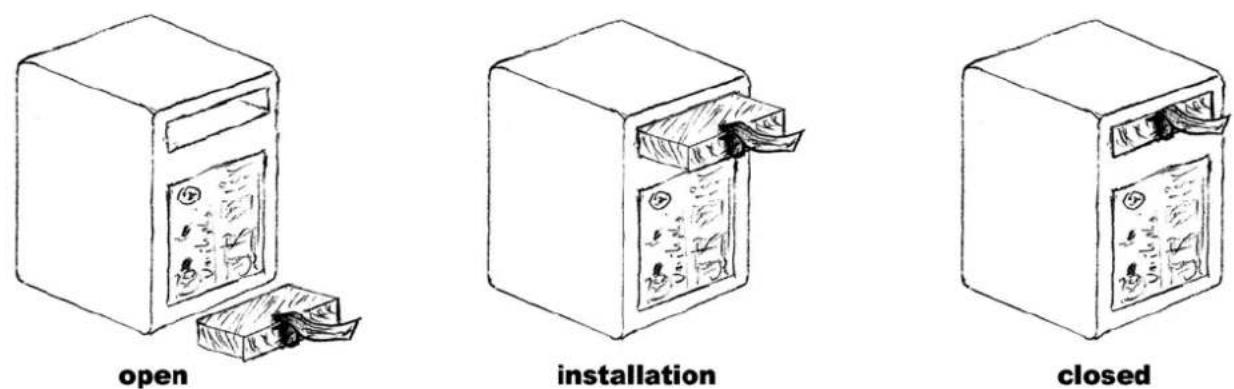
ESI uniK plus
Together with the room adjustment options, this gives you amazing amount of flexibility in reference to the requirements of your listening room and your own preference to sound.
3.8 Rubber Feet
uniK plus are supplied with 4 rubber feet, two on the front of the speaker and two on the rear. The rubber feet help you to reduce unwanted vibrations, depending on where exactly the speaker is placed. They can individually be adjusted by turning them in and out, or they can be removed altogether if you prefer not to use them or if you want to use something like a custom foam pad under your monitors. Essentially, you have these 4 options:
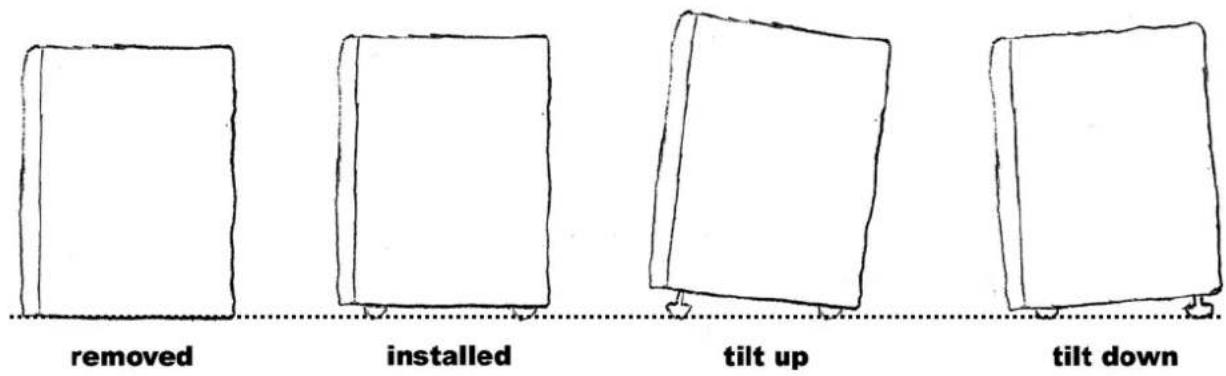
As a general rule, make sure that the speaker always directly points directly at your ears when you are sitting at the preferred listening spot. This should be considered when you tilt the speakers upwards or downwards.
4. Technical Data
Please note that technical specifications are subject to change without any prior notice. The specs given in this manual are up-to-date at the time of the creation of this document.
4.1 Specifications of uniK 05+
- Biamp 2-Way Powered Speaker System
• Active Studio Monitor Speaker
• HF Driver: extremely low mass magnetostactic tweeter Φ49 x 26 mm - LF Driver: 5" kevlar curved cone (magnetic shielding type)
- Output Power: 80W (HF: 40W, LF: 40W), 110W AC consumption power
• Frequency Response: 49Hz - 25kHz - Input Impedance: 27.2kOhm (balanced) / 13.6kOhm (unbalanced)
• Crossover Point: 3.2kHz - SPL: 101dB, Peak 104dB
- Input Connectors: XLR / TRS 1/4" combo connector, balanced / unbalanced
- Gain Control: -14 .. 0dB .. +14
- Room Adjustments Control: Character: -6 .. 0dB .. +6; Low: -5 .. 0dB .. +5; High: -5 .. 0dB .. +5
- works as closed speaker system (ESI Bass Port Plug™ installed) or bass reflex system with rear ventilation port, optimised for near field operation (ESI Bass Port Plug™ removed)
- Ground lift switch
- Standby function, can be turned on and off
- Indicator: multi color LED on front panel, power on orange, standby red, over load red flashing
- Feet: 4 pieces rubberized, adjustable height separately
- Working Voltage: AC100-240V 50/60Hz
- Dimensions (W x H x D): 190 x 265 x 210mm
- Weight: 4.4 kg
4.2 Specifications of uniK 08+
- Biamp 2-Way Powered Speaker System
• Active Studio Monitor Speaker
• HF Driver: extremely low mass magnetostactic tweeter Φ49 x 26 mm - LF Driver: 8" kevlar curved cone (magnetic shielding type)
- Output Power: 140W (HF: 70W, LF: 70W), 160W AC consumption power
• Frequency Response: 37Hz - 25kHz - Input Impedance: 27.2kOhm (balanced) / 13.6kOhm (unbalanced)
• Crossover Point: 3.2kHz - SPL: 105dB, Peak 108dB
- Input Connectors: XLR / TRS 1/4" combo connector, balanced / unbalanced
• Gain Control: -14 .. 0dB .. +14 - Room Adjustments Control: Character: -6 .. 0dB .. +6; Low: -5 .. 0dB .. +5; High: -5 .. 0dB .. +5
- works as closed speaker system (ESI Bass Port Plug™ installed) or bass reflex system with rear ventilation port, optimised for near field operation (ESI Bass Port Plug™ removed)
- Ground lift switch
ESI uniK plus
- Standby function: can be turned on and off
- Indicator: multi color LED on front panel, power on orange, standby red, over load red flashing
- Feet: 4 pieces rubberized, adjustable height separately
• Working Voltage: AC100-240V 50/60Hz
• Dimensions (W x H x D): 252 x 352 x 319mm - Weight: 8.1 kg
4.3 Rear Panel
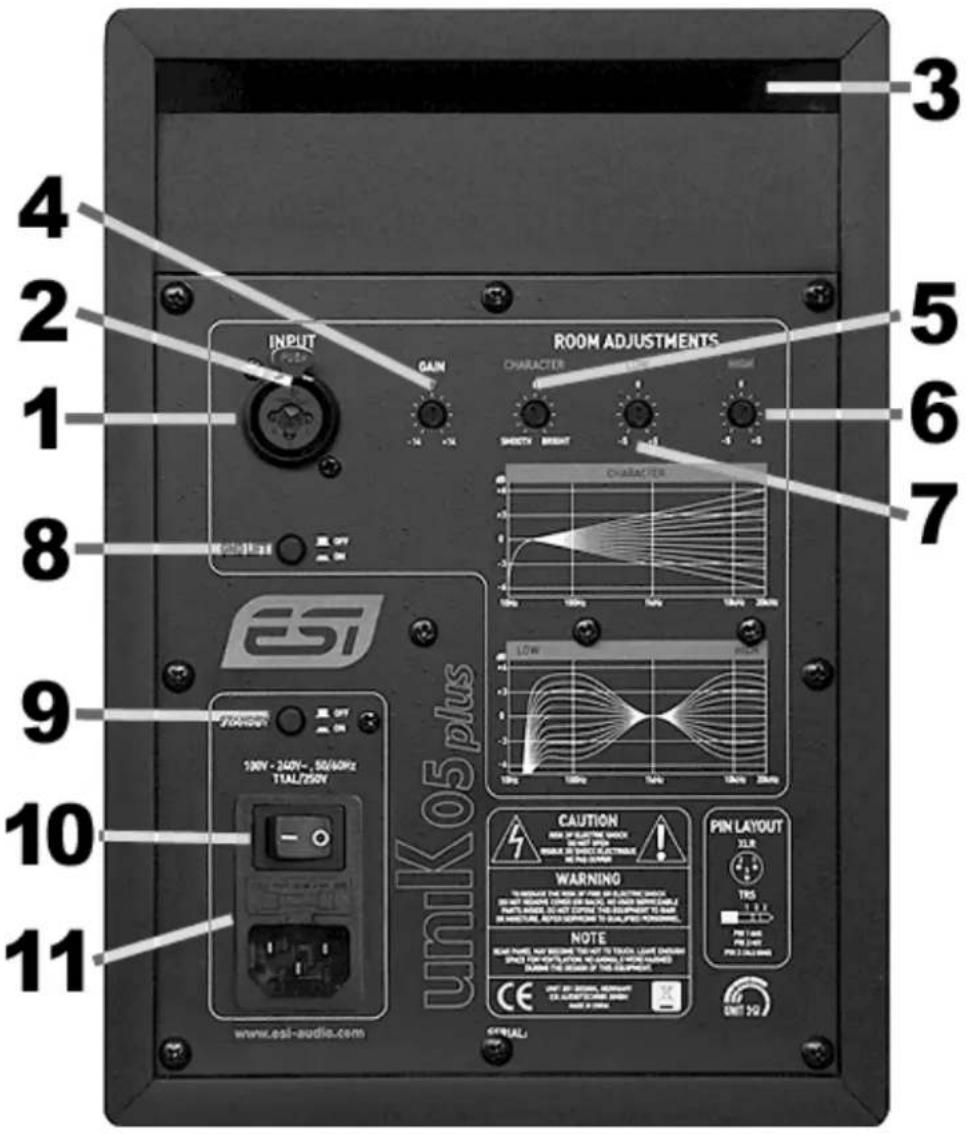
The following picture shows the rear panel of uniK 05+. The functions of uniK 08+ are identical.
text_image
INPUT GAIN ROOM ADJUSTMENTS Character Character 100V - 240V - 50/60Hz TIAL/250V CAUTION WARNING NOTE PIN LAYOUT 3 4 5 6 7 8 9 10 11 www.esi-audie.com UNIT 1/2 UNIT 2/2 UNIT 3/2 UNIT 4/2 UNIT 5/2 UNIT 6/2 UNIT 7/2- XLR input – this connector accepts balanced XLR input connections (typically with a +4dBu level). XLR input is wired like this:
| INPUT SIGNAL XLR CONNECTIONS | |
| + | PIN |
| - | PIN |
| Shield | PIN |
2 3 1
- TRS input - this jack accepts TRS input connections, either balanced or unbalanced. For balanced connections, a 3-conductor TRS plug is necessary. The TRS input is wired like this:
| INPUT SIGNAL TRS CONNECTIONS | |
| + | Tip |
| - | Ring |
| Shield | Sleeve |
Unbalanced wiring works with either a 2- or 3-conductor TRS connector. A 2-conductor TRS plug (or sometimes also just called TS plug) automatically grounds the minus signal input, whereas a 3-conductor TRS plug wired unbalanced provides the option of leaving the minus open or grounded. We recommend that you ground the unused part.
- vent port – uniK plus is a vented box speaker system with a vent port on the rear panel. Because of this, it is better to keep some small distance from the wall and not to put the speaker directly into a corner of the room (as the two sides of the corner would generate different reflections). One option to deal with this in case it cannot be avoided or if it is your preference, you can close the vent port with the included ESI Bass Port Plug ^TM (described in section 3.7) that ships with uniK plus.
- gain level adjustment - use this gain control knob to adjust the speaker properly to the input level from the sound source. Make sure to setup all speakers accordingly. When set to 0 (middle position), the input level is set to the recommended calibrated level to reach the most optimised dynamic response on the output (based on a balanced XLR or TRS signal with +4dBu reference level).
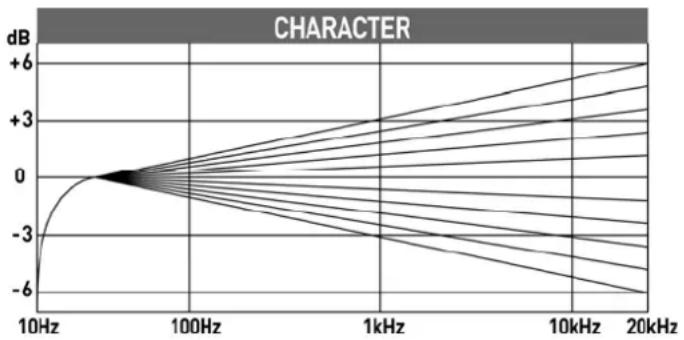
- character selection (room adjustment) – via the character selection it is possible to tilt the whole frequency spectrum up (BRIGHT) or down (SMOOTH). This allows you to adjust the sound according to the requirements in your room as well as to your own hearing preferences and requirements.
line
| Frequency | Channel 1 | Channel 2 | Channel 3 | Channel 4 | Channel 5 | Channel 6 | Channel 7 | Channel 8 | Channel 9 | Channel 10 | | --------- | --------- | --------- | --------- | --------- | --------- | --------- | --------- | --------- | --------- | ---------- | | 10Hz | -6 | -3 | -2 | -1 | 0 | 1 | 2 | 3 | 4 | 5 | | 100Hz | -3 | -2 | -1 | 0 | 1 | 2 | 3 | 4 | 5 | 6 | | 1kHz | -2 | -1 | 0 | 1 | 2 | 3 | 4 | 5 | 6 | 7 | | 10kHz | -1 | 0 | 1 | 2 | 3 | 4 | 5 | 6 | 7 | 8 | | 20kHz | 0 | 1 | 2 | 3 | 4 | 5 | 6 | 7 | 8 | 9 |When set to 0 (middle position), the frequency response is optimised, i.e. as linear as possible. When the value is tilted upwards, the higher frequencies will appear stronger, yet the whole frequency spectrum will match accordingly. When the value is tilted downwards, the high frequencies will appear less strong. It is recommended to adjust the CHARACTER first, before you change something on the LOW and HIGH knobs. Also make sure that each speaker has exactly the same settings.
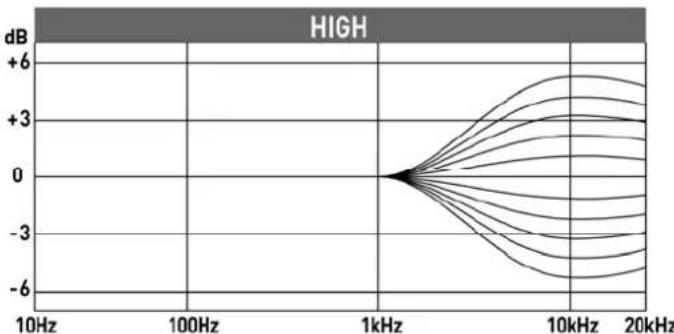
- high frequencies (room adjustment) – the HIGH knob allows you to adjust the high frequencies via a built-in EQ mostly affecting the area around 10kHz, by around 1dB for each step up or down, according to local requirements and your taste.
ESI uniK plus
line
| Frequency | Value | | --------- | ----- | | 10Hz | +6 | | 100Hz | +3 | | 1kHz | 0 | | 10kHz | -3 | | 20kHz | -6 |When set to 0 (middle position), the whole frequency response is optimised, i.e. as linear as possible. Make sure that each speaker has exactly the same settings.
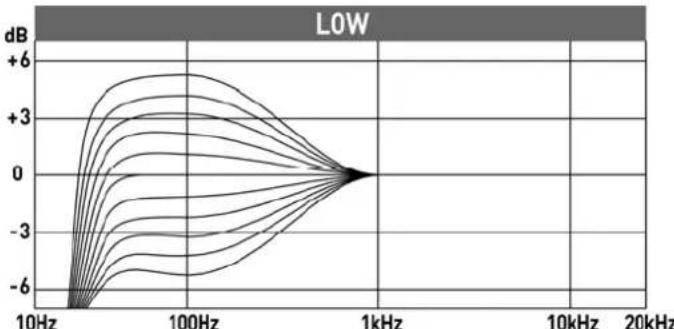
- low frequencies (room adjustment) – the LOW knob allows you to adjust the low frequencies via a built-in EQ mostly affecting the area around 100Hz and below, by around 1dB for each step up or down, according to local requirements and your taste.
line
| Frequency | Value | | --------- | ----- | | 10Hz | -6 | | 100Hz | +3 | | 1kHz | 0 | | 10kHz | -3 | | 20kHz | -6 |When set to 0 (middle position), the whole frequency response is optimised, i.e. as linear as possible. Make sure that each speaker has exactly the same settings.
-
ground lift switch – with the ground lift switch you can lift the signal ground from earth (when set to ON) or by default keep it connected (when set to OFF). This allows you in some situation to reduce or remove unwanted hum noise when there are issues with grounding of your audio signals in your studio setup.
-
standby switch – you can turn the standby functionality ON or OFF. When set to OFF, the standby energy saving functions are not available and the unit will always be turned on. When set to ON, the unit will switch to power saving mode after a while without any audio signal. The power saving mode is indicated by a red ESI logo LED on the front panel (instead of the normally orange power ESI logo LED). When there is an audio signal again, regular operation resumes.
-
power switch – with the power switch you can turn uniK plus on and off.
-
power port with ext. fuse – use this connector to plug in the detachable 3-circuit line cord that connects to the power outlet. The connector contains a replaceable fuse (T1AL/250V in case of uniK 05+ and T2AL/250V in case of uniK 08+).
5. General Information
Trademarks
ESI, uniK, uniK 05+, uniK 08+ and uniK plus are trademarks or registered trademarks of ESI Audiotechnik GmbH. Other product and brand names are trademarks or registered trademarks of their respective companies.
Correspondence
For technical support inquiries, contact your nearest dealer, local distributor or ESI support online at www.esi-audio.com.
Disclaimer
All features and specifications subject to change without notice.
Parts of this manual are continually being updated. Please check our web site www.esi-audio.com occasionally for the most recent update information.
5.1 Safety Information