
U22 XT - Hi-Fi System ESI - Free user manual and instructions
Find the device manual for free U22 XT ESI in PDF.


| Product Type | USB 2.0 Audio Interface |
| Brand | ESI |
| Model | U22 XT |
| Category | Hi-Fi System / Audio Interface |
| Channels | 2 Input / 2 Output |
| Maximum Sample Rate | 96 kHz |
| Bit Depth | 24-bit |
| ADC Dynamic Range | 102 dBA @ 48 kHz |
| DAC Dynamic Range | 108 dBA @ 48 kHz |
| Inputs | 1x XLR/TRS combo (mic), 1x TS 1/4" (Hi-Z), 2x RCA (line) |
| Outputs | 2x TRS 1/4" balanced (line), 1x TRS 1/4" headphone |
| Phantom Power | +48V switchable |
| Power Supply | USB bus powered (5V, 500mA) |
| Dimensions (approx.) | 140 x 100 x 45 mm |
| Weight (approx.) | 300 g |
| Driver Support | Windows: ASIO 2.0, WDM, MME, DirectSound; Mac: CoreAudio (class compliant) |
| DirectWIRE | Internal audio routing via EWDM drivers (Windows only) |
| Control Panel | Windows and Mac software for volume, monitoring, and routing |
| Compatibility | Windows Vista/7/8/10 (32/64-bit), Mac OS X 10.7+ |
| Cleaning | Wipe with dry cloth; avoid liquids and solvents |
| Warranty | Standard manufacturer warranty (check with retailer) |
| General Information | Professional USB audio interface for home studios and mobile recording |
Frequently Asked Questions - U22 XT ESI
User questions about U22 XT ESI
0 question about this device. Answer the ones you know or ask your own.
Ask a new question about this device
Download the instructions for your Hi-Fi System in PDF format for free! Find your manual U22 XT - ESI and take your electronic device back in hand. On this page are published all the documents necessary for the use of your device. U22 XT by ESI.
USER MANUAL U22 XT ESI
Professional 24-bit USB Audio Interface
U22 XT
User's Guide

natural_image
Abstract metallic logo design with stylized 'EST' letters (no text or symbols)ESI - Copyright © 2016
Revision 1, January 2016
INDEX
1. Introduction......4
1.1 Features....4
2. Installation 5
2.1 System Recommendation....5
2.2 Hardware Installation....6
2.3 Driver & Software Installation....6
2.3.1 Installation under Windows....6
2.3.2 Installation under Mac OS X....8
3. Windows Audio Settings....8
4. Control Panel under Windows 9
4.1 Latency settings 9
4.2 DirectWIRE 10
5. Control Panel under Mac OS X....12
6. Specifications....13
7. General Information....14
1. Introduction
U22 XT offers a maximum of flexibility as fully bus powered USB device with pristine professional 24-bit audio quality.
It features 2 analog input and 2 analog output channels with RCA connection, a microphone preamplifier with XLR input and support for +48V phantom power, a Hi-Z instrument input for guitars, a high quality headphone output and TRS line outputs. Master and headphone volume as well as monitoring are controlled on the front panel.
On the software side, U22 XT provides low latency drivers with support for WDM, ASIO 2.0 and CoreAudio based on our EWDM and DirectWIRE technology. If you're looking for a really powerful USB audio solution for your PC or Mac to start working out of the box, then U22 XT is for you!
1.1 Features
The U22 XT hardware has these main features:
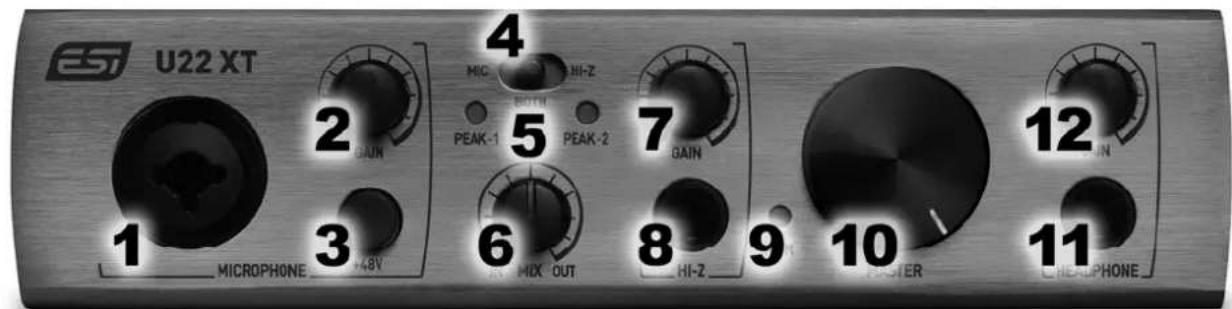
- Microphone input with XLR/TRS combo connector, use this connector to connect a dynamic or condenser microphone.
- Microphone input gain knob, controls the input volume of the microphone preamplifier.
- 48V switch, use this switch to enable phantom power for condenser microphones.
-
Mic/HiZ input selection switch, allows you to select the input signal: the microphone input (Mic), the instrument/guitar input (Hi-Z) or both. When the switch is in the middle position and both is selected, the microphone input signal will be recorded on the left input channel and the instrument signal on the right input channel.
-
Peak LEDs, shows the input 1 and 2 input levels.
- Mix control, allows you to control the input monitoring (i.e. whether you want to listen to the input signal in realtime or the computer playback signal or both). When the knob is turned all the way to the left (In), you can hear only the input signal. When it is turned all the way to the right (Out), you hear the output signal. In the middle position, you can hear both equally.
- Hi-Z input gain knob, controls the input volume of the instrument / guitar input.
- Hi-Z input with 1/4" connector, use this connector to connect to your electric guitar.
- Power LED.
- Master volume, allows you to control the master output volume.
- Headphone output with 1/4" TRS connector, use this to connect your headphones.
- Headphone gain, controls the headphone output volume.
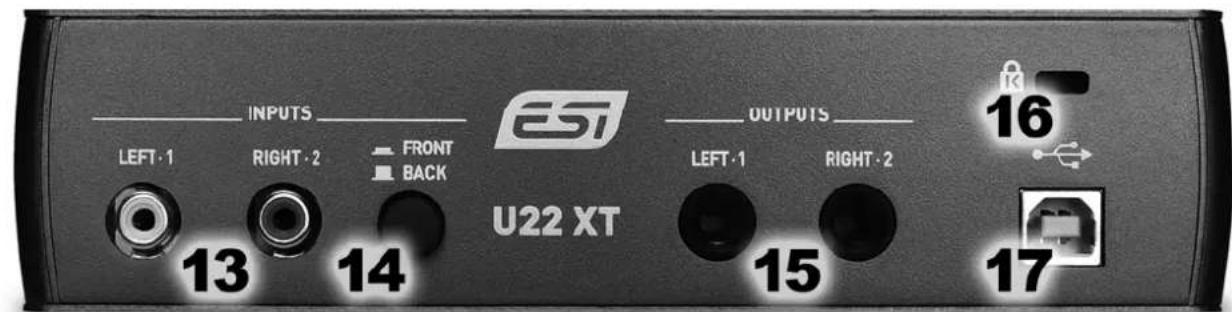
- Left and Right RCA input connectors, this is the stereo line input that connects to devices with line level outputs such as a mixing desk, a CD player or a synthesizer for example.
- Front / Back selection switch, allowing you to select the RCA line inputs on the backside (when set to 'Back') or the microphone and instrument inputs on the front (when set to 'Front').
- Left and Right 1/4" TRS outputs, this is the main balanced line output that connects to your active studio monitors, amplifier or an external mixing desk.
- If required, this connects your unit to a standard laptop lock connector, preventing it from being stolen.
- USB connection port, connects to your computer with the supplied USB cable.
2. Installation
2.1 System Recommendation
U22 XT is not simply a standard digital audio interface, but a high-resolution device capable of advanced processing of audio content. Even though U22 XT is built to have low-CPU resource dependability, system specifications play a key part in the U22 XTs performance. Systems with more advanced components are generally recommended.
Minimum System Requirements
PC
- Windows Windows Vista / 7 / 8 / 8.1 or 10 (32- and 64-bit) operating system
- 1 available USB 2.0 port
Mac
- Mac OS X 10.7 or higher
- 1 available USB 2.0 port
2.2 Hardware Installation
U22 XT is simply connected to an available USB port of your computer. A separate power supply is not required, as U22 XT is a USB powered device. Simply install the hardware by plugging it into your computer with the supplied cable.
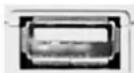
USB port of a computer
2.3 Driver & Software Installation
After the connection of U22 XT, the operating system automatically detects it as a new hardware device. Modern operating systems like Windows Vista/7/8/10 or Mac OS X usually detect the hardware directly and are installing the correct USB audio drivers automatically.
You can use U22 XT already now in typical consumer audio applications that do not need special professional ASIO driver support. Under Windows this could be for example programs used for DVD playback or more simple DJ applications that don't require ASIO. Under Mac OS X this could be applications like Garageband.
2.3.1 Installation under Windows
This text explains how to install U22 XT under Windows 10. If you use Windows Vista, Windows 7, Windows 8 or Windows 8.1, the steps are basically the same. Disconnect U22 XT before you install the driver if it has been connected already.
To start the installation, launch the setup program, which is an .exe file that is inside a recent driver download from our website or in the Windows folder of the included Installation DVD, by double clicking on it. Typically the filename is something like U22_XT_vX.YY_setup.exe where X.YY is the version number of the driver. When launching the installer, Windows might display a security message. Make sure to allow the installation. After that, the following dialog on the left will appear. Click Next and then the dialog on the right will appear:
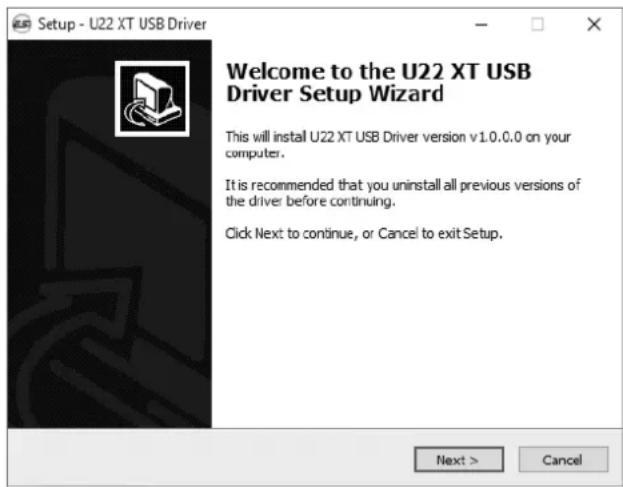
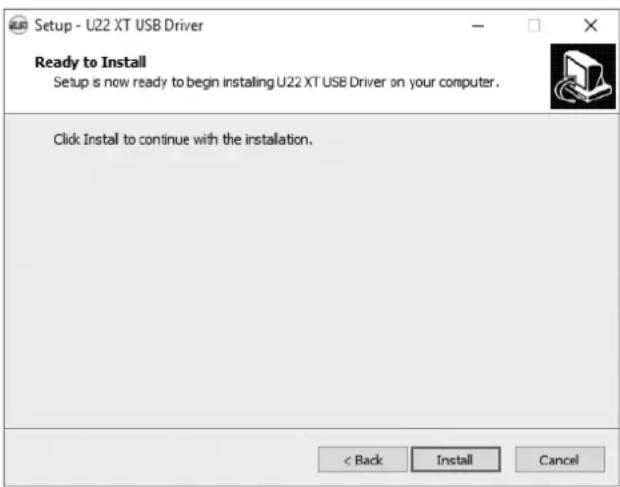
Now click Install. Files are now being copied. After some time an additional dialog will appear:
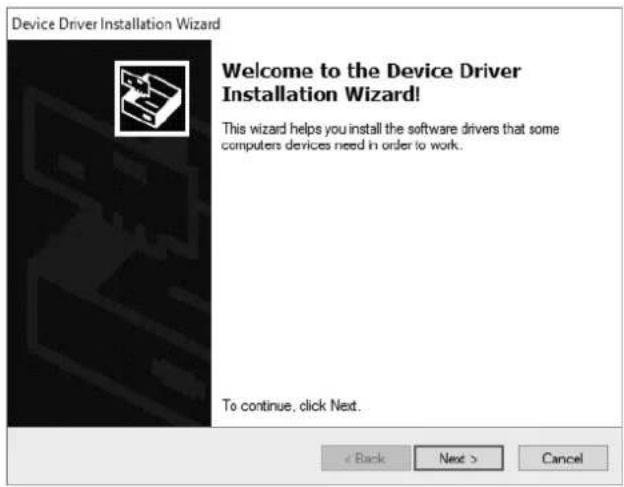
Confirm this by clicking Next. Again some files are being copied and typically you will be prompted with a Windows Security message like this:
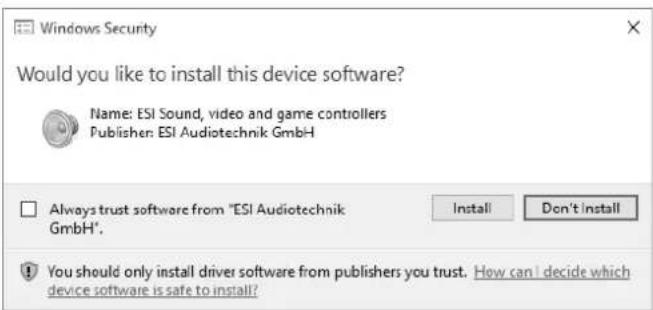
Confirm it by clicking Install. After a while the installation then will be completed and the following dialog will appear:
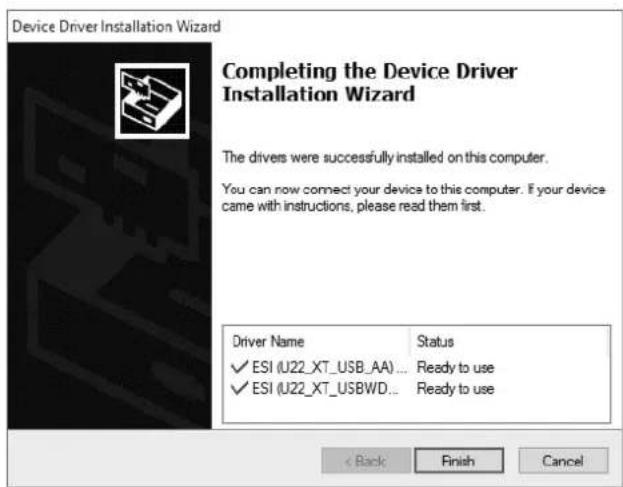
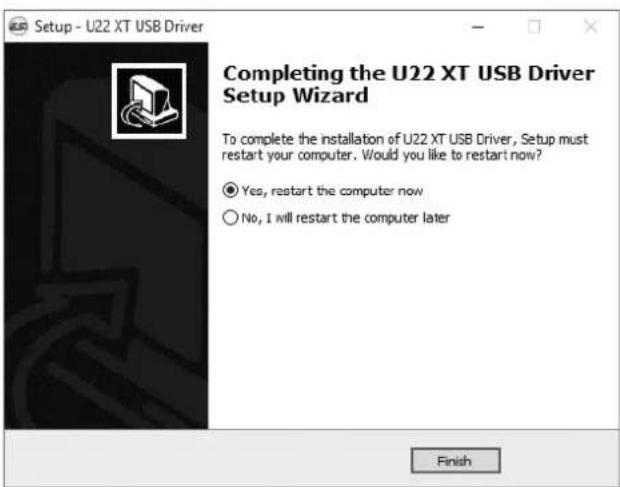
Once you see the window on the left, click Finish. In many cases, the Windows on the right appears then. We strongly suggest to select Yes, restart the computer now and then click Finish.
You can connect U22 XT to your computer anytime if not done yet. Windows will automatically setup the system so you can use the device.
Once the system starts again and you are logged in with the hardware connected, you will see by looking at the ESI icon in the taskbar notification area as shown below, that the U22 XT control panel is now automatically being loaded:
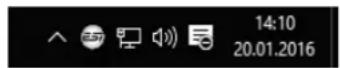
If you can see it, the driver installation has been completed successfully.
2.3.2 Installation under Mac OS X
Mac OS X already provides support for class compliant USB audio devices such as U22 XT. This means that no software or driver needs to be installed to use U22 XT under Mac OS X. Simply connect the unit with the supplied USB cable to your Mac and you can start using it.
To make the usage more simple, we provide a control panel application that can be installed from the included DVD (Mac OS X folder) or downloaded on our website. To install it, open the .dmg file and then you can drag the control panel icon into your application folder.
Controlling some of the basic options of U22 XT under Mac OS X can also be done via the Audio MIDI Setup utility from Mac OS X.
3. Windows Audio Settings
In the Windows Control Panel under Hardware and Sound > Sound, you can select the default playback device that is used by all audio applications that do not have their own preferences. It looks like the following dialog:
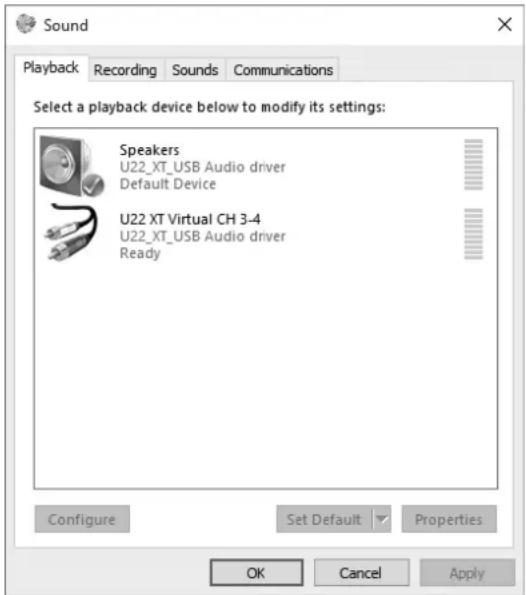
The main playback device represents the main output of U22 XT. There is also a virtual device representing channels 3 and 4.
4. Control Panel under Windows
This chapter describes the U22 XT Control Panel under Windows.
To open the control panel double click on the ESI icon in the task notification area. The following dialog will appear:
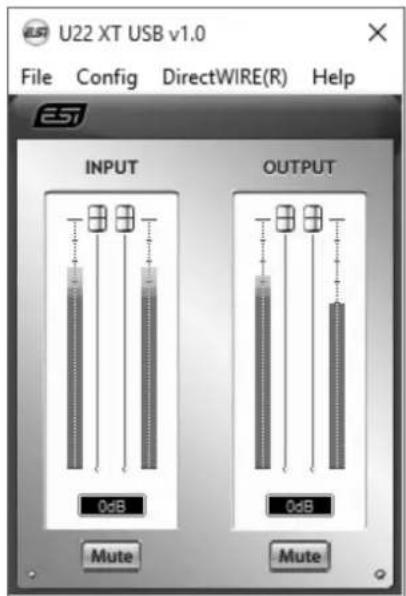
The panel has the following functions and sections:
INPUT section: this section controls the input monitoring volume of the incoming signal from the hardware. A pair of mono faders can be controlled together or individually depending on your mouse position – perfect for stereo signals. The Mute button the channel allows you to mute the signal. A red Mute button indicates that the mute function is enabled. When disabled, the button is gray.
OUTPUT section: this section controls the playback volume of the playback signal from your audio applications. The pair of mono faders can be controlled together or individually depending on your mouse position – perfect for stereo signals. The Mute button the channel allows you to mute playback. A red Mute button indicates that the mute function is enabled. When disabled, the button is gray.
4.1 Latency settings
Via Config > Latency in the Control Panel it is possible to change the latency setting (also called “buffer size”) for the driver of U22 XT. A smaller latency is the result of a smaller buffer size and value. Depending on the typical application (e.g. for playback of software synthesizers) a smaller latency is an advantage. At the same time, the best latency setting indirectly depends on the performance of your system. For recording applications, a typical latency buffer size between 4 and 8ms is standard, a value displayed typically inside your audio application. Note that the latency has to be setup before launching the audio application using U22 XT.
4.2 DirectWIRE
What is DirectWIRE?
DirectWIRE is a driver technology, developed by ESI, which can be used for routing audio streams internally within applications using EWDM Audio MIDI Drivers exclusively developed by ESI.
With the DirectWIRE router, an application can record from other application's audio outputs without external wiring or any loss of data when they are running at the same time.
DirectWIRE also allows you to easily rip any audio stream in real time by transferring data thru DirectWIRE from MP3s, live On-line Broadcast and On-demand content, and more.
DirectWIRE is not available under Mac OS X.
DirectWIRE Panel
Click on DirectWIRE on the U22 XT control panel. The DirectWIRE dialog as shown below will appear. DirectWIRE digital virtual wiring technology, developed by ESI, routes audio streams internally within applications using standard audio drivers such as WDM, ASIO and MME, even when they are running at the same time.
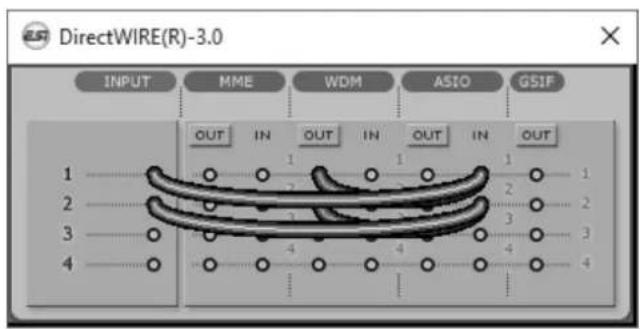
The number on the row represents the input or output port. The columns represent ins and outs (on and off) of the respected drivers. Patch the virtual cables from one point to another as you drag your mouse point.
INPUT section: It's used to route signals from the card's hardware inputs.
MME section represents general applications I/O (typically older versions), like WinAmp, WaveLab (non ASIO mode), Cakewalk, Audition, Vegas, etc.
WDM section represents Multi-MME applications I/O (typically newer versions), like SONAR (when using WDM/KS), PowerDVD, WinDVD, etc.
ASIO section represents ASIO applications, like Cubase, Reason, Nuendo, SONAR (when using ASIO), Samplitude, etc.
GSIF section represents GSIF application like GigaStudio.
Note that some applications support multiple driver modes. Usually the following applies: when an application does not support ASIO, it usually supports WDM. Older programs typically support MME.
DirectWIRE Examples
Example 1. Recording from WinAmp (MME) to WaveLab (MME).
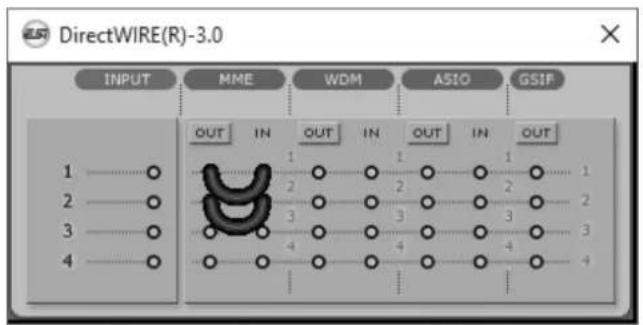
If you want to record what's played back in WinAmp, but don't want to hear the sound, you should click the OUT button in the MME section so it'll change to OFF.
Example 2. Recording from WinAmp (MME) to SONAR (WDM).
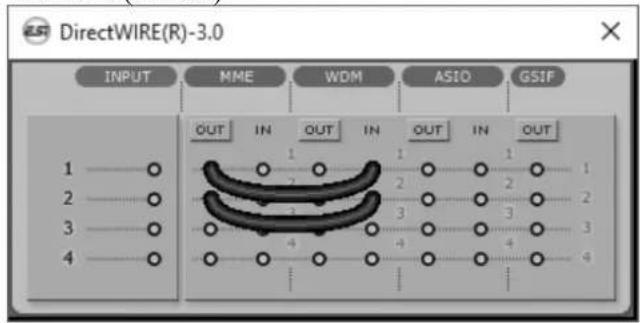
Example 3. Recording from SONAR (WDM) to Cubase, Nuendo (ASIO).
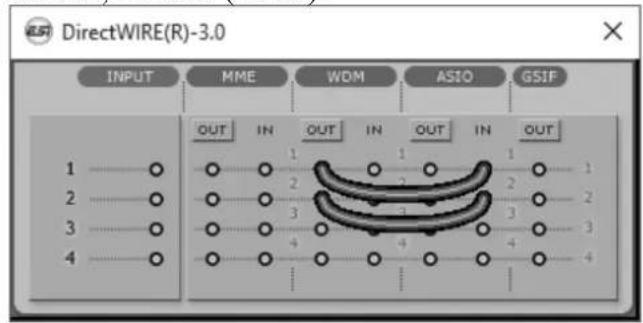
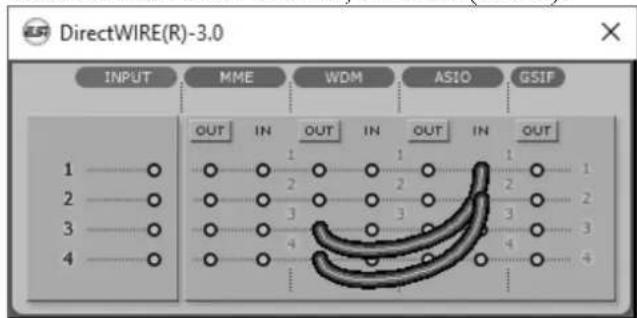
Example 4. Recording of the playback from channel 3/4 from Windows Media Player (WDM) into channel 1/2 of Cubase, Nuendo (ASIO).
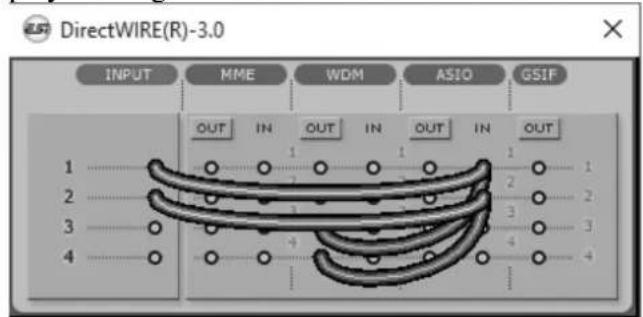
Example 5. same as example 4, but in addition the input signal is also recorded and mixed to the playback signal.
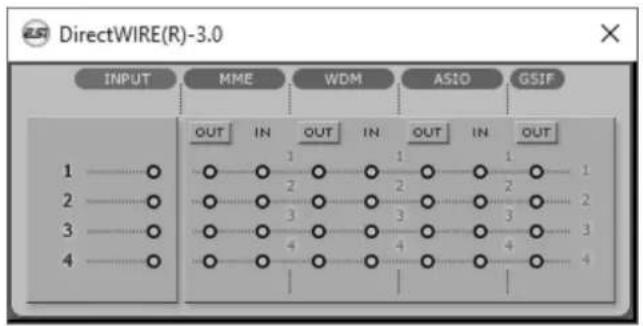
Default Settings: remove all connections in the DirectWIRE panel, when you do not want to record signals internally from one application to another.
5. Control Panel under Mac OS X
This chapter describes the U22 XT Control Panel under Mac OS X.
After the installation, the panel can be found in your Applications folder. You can launch it in the Finder via Go>Applications >U22 XT Panel. The following dialog appears:
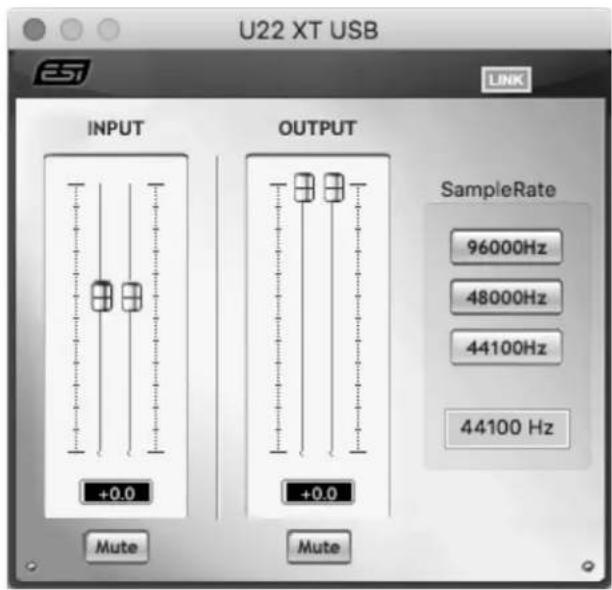
The panel has the following functions and sections:
INPUT section: this section controls the input monitoring volume of the incoming signal from the hardware. The pair of mono faders can be controlled together when the LINK function is enabled or or individually when it is disabled – perfect for stereo signals. The Mute button the channel allows you to mute the signal. A red Mute button indicates that the mute function is enabled. When disabled, the button is gray.
OUTPUT section: this section controls the playback volume of the playback signal from your audio applications. The pair of mono faders can be controlled together when the LINK function is enabled or or individually when it is disabled – perfect for stereo signals. The Mute button the channel allows you to mute playback. A red Mute button indicates that the mute function is enabled. When disabled, the button is gray.
6. Specifications
Product Overview
- 2 input / 2 output USB 2.0 24-bit Audio Interface
- line, guitar and microphone inputs
- microphone preamp with +48V phantom power support
- line output with master output volume
- adjustable headphone output
- USB bus powered
Key Features
- USB 2.0 Full Speed
- 2 input channels
- 2 output channels
- Input Type:
- 1 XLR (for microphone), +48V support
- 1 TS unbalanced Hi-Z (for guitar)
- 2 RCA unbalanced (for line signals)
- Output Type:
- 2 TRS balanced (left/right channel line signal)
- 1 headphone output (stereo)
Audio Specifications
- max. 24-bit / 96kHz
- ADC Dynamic Range:
- 102dBA@48kHz, SNR = 102dBA@48kHz
- DAC Dynamic Range:
- 108dBA@48kHz, SNR = 108dBA@48kHz
Compatibility
- supports Windows Vista, Windows 7, Windows 8 / 8.1 and Windows 10 with ASIO 2.0, MME, WDM and DirectSound incl. DirectWIRE support
- supports Mac OS X (10.4 and above) via the native CoreAudio USB audio driver from Apple (no driver install required, Mac control panel available)
7. General Information
Trademarks
ESI, U22 and U22 XT are trademarks of ESI Audiotechnik GmbH. Windows is a trademark of Microsoft Corporation. Other product and brand names are trademarks or registered trademarks of their respective companies.
The FCC and CE Regulation Warning
This device complies with Part 15 of the FCC Rules. Operation is subject to the following two conditions: (1) this device may not cause harmful interference, and (2) this device must accept any interference received, including interference that may cause undesired operation. Caution: Any changes or modifications in construction of this device with are not expressly approved by the party responsible for compliance, could void the user's authority to operate equipment.
Note: This equipment has been tested and found to comply with the limits for a Class A digital device, pursuant to Part 15 of the FCC Rules. These limits are designed to provide reasonable protection against harmful interference when the equipment is operated in a commercial environment. This equipment generates, uses, and can radiate radio frequency energy and, if not installed and used in accordance with the instruction manual, may cause harmful interference to radio communications. Operation of this equipment in a residential area is likely to cause harmful interference in which case the user will be required to correct the interference at his own expense. If necessary, consult an experienced radio/television technician for additional suggestions.
Correspondence
For technical support inquiries, contact your nearest dealer, local distributor or ESI support online at www.esi-audio.com. Please also check our extensive Knowledge Base with Frequently Asked Questions, installation videos and technical details about our products in the support section of our website.
Disclaimer
All features and specifications subject to change without notice.
Parts of this manual are continually being updated. Please check our web site www.esi-audio.com occasionally for the most recent update information.
- Professional 24-bit USB Audio Interface
- U22 XT
- User's Guide
- ESI - Copyright © 2016
- INDEX
- Introduction......4
- Installation 5
- Windows Audio Settings....8
- Control Panel under Windows 9
- Control Panel under Mac OS X....12
- Specifications....13
- General Information....14
- Introduction
- Features
- Installation
- System Recommendation
- Minimum System Requirements
- PC
- Mac
- Hardware Installation
- Driver & Software Installation
- Installation under Windows
- Installation under Mac OS X
- Windows Audio Settings
- Control Panel under Windows
- Latency settings
- DirectWIRE
- What is DirectWIRE?
- DirectWIRE Panel
- DirectWIRE Examples
- Control Panel under Mac OS X
- Specifications
- Product Overview
- Key Features
- Audio Specifications
- Compatibility
- General Information
- Trademarks
- The FCC and CE Regulation Warning
- Correspondence
- Disclaimer
Brand : ESI
Model : U22 XT
Category : Hi-Fi System