
VSE 7806 - Fridge BOMANN - Free user manual and instructions
Find the device manual for free VSE 7806 BOMANN in PDF.


| Product type | Built-in larder fridge |
| Brand | Bomann |
| Model | VSE 7806 |
| Overall dimensions (H x W x D) | 122.0 x 54.0 x 54.0 cm |
| Net weight | approx. 34.0 kg |
| Voltage / Frequency | 220-240 V ~ 50 Hz |
| Rated current | 0.6 A |
| Energy efficiency class | A++ |
| Annual energy consumption | 102 kWh |
| Total net capacity | 201 L |
| Climate class | SN/N/ST/T |
| Refrigerant | Isobutane (R600a) |
| Noise level | 42 dB(A) |
| Number of glass shelves | 4 |
| Vegetable box | 1 |
| Door storage racks | 3 |
| Egg tray | 1 |
| Interior light | LED (automatic) |
| Control panel | Electronic with ADJUST and MODE buttons |
| Functions | SMART, SUPER (quick cool) |
| Door open alarm | Yes (after 90 seconds) |
| Door reversible | Yes |
| Installation type | Built-in |
| Defrost system | Automatic |
| Included accessories | Mounting material, seal, guides, brackets, covers |
Frequently Asked Questions - VSE 7806 BOMANN
User questions about VSE 7806 BOMANN
0 question about this device. Answer the ones you know or ask your own.
Ask a new question about this device
Download the instructions for your Fridge in PDF format for free! Find your manual VSE 7806 - BOMANN and take your electronic device back in hand. On this page are published all the documents necessary for the use of your device. VSE 7806 by BOMANN.
USER MANUAL VSE 7806 BOMANN
HOUSEHOLD - BUILT-IN LARDER

natural_image
Empty white refrigerator with open doors and plastic compartments (no text or symbols visible)Special safety Information for this Unit......Page 16
Transport and Packaging......Page 18
Appliance Equipment......Page 18
Installation......Page 19
Startup / Operation......Page 21
Cleaning and Maintenance......Page 23
Troubleshooting......Page 24
Technical Data......Page 24
Thank you for choosing our product. We hope you will enjoy using the appliance.
Symbols in these Instructions for Usee Instructions for Use
Important information for your safety is specially marked. It is essential to comply with these instructions to avoid accidents and prevent damage.

WARNINGING
This warns you of dangers to your health and indicates possible injury risks.

CAUTIONCAUTION
This refers to possible hazards to the machine or other objects.

IOTENOTE highlights tips and information.
General Notes General Notes
Read the operating instructions carefully before putting the appliance into operation and keep the instructions including the warranty and the receipt. If you give this appliance to other people, please also pass on the operating instructions.

IOTENOTE
Illustrations can deviate from the original appliance.
- The appliance is designed exclusively for private use and for the envisaged purpose. This appliance is not fit for commercial use.
- The appliance is only to be used as described in the user manual. Do not use the appliance for any use other purpose. Any other use is not intended and can result in damages or personal injuries.
- Operate the appliance only properly installed.
- Do not use it outdoors. Keep it away from sources of heat, direct sunlight and humidity.
- When not in use, for cleaning, user maintenance works or with disruption, switch off the appliance and disconnect the plug (pull the plug itself, not the lead) or turn off the fuse.
- The appliance and if possible the mains lead have to be checked regularly for signs of damage. If damage is found the appliance must not be used.
- For safety reasons, alterations or modifications of the appliance are prohibited.
- To ensure your children's safety, please keep all packaging (plastic bags, boxes, polystyrene etc.) out of their reach.

WARNING
Do not allow small children to play with the foil.
There is a danger of suffocation!
Special safety Information for this Unit
- This unit is intended to be used in household and similar applications such as
- staff kitchen areas in shops, offices and other working environments;
-
farm houses and by clients in hotels, motels and other residential type environments;
-
bed and breakfast type environments;
- catering and similar non-retail applications.
WARNING: WARNING:
- Keep ventilation openings, in the appliance enclosure or in the built-in structure, clear of obstruction.
- Do not use mechanical devices or other means to accelerate the defrosting process (if necessary), except those described in this manual (depending on the model included the scope of delivery).
- Do not damage the refrigerant circuit.
- Do not operate any electrical devices inside the appliance.
- Do not store explosive substances such as aerosol containers with flammable propellant in the appliance.
- This appliance can be used by children aged from 8 years and above and persons with reduced physical, sensory or mental capabilities or lack of experience and knowledge if they have been given supervision or instruction concerning use of the appliance for way and understand the hazards involved.
- Children should not play with the appliance.
- Cleaning and user maintenance shall not be made by children dress they are older 8 years and supervised.
- NOTE: No children aged from 3 to 8 years are allowed to load and unload refrigerating appliances.
- When positioning the appliance, ensure the supply cord is not trapped or damaged.
- Do not locate multiple portable socket-outlets or portable power supplies at the rear of the appliance.
- Do not try to repair the appliance on your own. Always contact an authorized technician. To avoid the exposure to danger, always have faulty cable be replaced only by the manufacturer, by our customer service or by qualified person and with a cable of the same type.
- Use the provided collection points of electrical equipment for the disposal of the appliance.
CoolantCoolant

WARNING/Risk Notice: /Flammable
materialsmaterials
The coolant circuit of this unit contains the refrigerant Isobutane (R600a), a natural gas that is flammable and of high environmental compatibility. Make sure no parts of the coolant circuit get damaged during transport and installation of the appliance.
If the coolant circuit is damaged: rcuit is damaged:
- avoid any open flames or ignition source,
- disconnect the plug,
- thoroughly air the room in which the appliance is installed and
- contact an authorized technician.
Transport and Packaging Transport and
Transport the appliance
Transport the appliance, if possible, in vertical position. Otherwise, it is absolutely necessary to allow the appliance standing upright for a few hours before installation "Prior to first use". Protect the appliance during transport against weather influences.
Unpacking the appliance
- Remove the appliance from its packaging.
- Remove all packaging material, such as foils, filler and cardboard packaging.
in case of damage, do not put the appliance into flammable operation. Contact your distributor.
- To prevent hazards, check the appliance for any transport damage.
- In case of damage, do not put the appliance into mable operation. Contact your distributor.
i NOTE:
Production residue or dust may have collected on the appliance. We recommend cleaning the appliance according to chapter “Cleaning and Maintenance”.
Appliance Equipment
Appliance overview
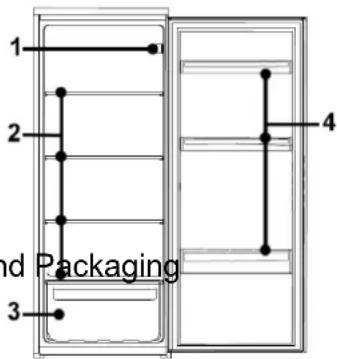
text_image
1 2 3 4 and Packaging1 Control panel / interior light
2 Glass shelves
3 Vegetable box
4 Door storage
racks
Delivery scope
4x glass shelf, 1x vegetable box, 3x door storage rack, 1x egg tray, incl. mounting material
Installation Installation
Conditions for credit installation locationr the installation location
- Good ventilation is required around the appliance to dissipate the heat properly and to guarantee efficient cooling operation at low power consumption. Enough clearance is necessary.
- Refer to the instructions which we give you in "Built-in";
- Place the appliance so that the appliance door can open without being impeded.
- Only install at a location with an ambient temperature suitable for the climate class of the appliance. For information on the climate class, please refer to the "EU Product Data Sheet" or to the rating label located in the interior or on the appliance rear.
- Look for stable, horizontal appliance position.
-
Avoid the installation: Avoid the installation:
-
near heaters, next to a stove, direct sunlight or any other heat sources;
- at locations with high humidity (e.g. outdoors, bathroom), as metal parts would be susceptible to corrosion under such circumstances;
- near volatile or flammable materials (e.g. gas, fuel, alcohol, paint, etc.), in rooms which may have poor air circulation (e.g. garages).
- Do not expose the appliance any weather.
Electrical connection Electrical connection

WARNING: WARNING:
- The installation to the mains supply must conform to the local standards and regulations.
- Improper connection may cause to an electric electric shock!
- Do not modify the appliance plug. If the plug does not fit properly to the outlet, let install a proper outlet by an authorized specialist.
-
The accessibility of the power plug must be ensured to disconnect the appliance from the power supply in case of emergency.
-
Make sure that the voltage supply matches the specifications on the rating label before connection ing.
- Connect the mains cable to a properly installed and earthed wall outlet.
- If the plug after installation is not accessible, a corresponding disconnect device must be available to meet the relevant safety regulations.
Reversing the door opening Reversing the door opening If required, the door opening can be moved from the right (supplied condition) to the left side.

WARNING:
When replacing the door stop, the appliance must be disconnected from the power supply first.

IOTE:
- Ask another person to assist.
- You possibly need: screw wrench, Phillips screw-driver as well as a thin-blade screwdriver.
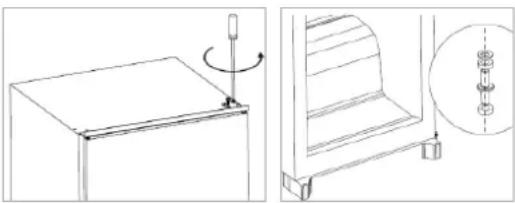
natural_image
Technical line drawing showing a mechanical assembly with a rotating component and a close-up view of a curved component (no text or symbols)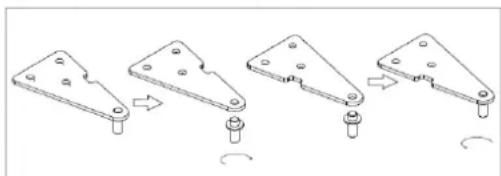
natural_image
Four-step diagram showing a mechanical bracket with mounting holes and a rotation arrow (no text or symbols)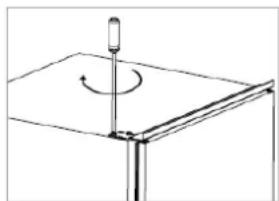
natural_image
Simple line drawing of a mechanical setup with a rotating component and a base (no text or symbols)- Dismount the upper door hinge, lift the appliance door and set the door safely aside.
- Release and move the lower hinge pin to the opposite appliance side.
- Put on the appliance door and fix it in the intended position.
- Transfer and fasten the upper door hinge to the opposite appliance side; after unscrewing the hinge pin and have reinstalled from the other hinge side.
Check that the door is aligned vertically and horizontally to ensure proper opening and closing of the door.
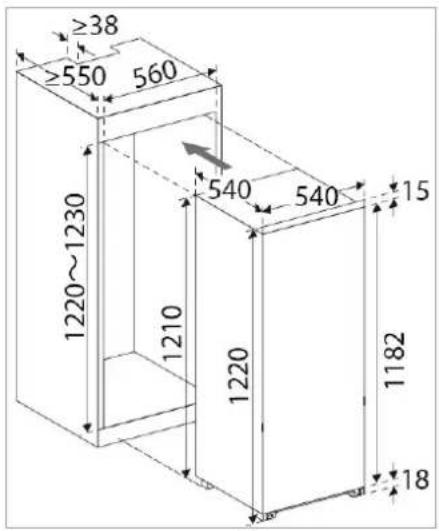
Built-in
text_image
≥38 ≥550 560 1220~1230 1210 540 540 15 1220 1182 18Figures in mm
text_image
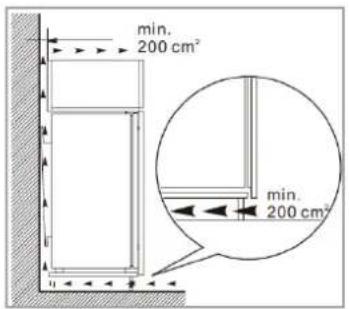
min. 200 cm² min. 200 cm²For ventilation, an exhaust duct of approx. 38 mm depth must be provided on the appliance back.
The ventilation openings in the furniture base and building must be min. 200 cm ^4 to ensure that heated air can be freely escape.
Mounting material Mounting material
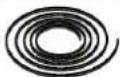 | 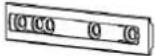 |  | 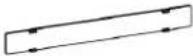 | 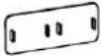 | 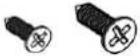 |
| (R) 1x seal (a) | 2x guide (b) | 2x bracket (c) | 2x cover (d) | 2x cover | (S1) 13x / (S2) 2x screws |
natural_image
Diagram of a rectangular box with a side panel and directional arrows, labeled 'A' (no text or symbols on the diagram itself)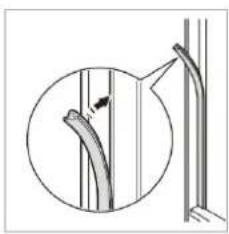
natural_image
Diagram showing a curved pipe or duct with an arrow indicating direction, enclosed in a circular inset (no text or symbols)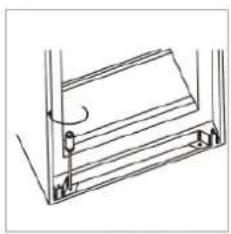
natural_image
Technical line drawing of a structural frame with no visible text or symbols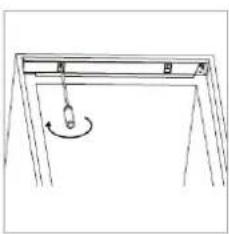
natural_image
Simple line drawing of a crane frame with a hanging hook and rotational motion indicator (no text or symbols)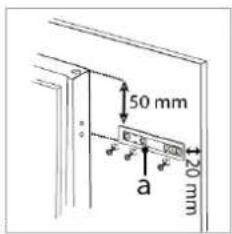
text_image
50 mm 20 mm a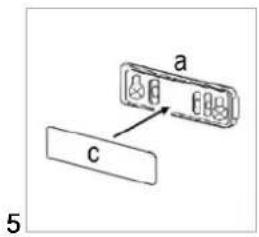
text_image
a c 5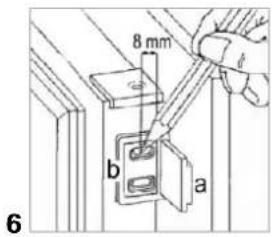
text_image
8 mm b a 6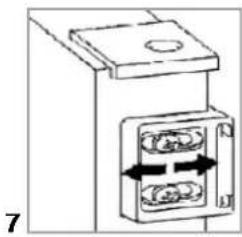
natural_image
Technical diagram showing a mechanical assembly with two components and directional arrows indicating movement (no text or symbols)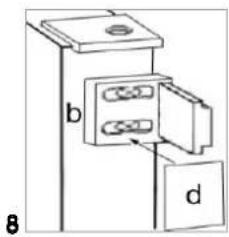
text_image
b dCAUTION:
Before drilling, check the furniture front for sufficient strength for the enclosed screw length.
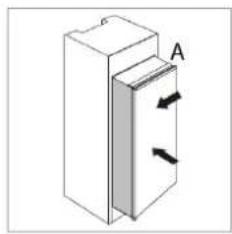
1 Install the power cord so that the appliance can be easily connected after installation. Slide the appliance into the build-in opening until the stop plate (A) abuts the furniture.
2 Press the rubber seal between the appliance and built-in furniture firmly (on the side without hinge).
3 Open the appliance door. Push the appliance side, which is located opposite the hinges, against the built-in furniture. Arrange the appliance for a secure, vertical position, fix it with the supplied screws, bottom 2x (S2) and top 2x (S1).
4 In consideration of the shown distances, hold the guide (a) at the top and bottom inside of the furniture door; mark the positions of the drill holes. After drilling, fix the guide with the screws (S1) provided.
5 Insert the cover (c) until it clicks in the guide (a).
6 Fully open the appliance and furniture door and join them together. Slide the angle (b) in the guide (a) and mark the drill holes. Remove the bracket and drill ∅ 2 mm holes with about 8 mm distance to the outer door edge. Put the bracket on again; secure it with the screws (S1) provided.
7 If an aligning of the furniture door is necessary, use the slot spacing. Check if the door is arranged vertical as well as horizontal, so that a smooth opening and closing of the door is ensured.
8 Insert the cover (b) until it clicks on the angle (b).
Startup / Opera Startup / Opera
Prior to first use Prior to first use
CAUTIONCAUTION
After transport, the appliance should be left standing upright for about four hours before connecting to the power supply. Nonobservance could lead to malfunction of the cooling system and causes an appliance breakdown.
Clean the appliance interior including all accessory parts. Consider the instructions which we provide in the chapter "Cleaning and Maintenance".
Staffing the appliancerting the appliance
- Connect the appliance to the power supply.
- Switch on the appliance and adjust the power level at the control panel. Read the following sections as well.
Control panel
text_image
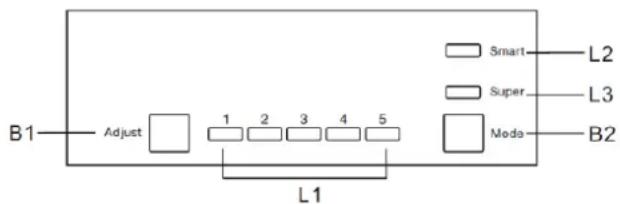
B1 Adjust 1 2 3 4 5 Smart Super Mode L2 L3 B2 L1Function buttons
B1\_ADJUST
- Keep pressing the button for about 5 seconds to switch the appliance on or off.
- Press the button several times to select the power level: 1 -> 2 -> 3 -> 4 -> 5
B2\_MODEMODE
Press the button several times to select the modes:
$$ S M A R T \rightarrow S U P E R \rightarrow U s e r ^ {\prime} s \text { setting } $$
Control lamps
L1: indicates the selection of the power level.
L2: indicates the activation of the SMART function.
L3: indicates the activation of the SUPER function.
Function description
SMART: Automatic temperature control
The indoor temperature automatically adapts to the ambient temperature of the most optimal way to preserve and store food.
SUPER: Quick cooling
When activated, the appliance operates at maximum power to speed up the cooling process.
The quick cooling function switches off automatically after about 54 hours. The indoor temperature adapts to the preset power level.
The function can be stopped at any time before the switch-off time has expired.
SettingsSettings
If the control lamps L1 are off, the appliance is in the off state. Switch on the appliance and select the desired power level.
The power levels [1-5] regulate the different values of the internal temperature.
Setting lowest setting (warmest inside temp.)
Setting5nHighest setting (coldest inside temp.)
Note that the temperature will change depending on the ambient temperature, frequency of door opening and the amount of food in the appliance.
During initial operation, turn the power level to the highest level (or SUPER) first, until the appliance has reached the desired operating temperature. Afterwards it is recommended to turn the control back to a medium setting; correcting the temperature at a later point would then be easier.
Interior light Interior light
When opening the appliance door, the interior light will turn on automatically.
Alarm/Functionfunction
Once the appliance door remains open for more than 90 seconds, 5 consecutive alarm tones sounds every 30 seconds until the door is closed.
Storing foodStoring food
NOTE: Recommendation! Recommendation!
To guarantee that the temperature is low enough, you should pre-cool the appliance a few times before initial loading foods.
CAUTION:
Always pay attention to the storage instructions on the sales packaging.
Always store food covered or packed to prevent drying-out and transfer of odor or taste onto other food items. You may pack the food with e.g.
• Polyethylene plastic bags or foil
- Plastic bowl with lid
• Special plastic cover with elastic strip
- Aluminum foil
To avoid contamination of food, respect the following instructions:
- Opening the door for long periods can cause a significant increase of the temperature in the compartments of the appliance.
- Clean regularly surfaces that can come in contact with food and accessible drainage systems (see "Cleaning and Maintenance").
- Store raw meat and fish in suitable containers in the refrigerator, so that it is not in contact with or drip onto other food.
- If the appliance is out of use for long period, follow the instructions under "Switching off".
Recommendations
- Store fresh packed items on the glass shelves, fresh fruits and vegetables in the vegetable box.
- Place bottles in the door storage racks.
-
With air circulation different climate zones arises.
-
The coldest zone is located at the rear and the lower fridge part. Recommended for the storage of foods such as fish, sausages and meat.
- The warmest zone is located at the door and the upper fridge part. Suitable for the storage of e.g. cheese and butter.
- Let warm food cool down first.
Shelves
Depending on requirements, the shelves (partially and depending on model) can be adjusted in height or removed to optimize the storage space.
Vegetable boxVegetable box
Suitable for fruits and vegetables at a temperature around 8^ C, depending on the fridge temperature.
To ensure that delicate fruits and vegetables feel good, a glass shelf above avoids the falling cold.
Operating noise Operating noise
| Type of sounds | Causau |
| Mumbling Compressor during its operation | |
| Liquid sounds Circulation of the refrigerant | |
| Click sounds The temperature control turns the compressor on or off | |
| Disturbing noises | Vibration of the shelves or cooling coils |
Switching Softening
To switch off the appliance appless the button B1 for approx. 5 seconds.
If the appliance is out of use for long periods:
- Remove the appliance content.
- Disconnect the appliance from the power supply.
- Defrost (model dependent) and clean the device thoroughly (see "Cleaning and Maintenance").
- Leave open the appliance door to avoid formation of mold and unpleased odors.
Tips for Energy saving
- Disconnect the appliance from the power supply, if it isn't in use.
- Do not install the appliance near stoves, heaters or other heat sources. In case of higher ambient temperatures, the compressor will run more frequently and longer.
- Ensure enough ventilation at the bottom and rear side. Never block ventilation openings.
-
Adjust the temperature not colder than necessary.
-
Allow warm food to cool before placing it in the appliance.
- Open the unit door only as necessary.
• Defrost the unit regularly (model dependent). - The seal of the appliance door must be completely intact, so that the door closes properly.
Cleaning and Maintiegaroe
WARNING:
- Always disconnect the appliance from the power supply before cleaning and user maintenance.
- Do not use steam cleaners for cleaning the appliance; moisture could enter electrical components.
Risk of electric shock! Hot steam could damage the plastic parts. - The unit must be dry before restarting operation.
△ CAUTION:
- Do not use a wire brush or other sharp, abrasive items.
- Do not use any acidic or abrasive detergents.
- Do not damage the refrigerant circuit.
Cleaning the appliance including interior
- Clean the appliance interior, the exterior surfaces, the accessories and the door seal regularly with warm water and mild detergent; or with a clean, damp microfiber cloth without cleaning agent.
- Remove the appliance content and storage it at a cool location.
- Clean the thaw water discharge channel / opening carefully e.g. with a pipe cleaner.
- After everything was thoroughly dried, you can restart the operation.
Defrosting
CAUTION:
Never use metal objects (e.g. knives) to remove ice from the evaporator. Otherwise it can be damaged.
The appliance has an automatic defrosting system. During defrosting water drops drains off at the back of the cooling chamber. The thaw water running through a channel, is collected in a drip tray located on the compressor, where it will evaporate. Make sure the water discharge opening does not get clogged. A light formation of ice on the interior back during operation is normal.
Changing Changbulb

CAUTION:UTION:
Do NOT move the cover of the interior light. The LED light may be replaced / repaired in case of failure / defect only by an authorized specialist.
Technical Data
Electrical connection....
Power voltage: 220-240 V\~ / 50 Hz
Rated power: 0.6 A
Dimension H x W x D / Weight....
Appliance size: 122.0 x 54.0 x 54.0 cm
Net weight: ....approx. 34.0 kg
The right to make technical and design modifications during continuous product development remains reserved.
This appliance has been tested according to all relevant current CE guidelines, such as electromagnetic compatibility and low voltage directives, and has been constructed in accordance with the latest safety
Troubleshooting Troubleshooting regulations.
Before you contact an authorized specialist Before you contact an authorized specialist
| ProblemP | Cause /ActionAction |
| Unit is not working properly or at all | Check the power supply / temperature setting / ambient temperature.Unblock the ventilation openings, install the appliance freely. |
| Loading is too warm | Check the temperature setting / ambient temperature. Open the door only as long as necessary. |
| Loud noise during operation | Check the appliance position.See the section “Operating noise”. |
| Water on the unit bottom | Check the temperature setting / water discharge channel or opening. |
| Light does not work | Check the power supply.See “Changing the bulb”. |
i NOTE:
If a problem persists after following the steps above, contact your trader or an authorized technician.
Disposal
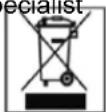
Meaning of the "Dustbin" Symbol
Protect our environment; do not dispose of electrical equipment in the domestic waste.
Please return any electrical equipment that you will no longer use to the collection points provided for their disposal.
This helps avoid the potential effects of incorrect disposal on the environment and human health. This will contribute to the recycling and other forms of reutilization of electrical and electronic equipment. Information concerning where these can be disposed of can be obtained from your local authority.

WARNING:
Remove or disable any existing snap and bolt locks, if you take the unit out of operation or dispose it.
EU Product Data Sheet EU Product Data Sheet
Product data sheet for household refrigerators/flores/ers according to regulation (EU) No. 1060/2010 No. 1060/2010
| BrandBrand | BOMANNBOMANN | |
| ModelModel | VSE 7806 | |
| Category1) | 1 | |
| Energy Efficiency class2) | A++ | |
| Annual Energy consumption3) | kWh/a | 102 |
| Net capacity cooling total | l | 201 |
| - thereof cold storage compartment | l | - |
| - thereof wine storage compartment | l | - |
| - thereof cold storage compartment | l | - |
| - thereof storage compartment for fresh-food | l | 201 |
| Net capacity freezing total | l | - |
| Star rating4) | - | |
| Design temperature of other compartments | °C | - |
| Coldest storage temperature of wine storage compartment | °C | - |
| Frost-free | - | |
| Temperature rise time | h | - |
| Freezing capacity | kg/24h | - |
| Climate class5) | SN/N/ST/T | |
| Noise emission | dB(A) re1 pW | 42 |
| Built-in | √ | |
| Wine storage appliance | - | |
1) Category: 1 = Refrigerator with one or more fresh-food storage compartments, 2 = Refrigerator-cellar, Cellar and Wine storage appliances, 3 = Refrigerator-chiller and Refrigerator with a 0-star compartment, 4 = Refrigerator with a one-star compartment, 5 = Refrigerator with a two-star compartment, 6 = Refrigerator with a three-star compartment, 7 = Refrigerator-freezer, 8 = Upright freezer, 9 = Chest freezer, 10 = Multi-use and other refrigerating appliances
2) A+++ (highest efficiency) to G (lowest efficiency)
3) Annual energy consumption „XYZ“ kWh per year based on standard test results for 24 h. Actual energy consumption will depend on how the appliance is used and where is located.
4)* = compartment: a frozen-food storage compartment in which the temperature is not warmer than -6°C
** = compartment: a frozen-food storage compartment in which the temperature is not warmer than -12°C
*** = compartment: a frozen-food storage compartment in which the temperature is not warmer than -18°C
(^**) = food freezer compartment in which the temperature is not warmer than -18^ and a min. freezing capacity in 24h
5) Climate class SN: ambient temperature of +10°C up to +32°C
Climate class N: ambient temperature of +16°C up to +32°C
Climate class ST: ambient temperature of +16°C up to +38°C
Climate class T: ambient temperature of +16°C up to +43°C