
KS 7254 - Refrigerator BOMANN - Free user manual and instructions
Find the device manual for free KS 7254 BOMANN in PDF.


| Product Type | Freestanding Refrigerator |
| Brand | Bomann |
| Model | KS 7254 |
| Dimensions (H x W x D) | 85 cm x 55 cm x 55 cm |
| Weight | Approx. 30 kg |
| Power Supply | 220-240 V, 50 Hz |
| Energy Efficiency Class | E |
| Annual Energy Consumption | Approx. 150 kWh |
| Net Capacity | Approx. 100 L |
| Climate Class | N-ST |
| Noise Level | 40 dB |
| Refrigerant | R600a |
| Defrost Type | Manual |
| Interior Light | LED |
| Shelves | Glass shelves |
| Vegetable Drawer | Yes |
| Adjustable Thermostat | Yes |
| Reversible Door | Yes |
| Spare Parts Availability | Yes, from manufacturer |
| Cleaning and Maintenance | Clean interior with mild soap; defrost regularly |
| Safety Certification | CE |
Frequently Asked Questions - KS 7254 BOMANN
User questions about KS 7254 BOMANN
0 question about this device. Answer the ones you know or ask your own.
Ask a new question about this device
Download the instructions for your Refrigerator in PDF format for free! Find your manual KS 7254 - BOMANN and take your electronic device back in hand. On this page are published all the documents necessary for the use of your device. KS 7254 by BOMANN.
USER MANUAL KS 7254 BOMANN
natural_image
Interior view of a white Fresh Zone refrigerator with open doors and storage compartments (no visible text or symbols)| Introduction page 17 | |
| General notes | page 17 |
| Special safety information for this unit | page 18 |
| Transport and packaging | page 19 |
| Appliance equipment | page 20 |
| Installation page 20 | |
| Startup / Operation page 21 | |
| Cleaning and maintenance | page 25 |
| Troubleshooting | page 26 |
| Technical data | page 26 |
| Disposal | page 27 |
Einleitung
natural_image
Illustration of hands holding a tablet with a curved arrow indicating rotation (no text or symbols)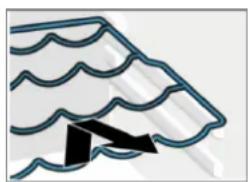
natural_image
Abstract line drawing of a stylized roof or awning with wavy lines and a black arrow pointing downward (no text or symbols)natural_image
Diagram of a mechanical assembly with two upward arrows indicating motion or force direction (no text or symbols)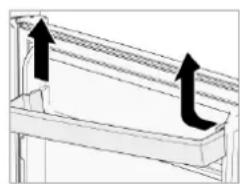
natural_image
Diagram of a mechanical or structural component with two upward arrows indicating direction (no text or symbols)natural_image
Simple line drawing of a container with an arrow indicating direction (no text or symbols)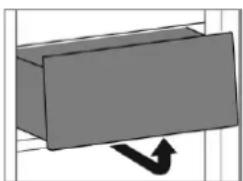
natural_image
Simple 3D diagram of a rectangular block with an arrow indicating downward motion (no text or symbols)Website: https://bomann.sparepartservice.shop/
Mail: bomann@asci-service.com
Tel: 0800 / 96 36 800
Thank you for choosing our product. We hope you will enjoy using the appliance.
Symbols in these instructions for use
Important information for your safety is specially marked. It is essential to comply with these instructions to avoid accidents and prevent damage.

WARNING:
This warns you of dangers to your health and indicates possible injury risks.

CAUTION:
This refers to possible hazards to the machine or other objects.

NOTE: This highlights tips and information.
General notes

Read the operating instructions very carefully before putting the appliance into operation and keep the instructions including the warranty and the receipt. If you give this appliance to other people, also pass on the operating instructions.

IOTE:
- Due to constant product modifications, your appliance may differ slightly from these operating instructions; functions and methods of use remain unchanged.
- The illustrations in these operating instructions are for illustrative purposes only and may differ from the original appliance.
- The appliance is designed exclusively for private use and for the envisaged purpose. This appliance is not fit for commercial use.
- The appliance is only to be used as described in the user manual. Do not use the appliance for any
other purpose. Any other use is not intended and can result in damage or personal injuries.
- This appliance is not intended to be used as a built-in appliance.
- Do not use it outdoors. Keep it away from sources of heat, direct sunlight and humidity.
- When not in use, for cleaning, user maintenance works or with disruption, switch off the appliance and disconnect the plug (pull the plug itself, not the lead) or turn off the fuse.
- The appliance and if possible, the mains lead must be checked regularly for signs of damage. If damage is found the appliance must not be used.
- For safety reasons, alterations or modifications of the appliance are prohibited.
- To ensure your children's safety, please keep all packaging (plastic bags, boxes, polystyrene etc.) out of their reach.

WARNING:
Do not allow small children to play with foil. There is a danger of suffocation!
Special safety information for this unit
- This unit is intended to be used in households and similar applications such as
- staff kitchen areas in shops, offices and other working environments;
- farm houses and by clients in hotels, motels and other residential environments;
- bed and breakfast type environments;
- catering and similar non-retail applications.

WARNING:
- Keep ventilation openings, in the appliance enclosure or in the built-in structure, clear of obstruction.
- When positioning the appliance, ensure the supply cord is not trapped or damaged.
- Do not locate multiple portable socket-outlets or portable power supplies at the rear of the appliance.
- Do not use mechanical devices or other means to accelerate the defrosting process, other than those recommended by the manufacturer.
- Do not damage the refrigerant circuit.
- Do not use electrical appliances inside the food storage compartments of the appliance, unless they are of the type recommended by the manufacturer.
- Do not store explosive substances such as aerosol containers with flammable propellants in the appliance.
- This appliance can be used by children aged from 8 years and above and people with reduced physical, sensory or mental capabilities or
lack of experience and knowledge if they have been given supervision or instruction concerning use of the appliance in a safe way and understand the hazards involved.
- Children should not play with the appliance.
- Cleaning and user maintenance shall not be done by children unless they are older 8 years and supervised.
- NOTE: Children aged from 3 to 8 years are allowed to load and unload refrigerating appliances.
- Do not repair the appliance by yourself, always consult an authorized specialist. If the supply cord is damaged, it must be replaced by the manufacturer, its service agent or similarly qualified people to avoid a hazard. In case of damage, the appliance must not be used!
- Use the provided collection points of electrical equipment for the disposal of the appliance.
Coolant

WARNING: Risk of fire / flammable
materials
The coolant circuit of this unit contains the refrigerant Isobutane (R600a), a natural gas that is flammable and of high environmental compatibility. Make sure no parts of the coolant circuit get damaged during transport and installation of the appliance.
If the coolant circuit is damaged:
- avoid any open flames or ignition source,
- disconnect the plug,
- thoroughly air the room in which the appliance is installed and
- contact an authorized technician.
Transport and packaging
Transport the appliance
Transport the appliance, if possible, in vertical position. Otherwise, it is absolutely necessary to allow the appliance standing upright for a few hours before installation "Prior to first use". Protect the appliance during transport against weather influences.
Unpacking the appliance
- Remove the appliance from its packaging.
- Remove all packaging material, such as foils, filler and cardboard packaging.
Dispose of packaging materials that are no longer required in accordance with the locally applicable regulations. - To prevent hazards, check the appliance for any transport damage.
- In case of damage, do not put the appliance into operation. Contact your distributor.
i NOTE:
Production residue or dust may have collected on the appliance. We recommend cleaning the appliance according to chapter "Cleaning and maintenance".
Appliance equipment
Appliance overview
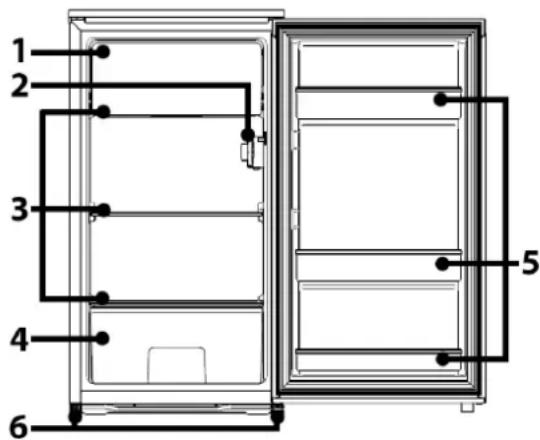
1 Fresh zone with drip tray
3 Glass shelves
2 Temperature control / interior light
4 Vegetable drawer
5 Door balconies
6 Feet
Delivery scope
2x glass shelf, 1x drawer, 3x door balcony, 1x egg tray, 1x ice cube tray, 1x condensation drip tray (below fresh zone)
Installation
Conditions for the installation location
- Good ventilation is required around the appliance to dissipate the heat properly and to guarantee efficient cooling operation at low power consumption. Enough clearance is necessary.
- Gap to the back approx. 50 \~ 70 mm, to the side walls and above the appliance each approx. min. 100 mm;
- Place the appliance so that the appliance door can open without being impeded.
- Only install at a location with an ambient temperature suitable for the climate class of the appliance. The climate class can be found under "Technical data" and on the rating label located in the interior or on the appliance rear.
- Place the appliance on a steady and safe surface. If the appliance is not horizontally leveled, adjust the feet accordingly.
-
Avoid the installation:
-
near heaters, next to a stove, direct sunlight or any other heat sources;
- at locations with high humidity (e.g. outdoors, bathroom), as metal parts would be susceptible to corrosion under such circumstances;
- near volatile or flammable materials (e.g. gas, fuel, alcohol, paint, etc.), in rooms which may have poor air circulation (e.g. garages).
- Do not expose the appliance to any weather.
Aligning the appliance stand
The front feet can be used to compensate for slight unevenness in the floor.
Check that the appliance is level. If the appliance is not level, the feet must be adjusted.
Electrical connection
WARNING:
- The installation to the mains supply must conform to the local standards and regulations.
- Improper connection may cause an electric shock!
- Do not modify the appliance plug. If the plug does not fit properly to the outlet, let a proper outlet install by an authorized specialist.
WARNING:
- The accessibility of the power plug must be ensured to disconnect the appliance from the power supply in case of emergency.
- Make sure that the voltage supply matches the specifications on the rating label before connecting.
- Connect the mains cable to a properly installed and earthed wall outlet.
- If the plug after installation is not accessible, a corresponding disconnect device must be available to meet the relevant safety regulations.
Reversing the door opening
If required, the door opening can be moved from the right (supplied condition) to the left side.
WARNING:
When replacing the door stop, the appliance must be disconnected from the power supply first.
i NOTE:
- Ask another person to assist.
- You possibly need: screw wrench, Phillips screw-driver as well as a thin-blade screwdriver.
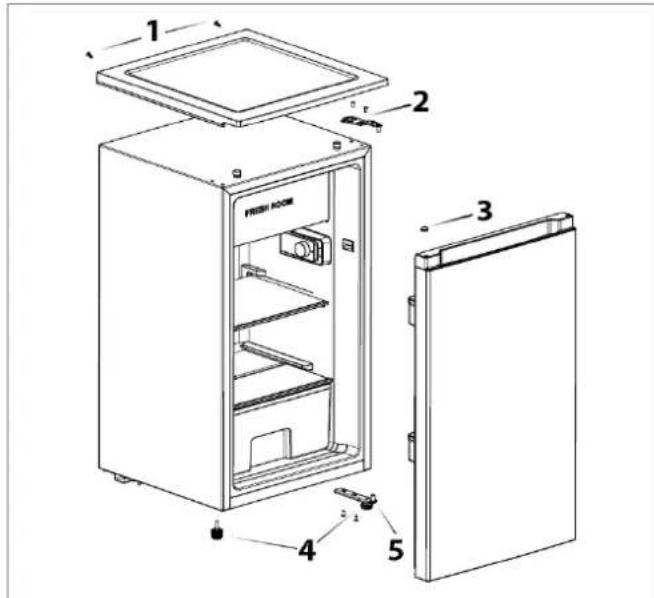
- Loosen the screws (1) on the back of the appliance and remove the appliance cover.
- Dismantle the upper door hinge (2) and lift out the appliance door. Move the blind plug (3) and place the appliance door safely aside.
- Tilt the appliance slightly backwards and block it in this position. Unscrew the feet (4). Dismantle the lower door hinge (5).
- Transfer and attach the lower door hinge (5) to the opposite side of the appliance. Screw in the feet (4) accordingly.
- Return the appliance to the upright position. Fit the appliance door and secure it in the intended position.
- Transfer and attach the upper door hinge (2) to the opposite side of the appliance.
- Fit the appliance cover and secure it with the screws (1).
Check - that the rubber door seal is evenly and firmly seated in its intended position, - that the door is optimally aligned vertically and horizontally to ensure that the door opens and closes smoothly.
Startup / Operation
Intended use
The appliance is intended for private/household use. It is suitable for cooling perishable foods such as milk, dairy products, meat, fish, eggs, margarine, various spreads and fruit and vegetables that are not sensitive to cold.
This cooling unit is not suitable for freezing food!
Prior to first use
△ CAUTION:
After transport, the appliance should be left standing upright for four hours before connecting to the power supply. Nonobservance could lead to malfunction of the cooling system and cause an appliance breakdown.
Clean the appliance interior including all accessory parts. Consider the instructions which we provide in the chapter "Cleaning and maintenance".
Starting the appliance
- Connect the appliance to the power supply.
- Set the operating conditions. See also the following sections.
Settings
Position [0] means that the appliance is in the switched-off state. Turn the temperature control clockwise from this position, the appliance switches on automatically.
The power levels [1-7] control the different values of the internal temperature.
| Power level | |
| 1, 2 | lowest level,warmest internal temperature |
| 3, 4 | medium level,optimal operating temperature |
| 5, 6, 7* | highest level,coldest internal temperature |
* Beware of high setting because the maximum level may already mean "freezing point".
The temperature of the fresh zone is automatically controlled by the power level setting in the fridge.
Basically, the temperature changes depending on the ambient temperature (place of installation), the frequency of opening the door and the equipment.
For initial operation, first set the lowest possible internal temperature (highest power level) until the appliance has reached the desired operating temperature. It is recommended to reset to a medium power level afterwards, then you can easily make any temperature correction.
Recommendation, for optimized food storage and to avoid food waste, a medium power level is generally best. A high-power level also increases energy consumption.
The recommended fridge temperature in the center of the appliance is approx. 4\~7 degrees. If the temperature in the center is correct, the different zones usually also have the correct temperature.
Interior light
When opening the appliance door, the interior light will turn on automatically.
Equipment
Note that the equipment varies depending on the type of appliance.
The various shelves and drawers can be height-adjusted (partially and model-dependent) or removed for individual storage. Practical also for cleaning purposes.
i NOTE:
For the most efficient use of energy, place all shelves/drawers in their original positions.
Removing / inserting the shelves
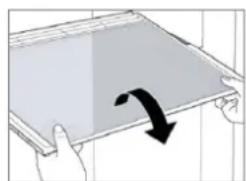
- To remove, open the appliance door completely, lift the shelf, if necessary, slant slightly and pull it out to the front.
natural_image
Illustration of hands holding a tablet with a curved arrow indicating rotation (no text or symbols)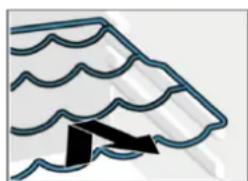
natural_image
Simple line drawing of a stylized roof or awning with wavy roof lines and a black triangular base (no text or symbols)- Insert the shelf at the desired height at a slight angle and push it in until the stop is reached.
Removing / inserting the door racks
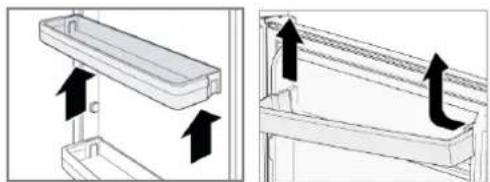
- To remove, open the appliance door completely, press the door rack upwards out of the holder or,
depending on the model, first press inwards on one side until this side can be pulled out upwards.
natural_image
Technical line drawing showing two views of a structural component with arrows indicating direction (no text or symbols)- Place the door rack flat and press both sides of the rack downwards so that it engages in the brackets.
Removing / inserting the drawers
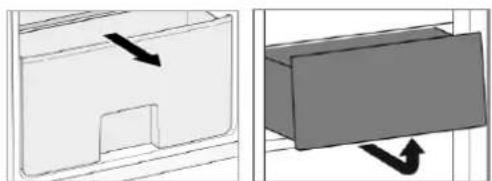
- To remove, open the appliance door completely, remove the drawer towards the front, lift it slightly if necessary, so that it can be pulled out past the stop and remove it.
natural_image
Two technical diagrams showing a 3D object with directional arrows, one in a rectangular frame and the other in a gray rectangular block (no text or symbols)- Insert the drawer, if necessary, insert the front part of the drawer into the guide rails at a slight angle and push it in completely until it is securely in place.
Egg tray
Depending on the model, a tray for storing eggs is included with the appliances.
Ice cube tray
Depending on the model, an ice cube tray for making ice cubes is included with the appliance.
- Fill the ice cube tray about 34 full of fresh drinking water. Then place the tray flat in the fresh zone for a few hours.
- To release the ice cubes from the tray more easily, you can briefly hold the tray under warm water.
Storing food
i NOTE: Recommendation!
To guarantee that the temperature is low enough, you should pre-cool the appliance a few times before initial loading foods.
△ CAUTION:
Always pay attention to the storage instructions on the sales packaging.
Always store food covered or packed to prevent drying-out and transfer of odor or taste onto other food items. You may pack the food with e.g.
• Polyethylene plastic bags or foil
- Plastic bowl with lid
• Special plastic cover with elastic strip
- Aluminum foil
To avoid contamination of food, respect the following instructions:
- Opening the door for long periods can cause a significant increase of the temperature in the compartments of the appliance.
- Clean regularly surfaces that can come in contact with food and accessible drainage systems (see "Cleaning and maintenance").
- Store raw meat and fish in suitable containers in the refrigerator, so that it is not in contact with or drip onto other food.
- Two-star ** frozen-food compartments are suitable for storing pre-frozen food, storing or making ice-cream and making ice-cubes.
- One- *, two- ** or three-star *** compartments are not suitable for the freezing of fresh food.
- If the appliance is out of use for a long period, follow the instructions under "Switching off".
Temperature zones and storage recommendations The optimal cooling temperature is around 4\~7 degrees for the central area of the cooling.
Different cooling zones are created by air circulation. Regardless of the power level, cold air drops off.
- The coldest zone is on the cooling rear wall and in the lower cooling part. Recommended for storing perishable foods such as meat, fish and sausages at around 2\~3 degrees. Be sure to pack food well or cover it appropriately.
- About that it becomes less cold. For dairy products such as yoghurt, cheese and co., the center of the cooling is just the right temperature at around 4\~7 degrees.
- Well-packed leftovers or preserves need less cooling. The upper cooling part at around 6\~8 degrees could be the right place.
- The cooling door is one of the warmest locations. The upper racks are a good location for food that needs moderate cooling, such as butter and eggs. There is space for drinks in the lower door racks.
- The vegetable drawer / crisper box (depending on the model) is suitable for fruit and vegetables at a temperature of around 8 degrees, depending on the temperature in the fridge. To ensure that sensitive fruit and vegetables in particular feel comfortable, a glass shelf above the drawer keeps the falling cold at bay and prevents moisture loss.
Fresh zone
The fresh zone allows you to store already frozen food at a temperature up to -4^ C temporarily. In addition, observe the recommended storage times on the sales packaging. However, it is especially intended for the preparation and storage of ice cubes.
Operating noise
| Type of sound | Cause |
| Mumbling | Compressor during its operation |
| Liquid sounds | Circulation of the refrigerant |
| Click sounds | The temperature control turns the compressor on or off |
| Disturbing noises | Vibration of the shelves or cooling coils |
Switching off
To switch off the appliance turn the temperature control to the off state.
If the appliance is out of use for long periods:
- Remove the appliance content.
- Disconnect the appliance from the power supply.
- Defrost (model dependent) and clean the appliance thoroughly (see "Cleaning and maintenance").
- Leave open the appliance door to avoid the formation of mold and unpleased odors.
Tips for energy saving
- Disconnect the appliance from the power supply if it isn't in use.
- Do not install the appliance near stoves, heaters or other heat sources. In case of higher ambient temperatures, the compressor will run more frequently and longer.
- Ensure enough ventilation at the bottom and rear side. Never block ventilation openings.
- Place all shelves, racks or drawers (depending on model) in their original position.
- Adjust the temperature not colder than necessary.
- Allow warm food to cool before placing it in the appliance.
- Open the appliance door only as necessary.
- Defrost the unit regularly (model dependent).
- The seal of the appliance door must be completely intact, so that the door closes properly.
Cleaning and maintenance
WARNING:
- Always disconnect the appliance from the power supply before cleaning and user maintenance.
- Do not use steam cleaners for cleaning the appliance; moisture could enter electrical components. Risk of electric shock! Hot steam could damage the plastic parts.
- The unit must be dry before restarting operation.
△ CAUTION:
- Do not use a wire brush or other sharp, abrasive items.
- Do not use any acidic or abrasive detergents.
- Do not damage the refrigerant circuit.
Cleaning the appliance including interior
To keep dirt and germs at bay, clean the appliance regularly!
- First clear out the contents of the appliance and store it in a cool place. Remove all moving parts such as shelves and drawers.
- Clean the interior of the appliance, the exterior surfaces and the accessories with lukewarm water and a mild cleaning agent; or with a clean, damp microfiber cloth without cleaning agent.
- Carefully clean the drip tray underneath the fresh zone, depending on the model clean the defrost water drainage channel and opening on the rear wall inside the appliance, e.g. with a pipe cleaner.
- After everything has dried thoroughly, you can put the appliance back into operation.
- Depending on the model, wipe off the dust, at least once a year, that has accumulated on the rear wall of the unit and on the condenser (metal grille). Use a soft brush or a vacuum cleaner for this purpose.
Cleaning / replacing the door seal
Regularly check the seal for dirt, damage and air tightness!
Checking the seal for air tightness
- Clamp a thin piece of paper at various points for testing. The paper must be equally difficult to pull through at all points.
Cleaning the gasket
- Clean the gasket with clear water only!
- CAUTION, grease and oil make the seal porous and brittle. Wipe up grease or oil immediately with a damp, clean cloth.
Replacing the seal
- Remove the contents of the appliance and, if necessary, defrost the unit. Pay attention to how the old gasket is attached. Most gaskets are only plugged in.
- Remove the worn gasket rubber by removing it from the groove. Carefully clean the appliance door and the groove below the rubber and remove any adhesive residue.
- Attach the new rubber. If necessary, heat the rubber seal with a hair dryer or hot water and shape it by hand. Start pressing the gasket in one corner and then pressing it around the door into the groove provided for this purpose.
- Continue to check the seal regularly for dirt and damage!
Defrosting
△ CAUTION:
Never use metal objects (e.g. knives) to remove ice from the evaporator. Otherwise, it can be damaged.
To achieve better cooling and to save energy, defrost the appliance regularly.
- To start the defrosting process, turn the temperature control to the off state and disconnect the appliance from the power supply.
- Remove the appliance content and keep covered at a cool location.
- Once the ice has melted, empty the condensation drip tray below the chilling compartment; wipe up the condensation water and dry the unit interior.
- Then you may restart the appliance by connecting the plug and turning the temperature control.
Changing the light
CAUTION:
Do NOT remove the cover of the light. The LED light may be replaced / repaired in case of failure / defect only by an authorized specialist.
Replacing the door hinge
If the appliance door starts to stutter, crack or jam when you open it, it is probably due to a worn or damaged hinge.
It is recommended to replace all door hinges at the same time, otherwise the next repair will soon be beckoning.
- Remove the contents of the appliance and the movable interior parts.
- Tilt the appliance backwards and block it in this position to prevent the door from sliding out.
- The disassembly of the upper and lower door hinges is done as described under "Reversing the door opening".
- The respective hinge assembly is carried out in reverse order.
- Open and close the appliance door for a test run, readjust the hinges if necessary. In any case, make sure that the door fits tightly and accurately.
Troubleshooting
Before you contact an authorized specialist
| Problem / cause / action |
| Appliance is not working properly or at all |
| - Check the power supply / temperature setting / ambient temperature.- Unblock the ventilation openings, install the appliance freely. |
| Loading is too warm |
| - Check the temperature setting / ambient temperature.- A large quantity of warm food has been stored in the unit in the last 24 hours.- The appliance door is not closed properly, check the door seal. |
| Loud noise during operation |
| - Check that the appliance is level.- See "Operating noise". |
| Water on the appliance bottom |
| Check temperature setting / condensation drip tray / water discharge channel or opening (depending on model). |
| Light does not work |
| - Check the power supply.- See "Changing the light". |
i NOTE:
If a problem persists after following the steps above, contact your trader or an authorized technician.
Technical data
Climate class N/ST: this appliance is intended to be used at ambient temperature ranging from 16°C to 38°C.
Electrical connection....
Power voltage: 220-240 V\~ / 50 Hz
Rated power: 60 W
Rated current: 2.0 A
Dimension H x W x D / weight.....
Appliance size: 83.5 x 44.5 x 47.0 cm
Net weight: ....approx. 19.0 kg
For more information about the product, scan the QR code on the supplied energy label and/or visit the official website of the product data bank:
https://eprel.ec.europa.eu
The right to make technical and design modifications during continuous product development remains reserved.
This appliance has been tested according to all relevant current CE guidelines, such as electromagnetic compatibility and low voltage directives, and has been constructed in accordance with the latest safety regulations.
Disposal
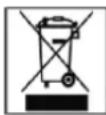
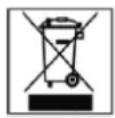
Meaning of the "Dustbin" symbol
This symbol indicates that this product must not be disposed of with household waste in accordance with the Waste Electrical and Electronic Equipment Directive (2012/19/EU) and national legislation.
Improper handling of waste electrical and electronic equipment can have negative effects on the environment and human health due to potentially hazardous substances that are often contained in waste electrical and electronic equipment.
Consumers are legally obliged to dispose of electrical and electronic appliances separately from unsorted municipal waste at the end of their service life. By disposing of this product properly, you are also contributing to the effective utilization of natural resources.
Information on collection points for old appliances can be obtained from your local authority, the public waste disposal authority, an authorized body for the disposal of old electrical and electronic appliances or your waste collection service.
This product must be returned to a designated collection point. This can be done, for example, by returning it when purchasing a similar product or by handling it in at an authorized collection point for the recycling of old electrical and electronic equipment. The return of old appliances is free of charge. Your dealer or contractual partner is also obliged to take back the old appliance free of charge.
Before disposing of the product, remove all batteries and rechargeable batteries as well as all lamps that can be removed without destroying them.
Please note that you are responsible for deleting personal data from the product to be disposed of.
WARNING:
Remove or destroy any existing latches and bolt locks when you take the appliance out of operation or dispose of it.
Polski
Wstep
natural_image
Illustration of hands holding a tablet with a curved arrow indicating rotation (no text or symbols)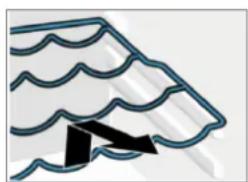
natural_image
Simple line drawing of a stylized roof or awning with wavy lines and a black arrow pointing to the base (no text or symbols)natural_image
Diagram of a mechanical assembly with two components and directional arrows indicating movement (no text or symbols)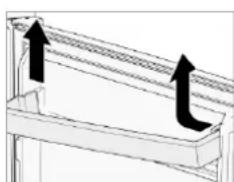
natural_image
Diagram of a mechanical or structural component with two upward arrows indicating direction (no text or symbols)natural_image
Simple line drawing of a door with an arrow indicating direction (no text or symbols)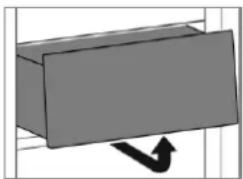
natural_image
3D diagram of a rectangular block with an arrow indicating direction (no text or symbols)Masa netto: ......ok. 19,0 kg
CTC Clatronic Sp. z o.o
UI. Brzeska 1
45-960 Opole
Usuwanie
- Einleitung
- WARNING:
- CAUTION:
- General notes
- IOTE:
- Special safety information for this unit
- Coolant
- WARNING: Risk of fire / flammable
- materials
- If the coolant circuit is damaged:
- Transport and packaging
- Transport the appliance
- Unpacking the appliance
- i NOTE:
- Appliance equipment
- Delivery scope
- Installation
- Conditions for the installation location
- Aligning the appliance stand
- Electrical connection
- Startup / Operation
- Intended use
- Prior to first use
- △ CAUTION:
- Starting the appliance
- Settings
- Interior light
- Equipment
- Removing / inserting the shelves
- Removing / inserting the door racks
- Removing / inserting the drawers
- Egg tray
- Ice cube tray
- Storing food
- i NOTE: Recommendation!
- To avoid contamination of food, respect the following instructions:
- Fresh zone
- Switching off
- Tips for energy saving
- Cleaning and maintenance
- Cleaning the appliance including interior
- Cleaning / replacing the door seal
- Checking the seal for air tightness
- Cleaning the gasket
- Replacing the seal
- Defrosting
- Changing the light
- Replacing the door hinge
- Troubleshooting
- Technical data
- Disposal
- Meaning of the "Dustbin" symbol
- Polski
- Wstep
- Usuwanie
Brand : BOMANN
Model : KS 7254
Category : Refrigerator