
C510 - Printer LEXMARK - Free user manual and instructions
Find the device manual for free C510 LEXMARK in PDF.


| Product Type | Color Laser Printer |
| Model | Lexmark C510 |
| Print Technology | Laser |
| Color Capability | Color |
| Functions | Print only |
| Dimensions (W x D x H) | 430 x 480 x 390 mm (approx) |
| Weight | 25 kg (approx) |
| Power Input | 110-127V or 220-240V AC, 50-60 Hz |
| Power Consumption | Standby: 20 W, Printing: 400 W (approx) |
| Print Speed (Color) | Up to 30 ppm |
| Print Speed (Black) | Up to 35 ppm |
| Maximum Paper Size | Legal (216 x 356 mm) / A4 |
| Paper Capacity (Standard) | 250 sheets |
| Connectivity | USB 2.0, Parallel, Optional Ethernet |
| Display | 16-character LCD |
| Maintenance | Clean exterior with soft cloth; replace toner cartridges and waste toner box |
| Safety | Class 1 laser product; avoid direct exposure to laser beam |
| Spare Parts | Toner cartridges (cyan, magenta, yellow, black), drum unit, fuser |
| Warranty | One year limited warranty |
Frequently Asked Questions - C510 LEXMARK
User questions about C510 LEXMARK
0 question about this device. Answer the ones you know or ask your own.
Ask a new question about this device
Download the instructions for your Printer in PDF format for free! Find your manual C510 - LEXMARK and take your electronic device back in hand. On this page are published all the documents necessary for the use of your device. C510 by LEXMARK.
USER MANUAL C510 LEXMARK
Edition: December 2003
The following paragraph does not apply to any country where such provisions are inconsistent with local law: LEXMARK INTERNATIONAL, INC., PROVIDES THIS PUBLICATION "AS IS" WITHOUT WARRANTY OF ANY KIND, EITHER EXPRESS OR IMPLIED INCLUDING, BUT NOT LIMITED TO, THE IMPLIED WARRANTIES OF MERCHANTABILITY OR FITNESS FOR A PARTICULAR PURPOSE. Some states do not allow disclaimer of express or implied warranties in certain transactions; therefore, this statement may not apply to you.
This publication could include technical inaccuracies or typographical errors. Changes are periodically made to the information herein; these changes will be incorporated in later editions. Improvements or changes in the products or the programs described may be made at any time.
Comments about this publication may be addressed to Lexmark International, Inc., Department F95/032-2, 740 West New Circle Road, Lexington, Kentucky 40550, U.S.A. In the United Kingdom and Eire, send to Lexmark International Ltd., Marketing and Services Department, Westhorpe House, Westhorpe, Marlow Bucks SL7 3RQ. Lexmark may use or distribute any of the information you supply in any way it believes appropriate without incurring any obligation to you. You can purchase additional copies of publications related to this product by calling 1-800-553-9727. In the United Kingdom and Eire, call +44 (0)8704 440 044. In other countries, contact your point of purchase.
References in this publication to products, programs, or services do not imply that the manufacturer intends to make these available in all countries in which it operates. Any reference to a product, program, or service is not intended to state or imply that only that product, program, or service may be used. Any functionally equivalent product, program, or service that does not infringe any existing intellectual property right may be used instead. Evaluation and verification of operation in conjunction with other products, programs, or services, except those expressly designated by the manufacturer, are the user's responsibility.
Lexmark, Lexmark with diamond design, and MarkNet are trademarks of Lexmark International, Inc., registered in the United States and/or other countries.
ImageQuick and PrintCryption are trademarks of Lexmark International, Inc.
PostScript® is a registered trademark of Adobe Systems Incorporated. PostScript 3 is Adobe Systems' designation of a set of printer commands (language) and functions included in its software products. This printer is intended to be compatible with the PostScript 3 language. This means the printer recognizes PostScript 3 commands used in various application programs, and that the printer emulates the functions corresponding to the commands.
Other trademarks are the property of their respective owners.
© 2003 Lexmark International, Inc. All rights reserved.
UNITED STATES GOVERNMENT RIGHTS
This software and any accompanying documentation provided under this agreement are commercial computer software and documentation developed exclusively at private expense.
FCC emissions information
This product complies with the limits for a Class B digital device, pursuant to Part 15 of the FCC Rules. Operation is subject to the following two conditions:
(1) this device may not cause harmful interference, and
(2) this device must accept any interference received, including interference that may cause undesired operation.
Any questions on this statement should be directed to:
Director of Lexmark Technology & Services
Lexmark International, Inc.
740 West New Circle Road
Lexington, KY 40550
(859) 232-3000
Refer to the online documentation for additional compliance information.
Safety information
- If your product is not marked with this symbol ☐, it must be connected to an electrical outlet that is properly grounded. CAUTION: Do not set up this product or make any electrical or cabling connections, such as the power cord or telephone, during a lightning storm.
- The power cord must be connected to an electrical outlet that is near the product and easily accessible.
- Refer service or repairs, other than those described in the operating instructions, to a professional service person.
- This product is designed, tested, and approved to meet strict global safety standards with the use of specific Lexmark components. The safety features of some parts may not always be obvious. Lexmark is not responsible for the use of other replacement parts.
- Your product uses a laser. CAUTION: Use of controls or adjustments or performance of procedures other than those specified herein may result in hazardous radiation exposure.
- Your product uses a printing process that heats the print media, and the heat may cause the media to release emissions. You must understand the section in your operating instructions that discusses the guidelines for selecting print media to avoid the possibility of harmful emissions.
Conventions
It may help you to recognize the caution and warning conventions used in this document.
CAUTION: A caution identifies something that could cause you harm.
Warning: A warning identifies something that could damage your product hardware or software.
Attention!

This symbol identifies static-sensitive parts. Do not touch in the areas near these symbols without first touching the metal frame of the printer.
Contents
Introduction....1
About the printer ....1
Other sources of information 2
Step 1: Unpack the printer ....4
Getting ready for setup 4
Step 2: Install printer supplies ....6
Installing toner cartridges 6
Installing the photodeveloper cartridge .....9
Step 3: Position the optional drawer ..... 11
Step 4: Prepare the printer ..... 12
Positioning the printer .....12
Securing the drawer to the printer 13
Attaching an operator panel overlay .....15
Adjusting tray 2 margins .....16
Step 5: Set up the optional duplex unit ..... 17
Attaching the optional duplex unit .....17
Adjusting duplex margins .....21
Step 6: Install memory, firmware, or option cards ..... 22
Removing the system board .....23
Installing printer memory .....24
Contents
Installing an optional flash memory or firmware card .....25
Reinstalling the system board .....27
Step 7: Load paper 28
Loading the trays 29
Step 8: Attach cables ...... 32
Attaching a local cable ....32
Attaching a network cable .....34
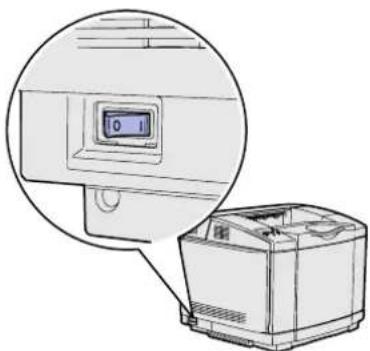
Turning your printer on ....35
Step 9: Install drivers for local printing ..... 36
Windows 37
Macintosh 41
UNIX/Linux 42
Step 10: Verify printer setup .....44
Printing a menu settings page 44
Printing a network setup page 45
Printing Quick Reference information .....45
Step 11: Configure for TCP/IP 47
Assigning a printer IP address .....47
Verifying the IP settings 48
Configuring for Pull Printing 48
Step 12: Install drivers for network printing ..... 49
Windows 49
Macintosh ....53
UNIX/Linux 55
NetWare ....56
Step 13: Using the publications CD ..... 57
Viewing the CD contents .....57
Distributing the information .....58
Storing Quick Reference information .....58
Contents
Introduction
About the printer Your printer is available in three models:
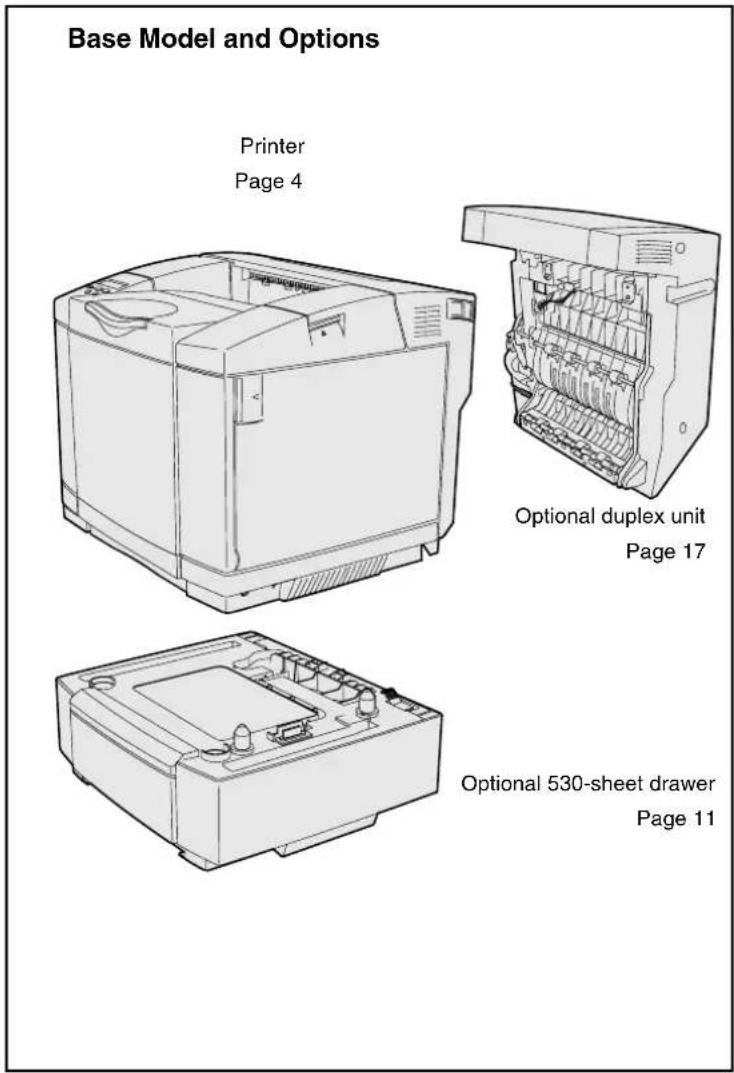
- Lexmark C510, with 64MB of standard memory, one 250-sheet tray, and USB and parallel connectors.
- Lexmark C510n, which has 128MB of standard memory, as well as an Ethernet 10BaseT/100BaseTX print server installed, with an Ethernet connector.
- Lexmark C510dtn, which has the same features as the C510n, as well as a duplex unit and a 530-sheet drawer.
You can purchase several different options for your printer. Launch the publications CD and then click User's Reference. Look for printer overview information.
Introduction
Other sources of information If you need more information after you
have completed setup, refer to the other printer documentation.
Publications CD The publications CD provides
information about loading media, clearing error messages, ordering and replacing supplies, and troubleshooting. It also provides general information for administrators.
The information on the publications CD is also available on our Lexmark Web site at www.lexmark.com/publications.
Information pages Information pages are stored inside the
printer. They provide information about loading print media, diagnosing and solving print problems, and clearing jams from the printer. The following is a list of guides available from the Help Menu:
- Help Guide
- Printing Guide
-
Jam Clearance
-
Print Quality
-
Color Quality
• Media Guide -
Connection Guide
- Supplies Guide
- Moving Guide
- Print Defects
To print these pages:
1 On the operator panel, press Menu until you see Help Menu.
2 Press Menu until you see the topic you want to print, and then press Select.
We strongly recommend that you print the Jam Clearance guide and keep it by the printer. These pages are also available on the publications CD that shipped with your printer.
Introduction
Quick Reference sheet
The printer Quick Reference provides easy access to information about loading media, clearing jams, printing confidential jobs, and understanding common printer messages.
This information is also available, in a printable format, on the publications CD that shipped with your printer.
Drivers CD The drivers CD contains all the
necessary files to get your printer up and running. It may also contain printer utilities, screen fonts, and additional documentation.
Lexmark Web site
Visit our Web site at www.lexmark.com for updated printer drivers, utilities, and other printer documentation.
Step 1: Unpack the printer
Getting ready for setup

Select a well ventilated location for your printer that provides room for the trays, cover, and doors. Choose a firm, level surface away from direct airflow and temperature extremes.
| Total clearance needed with options | |||
| Optional 530-sheet tray | Optional duplex unit Both | ||
| Height 73.5 cm (29 in.) | 63.8 cm (25.1 in.) | 73.5 cm (29 in.) | |
| Rear 25 cm (10 in.) | 35 cm (14 in.) | 35 cm (14 in.) | |
CAUTION: The printer weighs 30.4 kg (67 lb), and requires at least two people to lift it safely.
Note: To avoid overexposing the photodeveloper cartridge, leave it in its packaging until you are ready to install it.
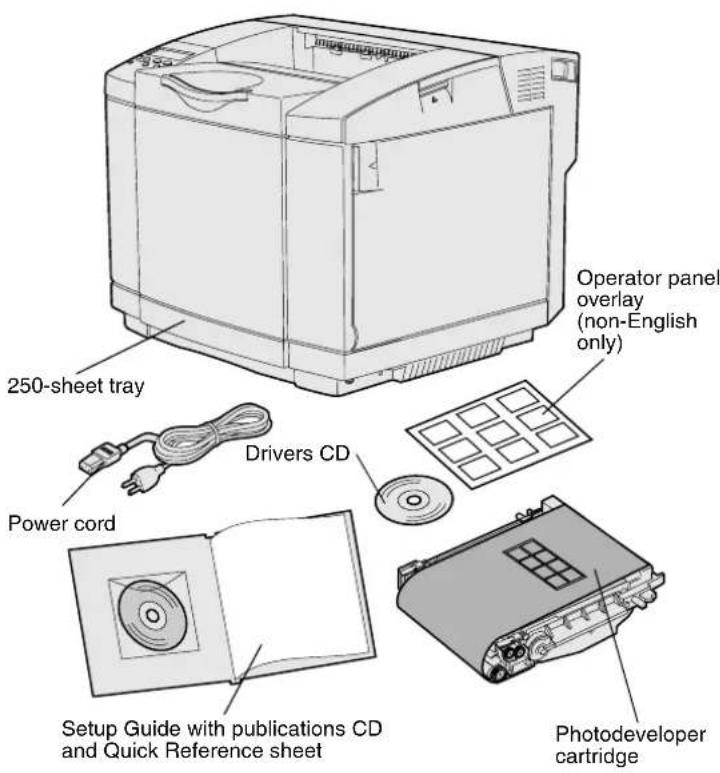
Remove all items from the box. Make sure you have the following items:
• Printer with one 250-sheet tray
- Power cord
• Photodeveloper cartridge
• Print cartridges (four, shipped inside printer, wrapped in packaging)
- Setup Guide with a publications CD and Quick Reference sheet
- Drivers CD
- Operator panel overlay (non-English only)
If any items are missing or damaged, refer to our Lexmark Web site at www.lexmark.com for the designated Lexmark support phone number for your country.
Remove any tape and packing material from the printer. Save the carton and packing material in case you need to repack the printer.
Step 2: Install printer supplies
Installing toner cartridges Follow the instructions in this section to prepare the toner cartridges.

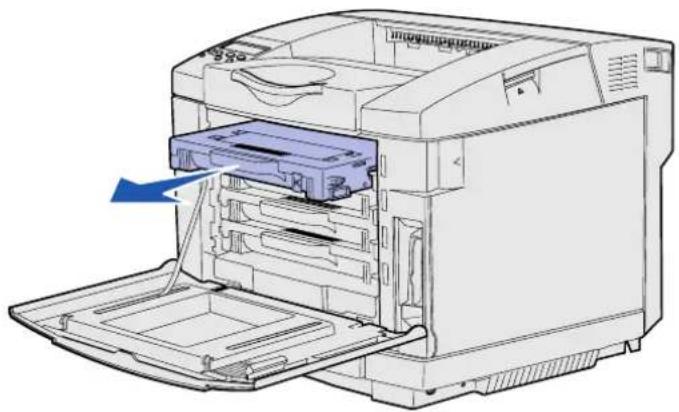
1 Pull the front door release latch forward and gently lower the front door.
2 Remove the packaging.
3 Grasp one of the toner cartridges by the handle and pull it straight out.
natural_image
Line drawing of an open printer with a blue arrow indicating the paper feed (no text or symbols present)Install printer supplies

natural_image
Two technical diagrams showing a device's internal structure before and after assembly, with blue arrows indicating motion (no text or symbols present)4 Hold the cartridge level, and gently shake it to distribute the toner.
5 Remove the tape and cover from the cartridge.
Install printer supplies
Warning: Do not touch the roller surface under the cartridge cover. Touching the surface may damage the roller.

6 Grasp the cartridge by the handle.
7 Align the cartridge with the appropriate slot and slide the cartridge in.
Toner cartridges must remain in their original order; they are not interchangeable in the slots.
8 Repeat step 3 on page 6 through step 7 on page 8 to set up the other cartridges.
9 Close the front door.
Install printer supplies
Installing the photodeveloper cartridge
natural_image
Two technical line drawings of a printer or printer with an arrow indicating rotation (no text or symbols present)Warning: The photodeveloper is very delicate. To avoid damaging it, do not remove its packaging until you are ready to install it.

natural_image
Diagram of a printer or scanner with blue arrows indicating rotation or movement (no text or symbols present)Follow the instructions in this section to install the photodeveloper cartridge.
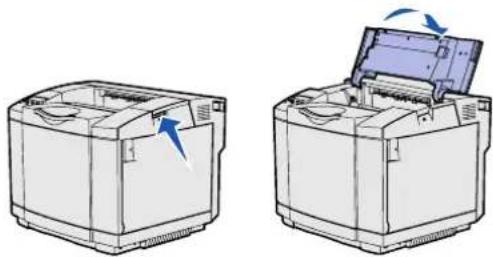
1 Open the printer top door.
2 Carefully remove the packaging, pins, and tape from the photodeveloper cartridge.
Install printer supplies
Warning: Do not touch the shiny photoconductor film on the photodeveloper cartridge.

natural_image
Diagram of a printer with arrows indicating process flow, showing internal structure and control panel (no text or symbols)3 Grasp the cartridge by the handle and align it with its opening. Gently lower it into place.
natural_image
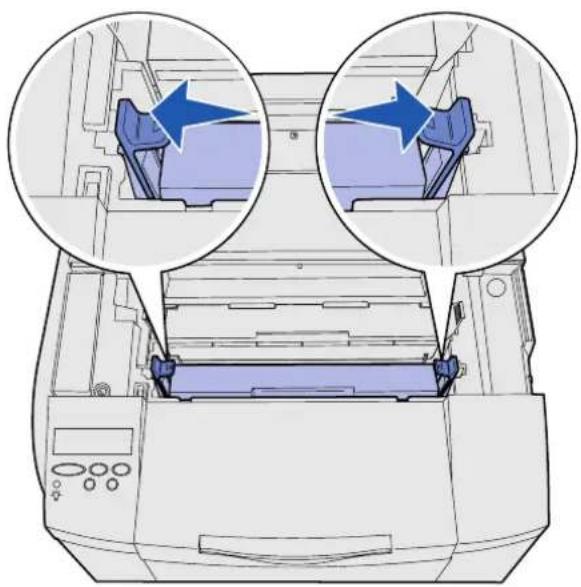
Diagram of a printer with two views of the lid showing internal components (no text or symbols)4 Push the latches away from each other to lock the cartridge into place.
5 Close the top door.
Install printer supplies
Step 3: Position the optional drawer
CAUTION: If you are adding an optional drawer sometime after setting up the printer, be sure to turn the printer off, unplug the power cord, and disconnect all cables from the back of the printer before completing these tasks.

natural_image
Illustration of a mechanical housing with internal components and a separate view of a plastic part (no text or symbols)
natural_image
3D diagram of a computer case with internal components and a blue arrow indicating motion (no text or symbols)Note: When you add or remove the optional drawer, remember to update the printer configuration through your printer driver.
Your printer supports an optional 530-sheet drawer. The optional drawer consists of a support unit and a tray.
1 Unpack the box. Enclosed are:
- a support unit with the tray inside
- two side covers (left and right)
- two metal brackets (left and right) with thumbscrews
2 Remove all packing material and tape from the support unit.
3 Pull the tray out of the support unit. Remove any packing material and tape from the tray.
4 Move the support unit to the location selected for the printer.
5 Tip the tray slightly and push it fully into the support unit.
Step 4: Prepare the printer
Positioning the printer Once you have selected a location and
positioned an optional drawer (if you have one), you are ready to position the printer.
Note: If you have optional memory to install, leave clearance behind the printer.
CAUTION: The printer weighs 30.4 kg (67 lb), and requires at least two people to lift it safely.

Lift the printer by the recessed handholds on both sides, and place it on the table or optional drawer.
To position the printer on an optional drawer:
1 Align the posts, slots, and connector on the drawer with the underside of the printer.
2 Lower the printer into place. Make sure it is seated securely on the drawer.
Prepare the printer
Securing the drawer to the printer If you have an optional drawer, secure it to the printer.
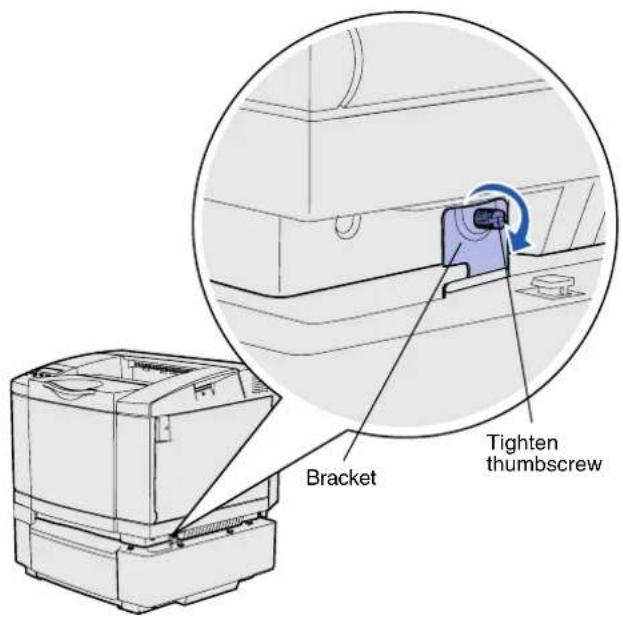
1 Align one bracket with the hole on the right side of the printer as shown. Press the bracket flat against the printer, and then tighten the thumbscrew.

natural_image
Diagram of a printer with internal components and airflow arrows, no text or symbols present2 Starting at the front of the printer, push the right side cover onto the printer, fitting each slot on the cover over its corresponding tab on the optional drawer, to cover the gap between the printer and the optional drawer.
Note the side cover orientation. The side cover is flat on the bottom.
Prepare the printer

3 Align the other bracket with the hole on the left side of the printer as shown. Press the bracket flat against the printer, and then tighten the thumbscrew.

natural_image
Line drawing of a printer with blue airflow arrows indicating fluid or movement (no text or symbols)4 Starting at the front of the printer, push the left side cover onto the printer, fitting each slot on the cover over its corresponding tab on the optional drawer, to cover the gap between the printer and the optional drawer.
Note the side cover orientation. The side cover is flat on the bottom.
Prepare the printer
Attaching an operator panel overlay
If English is not your preferred language and your printer shipped with an operator panel overlay, attach the overlay that has the appropriately translated button names:

natural_image
Line drawing of a car interior with a blue arrow pointing to a component on the door (no text or symbols)1 Peel the protective backing off the overlay.
2 Align the holes in the overlay with the lights and buttons on the operator panel, and then press the overlay into place. Rub firmly to transfer the overlay labels.
3 Peel the overlay off the printer.
Adjusting tray 2 margins Adjusting tray 2 margins ensures your
margins are consistent when tray linking is enabled.
1 Load plain paper in both trays.
2 From the printer operator panel, press Menu until you see Setup Menu, and then press Select.
3 Press Menu until you see Left Margin, and then press Select.
4 Press Menu until you see Tray 2, and then press Select.
5 Press Go.
Two pages print.
6 Follow the instructions on the printed pages to determine the left margin value you need.
7 Repeat steps 1–4, press Menu until you see the left margin value you need, and then press Select.
Step 5: Set up the optional duplex unit
Attaching the optional duplex unit
Your printer supports an optional duplex unit which lets you print on both sides of a page.
CAUTION: If you are installing an optional duplex unit sometime after setting up the printer, turn the printer off and unplug the power cord before continuing.
1 Unpack the duplex unit and discard the packing material.

natural_image
Diagram of a computer monitor with two blue arrows indicating directional control or movement, showing internal components and a scroll wheel (no text or symbols present)Note: When you add or remove the optional duplex unit, remember to update the printer configuration through your printer driver.
2 Use a flathead screwdriver to carefully remove the connector cover, and the upper and lower duplex covers, from the back of the printer.

natural_image
Diagram of a computer monitor with cable and ventilation slots, showing internal components without any text or symbols.3 Insert the bottom of the duplex unit into the lower opening as shown.
4 Pull up on the top of the duplex unit as you swing it up over the top of the printer, and then press it down so that it locks fully into the upper opening.
When the duplex unit is mounted correctly, there is a small and even gap between the duplex unit and the top of the printer, visible from the front of the printer.
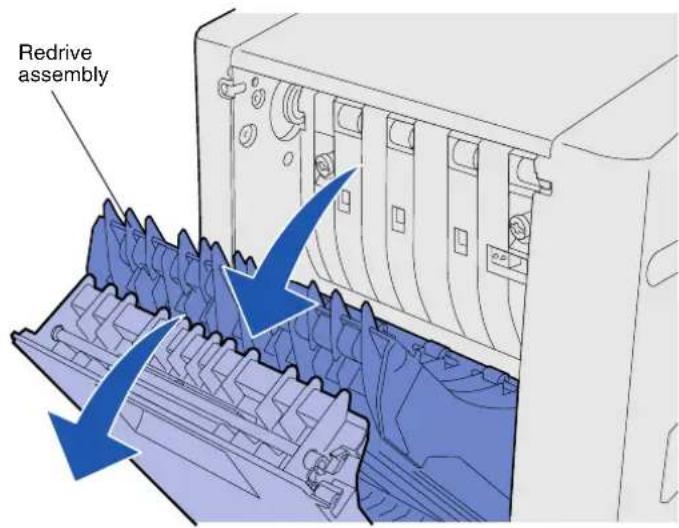
5 Open the duplex rear door and pull down the redrive assembly.

natural_image
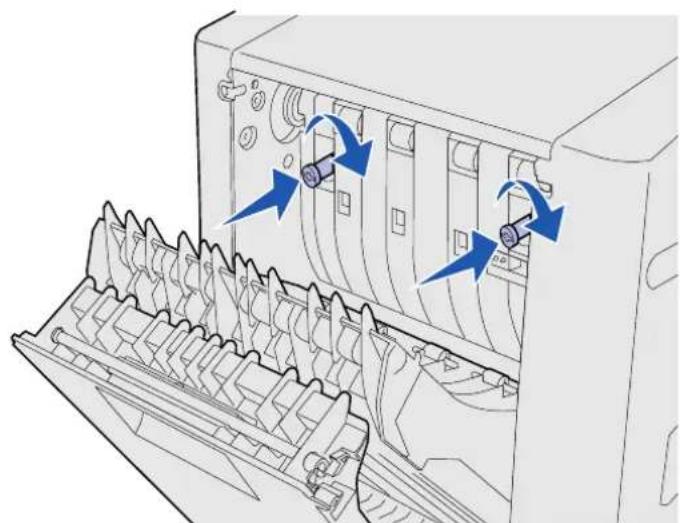
Technical line drawing of a server rack with two blue arrows indicating internal components (no text or symbols present)6 Pull the two green thumbscrews out to extend them.
natural_image
Technical line drawing of a computer tower with ventilation slots and scrollbars (no text or symbols)7 Push each green thumbscrew gently toward the printer as you turn it clockwise to tighten it fully. If necessary, use a flathead screwdriver to tighten the screws. Then, push the thumbscrews firmly toward the printer to collapse them.
Note: Failure to collapse the green thumbscrews can cause jams.
8 Push up the redrive assembly and close duplex rear door.
natural_image
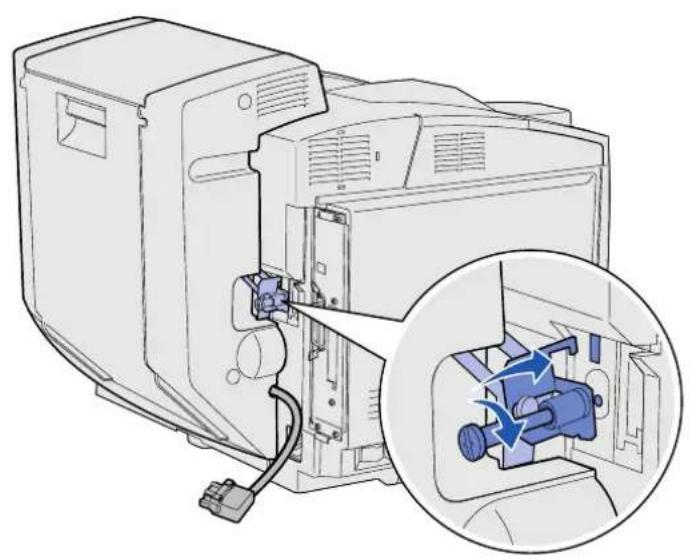
Technical line drawing of a mechanical device with an inset showing internal components (no text or symbols)9 Hook the bracket into the slot, and then turn the mounting screw clockwise to tighten.

natural_image
Technical diagram of a computer monitor internal structure with an inset showing a close-up of the internal components (no text or symbols present)10 Plug in the duplex connector as shown. The duplex connector release latch must face away from the duplex unit.
Set up the optional duplex unit
Adjusting duplex margins Adjusting duplex margins ensures your
margins are consistent when two-sided printing is selected.
1 Load plain paper in the standard tray.
2 From the printer operator panel, press Menu until you see Setup Menu, and then press Select.
3 Press Menu until you see Left Margin, and then press Select.
4 Press Menu until you see Duplex, and then press Select.
5 Press Go.
Two pages print.
6 Follow the instructions on the printed pages to determine the left margin value you need.
7 Repeat steps 1–4, press Menu until you see the left margin value you need, and then press Select.
Step 6: Install memory, firmware, or option cards
CAUTION: If you are installing memory or option cards sometime after setting up the printer, turn the printer off and unplug the power cord before continuing.
You can customize your printer memory capacity and connectivity by adding optional cards.
The instructions in this section help you install any of the following:
- Memory cards
- Printer memory
- Flash memory
-
Fonts
-
Firmware cards
- Bar code
- ImageQuick™
- PrintCryption™
Note: You need a small Phillips screwdriver to remove the system board access cover.
Removing the system board Follow the instructions in this section to remove the printer system board.

Warning: Electronic components can be damaged by rough handling or static electricity. Touch something metal on the printer before you touch any card.

Note: The system board may be tightly seated in the printer. You may need to pull firmly on the handles.
1 Remove the four screws at the corners of the system board.
2 Slide the system board straight out of the printer.
Installing printer memory

Note: Some memory and firmware options offered for other Lexmark printers cannot be used with your printer. Refer to the publications CD for specifications.
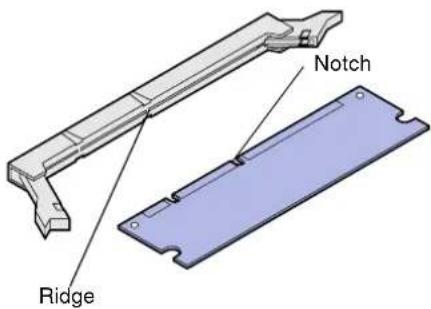
Follow the instructions in this section to install printer memory.
1 Unpack the optional printer memory card. Avoid touching the connection points along its edge. Save the packaging materials.
2 Open both latches on the connector completely.
3 Align the notches on the memory card with the ridges on the connector.
Install memory, firmware, or option cards
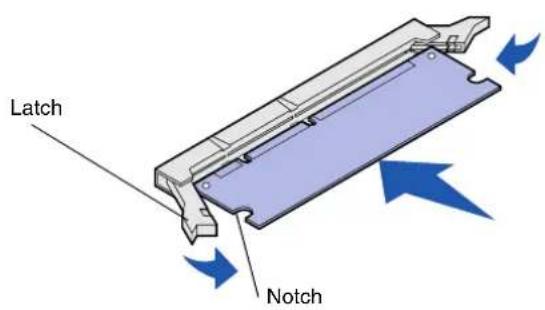
4 Push the memory card straight into the connector until it snaps into place. Make sure each latch fits over the notch located on either side of the memory card.
Installing an optional flash memory or firmware card
Note: Firmware cards offered for other Lexmark printers cannot be used with your printer.
Warning: Firmware cards are easily damaged by static electricity. Touch something metal on the printer before you touch a card.
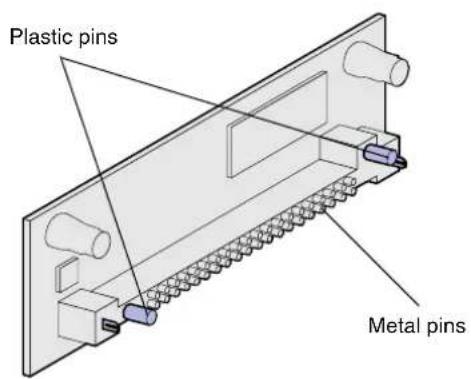
Follow the instructions in this section to install flash memory or a firmware card. The system board has two connection locations where you can install a total of one flash memory card and one firmware card.
1 Unpack the flash memory or firmware card.
Avoid touching the metal pins on the bottom of the card. Save the packaging.
Install memory, firmware, or option cards

Note: The row of metal pins on the firmware card must be fully inserted along its entire length.
2 Holding the flash memory or firmware card by its sides, align the plastic pins on the card with the holes on the system board.
3 Push in until the flash memory or firmware card is firmly in place.
Reinstalling the system board
Follow the instructions below to reinstall the system board.

1 Orient the system board as shown and align it with the tracks in the printer slot.
2 Push the system board firmly and evenly into the printer. Make sure the system board is pushed completely into the printer slot.
3 Reattach the four screws to the corners of the system board.
Install memory, firmware, or option cards
Step 7: Load paper
Note: If you load any media other than plain letter or A4 paper, make sure you change the Paper Type and Paper Size settings for that tray. Refer to the publications CD for detailed information.
Your printer has one standard tray with a capacity of 250 sheets. If you have installed an optional drawer, it can hold an additional 530 sheets, for a total of 780 sheets.
The following table lists the amount and type of print media each tray accepts.
| Source | Capacity (sheets) | Paper sizes Envelope sizes Paper types | ||
| Tray 1 250 A4, A5 | JIS B5, letter, executive, statement | 9, COM 10, DL, C5, B5 | Plain paper, transparencies, labels, card stock, glossy | |
| Tray 1—optional legal tray | 250 A4, A5 | JIS B5, letter, legal, executive, folio, statement | 9, COM 10, DL, C5, B5 | Plain paper, transparencies, labels, card stock, glossy |
| Tray 2 530 A4, letter, executive | Plain paper |
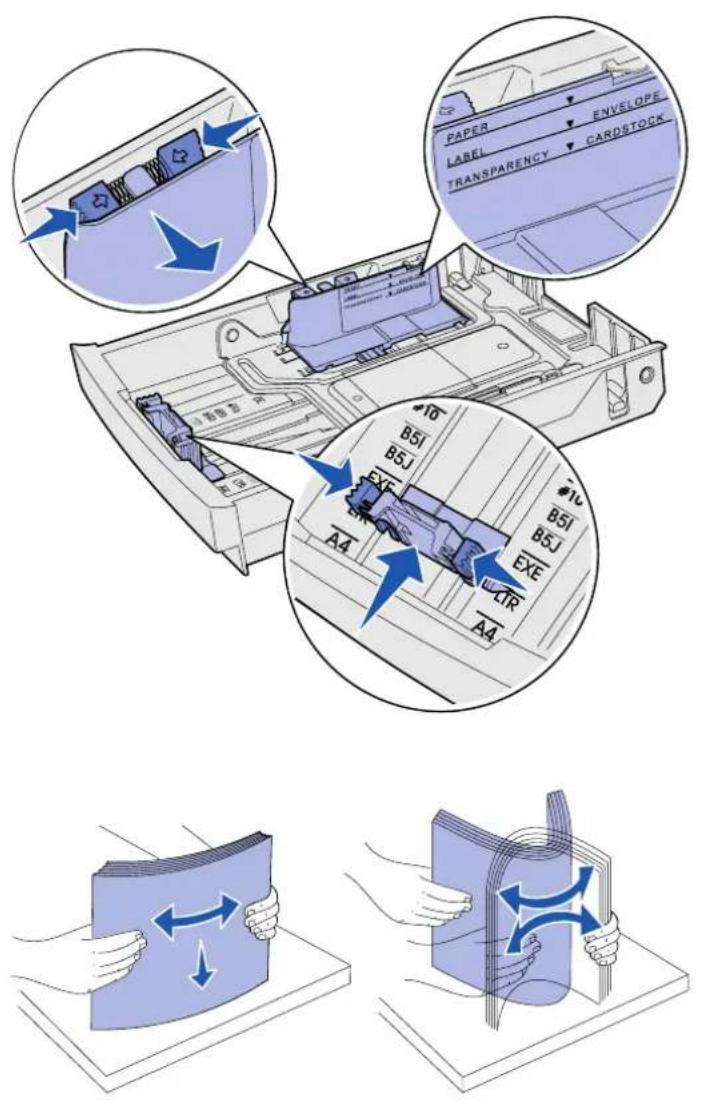
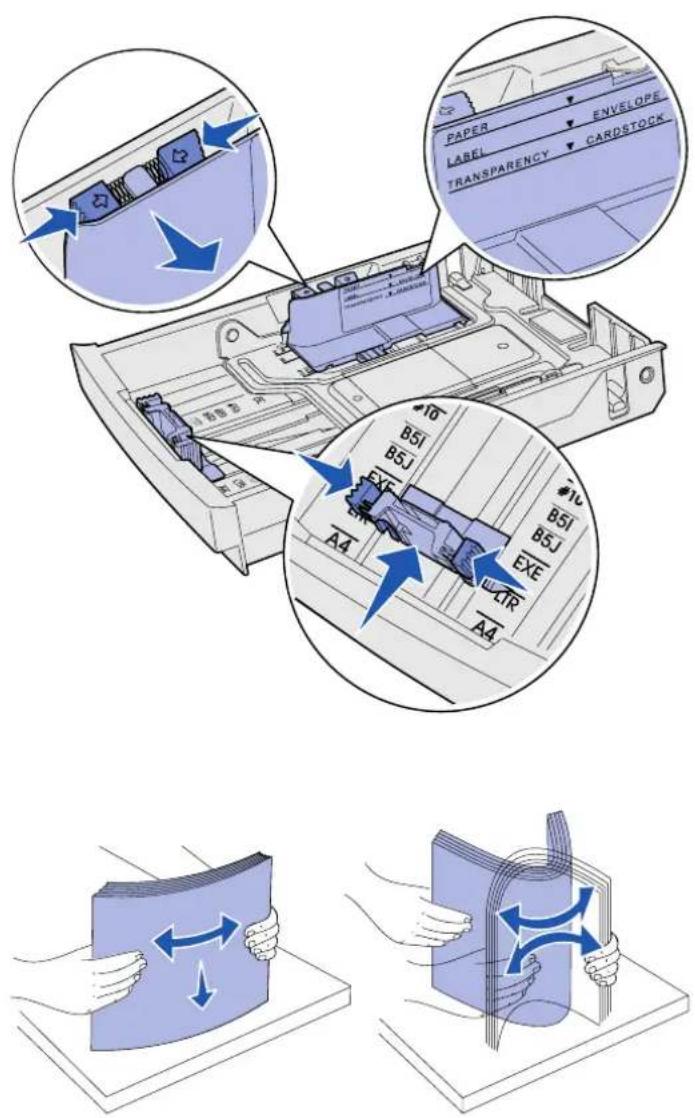
Loading the trays Follow these instructions to load paper in
the standard and optional trays.
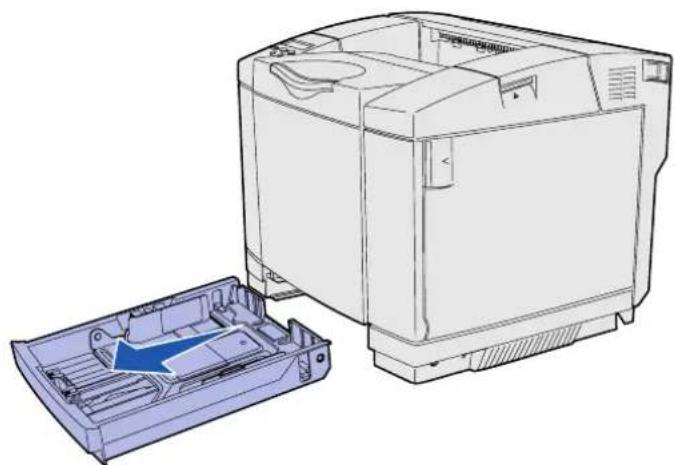
1 Pull the tray completely out.
natural_image
Technical line drawing of a printer with an open lid and internal compartments (no text or symbols)Note: The length and width guides in an optional 530-sheet tray are shaped differently than the guides in the standard tray, but the function is the same.
2 If you are loading an optional legal tray, open the cover.

natural_image
Technical line drawing of a mechanical device casing with internal components and a blue arrow indicating direction (no text or symbols)Load paper
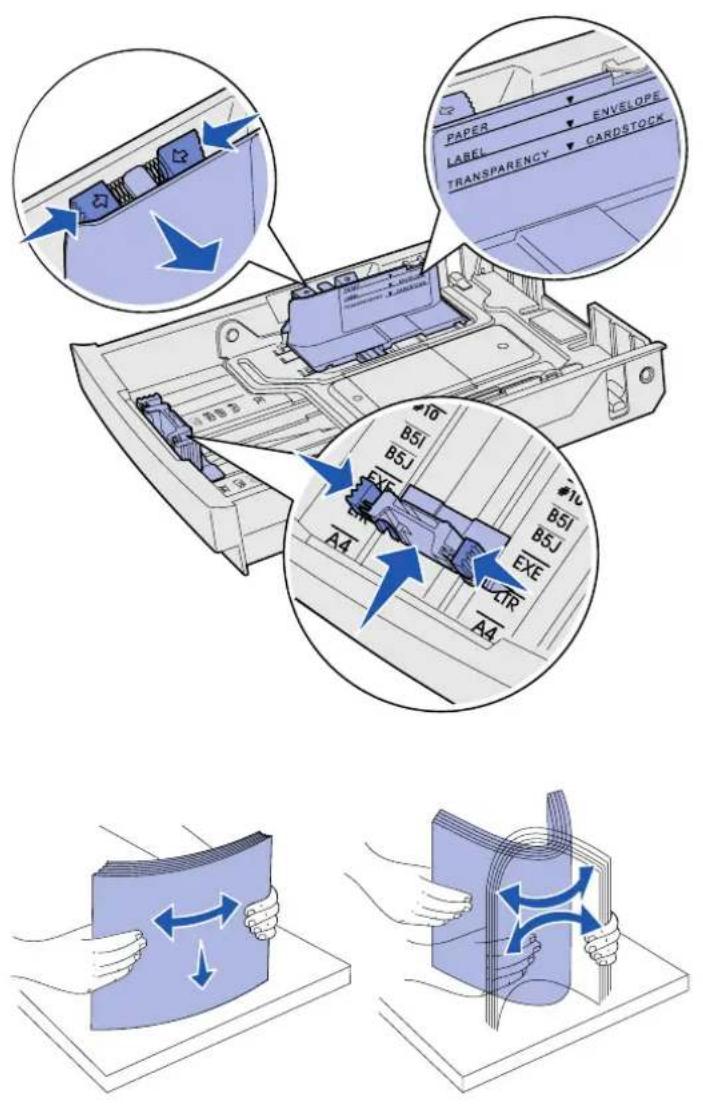
3 Squeeze the tabs at the sides of the length guide together as shown. Slide the guide to the correct position for the size of paper you are loading, according to the size indicators on the bottom front of the tray.
4 Squeeze the tabs at the sides of the width guide together as shown. Slide the width guide to the correct position for the size of paper you are loading, according to the size indicators on the bottom left of the tray.
Notice the load line label on the side of the tray which indicates the maximum stack height for your media.
5 Flex the sheets back and forth to loosen them, then fan them. Do not fold or crease the media. Straighten the edges on a level surface.

Warning: When you load the tray, do not exceed the load line on the label in the tray. Overfilling the tray may cause jams.

natural_image
Technical line drawing of a mechanical device with a blue arrow pointing to a component (no text or symbols present)Note: Refer to "Loading envelopes in the standard tray" in the Media specifications chapter of your User's Reference for information about loading envelopes.
6 Load the stack with the recommended print side faceup. Load the stack toward the rear of the tray as shown.
If you load letterhead paper, place the header faceup at the rear of the tray as shown. For two-sided printing, place the header facedown at the front of the tray.
7 If you are loading an optional legal tray, close the cover.
8 Re-insert the tray.
Step 8: Attach cables
CAUTION: Do not connect or disconnect a communication port, a teleport, or any other connector during a lightning storm.
The printer can be attached to a network or directly to a computer to print locally.
Attaching a local cable
You can attach your printer locally using either a USB, parallel, or serial connection.
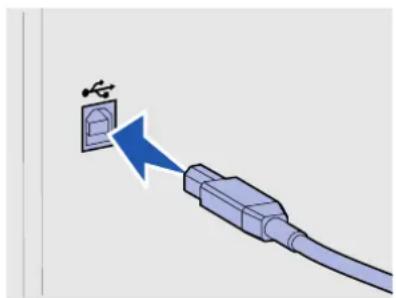
USB A USB port is standard on all models.
natural_image
Illustration of a plug with a switch and a blue arrow pointing to it, no text or symbols presentWindows 98 SE, Windows Me, Windows 2000, and Windows XP operating systems support USB connections. Some UNIX, Linux, and Macintosh computers also support USB connections. Refer to your computer operating system documentation to see if your system supports USB.
A USB port requires a USB cable such as Lexmark part number 12A2405 (2 m [6.5 ft]).
Be sure to match the USB symbol on the cable to the USB symbol on the printer.
Parallel A parallel port is included on base printer models.

natural_image
Diagram showing mechanical assembly with two connected components and a magnified inset highlighting a component (no text or symbols)A parallel port requires an IEEE-1284 compliant parallel cable such as Lexmark part number 1329605 (3 m [10 ft]).
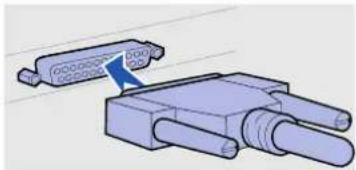
Serial A serial port can be attached through the INA port on the printer system board.
A serial port requires a compatible serial cable such as Lexmark part number 1038693.

natural_image
3D diagram of a connector assembly with a blue arrow pointing to a component (no text or symbols present)Attach cables
Attaching a network cable
You can attach your printer to a network using standard network cables.
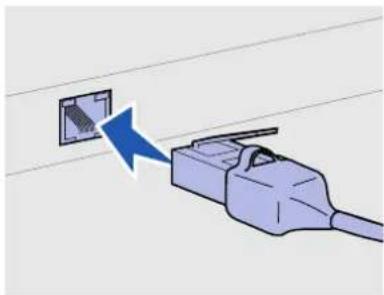
Ethernet A 10BaseT/100BaseTX Fast Ethernet port is standard on the network model.
To attach the printer to a network:
natural_image
Illustration of a cable connector with a blue arrow pointing to a wall-mounted socket (no text or symbols)Use Category 5 cable with an RJ-45 connector for the standard network port.
1 Make sure the printer is turned off and unplugged.
2 Plug one end of the standard network cable into a LAN drop or hub and the other end into the Ethernet port on the back of the printer. The printer automatically adjusts for the network speed.
802.11b wireless options
Your printer can be converted to wireless networking by using an optional 802.11b Wireless Print Adapter. This adapter is a piece of hardware that plugs into the Ethernet port on your printer.
If you purchased this adapter for your printer, refer to the documentation that shipped with the adapter for installation and configuration.
Turning your printer on
natural_image
Diagram of a kitchen appliance with a digital display and base, showing no text or symbols.Follow these instructions to turn your printer on.
1 Plug one end of the printer power cord into the socket at the back of the printer and the other end into a properly grounded outlet.
2 Turn on the printer.
After the printer completes its internal tests, the Ready message indicates that the printer is ready to receive jobs.
If you see a message other than Ready on the display, refer to the publications CD for instructions on clearing the message. Click Printing, and then click Understanding printer messages.
3 If you have attached your printer locally, turn on your computer and any other peripherals.
What do I do next?
| For connection type... Go to... | |
| Local attachment | “Install drivers for local printing” on page 36 |
| Network attachment | “Verify printer setup” on page 44 |
Step 9: Install drivers for local printing
Note: For Windows operating systems, you can skip the hardware wizard and use the drivers CD to install your printer drivers. Launch the CD and follow the instructions to install printer software.
A local printer is a printer attached to your computer using a USB or parallel cable. If your printer is attached to a network instead of your computer, skip this step and go to Step 10: "Verify printer setup" on page 44.
A printer driver is software that lets your computer communicate with your printer. The procedure to install drivers depends on the operating system you are using.
Select your operating system and cable from the following table to find driver installation instructions.
| Operating system Cable Go to page... | ||
| Windows XP; Windows Server 2003 | USB* or Parallel 37 | |
| Windows 2000 USB | * or Parallel 38 | |
| Windows Me USB | * or Parallel 38 | |
| Windows 98 USB | * or Parallel 39 | |
| Windows NT 4.x Parallel only 40 | ||
| Windows 95 Parallel only 40 | ||
| Macintosh USB only 41 | ||
| UNIX/Linux | USB or Parallel | 42 |
| * If you attach a USB printer cable while your printer and computer are turned on, the Windows hardware wizard launches immediately. Find the instructions for your operating system and use them to answer the plug and play screens. | ||
Install drivers for local printing
Windows In addition to the following driver installation instructions, you may need to refer to the documentation that shipped with your computer and your Windows software.
Before you install Some versions of Windows software may already have a system
printer driver for this printer included. This may mean that installation will seem automatic in later versions of Windows. System drivers work well for simple printing, but they contain less functionality than our enhanced custom driver.
Note: Installing a custom driver will not replace the system driver. A separate printer object will be created and appear in the Printers folder.
To obtain all the features of the custom driver, you will need to install the custom printer driver using the drivers CD that shipped with the printer.
Drivers are also available in downloadable software packages on our Lexmark Web site at www.lexmark.com.
Using Windows XP or Windows Server 2003 with USB or parallel cable
Note: Business versions of Windows XP require that you have administrative access to install printer drivers on your computer.
When the Found New Hardware Wizard screen appears:
1 Insert the drivers CD. If the CD auto launches, exit the CD. Click Next.
2 Browse to the location of the printer driver on the drivers CD:
D:\drivers\win_2000\
3 Click Next to install the driver.
If any messages appear regarding the driver not being certified, it is okay to disregard these messages and click Continue Anyway. Your printer has been thoroughly tested and is compatible with Windows XP and Windows Server 2003.
4 Click Finish when the software is installed.
5 Print a test page to verify printer setup.
Using Windows 2000 with USB or parallel cable
Note: You need administrative access to install printer drivers on your computer.
When the Found New Hardware Wizard screen appears:
1 Insert the drivers CD. If the CD auto launches, exit the CD. Click Next.
2 Select Search for a suitable driver, and then click Next.
3 Select only Specify a location, and then click Next.
4 Browse to the location of the printer driver on the drivers CD:
D:\Drivers\Win_2000\
5 Click Open, and then click OK.
6 Click Next to install the driver that is displayed.
If a message appears regarding the driver not being digitally signed, it is okay to disregard this message.
7 Click Finish when the software is installed.
8 Print a test page to verify printer setup.
Using Windows Me with USB or parallel cable
Note: Depending on the software and printers already installed on your computer, your screens may vary from those in the instructions.
You must install both a USB port driver and an enhanced custom print driver.
When the Found New Hardware Wizard screen appears:
1 Insert the drivers CD. If the CD auto launches, exit the CD. Click Next.
2 Select Automatic search for the best driver (recommended), and then click Next. The wizard searches for a USB port driver. The name of it will be similar to your printer name.
3 After the USB port driver is found, click Finish.
4 Select Automatic search for the best driver (recommended), and then click Next. The wizard now searches for a printer driver.
5 Select your printer and driver from the list, and then click OK. Make sure you select the driver in the correct language you want to use.
D:\Drivers\WIN_9X\
6 After the printer driver is installed, click Finish.
Install drivers for local printing
Using Windows 98 with USB or parallel cable
Note: Depending on the software and printers already installed on your computer, your screens may vary from those in the instructions.
7 Use the default printer name or type a unique name for your printer, and then click Next.
8 Click Yes (recommended), and then click Finish to print a test page.
9 After the test page prints, click Yes to close the window.
10 Click Finish to complete the installation and close the wizard. You are now ready to print.
You must install both a USB port driver and an enhanced custom print driver.
When the Add New Hardware Wizard screen appears:
1 Insert the drivers CD, and then click Next. If the CD auto launches, exit the CD.
2 Select Search for the best driver for your device (recommended), and then click Next.
3 Select only CD-ROM drive, and then click Next.
4 After the wizard finds the USB port driver, click Next.
5 After the USB port driver is installed, click Finish.
6 Click Next.
7 Select Search for the best driver (recommended), and then click Next.
8 Select to Specify a location.
9 Browse to the location of the printer driver on the drivers CD:
D:\Drivers\WIN_9X\english
10 Click OK.
11 After the printer driver is found, click Next.
12 Use the default printer name or type a unique name for your printer, and then click Next.
13 Select Yes to print a test page, and then click Finish. All the necessary files are installed on your computer.
14 After the test page prints, click Yes to close the message window.
Install drivers for local printing
Using Windows NT with a parallel cable
Note: USB support is not available for Windows NT operating systems.
Note: You need administrative access to install printer drivers on your computer.
Using Windows 95 with a parallel cable
Note: USB support is not available for Windows 95 operating systems.
15 Click Finish to complete the installation. You are now ready to print.
The easiest way to install a driver is to use the drivers CD that shipped with your printer.
1 Insert the drivers CD.
2 Click Install Printer and Software.
3 Click Printer.
4 Click Agree to accept the license agreement.
5 Select Quick Install, and then click Next.
6 Select the port you want to use, and then select the printer you are installing.
7 Click Finish to complete the installation. You are now ready to print.
When the Update Device Driver Wizard screen appears:
1 Insert the drivers CD. If the CD auto launches, exit the CD.
If a system-compatible driver is found on your operating system, the Wizard installs it.
If no compatible system driver is found on your operating system, click Other Locations.
2 Browse to the location of the printer driver on the drivers CD: D:\drivers\win_9x\english
3 Click OK.
4 Click Finish. The Add Printer Wizard screen appears.
5 Use the default printer name or type a unique name for your printer, and then click Next.
6 Click Yes to print a test page.
7 Click Finish. A test page is sent to the printer once the driver files are copied to your computer. You are now ready to print.
Install drivers for local printing
Macintosh
Macintosh OS 8.6 or later is required for USB printing. To print locally to a USB-attached printer, you must create a desktop printer icon (Macintosh 8.6–9.x) or create a queue in Print Center (Macintosh OS X).
Creating a desktop printer icon (Macintosh 8.6–9.x)
Note: A PPD file provides detailed information about the capabilities of a printer to your Macintosh computer.
Note: A PPD for your printer is also available in a downloadable software package on our Lexmark Web site at www.lexmark.com.
1 Install a printer PostScript™ Printer Description (PPD) file on your computer.
a Insert the drivers CD.
b Double-click Classic, and then double-click the installer package for your printer.
c Choose the language you want to use, and then click OK.
d Click Accept after you read the license agreement.
e Click Continue after you finish with the Readme file.
f Choose a default paper size.
g On the Easy Install screen, click Install. All the necessary files are installed on your computer.
h Click Quit when installation is complete.
2 Do one of the following: Macintosh 8.6–9.0: Open Apple LaserWriter. Macintosh 9.1–9.x: Open Applications, and then click Utilities.
3 Double-click Desktop Printer Utility.
4 Select Printer (USB), and then click OK.
5 In the USB Printer Selection section, click Change.
If your printer does not appear in the USB Printer Selection list, make sure the USB cable is properly connected and the printer is turned on.
6 Select the name of your printer, and then click OK. Your printer appears in the original Printer (USB) window.
7 In the PostScript Printer Description (PPD) File section, click Auto Setup. Make sure your printer PPD now matches your printer.
8 Click Create, and then click Save.
Install drivers for local printing
Creating a queue in Print Center (Macintosh OS X)
Note: A PPD file provides detailed information about the capabilities of a printer to your Macintosh computer.
Note: A PPD for your printer is also available in a downloadable software package on our Lexmark Web site at www.lexmark.com.
9 Specify a printer name, and then click Save. Your printer is now saved as a desktop printer.
1 Install a printer PostScript Printer Description (PPD) file on your computer.
a Insert the drivers CD.
b Double-click Mac OS X, and then double-click the installer package for your printer.
C On the Authorization screen, choose Click the lock to make changes.
d Enter your password, and then click OK.
e Click Continue on the Welcome screen and again after you view the Readme file.
f Click Agree to accept the license agreement.
g Select a Destination, and then click Continue.
h On the Easy Install screen, click Install. All the necessary files are installed on your computer.
i Click Close when installation is complete.
2 Open Finder, click Applications, and then click Utilities.
3 Double-click Print Center.
4 Do one of the following:
If your USB-attached printer appears in the Printer List, you can quit Print Center. A queue has been created for your printer.
If your USB-attached printer does not appear in the Printer List, make sure the USB cable is properly connected and the printer is turned on. After the printer appears in the Printer List, you can quit Print Center.
UNIX/Linux Local printing is supported on many UNIX and Linux platforms, such as Sun Solaris and Red Hat.
The Sun Solaris and Linux packages are available on the drivers CD and on our Lexmark Web site at www.lexmark.com. The
Install drivers for local printing
User's Guide in each package gives detailed instructions for installing and using Lexmark printers in UNIX and Linux environments.
All the printer driver packages support local printing using a parallel connection. The driver package for Sun Solaris supports USB connections to Sun Ray appliances and Sun workstations.
Visit our Lexmark Web site at www.lexmark.com for a complete list of supported UNIX and Linux platforms.
Step 10: Verify printer setupVerify pr
The Menu Settings page lists all the options you installed. If a feature or an option is not listed, check your installation. The Network Setup page provides information that is needed if you are attaching your printer to a network.
This is also a good time to print Quick Reference and Clearing Jams information. See "Printing Quick Reference information" on page 45.
Printing a menu settings page
Note: For more information about using the printer operator panel and changing menu settings, refer to the publications CD.
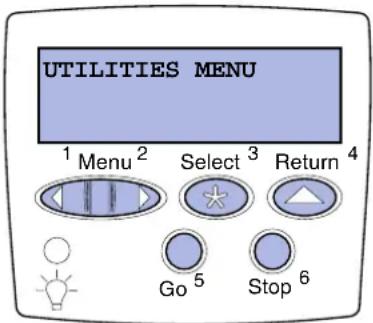
Print a menu settings page to review the default printer settings and to verify that printer options are installed correctly.
1 Make sure the printer is on.
2 Press Menu until you see UTILITIES MENU, and then press Select.
3 Press Menu until you see Print Menus, and then press Select to print the page. The message Printing Menus appears on the display.
4 Verify that the options you installed are correctly listed under "Installed Features."
Note: When you add or remove these options: 530-sheet tray, duplex unit, printer or flash memory, or firmware card, remember to update the printer configuration through your printer driver.
If an option you installed is not listed, turn the printer off, unplug the power cord, and reinstall the option. See Step 6: "Install memory, firmware, or option cards" on page 22 for more information.
5 Verify the amount of memory installed is correctly listed under "Printer Information."
6 Verify that the paper trays are configured for the sizes and types of paper you loaded.
Printing a network setup page
Note: If an optional MarkNet™ print server is installed, you may see Print Net1 Setup (or Print Net2 Setup).
If the printer is attached to a network, print a network setup page to verify the network connection. This page also provides important information that helps you configure for network printing.
Save the network setup page after it prints. You will use it in the later steps.
1 Make sure the printer is on.
2 Press Menu until you see UTILITIES MENU, and then press Select.
3 Press Menu until you see Print Net Setup, and then press Select to print the page.
4 Check the first section on the network setup page and confirm that Status is "Connected."
If Status is “Not Connected,” your LAN drop may not be active or your network cable may be malfunctioning. Consult your network administrator for a solution. Afterwards, print another network setup page to verify connection to your network.
Printing Quick Reference information
Information about using the printer and clearing jams is included on the publications CD that shipped with your printer documentation.
We recommend you print this information and store it in a convenient location near the printer.
To print Quick Reference information stored on the CD:
1 Launch the CD.
2 Click Quick Reference.
Verify printer setup
3 Print the document.
To print Quick Reference pages stored in the printer:
1 Make sure the printer is on.
2 Press Menu until you see UTILITIES MENU, and then press Select.
3 Press Menu until you see Quick Reference, and then press Select.
4 Press Menu until you see the topic you want to print, and then press Select.
5 Repeat steps 2 through 4 to print other pages.
Step 11: Configure for TCP/IP
If you have TCP/IP available on your network, we recommend that you assign an IP address to the printer.
Assigning a printer IP address
If your network is using DHCP, an IP address is automatically assigned after you connect the network cable to the printer.
1 Look for the address under the "TCP/IP" heading on the network setup page. This is the page you printed in "Printing a network setup page" on page 45.
2 Go to "Verifying the IP settings" on page 48 and begin with step 2.
If your network is not using DHCP, then you must manually assign an IP address to the printer.
An easy way to do this is to use the printer operator panel:
Note: Standard Network appears if you purchased a printer with a network port on the printer system board. If you have a MarkNet print server installed in option card slot 1 or 2, you see Network Option 1 or Network Option 2.
1 Press Menu until you see NETWORK MENU, and then press Select.
2 Press Menu until you see Standard Network, and then press Select.
3 Press Menu until you see Std Net Setup (or Network 1 Setup or Network 2 Setup), and then press Select.
4 Press Menu until you see TCP/IP, and then press Select.
5 Press Menu until you see Set IP Address, and then press Select.
6 Change the address by pressing Menu to increase or decrease each number. Press Select to move to the next segment. Press Select when you are finished.
The message saved appears briefly.
7 Press Menu until you see Set IP Netmask, and then press Select.
Configure for TCP/IP
Verifying the IP settings
Note: On Windows computers, click Start ▶ Run.
Configuring for Pull Printing
8 Repeat step 6 to set the IP Netmask.
9 Press Menu until you see Set IP Gateway, and then press Select.
10 Repeat step 6 to set the IP Gateway.
11 When you are finished, press Go to return the printer to the Ready state.
12 Go on to "Verifying the IP settings" on page 48.
1 Print another network setup page. Look under the "TCP/IP" heading and make sure the IP address, netmask, and gateway are what you expected.
See "Printing a network setup page" on page 45 if you need help.
2 Ping the printer and verify that it responds. For example, at a command prompt on a network computer, type ping followed by the new printer IP address (for example, 192.168.0.11):
ping xxx.xxx.xxx.xxx
If the printer is active on the network, you should receive a reply.
If your printer has an optional ImageQuick firmware card installed, you can configure for Pull Printing once an IP address has been assigned to the printer.
For detailed configuration instructions, refer to the CD that shipped with the ImageQuick firmware card.
Step 12: Install drivers for network printing
After you have assigned and verified the TCP/IP settings, you are ready to install the printer on each network computer.
Windows In Windows environments, network printers can be configured for
direct printing or shared printing. Both network printing methods require the installation of a printer driver and the creation of a network printer port.
Supported printer drivers
• Windows system printer driver
- Lexmark custom printer driver
System drivers are built into Windows operating systems. Custom drivers are available on the drivers CD.
Updated system and custom drivers are available on our Lexmark Web site at www.lexmark.com.
Supported network printer ports
- Microsoft IP port—Windows NT 4.0, Windows 2000, Windows XP, and Windows Server 2003
- Lexmark network port—Windows 95/98/Me, Windows NT 4.0, Windows 2000, Windows XP, and Windows Server 2003
For basic printer functionality, you can install a system printer driver and use a system network printer port, such as an LPR or a standard TCP/IP port. The system printer driver and port let you maintain a consistent user interface for use with all the printers on your network. However, using a custom printer driver and network port provides enhanced functionality, such as printer status alerts. Follow the steps
Install drivers for network printing
for your printing configuration and operating system to configure your network printer:
| Printing configuration Operating system Go to page... | ||
| DirectPrinter is connected directly to the network using a network cable, such as Ethernet.Printer drivers are typically installed on each network computer. | Windows 95/98/Me, Windows NT 4.0, Windows 2000, Windows XP, or Windows Server 2003 | 50 |
| SharedPrinter is connected to one of the computers on the network using a local cable, such as USB.Printer drivers are installed on the computer attached to the printer.During driver installation, the printer is set up to be “shared” so that other network computers can print to it. | Windows NT 4.0, Windows 2000, Windows XP, or Windows Server 2003 | 51 |
Direct printing using Windows 95/98, Me, Windows NT 4.0, Windows 2000, Windows XP, and Windows Server 2003

flowchart
graph LR
    A["Printer"] --> B["Client 1"]
    A --> C["Client 2"]
    B --> D["Client 3"]
    C --> E["Client 4"]
Note: If you don't know the IP address, print a network setup page and look under the TCP/IP heading. For help, see "Printing a network setup page" on page 45.
To install a custom printer driver and network port:
1 Launch the drivers CD.
2 Click Install Printer and Software.
3 Click Printer.
4 Click Agree to accept the license agreement.
5 Select Quick install, and then click Next.
6 Click Create new port.
7 Click Add Port.
8 Select Lexmark TCP/IP Network Port, and then click Add.
9 Enter the information to create the port.
a Assign a logical port name.
This can be any name that you associate with the printer, such as Color1-lab4. After the port is created, this name appears in the list of available ports on the Method of Connection screen.
b Enter the IP address in the text box.
c Click Add Port.
10 Click Done until you return to the Method of Connection screen.
Install drivers for network printing
Shared printing from a server using Windows NT 4.0, Windows 2000, Windows XP, and Windows Server 2003

flowchart
graph TD
    Server["Server"] --> Printer["Printer"]
    Printer --> Clients["Clients"]
    Server1["Server"] --> Client1["Client"]
    Server2["Server"] --> Client2["Client"]
    Printer --> Client2
    Client1 --> Server1
    Client2 --> Server2
11 Select the newly-created port from the list, and then select the model of the printer you want to install.
12 Click Finish to complete the installation.
13 Print a test page to verify printer installation.
After connecting your printer to a Windows NT 4.0, Windows 2000, Windows XP, or Windows Server 2003 computer (which will act as a server), follow these steps to configure your network printer for shared printing:
Step 1: Install a custom printer driver
1 Launch the drivers CD.
2 Click Install Printer and Software.
3 Click Printer.
4 Click Agree to accept the license agreement.
5 Select Quick install, and then click Next.
6 Select the desired port from the list, and then select the model of the printer you want to install.
7 Click Finish to complete the installation.
8 Print a test page to verify printer installation.
Step 2: Share the printer on the network
1 Click Start ▶ Settings ▶ Printers.
2 Select the printer you just created.
3 Click File ▶ Sharing.
4 Check the Shared check box, and then enter a name in the Shared Name text box.
5 In the Alternate Drivers section, select the operating systems of all the network clients that will print to the printer.
6 Click OK.
Install drivers for network printing
Note: If you are missing files, you may be prompted to provide the server operating system CD.
Note: This method is usually the best use of system resources. The server handles driver modifications and the print job processing. This lets network clients return to applications much faster.
7 Check the following to make sure the printer was successfully shared.
- The printer object in the Printers folder now has a shared indicator. For example, in Windows NT 4.0, a hand appears under the printer object.
- Browse Network Neighborhood. Find the host name of the server and look for the shared name you assigned to the printer.
Step 3: Install the printer driver (or subset) on network clients
Using the point and print method
With this method, a subset of driver information is copied from the server to the client computer. This is just enough information to send a print job to the printer.
1 On the Windows desktop of the client computer, double-click Network Neighborhood.
2 Locate the host name of the server computer, and then double-click the host name.
3 Right-click the shared printer name, and then click Install.
4 Wait a few minutes for the driver information to be copied from the server computer to the client computer, and for a new printer object to be added to the Printers folder. The time this takes varies, based on network traffic and other factors.
5 Close Network Neighborhood.
6 Print a test page to verify printer installation.
Install drivers for network printing
Using the peer-to-peer method
With this method, the printer driver is fully installed on each client computer. Network clients retain control of driver modifications. The client computer handles the print job processing.
1 Click Start ▶ Settings ▶ Printers.
2 Click Add Printer to launch the Add Printer wizard.
3 Click Network Print Server.
4 Select the network printer from the Shared printers list. If the printer is not listed, enter the path of the printer in the text box.
The path will look similar to the following:
\
The server host name is the name of the server computer that identifies it to the network. The shared printer name is the name assigned during the server installation process.
5 Click OK.
6 Select whether you want this printer to be the default printer for the client, and then click Finish.
7 Print a test page to verify printer installation.
Note: If this is a new printer, you may be prompted to install a printer driver. If no system driver is available, then you will need to provide a path to available drivers.
Macintosh
Note: A PostScript Printer Description (PPD) file provides detailed information about the capabilities of a printer to your UNIX or Macintosh computers.
To print to a network printer, each Macintosh user must install a custom PostScript Printer Description (PPD) file and either create a desktop printer on the computer (Mac OS 8.6–9.x) or create a print queue in Print Center (Mac OS X). Follow the instructions for your operating system:
| Operating system Go to page... | |
| Mac OS 8.6 to 9.x 54 | |
| Mac OS X version 10.1.2 and later 55 |
Install drivers for network printing
Mac OS 8.6–9.x
Note: Installing the custom PPD is required only if this is the first time the printer has been set up. If the printer was previously installed, go on to "Step 2: Create a desktop printer" on page 54.
Step 1: Install a custom PPD file
1 Insert the drivers CD into your CD-ROM drive.
2 Double-click Classic.
3 Double-click the Lexmark Installer icon.
4 Select the language of your operating system, and then click OK.
5 Click Install to install the PPD file for your printer.
Step 2: Create a desktop printer
1 In the Chooser, select the LaserWriter 8 driver.
2 If you have a routed network, select the default zone from the list. If you don't know which zone to select, look on the Network Setup page under AppleTalk for Zone.
3 Select the new printer from the list.
4 If you don't know which printer to select, look on the Network Setup page under the AppleTalk heading to find the default name of the printer.
5 Click Create.
6 Make sure there is an icon next to the printer name in the Chooser.
7 Close the Chooser window.
8 Verify printer installation.
a Click the desktop printer icon you just created.
b Choose Printing ▶ Change Setup.
- If the PPD file displayed in the PPD file portion of the menu is correct for your printer, printer setup is complete.
- If the PPD file displayed in the PPD file portion of the menu is not correct for your printer, repeat "Step 1: Install a custom PPD file" on page 55.
Install drivers for network printing
Mac OS X version 10.1.2 and later
Step 1: Install a custom PPD file
1 Insert the drivers CD into your CD-ROM drive.
2 Click Mac OS X ▶ English.
3 Double-click the installer icon for your printer to run the installer.
Step 2: Create a print queue in Print Center
1 Click Applications ▶ Utilities ▶ Print Center.
2 Click Add Printer.
3 Choose AppleTalk as your method of connection.
4 If you have a routed network, select the zone from the list. If you don't know which zone to select, look on the Network Setup page under AppleTalk for Zone.
5 Select the new printer from the list, and then click Add.
6 Verify printer installation:
a Click Applications ▶ TextEdit.
b Choose File ▶ Print ▶ Summary. The Summary window shows the PPD installed for your printer.
- If the PPD file displayed in the Summary window is correct for your printer, printer setup is complete.
- If the PPD file displayed in the Summary window is not correct for your printer, delete the print queue from Print Center and repeat "Step 1: Install a custom PPD file" on page 55.
Note: If you don't know which printer to select, look on the Network Setup page under the AppleTalk heading to find the default name of the printer.
UNIX/Linux
Your printer supports many UNIX and Linux platforms, such as Sun
Solaris and Red Hat. Visit our Lexmark Web site at www.lexmark.com for a complete list of supported UNIX and Linux platforms.
Note: The Sun Solaris and Linux packages are available on the drivers CD and on our Lexmark Web site at www.lexmark.com.
Lexmark provides a printer driver package for each supported UNIX and Linux platform. The User's Guide in each package gives detailed instructions for installing and using Lexmark printers in UNIX and Linux environments.
Install drivers for network printing
You can download these packages from our Lexmark Web site. You may also find the driver package you need on the drivers CD.
NetWare Your printer supports both Novell Distributed Print Services (NDPS) and regular queue-based NetWare environments. For the latest information about installing a network printer in a NetWare environment, launch the drivers CD and click View Documentation.
Install drivers for network printing
Step 13: Using the publications CD
Viewing the CD contents
Note: The publications CD is shipped inside the Setup Guide.
Launch the publications CD and browse the contents to see a complete list of the available information.
The type of helpful information provided on the publications CD includes:
- Tips for successful printing
- Ways to improve print quality
• Information about using the printer operator panel - Instructions for replacing supplies
- Solutions to common printing problems
• Methods for clearing jams
• Overview of printer menus - Explanation of printer messages
Using the publications CD
Distributing the information
You can give users access to the information on the publications CD in several ways:
- Give the publications CD to a system administrator or the Help desk.
- Copy the entire contents of the CD (or just specific topics) to a shared network drive or intranet site.
- Print the information on the publications CD and store it near the printer for easy access.
- Send Lexmark's printer documentation URL to printer users (www.lexmark.com/publications). Users with Internet access can browse the site.
Storing Quick Reference information
We recommend that during printer setup you print the Quick Reference information you want to use. Store the information near the printer for easy access.
See “Printing Quick Reference information” on page 45 for printing instructions.
Congratulations!
You are now ready to use your new printer. Save this book if you anticipate purchasing printer options in the future.
Guía de instalación
Español
Director of Lexmark Technology & Services
Lexmark International, Inc.
740 West New Circle Road
Lexington, KY 40550
(859) 232-3000
natural_image
Diagram of an open printer with internal components and a blue arrow indicating a loading or transfer process (no text or symbols present)natural_image
Diagram of a computer chassis with blue arrows indicating rotational motion (no text or symbols)natural_image
Diagram of a computer monitor with scroll wheel and cable attachment, showing blue arrows indicating motion (no text or symbols)natural_image
Two technical line drawings of a printer or printer with an arrow indicating rotation (no text or symbols present)natural_image
Diagram of a mechanical device with blue arrows indicating rotational flow or movement (no text or symbols)natural_image
Diagram of a printer with arrows indicating process flow, showing internal structure and control panel (no text or symbols)natural_image
Diagram of a printer with two views of the lid showing internal components (no text or symbols)natural_image
Illustration of a mechanical housing with cutouts and internal components (no text or symbols)natural_image
3D diagram of a printer internal structure showing internal components and a blue arrow indicating flow direction (no text or symbols)natural_image
Technical illustration of a printer with internal components and airflow arrows (no text or symbols)natural_image
Line drawing of a printer with blue airflow arrows indicating internal flow (no text or symbols)natural_image
Line drawing of a car interior with a blue arrow pointing to a component on the ceiling (no text or symbols)natural_image
Diagram of a computer monitor with scroll wheel and two blue arrows indicating directional flow (no text or symbols)natural_image
Diagram of a computer monitor with cable and ventilation system, showing internal components without any text or symbols
natural_image
Technical line drawing of a server rack with two blue arrows indicating internal components (no text or symbols present)natural_image
Technical line drawing of a computer tower with ventilation slots and scrollbars, showing internal components and blue directional arrows indicating flow or movement (no text or symbols present)natural_image
Technical line drawing of a mechanical device with an inset showing internal components (no text or symbols)natural_image
Technical diagram of a computer monitor with an inset showing internal components (no text or symbols)natural_image
Technical line drawing of a mechanical device with an open lid and internal compartments (no text or symbols)natural_image
Technical line drawing of a mechanical assembly with internal components and a blue arrow indicating direction (no text or symbols)Carga del papel
natural_image
Technical line drawing of a mechanical device with a blue arrow pointing to a component (no text or symbols present)natural_image
Illustration of a plug with a fuse and socket, showing a blue arrow pointing to the socket (no text or symbols present)natural_image
Diagram showing mechanical assembly with a magnified inset of a bracket component (no text or symbols)natural_image
Diagram of a connector assembly with a blue arrow indicating direction (no text or symbols present)natural_image
Illustration of a cable connector with a blue arrow pointing to a wall-mounted socket (no text or symbols present)natural_image
Diagram of a computer with an open screen and a close-up view of its front panel (no text or symbols present)Director of Lexmark Technology & Services
Lexmark International, Inc.
740 West New Circle Road
Lexington, KY 40550
(859) 232-3000
Per imprimir aquests fulls:
natural_image
Diagram of an open printer with internal components and a blue arrow indicating a component (no text or symbols present)natural_image
Diagram of a computer chassis with blue arrows indicating rotational motion (no text or symbols)natural_image
Diagram of a computer monitor with cable routing and blue arrows indicating motion (no text or symbols)5 Traieu la cinta adhesiva i la coberta del cartutx.
natural_image
Two technical line drawings of a printer or printer with an arrow indicating rotation (no text or symbols present)natural_image
Diagram of a mechanical device with blue arrows indicating rotational flow or movement (no text or symbols)natural_image
Diagram of a printer with arrows indicating process flow, showing internal structure and control panel (no text or symbols)natural_image
Diagram of a printer with two views of the lid showing internal components (no text or symbols)natural_image
Illustration of a mechanical housing with internal components and a separate view of a plastic housing (no text or symbols)
natural_image
Diagram of a device internal structure showing a blue component being inserted into a housing (no text or symbols visible)natural_image
Diagram of a printer with internal components and airflow arrows, no text or symbols presentnatural_image
Line drawing of a printer with blue airflow arrows indicating fluid or airflow direction (no text or symbols)natural_image
Line drawing of a car interior with a blue arrow pointing to a component on the top (no text or symbols)natural_image
Diagram of a computer monitor with scroll wheel and drive mechanism, showing blue directional arrows indicating movement (no text or symbols present)natural_image
Diagram of a computer monitor with cable and ventilation system, showing internal components without any text or symbols
natural_image
Technical line drawing of a server rack with two blue arrows indicating internal components (no text or symbols present)natural_image
Technical line drawing of a computer tower with ventilation slots and scrollbars, showing internal components and blue directional arrows indicating flow or movement (no text or symbols present)natural_image
Technical line drawing of a mechanical device with an inset showing internal components (no text or symbols)natural_image
Technical diagram of a computer monitor with an inset showing internal components (no text or symbols)natural_image
Technical line drawing of a mechanical device with an open lid and internal compartments (no text or symbols)natural_image
Technical line drawing of a mechanical assembly with internal components and a blue arrow indicating direction (no text or symbols)Carregueu paper
natural_image
Technical line drawing of a mechanical device with a blue arrow pointing to a component (no text or symbols present)natural_image
Illustration of a plug with a switch and a small socket, showing no text or symbolsnatural_image
Diagram showing two connected electrical connectors with a magnified inset highlighting the connection (no text or symbols present)Série
Podeu connectar un port série a través del port INA del tauler del sistema de la impressora.
natural_image
Diagram of a connector assembly with two components and a blue arrow indicating direction (no text or symbols)Un port série necessita un cable série compatible, com el Lexmark número 1038693.
natural_image
Illustration of a cable connector with a blue arrow pointing to a wall-mounted socket (no text or symbols present)natural_image
Diagram of a computer with an open screen and a close-up view of its front panel (no text or symbols present)Seguiu aquestes instruccions per engegar la impressora.
Macintosh 8.6–9.0: Obriu Apple LaserWriter.
Macintosh 9.1–9.x: Obriu Applications [Aplicacions] i, seguidament, Utilities [Eines].
3 Feu doble clic a Desktop Printer Utility [Eina d'impressora d'escriptori].
4 Seleccioneu Printer (USB) [Impressora (USB)] i, seguidament, feu clic a OK [D'acord].
Director of Lexmark Technology & Services
Lexmark International, Inc.
740 West New Circle Road
Lexington, KY 40550, E. U. A.
(859) 232-3000
natural_image
Diagram of an open printer with a blue arrow indicating a component, showing internal structure without any text or symbols.natural_image
Two technical diagrams showing a device's internal structure before and after assembly, with blue arrows indicating motion (no text or symbols present)natural_image
Two technical line drawings of a printer or printer with an arrow indicating rotation (no text or symbols present)natural_image
Illustration of a printer or scanner with blue arrows indicating rotation or movement (no text or symbols)natural_image
Diagram of a printer with arrows indicating process flow, showing internal structure and control panel (no text or symbols)natural_image
Diagram of a printer with two views of the lid showing internal components (no text or symbols)natural_image
Illustration of a mechanical housing with internal components and exploded views (no text or symbols)
natural_image
Diagram of a printer internal structure showing internal components and a blue arrow indicating motion (no text or symbols)natural_image
Diagram of a printer with internal components and airflow arrows, no text or symbols presentnatural_image
Line drawing of a mechanical device with blue arrows indicating airflow or ventilation (no text or symbols)natural_image
Diagram of a car interior showing a blue arrow pointing to a component on the ceiling, with no visible text or symbols.natural_image
Diagram of a computer monitor with scroll wheel and drive mechanism, showing blue directional arrows indicating movement (no text or symbols present)natural_image
Diagram of a computer monitor with cable and ventilation system, showing internal components and directional arrows (no text or labels)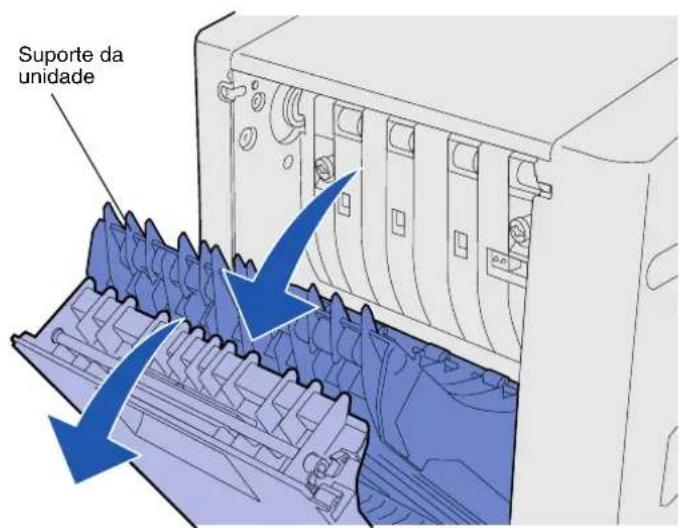
natural_image
Technical line drawing of a server rack with two blue arrows indicating internal components (no text or symbols present)natural_image
Technical line drawing of a computer tower with ventilation slots and scrollbars, showing internal components and blue directional arrows indicating flow or movement (no text or symbols present)natural_image
Technical line drawing of a mechanical device with an inset showing internal components (no text or symbols)natural_image
Technical diagram of a computer monitor with an inset showing internal components (no text or symbols)natural_image
Technical line drawing of a mechanical device with an open plastic housing and internal components (no text or symbols)natural_image
Technical line drawing of a mechanical device casing with internal components and a blue arrow indicating direction (no text or symbols)Colocar papel

natural_image
Technical line drawing of a mechanical device with a blue arrow pointing to a component (no text or symbols present)natural_image
Illustration of a plug with a switch and a small socket, showing no text or symbolsnatural_image
Diagram showing mechanical assembly with two connected components and a magnified inset highlighting a component (no text or symbols)natural_image
3D diagram of a connector assembly with a blue arrow indicating direction (no text or symbols)natural_image
Illustration of a cable connector with a blue arrow pointing to a wall-mounted socket (no text or symbols)natural_image
Diagram of a computer with an open control panel and a close-up view of its front panel (no text or symbols present)Macintosh 8.6 - 9.0: Abra Apple LaserWriter.
Director of Lexmark Technology & Services
Lexmark International, Inc.
740 West New Circle Road
Lexington, KY 40550
(859) 232-3000
www.lexmark.com/publications.
natural_image
Diagram of an open printer with a blue arrow indicating a component, showing internal structure without any text or symbols.natural_image
Two technical diagrams showing a device with internal components and blue arrows indicating motion or assembly (no text or symbols present)natural_image
Technical illustration of a mechanical component with a magnified inset showing a hand holding a cable (no text or symbols present)natural_image
Diagram showing a printer's internal structure with an inset close-up of its internal components (no text or symbols visible)natural_image
Line drawing of a mechanical device with a blue arrow pointing to a component (no text or symbols)
natural_image
Illustration of a printer with an open lid and a blue arrow indicating rotation (no text or symbols)natural_image
Illustration of a mechanical device with blue arrows indicating rotational flow (no text or symbols)natural_image
Diagram of a printer with blue arrows indicating compression or disassembly process (no text or symbols present)natural_image
Diagram of a printer with two views of the lid showing internal components (no text or symbols)natural_image
Illustration of a device housing with internal components and a separate view of the plastic casing (no text or symbols)
natural_image
3D diagram of a printer internal structure showing internal components and a blue plastic cover (no text or symbols)natural_image
Technical illustration of a printer internal structure with a magnified inset showing internal components (no text or symbols)تجهيز الطابعة
natural_image
Line drawing of a printer with blue arrows indicating airflow or ventilation direction (no text or symbols)تجهيز الطابعة
natural_image
Diagram of a car interior showing a blue arrow pointing to a component on the ceiling, with no visible text or symbols.natural_image
Diagram of a computer monitor with two arrows indicating left-hand moves, showing internal components and a screwdriver inserted (no text or symbols present)natural_image
Diagram of a computer monitor with cable and ventilation slots, showing internal components and directional arrows (no text or labels)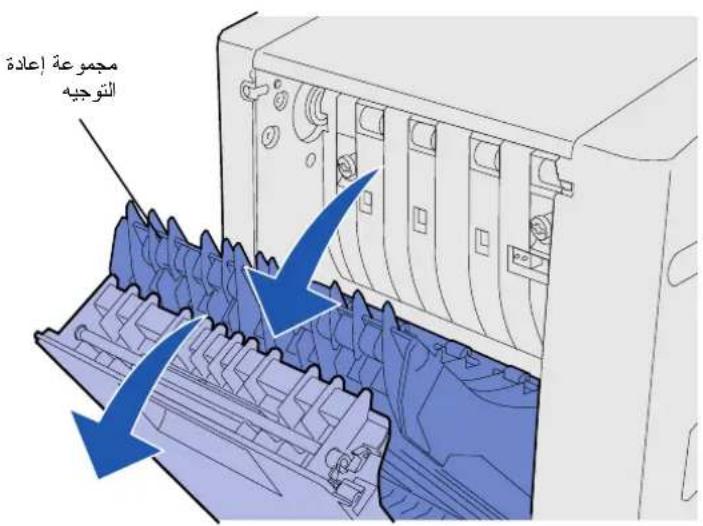
natural_image
Technical line drawing of a mechanical device with internal components and blue arrows indicating directional flow (no text or symbols)natural_image
Technical line drawing of a server rack with blue directional arrows indicating internal components (no text or symbols)natural_image
Technical line drawing of a mechanical device with an inset showing internal components (no text or symbols)natural_image
Technical line drawing of a computer monitor internal component with an inset showing a close-up view of the internal structure (no text or symbols present)natural_image
Technical line drawing of a printer with an open lid and internal compartments (no text or symbols)natural_image
Technical line drawing of a mechanical device casing with internal components and a blue arrow indicating direction (no text or symbols)تحميل الورق
natural_image
Illustration of two hands holding a curved object with directional arrows, no text or symbols presentتحميل الورق
natural_image
Technical line drawing of a mechanical device with a blue arrow pointing to a component (no text or symbols present)natural_image
Illustration of a plug with a cable and a small socket, showing no text or symbolsnatural_image
Diagram showing mechanical assembly with two connected components and a magnified inset of a component being lifted (no text or symbols)تىلىلى
natural_image
Illustration of a blue arrow pointing to a wall-mounted device (no text or symbols present)natural_image
Diagram of a computer with an open control panel and a close-up view of the device (no text or symbols present)ماذا أفعل بعد ذلك?
- Edition: December 2003
- UNITED STATES GOVERNMENT RIGHTS
- FCC emissions information
- Safety information
- Conventions
- Attention!
- Contents
- Introduction....1
- Step 1: Unpack the printer ....4
- Step 2: Install printer supplies ....6
- Step 3: Position the optional drawer ..... 11
- Step 4: Prepare the printer ..... 12
- Step 5: Set up the optional duplex unit ..... 17
- Step 6: Install memory, firmware, or option cards ..... 22
- Step 7: Load paper 28
- Step 8: Attach cables ...... 32
- Step 9: Install drivers for local printing ..... 36
- Step 10: Verify printer setup .....44
- Step 11: Configure for TCP/IP 47
- Step 12: Install drivers for network printing ..... 49
- Step 13: Using the publications CD ..... 57
- Introduction
- About the printer Your printer is available in three models:
- Other sources of information If you need more information after you
- Publications CD The publications CD provides
- Information pages Information pages are stored inside the
- Quick Reference sheet
- Drivers CD The drivers CD contains all the
- Lexmark Web site
- Step 1: Unpack the printer
- Getting ready for setup
- Step 2: Install printer supplies
- Installing the photodeveloper cartridge
- Step 3: Position the optional drawer
- Step 4: Prepare the printer
- Positioning the printer Once you have selected a location and
- Securing the drawer to the printer If you have an optional drawer, secure it to the printer.
- Attaching an operator panel overlay
- Adjusting tray 2 margins Adjusting tray 2 margins ensures your
- Step 5: Set up the optional duplex unit
- Attaching the optional duplex unit
- Adjusting duplex margins Adjusting duplex margins ensures your
- Step 6: Install memory, firmware, or option cards
- Removing the system board Follow the instructions in this section to remove the printer system board.
- Installing printer memory
- Installing an optional flash memory or firmware card
- Reinstalling the system board
- Step 7: Load paper
- Loading the trays Follow these instructions to load paper in
- Step 8: Attach cables
- Attaching a local cable
- Attaching a network cable
- 802.11b wireless options
- Turning your printer on
- Step 9: Install drivers for local printing
- Before you install Some versions of Windows software may already have a system
- Using Windows XP or Windows Server 2003 with USB or parallel cable
- Using Windows 2000 with USB or parallel cable
- Using Windows Me with USB or parallel cable
- Using Windows 98 with USB or parallel cable
- Using Windows NT with a parallel cable
- Using Windows 95 with a parallel cable
- Macintosh
- Creating a desktop printer icon (Macintosh 8.6–9.x)
- Creating a queue in Print Center (Macintosh OS X)
- Step 10: Verify printer setupVerify pr
- Printing a menu settings page
- Printing a network setup page
- Printing Quick Reference information
- Step 11: Configure for TCP/IP
- Assigning a printer IP address
- Verifying the IP settings
- Configuring for Pull Printing
- Step 12: Install drivers for network printing
- Windows In Windows environments, network printers can be configured for
- Direct printing using Windows 95/98, Me, Windows NT 4.0, Windows 2000, Windows XP, and Windows Server 2003
- Shared printing from a server using Windows NT 4.0, Windows 2000, Windows XP, and Windows Server 2003
- Step 1: Install a custom printer driver
- Step 2: Share the printer on the network
- Step 3: Install the printer driver (or subset) on network clients
- Mac OS 8.6–9.x
- Step 1: Install a custom PPD file
- Step 2: Create a desktop printer
- Mac OS X version 10.1.2 and later
- Step 2: Create a print queue in Print Center
- UNIX/Linux
- Step 13: Using the publications CD
- Viewing the CD contents
- Distributing the information
- Storing Quick Reference information
- Congratulations!
- Guía de instalación
- Español
- Série
Brand : LEXMARK
Model : C510
Category : Printer